ViewSonic VS10418M Pocket PC (PDA) User Manual V38r UG
ViewSonic Corporation Pocket PC (PDA) V38r UG
Users Manual

User Guide
V38r Rugged Handheld
with
Pocket PC 2003 Operating System

ViewSonic V38r with Pocket PC OS i
Copyright © ViewSonic Corporation, 2006. All rights reserved.
ViewSonic and the three birds logo are registered trademarks of ViewSonic Corporation.
Intel XScale is a trademark or registered trademark of Intel Corporation or its subsidiaries
in the United States and other countries. Bluetooth is a trademark owned by its proprietor
and used by Intel Corporation under license.
Microsoft, Windows, the Microsoft Internet Explorer logo graphic, ActiveSync, PowerPoint,
Outlook, DirectX, DirectSound, Pocket Word, MSN, Pocket Excel, Pocket Internet Explorer,
Microsoft Exchange, and the Windows logo are either registered trademarks or
trademarks of Microsoft Corporation in the United States and/or other countries. ClearVue
is a trademark of the Westtek Corporation.
Corporate names and trademarks are the property of their respective companies.
Disclaimer: ViewSonic Corporation shall not be liable for technical or editorial errors or
omissions contained herein; nor for incidental or consequential damages resulting from
furnishing this material, or the performance or use of this product.
In the interest of continuing product improvement, ViewSonic Corporation reserves the
right to change product specifications without notice. Information in this document may
change without notice.
No part of this document may be copied, reproduced, or transmitted by any means, for
any purpose without prior written permission from ViewSonic Corporation.
Product Registration
To meet your future needs, and to receive any additional product information as it
becomes available, please register your product on the Internet at:
www.viewsonic.com. The ViewSonic product also comes with a CD-ROM that has a
registration form that you can print and mail or fax to ViewSonic Corporation.
Product disposal at end of product life
ViewSonic is concerned about the preservation of our environment. Please dispose of this
product properly at the end of its useful life. Your local waste disposal company may
provide information about proper disposal.
For Your Records
Model Name:
Model Number:
Document Number:
Serial Number:
Purchase Date:
ASV38r
VS10418
_______________
_______________
V38r-PPC_UG_ Rev1 F J 4 January 0J6J
Contents
ViewSonic V38r with Pocket PC OS ii
INTRODUCTION
Packaged contents . . . . . . . . . . . . . . . . . . . . . . . . . . . . . 1
Features (if equipped) . . . . . . . . . . . . . . . . . . . . . . . . . . . 2
Software installed . . . . . . . . . . . . . . . . . . . . . . . . . . . . . . 2
Front view . . . . . . . . . . . . . . . . . . . . . . . . . . . . . . . . . . . 3
Back view . . . . . . . . . . . . . . . . . . . . . . . . . . . . . . . . . . . . 4
Side views . . . . . . . . . . . . . . . . . . . . . . . . . . . . . . . . . . . 5
INITIAL SETUP
1.Remove the back panel . . . . . . . . . . . . . . . . . . . . . . . . 6
2.Slide the backup battery switch to ON . . . . . . . . . . . . . 7
3.Install the battery . . . . . . . . . . . . . . . . . . . . . . . . . . . . . 8
4.Replace the back panel and close the latch . . . . . . . . 9
5.Remove the protective cover (depending on model) . . 9
6.Connect AC power . . . . . . . . . . . . . . . . . . . . . . . . . . . .10
7.Charge the battery overnight . . . . . . . . . . . . . . . . . . . .10
8.Turn the power on . . . . . . . . . . . . . . . . . . . . . . . . . . . .11
MORE ABOUT SETUP
Battery and power properties . . . . . . . . . . . . . . . . . . . . .12
Battery power status . . . . . . . . . . . . . . . . . . . . . . . . . . . .12
The stylus . . . . . . . . . . . . . . . . . . . . . . . . . . . . . . . . . . . .13
Calibrating the touch screen . . . . . . . . . . . . . . . . . . . . . .14
Adjusting the stylus double-tap rate . . . . . . . . . . . . . . . .14
Enable wireless . . . . . . . . . . . . . . . . . . . . . . . . . . . . . . . .15
ViewSonic V38r with Pocket PC OS iii
USING THE V38r
The Today screen . . . . . . . . . . . . . . . . . . . . . . . . . . . . . 17
Status icons . . . . . . . . . . . . . . . . . . . . . . . . . . . . . . . . 18
Navigation bar and Command bar . . . . . . . . . . . . . . . 19
Running programs . . . . . . . . . . . . . . . . . . . . . . . . . . . . . 20
Pop-up menus . . . . . . . . . . . . . . . . . . . . . . . . . . . . . . . . 21
Notifications . . . . . . . . . . . . . . . . . . . . . . . . . . . . . . . . . . 21
Entering information . . . . . . . . . . . . . . . . . . . . . . . . . . . 22
Entering text using the Input Panel . . . . . . . . . . . . . . 22
Writing on the screen . . . . . . . . . . . . . . . . . . . . . . . . . . 24
Drawing on the screen . . . . . . . . . . . . . . . . . . . . . . . . . 27
Recording a message . . . . . . . . . . . . . . . . . . . . . . . . . . 28
Playing a message . . . . . . . . . . . . . . . . . . . . . . . . . . . . 29
Recording formats . . . . . . . . . . . . . . . . . . . . . . . . . . . . . 29
Using My Text . . . . . . . . . . . . . . . . . . . . . . . . . . . . . . . . 30
MANAGING THE V38r
Managing power . . . . . . . . . . . . . . . . . . . . . . . . . . . . . . 31
Smart power management . . . . . . . . . . . . . . . . . . . . 32
Power-saving tips . . . . . . . . . . . . . . . . . . . . . . . . . . . 33
Battery storage . . . . . . . . . . . . . . . . . . . . . . . . . . . . . 33
Data storage . . . . . . . . . . . . . . . . . . . . . . . . . . . . . . . 33
Managing memory . . . . . . . . . . . . . . . . . . . . . . . . . . . . 34
Storage and program memory . . . . . . . . . . . . . . . . . . 34
Memory cards . . . . . . . . . . . . . . . . . . . . . . . . . . . . . . 34
SD memory capabilities . . . . . . . . . . . . . . . . . . . . . . . . . 34
SDRAM memory allocation . . . . . . . . . . . . . . . . . . . . 35
Memory map for 64/128 MB SDRAM . . . . . . . . . . . . 35
Antenna signal properties . . . . . . . . . . . . . . . . . . . . . 35
Finding and organizing information . . . . . . . . . . . . . . . . 36
Customizing the V38r . . . . . . . . . . . . . . . . . . . . . . . . . . 37
Setting a password . . . . . . . . . . . . . . . . . . . . . . . . . . . . 38
Adding/removing programs . . . . . . . . . . . . . . . . . . . . . . 39
Adding programs . . . . . . . . . . . . . . . . . . . . . . . . . . . . 39
Removing programs . . . . . . . . . . . . . . . . . . . . . . . . . 39
Backing up data . . . . . . . . . . . . . . . . . . . . . . . . . . . . . . 40
Using Backup . . . . . . . . . . . . . . . . . . . . . . . . . . . . . . 40
ViewSonic V38r with Pocket PC OS iv
MICROSOFT ACTIVESYNC
Using Microsoft ActiveSync . . . . . . . . . . . . . . . . . . . . . . 42
Synchronizing data . . . . . . . . . . . . . . . . . . . . . . . . . . . . 43
Connecting to your PC . . . . . . . . . . . . . . . . . . . . . . . . . 44
By USB cable . . . . . . . . . . . . . . . . . . . . . . . . . . . . . . 44
By infrared . . . . . . . . . . . . . . . . . . . . . . . . . . . . . . . . . 44
POCKET OUTLOOK
Scheduling appointments/meetings . . . . . . . . . . . . . . . 45
Creating an appointment . . . . . . . . . . . . . . . . . . . . . . 46
Using the summary screen . . . . . . . . . . . . . . . . . . . . 47
Creating meeting requests . . . . . . . . . . . . . . . . . . . . 47
Managing contacts . . . . . . . . . . . . . . . . . . . . . . . . . . . . 48
Finding a contact . . . . . . . . . . . . . . . . . . . . . . . . . . . . 50
Using the Summary screen . . . . . . . . . . . . . . . . . . . . 50
Tasks: keeping a To Do list . . . . . . . . . . . . . . . . . . . . . . 51
Creating a task . . . . . . . . . . . . . . . . . . . . . . . . . . . . . 52
Using the Summary screen . . . . . . . . . . . . . . . . . . . . 53
Notes: capturing thoughts and ideas . . . . . . . . . . . . . . . 54
Creating a note . . . . . . . . . . . . . . . . . . . . . . . . . . . . . 54
Inbox: sending and receiving email . . . . . . . . . . . . . . . . 55
Synchronizing email messages . . . . . . . . . . . . . . . . . 55
Using the message list . . . . . . . . . . . . . . . . . . . . . . . 55
Managing email messages and folders . . . . . . . . . . . 57
ViewSonic V38r with Pocket PC OS v
COMPANION PROGRAMS
Pocket Word . . . . . . . . . . . . . . . . . . . . . . . . . . . . . . . . . 58
Using Pocket Word . . . . . . . . . . . . . . . . . . . . . . . . . . 58
Tips for working in Pocket Word . . . . . . . . . . . . . . . . 59
Pocket Excel . . . . . . . . . . . . . . . . . . . . . . . . . . . . . . . . . 60
Tips for working in Pocket Excel . . . . . . . . . . . . . . . . 60
Windows Media Player for Rugged Handheld . . . . . . . . 61
Microsoft Reader . . . . . . . . . . . . . . . . . . . . . . . . . . . . . . 62
Getting books onto your V38r . . . . . . . . . . . . . . . . . . 62
Using the Library . . . . . . . . . . . . . . . . . . . . . . . . . . . . 63
Reading a book . . . . . . . . . . . . . . . . . . . . . . . . . . . . . 64
Using reader features . . . . . . . . . . . . . . . . . . . . . . . . 65
Removing a book . . . . . . . . . . . . . . . . . . . . . . . . . . . . 66
Other programs . . . . . . . . . . . . . . . . . . . . . . . . . . . . . . . 66
POCKET INTERNET EXPLORER
Using Pocket Internet Explorer . . . . . . . . . . . . . . . . . . . 67
Viewing Mobile Favorites and Channels . . . . . . . . . . 68
Browsing the Internet . . . . . . . . . . . . . . . . . . . . . . . . . 68
The Mobile Favorites Folder . . . . . . . . . . . . . . . . . . . . . 69
Favorite links . . . . . . . . . . . . . . . . . . . . . . . . . . . . . . . 69
Mobile Favorites . . . . . . . . . . . . . . . . . . . . . . . . . . . . 69
Conserving memory . . . . . . . . . . . . . . . . . . . . . . . . . 70
Using AvantGo channels . . . . . . . . . . . . . . . . . . . . . . . . 70
ViewSonic V38r with Pocket PC OS vi
GETTING CONNECTED
Connecting to a network or the Internet . . . . . . . . . . . . 71
Using an infrared connection . . . . . . . . . . . . . . . . . . . . 72
Wireless connection information . . . . . . . . . . . . . . . . . . 73
Wireless connection signal status . . . . . . . . . . . . . . . . . 74
Wireless and network settings . . . . . . . . . . . . . . . . . . . . 74
WLAGS46F1 manual settings . . . . . . . . . . . . . . . . . . . . 74
VPN settings . . . . . . . . . . . . . . . . . . . . . . . . . . . . . . . . . 75
THE CAMERA
Requirements . . . . . . . . . . . . . . . . . . . . . . . . . . . . . . . . 77
Install Active Sync & the camera application . . . . . . . . . 77
To un-install the camera application . . . . . . . . . . . . . 78
Launch the camera application . . . . . . . . . . . . . . . . . . . 79
Take a picture . . . . . . . . . . . . . . . . . . . . . . . . . . . . . . 80
View picture . . . . . . . . . . . . . . . . . . . . . . . . . . . . . . . . 82
Delete a picture(s) . . . . . . . . . . . . . . . . . . . . . . . . . . . 84
View pictures side-by-side . . . . . . . . . . . . . . . . . . . . . 85
Compare one picture with another . . . . . . . . . . . . . . 86
Make the other side stationary . . . . . . . . . . . . . . . . . 87
Download pictures . . . . . . . . . . . . . . . . . . . . . . . . . . . 89
Changing the camera setup . . . . . . . . . . . . . . . . . . . . . 89
Basic settings . . . . . . . . . . . . . . . . . . . . . . . . . . . . . . 90
Advanced settings . . . . . . . . . . . . . . . . . . . . . . . . . . 91
System settings . . . . . . . . . . . . . . . . . . . . . . . . . . . . . 92
Exit the camera application . . . . . . . . . . . . . . . . . . . . . . 92
ViewSonic V38r with Pocket PC OS vii
BAR CODE SCAN
Scan a bar code . . . . . . . . . . . . . . . . . . . . . . . . . . . . . . 93
Adding different bar code formats . . . . . . . . . . . . . . . . . 93
TROUBLESHOOTING & MAINTENANCE
Reset the V38r . . . . . . . . . . . . . . . . . . . . . . . . . . . . . . . 99
Warm reset – do this first! . . . . . . . . . . . . . . . . . . . . . 99
Cold reset . . . . . . . . . . . . . . . . . . . . . . . . . . . . . . . . . 99
Firmware image upgrade . . . . . . . . . . . . . . . . . . . . . . . 100
Power problems . . . . . . . . . . . . . . . . . . . . . . . . . . . . . . 101
Memory problems . . . . . . . . . . . . . . . . . . . . . . . . . . . . . 101
Screen problems . . . . . . . . . . . . . . . . . . . . . . . . . . . . . . 103
Device connection problems . . . . . . . . . . . . . . . . . . . . . 104
USB dock/cradle connection problems . . . . . . . . . . . 104
Infrared connection problems . . . . . . . . . . . . . . . . . . 105
Care and maintenance . . . . . . . . . . . . . . . . . . . . . . . . . 105
Travel guidelines . . . . . . . . . . . . . . . . . . . . . . . . . . . . 106
Customer support . . . . . . . . . . . . . . . . . . . . . . . . . . . . . 106
Wireless products disclaimer . . . . . . . . . . . . . . . . . . . . . 106
APPENDIX
Optional accessories . . . . . . . . . . . . . . . . . . . . . . . . . . . 107
Safety guidelines . . . . . . . . . . . . . . . . . . . . . . . . . . . . . . 108
Compliance and safety notices . . . . . . . . . . . . . . . . . . . 110
Radio frequency interference (RFI) compliance . . . . 110
Data loss disclaimer . . . . . . . . . . . . . . . . . . . . . . . . . . . 113
Specifications . . . . . . . . . . . . . . . . . . . . . . . . . . . . . . . . 114
Limited Warranty . . . . . . . . . . . . . . . . . . . . . . . . . . . . . . 115

ViewSonic V38r with Pocket PC OS 1 of 115
INTRODUCTION
Congratulations on purchasing the ViewSonic® V38r Rugged Handheld.
Windows® Pocket PC operating system enables you to keep your most important
business and personal information up-to-date and close at hand. This section
introduces you to the internal and external parts of the V38r and provides initial
setup instructions.
Packaged contents
These items vary depending on the model shipped.
•The ViewSonic V38r may include front protective cover depending on model
• Quick Start Guide
•V38r battery
• AC power adapter
• AC power connector
•USB cable
• Dongle (for communication, AC power, with a USB-A mini and a USB-B port)
• Stylus (1) and stylus tether (1)
•ViewSonic CD with user guide(s), camera application, & Active Sync
For more information on Pocket PC software, go to this Microsoft
Pocket PC website
http://www.microsoft.com/windowsmobile/pocketpc/ppc/default.mspx

ViewSonic V38r with Pocket PC OS 2 of 115
Features (if equipped)
•V38r Rugged Handheld
• Dock/cradle connector for optional cradle for input devices
• Wireless 802.11b/g
• 1D CCD Bar code scanner
• Standard joy stick/navigation pad
• SD card slot for extended memory
• Rechargeable battery (Lithium Ion)
• Color display and touch screen
• Synchronize data between desktop/laptop computer and your V38r
• Microphone to record messages, internal speaker
• Fingerprint sensor (depending on model, instructions come with the SDK)
• Camera for snapshots (depending on model)
Software installed
The software listed below is already installed along with the V38r PPC 2003
operating system. Your company’s software development department most likely
ensured that all software is set up for the V38r to perform its designated function(s)
in the field.
• Internet Explorer
• Windows Explorer
• Media Player
• MS WordPad
• Microsoft Inbox
• Microsoft ActiveSync*
• Microsoft File Viewers
MS Excel Viewer
MS Image Viewer
MS PDF Viewer
MS Word Viewer
*ActiveSync allows you to synchronize your V38r with your PC. ActiveSync may be
on a CD that came with your V38r depending on the model. But, for the latest version
of ActiveSync, go to the Microsoft website to your PC and download ActiveSync to
your PC. For more information on installing ActiveSync, see the step in this guide to
Install MS ActiveSync on your PC.
ViewSonic V38r with Pocket PC OS 3 of 115
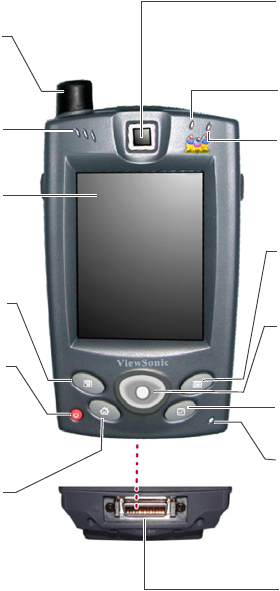
Front view
Programmable buttons can be changed to a different shortcut/function in Setup.
Contacts (programmable)
Home button (programmable) shows
the main screen on the desktop to add
or change details about tasks, etc.
Navigation/Joy stick (move
cursor left/right, up/down) or
press to ENTER
GPS (Global Positioning System) antenna
Speaker
Calendar button
(programmable) see the Pocket
Outlook section in this guide
Tasks button (programmable)
Power Status LED
Display / touch screen
Power button turns the device ON or
OFF. When changing the battery, press
the power button to put the device into
suspend mode for 5 minutes.
Internal microphone records
sound and/or voice messages.
See the section on Recording
a Message
Fingerprint sensor (depends on
model), programmable button,
used for fingerprint recognition
Wireless Antenna Status LED
IN Port (programmable) from:
• AC Power
• Communication Devices
• Cradle (optional accessory)
ViewSonic V38r with Pocket PC OS 4 of 115
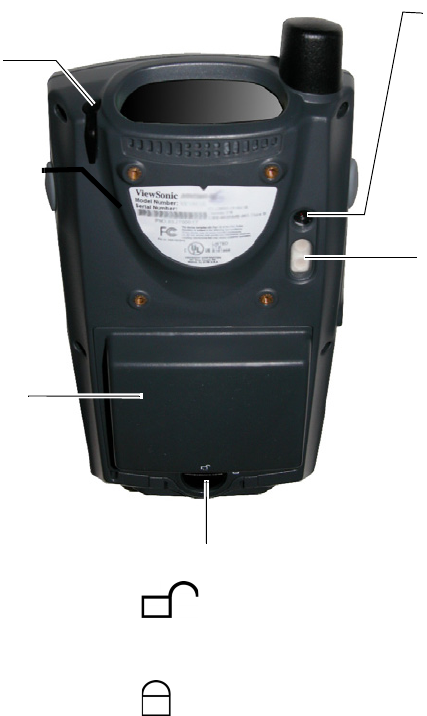
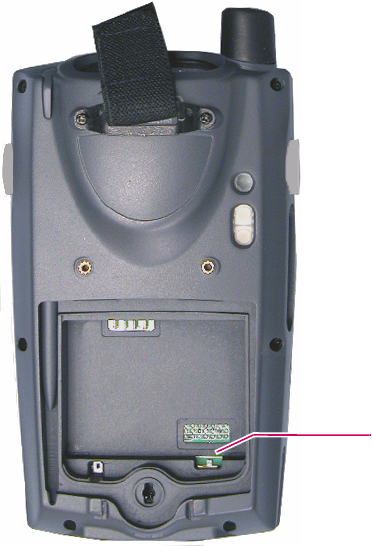
Back view
Camera flash when you take a
picture
Stylus slot for
storing the stylus
1.3M camera lens aimed at
subject for taking the picture.
CMOS (Complimentary Metal
Oxide Semiconductor) camera
in Camera mode. Take picture
in portrait mode only and view
picture in landscape mode.
Back cover
(Standard or
extended battery
depends on model)
Latch for back cover
Unlock icon. Turn the
latch to this icon to
release the back cover
to the battery
Lock icon. Turn the
latch to this icon to
lock the back cover
ViewSonic V38r with Pocket PC OS 5 of 115
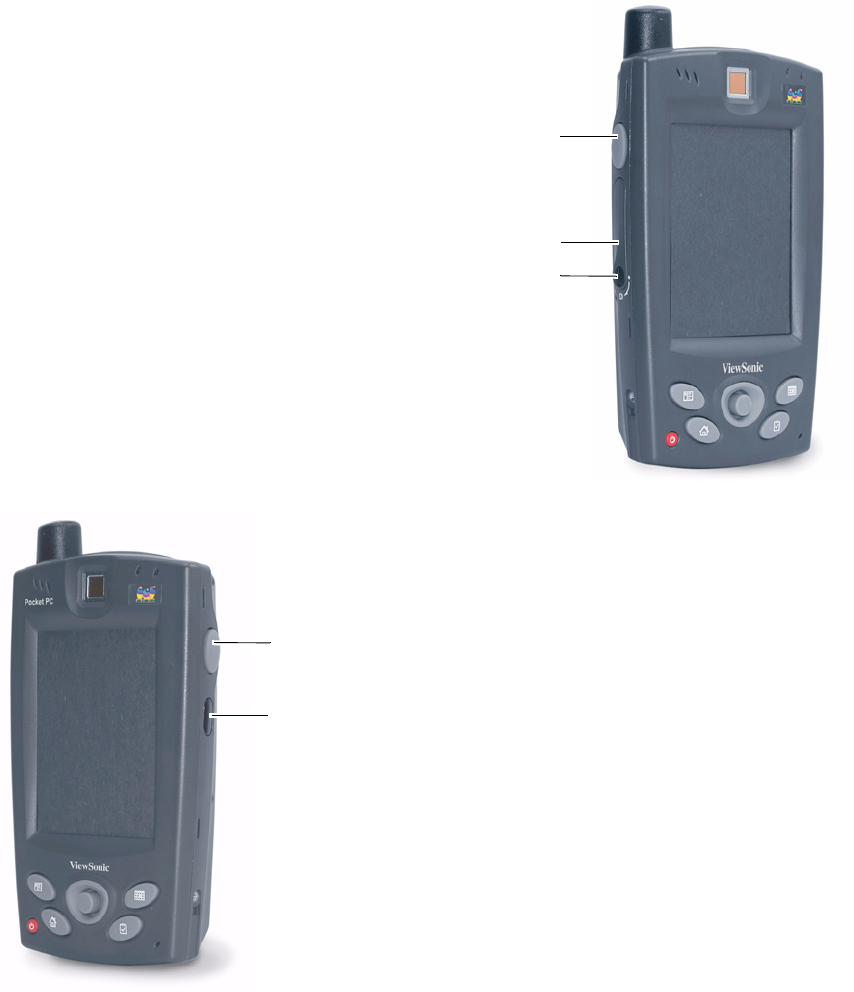
Side views
*The Secure Digital (SD) Memory Card is a flash memory storage device only and is not
compatible with SD I/O cards.
SD* (Secure Digital) slot cover for extended memory
Screw to close or release SD slot cover
IrDA (Infrared Communication with
other IrDA devices
Snapshot button (shutter release) in
Camera Mode (right/left-handed in setup),
or scan bar code button in Scan Mode
(pictures and bar codes appear on-screen)
> Snapshot button (shutter release) in Camera mode. Picture is
saved to an SD card.
> Scan bar code button in Scan mode
ViewSonic V38r with Pocket PC OS 6 of 115
INITIAL SETUP
The V38r allows you to connect to your PC to view and edit files, wirelessly send/
receive email, and explore the World Wide Web. To get started, do the initial steps
below. For more information, see More About Setup in this guide.
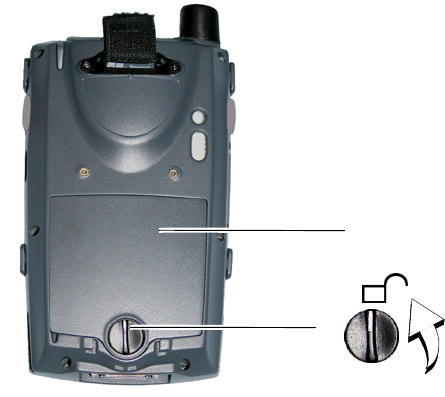
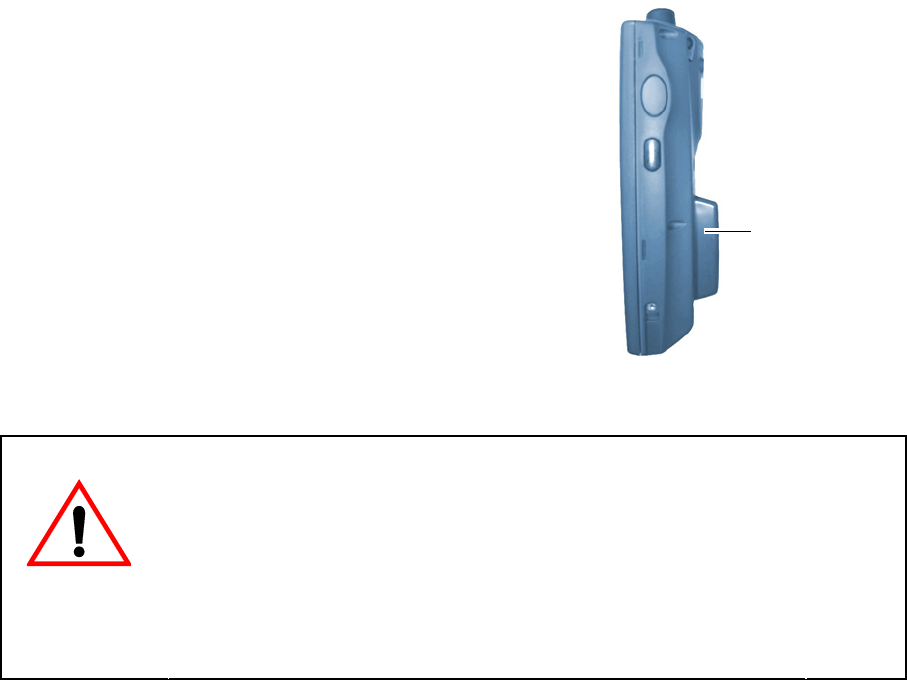
1. Remove the back panel
Turn the latch shown below counter-clockwise and remove the back panel.
Back panel
ViewSonic V38r with Pocket PC OS 7 of 115
2. Slide the backup battery switch to ON
Slide the backup battery switch in the battery compartment to the ON
position. Leave the backup battery switch ON, especially when you need
to change batteries.
WARNING! If you change batteries without the backup switch in the ON
position, all data on SDRAM will be lost.
Backup battery switch
ViewSonic V38r with Pocket PC OS 8 of 115
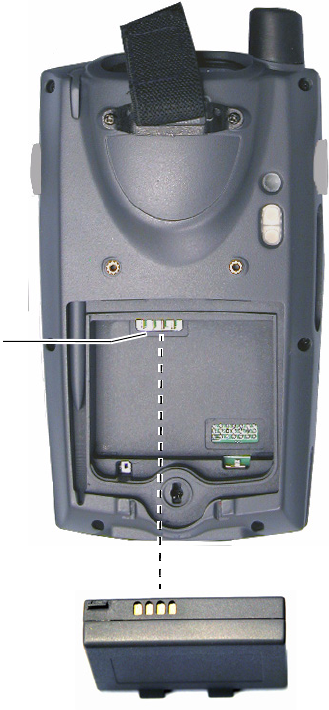
3. Install the battery
Slide the battery into the battery compartment making sure to line up the pin
connections as shown below.
Pin connections
ViewSonic V38r with Pocket PC OS 9 of 115
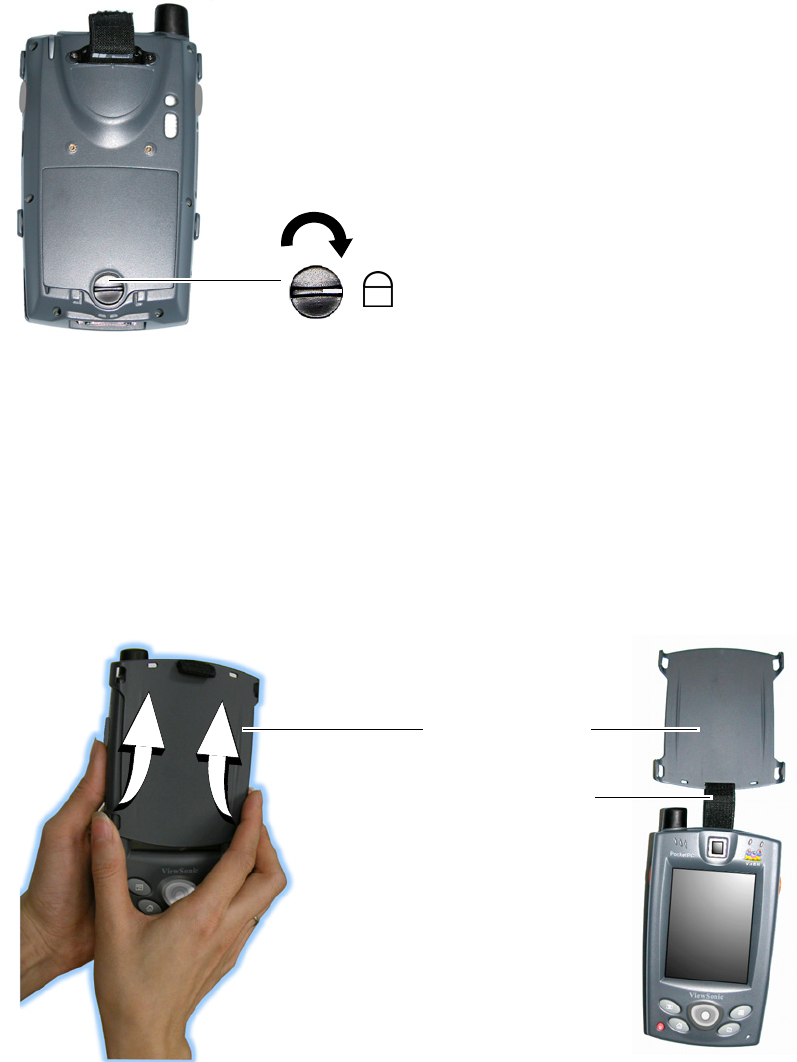
4. Replace the back panel and close the latch
Turn the latch clockwise to lock the panel.
5. Remove the protective cover (depending on
model)
Depending on the model shipped, a protective cover might be included in the
package but not attached to the device. In any event, make sure the cover is off
so you can start using the device. To remove the cover, pinch the sides as shown
below and push the cover off.
Locked
Protective cover
Cover may be
attached here
ViewSonic V38r with Pocket PC OS 10 of 115
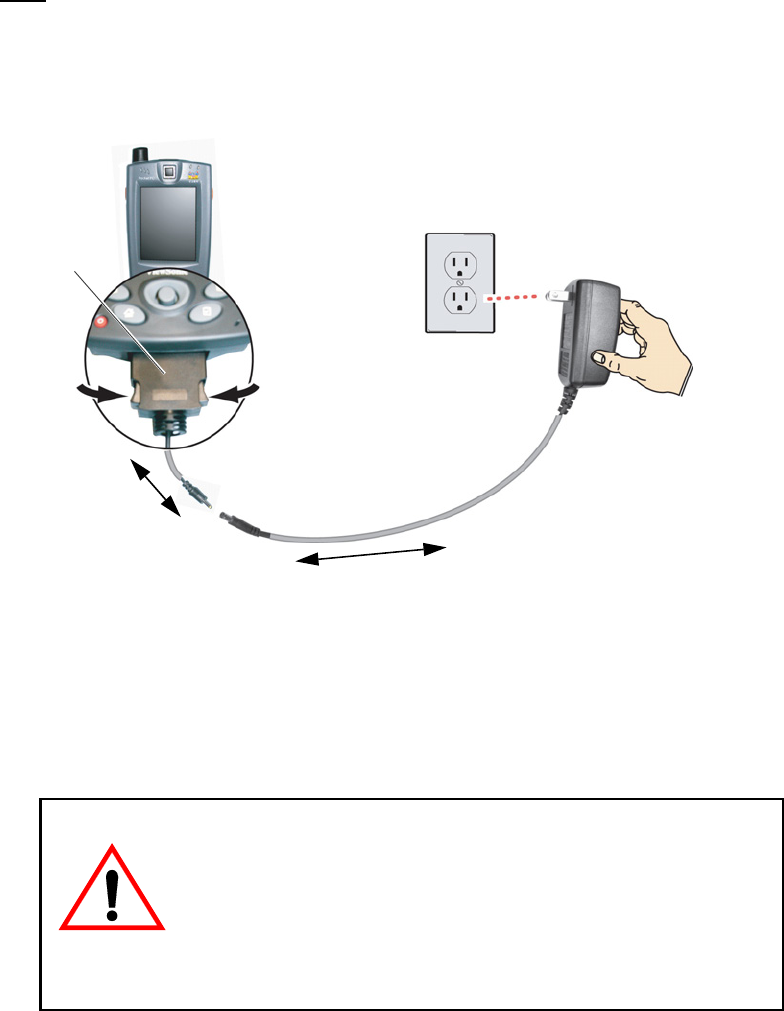
6. Connect AC power
Use only the cords that came with your V38r. Plug the AC power connector to
the V38r while pinching the sides as shown below. Attach the connector to the
AC power cord adapter. Plug the adapter into an AC power wall outlet.
7. Charge the battery overnight
Charge the battery overnight to ensure that the battery is fully charged before
using the V38r the first time.
AC power
connector
AC power
wall outlet
AC power cord adapter
Pinch
here Pinch
here
WARNING! If the backup battery switch is in the OFF
position when you remove the battery, all data on the
SDRAM will be lost. Leave the backup battery switch in
the ON position while using the device or changing the
main battery.
ViewSonic V38r with Pocket PC OS 11 of 115
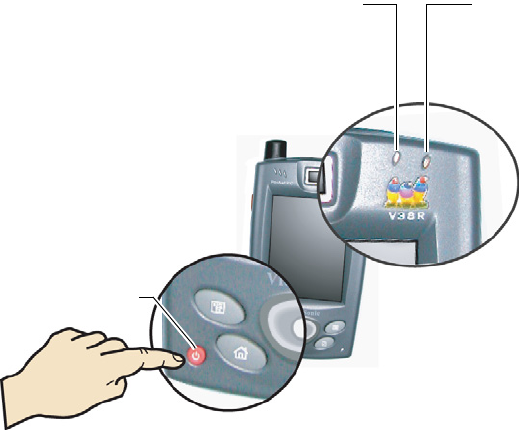
8. Turn the power on
Press the power button. The Power Status LED turns green. Initial Setup is
done. You can start using the V38r. For more information, see MORE ABOUT
SETUP in this guide: includes Battery and power properties, Reset,
firmware upgrade, and wireless connection information.
Power button
Power Status LED
Red = battery is charging
Green = fully charged
Blinking red = error
Wireless Antenna LED
Green = excellent
Yellow = good signal
Blinking yellow = very low
ViewSonic V38r with Pocket PC OS 12 of 115
MORE ABOUT SETUP
Battery and power properties
Your V38r has several possible sources for power:
battery or AC (using the AC power connector or the
optional cradle). Use only the cable(s) that came in
the package. CAUTION: Replace the battery with
one of the following V38r series part numbers only:
• Standard Battery part number: BAT-002
• Extended Battery part number: BAT-001
After the Initial setup, the V38r recharges in
approximately two (2) to three (3) hours while not
using or four (4) hours while using the device.
Normally, the V38r operates on battery power alone.
A fully charged battery can last up to four (4) hours
depending on power consumption factors such as the
screen’s brightness setting.
Battery power status
To determine the main battery’s current charge level, on the V38r tap the Window’s
Start button > select the Control Panel > tap the Battery Power icon >
Properties > Battery Status. The Battery Status window opens with the
percentage of power left in the main battery and rates the quality of the external
power connection and backup battery as either Good, Low, or Very Low.
When the V38r is in the cradle and connected with the AC power cord adapter, the
Power LED on top of cradle means the following:
Red = battery charging
Green = fully charged
Blinking Red = error
Extended back
cover for
extended battery
(depending on
model)
WARNING! If allowed to discharge completely for 2 ~ 4
weeks, the battery may not recharge. If you are not
using the V38r on a daily basis, store the device plugged
into an AC power wall outlet with the AC power adapter
and AC power connector. If you remove the battery
from the device, you loose all data in SDRAM. That’s
why you have to keep the battery charged.
ViewSonic V38r with Pocket PC OS 13 of 115
The stylus
Use the stylus to “tap” or “double-tap” on the touch screen with icons and to select
menu items. The stylus is also used to “type” on the Input Panel and to write notes
when in handwriting recognition mode. The stylus that came with the device is
designed for the V38r screen. Using other pointers could damage the screen and
may void the warranty.
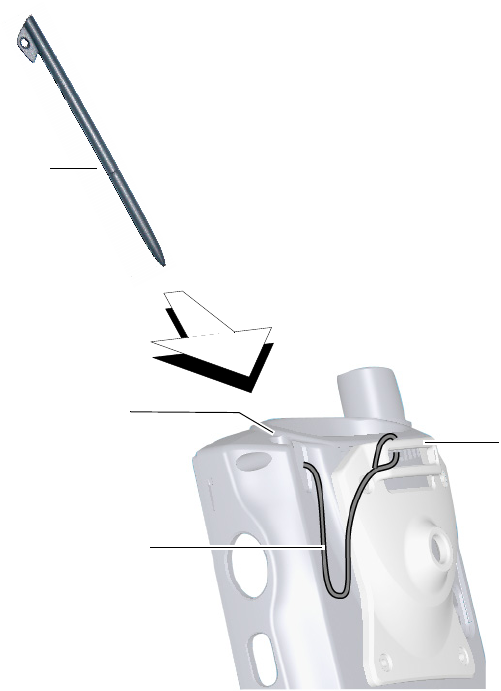
When the V38r is not being used, slide the stylus into the stylus slot on the top edge
of the V38r shown below. To keep from loosing the stylus, attach the stylus tether
that came in the package to the bracket on the back of the V38r.
Stylus slot
Stylus tether
Bracket
Stylus
ViewSonic V38r with Pocket PC OS 14 of 115
Calibrating the touch screen
If your touch screen is not responding accurately to taps with the stylus, you can
recalibrate the screen as follows.
1Tap Windows Start > Settings > Control Panel > Stylus > Stylus Properties
> Calibration > Recalibrate (the cross hairs appear).
2 Follow the on-screen instructions to place the stylus on a cross-hair. Rather than
just tapping the screen, hold the stylus in place for a second or two as directed
until the program responds. Repeat this at each corner of the screen.
3 When finished, tap the screen. Recalibration is complete.
Adjusting the stylus double-tap rate
The double-tap rate can also be adjusted in the Settings window:
1Tap Windows Start > Settings > Control Panel > Stylus > Stylus Properties
> double-tap on the checkerboard graphic to set your double-tap rate.
2Close the Settings window. To save your settings, press the power button which
goes into Suspend mode > wait momentarily > press the power button again
and resume working.
ViewSonic V38r with Pocket PC OS 15 of 115
Enable wireless
Connect the V38r to a network or to the Internet using a wireless connection and a Network
Encryption key. See your IT administrator for wireless setup information.
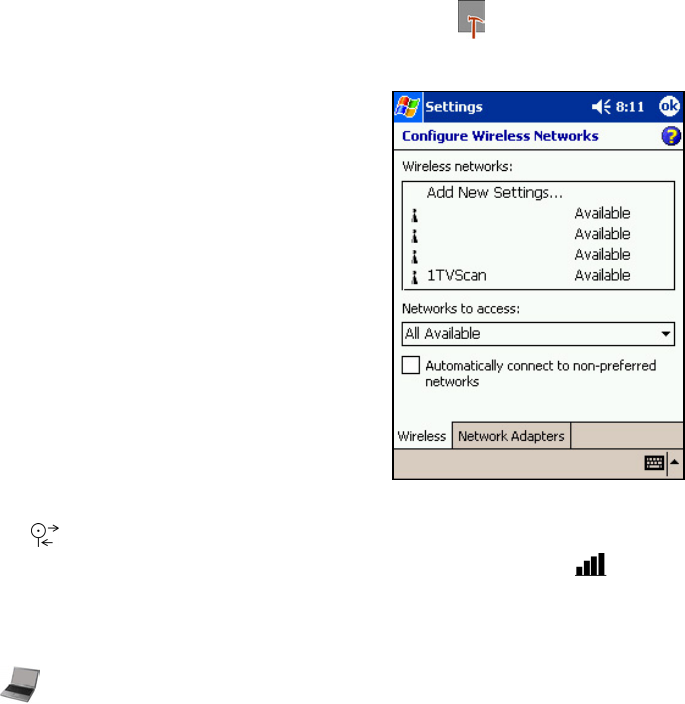
1Tap Start > Settings > System > the V38r Utility icon []. A window
appears showing the ROM version and the device id.
2 Tap the box at the bottom of the window saying
Wireless Card > tap Yes to enable WLAN.
The WLAN LED blinks as it searches. A
Connectivity window appears. Wait for the list
of wireless APs (Access Point) to appear. A
screen like the one shown on the right
appears. If you do not see the AP that you
want, tap Settings. Select the AP that is
available.
3 Enter the web encryption from your
Administrator. Tap the Network Key tab.
4 Clear the box next to “The key is provided
for me automatically.” Then, enter your
network key in the network key field > tap OK
at the top of the screen. Wait a few seconds till
you see the symbol [ ] at the top of the
screen that looks like a beacon to indicate the status. The status bar [ ] also
appears at the bottom of the screen.
To verify that you are connected properly, tap Start > Programs > the
WMAGS46 icon [] > the Wireless Client window appears to show the
status of the device. To check the IP Address, tap ADVANCED. A pop-up appears
> tap Network Troubleshooting. The IP Address assigned to your device
appears > tap OK. You are now connected wirelessly!
To check the IP Address, tap ADVANCED. A pop-up appears > tap Network
Troubleshooting. The IP Address assigned to your device appears. tap OK.
You are now connected wirelessly!

ViewSonic V38r with Pocket PC OS 16 of 115
For more information
For information on: See this source
Operating the V38r V38r Hardware Guide (a PDF file on the ViewSonic
V38r Companion CD.)
Programs on your V38r V38r Hardware Guide and Help on your PC.
Additional programs that can be installed
on your V38r ViewSonic V38r Companion CD
Connecting to and synchronizing with a PC V38r Hardware Guide or online Help. Tap Help on the
Start menu to view Help.
ViewSonic Customer Support Customer Support section in the Appendix of this guide
Troubleshooting See the Troubleshooting section later in this guide
Last-minute updates and technical
information The Read Me files in the “Microsoft ActiveSync” folder
on your PC or the ViewSonic V38r Companion CD
The latest on Windows Powered devices The Microsoft Mobile Devices Web site:
www.microsoft.com/mobile/
ViewSonic V38r with Pocket PC OS 17 of 115
USING THE V38r
This section introduces you to the basics of working with programs and documents
on your V38r.
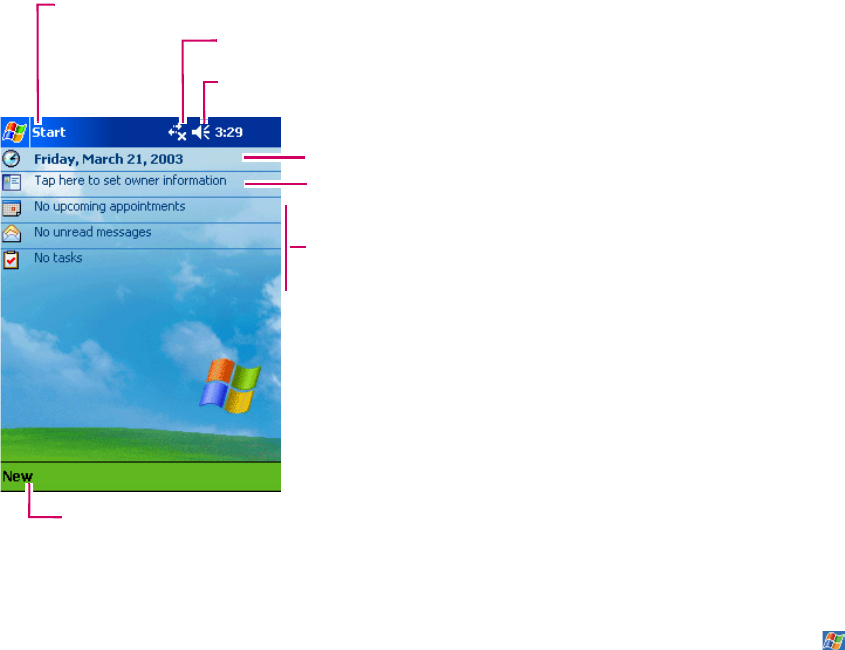
The Today screen
The Today screen shown below appears when you turn on your V38r for the first
time each day or after four hours of inactivity. The Today screen shows at a glance
important information for the day: current date, appointments, activities, new email,
and create new documents.
Another way to show the Today screen is to tap the Windows Start button > tap
Today.
Tap to start to a program
Tap to change Volume or Mute sound coming from speaker
Tap to change date and time
Tap to open an item
Your day at a glance
Tap to create a new item
Shows Connection Status to host PC or wireless network
ViewSonic V38r with Pocket PC OS 18 of 115
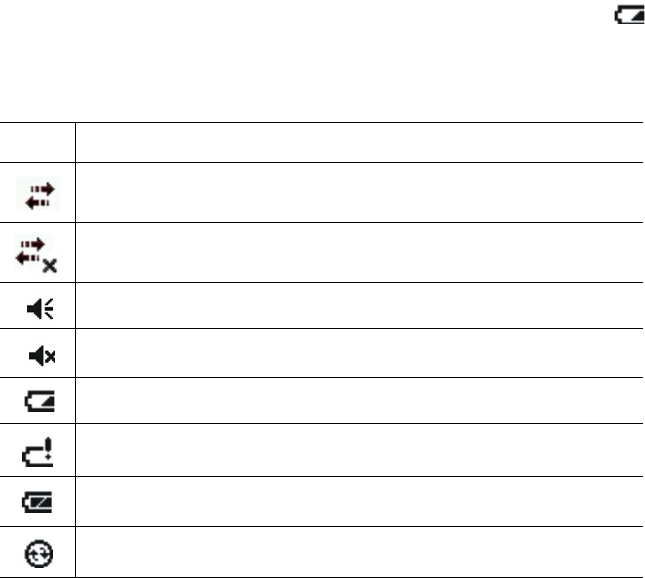
Status icons
From the Today screen appears, the status icons in the table below appear on the
Command bar or on the Navigation bar (see next page). For more information, tap
the icon and the associated control panel appears. For example, tap to see
information about the battery status.
Icon Description
Active Connection: there is an active connection to host PC
or wireless network
Inactive Connection: no active connection to host PC or
wireless network
Speaker is On
Speaker is Off
Main battery is low
Main battery is very low
Main battery is fully charged
Synchronization is beginning or ending

ViewSonic V38r with Pocket PC OS 19 of 115
Navigation bar and Command bar
The Navigation bar shown below is located at the top of the screen. It displays the
active program and current time, and allows you to switch programs and close
screens.
The Navigation bar and Start menu:
Use the Command bar at the bottom of the screen to perform tasks in programs.
The Command bar includes menu names, buttons, and the Input Panel button. To
create a new item in the current program, tap New. To see the name of a button,
press and hold the stylus on the button. Drag the stylus off the button so that the
command is not carried out.
Tap to change Volume or Mute sound.
Shows Connection Status to host PC or
wireless network
Tap to quickly select a program
you have recently used.
Tap to see additional programs.
Tap to customize the device.
Tap to select a program.
Navigation bar
Command bar
Windows Start button
New
button
Buttons
Menu names
Input Panel
button
Command bar
ViewSonic V38r with Pocket PC OS 20 of 115
Running programs
Depending on the program you want to run, you can:
•Tap or tap Start at the top of the screen and select from the menu. (You can
customize which programs you see on this menu. For information, see the
section “Customizing Your V38r”).
• Tap and then tap Programs to access additional programs. Tap the icon to
run the program.
• Press program buttons on the front of your V38r to open the program. The
icons on the buttons identify the programs they are associated with. (You can
customize which programs are associated with the buttons. For information, see
the section “Customizing Your V38r” in this guide).
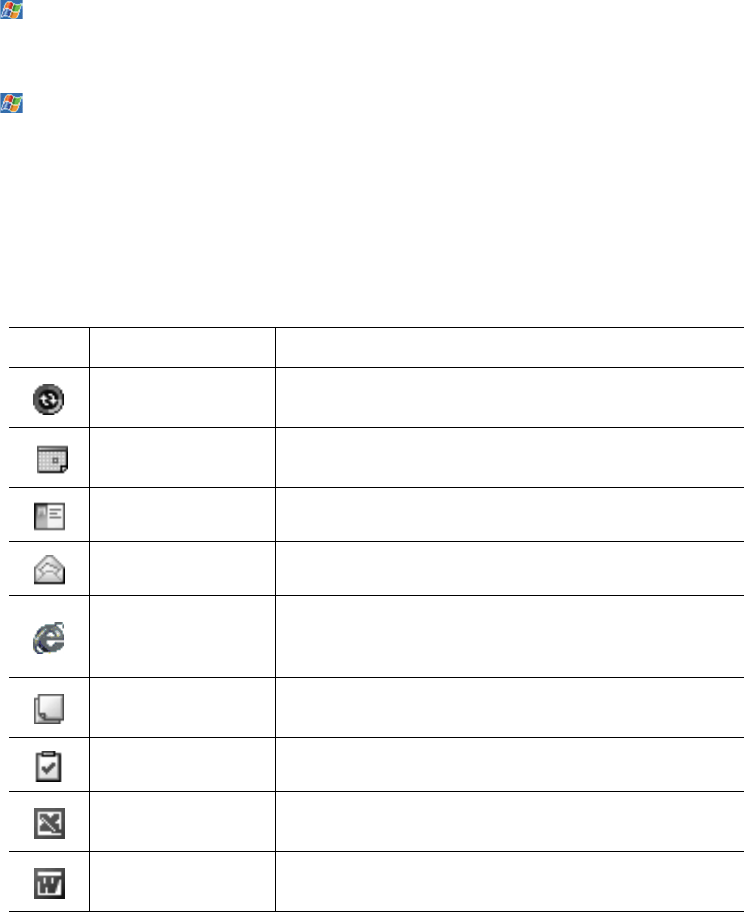
The following table contains a partial list of the program icons on your V38r.
Icon Program Description
ActiveSync Synchronize information between your V38r and
PC.
Calendar Keep track of your appointments and create
meeting requests.
Contacts Keep track of your friends and colleagues.
Inbox Send and receive email messages.
Pocket Internet
Explorer
Browse Web and WAP (Wide Area Protocol) sites,
and download new programs and files from the
Internet.
Notes Create handwritten or typed notes, drawings, and
recordings.
Tasks Keep track of your tasks.
Pocket Excel Create new workbooks or view and edit Excel
workbooks created on your PC.
Pocket Word Create new documents or view and edit Word
documents created on your PC.
ViewSonic V38r with Pocket PC OS 21 of 115
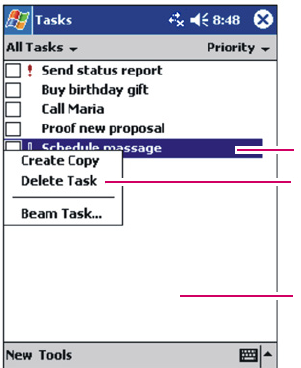
Pop-up menus
With pop-up menus, you can quickly choose an action for an item. For example, you
can use the pop-up menu in the contact list to quickly delete a contact, make a copy
of a contact, or send an email message to a contact. The actions in the pop-up
menus vary from program to program. To access a pop-up menu, press and hold the
stylus on the name of the item that you want to perform the action on.
When the menu appears, lift the stylus, then tap the action you want to perform. Or
tap anywhere outside the menu to close the menu without performing an action.
Notifications
Your V38r reminds you in a variety of ways when you have something to do. For
example, if you have set up an appointment in Calendar, a task with a due date in
Tasks, or an alarm in Clock, you will be notified in any of the following ways:
• A message appears on-screen.
• A sound, which you can specify, is played.
• The notification LED flashes.
To choose reminder types and sounds for your V38r, tap Settings on the Start
menu. On the Personal tab, tap Sounds & Notifications.
Press and hold to display the
pop-up menu.
Using the tip of the sylus, tap
the action you want.
Tap outside the menu to close it
(when you decide not select an
option on the menu).

ViewSonic V38r with Pocket PC OS 22 of 115
Entering information
You have the following options for entering new information:
•Use the Input Panel to enter typed text, either by using the soft keyboard (on-
screen) or other input methods.
• Write directly on the screen.
• Draw pictures on the screen.
• Speak into the microphone to record a message. For more information on using
the microphone, see the section on “Recording a Message”.
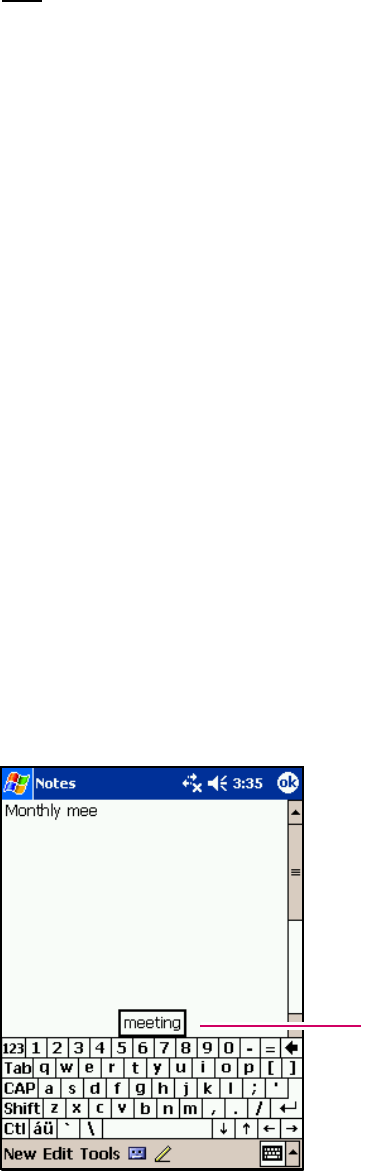
Entering text using the Input Panel
Use the Input Panel to enter information into any program on your V38r. As you
type with the on-screen Soft Keyboard or write with the Block Recognizer or
Letter Recognizer characters appear as typed text on the screen. For more
information on these options, see the next few pages. But, first do the following:
1 Open a new or existing file in an application like Word or Excel. The Input
Panel button appears at the bottom of the screen in the command bar.
2Tap the Input Panel button as shown below > tap the arrow next to the Input
Panel button. A menu appears.
Input Panel button: tap to show or hide the Input Panel
Tap the arrow for the menu of input methods
ViewSonic V38r with Pocket PC OS 23 of 115
3Tap one of the following input methods on the Options menu shown above: as
you type with any of these options, the Input Panel anticipates the word you
are typing or writing and displays the word above the Input Panel. The more you
use the V38r, the more words it learns to anticipate. To change word suggestion
options, such as the number of words suggested at one time, tap Start >
Settings > Personal Information tab > Input > Word Completion.
•Block Recognizer: with the Block Recognizer option, a box appears at the
bottom of the Input Panel where you can write a letter with the stylus to
input characters and words. The letter is converted to typed text that appears
on-screen. For specific instructions on using Block Recognizer, open Block
Recognizer, and then tap the question mark (?) next to the writing area.
•Keyboard: an on-screen (soft) keyboard displayed at the bottom of the
Input Panel. Tap the keys with your stylus.
•Letter Recognizer: write a letter in the box at the bottom of the Input Panel
with the stylus like you would use a pen on paper. The text is converted to
typed text. For specific instructions on using Letter Recognizer, open Letter
Recognizer and tap the question mark next to the writing area.
•Transcriber: with Transcriber you can write anywhere on the screen using
the stylus just as you would write with a pen on paper. Unlike Letter
Recognizer and Block Recognizer, you can write a sentence or more of
information; then, pause and let Transcriber change the written characters
to typed characters. For specific instructions on using Transcriber, open
Transcriber, then tap the question mark in the lower-right corner of the
screen.
Tap here if this is the word
you meant to type
ViewSonic V38r with Pocket PC OS 24 of 115
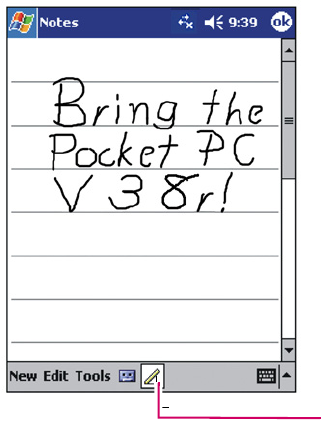
Writing on the screen
In any program that accepts writing—such as the Notes program and the Notes tab
in Calendar, Contacts, and Tasks—you can use your stylus to write directly on the
screen. Write the way you do on paper. You can edit and format what you have
written and convert the information to text later.
To write on the screen, tap the Pen button to switch from tapping to writing mode.
This action displays lines on the screen to help you write.
Some programs that accept writing may not have the Pen button. See the
documentation for that program to find out how to switch to writing mode.
If you want to edit or format writing, select it first. To select writing:
1 Press and hold the stylus next to the text you want to select until the insertion
point appears.
2 Without lifting, drag the stylus across the text you want to select.
If you write accidentally on the screen, tap Tools, then Undo, and try again. You
can also select text by tapping the Pen button to deselect it and then dragging the
stylus across the screen.
Tap the Pen button and use your stylus like a pen
ViewSonic V38r with Pocket PC OS 25 of 115
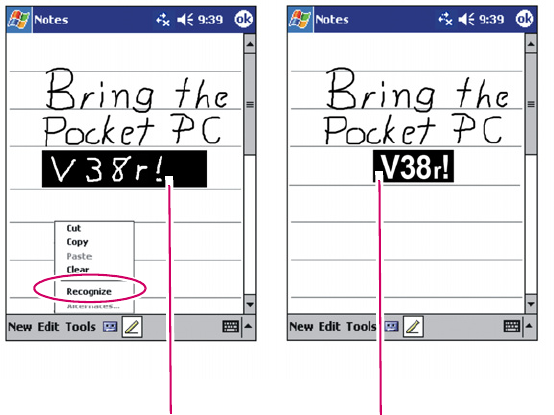
You can cut, copy, and paste written text in the same way you work with typed text:
press and hold the stylus on the selected words and then tap an editing command on
the pop-up menu, or tap the command on the Edit menu. To convert writing to text,
tap Recognize on the Tools menu.
If you want to convert only certain words, select them before tapping Recognize on
the Tools menu (or press and hold the selected words and then tap Recognize on
the pop-up menu). If a word is not recognized, it is left as writing.
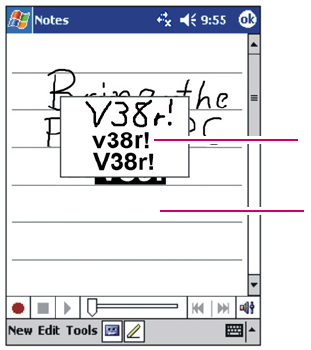
If the conversion is incorrect, you can select different words from a list of alternates
or return to the original writing. To do so, press and hold the incorrect word (tap one
word at a time). On the pop-up menu, tap Alternates.
Select the text you
want to convert and
tap Recognize on the
Pop-up menu
Your
handwriting is
turned into text
ViewSonic V38r with Pocket PC OS 26 of 115
A menu with a list of alternate words appears. Tap the word you want to use, or tap
the writing at the top of the menu to return to the original writing.
Some tips for getting good recognition are listed below:
• Write on the lines and draw descenders below the line. Write the cross of the “t”
and apostrophes below the top line so that they are not confused with the word
above. Write periods and commas above the line.
For better recognition, use the Tools menu to increase the zoom level to 300%.
• Write the letters of a word close together and leave big gaps between words.
• Hyphenated words, foreign words that use special characters such as accents,
and some punctuation cannot be converted.
• If you add writing to a word to change it (such as changing a “3” to an “8”) after
you attempt to recognize the word, the writing you add will not be included if
you attempt to recognize the writing again.
Or, tap outside the pop-up window
to return to your original writing
Tap the word you want to use

ViewSonic V38r with Pocket PC OS 27 of 115
Drawing on the screen
Drawing on-screen is similar to writing on-screen except the way items are selected
and edited. For example, selected drawings can be resized, but writing cannot be
resized.
To create a drawing, cross three ruled lines on your first stroke. A drawing box
appears. Drawings that do not cross three ruled lines will be treated as writing.
You may want to change the zoom level so that you can more easily work on or view
your drawing. Tap Tools, then choose a zoom level.
To edit or format a drawing, select the drawing first. To select a drawing, press and
hold the stylus on the drawing until the selection handle appears. To select multiple
drawings, deselect the Pen button and drag to select the drawings you want.
Cut, copy, and paste selected drawings, press and hold the selected drawing and tap
an editing command on the pop-up menu, or tap the command on the Edit menu. To
resize a drawing, make sure the Pen button is not selected, and drag a selection
handle.
The drawing box indicates the
boundaries of the drawing
ViewSonic V38r with Pocket PC OS 28 of 115
Recording a message
In any program where you can write or draw on the screen, you can also quickly
capture thoughts, reminders, and phone numbers by recording a voice message. In
Calendar, Tasks, and Contacts, you can include a recording in the Notes tab. In
the Notes program, you can either create a stand-alone message or include a
message in a written note. To include the message in a note, open the note first,
then record your message. Or, in the Inbox program, add a message to an email
message as follows:
1 Hold the V38r’s microphone about three inches from your mouth.
2 With a note open, press and hold the on-screen record button on the bottom of
the screen as shown below. If the speaker is not muted, a beep indicates that
your V38r is recording. While holding down the record button, speak into the
microphone. You can also press the button on the left side of the device.
3 To stop recording, release the record button. Two beeps mean recording stopped.
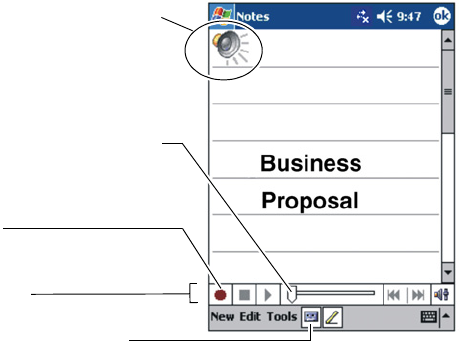
The new message is attached. The recorded message icon appears in the note
list or in the note as shown above.
Recorded message icon in a note or in the list
means that a recorded message is attached
to this note. Tap this icon to hear the message
Slider bar. Move the slider bar to go forward or
backward in a message
Tap this icon to show or hide
the Recording toolbar
Record button
Recording toolbar
ViewSonic V38r with Pocket PC OS 29 of 115
Playing a message
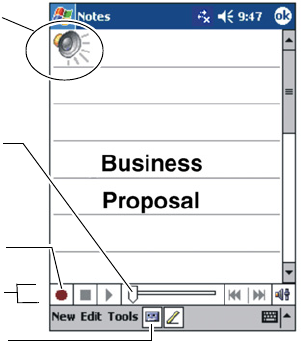
Tap the Record button in the list or in the note as shown below.
Recording formats
Your V38r supports several formats for voice notes. The formats vary in both the
quality of the recording and the size of the sound file. When selecting a recording
format, you should consider the quality you need as well as how much storage
memory the recording will use on your V38r.
Not all recording formats are compatible with other software or computers. If you
will be sharing your recordings with others or transferring a recording to your PC, be
sure to choose a recording format that is supported by the software used to play
recordings on the other computer.
To select a recording format:
1On the Start menu, tap Settings, and then tap the Input icon.
2On the Options tab in the Input control panel, select a voice recording format
from the drop-down list.
The list of recording formats on your V38r indicates the sample rate, whether the
format is stereo or mono, and how much storage memory is required per second of
recording. You may need to experiment with different sample rates and formats to
determine which format best suits your voice.
Tap this icon to hear the message
Slider bar. Move the slider bar to go
forward or backward in a message
Tap this icon to show or hide
the Recording toolbar
Recording toolbar
Record button
ViewSonic V38r with Pocket PC OS 30 of 115
Using My Text
When using Inbox, use My Text to quickly insert a preset or frequently used
messages into the text entry area. To insert a message, tap My Text, and then tap
a message. After inserting a My Text message, you can add text before sending the
message.
To edit a My Text message, on the Tools menu, tap Edit My Text Messages.
Select the message you wish to edit and make desired changes.
ViewSonic V38r with Pocket PC OS 31 of 115
MANAGING THE V38r
This section tells you how to effectively manage power and memory, and how to
add/remove programs, and back up your data.
Managing power
It is important to maintain a continuous power supply to the V38r to prevent data or
files stored in RAM from being damaged. Your V38r can operate either on external
AC power or internal battery power. You will lose any information, programs or
settings that you added if the battery completely runs out of power.
A fully charged battery should provide power for using up to 4 hours. The operating
time of a fully charged battery depends on how you are using the V38r. Some
functions, such as multimedia features or a Secure Digital memory card, may
consume extra battery power.
Recharge the battery when a warning of low power is displayed on your
V38r, or the V38r will turn off automatically. Connect the V38r to external AC
power for charging before using it again.
To check the remaining power, on the Start menu, tap Settings > on the System
tab, tap the Power icon. The remaining power appears on a status bar in the Power
control panel.

ViewSonic V38r with Pocket PC OS 32 of 115
Smart power management
Power management utilities supplied with your V38r provide options that help
prolong the battery’s operating time.
To access these utilities tap the Windows Start button [ ], tap Settings >
System tab > Advanced Settings (three tabs appear: System, Smart Battery,
and Power Manager). For more information, see the tables below.
System: The System screen shows system information only but not any control
options.
Smart Battery
Power Manager: You can also select the events that wake up your V38r from
Sleep Mode: for each of the three options below the default setting is “checked.”
Option Description
Auto
(default setting)
This mode automatically adjusts the CPU speed
according to the need of the current operation.
Low Performance This mode prolongs the battery life by minimizing the
CPU’s performance.
High Performance This mode enhances battery life by improving the
CPU’s performance.
Superior Performance This mode decreases the battery life, resulting from
maximum CPU performance.
Option Description
Application Buttons If this option is checked, you can wake up your V38r by
pressing one of these four application buttons on the
front of your V38r: Note, Calender, Contacts, or
Task.
Record Button If this option is checked, you can wake up your V38r by
pressing the Record button on the V38r.
SD/MMC Card
Insertion/Removal
If this option is checked, you can wake up your V38r by
inserting or removing an SD card.

ViewSonic V38r with Pocket PC OS 33 of 115
Power-saving tips
Follow these suggestions to maximize the battery’s operating time:
•Turn off the backlight. Press and hold the power button to turn off the
backlight, or use the Backlight control panel to set the backlight to turn off
automatically after a short period of inactivity.
•Always use AC power when connecting your V38r to your PC. Note that
your V38r will not auto-suspend while it is connected.
•Turn off sounds. Use the Sounds & Notifications control panel to turn off all
but the most necessary system sounds.
•Avoid using memory card accessories while on battery power. Some
memory cards use considerable power and will quickly drain your battery.
•Do not “listen” for infrared transfers. Although you can set your V38r to
constantly monitor the IR port for files sent from other devices, doing so will
quickly drain your batteries.
Battery storage
Data storage
Before removing the battery, we strongly recommend that you do one of the
following:
• Drag any changed files you want to protect to the V38r’s Persistent Storage
folder (under My Computer), then press the Power button (to turn the V38r
off/Suspend Mode) before removing the old battery. Or,
• Plug the AC Power Cord into the V38r before removing the old battery to
prevent a disruptive interruption of power. Or,
• Press the Power button to put the V38r in Suspend Mode, remove the old
battery, and insert the replacement battery quickly. The backup battery
(permanently installed) will prevent an interruption of power, providing a
maximum of five (5) minutes of power while in Suspend Mode.
Battery Storage: to store the V38r if you are not using the device on a daily
basis, leave the battery in the device and plug the V38r into AC power.
!
Data Storage: Remove the back cover by turning the latch counterclockwise
then take the battery out. CAUTION: Removing the battery can cause the
loss of content that is not saved in the Persistent Storage folder.
!
ViewSonic V38r with Pocket PC OS 34 of 115
Managing memory
Your V38r uses two kinds of memory: storage and program memory (RAM), and
optional memory cards.
Storage and program memory
RAM (Random Access Memory) on your V38r is shared between storage memory
and program memory. “Storage memory” is used to store the data you create and
additional programs you install. “Program memory” is used to run programs on your
V38r. Your V38r automatically manages the allocation between storage and
program memory. However, in some situations, such as when the memory is running
out, your V38r may not be able to automatically adjust the allocation.
Memory cards
Memory cards are small, removable flash storage cards that enable you to expand
the memory of your V38r. You can use memory cards for backup storage, archives,
or to transfer large files to other devices. Your V38r supports Secure Digital
memory cards. Memory cards can be purchased from a variety of third-party
vendors.
SD memory capabilities
Your V38r has an SD card slot which accepts an SD (Secure Digital) memory card.
You can purchase an SD card to expand the memory capacity and capabilities of
your V38r.
To insert an SD memory card
1 Slide the end of the card with the chipped corner into the SD slot on the side of
the V38r.
2 Push the card into the slot until it clicks into place.
To remove an SD memory card
Press the card. When the card pops out slightly, you can pull it out.

ViewSonic V38r with Pocket PC OS 35 of 115
SDRAM memory allocation
The V38r has the following SDRAM memory:
• For the USA and European models: 15 MB is used by the Rugged Handheld 2003
Operating System, applications, and drivers.
• The remaining memory is available for user applications and file storage:
36.5MB for the USA and Europe V38r models.
Memory map for 64/128 MB SDRAM
The USA and Europe V38r models have an additional 36 MB of Flash ROM memory
available for file storage called "My Flash Disk."
Antenna signal properties
Your V38r uses the 802.11b/g wireless radio signal standard to communicate with a
local 802.11b/g networks. The quality of your radio connection signal can be
weakened by excessive distance and by intervening materials such as walls and
furnishings. If the wireless connection seems to work intermittently, check the
quality of your wireless connection.
Description 64 128
Flash ROM Image allocated for Rugged
Handheld 2003 Operating System and
applications 28.8 MB 60.8MB
Drivers 5.40 MB 6.3 MB
Available for user applications and file
storage 23.4 MB 54.4 MB
Flash ROM 25.18 21.30
Total Memory 57.59 MB 121.5 MB
ViewSonic V38r with Pocket PC OS 36 of 115
Finding and organizing information
The Find feature on your V38r helps you quickly locate information. To find a file,
on the Start menu, tap Find. Enter the text you want to find, select a data type,
and then tap Go to start the search.
To quickly find information that is taking up storage space on your V38r, under Type
select Larger than 64KB.
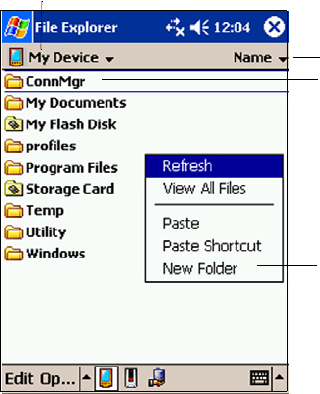
You can also use the File Explorer to find files on your V38r and to organize these
files into folders. On the Start menu, tap Programs, tap File Explorer.
Select the sort order for the list.
Press and hold to create a new
folder.
Tap the folder name to open it.
Tap to change folders.

ViewSonic V38r with Pocket PC OS 37 of 115
Customizing the V38r
To customize the settings of the V38r to your own preferences, tap Start >
Settings > tap any of the icons on the Personal Information, System, or
Connections tabs. The customization options are as follows:
Tab Options Description
PERSONAL INFORMATION
Buttons Assigns your favorite programs to the program buttons
Input Sets the settings related to Block Recognizer, soft keyboard, Letter Recognizer
and Transcriber input methods.
Menus Selects items that appear on Start menu & New menu on Today screen.
Owner
Information Saves your personal information.
Password Sets the password to your V38r to protect the stored data.
Sounds &
Notifications Sets the conditions and types of the sounds, system volume, and ways of
notifications.
Today Sets the items that appear on the Today screen.
SYSTEM
About Shows information about the version of the operating system, the name of the
Rugged Handheld, and copyrights.
Backlight Adjusts the backlight of the display.
Certificates Network administrator.
Clock &
alarms Sets the current time and alarm.
Memory Adjusts the allocation of data and program storage.
Power Shows the remaining battery and external AC power, and set the time for the
V38r to turn off automatically.
Regional
Settings Sets the region of your location, and formats for number, currency, time and date.
Remove
Programs Removes programs pre-installed in RAM.
Screen Realigns the touch screen for accurate taps.
V38r Utility Information only and a button to enable the Wireless Card.

ViewSonic V38r with Pocket PC OS 38 of 115
Setting a password
A password can safeguard your V38r against unauthorized use. To set your
password:
1Tap Start, tap Settings, then tap the Password icon on the Password tab.
2 Tap the digits or characters to set your password. You can set a four-digit
password, or a long password containing a combination of at least seven
characters, digits or punctuation.
3 You can set the time for the V38r to prompt for a password after idling.
4Tap OK.
CONNECTIONS
Connections Connect to modem, server, VPN
AvantGo
Connection Defines properties of server setting for AvantGo.
Beam Allows for receiving & transmitting data through infrared.
Bluetooth Enable another Bluetooth device.
Network
Cards Defines different network adapter drivers available on the device.
Tab Options Description
ViewSonic V38r with Pocket PC OS 39 of 115
Adding/removing programs
Adding programs
You can add even more functionality to your V38r by installing additional software
and programs. A wide variety of software is available for Windows Powered Rugged
Handhelds, ranging from custom business applications and system utilities to games
and entertainment. Some programs are available from software vendors or on the
Web.
Install only programs designed specifically to run on a Rugged Handheld personal
digital assistant and/or a Windows Powered Rugged Handheld. You cannot run
programs designed for Windows on your V38r. In addition, you may need a version
of the program designed specifically for the X-Scale processor used by your V38r.
Install software to your V38r by first loading the installation files onto your PC. Use
ActiveSync on your PC to transfer and install programs to the storage memory
(RAM) in your V38r.
Removing programs
To free storage memory on your V38r, you can remove programs you no longer use.
Only programs that are stored in RAM can be removed.
Programs pre-installed in Flash ROM cannot be removed; however, these programs
do not use storage memory.
To remove a program:
1On the Start menu, tap Settings.
2On the System tab, tap Remove Programs.
3 Select the program in the list, and then tap Remove.
If the program does not appear in the list of installed programs, use File Explorer
on your V38r. Locate the program, press and hold the stylus on the program, and
then tap Delete on the pop-up menu.
ViewSonic V38r with Pocket PC OS 40 of 115
Backing up data
To prevent loss of data, you should back up your V38r frequently. Your V38r comes
with two programs for backing up data:
•Microsoft ActiveSync. ActiveSync enables you to back up data to your PC.
You can back up all data on your V38r, or only your PIM databases (Calendar,
Contacts, and Tasks). You can set ActiveSync to back up automatically each
time you connect, or you can back up manually, whenever you choose. For more
information, see ActiveSync Help on your PC.
•Backup enables you to back up all data stored in the internal (RAM) memory on
your V38r. You can save the backup file on an optional Secure Digital memory
card.
Using Backup
Backup gives you added flexibility in backing up your valuable data. With Backup,
you can back up all data in RAM. You can save the backup file to an optional SD
memory card, so you can safeguard your data even while you are traveling or away
from your PC.
An internal storage device called “My Flash Disk” is included. When using Backup,
you can choose this disk as your target backup device.
Backing up data using Backup
1 Close all running applications and insert a memory card.
2 Disconnect your V38r from your PC.
3On the Start menu on your V38r, tap Programs and then tap the Backup icon.
4Tap Backup, then tap Next.
5 Tap your preference of storage media for backing up your data, then tap Next.
6 Tap the item you want to back up, then tap Next.
7Tap Backup, then tap Yes to start the backup process.
8 Remove the memory card after the backup is complete.
CAUTION:
• Never delete the backup file in the memory card. If the backup file is deleted,
the backup data will be lost and cannot be restored.
• When you use the backup file to restore information, information on your V38r
is replaced with the information stored in the backup file. If you have created
files on your V38r since the last backup and do not want to delete these files
during the restore process, move the files from your V38r to your PC – or to an
optional memory card – before restoring the information.
ViewSonic V38r with Pocket PC OS 41 of 115
Restoring data using Backup
1 Close all running applications and insert a memory card with the backup data.
2 Disconnect your V38r from your PC.
3On the Start menu tap Programs, then tap the Backup icon.
4Tap Restore, then tap Yes.
5 Tap your preference of storage media for restoring your data, then tap Next.
6 Tap the item you want to restore, then tap Next.
7Tap Restore, then tap Yes to start the restore process.
8 Remove the memory card after the restore process is complete, and reset your
V38r.
IMPORTANT: When you restore data, your V38r must have the same regional
settings that it had when you completed the backup; otherwise, you will not be able
to restore the files. To change regional settings, on the Start menu, tap Settings,
and then tap the Regional Settings icon on the System tab. Select your region
from the drop-down list.
ViewSonic V38r with Pocket PC OS 42 of 115
MICROSOFT ACTIVESYNC
This section tells you what the Microsoft ActiveSync program is and what you
need to do to use it.
Using Microsoft ActiveSync
ActiveSync is already installed on your V38r. You need to install ActiveSync on your
PC. For more detail, see the section on installing ActiveSync.
Microsoft ActiveSync allows you to synchronize the information on your PC with
information on your V38r. Synchronization compares the data on the two sides and
updates both computers with the most recent information. For example, you can:
• Keep your Pocket Outlook Contacts, Calendar, and Tasks databases up-to date
by synchronizing your V38r with Microsoft Outlook data on your PC.
•IMPORTANT: Outlook must be installed on your PC in order to synchronize
your email data.
• Synchronize email messages in your V38r Inbox with email messages in
Microsoft Outlook on your PC.
•Synchronize Microsoft Word and Microsoft Excel files between your V38r
and PC. Your files will be automatically converted to the correct format.
With ActiveSync, you can also:
• Back up and restore your V38r data.
• Copy (rather than synchronize) files between your V38r and PC.
• Add and remove programs on your V38r.
ViewSonic V38r with Pocket PC OS 43 of 115
Synchronizing data
Once you have created a synchronization partnership and completed the first
synchronization, you can initiate synchronization from your V38r. Follow this
procedure:
1 Connect your V38r to your PC.
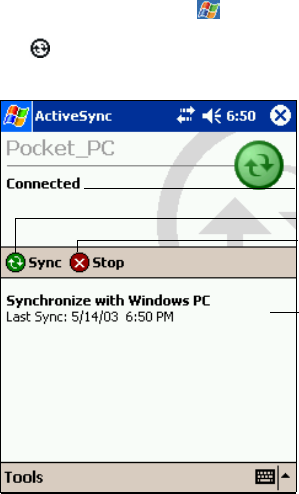
2 On your V38r, tap , and then tap ActiveSync.
3 Tap to begin synchronization.
By default, ActiveSync does not automatically synchronize all types of information.
Use ActiveSync options to turn synchronization on and off for specific information
types. You can:
• Control when synchronization occurs by selecting a synchronization mode. For
example, you can synchronize continually while the V38r is connected or only
when you choose the synchronize command.
• Select which information types are synchronized and control how much data is
synchronized. For example, you can choose how many weeks of past
appointments you want synchronized.
For information on setting ActiveSync options and using ActiveSync on your PC, see
ActiveSync Help on your PC. For information on using ActiveSync in your V38r,
see ActiveSync Help on the V38r.
View connection status
Tap to connect and synchronize
Tap to stop synchronization
View synchronization status
ViewSonic V38r with Pocket PC OS 44 of 115
Connecting to your PC
CAUTION: Do not shut down or restart your PC while the V38r is connected. Turn
off the V38r or disconnect the USB cable before shutting down your PC.
By USB cable
CAUTION: Before connecting the V38r to the USB synchronization cable, be sure
your PC is turned on, that ActiveSync is on your PC and is configured to allow a
USB connection. For more information, see the section “Installing Microsoft
ActiveSync” in this guide.
By infrared
You can use the IR port instead of using the cable to synchronize data with your PC.
IR ports are on many notebook computers; however, on a PC, you may need to
install and configure an IR port. To install the port, follow the manufacturer’s
instructions. For complete instructions on connecting to your PC by infrared, refer to
ActiveSync Help on your PC.
ViewSonic V38r with Pocket PC OS 45 of 115
POCKET OUTLOOK
This section introduces you to the basics of Microsoft Pocket Outlook, including
Calendar, Contacts, Tasks, Notes and Inbox.
Scheduling appointments/meetings
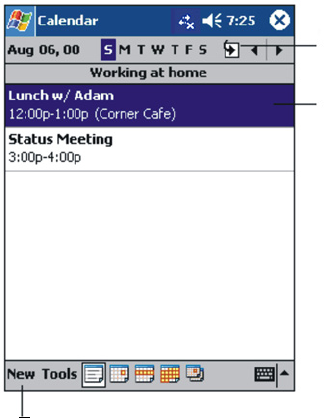
Use Calendar to schedule appointments, including meetings and other events.
You can check your appointments in one of several views (Agenda, Day, Week,
Month, and Year) and easily switch views by using the View menu.
You can customize the Calendar display (for example, change the first day of the
week), by tapping Options on the Tools menu.
Tap to go to Today
Tap to display or edit the
appointment details
Tap to create a new appointment.
ViewSonic V38r with Pocket PC OS 46 of 115
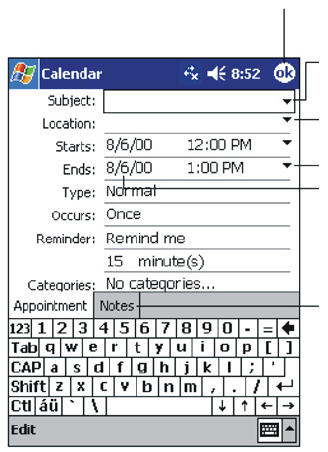
Creating an appointment
1 In Day or Week view, tap the desired date and time for the appointment.
2Tap New.
3 When using the Input panel, tap first to select the field, and then enter a
description and a location.
4 If needed, tap the date and time to change them.
5 Enter other desired information. You will need to hide the Input panel to see all
available fields.
6 To add notes, tap the Notes tab. You can enter text, draw, or create a recording.
For more information on creating notes, see “Notes: Capturing Thoughts and
Ideas” later in this section.
7Tap OK to return to Calendar.
If you select Remind me in an appointment, your V38r will remind you according to
the options set in the Sounds & Notifications control panel.
Tap to return to the calendar (the appointment is
saved automatically)
Tap to choose from predefined text
Tap to choose from previously entered locations
Tap to select a time
Tap to select a date
Notes is a good place for maps and directions
ViewSonic V38r with Pocket PC OS 47 of 115
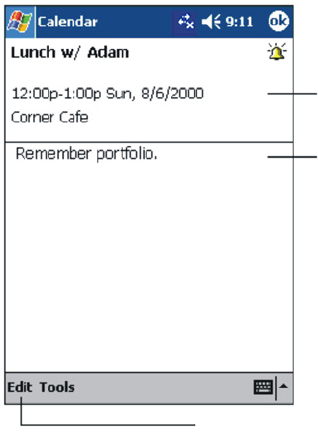
Using the summary screen
When you tap an appointment in Calendar, a summary screen displays. To change
the appointment, tap Edit.
Creating meeting requests
You can use Calendar to set up meetings with users of Outlook or Pocket
Outlook. The meeting notice will be created automatically and sent either when you
synchronize Inbox or when you connect to your email server. Indicate how you want
meeting requests sent by tapping Tools and then Options. If you send and receive
email messages through ActiveSync, select ActiveSync.
To schedule a meeting:
1 Create an appointment.
2 In the appointment details, hide the Input panel, and then tap Attendees.
3 From the list of email addresses in Contacts, select the meeting attendees. The
meeting notice is created automatically and placed in the Outbox folder. For
more information on sending and receiving meeting requests, see Calendar
Help and Inbox Help on your V38r.
View appointment details.
View.
Tap to change appointment.
ViewSonic V38r with Pocket PC OS 48 of 115
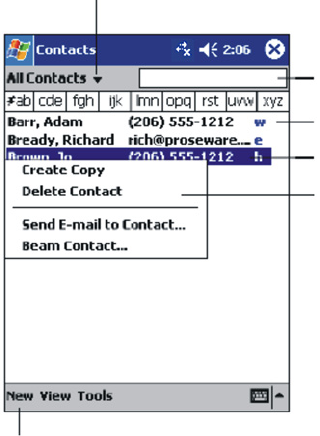
Managing contacts
Contacts maintains a list of your friends and colleagues so that you can easily find
the information you are looking for, whether you are at home or on the road. Using
the IR port on the V38r, you can quickly share Contacts information with users of
Rugged Handhelds and other mobile devices.
To change the way information is displayed in the list, tap Tools then tap Options.
Select the category of contacts
you want to display in the list.
Tap and enter part of a name to
quickly find it in the list.
Tap to see additional phone
numbers and e-mail addresses.
Tap to display or edit the contact
details.
Press and hold to display a pop-up
menu of actions.
Tap to create a new record.
ViewSonic V38r with Pocket PC OS 49 of 115
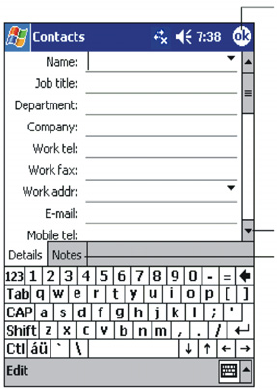
1Tap New.
2Using the Input panel, enter a name and other contact information. Scroll down
to see all available fields.
3 To assign the contact to a category, scroll to and tap Categories, then select a
category from the list. In the contact list, you can display contacts by category.
4 To add notes, tap the Notes tab. You can enter text, draw, or create a recording.
For more information on creating notes, see “Notes: Capturing Thoughts and
Ideas” later in this section.
5Tap OK to return to the contact list.
Tap to return to the contact list (the
contact is saved automatically)
Scroll to see more fields
Notes is a good place for maps and directions
ViewSonic V38r with Pocket PC OS 50 of 115
Finding a contact
There are several ways to find a contact:
•On the Start menu, tap Find, enter the contact name, select Contacts for the
type, and then tap Go.
• In the contact list, enter a contact name in the box under the Navigation bar.
• To show all contacts again, clear text from the box or tap the button to the right
of the box.
• In the contact list, tap the category list (labeled All Contacts by default) then
select the type of contact that you want displayed. To show all contacts again,
select All Contacts. To view a contact not assigned to a category, select None.
• To view the names of companies your contacts work for, in the contact list, tap
View then tap By Company. The number of contacts that work for that
company will be displayed to the right of the company name.
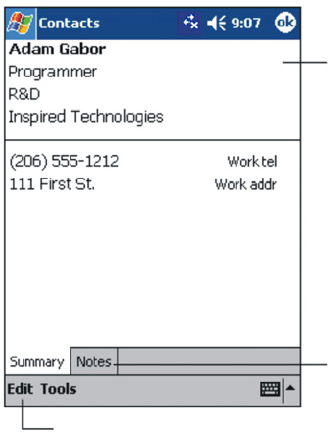
Using the Summary screen
When you tap a contact in the contact list, a summary screen displays. To change
the contact information, tap Edit.
View contact details.
Tap to view notes.
Tap to change contact information.
ViewSonic V38r with Pocket PC OS 51 of 115
Tasks: keeping a To Do list
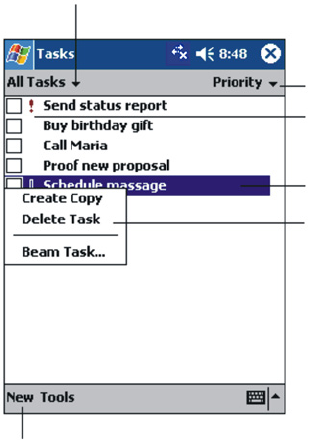
Use Tasks to keep track of what you have to do.
Select the category of tasks you want
to display in the list.
Select the sort order of the list.
! Indicates high priority.
Tap to display or edit the task details.
Press and hold to display a pop-up menu of actions.
Tap to create a new task.
ViewSonic V38r with Pocket PC OS 52 of 115
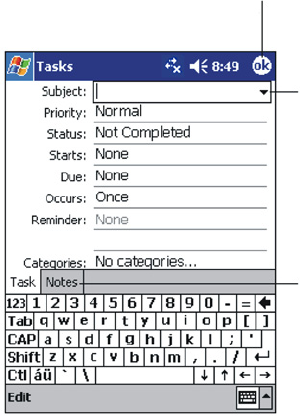
Creating a task
1Tap New.
2Using the Input panel, enter a description.
3 You can enter a start date and due date, or enter other information by first
tapping the field. If the Input panel is open, you will need to hide it to see all
available fields.
4 To assign the task to a category, tap Categories, then select a category from the
list. In the task list, you can display tasks by category.
5 To add notes, tap the Notes tab. You can enter text, draw, or create a recording.
For more information on creating notes, see “Notes: Capturing Thoughts and
Ideas” later in this section.
6Tap OK to return to the task list.
Tap to return to the task list (the task
is saved automatically).
Tap to choose from
predefined subjects.
Notes is a good place for
maps and drawings.
ViewSonic V38r with Pocket PC OS 53 of 115
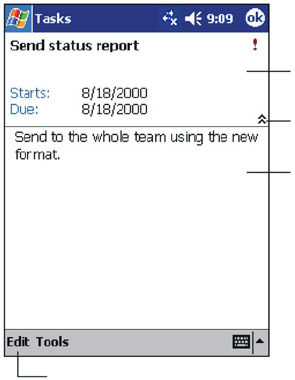
Using the Summary screen
When you tap a task in the task list, a summary screen displays. To change the task,
tap Edit.
View task details.
Tap to show or hide
additional summary
information.
View notes.
Tap to change task.
ViewSonic V38r with Pocket PC OS 54 of 115
Notes: capturing thoughts and ideas
Quickly capture thoughts, reminders, ideas, drawings, and phone numbers with
Notes. You can create a written note or a recording. You can also include a
recording in a note. If a note is already open when you create the recording, it will
be included in the note as an icon. If the note list is displayed, the recording will be
created as a stand-alone recording.
Creating a note
1Tap New.
2 Create your note by writing, drawing, typing, or recording. For more information
about using the Input panel, writing and drawing on the screen, and creating
recordings, see the section on “Entering Information” in this guide.
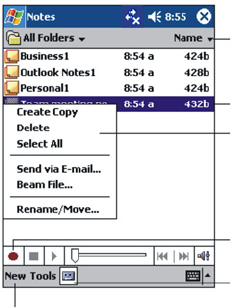
Tap to change the sort order of the
list.
Tap to change open a note or play a recording.
Press and hold to display a pop-
up menu of actions.
Tap to record.
Tap to show or hide the Recording toolbar.
Tap to create a new
item.
ViewSonic V38r with Pocket PC OS 55 of 115
Inbox: sending and receiving email
Use the Inbox to send and receive e-mail messages with Microsoft Outlook on
your PC.
Synchronizing email messages
Email messages can be synchronized as part of the general synchronization process.
To do this, you need to enable Inbox synchronization in ActiveSync. For
information on enabling Inbox synchronization, see ActiveSync Help on the PC.
During synchronization:
• Messages are copied from the mail folders of Exchange or Outlook on your PC
to the ActiveSync folder in Inbox on your V38r.
• Email messages in the Outbox folder on your V38r are transferred to
Exchange or Outlook, and then sent from those programs.
• Email messages in subfolders must be selected in ActiveSync on your PC in
order to be transferred.
Using the message list
Messages you receive are displayed in the message list. By default, the most
recently received messages are displayed first in the list.
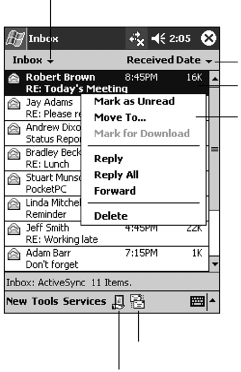
Select the Internet Service Provider
and the folder you want to display.
Select the sort order for messages.
Tap to open a message.
Press and hold to display a
pop-up menu of actions.
Tap to connect, and to send and receive e-mail.
Tap to connect to the selected Internet Service Provider.

ViewSonic V38r with Pocket PC OS 56 of 115
When you receive a message, tap the message to open it. Unread messages display
in bold.
IMPORTANT: When you synchronize with your PC, by default, you will receive
messages from the last three days only, the first 100 lines of each new message,
and file attachments of less than 100 KB in size. The original messages remain on
your PC.
Tap to return to the message list.
Tap to delete this message.
Tap to view the previous or next message.
Tap to reply to or forward this message.
ViewSonic V38r with Pocket PC OS 57 of 115
To compose a message:
1Tap New.
2In the To field, enter an email of one or more recipients, separating them with a
semicolon, or select a name from the contact list by tapping the Address Book
button. All email addresses entered in the email fields in Contacts appear in the
Address Book.
3 Compose your message. To enter preset or frequently used messages, tap My
Text and select a message.
4Tap Send when you have finished the message. If you are working offline, the
message is moved to the Outbox folder and is sent the next time you connect.
The message is placed in the Outbox folder on your device.
Managing email messages and folders
By default, messages are displayed in one of five folders for each service you have
created: Inbox, Deleted Items, Drafts, Outbox, and Sent Items. The Deleted
Items folder contains messages that were deleted from the V38r. The behavior of
the Deleted and Sent Items folders depends on the options you have chosen. In
the message list, tap Tools then tap Options. On the Message tab, select your
options.
If you want to organize messages into additional sub-folders, tap Tools, then tap
Manage Folders to create new folders. To move a message to another folder, in the
message list, press and hold the message then tap Move on the pop-up menu.
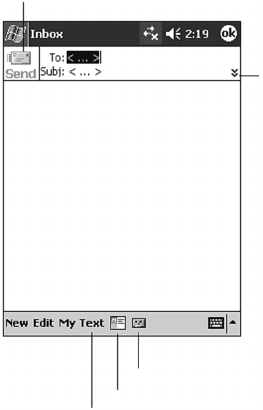
Tap to show or hide the complete header.
Tap to send the message.
Tap to show or hide the recording toolbar.
Tap to display the Address Book.
Tap to insert common (frequently used) messages.

ViewSonic V38r with Pocket PC OS 58 of 115
COMPANION PROGRAMS
This section tells you about Microsoft Pocket Word and Microsoft Pocket Excel.
Pocket Word
Microsoft Pocket Word works with Microsoft Word on your PC to give you easy
access to copies of your documents. You can create new documents on your V38r or
you can copy documents from your PC. IMPORTANT: Synchronize documents
between your PC and your V38r regularly so that you have the most up-to-date
content in both locations.
Using Pocket Word
1On the Start, tap Programs and then tap the Pocket Word icon.
2 Type the name of a document in the file list or tap New to open a blank
document.
To open a template rather than a blank document, select a template for new
documents. Tap on the Tools menu, tap Options, then browse to select the default
template. When you tap New, the template appears with appropriate text and
formatting already provided.
You can open only one document at a time; when you open a second document, you
will be asked to save the first. You can save a document you create or edit in a
variety of formats, including Pocket Word (.psw), Rich Text Format (.rtf), and Plain
Text (.txt).
You can enter information in Pocket Word in four modes: writing, drawing, typing,
and recording. Use the View menu to switch between modes. Each mode has its
own toolbar which you can show or hide by tapping the Show/Hide Toolbar button
on the Command bar.
•Typing Mode. Use the Input panel to enter typed text into the document with
the soft keyboard. For more information, see the section on “Entering
Information.”
•Writing Mode. In writing mode, use your stylus to write directly on the screen.
Ruled lines are displayed as a guide, and the zoom magnification is greater than
in typing mode to allow you to write more easily. For more information, see the
section on “Entering Information.” Written words are converted to graphics
(metafiles) when a Pocket Word document is converted to a Word document on
your PC.
ViewSonic V38r with Pocket PC OS 59 of 115
•Drawing mode. In drawing mode, use your stylus to draw on the screen.
Gridlines appear as a guide. When you lift your stylus off the screen after the
first stroke, you will see a drawing box indicating the boundaries of the drawing.
Every subsequent stroke within or touching the drawing box becomes part of
the drawing. For more information, see the section on “Entering Information.”
•Recording mode. Use recording mode to embed a recording into your
document. Recordings are saved as WAV files. For more information, see the
section on “Entering Information.”
Tips for working in Pocket Word
• You can change the zoom magnification by tapping View and then taping
Zoom. Then select the percentage you want. Select a higher percentage to
enter text and a lower one to see more of your document.
• If you are opening a Word document created on a PC, select Wrap to Window
on the View menu so that you can see the entire document.
ViewSonic V38r with Pocket PC OS 60 of 115
Pocket Excel
Microsoft Pocket Excel works with Microsoft Excel on your PC to give you easy
access to copies of your workbooks. You can create new workbooks in your V38r, or
you can copy workbooks from your PC to your V38r. Synchronize workbooks
between your PC and your V38r so that you have the most up-to-date content in
both locations. Pocket Excel provides fundamental spreadsheet tools, such as
formulas, functions, sorting, and filtering, which enable you to create simple
workbooks, such as expense reports and mileage logs.
On the Start menu, tap Programs and then tap the Pocket Excel icon > tap the
name of a workbook in the file list or tap New to open a blank workbook. You can
open only one workbook at a time; when you open a second workbook, you will be
asked to save the first. You can save a workbook you have created or edit in a
variety of formats, including Pocket Excel (.pxl) and Excel (.xls).
Tips for working in Pocket Excel
• View in full-screen mode to see as much of your worksheet as possible. Tap
View and then tap Full Screen. To exit full-screen mode, tap Restore.
• If your workbook contains sensitive information, you can protect it with a
password. To do so, open the workbook, tap Edit, and then tap Password.
• Show or hide window elements. Tap View, then tap the elements you want to
show or hide.
• Freeze panes on a worksheet. First, select the cell where you want to freeze
panes. Tap View and then tap Freeze Panes. You might want to freeze the top
and furthest left panes in a worksheet to keep row and column labels visible as
you scroll through a sheet.
• Split panes to view different areas of a large worksheet. Tap View and then tap
Split. Then drag the split bar to where you want it. To remove the split, tap
View and then tap Remove Split.
• Show and hide rows and columns. To hide a row or column, select a cell in the
row or column you want to hide, tap Format, tap Column, then tap Hide. To
show a hidden row or column, tap Tools, tap Go To, then type a reference that
is in the hidden row or column. Tap Format, then tap Row or Column, then tap
Unhide.
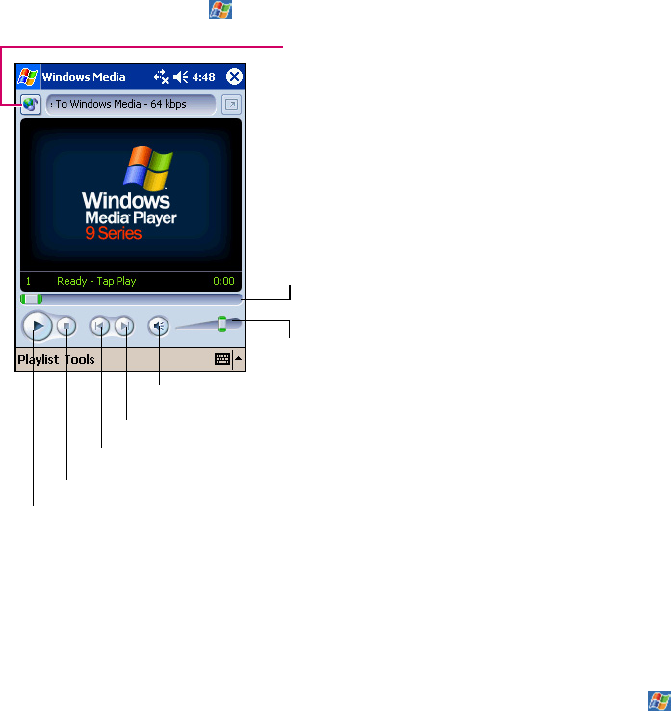
ViewSonic V38r with Pocket PC OS 61 of 115
Windows Media Player for Rugged Handheld
Use Microsoft Windows Media Player for V38r to play digital audio and video
files that are stored on your V38r or on a network. To switch to Windows Media
Player for V38r, tap and tap Windows Media.
Use Microsoft Windows Media Player on your PC to copy digital audio and video
files to your V38r. You can play Windows Media and MP3 files on your V38r.
For more information about using Windows Media Player, tap , then tap Help.
Tap to adjust the playback
progress of a selected file.
Tap to adjust volume.
Tap to play or pause.
Tap to stop.
Tap to skip to the next file.
Tap to play a previous file.
Tap to mute (temporarily silence) the audio.
Tap to display the
WindowsMedia.com website.

ViewSonic V38r with Pocket PC OS 62 of 115
Microsoft Reader
Use Microsoft Reader to read eBooks on your V38r. Download books to your PC
from your favorite eBook Web site. Use ActiveSync to copy the book files to your
activated V38r. The books appear in the Reader Library, where you can tap them in
the list to open them.
Before you can use Microsoft Reader, activate it from the Microsoft activation site
(http://das.microsoft.com/activate). Follow the directions given at the Microsoft
site.
Each book consists of a cover page, an optional table of contents, and the pages of
the book. You can:
• Page through the book by tapping the page number on each page.
• Annotate the book with highlighting, bookmarks, notes, and drawings.
• Search for text or look up definitions for words.
The Guidebook contains all the information you need to use the software. To open
the Guidebook, tap Help on the Reader command bar. Or, on a book page, press and
hold on the book title, and then tap Help on the pop-up menu.
To switch to Microsoft Reader, tap , tap Programs, then tap Microsoft Reader.
Getting books onto your V38r
You can download book files from the Web. Just visit your favorite eBook retailer and
follow the instructions to download the book files.
Sample books and a dictionary are also included in the MSReader folder on the
Companion CD.
Use ActiveSync to download the files from your PC to your activated V38r as
described in the Read Me file in the MSReader folder.
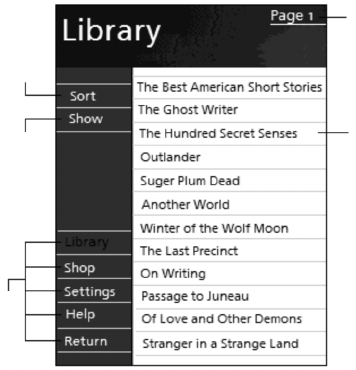
ViewSonic V38r with Pocket PC OS 63 of 115
Using the Library
The Library is your Reader home page. The home page displays a list of all books
stored on your V38r or storage card.
To open the Library:
• On the Reader command bar, tap Library.
• On a book page, tap the book title, and tap Library, on the pop-up menu.
To open a book, tap its title in the Library list.
Tap to scroll through the Library list
Tap to select a sort order
Tap to specify the books you
want to display in the list
Tap here to navigate to
other parts of the Reader
Tap to open a book
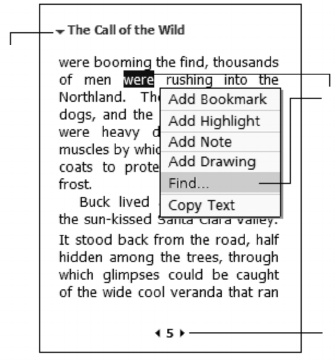
ViewSonic V38r with Pocket PC OS 64 of 115
Reading a book
Each book consists of a cover page, an optional table of contents, and the pages of
the book. Navigation options are listed in the bottom portion of the cover page.
The first time you open a book, you will probably want to go to the first page or to
the table of contents, if there is one. Subsequently, whenever you open the book,
you automatically go to the last page read.
In addition to the text, each book page includes a page number and book title.
Tap to select a
navigation
option. Drag to select
text and then
tap an option.
Tap arrows to turn
the page, or press
and hold page # to
bring up page title.
ViewSonic V38r with Pocket PC OS 65 of 115
Using reader features
Reading a book electronically gives you several options not available with paper
books. These options are available from any book page.
Select text by dragging across the text on the page. Then, tap an option on the pop-
up menu, as described here.
•Search for Text. Find text in a book by tapping Find on the pop-up menu.
Enter the word you want to search for, and tap the desired Find option. Reader
highlights found text on the page. To close Find, tap outside the box. To return
to your original page, tap the title, then tap Return on the pop-up menu.
•Copy Text. You can copy text from books that support this feature into any
program that accepts text. On a book page, select the text you want to copy.
Then, tap Copy Text on the pop-up menu. The text can be pasted into the
program of your choice.
•Bookmarks. When you add a bookmark to a book, a color-coded bookmark
icon appears in the right margin. You can add multiple bookmarks to a book.
Then, from anywhere in the book, tap the bookmark icon to go to the
bookmarked page.
•Highlights. When you highlight text, it appears with a colored background.
•Notes. When you attach a note to text, you enter the text in a note pad that
appears on top of the book page. A Note icon displays in the left margin. To
show or hide the note, tap the icon.
•Drawings. When you add a drawing, a Drawing icon appears in the bottom-left
corner of the page and drawing tools appear across the bottom of the page.
Draw by dragging your stylus.
To see a list of a book’s annotations, including bookmarks, highlights, text notes,
and drawings, tap Annotations Index on the book’s cover page. You can tap an
entry in the list to go to the annotated page.

ViewSonic V38r with Pocket PC OS 66 of 115
Removing a book
When you finish reading a book, you can delete it to conserve space on your V38r. If
a copy of the book is stored on your PC, you can download it again at any time.
To remove a book from your V38r, press and hold the title in the Library list, and
then tap Delete on the pop-up menu.
Other programs
The following programs are permanently installed in your V38r:
Program How to Access the Program
Infrared Receiver On the Start menu, tap Programs and then tap the Infrared Receiver
icon. Infrared Receive establishes the connection between your V38r and
the IR device.
Terminal Services On the Start menu, tap Programs and then tap the Terminal Services
icon. Terminal Services allows you to access the programs and documents
in a Windows NT server type PC that is running Terminal Services.
Backup To determine if your company has registered your device with the V38r
web service and has any software download ready for you, you can run
the RDMUpdate.exe file on your V38r. On the Start menu, tap Programs
and then tap the Backup icon. Backup enables you to back up all data
stored in the internal (RAM) memory on your V38r. For more information,
see section “Backing up Data” in this guide.
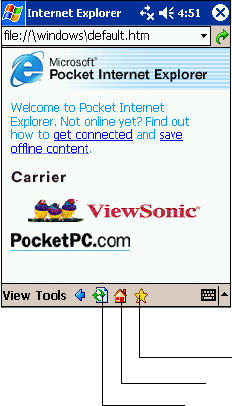
ViewSonic V38r with Pocket PC OS 67 of 115
POCKET INTERNET EXPLORER
This section tells you about Microsoft Pocket Internet Explorer, Mobile
Favorites Folder and AvantGo Channels.
Using Pocket Internet Explorer
Use Microsoft Pocket Internet Explorer to view Web pages by doing the
following:
• During synchronization with your PC, download your favorite links and mobile
favorites that are stored in the Mobile Favorites subfolder in Internet Explorer on
the PC.
To start Pocket Internet Explorer
•On the Start menu, tap Internet Explorer. The Pocket Internet Explorer
home page:
Favorites button
Home button
Refresh button
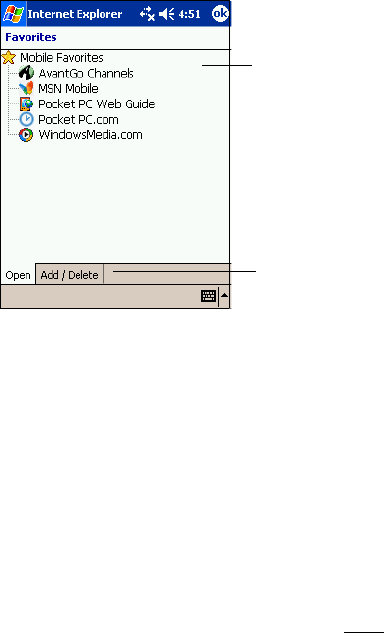
ViewSonic V38r with Pocket PC OS 68 of 115
Viewing Mobile Favorites and Channels
1Tap the Favorites button to display your list of favorites.
2 In the list, tap the page you want to view.
You will see the page that was downloaded the last time you synchronized with your
PC. If the page is not on your V38r, it will be dimmed in the Favorites list. You will
need to synchronize with your PC again to download the page to your V38r, or
connect to the Internet to view the page.
Browsing the Internet
To connect and start browsing, do one of the following:
•Tap the Favorites button, and then tap the favorite you want to view.
•Tap View, and then tap Address Bar. In the address bar that appears at the
top of the screen, enter the Web address you want to visit and then tap Go. Tap
the arrow to choose from previously entered addresses.
Tap the Favorite you want to view.
Tap to add or delete a
folder or Favorite link.
ViewSonic V38r with Pocket PC OS 69 of 115
The Mobile Favorites Folder
Only items stored in the Mobile Favorites subfolder in the Favorites folder in
Internet Explorer on your PC will be synchronized with your Rugged Handheld.
This folder is created automatically when you install ActiveSync.
Favorite links
During synchronization, the list of favorite links in the Mobile Favorites folder on
your PC is synchronized with Pocket Internet Explorer on your V38r. Both
computers are updated with changes made to either list each time you synchronize.
Unless you mark the favorite link as a mobile favorite, only the link (and not the
page) will be downloaded to your V38r, and connect to your ISP or network to view
the content. For more information on synchronization, see ActiveSync Help on
your PC.
Mobile Favorites
If you are using Microsoft Internet Explorer 5 or later on your PC, you can
download mobile favorites to your V38r. When you synchronize your PC and V38r,
the content of your mobile favorites is downloaded to your V38r so that you can
view pages while you are not connected to your ISP or your network.
Use the Internet Explorer plug-in installed with ActiveSync to create mobile
favorites quickly.
To create a mobile favorite:
1In Internet Explorer on your PC, tap Tools, tap Create.
To change the link name, enter a new name in the Name box.
To change how often the mobile favorite is updated, select a desired update
schedule under Update.
2Tap OK. Internet Explorer downloads the latest version of the page to your PC.
3 If you want to download the pages that are linked to the mobile favorite you just
created, tap the mobile favorite and then tap Properties. On the Download tab,
specify the number of links deep you want to download. To conserve memory on
your V38r, download only one level of links.
4 Synchronize your V38r and PC. Mobile favorites that are stored in the Mobile
Favorites folder in Internet Explorer are downloaded to your V38r.

ViewSonic V38r with Pocket PC OS 70 of 115
If you do not specify an updated schedule, manually download content to keep
the information updated on your PC and V38r. Before synchronizing in Internet
Explorer or your PC, tap Synchronize on the Tools menu. You will see the last
time content was downloaded to your PC, and you can manually download if
needed.You can add a button to the Internet Explorer toolbar for creating
mobile favorites. In Internet Explorer on your PC, on the View menu, tap
Toolbars, and tap Customize.
Conserving memory
Mobile favorites take up storage memory on your V38r. Follow these tips to
minimize the amount of memory used:
• Use ActiveSync settings to turn off pictures and sounds for the Mobile Favorites
information type or to stop some mobile favorites from being downloaded to
your V38r. For more information, see ActiveSync Help.
• Limit the number of downloaded linked pages. In Internet Explorer on the PC,
tap the mobile favorite you want to change, and then tap Properties. On the
Download tab, specify 0 or 1 for the number of linked pages you want to
download.
Using AvantGo channels
AvantGo is a free interactive service that gives you access to personalized content
and thousands of popular Web sites. You subscribe to AvantGo channels directly
from your V38r. Then you synchronize your V38r with your PC or connect to the
Internet to download the content. For more information, visit the AvantGo Web
site: http://www.avantgo.com/frontdoor/learn_more.html
To sign up for AvantGo:
1In ActiveSync options on the PC, turn on synchronization for the AvantGo
information type.
2In Pocket Internet Explorer on your V38r, tap the Favorites button to display
your list of favorites.
3Tap the AvantGo Channels link.
4Tap the Activate button.
5 Follow the directions on the screen. Synchronize your V38r with your PC, and tap
the My Channels button to complete the AvantGo setup.
When synchronization is complete, tap the AvantGo Channels link in your list of
favorites to see a few of the most popular channels. To add or remove channels,
tap the Add or Remove link.

ViewSonic V38r with Pocket PC OS 71 of 115
GETTING CONNECTED
This section explains how to connect your V38r to the Internet or to a network using
a wireless connection. This section also explains how to connect with other mobile
devices or to your PC using an infrared (IR) connection.
Connecting to a network or the Internet
You will need a Network Encryption key from your IT Administrator for this
procedure.
1Tap Start > Settings > System tab at the bottom of the screen > V38r Utility
> tap YES to enable the Wireless Card.
2 Wait for the list of wireless APs (Access Point) to appear. If you do not see the
AP that you want, tap Settings. Select the AP that is available.
3The Network Key screen appears. Enter the web encryption from your
Administrator. tap the Network Key tab.
4 Clear the box next to “The key is provided for me automatically.” Then, enter
your network key in the network key field.
5Tap OK at the top of the screen. Wait a few seconds till you see the
symbol at the top of the screen that looks like a beacon as shown on the
right to indicate the status. Also, notice the status bar at the bottom of
the screen.

ViewSonic V38r with Pocket PC OS 72 of 115
Using an infrared connection
An infrared (IR) connection will allow you use your V38r to exchange information
(such as contacts and appointments) with other mobile devices as well as your PC.
For more information, see the section on “Using Microsoft ActiveSync.”
Use the infrared (IR) port on the V38r to exchange (send/receive) files with another
mobile device.
Sending Information
1 Switch to the program in which you created the item you want to send, then
locate the item in the list.
2 Align the IR ports so that they are unobstructed and within a close range.
CAUTION: If the devices are too far apart or if something blocks the path
between the two ports, data might not be sent or received correctly.
3 Press and hold the item, then tap Beam Item on the pop-up menu.
You can also send items, but not folders, from File Explorer. Press and hold the
item you want to send, then tap Beam File on the pop-up menu.
Receiving Information
1 Align the IR ports so that they are unobstructed and within a close range.
2Tap , tap Programs, then tap Infrared Receive.
3 Have the owner of the other device send the information to you. Your V38r will
automatically receive it.
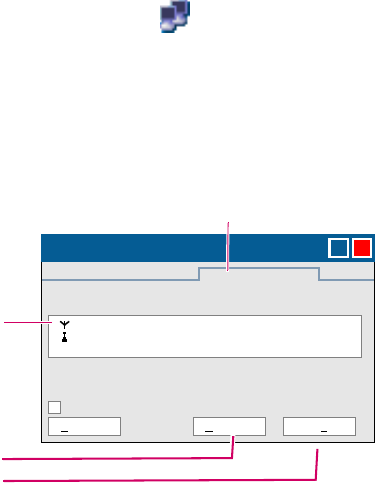
ViewSonic V38r with Pocket PC OS 73 of 115
Wireless connection information
To enable wireless, tap the Windows Start button > Settings > Control Panel >
tap the Wireless LAN On/Off icon with the antennae > check Turn Wi-Fi On >
OK double-tap the Nethood icon . The WLAGS46F1 information window opens
with the following three tabs:
•IP Information Tab - Displays current IP settings
•IPv6 Information Tab - Displays additional current settings
•Wireless Information Tab - Automatic IP address assignment
The Wireless Information window lists all Wi-Fi networks available to the V38r,
allowing you to choose a connection. It also allows you to alter and control
connections to available networks:
•Add New - opens the Wireless Network Properties window allowing you to
set up a new network and provides settings for network name, encryption type,
and authentication options.
•Advanced - Allows you to set a hierarchy of connections in order of preference.
Should one connection become unavailable, the device automatically cycles
down the list to the next connection on the list.
•View Log - opens the Wireless Network Log window which displays the
success or failure of the most recently made attempts to connect to available
networks.
IMPORTANT! If you are not thoroughly familiar with network types, you should
avoid making changes to your Advanced settings without first seeking assistance
from your IT Administrator.
Notify me when new wireless networks are available
WLAGS46F1
Wireless Information
Advanced
✔
OK
X
View Log...Connect
Signal Strength: High
Status: Connected to V38r
Select a network and press connect or tap for more
options. To add a new network, tap ‘Add New’.
Add New...
[V38r]
Wireless Information Tab
Add New
Advanced
View Log
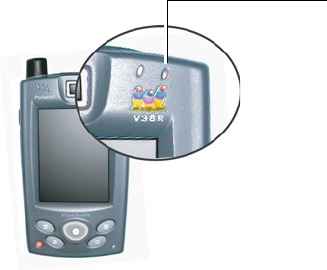
ViewSonic V38r with Pocket PC OS 74 of 115
Wireless connection signal status
The Antenna Status LED at the upper right corner of the V38r also displays useful
information on the wireless signal connection.
Wireless and network settings
The quality of your radio connection signal can be weakened by excessive distance
and by intervening materials such as walls and furnishings.
WLAGS46F1 manual settings
Tap Windows Start > Settings > Control Panel > Network and Dial-up
Connections. This panel allows you to assign IP server address and Domain Name
server address for your V38r.
Wireless Communication LED (antenna):
Green = active communication
(excellent signal level)
Yellow = good signal level
Blinking yellow = very low
Red = error
Off = no signal, no connection
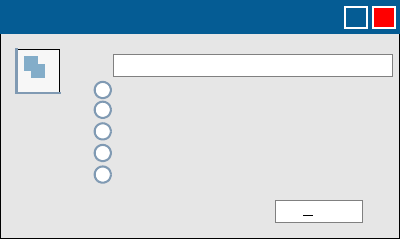
ViewSonic V38r with Pocket PC OS 75 of 115
VPN settings
To access VPN (Virtual Private Network) settings, tap the Windows Start button >
selecting Settings, Control Panel > Network > tap the Dial-up Connections
icon > make a new connection icon with add, name, and configure five types of
connection options to your V38r.
• Dial-up Connection - through modem (not currently supported)
• Direct Connection - through cable
• Virtual Private Network (PPTP) - through host or IP address
• Virtual Private Network (L2TP) - through host or IP address
• Virtual Private Network (PPPoE) - through host or IP address
Each connection type has options for Security and TCP/IP settings accessed by
taping the Next button. The Dial-up and Direct connections have additional options
for the configuration of port settings and connection preferences.
Dial-up Connection
Direct Connection
Virtual Private Connection (PPTP)
Next
My Connection
Make New Connection
OK
X
Virtual Private Connection (L2TP)
Virtual Private Connection (PPPoE)
ViewSonic V38r with Pocket PC OS 76 of 115
ISP Address Tab - Allows you to choose between an automatically set IP address
(DHCP) or a specified IP (user filled-in) address.
• Obtain an IP Address via DHCP - Prompts device to chose an automatically set
IP address (DHCP) rather than a specified IP (user filled-in) address.
• Specify an IP Address - Prompts the device to select the DNS server address
entered rather than relying on the network to automatically assign one.
Name (Domain) Servers Tab - DNS assignment, if DHCP is enabled
Primary/Secondary DNS - Allows you to enter DNS preferences.
Primary/Secondary WINS - Allows you to enter WINS preferences.
IMPORTANT: If you are not thoroughly familiar with IP and DNS settings, you
should avoid making changes here without first seeking assistance from your IT
Administrator.
Obtain an Address via DHCP
Specify an IP Address
IP Address
PC Card Network Settings
Subnet Mask
IP Address
Default Gateway
OK
X
Primary DNS
Secondary DNS
Primary WINS
Secondary WINS
PC Card Network Settings
Name Server
OK
X

ViewSonic V38r with Pocket PC OS 77 of 115
THE CAMERA
Availability depends on the model shipped.
This section shows how to download Active Sync to your PC and the camera
application to the V38r device followed by some of the camera features.
Requirements
•The V38r Camera application works on a ViewSonic V38r Rugged Handheld
running on Microsoft Windows with CE.NET and Pocket PC 2003 Second
Edition
• 1.9 MB free space for the camera application
WARNING: If you remove the battery, you loose the camera application. Reinstall
the backup files from the SD card which includes the camera application and the
backup software.
Install Active Sync & the camera application
This step synchronizes your PC with the V38r device.
1Put the ViewSonic Companion CD into the CD ROM
drive of your PC. The CD auto loads and a menu appears.
Select Active Sync.
2Install ActiveSync or browse the ViewSonic
Companion CD to the ActiveSync folder and tap
setup.exe. A message appears about the file
downloading.
Not enough free space? Close all programs > re-start
your PC > download again. Temporary files will be deleted automatically from
your hard drive when installation is complete.
Continued...
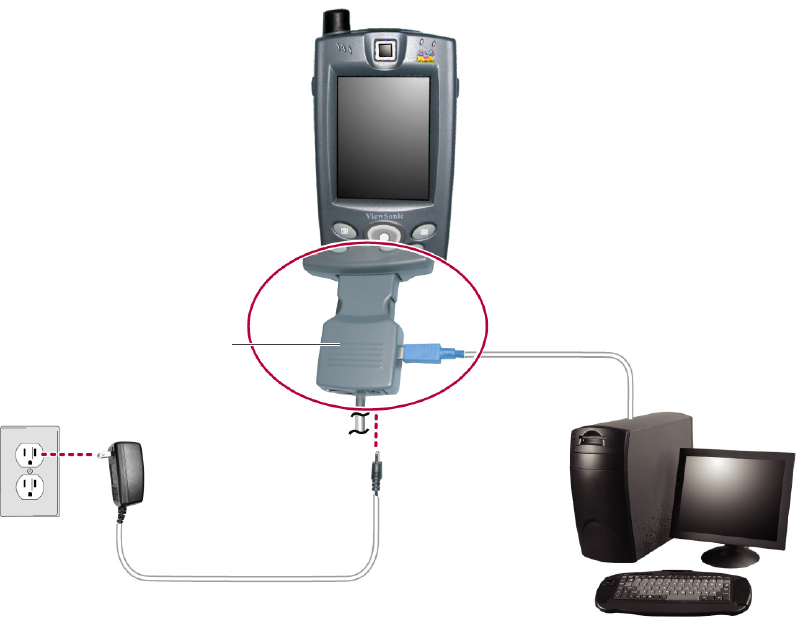
ViewSonic V38r with Pocket PC OS 78 of 115
3Turn the V38r OFF > connect the dongle that came in the package to the V38r >
connect a USB cable to the dongle and the other end to your PC.
4Turn the V38r power ON by pressing the power button. ActiveSync auto-detects
your V38r. The connection status appears. A New Relationship menu appears.
Select Guest > tap Next Step. A Connecting message appears. Follow the on-
screen instructions.
5Tap VS Cam.exe on the CD ROM or hard drive to install the camera application. A
message appears about the status of the installation > tap OK. The camera
application launches.
To un-install the camera application
Tap Windows Start > select Settings > Control Panel > Add or Remove
Programs. Wait for the list of programs to appear > select VS Cam > Remove.
AC power cord
Dongle
USB cable
PC Wired
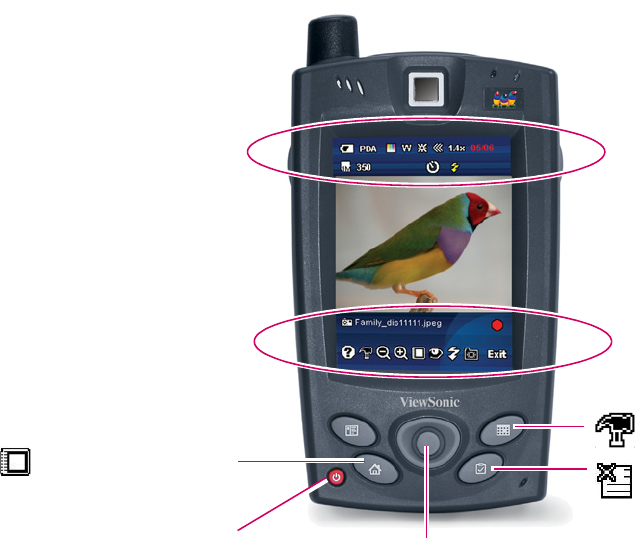
ViewSonic V38r with Pocket PC OS 79 of 115
Launch the camera application
If you just installed the camera application as shown on the previous page, the
application launches automatically. But, if you have turned the V38r off and want to
launch the camera application, tap Windows Start > Programs > VS Cam.
When the camera application launches, the buttons and the touch screen icons
function as shown below. Some icons are either functional or give useful information
like the status of the battery or the date.
For more information on the functions and status of the icons, see the next few
pages. The icons change depending on where you are in the camera application,
whether you are taking a picture, viewing images, or viewing images side-by-side.
Setup button
View Picture button
Status icons
Functional/Utility icons
Navigation Pad with joy stick to
cursor left/right or up/down, and
press to ENTER/select
Power button
Delete Picture(s) button
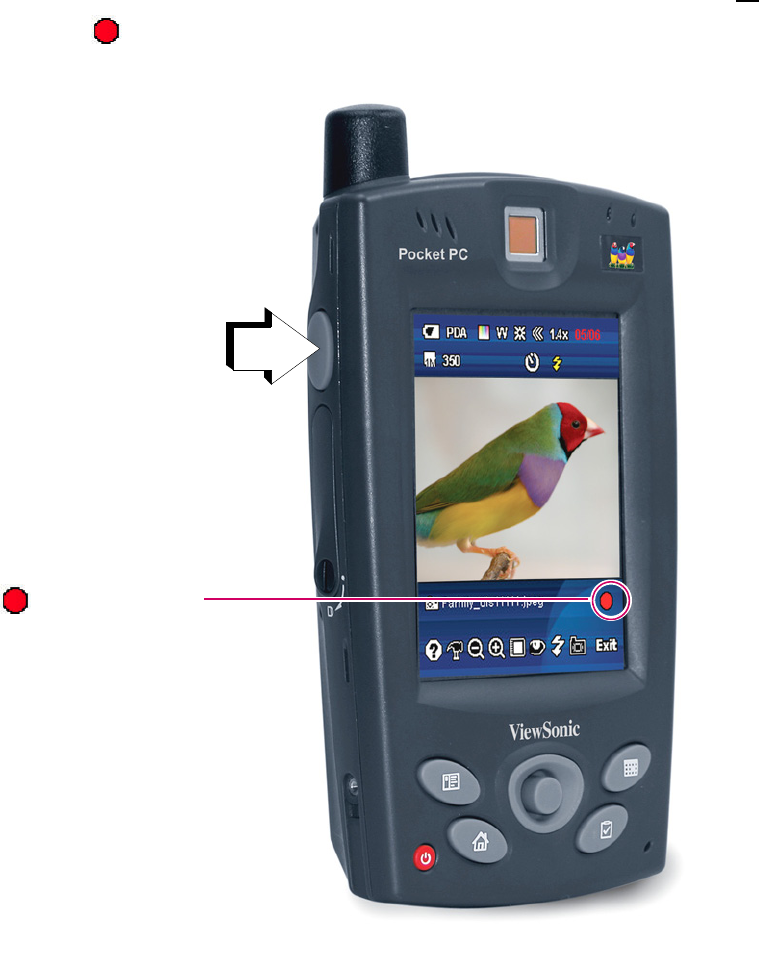
ViewSonic V38r with Pocket PC OS 80 of 115
Take a picture
Pictures are taken in the camera application only in PORTRAIT mode as shown
below. To take a picture, press the Shutter release button on the left side or tap
the red dot icon [ ] with the stylus.
Press this Shutter
release button, or
Tap the red dot
with the stylus
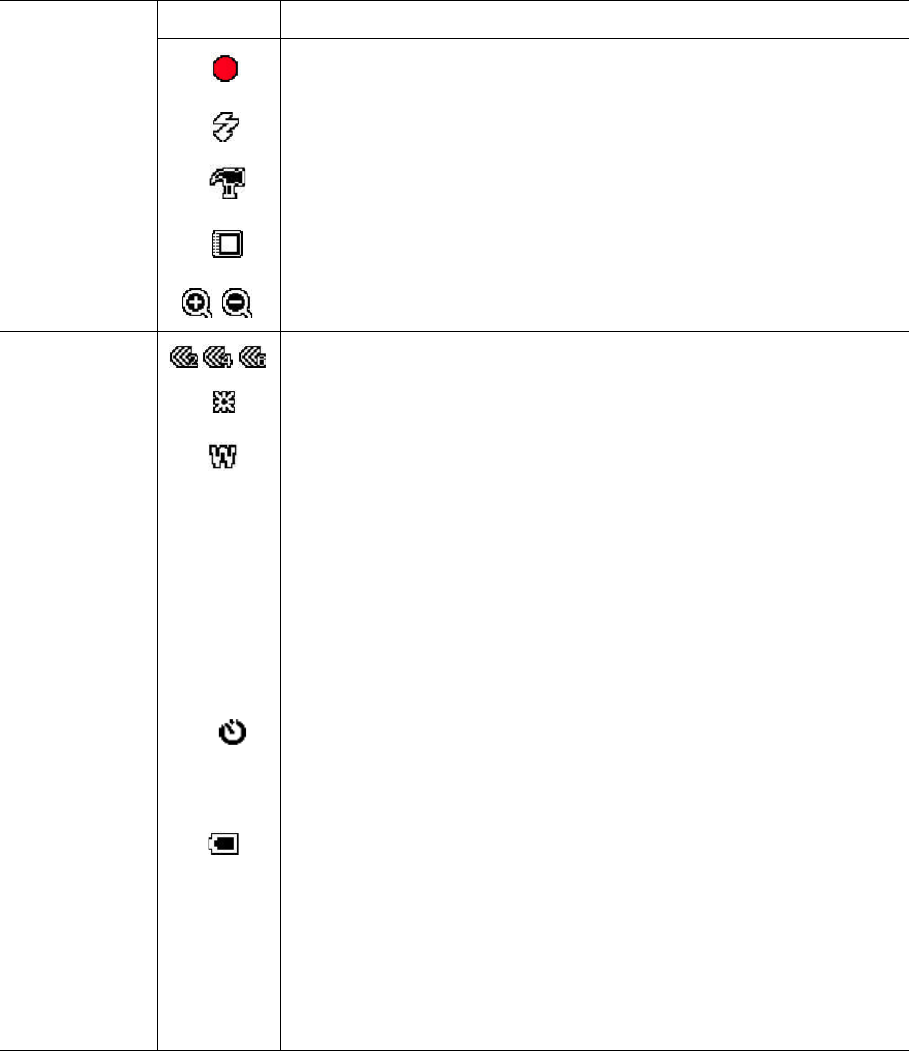
ViewSonic V38r with Pocket PC OS 81 of 115
Functions and status icons when TAKING A PICTURE
Functions
Icon Description
Press this icon to take a picture
Flash ON/OFF
Setup Mode. You can change settings in Setup Mode; for example,
switch between Left or Right Hand Mode.
View images
Zoom IN/OUT: Only at low resolution
Status
Continuous Shooting ON in Photo Mode
Brightness
White Balance
XGA
VGA
QVGA
QCIF
Picture resolution: default is 640 x 480
SD
PDA
USB
Storage capacity
Timer ON in Photo Mode
Date Default is MM-DD-YY+HH-Mm. Change format in Changing the
SETUP section of this guide
Battery
1.0x
1.2x
1.4x
1.6x
1.8x
2.0x
Zoom
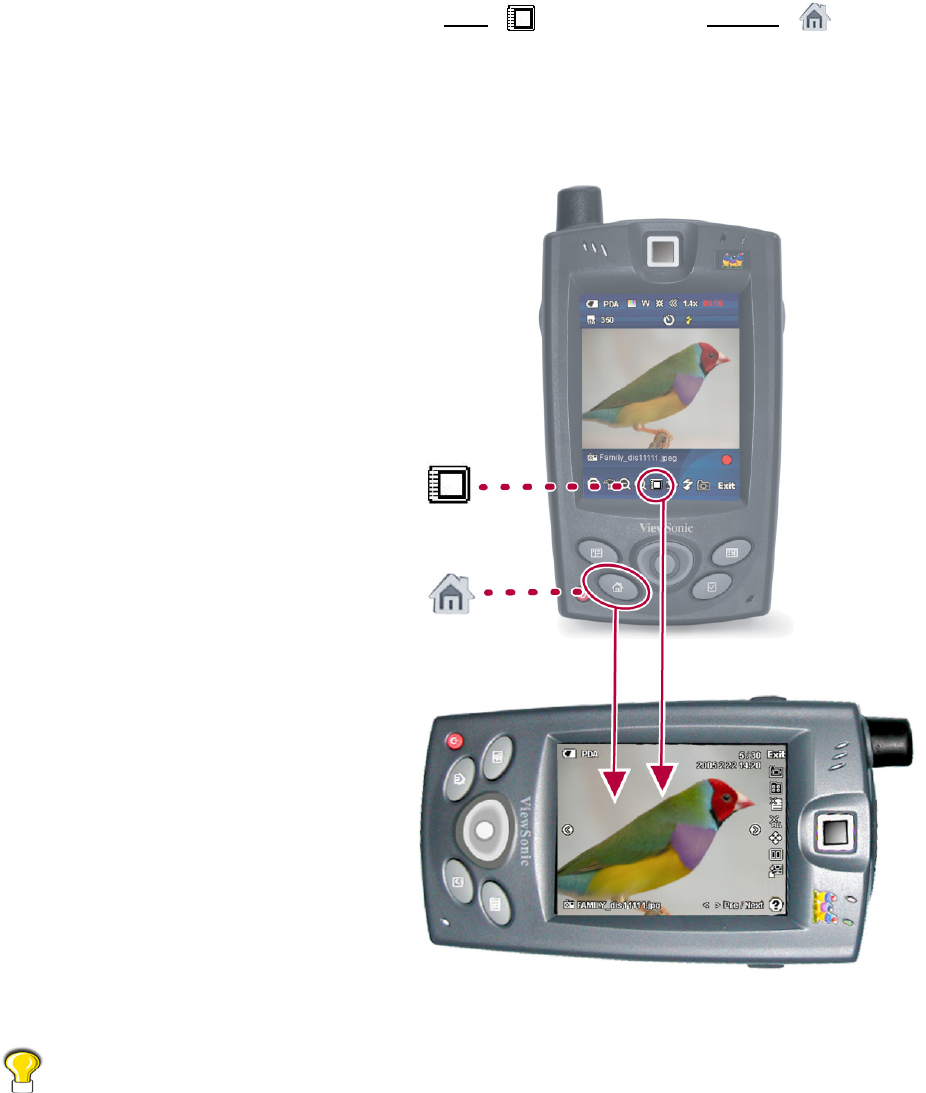
ViewSonic V38r with Pocket PC OS 82 of 115
View picture
To view pictures, tap the VIEW picture icon [] or the HOME button [ ]. In the
camera application, the HOME button changes functions to VIEW picture. The
V38r automatically goes to LANDSCAPE mode to view pictures.
Images are stored in the device’s memory by default. To change where the
images are stored, see the section on Changing the Setup.
PORTRAIT mode
LANDSCAPE mode
(view picture)

ViewSonic V38r with Pocket PC OS 83 of 115
To view the previous or next picture in the folder, tap the View Previous/Next
icon. For more information about the icons in View mode, see the table below.
Functions and status icons when VIEWING pictures
Functions
Icon Description
Back to Capture Mode
Browse pictures in other folders
Delete the picture on-screen. For more information, see Deleting the
picture(s) on the next page
Delete all pictures in current folder. For more information, see Deleting a
picture(s) on the next page
Zoom in/out
View pictures side-by-side. For more information, see the Side-By-Side section
in this guide
Save picture in low resolution: a pop-up menu appears > choose to save the file
in 640x480, 320x240, or 176x144. If the picture is already 640x480 (320x240)
or lower, this option is not be available
View previous picture in the current folder or press the left/right navigation
buttons
View next picture in the current folder or press the left/right navigation buttons
Status
Filename
nn/NN Picture order number/total number of pictures in folder
Date/Time/
Hour Time the picture was taken: i.e., 2005 6 1 14:20
View Previous
picture icon View Next picture icon
+
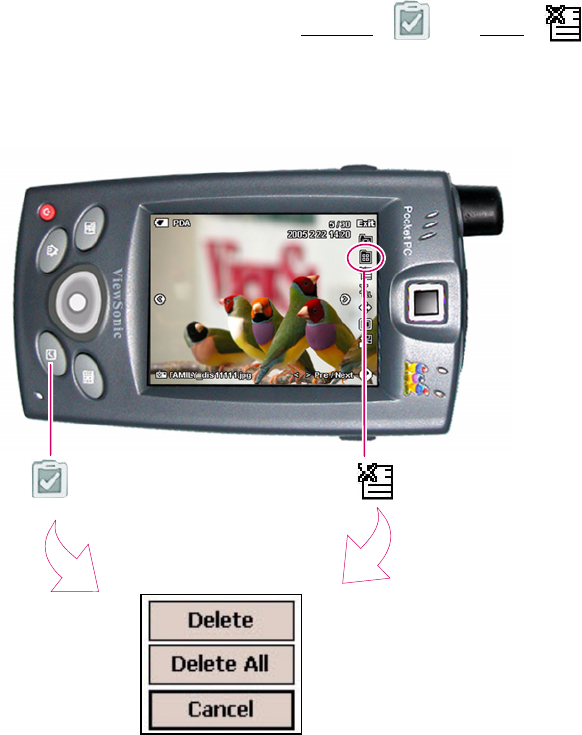
ViewSonic V38r with Pocket PC OS 84 of 115
Delete a picture(s)
To delete a picture(s), press the Delete picture button [ ] or icon [ ]. A menu
appears for you to make a selection.
Delete picture(s) button Delete picture(s) icon
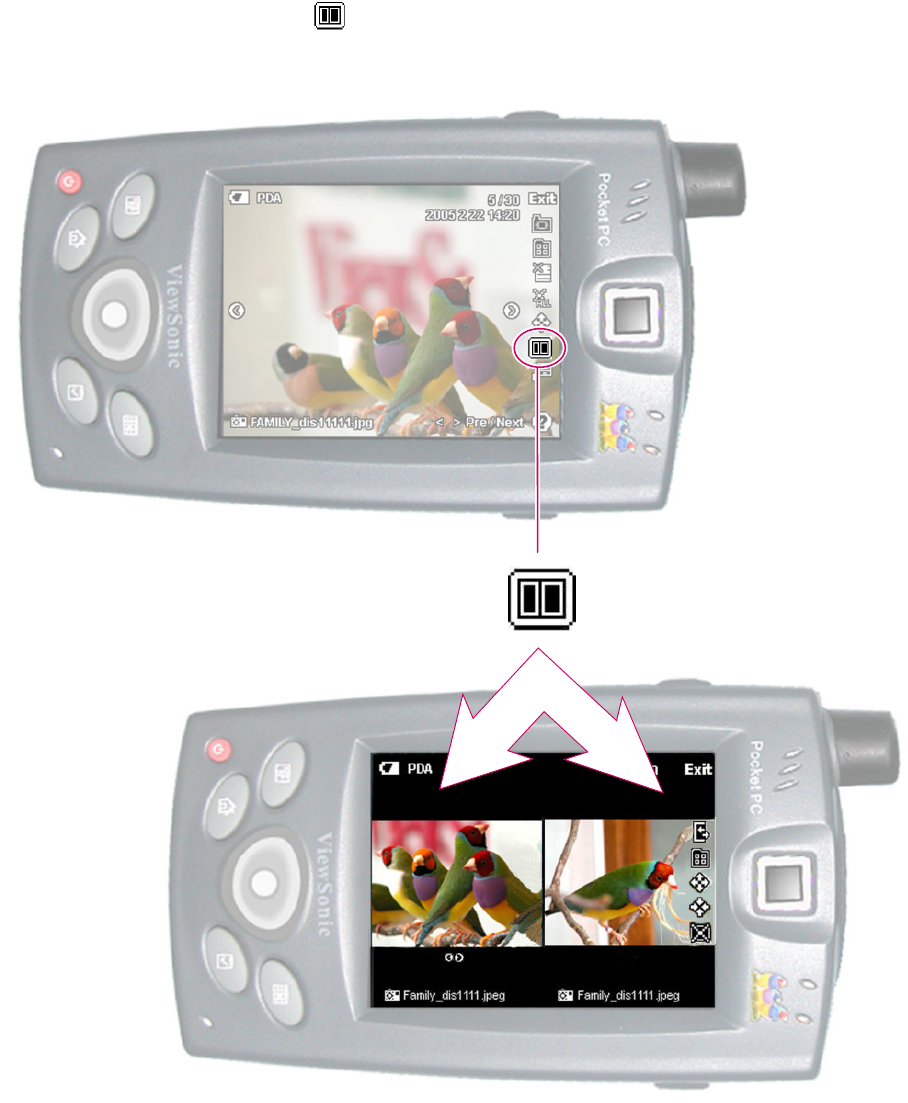
ViewSonic V38r with Pocket PC OS 85 of 115
View pictures side-by-side
Tap the Side-by-side icon [ ] to view two pictures on-screen.
Side-by-side icon
Two pictures side-by-side
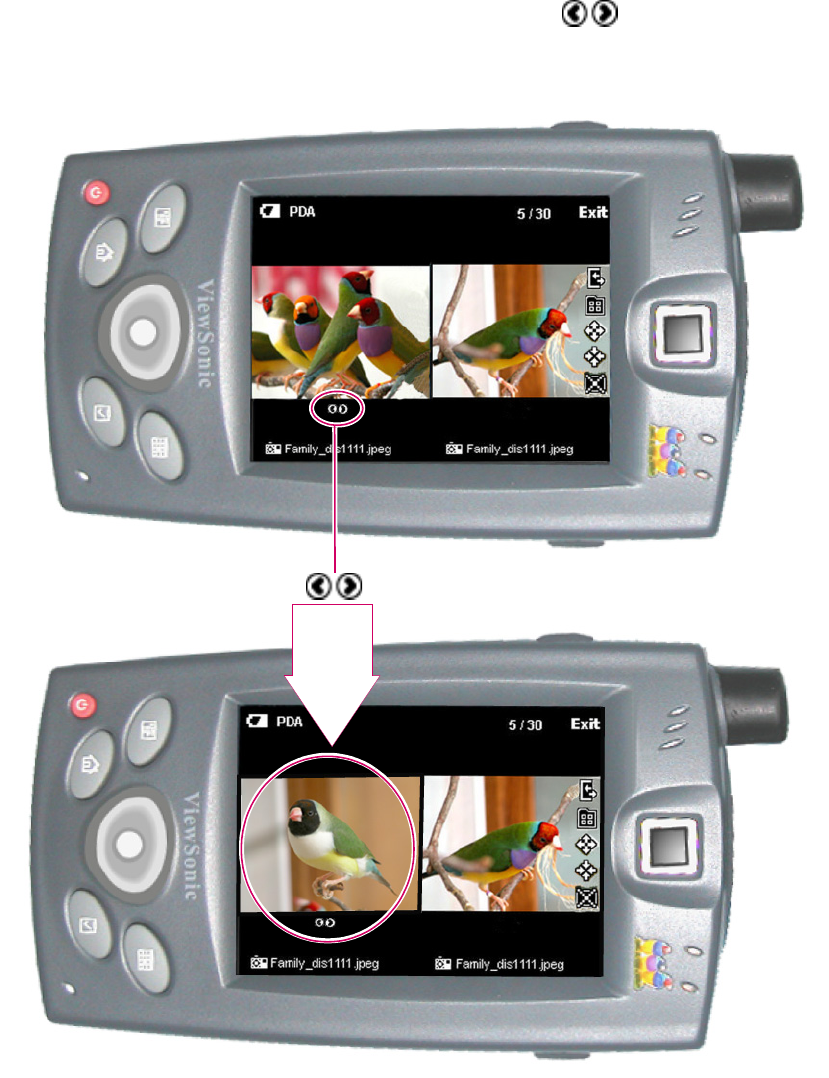
ViewSonic V38r with Pocket PC OS 86 of 115
Compare one picture with another
With two pictures side-by-side on-screen, you can compare one picture with another.
One picture remains stationary and the other goes to the Previous or Next picture
in the folder. Tap the Previous/Next picture icon [ ] under the picture on the
left side as shown below. The picture changes while the picture on the right side
remains stationary.
Previous/Next
picture icon
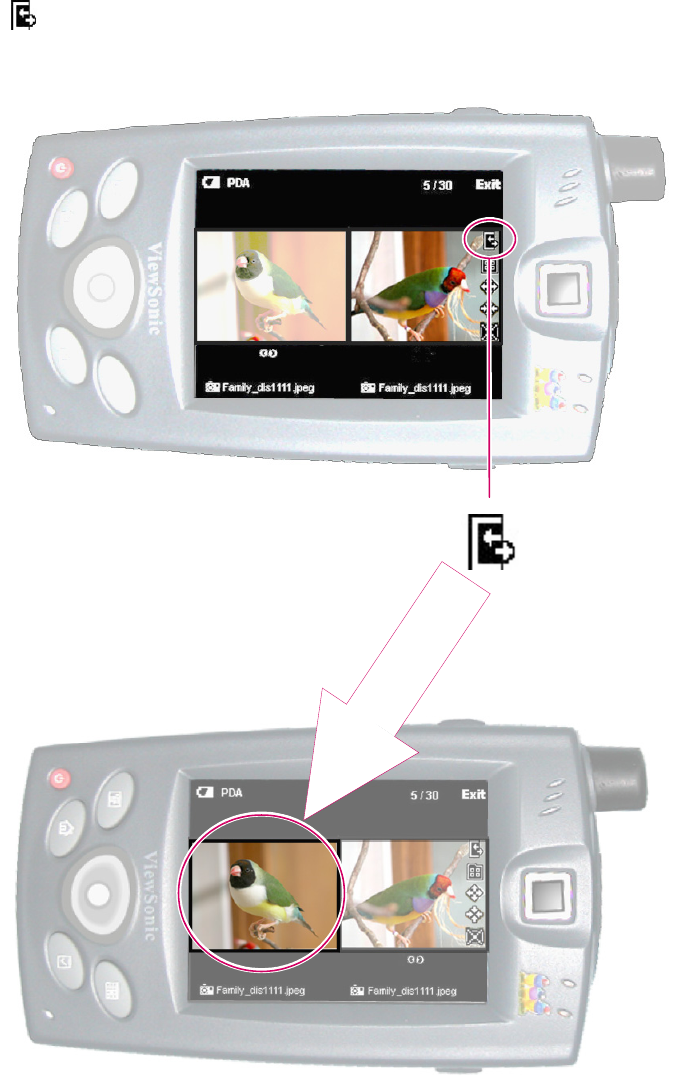
ViewSonic V38r with Pocket PC OS 87 of 115
Make the other side stationary
To switch the side that stays stationary, tap the Switch Window Controller icon
[ ]. The stationary picture switches over to the other side as shown below.
Switch Window Controller icon
LEFT side is
stationary
RIGHT side is
stationary

ViewSonic V38r with Pocket PC OS 88 of 115
Functions and status icons in SIDE-BY-SIDE mode
Functions
Icon Description
Switch Window Controller from one side of the screen to the other to
compare pictures in different folders. Default: sub window
Browse pictures in other folders
Expand image to view actual size. Press left/right, up/down, or drag the
picture with the stylus to move picture on-screen
Fit the image in the current window to the screen
Close side-by-side view
View Previous Picture in the current folder
View Next Picture in the current folder
Browse
Select a folder to browse
Browse images by list
Browse images by thumbnails (3x2)
OK to view the selected image
Exit Browse
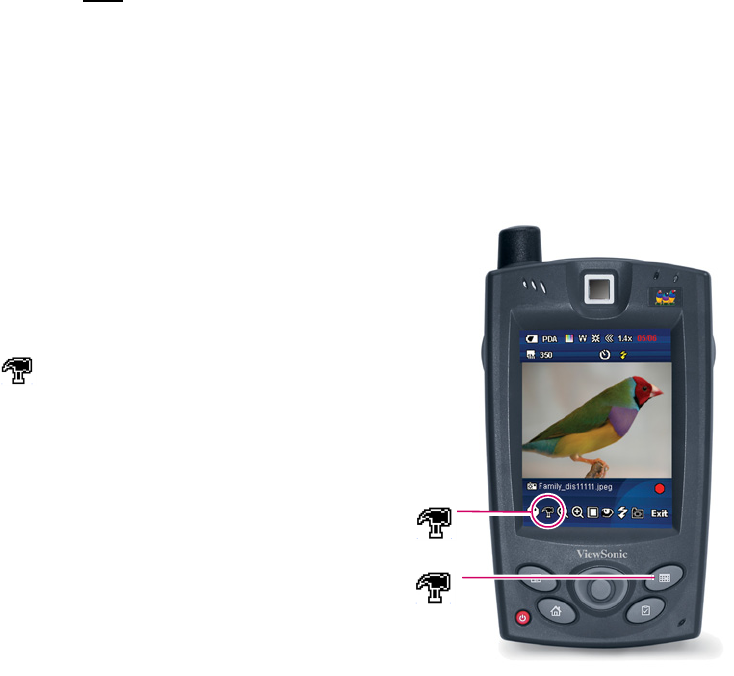
ViewSonic V38r with Pocket PC OS 89 of 115
Download pictures
To download pictures, do one of the following:
• Move pictures from the VS Cam folder to the SD memory card, or
•In ActiveSync mode, download pictures to a PC folder connected with a USB
cable.
Changing the camera setup
To change settings, press the Setup icon or
the Setup Button as shown on the right. A
menu appears where you can select Basic,
Advanced, or System settings.
The Setup Icon [ ] appears in the Camera
application but not in the Bar Code application.
Setup
button
Setup
icon

ViewSonic V38r with Pocket PC OS 90 of 115
Basic settings
Function Option Description Default
Continuous 1/ 2/ 4/ 6 The number of images taken per snap 1
Picture
Resolution
1024 x 768 XGA
640 x 480 VGA
320 x 240 QVGA
176 x 144 QCIF
In JPEG file format 640 x 480
Storage
SD
DEVICE
USB Memory Device
Secure Digital Memory Card
Built-in memory
External hard/memory disc
Device
memory
Shutter Sound Check box to Enable/
Disable Simulates the sound of pressing a
camera’s shutter release to take a picture ON
Timer Check box to Enable/
Disable
When Timer is enabled, the Timer icon
[ ] appears on-screen: when you press
the Snap Picture Button or the on-screen
icon, the Timer Icon blinks for 10 seconds
and then takes the picture
OFF
Flash ON/OFF OFF

ViewSonic V38r with Pocket PC OS 91 of 115
Advanced settings
Check the box to Enable or Disable file deleting from the camera (allow deleting
a file).
Function Option Description Default
Formats for
Date/ Time/ Hour/
Minutes
None
YY – MM – DD
MM – DD – YY
YY – MM – DD+HH – Mm
MM – DD – YY+HH – Mm
Time format MM – DD – YY+HH – Mm
On-screen location for
the Date/ Time/ Hour/
Minutes
Top Left
Top Right
Bottom Left
Bottom Right
Top Right
White Balance
Auto
Indoor Halogen
Indoor Office
Outdoor Sunny Cloudy
Outdoor Sunny Only
Outdoor Cloudy
Auto
Brightness
Darkest
Darker
Dark
Normal
Brighter
Brightest
Auto
Zoom
1.0x
1.2x
1.4x
1.6x
1.8x
2.0x
Only zoom in
lower
resolution 1.0x
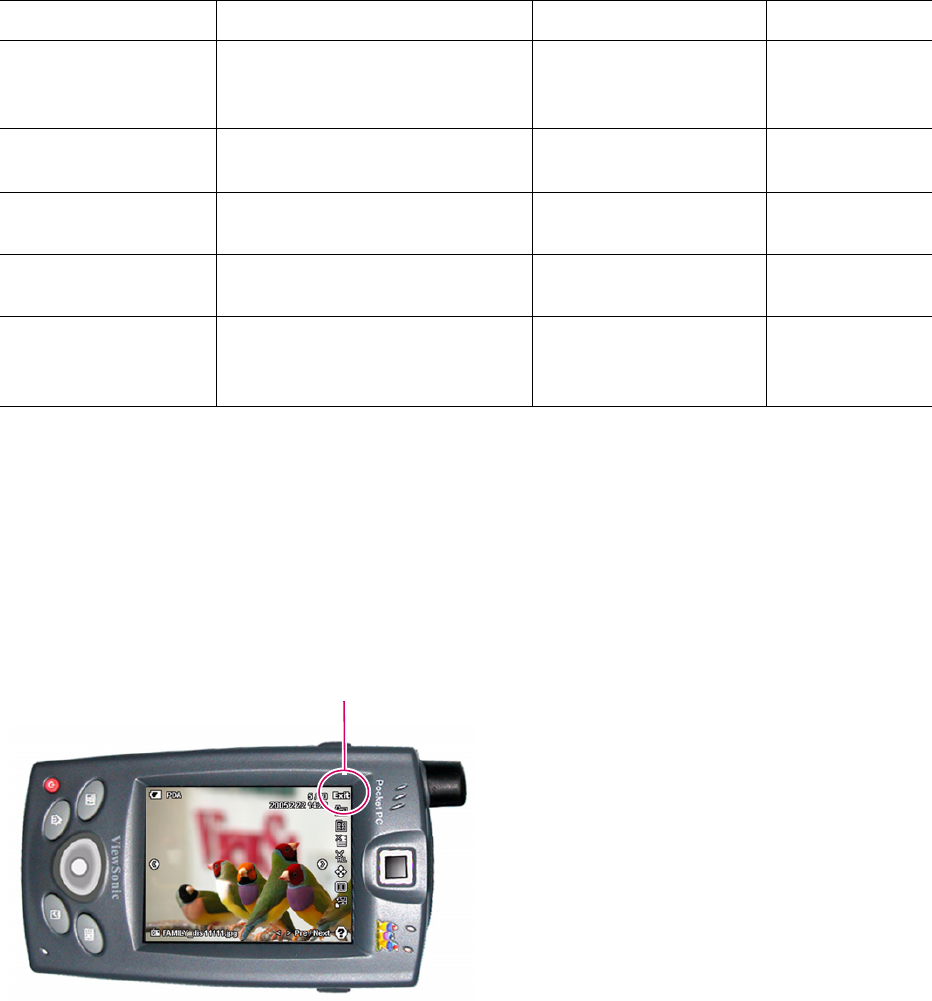
ViewSonic V38r with Pocket PC OS 92 of 115
System settings
Exit the camera application
Tap EXIT on-screen to exit the camera.
Function Option Description Default
Operation Mode Portrait (Right Handed ONLY)
Landscape (Right or Left
Handed)
Camera rotates to use
with right or left hand Left Handed
Flicker Control 50Hz
60Hz 60Hz
Default Value Tap on Default Value to return
settings to factory defaults
S/W Version Version Camera software
version
About Product Information ViewSonic
Copyright
Software version
EXIT camera
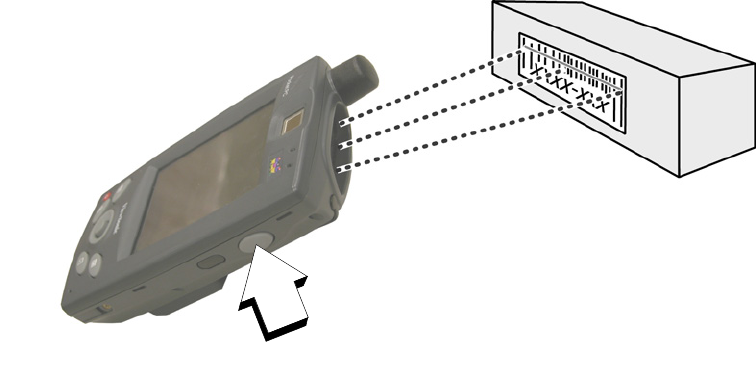
ViewSonic V38r with Pocket PC OS 93 of 115
BAR CODE SCAN
Scan a bar code
1 Open MS Word or Excel (tap Windows Start > Programs > MS Word or
Excel) Open a New Document.
2Point the V38r four to five inches from the bar code and press the scan button on
the right side. The bar code number appears in the display and beeps. You’re
done scanning!
Adding different bar code formats
To add an additional bar code format to the V38r for scanning, your administrator
should assist you with this process. Point the V38r bar code scanner at one of the
following bar codes.
Scan button on
right side of device
4 ~ 5 inches
Bar code scanner
(depending on model) 1 D CCD. In
Scan mode, point the top of the
device at a bar code & press the
Scan Bar Code button

ViewSonic V38r with Pocket PC OS 94 of 115
1 Reset factory defaults (optional)
2 Select baud rate (* default value)
\46\42\60
1200
\41\04\60
2400
\41\05\60
4800
\41\06\60
9600
\41\07\60
19200 (*)
\41\08\60
38400
\41\09\60

ViewSonic V38r with Pocket PC OS 95 of 115
3 Select data bits
4 Select parity
7
\42\60
8 (*)
\43\60
even
\46\01\60
odd
\46\02\60
none (*)
\46\00\60
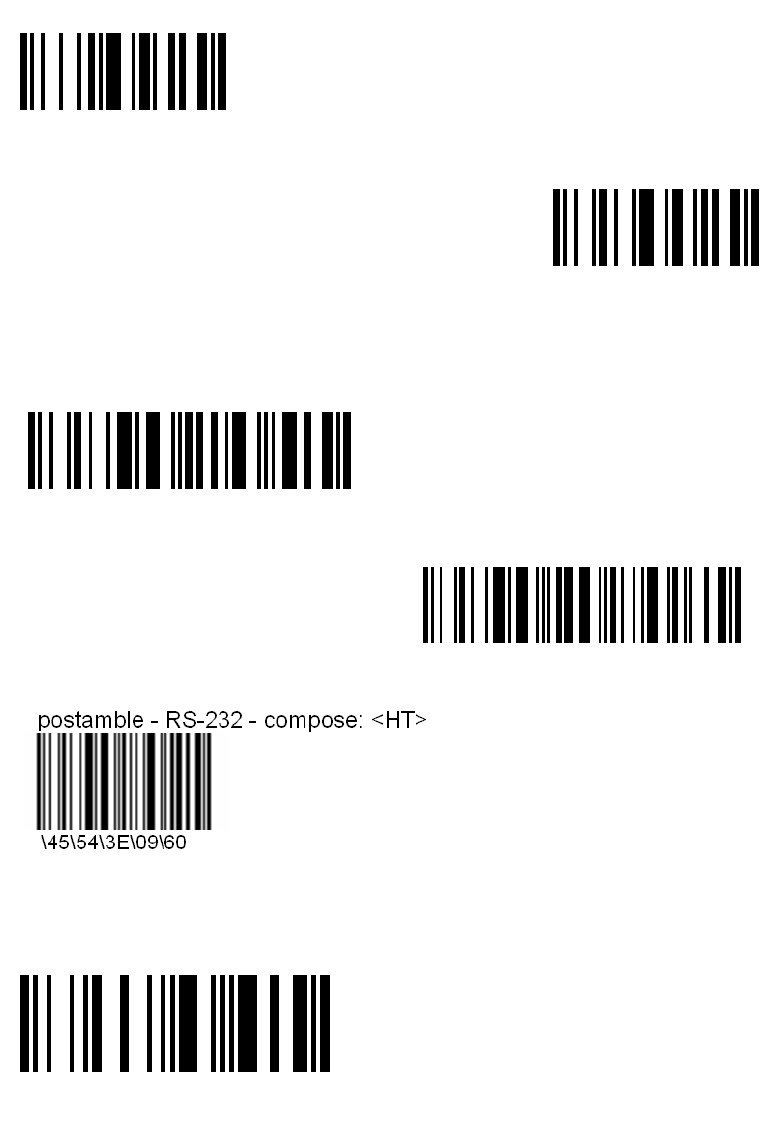
ViewSonic V38r with Pocket PC OS 96 of 115
5 Select stop bits
6 Select postamble
7 Disable all symbologies
1 (*)
\44\60
2
\45\60
none
\45\54\3E\00\60
Carriage Return + Line Feed (*)
\45\54\3E\0D\3E\0A\60
\41\4B\60

ViewSonic V38r with Pocket PC OS 97 of 115
8 Select symbologies
Code 39 (*)
\41\4C\60
Code 128 / EAN 128
\41\5A\60
\41\4E\60
\41\50\60
(UPC-A ➜ EAN-13)
UPC-A, UPC-E, EAN-8, EAN-13
(UPC-A ➜ UPC-A)
Codabar (minimum length=6)
\41\52\60
Interleaved 2 of 5
(minimum length=6)
Standard 2 of 5
(minimum length=6)
EAN-13 (*)
UPC-A, UPC-E, EAN-8,
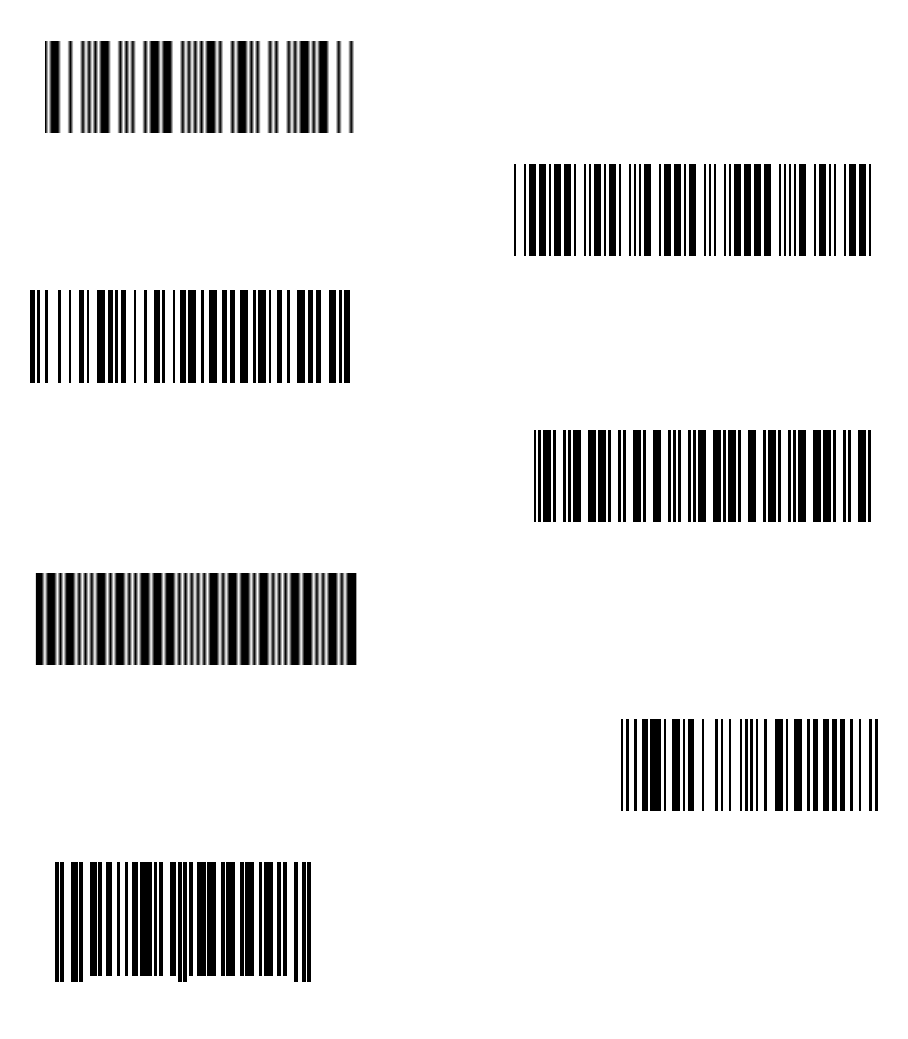
ViewSonic V38r with Pocket PC OS 98 of 115
9 Test symbologies
Code 39
CODE 39
Code 128
CODE 128 Interleaved 2 of 5
12345678901234
Standard 2 of 5
123456
EAN-13
1234567890128
UPC-A
0
01234 50000
7
Codabar
123456

ViewSonic V38r with Pocket PC OS 99 of 115
TROUBLESHOOTING & MAINTENANCE
This section gives solutions to common V38r problems you may encounter when
using the device and guidelines for taking care of your V38r. If you encounter a
problem that you cannot solve, contact your reseller or ViewSonic Customer
Support. See the “Customer Support” section for contact information.
Reset the V38r
Warm reset – do this first!
A Warm reset may be required on rare occasions if your V38r completely locks up.
To do a Warm reset, press and hold both the POWER and the HOME buttons down
for four (4) seconds. This should unlock the device. If not, do a Cold reset.
Cold reset
If the Warm reset did not work and your V38r locks up or fails to respond to the
stylus, do a Cold reset as follows: press and hold the POWER button down for 15
seconds to reset the device to factory settings.
WARNING!
all customization in SDRAM (files, programs,
and settings) will be lost with a Cold reset. As a precaution,
make sure the backup battery switch is in the ON position,
then drag any changed files that you want to protect to the
V38r’s Permanent Storage folder before removing the
battery.
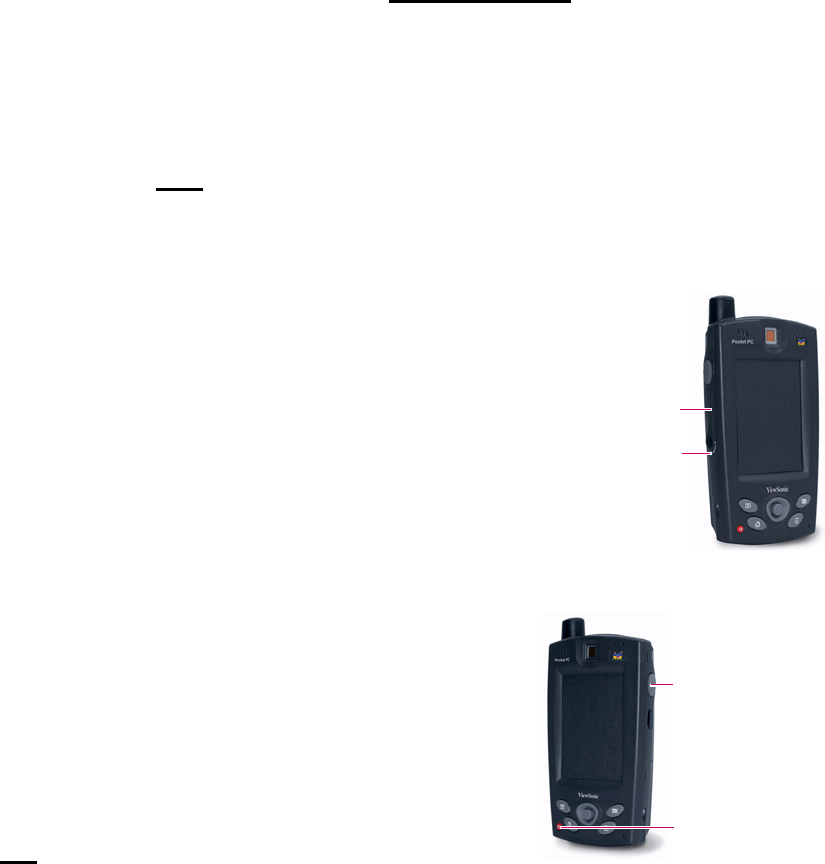
ViewSonic V38r with Pocket PC OS 100 of 115
Firmware image upgrade
From time to time, ViewSonic may offer a firmware image upgrade for the V38r.
For current information, visit our web site at viewsonic.com or check with your IT
Administrator. You need access to the Internet on your PC in order to download new
firmware.
1 Before upgrading to a new firmware image, save all your data to your storage
device.
2VERY IMPORTANT! Slide the backup battery switch that is in the battery
compartment to the OFF position. Remove all power connections (AC and
battery).
3 Format the SD Memory Card to FAT16. Copy the firmware image (NK.bin) onto
the SD Memory Card.
4 Loosen the screw to the SD slot cover shown on the
right. Slide the SD card carefully into the slot on the
side of the V38r until the card snaps into place.
CAUTION: Make sure the card is turned correctly
before sliding the card into the slot. The card should
have an arrow saying which side is up and which end
goes in first. Do not force the card in or out. It should
be easy to slide in or out.
5 Connect the AC power to the device WITHOUT
turning on the power.
6 Press and hold down the button as shown on the
right.
7 Press and release the power button to turn the device
ON and let the new image be installed. Wait for the
message saying the installation is “DONE.”
8 To remove the SD card, push the card inwards until
the card pops out.
9VERY IMPORTANT! Slide the backup battery switch
to the ON position before using the device.
SD slot cover
Screw to
release SD
slot cover
Button on the
right side (Step 6)
Power button

ViewSonic V38r with Pocket PC OS 101 of 115
Power problems
Power does not turn on when using battery power
The remaining battery power may be too low to run your V38r. Connect the AC
adapter to your V38r and to external AC power. Then, turn on your V38r. (Charge
the battery whenever possible to avoid running out of battery power and thus
loosing data.)
Battery runs out of power quickly
You might be using your V38r in ways that drain power quickly. For more
information, see the section “Managing Power” in this guide for tips on saving power.
Memory problems
If a warning message of not enough memory appears due to a memory allocation
problem, try the following to free memory on your V38r.
CAUTION: Be discreet when you delete files. Deleting files of which the function is
unknown can cause programs or features to malfunction. It is recommended that
you create a backup before deleting files.
• Delete files you no longer need. Tap , Programs, and then File Explorer.
Press and hold the file you wish to delete, then tap Delete on the pop-up menu.
To find your largest files, tap then Find. In the Type list, tap Larger than
64KB, then tap Go.
• Remove programs you no longer need. Tap , and then Settings. Tap System
tab, then tap Remove Programs. Tap the program you want to remove then
tap Remove.
• In Internet Explorer options, delete all files then clear history. In Internet
Explorer, tap Tools then Options. Tap Delete Files then Clear History.
• If you are copying files from a computer or other device to your V38r, try
adjusting the slider in the Memory setting. Tap then Settings. Tap System
tab, then tap Memory. Check to see if you can manually move the slider before
copying files.
Stop programs you are not currently using. In most cases, programs automatically
stop to free needed memory. However, in some situations, such as when
confirmation dialog boxes are waiting for a user response, the program may not be
able to automatically stop. To check the state of your active programs, tap then
Settings. Tap System tab, tap Memory, then Running Programs. Tap the
program you want to view and tap Activate. Close any open windows or messages
and return the program to list view. If this does not work, you can stop the program

ViewSonic V38r with Pocket PC OS 102 of 115
manually. First, make sure that your work is saved by closing open items and return
the program to list view. Then, stop the program by tapping Stop or Stop All on the
Running Programs tab.
Reset your V38r as described earlier in this section.
If you have an SD card, move data to the SD card as follows:
Tap , Programs, then File Explorer. Press and hold the file you want to move,
then tap Cut. Browse to My Documents folder in the SD card folder, tap Edit, then
Paste. Files stored in folders other than My Documents or stored in subfolders
within subfolders in My Documents may not show up in the list view of some
programs. When using Notes, Pocket Word, or Pocket Excel, you can also move files
by opening the item then tapping Tools or Edit then Rename/Move.
Files stored in folders other than My Documents or stored in subfolders within
subfolders in My Documents may not show up in the list view of some programs.
When using Notes, Pocket Word, or Pocket Excel, you can also move files by opening
the item then tapping Tools or Edit then Rename/Move.

ViewSonic V38r with Pocket PC OS 103 of 115
Screen problems
Screen is off
If the screen does not respond, even after you press the power button, try the
following until the problem is solved:
1 Connect the AC adapter to your V38r and to external AC power, then
2Reset your V38r as described in “Resetting Your V38r” earlier in this section.
Screen responds slowly
Make sure that your V38r is not running out of battery power or running many
active programs. If the problem still exists, reset your V38r as described in
“Resetting Your V38r” earlier in this section.
Screen freezes
Reset your V38r as described in “Resetting Your V38r” earlier in this section.
Screen is hard to read
• Make sure that the backlight of the display is on.
• Move to a location with enough light.
• If you are having a hard time reading a document on the screen, try adjusting
the zoom percentage or text size.
-In Notes, tap Tools, then select a zoom percentage.
-In Pocket Word and Pocket Excel, tap View, tap Zoom, then select a zoom
Percentage.
-In Pocket Internet Explorer, tap View, tap Text Size, then select a size.
-In Calendar, Contacts, and Tasks, tap Tools, tap Options, then select Use
large font.
Inaccurate response to stylus taps
Realign the touch screen. Tap Start > Settings > System tab > Align Screen.
If you cannot realign the touch screen, turn off the V38r. Press the power button to
turn on the V38r. You should now be able to start the touch screen alignment
process.
ViewSonic V38r with Pocket PC OS 104 of 115
Device connection problems
USB dock/cradle connection problems
• Make sure that you installed the correct version of ActiveSync on your desktop
PC. Install the version ActiveSync included with your V38r.
• Make sure that your V38r and your desktop PC are turned on.
• Make sure that you do not have any other active connections.
• When using the USB cradle, make sure that your V38r is properly seated.
• Make sure that the cable is securely plugged into the USB port on your desktop
PC. Connect the USB cable directly to your desktop PC — do not run the cable
through a USB hub.
• Make sure that the USB connection is enabled in ActiveSync on your desktop PC.
If the USB connection is already enabled, disable the USB connection, close the
Connection Settings window, and then reopen and re-enable the USB
connection.
• Reset your V38r before connecting the USB cable. (See “Resetting Your V38r”
earlier in this section.) Always disconnect your V38r before you restart your
desktop PC.
• Connect only one V38r or personal digital assistant to your desktop PC at
atime.

ViewSonic V38r with Pocket PC OS 105 of 115
Infrared connection problems
• Transfer only one file, or no more than 25 contact cards, at a time.
• Position the IR ports so that they line up at a distance less than 20 cm (8
inches) but more than 5 cm (2 inches) apart.
• Make sure that there are no obstacles between the two IR ports.
• Adjust the room lighting. Some types of light interfere with IR communications.
Try moving to a different location or turning off some lights.
Care and maintenance
Taking good care of your V38r ensures trouble-free operation and reduces the risk
of damage to your V38r.
General guidelines
• Keep your V38r away from excessive moisture and extreme temperatures.
• Avoid exposing your V38r to direct sunlight or strong ultraviolet light for
extended periods of time.
• Do not place anything on top of your V38r as this may damage the display.
•Do not drop your V38r.
•Store your V38r in a protective case when not in use.
• The screen surface is easily scratched. Use only the stylus to tap on the screen.
Avoid touching the screen with your fingers, pens, or pencils.
To clean the screen
1 Make sure the V38r is turned off.
2 Never use paper towels to clean the screen.
3 Never spray or pour any liquid directly onto the screen or case.
4 Never immerse the V38r in any liquid.
5 Use a soft, lint-free cloth moistened with water to remove dust and other
particles off the screen and the exterior of the V38r.
6 If still not clean, apply a small amount of non-ammonia, non-alcohol based glass
cleaner onto a clean, soft, lint-free cloth, and wipe the screen.
Disclaimer: ViewSonic® does not recommend using any ammonia or alcohol-based
cleaners on the V38r screen or case. Some chemical cleaners have been reported to
damage the screen and/or case of the device. Doing so may void the warranty and
ViewSonic will not be liable for damage resulting from using any ammonia or
alcohol-based cleaners.

ViewSonic V38r with Pocket PC OS 106 of 115
Travel guidelines
• Before traveling with your V38r, back up your data. As an added precaution,
bring along a backup copy.
• Turn off your V38r and disconnect all external devices.
• Make sure that the battery is fully charged.
• Take the AC adapter with you. Use the AC adapter as the power source and as a
battery-recharger.
•Hand-carry your V38r in a protective case.
• Consult the airlines first before using your V38r on the plane. You need to be
very careful when using electronic devices during the flight.
• If you plan to travel abroad with your V38r, consult your dealer for the
appropriate AC adapter for use in your country of destination.
Customer support
For Customer Support contact information, see the V38r Rugged Handheld User
Guide on the ViewSonic Companion CD. You will need the product’s serial number
on hand when you call. Before sending the V38r out for service, be sure to back up
all data and remove all third party software. See the Data Loss Disclaimer in the
Appendix.
Wireless products disclaimer
The actual data throughput rate is controlled by several factors including but not
limited to the following: (1) network conditions (volume of network traffic, network
overhead, etc.) and (2) environmental factors (power surge, building materials, and
construction, etc.).
Country/Region Website
(for email address also)
T = Telephone
F = FAX
United States www.viewsonic.com T: (800) 688-6688
F: (909) 468-1202
Canada www.viewsonic.com T: (800) 688-6688
F: (909) 468-1202
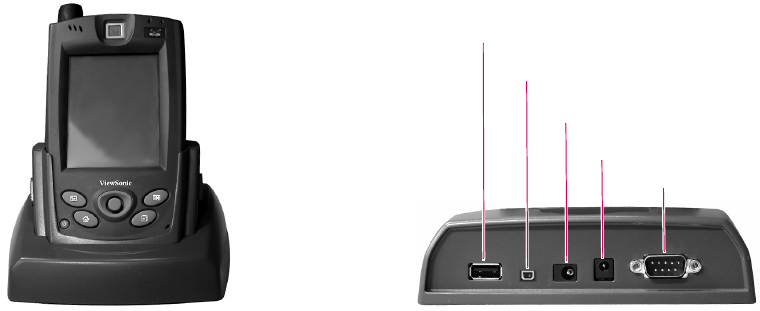
ViewSonic V38r with Pocket PC OS 107 of 115
APPENDIX
Optional accessories
The following optional accessories will be available from ViewSonic:
• Cradle with battery charging and communication
• Car adapter
• Extended battery with extended back cover
• Dongle with communication and AC power
•Belt clip
• Hand strap
The cradle: the optional V38r cradle easily connects to the ports shown below. The
cradle can be used to charge, recharge, and/or operate your V38r. For more
information, see the Battery Power and Properties section of this guide.
IMPORTANT: Remove any cable or dongle connected to the V38r and place the
V38r in the cradle.
External USB keyboard and mouse: You can attach a USB external keyboard or
mouse that is commercially available to the cradle’s USB-A port or the
communication dongle.
Serial communication
Multi-pack charging
AC power
USB Mini-B
USB-A
V38r mounted in the cradle Back of cradle

ViewSonic V38r with Pocket PC OS 108 of 115
Safety guidelines
CAUTION: The socket-outlet should be installed near the equipment and be easily
accessible.
CAUTION: Use a power cable that is properly grounded. Always use the appropriate
AC cord that is certified for the individual country. Some examples are listed below:
IMPORTANT NOTICE CONCERNING POWER CORD SELECTION: The
power cord set for this unit has been enclosed and has been
selected according to the country of destination and must be used
to prevent electric shock.
For the United States and Canada: In the United States and Canada the male plug is
NEMA5-15 style (shown above), UL Listed, and CSA Labeled. For units which are
mounted on a desk or table, type SVT or SJT cord sets may be used. For units which
sit on the floor, only SJT type cord sets may be used. The cord set must be selected
according to the current rating for your unit. Please consult the table below for the
selection criteria for power cords used in the United States and Canada.
USA UL
Canada CSA
Germany VDE
Switzerland SEV
Britain BASE/BS
Japan Electric Appliance Control Act
Cord Type Size of Conductors in Cord Maximum Current Rating
of Unit
SJT
18 AWG
16 AWG
14 AWG
10 Amps
12 Amps
12 Amps
SVT 18 AWG
17 AWG
10 Amps
12 Amps

ViewSonic V38r with Pocket PC OS 109 of 115
For European countries
In Europe you must use a cord set which is appropriate for the receptacles in your
country. The cord set is HAR-Certified, and a special mark that will appear on the
outer sheath, or on the insulation of one of the inner conductors.
AC PLUG CORD PRECAUTIONS FOR THE UNITED KINGDOM
FOR YOUR SAFETY PLEASE READ THE FOLLOWING TEXT CAREFULLY.
IF THE FITTED MOULDED PLUG IS UNSUITABLE FOR THE SOCKET OUTLET THEN
THE PLUG SHOULD BE CUT OFF AND DISPOSED OF SAFELY. THERE IS A DANGER OF
SEVERE ELECTRICAL SHOCK IF THE CUT OFF PLUG IS INSERTED INTO AN
APPROPRIATE SOCKET.
If a new plug is to be fitted, please observe the wiring code as shown below. If in
any doubt, please consult a qualified electrician.
WARNING: THIS APPLIANCE MUST BE EARTHED.
IMPORTANT: The wires in this mains lead are coloured in accordance with the
following code:
• Green-and-Yellow: Earth
•Blue: Neutral
•Brown: Live
If the coloured wires of the mains lead of this appliance do not correspond with the
coloured markings identifying the terminals in your plug, proceed as follows:
The wire which is coloured GREEN-AND-YELLOW must be connected to the terminal
in the plug which is marked by the letter E or by the Earth symbol or coloured
GREEN or GREEN-AND-YELLOW.
The wire which is coloured BLUE must be connected to the terminal in the plug which
is marked with the letter N or coloured BLACK. The wire which is coloured BROWN
must be connected to the terminal in the plug which is marked with the letter L or
coloured RED.
If you have any questions concerning which proper power cord to use, please
consult with the dealer from whom you have purchased the product.
ViewSonic V38r with Pocket PC OS 110 of 115
Compliance and safety notices
Radio frequency interference (RFI) compliance
United States compliance notice
This equipment has been tested and found to comply with the limits for a Class B
digital device, pursuant to Part 15 of the Federal Communications Commission (FCC)
Rules. These limits are designed to provide reasonable protection against harmful
interference in a residential installation. This equipment generates, uses, and can
radiate radio frequency energy and, if not installed and used in accordance with the
instructions, may cause harmful interference to radio communications. However,
there is no guarantee that interference will not occur in a particular installation. If
this equipment does cause harmful interference to radio or television reception,
which can be determined by turning the equipment off and on, the user is
encouraged to try to correct the interference by one or more of the following
measures:
• Reorient or relocate the receiving antenna.
• Increase the separation between the equipment and the receiver.
• Connect the equipment into an outlet on a circuit different from that to which
the receiver is connected.
• Consult the dealer or an experienced radio or television technician for help.
CAUTION: The Part 15 radio device operates on a non-interference basis with other
devices operating at its frequency. Any changes or modification to said product not
expressly approved could void the user’s authority to operate this device.
FCC Caution: Any changes or modifications not expressly approved by the party
responsible for compliance could void the user's authority to operate this equipment.
This device complies with Part 15 of the FCC Rules. Operation is subject to the
following two conditions: (1) This device may not cause harmful interference, and
(2) this device must accept any interference received, including interference that
may cause undesired operation.
The antenna(s) used for this transmitter must not be co-located or operating in
conjunction with any other antenna or transmitter.
IMPORTANT NOTE: FCC Radiation Exposure Statement:
This equipment complies with FCC radiation exposure limits set forth for an
uncontrolled environment. This equipment should be installed and operated with
minimum distance 1.5cm between the radiator & your body.

ViewSonic V38r with Pocket PC OS 111 of 115
Proper operation of this radio according to the instructions found in this user’s guide
will result in user exposure that is substantially below the FCC recommended limits.
• Do not touch or move antenna while the unit is transmitting or receiving.
• Do not hold any component containing the radio such that the antenna is very
close or touching any exposed parts of the body, especially the face or eyes,
while transmitting.
• Do not operate a portable transmitter near unshielded blasting caps or in an
explosive environment unless it is a type especially qualified for such use.
• Do not operate the radio or attempt to transmit data unless the antenna is
connected: if not, the radio may be damaged.
Canadian compliance notice
English: This digital apparatus does not exceed the Canada ICES-003 Class B limits
for radio noise emissions from digital apparatus as set out in the radio interference
regulations of the Canadian Department of Communications.
French: Le present appareil numerique nemet pas de bruits radioelectriques
depassant les limites applicables aux appareils numeriques de Canada ICES-003
Class B prescrites dans le reglement sur le brouillage radioelectrique edicte par le
Ministere des Communications du Canada.
European compliance notice
Products with the CE Marking comply with both the EMC Directive (89/
336/EEC) and the Low Voltage Directive (73/23/EEC) issued by the
Commission of the European Community.
Compliance with these directives implies conformity to the following European
Norms:
• EN55022 (CISPR 22) Radio Frequency Interference
• EN55024 (IEC61000-4-2, -4-4, -4-5, -4-6, -4-11)
• EN60950 (IEC950) Product Safety
Industry Canada Statement
"This device has been designed to operate with the antennas listed below,
and having a maximum gain of 3.21 dBi. Antennas not included in this list or
having a gain greater than 3.21 dBi are strictly prohibited for use with this device.
The required antenna impedance is 50 ohms."
"Operation is subject to the following two conditions: (1) this device may not
cause interference, and (2) this device must accept any interference, including
interference that may cause undesired operation of the device."
"To reduce potential radio interference to other users, the antenna type
and its gain should be so chosen that the equivalent isotropically radiated
power (e.i.r.p.) is not more than that permitted for successful communication."
ViewSonic V38r with Pocket PC OS 112 of 115
Battery safety notice
• The battery pack is intended for use only with this device.
• Do not disassemble the pack.
• Do not dispose of the battery pack in fire or water.
• To avoid risk of fire, burns, or damage to your battery pack, do not allow a metal
object to touch the battery contacts.
• Handle a damaged or leaking battery with extreme care. If you come in contact
with the electrolyte, wash the exposed area with soap and water. If it contacts
the eye, flush the eye with water for 15 minutes and seek medical attention.
• Do not charge the battery pack if the ambient temperature exceeds 113 degrees
Fahrenheit (45 degrees Celsius).
• To obtain a replacement battery, contact your local dealer.
• Do not expose the battery pack to high storage temperatures (above 140
degrees Fahrenheit, 60 degrees Celsius).
• When discarding a battery pack, contact your local waste disposal provider
regarding local restrictions on the disposal or recycling of batteries.
Lithium battery notice
The V38r has two batteries: one is under the back cover which you can replace
yourself but the other is inside the device itself. DO NOT ATTEMPT TO REMOVE THE
INTERNAL BATTERY as this will void the warranty.
There is also danger of explosion if the device is not used, handled, or disposed of
correctly, or if the batteries are replaced incorrectly. Replace batteries only with the
same or equivalent type battery as recommended in the Battery and power
properties section of this guide. Discard used batteries according to the
manufacturer’s instructions or local laws.
Power supply safety notice
The power supply provided with this device is for use with this device only. Replace
only with the same or equivalent type power supply as recommended by the
manufacturer.
ViewSonic V38r with Pocket PC OS 113 of 115
Infrared LED safety notice
If this device contains an infrared networking or peripheral connection capability, or
if one is added to the device, the following precautions are recommended:
• Do not attempt to view the infrared LED beam with any type of optical device.
• Do not attempt to make any adjustment of the unit.
• If the unit requires service, contact an authorized service center.
• Avoid direct eye exposure to the infrared LED beam. Be aware that the beam is
invisible light that cannot be seen.
Mercury warning
This product contains mercury. Dispose of in accordance to local, state and federal
laws.
Data loss disclaimer
Before sending the V38r out for service, be sure to backup all data and remove all
third party software.
With respect to all service provided, it is your responsibility to backup the contents
of your V38r, including any data you have stored or software you have installed on
the V38r. It is likely that the contents of your V38r will be lost in the course of
service and ViewSonic will not be responsible for any damage to or loss of any
programs, data or other information stored on any media or any part of any Product
serviced hereunder.
IF DURING THE REPAIR OF THE PRODUCT THE CONTENTS OF THE V38r ARE
ALTERED, DELETED, OR IN ANY WAY MODIFIED, VIEWSONIC IS NOT RESPONSIBLE
WHATSOEVER. YOUR PRODUCT WILL BE RETURNED TO YOU CONFIGURED AS
ORIGINALLY PURCHASED (SUBJECT TO AVAILABILITY OF SOFTWARE).
Be sure to remove all third party hardware, software, features, parts, options,
alterations, and attachments not warranted by ViewSonic prior to sending the
product to ViewSonic for service. ViewSonic is not liable for any loss or damage to
these items.

ViewSonic V38r with Pocket PC OS 114 of 115
Specifications
THE V38r
DEVICE
Processor Intel® Bulverde® 416MHz CPU with 64MB flash
OS Microsoft® Windows® PPC2003 (included)
Memory 64MB SDRAM (128MB SDRAM depending on model)
Display 240x320 transflective TFT panel, 256K colors (3.5” diagonal)
Contrast Ratio: 5:1 (B/L off); 80:1 (B/L on); Brightness: Typical 90 nits (with touch panel)
Touch Screen
4-wire resistive type, Hardness: 3H
Punch life: 1M cycles with 250g force, 2 times/sec
Stroke life: 100K cycles with 250g force, repeat 1 inch
1.3 Megapixel camera
Picture formats
F Number
Output Format
SXGA, VGA, QVGA, CIF, QCIF
2.8
YUV, Raw RGB data
SD Memory Slot User accessible SD slot on the left side of unit
Dimensions 145mm (L) x 83mm (W) x 32mm (H)
Weight <500g including battery pack and standard expansion hatch cover, excluding Scanner
engine and WWAN solution
Communication IrDA (SIR 115 kbps)
Wireless
Communication
WLAN 802.11b/g (Wi-Fi Compliant), BT (BQB certification)
Integrated Antenna For WLAN
Standard battery 3.7V, 1800mAhr removal battery pack. Up to 3 hours life (depending on use and
configuration), 2000mAh (fast charging), 14.8V (nominal voltage)
Extended battery (opt’l) 3.7V, 3600mAhr removable battery pack. Over 8 hours operation with full WLAN
Power Consumption System operating, 400mW, LCD maximum brightness, 460mW
WLAN/Bluetooth module, Continuous Transmit 1.0829W, Continuous Received 643mW
Environment Operation -10° F to 104° (-10° C to 55° C), 10% to 85%
non-condensing humidity, 0 - 3,000 meters
Storage -4° F to 140° F (-20° C to 75° C), 10% to 85%
non-condensing humidity, 0 to 12,000 meters
Bar code scanner 1-D Imager 1-D CCD Image engine
Symbologies UPC (E&A), EAN, Code 11, Code 39, Code 128,
UCC EAN 128, ISBN, ISBT, Interleaved, Matrix,
Industrial and Standard 2 of 5, Codabar, Code 93,
MSI, Plessey, Telepen
Basic Software Internet Explorer
Windows Explorer
Media Player
MS WordPad
Solitaire
Microsoft File Viewers
MS Excel Viewer
MS Image Viewer
MS PDF Viewer
MS Word Viewer
Windows PPC2003
Microsoft ActiveSync
Microsoft Inbox
Regulatory Approvals FCC, UL, Radio Country Approvals, US/Canada
ACCESSORY Dongle Power connector with one USB-A port, one mini USB port, Serial RS232 port
Cradle Supports USB, and one serial RS232 port
OPTIONAL
Echo cancelling option
Fingerprint (depending
on model)
Hardware echo cancelling for VoIP
Supports AuthenTec® AES3400 SDK fingerprint program (optional) available at
ViewSonic® (instructions come with the SDK)
ViewSonic V38r with Pocket PC OS 115 of 115
Limited Warranty
RUGGED HANDHELD PRODUCTS
What the warranty covers:
ViewSonic® warrants its Rugged Handheld products to be free from defects in material and workmanship during the
warranty period. If a Rugged Handheld product proves to be defective in material or workmanship during the warranty
period, ViewSonic will, at its sole option, repair or replace the product with a like product. Replacement product or
parts may include remanufactured or refurbished parts or components. ViewSonic provides no warranty for the third
party software included with the product. For specific warranty information, please see the EULAs included with the
product. ViewSonic does not warrant that software will meet your requirements or that operation of software will be
uninterrupted or error free. VIEWSONIC AND ITS SUPPLIERS DISCLAIM ALL WARRANTIES AND CONDITIONS, EITHER EXPRESS OR IMPLIED,
INCLUDING, BUT NOT LIMITED TO, IMPLIED WARRANTIES OF MERCHANTABILITY, FITNESS FOR A PARTICULAR PURPOSE, AND NONINFRINGEMENT.
How long the warranty is effective:*
ViewSonic Rugged Handhelds are warranted for one (1) year for all parts (except software) and one (1) year for all
labor from the date of the first consumer purchase.
Who the warranty protects:
This warranty is valid only for the first consumer purchaser.
What the warranty does not cover:
1. Software
2. Any product on which the serial number has been defaced, modified or removed.
3. Damage, deterioration or malfunction resulting from:
a. Accident, misuse, neglect, fire, water, lightning, or other acts of nature, unauthorized product modification, or fail-
ure to follow instructions supplied with the product.
b. Repair or attempted repair by anyone not authorized by ViewSonic.
c. Damage to or loss of any programs, data or removable storage media.
d. Software or data loss occurring during repair or replacement.
e. Any damage of the product due to shipment.
f. Removal or installation of the product.
g. Causes external to the product, such as electrical power fluctuations or failure.
h. Use of supplies or parts not meeting ViewSonic's specifications.
i. Normal wear and tear.
j. Any other cause which does not relate to a product defect.
4. Removal, installation, and set-up service charges.
How to get service:
1. For information about receiving service under warranty, contact ViewSonic Customer Support. You will need to
provide your product's serial number.
2. To obtain service under warranty, you will be required to provide (a) the original dated sales slip, (b) your name, (c)
your address, (d) a description of the problem, and (e) the serial number of the product.
3. Take or ship the product freight prepaid in the original container to an authorized ViewSonic service center or ViewSonic.
4. For additional information or the name of the nearest ViewSonic service center, contact ViewSonic.
Limitation of implied warranties:
THERE ARE NO WARRANTIES, EXPRESS OR IMPLIED, WHICH EXTEND BEYOND THE DESCRIPTION CONTAINED HEREIN
INCLUDING THE IMPLIED WARRANTY OF MERCHANTABILITY AND FITNESS FOR A PARTICULAR PURPOSE.
Exclusion of damages:
VIEWSONIC'S LIABILITY IS LIMITED TO THE COST OF REPAIR OR REPLACEMENT OF THE PRODUCT.
VIEWSONIC SHALL NOT BE LIABLE FOR:
1. DAMAGE TO OTHER PROPERTY CAUSED BY ANY DEFECTS IN THE PRODUCT, DAMAGES BASED UPON
INCONVENIENCE, LOSS OF USE OF THE PRODUCT, LOSS OF DATA, LOSS OF TIME, LOSS OF PROFITS, LOSS OF
BUSINESS OPPORTUNITY, LOSS OF GOODWILL, INTERFERENCE WITH BUSINESS RELATIONSHIPS, OR OTHER
COMMERCIAL LOSS, EVEN IF ADVISED OF THE POSSIBILITY OF SUCH DAMAGES.
2. ANY OTHER DAMAGES, WHETHER INCIDENTAL, CONSEQUENTIAL OR OTHERWISE.
3. ANY CLAIM AGAINST THE CUSTOMER BY ANY OTHER PARTY.
Effect of state law:
This warranty gives you specific legal rights, and you may also have other rights which vary from state to state. Some
states do not allow limitations on implied warranties and/or do not allow the exclusion of incidental or consequential
damages, so the above limitations and exclusions may not apply to you.
Sales outside the U.S.A. and Canada:
For warranty information and service on ViewSonic products sold outside of the U.S.A. and Canada, contact
ViewSonic or your local ViewSonic dealer.
* For Europe: This Limited Warranty is effective in Europe for two (2) years for all parts (except software) and two (2) years for all
labor from the date of the first consumer purchase.
ViewSonic Rugged Handheld Warranty (V1.0) Release Date: February 4, 2005