ViewSonic VS14445G Tablet PC User Manual Z97T User guide2011 9 20
ViewSonic Corporation Tablet PC Z97T User guide2011 9 20
Contents
- 1. User Manual
- 2. user manual
User Manual

USER GUIDE
USER GUIDE
VS14445
Tabelt PC
FCC ID:GSS-VS14445G
ViewSonic Corporation

Table of Contents
Front view------------------------------------------------------------------------------------------------------ 1
Android system application------------------------------------------------------------------------------------- 5
Side view------------------------------------------------------------------------------------------------------- 2
Rear view------------------------------------------------------------------------------------------------------- 1
Indicators------------------------------------------------------------------------------------------------------- 4
Start Use your Device
-------------------------------------------------------------------------------------------- 5
Home(desk)----------------------------------------------------------------------------------------------------- 6
Main menu------------------------------------------------------------------------------------------------------ 7
Settings--------------------------------------------------------------------------------------------------------- 8
Install and remove an applications---------------------------------------------------------------------------------9
Touch screen calibration-----------------------------------------------------------------------------------------10
Set date & time--------------------------------------------------------------------------------------------------10
Set the system language----------------------------------------------------------------------------------------- 11
Using Wi-Fi----------------------------------------------------------------------------------------------------- 12
Using Bluetooth------------------------------------------------------------------------------------------------- 13
Web surfing---------------------------------------------------------------------------------------------------- 14
Play video------------------------------------------------------------------------------------------------------ 15
Play music----------------------------------------------------------------------------------------------------- 16
Gallery--------------------------------------------------------------------------------------------------------- 17
General hardware problems----------------------------------------------------------------------------------- 18
Exploring the Device---------------------------------------------------------------------------------------------- 1
Package contents----------------------------------------------------------------------------------------------- Ⅲ
------------------------------------------------------------------------------------------------
Brief introduction Ⅱ
Ⅰ
Ⅱ
Brief introduction
A Main Device
Changeable Power Plug
Power Adaptor
Quick Start Guide
USB Cable
Compliance Information
1
Exploring the Device
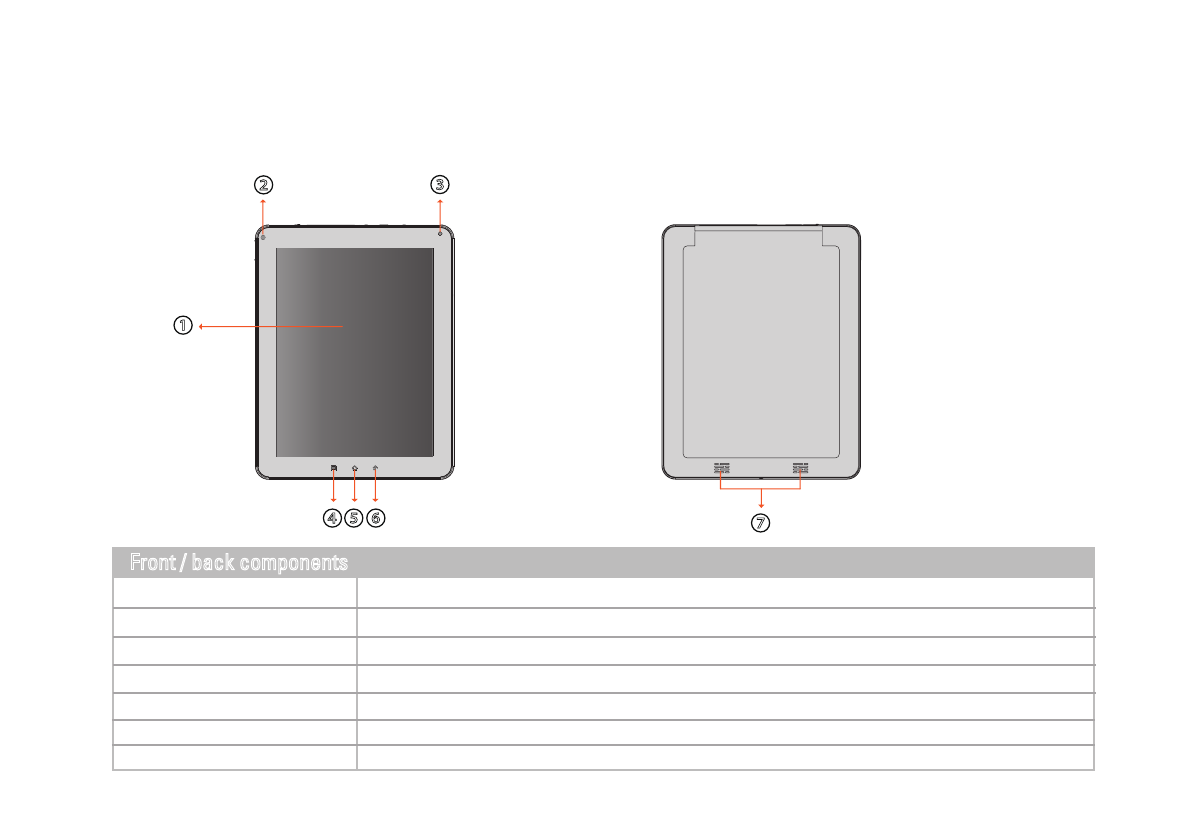
Front View Rear View
①
②③
⑦
① Touch screen
③
Camera
④
Menu button
⑤
Home button
⑥
Back button
⑦ Speaker
② Indicator
Front / back components
A built-in webcam that allows you to capture still images, record videos, and chat online.
Refer to "Indicators" on page 4 for details.
Use finger to control system & application.
Produces sounds from multimedia files or the operating system.
Press for menu function; press and hold 10s to go to H/W calibration.
Press for Home function.
Press for Back function.
To "Turn off ViewScene 3D" please go to Manage Applications - ViewScene 3D - Clear defaults and then after pushing Home button you can
select as Default "Launcher"
④⑤⑥
Side View
2
⑧
⑨
①
② ③ ④ ⑤ ⑥ ⑦
Top side
Bottom side
Right side
Left side
3
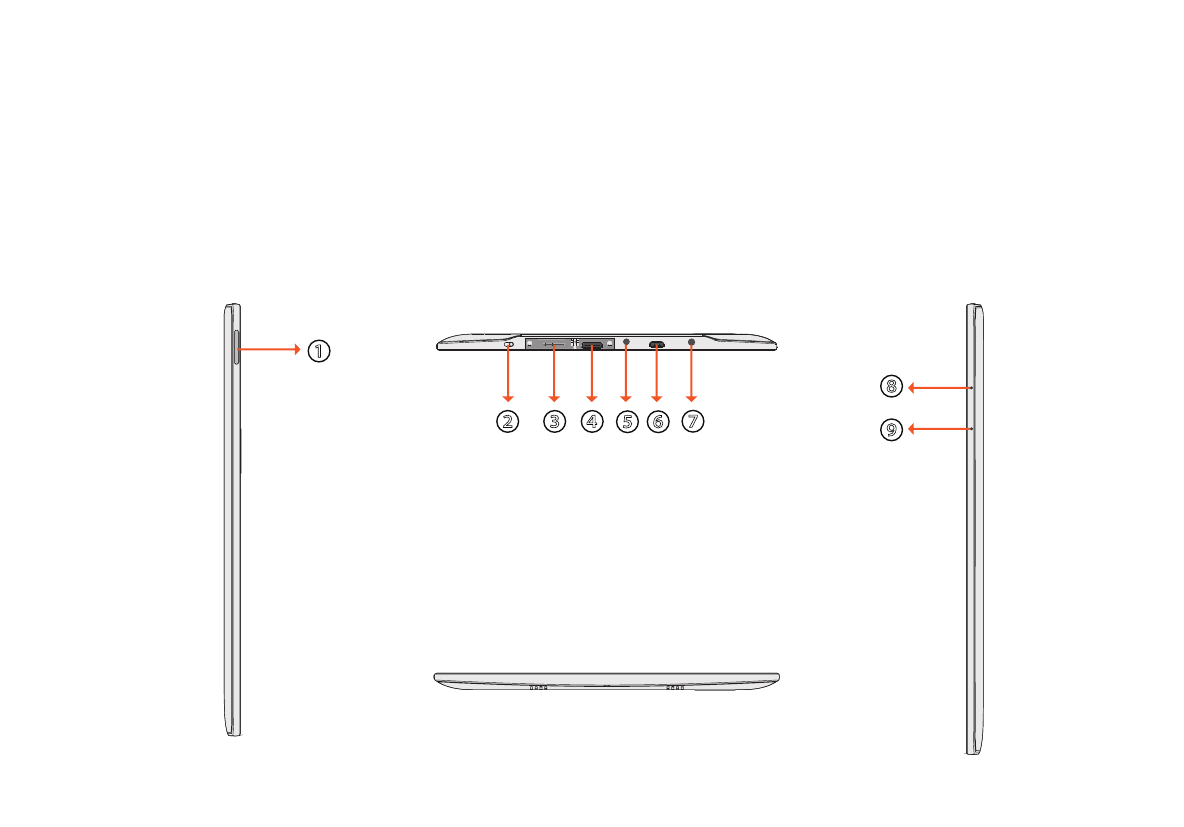
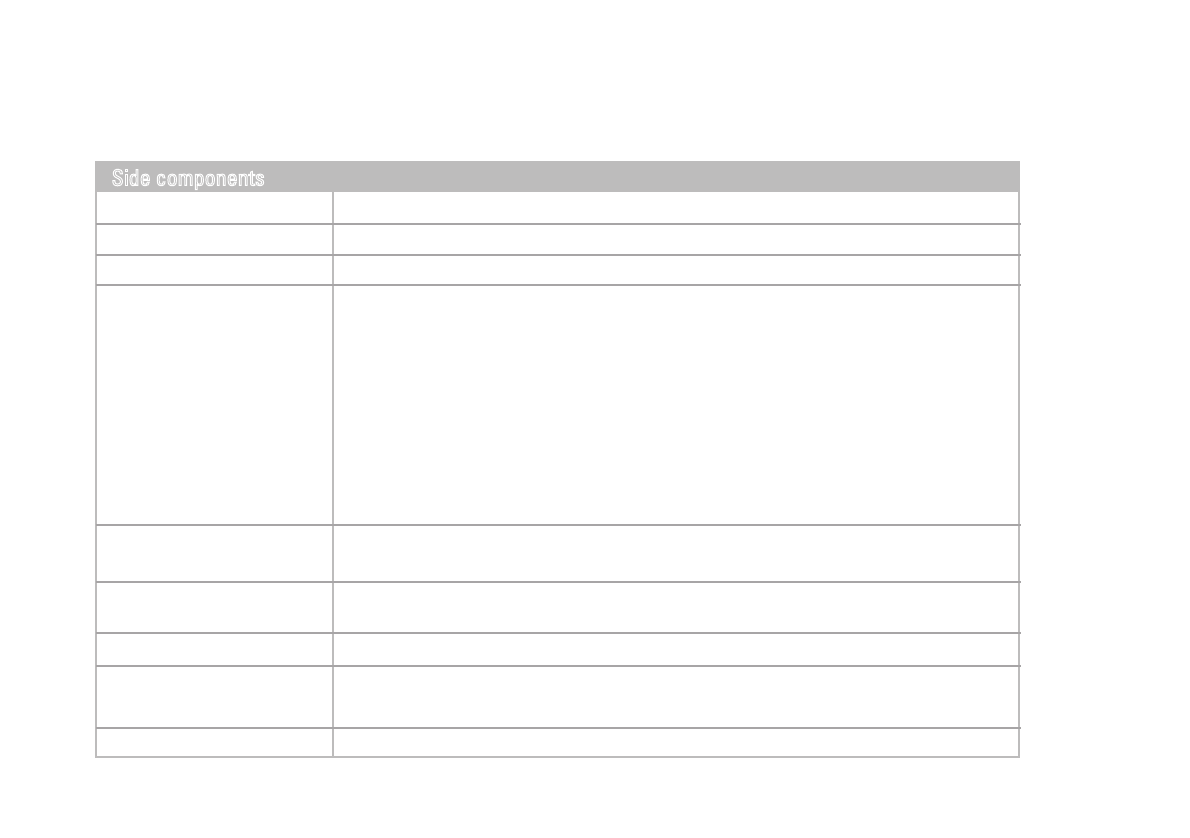
① Volume button
Connects an optional video or audio device,such as a high-definition television, or any
compatible digital or audio component (Use a tieline to conect the normal HDMI jack).
② Power switch
④ Mini-HDMI port
③ Micro-SD Card slot
Side components
Press to adjust the volume (+Volume up/-Volume down).
Turns your device on or off.
For a Micro-SD memory card.
⑦ Power jack
⑤ Audio output jack
(Mic and headphone 2 in 1)
Connects 4 pole earphone to play audio or chat online.
⑧ Reset
⑨ MIC
⑥ Micro-USB port Connects peripherals such as mice, digital cameras and MP3 players that use the USB 2.0
interface(Use a tieline to conect the normal USB port).
Connects AC power supply to power the device and charge the battery.
When system abnormal (can’t start the system or turn off the system), insert a thin,straight
object(such as a paper clip) in the manual eject hole on the device.
Receives sounds and voices for recording.
When streaming video content trough HDMI output, touching
the screen will enable the video playback options.
Adjust the volume of your video:
Scroll up/down in your screen for volume adjustment .
Enable seek in your video:
Scroll left/right in your screen for video seeking.
Tap the Screen for play/pause your video :
Tapping the screen will enable you to play/pause your video content.
4
①
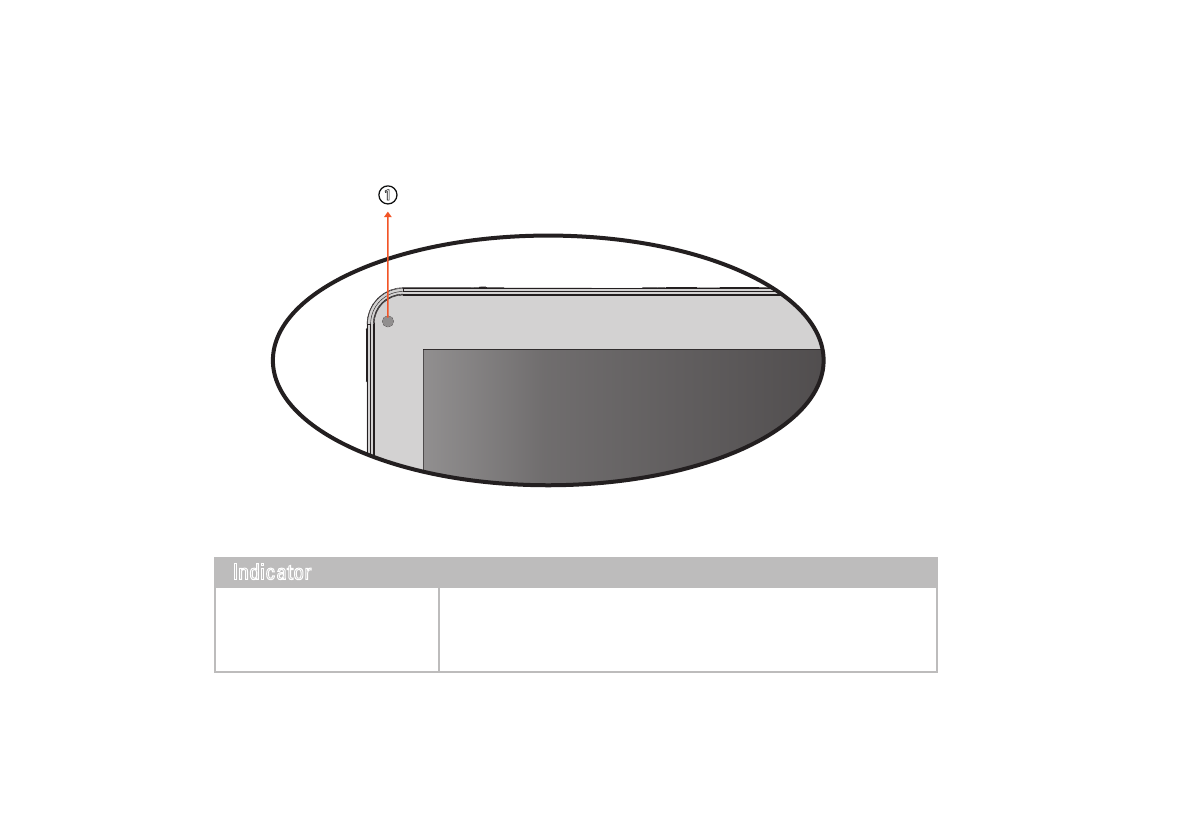
① Battery status indicator
Indicator
Indicator
When the battery is charging, it lights up in red.
When the battery is fully charged, it lights up in green.
Android system application
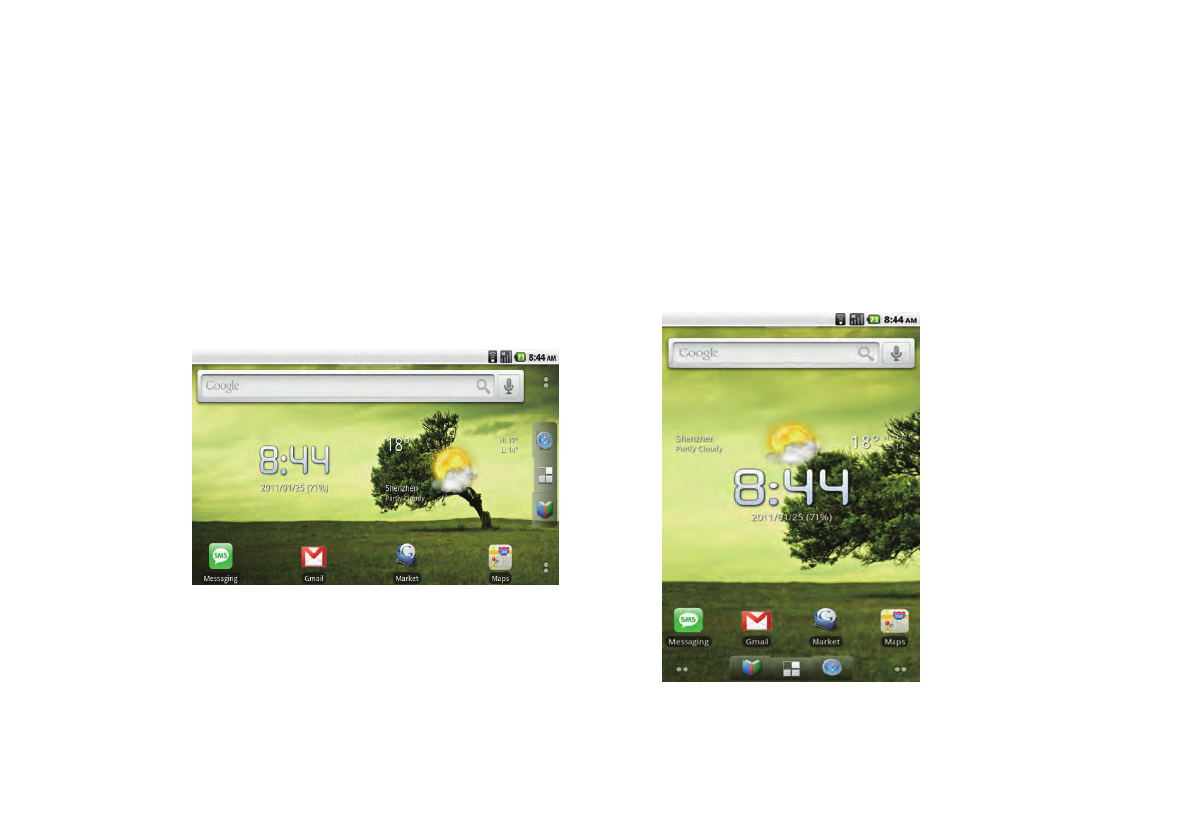
Portrait view
Landscape view
Start use your Device
Press and hold the power button until a pop-up window appears.
And then follow the on-screen instructions to complete the initial Operating system setup.
The system home(desktop) screen will appear as follows(The device’s built-in G-sensor movement and changes
its angle/orientation).
5
6
Home(desk)
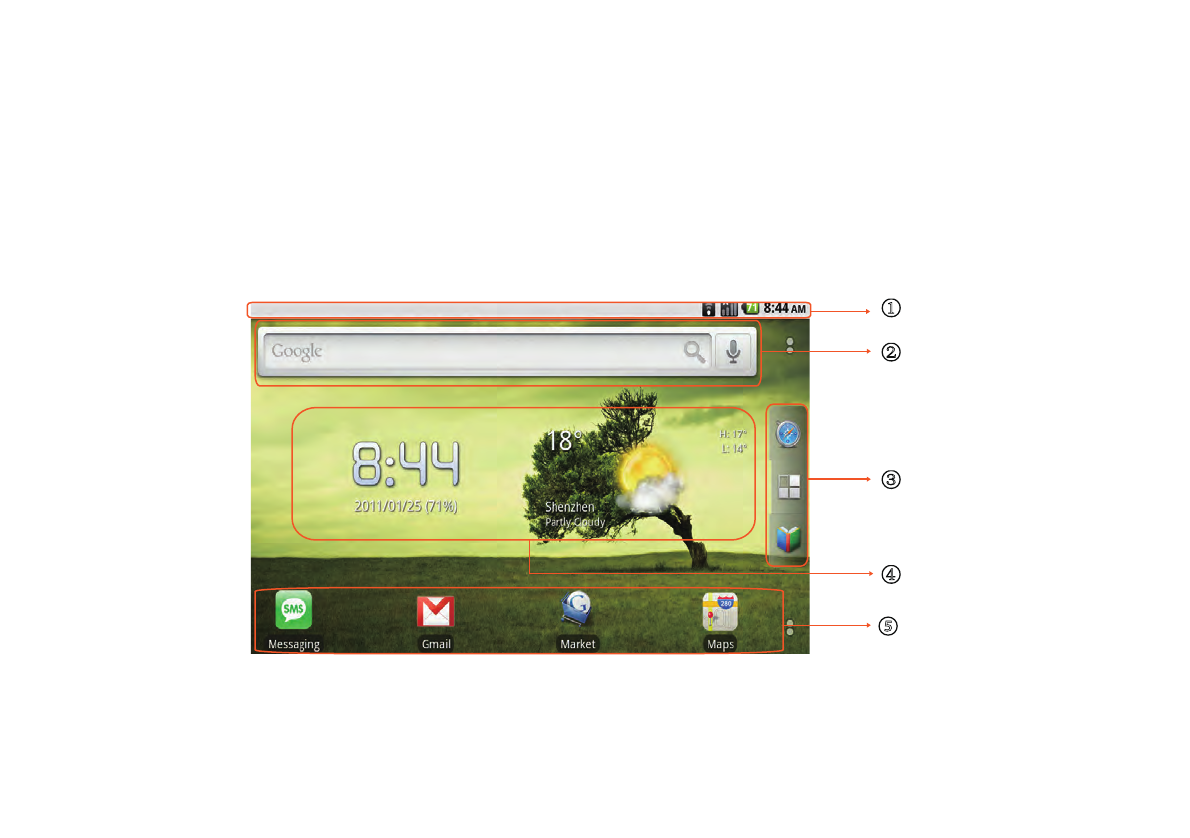
The default system desk include: ①Status column, ②Quick search bar, ③Main menu column, ④fancy widget,
and ⑤some Shortcuts.
displays notification icons. Quick search bar can use Google search that you can use directly on the home screen.
The Shortcut help to quick open an application or a folder, and so on. if you press and hold the shortcut icon, then
you can add, move, or delete the shortcut icons.
①
②
③
④
⑤
The Status column shows the time, WiFi connection status,battery status, and other information, its also
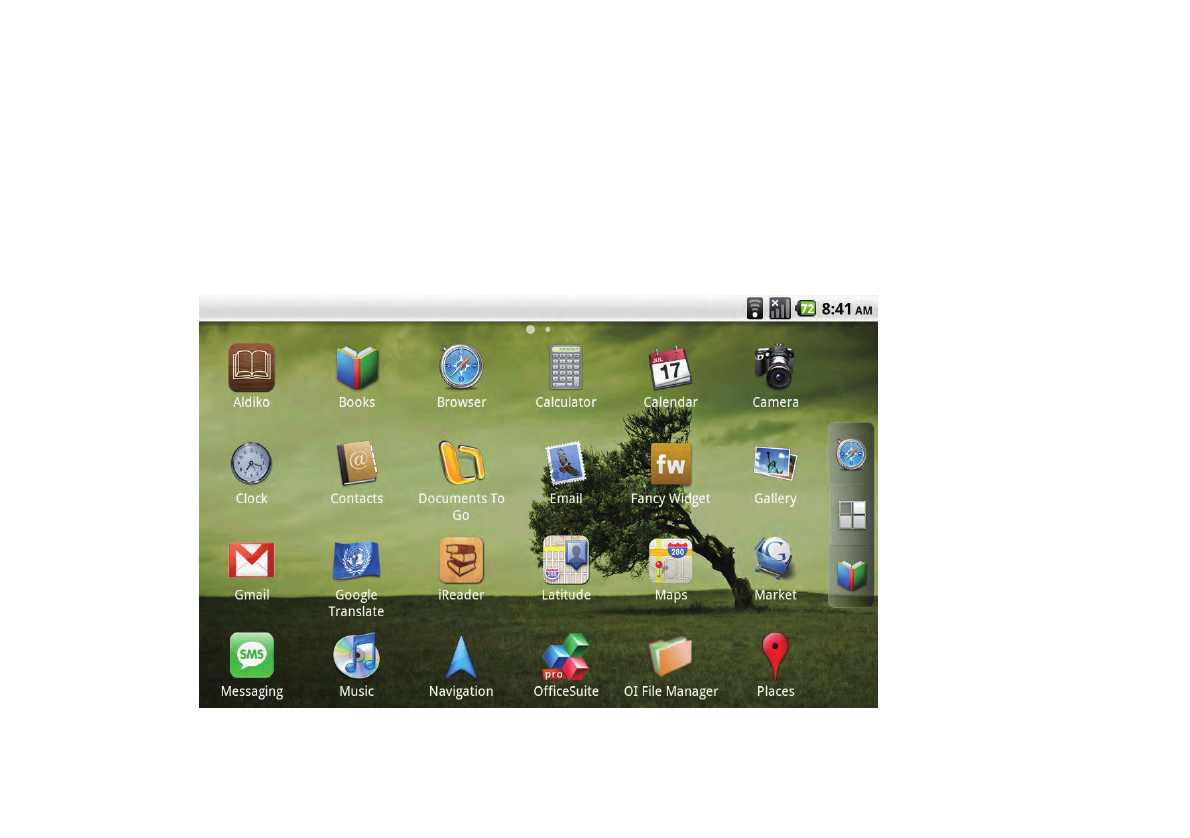
Main menu
7
Touch the main menu tab icon to open the main menu from main menu column and view icon for all installed
applications. You can setup system, install and run application.
Main menu column content three tab icon,The middle icon is main menu tab, the other two tabs is shortcut icon, you
can customize these tabs by use drag and drop action. Slide the main menu column from left to right , you can hide it.
Also you can show it in reverse order.(When in main menu, the main menu tab icon charge to be home desktop tab
icon, touch it , you can go back to the home desktop .)
Android system main menu(not default)
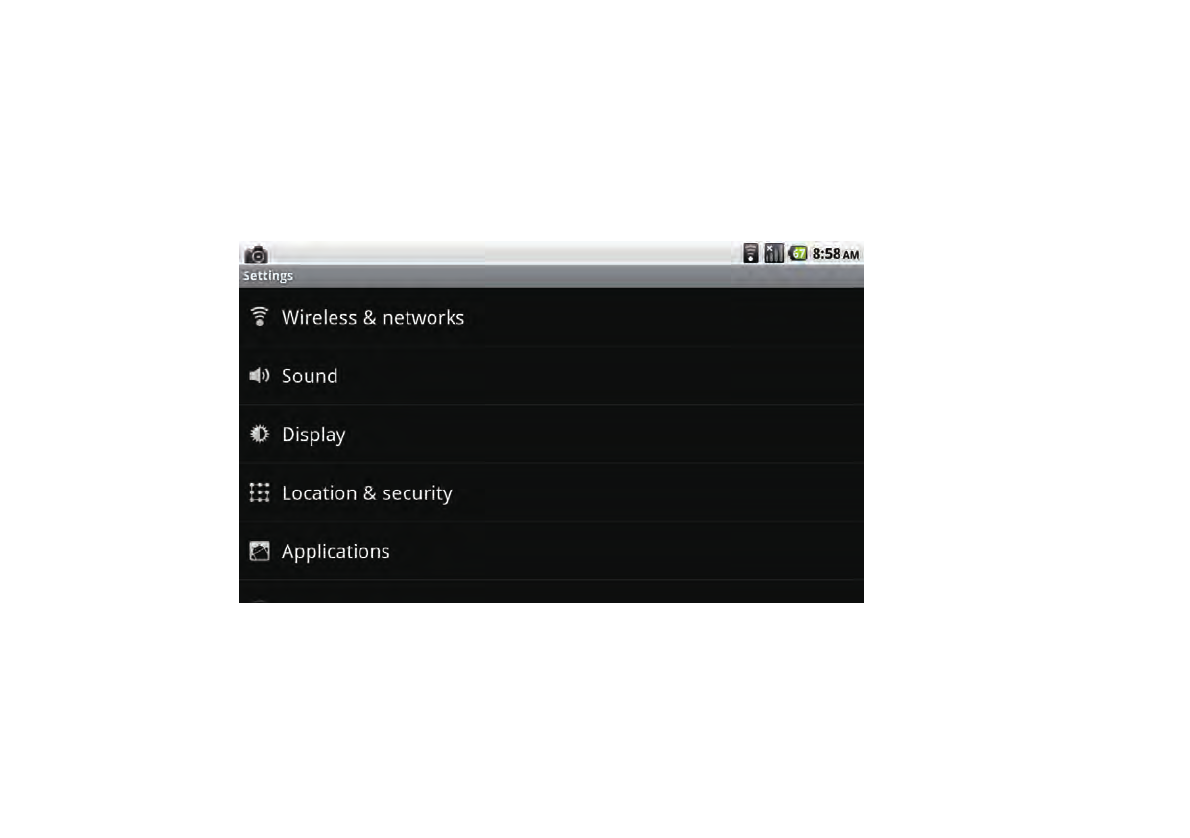
Settings
8
Touch the”settings”icon to open settings from Main menu. Then you can configure related function(such
as Set up a Wi-Fi Connection,adjust time, and so on).
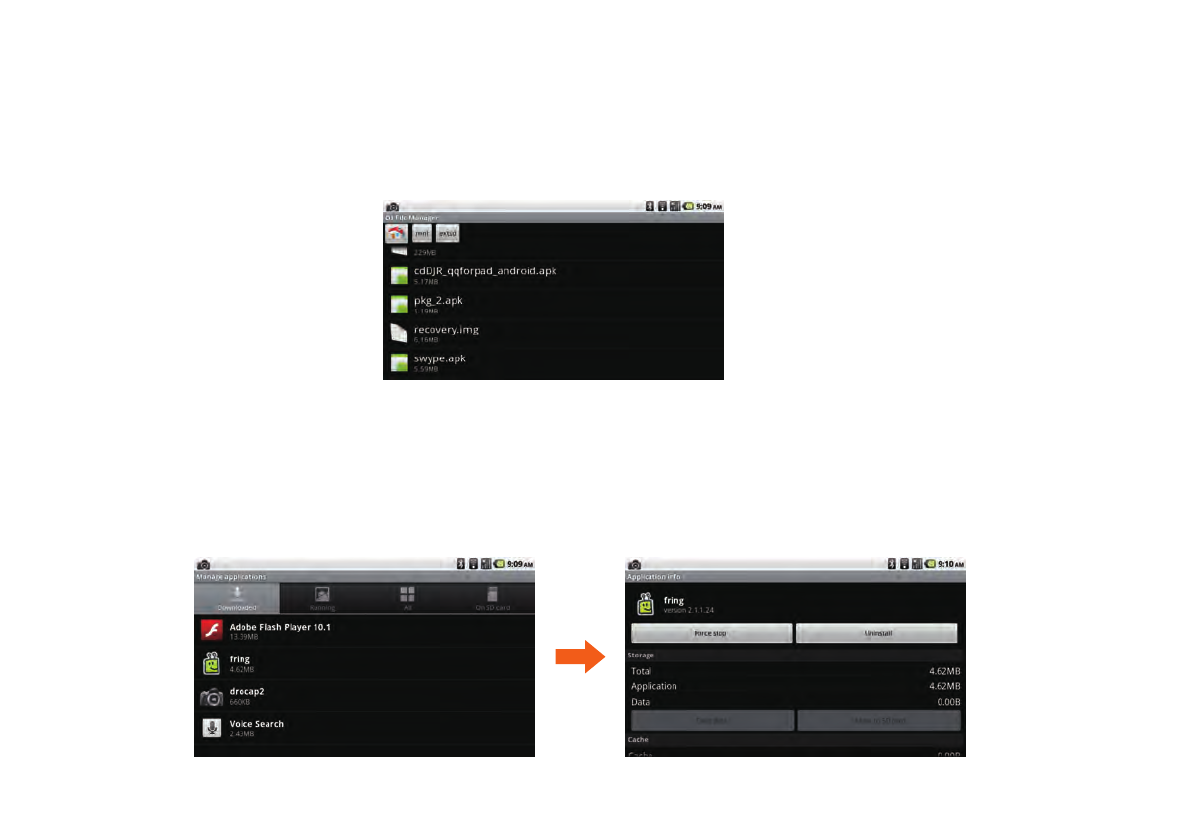
Touch to enter main menu > Settings > Applications>Manage applications, then You will be presented with a list of
applications you have installed.Select the application you want to uninstall, and click the Uninstall button.
Install and remove an applications
Remove an applications
9
Touch the“OI File Manager”icon from the main menu,then open the List of files & folders; you can quick slide
up-down to select which software you wanted to install it, and click the software icon to install the applications.
List of files & folders
Press and hold Fuction button for 10 second, the power indicator will flash , then go to H/W Calibration, When
you into Calibration, do not touch the screen.
Touch screen calibration
Set date & time
10
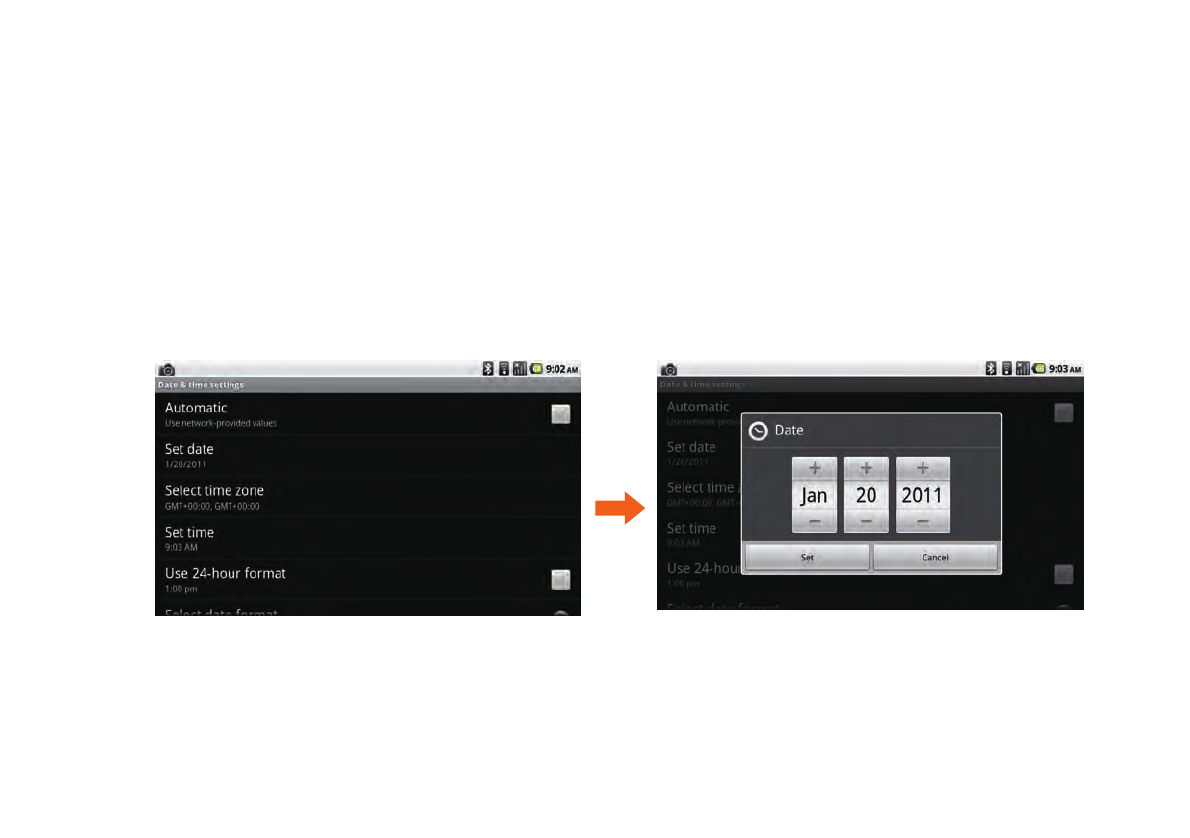
Touch the “Settings”icon from the main menu, after select the“Date & Time”and click to enter the List of Date &
time setting,then you can set date, time zone, time , and so on.
Press and hold Menu button 10s to go to the touch-screen H/W calibration.
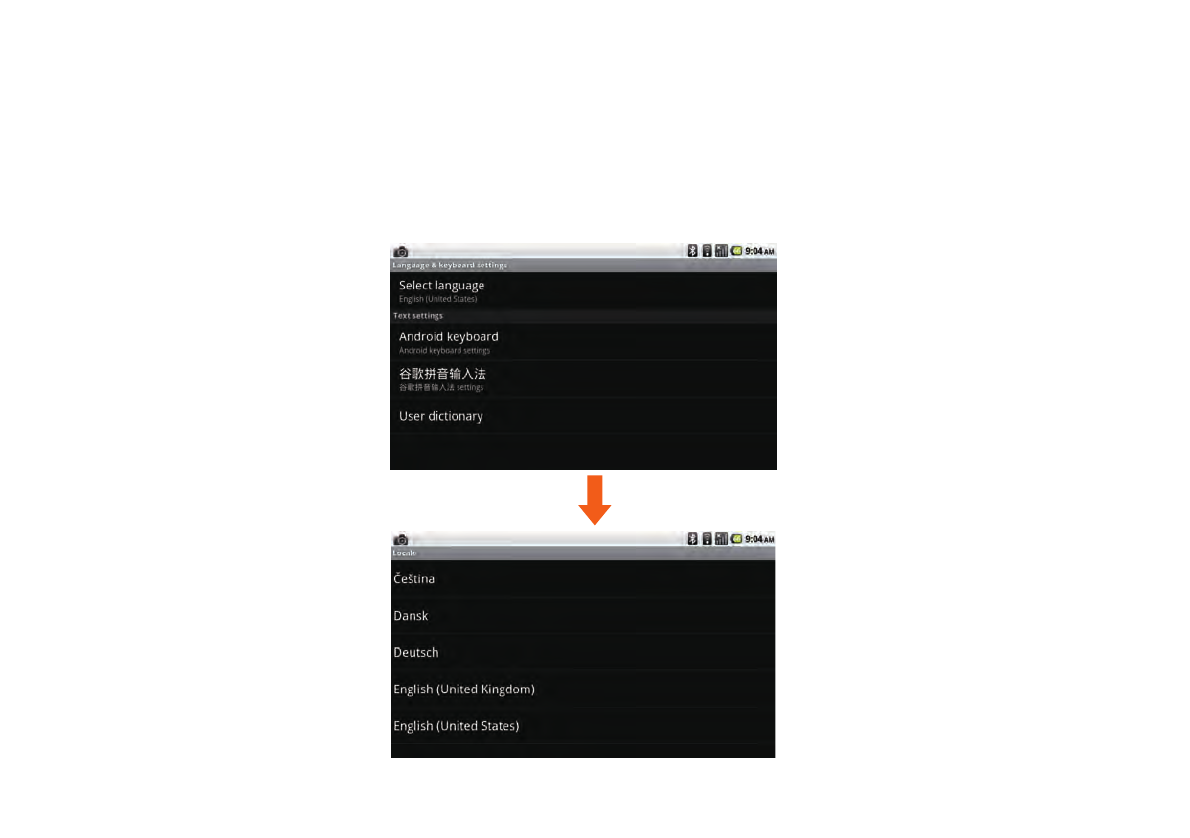
Set the system language
Touch to enter main menu > Settings > Locale & text >select locale,then the language list screen. Touch and
scroll up or down to search the locale and language you want to set. Then, touch the locale and language to
complete the locale and language setting. The screen will then return to the Locale & text settings screen and
the language you have selected will display on the Select locale screen.
11
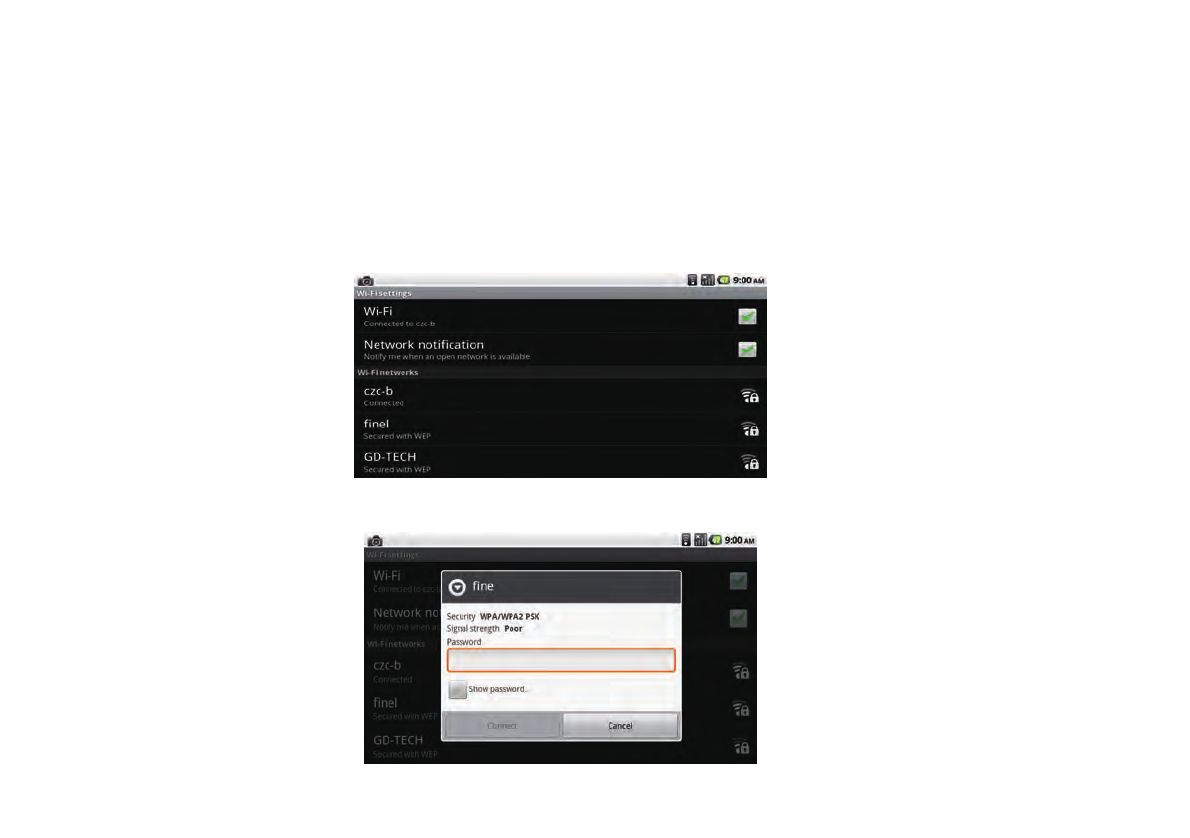
Using Wi-Fi
12
Touch to enter main menu > Settings > Wireless controls.Then touch on Wi-Fi to start scanning for available
wireless networks; Select a network to connect it.
(Notce: If you have selected a network that is secured with WEP, enter the WEP(security) key and then touch
Connect.)
Connect to a secured networks
Wi-Fi settings
13
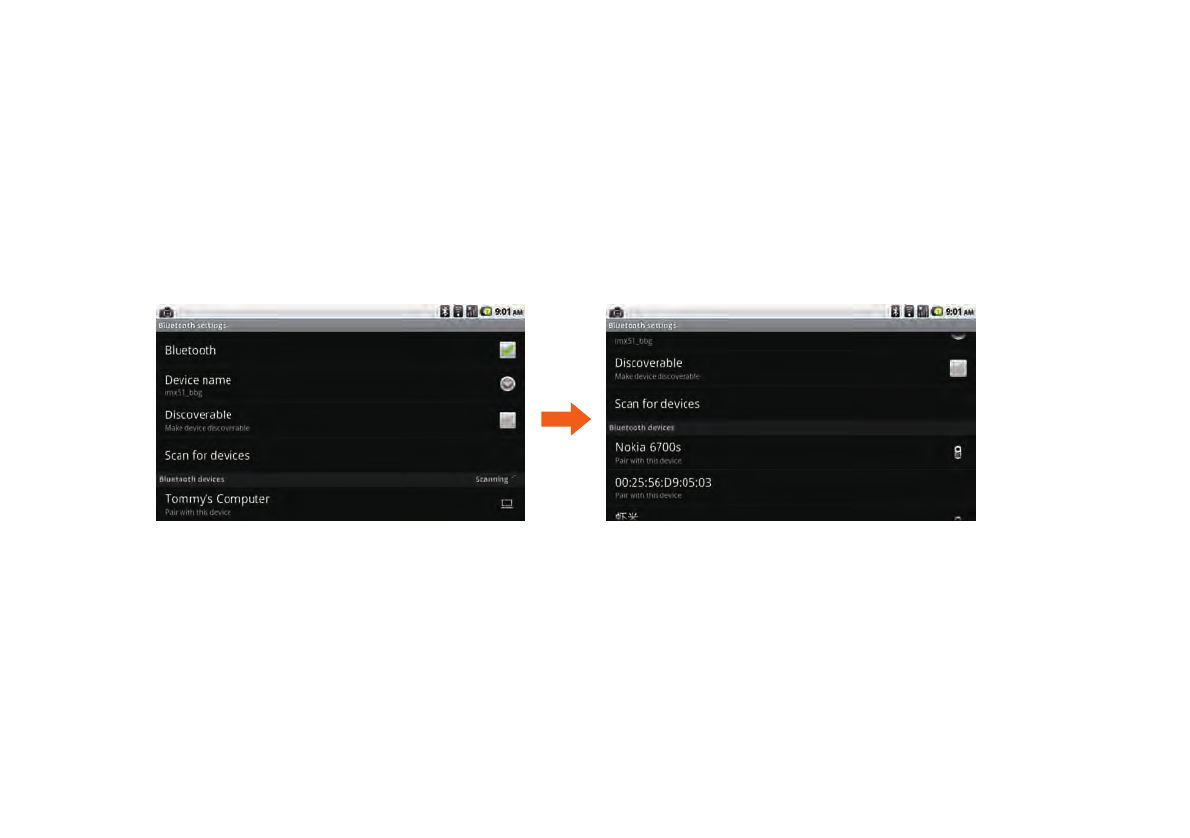
Using Bluetooth
Touch to enter main menu > Settings > Wireless controls.Then touch on Bluetooth to start scanning for available
Bluetooth device; Select a device that you wanted and connect it.
(For secure ,you may need to type the secured code.)
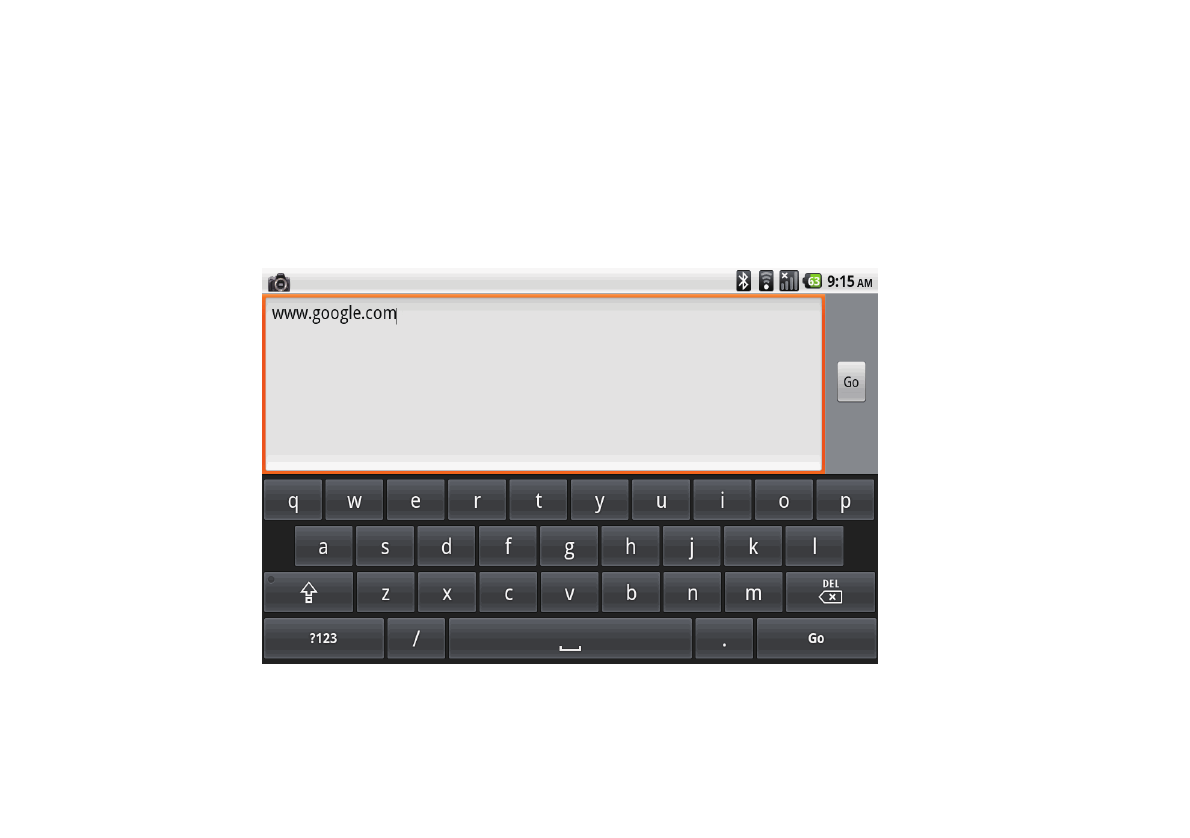
Web surfing
14
Using the quick search bar from desktop to open the website. you can use soft keyboard to enter the URL.
Before browse the webpage, you must make sure you can connect to the Internet. Also you can use the
browser from main menu to do this work.
15
Play video
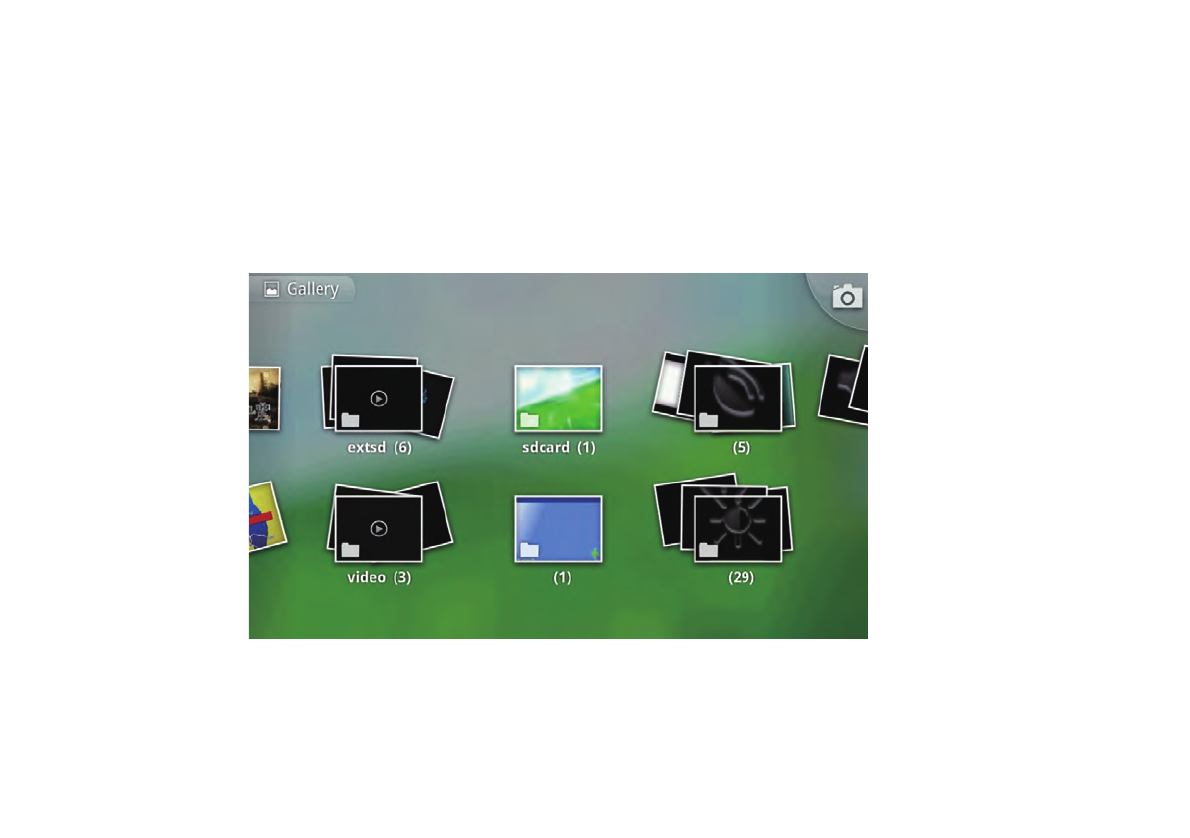
Touch the video icon from main menu to see all your videos displayed as thumbnails. Touch and scroll left or right
to view more video thumbnails and touch to select the thumbnail you would like to watch. The screen will start
playing the video on your device.
(.mp4, .3gp, .avi, .wmv/.asf, .mkv/mka, .flv support)
Play music
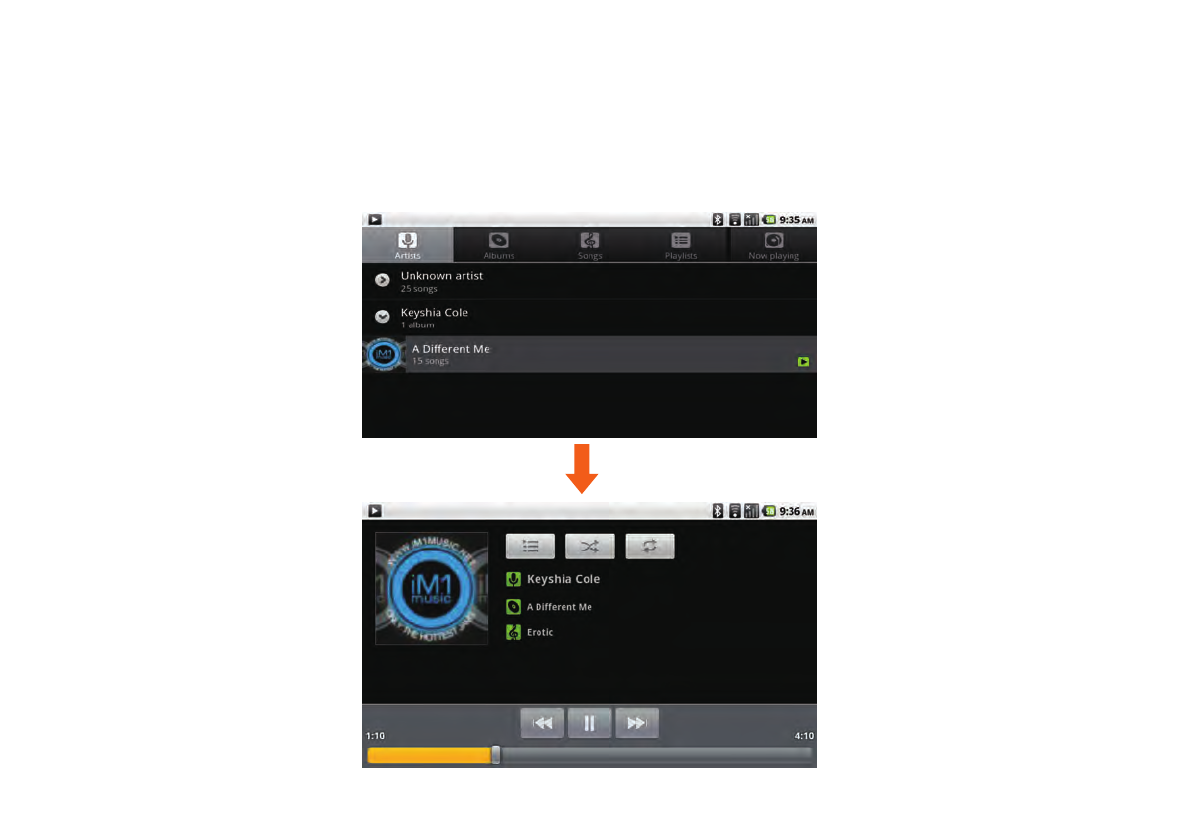
Touch the “Music”icon from the main menu, after enter the Music applicaton. You may search music by Artists,
Albums, Playlists, or by All songs to play the song you like to listen.
16
Gallery
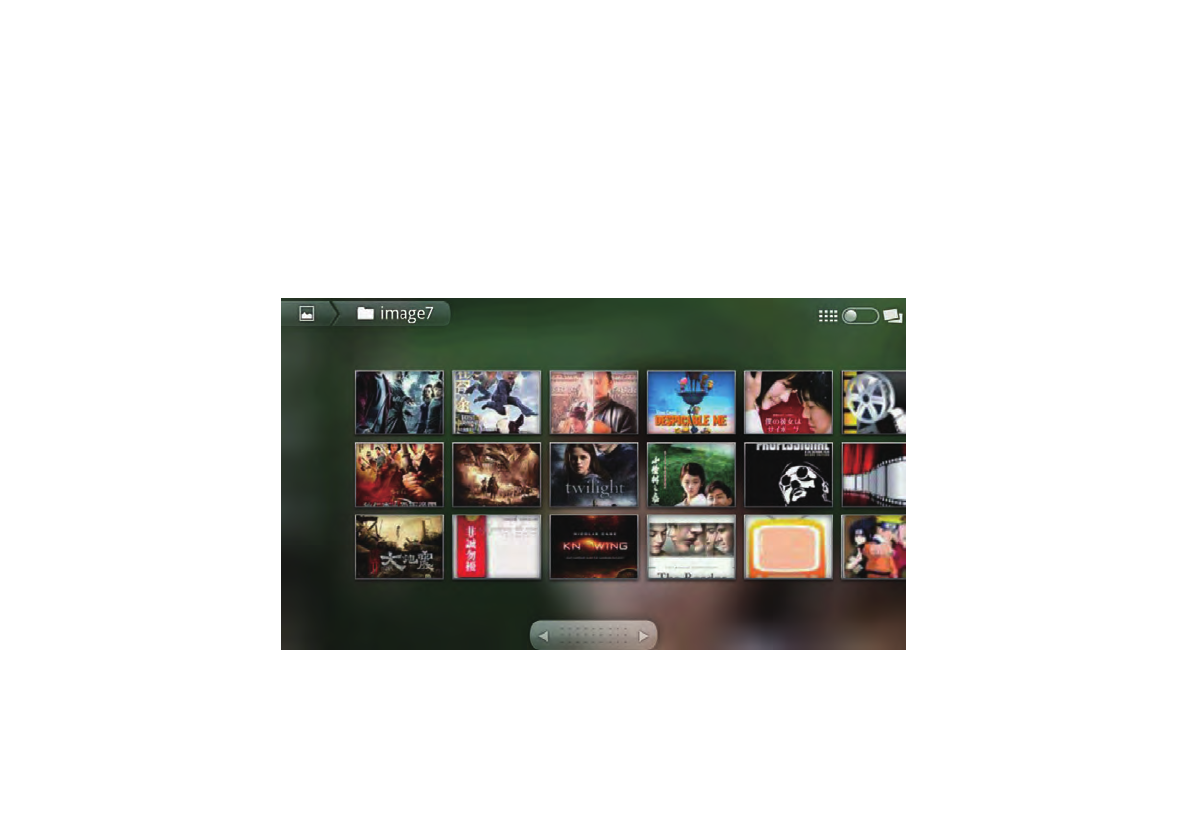
Gallery application provides a viewing space for your pictures and videos. Before using Gallery application,
remember to install the Micro SD Card.
Touch the Gallery icon from main menu to enter the Gallery application. On the Gallery screen, the default folders
are the All pictures and All videos. You also can create personal folders in the micro SD Card to manage your files.
17

General hardware problems / possible causes and solutions
Some common hardware problems and recommended solutions are in the table below:
18
1. System Ceased Operation during the Execution of the Program.
Cause: error by using the current procedure. Solution: Click <Ctrl>, <Alt> and <Del> keys. Windows operating system
causes error; restart the system by using the power supply.
2. Operating System cannot be Restored to the Using State.
If the operating system can not resume operation after a pause, please check the following possible causes:The battery
may have a malfunction, or the current power level may be very low. To solve this problem, please connect an external
power supply such as the AC adapter.
3. The System cannot Shutdown Normally.
Hold down the power button 4-6 seconds, until the system shuts down.
4. After Shutdown, if the System cannot reboot:
Connect the AC power adapter immediately; as it means that the battery did not have sufficient power to reboot.
5. Measures to Extend Battery Life?
Adjust the screen brightness to the minimum possible level.
Adjust the device screen to the normal standard.
Remove the device card if not often used.
Turn off the device Bluetooth function.
Turn off the device wireless network function.
Ensure that the power configuration setting is in the "Save power" mode.
6. The USB port of Docking can not be connected to the device?
The Docking must be supported by DC power when connect to the device.

7. Wireless Network Breaks after 2 to 3 Minutes on line, and cannot resume on-line.
This may be due to interference caused by channel, please change the AP's channel and re-line.
8. The device cannot connect to the Internet Network.
Internet service providers (ISP) account is not setup; please contact your network service company for assistance.
9. The device has been online via a Wireless Network, but still cannot connect to
another Computer.
Please check the device driver is installed correctly. If the driver is not installed correctly, press the [Start] -> [Control
Panel] -> [System] -> [Device Manager] -> [Network Adapters], you will find a yellow exclamation mark on the network
tag. If a yellow exclamation mark occurs, please use the driver CD to reinstall the device driver.
10. Good Signal Strength, but cannot connect to the Network.
Please check the TCP / IP address settings are correct or not.
12. The device cannot continue running.
An external or internal storage device could be the cause of this problem as it is not operating properly when storing the
content.
11. If water accidentally penetrates the device, how to solve this problem?
At this point, do not connect the device's power supply, or it will cause more serious damage to the device. Unplug the
power supply and power cord, remove any attached external devices (such as: drive). Dry any liquid that was spilled
on the device; wipe stains with a soft cloth to reduce potential damage to the unit. Dry the body and other equipment
with fans, and then send it to the nearest device repair center to diagnose and repair the device by qualified engineers,
in order to reduce the damage to the device.
19
External peripheral devices may not compatible with the device - such as external
USB devices, Micro-SD Card, that are belong to precision devices; if incorrectly used,
they can easily cause the device to move to a standby situation when connected
to the device.
Incompatible software or drivers - the driver which is not compatible will cause .dll,
.sys and .exe extension files and will put the device into standby or hibernation.
20
Contact Distributors
After reading the previous section, if the problem persists, the next step is to contact
the distributor.
Distributors can determine whether the computer needs to be sent back to the store.
Before you call the distributor, please prepare the following information:
1. What configuration/model is your device? Distributors need to know what
peripherals you use.
2. Is there any error message on the screen?
3. When operation failure occurs, which software are you trying to use?
4. What steps have you tried to solve the problem?

WARNING:
Changes or modifications to this unit not expressly approved by the party responsible for compliance could void the user’s authority to operate the equipment.
!
This device complies with Part 15 of the FCC Rules and Industry Canada licence-exempt RSS standard(s).
Operation
is
subject
to
the following tow conditions:
(1)
this
device
may
not
cause interference, and
(2) this
device must accept any interference, including interference that may cause undesired operation
of the device.
Le présent appareil est conforme aux CNR d'Industrie Canada applicables aux
appareils radio
exempts de licence. L'exploitation est autorisée aux deux conditions suivantes :
(1) l'appareil nedoit pas produire de brouillage, et (2) l'utilisateur de l'appareil doit
accepter tout brouillage radioélectrique subi, même si le brouillage est susceptible d'en compromettre le fonctionnement.
This device is acting as slave and operating in the 2.4 GHz (2412 – 2462 MHz) band. Ad Hoc function is
supported but not able to operate on non-US frequencies.
RF Exposure Information:
FCC RF Exposure requirements: The highest SAR value reported under this standard during product certification for use next to the body
is
1.448 W/kg (2G),0.713
W/kg (3G),0.483 W/kg
(Wi-Fi)
This transmitter must
not be
collocated
or
operating
in
conjunction with any other antenna
or transmitter.
NOTE: This equipment has been tested and found
to
comply with
the
limits
for a
Class
B
digital device, pursuant
to
Part
15 of the
FCC
Rules.
These limits
are
designed
to
provide reasonable protection against harmful interference
in a
residential installation. This equipment
generates,
uses and can radiate radio frequency energy and, if not installed and used in accordance with the instructions, may cause harmful interference to radio
communications. However, there is no guarantee that interference will not occur in a particular installation.
If
this equipment does cause harmful interference
to
radio
or
television reception, which can
be
determined
by
turning the equipment
off
and
on,
the user is encouraged to try to correct the interference by one or more of the following measures:
-- Reorient or relocate the receiving antenna.
-- Increase the separation between the equipment and receiver.
-- Connect the equipment into an outlet on a circuit different from that to which the receiver is connected.
-- Consult the dealer or an experienced radio/TV technician for help.
!
!
VER.1.0