Virtualtek WXR-PG Portable WiMax CPE User Manual XMR 300 manual UQ ENG
Virtualtek Corp. Portable WiMax CPE XMR 300 manual UQ ENG
Contents
- 1. user manual
- 2. users manual
user manual

Safet
y
Precautions
Placin
g
the Produc
t
Make sure to use the product on a level surface.
Use the product in a clean area with no excessive dust.
Power Adapter and Char
g
in
g
Do not pull the power adapter b
y
its cord--alwa
y
s hold the adapter itself ti
g
htl
y
when plu
gg
in
g
into or removin
g
from an electric outlet
Leave the adapter unplu
gg
ed when li
g
htnin
g.
Plu
g
in the adapter to the outlet firml
y
.
Use the product in the environment with no electronic interference.
Do not place the product on top of a wet surface.
Do not expose the product under the direct sun ra
y
.
Do not leave the power cord han
g
in
g
in an area where there is a lot of traffic.
Do not use the product around a ma
g
netic ob
j
ect.
Do not handle the product with a wet hand. If the adapter is wet, let it dr
y
before usin
g
it
.
Leave the adapter unplu
gg
ed when not in use.
Handlin
g
the Produc
t
Make sure the product is not exposed to rattlin
g
and shakin
g
when carr
y
in
g
the product.
Do not insert an
y
forei
g
n ob
j
ect into the ventilation holes
.
When used nearb
y
an electronic product the frequenc
y
interference ma
y
cause the unit to produce noise.
ypqy y p
Unplu
g
all cables when movin
g
the product.
Do not expose the product in hi
g
h temperature or heat the unit--the inte
g
rated batter
y
ma
y
explode
.
A
void exposin
g
the product to the direct sun ra
y
. Avoid an
y
hot, damp place, and alwa
y
s keep the product in a cool, well-ventilated area
A
lwa
y
s use the certified power adapter.
Do not open, or modif
y
the unit--doin
g
so will void the warrant
y.
Make sure the char
g
in
g
plu
g
does not touch an
y
metal ob
j
ect.
A
lwa
y
s use the certified accessories.
The WiMAX and Wi-Fi si
g
nals are sub
j
ect to surroundin
g
environment.
The manufacturer or the service en
g
ineer ma
y
not perform an
y
life-critical service for the unit’s si
g
nal ma
y
interfere with other devices.
In the Box
WXR-PG Main Unit
User’s Instructional Manual
(
with the manufacturer’s warrant
y)
Quick User’s Guide
Power Adapte
r
Note
* The supplied accessories are sub
j
ect to chan
g
e without notice.
* Alwa
y
s use the supplied power adapter to char
g
e
.
* The supplied power adapter ma
y
not be used to char
g
e a mobile phone.
Index
Chapter 1
Product Information and Specifications
1.1 About the Produc
t
* The WXR-PG Portable Access Point
By default, this product is set to serve up to three users or three Wi-Fi devices; however, the maximum number of users who can connect to the
Internet via WXR-PG is 252, and this settin
g
can be modified b
y
the user. The connection is not lost even when on the move.
* Minimum S
y
stem Requirements
The Web Connection Mana
g
er is best viewed under the followin
g
environment: Internet Explorer 5.0 or newer, and the displa
y
resolution o
f
* Network
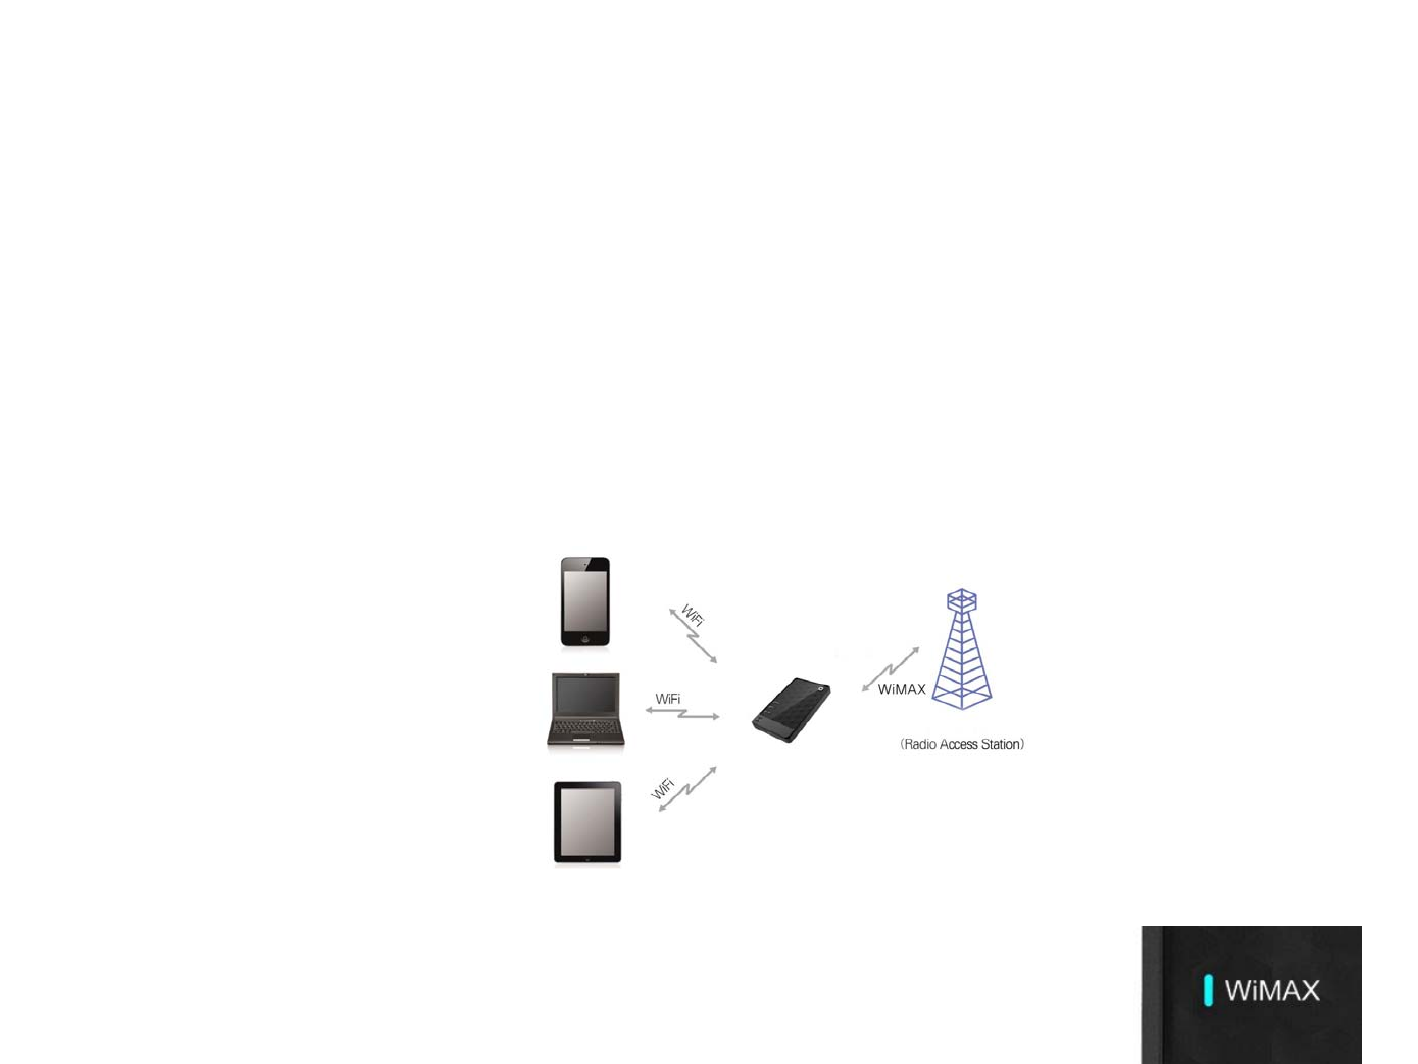
The WXR-PG receives a dynamic IP address from the WiMAX signal, and switches it to form three (3) IP addresses by default and 252 IP
addresses max through Wi Fi
addresses
max
,
through
Wi
-
Fi
.
Picture dia
g
ram of WiMAX connectivit
y
scenario
1.2 Thin
g
s to Remember
Features
FrontThere are three LED status indicators.
[Ima
g
e: Product ima
g
e showin
g
the LED indicators]
(
1
)
WiMAX Status Indicato
r
Displa
y
s WiMAX si
g
nal stren
g
th in colors.
Yellow: Bad to poor WiMAX si
g
nal reception
Green: Good to excellent WiMAX si
g
nal reception

Red: No WiMAX si
g
nal reception
Blinkin
g
y
ellow:Connection is bein
g
made or authorization is in pro
g
res
s
Blinkin
g
red: The unit is not authorized for service
(
2
)
Wi-Fi Indicator
The LED turns GREEN to indicate stable Wi-Fi status.
(
3
)
Power/Batter
y
Indicator
Power On/Off Indicator: li
g
hts up when the power switch is switched to ON.
Batter
y
Level Indicator: this LED shows the batter
y
level, and works ten
(
10
)
seconds after the unit is turned on
.
Red: Batter
y
level is between 0-20%, or the batter
y
is char
g
in
g.
Yellow: Better
y
level is between 20-50
%
Green: Batter
y
level is between 50-100%, or the batter
y
is full
.
Rea
r
Pull open the protection tab to reveal the batter
y
char
g
e connector
.
(
4
)
AC-DC
p
ower ada
p
ter connecto
r
Plu
g
in the supplied proprietar
y
power adapter. Do not use a third-part
y
power adapter not approved b
y
the manufacturer or
y
our service provider
gppppypp pyppppy y p
Note
The Micro-USB 4.2V/750mA power adapter made for mobile phones, though it may fit in the unit's power adapter connector, will not work properly
because it does not
p
rovide necessar
y
p
ower to char
g
e.
Bottom
(
5
)
Reset Hole
If the unit behaves abnormall
y
, use a thin clip or a pin to li
g
htl
y
press into the hole to reset the unit
.
(
6
)
Power Button
To turn on the power, press and hold the Power Button at the bottom of the unit for four(4) seconds, or until the Power LED indicator lights. It may
take u
p
to one
(
1
)
minute until the unit is read
y
for o
p
eration.
To turn off the power, press and hold the Power Button for four
(
4
)
seconds.
Chapter 2
Using WXR-PG
Char
g
in
g
WXR-PG
Use the supplied power adapter to char
g
e the unit.

(
1
)
Plu
g
in the power adapter into the connector as shown below
.
[Picture]
* The batter
y
/char
g
e indicator turns red when the unit is char
g
in
g
.
* The batter
y
/char
g
e indicator turns
g
reen if the unit is full
y
char
g
ed.
(
2
)
Char
g
e time
(
via supplied power adapter
)
Fast char
g
e time: about 80 minutes
(
char
g
es up to 80% of batter
y
capacit
y)
Full-char
g
e time: 150 minutes
(
3
)
Usa
g
e time
(
when full
y
char
g
ed
)
When used continuousl
y
: 600 minutes or 10 hours
When in stand-b
y
: 720 minutes or 12 hours
Note
* Char
g
e time ma
y
var
y
accordin
g
to the user environment.
* The above char
g
e time is measured with the supplied power adapter.
* The batter
y
life and capacit
y
are sub
j
ect to
y
our usa
g
e behavior and the service territor
y.
* The batter
y
life and capacit
y
, althou
g
h b
y
unnoticeabl
y
small amount, naturall
y
decreases after time
.
(
4
)
Cover the slots with the protection tap when not char
g
in
g
the unit
.
2.2 Powerin
g
on WXR-PG
g
(1) To turn on the power, press and hold the Power Button at the bottom of the unit for four(4) seconds, or until the Power LED indicator lights. It may
take u
p
to one
(
1
)
minute until the unit is read
y
for o
p
eration.
(2) The Power Indicator and the WiMAX Indicator LEDs blink as the unit initializes, and when it has been activated successfully, the Wi-Fi indicator turns
g
reen.
(
3
)
Simpl
y
select the Wi-Fi network created b
y
the unit to connect to the Internet.
Note
If the unit fails to initialize, press Reset at the bottom of the unit to restart the unit.
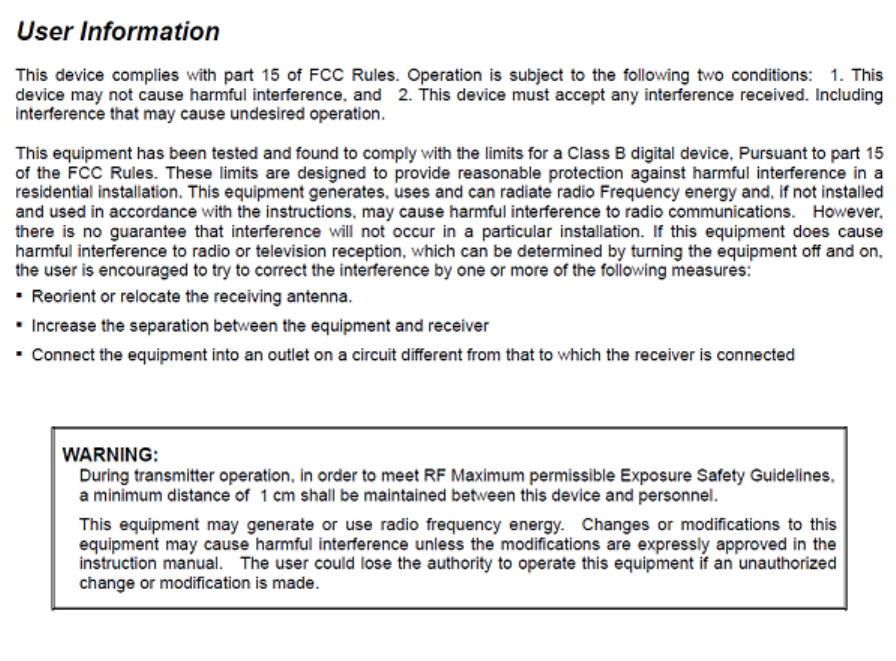
Warnin
g
Factor
y
rese
t
Never perform factor
y
reset unless there is a certain problem with the unit or when
y
ou have lost/for
g
otten
y
our PIN
.
To perform factory reset: First, power off the unit. After the unit powers off, press and hold the Power button for twenty (20) seconds. The product is
set to factor
y
default when the unit is turned on next time.
2.3 Read
y
in
g
y
our com
p
uter for Wi-Fi network
IMPORTANT
WXR-PG's network name is [WXR-PG-XXXXX] by default, where XXXXX indicates the last five digits of the product serial number. Keep
this network name in mind before
p
roceedin
g
to the instructions below.
Connecting to the Internet via WXR-PG is as easy as selecting WXR-PG in the Wi-Fi wireless network list; however, setting up your computer to be
read
y
for Wi-Fi wireless network is different, de
p
endin
g
on
y
our com
p
uter setu
p
and environment.
Carefull
y
follow the below instructions if
y
ou are not alread
y
familiar with settin
g
up the Wi-Fi network connections
.
For Windows XP
(
1
)
Press [Start]
Choose [Control Panel] in the Start Menu.
Find and select [Network Connections]
Select [Wireless Network Connection]
(
2
)
Select [View available wireless networks
]
Double-click on WXR-PG's Network Name.
Enter network password. The factory default password is "XMRXXXXX" where XXXXX is the last 5 digit of your product serial number. Refer to the
default network name to check these numbers.
For Windows Vista
(
1
)
Select in this order: [Start] - [Control Panel] - [Network and Internet] - [View Network Status] - [Connect to a network
]
(
2
)
In the [Network Connection] window, choose WXR-PG's Network Name, then click on [Connect]
(
3
)
A
window will prompt that the computer is attemptin
g
to connect to the network, followed b
y
a connection success window
.
(4) If you want your computer to automatically sign on to WXR-PG network, check [Save this network] and also check [Automatically connect to this
network
]
]
To see connection status, click on the wireless network icon in the Task Tra
y
at the bottom ri
g
ht of the screen.
Note
Microsoft Windows Vista supports both Internet Protocol Version 4(TCP/IPv4) and Version 6(TCP/IPv6). WXR-PG has no support for TCP/IPv6 at
this time.
For MacOS
(
1
)
Click on the Airport Icon on top ri
g
ht side of the screen.
(
2
)
Select [Turn AirPort On]. List of available networks will soon displa
y.
(
3
)
Select WXR-PG's Network Name.
Note
The default network ID for this product is "WXR-PG-XXXXX" where XXXXX is the last 5 di
g
its of the product serial number.
2.4 Chan
g
in
g
WXR-PG's Confi
g
urations
To chan
g
e or modif
y
WXR-PG's confi
g
urations,
y
ou must use Web CM.
Web CM can be accessed via an
y
Web browser.
Connectin
g
to Web CM
(
1
)
Open a Web browser in the computer or a terminal with Web browser support.
(
2
)
T
y
pe in http://192.168.1.1/ in the address bar, and press Enter.
(3) Choose the User Mode
Type [user] in the User Name field,
and [user] in the Password field. Press [OK] to continue.
Note that the user name and the password are case sensitive,
and the
p
assword ma
y
be chan
g
ed once inside Web CM.
Note
* The factor
y
default user name and password are "user" and "user" respectivel
y
. Please chan
g
e the password for securit
y.
* The look and functionalities of Web CM can be chan
g
ed without notice.
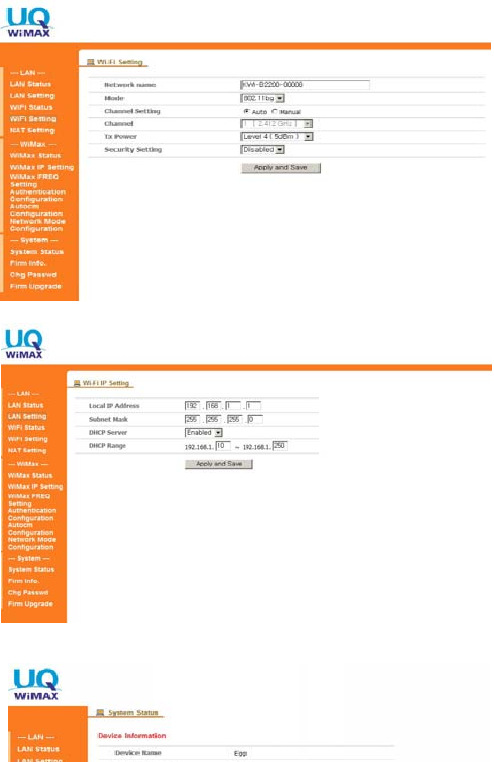
Main Screen
The main screen of Web CM lists minimum securit
y
-related options.
(
1
)
You can chan
g
e WXR-PG's network name and modif
y
its securit
y
settin
g
.
* Network Name: This option sets WXR-PG's Wi-Fi network name.
The factor
y
default network name is set as "WXR-PG."
* Security Setting : This option is set to [Disabled] by default,
and if you opt to change this setting,
This setting will NOT be applied until you press the [Apply and Save] button
This
setting
will
NOT
be
applied
until
you
press
the
[Apply
and
Save]
button.
(
2
)
Wi-Fi Settin
g
* Mode : This option sets XMR-1000L's Wi-Fi Access Mode.
* Channel Setting : This option enables user to select channel.
The Default settin
g
is "Auto" o
p
tion
* Channel : This option is activated by Channel Setting Menu
b
y
choosin
g
Manual o
p
tion.
* Tx Power : This option sets Wi-Fi Tx output power.
(
3
)
Wi-Fi IP confi
g
uration
* Local IP address: This is the Wi-Fi Access Point IP address.
* Subnet Mask: This is the subnet mask allocated to the Wi-Fi Access Point.
* DHCP Server: Shows the DHCP server value for Wi-Fi Access Point.
S
y
stem Status
Displa
y
s the device, LAN, and WiMAX information.
(
1
)
Device
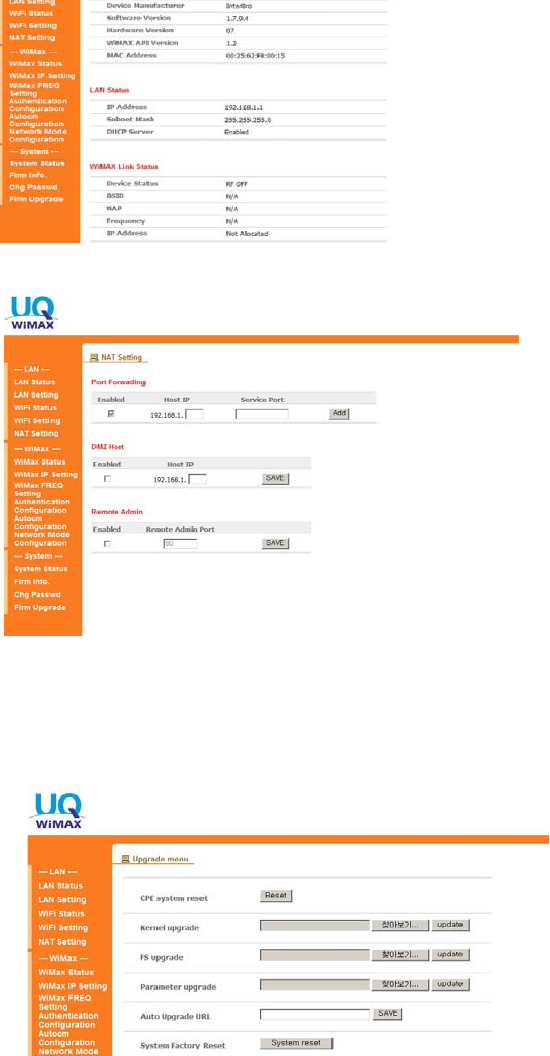
* Device Name/Manufacturer : Displa
y
s the device information.
* Software/Hardware/WiMAX API version : Displa
y
s the version information
* MAC Address : Displa
y
s the allocated MAC Address information
(
2
)
LAN Status
* Displa
y
s LAN status when connected to the device.
(
3
)
WiMAX Link Status
* Displa
y
s WiMAX status when connected to the WiMAX service
y
ou subscribe to.
* Device Status : Displa
y
s the WiMAX Connection status.
* BSID/ NAP/ Frequenc
y
: Displa
y
s the WiMAX service information
(
Radio station,etc.
)
* IP Address : Displa
y
s the allocated IP Address information
Confi
g
urin
g
NAT Settin
g
(1) Port Forwarding
* This o
p
tion enables to set the Port Forwardin
g
b
y
choosin
g
IP,Service Por
t
(
2
)
DMZ Host
* This option enables to set the DMZ Host b
y
choosin
g
IP address.
(
3
)
Remote Admin
* This option enables to set the Remote Admin b
y
selectin
g
Port to control.
U
pg
rade menu
(
1
)
Manual U
pg
rade
In Manual Up
g
rade, the user must download and acquire the firmware file and perform the firmware up
g
rade.
* Downloadin
g
most current firmware
The most current firmware can be downloaded from UQ Web Site
at www.UQ.
jp
or at
y
our service
p
rovider's Home Pa
g
e.
* U
p
datin
g
the firmware
- Lo
g
into Web CM from the computer or a terminal with Web browser support.
- Select [Firm Up
g
rade] from Web CM's menu.
- Click [Browse] and select the downloaded firmware file. (Kernel file , FS file)
- Web CM will display a notification when the upgrade has been completed.
Click
[
U
p
date
]
button to start Firm U
pg
rade.

- Verif
y
in Web CM if the WXR-PG version number matches the firmware version.
Note
The Web Site from which you can download the latest firmware might be different from the ones described above. Please check your box or the
service contract to find the correct URL.
(
2
)
Auto U
pg
rade
Dependin
g
on
y
our WiMAX service provider,
y
our WXR-PG mi
g
ht be set up to automaticall
y
up
g
rade the firmware itself.
* U
pg
radin
g
WXR-PG Automaticall
y
- When you turn on the unit, it checks to see if a new firmware is available. If a new firmware exists, WXR-PG automatically proceeds to download
the firmware file and stores it in its memor
y
.
- The next time you turn off the unit, and if the unit is connected to the power adapter charger, WXR-PG performs the upgrade process before it
turns itself off. While this is
g
oin
g
on, the WiMAX status indicator blinks blue.
- Check the version number inside Web CM.
Warnin
g
A
uto Up
g
rade URL option is made for WiMAX service provider,not for subscriber.
Do not turn on or off the unit and access the Internet while the unit is up
g
radin
g
its firmware.
(
3
)
S
y
stem Factor
y
Rese
t
* This option helps to
g
o back to the Factor
y
settin
g
status.
ppg yg
* Password, ID, SSID information are recovered to the default value.
A
pp
endi
x
S
p
ecifications and FAQs
A.1 Technical S
p
ecifications
WiMAX
* Technolo
gy
standard: IEEE802.16e-200
5
* Si
g
nal frequenc
y
: 2.499 - 2.68675 GHz
(
5 MHz BW
)
/ 2.5085 - 2.6835 GHz
(
10 MHz BW
)
* Si
g
nal accurac
y
: 1% Ma
x
* Si
g
nal stren
g
th: 23dBm
(
200mW
)
max
Wi-Fi
* Technolo
gy
standard: IEEE802.11b/
g
/n
(
HT20
)
* Si
g
nal frequenc
y
: 2.412 - 2.462 GH
z
* Si
g
nal accurac
y
: 2% Ma
x
* Wireless si
g
nal covera
g
e: 30 meters
(
outdoors
)
; 10 meters
(
indoors
)
* Wi-Fi Certification ID:
Batter
y
* Volta
g
e: 3.7V, 2000mAh
A
ntenna
* Built-in, inte
g
rated antenn
a
Environmental requirements
* Operatin
g
temperature: -20 to 50 de
g
rees Celcius
(
-4 to 122 de
g
rees Fahrenheit
)
* Relative humidit
y
: 0% to 95% noncondensin
g
Size and wei
g
h
t
* Dimensions: 60 x 97 x 12.2mm
* Wei
g
ht: 60
g
rams
(
without batter
y)
A
ccessories
* Power adapter char
g
er: DC 5V/2A, Micro USB pin plu
g
t
y
p
e
* User's Instructional Manual
(
this booklet
)
* Quick User's Guide
T
YLIMITED WARRANT
Y
Product Desi
g
nation:
Model:
Date purchased:
Store:
Manufacture number:
Product warrant
y
period:
One
(
1
)
Year Limited Warrant
y
The Limited Warranty Period for this product is one(1) year, commencing on the date of purchase. The date on your sales receipt is the date of
p
urchase unless UQ or
y
our reseller informs
y
ou otherwise in writin
g
.
UQ's warranty obligations are limited to the terms set forth below: UQ warrants this hardware product against defects in materials and workmanship
for a period of ONE (1) YEAR from the date of original retail purchase. If a defect exists, at its option UQ will (1) repair the product at no charge,
using new or refurbished replacement parts, (2) exchange the product with a product that is new or which has been manufactured from new or
serviceable used parts and is at least functionally equivalent to the original product, or (3) refund the purchase price of the product. A replacement
product/part assumes the remaining warranty of the original product or ninety (90) days from the date of replacement or repair, whichever provides
longer coverage for you. When a product or part is exchanged, any replacement item becomes your property and the replaced item becomes UQ's
p
ro
p
ert
y
. When a refund is
g
iven
,
y
our
p
roduct becomes UQ's
p
ro
p
ert
y
.

Warrant
y
Service Table
Insert "Limited Product Warranty" table here
Exclusions and Limitations
This Limited Warranty applies only to hardware products manufactured by or for UQ that can be identified by the "UQ" trademark, trade name, or
logo affixed to them. The Limited Warranty does not apply to any non-UQ hardware products or any software, even if packaged or sold with UQ
hardware. Non-UQ manufacturers, suppliers, or publishers may provide their own warranties. Software distributed by UQ under the UQ brand name
(including, but not limited to system software) is not covered under this Limited Warranty. Refer to the UQ Software License Agreement for more
information. UQ and its Authorized Service Providers are not liable for any damage to or loss of any programs, data, or other information stored on
any media, or any non-UQ product or part not covered by this warranty. Recovery and reinstallation of system and application software and user data
are not covered under this Limited Warranty. This warranty does not apply: (a) to damage caused by accident, abuse, misuse, misapplication, or
non-UQ products; (b) to damage caused by service (including upgrades and expansions) performed by anyone who is not an UQ Authorized Service
Provider; (c) to a product or a part that has been modified without the written permission of UQ; or (d) if any UQ serial number has been removed or
defaced
THIS WARRANTY AND REMEDIES SET FORTH ABOVE ARE EXCLUSIVE AND IN LIEU OF ALL OTHER WARRANTIES, REMEDIES AND
CONDITIONS, WHETHER ORAL OR WRITTEN, EXPRESS OR IMPLIED. UQ SPECIFICALLY DISCLAIMS ANY AND ALL IMPLIED
WARRANTIES, INCLUDING, WITHOUT LIMITATION, WARRANTIES OF MERCHANTABILITY AND FITNESS FOR A PARTICULAR PURPOSE.
IF UQ CANNOT LAWFULLY DISCLAIM IMPLIED WARRANTIES UNDER THIS LIMITED WARRANTY, ALL SUCH WARRANTIES, INCLUDING
WARRANTIES OF MERCHANTABILITY AND FITNESS FOR A PARTICULAR PURPOSE ARE LIMITED IN DURATION TO THE DURATION OF
THIS WARRANTY. No UQ reseller, agent, or employee is authorized to make any modification, extension, or addition to this warranty.
UQ IS NOT RESPONSIBLE FOR DIRECT, SPECIAL, INCIDENTAL OR CONSEQUENTIAL DAMAGES RESULTING FROM ANY BREACH OF
WARRANTY OR CONDITION, OR UNDER ANY OTHER LEGAL THEORY, INCLUDING BUT NOT LIMITED TO LOST PROFITS, DOWNTIME,
WARRANTY
OR
CONDITION
,
OR
UNDER
ANY
OTHER
LEGAL
THEORY
,
INCLUDING
BUT
NOT
LIMITED
TO
LOST
PROFITS
,
DOWNTIME
,
GOODWILL, DAMAGE TO OR REPLACEMENT OF EQUIPMENT AND PROPERTY, ANY COSTS OF RECOVERING, REPROGRAMMING, OR
REPRODUCING ANY PROGRAM OR DATA STORED IN OR USED WITH UQ PRODUCTS, AND ANY FAILURE TO MAINTAIN THE
CONFIDENTIALITY OF DATA STORED ON THE PRODUCT. UQ SPECIFICALLY DOES NOT REPRESENT THAT IT WILL BE ABLE TO REPAIR
ANY PRODUCT UNDER THIS WARRANTY OR MAKE A PRODUCT EXCHANGE WITHOUT RISK TO OR LOSS OF PROGRAMS OR DATA.
Some states and provinces do not allow the exclusion or limitation of incidental or consequential damages or exclusions or limitations on the duration
of implied warranties or conditions, so the above limitations or exclusions may not apply to you. This warranty gives you specific legal rights, and you
may also have other rights that vary by state or province.