Vitelcom Mobile Technology SP-100 TRI-BAND GSM 850/1800/1900 MHz MOBILE PHONE User Manual 6p 70p
Vitelcom Mobile Technology, S.A. TRI-BAND GSM 850/1800/1900 MHz MOBILE PHONE 6p 70p
Contents
- 1. Users Manual 1 of 2
- 2. Users Manual 2 of 2
Users Manual 1 of 2
- 11 -
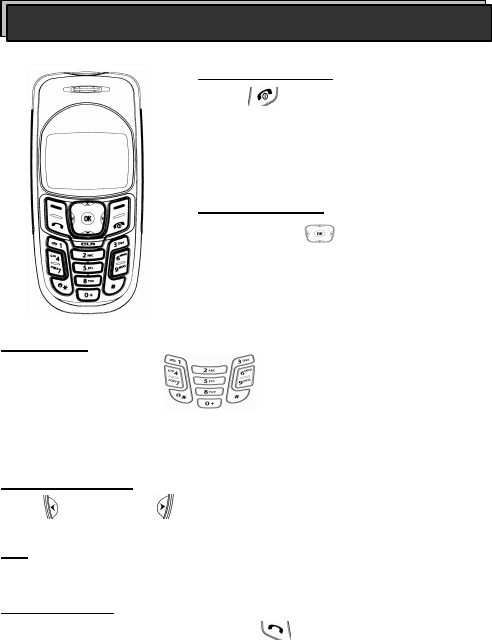
3. Buttons
0 ~ 9 are used for number, text and sign.
* and # buttons have various functions, which are used on the phone menu.
4. Select button
Left ( ) and Right ( ) Select buttons are used to perform the option
positioned right above.
Ref) Select button is displayed in capital letters in thick color in this manual.
For example, ACEPTAR (Confirm)
5. Call button
Press the phone number and then Call ( ) button to start to make a call
to the number.
Telephone
1. On/Off button
Press ( ) button to turn the mobile phone
on or off. Press this button to finish the call. If
the button is pressed for long, you will be back
to the previous screen from the present screen
where a certain menu is applied.
2. Move button
Keep pressing ( ) button to move to the
mobile phone menu. Press Move button
downward to display the menu where SMS
message can be sent. On the basic screen
press Move button upward to display the call
records.

- 12 -
Installation of SIM card
Prior to installation of SIM card, make sure the mobile phone is powered off
and then remove the battery. Since the SIM card can be easily damaged if
scratched or bent, be careful when installing on or removing from the phone.
Introduction
1. Let the back of the phone
directed toward the user, and
press the open lever (as pointed
by the arrow in the figure).
The battery is put together with
the cover as a single unit.
2. Take the battery out as shown
in the figure.
3. Let the yellow connector of
the SIM card directed downward
as shown in the figure and then
put inside onto the corner.
Ref) Hold and take out the SIM
card carefully to remove from the
slot.
4. Install the battery.
- 13 -
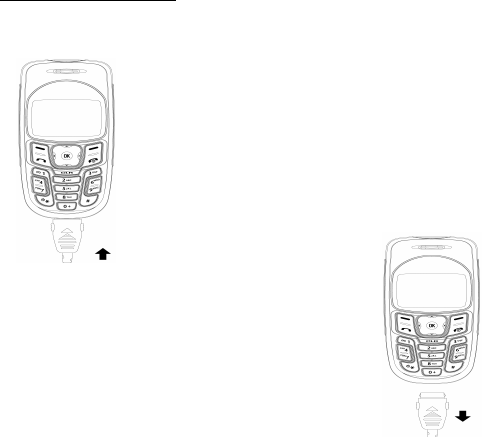
Charging the battery
1. Insert the charger as shown in the figure. (The phone
is available during charging the battery.) If the mobile
phone is turned off, the sign “Battery being charged” will
be displayed continuously.
2. If the battery is charged, it will not
blink as in the figure of the screen.
In order to remove the battery, hold
and press the both ends of the
charger to take out.
- 14 -
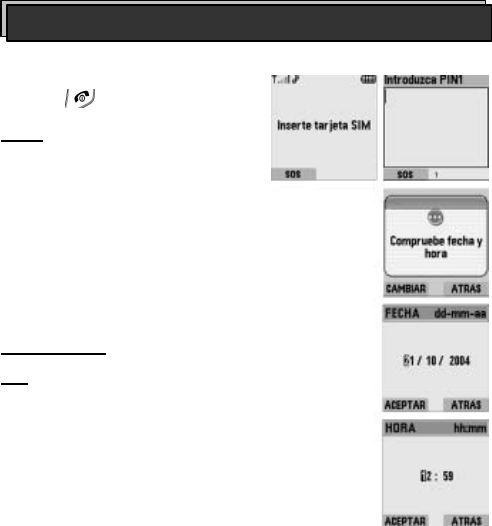
In order to turn the phone on or off, keep
pressing ( ).
Start
If the phone is turned off, 8-digit password
will be required. Input the password and
press OK button.
If the date is correct, press OK button,
if not, input new date and time and then
press OK button.
Main screen
Ref) For 1 minute and 30 seconds after
the phone turned on, its image and
menu may be displayed later than usual,
which is because the menu setting
environment needs such time when the
menu is not visible. After this period of
time, the speed will be back to normal
condition. Stand-by screen is displayed
if the phone is ready to answer and
make the phone call. The stand-by screen
is divided into 4 icon areas.
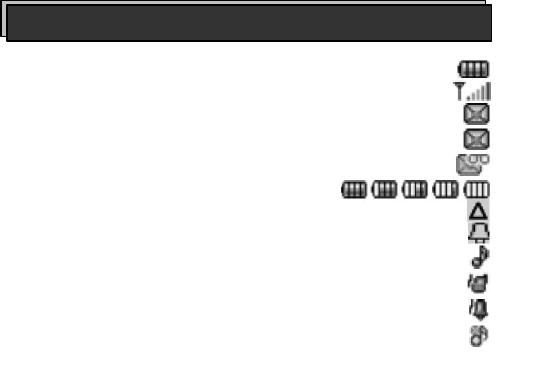
• Icon area: displays each different icon used to show the state of the phone.
Phone ON/OFF

- 15 -
• User’s option screen area: displays connection status
to the communication network including service provider
and service type.
• Date & time area: shows the present time year, month
and day.
• Functions key area: shows Select keys.
Directory allows you to move to the directory if the button pressed.
Menu shows the main menu if the button pressed.
Press the downward arrow to move to a new text message.
Press the upward arrow to display the calling list menu.
You will mainly use the arrow keys with these functions available.
Keep pressing End button to turn the phone off. Press Call (green) button to
move to the call records screen.
Press the number you want to make a call to and then press Call (green)
button. Keep pressing a number button where a phone number is saved if you
want to make a call thereto.
Keep pressing «*»button to set the lock.
Keep pressing «#»button to display «Notice mode» menu in the sound
setting environment. You can set the notice mode as desired.
Press «1» on the basic screen to make a call to voice message box.
- 16 -
1) Battery capacity
2) Frequency strength
3) Receive new text message
4) Notice message, message box capacity insufficient
5) Receive new voice message
6) Battery left
7) Roaming
8) Alarm & Schedule notice
9) Bell mode
10) Vibration mode
11) Bell-vibration mode
12) Mute
Icons used on the basic screen
- 17 -
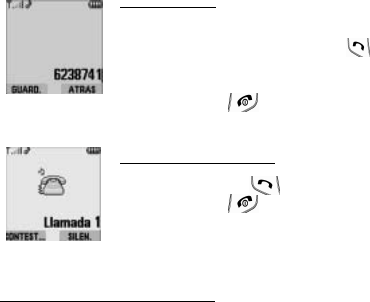
Make a call
In order to make a call, press the number on the stand-by
screen and then press Call(green) ( ) button.
If a wrong number has been pressed, press Clear (CLR)
button to delete the wrong number.
Press End (red) ( ) button to finish the call.
Answer the phone
Press Call(Answer) ( ) button to answer the phone.
Press End/Start ( ) button not to answer the phone.
Setting the manner mode
This function is designed to mute the sound of the bell or the melody for you to
answer the phone while not turned off. Through the mute function, the user
can make the phone call sound mute or withhold the notice function if a call
comes in when the user is not available.
- 18 -
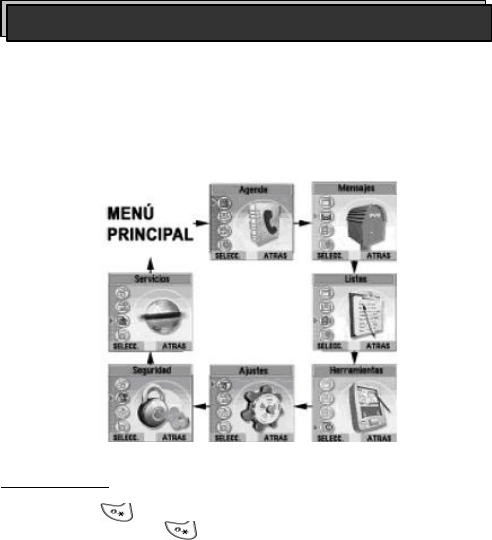
In the stand-by state, press Menu button to go to the basic menu. The basic
menu includes details of Menu with all available functions. Press Up/Down
Move button to go to the desired type of menu. In addition, with the menu
button being pressed, press the applicable number to go to the category for
the number. Figures of icons, names of categories and description of each
menu and shortcut buttons are as follows;
Lock keypad
Keep pressing ( ) the button to lock the keypad.
Press Cancel button and ( ) button to cancel Lock.
Basic menu
- 19 -
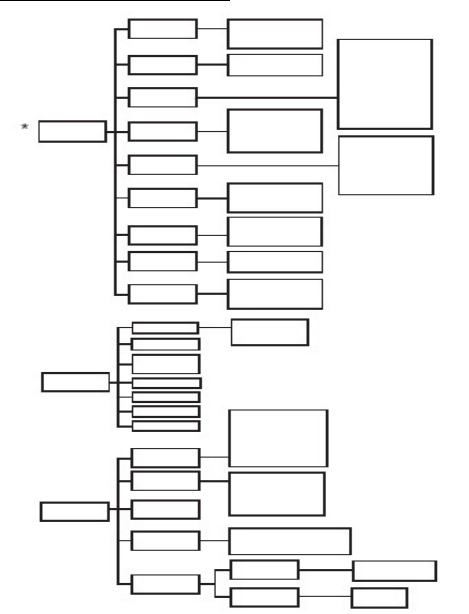
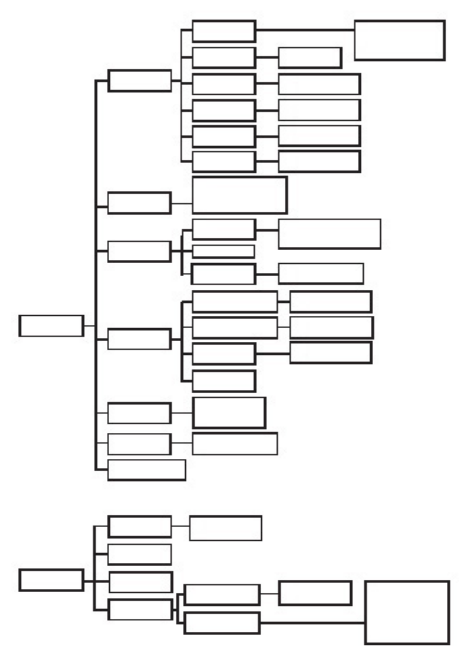
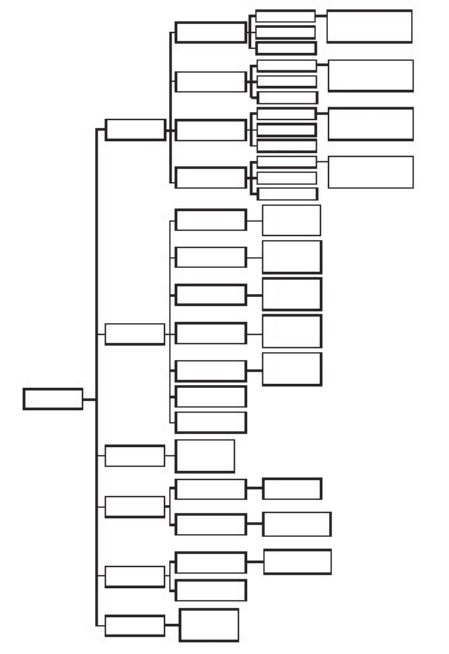
Structure of function menu
* Contact your communication provider and ask if the service is available.
Movistar
menu
Customer
service
Charge
2424 service
Leisure
News
Chatting
Emergency
Roaming
On-line game
Details
Send message
New
Find
Delete
Delete all
Make a call
•
Operator
• Check balance
• Change payment system
•
Other cards
• Advance-paid card
•
Fortune
• Movies, TV
• Humor
• Daily bible
• Self therapy
•
Chatting information
• Chatting channel
• Go chatting
•
Game
of the month
• Finding game
• Catalog
•
Roaming1
• Roaming2
•
Ambulance
• Fire engine
• Police car
•
Edit
• Delete
• Copy to FDN
•
Assistant
• Stock market
• Find roads
• Phone
• Movies
• Drugstore
• ATM
• Flight information
• Tractor
• Police
• Restaurants
•
Domestic news
• International news
• Soccer
• Sports
• Economic news
• Science technology
• Restriction
Directory
Message
Message
received
Message sent
Write message
Change
SMS CB
•
Edit
• Send
• Delete
• Delete all
•
Answer
• Resend
• Delete
• Delete all
• Extract number
•
Message center
• Change voice message box
• Term of validity
Receive
Channel
•
Available
• Unavailable
•
Add
• Execute
- 20 -
In absence
List
Receive
Send
Counter
Delete call list
•
Details
• Send message
• Save
• Make a call
• Delete
•
Details
• Send message
• Save
• Make a call
• Delete
•
Details
• Send message
• Save
• Make a call
• Delete
•
Delete in
-
absence call
• Delete received call
• Delete sent call
• Delete all
Calendar
Calculator
E-book (Tool)
World time
Games
Event
View calendar
Day with event
Today
Add new event
Go to
Delete past event
Delete all events
Exit
•
Alarm
• Meeting
• Birthday
• Notice
Standard area
Local time
Date format
Time format
Date
Time
Sta ndard city
Standard summer time
•
Available
• Unavailable
Local time
Local summer time
•
Available
• Unavailable
•
24 hours
• 12 hours
Snake
Video poker
Memorice
•
Level
• Rules
• Rules
• Rules
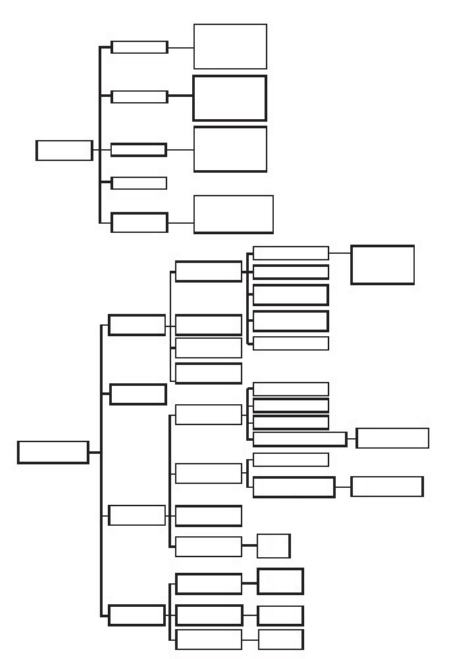
- 21 -
Change
Screen
Notice mode
Volume
Default setting
Key lock
Language
Call
Error sound
Connection sound
Button sound
Message bell
sound
Bell sound
Volume
Stand-by screen
Background brightness
Background
lighting
•
Bell
• Vibration
• Bell & Vibration
•
Mute
•
Digital clock
• World time
•
Always off
• 5, 10, 15, 30 s ec.
• Always on
Shortcut dial
Calling time sound
Auto resend
Receive with key
•
Available
• Unavailable
•
Available
• Unavailable
•
Available
•
Unavailable
•
Unavailable
• Available
•
Auto
• English
• Spanish
Securi
ty
Lock PIN code
Change
PIN2 code
F
.
D
.
N
.
Change
PIN 1 code
•
Available
• Unavailable
Only F.D.N.
Number
•
Details
• New
• Send message
• Make a call
• Find
• Delete
• Delete all
•
Available
• Unavailable
•
Available
• Unavailable
•
Available
• Unavailable
•
Available
• Unavailable
•
Available
• Unavailable
Melody & Bell
• Speaker
• Bell
- 22 -
Services
Receive calls
Call stand-by
Restrict calls
My number
Communication
network
Display sender
Out of service area
Receive if not
answered
Receive during call
Receive all
Status
Unavailable
Available
Status
Unavailable
Available
Status
Unavailable
Available
Status
Unavailable
Avail
able
Change password
Cancel all
Call received
International call
received
International call except
the place of origin
International call
Call sent
•
Available
• Unavailable
• Status
•
Available
• Unavailable
• Status
•
Available
• Unavailable
• Status
•
Available
• Unavailable
• Status
•
Available
• Unavailable
• Status
•
Available
• Unavailable
• Status
•
Available
• Unavailable
Hide sender
• Status
Display sent
number
• To voice message box
• To call list
• To other number
• To voice message box
• To call list
•
To other number
• To voice messa ge box
• To call list
• To other number
• To voice message box
• To call list
• To other number
Preference
•
Add
• Edit
• Delete
Select type
•
Auto
• Manual

- 23 -
Press Directory button on the menu to go to the window where the directory is
saved. (or, press Select button after moving to the directory by pressing
Menu button on the basic screen.)
The phone has two different directories.
1. SIM card directory
2. FDN directory (fixed the phone number)
For more information on FDN directory, refer to Chapter <Safety>.
SIM directory is composed of the following items.
• 14-character name
• 20-digit number
50 FDN phone numbers can be saved in the SIM directory of the phone.
New save
Names and phone numbers can be saved in the SIM directory.
On the basic screen press Menu to move to Directory, and press Select
button to display saved name list. If there is no saved name, the sign “Empty
directory” will be displayed on the screen.
Directory
- 24 -
If the directory is not empty
1. Press Option button on the directory menu.
2. Move to the new item and Press Select button.
3. Input the name and Press OK button.
• When inputting a name, use ( - ) button. Press the button
once to input the 1st
text, twice to input the 2nd text, 3 times to input the 3rd
text and 4 times to input the 4th
text as desired.
• Pressing ( ) button for long or short to change to a capital letter, a
small letter or a number for sentence type. Select type will be displayed
as in Ab, ab, AB, or 123.
• If an empty space is needed, press ( ) button. The symbols in the
( ) stand for space, @ / 1.
• If input incorrectly, it can be deleted to the left direction of the cursor by
pressing the but ton ( ) as many times as desired. Keep pressing
( ) button to delete all the text on the screen.
• Use Move button to move the cursor to the left or to the right.
4. Input the desired phone number along with its applicable district
number and then press OK button.
- 25 -
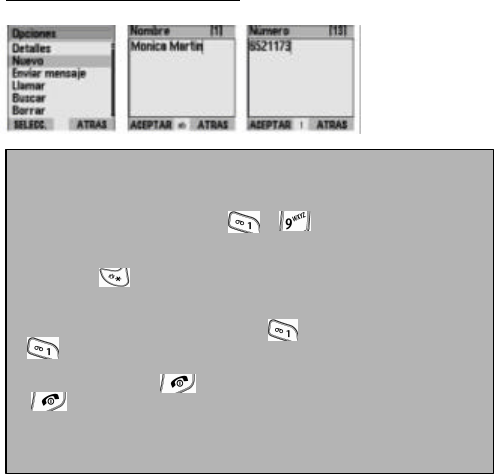
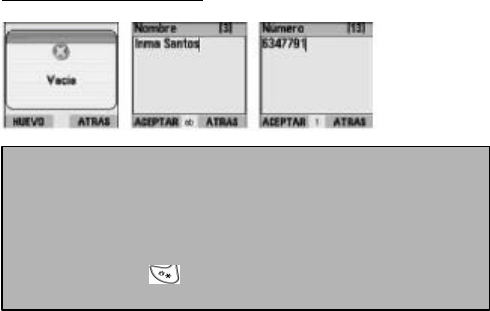
If the directory is empty
1. Press New on the directory menu and press Select button.
2. Input the name and press OK button.
3. Input the phone number and press OK button.
Ref) Quick save- Press the phone number on the basic screen and then
press Save button. Input the name and press OK button.
Ref) Keep pressing ( ) button to display the list of special characters.
. , ¿? _ ! ‘ ” - + * = ( ) [ ] < > { } | # $ % : ; ^ \ & ~ ¥ Ç @ ¡ /
- 26 -
Tecla
1
Press
times
2
Press
times
3
Press
times
4
Press
times
5
Press
times
6
Press
times
1 Space
. , @ / 1
2 A/a
B/b C/c 2 Á/á A/a
3 D/d E/e F/f 3 É/é D/d
4 G/g H/h I/I 4 I/? G/g
5 J/j K/k L/l 5 J/j K/k
6 M/m N/n Ññ O/o 6 Ó/ó
7 P/q Q/q R/r S/s 7 P/p
8 T/t U/u V/v 8 Ú/ú Ü/ü
9 W/w X/ x Y/y Z/z 9 W/w
0 Space
0
Space
0
Space
0
Space
0
Space
0
Space
0
* Short Press: Input text type (Ab, ab, AB, 1)
Long Press: makes Predictive Dictionary available or unavailable.
# Short Press: selects special characters.
- 27 -
View directory details
Specific details of the directory are available as specified below;
Names and phone numbers will be displayed.
Use the move keys to go to the next item from the directory.
Ref) Press End button to return to the main screen.
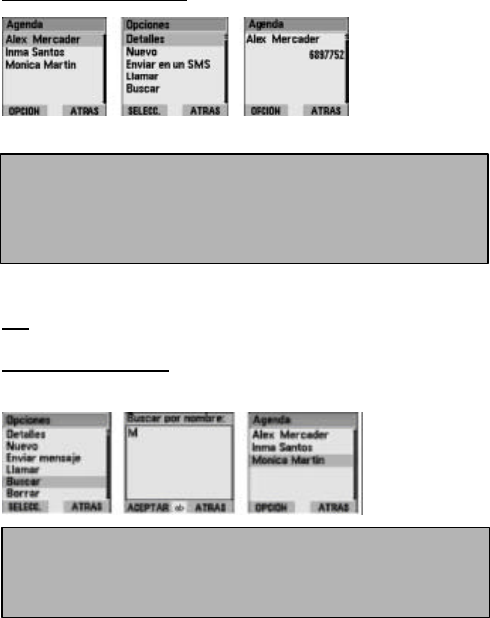
Find a specific item
You can find a specific item in the directory using the following procedures.
1. Select the directory menu.
2. The list of names will be displayed on the directory menu.
3. Use the move keys to select a desired item and then press Option
button.
4. Select details item and then press Select button.
1. Select the menu.
2. The name list will be displayed on the directory menu.
3. Press Option button.
4. Select Find item and then press Select button.
- 28 -
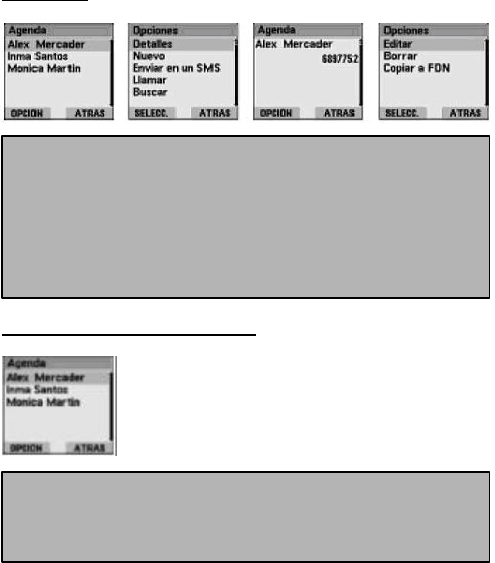
Edit items
Make a call from the directory
1. Select the directory menu.
2. The name list will be displayed on the directory menu.
3. Select a desired item to edit and then press Option button.
4. Press Select button on the details item.
5. Press Option button on the details screen.
6. Move to Edit item and then press Select button.
7. Edit the name and then press OK button.
8. Edit the phone number and then press OK button.
1. Select the directory menu.
2. The name list will be displayed on the directory menu.
3. Use the move keys to select the name to make a call to.
4. Press Call (green) button to make a call.
- 29 -
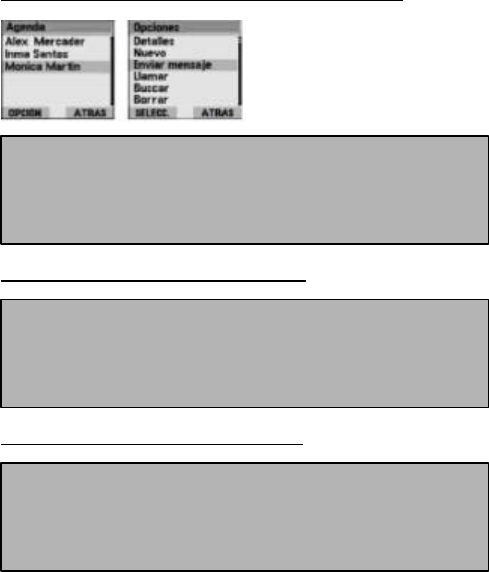
Send a text message through the selected item
Delete one item in the SIM directory
Delete all items in the SIM directory
1. The name list will be displayed on the directory menu.
2. Use the move keys to select the name to send a message to.
3. Press Option button and move up to Send message item.
4. For more information on Send text message, refer to Send a new text
message.
1. Select the directory menu.
2. Press Option button.
3. Select Erase and then press Select button.
4. Confirmation window will be displayed.
5. Press OK button.
1. Select the directory menu.
2. Press Option button.
3. Select Erase All.
4. Confirmation window will be displayed.
5. Press OK button.
- 30 -
Text message
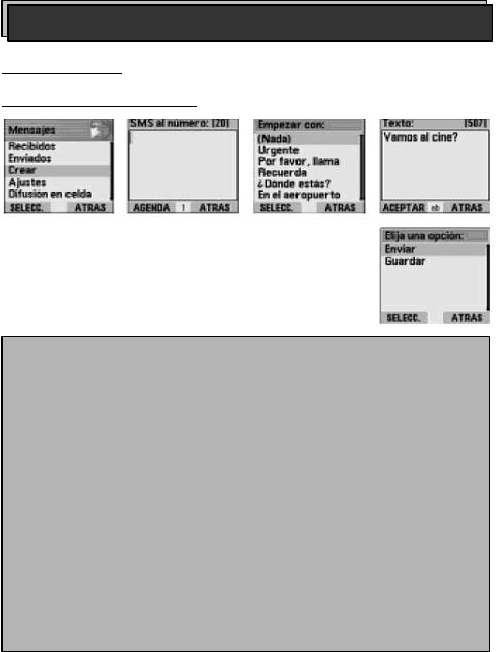
Send a new text message
Message
1. Press Menu button on the basic screen to go to the message menu
and then press Select button.
2. Move to New Message from the message menu and then press Select
button.
3. Input the desired number or use the directory button to find the number
to input. Move to the desired item and then press Select button.
Press OK button. And its edit is available before pressing OK button.
4. Select a commonly used message expression on the list and press
Select button. If commonly used message expressions are not
necessary, select None.
5. Messages can be input on the text screen. After inputting, press OK
button.
6. Option to send and save.
• Select Send if you want to send the message and then press Select
button.
• Select Save if you want not to send but to save the message and then
p
ress
Select button
.
- 31 -
View a new message
If a message is received, the phone lets you know a text message has arrived
by setting tone in the device. You can check the message promptly by
pressing View button or later by pressing Previous button. Pressing Previous
button will display an envelope icon to let you know there are one or more
messages not read on the main screen.
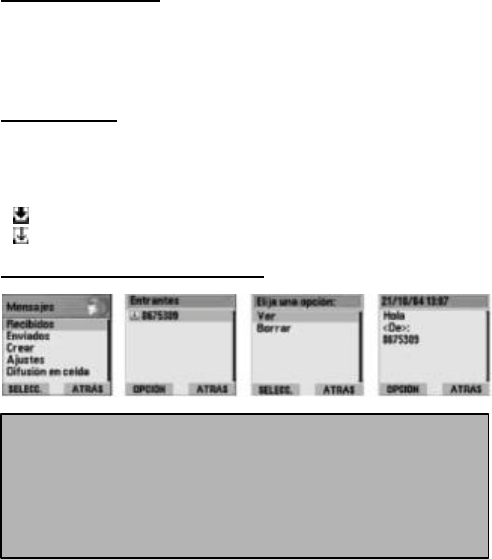
Received box
Received box is a place where all the received messages (SMS) are received
and saved, which includes the list of received messages. The list displays the
icon for message status (read, not read) and the number of the sender. Icons
used to display message status in the received box are as follows;
( ) This icon shows that the message in the received box is not read yet.
( ) This icon shows that the message in the received box has been read.
View messages from received box
1. Press Menu on the basic screen to go to Message item and then press
Select button.
2. Move to the received message box from the message menu and then
press Select.
3. Move to the desired message from the list and then press Option
button.
4. Move to View and press Select button.

- 32 -
Send a reply
Resend the message
1. Press Menu button on the basic screen to go to the message menu
and then press Select button.
2. Move to the received box item from the message menu and then press
Select button.
3. Move to the desired message from the list and then press Option
button.
4. Go to View option and press Select button. Press Option button on
the message details screen and move to Send a reply. Press Select
button. Select None if you don’t want to use the previously prepared
message.
5. Input the message on the text input window and then press OK
button.
6. Option to send and save.
• Select Send if you want to send the message and then press Select
button.
• Select Save if you want not to send but to save the message and then
p
ress
Select button
.
1. Press Menu button on the basic screen to go to the message menu
and then press Select button.
2. Move to the received box item from the message menu and then press
Select button.
3. Move to the desired message from the list and then press Option
button.
4. Go to View option and press Select button. Press Option button on
the message details screen and move to Resend. Press Select button.
Input the message on the text input window and then press OK button.
5. Option to send and save.
• Select Send if you want to send the message and then press Select
button.
• Select Save if you want not to send but to save the message and then
p
ress
Select button
.
- 33 -
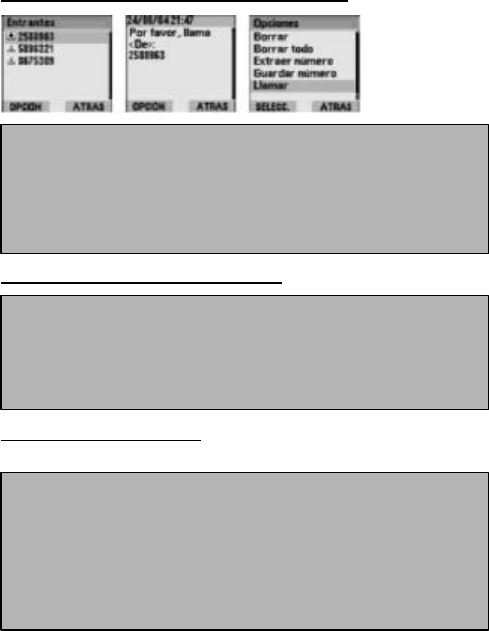
Make a call to the number of message sender
Delete messages in the received box
Extract the phone number
This function is used to extract the desired number from the text message.
1. Press
M
enu
button on
the basic screen to go to the message menu
and then press Select button.
2. Move to the received box item from the message menu and then press
Select button.
3. Move to the desired message from the list and then press Option
button.
4. Go to View option and press Select button.
5.
Press
Option button
and move to Call. And p
ress
Select button
.
1. Press
M
enu
button on the basic screen to go to the message menu
and then press Select button.
2. Move to the received box item from the message menu and then press
Select button.
3. Move to the desired message from the list and then press Option
button. Go to Delete and press Select button.
4. Press
OK button
.
1. Press
M
enu
button on the basic screen to go to the message menu
and then press Select button..
2. Move to the received box item from the message menu and then press
Select button.
3. Move to the desired message from the list and then press Option
button.
4. Go to View option and press Select button.
5. Press Option button and move to Extract. If the number is once
extracted, you can make a call and send a message to the number and
save the number as well.
- 34 -
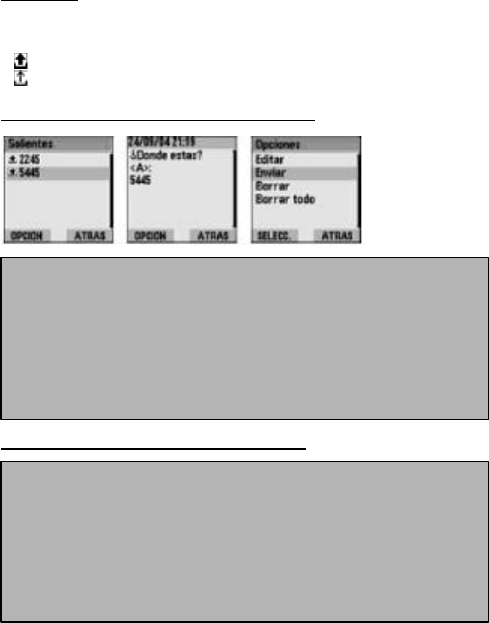
Sent Box
Sent Box is a place where all the sent messages are made and saved.
Icons used to display message status in the sent box are as follows;
( ) Message not sent.
( ) Message sent.
Send the message saved in the sent box.
Edit the message saved in the sent box.
1. Press
M
enu
button on the basic screen to go to the message menu
and then press Select button.
2. Move to the sent box from the message menu and then press Select
button.
3. Move to the desired message from the list and then press Option
button.
4. Go to View option and press Select button.
5. Press Option button.
6. Select Send to send the message.
1. Press
M
enu
button on the basic screen to go to th
e message menu
and then press Select button.
2. Move to the sent box from the message menu and then press Select
button.
3. Move to the desired message from the list and then press Option
button.
4. Go to View option and press Select button.
5. Press Option button.
6. Select Edit Option to edit the message.

- 35 -
Setting message box environment
Through the environment setting menu of the message box, you can specify
the number of the voice messages and text messages in the box and change
the term of validity of messages.
Change the number of text messages in the box
Change the number of voice messages in the box
Change the term of validity of messages
1. Press Menu button on the basic screen to go to the message menu
and then press Select button.
2. Go to Change menu list and press Select button.
3. Select the option of the message box and press Select button.
4. Input the desired number of messages in the box and then press OK
button
.
1. Press Menu button on the basic screen to go to the message menu
and then press Select button.
2. Go to Change menu list and press Select button.
3. Select the option of the voice message box and press Select button.
4. Input the desired number of voice messages in the box and then press
OK button
.
1. Press Menu button on the basic screen to go to the message menu
and then press Select button.
2. Go to Change menu list and press Select button.
3. Select the option of the term of validity and press Select button.
4. Input the desired term of validity and press OK button.

- 36 -
SMS CB (Callback)
SMS CB message
SMS CB environment setting
Environment setting of SMS CB option can be specified through this menu.
Check this service is available from your communication service provider. This
service is available only when provided through the communication network of
its provider.
SMS CB service available/unavailable
Channel available/unavailable
Add new channel
1. Press
Menu
on the basic screen to move to the message item and
then press Select button.
2. Go to SMS CB list item and press Select button.
3. Select Receive option and press Select button.
4. Select Available/Unavailable.
1. Press
Menu
on the basic screen to move to the message item and
then press Select button.
2. Go to SMS CB list item and press Select button.
3. Select Channel option and press Select button.
4. Select the desired channel and press Option button.
5. Go to Available/Unavailable menu list to make it available or unavailable.
1. Press
Menu
on the basic screen to move to the messag
e item and
then press Select button.
2. Go to SMS CB list item and press Select button.
3. Select Channel option and press Select button.
4. Press the option button.
5. Select Add and press Select button.
6. Input the channel number and press OK button.
7.
Input the channel name and press
OK button
.

- 37 -
You can refer to information of previously received calls, sent calls and calls in
absence.
Press Menu on the basic screen to move to the call list and then press Select
button.
Sent call list
10 sent calls are saved in the sent call list.
Select the sent call list on the call list menu to display the list of calls you have
sent.
View sent call details
You can find details of name, number, calling time, date and time.
Make a call from the sent call list
Save the sent call list number in the directory
List
• Use the move keys to go to the sent call list and press Select button.
• Move to the desired number and press Option button.
• Go to the details item and press Select button.
• Use the move keys to go to the sent call list and press Select button.
Go to the desired number and press Call (green) button.
• Use the move keys to go to the sent call list and press Select button.

- 38 -
Delete the sent call list number
You can delete one or all numbers from the sent call list.
Delete individual number from the sent call list
Delete all numbers from the sent call list
Received call list
10 received calls are saved in the sent call list.
Select the received call list on the call list menu to display the list of calls you
have received.
View received call details
You can find details of name, number, calling time, date and time of the received
calls.
• Move to the selected number and press Option button.
• Use the move keys to go to Save item and press Select button.
• Use the move keys to go to the desired number to delete from the sent
call list, and press Option button.
• Go to Delete item and press Select button.
• If the confirmation window is displayed, press OK button to execute
Delete.
• Press Select button on the list menu.
• Move to Delete item from the call list and press Select button.
• Select Delete the sent calls on the list and press Select button.
• If the confirmation window is displayed, press OK button to delete all
the sent calls on the list.

- 39 -
Make a call from the received call list
Save the received call list number in the directory
Delete the received call list number
You can delete one or all numbers from the received call list.
Delete individual number from the received call list
Delete all numbers from the received call list
• Use the move keys to go to the received call list and press Select
button.
• Move to the desired number and press Option button.
• Go to the details item and press Select button.
• Use the move keys to go to the received call list and press Select
button. Go to the desired number and press Call (green) button.
• Use the move keys to select the received call list number.
• And press Option button.
• Use the move keys to go to Save item and press Select button.
• Use the move keys to go to the desired number to delete from the
received call list, and press Option button.
• Go to Delete item and press Select button.
• If the confirmation window is displayed, press OK button to execute
Delete.
• Press Select button on the list menu.
• Move to Delete item from the call list and press Select button.
• If the confirmation window is displayed, press OK button to delete all
the sent calls on the list.

- 40 -
Call list in absence
10 calls in absence are saved in the in-absence call list.
Select the in-absence call list on the call list menu to display the list of calls
you have not received.
View in-absence call details
You can find details of name, number, date and time of the received calls.
Make a call from the in-absence call list
Save the in-absence call list number in the directory
Delete the in-absence call list number
You can delete one or all numbers from the in-absence call list.
De lete individual number from the in-absence call list
•
Use the move keys to go to the in
-
absence call list and press
Option
button.
•
Go to the details item and press
Select button
.
•
Use the move keys to go to the in
-
absence call list and press
Select
button. Go to the desired number and press Call (green) button.
•
Use the move keys to select the in
-
absence call list number.
• Press Select on the desired number to save and press Option.
•
Use the move keys to go to Save item and press
Select button
.
• Use the move keys to go to the desired number to delete from the in-
absence call list, and press Option button.
• Go to Delete item and press Select button.
• If the confirmation window is displayed, press OK button to execute
Delete.
- 41 -
Delete all numbers from the in-absence call list
Delete all the call records
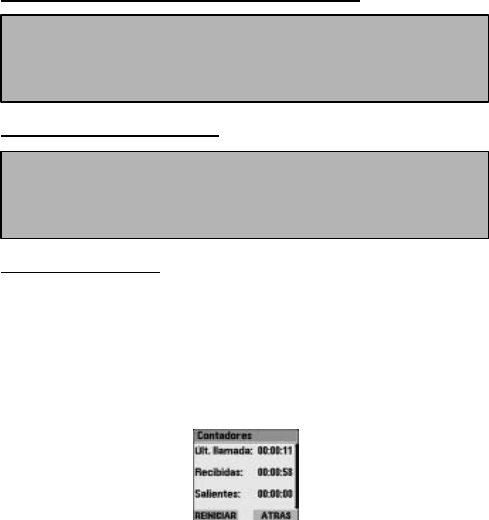
Calling time gauge
Information of each calling time is displayed through the sub-menu of the
calling time gauge.
Calling time of the last call and all the received/sent calls are saved in the
gauge.
Press Restart button to initialize the calling time of the last call and
received/sent calls.
If the confirmation window is displayed, press OK button to restart the gauge.
• Move to Delete item from the call list and press Select button.
• Select Delete the in-absence call list and press Select button.
• If the confirmation window is displayed, press OK button to delete all
the calls on the list.
• Select Delete call list on the list menu.
• Use the move keys to select Delete all the list and press Select button.
• If the confirmation window is displayed, press OK button to delete all
the call records on the list.

- 42 -
Calendar
Various kinds of alarms are available for this phone. If an alarm bell rings at a
specific time, a message will be displayed on the phone.
If an event is added, its details and options of Edit/Delete can be specified.
Additional options of the event are also available, and one or all the events
can be deleted on a specific date.
E
-
book (tool)
1. Press Menu button on the basic screen to move to E-book and press
Select button.
2. Go to the calendar and press Select button.
3. Press Select button on Event item.
4. Press Add.
5. Select Alarm option (or desired type of event).
6. Input the desired message and press OK button.
7. Input the desired alarm time and press OK button.
8. If you want a single alarm bell, select «Once», and if you want daily
alarm bells at a specific time select «Daily » and then press Select
button
.
1. Press Menu button on the basic screen to move to E-book and press
Select button.
2. Go to the calendar and press Select button.
3. Press Select button on Event item.
4. Move to the desired event and press Option button.
5. Select the desired item (Details, Send or Delete).
1. Press Menu button on the basic screen to move to E-book and press
Select button
.