Voxx Electronics DEI7752 Hand Held Security/Remote Control Transceiver User Manual pages 22 to 30
DEI Headquarters, Inc. Hand Held Security/Remote Control Transceiver pages 22 to 30
Contents
- 1. user manual page 1 to 20
- 2. user manual pages 1 to 20
- 3. user manual page 21
- 4. user manual pages 22 to 30
- 5. user manual page 31 to 54
user manual pages 22 to 30
22 © 2008 Directed Electronics. All rights reserved.
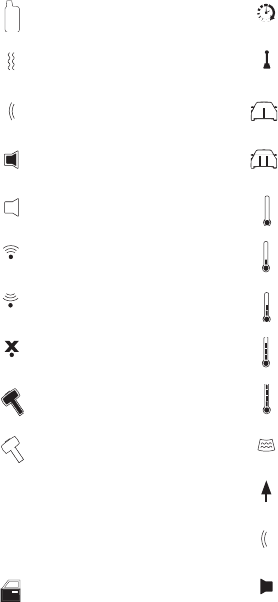
9
ALL
Pager Off 30
ALL
Timer Mode
10
ALL
Pager Vibe On 31
ALL
Manual Transmission En-
abled
11
ALL
Pager Tone On 32
ALL
Car 1
12
ALL
Siren 33
ALL
Car 2
13
ALL
Silent Mode 2 34
ALL
Thermometer very cold
14
ALL
Transmit 35
ALL
Thermometer cold
15
ALL
Receive 36
ALL
Thermometer comfortable
16
ALL
Out of Range 37
ALL
Thermometer warm
17
ALL
Sensor 38
ALL
Thermometer hot
18
ALL
Sensor Bypassed 39
ALL
Defroster
19
ALL
All Zones 40 Arrow
20
ALL
1 41
ALL
Sound Wave
21
ALL
Car Door 42
ALL
Large Siren
➤ Multi-car control capability
You can operate the 2-way remote control system for two cars, with full
command capability for both vehicles.

23
© 2008 Directed Electronics. All rights reserved.
While holding a command button and transmitting, the car icon at the
top of the remote control will blink in groups to indicate which Car is
being controlled.
Car 1: 1 blink•
Car 2: 2 blinks•
To change the Car to be operated:
Two Way Remote
Press/hold the
A U X
button for 3 seconds or until the remote beeps
and the text reads Car 1 or Car 2. Pressing the
A U X
button will scroll
between the two.. This will indicate which car the remote currently
operates.
One Way Remote
Press and hold the
A U X
button until the amber light blinks once or twice
indicating current vehicle (one blink = car 1. 2 blinks = car 2)
to scroll from one to the other press the
A U X
button again.
Using the system
➤ Arming the system
To arm the system, press the
A U X
button on the remote control.
The siren in the vehicle will “chirp” once and the parking lights will
flash once. If the power door locks have been connected, the doors
will lock. The system will automatically check for errors when it arms.
The 2-way remote will “chirp” once and blink the LOCK indicator to

24 © 2008 Directed Electronics. All rights reserved.
confirm arming. If no arm confirmation is received, the remote will give
the Out-Of-Range signal.
If errors are found when arming:
If an alarm trigger zone – such as a door, the trunk, the hood, or a
sensor, was active at the time of arming, the system will “bypass”, or
ignore, this trigger zone. This allows the system to continue to protect
your vehicle using the remaining trigger zones.
You are notified of this active zone immediately after arming the system.
The siren in the vehicle will “chirp” again and the parking lights will
flash again. The Status LED indicator in the vehicle will blink in a pattern
to indicate the active zone number error which was found (See Table
of Zones on page 36). The 2-way remote control will sound a short
“error” tone.
Arming without the chirp (Silent Arm):
Press the
A U X
button at the bottom of the remote once, and then press
the
A U X
button. The system will arm without the confirmation chirp. The
parking lights will flash once. The 2-way remote will blink the LOCK in-
dicator to confirm arming. If no arm confirmation is received, the 2-way
remote will give the Out Of Range signal.
➤ While the system is armed
Fail-Safe Starter Kill•
The starter is disabled by the system’s Fail-Safe starter kill.
Alarm Responses
The security system can generate two levels of alarm: Warn Away - Soft
25
© 2008 Directed Electronics. All rights reserved.
siren chirps and flashing parking lights.
The purpose of Warn-Away is to warn a would-be thief next to your
vehicle that the vehicle is protected, but in a manner that does not call
attention to it from more than a few feet away.
Full Alarm Trigger
Sounds the siren at maximum volume and ashes the parking lights.
The default duration of the Full Alarm is 30 seconds. This can be pro-
grammed to any duration from 30 to 60 seconds manually. Ask your
authorized dealer for details.
Pages the 2-way remote control. If in range, the two way remote will
display what triggered the alarm.
Warn-Away response is triggered by:
Lesser or lighter vibrations or impacts (detected by the Stinger •
Doubleguard shock sensor)
Opening a door: the Progressive Door Trigger feature will sound •
the Warn Away response, followed immediately by Full Alarm
Any attempt to start the car: the Progressive Ignition Trigger will •
first sound the Warn Away response, followed immediately by Full
Alarm.
An optional Proximity Sensor (508D) triggered in the outer zone.•
Full Alarm response is triggered by:
Heavier impact to the vehicle (detected by the Stinger Double-•
Guard shock sensor).
Opening the trunk or hood.•
Opening a door: the Progressive Door Trigger feature will first •

26 © 2008 Directed Electronics. All rights reserved.
sound the Warn-Away response, followed immediately by Full
Alarm.
An optional sensor, such as an optional Proximity Sensor triggered •
in the inner zone.
Paging Signals
If the Full Alarm response is triggered, the 2-way remote control will be
sent a paging signal by the in-car system.
Note:
Call the police immediately if you witness a crime in progress.
Paging range varies with terrain and environmental conditions.
➤ Modified Arming Modes
The Responder LC gives you an unprecedented level of control over
how it will protect your car. “Normal arming” means that all the Re-
sponder LC security features are active automatically. You can turn
some security features off on a one-time basis.
Turning off the Warn Away response
After arming, you can turn off the Warn-Away response on a one-time
basis.
Press the 1.
A U X
button twice.
Press the 2.
A U X
button.
The
A U X
LED flashes and the remote sounds an error tone.
Now, slight impacts or vibrations will not trigger Warn-Away. Heavy
impacts will still trigger Full Alarm.
Note:
The next time you arm the system, Warn-Away will work
normally.
27
© 2008 Directed Electronics. All rights reserved.
Turning off the Sensor Full Trigger response
You can completely disable the Stinger Doubleguard Shock Sensor
and any added optional sensors on a one-time basis. The entry points
(doors, hood, etc.) will still be monitored. All sensors will not be able to
trigger the Warn-Away response or the Full Alarm response.
After disabling Warn-away response, press the 1.
A U X
the button
twice.
Press the 2.
A U X
button.
Note:
The next time you arm the system, the shock sensor will work
normally.
Silent Mode 2 - Turning off the siren
You can turn off the vehicle siren and flashing lights on a one-time basis,
leaving the system’s paging feature as the only alarm response.
Note: Call the police immediately if you witness a crime in progress.
Paging range varies with terrain and environmental conditions.
Full Silent Mode.
In this mode, the siren cannot be triggered, but any trigger will cause
the 2-way remote to be paged.
Press the
A U X
button four times, and then press the
A U X
within five
seconds.
Sensor Silent Mode
In this mode, a sensor cannot trigger the siren, but will cause the
2- way remote to be paged. All entry points (doors, hood, etc.) will still
trigger the siren.
Press the
A U X
button three times, and then press the
A U X
button.
Note:
The next time you arm the system, it will function normally.

28 © 2008 Directed Electronics. All rights reserved.
➤ Disarming the System
While the system is armed normally:
Press the •
A U X
button once.
The siren in the vehicle will “chirp” twice, and the parking lights will
ash. The 2-way remote will “chirp” twice and the
A U X
LED indicator
will blink.
If you hear four chirps on disarming, the system was triggered in your
absence. Immediately look at the Status LED in the vehicle and count
the number of flashes between pauses. This number is important, it tells
what triggered your alarm. See Disarming section under Diagnostics on
page 34 for more details.
If you hear five chirps on disarming, the system was repeatedly trig-
gered in your absence. Immediately look at the Status LED in the vehicle
and count the number of flashes between pauses. This number is impor-
tant, it tells what triggered your alarm.
The door locks (if connected) will unlock, and the parking lights will
flash.
While the alarm is triggering:
Press the
A U X
button on the remote. The siren will stop sounding and
disarm the alarm system.
High-Security Disarming
If you want the Full Alarm response to stop without unlocking the doors,
press the
A U X
button. The system will re-arm and the current alarm re-
sponse will reset.
➤ System override
29
© 2008 Directed Electronics. All rights reserved.
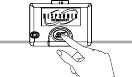
To disarm the system without a remote control:
You will need to use your Override Switch located on your systems
control center (see diagram below) to disarm the system. The Override
Switch disarms the system only if you have the vehicle key.
2. Radious will be if not specied.
1. Tex ture is same as
3. Body color :
INJECT TOLERANCE SPEC.
*Tolerance please refer specication
of tolerance limits "c"
120~300
DIMENSION
30~120
UNDER 6
0.40 0.80
0.20
0.10
0.08
A
±
GRADE
6~30
B
±
0.40
0.20
0.16
2.00
C
±
0.40
0.80
0.30 DEI
NUTEK
FELIX
VICTO R
APPD BY
UNIT:
M/M
CODE
MATERIAL
FINISH
SCALE:
1:1
YG F
SHEET
DRN BY
CHK BY
11/20/07
OF
DATE
A4
TITLE
DEPTSIZE
REV.
1
REVISIONS
DESCRIPTION
CORPORA T ION
OLED IVU
94I0600
DRAWING NO
0
REV
DATE DRN.
94I0600
CASE P/N:IADGH0A1
KEY P/N:IKDEL0A0
36.32
11.50
10.44
%2'<0$7(5,$/+,+($7$%689
%/$&.
To check proper operation:
Open the door. The alarm will sound.•
Immediately insert the key into the ignition and turn it to the RUN or ON
position. (all the indicators in the dash will turn on).
Press the Override Switch once.
Note: The Override Switch feature allows you to select a specific
number of presses needed to disarm the alarm. If the Override
Switch has been programmed to a new number of presses by your
authorized dealer, that number should be indicated below.
Override Switch Number ___________

30 © 2008 Directed Electronics. All rights reserved.
Using the remote start
➤ Before using your Remote Start
Read this user guide, including the Warnings section at the begin-
ning.
Ensure that the vehicle is parked in the open air and not in a garage.
To use your remote start to pre-warm or pre-cool your vehicle, remember
to set the climate controls to the desired settings before shutting off the
engine.
➤ Remote starting your vehicle
Press the •
A U X
button on the remote control. The vehicle parking
lights flash.
On the 2-way remote, the Remote Start indicator appears and •
ascending Remote Start tone plays.
The preset remote start run time is 12 minutes. This can be changed to
between 12 and 60 minutes (see your authorized dealer for program-
ming changes).
Your system has a feature (if programmed on) that will automatically
notify you when the run time is running low. When 9 minutes (of the 12
minute default) runtime has elapsed, the system sends the 2-way remote
control a paging signal.
➤ Points to remember
If the hood is open or is the brake pedal is pressed, the vehicle will not
start using remote start. The remote starter shuts down:
When the brake pedal is pressed •
The hood is opened •