WINIA Electronics 7NF0008 Video Cassette Recorder User Manual 15708270 VR661HF E 01 CVR

Dongbu Daewoo Electronics Corporation Video Cassette Recorder 15708270 VR661HF E 01 CVR
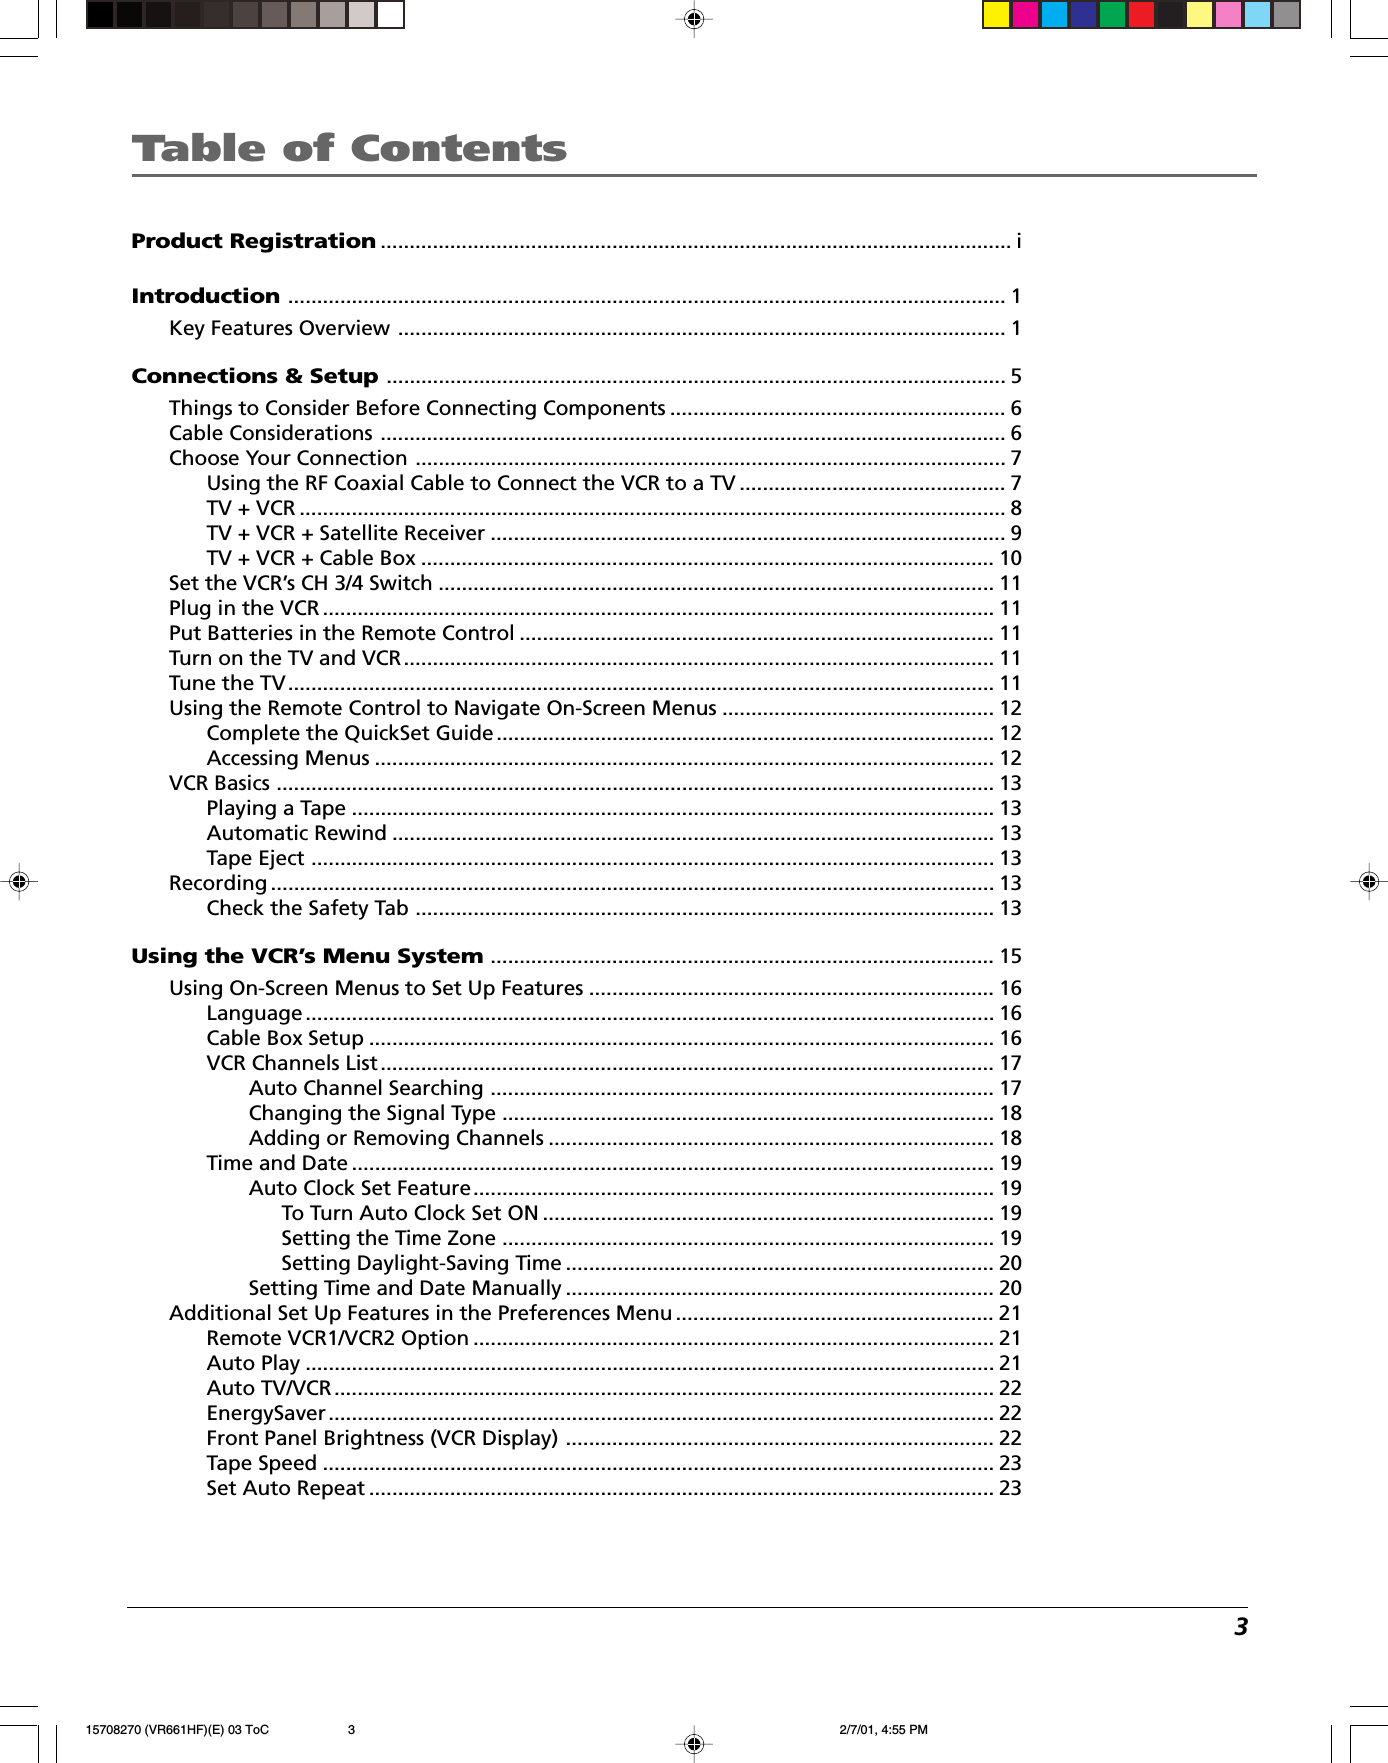
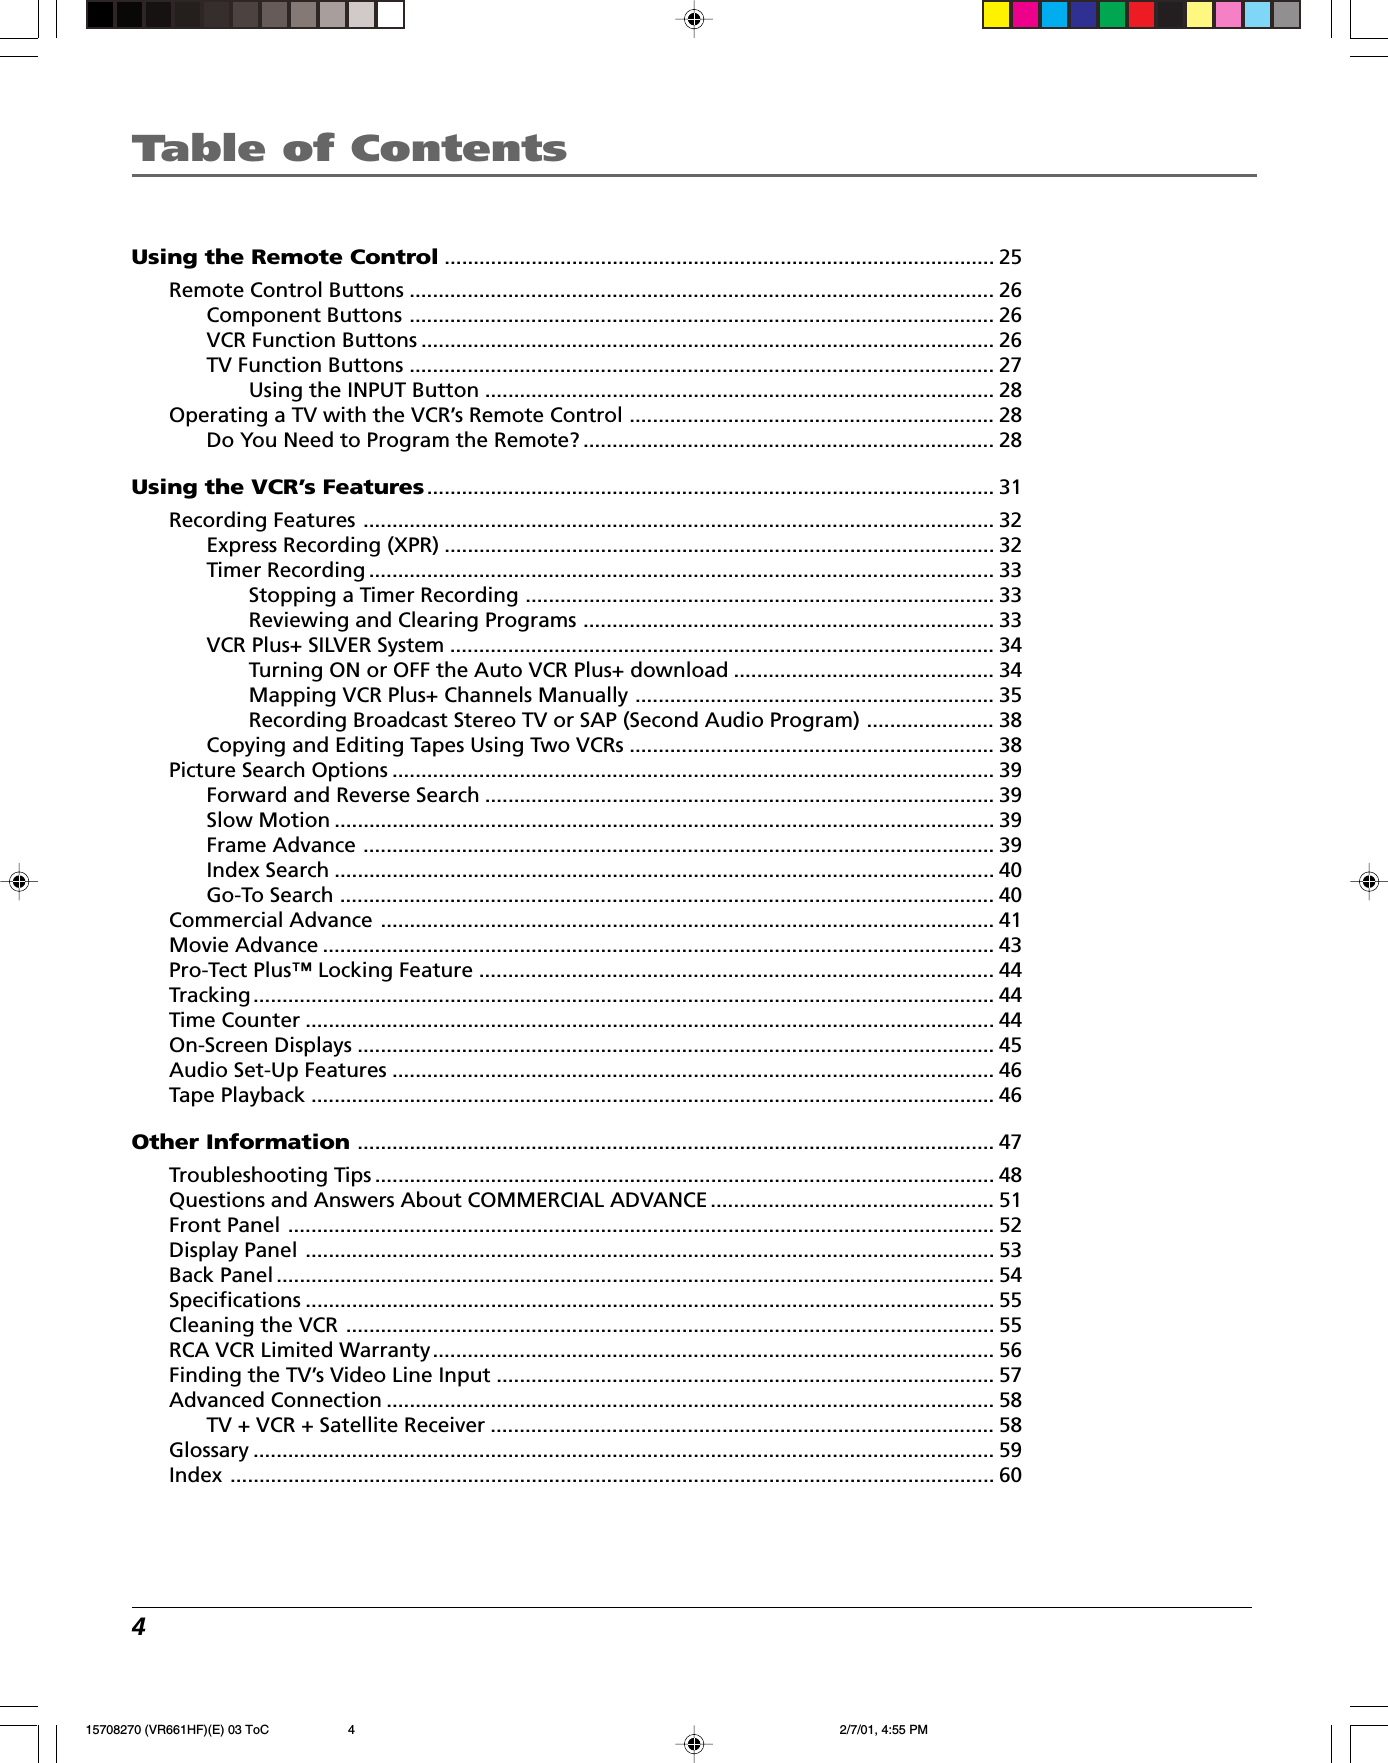
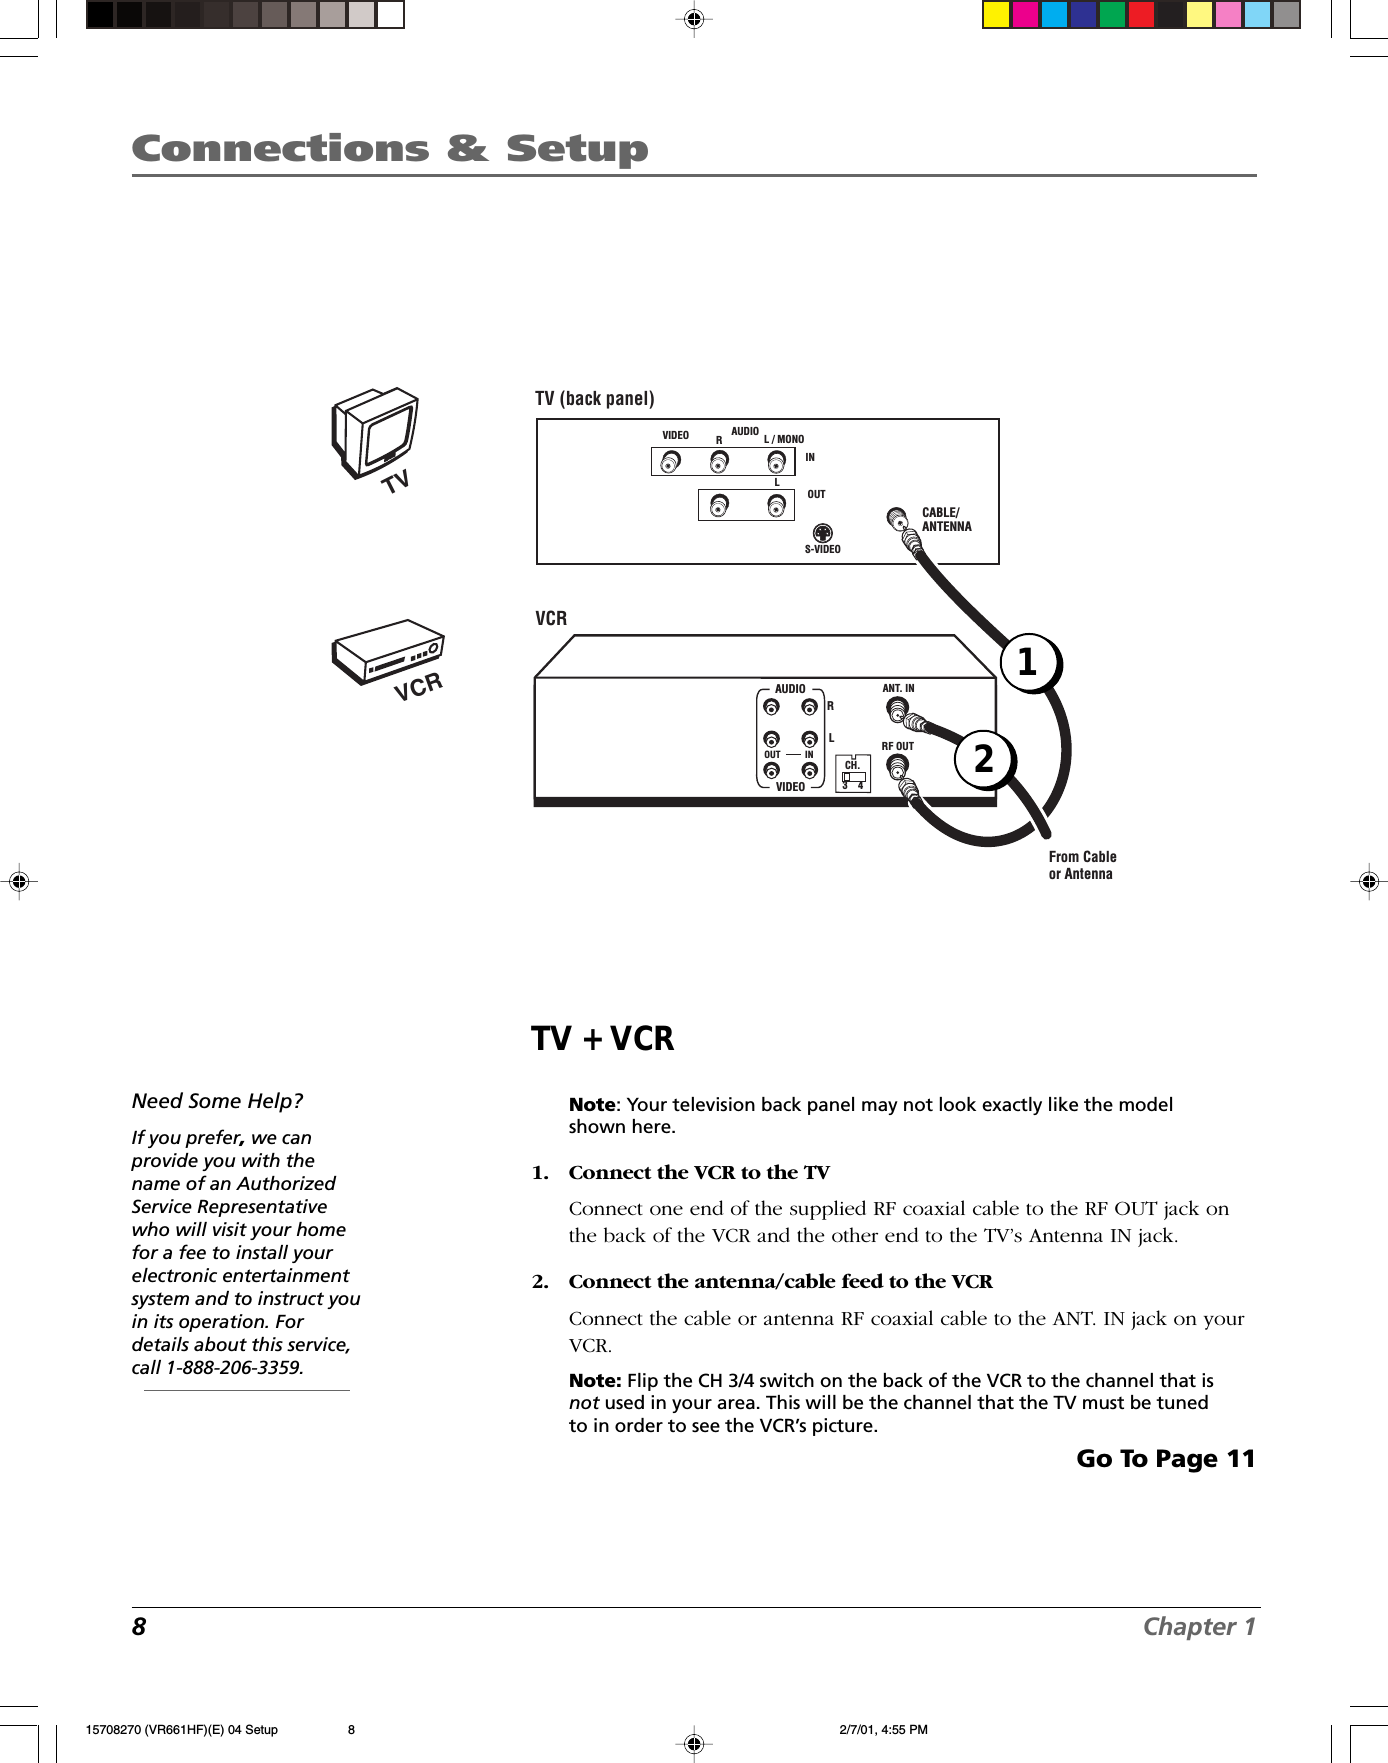
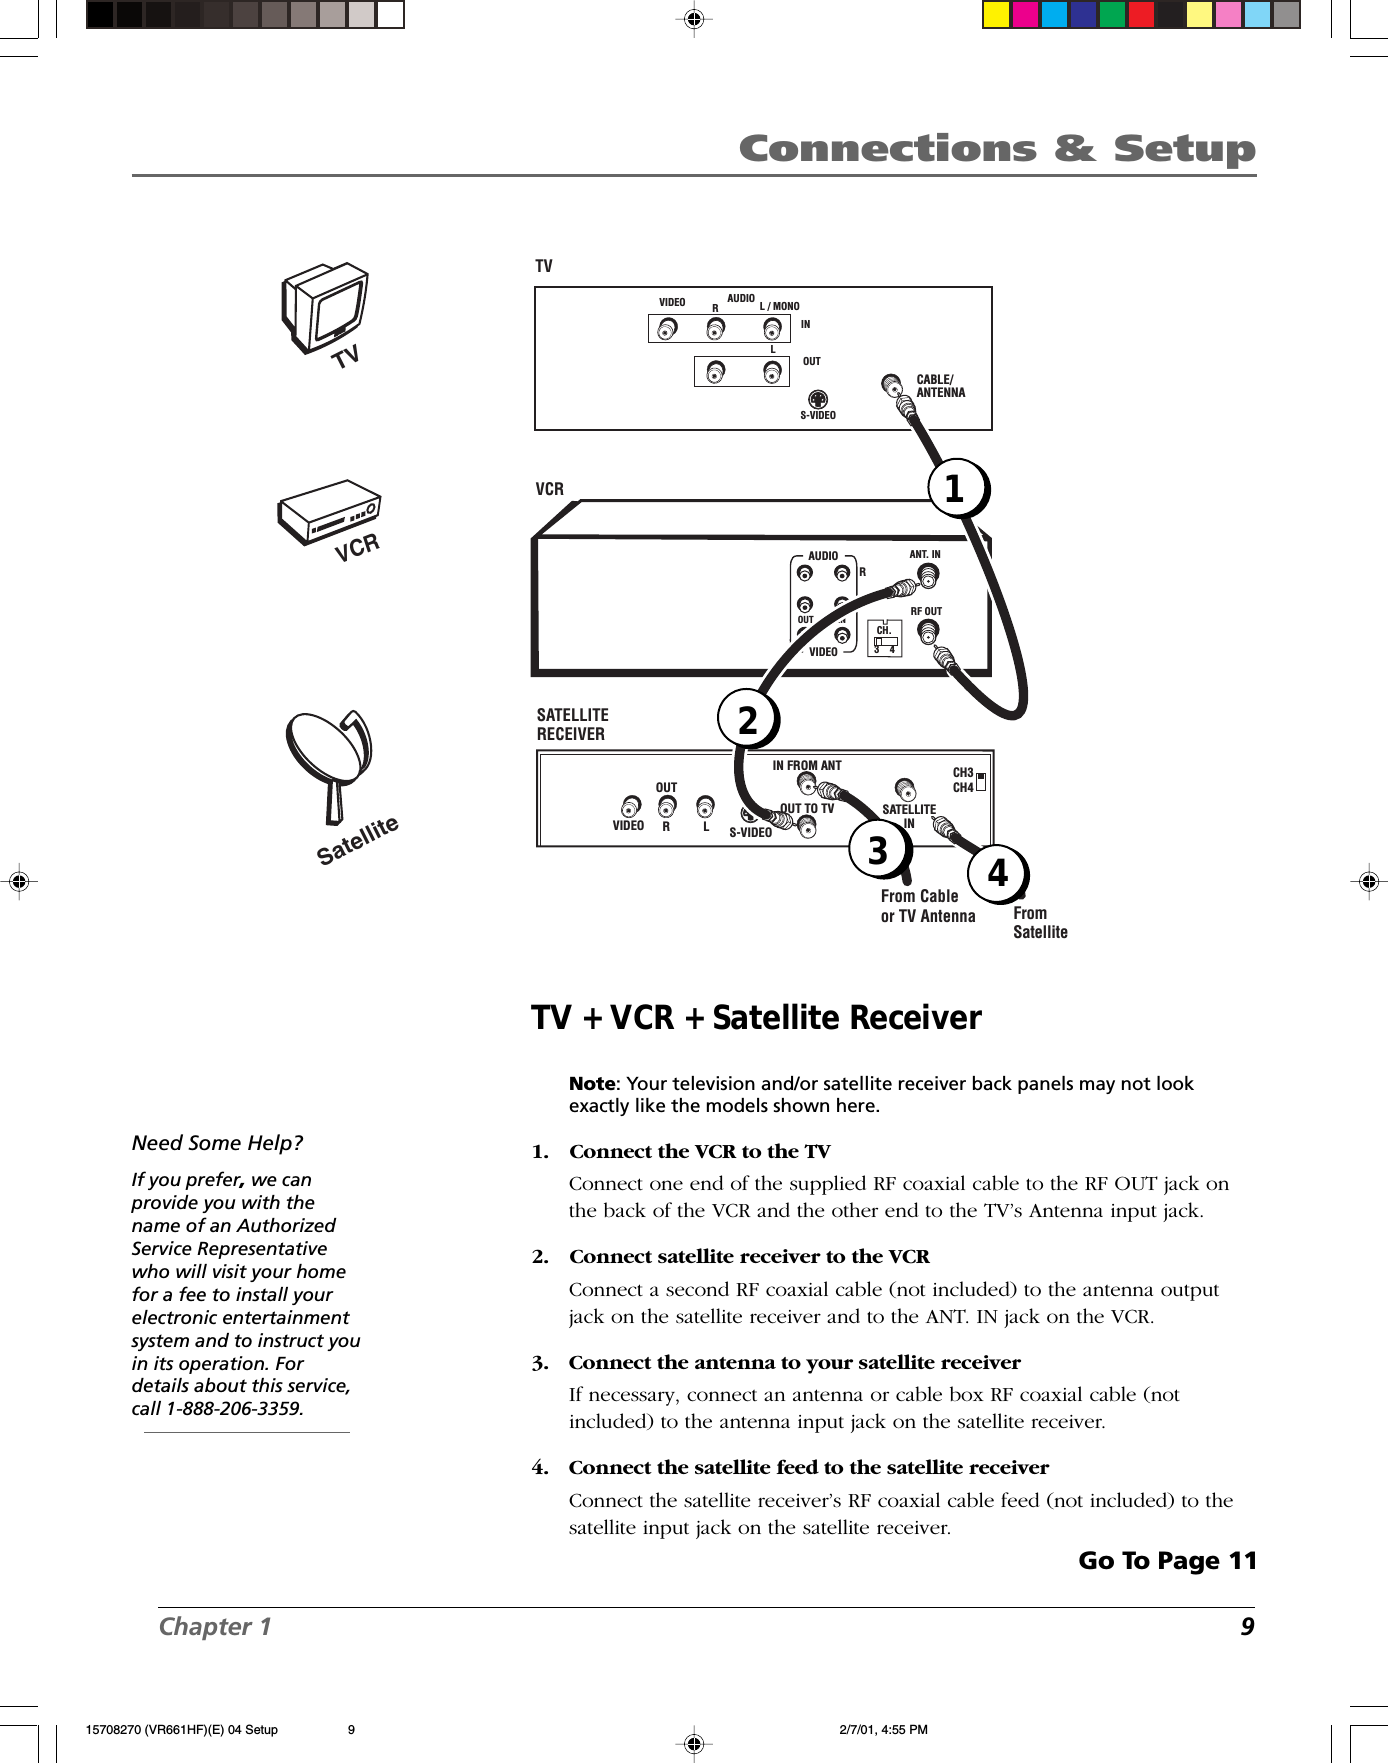
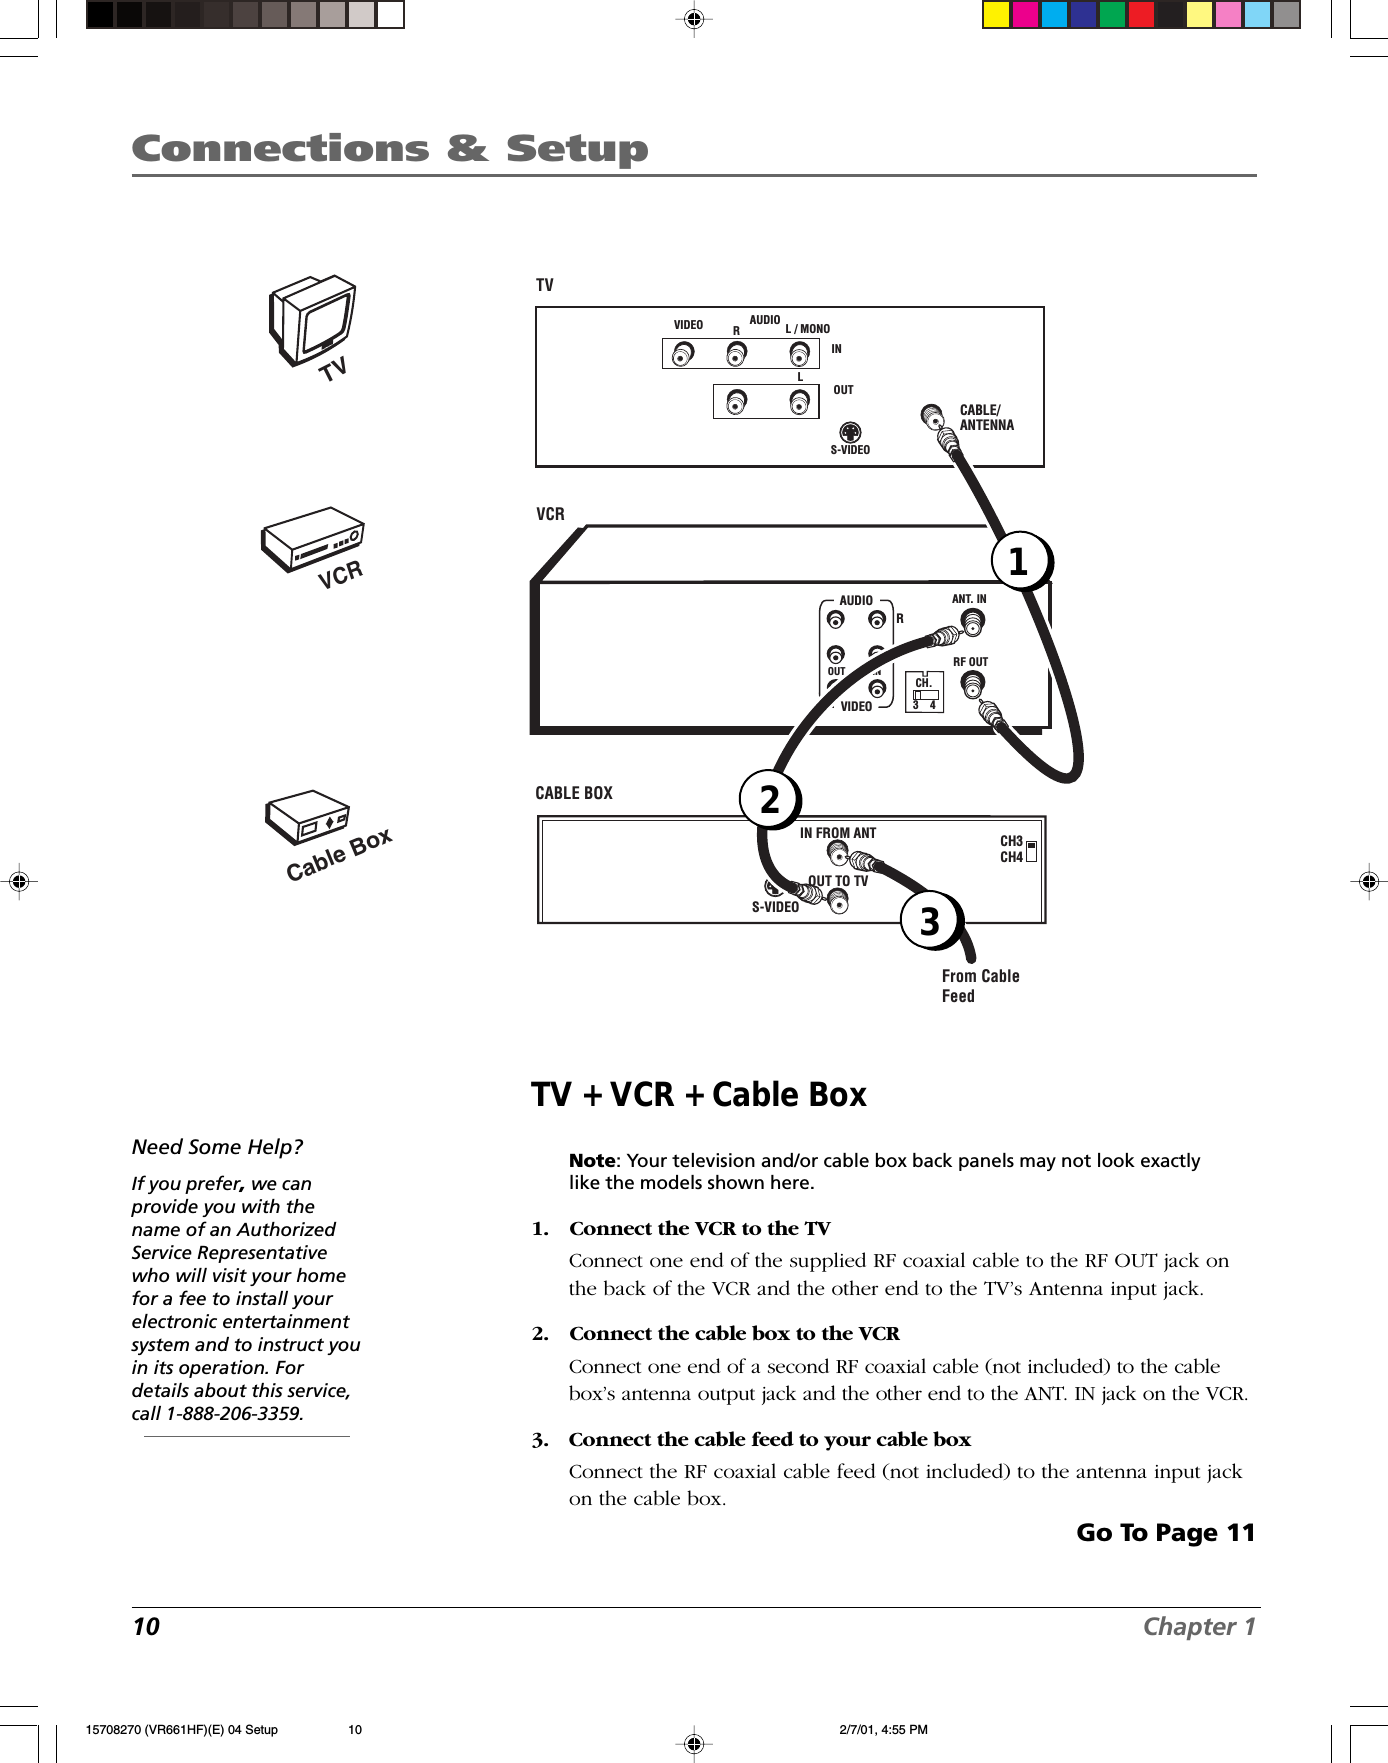
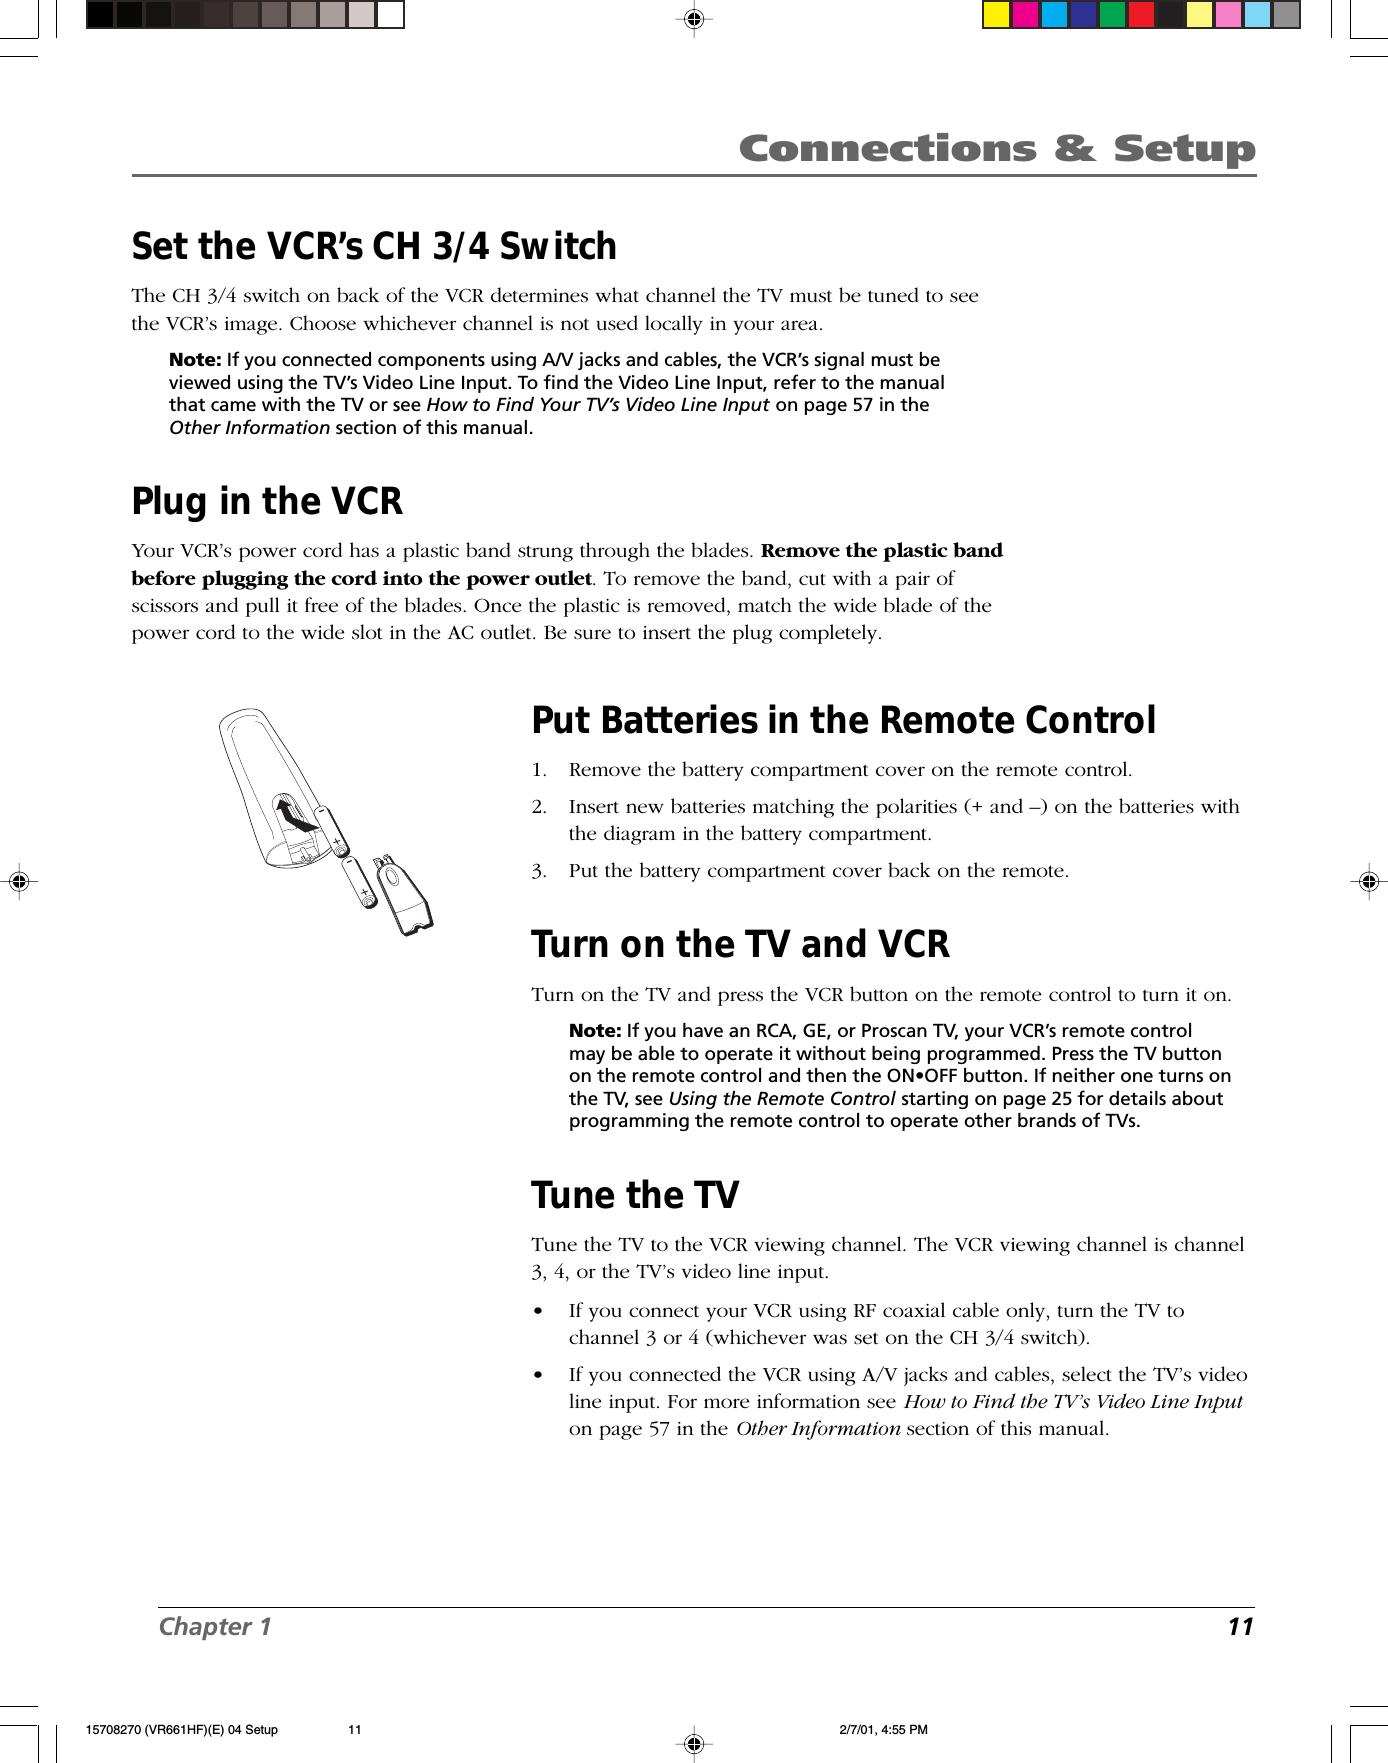
Contents

User Manual 1of 2

VCRUser’s GuideChanging Entertainment. Again.VR637HF15708270 (VR661HF)(E) 01 CVR 2/7/01, 4:55 PM1
This symbol indicates"dangerous voltage" insidethe product that presents arisk of electric shock orpersonal injury.WARNINGTo reduce the risk of fire orelectric shock, do not exposethis product to rain or moisture.To reduce the risk of electric shock, do notremove cover (or back). No user serviceableparts inside. Refer servicing to qualified servicepersonnel.This symbol indicatesimportant instructionsaccompanying the product.Caution: To prevent electric shock, match wide bladeof plug to wide slot, fully insert.Attention: Pour éviter les chocs électriques, introduirela lame la plus large de la fiche dans la bornecorrespondante de la prise et pousser jusqú au fond.Refer to the identification/rating label located on theback panel of your product for its proper operatingvoltage.FCC Regulations state that unauthorized changes or modifications to thisequipment may void the user’s authority to operate it.Cable TV Installer: This reminder is provided to call your attention toArticle 820-40 of the National Electrical Code (Section 54 of the CanadianElectrical Code, Part 1) which provides guidelines for proper groundingand, in particular, specifies that the cable ground shall be connected tothe grounding system of the building as close to the point of cable entryas practical.Product RegistrationPlease fill out the product registration card and return it immediately.  Returning the card allows us to contactyou if needed.Keep your sales receipt to obtain warranty parts and service and for proof of purchase. Attach it here andrecord the serial and model numbers in case you need them. The numbers are located on the back of the VCR.Model NoSerial No. _______________________________________________________________________________________Purchase Date:___________________________________________________________________________________Dealer/Address/Phone: ___________________________________________________________________________Important InformationVR637HFiCAUTIONRISK OF ELECTRICSHOCK. DO NOT OPEN.15708270 (VR661HF)(E) 01 CVR 2/7/01, 4:55 PM2
1IntroductionIntroductionKey Features OverviewYour VCR is equipped with features that will add to your recording and viewing experience.The following information summarizes a few of these features. Chapter 4 provides moreinformation about the rest of the VCR’s features and how to use them.INPUTTV•VCRON•OFFPLAY FORWARDRECORD STOP PAUSEF.ADVCLEAR MENU SPEEDTRACKING1472583690CHANVOLVOLCHANINFO SEARCHMUTE GO BACK TV VCRREVERSERec     Ch 36Record Length 1:30Press REC to set lengthVCR Plus+® SILVER SystemThe VCR Plus+ system allows for simple timer recording programming by usinga single PlusCode® programming number found in most TV program listings.The VCR Plus+ SILVER system simplifies timer recordings by automaticallysetting up and updating the VCR’s clock and channel list for you.Requirements: Make sure the VCR Plus+ SILVER system is active, and that AutoChannel Search and time set features are correct.®This feature uses patented technology that detects and marks most commercialson your recordings. The VCR determines where commercials are located, marksthe beginnings and ends of detected commercial segments, then easily skipsover them during playback. This feature does not erase commercials fromthe tape.®This feature helps locate the beginning of a purchased or rented movie as wellas skip thorugh previews. You can go to the beginning of the movie, or, skipfrom one preview/long commercial to the next.Universal Back-Lit Remote ControlDescription: The VCR’s remote control can operate most RCA, GE, and ProscanTVs with no additional steps. It can be programmed to operate many otherbrands of TVs. Back-lit buttons offer easier control in the dark.Requirements: Point the remote control at the active component and press theON•OFF button to see if it can be operated.Auto Clock SetDescription: The VCR automatically looks for time and date information aftermost power outages as well as each time the machine is turned off. Using timeinformation broadcast in TV signals (if available), the VCR’s clock sets itself.Requirements: Start Auto Clock Set using the VCR’s on-screen menus.VCR Plus+ and PlusCode are registered trademarks of the Gemstar Development Corporation.The VCR Plus+ system is manufactured under the license from Gemstar Development Corporation.COMMERCIAL ADVANCE and MOVIE ADVANCE are registered trademarks of SRT, Inc.; a Jerry Iggulden invention licensed in association with Arthur D. Little Enterprises.15708270 (VR661HF)(E) 02 Intro 2/7/01, 4:55 PM1
2IntroductionExpress Recording (XPR)Description: XPR quickly records the remaining portion of a program alreadyin progress. XPR is a great way to capture the end of a sporting event that hasrun into overtime or a live broadcast that runs long.Requirements: Repeatedly press the Record button on the VCR front panel orremote control to set the desired duration of time to record.Pro-Tect Plus™ LockingDescription: Locks the VCR so that buttons on the front panel and remotecontrol won’t operate the VCR. This feature protects timer programs fromfrustrating accidents such as being left on at the time of recording.Requirements: Lock the VCR by pressing and holding the POWER button onthe remote control for six seconds. The front panel display will blink for severalseconds. The VCR unlocks by pressing and holding the POWER button on theremote control, again for six seconds. The front panel display will blink againand release the lock on the system.Front Audio/Video Input JacksDescription: The VCR has Audio/Video (A/V) input jacks on both the front andrear of the unit (there are output jacks on the rear panel only). The front A/Vjacks make it easy to plug in an external A/V device, such as a camcorder.Requirements: Make sure that all A/V connections are snug. To see aconnected device’s image, turn the VCR to its Video Line Input by pressing theremote control’s INPUT button.Hi-Fi Quality SoundDescription: When using the VCR’s A/V jacks, you can feed stereo qualitysound from your VCR to your TV or stereo. Stereo quality sound allows for twoseparate channels of sound (Left and Right) to be heard.Requirements: Using A/V jacks and cables to connect the VCR to the TV orstereo (see page 58 for an advanced connection setup diagram).SQPB S-VHS Quasi PlaybackDescription: Your VCR will be able to play back tapes recorded in S-VHS orS-VHS-ET mode (in VHS quality).Requirements: Insert a tape recorded in S-VHS or S-VHS-ET mode and pressingthe PLAY button on the remote control or PLAY•PAUSE on the VCR.    TIMER RECORDINGS1 Create a New Program2 Review Existing Progs.3 Use VCR Plus+ Code0 Exit15708270 (VR661HF)(E) 02 Intro 2/7/01, 4:55 PM2
3Table of ContentsProduct Registration............................................................................................................. iIntroduction............................................................................................................................ 1Key Features Overview ......................................................................................................... 1Connections & Setup........................................................................................................... 5Things to Consider Before Connecting Components .......................................................... 6Cable Considerations ............................................................................................................6Choose Your Connection ...................................................................................................... 7Using the RF Coaxial Cable to Connect the VCR to a TV .............................................. 7TV + VCR .......................................................................................................................... 8TV + VCR + Satellite Receiver ......................................................................................... 9TV + VCR + Cable Box ................................................................................................... 10Set the VCR’s CH 3/4 Switch ................................................................................................ 11Plug in the VCR .................................................................................................................... 11Put Batteries in the Remote Control .................................................................................. 11Turn on the TV and VCR...................................................................................................... 11Tune the TV.......................................................................................................................... 11Using the Remote Control to Navigate On-Screen Menus ............................................... 12Complete the QuickSet Guide ...................................................................................... 12Accessing Menus ........................................................................................................... 12VCR Basics ............................................................................................................................ 13Playing a Tape ............................................................................................................... 13Automatic Rewind ........................................................................................................ 13Tape Eject ......................................................................................................................13Recording ............................................................................................................................. 13Check the Safety Tab .................................................................................................... 13Using the VCR’s Menu System....................................................................................... 15Using On-Screen Menus to Set Up Features ...................................................................... 16Language ....................................................................................................................... 16Cable Box Setup ............................................................................................................ 16VCR Channels List.......................................................................................................... 17Auto Channel Searching ....................................................................................... 17Changing the Signal Type ..................................................................................... 18Adding or Removing Channels ............................................................................. 18Time and Date ............................................................................................................... 19Auto Clock Set Feature.......................................................................................... 19To Turn Auto Clock Set ON .............................................................................. 19Setting the Time Zone ..................................................................................... 19Setting Daylight-Saving Time .......................................................................... 20Setting Time and Date Manually .......................................................................... 20Additional Set Up Features in the Preferences Menu ....................................................... 21Remote VCR1/VCR2 Option .......................................................................................... 21Auto Play .......................................................................................................................21Auto TV/VCR.................................................................................................................. 22EnergySaver................................................................................................................... 22Front Panel Brightness (VCR Display) .......................................................................... 22Tape Speed .................................................................................................................... 23Set Auto Repeat ............................................................................................................ 2315708270 (VR661HF)(E) 03 ToC 2/7/01, 4:55 PM3
Table of Contents4Using the Remote Control............................................................................................... 25Remote Control Buttons ..................................................................................................... 26Component Buttons ..................................................................................................... 26VCR Function Buttons ................................................................................................... 26TV Function Buttons ..................................................................................................... 27Using the INPUT Button ........................................................................................ 28Operating a TV with the VCR’s Remote Control ............................................................... 28Do You Need to Program the Remote? ....................................................................... 28Using the VCR’s Features.................................................................................................. 31Recording Features ............................................................................................................. 32Express Recording (XPR) ............................................................................................... 32Timer Recording ............................................................................................................ 33Stopping a Timer Recording ................................................................................. 33Reviewing and Clearing Programs ....................................................................... 33VCR Plus+ SILVER System .............................................................................................. 34Turning ON or OFF the Auto VCR Plus+ download ............................................. 34Mapping VCR Plus+ Channels Manually .............................................................. 35Recording Broadcast Stereo TV or SAP (Second Audio Program) ...................... 38Copying and Editing Tapes Using Two VCRs ............................................................... 38Picture Search Options ........................................................................................................ 39Forward and Reverse Search ........................................................................................ 39Slow Motion .................................................................................................................. 39Frame Advance ............................................................................................................. 39Index Search .................................................................................................................. 40Go-To Search ................................................................................................................. 40Commercial Advance .......................................................................................................... 41Movie Advance .................................................................................................................... 43Pro-Tect Plus™ Locking Feature ......................................................................................... 44Tracking................................................................................................................................ 44Time Counter ....................................................................................................................... 44On-Screen Displays ..............................................................................................................45Audio Set-Up Features ........................................................................................................ 46Tape Playback ...................................................................................................................... 46Other Information.............................................................................................................. 47Troubleshooting Tips ........................................................................................................... 48Questions and Answers About COMMERCIAL ADVANCE ................................................. 51Front Panel .......................................................................................................................... 52Display Panel ....................................................................................................................... 53Back Panel ............................................................................................................................ 54Specifications ....................................................................................................................... 55Cleaning the VCR ................................................................................................................55RCA VCR Limited Warranty................................................................................................. 56Finding the TV’s Video Line Input ...................................................................................... 57Advanced Connection ......................................................................................................... 58TV + VCR + Satellite Receiver ....................................................................................... 58Glossary ................................................................................................................................ 59Index .................................................................................................................................... 6015708270 (VR661HF)(E) 03 ToC 2/7/01, 4:55 PM4
5Changing Entertainment. Again.Connections & SetupChapter Overview:•Things to Consider Before Connecting•Choosing Your Connection•Making Connections•Navigating On-Screen Menus•Completing the QuickSet™ Guide•Basic RecordingChapter 115708270 (VR661HF)(E) 04 Setup 2/7/01, 4:55 PM5
6Chapter 1Connections & SetupThings to Consider Before ConnectingComponentsProtect Components From Power Surges•Connect all components before plugging any power cords into the wall outlet.•Always turn off the TV and other components before you connect or disconnect any cables.Position Cables to Avoid Audio Hum or Interference•Insert all cable plugs firmly into their jacks.•Place any Audio/Video (A/V) cables to the side(s) of the TV’s back panel instead of straightdown the back after connecting components.•Try not to coil any twin-lead cables and keep them away from all A/V cables as much aspossible.•Make sure all antennas and cables are properly grounded. Refer to the Safety Tips sheetpacked with your unit for detailed information.Protect Components From Overheating•Never block ventilation slots in any component. Arrange the components so that air cancirculate freely.•Do not stack components.•Allow adequate ventilation when placing components in a stand.•Place an amplifier or satellite receiver on the top shelf of a stand so heated air rising from itwill not flow around other components.Cable ConsiderationsThe RF coaxial cable supplied with your VCR carries both sound and picture information. This isthe cable used in all connection diagrams illustrated in this chapter.If your TV has A/V input jacks, you should use A/V cables (not supplied) to connect the VCR tothe TV. A/V cables provide better picture and sound quality than an RF coaxial cable. If youwould like to hook up your VCR using A/V cables, refer to the Advanced Connectioninformation on page 58 in the Other Information chapter of the manual.15708270 (VR661HF)(E) 04 Setup 2/7/01, 4:55 PM6
Chapter 1 7Connections & SetupComponents Connection Go ToTitleTV + VCR page 8TV + VCR +Satellite Receiver page 9TV + VCR +Cable Box page 10VCRTVSatelliteCable BoxVCRTVVCRTVRF Coaxial CableUsing the RF Coaxial Cable to Connect theVCR to a TVThis graphic shows the RF coaxial cable supplied with your VCR. This will bethe cable used for the basic connections represented in this chapter.Notes: To hear stereo sound, you will need to purchase Audio/Video (A/V)cables (not provided) and connect the VCR to the TV. A/V jacks and cablesalso provide a superior image and sound quality. For details about usingthis advanced setup, see the instructions on page 58.Using A/V jacks to connect the VCR to the TV requires tuning to the TV’sVideo Line Input to see the VCR’s picture. For more information aboutfinding your TV’s Video Line Input, see page 57.If you prefer, we can provide you with the name of an Authorized ServiceRepresentative who will visit your home for a fee to install your electronicentertainment system and to instruct you in its operation. For details aboutthis service, call 1-888-206-3359.Choose Your ConnectionThere are several ways to hook up your VCR depending on the components connected. Please usethe following chart to determine which connection is best for you and proceed to the appropriatepage.15708270 (VR661HF)(E) 04 Setup 2/7/01, 4:55 PM7
8Chapter 1Connections & SetupTV + VCRNote: Your television back panel may not look exactly like the modelshown here.1. Connect the VCR to the TVConnect one end of the supplied RF coaxial cable to the RF OUT jack onthe back of the VCR and the other end to the TV’s Antenna IN jack.2. Connect the antenna/cable feed to the VCRConnect the cable or antenna RF coaxial cable to the ANT. IN jack on yourVCR.Note: Flip the CH 3/4 switch on the back of the VCR to the channel that isnot used in your area. This will be the channel that the TV must be tunedto in order to see the VCR’s picture.Go To Page 11Need Some Help?If you prefer, we canprovide you with thename of an AuthorizedService Representativewho will visit your homefor a fee to install yourelectronic entertainmentsystem and to instruct youin its operation. Fordetails about this service,call 1-888-206-3359.VCRTVVCRTV (back panel)CABLE/ANTENNA VIDEO RL / MONOS-VIDEOAUDIOLINOUTFrom Cableor AntennaANT. INRF OUTCH.VIDEOAUDIOOUT INRL3    42115708270 (VR661HF)(E) 04 Setup 2/7/01, 4:55 PM8
Chapter 1 9Connections & SetupTV + VCR + Satellite ReceiverNote: Your television and/or satellite receiver back panels may not lookexactly like the models shown here.1. Connect the VCR to the TVConnect one end of the supplied RF coaxial cable to the RF OUT jack onthe back of the VCR and the other end to the TV’s Antenna input jack.2. Connect satellite receiver to the VCRConnect a second RF coaxial cable (not included) to the antenna outputjack on the satellite receiver and to the ANT. IN jack on the VCR.3. Connect the antenna to your satellite receiverIf necessary, connect an antenna or cable box RF coaxial cable (notincluded) to the antenna input jack on the satellite receiver.4. Connect the satellite feed to the satellite receiverConnect the satellite receiver’s RF coaxial cable feed (not included) to thesatellite input jack on the satellite receiver.Go To Page 11Need Some Help?If you prefer, we canprovide you with thename of an AuthorizedService Representativewho will visit your homefor a fee to install yourelectronic entertainmentsystem and to instruct youin its operation. Fordetails about this service,call 1-888-206-3359.VCRTVSatelliteCABLE/ANTENNAVCRTV VIDEO RL / MONOS-VIDEOAUDIOLINOUTCH3CH4 S-VIDEO LRVIDEO OUTIN FROM ANTOUT TO TV SATELLITEINFrom SatelliteFrom Cableor TV AntennaANT. INRF OUTCH.VIDEOAUDIOOUT INRL3    4SATELLITE RECEIVER124315708270 (VR661HF)(E) 04 Setup 2/7/01, 4:55 PM9
10 Chapter 1Connections & SetupTV + VCR + Cable BoxNote: Your television and/or cable box back panels may not look exactlylike the models shown here.1. Connect the VCR to the TVConnect one end of the supplied RF coaxial cable to the RF OUT jack onthe back of the VCR and the other end to the TV’s Antenna input jack.2. Connect the cable box to the VCRConnect one end of a second RF coaxial cable (not included) to the cablebox’s antenna output jack and the other end to the ANT. IN jack on the VCR.3. Connect the cable feed to your cable boxConnect the RF coaxial cable feed (not included) to the antenna input jackon the cable box.Go To Page 11Need Some Help?If you prefer, we canprovide you with thename of an AuthorizedService Representativewho will visit your homefor a fee to install yourelectronic entertainmentsystem and to instruct youin its operation. Fordetails about this service,call 1-888-206-3359.VCRTVCable BoxCABLE/ANTENNAVCRTV VIDEO RL / MONOS-VIDEOAUDIOLINOUTCH3CH4CABLE BOX S-VIDEOIN FROM ANTOUT TO TVFrom CableFeedANT. INRF OUTCH.VIDEOAUDIOOUT INRL3    412315708270 (VR661HF)(E) 04 Setup 2/7/01, 4:55 PM10
Chapter 1 11Connections & SetupSet the VCR’s CH 3/4 SwitchThe CH 3/4 switch on back of the VCR determines what channel the TV must be tuned to seethe VCR’s image. Choose whichever channel is not used locally in your area.Note: If you connected components using A/V jacks and cables, the VCR’s signal must beviewed using the TV’s Video Line Input. To find the Video Line Input, refer to the manualthat came with the TV or see How to Find Your TV’s Video Line Input on page 57 in theOther Information section of this manual.Plug in the VCRYour VCR’s power cord has a plastic band strung through the blades. Remove the plastic bandbefore plugging the cord into the power outlet. To remove the band, cut with a pair ofscissors and pull it free of the blades. Once the plastic is removed, match the wide blade of thepower cord to the wide slot in the AC outlet. Be sure to insert the plug completely.Put Batteries in the Remote Control1. Remove the battery compartment cover on the remote control.2. Insert new batteries matching the polarities (+ and –) on the batteries withthe diagram in the battery compartment.3. Put the battery compartment cover back on the remote.Turn on the TV and VCRTurn on the TV and press the VCR button on the remote control to turn it on.Note: If you have an RCA, GE, or Proscan TV, your VCR’s remote controlmay be able to operate it without being programmed. Press the TV buttonon the remote control and then the ON•OFF button. If neither one turns onthe TV, see Using the Remote Control starting on page 25 for details aboutprogramming the remote control to operate other brands of TVs.Tune the TVTune the TV to the VCR viewing channel. The VCR viewing channel is channel3, 4, or the TV’s video line input.•If you connect your VCR using RF coaxial cable only, turn the TV tochannel 3 or 4 (whichever was set on the CH 3/4 switch).•If you connected the VCR using A/V jacks and cables, select the TV’s videoline input. For more information see How to Find the TV’s Video Line Inputon page 57 in the Other Information section of this manual.15708270 (VR661HF)(E) 04 Setup 2/7/01, 4:55 PM11
12 Chapter 1Connections & SetupUsing the Remote Control toNavigate On-Screen MenusThe technical term is “Navigation” – how you move through the on-screen menus. The theory isthe same for all the menu screens; use the corresponding number button on the remote controlselect it.To choose an on-screen item, press the remote control’s corresponding number button.Note: Selecting a menu item can take you to another menu, activate a choice, or activate adata entry field (such as the hour field in the Set Time menu).Select a language.Seleccione un idioma.Choisissez une langue.1 English2 Español3 FrançaisComplete the QuickSet GuideThe menu system in your VCR allows you to customize your preferences aswell as use all the VCR’s features. To help you use the VCR as quickly aspossible, there is an initial QuickSet Guide that walks you through severalimportant setup steps at one time.The first time you turn on the VCR, you will be able to set up availablechannels, time and date information, and more. The first menu you will seeasks which language you prefer to have the on-screen menus appear in.Note: With numbered menu choices, press the corresponding numberbutton on the remote control to automatically select it. In the case of thelanguage menu, press 1 for English, 2 for Español (Spanish), or 3 forFrançais (French).The remaining menus throughout the setup will appear in the language chosen.Just follow the step-by-step procedures until the QuickSet Guide is complete.Accessing MenusThe series of preferences that are set in the QuickSet Guide can also behandled individually using the VCR’s on-screen menu system. There are othersettings not covered in the initial setup that are also handled using the on-screen menus.For example, if you decide to run the QuickSet Guide again, you can access theSetup menu by pressing the remote control’s MENU button. Once the MainMenu is displayed, press the 5 button to choose Setup. From there, you can startthe QuickSet Guide from the beginning.All on-screen menus are accessed the same way, starting in the Main Menuwhich is displayed by pressing the remote control’s MENU button.Note: See chapter two, Using On-Screen Menus, for details about changingthe VCR’s individual settings.     VCR MAIN MENU1 VCR Plus+2 Timer Recordings3 Time4 Channels5 Setup6 Preferences7 Audio8 Language0 ExitAll of the VCR’s menus areaccessed through the MainMenu. Press the remotecontrol’s MENU button tostart.15708270 (VR661HF)(E) 04 Setup 2/7/01, 4:55 PM12
Chapter 1 13Connections & SetupVCR BasicsOnce your initial settings are complete, you can begin using your VCR. In order to begin, youmust first understand some basic concepts..Safety TabAutomatic TrackingThe VCR has automatic trackingwhich adjusts the picture whenplaying back a tape recorded onanother VCR. To adjust trackingmanually, use the TRACKING -/+buttons on the remote control.Playing a Tape1. Tune the TV to your VCR viewing channel (03, 04, or the video line input).2. Insert a tape in the VCR.If the Auto Play feature is set to ON, the tape automatically begins playback(if the safety tab on the tape is removed).•Press FWD or REV (FORWARD or REVERSE on the remote control) tocue the tape at the desired starting position.•Press PLAY (if necessary) to begin tape play.•Press PAUSE for stop action.•Press TRACKING up or down (TRACKING + or – on the remotecontrol) to remove any streaks from the picture, if necessary.•Press STOP to stop playback.Automatic RewindThe VCR automatically rewinds the tape if it reaches the end of the tape duringplayback. While rewinding, you can press the ON•OFF button and the VCR willturn off after finishing. If the tape has no safety tab, it will be ejected.Tape EjectPress the EJECT button on the VCR when stopped to eject the tape. You canalso press and hold the remote control’s STOP button for three seconds.RecordingTo Capture Programming with Basic Recording Methods:1. Set the tape speed by pressing the SPEED button on the remote control(see Recording Speed on page 23 for information about recording speeds).2. Press the RECORD button to begin recording.3. Press the STOP button to halt recording.If you just want to pause the recording for a short time (like during acommercial), press PAUSE instead of STOP.Check the Safety TabNo matter which recording option you use, make sure there is a tape in theVCR with its safety tab in place. You cannot record on a tape with its safety tabremoved. If the safety tab is removed and you want to record, simply cover thehole with adhesive tape.15708270 (VR661HF)(E) 04 Setup 2/7/01, 4:55 PM13
This page left blank intentionally15708270 (VR661HF)(E) 04 Setup 2/7/01, 4:55 PM14
15Changing Entertainment. Again.Using the VCR’sMenu SystemChapter Overview:•Using On-Screen Menus•Cable Box Setup•Setting Time and Date•Setting VCR PreferencesChapter 215708270 (VR661HF)(E) 05 Menu 2/7/01, 4:55 PM15
16 Chapter 2Using On-Screen MenusUsing On-Screen Menus to Set Up FeaturesYou set up many of the VCR’s features by using the menu system as discussed in the previouschapter. Each feature that appears in the QuickSet Guide is explained in this section as well as afew other features you should set up to get the most out of your VCR.Note: Not all the VCR screens are shown in this manual when explaining how to accessfeatures.LanguageSelecting your preferred language determines how the on-screen displays willappear. To change the language:1. Press MENU to display the VCR MAIN MENU.2. Press the 8 button to select LANGUAGE.3. Select English, Spanish (Español), or French (Français).Cable Box SetupThis setup applies only when all channels are received through a cable box. Inthis case, the VCR will automatically enter the channel used to view cable boxprogramming. Your VCR will use this channel for all future timer recordings.1. Press MENU to display the VCR MAIN MENU.2. Press 4 to display the CHANNELS menu.3. Press 5 to display the CABLE BOX SETUP menu.       LANGUAGESelect a language.1 English2 Español3 FrançaisPress MENU to continue        CHANNELS1 Auto Channel Search2 Add/Remove Channels3 Signal Type:     CABLE 4 VCR Plus+ Setup5 Cable Box Setup6 SAT Setup0 ExitIs Something Missing?These instructions will notshow all of the step-by-stepOn-Screen Menus. Makesure to follow theinstructions completely toget to the menus beingdiscussed.15708270 (VR661HF)(E) 05 Menu 2/7/01, 4:56 PM16
Chapter 2 17Using On-Screen Menus4. Select one of the three choices. If “ALL Channels” is selected, enter theoutput channel of the cable box (usually 03 or 04), or if A/V jacks connectthe VCR to the TV, press the INPUT button on the VCR’s remote control.5. Once you complete the setup, the VCR confirms that it will now receive allsignals on the designated channel.VCR Channels ListYour VCR may come with a list of channels preset at the factory. Even though itmay come with such a list, you might want to add or delete certain channels.Note: If you use a cable box to view all channels, this step is not necessary.Auto Channel SearchingNotes: Use Auto Channel Search to place all available channels in memory.If you ever change cable or antenna signals, you may need to run the AutoChannel Search feature again.1. Press the MENU button to display the VCR MAIN MENU.2. Press 4 to select CHANNELS.3. Press 1 to select AUTO CHANNEL SEARCH.4. Select one of the three options:Cable TV searches for cable stations.Antenna searches for local broadcast stations.Detect Automatically decides which input to use for you.Note: With Detect Automatically, a strong cable or antenna signal in yourarea may cause channels to be detected inaccurately. If this should happen,manually select the input signal for the system you have.The VCR begins scanning for channels available in the area (taking aboutone-to-two minutes). When scanning is complete, the VCR tunes to thelowest channel available. After completing Auto Channel Search, pressingthe remote control’s  CHAN + or - buttons should only select activechannels.    CABLE BOX SETUPDo you use your cablebox to receive ALLchannels or only SOME channels?1 ALL channels2 Only SOME channels3 Cancel setup    CABLE BOX SETUPThe VCR will now receive all signals from the cable boxon channel 04.Press MENU to continue  AUTO CHANNEL SEARCHWhat type of signal are you using?1 Cable TV2 Antenna3>Detect Automatically0 Cancel 15708270 (VR661HF)(E) 05 Menu 2/7/01, 4:56 PM17
18 Chapter 2Using On-Screen MenusChanging the Signal TypeThis feature is useful if your cable signal goes out; it allows you to switch to aregular antenna for alternate television reception.1. Press the MENU button to display the VCR MAIN MENU.2. Press the 4 button to choose CHANNELS.3. Press 3 to choose between Signal Type: Cable and Antenna. Whenfinished, press 0 to exit back to the Main Menu and 0 again to exit tonormal viewing.Adding or Removing ChannelsYou might want to add or remove channels after using Auto Channel Search,especially if there are weak signals or channels with content you don’t care for.1. Press the MENU button to display the VCR MAIN MENU.2. Press 4 to choose CHANNELS.3. Press 2 to choose ADD/REMOVE CHANNELS. To go to the channel youwant to add or remove, use the remote control’s CHANNEL + or – buttonsor enter a specific channel number using the number buttons.Once the desired channel is displayed, the on-screen menu will tell you ifthe channel is currently in the VCR’s viewing list. Press the CLEAR button toremove a channel from the available channels list or press the INFO buttonto add it.4. Press the MENU button to exit out of the menus.Note: To view active channels, use the remote control’s CHANNEL + and -buttons. You can also access channels not available in the active channellist by using the remote control’s number buttons to enter the specificchannel number.        CHANNELS1 Auto Channel Search2 Add/Remove Channels3 Signal Type:     CABLE 4 VCR Plus+ Setup5 Cable Box Setup6 SAT Setup0 Exit  ADD/REMOVE CHANNELSChannel 115is presently ADDED Press CLEAR to removePress MENU to exit15708270 (VR661HF)(E) 05 Menu 2/7/01, 4:56 PM18
Chapter 2 19Using On-Screen MenusTime and DateYour VCR gives you two ways to set the time and date; manually or by using the Auto Clock Setfeature. Using Auto Clock Set enables the time to be updated each time the VCR is turned off byusing time and date information carried in certain broadcast signals.Auto Clock Set FeatureThe Auto Clock Set feature is set to ON by default at the factory. In the ON setting, the VCRlooks for a channel carrying time data and updates the clock automatically. In order for AutoClock Set to work properly though, certain steps must first be completed such as Auto ChannelSearch, setting the time zone, and setting the Daylight-Saving feature.Notes: Auto Clock Set is available only in limited areas.You must set available channels, time zone, and Daylight-Saving settings for Auto Clock Setto work.When using Auto Clock Set with a cable box, the VCR will not reset the clock after a poweroutage unless the cable box is tuned to the channel carrying time data.If the time does not automatically set after trying for ten minutes, manually set the timeand date information using the TIME menu (see the next page for information on manuallysetting time and date information).To Turn Auto Clock Set ONNote: make sure that available channels, time zone, and Daylight-Savingfeatures are set before turning on Auto Clock Set.1. Press MENU to display the VCR MAIN MENU.2. Press 3 to choose TIME.3. Press the 2 button repeatedly to toggle between Auto Clock Set ON and OFF.Setting the Time Zone1. Press MENU to display the VCR MAIN MENU.2. Press 3 to choose TIME.3. Press 3 to chose SET TIME ZONE.4. Select your time zone by pressing the corresponding number button.If you select Automatic for your time zone, the VCR sets the clock using thefirst time information it finds. If the time set is not correct, select anothertime zone or set the time and date through the menu system.         TIME1 Set Time and Date2 Auto Clock Set:  ON3 Set Time Zone4 Set Daylight SavingTime Data was found on channel 20.0 Exit     SET TIME ZONEWhat is your Time Zone?1 Eastern2 Central3 Mountain4 Pacific5 Alaska6 Hawaii7>AutomaticPress MENU to continue15708270 (VR661HF)(E) 05 Menu 2/7/01, 4:56 PM19
20 Chapter 2Using On-Screen MenusSetting Daylight-Saving Time1. Press MENU to display the VCR MAIN MENU.2. Press 3 to choose TIME.3. Press 4 to choose SET DAYLIGHT SAVING.4. Select the appropriate option.Notes: DST stands for Daylight–Saving Time.If you choose Automatic for the time zone, the VCR sets the clock using anyDST information broadcast in the channel’s signal.Setting Time and Date ManuallyIf Auto Clock Set was unsuccessful, set the time and date manually in the TIMEmenu. Auto Clock Set is automatically turned off when time and dateinformation is set this way.1. Press MENU to display the VCR MAIN MENU.2. Press 3 to choose TIME.3. Press 1 to choose SET TIME AND DATE.4. Enter the data using the number buttons. Press 0 before single-digitnumbers and follow the on-screen directions to exit the menus.  SET TIME AND DATETime --:--    (hh:mm)Date --/--/--Press MENU to cancelSET DAYLIGHT SAVINGDoes your area observeDaylight Saving Timefrom April to October?1 Yes, DST is observed2 No3 AutomaticPress MENU to continueDisplaying Time and DatePressing the INFO button onthe remote control or VCRdisplays the time and date onscreen temporarily.         TIME1 Set Time and Date2 Auto Clock Set:  ON3 Set Time Zone4 Set Daylight SavingTime Data was found on channel 20.0 Exit         TIME1 Set Time and Date2 Auto Clock Set:  ON3 Set Time Zone4 Set Daylight SavingTime Data was found on channel 20.0 Exit15708270 (VR661HF)(E) 05 Menu 2/7/01, 4:56 PM20
Chapter 2 21Using On-Screen MenusAdditional Set Up Features in thePreferences MenuNote: The features described on the following pages are all accessedthrough the PREFERENCES menu.To Access the PREFERENCES menu:1. Press MENU to display the VCR MAIN MENU.2. Press 6 to select PREFERENCES.You are now ready to select an item from the PREFERENCES menu to set up.Remote VCR1/VCR2 OptionSome universal remote controls have buttons labeled VCR1 and VCR2. Theseremotes can operate up to two VCRs. If you have a universal remote control withthis ability, your RCA VCR can be controlled with either the VCR1 or VCR2 button.See the documentation that came with your universal remote control for detailsabout programming it to operate your RCA VCR.In the PREFERENCES menu, press 1 to select the Remote Control feature. Thenpress the VCR2 button on your universal remote control to change the setting.Then, the VCR will respond to the universal remote control’s VCR2 button. Tochange the remote control setting back to VCR1, display the PREFERENCES menu,press 1, and then press the VCR1 button on the universal remote control.Note: Remember you must press VCR1 or VCR2 on a universal remotecontrol (not included) —whichever is selected in the PREFERENCES menu—before the remote control will operate the VCR.Auto PlayWith Auto Play turned ON (the factory default setting), the VCR automaticallystarts playback when you insert a tape with its safety tab removed.To Access Auto Play:1. In the PREFERENCES menu, press 2 repeatedly to switch between AutoPlay: ON and OFF.•Select ON if you want a tape with its safety tab removed to start playingautomatically when inserted.•Select OFF if you do not want a tape with its safety tab removed to startplaying automatically.      PREFERENCES1 Remote Control:  VCR12 Auto Play:    ON3 Auto TV/VCR:  ON4 EnergySaver:  2:005 Front Panel:  AUTO6 Tape Speed:  SLP7 Set Auto Repeat8 COMMERCIAL ADVANCE0 ExitThe PREFERENCES menuallows changes to be madeto a variety of differentVCR features.15708270 (VR661HF)(E) 05 Menu 2/7/01, 4:56 PM21
22 Chapter 2Using On-Screen MenusAuto TV/VCRTo control whether the VCR’s TV/VCR setting changes automatically to VCR-viewing mode when turned on, use the Auto TV/VCR setting.To Access Auto TV/VCR:In the PREFERENCES menu, press 3 repeatedly to toggle between Auto TV/VCR:ON and OFF.Note: Pressing the TV•VCR button on the remote control will switchbetween VCR and TV-viewing modes. When in VCR-viewing mode, VCR isdisplayed on the front panel. The VCR indicator turns off when in TV-viewing mode.•Select ON to switch VCR-viewing mode on automatically when the power isturned on. The VCR must be connected to the TV using the supplied RFcoaxial cable.•Select OFF to remain in the TV-viewing mode when the VCR is initiallyturned on. Leaving Auto TV/VCR off is useful if you use A/V cables toconnect the VCR to the TV and you watch the VCR’s picture using the TV’sVideo Line Input. This way, the antenna/cable signal will not be interruptedby the VCR.EnergySaverBy default, the VCR automatically turns off after two hours of inactivity. This canbe changed in the PREFERENCES menu by pressing the 4 button repeatedly tochange the time delay or to disable the feature altogether.•Select OFF and the VCR will stay on until you shut it off.•Select 1:00, 2:00, or 3:00 and the VCR will turn off after one, two, or threehours of inactivity.Thirty seconds before automatically shutting off, the VCR displays an on-screenmessage reading, The VCR will turn off in 30 seconds. Press any key to cancel.Pressing any remote control or VCR front panel button will halt the countdown.If you use the VCR’s tuner instead of your TV to view channels, you may wantto turn off this feature.Front Panel Brightness (VCR Display)You can change the brightness level of the VCR’s front panel display. In thePREFERENCES menu, press the 5 button repeatedly to toggle between options:•AUTO means the display brightens when the VCR is on and dims when theVCR is off.•BRIGHT keeps the display bright whether the VCR is on or off.•DIM keeps the display at a low brightness level whether the VCR is on oroff.      PREFERENCES1 Remote Control:  VCR12 Auto Play:    ON3 Auto TV/VCR:  ON4 EnergySaver:  2:005 Front Panel:  AUTO6 Tape Speed:  SLP7 Set Auto Repeat8 COMMERCIAL ADVANCE0 ExitThe PREFERENCES menuallows changes to be madeto a variety of different VCRfeatures.15708270 (VR661HF)(E) 05 Menu 2/7/01, 4:56 PM22
Chapter 2 23Using On-Screen MenusTape SpeedYou can choose as the preferred recording tape speed either Standard Play (SP)or Super Long Play (SLP). The speed selected appears in the VCR’s front displaypanel and in timer and VCR Plus+ system recording menus.To Select a Preferred Tape Speed:•In the PREFERENCES menu, press the 6 button repeatedly to switch betweenSP and SLP settings.Note: For an explanation of recording speeds, see the note to the left.To Override the Preferred Tape Speed:•Press the SPEED button on the remote control.•Set the tape speed in the timer or VCR Plus+ system recording menus.When you turn off the VCR, the tape speed reverts to the one  selected as thedefault.Set Auto RepeatA tape can be set to play the same segment over and over in a repeating loopwith the Set Auto Repeat feature. Set Auto Repeat uses the VCR’s memorycounter to determine the duration of the loop.In the PREFERENCES menu, press the 7 button to choose Set Auto Repeat. TheSET AUTO REPEAT menu will ask for an ending time for the loop to bespecified:•The CLEAR button will erase all three numbers entered and move the cursorback to the first position (hours).•The Press CLEAR to turn off message will appear only after the first numberhas been entered into the end time.•Auto Repeat is set back to -:-- by resetting the dialog box, ejecting a tape,powering off the VCR, power interruption, or by recording start.When a duration time has been set:•The VCR will automatically switch to rewind if the counter meets or goespast the set Auto Repeat duration.•The VCR will automatically switch to playback during rewind if the counterequals or is less than 0:00.•The Auto Repeat may be adjusted by setting the counter to 00:00. This canbe done by pressing the CLEAR button while the tape counter is on screenor on the front panel display. •The counter will not reset while rewinding in an Auto Repeat loop.AUTO REPEATSet the length of timeyou want the tape toplay in a repeating loopLoop from 0:00 to 2:--   (h:mm)Press CLEAR to turn offPress MENU to exitRecording SpeedsSP (Standard Play)Gives the best quality recording,but fewer programs can berecorded on the tape.SLP (Super Long Play)Gives three times the recordingtime of tapes recorded in SPmode.Recording TimesCassette SP SLPT-120 2 Hr 6 HrT-160 2 Hr/40 Min 8 Hr15708270 (VR661HF)(E) 05 Menu 2/7/01, 4:56 PM23
This page left blank intentionally15708270 (VR661HF)(E) 05 Menu 2/7/01, 4:56 PM24
25Changing Entertainment. Again.Using theRemote ControlChapter Overview:•Buttons on the Remote Control•Programming the Remote to Operate Other Components•How To Use the Remote After You’ve Programmed ItChapter 315708270 (VR661HF)(E) 06 Remote 2/7/01, 4:56 PM25
26 Chapter 3Using the Remote ControlINPUTTV•VCRON•OFFPLAY FORWARDRECORD STOP PAUSEF.A DVCLEAR MENU SPEEDTRACKING1472583690CHANVOLVOLCHANINFO SEARCHMUTE GO BACK TV VCRREVERSERemote Control ButtonsThe backlit remote has a light button ( ) that glows in the dark. Pressthis button to light the buttons on the remote. The remote buttonsremain lit when they are pressed within a few seconds of each other. Ifa button is not pressed within approximately seven seconds, the lightturns off to conserve battery power.The remote control is capable of controlling your VCR and manybrands of televisions. If you have an RCA, GE, or Proscan TV, you maybe able to control it without having to program the remote.Component ButtonsON•OFF  Turns off VCR when remote is set to control the VCR. Alsoturns some compatible components on and off.TV  Turns on a compatible RCA, GE, or PROSCAN TV and sets theremote to control the TV. Also used with the ON•OFF button to turnon a different brand of TV (if programmed) and sets the remote tocontrol the TV.VCR  Turns on a compatible RCA, GE, or PROSCAN VCR and sets theremote to control the VCR.VCR Function ButtonsCHAN Up or Down    Selects next higher or lower channel in the VCR’schannel memory.CLEAR  Resets time counter to 0:00:00. Allows you to change entrieswhen setting the clock or a timer recording.F. ADV  Lets you view one frame with each press of the button whentape is in pause.FORWARD  Fast forwards the tape when the VCR is stopped. Searchesforward through a tape during playback. Starts slow motion duringplay-pause and increases slow-motion speed.GO BACK  Switches between two channels. Select one channel andthen select another using the number buttons. Press GO BACK toswitch between the two channels. In menu mode, press to go back to aprevious menu.INFO  Shows the status displays on the TV screen.INPUT  Selects between the VCR’s line input or tuner. Line input refersto the signal coming from the component connected to the AUDIO/VIDEO IN jacks on the back (L1) or front (L2) of the VCR.MENU  Brings up VCR MAIN MENU on the TV screen.Numbers (0 through 9)  Select a channel up to 99 by pressing twonumbers. Select a cable channel over 99 by pressing and holding 1until 1 – – appears on the screen. Then press the other two numbers.15708270 (VR661HF)(E) 06 Remote 2/7/01, 4:56 PM26
Chapter 3 27Using the Remote ControlPAUSE  Pauses playback or recording. Press PAUSE a second time to return toplayback or recording.PLAY  Plays a tape.RECORD  Starts VCR recording. Also used for Express recording.REVERSE  Rewinds the tape when the VCR is stopped. Searches backward through atape during playback. Starts slow motion during play-pause and decreases slow-motion speed.SEARCH  Displays INDEX and GO-TO Search menus on screen when the VCR isstopped. Advances the tape forward through 30 seconds of recorded material duringplayback. Each press advances the tape an additional 30 seconds (up to five minutes).This button also displays the MOVIE ADVANCE screen for prerecorded movies andstarts COMMERCIAL ADVANCE skipping during playback.SPEED  Selects a recording speed (SP or SLP).STOP  Stops the current VCR function such as record, playback, rewind, or fastforward.TRACKING Up or Down  Lets you manually reduce the streaks that may appear onthe picture during play, slow motion, or pause. Reduces picture “jitter” during stop-action playback.TV•VCR  Switches the picture signal so that it either comes from the VCR or cable/antenna system.TV Function ButtonsCHAN Up or Down    Selects next higher or lower channel in the TV’s channelmemory.CLEAR  Removes menus or status displays from the screen.GO BACK  Switches between two channels. Select one channel and then selectanother using the number buttons. Press GO BACK to switch between the twochannels.INFO  Shows the TV’s status displays on the TV screen.INPUT  Selects between the TV’s input channel or tuner. Press to see the VCR signal ifyou connected your VCR using theAUDIO/VIDEO jacks.MUTE  Reduces volume to minimum level.Numbers (0 through 9)  Select a channel up to 99 by pressing two numbers. Selecta cable channel over 99 by pressing and holding 1 until 1 – – appears on the screen.Then press the other two numbers.ON•OFF  Turns a compatible TV off and on.VOL Up and Down  Raises and lowers sound of TV.15708270 (VR661HF)(E) 06 Remote 2/7/01, 4:56 PM27
28 Chapter 3Using the Remote ControlUsing the INPUT ButtonUse the INPUT button to toggle through the available Video Line Input sources (L1, L2, andregular broadcasting signals) and regular broadcast signals. Video Line Input allows you to viewthe image from a connected device (like a camcorder) through the VCR.1. Press the remote control’s VCR button to activate VCR-controlling mode. Make sure that theVCR is turned ON.2. Press the remote control’s INPUT button to tune to the Video Line Input source. L1represents the rear A/V jacks and L2 represents the front A/V jacks.3. Press the INPUT button again to tune back to the broadcast signal you were previouslywatching through the VCR.Operating a TV with the VCR’s Remote ControlThe remote control that came with your VCR can be programmed to operate most brands ofremote-controllable TVs and should already control most RCA, GE, and Proscan models withoutprogramming.Do You Need to Program the Remote?To determine whether the remote control needs to be programmed to operate your TV, turn theTV on, point the remote control at it, then press the remote control’s TV button (this puts theremote control into TV-operating mode and should automatically turn on most RCA, GE, andProscan TVs). Press the remote control’s ON•OFF button to see if the TV responds to thecommand. If not, the remote control needs to be programmed to control that model TV.Programming the Remote ControlTo program your remote control, you must use the code list on the next page. Look up thebrand name of your TV and the code(s) that brand uses.Notes: This remote control may not operate all models of the brands shown in the code list.Note the difference between the TV and VCR on-screen displays to know which componentthe remote control is operating.1. Turn on the TV.2. Find your TV brand and code number(s) in the code list.3. Press and hold the TV button on the remote control.4. Enter the code from the code list.5. Release the TV button, then press the CHAN up or down button. If the TV responds to theremote control’s command, the remote is programmed.6. If the TV does not respond, repeat these steps using the next code listed for your TV’sbrand.15708270 (VR661HF)(E) 06 Remote 2/7/01, 4:56 PM28

Navigation menu