WINIA Electronics 7NF0009 VCR with DVD Player User Manual DVD Video USA DV6T811N LT
Dongbu Daewoo Electronics Corporation VCR with DVD Player DVD Video USA DV6T811N LT
UserManual.wiki
>
WINIA Electronics
>
7NF0009 User Manual
User Manual
Navigation menu
Upload a User Manual
Namespaces
Wiki Guide
HTML
PDF
Info
Views
User Manual
Discussion / Help
Navigation
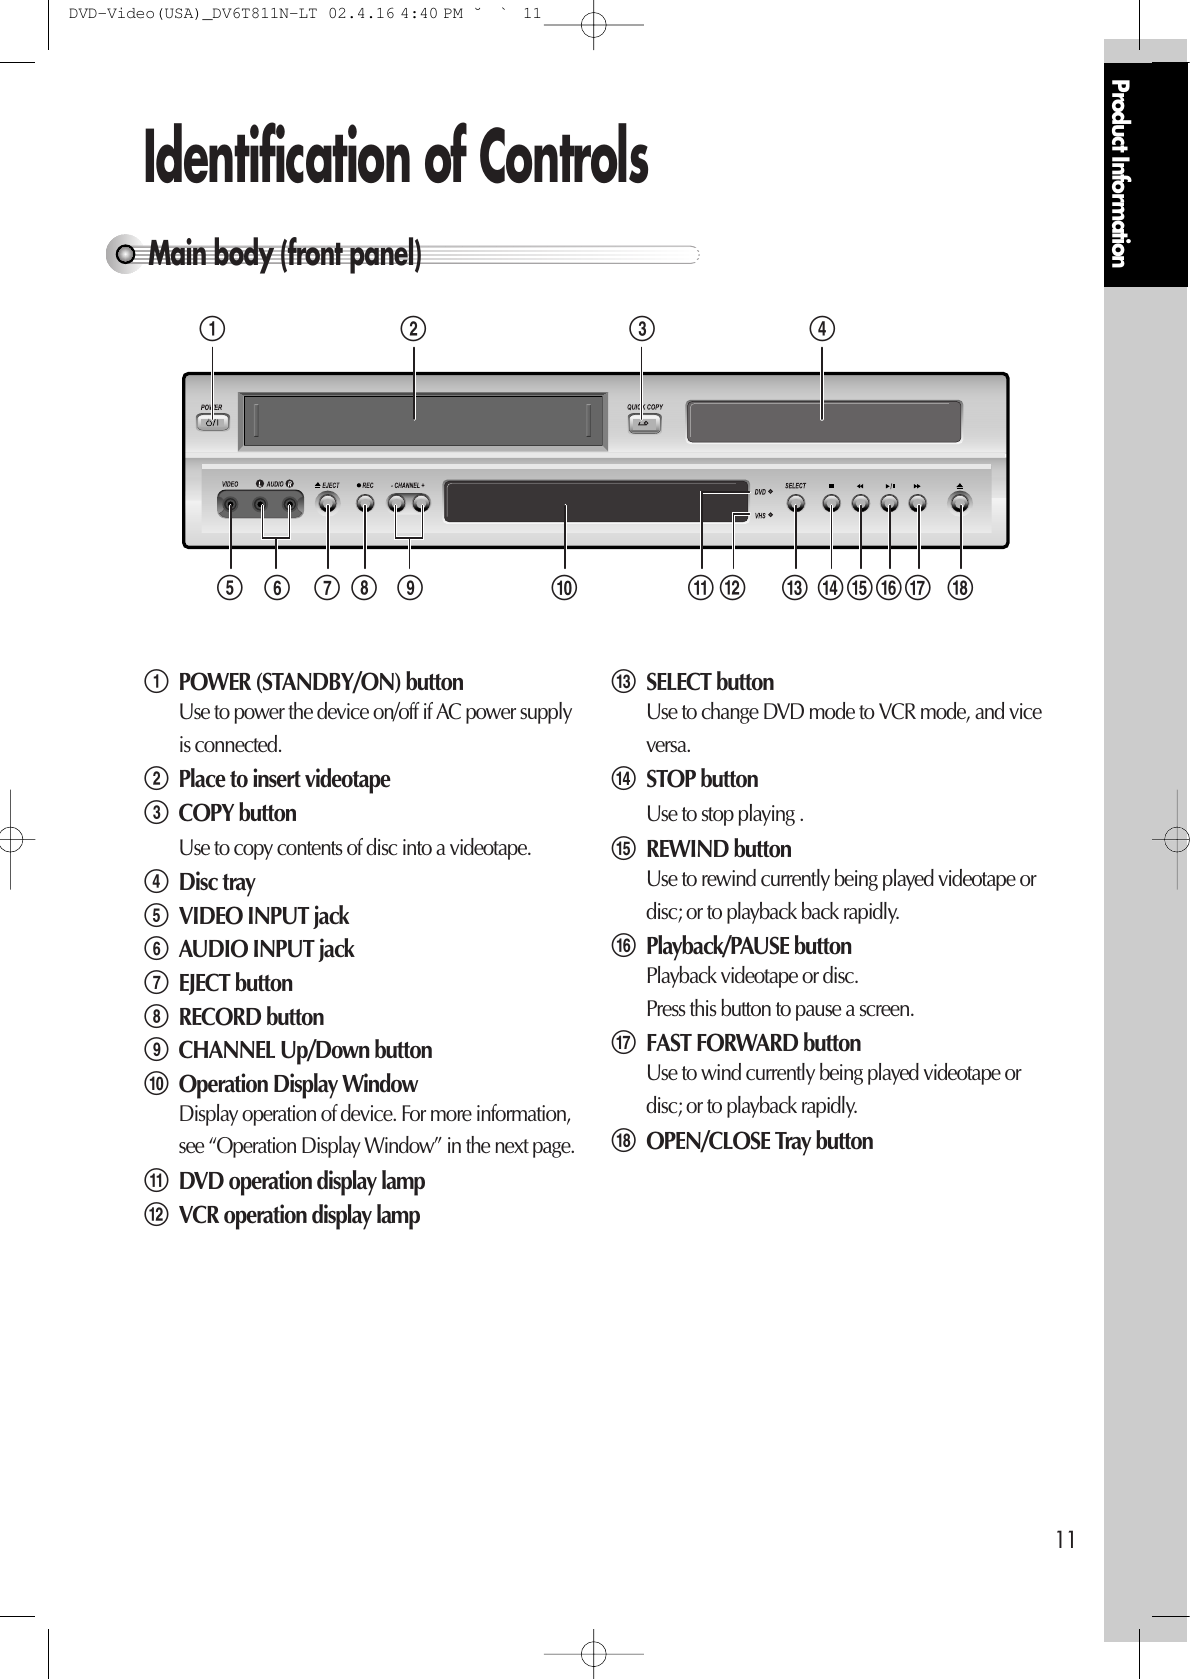
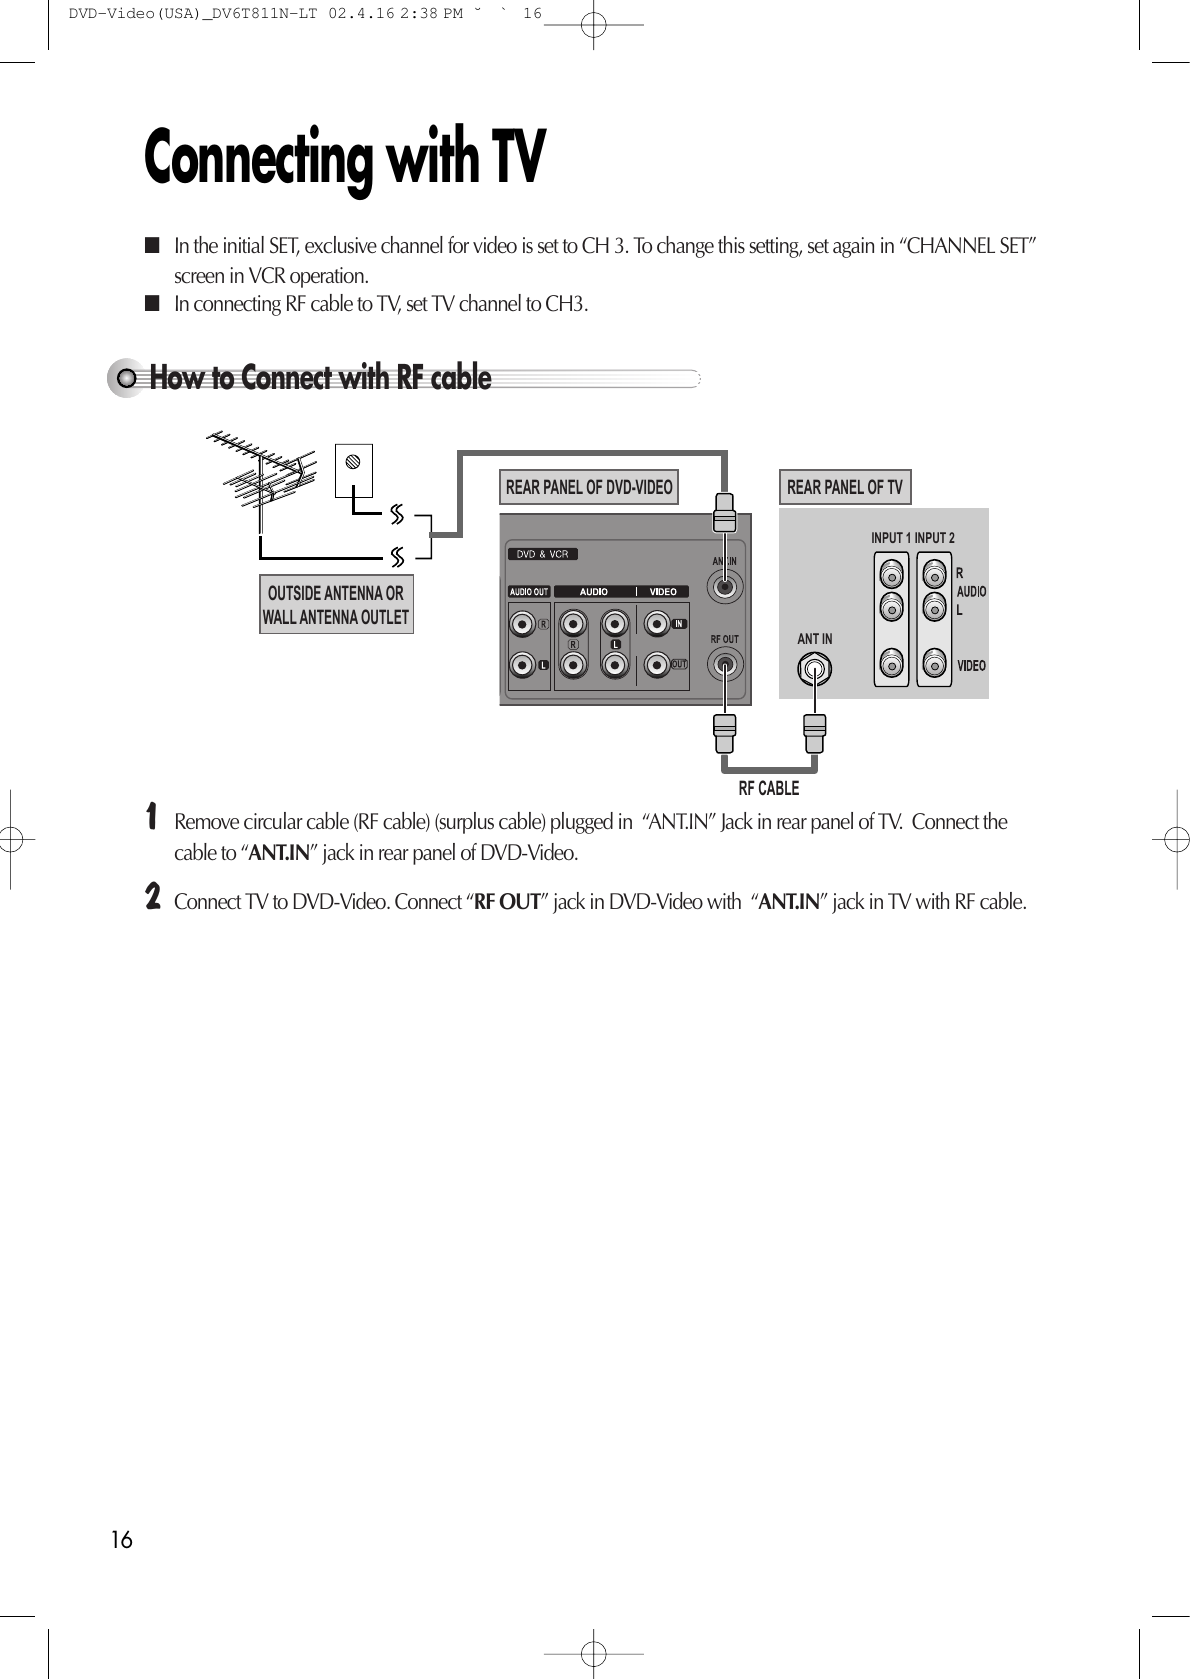
![DV6T811N [Hi-Fi] DVD-VIDEO PLAYEROwner’s Manual◆In the initial settings, exclusive channel forDVD/Video is set to CH 3. Set the TV channelto CH3 before using it. ◆Region code of DVD/Video player for home is1 or ALL. In inserting a disc with other regioncode, it does not operate. Please only use adisc with region code 1 or ALL. ◆is a ‘Prohibition’ mark. If this mark isdisplayed in operating the product, pleasewait for a while, then use it. If " Prohibition"mark continues to be displayed in pressing abutton after that, it means the button does notfunction in the currently played disc.◆Press a product button on the REMOTE thenuse the product. • DVD operation : [DVD] button • Video operation : [VCR] button DVD-Video(USA)_DV6T811N-LT 02.4.16 4:40 PM ˘`A](https://usermanual.wiki/WINIA-Electronics/7NF0009/User-Guide-242133-Page-1.png)
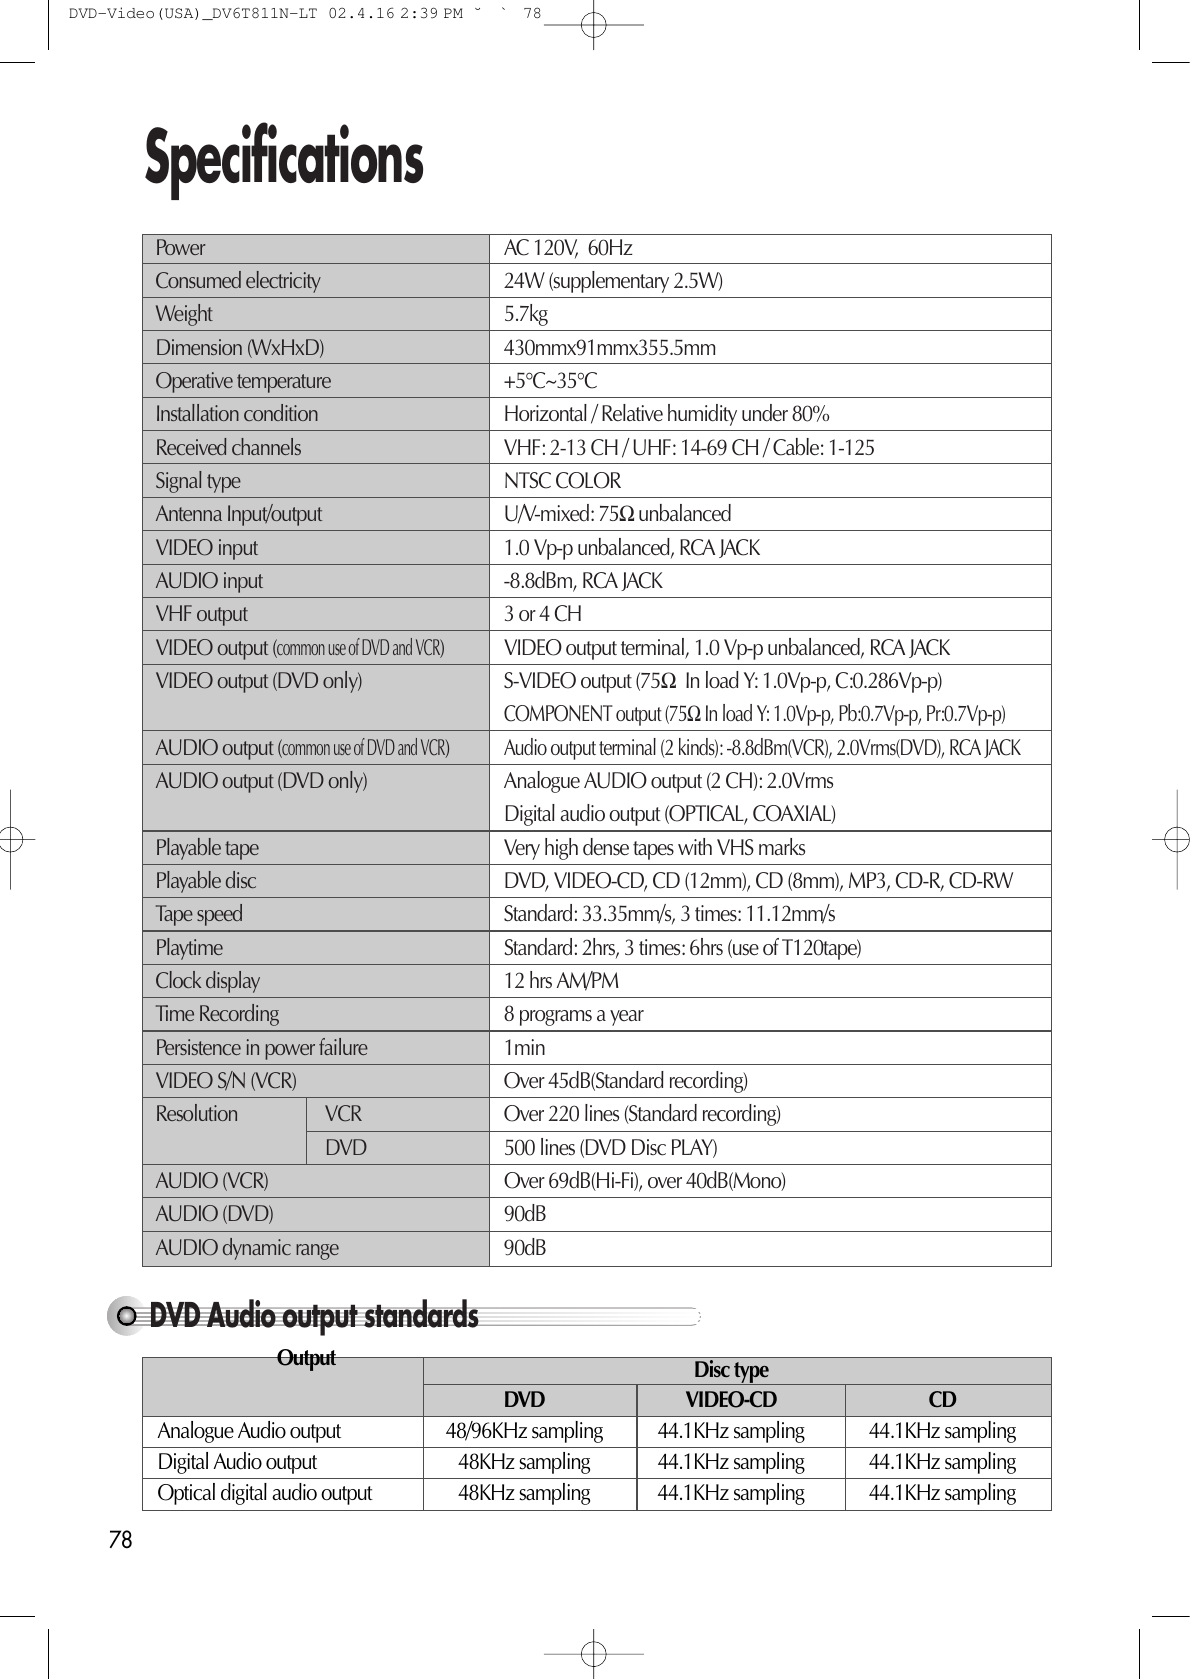
![Product Information5Advantages of This Product Are ..... • DVD, VCD, CD, CD-R(MP3), CD-RW, VHS, S-VHS playback function • DVD one-touch record function• Watching DVD for recording broadcast• Integrated REMOTE (VCR, DVD)• Ultra power savings : less than 3W for stand-by mode• VISS function • Multiplex sound playback/record • High Sound Quality of 6 head Hi-Fi • One Touch timer Recording (OTR) • MP3 file playback function (CD-R disc having records of MP3 files) • Various video type-supported (AUTO, NTSC and PAL)• GUI (Graphical User Interface) OSD (On Screen Display)By using the [DISPLAY] button on the remote control, information on the DVD/VCD/CD player and disc, canbe displayed on the TV screen. • Screensaver function (DVD)• 3D sound (3D sound effect using 2 speakers)• High bit / high sampling with 27MHz / 10bit video encoderThis unit has 27MHz / 10bit capability, that enables the faithful reproduction of fine images. • High bit / high sampling with 96KHz / 24bit audio D/A converter With this 96KHz / 24bit linear Pulse Code Modulated signals, which constitute the highest specifications in theDVD standards, you can enjoy faithfully reproduced sound in all of its various modes. To support 96KHzsampling / 24bit sound, the shaping noise of this multi-level digital sigma type of D/A converter is kept flat up to44KHz, thus preventing the important audio signals from being affected. • Coaxial, Optical digital output (PCM, Dolby Digital, dts) You can enjoy high-level digital audio by connecting with amp embedded with Dolby Digital / dts decoder. • Built-in Dolby Digital decoder (DVD)• Analog audio 2-channels output for DOWNMIX (x1) • Composite video out (x1)• S-Video out (x1) DVD-Video(USA)_DV6T811N-LT 02.4.16 2:37 PM ˘`5](https://usermanual.wiki/WINIA-Electronics/7NF0009/User-Guide-242133-Page-6.png)
![14Remote ControlVCRDVDREPEATOPEN/CLOSEDISPLAYTITLE/PBCMENUCHCHOUTPUTPREV.RECPROGRAMCLK/CNTSPEED/ANGLETRACKINGTV/VCRMARKSEARCH100/SYSTEMPLAY/PAUSE NEXTZOOM AUDIO SUBTITLERETURNCLEAR/3DSETUPENTER /S-VHS6@#!$%^&*()123457890“‘+=QqWwEeR![DVD] MENU button@POWER button #[DVD] TITLE /PBC button $[DVD] OPEN/CLOSE button, [VCR] EJECT button%[DVD, VCR] MOVE/SELECT in OSD, [VCR] ChannelUp/Down button ^RETURN button &[DVD] REPEAT Playback button *[DVD] ZOOM button ([DVD] PREVIOUS button (move into a previouschapter or track) )REVERSE SEARCH button 1[VCR] PROGRAM button2[DVD, VCR] CLOCK/COUNTER button 3[DVD] ANGLE, [VCR] Record SPEED button 4[VCR] Record button 5[DVD, VCR] NUMBER button , [VCR] S-VHS Playbackbutton, [VCR] TRACKING -/+ button 6DVD SELECT button 7VCR SELECT button 8[DVD, VCR] OSD DISPLAY button9OUTPUT Selection button0SETUP/ENTER button“CLEAR/3D button ‘[DVD] SUBTITLE Select button +[DVD] AUDIO LANGUAGE Select, [VCR] AUDIOSelect button =[DVD] NEXT button (Move into a next chapter ortrack) , [VCR] Frame Advance button in pausemode QPLAY/PAUSE button qFORWARD SEARCH button WSTOP button w[DVD] Chapter/Title/Time SEARCH button E[DVD] BOOKMARK button e[DVD, VCR] TV/VCR button R[VCR] Number 100, [DVD] SYSTEM button (SelectAuto/NTSC/PAL) Press the power [ ] button of the remote for about 8seconds. No buttons of front panel and remote can beoperated now and Lock indicator (“ ”) will bedisplayed on window display. To release child lock,press the power [ ] button of the remote control forabout 8 seconds.Child Lock!!!DVD-Video(USA)_DV6T811N-LT 02.4.16 2:38 PM ˘`14](https://usermanual.wiki/WINIA-Electronics/7NF0009/User-Guide-242133-Page-15.png)
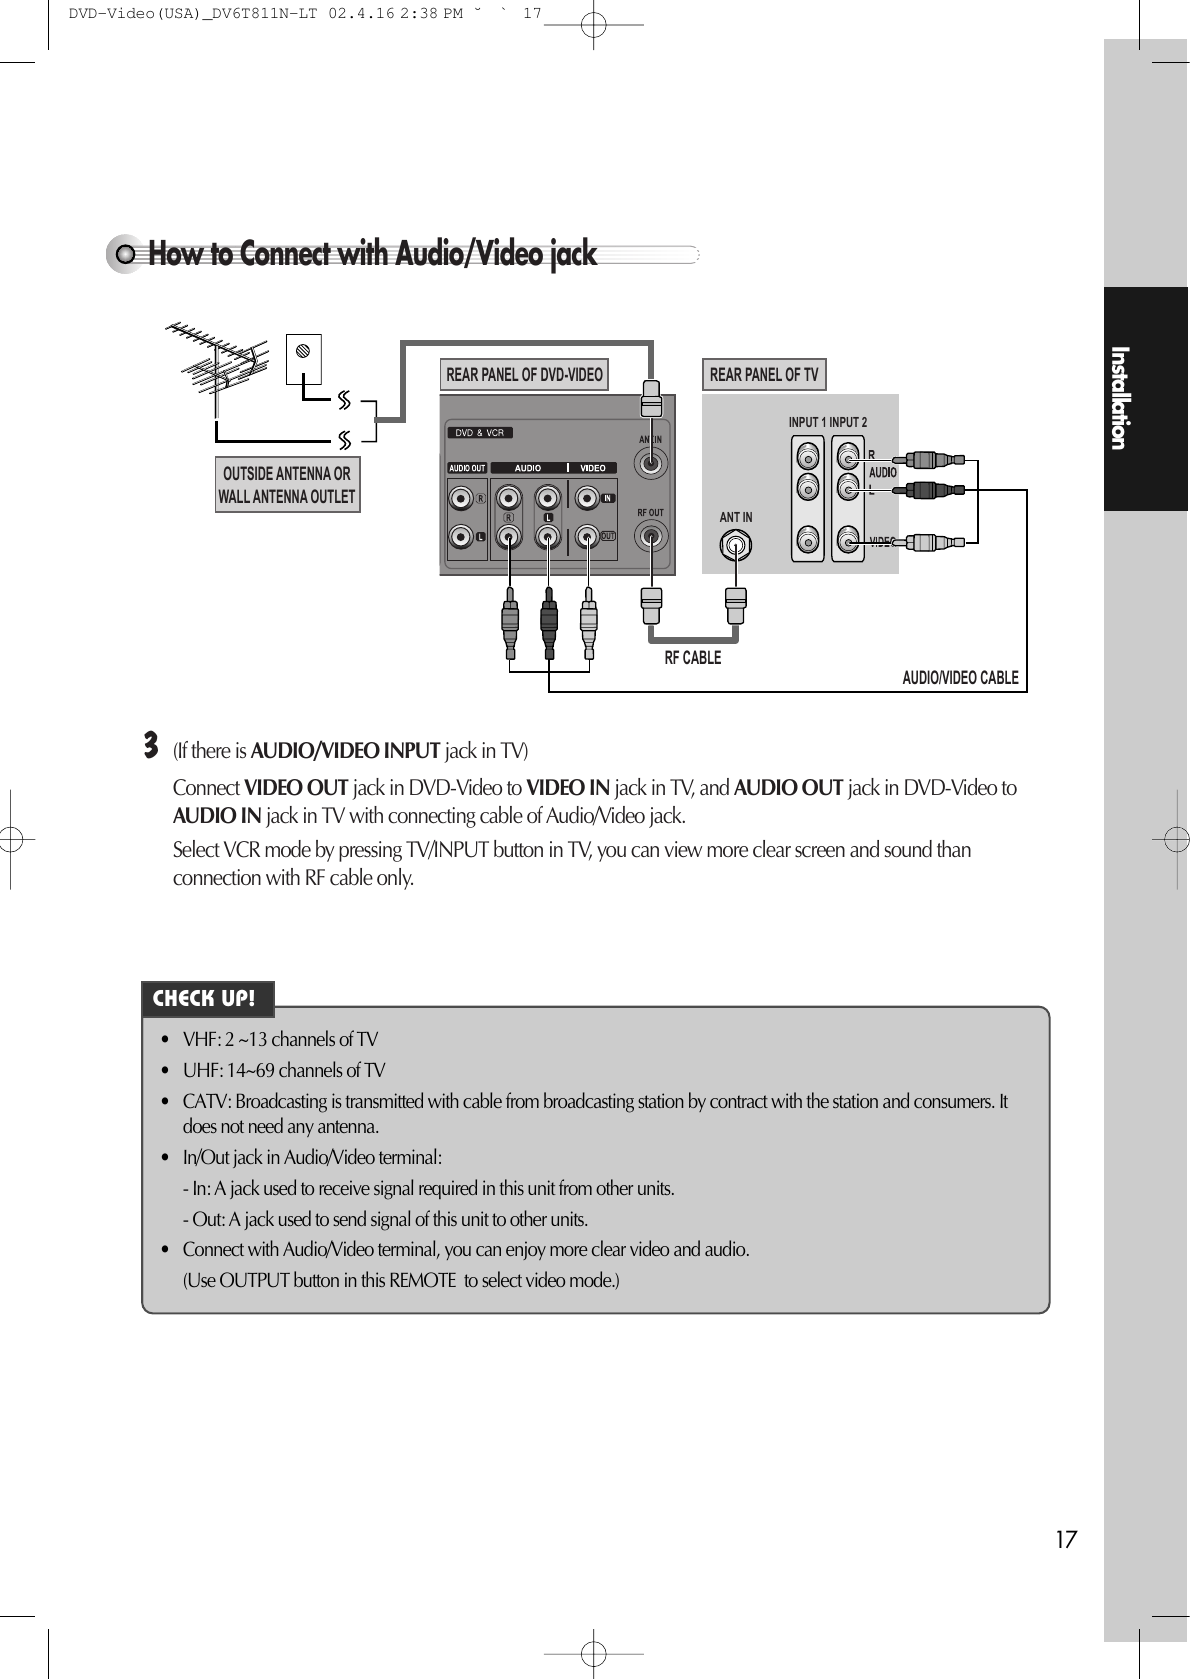
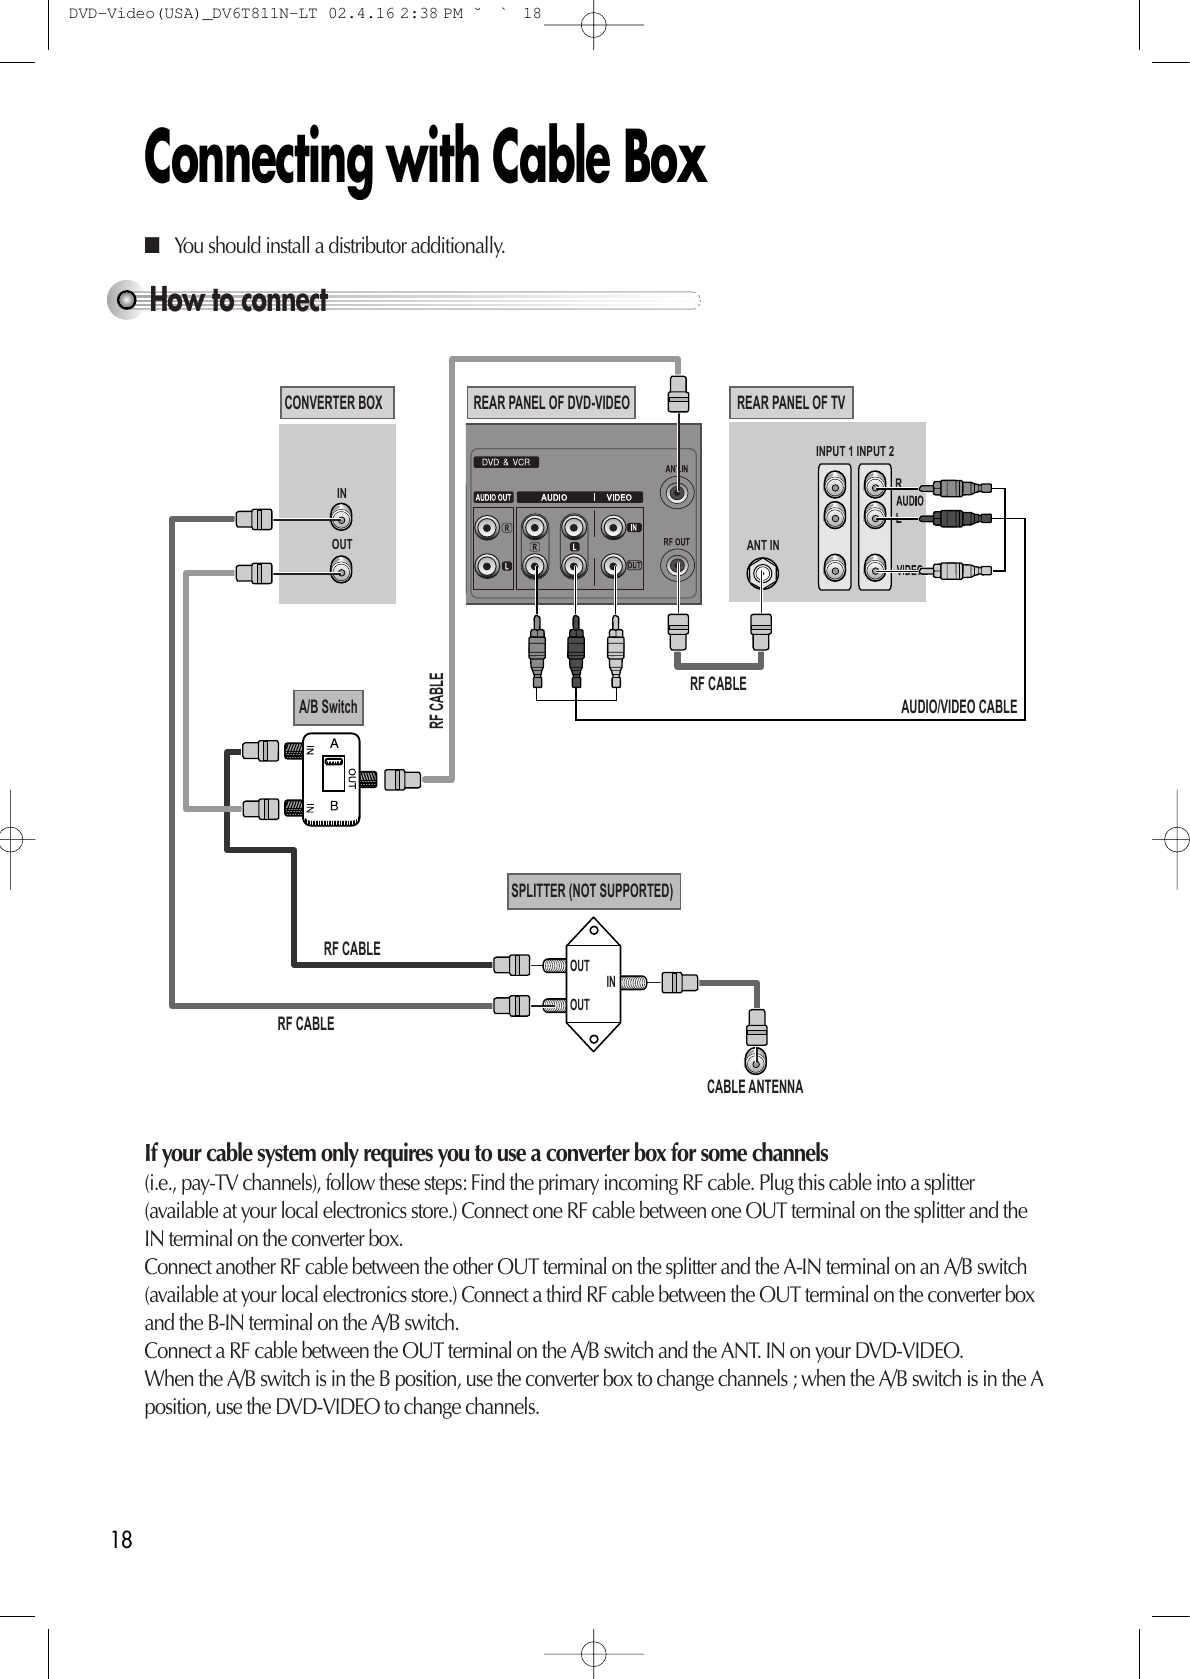
![Installation19How to watch general broadcasting with recording CATV¡Set Channel Select switch of Converter Box to CH 3 or 4 as same as video exclusive channel. Press [SET] buttonin [VCR] operation to set video exclusive channel in “CHANNEL SET” screen. ™Press channel button of Converter Box to select channel to be recorded. In this case, if you want to watch CATVto be recorded, press [TV/INPUT] button of TV to select “Out(VCR)”. £Press [REC] button in DVD-Video. ¢To watch general broadcasting, press channel button in TV to select the desired channel.• For some types of TV, you should press [TV/INPUT] button in TV REMOTE and convert from Out 1( VCR 1) or Out2(VCR 2) mode to Broadcasting Channel mode to change TV channel. • Change channel selection of CATV receiver in recording, contents of recording is changed. CHECK UP!DVD-Video(USA)_DV6T811N-LT 02.4.16 2:38 PM ˘`19](https://usermanual.wiki/WINIA-Electronics/7NF0009/User-Guide-242133-Page-20.png)
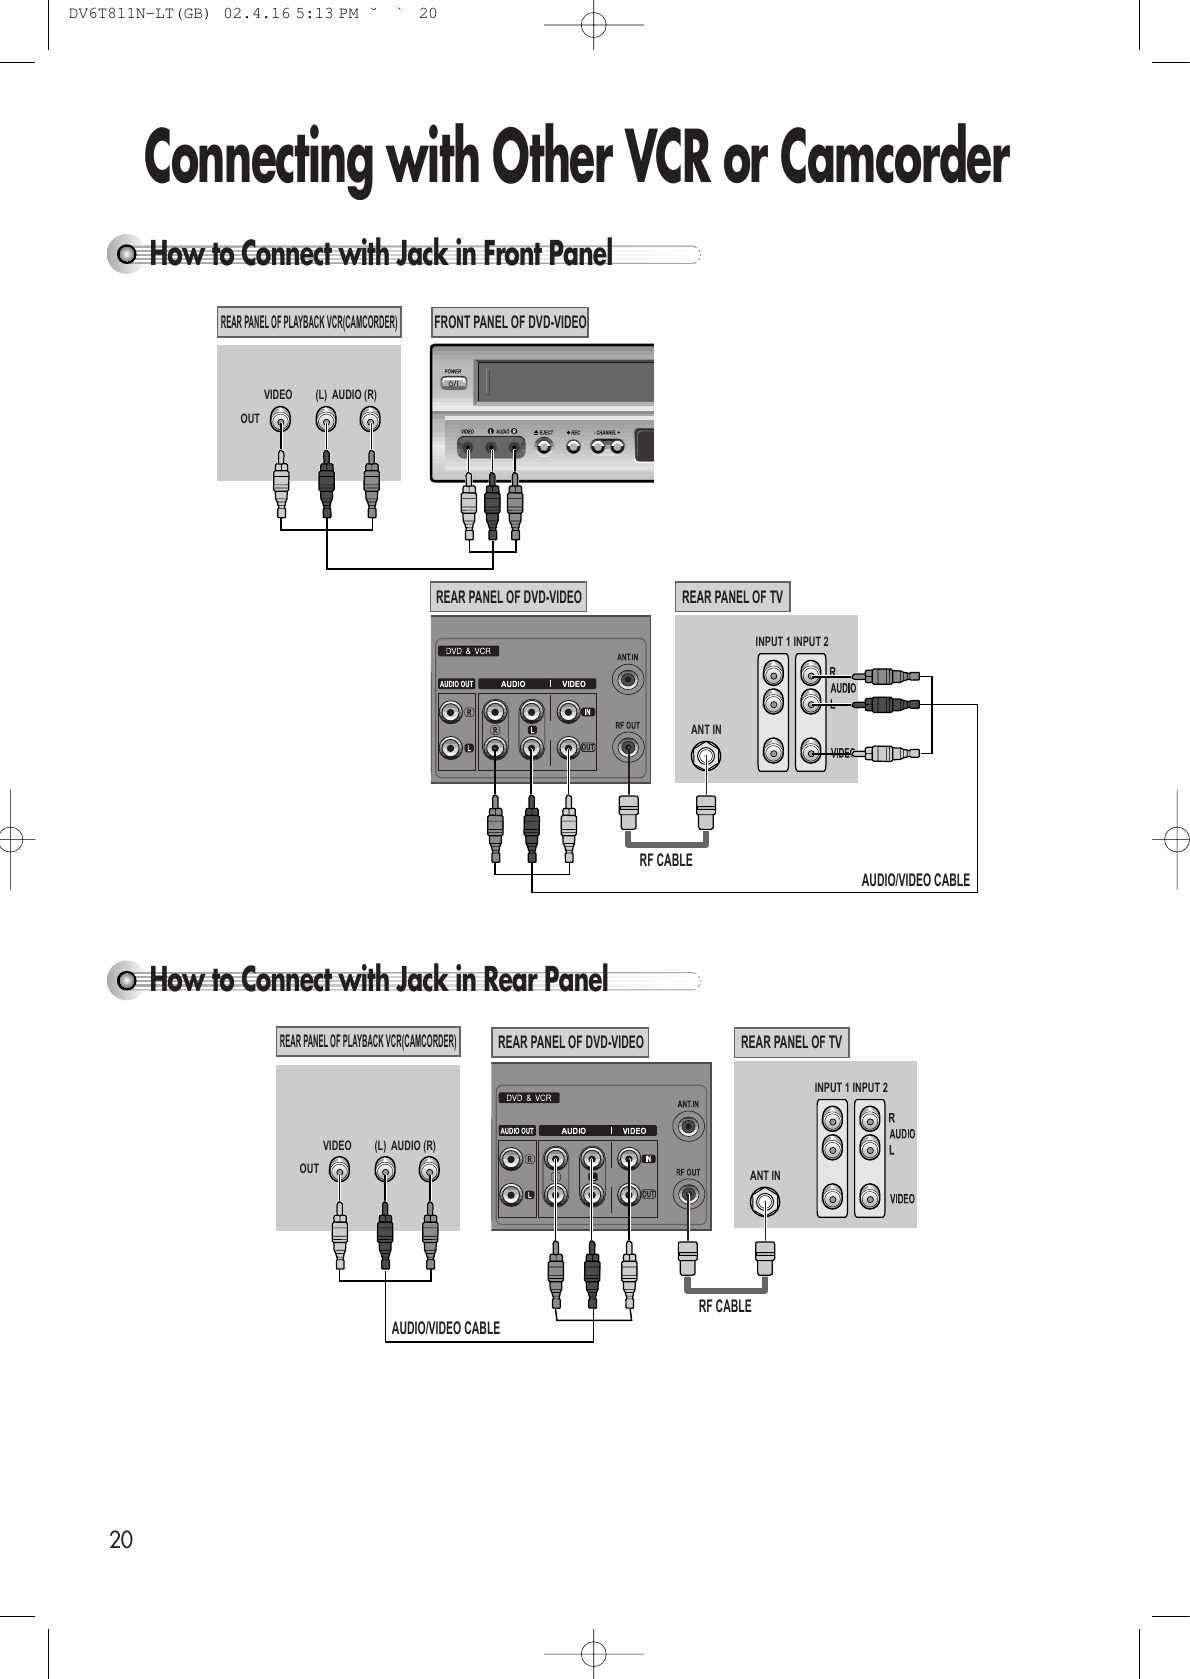
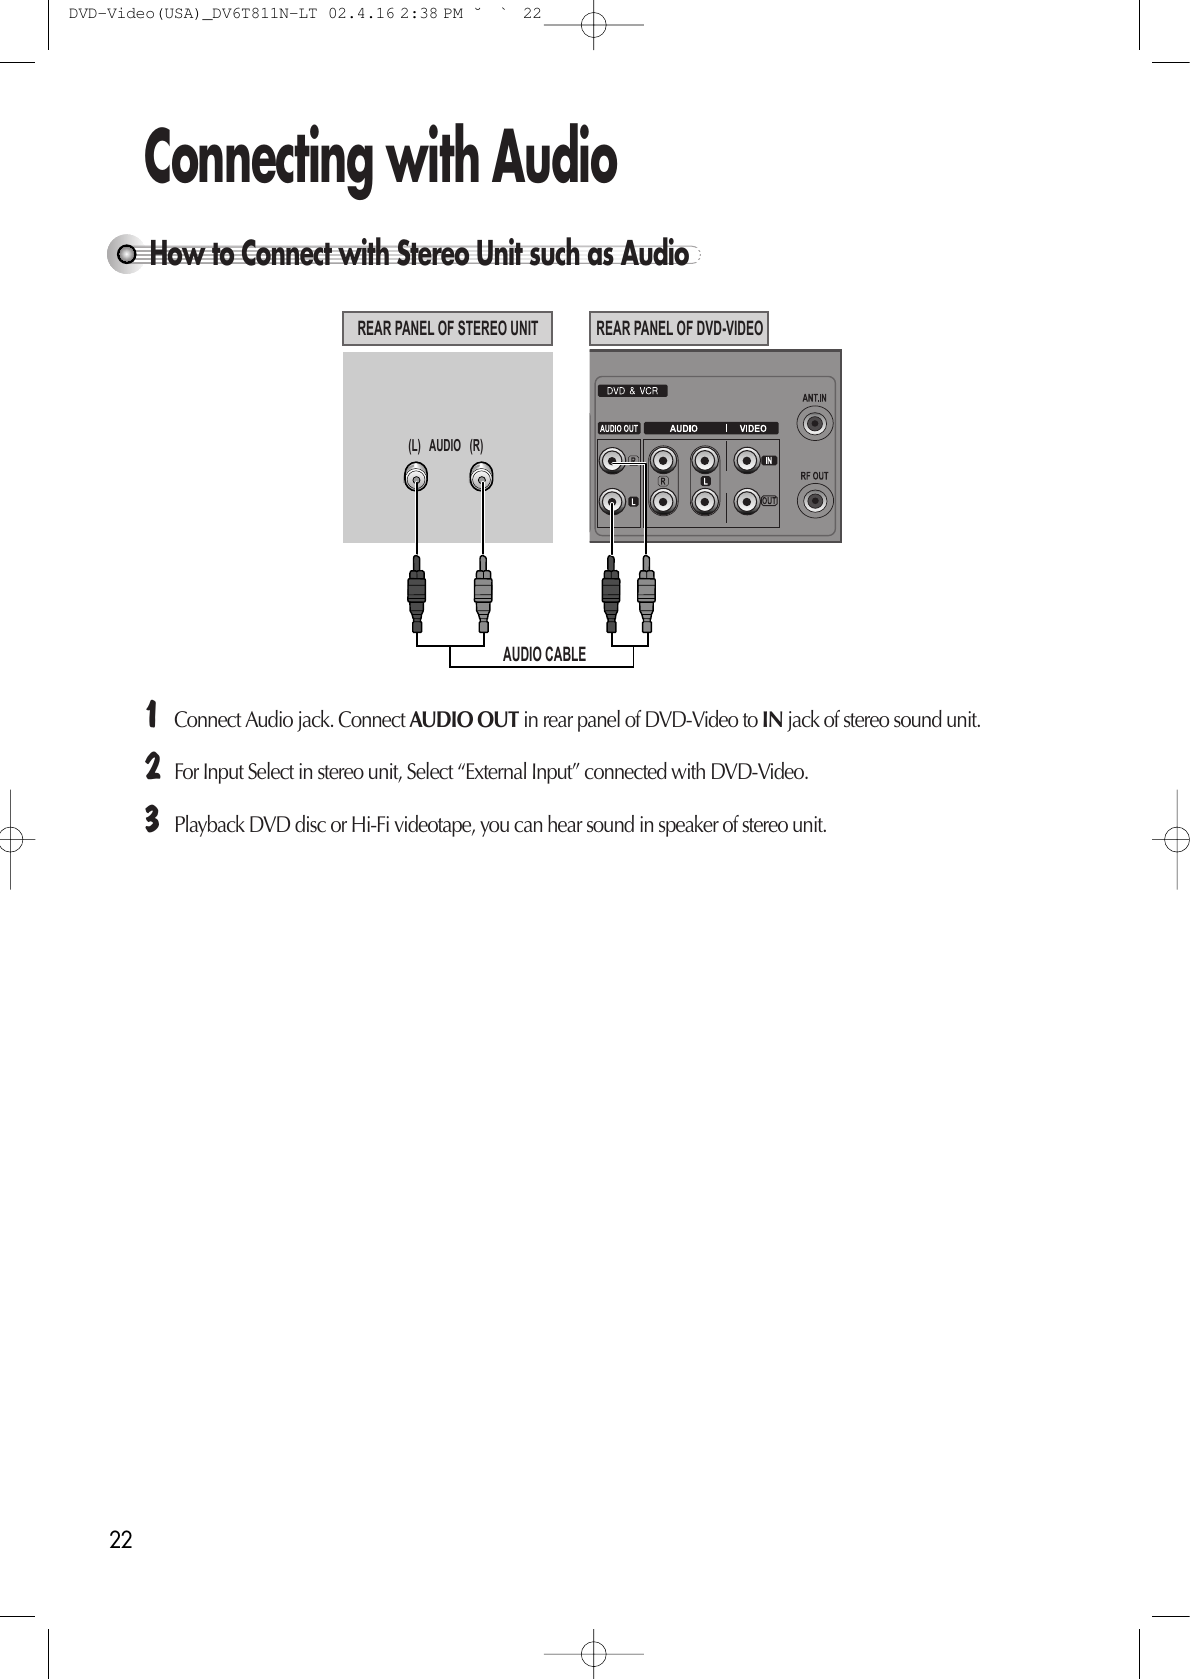
![Installation21How to Copy(Edit) Tape with Other VCR or Camcorder¡Connect AUDIO/VIDEO OUT jack in Camcorder(or playback video) to AUDIO/VIDEO IN jack in rear panel(or front panel) of DVD-Video with connecting cable. ™Connect “ANT. IN” jack in TV to “RF.OUT” jack in DVD-Video with RF cable. £To record contents of camcorder or playback video with DVD-Video, insert recording tape attached recordingtab in DVD-Video. ¡Turn on DVD-Video. ™Press [OUTPUT] button of remote control and adjust DVD-Video to display “External Input 1” or “External Input2” in TV screen. £Press [PLAY] button in Camcorder or playback video. ¢Press [REC] button in DVD-Video if you want to record contents of camcorder or playback video. ∞Press [Pause] button in DVD-Video when unnecessary or undesired scene is displayed in recording. (Caution) Recording is released automatically after 5 minutes since pressing [PAUSE] button. Press [REC]button if you want to record again. How to Playback Chapter Photographed by Camcorder ¡Turn DVD-Video on. ™Press [OUTPUT] button of remote control and adjust DVD-Video to display “External Input 1” or “External Input2” in TV screen. £Insert tape in camcorder and playback it. DVD-Video(USA)_DV6T811N-LT 02.4.16 2:38 PM ˘`21](https://usermanual.wiki/WINIA-Electronics/7NF0009/User-Guide-242133-Page-22.png)
![Move: Select : Exit:Setup/ReturnInstallation23Connecting TV with S-Video/Component Jack, Amp with Digital Audio Out JackHow to Connect (L) AUDIO IN (R)REAR PANEL OF DVD-VIDEOAMPLIFIER OF DOLBY DIGITAL REAR PANEL OF TVCOMPONENT INCONNECTING CABLE(NOT SUPPORTED)¡Select either S-VIDEO IN or COMPONENT IN to connect to TV. You shouldselect “Video Out” type in DVD SET(see 62P) in advance. ™Select either COAXIAL or OPTICAL to connect to amp of Dolby Digital. ** If you want to know about “Dolby Digital”, please refer to [About DVD] in68p.£If screen is broken in connecting COMPONENT OUT to Pr, Pb, Y of TVCOMPONENT IN jack , connect to Cr, Cb, Y. ■Use in S-VIDEO or COMPONENT In jack attached in TV or amp supporting Dolby Digital.Language Video Audio OthersTV Aspect 4:3 PSTV Type NTSCVideo Out S-VideoBrightness NormalSharpness NormalComponentS-VideoManufactured under license from Dolby Laboratories.“Dolby”, “Pro Logic”, and the double-D symbol are trademarks of Dolby Laboratories.DVD-Video(USA)_DV6T811N-LT 02.4.16 2:38 PM ˘`23](https://usermanual.wiki/WINIA-Electronics/7NF0009/User-Guide-242133-Page-24.png)
![24Clock SetPress [SETUP/ENTER] button.Press [>] button to select CLOCK SET.Select Time and Date Set with [ ] button inCLOCK SET screen.■Set TV to CH 4 (or 3). ■Press [VCR] button on remote control to change into VCR Mode and follow theprocedure below. Set the current date and time with [ , , ,] button or [NUMBER] button. For DATE SET, follow the order ofMonth/Day/Year ; for TIME SET, follow the orderof Hour/Minute in CLOCK SET screen. If CLOCK SET is completed, press[RETURN] button.123REPEATCHPREV.RECPROGRAMCLK/CNTSPEED/ANGLETRACKINGTV/VCRMARKSEARCH100/SYSTEMPLAY/PAUSE NEXTZOOM AUDIO SUBTITLERETURNCLEAR/3DSETUPENTER /S-VHSRETURNNUMBERSETUP/ENTERSETUPCLOCK SETTIMER RECORDINGSCHANNEL SETFUNCTIONSLANGUAGE SELECTMove: Select:End:RETURNCLOCK SETTime and Date SetAuto DST : ONTIME AND DATE SETTime - - : - -(hh:mm)Date - - / - - / 2 0 - -TIME AND DATE SETTime 11 : 01 AMDate 05 / 25 / 2002 (Sat)(mm/dd/yy)Move: Select:End:RETURNMove: Select:End:RETURNMove: Select:End:RETURNDVD-Video(USA)_DV6T811N-LT 02.4.16 3:42 PM ˘`24](https://usermanual.wiki/WINIA-Electronics/7NF0009/User-Guide-242133-Page-25.png)
![Basic Operation25Output Select Press [DVD] button. If DVD mode is correctly selected, DVD on the operation display window is lighted. Then, REMOTE button works as DVD function. Press the [DVD] button, then the mode of DVD-Video Player becomes to the OPERATION mode.To Select VCRPress [VCR] button.If VCR mode is correctly selected, VCR on the operation display window is lighted. Then, REMOTE button works as VCR function. Press the [VCR] button, then it becomes to the VCR OPERATION mode.To Select Watch Modes or External InputPress [OUTPUT] button.Whenever you press [OUTPUT] button, DVD, VCR PLAYBACK,BROADCASTING RECEPTION and EXTERNAL INPUT is selected inorder and the DISPLAY of DVD and VCR will be changed accordingly. Timer Program SettingPress [PROGRAM] button.You can set the Timer Program. Before timer program setting, clock should be set correctly (see page 24)and video mode should be selected. (See screen #3 in page 36)To Select DVDVCRDVDREPEATOPEN/CLOSEDISPLAYTITLE/PBCMENUCHCHOUTPUTPREV.RECPROGRAMCLK/CNTSPEED/ANGLETRACKINGTV/VCRMARKSEARCH100/SYSTEMPLAY/PAUSE NEXTZOOM AUDIO SUBTITLERETURNCLEAR/3DSETUPENTER /S-VHSDVDVCROUTPUT SELECT PROGRAMDVD-Video(USA)_DV6T811N-LT 02.4.16 2:38 PM ˘`25](https://usermanual.wiki/WINIA-Electronics/7NF0009/User-Guide-242133-Page-26.png)
![26DVD Playback Press [ ] button to power on.Press [DVD] button of REMOTE to change into DVD mode.Press [OPEN/CLOSE] button to open the disc tray. Place a disc firmly on the disc tray, making its label look upward. Insert the disc and press [OPEN/CLOSE] button to close the tray.The disc tray is closed and after checking the disc’s condition, Playback or Stopfunction starts to operate. 123To playback it, press [PLAY/PAUSE] button. • In the case of DVD,DVD menus and titles are displayed on TV screen. • In the case of S-VCD and VCD2.0the menus are displayed on TV screen and it isconverted into PBC(Playback Back Control) mode. • In the case of CD, VCD1.1 and MP3, the disc plays in order of its track numbers. 4To stop it, press [ ] button.For pause, press [PLAY/PAUSE] button in playbackmode. If you press this button once more, it starts playbackagain.5Press [OPEN/CLOSE] button to remove the disc.6VCRDVDREPEATOPEN/CLOSEDISPLAYTITLE/PBCMENUCHCHOUTPUTPREV.RECPROGRAMCLK/CNTSPEED/ANGLETRACKINGTV/VCRMARKSEARCH100/SYSTEMPLAY/PAUSE NEXTZOOM AUDIO SUBTITLERETURNCLEAR/3DSETUPENTER /S-VHSOPEN/CLOSEPLAYBACK/PAUSESTOPPOWER DVD-Video(USA)_DV6T811N-LT 02.4.16 4:44 PM ˘`26](https://usermanual.wiki/WINIA-Electronics/7NF0009/User-Guide-242133-Page-27.png)
![Basic Operation27VCR Playback Press [ ] button to power on.Press [VCR] button of remote control to change into VCR mode.Insert the desiredtape.If you want to playback it, press [PLAY/PAUSE] button.When the operational status is flickering or poor, adjust it with [TRACKING +/-]button. 123To stop it, press [ ] button. For pause, press [PLAY/PAUSE] button in playbackmode. If you press this button once more, it starts playbackagain. 4To playback forward fast or to rewind it, press[ ] or [ ] button, respectively.5Press [EJECT] button in the front part or[OPEN/CLOSE] button on remote control toremove the tape. 6VCRDVDREPEATOPEN/CLOSEDISPLAYTITLE/PBCMENUCHCHOUTPUTPREV.RECPROGRAMCLK/CNTSPEED/ANGLETRACKINGTV/VCRMARKSEARCH100/SYSTEMPLAY/PAUSE NEXTZOOM AUDIO SUBTITLERETURNCLEAR/3DSETUPENTER /S-VHSREWIND PLAYBACK/PAUSE FAST FORWARDSTOPPOWER • If the product, which has a auto-detector, detects a contaminated head(s), it showsthe conditions to notice the contamination on screen.* In case of the notice on screen, please rub the heads with a head-cleanerfollowed by “How to use a head-cleaner”. (70P)CHECK UP!DVD-Video(USA)_DV6T811N-LT 02.4.16 4:44 PM ˘`27](https://usermanual.wiki/WINIA-Electronics/7NF0009/User-Guide-242133-Page-28.png)
![28To Adjust DisplayVarious Playback Methods■If you want fast forward playback,press [ ] button in Playback mode. You can watch fast playing screen.■If you want fast reverse playback,press [ ] button in Playback mode. You can watch fast rewinding screen.■If you want Still picture, press [PLAY/PAUSE] in Playback mode. You can watch the desired screen in pause status.■If you want slow-motion playback,press [ ] or [ ] button in Pause mode. You can watch the desired screen in the slow forward or slow reverse playback. * NOTE: VCR doesn’t have Slow Reverse Playback function.■If you want to watch a series of screens one by one,(FRAME ADVANCE)press [NEXT ] button in Pause mode. Each time you press this button, the picture advances one frame.This product includes automatic Tracking function and enables users to enjoy clear picture without an additionaloperation. Provided that the following problems can be solved by the manual adjustment, which improves displayquality. (During automatic display adjustment, “Adjusting Display” are displayed on TV screen.)- If the screen is poor in Playback mode, - If noises occur in the upper or lower part ofscreen in slow playback mode, - If paused picture vibrates up and down.Use [TRACKING +/-] buttons of remote controlto adjust the display suitable for watching.TRACKING100/SYSTEM• To playback the tape which is recorded ormanufactured with S-VHS type, press [PLAY]button and then press [S-VHS] button. /S-VHSCHECK UP!DVD-Video(USA)_DV6T811N-LT 02.4.16 2:38 PM ˘`28](https://usermanual.wiki/WINIA-Electronics/7NF0009/User-Guide-242133-Page-29.png)
![Basic Operation29RecordingPress [ ] button to power on.• Press [VCR] button of remote control to change into VCR mode. • Power on TV and select Ch 3, or press [INPUT] button of TV set to selectExternal Input mode. Insert a recordable tape.Insert a tape with recording tab. With [CHANNEL], [NUMBER] and [OUTPUT] buttons, select the desiredbroadcasting channel or external input unit to record. 123Select the desired speed (SP or SLP) with [SPEED]button. 4Press [REC] button.Then, it starts recording. 5If you want to pause recording, press [PAUSE]button.After pressing [PAUSE] button, if the pause statuscontinues for five minutes, the recording is releasedautomatically.6To exit recording, press [STOP] button. 7VCRDVDREPEATOPEN/CLOSEDISPLAYTITLE/PBCMENUCHCHOUTPUTPREV.RECPROGRAMCLK/CNTSPEED/ANGLETRACKINGTV/VCRMARKSEARCH100/SYSTEMPLAY/PAUSE NEXTZOOM AUDIO SUBTITLERETURNCLEAR/3DSETUPENTER /S-VHSPLAYBACK/PAUSENUMBERSTOPREC SPEEDOUTPUT SELECTPOWERCHANNELVCRRECTo Record With VCRDVD-Video(USA)_DV6T811N-LT 02.4.16 2:38 PM ˘`29](https://usermanual.wiki/WINIA-Electronics/7NF0009/User-Guide-242133-Page-30.png)
![This product incorporates copyright protection technology that is protected by method claims of certain U.Spatents and other intellectual property rights owned by Macrovision Corporation and other rights owners. Use of this copyright protection technology must be authorized by Macrovision Corporation, and is intended forhome and other limited viewing uses only unless otherwise authorized by Macrovision Corporation. Reverseengineering or disassembly is prohibited.30To Copy From DVD To VideotapeIf you want to watch another TV channel during recording with video,press [TV/VCR] button.It is available of changing into and watching another TV channel.If you want to playback DVD during recording with video, insert a DVDdisc.Place the desired DVD disc on DVD tray, press [DVD] button to convertOUTPUT into DVD mode and press [PLAY] button. Then, you can watch DVD.12Insert the desired DVD disc. When it is a DVD disc with copy protect function, you can’t copy it. Insert a recordable tape. Press [Q. COPY] button on the front panel.DVD plays and VCR starts recording. 12To exit copy, press [VCR] button and then[ ] button.If not, DVD plays again and video continues tocopy.3To Enjoy Another TV Channel or DVD during recordingTo copy justwith buttons of remotecontrol, after playingDVD, press [VCR]button and then [REC]button.DVD-Video(USA)_DV6T811N-LT 02.4.16 2:38 PM ˘`30](https://usermanual.wiki/WINIA-Electronics/7NF0009/User-Guide-242133-Page-31.png)
![Basic Operation31One Touch timer Recording (OTR)First, follow the steps 1 to 4 in “Recording With VCR”. Press [REC] button as much as you want.See the “Recording Times Table” below.To stop Recording mode, press [STOP] button more than 8 seconds. 123Button Press Times .......... Operational StatusOnce ..................................... continuous recording until you press STOP button Twice .................................... recording for thirty minutes from current time 3(times).................................. recording for one hour 4 ............................................ recording for one hour and thirty minutes 5 ............................................ recording for two hours 6 ............................................ recording for two hours and thirty minutes 7 ............................................ recording for three hours 8 ............................................ recording for three hours and thirty minutes 9 ............................................ recording for four hours 10 .......................................... returning to the status of Once PressWhen your urgent business happens suddenly in watching TV or you want to record the current TV programfor the desired time, follow the procedures below. DVD-Video(USA)_DV6T811N-LT 02.4.16 2:38 PM ˘`31](https://usermanual.wiki/WINIA-Electronics/7NF0009/User-Guide-242133-Page-32.png)
![32Memorizing TV ChannelsPress [SETUP/ENTER] button.Press [ ] button to move into CHANNELSET, and then select CHANNEL SET with [ ]button. ■Set TV to Ch 3. ■Prior to the setting, press [VCR] button of your REMOTE to change into VCR mode.Select “AUTO CHANNEL SEARCH”. Press [ ] button in CHANNEL SET window toselect AUTO CHANNEL SEARCH. Select “Detect Automatically”. Press [ ] button in AUTO CHANNEL SEARCHwindow to detect the channel automatically.Channel number changes successively from 01to 125, while only broadcasting channels arememorized automatically. When memoryprocess is completed, the lowest number’s one ofmemorized channels is displayed.Please, check the memorized channels.To check the memorized channels, press [CH] button on remote control. 123To Memorize Automatically ChannelsSETUPCLOCK SETTIMER RECORDINGSCHANNEL SETFUNCTIONSLANGUAGE SELECTAUTO CHANNEL SEARCHWhat type of signal areyou using?Cable TVAntennaDetect AutomaticallyAUTO CHANNEL SEARCHNow scanning channel 011Move: Select:End:RETURNMove: Select:End:RETURNEnd:RETURNCHANNEL SETAuto Channel SearchAdd/Remove ChannelsSignal Type: CABLECable Box SetupOutput channelselection: CH3Move: Select:End:RETURNDVD-Video(USA)_DV6T811N-LT 02.4.16 3:42 PM ˘`32](https://usermanual.wiki/WINIA-Electronics/7NF0009/User-Guide-242133-Page-33.png)
![VCR Operation33To Memorize Channels Manually When the desired broadcasting finished or you want to add unmemorized channels owing to poor signals tothe memory, follow the procedures below.After pressing [SETUP/ENTER] button, select “CHANNEL SET”. Select “Add/Remove Channels”. Move into “Add/Remove Channels” with[ ] button and then, select the desired itemwith [ ] button.12Select the desired channel and memorize it. Press [NUMBER] button of remote control toselect the desired channel to memorize. When[CLEAR] button is pressed, “REMOVED” underchannel number converts into “ADDED”.3Check the memorized channel.To check the memorized channel, press [CH] button on remote control. 4CHANNEL SETAuto Channel SearchAdd/Remove ChannelsSignal Type: CABLECable Box SetupOutput channelselection: CH3ADD/REMOVE CHANNELSChannel 02is now REMOVED.Move: Select:End:RETURNAdd: CLEARSelect: End:RETURNDVD-Video(USA)_DV6T811N-LT 02.4.16 2:38 PM ˘`33](https://usermanual.wiki/WINIA-Electronics/7NF0009/User-Guide-242133-Page-34.png)
![34To Delete Channels Manually After memorizing automatically channels, when the same broadcasting is memorized in more than twochannels, or you want to delete badly displayed channels, follow the procedures below.Press [SETUP/ENTER] button and select “CHANNEL SET”.Select “Add/Remove Channels”. Move into “Add/Remove Channels” with[ ] button and then, select the desired itemwith [ ] button. 12Select the desired channel and delete it.Press [NUMBER] button of remote control toselect the desired channel to delete. When[CLEAR] button is pressed, “ADDED” under thechannel number converts into “REMOVED”. 3Check the deleted channel.To check the deleted channel, press [CH] button on remote control. 4Selecting cable or antenna viewingYou must set the viewing mode for your VCR, choosingeither CABLE (cable system connection) or ANTENNA(antenna connection). To set the viewing mode:Press [>] to toggle the setting between CABLE andANTENNA in CHANNEL SET screen. When the desired viewing mode is displayed, pressRETURN twice to exit.ADD/REMOVE CHANNELSChannel 02is now ADDED.CHANNEL SETAuto Channel SearchAdd/Remove ChannelsSignal Type: CABLECable Box SetupOutput channelselection: CH3Move: Select:End:RETURNRemove: CLEARSelect: End:RETURNCHANNEL SETAuto Channel SearchAdd/Remove ChannelsSignal Type: CABLECable Box SetupOutput channelselection: CH3Move: Select:End:RETURNDVD-Video(USA)_DV6T811N-LT 02.4.16 2:38 PM ˘`34](https://usermanual.wiki/WINIA-Electronics/7NF0009/User-Guide-242133-Page-35.png)
![VCR Operation35To Set Cable BoxTo Set Output Channel Press [SETUP/ENTER] button and select“CHANNEL SET” .Select “Output channel selection”. By pressing [ ] button, set the exclusive channel forvideo on the desired one of 3CH or 4CH.Press [SETUP/ENTER] button and select “CHANNEL SET”.Select “Cable Box Setup”. Move into Cable box setup with [ ]button and then, select the desired item with [] button. 12Select “Cable Box Channel”. Press the channel number which matches to theoutput of the Cable Box to connect betweenCable Box and this unit.3CABLE BOX SETUPOn what channel do youwant to receive fromthe cable box?03CHANNEL SETAuto Channel SearchAdd/Remove ChannelsSignal Type: CABLECable Box SetupOutput channelselection: CH3Move: Select:End:RETURNCHANNEL SETAuto Channel SearchAdd/Remove ChannelsSignal Type: CABLECable Box SetupOutput channelselection: CH3Move: Select:End:RETURNSelect: End:RETURNVideo:OUTPUTDVD-Video(USA)_DV6T811N-LT 02.4.16 2:38 PM ˘`35](https://usermanual.wiki/WINIA-Electronics/7NF0009/User-Guide-242133-Page-36.png)
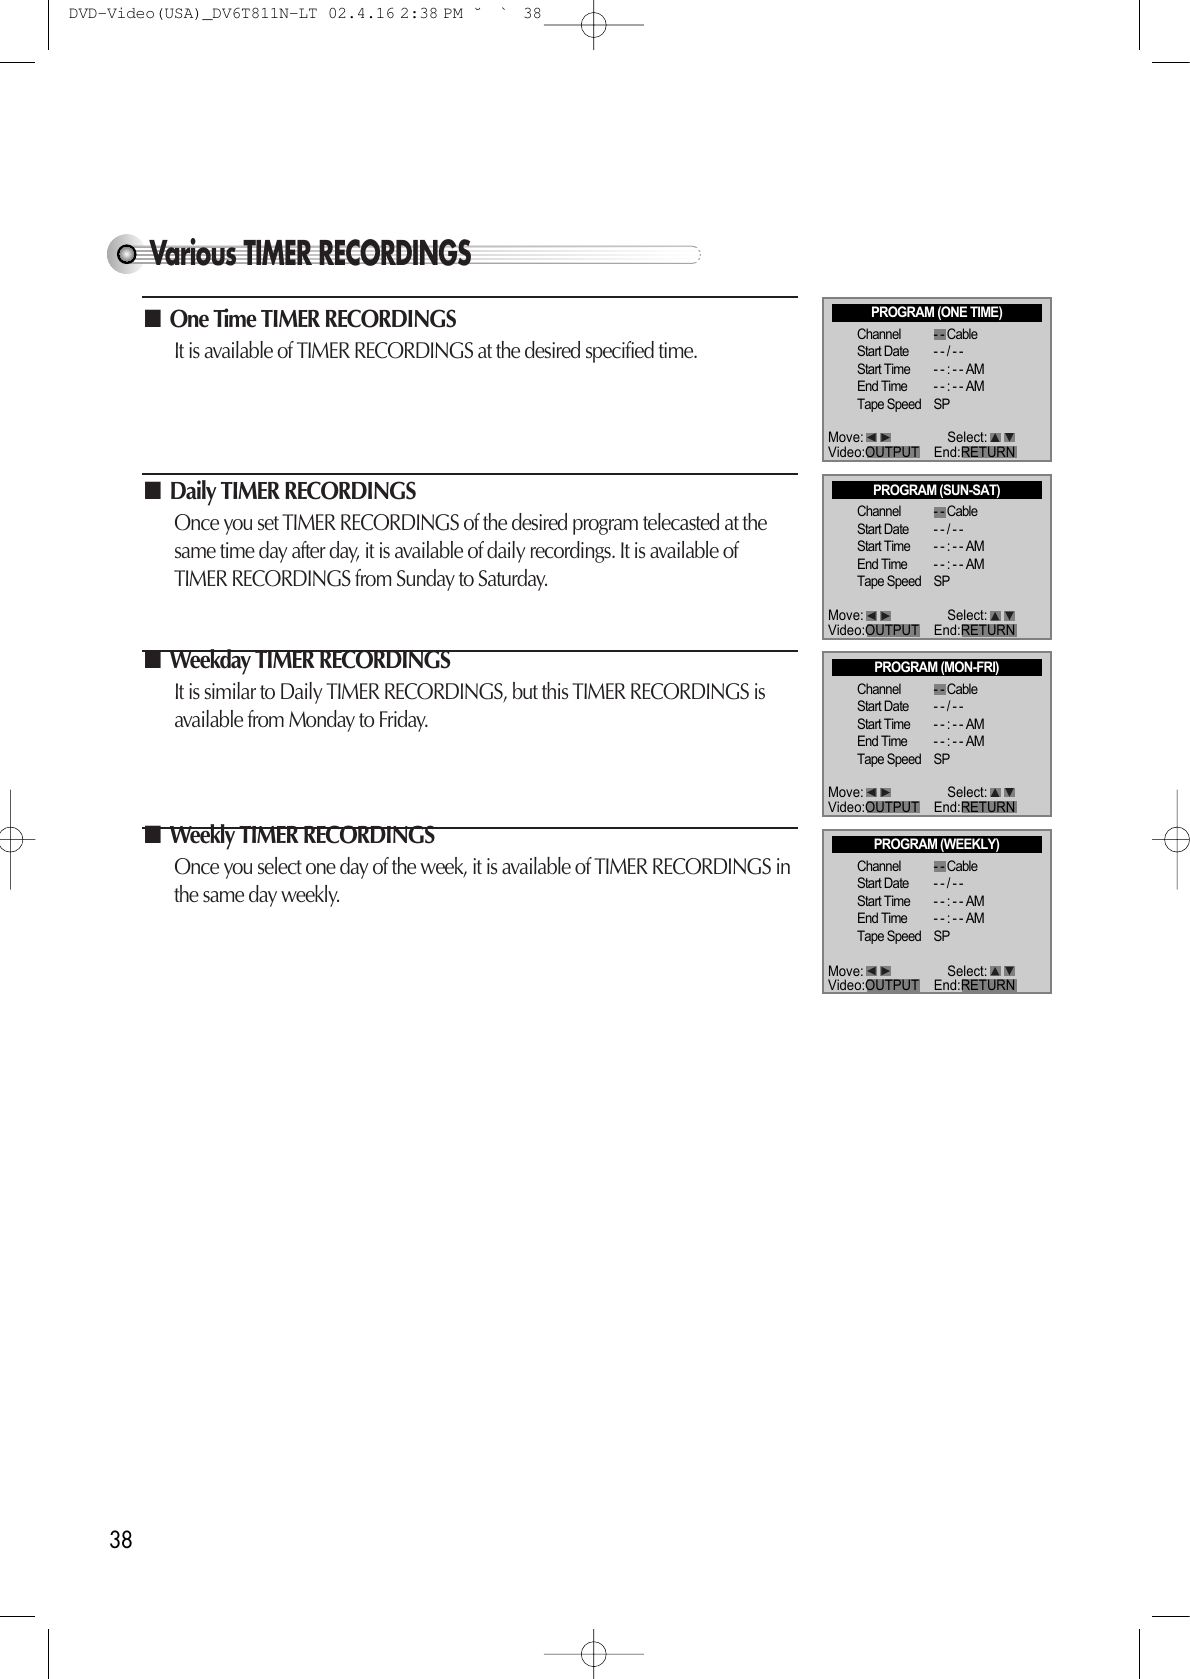
![Timer RecordingsTIMER RECORDINGSPress [SETUP/ENTER] button and select“TIMER RECORDINGS”.Move into “TIMER RECORDINGS” with[ ] and then, select the desired one with [ ]button.Select “Make a New Program”. Press [ ] button to select “Make a newProgram”. 12Select “TIMER REC method”. Move into desired recording type with [ ]and then, select the desired one with [ ]button. For TIMER REC method details, see “VariousTIMER REC” in the next page. 3Select “a broadcasting to record”.Select the desired broadcasting channel with[NUMBER] buttons. **If Converter Box and video are connected toVideo/Audio terminal, set “EXTERNAL INPUT”on TIMER REC CH by using “OUTPUT”button. 4Set “the date and time to record”. Select the date, start time and end time to recordwith [NUMBER] buttons.5■Power on TV.■Make sure that current time is set correctly. ■Insert a recordable tape with recording tab. ■Prior to the setting, press [VCR] button to change to VCR mode. When moves into (GENERAL BROADCASTING), select one of GENERALBROADCASTING/CABLE BROADCASTING with [ ] and [ ] buttons. 36SETUPCLOCK SETTIMER RECORDINGSCHANNEL SETFUNCTIONSLANGUAGE SELECTTIMER RECORDINGSMake a New ProgramReview/Cancel ProgramsPROGRAM (ONE TIME)How often do you wantto record program?One TimeDaily (Sun-Sat)Weekdays (Mon-Fri)Weekly (Once a Week)Channel - - CableStart Date - - / - - Start Time - - : - - AMEnd Time - - : - - AMTape Speed SPPROGRAM (ONE TIME)Channel 104 CableStart Date - - / - - Start Time - - : - - AMEnd Time - - : - - AMTape Speed SPMove: Select:End:RETURNMove: Select:End:RETURNMove: Select:End:RETURNMove: Select:Video:OUTPUT End:RETURNMove: Select:Video:OUTPUT End:RETURNDVD-Video(USA)_DV6T811N-LT 02.4.16 2:38 PM ˘`36](https://usermanual.wiki/WINIA-Electronics/7NF0009/User-Guide-242133-Page-37.png)
![VCR Operation37Set proper “RECORDING SPEED”. Select one of SP/EP with [ ] and [ ]buttons. For more information on recording speed, see“Types of Recording Speed” in the page 39. 6Press [RETURN] button to complete thesetting. “Program # has been saved. For programrecording, insert a cassette....” message isdisplayed. TIMER RECORDINGS indicator, is displayedin the operation display window. On the reserved time, TIMER RECORDINGSstarts to operate.7To Confirm or Cancel TIMER RECORDINGSSelect “Review/Cancel Programs”. 1Confirm reservation-recording details in turnwith [ ] button and then, press [CLEAR]button on the position of the detail(s) todelete. 2• If a recordable tape is not inserted in Stop mode under Power ON, “Waiting forTIMER RECORDINGS. Insert a recordable tape” message is displayed in thecenter of screen, for all changes or output conversions incurred during TIMERRECORDINGS SET. PROGRAM (ONE TIME)Channel 104 CableStart Date 06 / 04 Start Time 10 : 10 AMEnd Time 11 : 10 AMTape Speed SPPROGRAM (ONE TIME)Channel 104 CableStart Date 06 / 04 Start Time 10 : 10 AMEnd Time 11 : 10 AMTape Speed SPPROGRAM 1 (ONE TIME)Channel 104 CableStart Date 06 / 04 Start Time 10 : 10 AMEnd Time 11 : 10 AMTape Speed SPPROGRAM 1 has been saved.For program recording,insert a cassette andthe program start time.To leave your cable boxon and turnde to presetchannel.TIMER RECORDINGSMake a New ProgramReview/Cancel ProgramsMove: Select:Video:OUTPUT End:RETURNMove: Select:Video:OUTPUT End:RETURNMove: Select:End:RETURNCancel:CLEAR Next:End:RETURNCHECK UP!DVD-Video(USA)_DV6T811N-LT 02.4.16 2:38 PM ˘`37](https://usermanual.wiki/WINIA-Electronics/7NF0009/User-Guide-242133-Page-38.png)
![VCR Operation39Using video cassettesBefore you play or record on a video cassette tape, be certain to read this information on the proper care and use ofvideo cassettes.Only use video cassettes that bear the VHS mark: .There are four types of video cassettes: T-60, T-90, T-120, and T-160. The amount you can record on a tape isdependent upon the tape speed at which you record. The table below lists the recording time(hours:minutes) foreach tape type according to recording speed.Tape SP Mode EP ModeType (Standard Play) (Extended Play)T-60 1:00 3:00T-90 1:30 4:30T-120 2:00 6:00T-160 2:40 8:00Protecting video cassettes from accidental erasureCassettes have a safety tab to prevent erasure. Break off the safety tab with a screw driver. Ifyou wish to record on a cassette without a safety tab, cover the hole with cellophane tape. Inserting video cassettesFirmly insert the cassette into the cassette compartment with the label up. An inverted cassette cannot be inserted. Removing video cassettesPress [EJECT] on the front panel and the VCR will eject the tape. Pull the cassette out gently.• Audio-visual material may include works of copyright which must not be recorded without authorization of thecopyright owner.•If you insert a video cassette without a safety tab into the unit : After setting the timer recording program, “ ” willblink on the display panel in the power off mode and the unit will automatically eject the cassette. In the power onmode, the unit will playback automatically.•If you insert a video cassette with a safety tab into the unit : After setting the timer recording program,the unit will bestand-by mode in power off mode.• Do not attempt to pull out the video cassette once the unit begins to load the video cassette. • Do not insert fingers or any foreign object beyond the door flaps of the cassette compartment; this could lead to injuryor equipment damage.• Do not attempt to insert a video cassette if the unit in unplugged. CHECK UP!DVD-Video(USA)_DV6T811N-LT 02.4.16 2:38 PM ˘`39](https://usermanual.wiki/WINIA-Electronics/7NF0009/User-Guide-242133-Page-40.png)
![VCR Operation41Using advanced featuresPlay the tape automaticallyThis feature allows the VCR to automatically start playing when you insert a tape with the safety tab removed.Press [SETUP/ENTER] button and select“FUNCTIONS”.Move into “FUNCTIONS” with [ ] andthen, select the desired one with [ ] button.Press [ ] to switch between ON and OFF.- Select ON if you want a tape with its safetytab removed to start playing automaticallywhen the tape is inserted.- Select OFF if you do not want a tape with itssafety tab removed to start playingautomatically. 12SETUPCLOCK SETTIMER RECORDINGSCHANNEL SETFUNCTIONSLANGUAGE SELECTFUNCTIONSAuto Play: ONAuto TV/VCR: ONViss +Viss -Counter 0 StopMove: Select:End:RETURNMove: Select:End:RETURNDVD-Video(USA)_DV6T811N-LT 02.4.16 2:38 PM ˘`41](https://usermanual.wiki/WINIA-Electronics/7NF0009/User-Guide-242133-Page-42.png)
![42Switch the VCR to TV or VCR mode automaticallyThis feature controls whether the TV/VCR switch changes automatically to the VCR mode when the VCR is turnedon.Press [SETUP/ENTER] button and select“FUNCTIONS”.Move into “FUNCTIONS” with [ ] andthen, select the desired one with [ ] button.Press [ ] to switch between ON and OFF.- Select ON if you want the VCR to switch tothe VCR mode when the VCR is turned on ora cassette is inserted. This only applies if youconnect the ANT.IN and RF OUT jacks ofyour VCR and TV and watch your VCR onchannel 3 of your TV.- Select OFF if you want the VCR to remain inthe TV mode. This is useful if you watch yourVCR on the TV’s video input and you don’twant your antenna/cable signal interruptedby the VCR. 12SETUPCLOCK SETTIMER RECORDINGSCHANNEL SETFUNCTIONSLANGUAGE SELECTFUNCTIONSAuto Play: ONAuto TV/VCR: ONViss +Viss -Counter 0 StopMove: Select:End:RETURNMove: Select:End:RETURNDVD-Video(USA)_DV6T811N-LT 02.4.16 2:38 PM ˘`42](https://usermanual.wiki/WINIA-Electronics/7NF0009/User-Guide-242133-Page-43.png)
![VCR Operation43Indexing VISS SignalsVISS signal will be indexed automatically while starting any TIMERRECORDINGS including programmed and/or preselected recording.** The program for VISS function should be over 5-minutes length** Note that if the tape to be recorded is fully rewinded, it must be rolled a little beforerecording, for which the device might not index in the first of it (transparent part).What’s VISS?VISS is a quick and convenient search system for a recorded program by means of the program’s addressindexed in the beginning of the recorded program. Provided that there are various recorded programs in a tape,VISS must be a typical function in searching for a preferred program. Searching VISS SignalsPlease press [SETUP/ENTER] button.Press [ ] button until is located in“FUNCTIONS”, then select “FUNCTIONS”by pressing [ ] button. 1In the menu, please select “VISS +” or“VISS-”.If your search is forward direction, select “VISS+”. If reverse direction, select “VISS -”.2VISS searching motion• Searching, whether it forward or reverse, starts from the current position to theselected direction in serial order for VISS-indexed parts (first recorded parts) ofwhich contents are played in 5 seconds.• If a purposed part is found from the 5 seconds playing, please playback it withyour “PLAY” button.3■First, please press [VCR] button on your REMOTE for VCR mode, then manage it.■Inject your VISS-indexed tape.SETUPCLOCK SETTIMER RECORDINGSCHANNEL SETFUNCTIONSLANGUAGE SELECTFUNCTIONSAuto Play: ONAuto TV/VCR: ONViss +Viss -Counter 0 StopMove: Select:End:RETURNMove: Select:End:RETURNDVD-Video(USA)_DV6T811N-LT 02.4.16 2:38 PM ˘`43](https://usermanual.wiki/WINIA-Electronics/7NF0009/User-Guide-242133-Page-44.png)
![44Counter 0 StopThe function is to search any scene that you wish to watch again more easily by indexing while playing orrecording it. Please press [DISPLAY] button twice.The counter appears in screen and the operationdisplay window.1In the moment, please press [CLEAR] buttonto make the counter 0:00:00. 2■Please press [VCR] button on your REMOTE for VCR mode, then manage it.Memorizing a desired scenePlease press [SETUP/ENTER] button.Press [ ] button until is located in“FUNCTIONS”, then select “FUNCTIONS” bypressing [ ] button. 1Press [ ] button until is located in“Counter 0 Stop”, then select “ Counter 0Stop” by pressing [ ] button. The tape’s counter returns to 0:00:00 and stops.2■Please press [VCR] button on your REMOTE for VCR mode, then manage it.Searching a memorized sceneSETUPCLOCK SETTIMER RECORDINGSCHANNEL SETFUNCTIONSLANGUAGE SELECT1:22:330:00:00FUNCTIONSAuto Play: ONAuto TV/VCR: ONViss +Viss -Counter 0 StopMove: Select:End:RETURNMove: Select:End:RETURNDVD-Video(USA)_DV6T811N-LT 02.4.16 2:38 PM ˘`44](https://usermanual.wiki/WINIA-Electronics/7NF0009/User-Guide-242133-Page-45.png)
![VCR Operation45Displaying Clock/CounterPress [CLK/CNT] button. Each time you press this button, “CLOCK” and “COUNTER” are displayed inserial order.1“CLOCK” is displayed. Current time is displayed.2Real-time “COUNTER” is displayed. Current position of the video is displayed as hour, minute and even second bycounter.3■Above all, press [VCR] button of remote control and follow the procedure below. • In addition, it is available of grasping current position of DVD. First, prior to the beginning, press [DVD] button of remote control to change into DVDmode. If you press [CLK/CNT] button, current position of DVD is displayed as hour, minute andeven second by counter.CHECK UP!DVD-Video(USA)_DV6T811N-LT 02.4.16 2:38 PM ˘`45](https://usermanual.wiki/WINIA-Electronics/7NF0009/User-Guide-242133-Page-46.png)
![46Changing the on-screen menu languagePlease press [SETUP/ENTER] button.Press [ ] button until is located in“LANGUAGE SELECT”, then select“LANGUAGE SELECT” by pressing [ ]button. 1Select the language among English, Spanishor French.2You may select the language in which you would like the VCR’s menu to be displayed: English, Spanish, orFrench.SETUPCLOCK SETTIMER RECORDINGSCHANNEL SETFUNCTIONSLANGUAGE SELECTLANGUAGE SELECTSelect a language.EnglishSpanishFrenchMove: Select:End:RETURNMove: Select:End:RETURNDVD-Video(USA)_DV6T811N-LT 02.4.16 2:38 PM ˘`46](https://usermanual.wiki/WINIA-Electronics/7NF0009/User-Guide-242133-Page-47.png)
![VCR Operation47Hi-Fi Stereo PlaybackPlaying a tape in Hi-Fi high-quality• “Hi-Fi” signal lights up in the top of a screen.• Pressing [AUDIO] button changes menus one by one.If there are some noises made in recording, please “Linear” to reduce them.Forced Mono• In some cases, while receiving a stereo or SAP (Secondary Audio Programs), receiving condition may be poor,which may cause the stereo or SAP broadcasting to be interfered frequently or its volume to be uncontrollable.Just pressing [AUDIO] in stereo or SAP forces to fix the condition into mono sound.• To return it, you have two choices, pressing [AUDIO] button again or picking up the channel again.Recording Stereo Broadcast• Stereo : It separates sounds into dual signals and transfers them in order to achieve presence in a broadcastingstation.Hi-Fi LINEAR MIXSTEREO MONO SAP• While recording in stereo signal, it is recorded in Hi-Fi.• SAP is available only in its service areas from stations.• Programs are broadcast in mono or stereo audio, or with a SAP.• Pressing [AUDIO] button changes STEREO, MONO, SAP one by one.• The following guidelines will help you decide on the best method for recording programs. Choose:- Stereo reception for normal recording and to record broadcast stereo television.- Mono reception if the stereo signal is weak and sound is too “ noisy.”- SAP reception to record a second audio program. An example of a SAP is a program that is broadcast in English, buthas a Spanish SAP.•You can only record stereo and SAPs if the program is a broadcast in stereo or with a SAP. Consult a television guide forprogram broadcast information.Recording Stereo or Secondary Audio Programs (SAP)Hi-FiCHECK UP!CHECK UP!DVD-Video(USA)_DV6T811N-LT 02.4.16 2:38 PM ˘`47](https://usermanual.wiki/WINIA-Electronics/7NF0009/User-Guide-242133-Page-48.png)
![48Skipping from a current scene to a desired sceneTo skip chapter in a DVDTo move to next chapter, press [NEXT ] button.The current chapter moves to the next chapter.1Press [ PREV] button. It moves to the first part of current chapter.If pressing it again, it moves to the prior chapter.2To play it fastPress [ ] button to start fast-play in playing.Every time you press the button, play speed changes like the below ordersx 2 x 4 x 8 x 20 x 2 .... Also you can return to normal speed by pressing [ ] button.1Press [ ] button to start reverse fast-play in playing.Every time you press the button, reverse play speed changes like the below ordersx 2 x 4 x 8 x 20 x 2 ....Also you can return to normal speed by pressing [ ] button.2■Before setting it, you should change into DVD mode by pressing [DVD] button onremote control.■Before setting it, you should change into DVD mode by pressing [DVD] button onremote control.DVD-Video(USA)_DV6T811N-LT 02.4.16 2:38 PM ˘`48](https://usermanual.wiki/WINIA-Electronics/7NF0009/User-Guide-242133-Page-49.png)
![DVD Operation49To play it slowPress [ ] button to play it slow in PAUSE.Every time you press the button, slow play speed changes like the below orders.1/2 1/4 1/8 1/2 ....Also you can return to normal speed by pressing [ ] button. *For the case of SVCD or VCD, Slow playback is available.1Press [ ] button to reverse-play it slow in PAUSE.Every time you press the button, slow reverse-play speed changes like the beloworders.1/2 1/4 1/8 1/2 .... Also you can return to normal speed by pressing [ ] button. 2■Before setting it, you should change into DVD mode by pressing [DVD] button onremote control.DVD-Video(USA)_DV6T811N-LT 02.4.16 2:38 PM ˘`49](https://usermanual.wiki/WINIA-Electronics/7NF0009/User-Guide-242133-Page-50.png)
![Playing a programmed orderRANDOM PLAY50While STOP or RESUME STOP, press[REPEAT] button.While the right figure appearing, please inputdesired Title(T) and Chapter(C) number withNUMBER buttons.* In case of VCD and CD, please input TRACKNumber.1While STOP or RESUME STOP, press[REPEAT] button twice.While the right picture appearing, please press[SETUP/ENTER] button.Regardless of titles or track numbers, it plays inrandom.1If completing setting, press [SETUP/ENTER]button after moving a cursor to “Play Program”.Then, titles and chapters (track) are played in theabove-programmed order.2■Before setting it, you should change into DVD mode by pressing [DVD] button onremote control.■Available only in STOP.■Before setting it, you should change into DVD mode by pressing [DVD] button onremote control.Mode1 DVDProgramTitle - - Chapter --T C T C T C T C1 - - - - 4 - - - - 7 - - - - 10 - - - -2 - - - - 5 - - - - 8 - - - - 11 - - - -3 - - - - 6 - - - - 9 - - - - 12 - - - -Clear ALL Play ProgramMode1 DVDProgramTitle - - Chapter --T C T C T C T C1 01 05 4 - - - - 7 - - - - 10 - - - -2 01 08 5 - - - - 8 - - - - 11 - - - -3 01 12 6 - - - - 9 - - - - 12 - - - -Clear ALL Play ProgramMode 2 DVDShuffleDVD-Video(USA)_DV6T811N-LT 02.4.16 2:38 PM ˘`50](https://usermanual.wiki/WINIA-Electronics/7NF0009/User-Guide-242133-Page-51.png)
![DVD Operation51Repeating a defined period (DVD)You may repeat a desired chapter or track.While in playing, press [REPEAT] button.In REPEAT mode, you may see the right figure.Press [SETUP/ENTER] button in the positionto repeat.The beginning of REPEAT position (A) is set in theright figure.1Mode DVDRepeatA-B Chapter Title OffMode DVDRepeatA- Chapter Title OffMode DVDRepeatA-B Chapter Title OffMode DVDRepeatA-B Chapter Title OffMode DVDRepeatA-B Chapter Title OffPress [REPEAT] button againMove a cursor to “Chapter” with [>] button, thenif the right figure appears, press [SETUP/ENTER]button.Then, the current chapter is repeated.2Press [REPEAT] button one more time.Move a cursor to “Title” with [>] button, then ifthe right figure appears, press [SETUP/ENTER]button.Then, the current title is repeated.3Press [REPEAT] button one more time.Move a cursor to “Off” with [>] button, then if theright figure appears, press [SETUP/ENTER]button.REPEAT mode is off.4■Before setting it, you should change into DVD mode by pressing [DVD] button onremote control.Press [SETUP/ENTER] button again in the position to quit a repeatThe end of REPEAT period (B) is set and played repeatedly.* If you want to stop REPEAT and return to normal condition, please press[SETUP/ENTER] button in “A-B” or “Off” in the below step 4. A certain discmay not be repeated.DVD-Video(USA)_DV6T811N-LT 02.4.16 2:38 PM ˘`51](https://usermanual.wiki/WINIA-Electronics/7NF0009/User-Guide-242133-Page-52.png)
![52Repeating a defined period (VCD, CD)While in playing, press [REPEAT] button.In REPEAT mode, you may see the right figure.Press [SETUP/ENTER] button in the positionto repeat.The beginning of REPEAT position (A) is set in theright figure.1Press [REPEAT] button againMove a cursor to “Track” with [>] button, then ifthe right figure appears, press [SETUP/ENTER]button.Then, the current track is repeated.2Press [REPEAT] button one more time.Move a cursor to “Disc” with [>] button, then ifthe right figure appears, press [SETUP/ENTER]button.Then, the current disc is repeated.* Repeat playback of disc is only available in PBCOFF mode.3Press [REPEAT] button one more time.Move a cursor to “Off” with [>] button, then if theright figure appears, press [SETUP/ENTER]button.REPEAT mode is off.4Mode VCDRepeatA-B Track Disc OffMode VCDRepeatA- Track Disc OffMode VCDRepeatA-B Track Disc OffMode VCDRepeatA-B Track Disc OffMode VCDRepeatA-B Track Disc OffPress [SETUP/ENTER] button again in the position to quit a repeatThe end of REPEAT period (B) is set and played repeatedly.* If you want to stop REPEAT and return to normal condition, please press[SETUP/ENTER] button in “A-B” or “Off” in the below step 4.DVD-Video(USA)_DV6T811N-LT 02.4.16 2:38 PM ˘`52](https://usermanual.wiki/WINIA-Electronics/7NF0009/User-Guide-242133-Page-53.png)
![DVD Operation53SEARCH DVD (with a Title, Chapter number)While in playing, press [SEARCH] button.“Search 1” screen like the right figure appears.It shows total title numbers and chapter numbers.Please enter anew title and chapter number tosearch with [NUMBER] buttons.1Search1 DVDTitle --- 1-2 Chapter --- 1-8In completing entering, please press[SETUP/ENTER] button.PLAY starts from the selected position.2Search1 DVDTitle --- 1-2 Chapter 006 1-8■Before setting it, you should change into DVD mode by pressing [DVD] button onremote control.SEARCH DVD (with time)While in playing, press [SEARCH] buttontwice.“Search 2” screen like the right figure appears.It shows total hoursPlease enter anew hours to search with[NUMBER] buttons.1Search2 DVDTime - - : - - : - - 02:03:25In completing entering, please press[SETUP/ENTER] button.PLAY starts from the selected position.2Search2 DVDTime 01:00:00 02:03:25■Before setting it, you should change into DVD mode by pressing [DVD] button onremote control.DVD-Video(USA)_DV6T811N-LT 02.4.16 2:38 PM ˘`53](https://usermanual.wiki/WINIA-Electronics/7NF0009/User-Guide-242133-Page-54.png)
![54SEARCH VCD and CD (with a track number)While in playing, press [SEARCH] button. “Search 1” screen like the right figure appears.(In case of PBC OFF)Total track numbers appear.Please enter a new track numbers to search with[NUMBER] button.* If it is PBC ON, “Search 1” screen does notappear.1Search1 VCDTrack - - - 1-12Search1 VCDTrack 009 1-12In completing entering, please press[SETUP/ENTER].PLAY starts from the selected position.2■Before setting it, you should change into DVD mode by pressing [DVD] button onremote control.SEARCH VCD and CD (with time)While in playing, press [SEARCH] buttontwice.“Search 2” screen like the right figure appears.(In case of PBC OFF)It shows current track’s time and the whole disc’shours.Please enter a new hours to search with[NUMBER] button.* If it is PBC OFF, only the track’s time appears.1Search2 VCDTrack Time - -:- -:- - 00:03:20Disc Time - -:- -:- - 00:48:31In completing entering, please press[SETUP/ENTER] button.PLAY starts from the selected position.2Search2 VCDTrack Time 00:01:20 00:03:20Disc Time - -:- -:- - 00:48:31■Before setting it, you should change into DVD mode by pressing [DVD] button onremote control.DVD-Video(USA)_DV6T811N-LT 02.4.16 2:38 PM ˘`54](https://usermanual.wiki/WINIA-Electronics/7NF0009/User-Guide-242133-Page-55.png)
![DVD Operation55confirming the current disc modeConfirming the current PLAY mode on screenWhile in playing, press [DISPLAY] button.It shows a disc type, the current title, chapternumber, time elapsed and REPEAT mode.1■Before setting it, you should change into DVD mode by pressing [DVD] button onremote control.Display DVD Title1/2 Chapter 5/8 TIme 00:45:00Repeat OffWhile in playing, press [DISPLAY] button.It shows a disc type, the current track, timeelapsed and REPEAT mode.2Display VCD Track 2/12 TIme 00:45:00Repeat OffDVD-Video(USA)_DV6T811N-LT 02.4.16 2:38 PM ˘`55](https://usermanual.wiki/WINIA-Electronics/7NF0009/User-Guide-242133-Page-56.png)
![56Selecting an audio languageSelecting an AUDIO language, SUBTITLE language and 3D AUDIOA user may select an audio language and subtitle language if a disc includes Multi-language.Keep pressing [AUDIO] button till a user’s preferredlanguage appears.If DVD disc includes audio information, every time a userpresses [AUDIO] button, English (ENG), Spanish (SPA),French (FRE) and others appear one by one.Audio 1/3 Digital 5.1-CH ENGSelecting a subtitle languageKeep pressing [SUBTITLE] button till a user’spreferred language appears.If a DVD disc includes subtitle information, every time auser presses [SUBTITLE] button, English (ENG), Spanish(SPA), French (FRE) and others appear one by one.If a user presses [Off] button, subtitle does not appear onscreen.Subtitle 1/3 ENG■Before setting it, you should change into DVD mode by pressing [DVD] button onremote control.■Before setting it, you should change into DVD mode by pressing [DVD] button onremote control.Selecting 3D AudioPlease press [CLEAR/3D] button.If pressing the button twice, a user can select a 3D audio.** In setting data, “CLEAR/3D” means “clear”.■Before setting it, you should change into DVD mode by pressing [DVD] button onremote control.■Available in PLAY mode only.A certain discmay not supportaudio select or subtitleselect.DVD-Video(USA)_DV6T811N-LT 02.4.16 2:38 PM ˘`56](https://usermanual.wiki/WINIA-Electronics/7NF0009/User-Guide-242133-Page-57.png)
![DVD Operation57Selecting ZOOM and Multi Angle Using a zoom functionA user can enlarge the current screen about 1.3, 1.5 or 2 times.Keep pressing [ZOOM] button till the preferredzoom appears.Every time a user presses [ZOOM] button, a zoommagnification changes 1.3 times (X1.3) 1.5 times(X1.5) 2 times (X2) OFF 1.3 times (X1.3) ... one by one.A base point to be enlarged is center and the point can bechanged with the operation of [ , , , ] button.■Before setting it, you should change into DVD mode by pressing [DVD] button onremote control.X1.3Multi AngleIf a disc includes multi angle information, a user can watch a screen in multi angles. The function is limited to aDVD disc supporting multi angle information.Keep pressing [ANGLE] button till the preferredangle appears.Every time a user presses [ANGLE] button, an anglechanges in a consecutive order.■Before setting it, you should change into DVD mode by pressing [DVD] button onremote control.1/3When “TVASPECT” item is set to“4:3 PS” in setupscreen, or with certaindiscs, 2 times Zoommay not functionproperly.DVD-Video(USA)_DV6T811N-LT 02.4.16 2:38 PM ˘`57](https://usermanual.wiki/WINIA-Electronics/7NF0009/User-Guide-242133-Page-58.png)
![58Memorizing a sceneTo memorize a sceneOnce memorizing a scene, a user may watch it anytime.■Before setting it, you should change into DVD mode by pressing [DVD] button onremote control.■For VCD playback, set to “PBC OFF” mode by pressing the [PBC] button.While playing, press [MARK] button.The right figure appears.Then press [SETUP/ENTER] button and thecurrent scene is memorized in “A”.1If you want to memorize another preferredscene, press [>] button.The right figure appears.Then press [SETUP/ENTER] button and thecurrent scene is memorized in “B”.** A user may memorize “C” continuously withthe same method.2Playing a memorized scenePress [MARK] button.Memorized bookmark appears on screen.1Move it to preferred bookmark by pressing [> ] button.moves to the bookmark position.In the moment, press [SETUP/ENTER] button toplay it.2Bookmark DVDA01:30:10 B01:40:00 C--:--:--Bookmark DVDA--:--:-- B--:--:-- C--:--:--Bookmark DVDA01:30:10 B--:--:-- C--:--:--Bookmark DVDA01:30:10 B01:40:00 C--:--:--“BOOKMARK”function during thedisc playback ofSVCD or VCD2.0 isonly available in “PBCOFF” mode. Select“PBC OFF” mode bypressing [TITLE/PBC]button.“BOOKMARK”function during thedisc playback ofSVCD or VCD2.0 isonly available in “PBCOFF” mode. Select“PBC OFF” mode bypressing [TITLE/PBC]button.DVD-Video(USA)_DV6T811N-LT 02.4.16 2:38 PM ˘`58](https://usermanual.wiki/WINIA-Electronics/7NF0009/User-Guide-242133-Page-59.png)
![DVD Operation59Displaying menus in a discTo display menus in a discIf a disc includes menus, a user may use them.■Before setting it, you should change into DVD mode by pressing [DVD] button onremote control.DVD) Press [MENU] or [TITLE/PBC] button. It shows menus in the disc. Also they are different according to discs.If the disc has title menu, it is operated with [TITLE/PBC] button.VCD2.0) Press [TITLE/PBC] button. Every time pressing [TITLE/PBC] button, PBC function turns ON and OFF over andover.Menu screen only appears when selecting “PBC ON”.• CD and VCD1.1 do not support the function.1DVD) Move a cursor to a relative item with arrow buttons of [ , , ,] button and select one with [SETUP/ENTER] button or [PLAY] button.VCD2.0) Select a number of menu screen and press [SETUP/ENTER]button.* If you watch a movie without menu screen, select “PBC OFF” mode by pressing[TITLE/PBC] button.2DVD-Video(USA)_DV6T811N-LT 02.4.16 2:38 PM ˘`59](https://usermanual.wiki/WINIA-Electronics/7NF0009/User-Guide-242133-Page-60.png)
![Move: Select : Exit:Setup/Return60Basic SETUP mode■Before setting it, you should change into DVD mode by pressing [DVD] button onremote control.While STOP or RESUME STOP, press[SETUP/ENTER] button.• A screen to set various menus like the rightfigure appears.• By using [<] and [>] , a set menu changesfrom Language, which is covered with “”, to Video, Audio and Others.• If “ ” is on Language, press [ ] or [ ]to display submenus• Press [ ] and [ ] for the movementamong menus and press [<] and [>] for theselect of a menu.1In completing settings, press [RETURN] button or [SETUP/ENTER] button.2While STOP or RESUME STOP, press [SETUP/ENTER] button to set menus.Language Video Audio OthersOSD Language EnglishAudio EnglishSubtitle EnglishDisc Menu EnglishEnglishFrenchSpanishDVD-Video(USA)_DV6T811N-LT 02.4.16 2:39 PM ˘`60](https://usermanual.wiki/WINIA-Electronics/7NF0009/User-Guide-242133-Page-61.png)
![Move: Select : Exit:Setup/ReturnMove: Select : Exit:Setup/ReturnMove: Select : Exit:Setup/ReturnMove: Select : Exit:Setup/ReturnSetup61LANGUAGE Setup■Before setting it, you should change into DVD mode by pressing [DVD] button onremote control.While STOP or RESUME STOP, press [SETUP/ENTER] button.1Selecting a OSD language.Please select a language to be displayed on DVDscreen.** “OSD” means “On Screen Display”.2Selecting Audio language.Set it as the preferred audio language. In case theaudio language is set and recorded in the DISC, itis automatically played in the set language inevery playing. For example, English is set andrecorded as audio language in the DISC, it isplayed in English. 3Selecting Subtitle language.Please set it as the preferred language. In case thesubtitle language is set and recorded in the DISC,it is automatically played in the set language inevery playing. For example, English is set andrecorded as subtitle language in the DISC, it isplayed in English.4Selecting DISC MENU language.Please set it as the preferred DISC MENUlanguage. In case the DISC MENU language isset and recorded in the DISC, it is automaticallyplayed in the set language in every playing. Forexample, English is set and recorded as a DISCMENU language in the DISC, it is played inEnglish.5A user can set OSD language, Audio, Subtitle and Disc Menu.Language Video Audio OthersOSD Language EnglishAudio EnglishSubtitle EnglishDisc Menu EnglishEnglishFrenchSpanishLanguage Video Audio OthersOSD Language EnglishAudio EnglishSubtitle EnglishDisc Menu EnglishEnglishFrenchSpanishPortugueseChineseLanguage Video Audio OthersOSD Language EnglishAudio EnglishSubtitle EnglishDisc Menu EnglishEnglishFrenchSpanishPortugueseChineseLanguage Video Audio OthersOSD Language EnglishAudio EnglishSubtitle EnglishDisc Menu EnglishEnglishFrenchSpanishPortugueseChineseIn case a discdoes not includesetting languagesinformation, theselected languagedoes not appear.DVD-Video(USA)_DV6T811N-LT 02.4.16 2:39 PM ˘`61](https://usermanual.wiki/WINIA-Electronics/7NF0009/User-Guide-242133-Page-62.png)
![Move: Select : Exit:Setup/ReturnMove: Select : Exit:Setup/ReturnMove: Select : Exit:Setup/ReturnMove: Select : Exit:Setup/ReturnMove: Select : Exit:Setup/Return62VIDEO Setup■Before setting it, you should change into DVD mode by pressing [DVD] button onremote control.While STOP or RESUME STOP, press [SETUP/ENTER] button.Selecting TV Aspect.If a user selects “4:3 PS”, the user can watch onlya center of the original scene of “16:9”.If a user selects “4:3 LB”, the user can watch theoriginal scene of “16:9”, but the top and bottomof the screen look black color.If a disc size is originally recorded in 4:3, a usercannot watch it in a wide screen though a usersets a size as “16:9 Wide”.21Selecting TV type.A user may select a TV type.A user may select a type among NTSC, PAL orAuto. For example, NTSC type is used in NorthAmerica.3A user can set up a connected TV condition and screen. Selecting Video Out.A user may select a Video Out betweenComponent and S-Video.4Selecting Brightness.A user may select a brightness of a screen. Thereare two choices of Normal and Bright.5Selecting Sharpness.A user may select a sharpness of a screen. Thereare three of choices, Normal, Soft and Sharp.6Language Video Audio OthersTV Aspect 4:3 PSTV Type NTSCVideo Out S-VideoBrightness NormalSharpness Normal4:3 PS4:3 LB16:9 WideLanguage Video Audio OthersTV Aspect 4:3 PSTV Type NTSCVideo Out S-VideoBrightness NormalSharpness NormalAutoNTSCPALLanguage Video Audio OthersTV Aspect 4:3 PSTV Type NTSCVideo Out S-VideoBrightness NormalSharpness NormalComponentS-VideoLanguage Video Audio OthersTV Aspect 4:3 PSTV Type NTSCVideo Out S-VideoBrightness NormalSharpness NormalNormalBrightLanguage Video Audio OthersTV Aspect 4:3 PSTV Type NTSCVideo Out S-VideoBrightness NormalSharpness Normal NormalSoftSharpDVD-Video(USA)_DV6T811N-LT 02.4.16 2:39 PM ˘`62](https://usermanual.wiki/WINIA-Electronics/7NF0009/User-Guide-242133-Page-63.png)
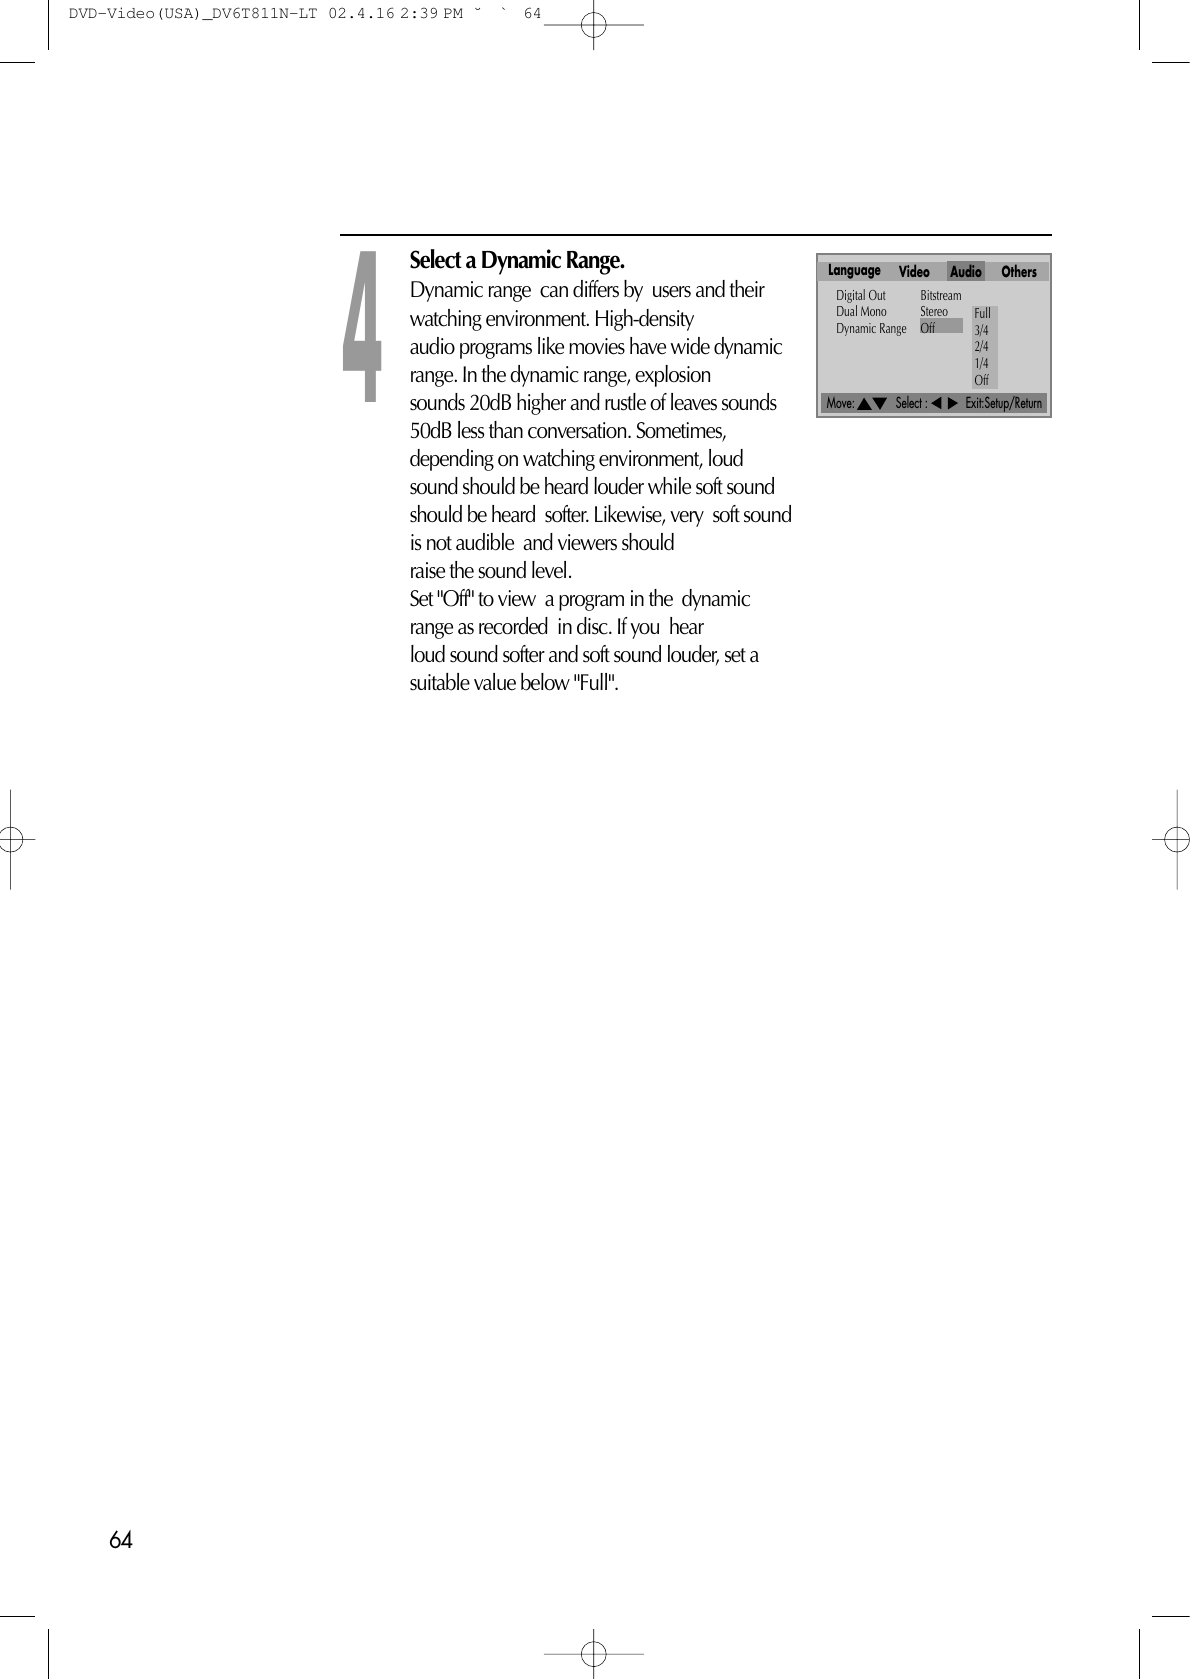
![Setup63AUDIO SetupMove: Select : Exit:Setup/ReturnMove: Select : Exit:Setup/Return■Before setting it, you should change status into DVD by pressing [DVD] button on theremote control.Select a digital output.Set output conditions to coaxial or opticalterminal. You can set following three(3) values ofdigital output;•Bitstream: The same signal as audio signalrecorded in disc goes to digital audio outputterminal.•PCM: Decoded audio signal goes to digitaloutput terminal.•Off: Not any output goes to digital audiooutput terminal.2Select Dual Mono.Dual Mono means 2 individual mono channels.Dual Mono is mainly used to apply 2 different languages to one program. Thisfunction is similar to multichannel sound function supported in TV or VCR. 2 monochannels can be combined into total 4 values; Stereo, L- Mono, R- Mono and Mixed Mono.3A user may select audio menu according to a user’s speaker set.While STOP or Resume STOP, press [SETUP/ENTER] button.1• Stereo: outputs left channel and right channel to left speaker and rightspeaker respectively.• L- Mono: outputs left channel to left speaker and right speaker.• R-Mono: outputs right channel to left speaker and right speaker.• Mixed Mono: mixes 2 mono channels and outputs the mixed channel to leftand right speaker at the same time.Language Video Audio OthersDigital Out BitstreamDual Mono StereoDynamic Range OffBitstreamPCMOffLanguage Video Audio OthersDigital Out BitstreamDual Mono StereoDynamic Range Off StereoL-MonoR-MonoMixed MonoDVD-Video(USA)_DV6T811N-LT 02.4.16 2:39 PM ˘`63](https://usermanual.wiki/WINIA-Electronics/7NF0009/User-Guide-242133-Page-64.png)
![Setup65Move: Select : Exit:Setup/ReturnMove: Select : Exit:Setup/ReturnMove: Select : Exit:Setup/ReturnMove: Select : Exit:Setup/ReturnMove: Select : Exit:Setup/ReturnOthers Setup■Before setting it, you should change into DVD mode by pressing [DVD] button onremote control.Select OSD (On Screen Display).Select "On" to make OSD(On Screen Display)language displayed in screen.2Select Angle Mark.Different angle screens up to 9 screens can besaved in DVD. You can set with this menuwhether angle mark ( )is displayed in thescreen during playing the multiple- angle-recorded disc. Select "On", the angle mark ( )is displayed in the screen if multiple angles arerecorded in the currently played disc.3Select Screen Saver.If bright scenes continue to be displayed inscreen, TV can be damaged. Set the screensaverto "On", the screensaver functions automaticallyand DVD logo moves continuously if theresume stop, stop or open mode is maintainedfor about 5 minutes.4Select Defaults.If you select defaults, every function set returns toFACTORY defaults except PARENTAL.5Select PARENTAL.It consists of 8 levels of violence, sexual scene,strong sexual scene and others to protect childrenfrom watching those scenes.6Language Video Audio OthersOSD OnAngle Mark OnScreensaver OnDefaults ResetParental 8 UnlockOnOffLanguage Video Audio OthersOSD OnAngle Mark OnScreensaver OnDefaults ResetParental 8 UnlockOnOffLanguage Video Audio OthersOSD OnAngle Mark OnScreensaver OnDefaults ResetParental 8 UnlockOnOffLanguage Video Audio OthersOSD OnAngle Mark OnScreensaver OnDefaults ResetParental 8 UnlockLanguage Video Audio OthersOSD OnAngle Mark OnScreensaver OnDefaults ResetParental 8 UnlockWhile STOP or RESUME STOP, press [SETUP/ENTER] button.1“Parental Lock”activates only if youset a password andthe unit goes intoLock status. When thedisc has no parentalfunction even if thedisc for adult only,Parental Lock doesn’tactivate.DVD-Video(USA)_DV6T811N-LT 02.4.16 2:39 PM ˘`65](https://usermanual.wiki/WINIA-Electronics/7NF0009/User-Guide-242133-Page-66.png)
![66Move: Select : Exit:Setup/ReturnInput Password Exit:Setup/ReturnSettling a user’s PARENTALEntering a password.If selecting “PARENTAL” by moving [>], apassword display appears.Then entering a user’s password, a user canresettle a user’s PARENTAL.1Resettling a user’s PARENTAL.Set your desired level in PARENTAL display.As the number is higher, it means the film getsclose to an adult film.It, however, operates only when a DVD discincludes PARENTAL information.For example, if a user settles the 6th level, 7th or8th level disc cannot be played.For the change of a user’s password, please moveto “CHANGE PASSWORD” and enter newpassword.2Language Video Audio OthersOSD OnAngle Mark OnScreensaver OnDefaults ResetParental 8 UnlockPassword - - - -Language Video Audio OthersParental 8 UnlockChange Password - - - -1 Kids Safe2 G3 PG4 PG-135 PG-R6 R7 NC-178 UnlockThe initialpassword is 3308. Incase you forget newly-input password, youcan use 3308 as apassword. DVD-Video(USA)_DV6T811N-LT 02.4.16 2:39 PM ˘`66](https://usermanual.wiki/WINIA-Electronics/7NF0009/User-Guide-242133-Page-67.png)

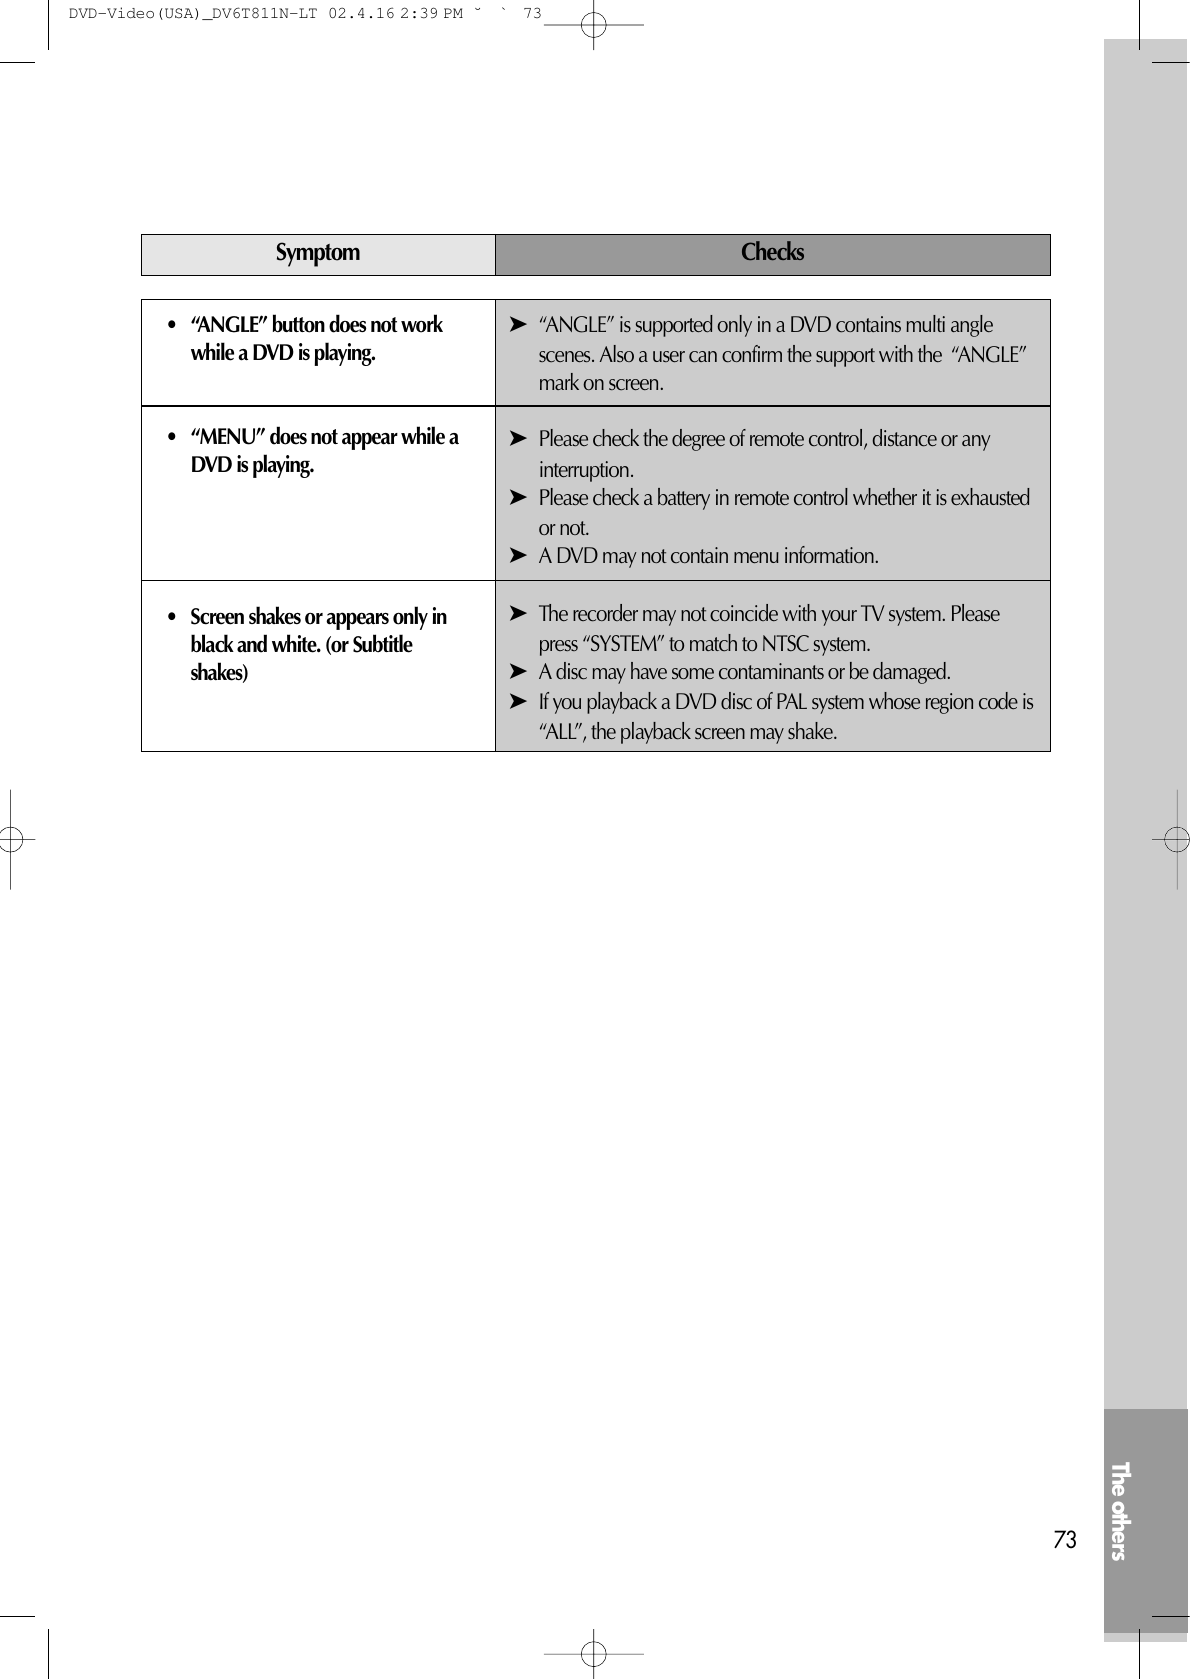
![72Before doubting about troubles (DVD)• The recorder does not play.• No sound comes through.• A disc is playing but screen doesnot appear or poor screen appears.• Sound is irregular• REMOTE does not work.• Dolby Digital sound does not work• “AUDIO” or “SUBTITLE” buttondoes not work.ChecksSymptom➤If a DVD is from overseas, it may not be played. Please check aDVD’s region code whether it has the relative region code 1 or All.➤Please check whether a DVD is inserted in a right direction.➤If it is a CD-ROM for PC or DVD-ROM, it does not work.➤Play mode may be “SLOW” or “PAUSE”(In abnormal speedplay, no sound comes through)➤Did you connect the parts in right way?➤Please check the operative condition of TV or amplifier.➤From SETUP, please check “AUDIO” items.➤Did you turn on your TV sets?➤Did you connect the parts in right way?➤The play may be in “PAUSE”.➤A disc may have some contaminants or be damaged.➤A disc may be bad one.➤Please check the connection with Dolby Digital amplifier.➤Please check the plugs are connected with one another tightly.➤Some contaminants may be remained in connection terminal.➤Please check the degree of remote control, distance or anyinterruption.➤Battery may be weak or exhausted.➤When you operate DVD, use it by pressing [DVD] button.➤Dolby Digital sound can be worked in the Dolby Digitalamplifier only.➤Please check “Dolby Digital ” mark on your DVD.➤In case of playing it through digital output, while pressing“STOP”, please check whether “DIGITAL OUTPUT” is“BITSTREAM” by pressing “SETUP/ENTER”.➤Please check the connection is correct.➤If a DVD does not include language information, it does notsupport the function.DVD-Video(USA)_DV6T811N-LT 02.4.16 2:39 PM ˘`72](https://usermanual.wiki/WINIA-Electronics/7NF0009/User-Guide-242133-Page-73.png)
![74Before doubting about troubles (VCR)• “Power On” does not work.• It does not work even in “PowerOn”.ChecksSymptom■Power➤Please check whether a power plug is inserted in an electric outlet.➤Please check whether a videotape is inserted in.➤Try to insert a plug again.• A channel on video and a playscreen does not appear.• Noise (screen noise) appears onscreen.■Screen and noise➤Please check your antenna’s connection.➤TV channel should be fixed on video channel (3 or 4).➤Please check your antenna’s signal whether it may be weak. Incase of its weakness, please use a frequency amplifier connectedwith the device.➤Press “TV/VCR” and then let “VCR” is displayed on the displaypanel.➤While in no use of VCR, was it turned on?➤While in recording a program, do you watch another channel?➤Select TV by pressing [TV/VCR] button on remote control.• A videotape is not inputted in.• On inputting a videotape, the tapeis re-ejected.• A videotape is not ejected.■Input and ejection➤Please check whether a power plug is inserted in an electric outlet.➤Please check whether a videotape is in.➤Please check whether a videotape is inserted in a right direction(a side of transparent window should be on the upside)➤Have you inputted a videotape again just after the tape wasejected? Please try it again after fully ejecting it.➤When a videotape forces to be ejected, the tape may not beinputted. In the case, please pull out an outlet, and then push thetape smoothly.➤That’s why a safe mode to protect a videotape is operatedautomatically. Please pull out the tape and input it again.➤In case the product is used for a long time, a videotape may not beejected for a film inside may be stretched. In the case, please pullout a power plug for about 10mins and then press “EJECT” button.DVD-Video(USA)_DV6T811N-LT 02.4.16 2:39 PM ˘`74](https://usermanual.wiki/WINIA-Electronics/7NF0009/User-Guide-242133-Page-75.png)
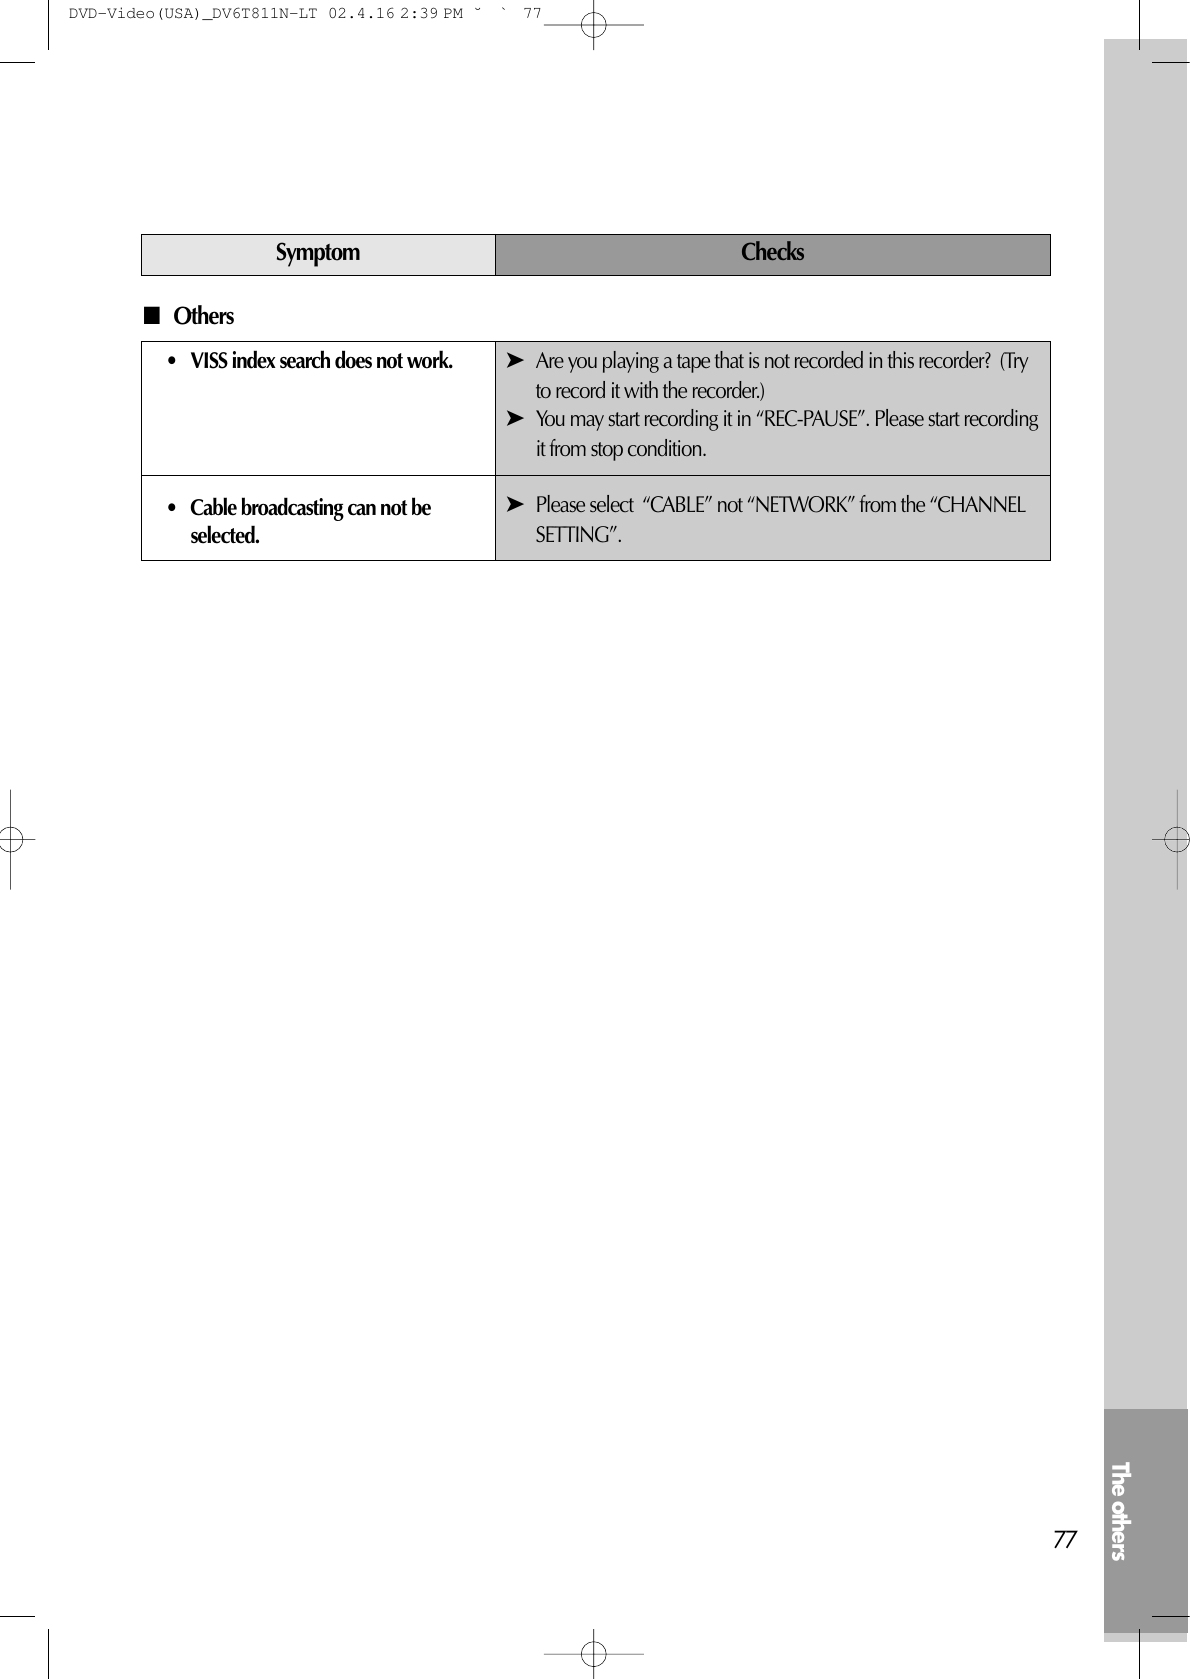
![The others75• Noise appears on screen afterrecording.• While in playing, noise appears.• Sound and screen are irregular.• Sound comes out but screen doesnot appear.• Screen is irregular and stripes appears.• "Screen Error" message is displayedin a screen.• While recording and playing, thetop of screen extremely waves.ChecksSymptom➤While in playing a videotape, there may happen some noise orblot in the part of the beginning of a videotape or resuming“PAUSE”, which are not breakdown.➤Please press “TRACKING” for better screen. Videotape may bepoor. Try to change it to another one.➤Please use a head-cleaner to clean VCR heads. VCR heads maybe contaminated.➤Since VCR Play signals are not stable like a TV signals, screenmay be unstable or curved while in playing. To fix the problem,please horizontal adjustment.• A screen is not clear.• A screen at pause is trembling orslow screen is not clear.■Play➤In case videotape is the one recorded by other products or oldone, stripe may appear on the screen.➤Try to adjust the screen by [TRACKING+/-] button➤Try to use a head-cleaner.➤Try to use a head-cleaner.➤Try to adjust the screen by [TRACKING+/-] button.■Recording• Recording a TV program isimpossible.➤For recording, you should use videotape with a tab.➤Please check whether a channel is fixed on video. If not, youhave to turn it into “TV” by pressing “OUTPUT” button.➤Please check whether the timer recording info is right.➤Are RF cables inputted antenna connection terminal correctly?➤Does a CH number selected in display section appear?➤Please check a tab on a tape whether it is broken or not. (If it wasbroken, please scotch-tape it)DVD-Video(USA)_DV6T811N-LT 02.4.16 2:39 PM ˘`75](https://usermanual.wiki/WINIA-Electronics/7NF0009/User-Guide-242133-Page-76.png)
![76• Recording a TV program isimpossible.• Once pressing “REC”, a videotapeis ejected automatically.• Timer recording of Cable TV doesnot work.• In spite of pressing “CHANNEL”, achannel can not be set.• While duplicating, screen is notclean and distorted.➤Check whether a tape attached with a recording tap is inserted.➤Check whether the screen is displayed in VCR Only Channel.Press [OUTPUT] button in this remote controller to adjust in"General Broadcast" condition.➤Is the rounded line (RF cable) connected in "ANT.IN" terminal?➤Is the selected channel number shown in Display?➤Is a tab of cassette tape broken? (Please cover a tab hole withcellophane adhesive tape (Scotch tape).)➤Please check whether the clock is right.➤Does the display on your video show “ ” (Ready to timerrecording)? Please make it out.➤Please check whether the timer recording info is right.➤Please check a tab on a tape whether it is broke or not. (If it wasbroken, please scotch-tape it)➤Was a cable data output code connected correctly?➤Were a converter manufacturer setup and output channel right?➤Did you enter a password? (Please cancel it.)➤Did you turn off your player? (Please turn it on.)➤You may not memorize channels.➤Please check your channel setting or press a number button.➤Some tapes or discs distributed in the market for lending is set toprevent copy in manufacturing. These tapes cannot beduplicated in a good condition.ChecksSymptom• remote control does not work.• Buttons on remote control do notwork.■REMOTE➤Battery may be weak or exhausted.➤A receiver of remote control may be different with a sender.➤In case a videotape is positioned in the beginning, “VISS REW”and “REW” do not work.➤In case a videotape is positioned in the end, “FF”, “VISS FF”,“PLAY” and “REC” do not work.➤Please check whether another button is pressed.DVD-Video(USA)_DV6T811N-LT 02.4.16 2:39 PM ˘`76](https://usermanual.wiki/WINIA-Electronics/7NF0009/User-Guide-242133-Page-77.png)