WINIA Electronics 7NF0015 DVD Recorder + VCR User Manual DWL71D1D RV4000 GB
Dongbu Daewoo Electronics Corporation DVD Recorder + VCR DWL71D1D RV4000 GB
UserManual.wiki
>
WINIA Electronics
>
7NF0015 User Manual
User Manual
Navigation menu
Upload a User Manual
Namespaces
Wiki Guide
HTML
PDF
Info
Views
User Manual
Discussion / Help
Navigation


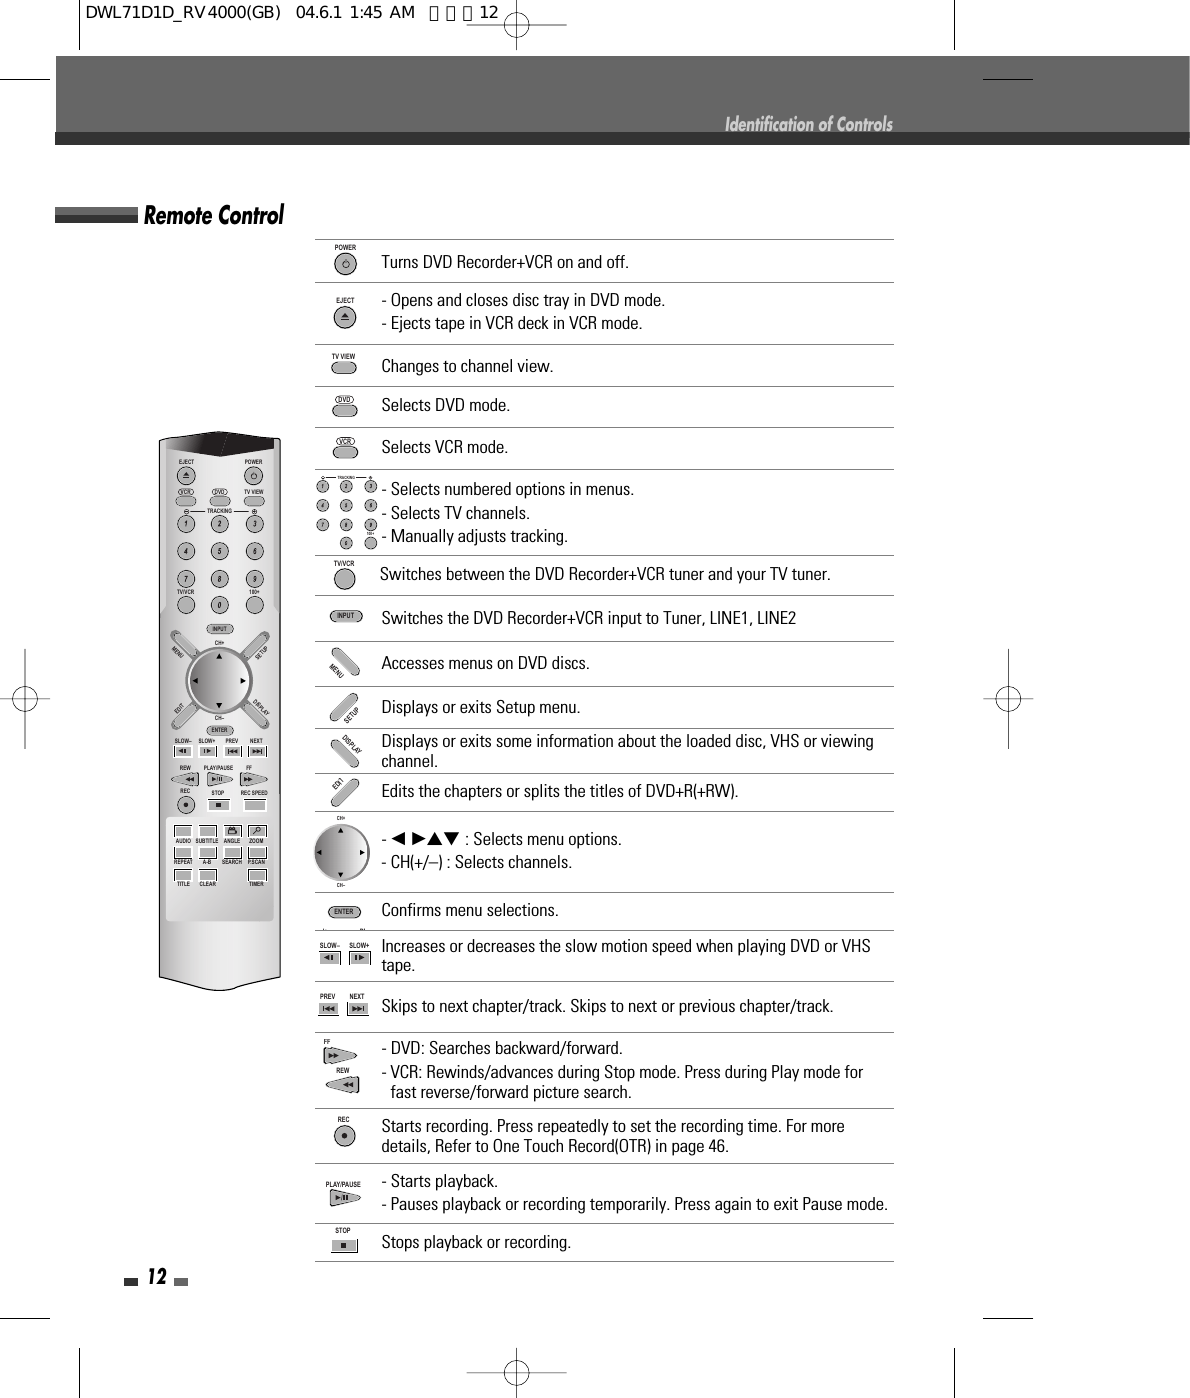
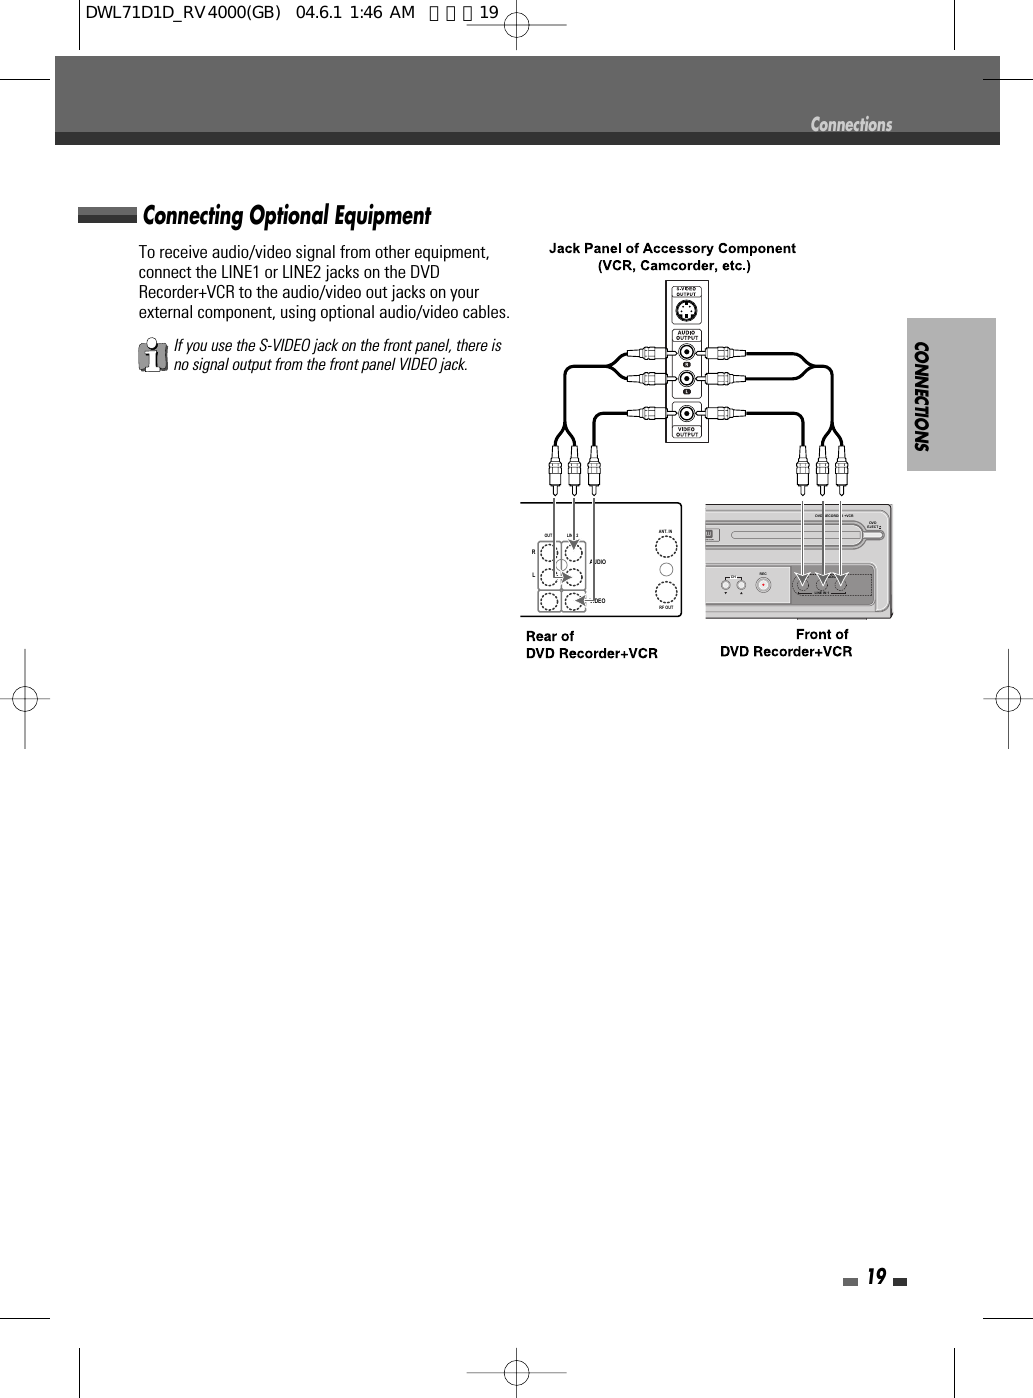
![INTRODUCTION13TITLEDisplays disc’s Title menu, if available.Identification of ControlsREC SPEEDSelects Recording mode: - DVD : HQ (1hr), SP (2hrs), EP (4hrs) or SLP (6hrs).- VCR : SP or SLP.CLEARReset the counter in the VCR mode. TIMERDisplays Timer Recording menu.AUDIOSelects an audio language(DVD), audio channel(CD) or audio type(Broadcast).SUBTITLESelects a subtitle language.ANGLESelects a DVD camera angle, if available.ZOOMEnlarges DVD video image.REPEATRepeats chapter, track, title or all.A-BRepeats sequence between two points (A and B).P.SCANSwitches between Progressive Scan mode and Interlace Scan mode. Thisfunction is activated only when the key is pressed for 3 seconds. SEARCHChanges a title or a chapter.POWEREJECTTV VIEWDVDTRACKINGINPUTMENUSETUPEDITDISPLAYENTERSLOW–REWRECAUDIO SUBTITLE ANGLE ZOOMREPEAT A-B SEARCH P.SCANTITLE CLEAR TIMERSTOP REC SPEEDPLAY/PAUSE FFSLOW+ PREV NEXTCH+CH–VCRTV/VCR 100+Progressive Scan If your TV system supports Progressive Scan, you can view high quality video by changingthe DVD Recorder+VCR set to send video as Progressive Scan mode. If the TV systemdoes not support Progressive Scan mode, Never try to change to Progressive scan mode.If you changed the TV Scan mode by mistake, press [P.SCAN] key for 3 seconds then itwill be restored.DWL71D1D_RV4000(GB) 04.6.1 1:45 AM 페이지13](https://usermanual.wiki/WINIA-Electronics/7NF0015/User-Guide-428847-Page-14.png)
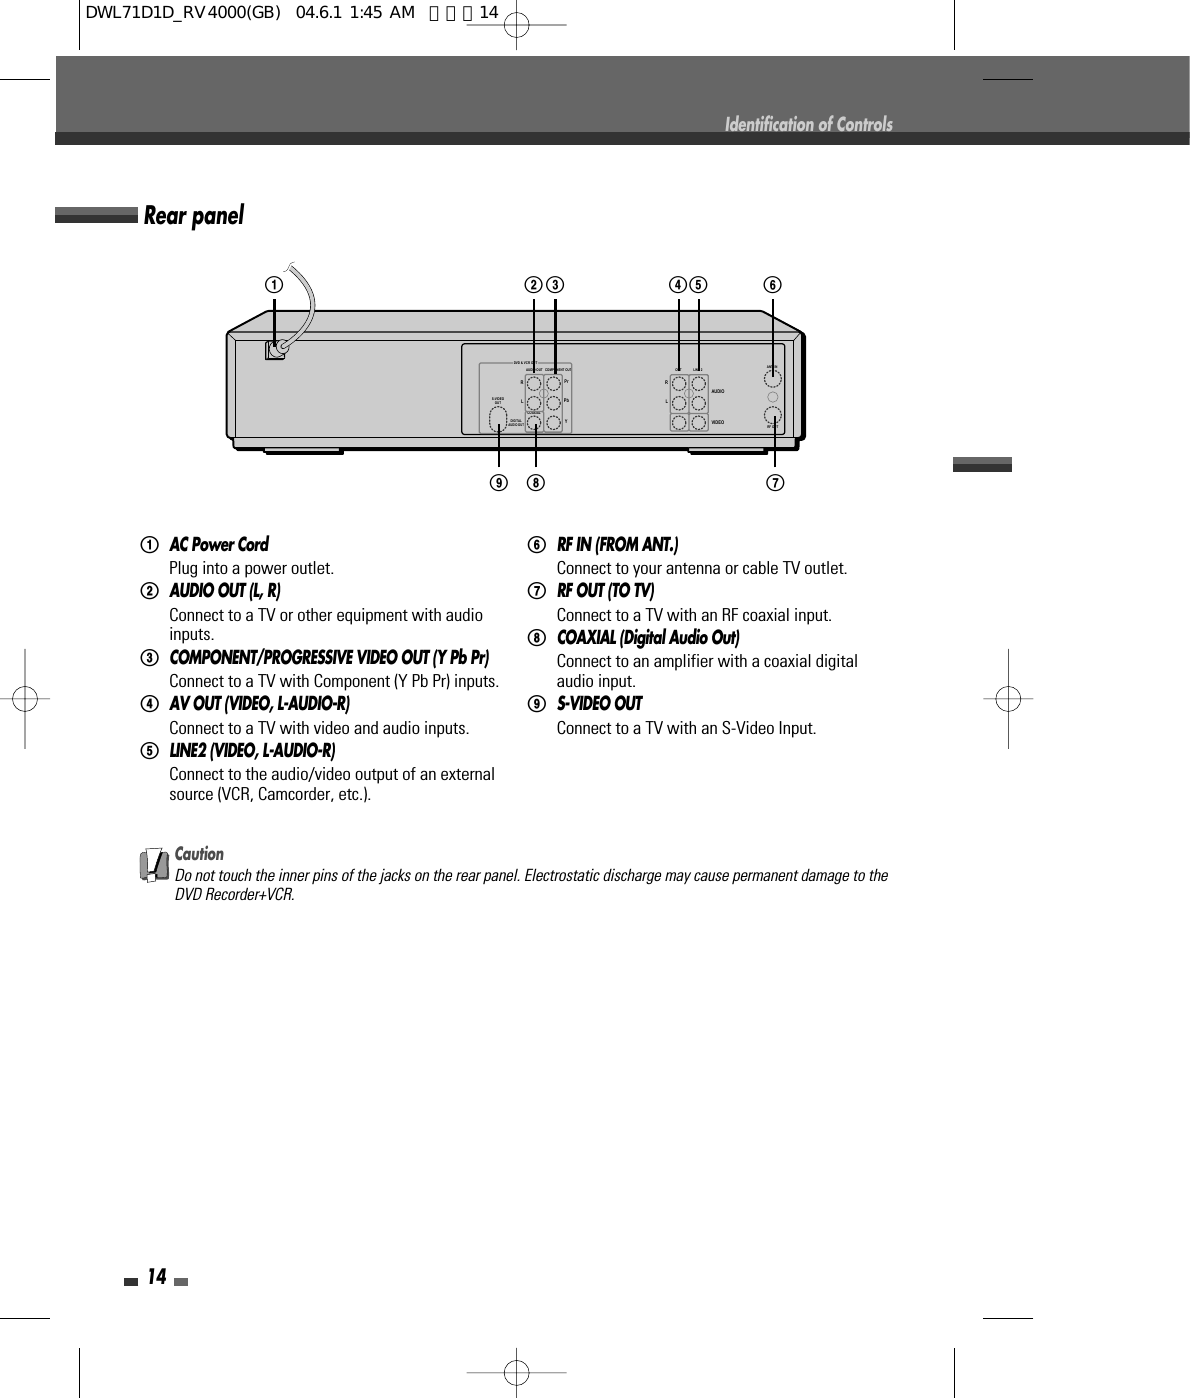
![INTRODUCTION15ConnectionsConnectionsConnecting Antenna/CableCONNECTIONS1Disconnect the antenna/cable from the rear of yourTV. 2Identify the type of cable from your antenna. If it isa round cable as illustrated, it is a 75 ohm coaxialantenna cable. This cable will connect directly tothe jack marked RF IN (FROM ANT.) on the DVDRecorder+VCR.Cable Service Without Cable BoxIf your cable wire is connected to your TV without a converter or descrambler box, unscrew the wire from yourTV and attach it to the RF IN (FROM ANT.) jack on the DVD Recorder+VCR.Use the supplied coaxial cable to connect between the DVD Recorder+VCR’s OUT (TO TV) jack and the 75 ohmantenna input jack on your TV. With this connection, you can receive all midband, superband, and hyperbandchannels (all cable channels).Cable Service With Cable BoxIf a cable box is required in your cable system, followthe instructions shown below. This hookup permits bothTV and DVD Recorder+VCR operation.To view or record a CATV channel:1Tune the TV to the correct video input channel.2Set the DVD Recorder+VCR to the output channel ofthe cable box using the [CH …/†] or the [0-9] keyson your DVD Recorder+VCR (e.g., CH3).3Select the channel you wish to view on the cablebox.• There are a variety of ways to connect the DVD Recorder+VCR to your TV and other equipment. Use only one ofthe connections described below. Whichever TV connection you use will work with all input sources.• Please refer to the manuals for your TV, VCR, stereo system or other devices as necessary to make the bestconnections.• For better sound reproduction, connect the DVD Recorder+VCR’s AUDIO OUT jacks to the audio in jacks of youramplifier, receiver, stereo or audio/video equipment. See ‘Connecting an Amplifier/Receiver‘ on page 18.If you are using a cable box to tune channels, it is not necessary to run Auto Channel Search as indicated on page 23.Caution• Make sure the DVD Recorder+VCR is connected directly to the TV, and the TV is set to the correct video input.• Do not connect the DVD Recorder+VCR’s AUDIO OUT jack to the phono in jack (record deck) of your audio system.• Do not connect the DVD Recorder+VCR via your VCR. The DVD image could be distorted by the copy protectionsystem.DEOTOUTDIGITALAUDIO OUTAUDIO OUT COMPONENT OUT LINE 2AUDIOVIDEOLRLRCOAXIALYPbPrRF OUTANT. INDVD & VCR OUTAntenna AntennaFlat Wire(300 ohm)300/75 ohmAdaptor(Not supplied)Cable TVWall JackOR ORRear of DVD Recorder+VCREOTOUTDIGITALAUDIO OUTAUDIO OUT COMPONENT OUT LINE 2AUDIOVIDEOLRLRCOAXIALYPbPrRF OUTANT. INDVD & VCR OUTCable TVWall JackBack Panel ofTypical Cable BoxRear of DVD Recorder+VCRDWL71D1D_RV4000(GB) 04.6.1 1:45 AM 페이지15](https://usermanual.wiki/WINIA-Electronics/7NF0015/User-Guide-428847-Page-16.png)
![Choose one of the following TV connections, depending on the capabilities of your equipment.RF Coaxial ConnectionConnect the RF OUT (TO TV) jack on the DVDRecorder+VCR to the antenna in jack on your TV usingthe supplied 75-ohm coaxial cable (R). If you use thisconnection, tune your TV to the DVD Recorder+VCR’sRF output channel (CH 3 or 4).How to set the DVD Recorder+VCR’s RF output channelPress [SETUP] and select Modulator out then press[ENTER] to change the RF out channel. For detailsrefer to page 24.Audio/Video Connection1Connect the VIDEO OUT jack on the DVDRecorder+VCR to the video in jack on your TVusing the supplied video cable (V). 2Connect the Left and Right AUDIO OUT jacksfrom the DVD Recorder+VCR to the left/right audio in jacks on your TV using the supplied audio cables (A).S-Video Connection1Connect the S-VIDEO OUT jack on the DVD Recorder+VCR to the S-Video in jack on your TV using an S-Video cable (S).2Connect the Left and Right AUDIO OUT jacks from the DVD Recorder+VCR to the left/right audio in jacks onyour TV using the supplied audio cables (A).Component Video Connection1Connect the COMPONENT/PROGRESSIVE VIDEO OUT jacks on the DVD Recorder+VCR to the correspondingin jacks on your TV using a Y Pb Pr cable (C) if the component (Y, Pb, Pr) is available on your TV.2Connect the Left and Right AUDIO OUT jacks from the DVD Recorder+VCR to the left/right audio in jacks onyour TV using the supplied audio cables (A).Connecting a TV16ConnectionsAll video signals are available from all video outputs. That means that whichever TV connection you use, it willwork with all input sources, including VHS out of the Component/Progressive Video Output.ANTENNAINPUTLRYPbPrCOMPONENT/PROGRESSIVE VIDEO INPUTAUDIO INPUTVIDEO INPUTS-VIDEO INPUTRear of TVS-VIDEOOUTOUTDIGITALAUDIO OUTAUDIO OUT COMPONENT OUT LINE 2AUDIOVIDEOLRLRCOAXIALYPbPrRF OUTANT. INDVD & VCR OUTRear of DVD Recorder+VCRRS AVCDWL71D1D_RV4000(GB) 04.6.1 1:45 AM 페이지16](https://usermanual.wiki/WINIA-Electronics/7NF0015/User-Guide-428847-Page-17.png)
![CONNECTIONS17Progressive Scan Connection• If your television is a high-definition or ‘digital ready‘ television, you may take advantage of the DVDRecorder+VCR’s Progressive Scan output for the highest video resolution possible.• If your TV does not accept the Progressive Scan format, the picture will appear scrambled.1Connect the COMPONENT/PROGRESSIVE VIDEO OUT jacks on the DVD Recorder+VCR to the correspondingin jacks on your TV using an optional Y Pb Pr cable (C).2Connect the Left and Right AUDIO OUT jacks from the DVD Recorder+VCR to the left/right audio in jacks onyour TV using the supplied audio cables (A).• Be sure to set the DVD Recorder+VCR to the Progressive Scan mode by pressing [P.SCAN] for 3 seconds on theremoter control or changing the Scan mode in the Setup Menu; See page 27.• Progressive Scan does not work with the RF, Audio/Video or S-Video connections.ConnectionsDWL71D1D_RV4000(GB) 04.6.1 1:45 AM 페이지17](https://usermanual.wiki/WINIA-Electronics/7NF0015/User-Guide-428847-Page-18.png)
![18ConnectionsConnecting to an amplifier equipped with two channel analog stereo or Dolby Pro Logic ll/ Pro LogicConnect the Left and Right AUDIO OUT jacks on the DVD Recorder+VCR to the left and right audio in jacks onyour amplifier, receiver, or stereo system, using the supplied audio cables (A).Connecting to an amplifier equipped with two channel digital stereo (PCM) or to an Audio/Video receiver equippedwith a multi-channel decoder (Dolby Digital™, MPEG 2, or DTS)1Connect one of the DVD Recorder+VCR’s DIGITAL AUDIO OUT jacks (OPTICAL O or COAXIAL X) to thecorresponding in jack on your amplifier. Use an optional digital (optical O or coaxial X) audio cable.2You will need to activate the DVD Recorder+VCR’s digital output; see ‘AUDIO Settings‘ on page 28.Digital Multi-Channel Sound?A digital multi-channel connection provides the best sound quality. For this you need a multi-channelaudio/video receiver that supports one or more of the audio formats supported by your DVD Recorder+VCR(MPEG 2, Dolby Digital and DTS). Check the receiver manual and the logos on the front of the receiver.Connecting an Amplifier/ReceiverDue to the DTS Licensing agreement, the digital output will be in DTS digital out when DTS audio stream is selected.• If the audio format of the digital output does not match the capabilities of your receiver, the receiver will producea strong, distorted sound or no sound at all.• 5.1 channel digital surround sound via the digital connection can only be obtained if your receiver is equipped witha digital multi-channel decoder.• To see the audio format of the current DVD on the on-screen display, press [AUDIO].The DVD Recorder+VCR does not perform internal (2- channel) decoding of DTS sound tracks. To enjoy DTS multi-channel surround, you must connect the DVD Recorder+VCR to a DTS compatible receiver via one of the DVDRecorder+VCR’s digital audio outputs.Amplifier (Receiver)RLAUDIO INPUT DIGITAL INPUTCOAXIALS-VIDEOOUTOUTDIGITALAUDIO OUTAUDIO OUT COMPONENT OUT LINE 2AUDIOVIDEOLRLRCOAXIALYPbPrRF OUTANT. INDVD & VCR OUTRear of DVD Recorder+VCRA XDWL71D1D_RV4000(GB) 04.6.1 1:46 AM 페이지18](https://usermanual.wiki/WINIA-Electronics/7NF0015/User-Guide-428847-Page-19.png)
![After successfully connecting your DVD Recorder+VCR to the TV set and otherdevices, this chapter will show you how to start the initial installation.1Welcome message displays on the screen. Check the aerial cableconnected correctly.2Select the desired language for the on-screen menu using […/†]. Press[ENTER] to confirm.3Select the desired disc menu language using […/†]. Press [ENTER] toconfirm.4Select the disc playback audio language using […/†]. Press [ENTER] toconfirm.Initial Installation20Initial InstallationInitial InstallationInstallationPlease select your language to begin autoinstall procedure:EnglishSpanishFrenchInstructionsEnter-Confirm Setup-Exit Move …†InstallationPlease select disc menu language:DefaultEnglishSpanishFrenchItalianJapaneseChineseInstructionsEnter-Confirm Setup-Exit Move …†InstallationPlease select disc play back audiolanguage:DefaultEnglishSpanishFrenchItalianJapaneseChineseInstructionsEnter-Confirm Setup-Exit Move …†InstallationWelcome.Press [Enter] to begin auto channel search.Ensure aerial is connected.InstructionsSetup-ExitYou must follow the initial installation process because the DVD Recorder+VCRalso record time and date. If you skip this process you shall encounter thisprocess after your set is powered on.DWL71D1D_RV4000(GB) 04.6.1 1:46 AM 페이지20](https://usermanual.wiki/WINIA-Electronics/7NF0015/User-Guide-428847-Page-21.png)
![SETUP215Select the disc playback subtitle language using […/†]. Press [ENTER] toconfirm.6Select the desired type of signal using […/†]. Press [ENTER] to confirm.7The DVD Recorder+VCR detects the signals automatically and registersthem.8After finishing channel search, set the clock.9Use [œ/√] to move to other positions and use […/†] to change thevalue.10After setting the clock, press [ENTER] to confirm. If you cancel the processduring Installation operation, you should do the same procedure again.Initial InstallationInstallationPlease select disc play back subtitlelanguage:DefaultEnglishSpanishFrenchItalianJapaneseChineseOffInstructionsEnter-Confirm Setup-Exit Move …†InstallationWhat type of signal are you using?Cable TVAntennaDetect AutomaticallyInstructionsEnter-Confirm Setup-Exit Move …†InstallationSearching for available TV stations:2 channels foundPlease wait...InstructionsSetup-ExitSet ClockPlease set the clock:Time : 12 : 00 AMDate : Jan / 01 / 2005 (SAT)InstructionsEnter-Confirm Setup-Exit Move …†…†DWL71D1D_RV4000(GB) 04.6.1 1:46 AM 페이지21](https://usermanual.wiki/WINIA-Electronics/7NF0015/User-Guide-428847-Page-22.png)
![The DVD Recorder+VCR Setup menu includes system settings in six categories such as Installation, RecordingOptions, Languages, Preferences, System Info and Restore Defaults. Press [SETUP] and [œ/√] on the remotecontrol to view the first and second levels of the Setup menu.Setup Menu Overview221Press [SETUP].The Setup menu appears.2Use [œ/√] to select the desired option.3While the desired item is selected, press […/†] to move to the second level.4Press [ENTER] to move to the third level.5Use […/†] to select the desired setting then press [ENTER] to confirm your selection. Some items require additional steps. Press [SETUP] at any time to return to the previous menu.6Press [SETUP] to exit the Setup menu.Menu NavigationTuning Band1Press [SETUP].The Setup menu appears.2Use [œ/√] to select the ‘Installation‘ option.3While the ‘Installation‘ option is selected, press [†] to selectthe ‘TV/CATV‘ option.4Press [ENTER] to move to the second level.5Use […/†] to select the tuning band option (TV or CATV)then press [ENTER].TV: If you are using a standard antenna to receive channels.CATV: If you are using basic cable to receive channels.INSTALLATION SettingsInitial SetupInitial SetupInstallationTV/CATV CATVAuto Channel SearchAdd/Remove ChannelsModulator Out CH3Set ClockInstructionsEnter-Confirm Setup-ExitMove …†Select The TVStandardTVCATVIf the input signal mode is other than channel, like LINE1 and LINE2, tuning band is not changed.DWL71D1D_RV4000(GB) 04.6.1 1:46 AM 페이지22](https://usermanual.wiki/WINIA-Electronics/7NF0015/User-Guide-428847-Page-23.png)
![SETUP23Initial SetupAuto Channel SearchThe DVD Recorder+VCR is equipped with a frequency synthesized tuner capableof receiving up to 181 channels. These include VHF channels 2-13, UHF channels14-69 and CATV channels 1-125.Preparation:Connect the DVD Recorder+VCR to the desired type of antenna or cable TVsystem, as shown in ‘Connecting Antenna/Cable‘ on page 15.1Follow steps 1-2 as shown under Tuning Band.2While the ‘Installation‘ option is selected, press […/†] to select the ‘AutoChannel Search‘ option.3Press [ENTER] to begin the channel search.The tuner will automatically search for all available channels in your areaand place them in the tuner’s memory.After the Auto Channel Set is complete, follow the instructions at left to make surethe Tuning Band is set correctly (TV or CATV).Add/Remove ChannelsThis feature allows you to manually add or delete channels from yourchannel list.1Follow steps 1-2 as shown under Tuning Band.2Use […/†] to select the ‘Add/Remove Channels‘ option.3Press [ENTER]. The Channel Edit menu appears.4Use […/†] to select a channel then toggle the add/delete selectionby pressing [ENTER].5Press [SETUP] to exit the edit menu.InstallationTV/CATV CATVAuto Channel SearchAdd/Remove ChannelsModulator Out CH3Set ClockInstructionsEnter-Confirm Setup-ExitMove …†InstallationSearching for available TV stations:5 channels foundPlease wait...InstructionsSetup-ExitInstallationTV/CATV CATVAuto Channel SearchAdd/Remove ChannelsModulator Out CH3Set ClockInstructionsEnter-Confirm Setup-ExitMove …†Channel 0 0 1Enter-Add/Remove Setup-ExitChange Channel …†…†DWL71D1D_RV4000(GB) 04.6.1 1:46 AM 페이지23](https://usermanual.wiki/WINIA-Electronics/7NF0015/User-Guide-428847-Page-24.png)
![Set Clock1Follow steps 1-2 as shown under Tuning Band.2Use […/†] to select the ‘Set Clock‘ option.3Press [ENTER]. The Set Clock menu appears.4Enter the necessary information for date and time.œ/√(left/right): Moves the cursor to the previous or next column.…/†(up/down): Changes the setting at the current cursor position.5Press [ENTER] to confirm your setting, then press [SETUP] to exit the Setupmenu.24Initial SetupModulator Out This feature allows you to manually add or delete channels fromyour channel list.1Follow steps 1-2 as shown under Tuning Band.2Use […/†] to select the ‘Modulator Out‘ option.3Press [ENTER] to move the third level. 4Use […/†] to select the modulator out channel between‘CH3’ and ‘CH4’.5Press [ENTER] to confirm.InstallationTV/CATV CATVAuto Channel SearchAdd/Remove ChannelsModulator Out CH3Set ClockInstructionsEnter-Confirm Setup-ExitMove …†Select OutputChannelCH3CH4InstallationTV/CATV CATVAuto Channel SearchAdd/Remove ChannelsModulator Out CH3Set ClockInstructionsEnter-Confirm Setup-ExitMove …†Set ClockPlease set the clock:Time : 12 : 00 AMDate : Jan / 01 / 2005 (SAT)InstructionsEnter-Confirm Setup-Exit Move …†…†DWL71D1D_RV4000(GB) 04.6.1 1:46 AM 페이지24](https://usermanual.wiki/WINIA-Electronics/7NF0015/User-Guide-428847-Page-25.png)
![SETUP25Initial SetupVCR Record QualityYou can set the default VCR recording quality to SP (StandardPlay) or SLP (Super Long Play). SP is higher quality, but SLPprovides 3 times the recording time; e.g., a 2 hour tape will record for 6 hours in SLP mode.Follow the same procedure as the DVD Record Quality.Auto ChapterDuring recording, chapter markers are added automatically atfixed intervals. You can set this interval to 5 minutes, 10 minutesor 15 minutes. To turn off automatic chapter marking, select ‘Off‘.Follow the same procedure as the DVD Record Quality.DVD Record QualityYou can set the default DVD recording quality to: HQ (High, 1hr/disc), SP (Standard, 2 hrs/disc), EP (Low, 4 hrs/disc) or SLP(Very Low, 6hrs/disc).1Press [SETUP].The Setup menu appears.2Use [œ/√] to select the ‘Recording Options‘ option.3While the ‘Recording Options‘ is selected, press [†] toselect the ‘DVD Record Quality‘ option.4Press [ENTER] to move to the second level.5Use […/†] to to select the desired Record Quality (SP, SLP, EP, HQ).6Press [ENTER] to confirm your selection, then press [SETUP] to exit the menu.RECORDING OPTIONS SettingsRecording OptionsDVD Record Quality HQVCR Record Quality SLPAuto Chapter OffInstructionsEnter-Confirm Setup-ExitMove …†Select RecordQualitySLPEPSPHQRecording OptionsDVD Record Quality HQVCR Record Quality SLPAuto Chapter OffInstructionsEnter-Confirm Setup-ExitMove …†Select VCRQualitySLPSPRecording OptionsDVD Record Quality HQVCR Record Quality SLPAuto Chapter OffInstructionsEnter-Confirm Setup-ExitMove …†Select AutoChapterOff5min10min15minDWL71D1D_RV4000(GB) 04.6.1 1:46 AM 페이지25](https://usermanual.wiki/WINIA-Electronics/7NF0015/User-Guide-428847-Page-26.png)
![26Initial SetupOSD LanguageSelect a language for the DVD Recorder+VCR Setup menu andon-screen displays.1Press [SETUP]. The Setup menu appears.2Use [œ] and [√] to select the ‘Language‘ option.3While the ‘Language‘ is selected, press [†] to select the‘OSD Language‘ option.4Press [ENTER] to move to the second level.5Use […/†] to select the desired language.6Press [ENTER] to confirm your selection, then press [SETUP] toexit the menu.DISC Menu/Audio/Subtitle LanguageSelect your preferred language for Disc Menus, Audiosoundtracks, and Subtitles.Default : The disc’s default language is selected.Follow the same procedure as the OSD Language.LANGUAGE SettingsLanguageOSD Language EnglishMenu Language DefaultSubtitle Language DefaultAudio Language DefaultInstructionsEnter-Confirm Setup-ExitMove …†Select OSDLanguageEnglishSpanishFrenchLanguageOSD Language EnglishMenu Language DefaultSubtitle Language DefaultAudio Language DefaultInstructionsEnter-Confirm Setup-ExitMove …†Select MenuLanguageDefaultEnglishSpanishFrenchLanguageOSD Language EnglishMenu Language DefaultSubtitle Language DefaultAudio Language DefaultInstructionsEnter-Confirm Setup-ExitMove …†Select SubtitleLanguageDefaultEnglishSpanishFrenchLanguageOSD Language EnglishMenu Language DefaultSubtitle Language DefaultAudio Language DefaultInstructionsEnter-Confirm Setup-ExitMove …†Select AudioLanguageDefaultEnglishSpanishFrenchDWL71D1D_RV4000(GB) 04.6.1 1:46 AM 페이지26](https://usermanual.wiki/WINIA-Electronics/7NF0015/User-Guide-428847-Page-27.png)
![SETUP27Initial Setup1Press [SETUP].2Use [œ/√] to select the ‘Preference‘ option.3While the ‘Preference‘ option is selected, press [†] to select the ‘Video‘option.3Press [ENTER]. Video sub menu appears.TV Aspect Ratio1Use […/†] to select ‘TV Aspect‘ while Video submenudisplays.2Press [ENTER] or [√] to go to the second level.3Use […/†] to select the desired TV Aspect.4Press [ENTER] to confirm your selection.5Press [SETUP] to exit the menu.4:3 LB : Select when a standard 4:3 TV is connected. Displaystheatrical images with masking bars above and below the picture.4:3 PS : Select when a standard 4:3 TV is connected. Displays pictures cropped to fill your TV screen. Bothsides of the picture are cut off.16:9 : Select when a 16:9 wide screen TV is connected.Auto : Convert to the appropriate aspect ratio automatically.Scan ModeProgressive Scan Video provides the highest picture quality withreduced flickering.• If you are using the COMPONENT/PROGRESSIVE VIDEO OUTjacks, but are connecting the DVD Recorder+VCR to astandard (analog) television, select Scan Mode as Interlace.• If you are using the COMPONENT/PROGRESSIVE VIDEO OUTjacks for connection to a TV or monitor that is compatiblewith a Progressive Scan signal, select Scan Mode asProgressive.Follow the same procedure as TV Aspect Ratio to change the Scan Mode.CautionOnce the setting for Progressive Scan output is entered, an image will only be visible on a Progressive Scan compatibleTV or monitor. Press [P.SCAN] on the Remote Control for 3 seconds.PREFERENCE / Video SettingsPreferenceVideoAudioParental ControlsAuto PlayAuto ClockVCRInstructionsEnter-Confirm Setup-ExitMove …†VideoTV Aspect AutoScan Mode InterlaceInstructionsEnter-Confirm Setup-Exit Move …†Select PictureFormat4:3 LB4:3 PS16:9AutoVideoTV Aspect AutoScan Mode InterlaceInstructionsEnter-Confirm Setup-Exit Move …†Select ScanModeInterlaceProgressiveDWL71D1D_RV4000(GB) 04.6.1 1:46 AM 페이지27](https://usermanual.wiki/WINIA-Electronics/7NF0015/User-Guide-428847-Page-28.png)
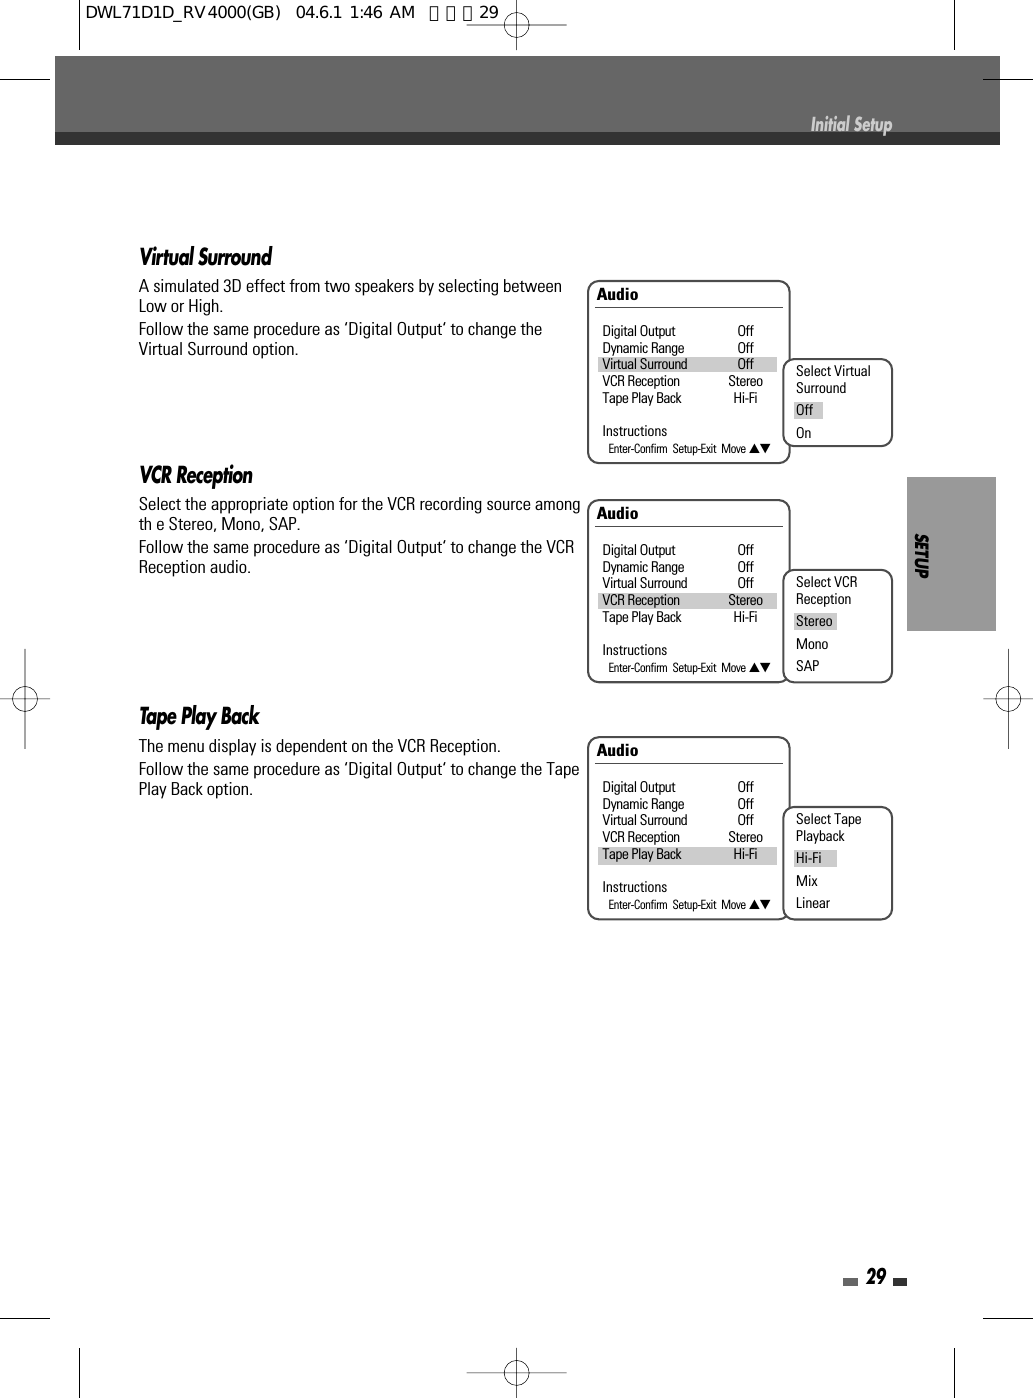
![Follow the same procedure as Video Settings to select Audio Settings option.Digital Output1Use […/†] to select ‘Digital Output‘ while Audio submenudisplays.2Press [ENTER] or [√] to go to the second level.3Use […/†] to select the desired output type.4Press [ENTER] to confirm your selection.5Press [SETUP] to exit the menu.OffNo signal will be output from the Digital Audio Out jacks.LPCMSelect when connected to a 2 channel digital stereo amplifier. The DVD Recorder+VCR's digital audio signal willbe output in the PCM 2ch format when you play a DVD (or VHS) recorded with a Dolby Digital (only for DVD) orMPEG soundtrack. If the DVD is recorded with a DTS sound track then you can hear no sound.BitstreamSelect when connected to a proper decoder such as Dolby Digital decoder or DTS decoder (or an amplifier orother equipment with the proper decoder).Dynamic RangeWhile watching DVD movies, you may wish to compress thedynamic range of the audio output (the difference between theloudest and quietest passages). This allows you to listen to amovie at a lower volume without losing clarity of sound. Set‘Dynamic Range‘ to Low or High for this effect.Follow the same procedure as ‘Digital Output‘ to change theDynamic Range.28Initial SetupAudioDigital Output OffDynamic Range OffVirtual Surround OffVCR Reception StereoTape Play Back Hi-FiInstructionsEnter-Confirm Setup-Exit Move …†Select DigitalOutputOffBitstreamLPCMAudioDigital Output OffDynamic Range OffVirtual Surround OffVCR Reception StereoTape Play Back Hi-FiInstructionsEnter-Confirm Setup-Exit Move …†Select DynamicRangeOffLowHighPREFERENCE / Audio SettingsPreferenceVideoAudioParental ControlsAuto PlayAuto ClockVCRInstructionsEnter-Confirm Setup-ExitMove …†DWL71D1D_RV4000(GB) 04.6.1 1:46 AM 페이지28](https://usermanual.wiki/WINIA-Electronics/7NF0015/User-Guide-428847-Page-29.png)
![Set Parental LevelThe Lock feature allows you to prevent DVDs from being played based on theirratings or to have certain discs played with alternative scenes. You can changethe parental level from 1 to 8.1Press [SETUP].2Use [œ/√] to select the ‘Preference‘ option.3While the ‘Preference‘ option is selected, press [†] to select the ‘ParentalControls‘ option.4Password Input dialog will appear. Enter a 4-digit password using the 0-9buttons. When you have not entered a password yet, Enter a 4-digitpassword and confirm again.5After setting up the password, press [ENTER] while 'Set Parental Level' isselected.6Password input dialog that is different from before is displayed. Input thepassword you changed before.7Use […/†] to select the desired parental level and press [ENTER] toconfirm. Off : If you select Unlock, the Lock feature is not active. The disc will play infull.Level 1 to 8: Some discs contain scenes not suitable for children. If you set arating for the DVD Recorder+VCR, all scenes with the same rating or lowerwill be played. Higher rated scenes will not be played unless an alternativescene is available on the disc. The alternative must have the same rating ora lower one. If no suitable alternative is found, playback will stop. You mustenter the 4-digit password or change the rating level in order to play the disc.30Initial SetupPreferenceVideoAudioParental ControlsAuto PlayAuto ClockVCRInstructionsEnter-Confirm Setup-ExitMove …†• The initial password is ‘0000‘. Use this at first.• Change the password different from 0000 to change the parental level.Parental ControlSet Parental Level OffChange PasswordInstructionsEnter-Confirm Setup-Exit Move …†Change PasswordCurrent Code _ _ _ _ Enter New Code _ _ _ _ Confirm Code _ _ _ _ InstructionsSetup-ExitPREFERENCE / Parental ControlsPassword Enter Password * * _ _InstructionsSetup-ExitParental ControlSet Parental Level OffChange PasswordInstructionsEnter-Confirm Setup-Exit Move …†Select theparental levelLevel6Level5Level4Level3 †…DWL71D1D_RV4000(GB) 04.6.1 1:46 AM 페이지30](https://usermanual.wiki/WINIA-Electronics/7NF0015/User-Guide-428847-Page-31.png)
![8Press [ENTER] to confirm your rating selection, then press [SETUP] to exitthe menu.SETUP31Parental ControlSet Parental Level Level3Change PasswordInstructionsEnter-Confirm Setup-Exit Move …†Change Password1While the ‘Preference‘ option is selected, press [†] to select the ‘ParentalControls‘ option.2Press [ENTER]. ‘Parental Controls‘ sub menu appears. 3Use […/†] to select the ‘Change Password‘ then press [ENTER].4Change Password submenu will appear. Enter 4-digit current password thenpress [ENTER].5Enter a new 4 -digit password, then press [ENTER]. And re-enter the newpassword for confirmation then press [ENTER].Parental ControlSet Parental Level OffChange PasswordInstructionsEnter-Confirm Setup-Exit Move …†Change PasswordCurrent Code * * * * Enter New Code * * * * Confirm Code * * _ _ InstructionsSetup-ExitMaster PasswordIf you forget your password, press 3,3,0,8 on the remote controller and press[ENTER].DWL71D1D_RV4000(GB) 04.6.1 1:46 AM 페이지31](https://usermanual.wiki/WINIA-Electronics/7NF0015/User-Guide-428847-Page-32.png)
![32Auto PlayThis enables the DVD Recorder+VCR to skip the opening title andplay a DVD main title automatically when it goes on with a disc isinserted in the tray.1Use […/†] to select ‘Auto Play’ option.2Press [ENTER] or [√] to go to the second level.3Use […/†] to change the ‘Auto Play Status’.4Press [ENTER] to confirm.Though AutoPlay is set, The DVD Recorder+VCR may play othertitle than the main title in some DVDs. In this case, set the AutoPlay off then play the disc.Auto ClockAuto clock enables the DVD Recorder+VCR to set the clockwhenever it is off in Standby mode.Follow the same procedure as Auto play to set the ‘Auto Clock’status.PreferenceVideoAudioParental ControlsAuto PlayAuto ClockVCRInstructionsEnter-Confirm Setup-ExitMove …†PreferenceVideoAudioParental ControlsAuto PlayAuto ClockVCRInstructionsEnter-Confirm Setup-ExitMove …†Select AutoPlayStatusOffOnSelect AutoClock StatusOffOnVarious PREFERENCE SettingsDWL71D1D_RV4000(GB) 04.6.1 1:46 AM 페이지32](https://usermanual.wiki/WINIA-Electronics/7NF0015/User-Guide-428847-Page-33.png)
![SETUP33Initial SetupVCRThis enables index search and go to search.1While the ‘preference’ option is selected, press [†] to move to the secondlevel.2Use […/†] to select ‘VCR’ menu.3Press [ENTER] then a sub menu appears.4You can select ‘Index Search’ or ‘Go-To Search’.5If you select ‘Index Search’ and press [ENTER], a sub menu appears. Use[…/†] to change index number you want to search and press [REW] or [FF].6If you select ‘Go-To Search’ and press [ENTER], a sub menu appears. Use […/†] to change the timernumber and press [REW] or [FF].PreferenceVideoAudioParental ControlsAuto PlayAuto ClockVCRInstructionsEnter-Confirm Setup-ExitMove …†VCRIndex SearchGo-To SearchInstructionsEnter-Confirm Setup-Exit Move …†VCRIndex SearchGo-To SearchInstructionsEnter-Confirm Setup-Exit Move …†Index SearchPress REW or FF to begin searchor enter a specific Index number– –Setup-ExitGo-To SearchCurrent Tape Counter is– :––:––Press REW or FF to go to– : – – : 00Setup-ExitVCR menu is activated only when a video cassette tape is inserted.DWL71D1D_RV4000(GB) 04.6.1 1:46 AM 페이지33](https://usermanual.wiki/WINIA-Electronics/7NF0015/User-Guide-428847-Page-34.png)
![• Some options cannot be reset, including Movie Rating,Password, and Country Code.• After Restoring Defaults the set reboots automatically and the Installation menu appears. You must set thecountry, language, auto channel and clock again.If you wish, you can reset the DVD Recorder+VCR to its originalfactory settings. 1Press [SETUP].2Use [œ/√] to select the ‘Restore Defaults‘ option.3Press [ENTER].4The Initialize menu will appear. Use the […/†] buttons toselect ‘Yes‘ and press [ENTER].System Information34Initial SetupThis is System Information which A/S Engineer can refer to when your set is outof order.System InfoChipset EP Set 1.0Main Build DR3-1.0.2Micom Software 0.0.0DVD Navigation 1.0.0InstructionsEnter-Confirm Setup-ExitMove …†Restore DefaultsRestore DefaultsIf you select this function allsettings will be removed andthe product will be set intoinitial (factory) mode.InstructionsEnter-Confirm Setup-ExitMove …†Are you sure you want to restoredefault settings?YesNoDWL71D1D_RV4000(GB) 04.6.1 1:46 AM 페이지34](https://usermanual.wiki/WINIA-Electronics/7NF0015/User-Guide-428847-Page-35.png)
![SETUP35On-Screen Display OverviewOn-Screen Display OverviewThe On-Screen Display provides feedback on the status of the DVD Recorder+VCR and/or the currently loadeddisc or tape. To access the On-Screen Display (or OSD), press the [DISPLAY] button.To display information about the currently loaded disc or tape:On-screen display operation1Press [DISPLAY] repeatedly to display/change the information displayed on-screen.2To remove the on-screen display, press [DISPLAY] repeatedly until it disappears.See the descriptions from current page to the next page for detailed explanations of on-screen displays foreach media type.Temporary Feedback IconsAction prohibited or not availableWhile watching TV, press [DISPLAY] to display/remove the on-screen display.When there is no rewritable DVD disc inserted, you would see a screen like the following:When a DVD+R or DVD+RW disc is inserted, the disc information is displayed at the first key input. If you pressagain then the TV information is displayed.Displaying Disc InformationDisplaying TV InformationChanging TV ChannelsSome discs may not provide all the features shown in the on-screen display examples.If no disc is playing, you can change TV channels using the [0-9] or [CH +/-] buttons on the remote control or [CH…/†] buttons on the front panel.Antenna channels are numbered 2 through 69. Cable channels are numbered 1 through 125.audio output signalcurrent date and timechannel numberDWL71D1D_RV4000(GB) 04.6.1 1:46 AM 페이지35](https://usermanual.wiki/WINIA-Electronics/7NF0015/User-Guide-428847-Page-36.png)
![Some TV programs are broadcast with both a main and a Secondary Audio Program (SAP). You can change theTV audio using the [AUDIO] button.Press [AUDIO] repeatedly to change the TV audio, according to Broadcast audio signal as shown below.• STEREO+SAP Audio SignalStereo ➝ SAP ➝ Mono ➝ Stereo• STEREO Audio SignalStereo ➝ L ➝ R ➝ Mono ➝ Stereo• SAP Audio SignalMono ➝ SAP ➝ Mono• MONO Audio SignalMonoThe current audio channel is displayed on-screen.• If SAP is selected, but there is no SAP channel being broadcast, you will still hear the main audio channel.• If the sound is poor quality when set to Stereo, you can often improve it by changing to Mono.• When an external input is selected, the audio channel can be switched only to Stereo.TitleShows the current title number and total number of titles, and skips to the desired title number.1Press [DISPLAY] during playback. The on-screen display appears on the TV screen.2Use […†] to select the ‘Title‘ icon on the on-screen display. Press [ENTER] to display a sub menu.3Use […†] to change the numbers.4Press [ENTER] to confirm.36On-Screen Display OverviewWith a DVD disc inserted and played, press [DISPLAY] to show the information of thecurrent disc.While the disc information is displayed, press [DISPLAY] again to show the discremaining time.Changing TV Audio ChannelOSD Menu Options for DVDDWL71D1D_RV4000(GB) 04.6.1 1:46 AM 페이지36](https://usermanual.wiki/WINIA-Electronics/7NF0015/User-Guide-428847-Page-37.png)
![SETUP37On-Screen Display OverviewChapterShows the current chapter number and total number of chapters, and skips to the desired chapter number.1Press [DISPLAY] during playback. The on-screen display appears on the TV screen.2Use […†] to select the ‘Chapter‘ icon on the on-screen display. Press [ENTER] to display a sub menu.3Use […†] to change the numbers.4Press [ENTER] to confirm.AngleShows the current angle number and total number of angles, and changes the angle number.1Press [DISPLAY] during playback. The on-screen display appears on the TV screen.2Use […†] to select the ‘Angle‘ icon on the on-screen display. Press [ENTER] to display a sub menu.3Use […†] to change the numbers.4Press [ENTER] to confirm.AudioShows the current audio soundtrack language, encoding method, and channel number, and changes the setting.1Press [DISPLAY] during playback. The on-screen display appears on the TV screen.2Use […†] to select the ‘Audio‘ icon on the on-screen display. Press [ENTER] to display a sub menu.3Use […†] to change the numbers.4Press [ENTER] to confirm.SubtitleShows the current subtitle language, and changes the setting.1Press [DISPLAY] during playback. The on-screen display appears on the TV screen.2Use […†] to select the ‘Subtitle‘ icon on the on-screen display. Press [ENTER] to display a sub menu.3Use […†] to change the numbers.4Press [ENTER] to confirm.Elapsed Shows the elapsed playing time, and skips to the desired time.1Press [DISPLAY] during playback. The on-screen display appears on the TV screen.2Use […†] to select the ‘Elapsed’ icon on the on-screen display. Press [ENTER] to search time. Then submenu appears.3Use […†] to change the numbers and use [œ √]to move to other time position.4Within 7 seconds, press [ENTER] to confirm the start time. Playback starts from the selected time on thedisc.DWL71D1D_RV4000(GB) 04.6.1 1:46 AM 페이지37](https://usermanual.wiki/WINIA-Electronics/7NF0015/User-Guide-428847-Page-38.png)
![38DVD PlaybackDVD Playback1Press the [DVD] button to set the remote control to operate the DVD deck.Turn the TV on and select the video input source connected to the DVD Recorder+VCR.Audio system: Turn the audio system on and select the input source connected to the DVD Recorder+VCR.2Press [EJECT] to open the disc tray.3Load your disc in the tray with the playback side down.4Press [EJECT] to close the tray.5READING appears on the front panel display, and playback starts automatically. If playback does not start,press [PLAY (√)]. In some cases, the Disc menu might appear instead.Playing a DVD+R(+RW) When a DVD+RW or unfinalized DVD+R is inserted, no title is played automatically but TV channel displays onthe screen. If you want to play a title in the DVD+R(+RW), you must press [DISC MENU] or [PLAY] to display the disc menuat first. Select a title to play then press [ENTER].Playing a DVDIf a Disc menu is displayedA Disc menu may be displayed when you load a DVD. Use the [œ √…†] buttons to select the title/chapter you wantto view, then press [ENTER] to start playback. Press [TITLE] or [DISC MENU] to return to the Disc menu.• If the Parental Lock feature is set and the disc is not within the current Movie Rating setting, the 4-digit codemust be entered and/or the disc must be authorized; see ‘Movie Rating‘ on page 30.• The DVD Recorder+VCR will not play discs with Region codes different from the DVD Recorder+VCR. The Regioncode for this DVD Recorder+VCR is 1 (one).• Unless stated otherwise, all operations described use the remote control. Some features may also be available inthe Setup menu.• A disc which is recorded with ripped source may not be played.• A disc which is recorded by computer with high speed(over or equal to 2x) may not be recognized.Still Picture and Frame-by-Frame Playback1Press [PLAY/PAUSE] during playback. The DVD Recorder+VCR will go into Pause mode.2You can back up or advance the picture frame-by-frame by pressing [FF (√√ )] repeatedly during Pausemode.Fast Forward/Backward1Press [REW (œœ )] or [FF (√√ )] during playback. The DVD Recorder+VCR will go into Search mode.2Press [REW] or [FF] to select the desired speed: √√ X2, √√ X4, √√ X8, √√ X16, √√ X32, √(forward) orœ, œœ X2, œœ X4, œœ X8, œœ X16, œœ X32 (backward).DWL71D1D_RV4000(GB) 04.6.1 1:46 AM 페이지38](https://usermanual.wiki/WINIA-Electronics/7NF0015/User-Guide-428847-Page-39.png)
![39DVD PlaybackZoomThe Zoom function allows you to magnify the video image and scroll around the enlarged image.1Press [ZOOM] during Play mode or Pause mode to activate the Zoom function.Each press of the [ZOOM] button changes Zoom level as follows: X1 (normal size) ➝X2 ➝X4 ➝X1(normal size)2Use the [œ √…†]buttons to scroll around the zoomed picture.3To resume normal playback, press [ZOOM] repeatedly until the X1 (normal picture) appears.Repeat1To repeat the currently playing chapter, press [REPEAT]. REPEAT CHAPTER appears on the TV screen.2To repeat the currently playing title, press [REPEAT] a second time. REPEAT TITLE appears on the TVscreen.3To repeat the whole disc, press [REPEAT] a third time. REPEAT DISC appears on the TV screen.4You can play in other modes like Repeat A-B, Shuffle, Scan by pressing [REPEAT] repeatedly.The Zoom function may not work on some DVDs.PLAYBACKThe Camera Angle icon is displayed on the TV screen when alternate angles are available.Changing the Audio LanguagePress [AUDIO] then press [œ √]repeatedly during playback to hear a different audio language or audio track.SubtitlesPress [SUBTITLE] then press [œ √]repeatedly during playback to select among all available subtitle languages.Camera AngleIf a DVD contains scenes recorded at different camera angles, you can select among these angles duringplayback.Press [ANGLE] then press [œ √]repeatedly during playback to select the desired angle.The number of the current angle appears on the TV screen.You can repeat some section with the start point when ‘Repeat A-‘ displays on the screen. To mark end point, press [A-B]. Press [A-B] again to repeat the section.Slow playback in the reverse mode is not supported.Slow MotionPress [SLOW+] to enter the Slow Motion mode. The default speed is 1/2. When you press [SLOW+] repeatedly,the speed will be 1/4, 1/8 and normal speed. DWL71D1D_RV4000(GB) 04.6.1 1:46 AM 페이지39](https://usermanual.wiki/WINIA-Electronics/7NF0015/User-Guide-428847-Page-40.png)
![40DVD PlaybackSearch 1Press [SEARCH] to display Search menu.2Use [œ √]to move to the Title(T) or Chapter(C) and use […†] to change the title orchapter number.Selecting TitlesWhen a disc has more than one title, you can select another title as follows:1Press [DISPLAY] and use […†] to select the Title icon. Press [ENTER] then a submenu appears. Use […†]to select the title number and press [ENTER] to confirm.Selecting ChaptersWhen a title on a disc has more than one chapter, you can select another chapter as follows:1Press [PREV (§)] or [NEXT (∞)] briefly during playback to select the next chapter or the previous chapter.2To skip directly to any chapter during playback, press [DISPLAY]. Use […†] to select the Chapter icon, thenpress [ENTER] to display a submenu. Use […†] to select the chapter number and press [ENTER] to confirm.Disc MenusMany DVDs contain Disc menus that allow you to access special features. To open a Disc menu, press [MENU].Then use the [0-9] buttons to directly select the desired option, or use the […†] buttons to highlight yourselection and press [ENTER].1Press [MENU]. The Disc menu is displayed.2To exit the Disc menu, press [STOP] or [TV VIEW].Title Menus1Press [TITLE]. If the current title has a menu, the Title menu will appear on the TV screen. Otherwise, theDisc menu may appear.2The Title menu may contain camera angles, spoken languages and subtitle options, as well as the chaptersfor the title.T/ C31…†œ √A-BYou can repeat some section using 2 methods. The first one is described in the ‘Repeat‘. The second one is bypressing [A-B] on the remote controller. 1Press [PLAY/PAUSE] to prepare start point (A) to be repeated. 2Press [A-B] to mark start point.3Press [PLAY/PAUSE] to continue playing.4Press [A-B] to mark end point (B).5Press [A-B] again to start repeating.DWL71D1D_RV4000(GB) 04.6.1 1:46 AM 페이지40](https://usermanual.wiki/WINIA-Electronics/7NF0015/User-Guide-428847-Page-41.png)
![PLAYBACK41Press the VCR button to set the remote control to operate the VCR deck.Turn the TV on and select the video input source connected to the DVD Recorder+VCR.Audio system: Turn the audio system on and select the input source connected to the DVD Recorder+VCR.Before You BeginPreparation:Turn on the TV.Tune the TV to the DVD Recorder+VCR output channel (CH 3 or 4) or select the video input connected to theDVD Recorder+VCR.1Insert a prerecorded video cassette.If the DVD Recorder+VCR is powered off, it will powered up automatically.Make sure the TIMER indicator on the front panel display is not lit. If it is, press [POWER] once.If a tape without a safety tab is inserted, the DVD Recorder+VCR will start playback automatically.2Press [PLAY].PLAY icon appears on the TV screen. It is not necessary to select the tape speed (SP, SLP) for playback. Itwill be automatically selected by the DVD Recorder+VCR.3Press [STOP] to stop playback.STOP icon appears on the TV screen. If the tape reaches the end before [STOP] is pressed, the DVDRecorder+VCR will automatically stop, rewind and eject the tape.Playing a VHS TapeAuto TrackingThe automatic tracking function adjusts the picture to remove snow or streaks. It works in the following cases:• When a tape is played for the first time.• When the tape speed (SP, SLP) changes.• When streaks or snow appear because of scratches on the tape.Manual TrackingIf noise appears on the screen during playback, press either [TRACKING +/-] on the remote control until thenoise on the screen is reduced.• In case of vertical jitter, adjust these controls very carefully.• Tracking is automatically reset to normal when the tape is ejected or the power cord is unplugged for morethan 3 seconds.Tracking ControlVCR PlaybackVCR PlaybackIf the DVD Recorder+VCR is powered up by inserting video cassette, it will not start playback automatically.DWL71D1D_RV4000(GB) 04.6.1 1:46 AM 페이지41](https://usermanual.wiki/WINIA-Electronics/7NF0015/User-Guide-428847-Page-42.png)
![Notes on special playback featuresHorizontal lines (noise bars) will appear on the TV screen. This is normal.The audio is automatically muted during special playback modes, so there is no sound during search, slow motion, etc.During high-speed picture search, a short time is needed to stabilize tape speed when re-entering Play mode. Slightinterference may be observed during this time.Fast Forward/BackwardThis function lets you visually search forward and backward for a desired scene on your tape.1Press [REW] or [FF] during playback.Search mode will be activated.If the DVD Recorder+VCR is left in Search mode for more than 3 minutes, the DVD Recorder+VCR willautomatically enter Play mode to protect the tape and video heads.2To return to normal playback, press [PLAY].Still Picture1Press [PLAY/PAUSE] during playback.A still picture appears on the TV screen.If a still picture vibrates vertically, stabilize it by using [TRACKING +/-] on the remote control.If the DVD Recorder+VCR is left in Still mode for more than 5 minutes, the DVD Recorder+VCR willautomatically enter Stop mode to protect the tape and video heads.2To return to normal playback, press [PLAY].Slow Motion1Press [SLOW+] for Slow Motion playback. 2For Slower speed press [SLOW+] repeatedly and for faster slow mode speed press [SLOW–] repeatedly.Counter Memory FunctionThis is useful if there is a section of tape you want to view immediately after recording or if you want to returnto the same point several times.1Begin recording or playing a tape.2At the point you want to locate later, reset the real-time counter to 0:00:00 by pressing [CLEAR]. Continueto play or record.3Press [STOP] when recording or playback finishes.4You can make the tape automatically stop when the counter returns to about ‘0:00:00‘ by setting thecounter to ‘0:00:00‘ in the ‘Go to Search‘ function of the ‘Setup’ ➝‘Preference’ ➝‘VCR’.Special Playback Features42VCR PlaybackDWL71D1D_RV4000(GB) 04.6.1 1:46 AM 페이지42](https://usermanual.wiki/WINIA-Electronics/7NF0015/User-Guide-428847-Page-43.png)
![PLAYBACK43VCR PlaybackThe DVD Recorder+VCR can play audio CD and MP3 files on CD-ROM, CD-R or CD-RW discs. Before playing MP3 files, read ‘Notes on MP3Recordings‘ at right.1Insert the CD disc and close the tray. The Audio CD or MP3 CD menuappears on the TV screen after detecting the CD. 2Use […†] to select a track or a file then press [PLAY] or [ENTER].During playback, the current track's elapsed playing time will appearon the front panel display and menu. Playback will stop at the end ofthe disc.3While playing Audio CD, use [FF] or [REW] key to fast speed(2x)playback. 4Use [PLAY/PAUSE] to pause the playback while the disc is played.5To stop playback at any time, press [STOP].Audio CD/MP3 PLAYBACK• Press [REPEAT] key to repeat a track(file) and press again to repeat awhole disc.• If the disc contains jpeg files as well as mp3 files, you can change playmode to display jpeg image files by pressing [TITLE] key.On the MP3 CD menu, you can display the folders on the disc. Use […†œ√] to select the folder icon on the MP3 cd menu then press [ENTER] or[PLAY]. Also you can display only tracks in the folders. Use […†œ √] toselect a folder then press [ENTER].••• Audio CD •••••• MP3 •••The DVD Recorder+VCR can display JPEG file and Kodak Picture CD.1Insert the CD disc and close the tray. The JPEG CD or Kodak PictureCD folder tree appears. 2If there are some folders which contain JPEG file (e.x. pictures forKodak Picture CD), select the folder using […†œ √] and press[ENTER] to get in.JPEG / Kodak Picture CD PLAYBACKDWL71D1D_RV4000(GB) 04.6.1 1:46 AM 페이지43](https://usermanual.wiki/WINIA-Electronics/7NF0015/User-Guide-428847-Page-44.png)
![44VCR Playback3Select the thumbnail you want to display using […†œ √] and press[ENTER]. 4The full size image will be displayed and slide show startsautomatically with the time interval of 10 seconds.5Press [NEXT] or [PREV] key to go to the next or previous imageimmediately.6Press [√] (or [œ]) to rotate the image (counter) clockwise.7Press [STOP] to quit the slideshow.• If the disc contains mp3 files as well as jpeg files, you can change playmode to play mp3 files by pressing [TITLE] key. • When a CD contains mp3 files and jpeg files, the default play mode isjpeg image file.You can enjoy slide show while listening the music. 1Prepare a CD which contain mp3 files as well as JPEG files.2Insert the disc and play an mp3 file. 3Press [TITLE] key while playing the mp3 file to change the play mode. Music will not stop.4Find image files and start slideshow by selecting a file and pressing [ENTER].5Slide Show starts and music will not stop. You can enjoy the slide show while listening music.Slide Show while playing mp3 filesDWL71D1D_RV4000(GB) 04.6.1 1:46 AM 페이지44](https://usermanual.wiki/WINIA-Electronics/7NF0015/User-Guide-428847-Page-45.png)
![PLAYBACK RECORDING45Follow the instructions below to record a TV program.1Turn on the DVD Recorder+VCR and load a recordable disc or tape.Make sure your TV input is set to view the DVD Recorder+VCR.2Set the desired Recording mode by pressing [REC MODE] repeatedly.DVD: HQ (High Quality - 1hr/disc), SP (Standard Quality - 2hrs/disc), EP (Extended Play - 4 hrs/disc), SLP(Very Low Quality - 6hrs/disc) VCR: SP (Standard Play), SLP (Super Long Play - 3times SP)3If your DVD Recorder+VCR does not show TV program, press [TV VIEW] on the remote. Use the [CH …/ †] tochange the TV channel you wish to record.4Press [AUDIO] to select the audio channel to record (Stereo, SAP, or Mono).The table below shows what audio channel will be recorded with different settings and different types ofbroadcasts.The last column (Monitor Audio) shows what you will hear during recording. For example, if the TVbroadcast is in Stereo, then setting the DVD Recorder+VCR to Stereo will record the broadcast in Stereo,and the Monitor Audio will also be in Stereo.• If you set the audio channel to SAP, but no SAP channel is broadcast, the main audio (Mono or Stereo) willbe recorded.5Press [REC (●)] once.Recording will start. The REC indicator lights on the front panel display.Recording continues until you press [STOP] or the disc is full.To record for a fixed length of time, see One Touch Record at next page.6Press [STOP (■)] to stop recording.Recording from TVBasic RecordingBasic Recording• The maximum number of DVD titles is 99. If the DVD Recorder+VCR is powered off during DVD recording, therecording will not be saved.• If DVD+RW or unfinalized DVD+R disc is inserted in the tray, no title is played automatically after loading isfinished. • In the case of virgin DVD+R(+RW) disc, it may takes up to 7 minutes for post processing after recording. Broadcast Audio MonitorL Ch R Ch AudioMONO MONO MONO MONO MONOSTEREO L R STEREOLeft L L LeftRight L R RightMONO MONO MONO MONOMONO MONO MONO MONOSAP SAP SAP SAPSTEREO L R STEREOSTEREO+SAP SAP SAP SAP SAPMONO MONO MONO MONOTV BroadcastSTEREOMONO+ SAPSelected AudioDWL71D1D_RV4000(GB) 04.6.1 1:46 AM 페이지45](https://usermanual.wiki/WINIA-Electronics/7NF0015/User-Guide-428847-Page-46.png)
![Total time and recorded time are displayed on the TV screen after pressing [DISPLAY] key twice. And recordedtime is displayed on the front panel display.Checking the Recording Time461Press [PLAY/PAUSE] to pause the disc during recording.2When you want to continue recording, press [PLAY/PAUSE] or [REC (●)].To Pause the RecordingBasic RecordingNote• To quit the One Touch Recording, press [STOP] for 3 seconds.• The DVD Recorder+VCR will automatically power off when the One Touch Recording ends.Tip (VCR mode only)Always use [PLAY/PAUSE] for best results when making changes during recording .For example: To change channels during recording, first press [PLAY/PAUSE] to put the unit in Pause mode. Then selectthe desired channel on the DVD Recorder+VCR, and press [PLAY/PAUSE] again to resume recording.• VCR and DVD cannot be recorded at the same time. • While VCR is under recording, DVD playback is possible. But while DVD is under recording, all the VCR function isdeactivated.One Touch Recording allows you add recording time in fixed increments at the touch of a button.1Follow steps 1-4 under Recording from TV.2Press [REC (●)] repeatedly to set the length of the recording.Recording starts after the first press. Each subsequent press increases the recording time by 15 minutes(DVD, to a maximum of 240 minutes) within the available space or 30 minutes (VCR, to a maximum of 540minutes). The recording time is displayed on the front panel display.One Touch Record (OTR)DWL71D1D_RV4000(GB) 04.6.1 1:46 AM 페이지46](https://usermanual.wiki/WINIA-Electronics/7NF0015/User-Guide-428847-Page-47.png)
![You can copy the contents of a DVD to a VHS tape using the [DVD ➝VCR] button.1Insert a Disc.Insert the disc you wish to copy in the DVD deck and close the disc tray.2Insert a VHS Tape.Insert a blank VHS videotape into the VCR deck.3Select DVD mode by pressing [DVD] on the remote control orpressing [DVD/VCR] on the front panel.4Find the place on the DVD (or Disc) from which you want to startrecording using the [PLAY] and [PAUSE] functions.For best results, pause playback at the point from which youwant to record.5Press [DVD ➝VCR] on the front panel.The Copy to VCR menu appears.6Press [REC SPEED] to select the desired Record Mode: • SP (Standard Play)• SLP (Super Long Play, 3 times SP).7Press [ENTER] to start copying.8Stop the Copy Process To stop copying at any other time, press [STOP]. You must stopthe Copy process manually when the DVD movie ends, or theunit may replay and record over and over again.RECORDING47One Touch Copy - DVD to VHSBasic RecordingIf the DVD you are attempting to copy is copy-protected, you will not be able to copy the disc. It is not permitted tocopy Macrovision encoded DVDs. ‘Copy-protected. Cannot record.‘ is displayed on the TV screen.Copy to TapeChoose speed thenpress COPY:SLPSPDVD Status■Stop – : – – : – –RecordPreparing the disc for recording...Please wait a moment...InstructionsSetup-ExitRecordStopping the recording & updatingthe disc. This may take a fewminutes. Please wait...InstructionsSetup-Exit00:00:32 02:03:27DWL71D1D_RV4000(GB) 04.6.1 1:46 AM 페이지47](https://usermanual.wiki/WINIA-Electronics/7NF0015/User-Guide-428847-Page-48.png)
![48Basic RecordingYou can copy the contents of a VHS tape to a DVD+R or DVD+RW using the [VCR ➝DVD] button. This allowsyou to archive your old VHS tapes to DVD.1Insert a VHS Tape.Insert the VHS videotape you wish to copy into the VCR deck.2Insert a DVD+R or DVD+RW disc.Insert a blank DVD+R or DVD+RW disc in the DVD deck and close the disc tray.3Select VCR mode by pressing [VCR] on the remote control orpressing [DVD/VCR] on the front panel.4Find the place on the VHS tape from which you want to startrecording using the [PLAY], [FF], [REW] and [PAUSE] functions.For best results, pause playback at the point from which youwant to record.5Press [VCR ➝DVD] on the front panel.The Copy to DVD menu appears.6Press [REC SPEED] to select the desired Record Mode:• HQ (High Quality, 1 hr/disc)• SP (Standard Quality, 2 hrs/disc)• EP (Extended Play, 4 hrs/disc)• SLP (Very Low Quality, 6 hrs/disc)7Press [ENTER] to start copying.8Stop the Copy ProcessTo stop copying at any other time, press [STOP].Copying will stop automatically when the VHS tape ends.One Touch Copy - VHS to DVDIf the VHS videotape you are attempting to copy is copy-protected, you will not be able to copy the tape. It is notpermitted to copy Macrovision encoded tapes.When using a DVD+RW disc, you must initialize before copying; seepage 52.Copy to DiscChoose quality thenpress COPY:HQSPEPSLPDVD Status■Stop 0 : 00 : 10Copy to DiscStopping the copy & updatingthe disc. This may take a fewminutes. Please wait...InstructionsSetup-Exit00:00:32 02:03:27DVD COPY00:00:32 02:03:27TAPE COPYDWL71D1D_RV4000(GB) 04.6.1 1:46 AM 페이지48](https://usermanual.wiki/WINIA-Electronics/7NF0015/User-Guide-428847-Page-49.png)
![RECORDING49The Timer Recording function allows you to record up to 8 programs within a period of one month.1Insert recordable media such as DVD+R ,DVD+RW, recordable VHS tape.2Press [TIMER].The ‘Timer Recording’ menu appears.Use […†] to move to a timer recording slot, and press [ENTER] to modify it.If you did not set the clock of DVD Recorder+VCR, set the clock at first to dotimer recording.• Media - Choose desired media between DVD and VHS using […†].• Ch. – Choose the desired channel, or one of the external inputs from whichto record.• Date – Choose a date up to 1 month in advance, or select a daily or weeklyprogram.• Start Time – Set the recording start time.• End Time – Set the recording end time.• Mode – Choose a Record mode.DVD: HQ, SP, SLP or EPVCR: SP, SLP3Enter the necessary information for your Timer Recording(s).• œ √– Moves the cursor left/right• …† – Changes the setting at the current cursor position• Press [SETUP] to exit the Timer Record menu.• Press [ENTER] after filling in all the program information.• Press [TIMER] to display the Timer Record List.4Press [ENTER] to save the program.The Timer Record List will appear.5Press [SETUP] to exit the Timer Record List.6Timer indicator will light or blinking. Power Off the DVD Recorder+VCR to startthe Timer Recording.Note• The Timer indicator lights on the front panel display when the DVD Recorder+VCR is ready for the Timer Recordingand powered off.• If the Disc and Tape indicator are blinking, if any of the following meets.– The DVD Recorder+VCR is not powered off.– No recordable disc or tape is inserted.• The DVD Recorder+VCR will record the audio according to the current TV tuner setting (Stereo, Mono or SAP). Usethe [AUDIO] button to set the audio before switching the DVD Recorder+VCR to Standby mode.• The DVD Recorder+VCR will automatically power off when the Timer Recording ends.• There is a short delay when a timer recording finishes to confirm the recorded program. If two timer recordingsare set to record sequentially (one right after the other), the very beginning of the later program may not berecorded.Timer RecordingTimer RecordingTimer RecordingCH No. Date Start End Mode---- --/-- --:-- --:-- ------- --/-- --:-- --:-- ------- --/-- --:-- --:-- ------- --/-- --:-- --:-- ------- --/-- --:-- --:-- ------- --/-- --:-- --:-- ------- --/-- --:-- --:-- ------- --/-- --:-- --:-- ---InstructionsEnter-Edit Setup-Exit Move …†Edit TimerMediaCH No. CH-03Date Jan/02 SunStart 01:36 AMEnd 02:36 AMMode HQRepeat OnceDeleteInstructionsEnter-Save Setup-ExitTimer RecordingCH No. Date Start End ModeCH03 01/0201:36AM 02:36AMHQ---- --/-- --:-- --:-- ------- --/-- --:-- --:-- ------- --/-- --:-- --:-- ------- --/-- --:-- --:-- ------- --/-- --:-- --:-- ------- --/-- --:-- --:-- ------- --/-- --:-- --:-- ---InstructionsEnter-Edit Setup-Exit Move …†DWL71D1D_RV4000(GB) 04.6.1 1:46 AM 페이지49](https://usermanual.wiki/WINIA-Electronics/7NF0015/User-Guide-428847-Page-50.png)
![50Timer RecordingEven if a Timer Recording is set, the DVD Recorder+VCR will not record if:• No disc is loaded.• A non-recordable disc is loaded.• DISC Lock is set to ON in the DISC Settings menu; see page 53.• There are already 99 titles recorded on the disc.You cannot enter a Timer Recording if:• The DVD Recorder+VCR is powered on.• A recording is already under way.• The start time has already passed.• Eight Timer Recordings have already been set.If two or more Timer Recordings overlap:• The earlier program takes priority.• When the earlier program finishes, the later program starts.• If two programs are set to start at exactly the same time, the program entered first takes priority.Confirmation is not possible when:• The DISC Protect setting is set to ON.• There are already 99 titles recorded on the disc.If the disc is damaged, the recording may not complete successfully, even if the Check field shows ‘Rec. OK‘.Timer Recording TroubleshootingYou can clear a Timer Recording any time before the recording actually starts.• Use […†] to select the program you want to erase on the Timer Recorder List, then press [ENTER] tomodify it. Use […†] to select 'Delete' then press [ENTER].Canceling a Timer RecordingAfter a Timer Recording has started, you can still cancel the program by pressing [STOP] for 3 seconds.Stopping a Timer Recording in ProgressDWL71D1D_RV4000(GB) 04.6.1 1:46 AM 페이지50](https://usermanual.wiki/WINIA-Electronics/7NF0015/User-Guide-428847-Page-51.png)
![RECORDING51You can record from an external component, such as a camcorder or VCR, connected to any of the DVDRecorder+VCR’s external inputs.1Make sure the component you want to record from is connected properly to the DVD Recorder+VCR; see pages15 and 18.2Use [ …†] to select the external input to record from.• Tuner: Built-in tuner• LINE1 : Audio/Video or S-Video Input on front panel• LINE2 : Audio/Video Input on back panel 3Load a recordable disc or tape.4Set the desired Recording mode by pressing [REC MODE] repeatedly.DVD: SP (Standard Quality - 2hrs/disc), EP (Extended Play - 4 hrs/disc, HQ (High Quality - 1hr/disc), SLP(Very Low Quality - 6hrs/disc)VCR: SP (Standard Play), SLP (Super Long Play -3times SP)5Press [REC (●)] once.Recording will start. The REC indicator lights on the front panel display.Recording continues until you press [STOP] or the disc is full.To record for a fixed length of time, see ‘One Touch Record‘ on page 46.6Press [STOP (■)] to stop recording.Recording from External ComponentsNoteIf your source is copy-protected, you will not be able to record it using the DVD Recorder+VCR. See ‘Copyright Notice‘on page 7 for more details.Recording from an External InputRecording from an External InputDWL71D1D_RV4000(GB) 04.6.1 1:46 AM 페이지51](https://usermanual.wiki/WINIA-Electronics/7NF0015/User-Guide-428847-Page-52.png)
![For recordable DVD media, such as DVD+R and DVD+RW, you can manage the disc using Disc Menu.Disc menu for DVD+R let you finalize or rename the disc. For DVD+RW you can erase, lock (unlock) and makethe disc compatible.Information / Erase the disc (DVD+RW)1Press [MENU] to go to disc menu mode.2In the DVD disc menu mode, press […] to move to the disc top menu.3Press [√] then Disc Menu appears.4Disc Menu shows you the disc information like disc type, number ofrecordings, total title, free space, etc.5Use [œ/√] to select ‘Erase the disc’ menu.6If you want to erase the whole disc, press [ENTER].7For confirmation, select Yes or No for erasing. If you select ‘Yes’ and press[ENTER], all the contents in the disc will be lost.52• If you load a blank DVD+R(+RW) disc, it will be initialized.• If you press [REC] while initialization is under process, Disc preparing message will appear and you shouldwait for some seconds.• If you load a DVD+RW that has already been used you can record a program immediately. DISC InitializeDisc MenuInformationType DVD+RWRecordings 5Total Title 00:57:57Free Space 01:48:48Finalized -Locked NoCompatible YesInstructionsSetup-ExitErase the discErase the disc?All recordings will be lost.YesNoInstructionsEnter-Confirm Move …†EditingEditingDVD+R disc cannot be locked (unlocked) or erased.Erase the discPress [Enter] if you wantto erase the disc. Allexisting recordings willbe cleared.InstructionsEnter-ConfirmDWL71D1D_RV4000(GB) 04.6.1 1:46 AM 페이지52](https://usermanual.wiki/WINIA-Electronics/7NF0015/User-Guide-428847-Page-53.png)
![EDITING53EditingLock/Unlock Disc (DVD+RW)If you want to prevent a disc from accidental recording, editing or erasing, you can lock the disc. If you can alsomake the disc unlock.1Use […] to go to top menu.2Press [√] to display Disc Information Menu.3Use [œ/√] to select ‘Lock/Unlock Disc’.4Press [ENTER] as described on the screen.5You can see the current disc status (Locked or Unlocked).6You can change the disc status by selecting ‘Yes’ and pressing [ENTER].7Changing Disc Status bar will appear. This process takes some seconds.8After the process ends the menu disappears automatically.Lock/Unlock DiscPress [Enter] to lock thedisc. This prevents futuredisc operations orrecordings.InstructionsEnter-ConfirmLock/Unlock DiscDisc is unlocked.Do you want to lock it?YesNoInstructionsEnter-Confirm Move …†Lock/Unlock DiscChanging disc lock status.Please wait a moment....DWL71D1D_RV4000(GB) 04.6.1 1:46 AM 페이지53](https://usermanual.wiki/WINIA-Electronics/7NF0015/User-Guide-428847-Page-54.png)
![54EditingOnce you have finalized a DVD+R disc, you cannot edit or record anything else on that disc.• ‘Finalize (Make Compatible)’ can take up to 3-4 minutes depending on the type of disc, how much is recorded onthe disc, and the number of titles on the disc.• A DVD+RW disc edited in the DVD Recorder+VCR will seem not edited if you do not 'make compatible'. Finalize (Make Compatible)Finalizing a DVD+R ‘locks’ its recordings in place so the disc can be played on most standard DVD players orcomputers equipped with DVD-ROM drives.'Make Compatible' for a DVD+RW will automatically create a menu screen for navigating the disc. This menuscreen is accessible by pressing [DISC MENU] or [TITLE].1Use […] to go to top menu.2Press [√] to display Disc Information Menu.3Press [√] and select ‘Finalize’ (‘Make Compatible’ forDVD+RW).4Press [ENTER] as described on the screen.5Select 'Yes' using […] and press [ENTER] to finalize the disc(make the disc compatible in the case of DVD+RW).6Press [ENTER] again.7Press [SETUP] to go to the top disc menu. Make CompatiblePress [Enter] to make anyprevious title editingcompatible with your DVDplayer.InstructionsEnter-ConfirmMake CompatibleMake disc compatible withyour DVD player.YesNoInstructionsEnter-Confirm Move …†Make CompatibleFinished.This Disc should alreadybe compatible.okInstructionsEnter-Confirm Move …†Finalize Press [Enter] to make anyprevious title editingcompatible with your DVDplayer.InstructionsEnter-ConfirmFinalizeMake disc compatible withyour DVD player.YesNoInstructionsEnter-Confirm Move …†FinalizeFinished.This Disc should alreadybe compatible.okInstructionsEnter-Confirm Move …†••• DVD+R disc ••• ••• DVD+RW disc •••DWL71D1D_RV4000(GB) 04.6.1 1:46 AM 페이지54](https://usermanual.wiki/WINIA-Electronics/7NF0015/User-Guide-428847-Page-55.png)
![EDITING55EditingChange Disc NameThe default disc name is MY DVD. You can change the name to what you want.1Use […] to go to top menu.2Press [√] to display Disc Information Menu.3Press [√] and ‘Change Disc Name’.4Press [ENTER] as described on the screen.5You can see Keyboard Menu.6Use [œ √…†]to select and press [ENTER] to change the name of the disc.CLR : Clear the disc nameSP : SpaceDEL : Delete a characterSAVE : Save the disc name7Press [ENTER] again.8To save the name of the disc, select ‘SAVE’ and press [ENTER].Change Disc NameProblem.This disc is locked. Itcannot be renamed.okInstructionsEnter-Confirm Move …†Change Disc NameMY DVDCLR SP DEL SAVE123 4 5 6 7 8 90ABC D E F G H I JKLMNOPQRSTUVWXYZ().,:;&Enter-Confirm Move …†Change Disc NamePress [Enter] to change the disc name.InstructionsEnter-ConfirmDWL71D1D_RV4000(GB) 04.6.1 1:46 AM 페이지55](https://usermanual.wiki/WINIA-Electronics/7NF0015/User-Guide-428847-Page-56.png)
![For the titles recorded in a DVD+R ,RW media, you can manage them using title menu.Play A titleFor the recorded title you can play the title using title menu. 1Press [MENU] to display disc menu.2Select a title you want to manage using […†].3Press [√] to display title menu.4Select ‘Play a title’ using [œ √] .5Press [ENTER] to play the title.Erase Title1Follow the sequences from 1 to 3 of the ‘Play a title‘.2Select ‘Erase Title‘ using [œ √].3Press [ENTER] to erase the title.4Select 'Yes' and press [ENTER] to confirm.5Erase progress bar will be displayed. It may takes several seconds.6After erasing is completed, the erased title remains as empty title.Title Menu56EditingYou can erase a title only for DVD+RW.Play Title Press [Enter] to beginplayback of title.InstructionsEnter-ConfirmErase Title Press [Enter] to erasethis title.InstructionsEnter-ConfirmErase TitleWould you like to Erasethe title?YesNoInstructionsEnter-Confirm Move …†Erase TitleTitle is being erased.Please wait a moment...DWL71D1D_RV4000(GB) 04.6.1 1:46 AM 페이지56](https://usermanual.wiki/WINIA-Electronics/7NF0015/User-Guide-428847-Page-57.png)
![EDITING57Change Name1Follow the sequences from 1 to 3 of the ‘Play a title‘.2Select ‘Change Name’ using [œ √] .3Press [ENTER] to change the title name.4Key matrix will be displayed. Use [œ √…†] to select a character orfunction and press [ENTER].CLR : Clear the whole title.SP : Make a spaceDEL : Delete a characterSAVE : Save the title name5After new title name is completed, select ‘SAVE’ and press [ENTER].Record Option1Follow the sequences from 1 to 3 of the ‘Play a title‘. 2Select ‘Record Options’ using [œ √] and press [ENTER].3According to the Disc Type (DVD+R, DVD+RW) and whether the title isblank or not, 'append', 'overwrite' or 'make a new title' is supported.Select the preferred item and press [ENTER]. For DVD+R The last recorded title : You can make new recording appended to thelast or as a new title.Others : You can record a new title to the end of thedisc.For DVD+RWThe last blank title : You can record a new title to the end of the disc.The last recorded title : You can overwrite the title then stop. You can overwrite the title and record plus remaining disc.You can append to the title.Others : Overwrite the title then stop Overwrite the title and record plus remaining disc.EditingChange NamePress [Enter] to changethe title name.InstructionsEnter-ConfirmRecord OptionsPress [Enter] to selecta method for overwritingthis title.InstructionsEnter-ConfirmChange NameTITLECLR SP DEL SAVE123 4 5 6 7 8 90ABC D E F G H I JKLMNOPQR STUVWX Y Z ( ) . ,:;&Enter-Confirm Move …†Record OptionsOverwrite this titlethen stopplus remaining discInstructionsEnter-Confirm Move …†DWL71D1D_RV4000(GB) 04.6.1 1:46 AM 페이지57](https://usermanual.wiki/WINIA-Electronics/7NF0015/User-Guide-428847-Page-58.png)
![58When you insert a DVD+R or DVD+RW disc already recorded by your DVD Recorder+VCR, you can edit titles andchapters.To edit the recorded title, press [EDIT] with any title selected when disc menu is displayed. The selected title will be played automatically by [EDIT] key.Titles and ChaptersWhen you insert a DVD+R or DVD+RW disc already recorded by your DVD Recorder+VCR, all the titles withinthat disc appear. If there are some chapters you can skip to the next or previous chapter by pressing [NEXT] or[PREV].You can also see how many chapters exist in a title by pressing [DISPLAY] during playback.Titles in the disc’s content contain one or more chapters. When you insert an title, all the chapters within thattitle also appear.In other words, titles in the Playlist behave exactly as chapters on a DVD disc.Title You can search a title by selecting ‘Title’ menu.1Use […†] to select title.2Press [ENTER] then sub menu appears. 3Use […†] to change the title number then press [ENTER].ChapterYou can search a chapter by selecting ‘Chapter’ menu.1Use […†] to select Chapter.2Press [ENTER] then sub menu appears. 3Use […†] to change the chapter number then press [ENTER].Edit MarkersYou can add a chapter marker anywhere in a title during playback.Once the chapter is marked, you can use the chapter search feature.You can Add/Delete a chapter marker or delete all chapter markers in a title. You can insert up to 999 chapter markers in both the contents.1Use […†] to select ‘Edit Markers’.2Press [ENTER] then sub menu appears. 3Use […†] to select various chapter marker mode.4Press [ENTER] to confirm.EditingEditingDVD EditTitle 1 of 2Chapter 1 of 11Edit MarkersUnhide ChapterChange Index PictureSplit TitleInstructionsEnter-Confirm Setup-ExitMove …†Select Title1 of 2…†DVD EditTitle 1 of 2Chapter 1 of 11Edit MarkersUnhide ChapterChange Index PictureSplit TitleInstructionsEnter-Confirm Setup-ExitMove …†Select Chapter1 of 11…†DVD EditTitle 1 of 2Chapter 1 of 11Edit MarkersUnhide ChapterChange Index PictureSplit TitleInstructionsEnter-Confirm Setup-ExitMove …†Choose the editFunctionAddDeleteDelete AllAfter editing is completed, DVD+RW disc is not compatible to the DVD player. Do 'make compatible' to make editioneffective.DWL71D1D_RV4000(GB) 04.6.1 1:46 AM 페이지58](https://usermanual.wiki/WINIA-Electronics/7NF0015/User-Guide-428847-Page-59.png)
![EDITING59Unhide ChaptersThis hide or unhide a chapter. After hiding a chapter, the chapter is not deletedbut only hided. If a chapter is hided then it shows "Unhide chapter" and viceversa.Change Index PictureEach title displayed in the Playlist menu is represented by a thumbnail picturetaken from the start of that title or chapter. If you prefer, select a different stillpicture from within a title.1Use […†] to select ‘Change Index Picture’.2Press [ENTER] then sub menu appears. 3Use […†] to select ‘Yes’ if you prefer.4Press [ENTER] when the preferred picture is on the TV screen.Split TitleThis splits a title into two titles. 1Use […†] to select 'Split Title'.2Press [ENTER] then a sub menu appears.3Use […†] to select 'Yes' if you prefer.4Press [ENTER] to confirm. It may takes a few minutes to split a title.EditingDVD EditTitle 1 of 2Chapter 1 of 11Edit MarkersUnhide ChapterChange Index PictureSplit TitleInstructionsEnter-Confirm Setup-ExitMove …†DVD EditTitle 1 of 2Chapter 1 of 11Edit MarkersUnhide ChapterChange Index PictureSplit TitleInstructionsEnter-Confirm Setup-ExitMove …†Change PictureAre you sure?YesNoDVD EditTitle 1 of 2Chapter 1 of 11Edit MarkersUnhide ChapterChange Index PictureSplit TitleInstructionsEnter-Confirm Setup-ExitMove …†Split the titlein two?YesNoSplit TitleSplitting title into 2 titles.Please wait a moment....InstructionsSetup-ExitDWL71D1D_RV4000(GB) 04.6.1 1:46 AM 페이지59](https://usermanual.wiki/WINIA-Electronics/7NF0015/User-Guide-428847-Page-60.png)
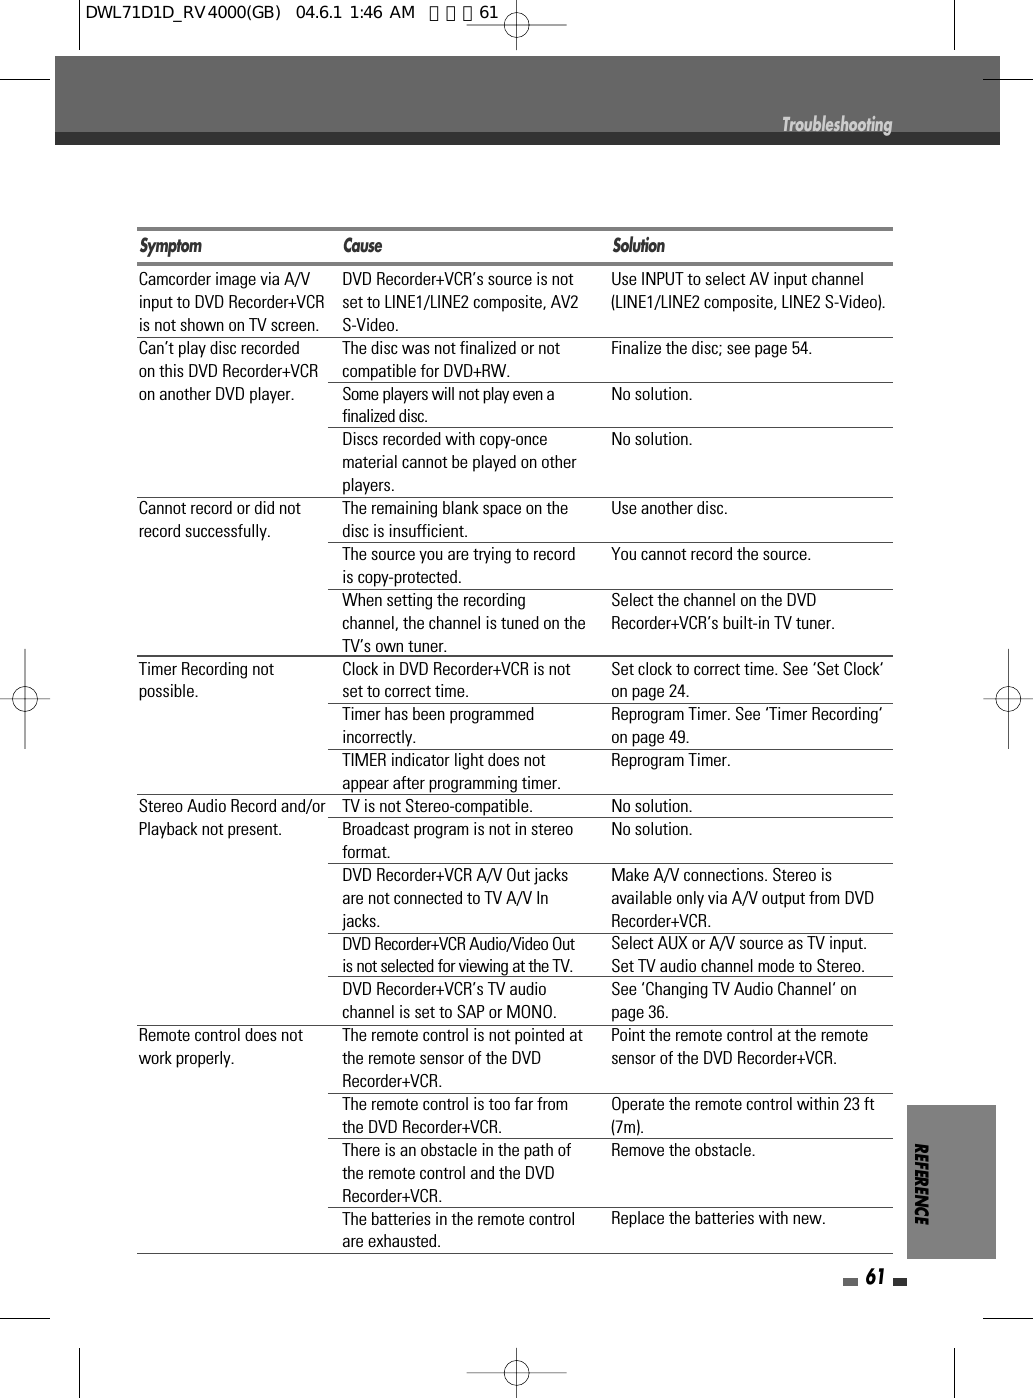
![60Check the following guide for the possible cause of a problem before contacting customer support.No power.No picture.No sound.Playback picture is poor.DVD Recorder+VCR doesnot start playback.Picture from external inputis distorted.Some channels are skippedover when using [CH…†].Picture or sound ofbroadcasting channel isweak or missing.Camcorder image not shown.The power cord is disconnected.The TV is not set to receive DVDRecorder+VCR signal output.The video cable is not connectedsecurely.The TV power is turned off.The equipment connected with theaudio cable is not set to receiveDVD Recorder+VCR signal output.The audio cables are not connectedsecurely.The power of the equipmentconnected with the audio cable isturned off.The audio connecting cord isdamaged.The disc is dirty.Tape heads are dirty.Tape is a rental or was recorded onanother VCR.No disc is inserted.No tape is inserted.An unplayable disc is inserted.The disc is placed upside down.The disc is not placed within theguide.The disc is dirty.The Movie Rating level is set.The video signal from the externalcomponent is copy-protected.The skipped channels were deletedwith the CH. Add/Del feature.Antenna or cables are loose.Wrong Tuning Band is selected inthe DVD Recorder+VCR Setup menu.Camcorder is off.Plug the power cord into the wall outletsecurely.Select the appropriate video input on theTV so the picture from the DVDRecorder+VCR appears on the TV screen.Connect the video cable securely.Turn on the TV.Select the correct input mode on theaudio receiver so you can listen to thesound from the DVD Recorder+VCR.Connect the audio cable securely.Turn on the equipment connected withthe audio cable.Replace it with a new one.Clean the disc.Clean video heads.Use [Tracking +/–] for manual trackingadjustment while tape is playing.Insert a disc or tape. (Check that the discindicator on the front panel display is lit.)Insert a playable disc. (Check the disctype, color system, and regional code.)Place the disc with the playback sidedown.Place the disc on the disc tray correctlyinside the guide.Clean the disc.Cancel the Movie Rating function orchange the rating level.You cannot connect via the DVDRecorder+VCR. Connect the componentdirectly to your TV.Use the CH. Add/Del feature to restorechannels. See ‘Add/Remove Channels‘ onpage 23.Tighten connections or replace cable.Try all ‘Tuning Band‘ options; see page20 for details.Turn camcorder on and operate properly.TroubleshootingTroubleshootingSymptom Cause SolutionDWL71D1D_RV4000(GB) 04.6.1 1:46 AM 페이지60](https://usermanual.wiki/WINIA-Electronics/7NF0015/User-Guide-428847-Page-61.png)