WINIA Electronics 7NFCMC715B 17" Color Monitor User Manual 715B EN
Dongbu Daewoo Electronics Corporation 17" Color Monitor 715B EN
Users Manual

COLOR MONITOR
Model No : 715B
USER’S GUIDE
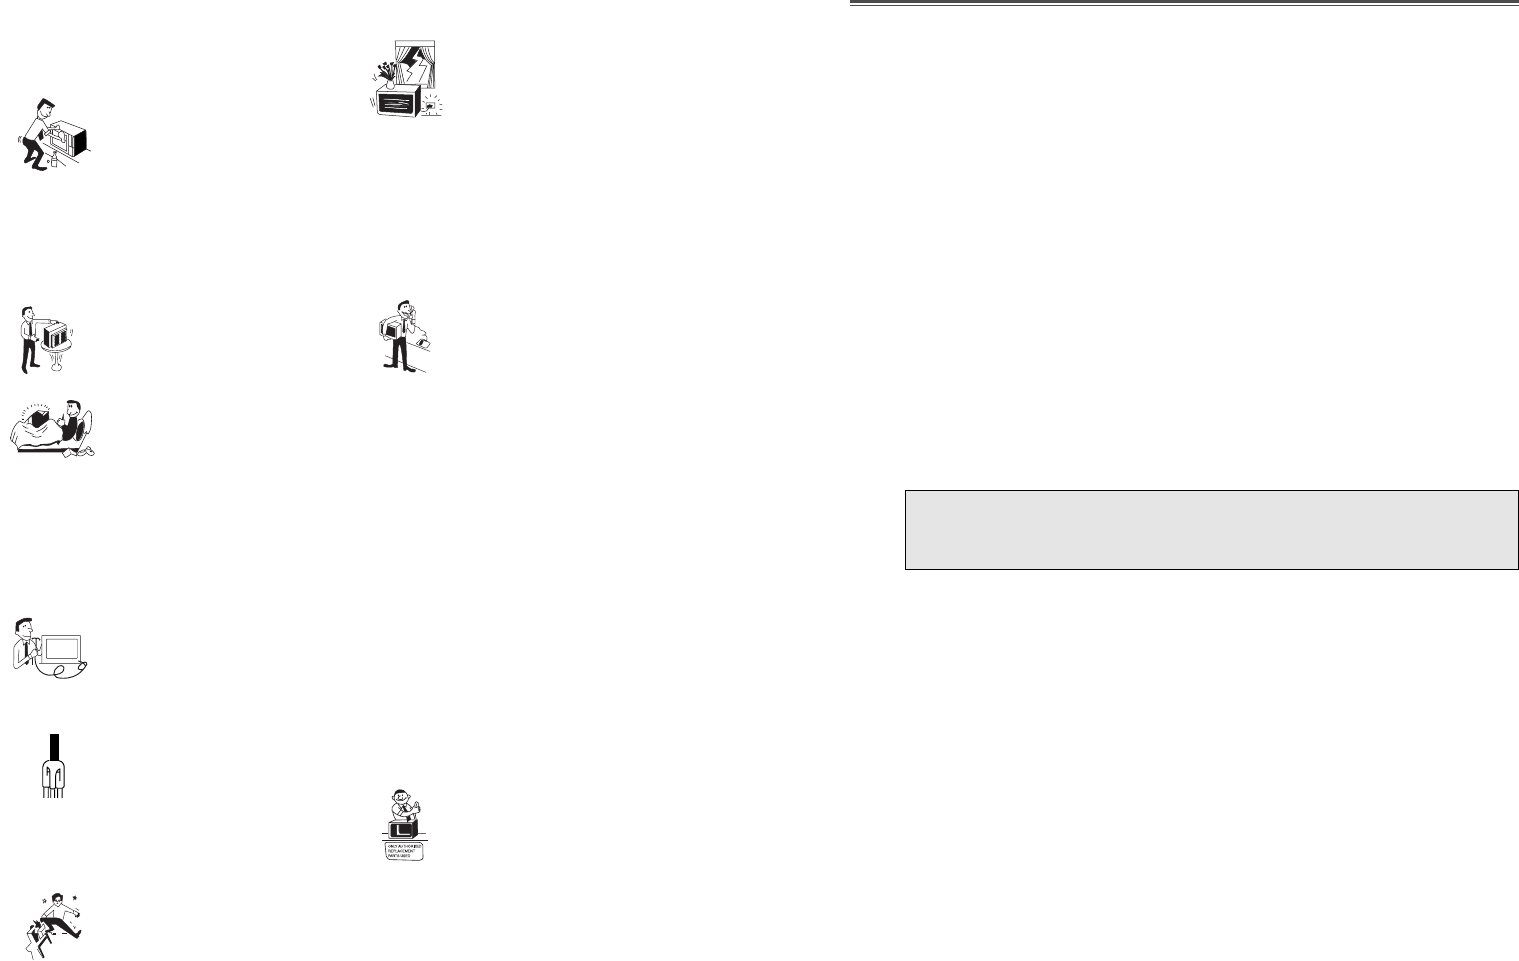
1. Read all of these instructions.
2. Save these instructions for later use.
3. Unplug this monitor from the
wall outlet before cleaning. Do not
use liquid cleaners or aerosol
cleaners. Use a damp cloth for
cleaning.
4. Do not use attachments not recommended by
the monitor manufacturer as they may cause
hazards.
5. Do not use this monitor near water, e.g., near a
bathtub, washbowl, kitchen sink, or laundry tub,
in a wet basement, or near a swimming pool, etc.
6. Do not place this monitor on an
unstable cart, stand, or table. The
monitor may fall, causing serious
injury to a child or adult, and
serious damage to the appliance.
7. Slots and openings in the
cabinet and the back or bottom are
provided for ventilation, to ensure
reliable operation of the monitor,
and to protect it from overheating.
These openings must not be blocked or covered.
The openings should never be blocked by
placing the monitor on a bed, sofa, rug, or other
similar surface. This monitor should never be
placed near or over a radiator or heat register.
This monitor should not be placed in a built-in
installation such as a bookcase unless proper
ventilation is provided.
8. This monitor should be operated
only from the type of power source
indicated on the marking label. If
you are not sure of the power
supplied to your home, consult
your monitor dealer or local power company.
9. This monitor is equipped with a
3-wire grounding-type plug, That
is, a plug having a third
(grounding) pin. This plug will
only fit into a grounding-type
power outlet. This is a safety feature. If you are
unable to insert the plug into the outlet, contact
your electrician to replace your obsolete outlet.
Do not defeat the purpose of the grounding-type
plug.
10. Do not allow anything to rest
on the power cord. Do not locate
this monitor where the cord will be
abused by people walking on it.
11. Follow all warnings and instructions marked
on the monitor.
IMPORTANT SAFEGUARDS
12. For added protection for this
monitor during a lightning storm,
or when it is left unattended and
unused for long periods of time,
unplug it from the wall outlet. This
will prevent damage to the monitor and/or the
computer due to lightning and power line surges.
13. Do not overload wall outlets and extension
cords as this can result in fire or electric shock.
14. Never push objects of any kind into this
monitor through cabinet slots, as they may touch
dangerous voltage points or short out parts that
could result in a fire or electric shock. Never spill
liquid of any kind on the monitor.
15. Do not attempt to service this
monitor yourself, as opening or
removing covers may expose you
to dangerous voltages or other
hazards. Refer all servicing to
qualified service personnel.
16. Unplug this monitor from the wall outlet and
refer servicing to qualified service personnel
under the following conditions:
a. When the power cord or plug is damaged or
frayed.
b. If liquid has been spilled into the monitor.
c. If the monitor has been exposed to rain or
water.
d. If the monitor does not operate normally by
following the operating instructions. Adjust only
those controls that are covered by the operating
instructions, as improper adjustment of other
controls may result in damage and will often
require extensive work by a qualified technician
to restore normal operation.
e. If the monitor has been dropped or the cabinet
has been damaged.
f. When the monitor exhibits a distinct change in
performance, this indicates a need for service.
17. When replacement parts are
required be sure the service
technician has used replacement
parts specified by the manufacturer
that have the same characteristics as
the original part. Unauthorized substitutions
may result in fire, electric shock, or other
hazards.
18. Upon completion of any service or repairs to
this monitor, ask the service technician to
perform routine safety checks to determine that
the monitor is safe to operate.
FEDERAL COMMUNICATIONS COMMISSION
RADIO FREQUENCY INTERFERENCE STATEMENT
NOTE : This equipment has been tested and found to comply with the limits
for a Class B digital device, pursuant to Part 15 of the FCC Rules. These
limits are designed to provide reasonable protection against harmful
interference in a residential installation. This equipment generates, uses and
can radiate radio frequency energy and, if not installed and used in
accordance with the instructions, may cuase harmful interference to radio
communications. However, there is no guarantee that interference will not
occur in a particular installation. If this equipment does cause harmful
interference to radio or television reception, which can be determined by
turning the equipment off and on, the user is encouraged to try to correct the
interference by one or more of the following measures :
- Reorient or relocate the receiving antenna.
- Increase the separation between the equipment and receiver.
- Connect the equipment to an outlet on a circuit different from that to
which the receiver is connected.
- Consult the dealer or an experienced radio or TV technician for help.
CAUTION : Any changes or modifications not expressly approved by the
party responsible for compliance could void the userÕs authority
to operate the equipment.
CANADIAN DEPARTMENT OF COMMUNICATIONS
COMPLIANCE STATEMENT
This digital apparatus does not exceed the Class A/Class B (whichever is
applicable) limits for radio noise emissions from digital apparatus set out in
the Radio Interference Regulations of the Canadian Department of
Communications.
Avis de conformitŽ aux normes du Minist•re des Communications du
Canada.
Le present appareil numŽrique nÕemet pas de bruits radioŽlectriques
depassant les limites applicables aux appareils numŽriques de Class A/de
Class B (selon le cas) prescrites dans le r•glement sur le brouillage
radioŽlectrique Ždicte par le minist•re des communications du Canada.

DECLARATION OF CONFORMITY
We, Manufacturer / Importer
DAEWOO ELECTRONICS CO., Ltd
541, 5-Ga, Namdaemoon-Ro, Jung-Gu
Seoul, Korea
declare under our sole responsibility that the product,
Color Display monitor
715B
to which this declaration relates is in conformity with
the following standard(s) or other normative document(s)
Safety : EN60950/1992/A1:1993/A2:1993
A3:1995/A4:1997
EMC : EN 55022/8.1994, EN 50082-1/1992
EN 60555 Part 2, 3/1987
following the provisions of 89/336 EEC-EMC Directive
and the provisions of 73/23 EEC-Low Voltage Directive.
Handed over by : S.Lee, Managing Director.
Display Business Division
Oct., 1999 Seoul Signature:
S.Lee, Managing Director.
Display Business Division.
DAEWOO ELECTRONICS Co., Ltd
WICHTIGE INFORMATIONEN
Bitte lesen Sie alle diese Informationen, bevor Sie das GerŠt in Betrieb
nehmen! Lesen Sie sich au§erdem die Bedienungsanleitung komplett
und sorgfŠltig durch, da nur in diesem Fall eine problemlose
Inbetriebnahme erwartet werden kann.
¥Achten Sie darauf, da§ das GerŠt nur in eine 230V Schuko-
Steckdose eingesteckt wird.
¥Die Steckdose sollte jederzeit frei zugŠnglich sein um bei einem
evtl. auftretenden Notfall das GerŠt schnell vom Netz zu trennen.
¥Achten Sie desweiteren darauf, da§ die Netzanschlu§leitung nicht
mechanisch beansprucht oder sonstwie beschŠdigt wird.
¥Offnen Sie das GerŠt niemals! Im Inneren befinden sich Teile mit
gefŠhrlicher Spannung.
¥Bevor Sie das GerŠt reinigen, ziehen Sie bitte den Netzstecker aus
der Steckdose. SŠubern Sie dann das GerŠt mit einem feuchten
(keinesfalls tropfnassen) Lappen.
¥Die in diesem GerŠt entstehende Ršntgenstrahlung ist ausreichend
abgeschirmt (Ortsdosisleistung in 0.1m Abstand weniger als 1.0µ
Sv/h). Beschleunigungsspannung maximal 29kV.
¥Stellen Sie das GerŠt an einem ergonomisch gŸnstigen Ort auf und
sorgen Sie dafŸr, da§ der Monitor mit nach GS-VW-SG7 geprŸfter
Peripherie betrieben wird, da nur unter diesen UmstŠnden ein
optimaler ergonomischer Betrieb des GerŠtes sichergestellt ist.
Falls Sie dennoch Fragen haben, auf die die Bedienungsanleitung keine
hinreichende Antwort geben kann, so kontaktieren Sie bitte den
nŠchsten FachhŠndler.
MaschinenlŠrminformationsverordnung 3. GSGV, 18.01 1991:
Der arbeitsplatzbezogene Schalldruckpegel betrŠgt 70 dB (A) oder
wenigergemŠ§ ISO 7779.
Emission Characteristics Tested by SEMKO
A sample of this type has been tested and has shown compliance with
theguidelines in the swedish document MPR II.
This product is also designed for IT power system with phase to phase
voltage of 230V.
The power cord is used as a main disconnect device. Disconnect the
power cord before servicing. The outlet must be installed near the
monitor and must be easily accessible.
As an ENERGY STAR Partner, Daewoo Electronics Co., Ltd. has
determined that this product meets the Energy Star guidelines for
energy efficiency.
The appliance is not intended for use by young children or infirm
persons without supervision ;
Young children should be supervised to ensure that they do not play
with the appliance.

This manual explains how to correctly install, operate and get the
best performance from your monitor. Please read this userÕs
guide carefully before installing your monitor, then keep it near
your monitor for quick reference.
First, please check that the contents of the box corresponds with
the following checklist :
¥Color monitor
¥Power cord
¥UserÕs guide
¥Tilt/swivel stand
¥Warranty card (Optional)
If there is any item missing or damaged, please contact your
dealer. Please keep the box and packing materials so that you
may properly store or transport your monitor.
English - 1
CONTENTS INTRODUCTION
Introduction ............................................................................. 1
Product Features ................................................................. 2
Setup ......................................................................................... 3
Installing the Tilt/Swivel Stand ......................................... 3
Connecting the Signal Cable and Power Cord..................... 4
Power Management System ............................................... 5
DDC for Plug & Play ......................................................... 5
Operation & Adjustment ...................................................... 6
Specifications ......................................................................... 12
Factory Preset Timings ......................................................... 12
Troubleshooting ..................................................................... 13
Appendix
Description for D-sub Connector
English - 3
PRODUCT FEATURES
¥The convenient and user-friendly on-screen display allows for
easy and accurate adjustments of horizontal and vertical
screen size and position, geometry and screen color.
¥The monitor supports a safe working environment in strict
compliance with the MPR II standard for low emissions
(TCO Optional).
¥The monitor complies with the VESA Display Data Channel
(DDC) specification for ÒPlug & PlayÓ compatibility.
Advanced microcircuitry makes set-up and configuration fast
and effortless.
¥The monitor features Advanced Color Controls for fine-
tuning to meet your own personal tastes or application
requirements. Use the on-screen controls to adjust the color
temperature, RGB gain value for the best possible screen
color and intensity.
¥Press the menu button and activate the Self-Diagnosis menu
to determine whether your monitor is functioning normally,
not receiving a signal or is receiving a signal that is out of
scanning range.
¥Activate the higher refresh rates of the monitor to stabilize the
screen and eliminate the annoying flicker that contributes to
eye-strain and headaches.
¥The ÒborderlessÓ full-screen display capability works under
all graphic modes and provides a larger viewing area than
conventional monitors, giving you a better picture with more
workspace.
English - 2
SETUP
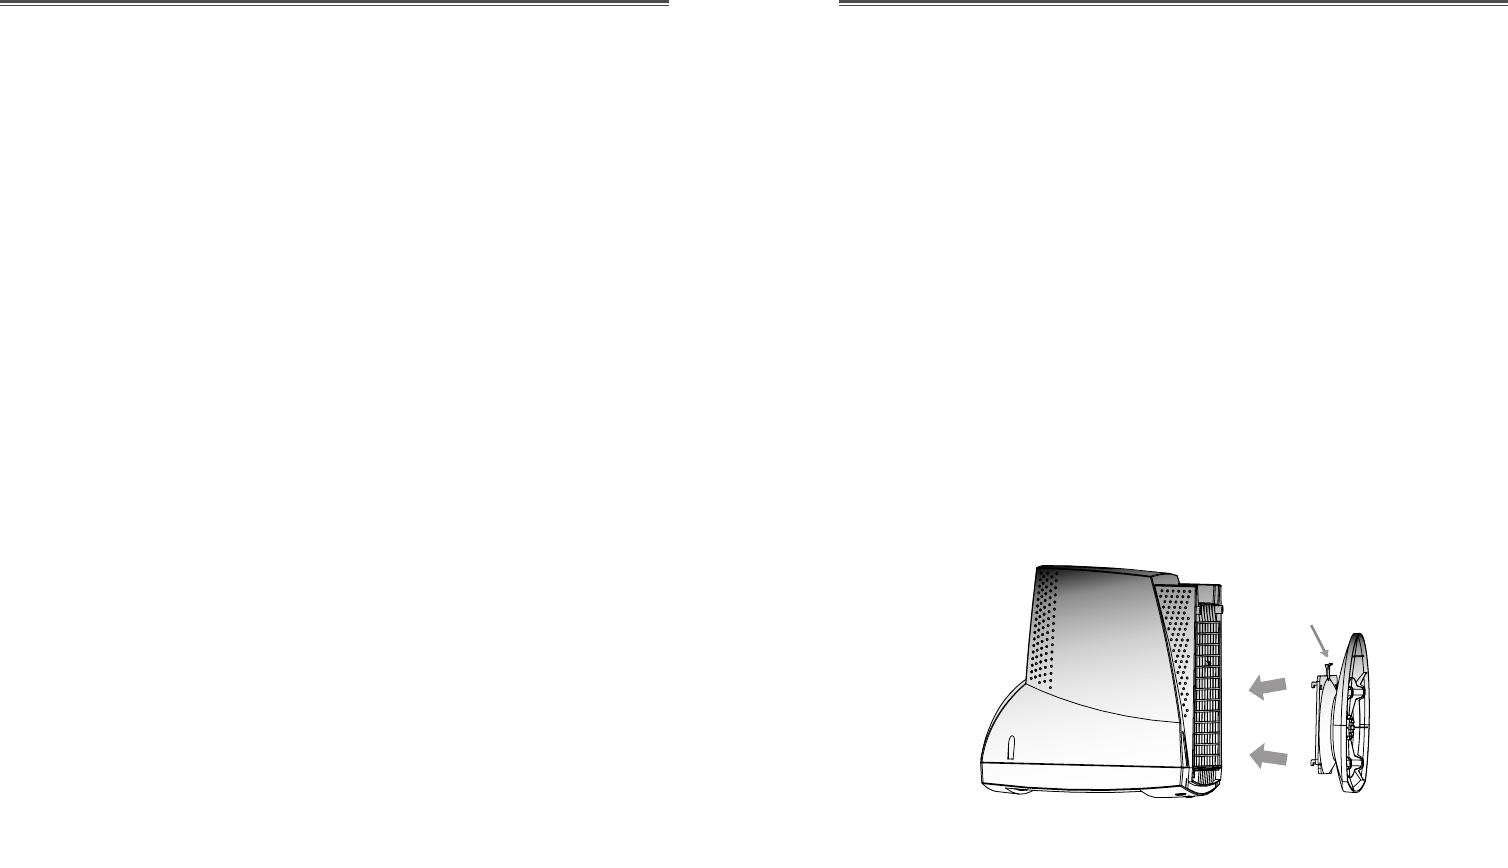
INSTALLING THE TILT/SWIVEL STAND
1. Ensure that the power to the monitor is off.
2. Set the monitor face down with the underside facing you.
Please be careful so as not to scratch the monitor screen.
3. Align the four hooks on the stand with the guide holes of
bottom chassis of the monitor.
4. Insert the hooks into the guide holes.
5. Slide the tilt/swivel stand toward the front of the monitor until
the latch locks in position.
6. Turn the monitor and the stand upright.
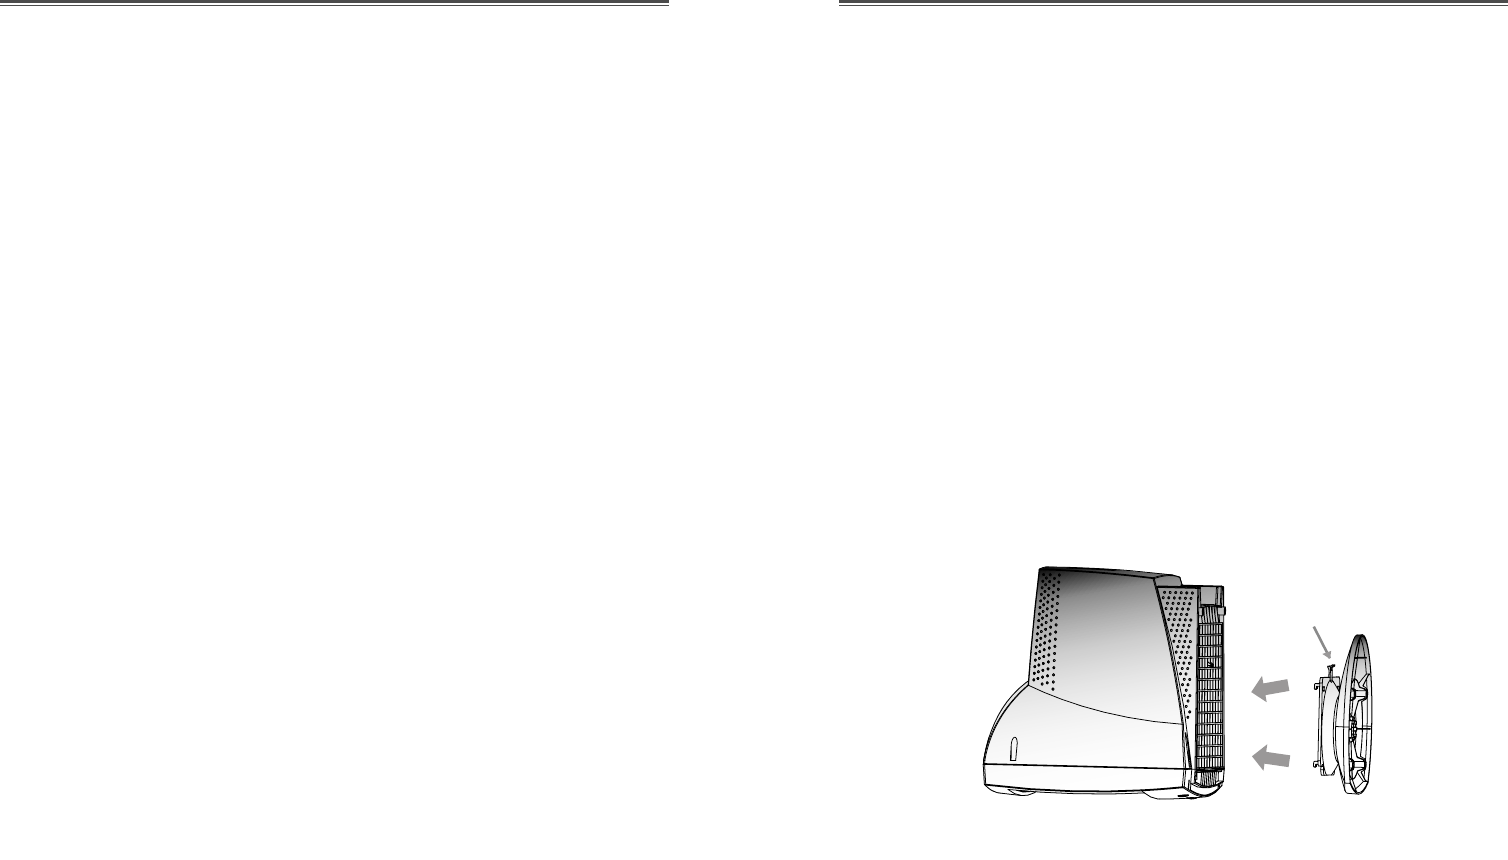
If you want to remove the tilt/swivel stand on the monitor, press
the latch and pull the tilt/swivel stand toward the back of the
monitor. Lift the stand to separate.
Latch

English - 4 English - 5
POWER MANAGEMENT SYSTEM
If you use the monitor with a computer that complies with the
power-saving program, you can set the monitor to go blank when
the system has remained unused for a period of time. To specify
the period or to disable this feature, set the system timeout field
of the computerÕs system setup program or use special software
for power-saving. See the computer userÕs manual for the details
of using the system setup. While the monitor is in power-saving
mode (blank screen), it consumes less power than when it is in its
normal state. The color of the power LED will indicate the state.
To restore the screen image, press any key of your keyboard or
move your mouse. If the signal cable is connected loosely or
disconnected, the power-saving feature will not operate.
DISPLAY DATA CHANNEL FOR PLUG AND PLAY
If you use the monitor with a computer that complies with
DDC1/2B/CI of VESA, the host video card automatically
configures itself without your intervention in a way that best fits
the attached monitor. The Display Data Channel(DDC) allows
the monitor to inform the host system about configuration
information for optimum use of the monitor. Use of the video
card utility is not required to match the resolutions and refresh
rates of the monitor and video card.
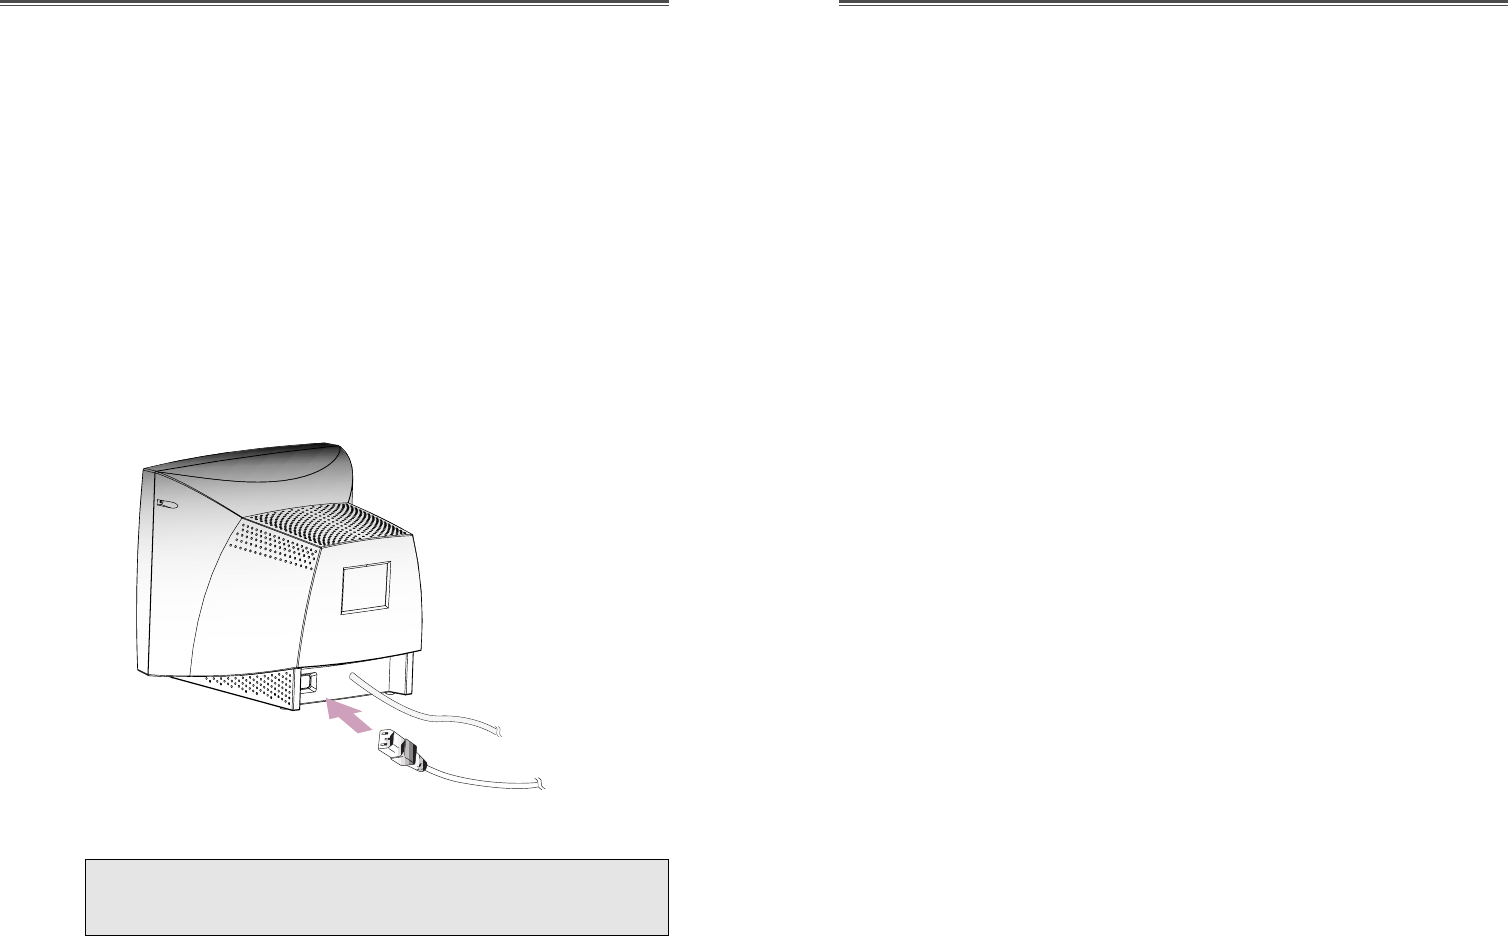
CONNECTING THE SIGNAL CABLE AND POWER
CORD
1. Turn off the computer and monitor.
2. Connect the 15 pin D-sub connector to the output port of the
video card in your computer.
3. Tighten the screws of the connector.
4. Plug the power cord into the AC receptacle located on the back
of the monitor.
5. Plug the other end of the power cord into the AC outlet.
If your power cord is PC-to-Monitor type, plug the other end
of the power cord into the AC receptacle in the computer.
Signal Cable
Power Cord
English - 6 English - 7
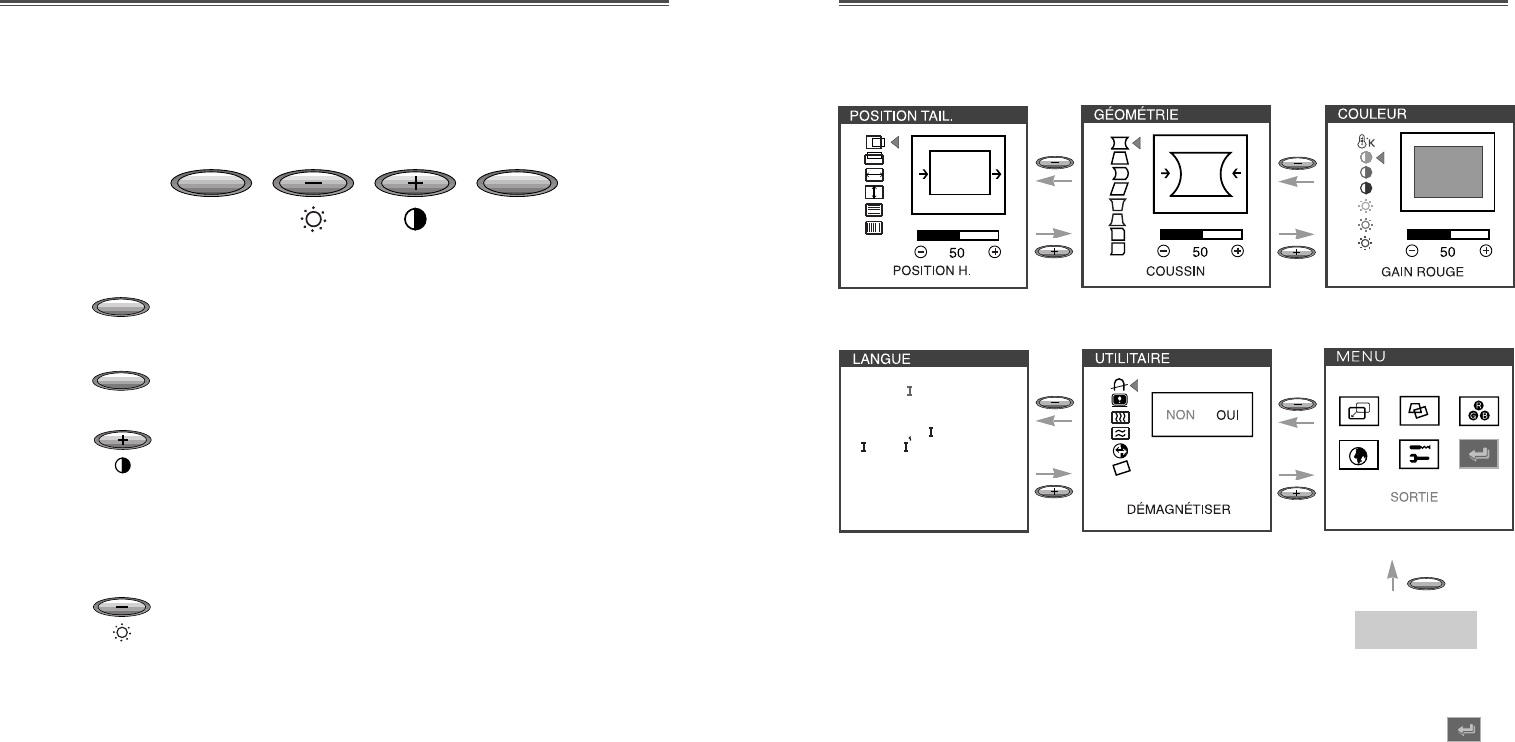
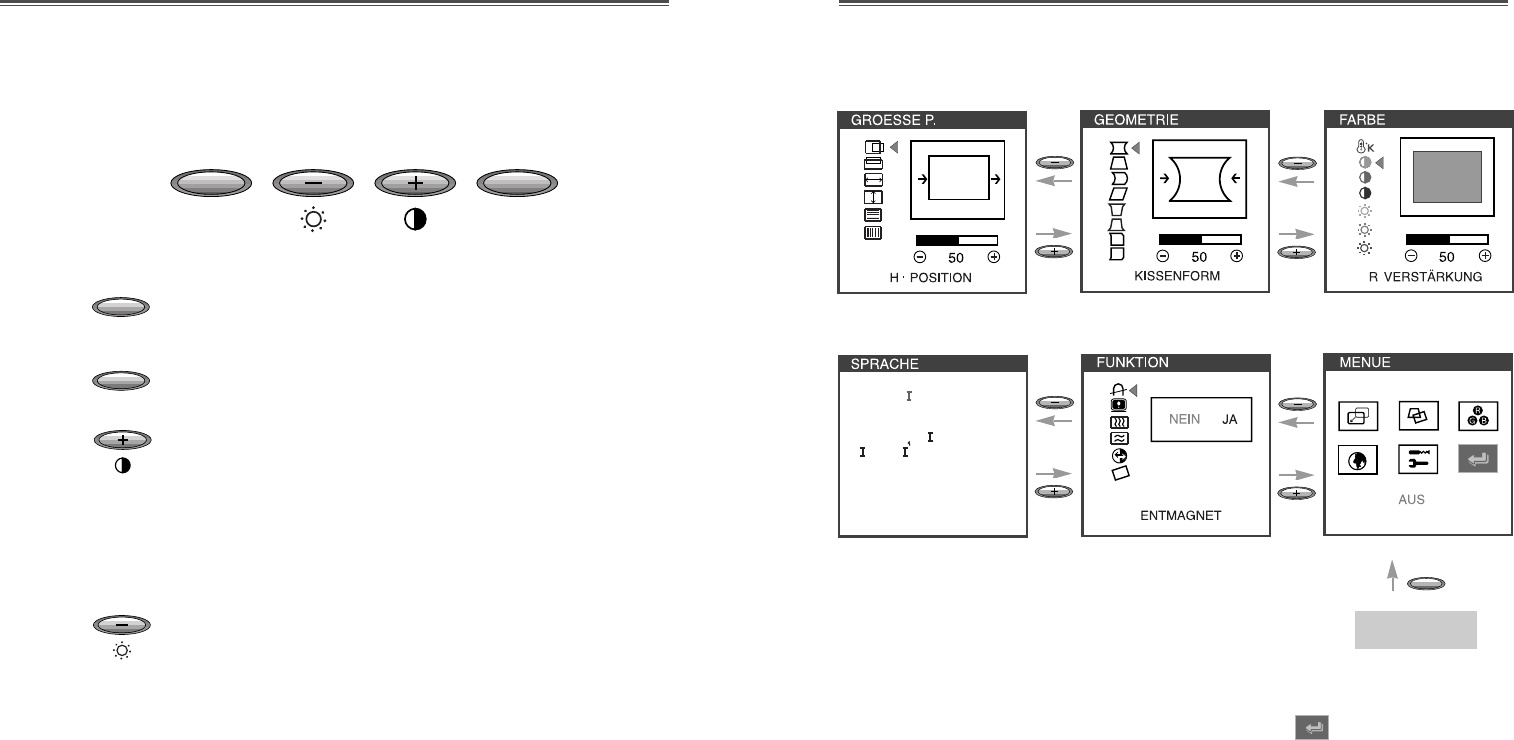
Key Process
OPERATION & ADJUSTMENT
Control Panel
MENU
SELECT
MENU
SELECT
¥Launch OSD(On-Screen Display) MENU window.
¥Select a sub Menu & function.
¥Move a sub Menu & function.
¥Increase the value of any selected function.
¥Adjust the contrast directly when there is no OSD.
¥Move a sub Menu & function.
¥Decrease the value of any selected function.
¥Adjust the brightness directly when there is no
OSD.
¥When you choose the icon on the OSD window, you can
exit the OSD screen.
DEUTSCH
ENGL SH
ESPA„OL
FRAN
C
A S
TAL ANO
MENU
Start

English - 9English - 8
OSD Functions
H. LINEARITY
V. LINEARITY
Adjust the horizontal linearity.
Adjust the vertical linearity.
Adjust the position of the display
horizontally (left or right).
H. POSITION
Adjust the position of the display
vertically (up or down).
Adjust the display width (horizontal
size).
Adjust the display height (vertical size).
V. POSITION
H.SIZE
V.SIZE
ICON CONTROL FUNCTIONS
Choose different preset color temperatures
or set your own customized color
parameters.
Adjust the red gain.
Adjust the green gain.
COLOR TEMP
RED GAIN
GREEN GAIN
Adjust the blue gain.
BLUE GAIN
Adjust the red bias.
Adjust the green bias.
Adjust the blue bias.
RED BIAS
GREEN BIAS
BLUE BIAS
ICON CONTROL FUNCTIONS
Adjust the left and right margins for
more convex or more concave margins.
Adjust the trapezoid of the screen by
moving the lines inward or outward.
Adjust the side balance when the sides of
the screen are bowed towards left or
right.
Adjust the parallelogram when the
screen is leaning left or right.
PINCUSHION
TRAPEZOID
PIN BALANCE
PARALLELOGRAM
Adjust the pin corner top when the top
sides of the screen are bowed.
Adjust the pin corner bottom when the
bottom sides of the screen are bowed.
PIN CORNER
TOP
PIN CORNER
BOTTOM
Adjust the side pin corner balance top
when the top sides of the screen are
bowed towards left or right.
PIN BALANCE
TOP
Adjust the side pin corner balance bottom
when the bottom sides of the screen are
bowed towards left or right.
PIN BALANCE
BOTTOM
Select language for OSD (5 languages).
LANGUAGE

English - 11English - 10
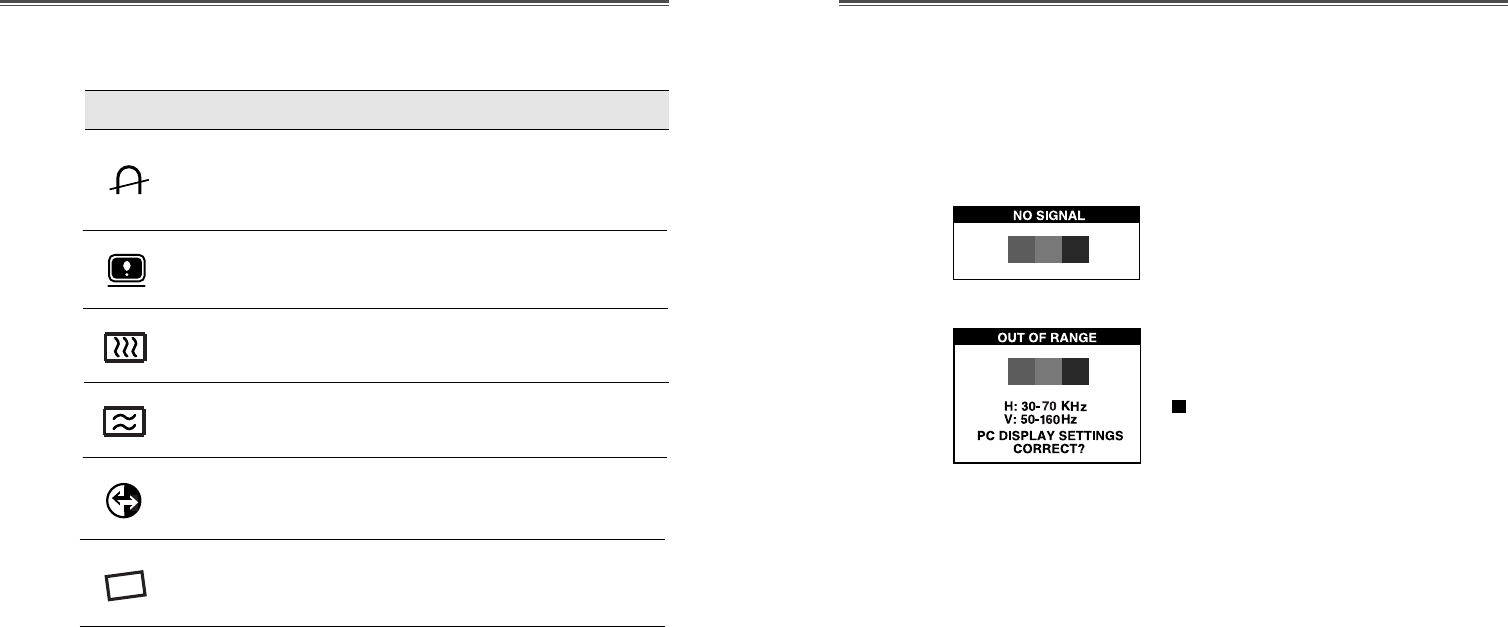
Self Diagnosis
When the monitor doesnÕt display, if you press any key, Self
Diagnosis screen is displayed. Self Diagnosis function checks if
the status of the monitor is No Signal or Out of range.
No Signal screen is displayed when the D-
Sub signal connector is not connected or
the status of the monitor is on DPMS
mode.
Out of Range screen is displayed when
the applied frequency is under or over
normal range.
Normal range
H : 30 - 70 KHz
V : 50 - 160 Hz
ICON CONTROL FUNCTIONS
Adjust the vertical picture moire
cancellation.
V. MOIRE
Adjust the horizontal picture moire
cancellation.
H. MOIRE
Adjust the rotation when the screen is
tilted left or right(Optional).
ROTATION
Display horizontal & vertical frequency
and polarity.
STATUS
Reset the screen to the Factory Preset
Display Settings.
RECALL
Degaussing keeps the monitor free from
unwanted magnetism that can result in
color impurity.
DEGAUSS
English - 13English - 12
TROUBLESHOOTING
Check if POWER SWITCH and COMPUTER
POWER SWITCH are in the on position.
Check if the signal cable is correctly connected to
the video card.
Check if the pins of D-sub connector are not bent.
Check if the computer is in the power saving mode.
Check if POWER SWITCH is in the on position.
Check if the power cord is correctly connected.
Check if the signal cable is suitable to the video card.
Adjust H & V Size or H & V Position to get the
proper image.
Keep the devices that may cause electrical
interference away from the monitor.
See the FCC information at the front cover of the
manual.
Operate Degauss once.
Adjust Contrast and Brightness.
Operate Degauss once.
Adjust Pincushion/Trapezoid/Pin Balance/
Parallelogram/Pin Coner Top/Pin Coner Bottom/
Pin Balance Top/Balance Bottom.
Symptom
No picture.
POWER LED is not
lit.
Image is unstable.
Image is not
centered, too small
or too large.
Picture bounces or a
wave pattern is
present in the
picture.
Color looks blotchy.
Picture is blurred.
Edges of available
area on the screen
are not straight.
Check
FACTORY PRESET TIMINGS
Mode H.Freq (KHz) V.Freq(Hz) Remark
VGA 480 640
X
480 31.5 60 Non-interlaced
VESA VGA 75 640
X
480 37.5 75 Non-interlaced
VGA 400 720
X
400 31.5 70 Non-interlaced
VESA 46K 800
X
600 46.9 75 Non-interlaced
VESA SVGA 85 800
X
600 53.7 85 Non-interlaced
VESA 60K 1024
X
768 60.0 75 Non-interlaced
VESA 1024/85 1024
X
768 68.7 85 Non-interlaced
VESA 1280/60 1280
X
1024 64.0 60 Non-interlaced
Resolution
(dots
X
lines)
SPECIFICATIONS
CDT Size 17-inch
Diagonal visible image area 16.2-inch
Dot Pitch 0.28 mm
Synchronization Horizontal 30 - 70 KHz
Vertical 50 - 160 Hz
Plug and Play DDC1/2B/CI
Power Saving EPA, VESA DPMS, Nutek Compliant
Power Source 100-240 Vac, 50/60Hz (Free Voltage)
Power Consumption 95W
Dimension-W x H x D 420 x 453.5 x 429mm
(set with stand)
Weight-unpacked (lbs/Kg) 33.7/15.3
Operating Temperature 10 ~ 40¡C /50 ~ 104¡F
The above timings are adjusted on the best display image condition.
DESCRIPTION FOR D-SUB CONNECTOR
APPENDIX
Pin
1
2
3
4
5
6
7
8
9
10
11
12
13
14
15
Signal
Red
Green
Blue
GND
GND
GND-Red
GND-Green
GND-Blue
+5Vdc
GND-H.Sync
GND-V.Sync
Bi-directional Data(SDA)
Horizontal Sync
Vertical Sync(VCLK)
Data Clock(SCL)
1
6
15
10
*GND=Ground

Ce manuel dŽcrit les procŽdures dÕinstallation et dÕutilisation de
votre Žcran et indique comment optimiser ses performances.
Lisez toutes les sections du manuel attentivement avant
dÕinstaller lÕŽcran et gardez-le ˆ portŽe de main pour pouvoir y
faire rŽfŽrence au besoin.
Assurez-vous de la prŽsence de tous les ŽlŽments suivants:
¥ƒcran couleur
¥Cordon dÕalimentation
¥Manuel de lÕutilisateur
¥Socle orientable
¥Carte de garantie (Optionnel)
En cas dÕŽlŽment manquant ou endommagŽ, contactez votre
fournisseur. Conservez le carton et les emballages dÕorigine;
vous en aurez besoin si vous transportez lÕŽcran vers un autre site
dans lÕavenir.
Fran•ais - 1
TABLE DES MATIERES INTRODUCTION
Introduction ............................................................................. 1
RŽsumŽ des caractŽristiques ............................................... 2
Installation ............................................................................... 3
Installation du socle orientable ........................................... 3
Raccordement du c‰ble du signal et du cordon
dÕalimentation .................................................................... 4
Gestion de lÕalimentation .................................................... 5
Dispaly Data Channel pour le pr•t ˆ jouer .......................... 5
OpŽration & Ajustement ........................................................ 6
SpŽcifications .......................................................................... 12
CaractŽristiques du signal .................................................... 12
DŽpannage .............................................................................. 13
INSTALLATION DU SOCLE ORIENTABLE
1. Mettez lÕŽcran hors tension.
2. Posez-le sur le plan de travail, la surface dÕaffichage vers le
bas et la base orientŽe vers vous. Veillez ˆ ne pas rayer la
surface du tube cathodique.
3. Alignez les quatre crochets du socle avec les trous de guidage
se trouvent sous le moniteur.
4. InsŽrez les crochets dans les trous de guidage.
5. Faites glisser le socle vers lÕavant de lÕŽcran jusquÕˆ ce que le
loquet sÕenclenche.
6. Posez lÕensemble socle/Žcran ˆ lÕendroit.
RÉSUMÉ DES CARACTÉRISTIQUES
¥Ë la fois pratique et convivial, lÕaffichage ˆ lÕŽcran permet de
rŽgler facilement et prŽcisŽment la dimension et la position
horizontale ou verticale, la gŽomŽtrie et la couleur de
lÕaffichage.
¥Ce moniteur favorise un environnement de travail sain car il
est rigoureusement conforme au normes MPR II relatives aux
radiations ŽlectromagnŽtiques (TCO Optionnel).
¥Ce moniteur est conforme ˆ la spŽcification VESA Display
Data Channel (DDC) pour la compatibilitŽ au standard Plug
and Play (Pr•t ˆ jouer). Les microcircuits permettent une
installation et une configuration simples et rapides.
¥Ce moniteur permet un contr™le prŽcis des couleurs selon vos
gožts ou les exigences de vos applications. Utilisez les
commandes ˆ lÕŽcran pour rŽgler la tempŽrature de la couleur,
le gain RVB afin dÕobtenir la couleur et lÕintensitŽ optimales ˆ
lÕŽcran.
¥Appuyez sur le bouton Menu et choisissez le menu
dÕautodiagnostic (Self-Diagnosis) afin de dŽterminer si votre
moniteur fonctionne normalement, sÕil re•oit un signal ou si
ce signal est en dehors de la gamme normale de frŽquences.
¥Activez une frŽquence de rŽgŽneration plus ŽlevŽe afin de
stabiliser lÕimage et Žliminer le scintillement responsable de la
fatigue oculaire et des maux de t•te.
¥LÕaffichage plein Žcran (sans bordure) fonctionne dans tous
les modes graphiques et offre une plus grande zone de
visualisation que les moniteurs conventionnels, permettant
ainsi une meilleure image et un espace de travail plus
important.
Fran•ais - 2 Fran•ais - 3
INSTALLATION
Si vous dŽsirez enlever le socle orientable du moniteur, tirez le
loquet vers vous et poussez le socle orientable vers lÕarri•re du
moniteur. Soulevez le socle pour le dŽgager.
Loquet
GESTION DE L’ALIMENTATION
Si vous utilisez lÕŽcran avec un ordinateur conforme aux
programmes dÕŽconomie dÕŽnergie, vous pouvez le rŽgler de
sorte que lÕaffichage soit interrompu apr•s un dŽlai dÕinactivitŽ
prŽdŽfini. Pour dŽfinir ce dŽlai ou dŽsactiver la fonction, vous
devez soit positionner le param•tre de dŽlai dÕattente du
programme de configuration(setup) de votre ordinateur, soit
recourir ˆ un logiciel de gestion dÕalimentation spŽcialisŽ. Pour
plus dÕinformations sur lÕutilisation du programme de
configuration, reportez-vous au manuel de votre ordinateur.
Lorsque le mode dÕŽconomie dÕŽnergie est actif(Žcran noir),
lÕŽcran consomme moins dÕŽlectricitŽ que lorsquÕil fonctionne en
mode normal. LÕŽtat de la consommation Žlectrique est indiquŽ
par le voyant dÕalimentation. Pour rŽtablir lÕimage affichŽe, il
suffit dÕappuyer sur une touche quelcocque du clavier ou sur un
bouton de la souris. La fonction dÕŽconomie dÕŽnergie nÕest pas
activŽe automatiquement si le c‰ble vidŽo est mal branchŽ ou
dŽbranchŽ.
DISPLAY DATA CHANNEL POUR LE PRÊT À JOUER
(PLUG AND PLAY)
Si vous utilisez lÕŽcran avec un ordinateur conforme ˆ la norme
DDC1/2B/CI de VESA, le ma”tre de la carte vidŽo
automatiquement configue soim•me sans votre intervention en
forme conforme au mieux avec lÕŽcran attachŽ. Display Data
Channel(DDC) donne ˆ lÕŽcran la permission dÕinformer le
ma”tre-system en ce qui concerne lÕinformation configurŽ pour
lÕusage optimal de lÕŽcran. LÕemploi de lÕutilitŽ de la carte vidŽo
nÕexige pas dÕharmonie avec la rŽsolution et la vitesse de
rŽgŽnŽration de lÕŽcran et la carte vidŽo.
RACCORDEMENT DU CABLE DU SIGNAL ET DU
CORDON D’ALIMENTATION
1. Mettez lÕordinateur et lÕŽcran hors tension.
2. Reliez le connecteur 15 broches ˆ la sortie vidŽo de votre
ordinateur.
3. Serrez les vis du connecteur.
4 Reliez le cordon dÕalimentation secteur au connecteur
dÕalimentation ˆ lÕarri•re de lÕŽcran.
5. Branchez lÕautre extrŽmitŽ du cordon sur une prise secteur.
Fran•ais - 4 Fran•ais - 5
Si votre cordon dÕalimentation est PC-to-Monitor type,
branchez lÕautre extrŽmitŽ du cordon au connecteur
dÕalimentation de votre ordinateur.
C‰ble de Signal
Cordon
dÕalimentation
Fran•ais - 6 Fran•ais - 7
Séquences de touches
¥Vous pouvez quitter lÕŽcran OSD en choississant lÕicone
de la fenetre OSD.
OPÉRATION & AJUSTEMENT
MENU
SELECT
MENU
SELECT
Panneau de réglage
¥Lance les menus OSD (affichage ˆ lÕŽcran).
¥SŽlectionne la sous-menu & la fonction.
¥DŽpalce la sous-menu & la fonction.
¥Augmente la valeur de toute fonction sŽlectionnŽe.
¥RŽgle le contraste directement quand
OSD nÕest pas affichŽ ˆ lÕŽcran.
¥DŽpalce la sous-menu & la fonction.
¥Diminue la valeur de toute fonction sŽlectionnŽe.
¥RŽgle la luminositŽ directement quand
OSD nÕest pas affichŽ ˆ lÕŽcran.
DEUTSCH
ENGL SH
ESPA„OL
FRAN
C
A S
TAL ANO
MENU
Commencer
Fran•ais - 8 Fran•ais - 9
Fonctions de OSD
ICONE RÉGLAGE FONCTIONS ICONE RÉGLAGE FONCTIONS
LINÉARITÉ V. RŽgle la linŽaritŽ verticale.
RŽglez la position de lÕaffichage
horizontalement(gauche ou droite).
POSITION H.
RŽglez la position de lÕaffichage
verticalement (haut ou bas).
RŽglez la largeur de
lÕaffichage(dimension horizontale).
RŽglez la hauteur de
lÕaffichage(dimension verticale).
POSITION V.
TAILLE H .
TAILLE V.
RŽgle les marges de gauche ou de droite
pour des marges plus convexes ou plus
concaves.
RŽgle le trapŽzoide de lÕŽcran en
dŽpla•ant les lignes vers lÕinterieur ou
vers lÕextŽrieur.
RŽgle le c™tŽ balance lorsque les c™tŽs de
lÕŽcran sont bombŽs vers la gauche ou
vers la droite.
RŽgle le parallŽlogramme lorsque lÕŽcran
est dŽcalŽ vers la gauche ou vers la droite.
COUSSIN
TRAPÈZE
COUSSIN
SYMET.
PARALLÉLO.
Choisi diffŽrentes tempŽratures de couleur
prŽ-rŽglŽes ou rŽglez vos propres
param•tres de couleurs personnalisŽes.
RŽgle le gain de rouge.
RŽgle le gain de vert.
TEMP.
COULEUR
GAIN ROUGE
GAIN VERT
RŽgle le gain de bleu.
GAIN BLEU
RŽgle la polarisation de rouge.
RŽgle la polarisation de vert.
RŽgle la polarisation de bleu.
POLARISATION
R
POLARISATION
V
POLARISATION
B
RŽgle la distorsion de coin en bas
lorsque les hauts c™tŽs de lÕŽcran sont
bombŽs.
ANGLES BAS
RŽgle le coussin symŽtrie en haut lorsque
les hauts c™tŽs de lÕŽcran sont bombŽs
vers la gauche ou vers la droite.
SYMÉTRIE
HAUT
RŽgle le coussin symŽtrie en bas lorsque
les hauts c™tŽs de lÕŽcran sont bombŽs
vers la gauche ou vers la droite.
SYMÉTRIE BAS
RŽgle la distorsion de coin en haut
lorsque les hauts c™tŽs de lÕŽcran sont
bombŽs.
ANGLES HAUT
LINÉARITÉ H. RŽgle la linŽaritŽ horizontale.
SŽlectionne la langue du menu OSD
(5 langages).
LANGUE
Fran•ais - 10 Fran•ais - 11
AutoDiagnostic
Lorsque le moniteur nÕaffiche rien et que lÕutilisateur appuie
sur une touche, lÕŽcran dÕautodiagnostic appara”t.
LÕautodiagnostic vŽrfie si le moniteur ne re•oit Aucun signal
(No signal) ou le signal est Hors gamme (Out of range).
Aucun signal (No signal) est affichŽ
lorsque le c‰ble dÕinterface (en D)
nÕest pas branchŽ ou que lÕŽtat du
moniteur est en mode DPMS.
Hors gamme (Out of range) est
affichŽ lorsque la frŽquence re•ue est
en dehors de gamme normale.
Gamme Normale
H : 30 - 70 KHz
V : 50 - 160 Hz
ICONE RÉGLAGE FONCTIONS
RŽgle lÕannulation du moire de lÕimage
verticale.
MOIRÉ V.
RŽgle lÕannulation du moire de lÕimage
horizontale.
MOIRÉ H.
RŽgle la rotation lorsque lÕŽcran est
inclinŽ ˆ gauche ou ˆ droite(Optionnel).
ROTATION
PrŽserve le moniteur des effets
magnŽtiques indŽsirables pouvant
provoquer une couleur de mauvaise
qualitŽ.
DÉMAGNÉTISER
Affiche la frŽquence et la polaritŽ
verticale et horizontale.
ÉTAT
Restaure les param•tres usine par dŽfaut
de lÕŽcran.
RAPPEL
Fran•ais - 12 Fran•ais - 13
DÉPANNAGE
Taille de CDT 17 pouces
Zones dÕaffichag 16.2 pouces
DensitŽ des points 0.28 mm
Synchronisation Horizontale 30 - 70 KHz
Verticale 50 - 160 Hz
Pr•t ˆ jouer DDC1/2B/CI
ƒconomie dÕŽnergie EPA, VESA DPMS, Nutek Complaisant
Alimentation Žlectrique 100-240V en courant alternatif, 50/60Hz (Variable)
Consommation de puissance 95 W
Dimension-W x H x D 420 x 453.5 x 429mm
(avec socle)
Poids-dŽpaquetage(lbs/Kg) 33.7/15.3
Conditions dÕexploitation 10 ~ 40¡C /50 ~ 104¡F
SPÉCIFICATIONS
CARACTÉRISTIQUES DU SIGNAL
Solutions
LÕordinateur et lÕŽcran sont-ils sous tension?.
Le c‰ble vidŽo est-il correctement reliŽ ˆ la carte vidŽo?
Les broches des connecteurs sont-elles tordues?
LÕordinateur fonctionne-t-il en mode Žconomie
dÕŽnergie?
LÕŽcran est-il sous tension.
Le cordon dÕalimentation est-il correctement branchŽ?
Le c‰ble et la carte vidŽo sont-ils compatibles?
RŽglez la Taille et la Position de lÕimage affichŽe en
fonction de vos besoins.
Ecartez tout appareil susceptible de provoquer des
interfŽrences ŽlectromagnŽtiques.
Lisez les renseignements fournis par la FCC sur la
couverture avant du manuel.
DŽmagnŽtisez lÕŽcarn une fois.
RŽglez le Contraste et la LuminositŽ
DŽmagnŽtisez lÕŽcran une fois.
Corrigez lÕeffet de Coussin/Trap•ze/Coussin
Symet./ParallŽlo./Angles Haut/Angles Bas/SymŽtrie
Haut/SymŽtrie Bas.
Probl•me
Rien ne sÕaffiche.
Le voyant
dÕalimentation ne
sÕallume pas.
LÕaffichage est
irrŽgulier.
LÕaffichage est mal
centrŽ, trop petit ou
trop grand.
LÕimage se
dŽplace sur lÕŽcran
ou prŽsente un effet
de vague.
Des taches de couleur
parasites sont visibles.
LÕimage est floue.
Les bordures de la
zone dÕaffichage ne
sont pas droites.
Mode RŽsolution FrŽq.H.(KHz) FrŽq.V.(Hz) Remarque
VGA 480 640
X
480 31.5 60 NoninterlacŽ
VESA VGA 75 640
X
480 37.5 75 NoninterlacŽ
VGA 400 720
X
400 31.5 70 NoninterlacŽ
VESA 46K 800
X
600 46.9 75 NoninterlacŽ
VESA SVGA 85 800
X
600 53.7 85 NoninterlacŽ
VESA 60K 1024
X
768 60.0 75 NoninterlacŽ
VESA 1024/85 1024
X
768 68.7 85 NoninterlacŽ
VESA 1280/60 1280
X
1024 64.0 60 NoninterlacŽ
Les synchronisation au-dessus sont rŽglŽes dans des conditions de image
dÕŽcran meilleure.

In dieser Bedienungsanleitung wird Ihnen erklŠrt, wie Sie den
Monitor korrekt installieren, in Betrieb nehmen und die
Mšglichkeiten des Monitors vollstŠndig nutzen. Lesen Sie diese
Bedienungsanleitung bitte sorgfŠltig durch, bevor Sie den
Monitor installieren, und halten Sie sie anschlie§end als schnelle
Informationsquelle stets griffbereit.
†berprŸfen Sie zunŠchst bitte, ob der Inhalt des Versandkartons
mit folgender Kontrolliste Ÿbereinstimmt:
¥Farbmonitor
¥Netzkabel
¥Benuzerhandbuch
¥Schwenk/Neige-Fu§
¥BŸrgschaftsbriefschein (Wahlfrei)
Falls Teile fehlen oder beschŠdigt sind, informieren Sie bitte
Ihren FachhŠndler. Bewahren Sie den Versandkarton und das
Verpackungsmaterial sorgfŠltig auf, damit Sie Ihren Monitor
ordnungsgemŠ§ lagern und transportieren kšnnen.
Deutsch - 1
INHALT EINLEITUNG
Einleitung ................................................................................. 1
Produktmerkmale................................................................. 2
Installation ............................................................................... 3
Installation des Schwenk/Neige-Fu§es ............................... 3
Anschlie§en des Signalkabels und Netzkabel .................... 4
Power-Management ............................................................ 5
Datenkanal FŸr Plug and Play Anzeigen ............................ 5
Betrieb und Einstellung........................................................... 6
Technische Daten.................................................................... 12
Sync-Wertetabelle ................................................................. 12
Fehlerbebung ......................................................................... 13
INSTALLATION DES SCHWENK/NEIGE-FUßES
1. GerŠt ausschalten.
2. Legen Sie den Monitor vorsichtig mit der Unterseite nach
oben hin. Achten Sie darauf, da§ die Bildršhre dabei nicht
verkratzt wird.
3. Die vier Haken am Schwenkfu§ auf die FŸhrungslšcher am
Boden des Monitors ausrichten.
4. Die Haken in die FŸhrungslšcher einfŸhren
5. Den Schwenk/ Neige-Fu§ in Richtung Monitorvorderseite
schieben, bis der Verschlu§ einrastet.
6. Den Monitor wieder in aufrechte Position bringen.
PRODUKTMERKMALE
¥Mit Hilfe des praktischen und benutzerfreundlichen OSD
kšnnen horizontale und vertikale Bildschirmgrš§e und-
position und-farbe leicht und genau eingestellt werden.
¥Der Monitor unterstŸtzt eine sichere Arbeitsumgebung und
entspricht ohne EinschrŠnkung dem MPR II-Standard fŸr
niedrige Strahlenemission (TCO Wahlfrei).
¥Der Monitor entspricht den VESA Display Data
Channel(DDC)-Richtlinien fŸr Plug and Play-KompatibilitŠt.
Moderne Mikroschaltungen machen die Einrichtung und
Konfiguration zu einer rasch und leicht zu erledigenden
Aufgabe.
¥Der Monitor ist mit hochentwickelten Einstellelementen fŸr
die Feinabstimmung nach Ihrem persšnlichen Geschmack
oder nach den Erfordemissen Ihrer jeweiligen Anwendung
ausgestattet. Sie kšnnen damit unter OSD-Kontrolle die
Farbtemperatur, die RGB-VerstŠrkung oder die RGB-
Vorspannung auf optimale Bildschirmfarbe und-helligkeit
einstellen.
¥DrŸchen Sie die MenŸ-Taste und aktivieren Sie das
Selbstdiagnose-MenŸ, um festzustellen, ob Ihr Monitor
ordnungsgemŠ§ funktioniert oder ob er kein Signal bzw, ein
Signal empfŠngt, das au§erhalb des Abtastbereichs liegt.
¥Aktivieren Sie einfach die hšheren Bildwiederholfrequenzen
des Monitors, um den Bildschirm zu stabilisieren und das
stšrende Flimmern zu eliminieren, das schŠdlich fŸr die
Augen ist und Kopfschmerzen verursacht.
¥Das randlose Full Screen-Schirmbild steht in allen Graphik-
Moden zur VerfŸgung und bietet ein grš§eres
Betrachtungsfeld als konventionelle Monitore. Sie haben
dadurch ein besseres Bild und mehr ArbeitsflŠche.
Deutsch - 2 Deutsch - 3
INSTALLATION
Wenn der Schwenkfu§ vom Monitor entfernt werden soll, die
Verriegelung nach vorne ziehen und den Schwenkfu§ zur
RŸckseite des Monitors ziehen. Den Schwenkfu§ anheben, um
ihm abzunehmen.
Verriegelung
POWER-MANAGEMENT
Falls Sie Ihren Monitor in Verbindung mit einem Computer
benutzen, der den Power-Management-Richtlinien entspricht,
konnen Sie ihn so einstellen, da§ der Bildschirm abgedunkelt
wird, wenn der Monitor eingeschaltet ist, aber eine geswisse Zeit
lang nicht benutzt wird. †ber die Einstellung der Ausschaltzeit
im Setup-Programm Ihres Computers oder einer speziellen
Energiespar-Software kšnnen Sie die Zeitdauer festlegen oder
diese Funktion abschalten. Hinweise zur Benutzung des Setup-
Programms entnehmen Sie bitte der Bedienungsanleitung fŸr
Ihren Computer. Wenn sich der Monitor im Energiespar-Modus
befindet (leerer Bildschirm), verbraucht er weniger Strom als im
Normalbetreib ; der jeweilige Zustand wird durch die LED-Farbe
angezeigt. BetŠtigen Sie eine beliebige Taste auf der Tastatur
oder bewegen Sie die Maus, um den Bildschirm wieder
aufzurufen. Die Energiesparfunktion ist nicht wirksam, wenn das
Videokabel locker ist oder sich der Anschlu§ gelšst hat.
DATENKANAL F
Ü
R PLUG AND PLAY ANZEIGEN
Wenn Sie den Monitor mit einem Computer benutzen, der den
DDC1/2B/CI-oder VESA-Standard entspricht, konfiguriert sich
die Wirts-Videokarte ohne Ihr Zutun selbstŠtig in einer Weise, die
der optimalen Nutzung des angeschlossenen Monitors am Besten
entspricht. Der Display Data Channel (DDC) macht es dem
Monitor mšglich, das Wirtssystem Ÿber die Konfiguration zu
informieren, die eine optimale Nutzung des Monitors gestattet.
Das Videokarten-Dienstprogramm ist zur Anpassung der
Auflšsungen und Auffrischungsraten von Monitor und
Videokarte nicht erforderlich.
ANSCHLIEßEN DES SIGNALKABELS UND
NETZKABEL
1. Computer und Monitor ausschalten.
2. Die 15-polige D-Sub-Steckverbindung an der Ausgangs-
schnittstelle der Videokarte Ihres Computers anschlie§en.
3. Schrauben des Steckers anziehen.
4. Das Netzkabel an der Buchse auf der RŸckseite des Monitors
anschlie§en.
5. Das andere Ende des Netzkabels an einer Steckdose
anschlie§en.
Deutsch - 4 Deutsch - 5
Wenn Ihr Power-Kabel an Typ PC-zu-Monitor ist, stšpseln Sie
die andere Ende des Power-Kabels in den AC-BehŠlter in der
Computer hinein.
Signalkabel
Netzkabel
Deutsch - 6 Deutsch - 7
Taste Prozeß
¥Wenn Sie im OSD-Fenster das Symbol wahlen, kšnnen
Sie den OSD-Bildschirm verlassen.
BETRIEB UND EINSTELLUNG
MENU
SELECT
MENU
SELECT
Kontrolle Tafel
¥Starten Sie OSD (ON-SCREEN DISPLAY) MEN†.
¥WŠhlen Sie ein HilfsmenŸ und eine Funktion.
¥Bewegen Sie ein HilfsmenŸ und eine Funktion.
¥Erhšhen Sie den Wert einer beliebigen gewŠhlten
Funktion.
¥Stellen Sie den Kontrast direkt ein, wenn es kein
OSD gibt.
¥Bewegen Sie ein HilfsmenŸ und eine Funktion.
¥Verringern Sie beliebigen gewŠhlten den Wert einer
Funktion.
¥Stellen Sie die Helligkeit direkt ein, wenn es kein
OSD gibt.
DEUTSCH
ENGL SH
ESPA„OL
FRAN
C
A S
TAL ANO
MENU
Beginnen

Deutsch - 8 Deutsch - 9
OSD Funktions
ABBILD KONTROLL FUNKTIONS ABBILD KONTROLL FUNKTIONS
V. INEARITAET Einstellen Sie die vertikale LinearitŠt.
Richten Sie das Display horizontal (rechts
oder links) aus.
H. POSITION
Richten Sie das Display vertikal (hoch
oder runter) aus.
Stellen Sie die Displaybreite
(Horizontalgrš§e) ein.
Stellen Sie die Displayhšhe ein
(Vertikalgrš§e).
V. POSITION
H. GROESSE
V. GROESSE
Stellen Sie den linken und rechten Rand
zur Erzielung konvexerer oder konkaverer
RŠnder ein.
Stellen Sie das auf dem Bildschirm
befindliche Trapez durch Nachinnen-bzw
Nachau§enbewegen der Linien ein.
Stellen Sie die Seitensymmetrie ein, wenn
sich die Bildschirmseiten nach links oder
rechts neigen.
Stellen Sie das Parallelogramm ein, wenn
sich der Bildschirm nach links oder
rechts neigt.
KISSENFORM
TRAPEZFORM
KIS.
AUSGLEICH
PARALLELO
-GRAMM
WŠhlen Sie unterschiedliche voreingestellte
Farbtemperaturen oder stellen Sie eigene
kundenspezifischen Farbparameter ein.
Stellen Sie die RotverstŠrkung ein
Stellen Sie die GrŸnverstŠrkung ein.
FARBTEMPERA
-TUR
R
VERSTÄRKUNG
G
VERSTÄRKUNG
Stellen Sie die BlauverstŠrkung ein.
B
VERSTÄRKUNG
Stellen Sie die Rotvorspannung ein.
Stellen Sie die GrŸnvorspannung ein.
Stellen Sie die Blauvorspannung ein.
R
VORSPANNUNG
G
VORSPANNUNG
B
VORSPANNUNG
Stellen Sie die Stift-Eckpunkt oberseite
ein, wenn die Oberseite von dem Bild
bogenartig ist.
Stellen Sie das Stift-Eckpunkt unterteil
ein, wenn die Unterteil von dem Bild
bogenartig ist.
OBEN KIS.
ECKE.
UN KIS. ECKE.
Stellen Sie die Symmetrie vom Seitenstift-
Eckpunkt oberseite ein, wenn sich die
Oberseite vom Bild nach links oder rechts
neigen.
O.K-
AUSGLEICH
Stellen Sie die Symmetrie vom Seitenstift-
Eckpunkt unterteit ein, wenn sich die
Unterteil vom Bild nach links oder rechts
neigen.
U.K-
AUSGLEICH
H. LINEARITAET Einstellen Sie die horizontale LinearitŠt.
Sprache fŸr OSD auswahlen (5 spraches).
SPRACHE
Deutsch - 10 Deutsch - 11
Selbstdiagnose
Erfolgt keine Anzeige, wenn der Benutzer eine beliebige
Taste drŸckt, dann erscheint das Selbstdiagnose-Schirmbild.
Die Selbstdiagnose kontrolliert, ob der Monitor kein Signal
erhŠlt oder ob der Bereich veriassen wurde.
ÒNo SignalÓ wird angezeigt, wenn der
Stecker (D-Sub) nicht angeschlossen
oder der Monitor auf DPMS-Betrieb
eingestellt ist.
ÒOut of RangeÓ wird angezeigt wenn die
benutzte frequenz unter-order oberhalb des
normalen Bereichs liegt.
Normaler Bereich
H : 30 - 70 KHz
V : 50 - 160 Hz
ABBILD KONTROLL FUNKTIONS
Einstellen Sie vertikal Bild moiriert
Lšschung.
MOIRE V.
Einstellen Sie horizontal Bild moiriert
Lšschung.
MOIRE H.
Stellen Sie die Rotation ein, wenn der
Bildschirm nach links oder rechts geneigt
ist (Wahlfrei).
ROTATION
Durch die Entmagnetisierung wird jeder
unerwŸnschte Magnetismus vermieden,
der zu Farbverunreinigungen fŸhren
kšnnte.
ENTMAGNET
Bilden Sie horizontale & vertikale
Frequenz und PolaritŠt ab.
STATUS
Stellen Sie den Bildschirm wieder auf die
in der Fabrik voreingestellten Display
Werte ein.
GR.
EINSTELLUNG
Deutsch - 12 Deutsch - 13
FEHLERBEHEBUNG
CDT Grš§e 17 Zoll
Sichtbarer Bereich 16.2 Zoll
Bildschirmpunkte 0.28 mm
Synchronization Horizontal 30 - 70 KHz
Vertikal 50 - 160 Hz
Plug and play DDC1/2B/CI
Energiesparfunktion EPA, VESA DPMS, Nutek Nachgiebig
Netzspannung 100-240V , 50/60Hz (Beliebige Wechselspannung)
Leistungsaufnahme 95 W
Abmessungen-W x H x D 420 x 453.5 x 429mm
(Komplett mit Standfu§)
Gewicht-auspacken(lbs/Kg) 33.7/15.3
Betriebsbedingungen 10 ~ 40¡C /50 ~ 104¡F
TECHNISCHE DATEN
SYNC-WERTETABELLE
Symptom
Kein Bild.
Die
Netzkontrollampe
brennt nicht.
Kein stabiles Bild.
Bilschirmanzeige ist
nicht zentriert, zu
klein oder zu gro§.
Bilddurchlauf oder
wellenmuster auf
dem monitor.
Unsaubere
Farbdarstellung.
Kontrolle
Kontrollieren, ob Monitor und Computer eingeschaltet
sind.
Kontrollieren, ob das Videokabel ordnungsgemŠ§ am
Computer angeschlossen wurde.
Kontrollieren, ob die Steckkontakte am D sub-
Steckanschlu§ verbogen sind.
Kontrollieren, ob sich der Computer im Energiespar-
Modus befindet.
Kontrollieren, ob sich der Netzschalter in der Position
EIN befindet
Kontrollieren, ob das Netzkabel ordnungsgemŠ§
angeschlossen wurde.
Kontrollieren, ob das Videokabel zum Anschlu§ an
die Videokarte geeignet ist.
Die Bildschirmdarstellung mit Hilfe der
Bedienelemente fŸr Groesse und Position einstellen.
GerŠte, die elektrische interferenzen verursachen
kšnnen, aus der NŠhe des Monitors entfernen.
Beachten Sie die FCC-Informationen vorne in diesem
Handbuch.
Entmagnet einmal durchfŸhren.
Mode Auflšsung H.Freq(KHz) V.Freq(Hz) Bemerkung
VGA 480 640
X
480 31.5 60 Non-interlaced
VESA VGA 75 640
X
480 37.5 75 Non-interlaced
VGA 400 720
X
400 31.5 70 Non-interlaced
VESA 46K 800
X
600 46.9 75 Non-interlaced
VESA SVGA 85 800
X
600 53.7 85 Non-interlaced
VESA 60K 1024
X
768 60.0 75 Non-interlaced
VESA 1024/85 1024
X
768 68.7 85 Non-interlaced
VESA 1280/60 1280
X
1024 64.0 60 Non-interlaced
Die obenerwŠhnte Zeitsteuerungen sind auf der besten Schirmbild-Zustand
gestellt.
Deutsch - 14
Symptom
Unscharfes Bild.
Eeken des
verfŸgbaren
Bildschirmbereichs
sind verzert.
Kontrolle
Kontrast und Helligkeit einstellen.
Entmagnet einmal durchfŸhren.
Kissenform/Trapezform/Kis. Ausgleich/
Parallelogramm/Oben Kis. Ecke./ Un Kis. Ecke./
O.K-Ausgleich/U.K-Ausgleich einstellen.

Este manual explica como hacer una instalacion correcta,
operarlo y obtener el mejor rendimiento de su monitor. Por favor
lea este manual del usuario cuidadosamente antes de instalar su
monitor, y despues guarde su manual cerca de su monitor, para
una rapida referencia.
Primero, por favor revise que el contenido de la caja de carton,
corresponda con la siguiente lista:
¥Monitor a color
¥Cable de voltage
¥Guia del Usuario
¥Base
¥Tarjeta de garantia(Opcional)
Si hay algun articulo que no venga o venga da–ado, por favor
hable con su vendedor. Por favor guarde la caja de carton y
materiales de empaquetado para poder guardarlo propiamente y
transportar su monitor.
Espa–ol - 1
CONTENIDO INTRODUCCION
Introducci—n ............................................................................ 1
Caracter’sticas del Producto................................................. 2
Setup ......................................................................................... 3
Instalacion de la Base Inclinatoria/Giratoria ...................... 3
Conectando el Cable de Se–al D-sub y voltaje ................... 4
Sistema de Ahorro de Energia ............................................ 5
DDC por Enchufando y Comenzando ................................ 5
Operaci—n y Ajuste .................................................................. 6
Especificaci—nes...................................................................... 12
Gu’a de Se–ales de Tiempos ................................................. 12
Solucion de Problemas .......................................................... 13
INSTALACION DE LA BASE INCLINATORIA/
GIRATORIA
1. Asegœrese de que el monitor este apagado.
2. Ponga el monitor con la pantalla hacia abajo y la parte de
abajo hacia usted, hagalo con cuidado para no rayar la pantalla.
3. Alinee los 4 ganchos de la base, con los agujeros guia de la
parte inferior del monitor.
4. Inserte los ganchos dentro de las agujeros guia.
5. Deslice la base hacia delante del monitor hasta que queden
enganchados.
6. Levante el monitor y pongalo sobre su base.
CARACTERISTICAS DEL PRODUCTO
¥La conveniencia, el desplegado en la pantalla permite ajustes
con facilidad y exactitud del horizontal, tama–o y posicion,
geometria y color de la pantalla.
¥El monitor soporta un seguro ambiente de trabajo en
cumplimiento estricto con el estandard MPR II, para baja
emision de radiacion (TCO opcional).
¥El monitor cumple con la especificacion (DDC) Canal de
Desplegado de Datos VESA. Especificacion de
compatibilidad por Conecte y Empiese. La avanzada
microcircuiteria hace la instalacion y configuracion rapida y
sencilla.
¥La caracteristica del monitor. Control de Color avanzado por
tono fino, permite conocer su propio gusto personal o
aplicacion de requerimientos. El uso de los controles en
pantalla para ajustar la temperatura del color, los valores de
ganancia del rojo, verde y azul, o el parametro de polaridad
rojo, verde y azul para la mejor pantalla posible en color e
intensidad.
¥Presione el boton de Menu y active el menu de diagnosis
hacia si mismo, para determinar si su monitor esta
funcionando normalmente, no recibiendo se–al o recibiendo
se–al que esta fuera del rango de escaneado.
¥Con solo activarlo se refresca la memo–a alta de el monitor
para estabilizar la pantalla y eliminar el Flicker (vibracion)
que contribuye a tension en los ojos y dolor de cabeza.
¥La capacidad de desplegado de pantalla completa, trabaja bajo
todos los modos graficos y provee una gran area de vision que
los monitores convencionales, dandole una mejor imagen con
mas espacio de trabajo.
Espa–ol - 2 Espa–ol - 3
SETUP
Si usted desea quitar la base, presione el candado como se
muestra en el dibujo, y jale la base hacia atras del monitor para
separata.
Canado
SISTEMA DE AHORRO DE ENERGIA
Si usted usa el monitor, con una computadora que cumpla con el
programa de ahorro de energia usted puede hacer que el monitor
se ponga sin nada en la pantalla, cuando ha permanecido sin
usarse por un periodo de tiempo. Para especificar el periodo o
esta caracteristica de deshabilitacion, fije el tiempo de salida en
un programa del ÒSet UpÓ del sistema de la computadora, o use
un paquete especial para el ahorro de energia. Mire el manual
del usuario de su computadora para detalles del uso del sistema
de ÒSet UpÓ. Mientras el monitor esta en modo de ahorro de
energia (pantalla en blanco), esta consume menos potencia que
en un estado normal, el color del Led indica este estado. Para
restaurar la imagen en la pantalla, presione cualquier tecla o
mueva el raton. Si el cable esta flojo o desconectado, la
caracteristica del ahorro de energia no es operando.
CANAL DE DESPLEGADO DE DATOS POR
ENCHUFANDO Y COMENZANDO
Si usted usa el monitor con una computadora que cumple con el
sistema DDC1/2B/CI de VESA, la tarjeta de video alojada que
autom‡ti camente se configura sin ninguna intervenci—n de
manera que encaje lo mejor al monitor adjunto.
La pantalla de datos de canales(DDC) permite al monitor
informar el sistema alojado referente a su informaci—n de
configuracion para un optimo uso del monitor.
El uso de la utilidad de la tarjeta de video no es requerido para
encajar con las resoluciones y refrescar los rangos del monitor y
la tarjeta de video.
CONECTANDO EL CABLE DE SEÑAL D-SUB Y
VOLTAJE
1. Apague el monitor y la computadora.
2. Conecte el conector de 15 pins D-Sub al puerto de la salida de
tarjeta de video de su computadora.
3. Apriete los tornillos del conector.
4. Enchufe el cable de voltaje dentro del receptaculo de AC,
localizado en la parte de atras del monitor.
5. Enchufe la otra terminal del cable de alimentaci—n, a la salida
de la linea de AC.
Espa–ol - 4 Espa–ol - 5
Si el tipo de cable de alimentaci—n se sirve para PC-to-
Monitor, conecte el otro cable de alimentaci—n a la toma de la
en su computadora.
Cable de Se–al
Cable de Voltaje
Espa–ol - 6 Espa–ol - 7
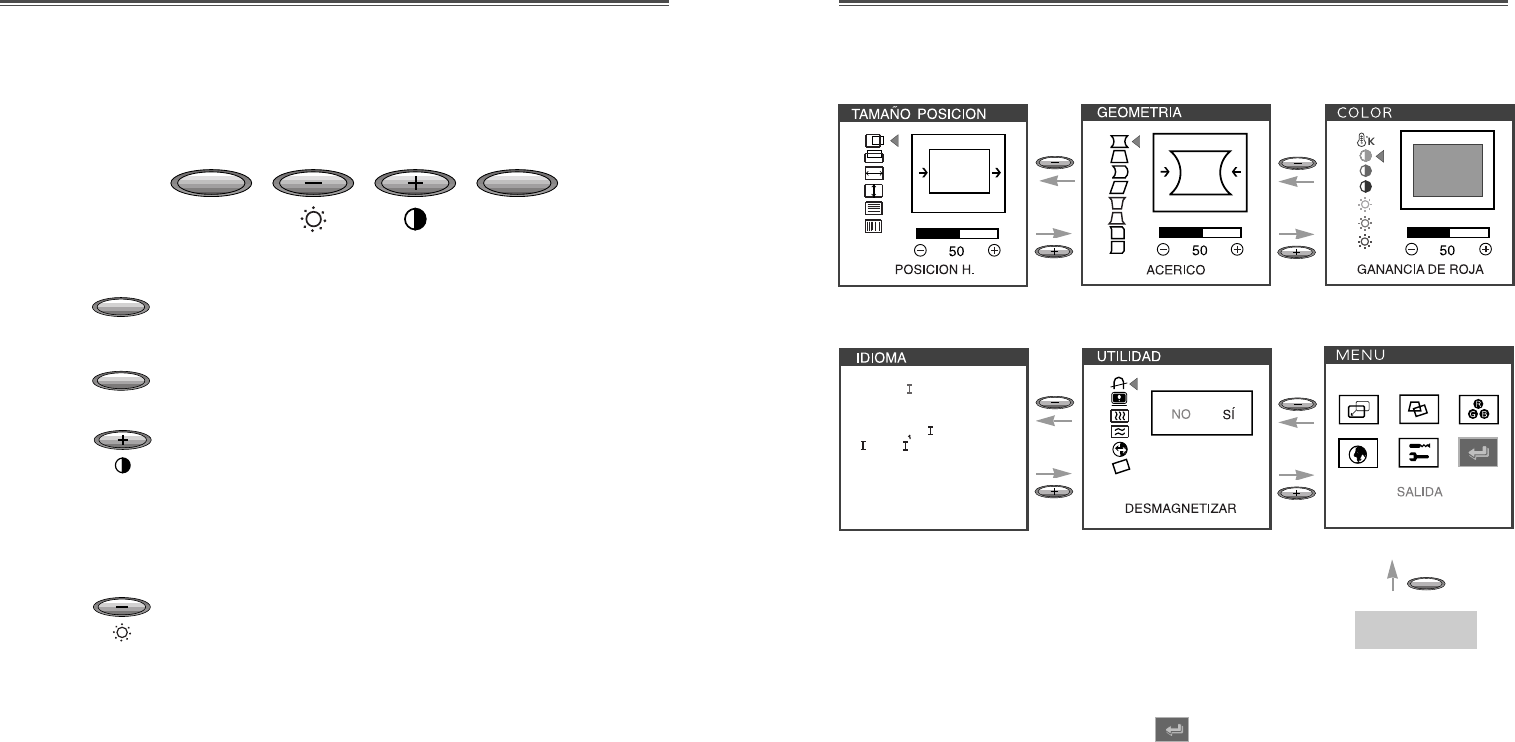
Proceso importante
¥Al seleccionar el icono en la ventana OSD, puede salir del
menu OSD.
OPÉRACION Y AJUSTE
MENU
SELECT
MENU
SELECT
Tablero de mandos
¥Lanzar OSD (Imagen del Display) de la pantalla
MENU.
¥Selecciona el submenu y la funci—n.
¥Mueva el submenu y la funci—n.
¥Aumentar el valor de funcion seleccionada.
¥Ajusta el contraste directamente cuando OSD
(expuesto) no est‡ aparecido en la pantalla.
¥Mueva el submenu y la funci—n.
¥Decrementar el valor de funcion seleccionada.
¥Ajusta la claridad directamente cuando OSD
(expuesto) no est‡ aparecido en la pantalla.
DEUTSCH
ENGL SH
ESPA„OL
FRAN
C
A S
TAL ANO
MENU
Empezar
Espa–ol - 8 Espa–ol - 9
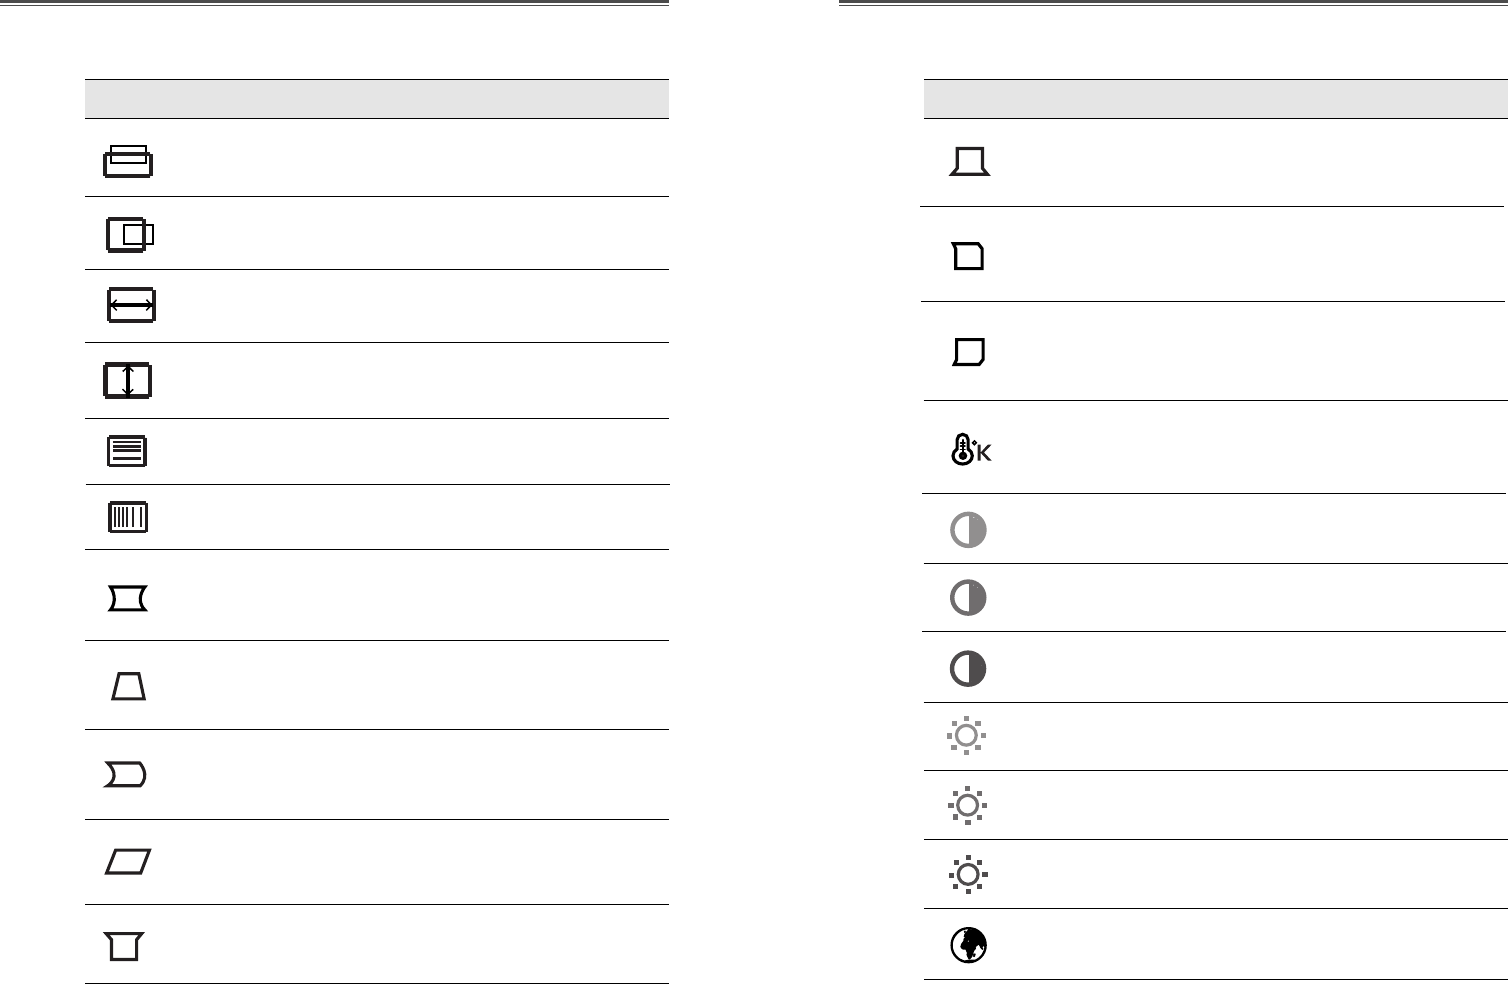
OSD Funcions
ICONO CONTROL FUNCIONS ICONO CONTROL FUNCIONS
LINEALIDAD V. Ajusta la linealidad vertical.
Ajusta la posici—n horizontal de la
visualizaci—n (izquierda o derecha).
POSICION H.
Ajusta la posici—n vertical de la
visualizaci—n (arriba o abajo).
Ajusta la anchura de la visualizaci—n
(tama–o horizontal).
Ajusta la altura de la visualizaci—n
(tama–o vertical).
POSICION V.
TAMAÑO H.
TAMAÑO V.
Ajusta los m‡rgenes de la izquierda y la
derecha para obtener m‡rganes m‡s
c—ncavos o convexos.
Ajusta el trapezoide de la pantalla
moviendo las l’neas hacia adentro o hacia
afuera.
Ajusta el equilibrio lateral cuando los
laterales de la pantalla est‡n curvados
hacia la izquierda o la derecha.
Ajusta el paralelogramo cuando la
pantalla se ladea a la izquierda o la
derecha.
ACERICO
TRAPEZOIDE
BALANCE
ACER.
PARALELOGRA
-MA
Escoge distintas temperaturas de color
preestablecidas o establece par‡metros de
color personalizados.
Ajusta el aumento de rojo.
Ajusta el aumento de verde.
TEMP. DE
COLOR
GANANCIA
ROJA
GANANCIA
VERDE
Ajusta el aumento de azul
GANANCIA
AZUL
Ajusta la intensidad de rojo.
Ajusta la intensidad de verde.
Ajusta la intensidad de azul.
SESGO ROJA
SESGO VERDE
SESGO AZUL
Ajusta la clavija esquina arriba cuando los
laterales de la pantalla est‡n curvados.
Ajusta la clavija de esquina al suelo
cuando la tama–o del suelo de la imagen
est‡ inclinada.
ESQUINA
SUPER.
ESQUINA
INFER.
Ajusta el lado del acerico equilibrio al
superior cuando el lado superior de la
imagen est‡ inclinada hacia la izquierda —
derecha.
BALANCE
SUPER.
Ajusta el lado del acerico equilibrio al
suelo cuando el lado inferior de la imagen
est‡ inclinada hacia la izquierda —
derecha.
BALANCE
INFER.
LINEALIDAD H. Ajusta la linealidad horizontal.
Seleccione el idioma para OSD
(5 lenguas).
IDIOMA
Espa–ol - 10 Espa–ol - 11
Diagnosis del Monitor
Cuando el monitor no desplega, si el usuario presiona
cualquier tecla, el diagnostico de la pantalla sera desplegado.
El diagnostico revisa el estado del monitor sino tiene se–al o
esta fuera de rango.
Es desplegado cuando el conector de
se–al (D-SUB) no es conectado o el
estado del monitor es en modo DPMS.
Es desplegado cuando la frecuencia
aplicada es bajo o alrededor del rango
normal.
Rango Normal
H : 30 - 70 KHz
V : 50 - 160 Hz
ICONO CONTROL FUNCIONS
Ajusta la cancellacion de vertical del
imagen.
MOIRE V.
Ajusta la cancellacion de horizontal del
imagen.
MOIRE H.
Ajusta la rotaci—n cuando la pantalla est‡
inclinada a la izquierda o a la derecha
(Opcional).
ROTACION
La desmagnetizaci—n mantiene el monitor
libre de cargas magnŽticas no deseadas
que pueden producir impurezas en el
color.
DESMAGNETI
-ZAR
Muestra la frecuencia y polaridad
horizontal y vertical.
ESTADO
Vuelve a poner la pantalla en los ajustes
de visualizaci—n preestablecidos en
f‡brica.
REVOLVER
Espa–ol - 12 Espa–ol - 13
Tama–o de CDT 17 pulgadas
Imagen visualizable 16.2 pulgadas
Espaciamiento de puntos 0.28 mm
Sincronizaci—n Horizontal 30 - 70 KHz
Vertical 50 - 160 Hz
Conecte y Empiese DDC1/2B/CI
Ahorro de energ’a EPA, VESA DPMS, Nutek Sumiso
Fuente de Voltaje 100-240 Vac, 50/60Hz (Voltaje libre)
Consumo de potencia 95W
Dimensiones-W x H x D 420 x 453.5 x 429mm
(con la base)
Peso-deshacer (lbs/Kg) 33.7/15.3
Ambiente del operaci—n 10 ~ 40¡C /50 ~ 104¡F
ESPECIFICACIONES
GUIA DE SEÑALES DE TIEMPOS
REVISE
Revise si el interruptor de voltaje y el de la
computadora estan encendidos.
Revise si el cable de se–al esta correctamente
conectado a la tarjeta de video.
Revise si las puntas del conector D sub no estan doblados.
Revise si la computadora esta en el modo de ahorro
de energia.
Revise si el interruptor de voltaje esta en la posicion
de encendido.
Revise si el cable de voltaje esta correctamente conectado.
Revise si el cable de se–al es conveniente a la
tarjeta de video.
Ajuste el Tama–o Horizontal y Vertical y la Posicion
Horizontal y Vertical para obtener la imagen apropiada.
Mantenga alejados los dispositivos que puedan
causar interferencia electrica al monitor.
Mire la informacion de FCC en la cubierta frontal
del manual.
Oprima el boton de Desmagnetizar.
Ajuste el Contraste y el Brillo.
Oprima el boton de Desmagnetizar.
Ajuste Acerico/Trapezoide/Balance
Acer./Paralelogramo/Esquina Super./Esquina Infer.
/Balance Super./Balance Infer.
SINTOMA
No imagen.
El Led del voltaje no
esta encendido.
La imagen inestable.
La imagen no esta
centrada, es muy
peque–a o grande.
Movimiento en la
imagen u ondas estan
presentas en la
imagen.
El color se ve
manchado.
Imagen borrosa.
Las orillas en el area
valida en la pantalla
no estan derechas.
SOLUCION DE PROBLEMA
Moda Resoluci—n Freq.H.(KHz) Freq.V.(Hz) Nota
VGA 480 640
X
480 31.5 60 Non-interlaced
VESA VGA 75 640
X
480 37.5 75 Non-interlaced
VGA 400 720
X
400 31.5 70 Non-interlaced
VESA 46K 800
X
600 46.9 75 Non-interlaced
VESA SVGA 85 800
X
600 53.7 85 Non-interlaced
VESA 60K 1024
X
768 60.0 75 Non-interlaced
VESA 1024/85 1024
X
768 68.7 85 Non-interlaced
VESA 1280/60 1280
X
1024 64.0 60 Non-interlaced
La se–ales del tiempo est‡ ajustada en el condic—n —ptimo.