WINIA Electronics DPA5034LDS 50" Plasma Display Panel User Manual 1
Dongbu Daewoo Electronics Corporation 50" Plasma Display Panel Users Manual 1
UserManual.wiki
>
WINIA Electronics
>
DPA5034LDS User Manual
>
Users Manual 1
Contents
1.
Users Manual 1
2.
Users Manual 2
Users Manual 1
Navigation menu
Upload a User Manual
Namespaces
Wiki Guide
HTML
PDF
Info
Views
User Manual
Discussion / Help
Navigation


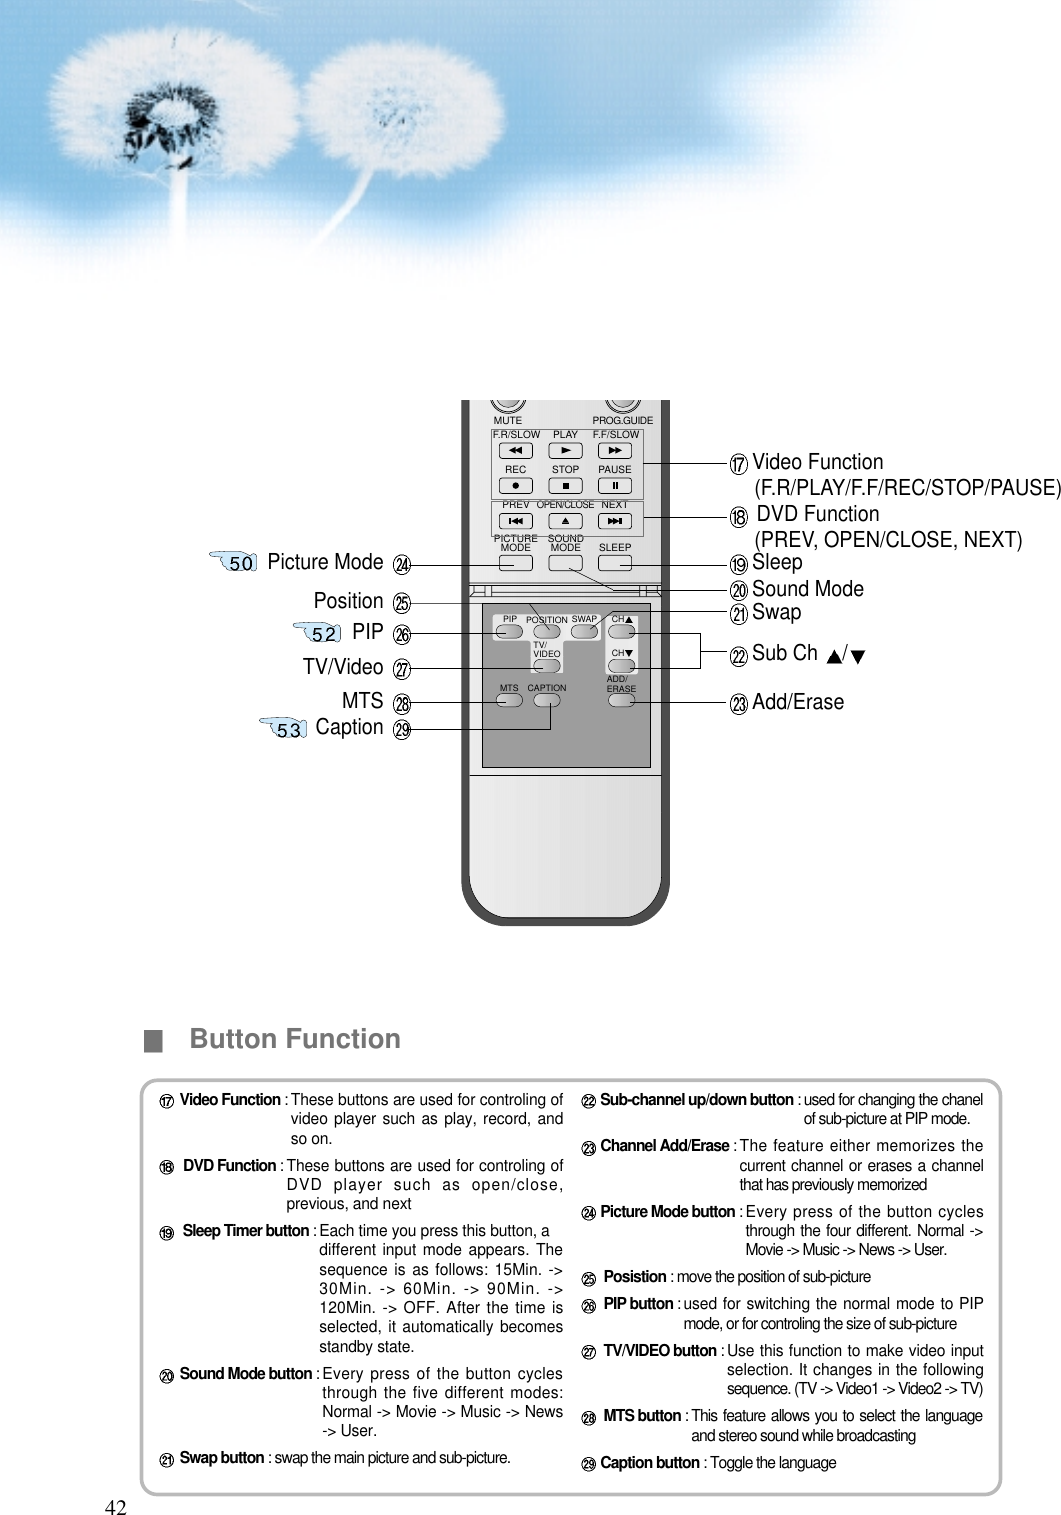
![21Input SelectTV/VIDEO• Select [Video 1 or Video 2] by pressingthe TV/VIDEO button of the RemoteControl or the "INPUT SELECT" Key inKeyPad of the pdp set.• Each time you press the “TV/VIDEO”button, different input modes appear. Thesequence is as follows: Select a Desired Channel and Function• Select a desired channel and function byusing the Remote Control of the CableBroadcasting Receiver.34NOTES:1) If your local cable company re-transmits digital broadcasts,you may watch normal broadcasts or digital broadcastssimultaneously. For detailed information, refer to your localcable company.Video1 Video2TV](https://usermanual.wiki/WINIA-Electronics/DPA5034LDS.Users-Manual-1/User-Guide-515231-Page-20.png)
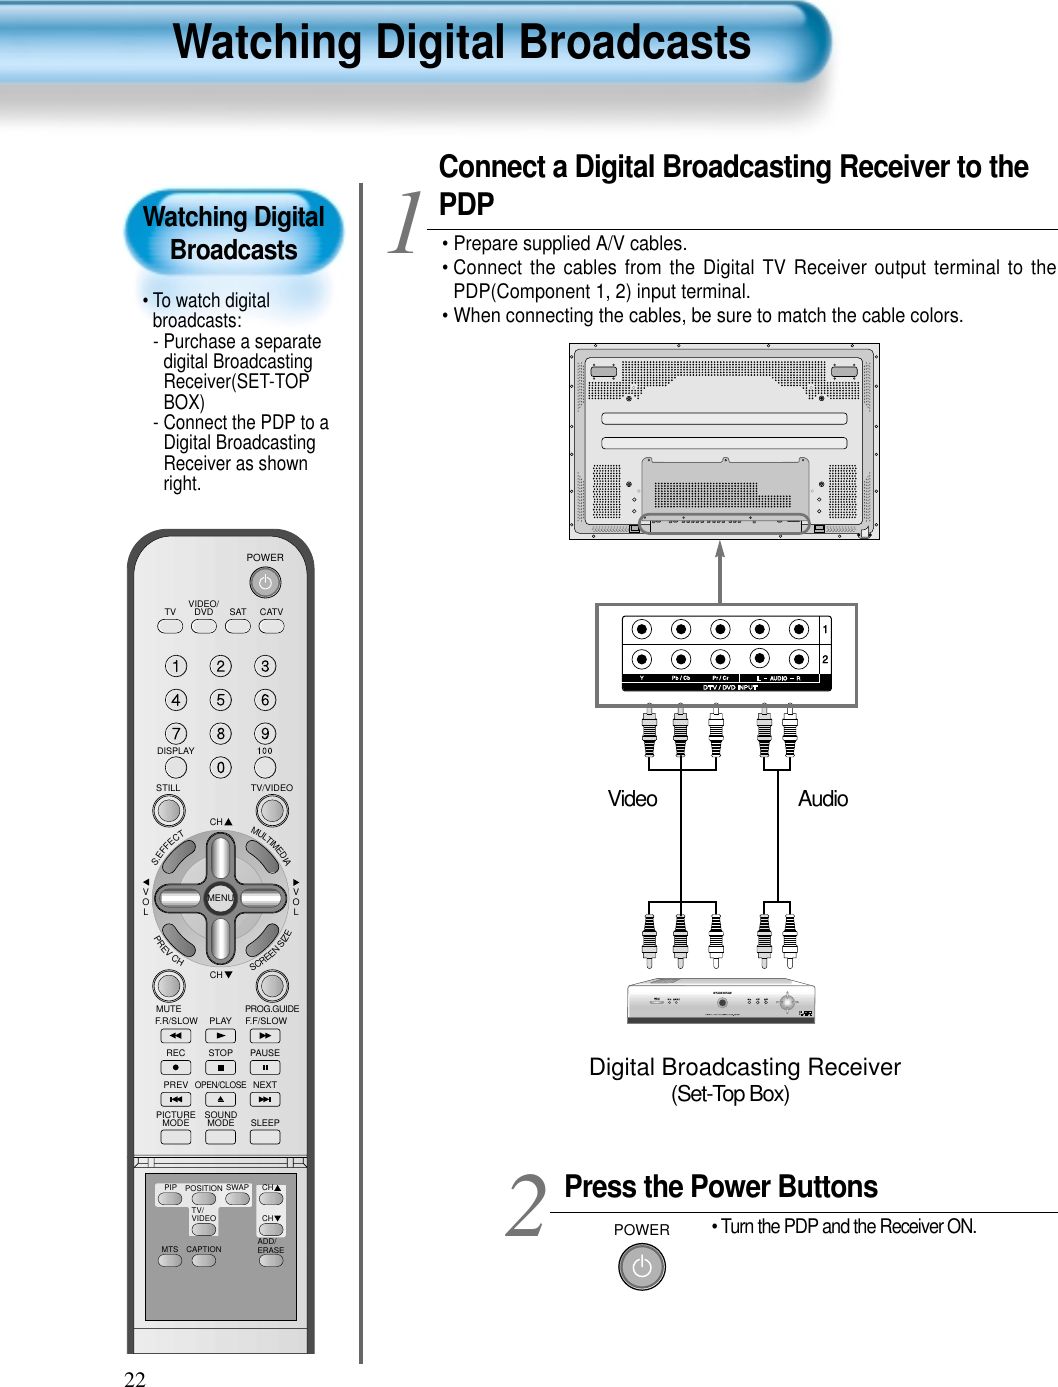
![23Input SelectMULTIMEDIA• Select [Component 1 or Component 2] bypressing the “Multimedia” button of theRemote Control or the "INPUT SELECT"Key in KeyPad of the pdp set.• Each time you press the “Multimedia”button, different input modes appear. Thesequence is as follows:Select a Desired Channel and Function• Select a desired channel and function byusing the Remote Control of DigitalBroadcasting Receiver.34NOTES:1) You can select input using [INPUT SELECT] button in the keypad ofthe pdp set. The used sequence is as follows:TV -> PC -> DVI -> Component1 -> Component2 -> Video1 -> Video22) Possible Digital Broadcasting signals: 1080i, 720p, 480p.3) Antenna Connection:Apartment : Check if community antenna receives digital broadcasts.Private Houses: Set the indoor/outdoor UHF antenna to the directionof the digital broadcasting transmitting company.4) For detailed connection method, refer to the Owner’s Manual of DigitalBroadcasting Receiver.5) What is a component? : Signals with which brightness and color areseparated, producing a sharp picture.6) If the Digital Broadcasting Receiver has PC Output terminal or DVIOutput terminal, connect to ‘PC INPUT’ or ‘DVI INPUT’ at the backpanel of the PDP.When watching the PDP by PC or DVI Input, some undesired signalsmay be seen at the top and bottom area of the screen. In this case,select [Menu] --> [Screen] --> [V. Size] to adjust.Component1DVI PCComponent2](https://usermanual.wiki/WINIA-Electronics/DPA5034LDS.Users-Manual-1/User-Guide-515231-Page-22.png)

![25Input SelectTV/VIDEO• Select [Video 1 or Video 2] by pressingthe TV/VIDEO button of the RemoteControl or the "INPUT SELECT" Key inKeyPad of the pdp set.• Each time you press the “TV/VIDEO”button, different input modes appear. Thesequence is as follows: Select a Desired Channel and Function• Select a desired channel and function byusing the Remote Control of the CableBroadcasting Receiver.34NOTES:1) If your local cable company re-transmits digital broadcasts,you may watch normal broadcasts or digital broadcastssimultaneously. For detailed information, refer to your localcable company.Video1 Video2TV](https://usermanual.wiki/WINIA-Electronics/DPA5034LDS.Users-Manual-1/User-Guide-515231-Page-24.png)
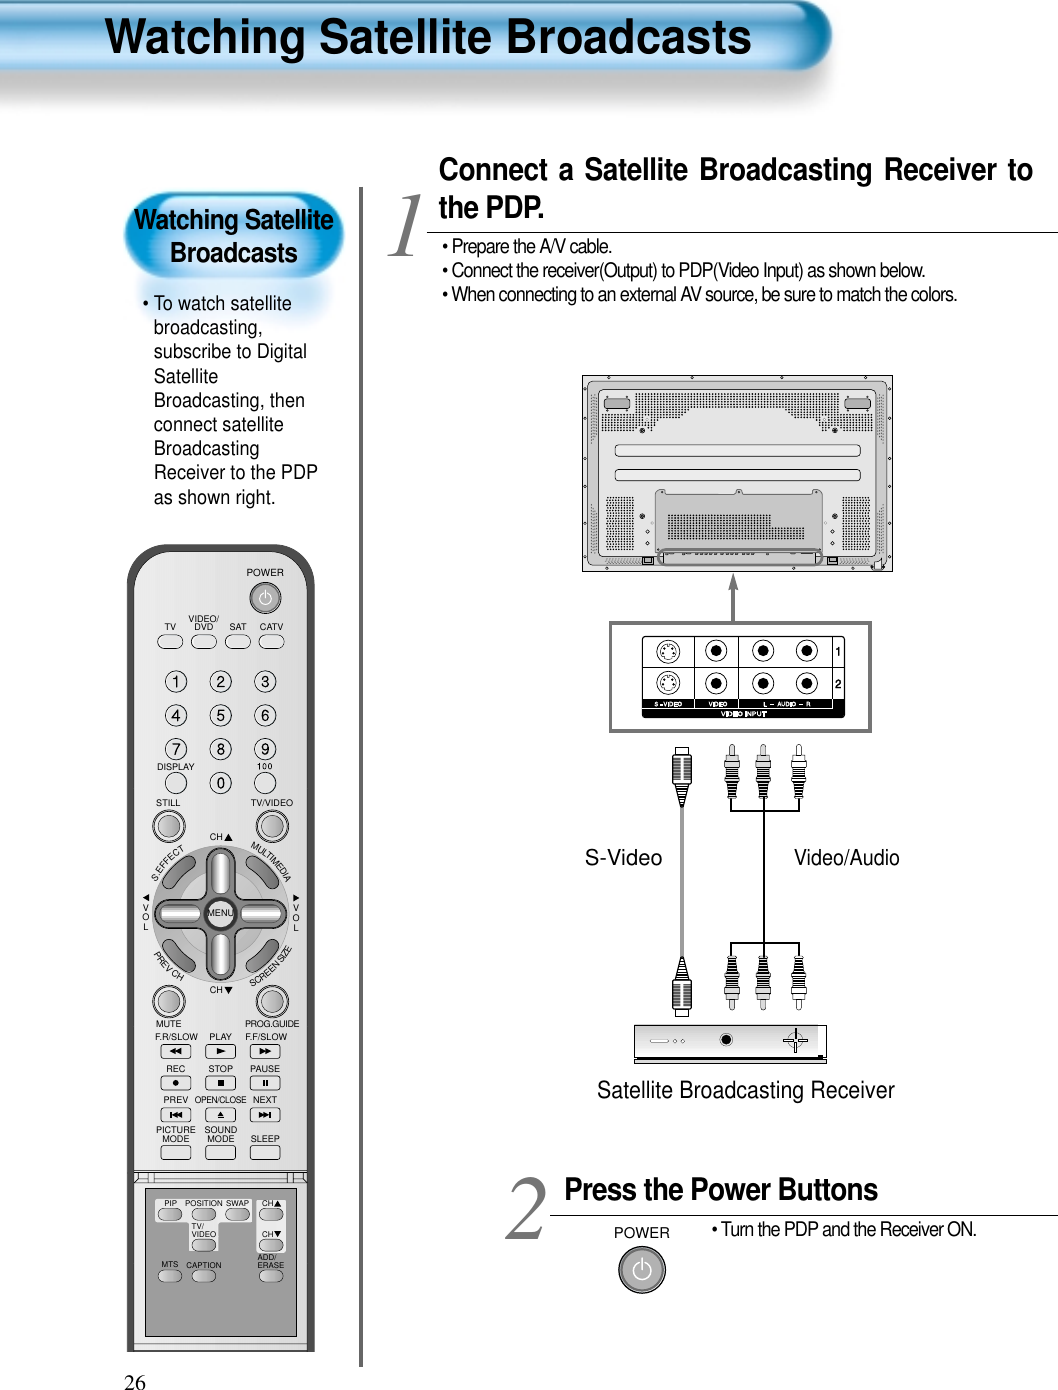
![27Input SelectTV/VIDEO• Select [Video 1 or Video 2] by pressingthe TV/VIDEO button of the RemoteControl or the "INPUT SELECT" Key inKeyPad of the pdp set.• Each time you press “TV/VIDEO” button,a different input mode appears.The sequence is as follows: Select a Desired Channel and Function• Select a desired channel and function byusing the Remote Control of the SatelliteBroadcasting Receiver.34Video1 Video2TV](https://usermanual.wiki/WINIA-Electronics/DPA5034LDS.Users-Manual-1/User-Guide-515231-Page-26.png)
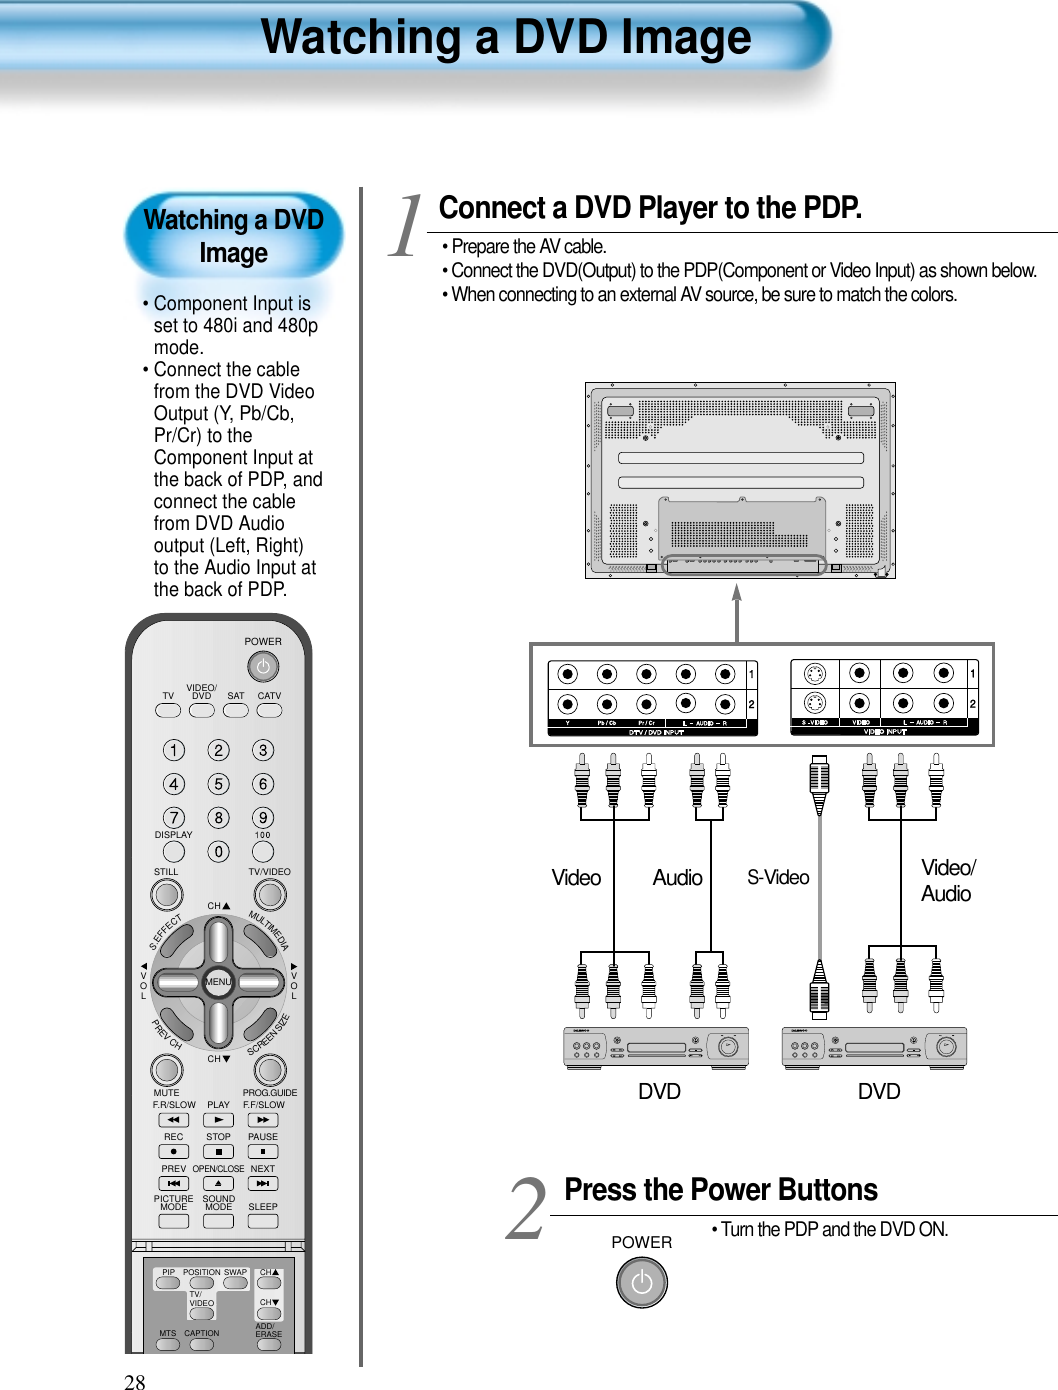
![29Input SelectMULTIMEDIA• Select [Component 1 or Component 2,Video1, Video2] by pressing the“MULTIMEDIA” or “TV/VIDEO” button ofthe Remote Control or the "INPUTSELECT" Key in KeyPad of the PDP set.• Each time you press the “MULTIMEDIA” or“TV/VIDEO” button, a different input modeappears. The sequence is as follows:Select a Desired Title and Function• Select a desired title and function byusing the Remote Control of the DVD.34NOTES:1) Y/Cb/Cr, which stands for DVD Player’s Output Terminal, canalso be written as Y/B-Y/R-Y, Y/Pb/Pr depending on the kindsof DVD devices.2) The way of connecting the DVD to the PDP is as follows:Y <---> Y Cb <---> Pb, B-Y, Cr <---> Pr, R-Y3) The DVD output can be Video, S-Video and/or ComponentVideo depending on the DVD devices. There are variousoutput modes, so be sure to check when you purchase it. 4) When connecting S-Video and Video simultaneously, only S-Video will be displayed on the screen. TV/VIDEOComponent1DVIPCComponent2Video1 Video2TV•“MULTIMEDIA”button•“TV/VIDEO”button](https://usermanual.wiki/WINIA-Electronics/DPA5034LDS.Users-Manual-1/User-Guide-515231-Page-28.png)
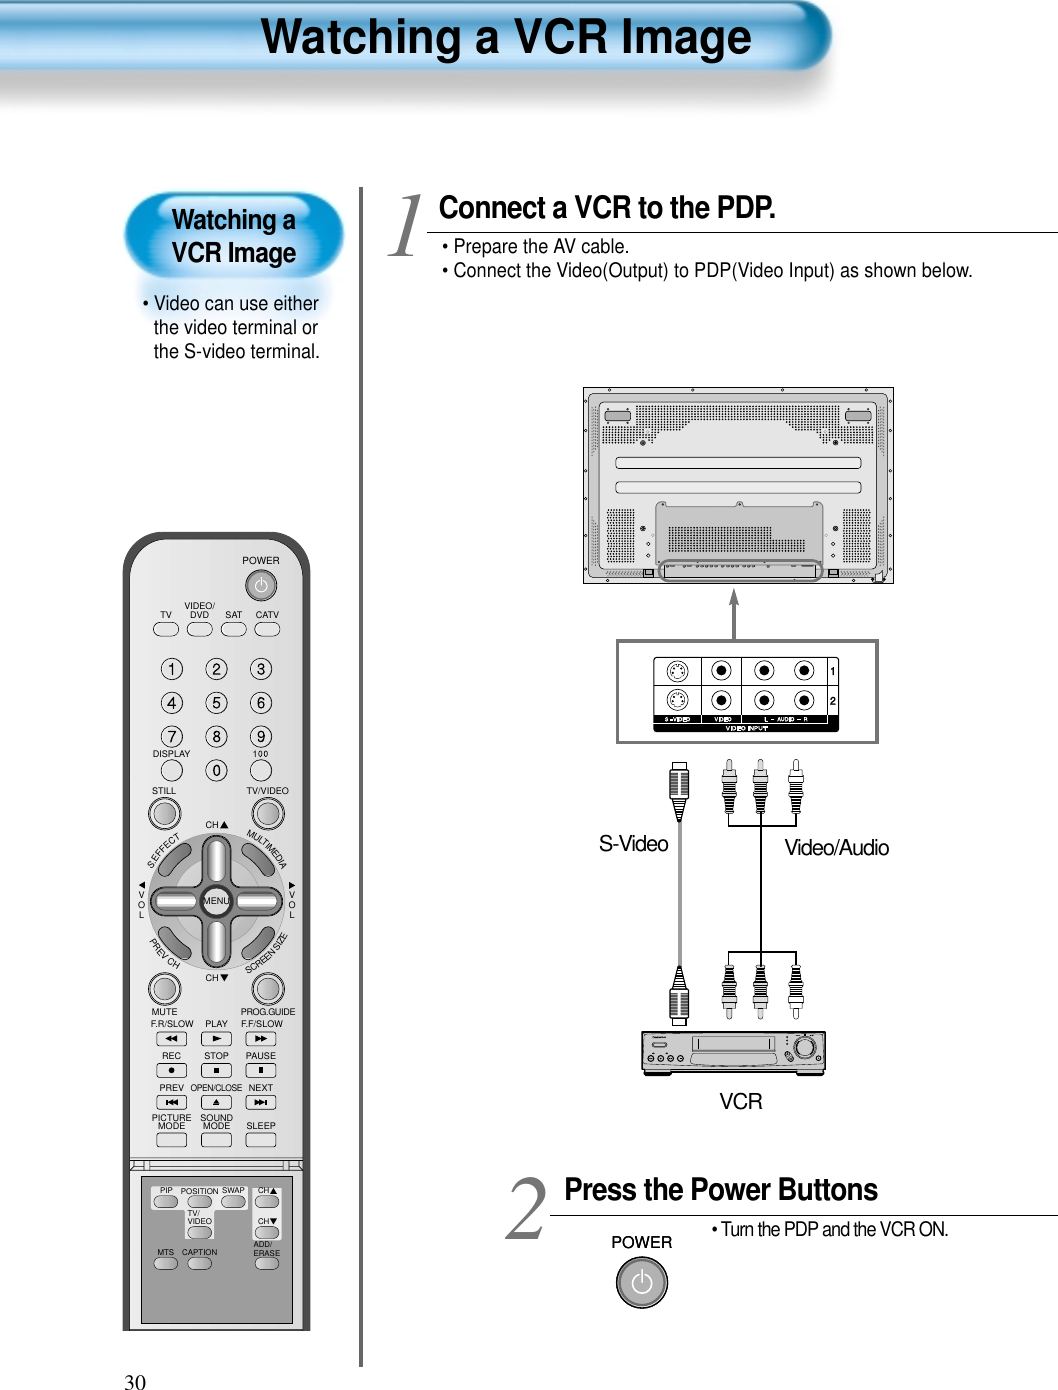
![31Input SelectTV/VIDEO• Select [Video 1 or Video 2] by pressingthe “TV/VIDEO” button of RemoteControl or the "INPUT SELECT" Keyin KeyPad of the pdp set.• Each time you press the “TV/VIDEO”button, a different input mode appears.The sequence is as follows: Select a Desired Title and Function• Select a desired title and function byusing the Remote Control of theVCR.34NOTES:1) When connecting a Video, the S-Video terminal provides abetter image than the Video terminal.2) When connecting to the Video terminal, connect 3 color AVcables (video, left audio, right audio) to the PDP; for the S-Video terminal, connect the Audio terminal (Left, Right) in thesame way, and connect the S-Video cable (sold separately).3) When connecting the Video terminal and the S-Videosimultaneously, the S-Video terminal is selected. This can bechecked by the “DISPLAY” button of the Remote Control.Video1 Video2TV](https://usermanual.wiki/WINIA-Electronics/DPA5034LDS.Users-Manual-1/User-Guide-515231-Page-30.png)
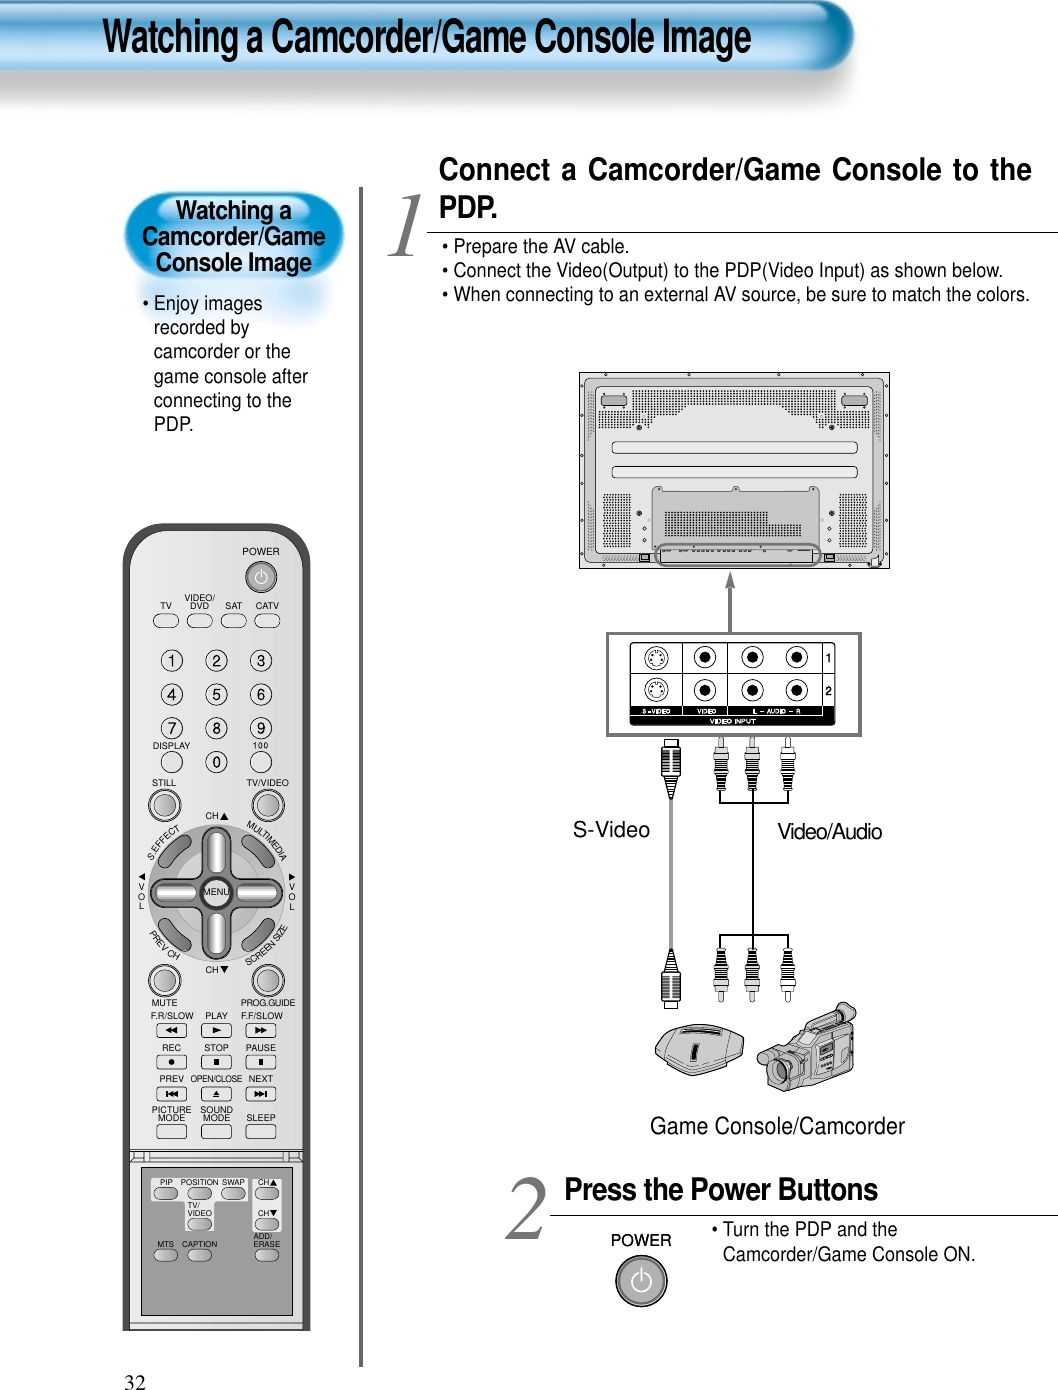
![33Input SelectTV/VIDEO• Select [Video 1 or Video 2] by pressingthe “TV/VIDEO” button of the RemoteControl or the "INPUT SELECT" Key inKeyPad of the pdp set.• Each time you press the “TV/VIDEO”button, a different input mode appears.The sequence is as follows:Select Function• Select the Function by using theRemote Control of Camcorder orGame Console.34NOTES:1) When connecting a Video, the S-Video terminal provides abetter image than the Video terminal.2) When connecting to the Video terminal, connect 3 color AVcables (video, left audio, right audio) to the PDP; for the S-Video terminal, connect the Audio terminal (Left, Right) in thesame way, and connect the S-Video cable(sold separately).3) When connecting a component, refer to “Watching a DVDImage” on page 34-35.Video1 Video2TV](https://usermanual.wiki/WINIA-Electronics/DPA5034LDS.Users-Manual-1/User-Guide-515231-Page-32.png)
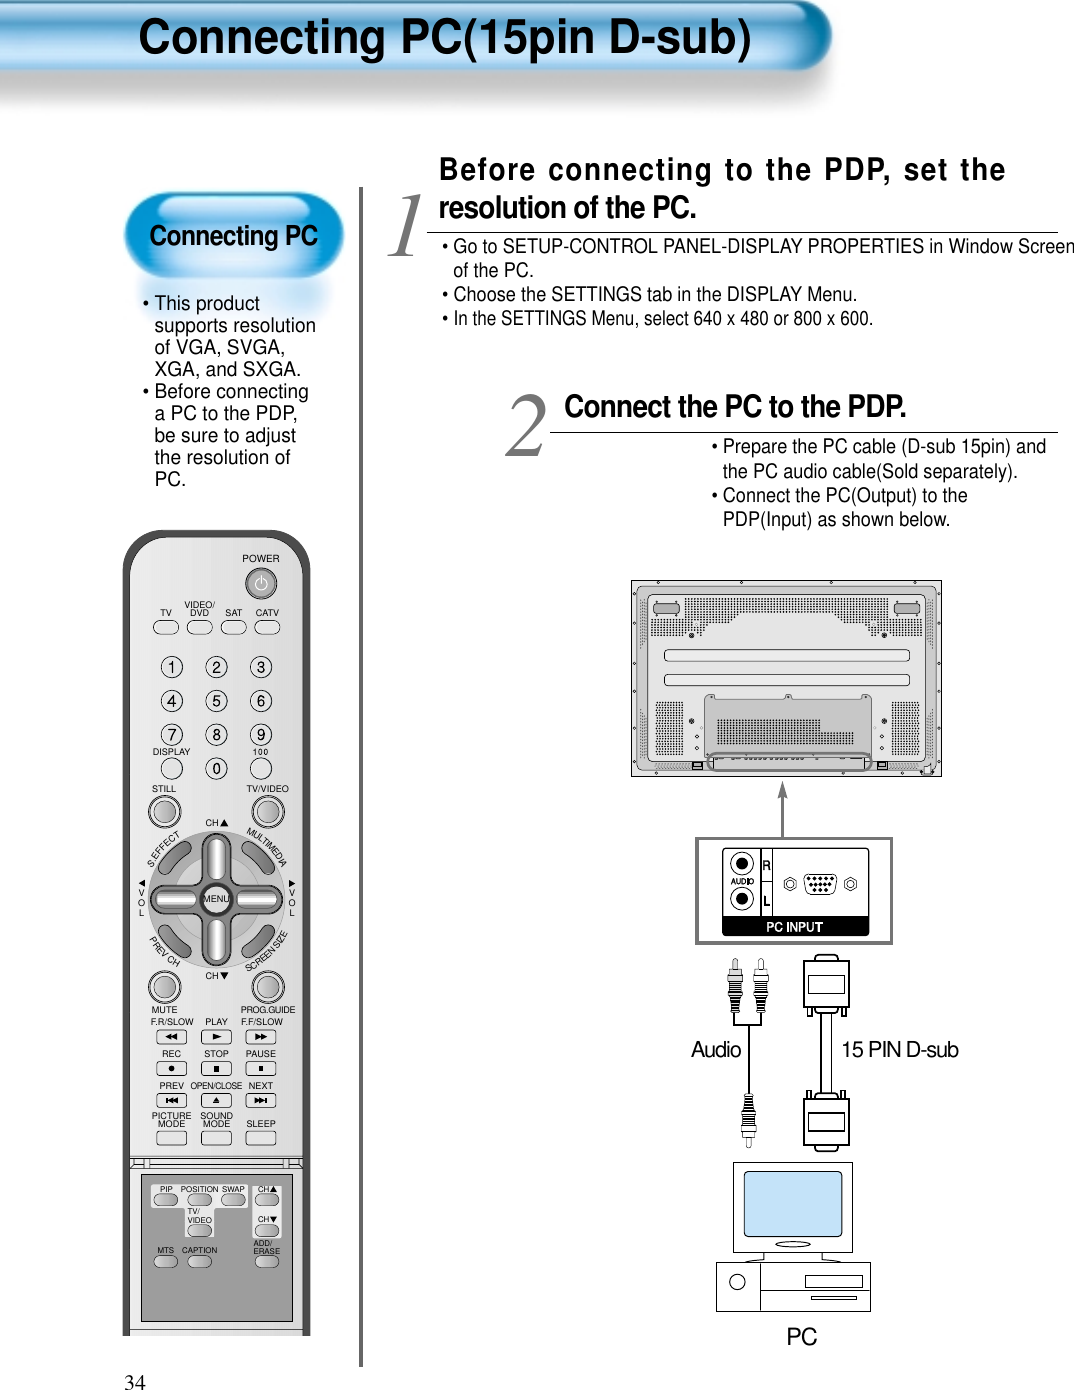
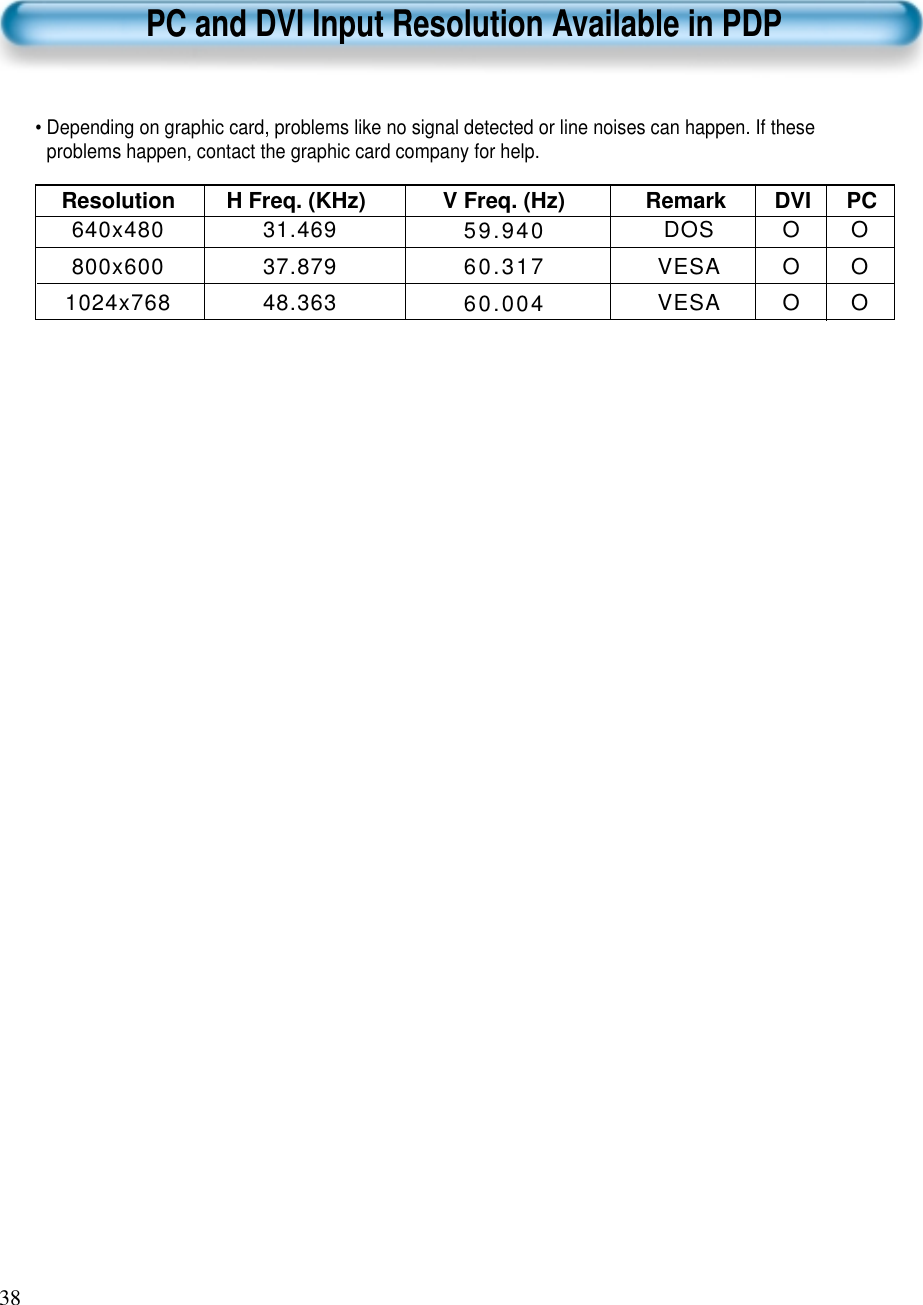
![35Input SelectMULTIMEDIA• Select [PC] by pressing the “MULTIMEDIA”button of the Remote Control or PDP unit.• Each time you press the “MULTIMEDIA”button, a different input mode appears. Thesequence is as follows: Enjoy Dynamic Ultra Screen TV byUsing PC’s Keyboard or Mouse.45Press the Power Buttons.• Turn on the PDP and the PC.3NOTES:1) The resolution of the PC TV is best at 1024 x 768 (XGA).2) If there is a [Vertical Frequency]setting menu in the [Display]Menu of the PC, adjust the frequency to 60Hz.3) If the PC resolution is too high, it may be hard to read letters.Select a suitable resolution.Component1DVIPCComponent2POWERPOWER](https://usermanual.wiki/WINIA-Electronics/DPA5034LDS.Users-Manual-1/User-Guide-515231-Page-34.png)

![37Input SelectMULTIMEDIA• Select [DVI] by pressing the“MULTIMEDIA” button of the RemoteControl or PDP unit.• Each time you press the “MULTIMEDIA”button, a different input mode appears. Thesequence is as follows: Enjoy Dynamic Ultra Screen TV byUsing PC’s Keyboard or Mouse.45Press the Power Buttons.• Turn on the PDP and the PC.3NOTES:1) The resolution of the PC monitor is best at 1024 x 768 (XGA).2) If there is a [Vertical Frequency]setting menu in the [Display]Menu of the PC, adjust the frequency to 60Hz.3) If the PC resolution is too high, it may be hard to read letters.Select a suitable resolution.4) DVI input port receives only Digital Signal.5) Depending on the graphic card when plug & unplug the DVIconnection the screen may not display correctly.Restart the computer if this happens.Component1DVIPCComponent2POWERPOWER](https://usermanual.wiki/WINIA-Electronics/DPA5034LDS.Users-Manual-1/User-Guide-515231-Page-36.png)