Wacom Co PL550 Computer Interactive Pen Display User Manual Manual
Wacom Co Ltd Computer Interactive Pen Display Manual
Wacom Co >
Manual
CAUTION
Be sure to ground the power adaptor cable at the receptacle when plugging in.
Do not touch the liquid crystal if leaked; it is irritative. In case of contact, rinse immediately with running water
for more than 15 minutes. If it went into the eye or mouth, consult physician.
WARNING
Turn off the power of the Cintiq 15X in the area where prohibited to use. It may cause other electronic
devices to malfunction.
Do not use the Cintiq 15X in a facility control system that requires extremely high reliability. It may cause
other electronic devices to malfunction or, other device may cause the Cintiq 15X to malfunction.
Do not open the Cintiq 15X It has the risk of electric shock.
HIGH VOLTAGE
If the Cintiq 15X is broken due to fall or hit, do not leave it connected to the power. It has the potential to
result in fire.
Only use the AC adaptor that came with your Interactive Pen Display. If a different type of AC adaptor is used,
the Interactive Pen Display will not work properly or it may be damaged. Using a different type of AC adaptor
also has the potential to result in fire.
Prevent your children from swallowing the UltraPen nib or side switch. The pen nib or side switch may
accidentally be pulled out if children are biting on them.
UM-0251/Cintiq AP.pm65 01.7.31, 9:27 PM1

Preface
The Wacom® Cintiq™ 15X is an integrated LCD tablet designed for direct draw-on-screen
interface with your computer. The Cintiq 15X Interactive Pen Display components include a
Wacom tablet internally mounted behind a 15.0" diagonal TFT color LCD monitor, and Wacom’s
UltraPen®.
This manual describes how to install the Cintiq 15X Interactive Pen Display hardware and
software.
It also describes how to use the Interactive Pen Display and UltraPen.
Information on using the Wacom Tablet Control Panel for customizing your tablet and pen
settings is available in the Interactive Pen Display online Help, located under the HELP menu in
the Wacom Tablet Control Panel.
The following are not included with this product:
■Information about your specific computer hardware.
■Information about your operating system.
■Information about application software. To use the pressure-sensitivity of the UltraPen with
your favorite drawing application, refer to instructions in that application’s manuals.
Please refer also to your computer hardware, operating system, or software application manuals.
UM-0251/Cintiq AP.pm65 01.7.31, 9:27 PM2
Precautions on handling the Cintiq 15X
■For use with DVI, do not use any graphics card that Cintiq 15X can not be used with. It may damage
the Cintiq 15X.
■Do not disassemble the Cintiq 15X or pen. This may cause the device to malfunction. In this case,
Wacom shall have no responsibility to repair or replace the product.
■Do not use or store the Cintiq 15X where:
- Temperature changes are severe (e.g., outdoors or inside a vehicle).
- The Cintiq 15X and pen are exposed to direct sunlight or heat from an appliance.
- The Cintiq 15X and pen are exposed to water or any other kind of liquid.
- Temperature or humidity exceeds the specifications.
■Do not block the ventilation holes in the rear panel. It may overheat and damage the Cintiq 15X.
■Do not use the Cintiq 15X in a dusty environment. It may damage the Cintiq 15X.
■Do not scratch the cover glass of the Cintiq 15X. Avoid placing sharp objects on the glass surface. If the
pen tip becomes sharp or angular, it may damage the coating on the cover glass of the Interactive Pen
Display. Please replace the pen nib as necessary.
■Do not use detergent to clean the cover glass of the Cintiq 15X—this may alter the surface friction and
deteriorate the handwriting feel.
■Do not lift up the Cintiq 15X by holding the stand. It may damage the open-close mechanism of the stand.
When you lift up the Cintiq 15X, be sure to hold the main unit casing.
■Do not put heavy articles on the Interactive Pen Display; this may damage the cover glass or stand.
■Do not place heavy article on the Cintiq 15X cables. Near the cable connectors, do not apply heavy stress
on the cables or do not repeat bending the cables. It may damage the Cintiq 15X.
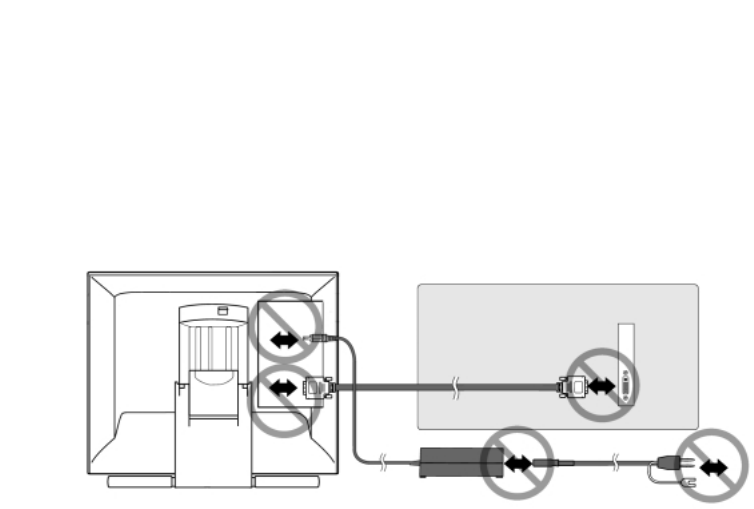
■Do not connect or disconnect the DVI video cable or power cable while the Interactive Pen Display or
your computer is turned on; it may damage the LCD display or computer video card.
UM-0251/Cintiq AP.pm65 01.7.31, 9:27 PM3
Federal Communication Commission Interference Statement
This equipment has been tested and found to comply with the limits for a Class B digital device, pursuant to Part 15 of
the FCC Rules. These limits are designed to provide reasonable protection against harmful interference in a residential
installation. This equipment generates, uses and can radiate radio frequency energy and, if not installed and used in
accordance with the instructions, may cause harmful interference to radio communications. However, there is no
guarantee that interference will not occur in a particular installation. If this equipment does cause harmful interference
to radio or television reception, which can be determined by turning the equipment off and on, the user is encouraged to
try to correct the interference by one of the following measures:
-Reorient or relocate the receiving antenna.
-Increase the separation between the equipment and receiver.
-Connect the equipment into an outlet on a circuit different from that
to which the receiver is connected.
-Consult the dealer or an experienced radio/TV technician for help.
FCC Caution: To assure continued compliance, (example - use only shielded interface cables when connecting to
computer or peripheral devices). Any changes or modifications not expressly approved by the party responsible for
compliance could void the user's authority to operate this equipment.

4
Table of Contents
Checking Packed Components 5
Installation 6
LCD Monitor Installation
Wacom Tablet Software Installation for Windows and Macintosh
Calibrating the Tablet
Cintiq 15X Component Functions 10
Front View
Rear View
Mounting the Cintiq 15X onto a Mount Arm or Other Stand
Caring For Your Cintiq 15X
Using the UltraPen
UltraPen
Pen Type Settings in the Wacom Tablet Control Panel
Replacing the Pen Tip
Using the UltraPen 13
UltraPen
Using a Pen
Adjusting the LCD Monitor 15
Factory Presets, Auto Adjust and User Settings
Functions and Uses of the MENU Window
Adjusting Pitch and Phase
Power Saving
Caring For Your Cintiq 15X 19
Cleaning Your Cintiq 15X
Replacing the Pen Tip
Troubleshooting for Display 20
Specifications 22
General Specifications
LCD Display
Tablet
UltraPen
UM-0251/Cintiq AP.pm65 01.7.31, 9:27 PM4
5
Checking Packed Components
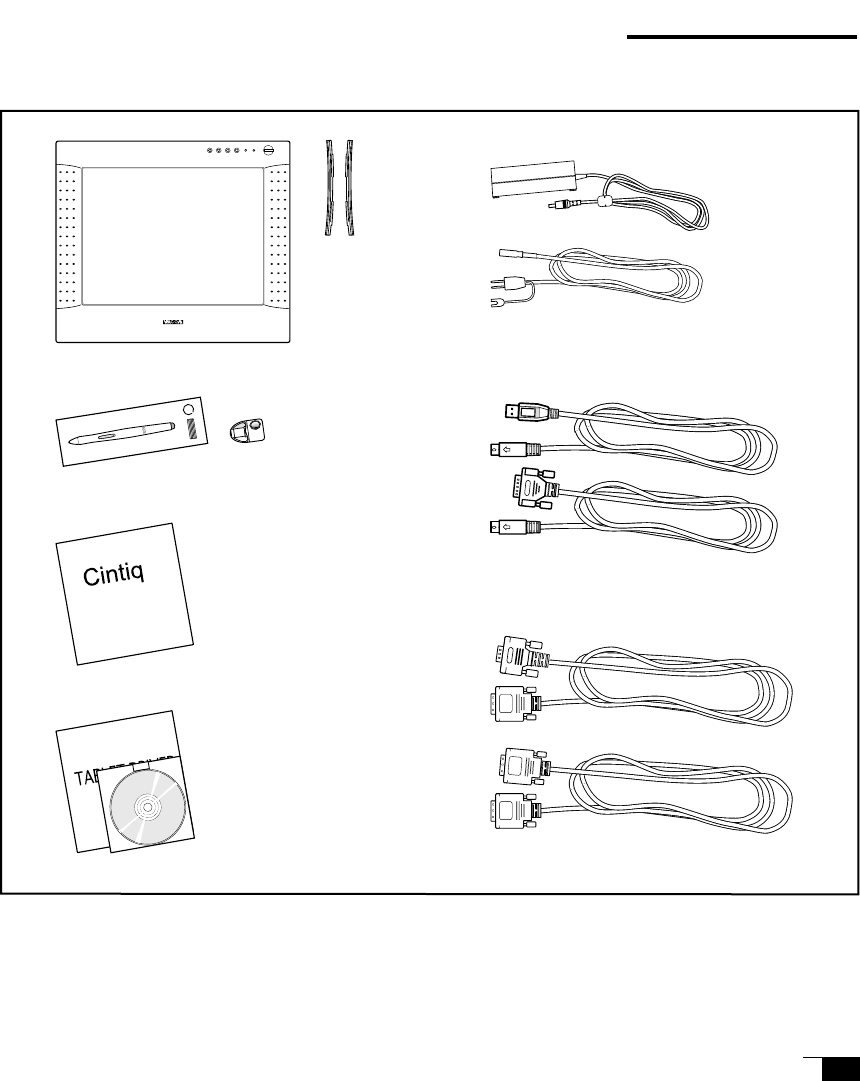
In your package you will find the following items:
USB Cable or RS-232C Cable
DVI-DVI Cable or DVI-RGB Cable*2
Cintiq 15X
main unit
UltraPen with Pen Holder
User’s Manual
Wacom Software CD
Contains the Interactive Pen
Display software and a
Readme file
(Windows/Macintosh)
AC Adaptor and Cable
Side Slit
Fillers
*1
*1 *2
For Cintiq 15X only. Do not use this for other devices.
One either cable is included.
*2
Please retain the package box for storage or transportation.
UM-0251/Cintiq AP.pm65 01.7.31, 9:27 PM5
6
Installation
LCD Monitor Installation
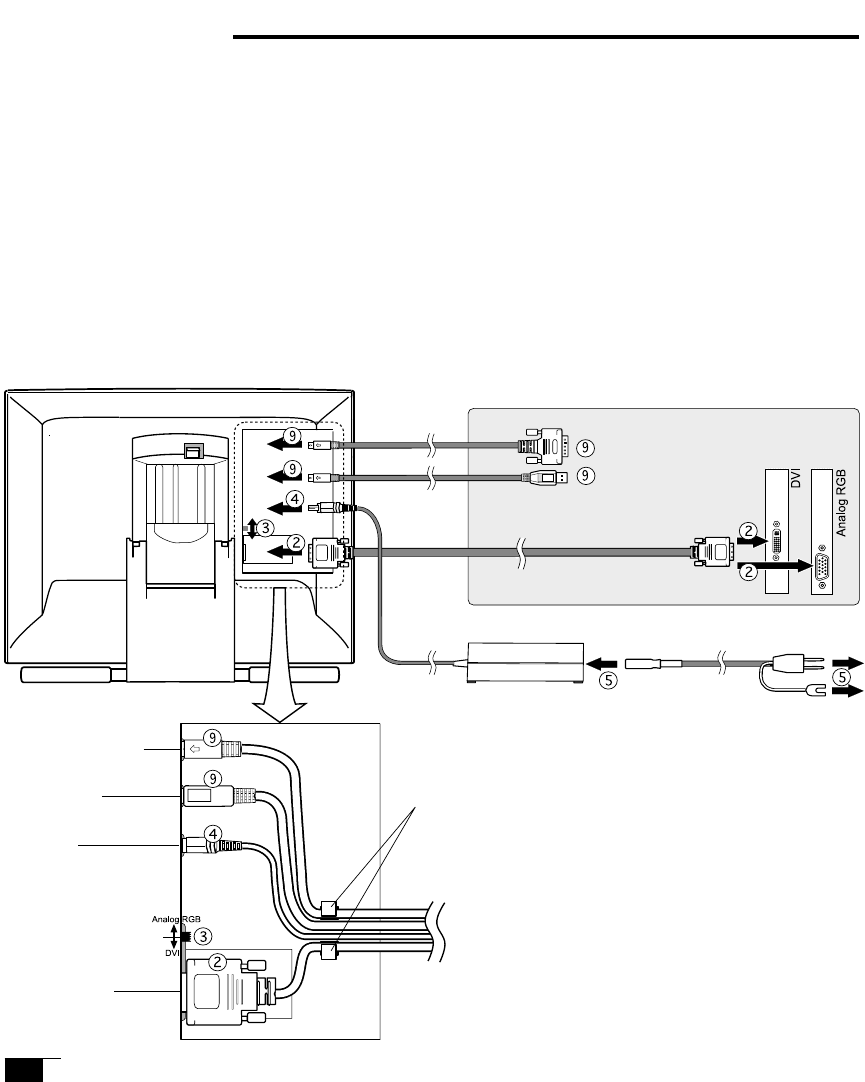
First install the Cintiq 15X as a monitor. Do not connect the USB cable or serial data cable until instructed for
the tablet software installation.
➀Turn off your computer.
IMPORTANT: Never connect or disconnect the DVI video cable or power cable while your computer
or Interactive Pen Display is powered on. This can damage the LCD display or video card.
➁Connect the DVI-to-DVI cable or DVI-RGB cable between the Cintiq 15X and your computer.
➂Set the DVI / Analog RGB switch. Turn it up for Analog RGB, and turn it down for DVI.
√Connect the AC adaptor to the Cintiq 15X.
➄Connect the AC adaptor power cable and plug the adaptor into an AC outlet.
IMPORTANT
■Do not use any cable that did not come with
the Cintiq 15X. It may damage the Cintiq
15X.
■For use with DVI, do not use any graphics
card on which Cintiq 15X can not be used.
It may damage the Cintiq 15X.
■Do not connect or disconnect the DVI video
cable or power cable while the Interactive
Pen Display or your computer is turned on;
it may damage the LCD display or
computer video card.
DVI-I connector
DVI/analog RGB switch
DC input
USB connector
RS-232C connector
Cable hooks
to AC outlet
Ground
Video card
DVI-DVI or DVI-RGB cable
To USB
port
Rear Panel of your computer
To serial port
UM-0251/Cintiq AP.pm65 01.7.31, 9:27 PM6

7
≈Turn on the power switch of the Cintiq 15X. The power lamp will light green , and then turns orange.
∆ Turn on your computer to start your operating system.
➇By looking at the Cintiq 15X display, configure the monitor settings for proper size and color resolution.
(The recommended resolution is 1024 x 768. Other settings may give unsatisfactory results.)
The color pallet and number of colors are as follows:
- High Color (16 bit), 65,536 color
- True Color (24 bit), 16,770,000 color approximate
The number of colors is constrained by the performance of your computer or graphics card. Refer to the
documentation of the manufacturer for details.
➈To install the Wacom tablet software, turn off your computer and connect the USB cable or serial data
cable.
Tablet Software Installation for Windows* and Macintosh
➀After connecting all cables of the Cintiq 15X, turn on the Cintiq 15X and your computer. Allow the operat-
ing system to fully load.
➁Insert the Wacom Tablet CD into the CD-ROM drive. The Wacom tablet software installer menu should
automatically display. If the menu does not display, double-click on the INSTALL icon (located on the CD).
Click on the INSTALL CINTIQ button and follow the prompts to install the driver software.
➂Windows: After the driver installation is complete, make sure you can use your UltraPen on the tablet dis-
play to move the screen cursor.
Macintosh: After the driver installation is complete, restart your Macintosh. You will be able to use your
UltraPen on the tablet display to move the screen cursor.
Be sure to read the README file for late braking news.
If you have trouble in the Tablet software installation, refer to the TROUBLESHOOTING CHAPTER in the online HelP
in the Wacom Tablet CD. You can also open the online Help from the HELP menu from the WACOM TABLET
control pane.
Precede to CUSTOMIZING YOUR CINTIQ 15X – THE BASICS.
*Windows 95 and later
UM-0251/Cintiq AP.pm65 01.7.31, 9:27 PM7
8
Customizing Your Cintiq 15X – The Basics
Opening the Wacom Tablet Control Panel
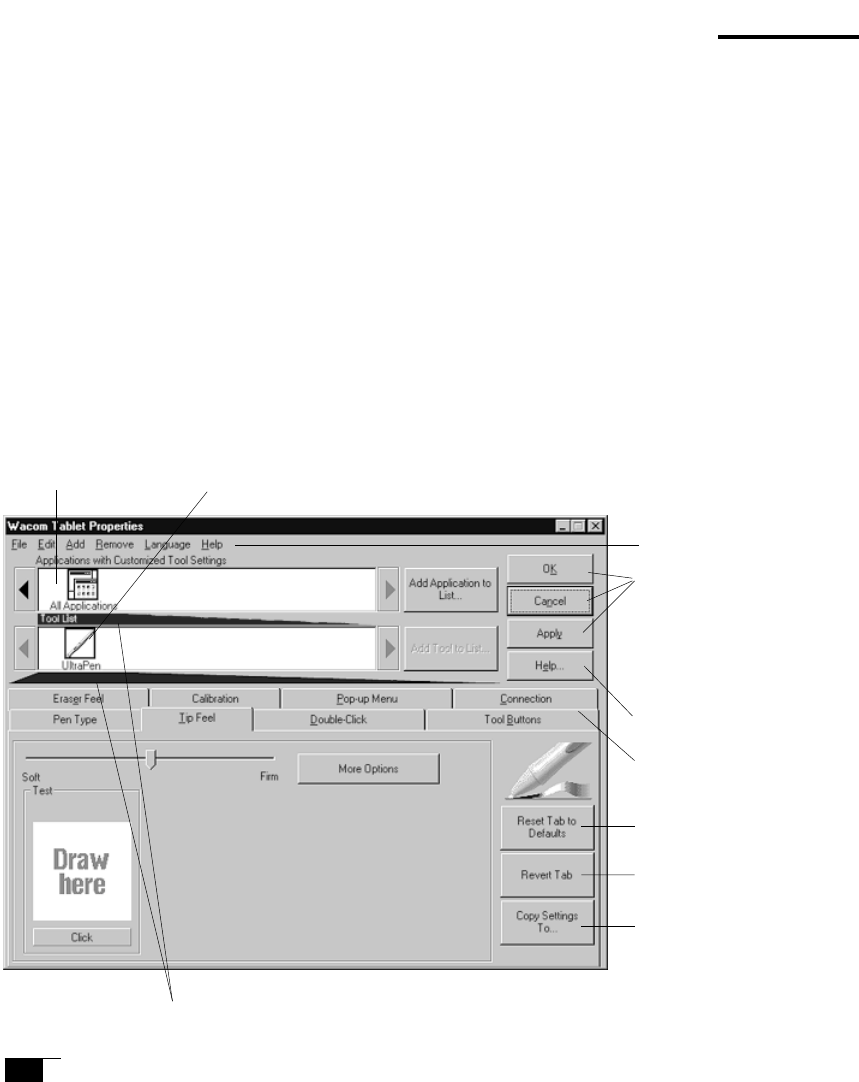
The Wacom Tablet Control Panel makes it easy to customize your Interactive Pen Display and UltraPen.
To open the control panel:
Windows: Click on the Windows Start button and choose Programs. From the Wacom Tablet group,
choose the Wacom Tablet option.
Macintosh: From the Apple menu, choose Control Panels and then Wacom Tablet.
When you open the control panel, an icon for the UltraPen is displayed in the Tool List and the appropriate
tabs are displayed. To customize the UltraPen, make your changes to the tab controls.
On Windows systems, be sure to click APPLY or OK to save your changes.
Note: Application-specific settings are for advanced users. Refer to the online Help for more information on
creating and using application-specific settings.
Displays applications with
customized settings.
Current selections are highlighted. Wedges emphasize the relationship
between tab settings and the selected tool and application.
Displays an icon
for the UltraPen.
The pull-down menus access a
variety of control panel
features.
For Windows only:
OK saves changes and closes
the control panel. Cancel
closes the control panel
without saving changes. Use
Apply to save changes without
closing the control panel.
Displays online Help for the
control panel.
Tabs display settings for the
selected application.
Resets the selected tab to its
factory default values
Returns a tab to its previously
saved or last applied settings.
Copies settings from one tool
or application to another.
Windows screen capture shown.
UM-0251/Cintiq AP.pm65 01.7.31, 9:27 PM8
9
Calibrating the Tablet
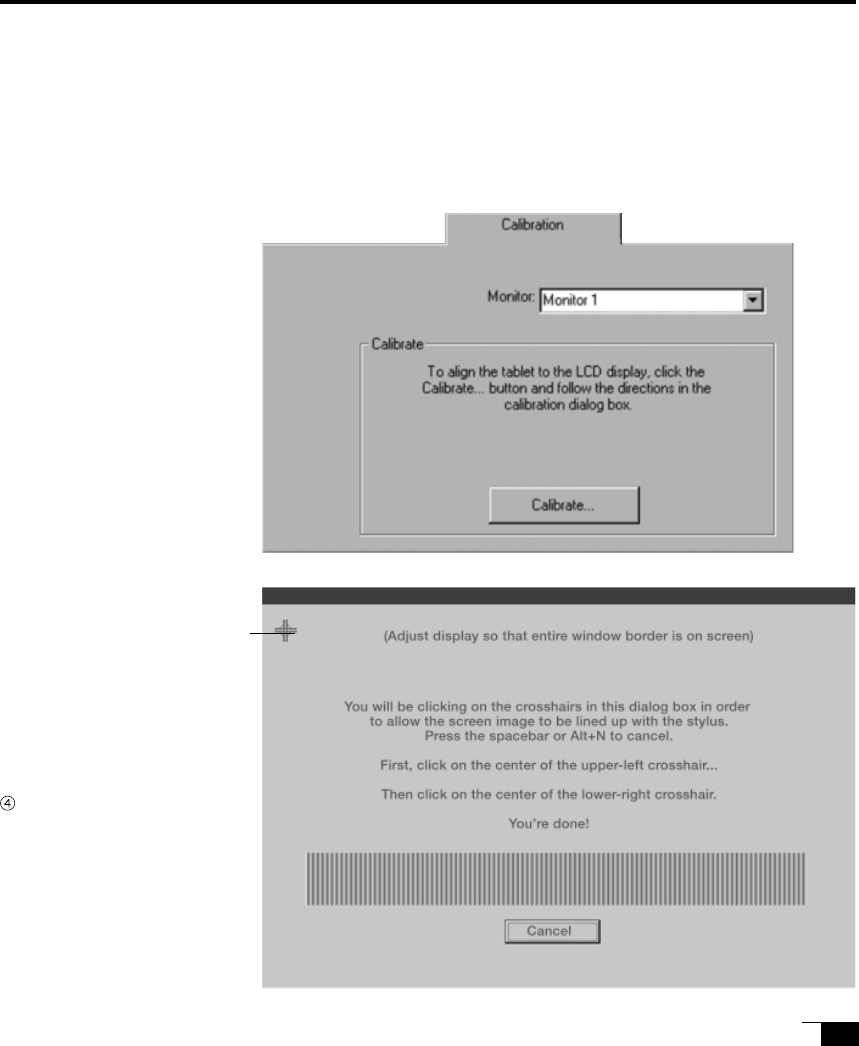
You will need to calibrate the tablet in order to line up the screen cursor position with the position of the
UltraPen on the Interactive Pen Display. This is required to adjust for parallax caused by the clear plastic
overlay. After setting the tablet in its working position, follow the procedure below to calibrate the tablet.
➀From the Wacom Tablet
Control Panel, select the
CALIBRATION tab.
If you are working with
multiple monitors, select
the Monitor that corre-
sponds to the tablet’s LCD
display.
➁Click on the CALIBRATE...
button to display the moni-
tor calibration screen..
➂Hold the pen as you nor-
mally do, and use the pen
tip to click on the cross-
hairs in the upper-left cor-
ner.
Then click on the cross-
hairs that are displayed in
the lower-right corner.
(You will need to click Ap-
ply or OK for the changes
to take effect.)
NOTE: The calibration setting
applies to all applications
UM-0251/Cintiq AP.pm65 01.7.31, 9:27 PM9
10
Front View
- On a TFT liquid crystal display, a very small number of pixels may be permanently illuminated or not illuminated
at all. This does not mean that the display is defective.
- When pressing the LCD panel hard it may temporarily cause moire to appear. This does not mean the display is
defective.
- When a still image is displayed for a long period of time, an after image may temporarily remain.
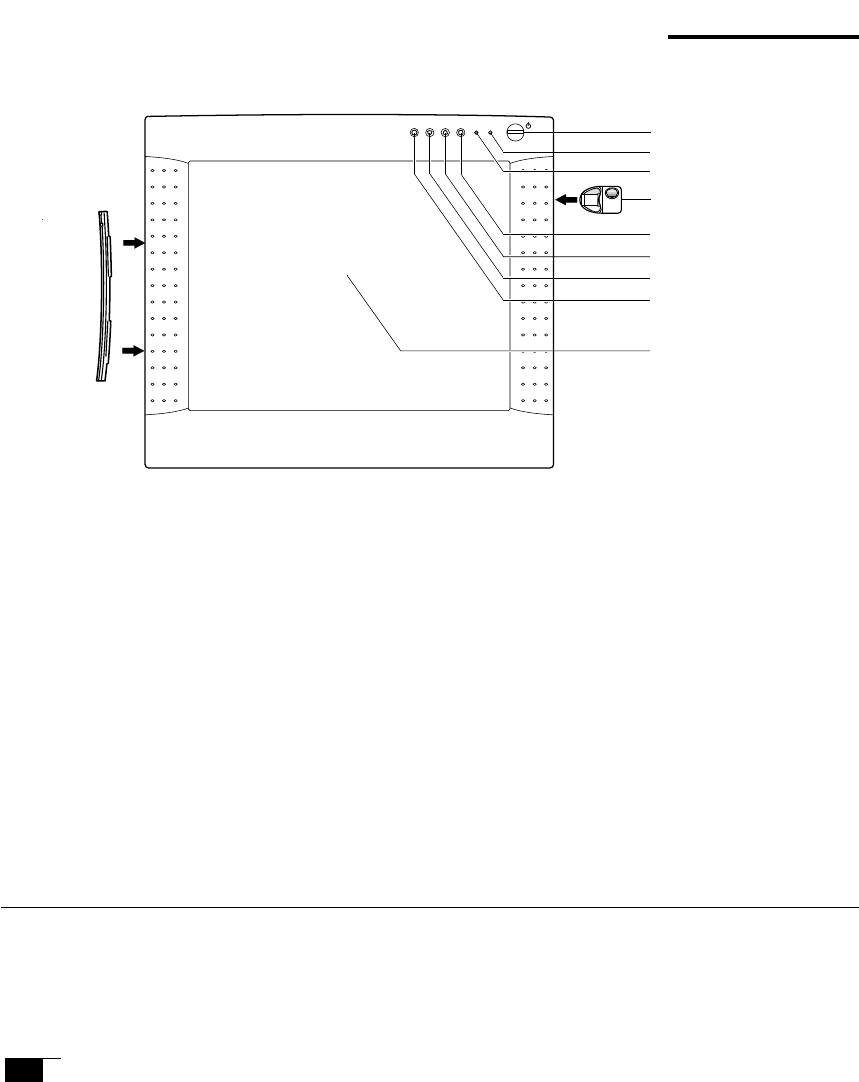
Power Switch
Integrated Tablet and
LCD Screen *2
Status Lamp
Power Lamp
Power Switch
Turns the power to the Cintiq 15X on or off.
Power Lamp
Lights green when power has properly been supplied to the Cintiq 15X. Turns orange or flashes when your
computer goes into power management mode and stops sending the video signal to the Cintiq 15X.
Status Lamp
Lights green when a pen switch is pressed.
Pen Holder
Can attach and detach at the location shown in the above drawing. When attached, it can be moved up and
down, or rotated. It can also be attached to the left side.
Side Slit Fillers
Closes the side slit on which the pen holder is not attached.
ENTER Button
Press this button when you select or exit an item in MENU*2 window.
POWER
STATUS
ENTER
EN
-
MENU
*1
ENTER Button
+ (plus) Button
- (minus) Button
MENU*1 Button
Pen Holder
*2
You can select the language to display the MENU window. ☞ P11
Cintiq 15X Component Functions
Side Slit
Filler
UM-0251/Cintiq AP.pm65 01.7.31, 9:27 PM10
11
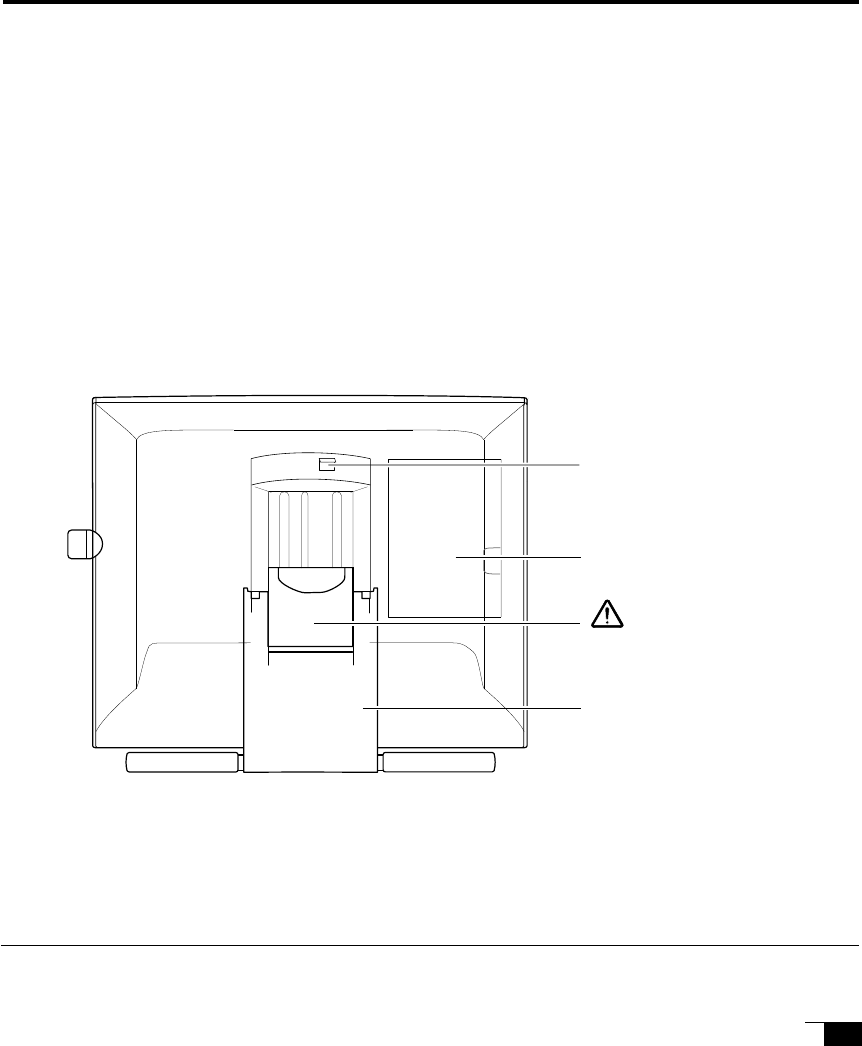
Stand
The angle of the stand can be
adjusted to one of 47 levels
between the horizontal closed
position (17° from horizontal).
Rear View
Stand Lever
Pulling this lever allows the stand to
move freely. Releasing the lever locks
the stand in place.
Connector Lid
IMPOTANT
Do not lift up the Cintiq 15X by holding the stand. It may damage the open-close mechanism of the
stand. When you lift up the Cintiq 15X, be sure to hold the main unit casing.
Be sure to close the stand when packing the Cintiq 15X Interactive Pen Display. If you do not close
the stand, the notched mechanism may be damaged during transportation and storage.
+ (plus) Button, - (minus) Button
Press this button when you change the item or settings in MENU window.
MENU Button
Opens and closes the MENU window.
Integrated Tablet and LCD Screen
The LCD monitor and tablet sensor function* as an integrated input and output device.
The LCD resolution is 1024 x 768 pixels at 16,777,216 colors. The tablet sensor reports coordinates, pressure,
switch, and eraser information.
The characteristics of the LCD may cause an inaccurate display of color tones. It is recommended that the
tones be checked on a color-adjusted CRT monitor.
Be careful to avoid catching your
finger in the gap of the movable
portion of the stand.
CAUTION
*As the tablet of the Cintiq 15X emits electromagnetic waves in a certain frequency, if another tablet is closely placed to
the Cintiq 15X, the screen cursor may jitters or jumps around. To solve this problem, place the tablet away from the
Cintiq 15X
UM-0251/Cintiq AP.pm65 01.7.31, 9:27 PM11
12
Cintiq 15X Component Functions
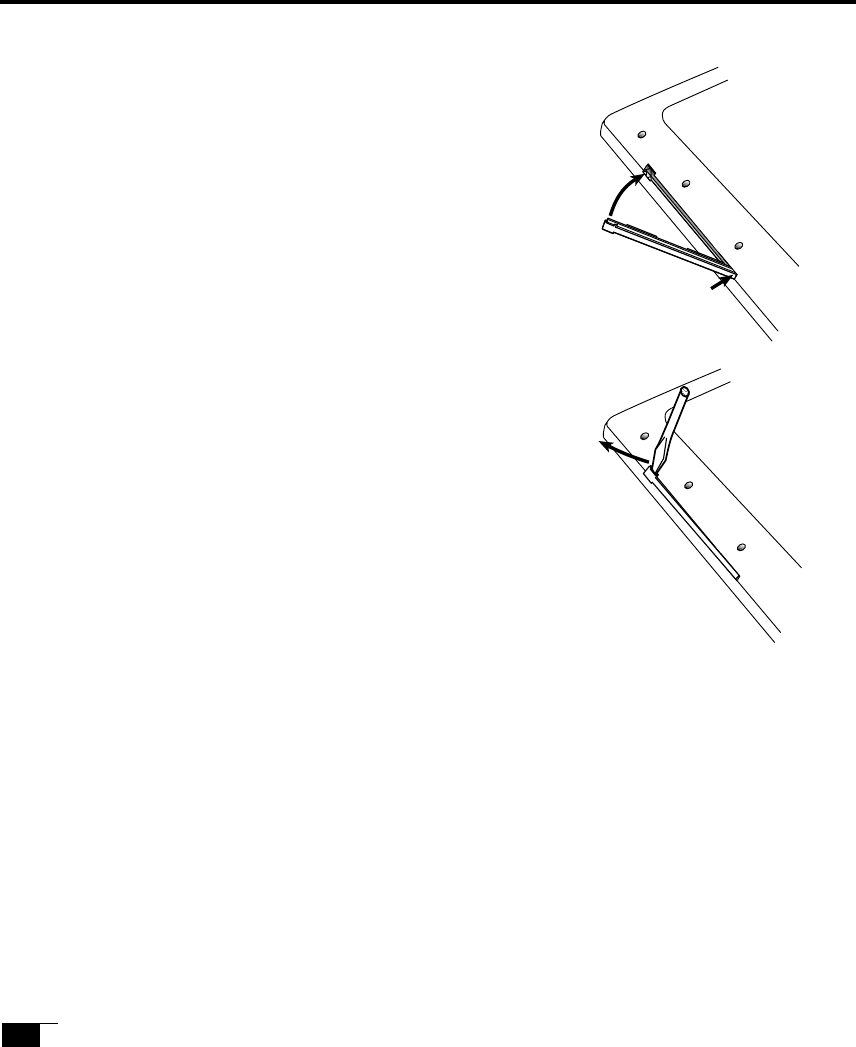
Using the side slit filler
To attach the side slit filler:
➀Adjust the botom of the side slit filler to the bottom of the side slit.
➁Fill in the slit pressing the top of the side slit filler.
➀
➁
To remove the side slit filler:
Pull out the top of the side slit filler using a screwdriver.
UM-0251/Cintiq AP.pm65 01.7.31, 9:27 PM12
13
CAUTION
When mounting the Cintiq 15X onto
an arm or other stand, be sure to
follow the instructions in the
documentation of the manufacturer. If
improperly installed, it may cause
Cintiq 15X to fall and be damaged.
Mounting the Cintiq 15X onto a Mount Arm or Other Stand
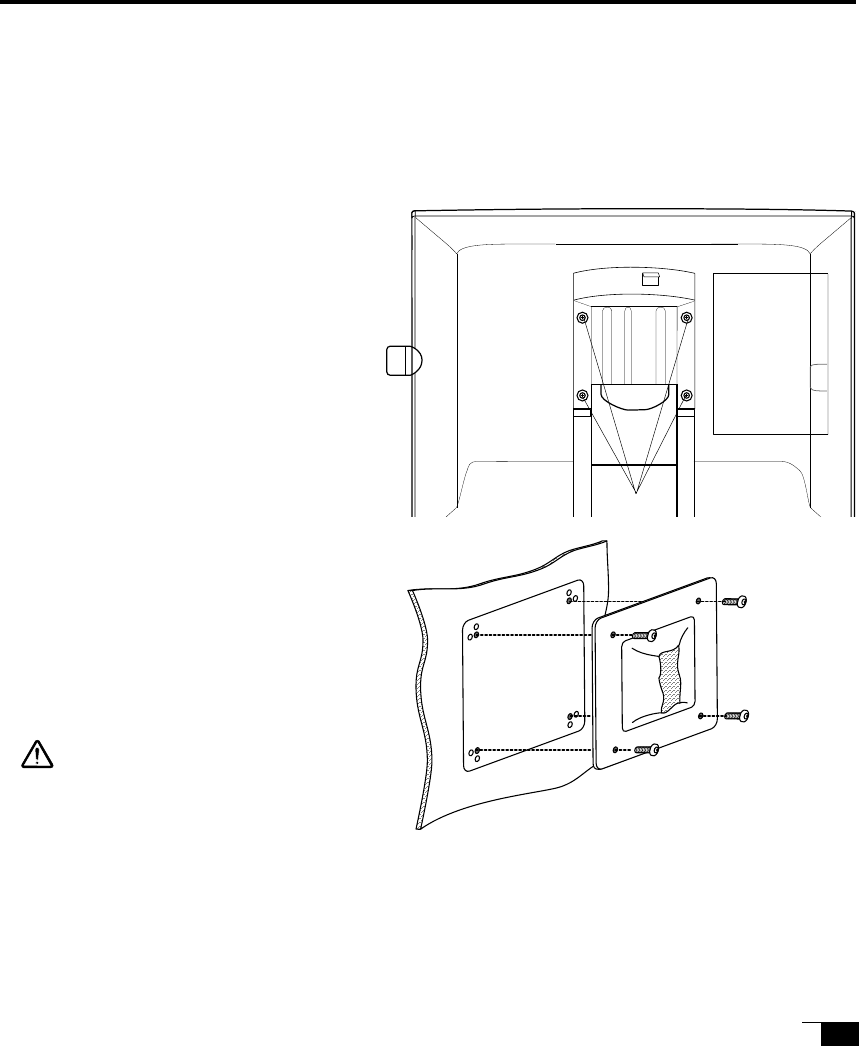
The Cintiq 15X conforms to VESA FPMPM standard.
You can dismantle the stand and mount the Cintiq 15X onto a VESA conformed mount arm or other stand.
(Screw gap: 75 mm, Thread pitch: 0.7 mm )
➀Turn off your computer and the Cintiq 15X, and disconnect all cables from the Cintiq 15X.
➁Place the Cintiq 15X on a flat table facing
down. Be sure to spread a soft cloth be-
tween the table and Cintiq 15X front panel
to protect the surface.
➂ Unscrew and dismantle the stand.
√Using the four screws of Cintiq 15X stand,
firmly mount the Cintiq 15X onto the arm.
➄Connect all cables by following the instruc-
tion on page 6.
unscrew
UM-0251/Cintiq AP.pm65 01.7.31, 9:27 PM13
14
UltraPen
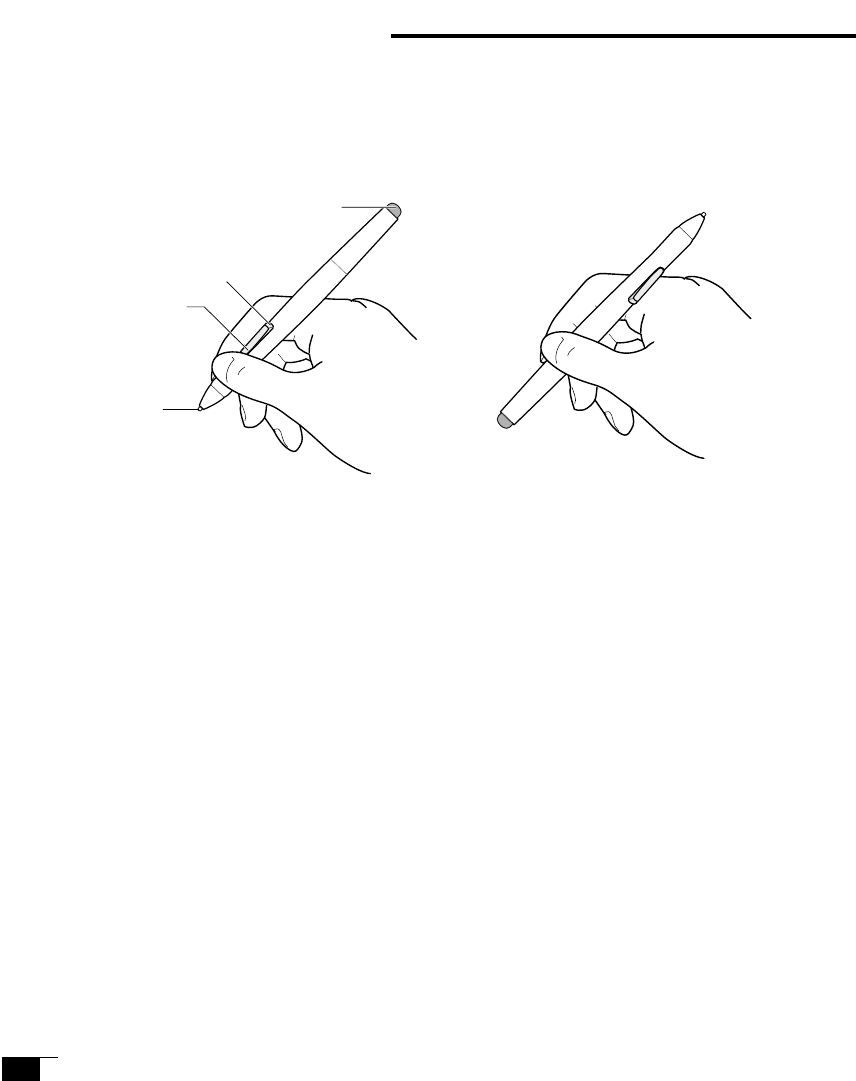
Hold the UltraPen as you would a pencil. Make sure the side switch is in a convenient location where you
can press it with your thumb or forefinger, but won’t accidentally press it while drawing.
Using the UltraPen
Pen Tip
When the pen tip is within proximity (5 mm or 0.2 in) of the active area, the tablet reports:
- The x, y coordinates of the pen tip.
- The pressure applied to the pen tip.
- Whether a side switch is on or off.
When pressure is applied to the pen tip, the tip switch is turned on and the pen simulates a
mouse button click.
Eraser
To use the eraser, hold the UltraPen upside down. When the eraser is within proximity of the active area, the
tablet reports the x, y coordinates and the pressure applied to the eraser.
The eraser can be used as an eraser or assigned to another function, depending on the application. The tab-
let distinguishes the tip switch from the eraser switch.
Side Switch and Second Side Switch
These switches are programmable, and can be used to perform the same click and double-click
functions as the tip switch. The switches are turned on when pressed, and are otherwise
turned off. Please refer to the online Help for more information on side switch settings.
Tip Switch
Eraser
Side Switch
Second Side Switch
UM-0251/Cintiq AP.pm65 01.7.31, 9:27 PM14

15
Using a Pen
Pointing and Selecting
Move the UltraPen above the Cintiq 15X Interactive Pen Display screen to position the screen cursor.
The cursor instantly jumps to the new location (absolute positioning). Press the pen tip on the Interactive
Pen Display screen to make a selection.
NOTE: If the screen cursor is not aligned with the pen tip, you will need to calibrate the Interactive
Pen Display.
Clicking
Tap the Interactive Pen Display screen once with the pen tip, or touch the pen to the display screen with
enough pressure to generate a mouse click.
Double-Clicking
Press the upper side switch (Windows systems) or quickly tap the Interactive Pen Display screen twice in the
same place with the pen tip. Double-clicking is easier when the pen is perpendicular to the tablet screen.
Dragging
Select an object, then slide the pen tip across the Interactive Pen Display screen to move the object.
Erasing
In supporting applications, the pen’s eraser works like the eraser on a pencil. In text applications,
use the eraser to select text, then lift the eraser from the tablet to delete the text.
Using the UltraPen
UM-0251/Cintiq AP.pm65 01.7.31, 9:27 PM15
16
Adjusting the LCD Monitor
Factory Presets, Auto Adjust and User Settings
Factory Presets: The Cintiq 15X is programmed with some prevailing display modes as defaults so that the
Cintiq 15X can display the image with the bast quality based on the incoming signals for most cases.
Auto Adjust: When the Cintiq 15X first receives the signals with a display mode out of factory presets, the
Auto Adjust automatically adjusts horizontal/vertical position, phase and pitch if horizontal frequency is be-
tween 28 to 64 kHz and vertical frequency is between 48 to 75 Hz. The adjusted settings will be stored in the
Cintiq 15X to display in the best condition when the same signals are received next time. This is effective for
analog RGB only. While the Auto Adjust is working, except for the power switch, all buttons will not work.
User Settings: For any display modes, once you manually set the display by using the MENU window, the
settings will be stored in the Cintiq 15X to display in the same condition when the Cintiq 15X receives the
same signals next time.
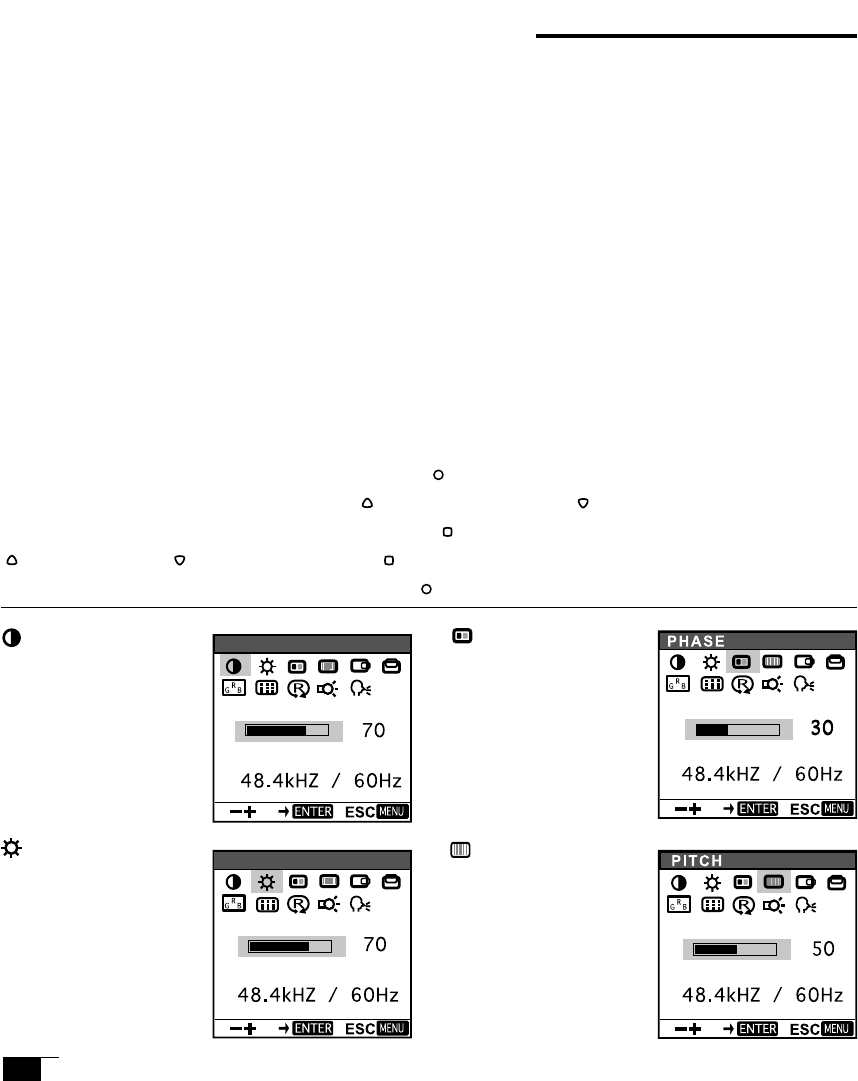
Functions and Uses of the MENU Window
To open the MENU Window: Press the MENU button ' '.
To switch an item: Press the + (plus) button ' ' or the - (minus) button ' ' .
To change setting in the item: Press the ENTER button ' ' to activate the item, then press the + (plus) button
'', - (minus) button ' ' and/or ENTER button ' '.
To exit the MENU Window: Press the MENU button ' '.
CONTRAST
Contrast
Adjusts contrast.
Brightness
Adjusts black level.
Phase
(Analog RGB only)
Calibrates phase when the
Auto Adjust is not
enough. ☞ P18
Pitch
(Analog RGB only)
Calibrates pitch when the
Auto Adjust is not enough.
☞ P18
BRIGHTNESS
UM-0251/Cintiq AP.pm65 01.7.31, 9:27 PM16
17
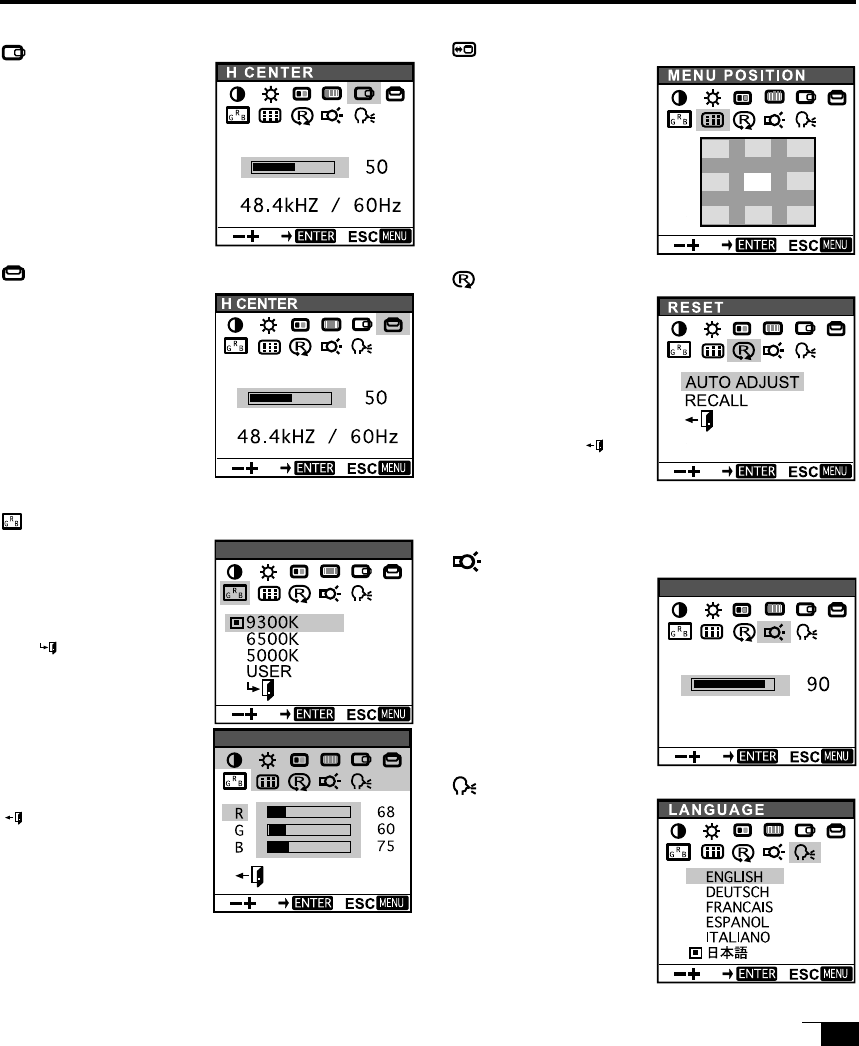
Vertical Position
(Analog RGB only)
Adjusts vertical position of
display.
Color Management
You can select one from
9300, 6500, 5000 deg. in
Kelvin and user setting.
You can change the user
setting by selecting the
icon ' '.
In the user setting, change
red and blue to calibrate
color centering on green.
To exit, select the icon
''.
Horizontal Position
(Analog RGB only)
Adjusts horizontal position
of display.
Menu Position
Moves the MENU window
to one of nine positions.
Reset
AUTO ADJUST resets the
horizontal/vertical
position, phase and pitch
to the condition that the
Auto Adjust did.
RECALL resets the display
to the factory default.
Selecting the icon ' '
exits the Reset window
without resetting any-
thing.
Backlight Level
Adjusts the backlight
level.
Language
Selects one language from
six options: English,
German, French, Spanish,
Italian and Japanese.
COLOR
BACKLIGHT
USER ADJUSMENT
Adjusting the LCD Monitor
UM-0251/Cintiq AP.pm65 01.7.31, 9:27 PM17
18
Adjusting Pitch and Phase (analog RGB only)
Some models of computer or graphics card may not allow the Auto Adjust to fully work when the Cintiq is first
connected. If the display does not fit the LCD panel border or some part of text show blurred, adjust pitch and
phase by following the below procedure. The resolution 1024 x 768 is recommended for the best effect.
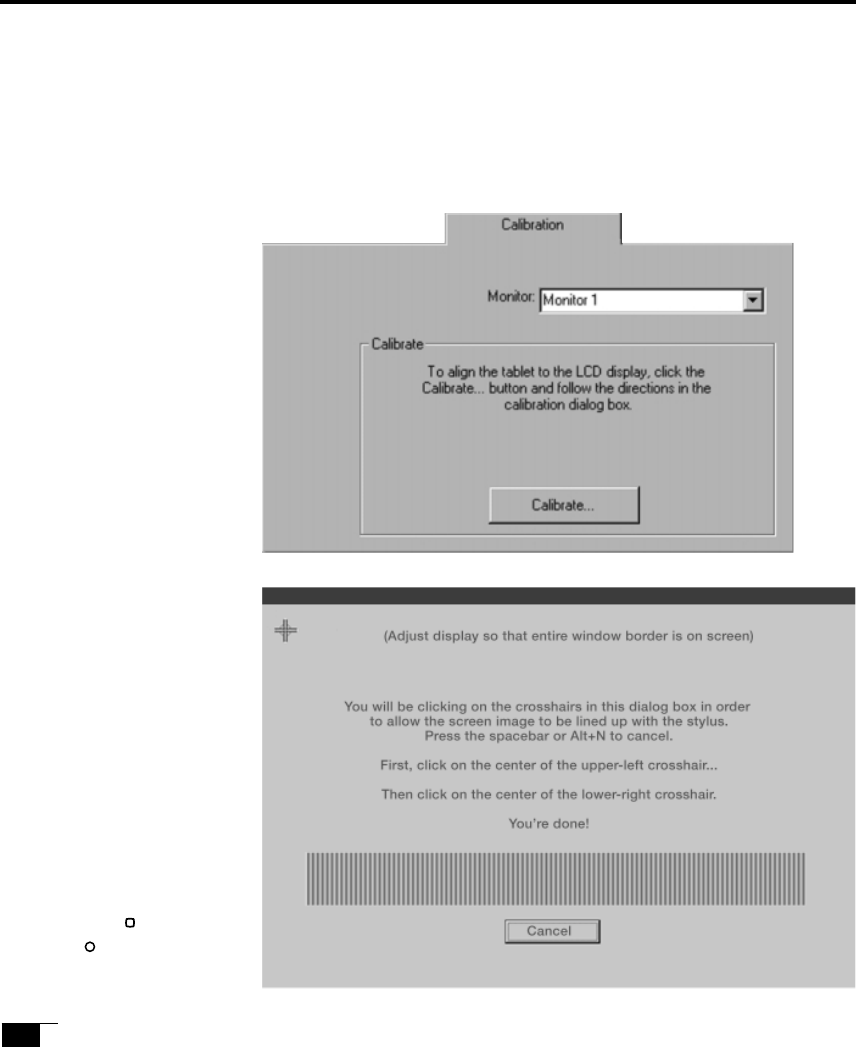
➀From the Wacom Tablet
Control Panel, select the
CALIBRATION tab.
If you are working with
multiple monitors, select
the Monitor that corre-
sponds to the tablet’s LCD
display.
➁Click on the CALIBRATE...
button to display the moni-
tor calibration screen..
➂Open the MENU window
and select Pitch.
√Adjust the Pitch level so
that the adjustment pattern
(fine vertical stripes) dis-
plays evenly.
➄Select Phase and adjust
the Phase level so that
played the adjustment pat-
ter shows clearly.
≈After completing the ad-
justments press the EN-
TER button ' ' and MENU
button ' ' to exit.
UM-0251/Cintiq AP.pm65 01.7.31, 9:27 PM18

19
HINT (Windows only): You can also adjust Pitch and Phase in the display of closing the Windows.
If the pitch is not calibrated, vertical moire appears in the darkened area. And if the phase is no
calibrated, the darkened area riffles.
Power Saving
Cintiq 15X conforms to VESA and Energy Star power saving guidelines. When the Cintiq is used with a VESA
DPMS (display Power Management signaling) compliant computer or graphics card, it will automatically
comply with the below Power Saving parameters.
Power Saving Mode
Power ON
Standby mode
Suspend mode
OFF mode
V-sync
Yes
Yes
No
No
Video
Active
Blanked
Blanked
Blanked
Power Consumption
45W max.
5W max.
5W max.
5W max.
Power Lamp
Green
Orange/Green
Orange/Green
Orange
H-sync
Yes
No
Yes
No
Adjusting the LCD Monitor
UM-0251/Cintiq AP.pm65 01.7.31, 9:27 PM19
20
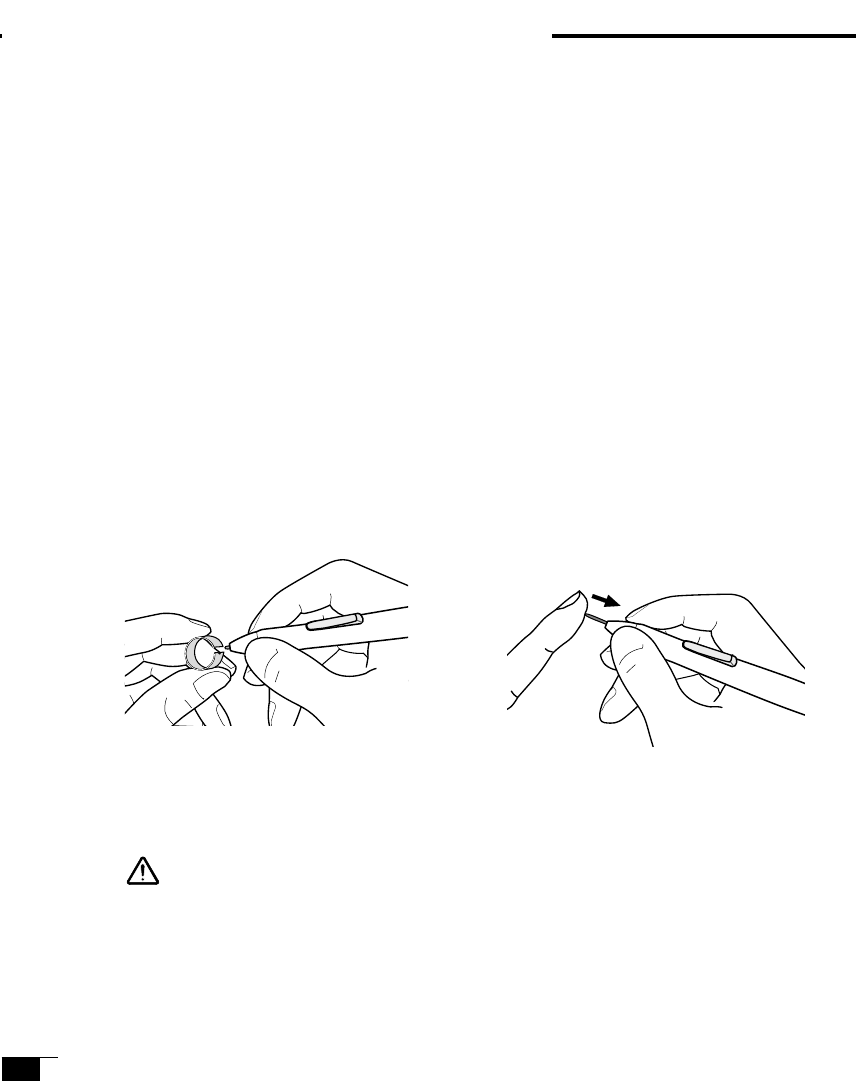
To insert a new nib: To remove the old nib:
Prevent your children from swallowing the UltraPen nib or side switch. The pen nib or
side switch may accidentally be pulled out if children are biting on them.
CAUTION
Slide it straight into the barrel of the
pen. Firmly push the nib until it stops.
The new nib will slide into the correct
position.
Clasp it with the o-ring tool that came
with your UltraPen and pull the old nib
straight out of the pen.
Caring For Your Cintiq 15X
Cleaning Your Cintiq 15X
To clean the Cintiq 15X casing, use a soft cloth with mild detergent (such as dish washing liquid) diluted with
water. Do not use paint thinner, benzine, alcohol, or other organic solvents to clean the Cintiq 15X casing or
pen.
Do not use detergent to clean the cover glass. This may alter the surface friction and deteriorate the
handwriting feel. To clean the cover glass of the Cintiq 15X, use a soft, dry cloth. If necessary, slightly moisten
the cloth with water and try again. When cleaning, apply only a light amount of pressure to the cover glass
and do not make the surface wet.
Replacing the Pen Tip
The pen tip will wear with normal use. When the nib gets too short, you can replace it with one of the extra
nibs that came with your UltraPen. If the pen tip wears and becomes angular, it may damage the coating on
the cover glass of the Cintiq 15X Interactive Pen Display. To avoid this, periodic nib replacement is recom-
mended.
UM-0251/Cintiq AP.pm65 01.7.31, 9:27 PM20
21
Troubleshooting for Display
If you encounter problems with the Cintiq display, refer to the following tables. Your problem may be
described here, and you can try the solution offered.
For problems regarding tablet or pen, refer to the Troubleshooting chapter in the online Help that can be
accessed from the Wacom Tablet control panes.
Problem Hint
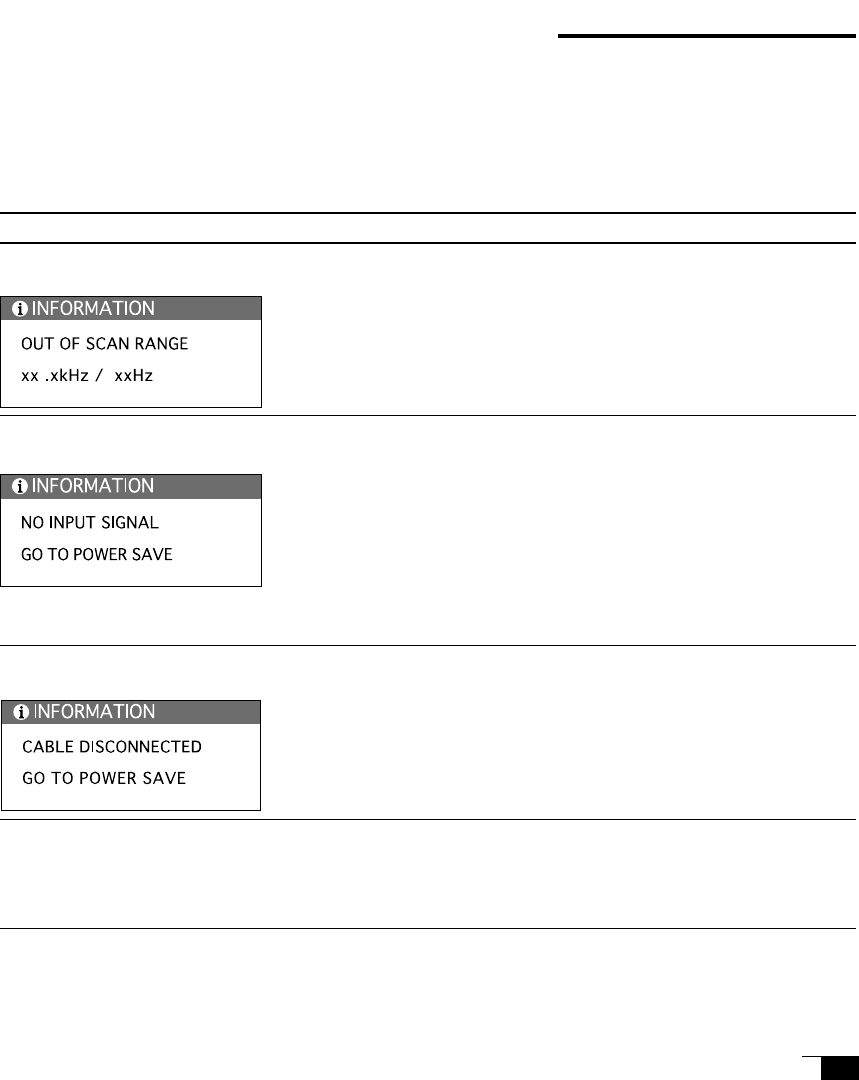
The message "OUT OF SCAN RANGE"
appears..
■The message "NO INPUT SIGNAL"
appears..
■The power lamp show orange LED
light, or flashes orange and green
The message "CABLE DISCON-
NECTED" appears.
■The power lamp does not light and
nothing displays.
■Nothing displays even though
power switch is turned on..
The frequency of input signals do not match the Cintiq 15X. Connect different
monitor and set the horizontal frequency to some value between 28 to 64 kHz
and vertical frequency to same value between 48 to 75Hz.
■Check the video signal cable, check the connector pins if bent or broken.
■If your computer is in the power management mode, move the mouse or hit
any key on the keyboard.
■Check if the graphics card is properly installed.
■Check the video signal cable, check the connector pins if bent or broken.
■The video signal cable used may not be the one came with the Cintiq 15X.
Please use the cable came with the Cintiq 15X.
■Check the power cable and if power switch is ON.
■For DVI, check if DVI/analog RGB switch is turned to the DVI side. ☞ P 6
Restart your computer after switching to the DVI side.
UM-0251/Cintiq AP.pm65 01.7.31, 9:27 PM21

22
Problem Hint
■Display riffles.
■Display flickers
Display is not clear.
Display is doubled or tripled.
■Display and CLCD panel are not
lined-up.
■Display size is not correct.
Display is dark.
■Display riffles or shows moire.
■Color is not even.
White color doesn't show white.
■Adjust pitch and phase. ☞ P16, 18
■Check if display adaptor or graphics card matches the Cintiq 15X specifications.
■ Adjust the refresh rate of your computer.
■Adjust contrast or brightness. ☞ P16
■Adjust pitch and phase. ☞ P16, 18
■Set the refresh rate to XGA (1024 x 768)
■Do not extend the video signal cable. So not use a input selector.
■Connect the
■Adjust pitch and phase. ☞ P16, 18
■Adjust horizontal and vertical position. ☞ P17
Some graphics card may not show display in proper size.
■Adjust brightness. ☞ P16
■Adjust backlight. ☞ P17
■Adjust pitch and phase. ☞ P16, 18
Adjust color. ☞ P17
UM-0251/Cintiq AP.pm65 01.7.31, 9:27 PM22
23
General Specifications
Physical dimensions (WxDxH): 405x340x53mm (excluding the stand)
Weight: 4.9kg (including the stand)
Main Unit input Voltage: DC18V
Power consumption: 45W or less (DC18V)
Operating temp. & humidity: 5 to 35 deg. C, 80%RH (non condensing)
Storage temp. & humidity: -10 to 60deg. C, 90%RH (non condensing) (maximum storage humidity is 38% at
60 deg.C, and maximum storage temperature is 42 deg. C at 90% humidity)
LCD Display
Display: a-Si TFT active matrix LCD
Screen size: 15 in
Resolution (75Hz Max.) 1024x768 pixels (XGA), 800x600 pixels (SGA), 640x480 pixels (VGA)
Pixel pitch: 0.297(W) x 0.297(H)mm
Color depth: 256 levels: 16,777,216 colors (24 bit)
Signal Inputs: Analog RGB: - 0.7Vp-p, 75ohms, positive
Synchronous signals: TTL level, 2.2kohms, free polarity (H/V separate or complex
sync.
Digital signals: DVI
Synchronous frequency: H--30 to 65kHz, V--50 to 75Hz
Plug and Play DDC2B
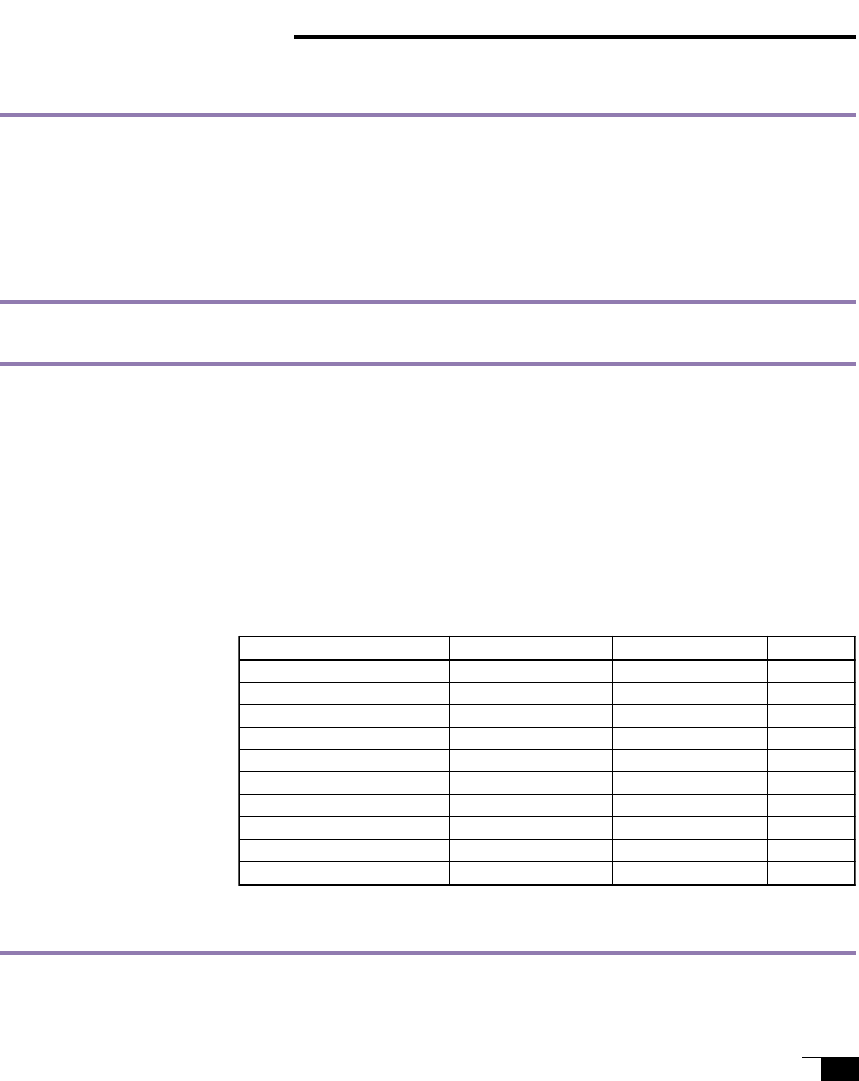
Std. Display Modes (default)
All scan modes are N.I.
Number of programmable 18 (excluding defaults)
On a TFT liquid crystal display, a very small number of pixels may be permanently illuminated or not illuminated at all.
This does not mean that the display is defective.
Specifications
Res. dots x lines
720x400
640x480
640x480
640x480
800x600
800x600
832x624
1024x768
1024x768
1024x768
H. freq. (kHz)
31.50
31.47
35.00
37.50
37.88
46.87
49.73
48.36
60.02
60.24
V. freq. (Hz)
70.08
59.94
66.67
75.00
60.32
75.00
74.60
60.00
75.03
74.93
H/V pol.
-/+
-/-
-/-
-/-
+/+
+/+
-/-
-/-
+/+
-/-
UM-0251/Cintiq AP.pm65 01.7.31, 9:27 PM23
24
Tablet
Reading technology: Electromagnetic give and receive method
Active area: 304.1 x 228.1mm
Resolution: 20 lpmm (0.05mm) max.
Accuracy: +/-0.5mm, four corners ( 7 mm wide, 25 mm long from each corner of four "L"
shaped areas) to be +/-1.0mm
Maximum reading height: 5mm
Maximum report rate: 205 points/sec. max (RS-232C), 100 points/sec. (USB)
Pressure levels 512 levels
Communication I/F USB, RS-232C
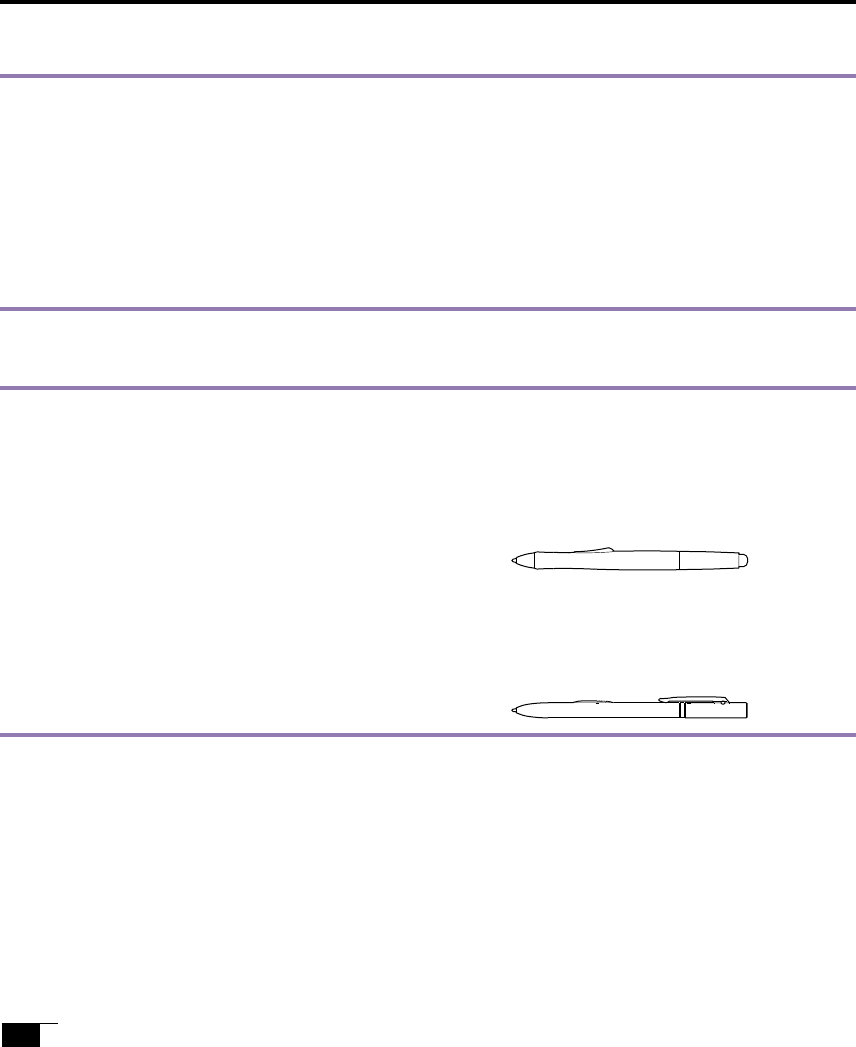
UltraPen
UP-813E
Side switch: Double (rocker switch)
Pressure: Tip and Eraser
Tip trave: 0.1mm max.
Eraser tip travel: 2 mm approximate
Tip switch ON load: 30g max.
Physical dimensions, weight: 11.4 dia x 140.5 mm, 12grams
UP-714W (optional)
Side switch: Sigle
Pressure: Tip only
Tip trave: 0.1mm max.
Tip switch ON load: 30g max.
Physical dimensions, weight: 9.0 dia x 140.0 mm, 8 grams
UM-0251/Cintiq AP.pm65 01.7.31, 9:27 PM24