Wanlida Group MGX-0550 GPS User Manual 1
Wanlida Group Co., Ltd. GPS 1
USERS MANUAL

2
WARNING
The apparatus shall not be exposed to dripping or splashing and that no objects filled with
liquids, such as vases, shall be placed on the apparatus.
NOTES
1. Read these instructions.
2. Keep these instructions.
3. Heed all warnings.
4. Follow all instructions.
5. Do not use this apparatus
near water.
6. Clean only with dry cloth.
7. Do not block any ventilation openings. Maintain well ventilated conditions around the
product. Do not put product on bed, sofa or anything that blocks ventilation. Install
according to the manufacturer s instructions.
8. Do not install near any heat sources such as radiators, heat registers, stoves or other
apparatus (including amplifiers) that produce heat.
9. Read, heed and follow all instructions to ensure correct and safe installation and
interconnection of the apparatus;
10. The apparatus shall not be exposed to dripping or splashing and that no objects filled
with liquids, such as vases, shall be placed on the apparatus;
11. The mains socket-outlet shall be installed near the apparatus and the mains plug shall
remain readily operable;
12. Protect the power cord from being walked on or pinched particularly at plugs,
convenience receptacles, and the point where they exit from the apparatus.
13. Only use attachments/accessories specified by the manufacturer.
14. Use only with the cart, stand, tripod, bracket, or table specified by the manufacturer, or
sold with the apparatus. When a cart is used, use caution when moving the
cart/apparatus combination to avoid injury from tip-over.
15. Unplug the apparatus during lightning storms or when unused for long periods of time.
16. Refer all servicing to qualified service personnel. Servicing is required when the
apparatus has been damaged in any way, such as power-supply cord or plug is damaged,
liquid has been spilled or objects have fallen into the apparatus, the apparatus has been
exposed to rain or moisture, does not operate normally, or has been dropped.
Note: Do not touch the color TFT LCD screen by hand directly.
Important Safety
Instructions
IMPORTANT
FOR
LASER
PRODUCTS
1. CLASS 1 LASER PRODUCT
2. DANGER: Visible laser radiation when open and
interlock failed or defeated. Avoid direct exposure to
beam.
3. CAUTION: Do not open the top cover. There are no use
r
serviceable parts inside the unit. Leave all servicing
toqualified service personnel.

3
Copyright Protection
This product incorporates copyright protection technology that is protected by U.S.
patents and other intellectual property rights. Use of this copyright protection technology
must be authorized by Macrovision, and is intended for home and other limited viewing
uses only unless otherwise authorized by Macrovision. Reverse engineering or
disassembly is prohibited.
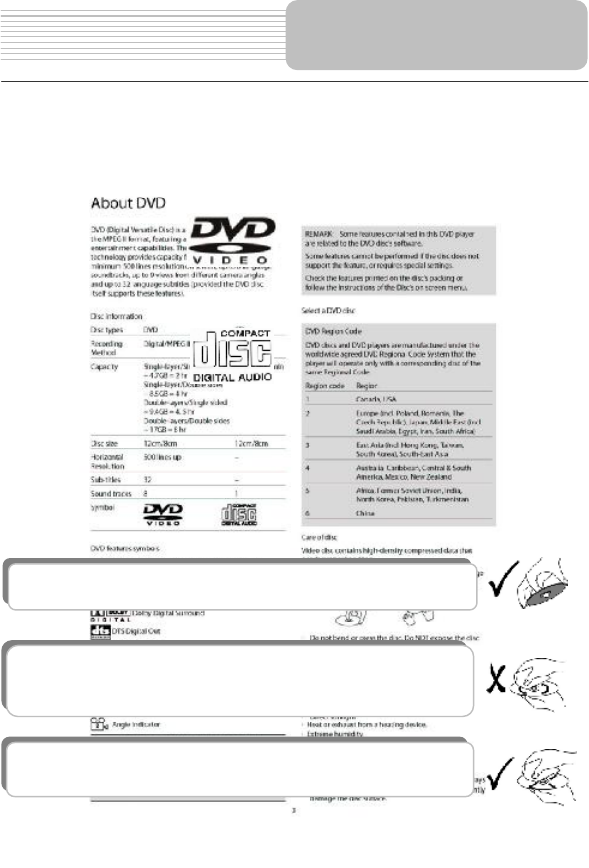
Region code information: DVD players and discs are coded by region. If the region
number described on the DVD disc does not correspond to the region number of this
product, this product cannot play the disc. The region code of this unit is 1.
Warning
Failure to avoid the following potentially hazardous situations may result in injury or
property damage.
The unit is designed to provide you with route suggestions. It does not reflect road
closures or road conditions, traffic congestion, weather conditions, or other factors that
may affect safety or timing while driving.
Use the unit only as a navigational aid. Do not attempt to use the unit for any purpose
requiring precise measurement of direction, distance, location, or topography. This
product should not be used to determine ground proximity for aircraft navigation.
Important Safety
Instructions
4
Navigation Function
High-quality audio and video
Advanced Playing Functions
Other Special Functions
Excellent Sound: Dolby Decoder delivers
great sound.
AV Input: External Audio, Video input can
be connected to most external AV sources.
AV Output: Analog Audio output and video
output.
High Resolution: MPEG-2 decoding
format achieves more than 500 lines o
f
horizontal resolution.
On-screen Display: You can choose from
English, Spanish or French etc. for the
On-screen Display language.
Compatibility: Compatible with DVD,
CD, CD-R, CD-RW, and Picture CD.
Particular Performance: Multi-speed,
fast forward, fast backward and slo
w
forward.
Search by Time: Search for a certain
track of a disk by selected time.
Last Memory Playback: Memorize the
stopped playback track and continue
playing disk from this spot when power is
restored if the disc tray is not opened.
Special Functions: Supports screen
image inverse function, multi-languages
caption, and multi-angles.
Features
Navigation Function: The unit is designed to provide you with route suggestions. It supports voice
navi
g
ation.
Power Adapter Switch: Automaticall
y
adapts to voltage requirements in U.S and
othercountries.
SD Card and USB Input: designed with SD
card and USB ports, can be connected to
SD card or other USB device for file loading.
FM radio: support 87.5-95.0MHz FM radio
function.
Parental-lock Features: Supports to lock
out certain scenes of the disc, or lock out the
whole disc depending on the contents of the
disc.
5
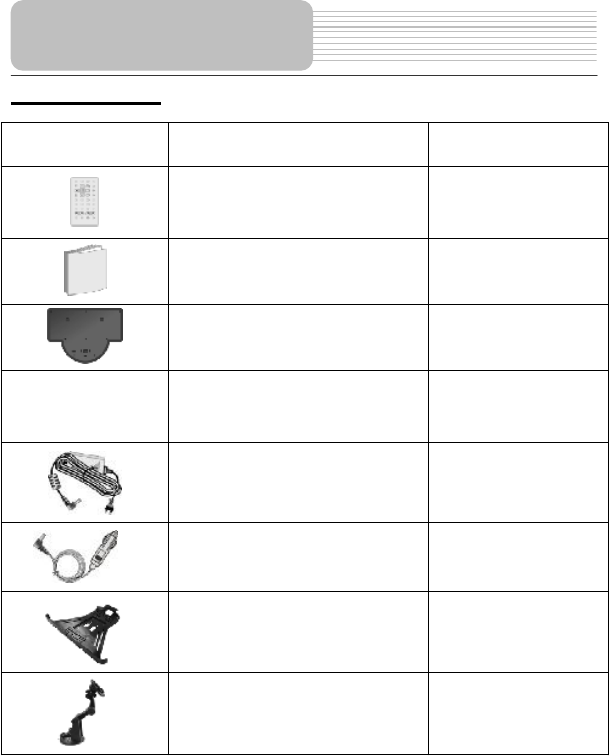
Accessories List
ITEM NAME QTY
Remote Control (with battery) 1
Owner s Manual 1
Rechargeable Battery 1
Audio/Video Cable 1
Power Adaptor 1
Car Adaptor 1
Cradle 1
Mounting Bracket 1
NOTE
Accessories and their parts numbers are subject to modification without prior notice due
to improvements.
Accessories
6
DVD Playback
CD Playback
Picture CD Playback
Contents
!!!!!!!!!!!!!!!!..1
!!!!!!!!!!!!!!!!...4
!!!!!!!!!!!!!!!!...5
!!!!!!!!!!!!!!!!...7
!!!!!!!!!!!!!!!.!..9
!!!!!!!!!!!!!!!!..10
!!!!!!!!!!!!!!!!..12
!!!!!!!!!!!!!!!!..13
!!!!!!!!!!!!!!!!..15
!!!!!!!!!!!!!!!!..16
!!!!!!!!!!!!!!!!..19
!!!!!!!!!!!!!!!!..20
!!!!!!!!!!!!!!!!..44
!!!!!!!!!!!!!!!!..45
!!!!!!!!!!!!!!!!..45
!!!!!!!!!!!!!!!!..50
!!!!!!!!!!!!!!!!..52
!!!!!!!!!!!!!!!!..54
!!!!!!!!!!!!!!!!..59
!!!!!!!!!!!!!!!!..61
!!!!!!!!!!!!!!!!..63
Important Safety Instructions
Features
Definitions
Troubleshooting
DVD System Setup
View of Main Unit Bottom
View of Remote Control
General Setup
Navigation
Notes on Discs
Playback Operation
System Connections
Battery Installation for RC
Power Supply Preparation
About the Rechargeable Batter
y
Accessories
View of Main Unit
Specifications
7
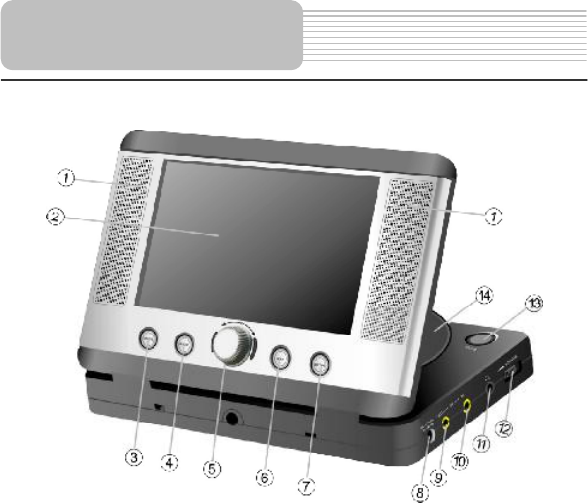
1. Speakers
2. LCD Screen
3. Mode button
Press to enter DVD, AV In or GPS mode.
4. BACK button
In the map view, press to return to the previous menu.
5. Adjusting Knob
In the map view, used to zoom in or zoom out the map.
In the DVD mode, used to select items.
6. MAP button
Press to display the map on the screen.
7. SETUP button
Press to enter or exit the general menu.
8. DC 12V Input Jack
Used to connect to the power adaptor, including the car adaptor.
9. AV OUT jack
Connected to the external AV device for audio and video output.
10. AV IN jack
Connected to the external AV signal source for audio and video input.
View of Main Unit
8
11. Headphone Jack
Used to connect headphones for private listening. When the headphones are
connected to this jack, the speaker will be turned off automatically.
12. Volume Control
Used to adjust the volume of the headphone and speaker.
13. OPEN button
Press to open the disc tray cover.
14. Disc Tray
Load disc into the disc tray.
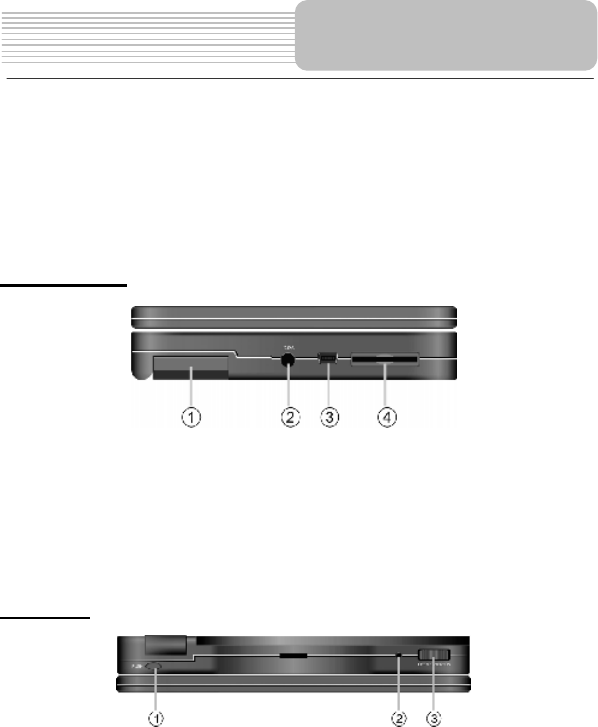
Left Side View
1. GPS Antenna
Used to receive the GPS signal.
2. GPS jack
Connected to the external antenna for receiving signal.
3. USB port
Used to connect to the USB device.
4. Card Port
Insert the SD card into the port.
Rear View
1. PUSH button
Press to open the LCD screen.
2. Power Indicator
Light turns green when the unit is under operation; turns red in standby mode.
3. POWER Switch
Switch power on or off.
View of Main Unit
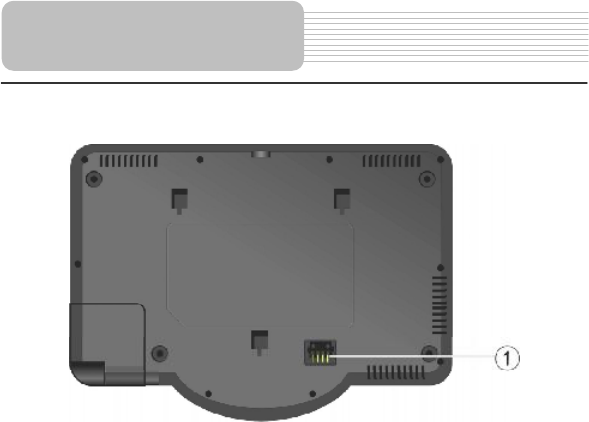
9
1. Rechargeable Battery Contacts
For connecting the rechargeable battery pack.
Note: do not touch the metal contacts point.
View of Main Unit Bottom
10
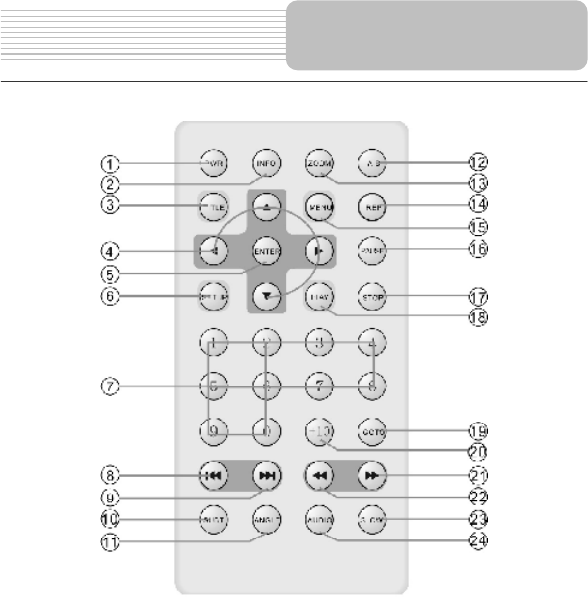
4. PWR button
Press to access standby mode or playback mode.
5. INFO button
Press to display the detailed information of the disc during playing. Press this button
again to exit from the information display.
6. TITLE button
Press to display title menu if it exists in the disc.
7. Direction buttons
Press to select different options.
8. ENTER button
Press to access playback, or confirm your selection
9. SETUP button
Press to enter the player s system setup.
View of Remote Control

11
10. 0-9 Number buttons
Press to select an option in the menu.
11. PREV button
Press to return to the previous list or the previous track or chapter. If it is a DVD disc,
it needs to press this button twice to return to the previous track.
12. NEXT button
Press to skip to the next list, track or chapter.
13. SUBT button
Press to select different subtitle languages if there are multiple subtitle languages
existing in the disc.
11. ANGLE button
Press to access various camera angles playback if the DVD disc contains multiple
camera angles.
12. A-B Repeat button
Press to play a certain selected segment repeatedly.
13. ZOOM button
Press to realize various zoom effects.
14. REP button
Press to repeat a chapter, a title, a track or the whole disc.
15. MENU button
Press to display or cancel the menu.
16. PAUSE button
Press to pause the playback.
17. STOP button
Press to stop the playback. Then press PLAY button to resume playback from the
stopped spot. Press this button twice to stop playback completely.
18. PLAY button
Press to begin to play.
19. GOTO button
Press to select the desired disc starting time, track or title.
20. +10 button
Press this button and the additional number buttons to select item numbers which
are greater than 9.
21. FWD SCAN button
Press to search forward fast.
22. REV SCAN button
Press to search backward fast.
23. SLOW button
Press to activate slow playback function.
24. AUDIO button
Press to select different languages
when a DVD disc which contains multiple audio languages is played. Press to
select different audio track when a CD disc is played.
View of Remote Control
12
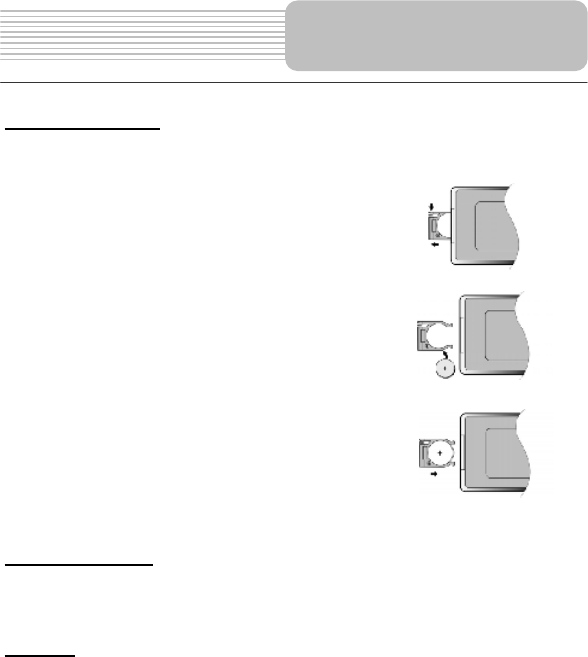
Installation Steps
Follow the steps below to install the battery.
Step1: Pull the battery holder out from the remote
control in the direction of the arrow.
Step 2: Load a new battery properly with
the (+) side up.
Step3: Insert the battery holder back into
the remote control.
Battery Property
Battery Type: CR2025 3V
Battery Life: Approximately 1 year under normal use (at room temperature).
Caution
1. Improper use of the battery may cause overheating, explosion or ignition, which
can result in an injury or fire. Battery leakage may damage the remote control.
2. Do not expose the remote control unit to direct sunlight.
3. Do not recharge, disassemble, deform or heat the battery.
4. Do not put the battery in fire or water.
5. Immediately replace the exhausted battery.
6. For best results, aim the remote control directly at the player s receiving window
within the range of 15 feet and angles of 60 degree, and without obstacles
between remote control and remote sensor.
Battery Installation for
Remote Control
13
Always ensure that the player, TV and any other electrical equipment to be
connected with are switched off and unplugged from the power supply.
Ensure that you observe the color coding when connecting audio and video
cables.
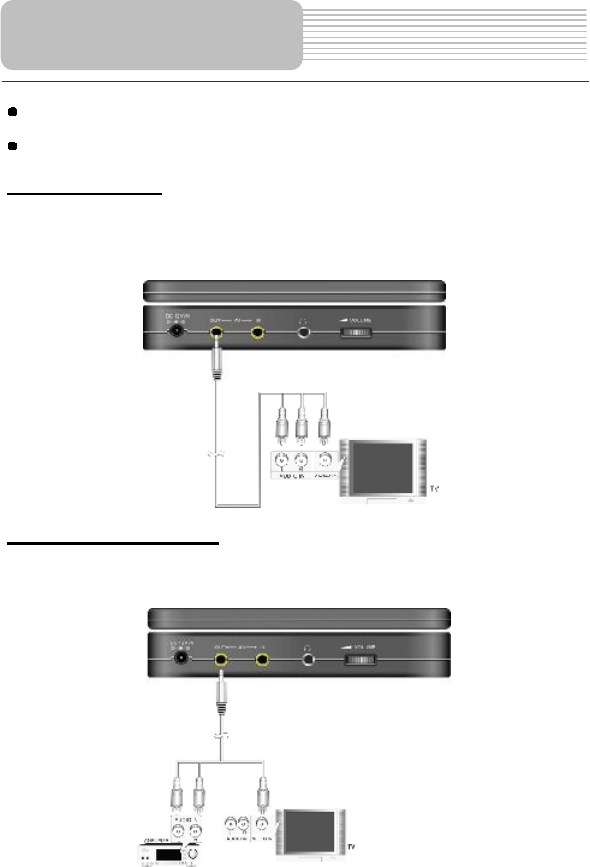
Connecting to TV
Audio/Video connections for audio and video output
Follow the drawings below to connect the player to TV's Audio/Video inputs with
Audio/Video cables.
Connecting to Amplifier
Refer to your Audio equipment's manual before connection.
Follow the drawings below to connect the player to AV amplifier.
System Connections
14
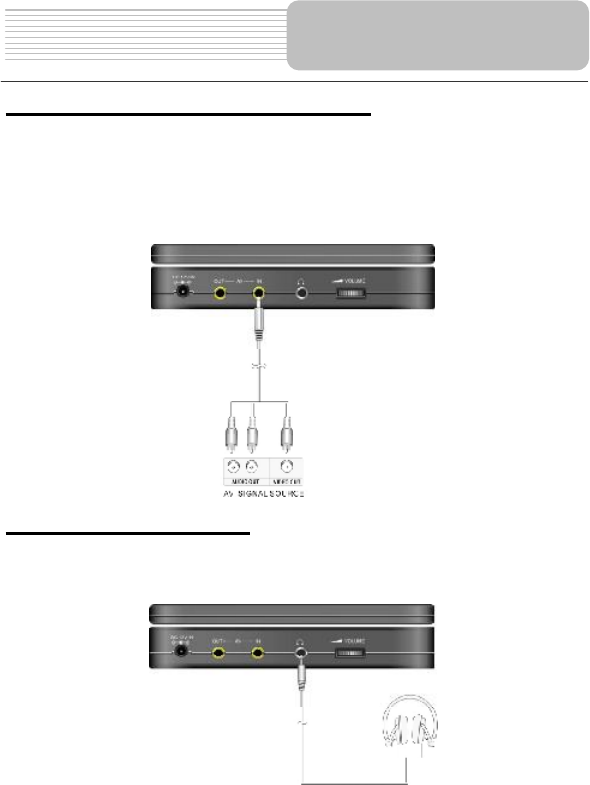
Connecting to External AV Signal Source
This player can be connected to an AV signal input source such as a video cassette
player, video game etc. Use the audio/video cable to connect the player and the
external AV signal source. After connecting, press the MODE button to shift to AV IN.
Ensure that you observe the color coding when connecting audio and video cables.
NOTE: Noise may occur in speakers when input external audio signal while playing a
DVD disc. Please unplug the audio cord to clear the noise.
Connecting to Headphones
Connect the headphones to the right side of the unit for private listening.
When headphone is connected, the speakers will automatically turn off.
System Connections

15
Using the AC Adaptor
The player is supplied with an AC adaptor for powering the unit and charging the
battery.
Note: Turn player's power off before unplugging.
Note: In the case of using the adaptor, the LCD screen will be brighter than with
the rechargeable battery.
Using of Car Adaptor
The player is supplied with a Car Adaptor for powering the unit while in a vehicle.
Attention
Do not operate the unit or view video software while driving a vehicle.
Place the unit in a proper position for viewing.
Detach battery pack when using the AC or car adaptor as power source.
Disconnect the player from the Car Adaptor when starting the vehicle.
Your portable GPS player comes with a rechargeable lithium ion battery pack. Please
see details in battery pack operation part of this user's manual.
Power Supply Preparation
1. Connect AC adaptor to the right side
of the player in the jack marked DC
12V IN, as shown on the right.
2. Plug the two-prong end of the powe
r
cord into a grounded electrical
outlet. The power indicator lights
red.
Connect the Car Adaptor Power Plug to
the unit s power jack and plug the othe
r
end to the vehicle s 12V accessory/
cigarette socket, as shown on the right
figure.
16
About Rechargeable Battery Pack
Your portable GPS player comes with a lithium rechargeable battery that attaches to
the rear of the GPS player. Charge the battery fully before initial use. Charging time is
normally about 5 hours. A fully charged battery delivers about 3 hours of use, but
playing time varies from disc to disc. If the battery will not be used for a long period of
time, fully charge the battery prior to storage.
Working conditions and precautions for the rechargeable battery
New batteries should be fully charged before initial use.
Battery should only be used and charged when temperatures are between
32-100F.
Never put the battery in fire or water.
Do not expose the battery to high temperatures or store in hot, sunny places.
Maintain well-ventilated conditions around the product to avoid overheating.
Don t put the product on a bed, sofa or anything that may block ventilation to the
product.
Do not short the battery terminals.
Do not open the battery.
Detach the battery after charging is complete. When charging the battery pack,
the charge light will turn red, when the charging is complete, the light will turn
green.
Detach the battery when it is not in use.
When the battery is weak, " # will appear on the LCD screen and about five
minutes later, the player will power OFF automatically.
Warning:
Do not touch any metal objects to the battery connectors, as it will put the battery in
standby mode. To exit the standby mode, connect the battery and Unit to AC or DC
power.
About the
Rechargeable Battery
17
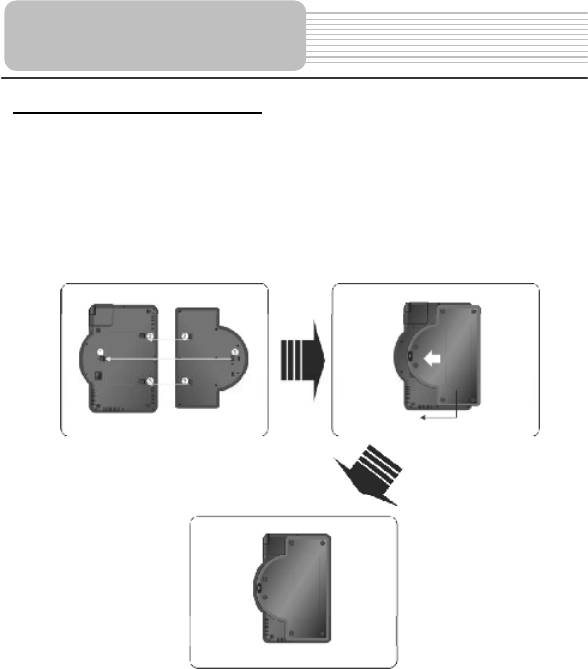
Attaching the Battery Pack
Refer to the following steps to attach the Battery Pack:
1. Place the unit on a soft and smooth surface with the bottom of the unit facing
up.
2. With one hand on the unit to prevent it from moving, take the battery and align
the plastic tabs on the battery pack with holes on the unit, and push the battery
pack into the unit.
3. Slide the Battery Pack until you hear it click.
About the
Rechargeable Battery
18
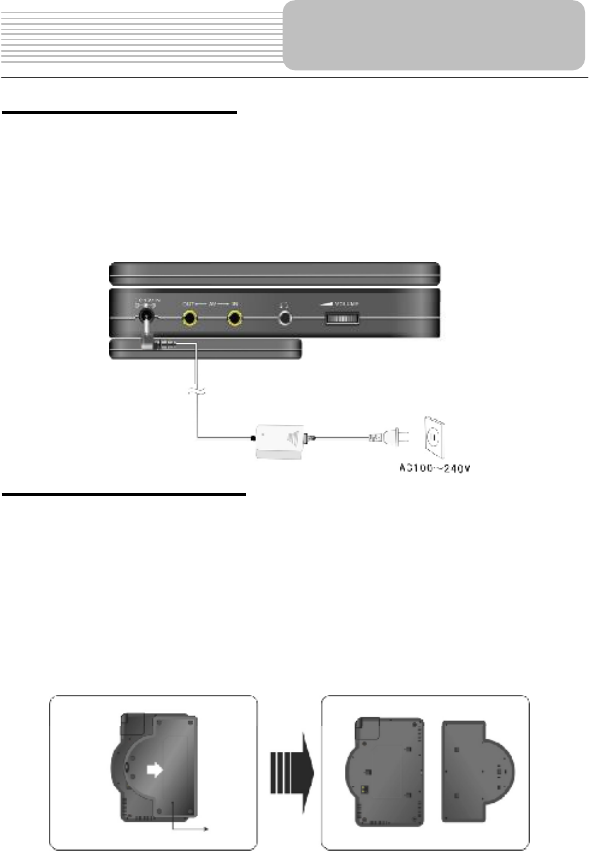
Charging the Battery Pack
The battery pack must be attached to the unit to be charged by using the supplied
power Adaptor.
1. Attach the battery pack to the unit.
2. Plug the supplied power adaptor into the player s power jack marked with "DC
12V IN#, which is located on right side of the unit.
3. Plug the other end of the power adaptor into a household outlet as shown
below:
Detaching the Battery Pack
If the unit is not going to be used for long periods of time, the battery pack should first
be fully charged and then detached. When the unit is turned OFF, the unit is still
consuming some power in STANDBY mode. This will eventually discharge the battery.
Make sure the power is turned OFF and the AC or car adaptor is disconnected before
detaching the Battery Pack.
To detach the Battery Pack:
1. Push the battery pack latch toward the rear of the player and slide the
rechargeable battery from the main unit (see drawings below).
2. Store the rechargeable battery in a safe place.
About the
Rechargeable Battery

19
Press the SETUP button on the unit; the screen will display a menu, as shown below:
In the menu, there are six items for selecting, touch the item to enter the setup.
Touch , you can adjust the volume.
Touch , you can adjust the brightness level. Touch AUTO, the unit will adjust the
brightness level automatically according to the environment.
Touch , you can adjust the contrast level.
Touch , you can set the touch screen sound on or off.
Touch , you can set the FM transmitter frequency.
Touch , you can set the screen aspect ratio.
General Setup
20
Preparation:
1. Connect to power supply.
2. Turn on the unit, and press the MODE button to shift to GPS mode.
3. Press the MAP button to display the map on the screen.
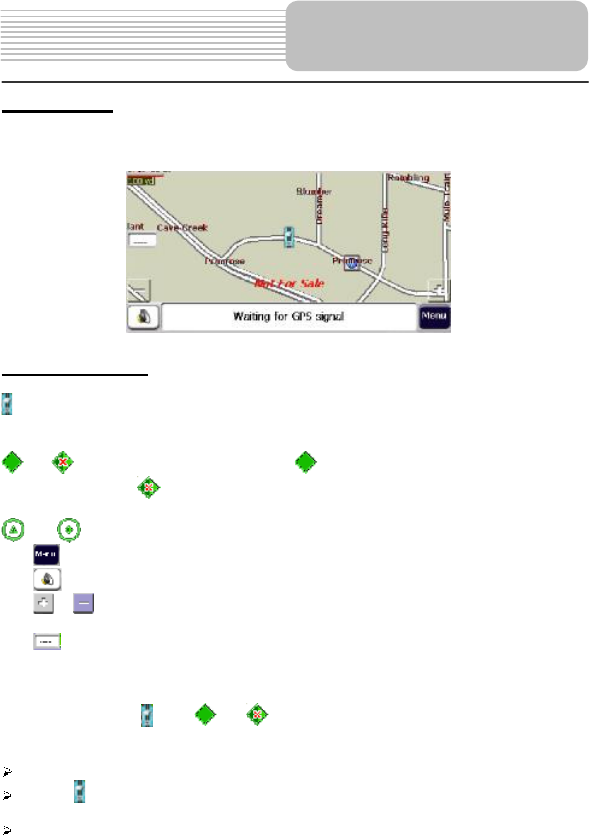
Map Description
Refer to the below descriptions for the buttons and icons on the map screen.
Indicates in Car mode. It shows your current location or your last known GPS
location (when there is no valid GPS information at this time) while in Navigation
Mode.
or indicates in Pedestrian Mode. shows your current location while in
Navigation Mode. shows your last known GPS location while in Navigation
Mode. When there is no valid GPS information at this time.
(or in Pedestrian Mode) shows the Origin in Free Map Browsing mode.
Tap on the map to enter the main menu.
Tap on the map to switch on/off the speaker.
Tap or to zoom in/out the map. The color of these buttons changes as the
background varies.
Tap to show your current driving or walking direction in the Navigation mode.
The distance scale is located in the top-left corner of the screen.
GPS status is shown in the bottom status bar.
Special features of and or icons
The three icons have the capability to automatically change its appearance so that you
will be informed of several important navigation conditions:
The icons indicate if you are in Car or Pedestrian mode.
The icon indicates if you are driving at high or low speeds. The icon becomes
elongated at higher speeds and wider at lower speeds.
The icons display a shadow that shows the position of the Sun. This is especially
important if you are using this unit in Pedestrian mode. By positioning yourself so
that the shadow that you cast is in the same position as the shadow on the
screen, you can be assured that you are walking in the right direction.
Navigation

21
The icons shadow disappears during night driving.
Main Menu
Tap on the map to enter the main menu. The screen will display as below:
Tap to switch the screen to the map view.
Tap to cancel the current route. After that, the previously calculated route
will be cleared from the map view and you can plan a new route.
To quit the navigation application, tap button.
Navigate to an Address(or Intersection)
In the main menu, tap "Enter Address# to open the entering address menu. As shown
below:
The default order for entering your destination is City Street Number
Enter City Name
Enter the first the first few characters of the city name by tapping the keyboard. The
scroll list, which is displayed below your input characters, will update accordingly. You
can also display the expanded list on the screen and hide the soft keyboard by tapping
the button.
Navigation
22
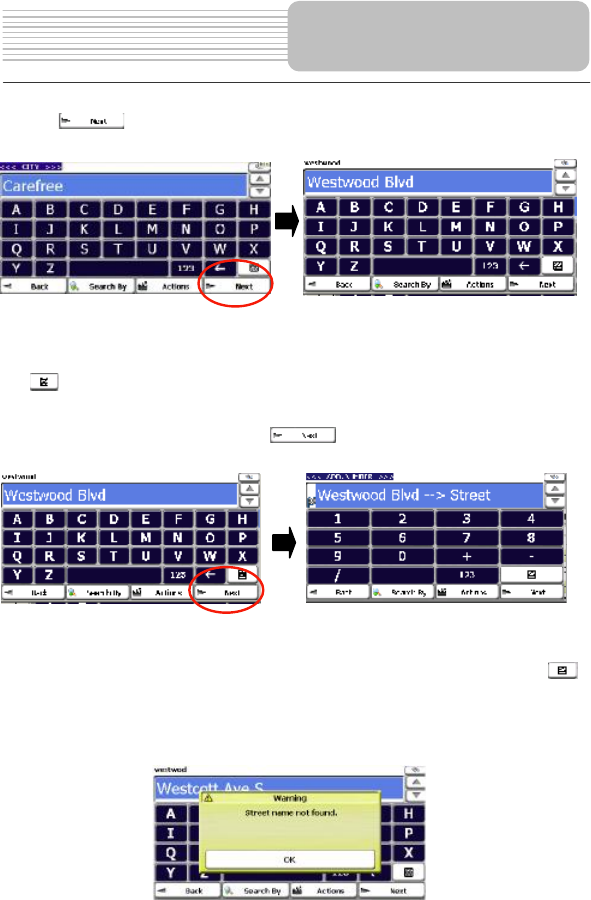
Enter Street Name
Tap the button to enter the street name of your desired address. As shown
below:
Take the same steps to enter the street name.
Enter the first the first few characters of the street name by tapping the keyboard. The
scroll list, which is displayed below your input characters, will update accordingly. You
can also display the expanded list on the screen and hide the soft keyboard by tapping
the button.
Enter Number
After entering the street name, tap the button for entering the number. As
shown below:
Take the same steps to enter the street name.
Enter the first the first few numbers of the number by tapping the keyboard. The scroll
list, which is displayed below your input numbers, will update accordingly. You can also
display the expanded list on the screen and hide the soft keyboard by tapping the
button.
Note: If you enter a wrong name of the city or the street or the number, a warning
message will be displayed to inform you as the following figure. Tap Ok to re-enter the
correct name or number. As shown below:
Navigation
23
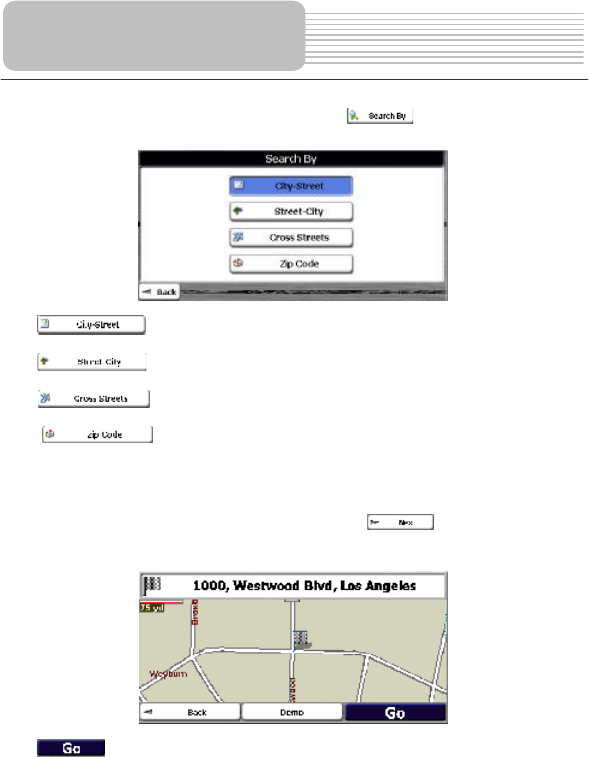
Search By
You can change the entering order by pressing button. The screen will
display as below:
Tap to search for an address by entering in the sequence of City,
Street, and Number.
Tap to search for an address by entering in the sequence of Street,
City, then the Number.
Tap to search for an intersection by entering in the sequence of City,
the first Street and the intersecting Street.
Tap to search for an address by entering in the sequence of
ZIP/Postal code,Street and Number.
The highlighted button (in the blue bar) indicates the current input order mode.
Show the Destination on the map
After Finishing entering the whole address, tap the button to show your
destination in the map. As shown below:
Tap button to calculate the route to this destination and then show it in the
map view. The route is shown as a blue solid line. The device switches to the
navigation mode. You can start your trip.
Tap Back button to change and reset your destination step by step.
Navigation
24
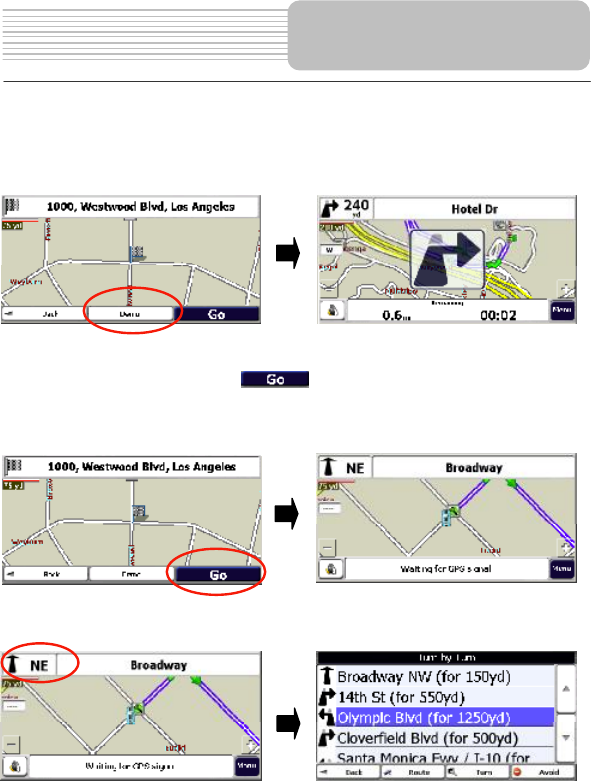
Driving Demo
Tap the Demo button to activate one piece of the demonstration of the calculated route
in the map view. Here, you can see a simulated navigation from the origin to the
destination. When closing to each turn, one visual notice will inform you the direction
change and with voice prompt. As shown below:
Driving List (Turn by turn)
As described above, when you tap button, the unit will display the route (a
blue solid line) and direction guide in the map screen. The driving direction indication
shows the next turn, the distance to the next turn and the current name of the street will
be displayed on the top. As shown below:
Tap the turn icon (top-left) to show the complete driving list. It displays all details about
each turn such as driving distance between two turns. As shown below:
Navigation
25
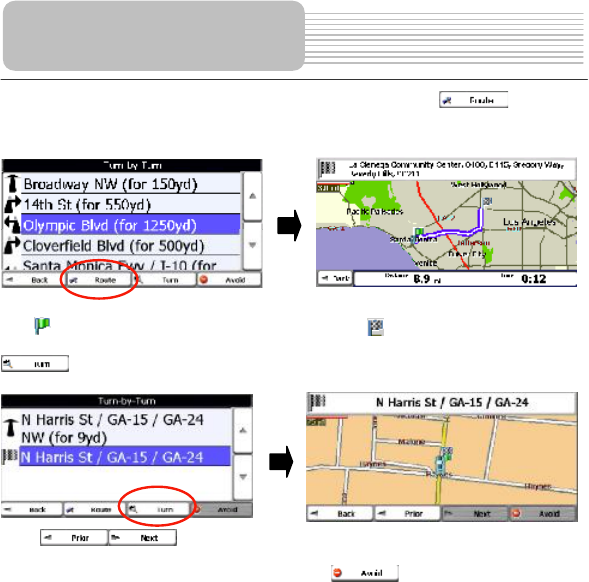
In the driving list, you can see the route overview by tapping button. It
shows the detailed in formation of the current route including the distance, the time to
travel and the destination address. As shown below:
The icon represents the origin of the route and the icon is for the destination.
Or see the one certain turn by tapping one turn in the turn-by-turn menu and then tap
button. As shown below:
Press to view the prior or next turn.
If you want to avoid one turn, select it and tap button in the turn-by-turn
menu. The route will be recalculated to avoid your desired turn and shown in the map
view.
Navigation
26
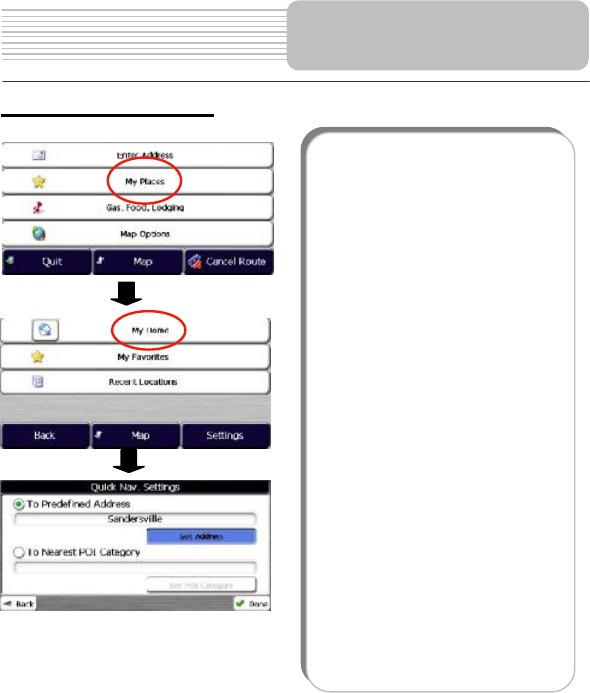
Navigate To My Home!
Navigation
When you navigate to your home
destination which could be your home o
r
one nearest POI, take the following steps:
1. Tap the My Places on the main
menu.
2. Tap the My Home on the menu to
enter the Quick Nav. Settings
menu.
3. Inthe Quick Nav. Settings menu, tap
"To Predefined Address#and then
tap "Set Address#to enter the
defined home address. Tap "To
Nearest POI Category#and then tap
"Set POI Category#to set the
nearest POI.
4. To navigate to the home or neares
t
POI
27
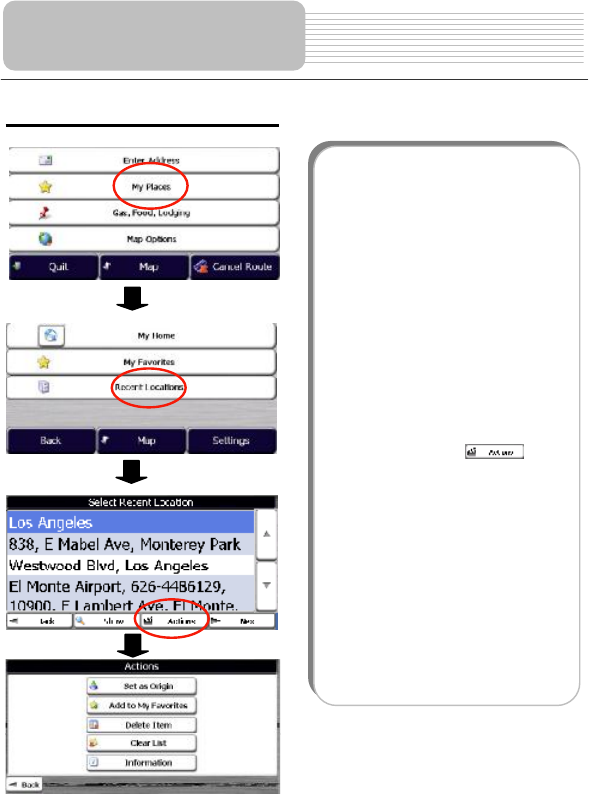
Navigate To a Recent Location
Navigation
The Recent Locations list allows you to
select an existing destination from a list o
f
previously traveled or entered address.
The software automatically stores the las
t
fewdestinations in memory. As each
new route is added to the top of the list,
the older destinations at the bottom are
erased. Take the following steps to
navigate to a recent location:
1. Tap the My Places on the main
menu.
2. Tap the Recent Locations on the
menu to enter recent location list.
3. In the recent location list,highligh
t
one desired location and tap Show
or Next button to see this location in
the mapview. To navigate there jus
t
tap the Go button described as the
previous section.
4. You can also tap button
in the list screen for more options
about this address.
5. Here the selected location can be
set as the origin, added to you
r
favorites, deleted or displayed with
detailed information or clear the
recent location list.
28
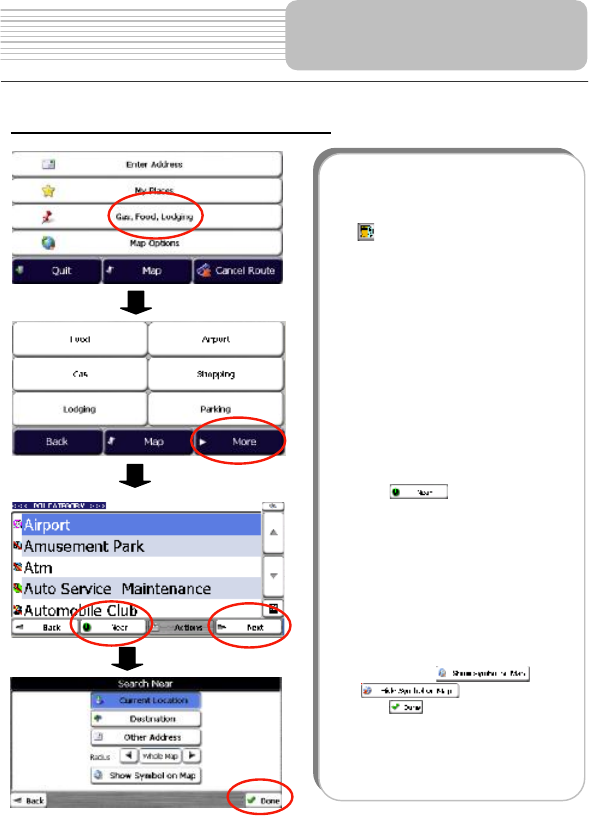
Navigate To a Point of Interest (POI)
Navigation
The Points of Interest (POI) list is a
collection of potential destinations o
f
interest in predefined categories. POIs
are identified on the map by various icons
(eg: Gas Station). POI navigation is
especially handy when you need to find a
facility, attraction or amenity by categor
y
or type. Take the followingsteps to
navigate to a POI:
1. Tap the Gas, Food, Lodging on the
main menu.
2. Tap your desired categoryin the
POI category menu or just tap More
button to the enrter category list.
3. In POI category list, scroll the lis
t
and highlight the desired POI
category and tap Next to show POI
list in a certain area.
4. Before you press the Next button,
you can define the searching area
for the selected POI category
Tap button, the Search
Near menu will appears fo
r
searching POIs. The defaul
t
searching area is the whole map.
More options are available such as
the center and radius. The cente
r
can be the current location,
destination or other address. The
searching radiusis 3, 25, 50 miles
or the whole map.
The selected POI category can be
shown or hiddenin the map b
y
tapping o
r
button.
Tap to save your selection.
29
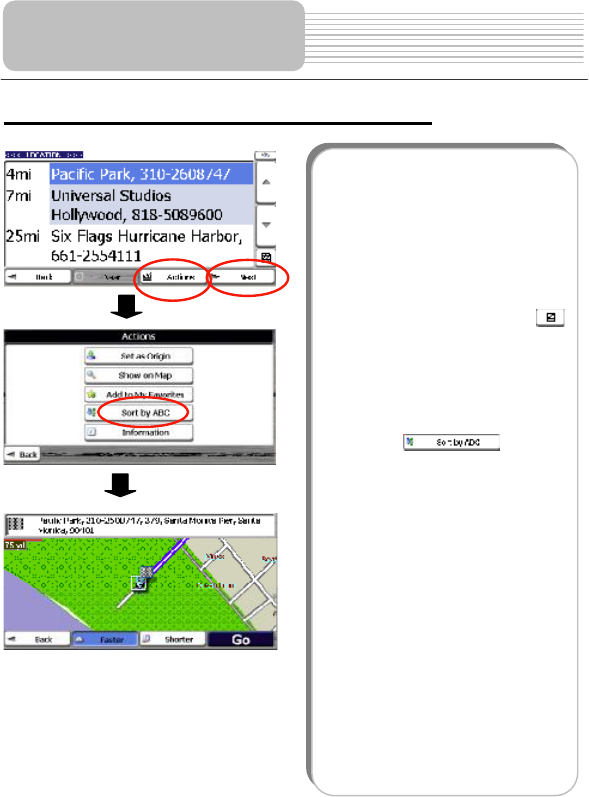
Navigate To a Point of Interest (POI) (continued)
Navigation
1. The item list of the selected POI
category in the defined searching
area is displayed with detailed
address. The POIs are listed in
order of distance.
2. With one POI ishighlighted, tap
Next button to display this POI in
the map view. Or Actions button fo
r
more options.
Note: in each screen, you can tap
button to show the soft keyboard fo
r
entering your desired POI category o
r
POI item instead of choosing in the scroll
list.
3. The POIs can be listed in order o
f
letter. To sort them alphabetically,
tap the button.
4. In the map view withyour desired
POI, tap Go button to navigate from
the origin. Tap Faster or Shorte
r
button to choose the route
calculation mode. Tap Demo button
to show the animated route.
As you drive, the unitprovides you with
turn-by-turn voice and visual directions,
letting you know when your next turn is
due.
30
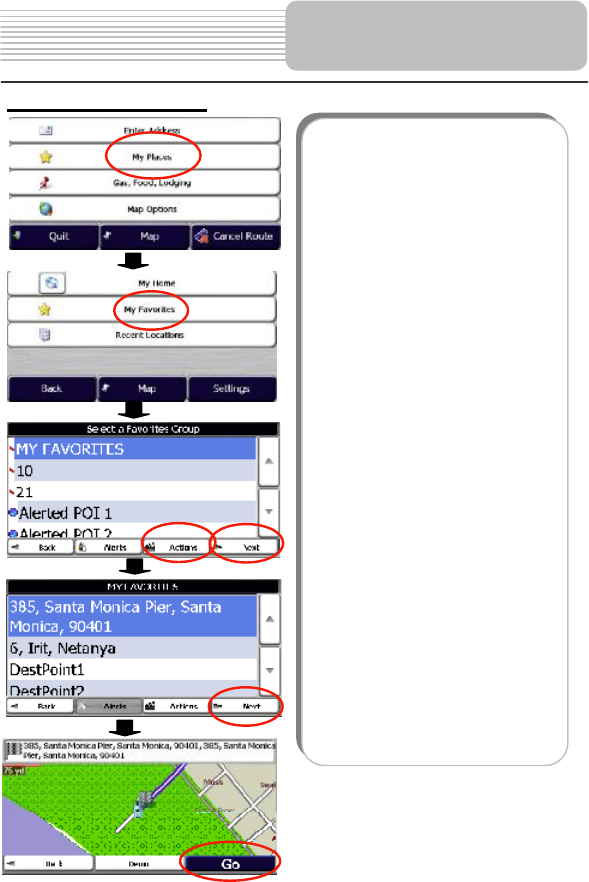
Navigate To a Favorite
Navigation
You can select a destination from your lis
t
of stored Favorites. A Favorite is an
address or destination previously stored
by you for quick and easy retrieval. You
can also save, edit or delete destinations
from this folder. Take the followingsteps
to navigate to a POI:
5. Tap the My Places on the main
menu.
6. Tap My Favorites button to the
enter My Favorites list.
7. Actions button is for manage you
r
favorites by adding, editingand
deleting a group. Highlight M
y
Favorites or other saved favorite,
and tap Next button. A list o
f
stored items is displayed.
8. Highlight your selection and tap
Next to show this favoritelocation
in the map. Or tap Actions button
to set as origin, show, edit, delete o
r
see detailed informationfor this
location.
9. In the map view, tap Go button to
navigate from the origin. Tap Demo
button to show the animated route.
The route is shown on the map as a
blue line.
As you drive, the unitprovides you with
turn-by-turn voice and visual directions,
letting you know when your next turn is
due.
31
Save To Favorites List
Navigation
When selecting a Destination which you
may use regularly, you can save it to you
r
personalized Favorites list. Take the
following steps to save to favorites list:
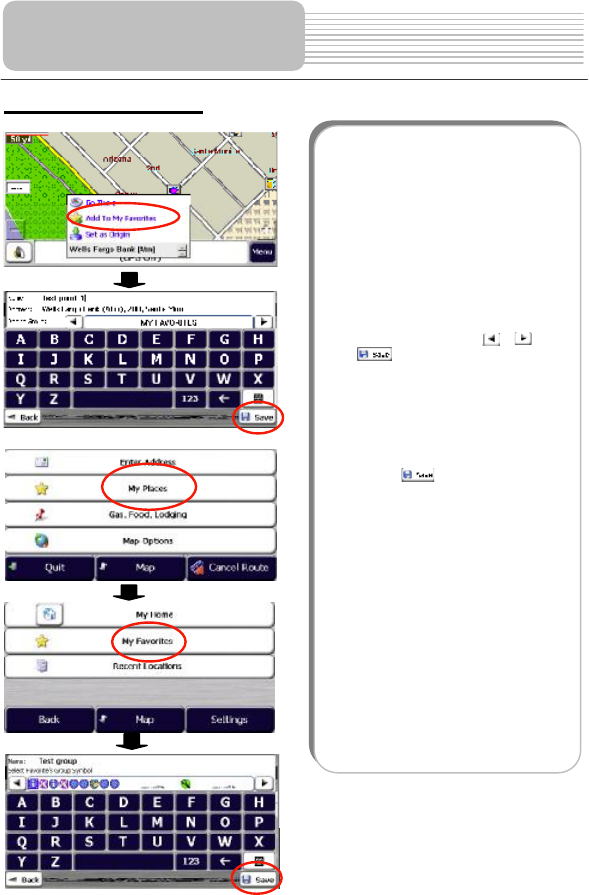
First method:
1. On the map, tap any point in the
map screen, a context menu
appears. You can add this desired
location to "My favorites# list. Tap
the Add To My Favorites.
2. In the favorites editingmenu, you
can set the name of this favorite
location and the favorite group to
add in by tapping or . Tap
button to save your settings.
Second method:
10. In the main menu, tap My Places
11. Tap MyFavorites. Then tap
Actions button to add one ne
w
group. The name and symbol fo
r
your favorites can be set in the
following screen.
12. Press button tosave the
new favorite group.
Your favorite destination has now been
stored for future use.
32
Navigate To a Point on the Map
Navigation
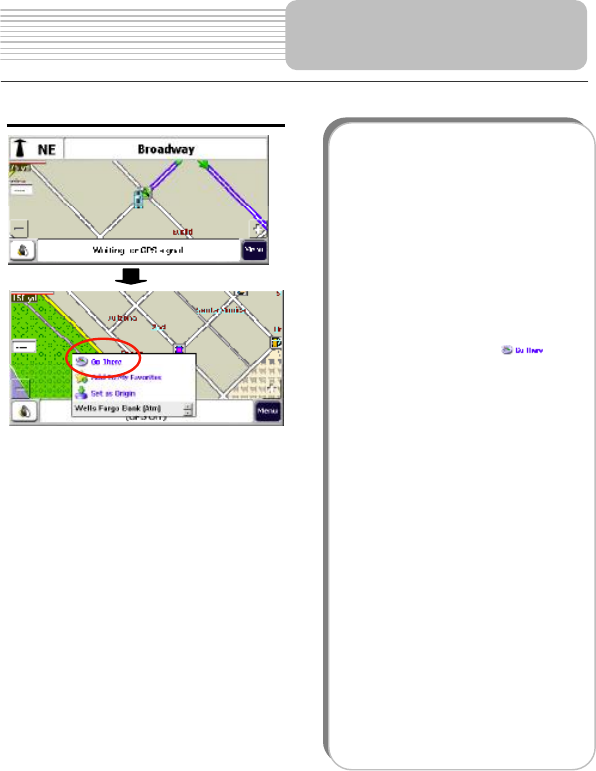
You can navigate to any point on the map
by tapping its location directly on the map
screen. This featureis especially hand
y
when you want to navigate to a specifi
c
point you see on the map, but you don
t
have its street address. Take the following
steps to navigate to a point on the map:
3. Scroll or drag the map to a specifi
c
point, and then tap the desired
location.
4. A dialog box (See Figure 24)
displays the address of that point,
and lets you select whether you
want to navigate to it ( ), add
the point to your Favorites, or set i
t
as your Origin (if you are in Planne
r
Mode).
5. To clear the cursor dialog,just tap
the screen again.
6. If you need to reset the point o
f
Origin, tap the map screen to open
the Cursor Dialog, and select Se
t
As Origin. All new route
calculations will use this as the
starting point, but only if you are in
Planner Mode. In Navigation
Mode, your current GPS location is
always your Origin.

33
There are various route and map options available from the Options Menu.
Map Options
In the main menu, tap "Map Options# to enter the map options menu. As shown below:
The Options Menu provides choices for displaying mode, avoiding roads, displaying
your driving directions, a route overview, playing and recording a route.
Tap to switch the screen to the map view.
Tap Back to return to the previous menu.
Tap Settings to enter the settings menu.
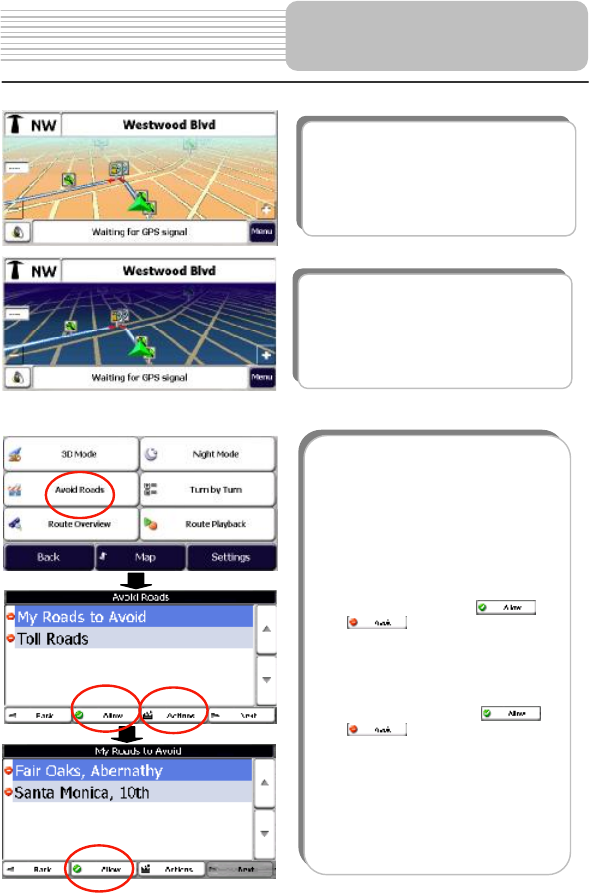
View types
Tap the two buttons to select 4 types of views: 2D, 2D Night, 3D and 3D Night. This
option displays your route on the map screen in its entirety, plus details such as the
address of and distance to your destination, the ETA (Estimated Time of Arrival), and
the ETR (Estimated Time Remaining).
Navigation
2D day view
The 2D view is the straight-forward
two-dimensional view. This is the defaul
t
map view. In this view, the map is
dynamically updated, and allows for manual
panning and zooming.
2D night view
This is a high contrast, two-dimensional
view, optimized for night driving or adverse
weather conditions. The map is
dynamically updated, and allows fo
r
manual panning and zooming.
34
Avoid Roads
Navigation
3D day view
The 3D view is a simplified
three-dimensional view showing the map in
a basic 3D relief. It shows the basic relie
f
(outline) and details of the surrounding
roads and general area.
3D night view
The 3D night view is a simplified
three-dimensional view with high-contrast
colorization optimized for night driving o
r
adverse weather conditions.
You can specify that certain roads be
excluded from your route calculations.
For example, you may prefer to not travel
on any toll roads. Take the following steps
to set the avoid roads:
7. On the Map Options menu, tap
Avoid Roads button to display a lis
t
of road categories.
8. To place restrictions on a desired
road group, tap o
r
to suit your preference.
Tap Actions button to add, edit o
r
delete a group.
9. Tap Next to list all the roads in a
highlighted group. To specif
y
restrictions for a particular road,
highlight it and tap o
r
. To preview a highlighted
road on the map screen, tap the
Actions button and select Show on
the map. In the Actions menu, you
can also add a new road or edit an
existing road.
35
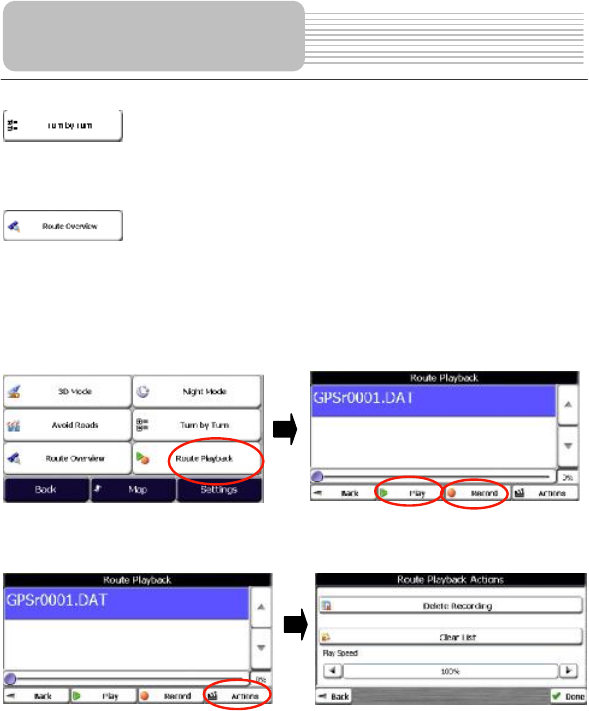
Turn by Turn
Tap the Turn by Turn button in the Map Options menu to display the complete list of
changing directions. See the "Driving List (Turn by Turn) part for details.
Route Overview
Tap Route Overview in the Map Options menu to show the complete route (a blue
solid line) in the map screen. See the "Driving List (Turn by Turn) part for details.
Route Playback
This feature allows you to record your route as you re traveling, and then to play it back
on the map screen at a later time. Tap Route Playback in the map options menu to
enter the route playback menu. As shown below:
In the Route Playback menu, tap Record to record a route, tap Play to play back a
route, and tap Actions to change the speed of the playback, and delete recordings or
clear the list. As shown below:
Navigation
36
You can easily change the default settings of maps, views and route parameters to suit
your personal preferences.
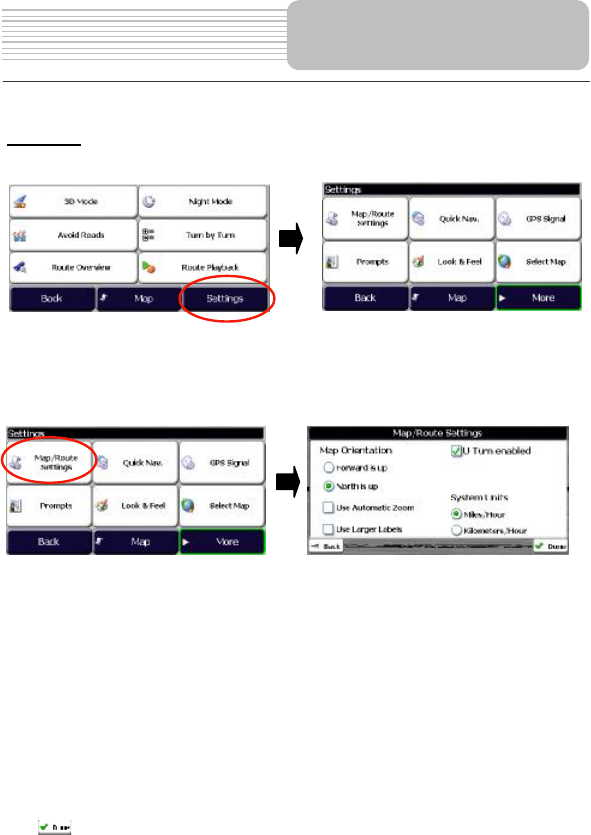
Settings
In the Map Options menu screen, press the Settings button to display Settings menu.
In the settings menu, tap Back to return to the previous menu, tap Map to go the map
view, tap More to know more information. Tap the items in the menu to enter it.
Map/Route Settings
Tap Map/Route Settings in the settings menu to enter the map/route settings menu,
as shown below:
The Map/Route Settings Menu allows you to change the settings that determine the
map orientation, U turn usage, system units automatic zoom and large labels.
Map Orientation
Forward is up $ orients the map so that your forward direction is always at the top.
North is up $ orients the map so that north is always at the top.
Zoom Mechanism
Automatic Zoom ensures that the zoom will return to its previous level after several
seconds of inactivity.
Map Font
Use large labels $ increases the size of street names to make the map easier to read.
Tap to save the settings.
Navigation
37
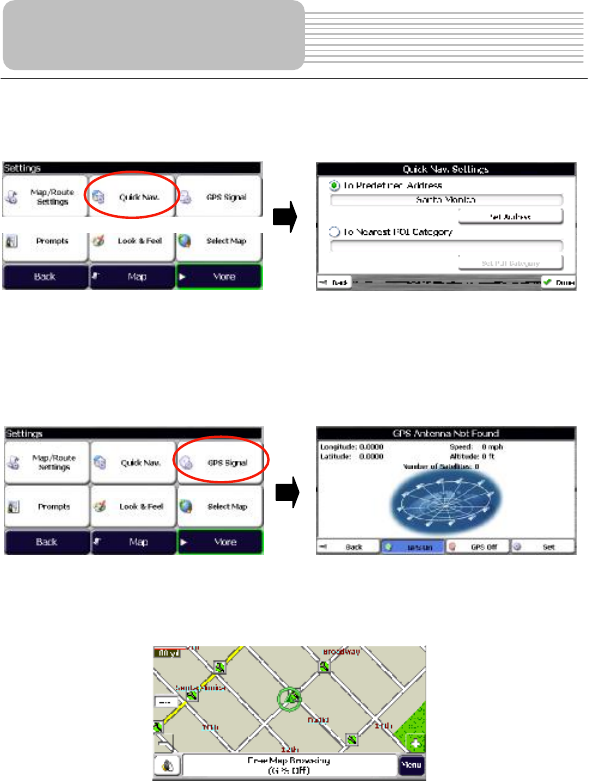
Quick Nav. Settings
Tap Quick Nav. in the settings menu to enter the quick Nav. settings menu, as shown
below:
To define your desired home destination, you can enter an address or the Nearest POI.
For example, you can enter your home address here for quick navigation. See
"Navigate to My Home# for the specific operation.
GPS Settings
Tap GPS Signal in the settings menu to enter the quick GPS Signal settings menu, as
shown below:
To view your GPS status and configuration, tap the GPS Signal button in the Settings
menu.
GPS off button allows you to browse the map freely without acquiring GPS signal. The
icon for your current location is changed as well. See the below map view for details:
Navigation
38
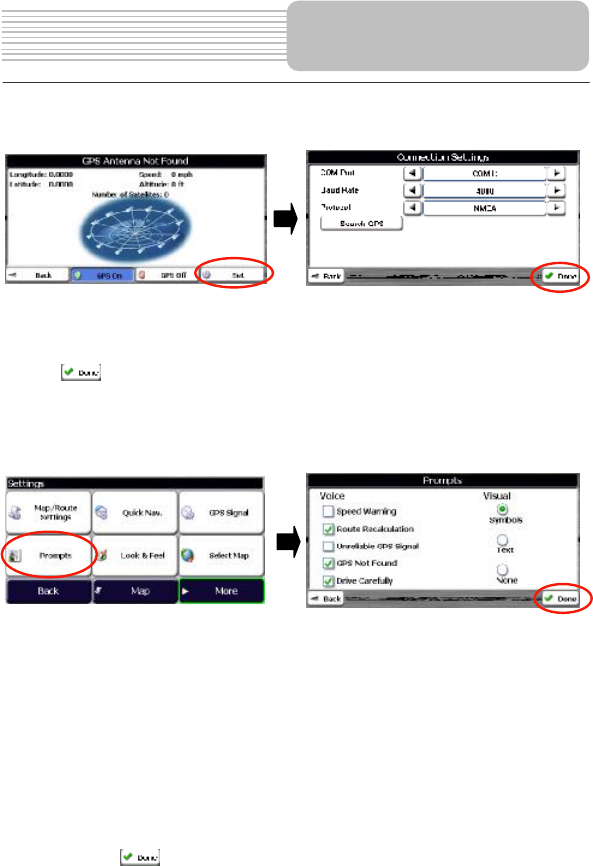
GPS Connection Settings Menu
Tap Set in the GPS signal settings menu, the screen will display as below:
COM Port - Defines the Communications Port.
Baud Rate - Transmission rate of data.
Protocol - Default is NMEA.
Search GPS Searches the GPS signal from the COM port defined above.
Tap the button to save your selections and return to the GPS Satellite graphic
screen.
Prompts
Tap Prompts in the settings menu to enter the Prompts settings menu, as shown
below:
Voice Prompts
1. Speed Warning - Gives you a voice prompt when your car exceeds the speed
limit on this section of the road.
2. Route Recalculation - If you deviate from the original route, the unit will
automatically recalculate a new route and update ETA and distances.
3. Unreliable GPS Signal - Warns that you are in an area of low GPS signal.
4. GPS Not Found - Alerts you if the GPS signal is lost, or if power is removed from
the GPS receiver.
5. Drive Carefully - Friendly reminder at the start of each journey.
Visual Prompts
The Visual Notifications screen lets you choose how the unit notifies you of your
upcoming turns.
After setting, tap to save the settings.
Navigation
39
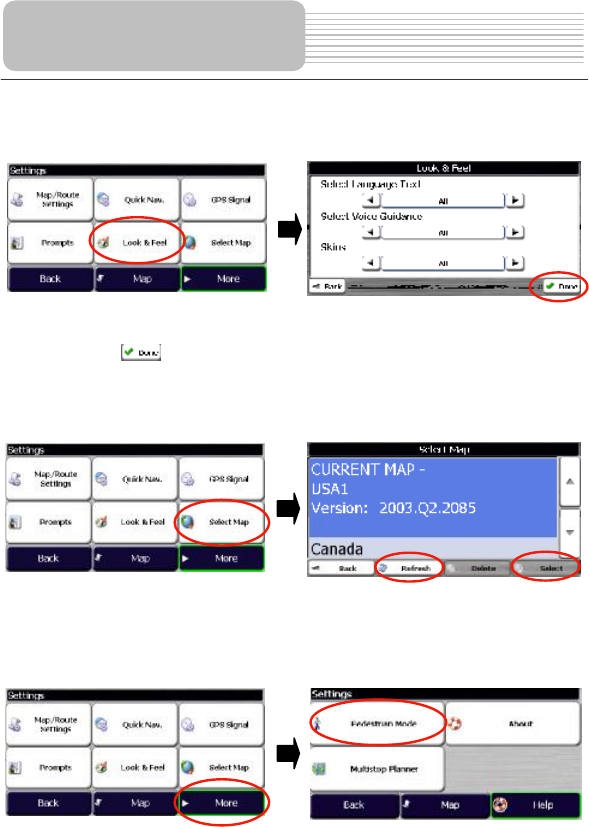
Look & Feel
Tap Look & Feel in the settings menu to enter the Look & Feel settings menu, as
shown below:
The Look & Feel settings menu allows you to choose the language text, voice guidance
and skins.
After setting, tap to save the settings.
Select Map
Tap Select Map in the settings menu to enter the Select Map settings menu, as shown
below:
In the list of installed maps, highlight your selection and tap Select to load a new map.
Tap Refresh button to update the map list. Tap Delete to delete the map.
Travel Mode
Tap More in the Settings menu, the screen will display as below:
Navigation

40
or
In the menu, tap Pedestrian Mode or Vehicle Mode.
In Pedestrian Mode, the navigation radius is restricted to 10 kilometers (6 miles) and
some functions are not available, such as Turn by Turn,Avoid Roads and Route
overview.
Routing Mode
Navigation Mode $ Provides voice instructions as you drive.
This mode is the one you will use most frequently. The unit uses the satellite-based
global positioning system (GPS) to constantly detect your current position. As you
drive, your location is compared to the destination you have chosen and you will be
constantly provided with accurate driving directions. Even if you accidentally drive off
course, the unit will direct you back on track.
Planner Mode $ Displays a route on the map.
You set an origin and a destination, and the unit displays a map that shows you the
route. In this mode of operation, the satellite-based global positioning system (GPS)
is not used. Your current position is not detected and the unit does not keep track of
your driving progress. Use Planner Mode for trip planning.
About
Tap About in the menu, the screen will display software version and details about your
Destinator application.
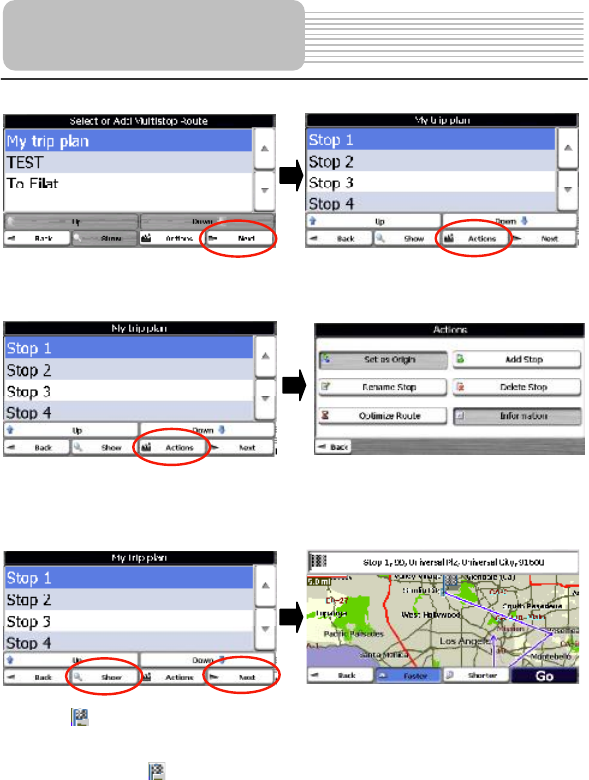
Multistop Planner
Trip planning is useful when you have more than one destination along your route
When you tap , the Route is calculated in stages, from the departure point to
the first stop. Once you ve reached the first stop, the route is recalculated to the
second stop, and then recalculated to the third stop, and so on.
Tap Multistop Planner in the menu, the screen will display as below:
The scroll list shows the list of existing trips. If this is the first time you are using
Multistop Planner, you will need to create a Multistop route to store your trip details.
You can use any name. For an example, you enter My plan trip.
By tapping Actions button, you can add, edit or delete a Multistop route.
Navigation
41
Tap Next button to add or edit some stops in the desired plan.
Highlight a stop item, and press Actions button for more operations such as Set as
Origin, add a stop, rename or delete a stop and Optimize route.
You can add a stop from an address, a POI, my Favorites or recent locations.
When finishing adding stops, tap Show or Next button to see this Multistop plan
overview in the map. No route is calculated yet.
Note: the icon represents the highlighted stop in the plan list not for the destination
here.
Choose Faster or Shorter for the route calculation mode. Press Go button to navigate
from the origin to the stop with this multistop plan.
Navigation
42
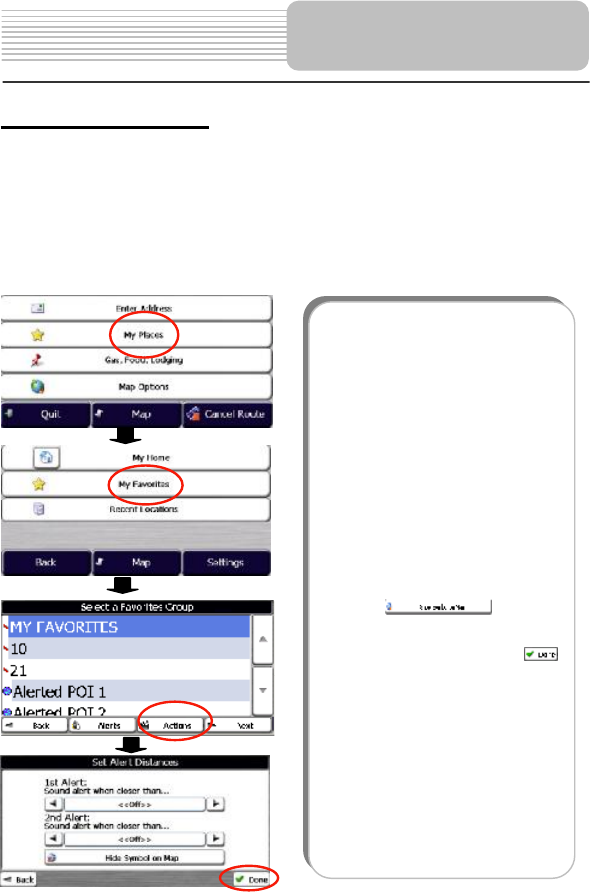
Auto & Favorites Alerts
An Automatic Alert refers to an item that you set so that Destinator will alert you when
you are within a certain distance of the item s location. You can set two distances for
each Automatic Alert. Destinator will first alert you when you are within the first distance
and then alert you when you are within the second. Automatic Alerts must be stored in
either one of three predefined categories - Auto Alerts 1, Auto Alerts 2, and Favorites
Alerts.
Setting Auto Alerts Category
Note that this configuration is applied to all items in the category.
Navigation
Take the followingsteps to set auto alerts
category:
1. In the main menu, tap My Places.
2. Tap My Favorites in the menu.
3. In the favorites list menu, highligh
t
the Auto Alerts folder you want to
configure and tap Actions from the
bottom. You can change the name
and symbol for alerts.
4. To enable both alerts, tap Alerts
button. In the Set Alert Distances
menu, set the distance for sound
alert with 100, 500, 1000, or 2000.
Or, you can disable either of the
alerts by set the distance with
"<off>#.
5. To display the map position of items
in the Auto Alerts category,
press , just as you
would to display map positions o
f
items in any other category.
6. Save your settings by tapping .
43
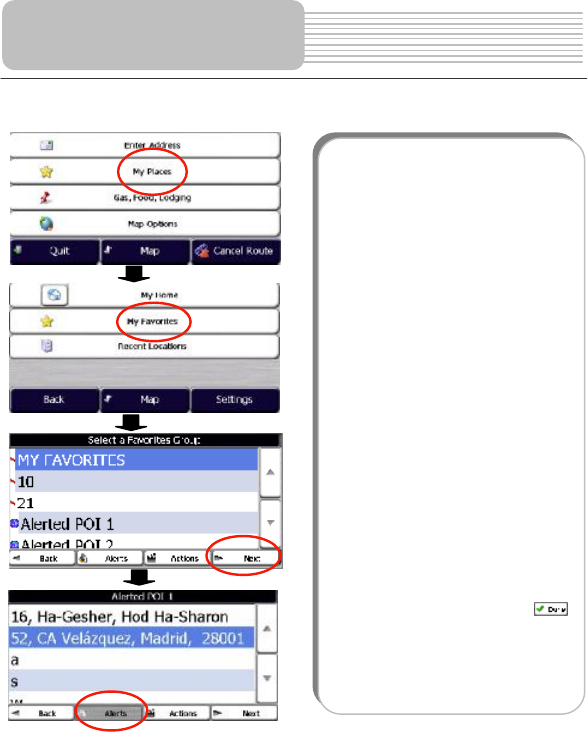
Setting Auto Alerts Items
Navigation
You can change the name, comment, and
category of any item in Auto Alerts 1 o
r
Auto Alerts 2. Note that if you change the
category of an item to something othe
r
than Auto Alerts 1 or Auto Alerts 2, it will
no longer function as an auto alert. Onl
y
those items in categories Auto Alert 1 and
Auto Alert 2 will function as automati
c
alerts. Take the followingsteps to set auto
alerts items:
1. In the main menu, tap My Places.
2. Tap My Favorites in the menu to
display all the categories.
3. In the favorites list menu,Highligh
t
a category and then select Nex
t
from the bottom menu bar. All items
in the category are displayed.
4. Highlight the alert you want to edi
t
and tap Actions from the tools
menu in the bottom.
5. You can change the name,
comment, and category of an item.
You cannot change any othe
r
information. Note that if you change
the category, the item will be moved
out of the current category. Onl
y
those items found in either Auto
Alerts 1 or Auto Alerts 2 will function
as auto alerts.
6. Save your settings by tapping .
44
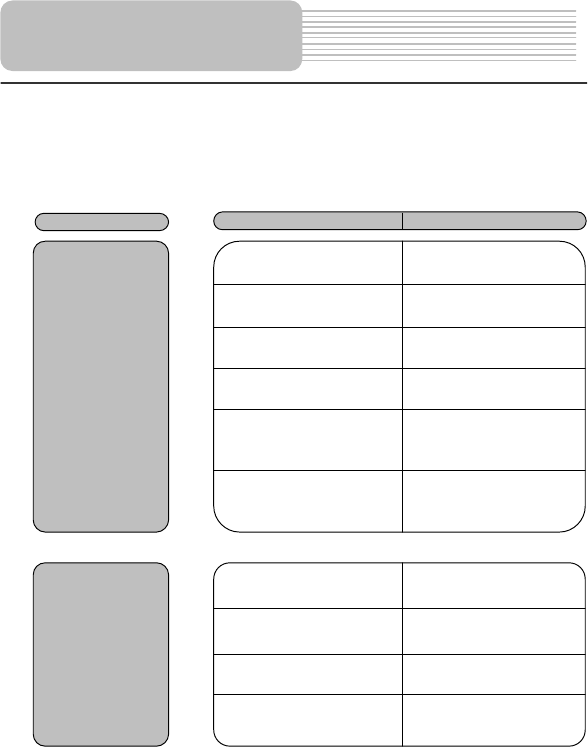
Compatible Disc Formats
DISC LOGO DIAMETER PLAYBACK TIME/
PLAYABLE SIDES
133 min (SS-SL)
242 min (SS-DL)
266 min (DS-SL)
12cm
484 min (DS-DL)
41 min (SS-SL)
75 min (SS-DL)
82 min (DS-SL)
DVD
8cm
150 min (DS-DL)
12cm 74 min
CD
8cm 20 min
JPEG 12cm
Operation methods of some DVD discs are specified by the software manufacturer.
Please refer to the instructions of those discs.
Care of Discs
Holding Discs
Cleaning
When loading or removing discs, donot touch their playing surfaces
as the right figure.
Fingerprints or stain on the disc may affect the quality of sound and
picture. To clean your discs, use a soft clean cloth to wipe them. I
f
necessary, moisten a soft cloth with diluted neutral detergent to remove
heave dirt or fingerprints.
Do not wipe in a circular direction as the figure in the right middle
(concentric scratches on the disc groove tend to cause noise). Gentl
y
wi
p
e from the center of the disc to the outer ed
g
e as the ri
g
ht fi
g
ure.
Notes on Discs
45
PLEASE READ THE FOLLOWING INSTRUCTIONS CAREFULLY BEFORE USING
THE UNIT FOR THE FIRST TIME.
WARNING: Do not play poor-quality discs to avoid damaging the lens.
Pre-operation
1. Connect the unit to power supply through the provided AC adaptor.
2. Switch "POWER ON/OFF# to "ON# on the left panel to turn on the unit.
3. Press the MODE button on the unit to shift to DVD mode.
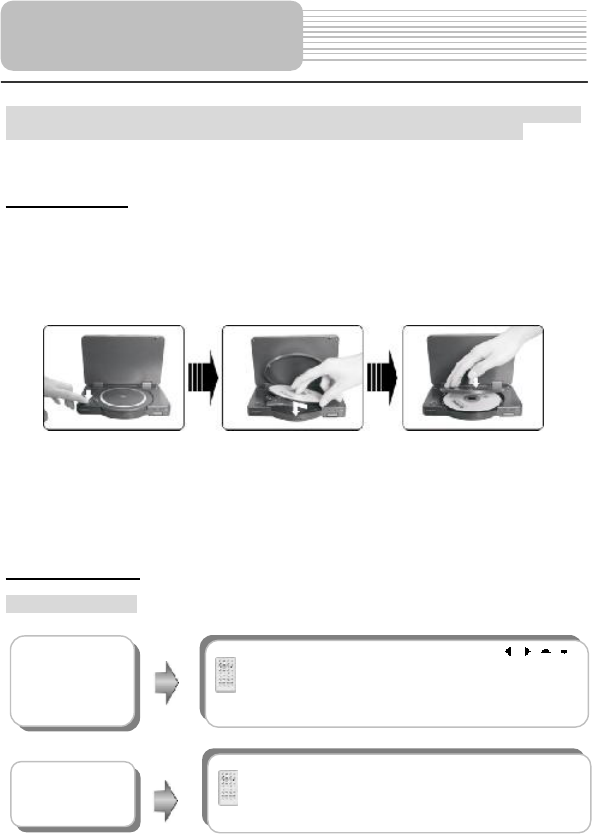
4. Press OPEN button on the unit to open the disc tray cover, put a disc in the disc tray
with printed side facing up. Close the disc cover. (See below)
5. The player will search disc and play it automatically.
6. Adjust the volume with the VOLUME control on the right panel to the desired level.
7. To turn the player off, switch the "POWER ON/OFF# on the left panel to "OFF#.
8. During the disc playback, you can also operate by tapping the buttons on the screen.
Note: make sure detach the cradle when you want to play disc.
DVD Playback
Buttons Operation
DVD Playback
Operation
PressENTERbutton to start playing,o
r
(Direction buttons) or 0-9 buttons to select a Title
and Chapter directly.
Play Button
Pause Button
Press PAUSEbutton once to pause during
playback, press it repeatedly to start frame-by-frame
playback. Press PLAY buttonto resume normal
pla
y
back.
46
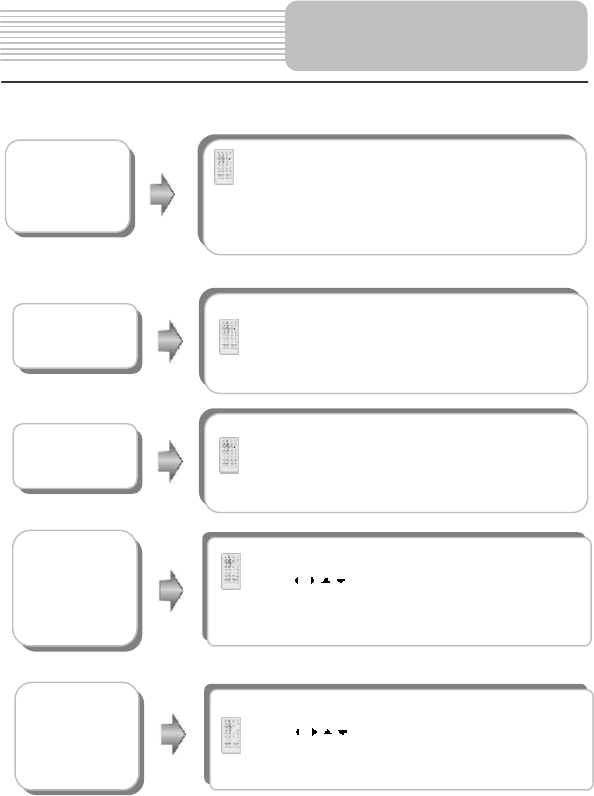
Stop Button
TITLE button
Press TITLE button during play. The title menu will
appear on the screen.
Press (direction buttons) to select the title
or disc menu item you wish to play, then press
ENTER button to confirm your selection. Or press
0-9 buttons to select the item you prefer directly.
DVD Playback
Operation
During pla
y
bac
k
,pressSTOPbuttononce to stop
playing, then press PLAYbutton to resume normal
playback from the stopped point. Press STOP button
twice repeatedly to stop playback completely. Then
when you press PLAY button, the player will pla
y
from the beginning.
Zoom button Press ZOOM button repeatedly to shift among
ZOOM 2, ZOOM 3, ZOOM 4, ZOOM 1/2, ZOOM
1/3, ZOOM 1/4 and ZOOM OFF modes.
A
-B Button
Press
A
-B button once to set the starting point A,
press it again to set the end point B. Then the
player will play the segment between A and B
continuously.
Press this button third time to stop the A-B repeat.
MENU button
Press MENUbutton during play. The rootmenu will
appear on the screen.
Press (direction buttons) to select the item
you wish to play, then press ENTER button to
confirm your selection. Or press 0-9 buttons to selec
t
the item you prefer directly.
47
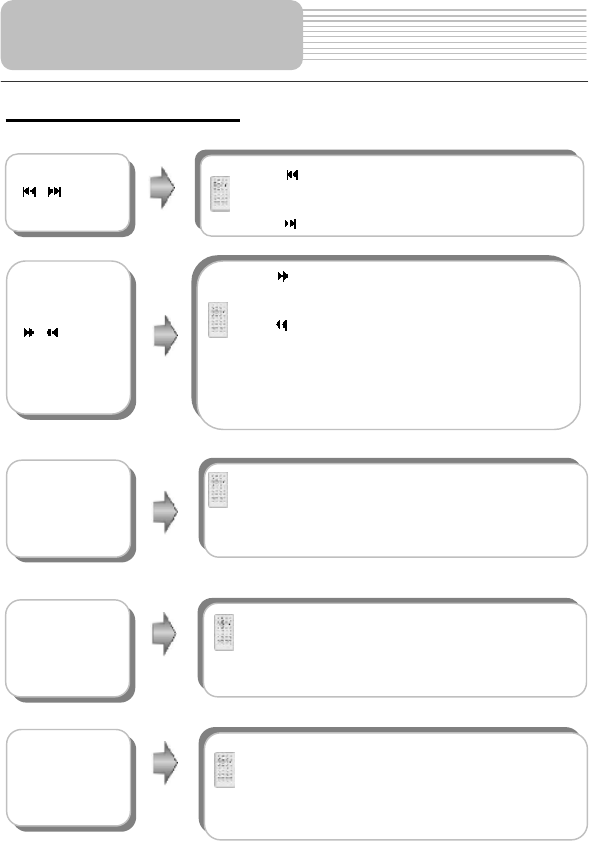
DVD Playback (continued)
& buttons
Press button once to go to the beginning of the
current chapter. Press it twice repeatedly to go to the
previous chapter.
Press button to play the next chapter.
& buttons
SLOW button
Press SLOW button repeatedly, the slow playbac
k
will be under going at the speed of 1/2, 1/3, 1/4, 1/5,
1/6, 1/7 and normal playback in sequence. Press
PLAY button to resume normal playback.
AUDIO button
DVD discs can contain up to 8 audio bit streams.
For example: English, French etc.
To select the audio bit stream you prefer, press
AUDIO button during playback. The Unit will pla
y
the next audio bit stream if exists every time you
press AUDIO button in succession.
Press button to play fast forward. Press it
repeatedly to the fast forward at the speed of 2X,
4X, 8X, 20X and normal playback in sequence.
Press button to fast reverse. Press it repeatedl
y
to fast reverse at the speed of 2X, 4X, 8X, 20X and
normal playback in sequence.
Press PLAY button on the remote controlto return
to normal playback.
INFO button
Press INFO button for detailed information about
the disc during the disc playback. Press it again to
cancel the information.
DVD Playback
O
p
eration
48
DVD Playback (continued)
When a DVD disc is playing, press SUBT button to
select a subtitle language or to turn the subtitle off.
A
DVD disc can be recorded with up to 32 subtitles.
Press SUBT button repeatedly, the mode of subtitles
will recycle as follows:
SUBTITLE 1/N: Subtitle 1 appears on the screen.
SUBTITLE 2/N: Subtitle 2 appears on the screen.
SUBTITLE */N: Subtitle * appears on the screen
SUBTITLE OFF: No subtitle.
"N# refers to the total number of subtitles that the
current disc contains.
NOTE: This function is available for DVD discs
recorded with multi-subtitles
SUBT button
REP button
Press REP button to repeat a Chapter, Title o
r
cancel the repeat in sequence.
DVD Playback
Operation
49
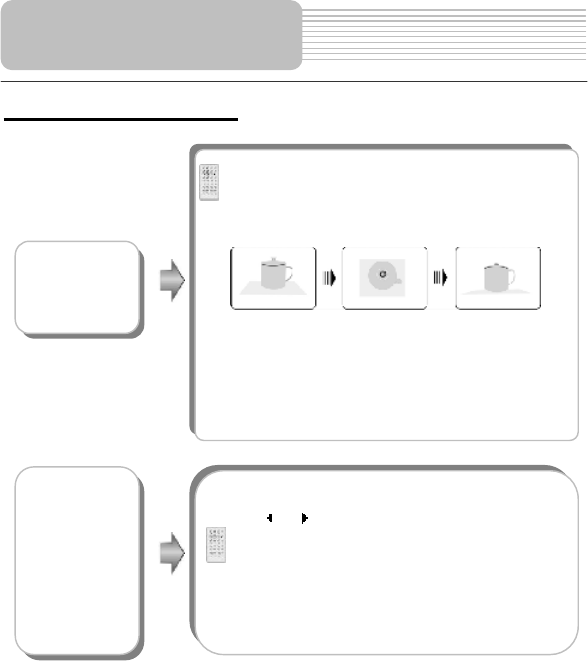
Press ANGLE button to play the disc in multi-angle.
Multi-angle means that a scene is shot from different
angle so that audience can watch from any angle, like
the drawings below:
If there are multiple angles in a scene, you can use
the ANGLE button to select the angle you like to
enjoy. Press the ANGLE button repeatedly to vie
w
from different angle.
NOTE: This function is only available for the DVD disc
that coded with multi-angles.
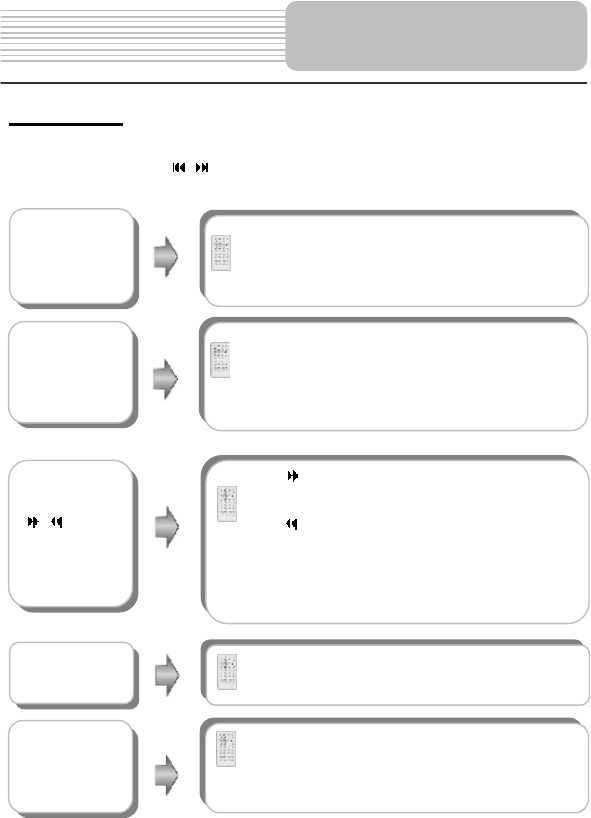
DVD Playback (continued)
Press GOTO button to select desired disc title,
chapter or time.
Use or direction button to select TT, CH o
r
TIME.
Use 0-9 number buttons to enter the desired title,
chapter or time directly, press the ENTER button to
confirm, Then the player will begin playing from the
selected title, chapter or time.
Press it repeatedly to cancel the item.
GOTO button
DVD Playback
Operation
ANGLE
button
50
CD Playback
When a CD disc is loaded, the player will play it automatically by the default sequence
of the disc. You can use ,ornumberbuttons to select a certain track to play.
DVD Playback
Operation
Pause Button
During pla
y
bac
k
,pressPAUSEbuttonto pause the
playback, then press PLAY button to resume
playback.
Press button to play fast forward. Press i
t
repeatedly to fast forward at the speed of 2X, 4X, 8X,
20X and normal playback in sequence.
Press button to fast reverse. Press it repeatedly to
fast reverse at the speed of 2X, 4X, 8X, 20X and
normal playback in sequence.
Press PLAY button on the remote controlto return to
normal playback.
& buttons
REP button Press REP button repeatedly to repeat a track, All
or cancel the repeat.
STOPButton
During pla
y
back,pressthe STOP buttononce to
stop playback. Then press PLAY button, the playe
r
will resume playback from the stopped point. Press
this button twice to stop playback completely.
A
-B button
Press
A
-B button once to set the starting point A,
press it again to set the end point B. Then the
player will play the segment between A and B
continuously. Press this button third time to stop the
A
-B re
p
eat.
51
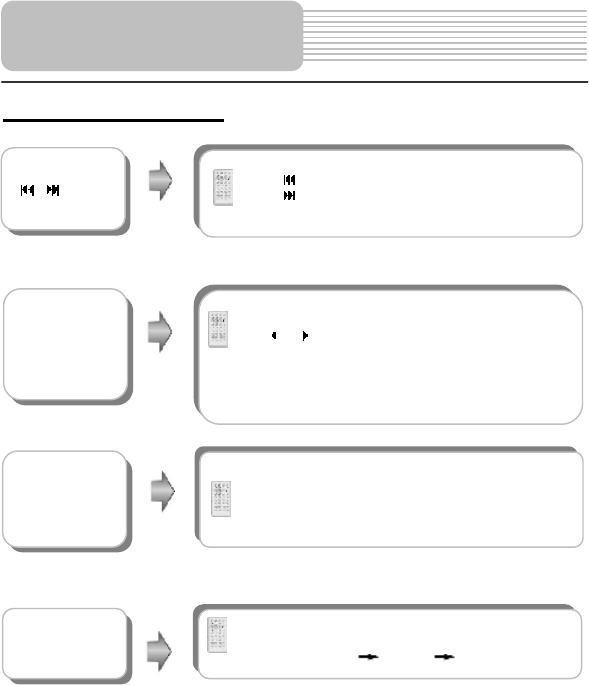
CD Playback (continued)
GOTO button
Press GOTO button to select desired track, trac
k
time or disc time.
Use or direction button to select the track or disc
time
Use 0-9 buttons on the remote control to enter the
desired time and press ENTER button to confirm.
Press it repeatedly to cancel the item.
Press INFO button for detailed informationabout the
disc during playback. Press it again to cancel the
information.
INFO button
AUDIO button
Press AUDIO button to select desired sound effect.
Press it repeatedly, the display will be as follows:
STEREO MONO L MONO R
DVD Playback
Operation
&buttons Press button to play the previous track.
Press button to play the next track.
52
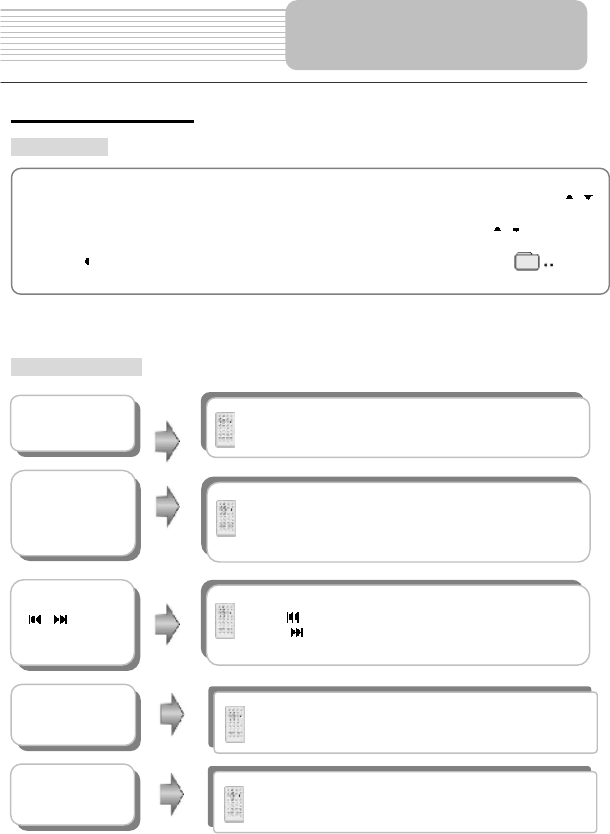
Picture CD Playback
Pre-operation
Note: Many discs have other items besides pictures.
Buttons Operation
DVD Playback
Operation
1. Load a Picture CD in the disc tray, the player will search for disc automatically.
2.The screen displays the Root Folder with several subdirectories/subfolders. Use ,
buttons to select a desired folder. Then press ENTER button to confirm your selection.
3.The screen enters the selected subfolder with several pictures. Use , buttons to
select the desired picture. Then press ENTERbutton to confirm your selection.
4.Press button to return to last folder or directory. Or move the yellow bar to , then
press ENTER button to return to the last folder or directory.
&buttons Press PREV button to go to the previous picture.
Press NEXT button to go to the next picture.
STOP button During playback, Press the STOP button to return to
the root menu.
PAUSE
button Press PAUSE button to pause during playback.
Press PLAY button to resume normal playback.
REP button Press REP button to repeat DIR, one, all or cancel
the repeat.
ZOOM Press the ZOOM button to zoom in or zoom out the
image.
53
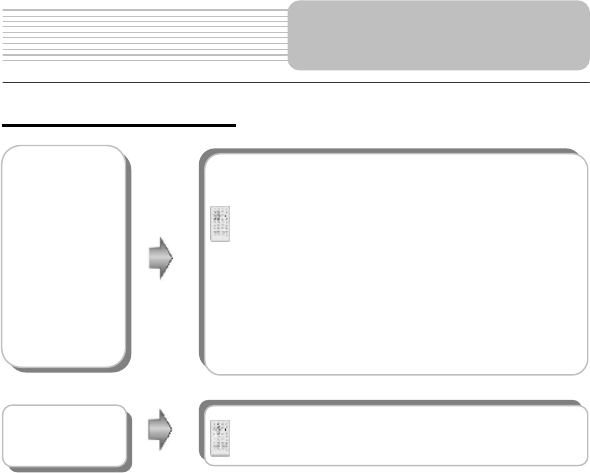
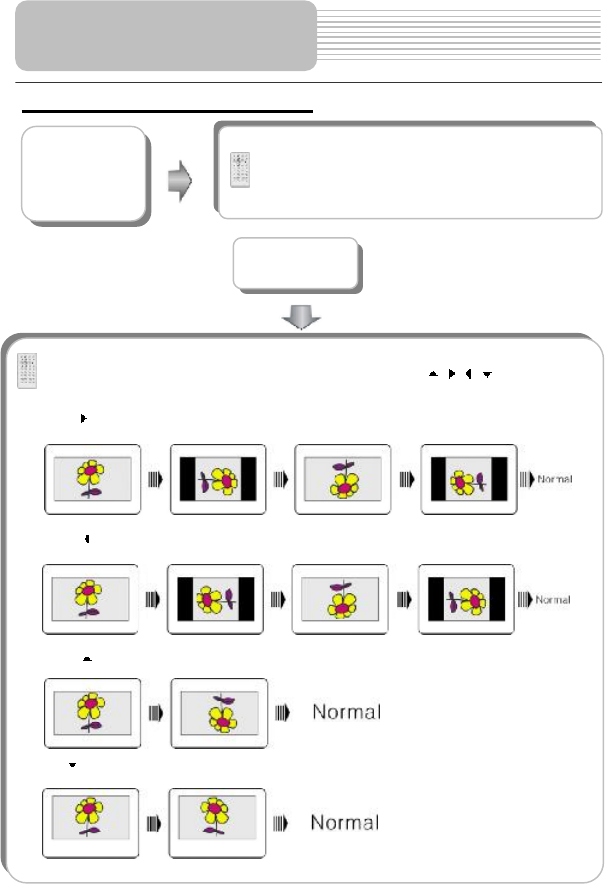
During browsing a picture, you can use direction buttons , , , to rotate the
current picture.
Press button to rotate the current picture clockwise, as following drawings:
Press button to rotate the current picture anti-clockwise, as following drawings:
Press button to rotate the current picture flip vertical, as following drawings:
Press button to rotate the current picture flip horizontal, as following drawings:
Picture CD Playback (continued)
Press GOTO button to select the desired folder o
r
picture.
Press 0-9 buttons to select your favorite folder o
r
picture directly.
GOTO button
Picture Rotate
DVD Playback
Operation
54
System Setup
You can change the default settings of this unit to customize its performance to your own
preference. Read this section to learn how to set up the system.
Note: the system should only beset up in the state that no disc is in the DVD drive or the unit
is in the completely stop mode.
Follow the steps below to set up your system:
1.Press the SETUP button.
The setup menu will appear on the screen. It includes system setup, language
setup,audio setup and digital setup. You can exit from the setup menu by pressing SETUP
button again at any time during the setting.
2.Press or (direction buttons) to select a sub-menu that you want to set up.
3.Press or button to select the item that you want to set up in the sub-menu.
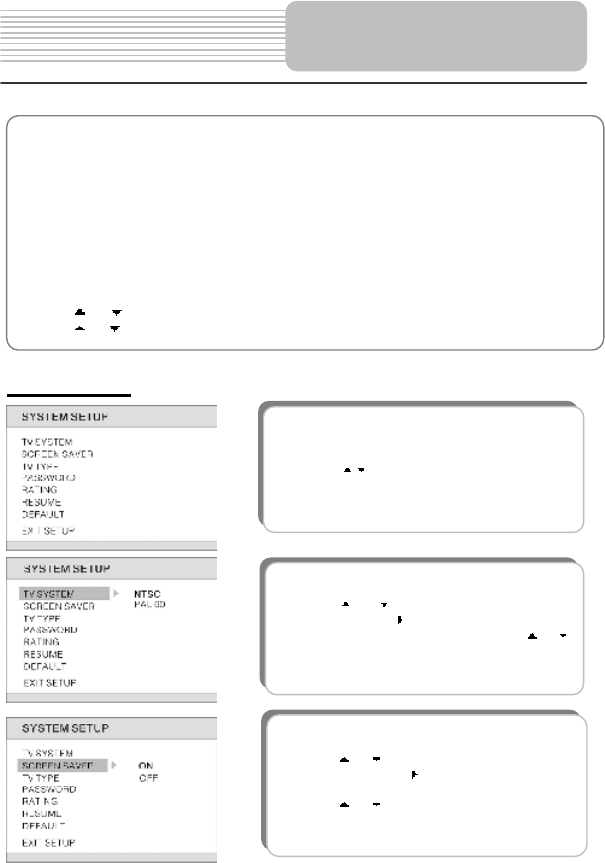
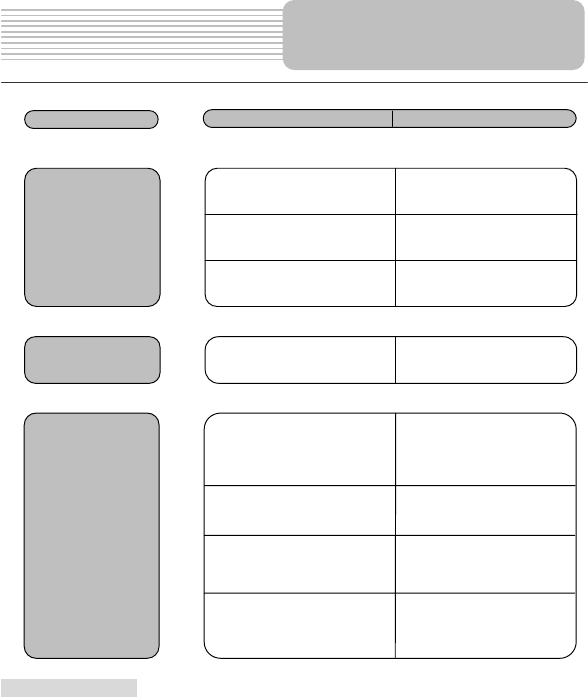
1.TV SYSTEM
This item is used to set Video System.
Press the or button to highlight this item.
Press the ENTER or button to enter the item.
The default TV system is NTSC. Press the or
to select.
Press the ENTER button to confirm and return.
2.SCREEN SAVER
This item is used to turn the screen saver on or off.
Press the or button to highlight this item.
Press the ENTER or to enter the setup of this
item. The default setting of this item is on.
Press the or button to choose on or off.
Press the ENTER button to confirm selection and
return.
The items included in this sub-menu areshown as
the left.
Press the button to select EXIT SETUP and
p
ress the ENTER button to exit the setu
p
menu.
DVD System Setup
55
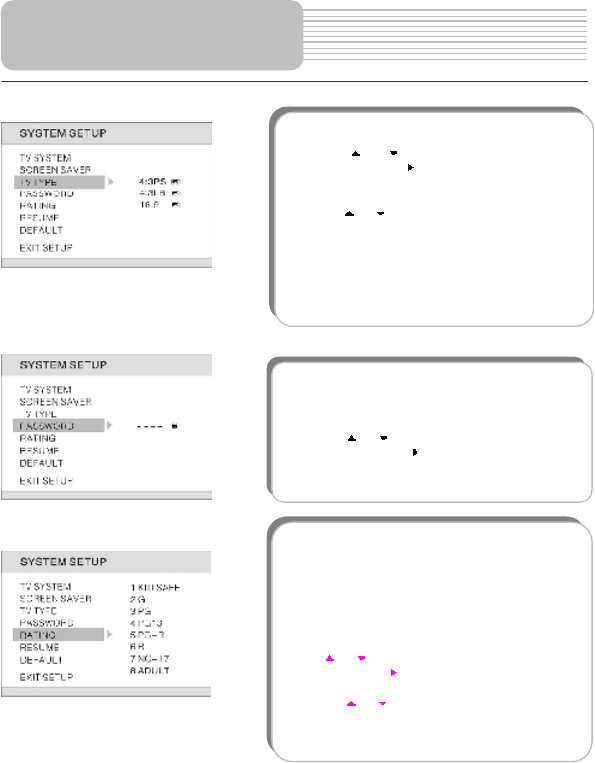
3.TV TYPE
This item is used to set TV display mode.
Press the or button to highlight this item.
Press the ENTER or button to enter the item.
It includes 4:3PS, 4:3LB and 16:9, 4:3PS b
y
default.
Press the or button to choose the proper one.
Press the ENTER button to confirm your selection
and return.
Note: Select Normal/PS or Normal/LB when a 4:3
TV is connected.
SelectWide when a 16:9 wide screen TV is
connected.
4. PASSWORD
Parental control is protected by password. This
item is used to change the password of the parental
control. The default password is 0000.
Press the or button to highlight this item.
Press the ENTER or button to enter the item.
Choose a password most suitable for you.
Press the ENTER button to confirm your enter.
5. RATING
DVD discs are rated according to their contents,
and their settings vary from disc to disc. The
function of this item is to set parental control. You
can lock out certain scenes of the discs, or lock ou
t
the whole disc depending on thecontents of the
disc after setting this item. The default level is
Adult.
Press or button to highlight this item.
Press ENTER or to enter the setup of this item.
Then the item will show as the left.
Press the or button to choose the proper one.
Pressthe ENTER button to confirm your selection.
Input the password. (See password)and press the
ENTER button again to return to the preview menu.
DVD System Setup
56
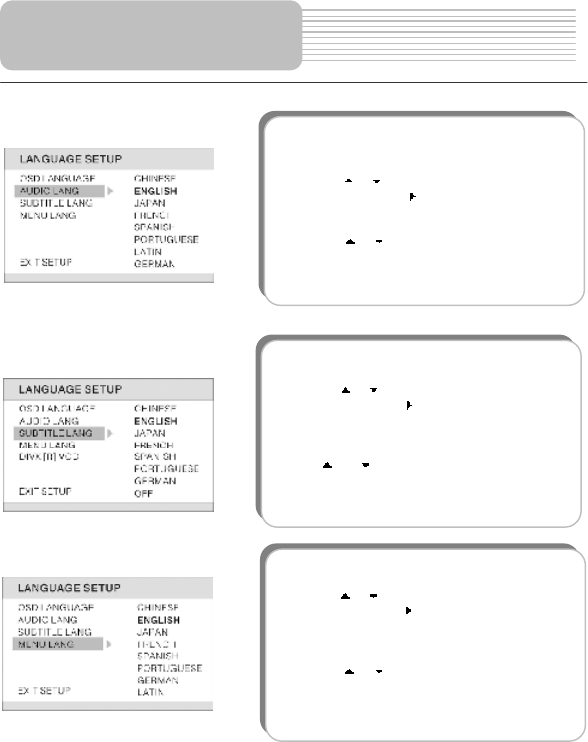
Language Setup
DVD System Setup
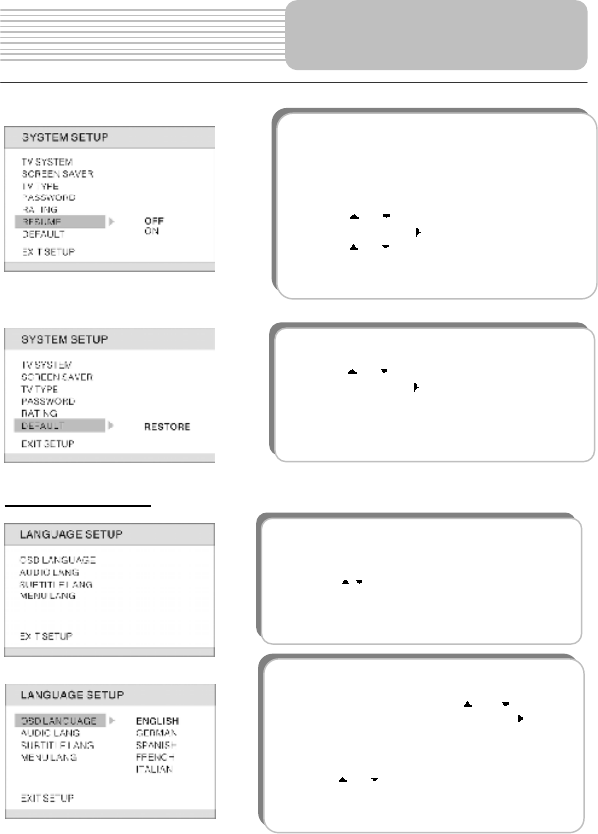
1. OSD LANGUAGE
This item is used to set the OSD (on-screen
display) language. Press the or button to
highlight this item. Press the ENTER or to ente
r
the setup of this item.
It includes English, German, Spanish, French, and
Portuguese, English by Default.
Press the or button to choose the proper one.
Press the ENTER button to confirm your selection
and return.
6. RESUME
This item is used to set last memory state.
Note: The last memory is referred to the state that i
f
the power is kept to supply to the unit, the playe
r
will resumeplayback from where stopped previous.
(only for DVD and CD)
Press the or button to highlight this item.
Press the ENTER or button to enter this item.
Press the or button to choose the proper one.
Press the ENTER button to confirm your selection
and return.
The items included in this sub-menu areshown as
the left.
Press the button to select EXIT SETUP and
p
ress the ENTER button to exit the setu
p
menu.
7. DEFAULT
This item is used to reset the unit.
Press the or button to highlight this item.
Press the ENTER or button to enter this item.
Press the ENTER button to reset.
Then all the settings of your unit will return to the
Original status.
57
4. SUBTITLE
This item is used to set the subtitle language.
Press the or button to highlight this item.
Press the ENTER or to enter the setup of this
item.
There are several languages for selecting.
English by default.
Press or button to choose the preferred
Language.
Press the ENTER button to confirm you
r
selectionand return.
4. MENU LANG
This item is used to set the menu language.
Press the or button to highlight this item.
Press the ENTER or button to enter the setup o
f
this item.
There are several languages for selecting. English
by default.
Press the or button to choose the preferred
Language.
Press the ENTER button to confirm your selection
and return.
2.AUDIO LANG
This item is used to set the audio outpu
t
language.
Press the or button to highlight this item.
Press the ENTER or button to enter the item.
There are several languages for selecting,
English by default.
Press the or button to choose the preferred
Language.
Press the ENTER button to confirm you
r
selectionand return.
DVD System Setup

58
Digital Setup
1.DYNAMIC RANGE
This item is used to adjust linear dynami
c
compression rate to get different signal
compression Effects.
Press the or button to highlight this item.
Press the ENTER or to enter the setup of this
item. Then the item will show as the left.
Press the or to adjust to the proper level.
Press the ENTER button to confirm your set and
return.
2. Dual Mono
This item is used to set the channel output mode.
Press the or button to highlight this item.
Press the ENTER or to enter the item.
It includes STEREO, MONO L, MONO R and Mi
x
MONO, MIX MONO by default.
Press the or button to choose the proper one.
Press the ENTER buttonto confirm your selection
and return.
The items included in this sub-menu areshown as
the left.
Press the button to select EXIT SETUP and
p
ress the ENTER button to exit the setu
p
menu.
DVD System Setup

59
COM PORT
Communications Port. In Computer systems, the name of a serial communications port - Eg:
COM1, COM2, COM3, and COM4.
EULA
End-User License Agreement. Is a legal contract between a software application author or
publisher and the user of that application. The EULA, often referred to as the "software
license," is similar to a rental agreement; the user agrees to pay for the privilege of using the
software, and promises the software author or publisher to comply with all restrictions stated
in the EULA.
ETA
Estimated Time of Arrival. The estimate time to complete the journey, if we where to leave
now. Excluding any detours, stops or delays along the route.
ETR
Estimated Time Remaining. Estimated Time remaining to complete route. Does not allow
for any delays.
FAQ
Frequently Asked Questions. List of Frequently Asked Questions with Answers.
GPS
Global Positioning System. The GPS (Global Positioning System) is a "constellation" of 24
well-spaced satellites that orbit the Earth and make it possible for Vehicles/ people/ assets
enabled with GPS receivers to pinpoint their location.
Lat
Latitude. An imaginary parallel circular line (East / West) around the earth, the same distance,
north or south from the equator $ expressed in degrees.
Long
Longitude. An imaginary circular line on the surface of the earth passing through the North
and South poles at right angles to the equator - expressed in degrees.
Orbit
Orbital path of a Satellite. Path or trajectory of a body through space. A GPS satellite traces
out an orbit about the earth.
POI
Point Of Interest. A place or item of interest along the selected route.
Sat
Satellite, See also GPS. A man-made object, or device that orbits the earth. Eg: a GPS
Satellite which orbits the earth in a fix pattern, height and speed
Definitions

60
SD
Secure Digital memory card. A Secure Digital (SD) card is a tiny flash memory card used to
make data storage portable among various devices.
TTD
Total Time Duration. The projected total time the trip is calculated to take - does not allow for
any detours or other delays.
Dolby Digital
Dolby Digital is a technology developed by Dolby Laboratories.
Soundtracks encoded in Dolby Digital can reproduce from one to 5.1 discrete channels
of excellent quality audio.
Letterbox screen
This refers to a screen on which the playback picture of wide-screen DVDs appears with
black bands running along the top and bottom.
Pan & Scan screen
This refers to a screen on which the playback picture of wide-screen DVDs is cut off at the
left and right sides.
Title, Chapter (DVD)
DVDs are divided into some large sections (titles) or some small sections (chapters). Each
section is numbered: these numbers are called "Title number" or "Chapter number".
Title 1 Title 2
Chapter1 Chapter 1
Chapter2
!! !!
Track (CD)
CDs are divided into some sections (tracks). Each section is numbered; these numbers are
called "Track number".
Track 1 Track 2 Track 3 !!
JPEG
JPEG is a common picture format that has
small file size and low quality loss rate of
picture. Hundreds of pictures can be stored
in a disc in this format. In order to utilize real
digital album, use film to make a "PICTURE CD"
in JPEG format.
Definitions
61
Take steps described in the tables below to solve simple problems before contacting
after-sales service.
If You Suspect Something Wrong, immediately turn the power off.
Disconnect the power connector and check that there is neither smoke nor heat from the unit
before asking for repairs. Never try to repair the unit by yourself because it is dangerous to
do so.
Troubleshooting
PROBLEM POSSIBLE CAUSE POSSIBLE SOLUTION
The player canno
t
play.
The disc cover may not be
closed.
Close the disc cover.
There may not be any discs
in the DVD drive.
Put a disc in to the DVD drive.
The disc may not be put in
with the right way.
Put the disc in with the label
side up.
The disc may be dirty o
r
warped.
Clean or change the disc.
The player's region code
may not as the same asthe
region code of DVD disc.
Make sure the player's
region code is the same as
the region code of DVD
disc.
There may be water on the
lens.
Remove the disc and keep
the player being powered of
f
for at least two hours.
There is no sound
The system connection ma
y
be not correct.
Connect the system
correctly.
The speaker may not be
turned on.
Turn on the speaker.
The sound setup of the DVD
disc may be not correct.
Setup the sound of the DVD
correctly.
The disc may be dirty o
r
warped.
Clean or change the disc.
62
Other possibilities:
Static or other external interference may cause the player function abnormally. In order to
recover normal status, please unplug the power-supply cord and then plug it into the outlet
again to reset the player. If the problems still exist, please cut off the power supply and
consult your service center or the qualified technician.
Troubleshooting
PROBLEM POSSIBLE CAUSE POSSIBLE SOLUTION
There is no picture.
The LCD may be off or not
be in correct video mode.
Turn on the LCD and choose
the correct video mode.
The system connection ma
y
be not correct.
Connect the system
correctly.
The unit may be not in A
V
out mode.
Switch AV tab on the bottom
of the unit to out.
Poor AV performance. The disc may be dirty o
r
warped.
Clean or change the disc.
The remote control
does not work
There may be some
obstructions between the
remote control and the
player.
Remove the obstruction
between the remote control
and the player.
The remote control may not
be pointed at the player.
Point the remote control at
the player directly.
The batteries of remote
control may be out of powe
r
or weak.
Make sure the polarity o
f
each battery is correct.
The batteries of remote
control may not be inserted
correctly.
Replace the batteries.
63
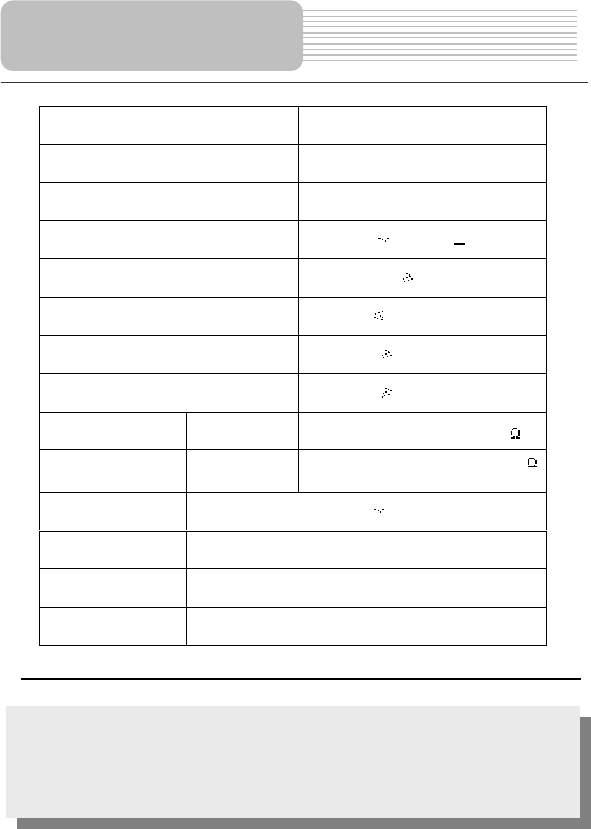
DESIGN AND SPECIFICATIONS ARE SUBJECT TO CHANGE WITHOUT NOTICE
TFT screen size 7 inches
Laser Wavelength 780/650 nm
Video System NTSC
Frequency Response 20Hz 20kHz 2.5dB
Audio Signal-to-noise Rate 85dB
Audio distortion+noise 70dB (1kHz)
Channel Separation 70dB (1kHz)
Dynamic Range 80dB (1kHz)
Audio Out Analog Audio
Out Output Level: 1.5V 0.2
1.0 , Load: 10K
Video Out Video Out Output Level:1VP-P .2, Load: 75?
Unbalanced Negative
Power AC 100-240V 50/60Hz
Power Consumption < 25W
Dimensions 190mmX136mmX40mm (L*W*D)
Weight About 1.25kg
Manufactured under license from Dolby Laboratories.
"Dolby# and the double-D symbol are trademarks of Dolby Laboratories.
Confidential unpublished works. © 1992 -1997 Dolby Laboratories, Inc.
All rights reserved.
Specifications