Wavetec FZCO WT-TDU TDU Lite User Manual Wavesphere Management POrtal
Wavetec FZCO TDU Lite Wavesphere Management POrtal
Users Manual

Android Smart KIOSK
User Manual
VERSION 4.2.3
1
Revision Chart
Version
Primary Author(s)
Description of Version
Date Completed
1.0
Mudassir Hassan
The document contains a complete
set of steps for deploying Android
TDU Lite/SmartKIOSK.
21st February, 2014
1.1
Mudassir Hasan
Text Box hint, Masking and WT
Tag added
15th May, 2014
1.2
Dilas Zooni Meraj
Dilas.zooni@wavetec.com.pk
Updated for version 3.8 which
includes Arabic font for ticket tag
added (Wavetec Designer Plugin)
and SmartKIOSK Models.
16th September, 2014
1.4
Muhammad Shabbir
Textbox alignment, Scripts with
barcode, Last Slide checkbox,
Steps for executing scripts with
print command
13th January, 2015

2
TABLE OF CONTENTS
Revision Chart ............................................................................................................................................ 1
1. Executive Summary ............................................................................................................................. 5
1.1 Purpose ......................................................................................................................................... 5
1.2 Scope ............................................................................................................................................ 5
1.3 Before You Begin......................................................................................................................... 5
1.4 How This Document Is Organized ............................................................................................... 5
1.4.1 Section I ................................................................................................................................ 6
1.4.2 Section II ............................................................................................................................... 6
1.4.3 Section III.............................................................................................................................. 6
1.4.4 Section IV ............................................................................................................................. 6
2. Section I – Designing Media for TDU-Lite/ SmartKIOSK ................................................................... 7
2.1 Pre-Requisites............................................................................................................................... 7
2.2 Installing the Wavetec Designer Plugin ....................................................................................... 7
2.3 Designing a Ticket for the Android SmartKIOSK Application ................................................... 9
2.3.1 Designing New Tickets ......................................................................................................... 9
2.3.2 Understanding the Ticket Tags ........................................................................................... 11
2.3.3 Ticket Tags Details ............................................................................................................. 12
2.3.3.1 Fixed Text and Graphics .............................................................................................. 13
2.3.4 Adding Ticket number in Arabic ........................................................................................ 13
2.4 Ticket Calculator ........................................................................................................................ 16
2.4.1 Number of Tickets .............................................................................................................. 17
2.4.2 Length of Paper Roll ........................................................................................................... 17
2.4.3 Width of Ticket ................................................................................................................... 17
2.4.4 Height of Ticket .................................................................................................................. 18
2.5 Generating output files for ticket ............................................................................................... 18
2.6 Designing screens and menus .................................................................................................... 19
2.7 Adding background to the Android SmartKIOSK screens ........................................................ 20
2.7.1 The Background Settings .................................................................................................... 20
2.8 Inserting the Action buttons ....................................................................................................... 23
3
2.8.1 Selecting Aspect Ratio ........................................................................................................ 23
2.8.2 Configuring idle time videos .............................................................................................. 24
2.8.3 Ticket Print Action button .................................................................................................. 25
2.8.4 Configuring timeout settings (automatic navigation) ......................................................... 30
2.8.5 Navigating to other screens ................................................................................................. 31
2.8.6 Configuring the Info Ticket ................................................................................................ 32
2.8.7 Inserting the Execute Action Button (for executing custom scripts) .................................. 33
2.8.8 Adding the Card Reader Action button .............................................................................. 35
2.8.9 Adding the Bar Code Reader Action button ....................................................................... 37
2.8.10 Adding the Text Box ........................................................................................................... 39
2.8.11 Inserting Borders ................................................................................................................. 46
2.8.12 Designing the Custom Keyboard ........................................................................................ 47
2.8.13 Custom Messages................................................................................................................ 49
2.9 Generating output files for Slides and Tickets by running Macros............................................ 51
3. Section II – Scheduling the slides ....................................................................................................... 53
3.1 How to create a Schedule ........................................................................................................... 53
3.2 How to Import the Schedule....................................................................................................... 61
3.3 How to create package ............................................................................................................... 64
4. Section III – Updating Android TDU Lite or SmartKIOSK Using USB Menu .................................. 65
4.1 Pre-Requisites............................................................................................................................. 65
4.2 Using the USB Menu ................................................................................................................. 65
4.2.1 Backup ................................................................................................................................ 66
4.2.2 Update ................................................................................................................................. 67
4.2.3 Backup and Update ............................................................................................................. 67
4.2.4 License ................................................................................................................................ 67
4.2.5 Exit ...................................................................................................................................... 68
5. Section IV – Printer Functionality ..................................................................................................... 69
5.1 Pre-Requisites............................................................................................................................. 69
5.2 Smart KIOSK Ticket Printing Icons .......................................................................................... 69
5.2.1 Print Icon ............................................................................................................................. 69
5.2.2 Printer Error Icon ................................................................................................................ 71
5.2.3 Automatic Printer Switching............................................................................................... 72

4
5.2.4 Thank you Screen ............................................................................................................... 73
5.2.5 Printer Paper out Tagline .................................................................................................... 74
6. Contact us .......................................................................................................................................... 75

5
1. EXECUTIVE SUMMARY
The Android Smart KIOSK is intelligent system especially designed for a customer friendly and
interactive interface. Its touch screen interface enables the customer to get ticket at the touch of a
fingertip. Strong graphical interface makes it interactive and user friendliness assists the user
during ticket dispensing. Its user friendly and easy to use system helps provide customer with
quality services and convenience.
This guide provides information and procedures for starting up the Android Smart KIOSK.
Before commencing, make sure you have reviewed the pre-installation considerations and
followed any requirements that apply to you. If you review this guide and feel unclear about the
terminology used, or have limited experience with installations, we do not recommend continuing
with the installation.
1.1 Purpose
This guide is intended for people who want to learn on how to design the tickets and slides, and upload
them on the Android SmartKIOSK for use by the customers.
1.2 Scope
This user guide will assist you to create and schedule Slides and Ticket Designing using the PowerPoint
Wavetec Designer Plugin. It will also elaborate on the USB Menu and the Wavetec scheduler. It follows
a well-kept flow and explains the functionality of Android SmartKIOSK in an orderly manner.
1.3 Before You Begin
This user‟s guide for Android Smart KIOSK is compiled on the assumption that you have already
deployed Android SmartKIOSK application on Donatello box. Furthermore, the following Applications
must be installed on your system.
Microsoft Office 2010 or above.
1.4 How This Document Is Organized
The User‟s guide for Android SmartKIOSK has been divided in four main sections namely the
following.

6
1.4.1 SECTION I
This section elaborates about designing slides along with the Ticket designs. This also gives details
about the functionality provided as part of the MS Power Point Plugin to create the slides and ticket
designs.
1.4.2 SECTION II
This section defines about how to create the running schedules for the slides created in Section I on
the Android SmartKIOSK. This elaborates the various options provided in the Wavetec Scheduler
application and the flexibility of its usage.
1.4.3 SECTION III
This section elaborates about uploading the designed media (slides and tickets) using the USB Flash
Drive
1.4.4 SECTION IV
This section elaborates about the usage of the Android SmartKIOSK in terms of the message and
icons displayed on it. It also elaborates about the functionality of the single and dual printer of the
Android SmartKIOSK.
7
2. SECTION I – DESIGNING MEDIA FOR TDU-LITE/
SMARTKIOSK
2.1 Pre-Requisites
The Pre-requisites applications and hardware for this section are mentioned below:
Windows based PC/Laptop.
MS Power Point 2010 or above.
Images, to be used as background of the Android SmartKIOSK screens.
Logo that are to be displayed on the Android SmartKIOSK Ticket.
2.2 Installing the Wavetec Designer Plugin
Wavetec Plug-in Tools is a free Power Point plugin that provides a set of action tools for generating the
Android SmartKIOSK Slides and configuration files.
1. This Wavetec Designer plugin is equipped with all the functional requirements. Please download
that from eQ Release site under the section “Smart KIOSK Android.
Important Note: The plugin will only work with Microsoft Office 2007 and 2010. It is highly
recommended to use the MS Office 2010 to use the all the plugin functionality without any technical
hindrances.
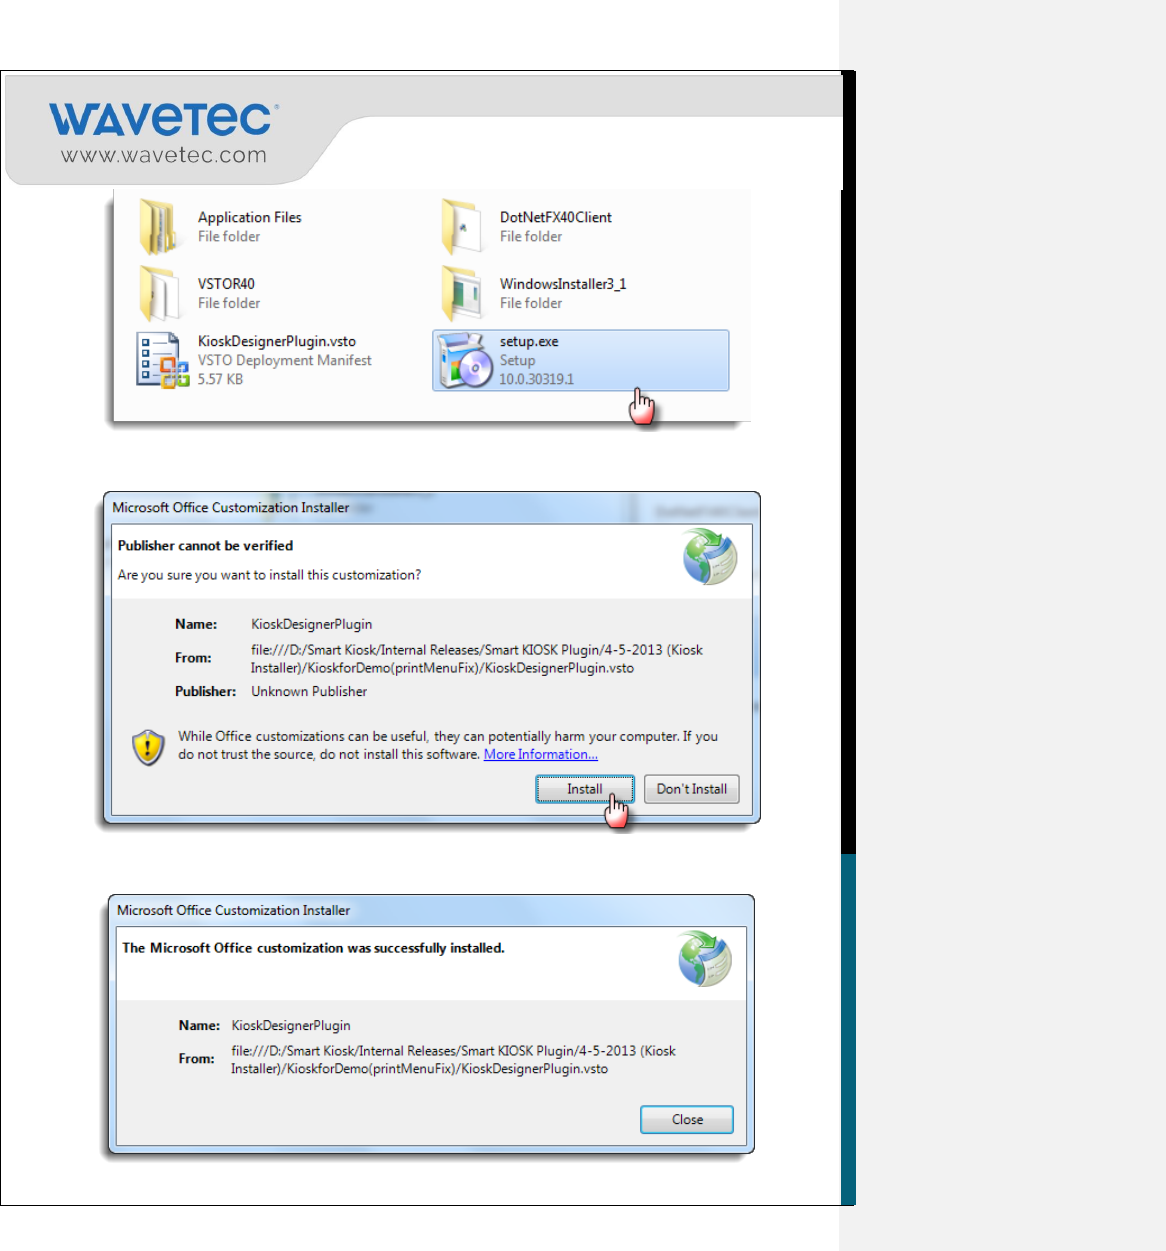
2. After the download, unzip the downloaded file. Now open the Smart KIOSK Plugin folder and run
the Setup.exe.
Important Note: Please make sure that the Microsoft Power Point is close before commencing
the installation process.
8
3. Select Install to start installation.
4. Select Close to complete the installation. Now open the Microsoft Power Point.
9
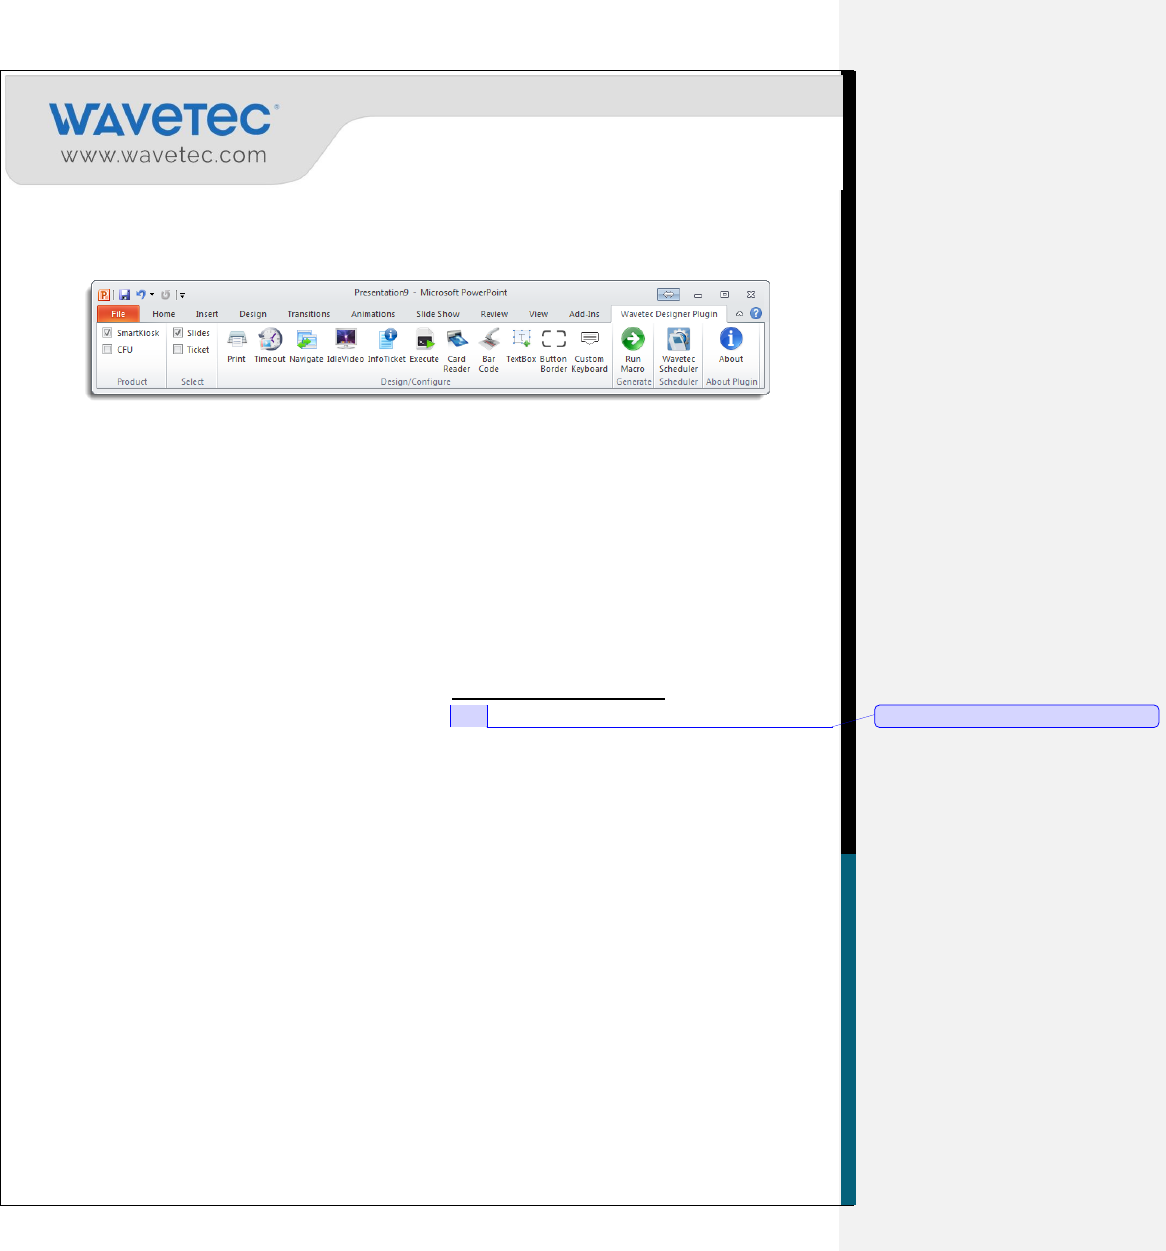
5. A new tab titled "Wavetec Designer Plugin" will be added to your PowerPoint ribbon on the far
right (see screenshot below). Make sure you have selected SmartKIOSK in Product section and
Slides in Select section.
2.3 Designing a Ticket for the Android SmartKIOSK Application
Tickets are also designed using Microsoft Power Point plugin of Wavetec. A default presentation file is
provided for the users which can be edited to create their own ticket. This default template can be found
in the Templates folder which is available on your PC when you download the complete Installation
package from the Smart KIOSK – Android section on “eQ product release site” which is being shared
by product division with all CSEs.
*Note: The wavetec designer plugin doesn’t support SCMT 2460 Printer model. so if you have this
model, please download it’s ticket from the following link:
After downloading, only you can change the background of that ticket. If you want to add or remove
any tag then please contact to Wavetec product development department.
2.3.1 DESIGNING NEW TICKETS
First access the template made for the ticket. This template can be found in the Templates folder which
can be downloaded from the eQ release site and from the section Smart Kiosk – Android.
It is vital that this template will be used for making any new ticket as it has all the parameters that can be
placed on a ticket.
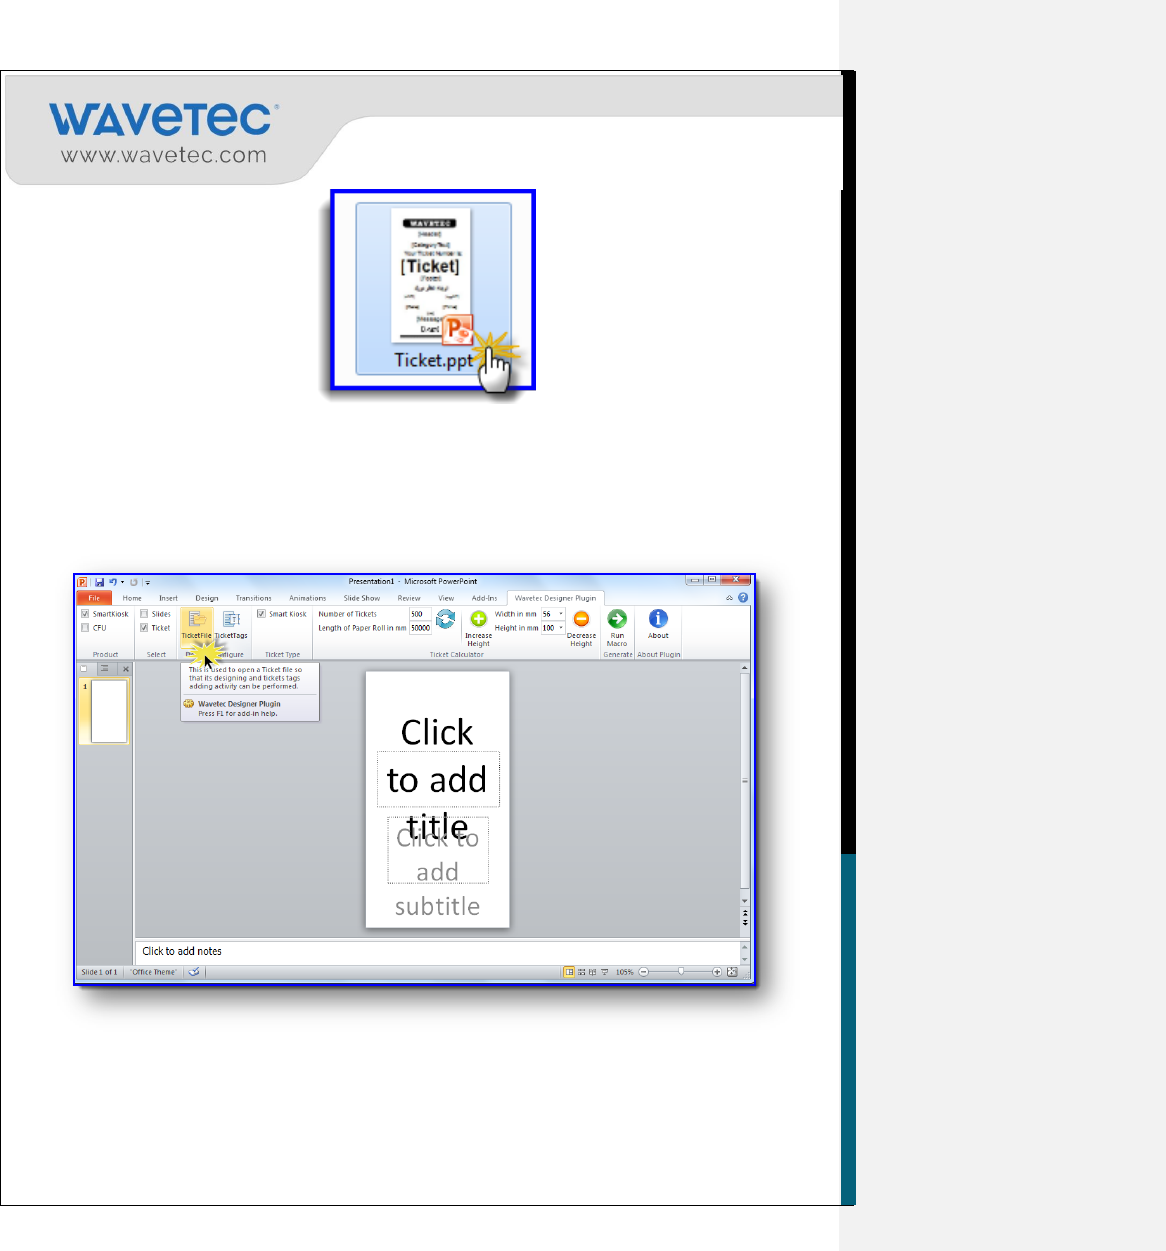
Once the download is complete, open the Ticket.ppt file.
Comment [DZ1]: ?
10
If the file cannot be downloaded then following are the steps to use a default Ticket file:
1. Using the Wavetec designer plugin, select the Ticket option in the Select ribbon.
2. Browse a default file from the Ticket File action of the Smart KIOSK.
3. When the Ticket file is opened a sample Ticket presentation is displayed in which the user can
see all tags placed in specific locations for designing a sample ticket.
11
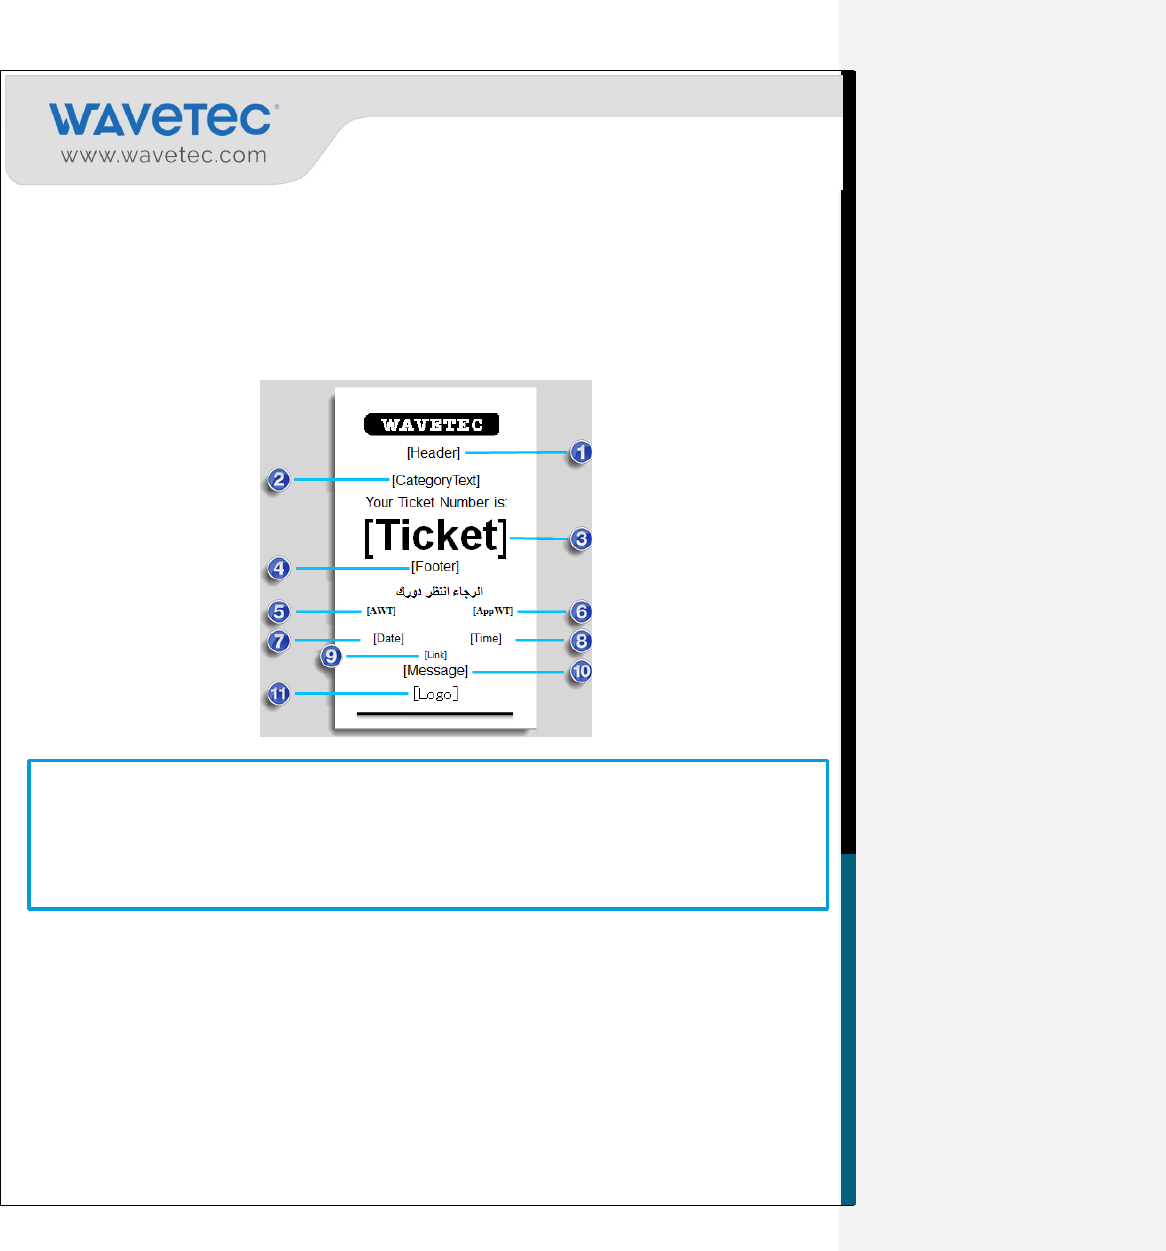
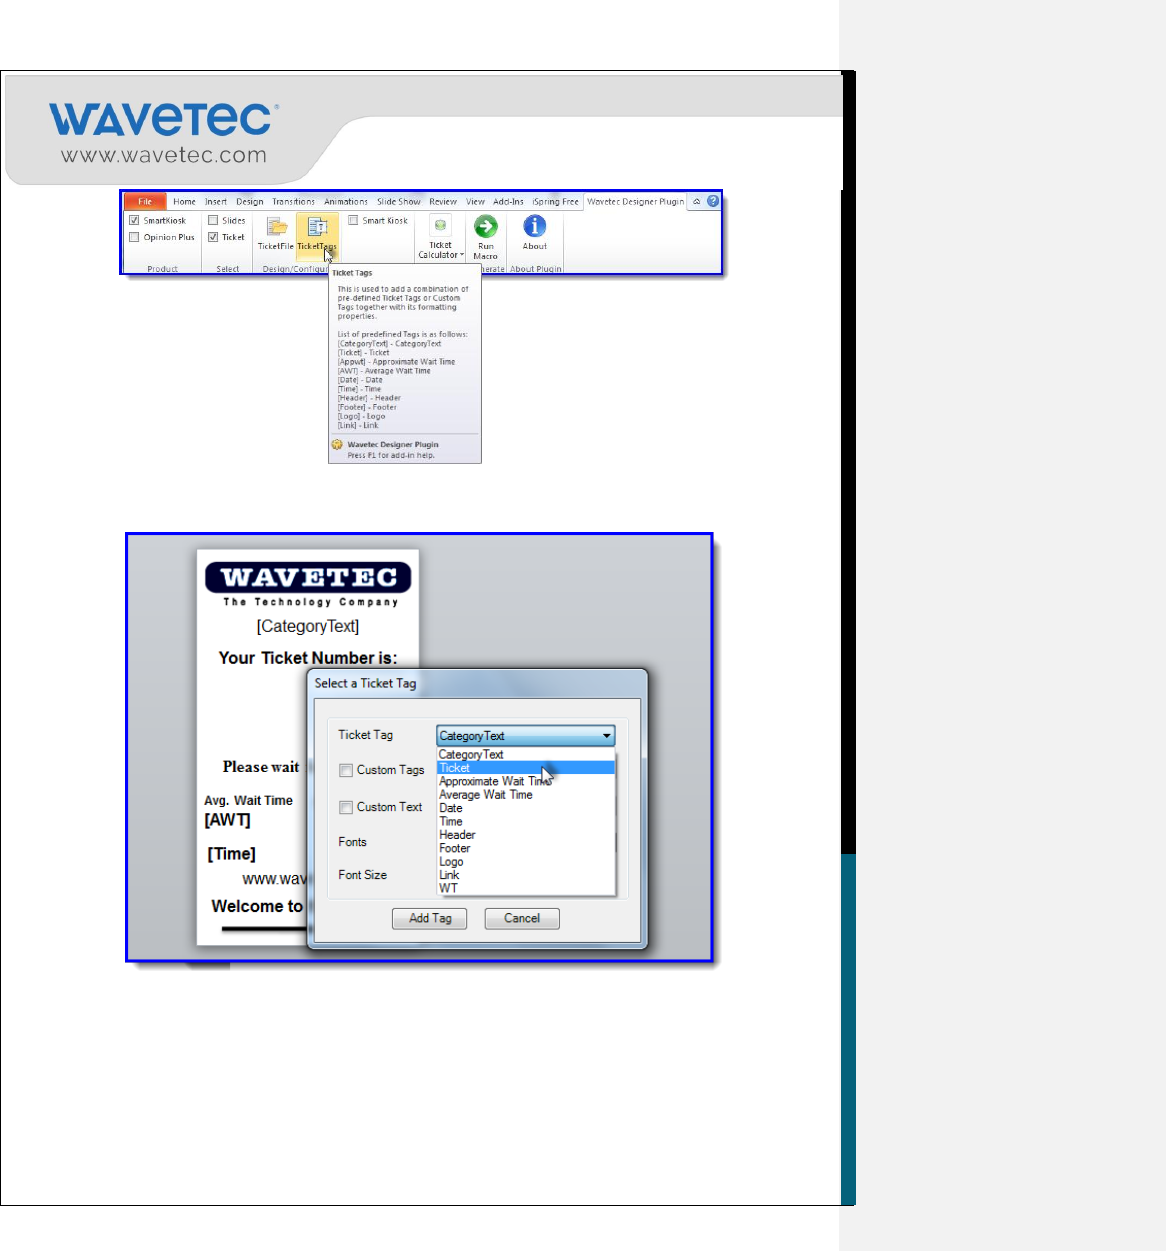
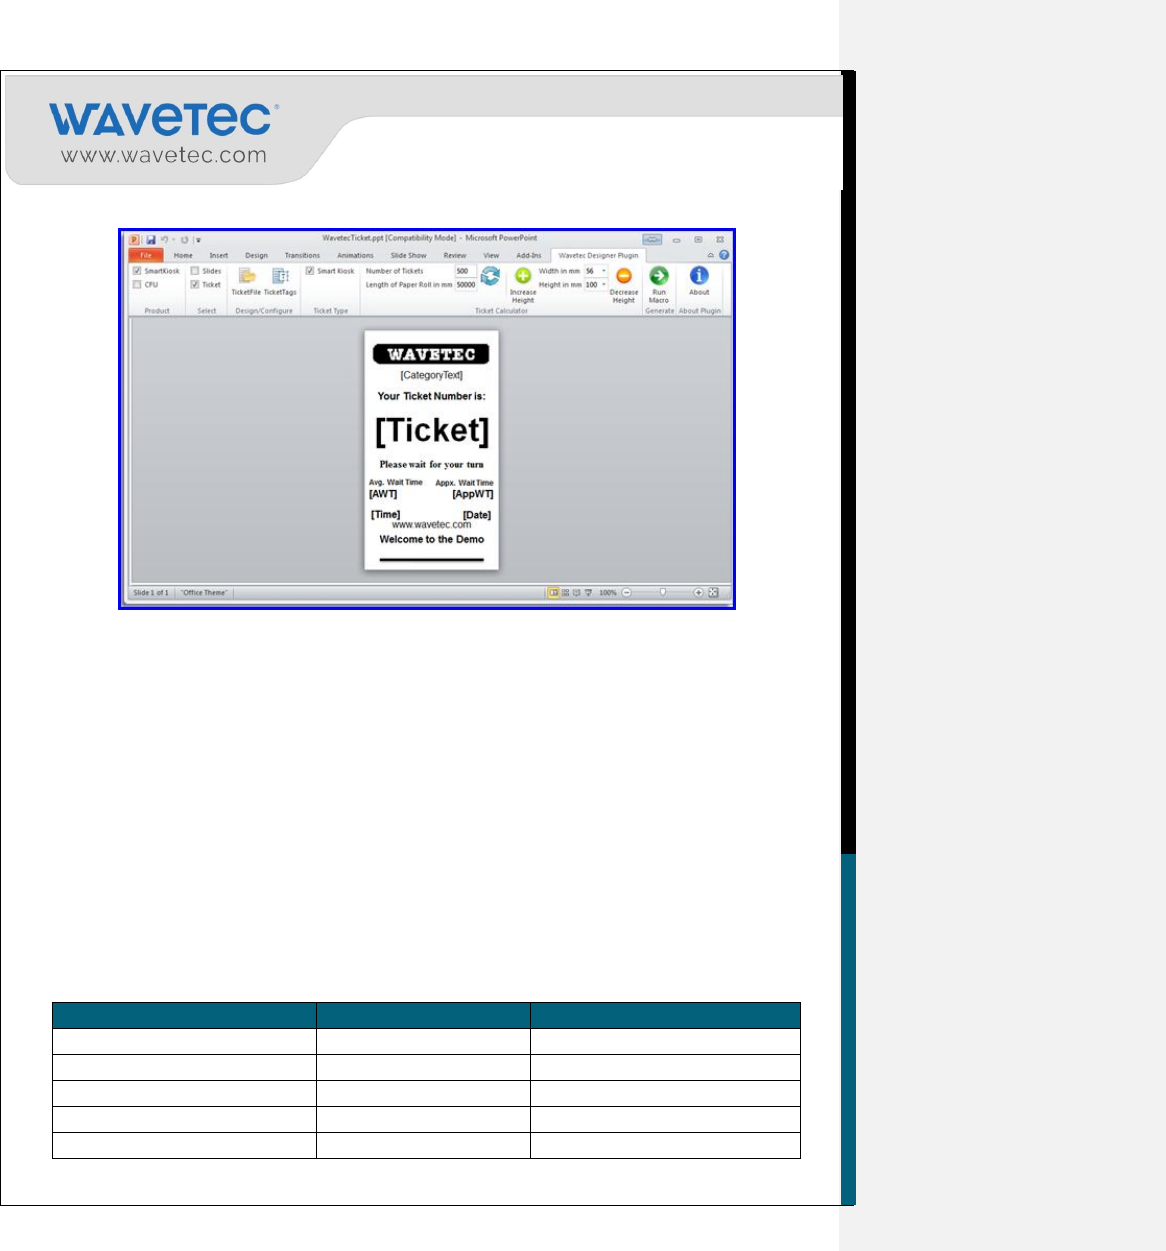
2.3.2 UNDERSTANDING THE TICKET TAGS
A ticket is a combination of Tags, fixed text and graphics. All these functionalities can be applied on the
Tickets placing specific tags from the Ticket plugin.
12
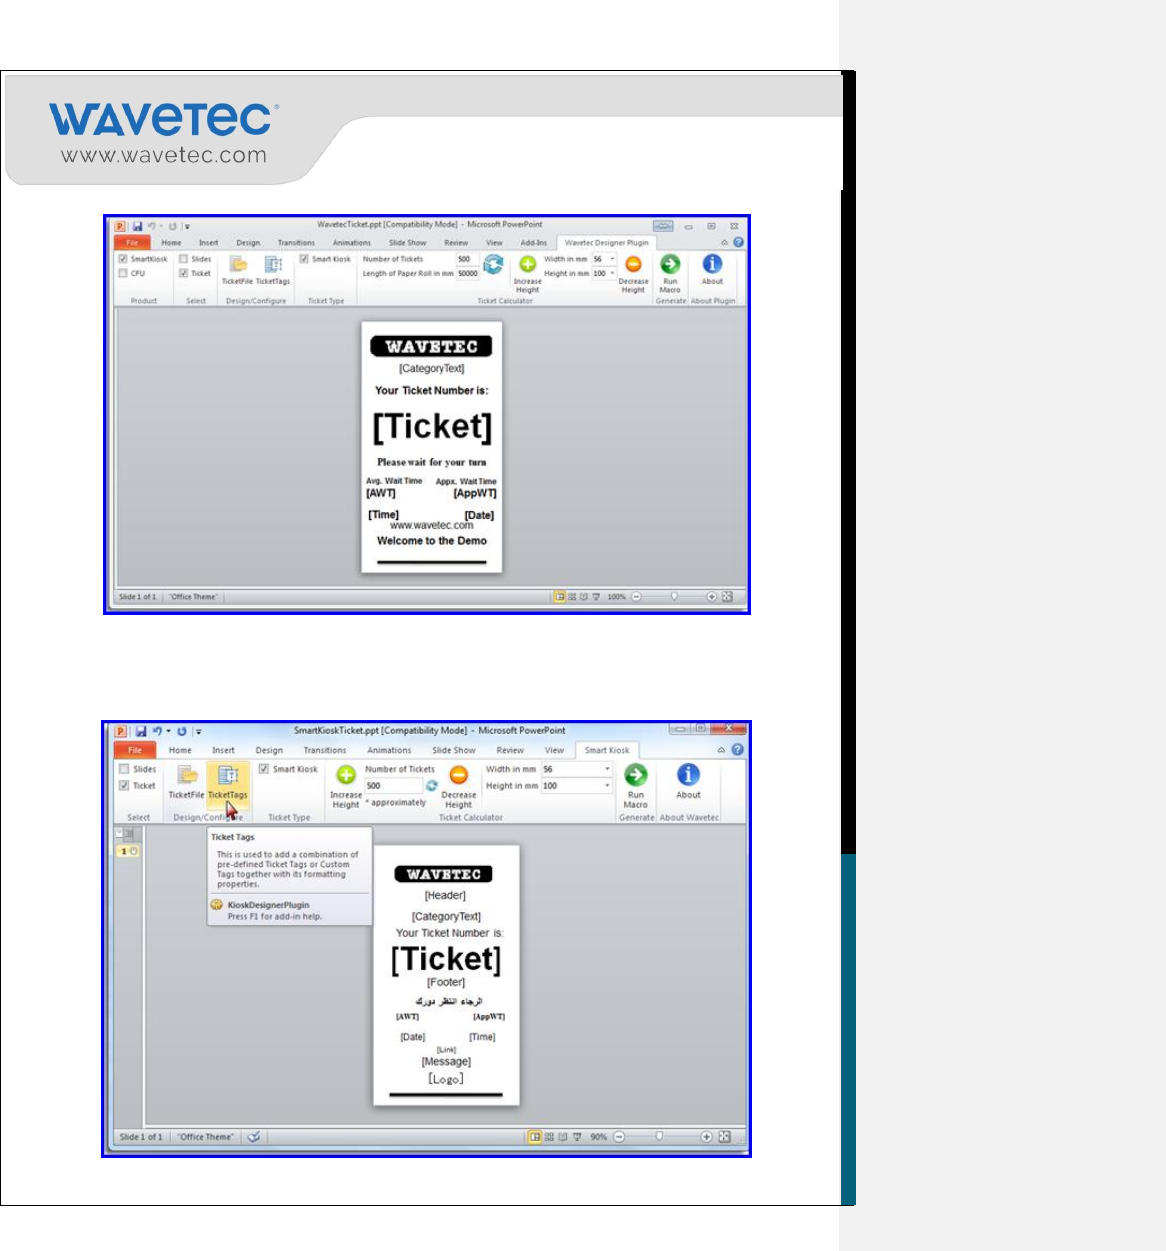
Select the Ticket Tags action from the Design/Configure ribbon.
A Tag selection window will open. From here user can select tags or apply custom tags,
customize their font‟s style and size.
2.3.3 TICKET TAGS DETAILS
The Ticket tags are the variables that are understandable to Android SmartKIOSK application and are
replaced by the actual content as the physical ticket is being generated for printing.
The following actions can be performed for each tag:
1. Change the placement of the tags by dragging them on the slide.
2. Remove the tag from the ticket.
3. Change the font style of any tag.
Following tags can be defined on the ticket.
1. [Header] – This is the heading of the ticket. Contents such as name of customer‟s branch can be
displayed here.
2. [CategoryText] – Name of the category as selected by the customer shall appear here.
3. [Ticket] – Ticket number shall appear here.
4. [Footer] – This is the footer for the ticket. Contents such as contact information can be displayed
here.
5. [AWT] – Average wait time of the customers shall appear here.
6. [AppWT] – Approximate wait time of the customer shall appear here.
13
7. [Date] – Current date of the eQ Controller shall appear here.
8. [Time] – Current time of the eQ Controller shall appear here.
9. [Link] – URL of the customer‟s website shall appear here.
10. [Message] – Any message that customer wants to appear on the ticket shall appear here.
11. [Logo] – Customer‟s logo shall be displayed here.
12. [WT] – This tag will show the number of customers waiting in that category. This tag cannot be
used with AppWT tag
2.3.3.1
Fixed Text and Graphics
Fixed text and graphics can be drawn to give an eye-catching look to the ticket. Any text or picture
can be added to the Ticket to make it look better. Typically for this purpose background images,
lines, rectangles are be added on the ticket.
2.3.4 ADDING TICKET NUMBER IN ARABIC
The user is allowed to add the tag for ticket number on the ticket in Arabic font as well. In order to
design, select the Ticket Tags from the Design/configure ribbon as shown.
Notes:
1. Do not edit any tag. Editing any tag will convert it into plain text.
2. If you are creating an info ticket, then do not specify tags on it. It primarily consists of textual
instructions to guide the users.
14
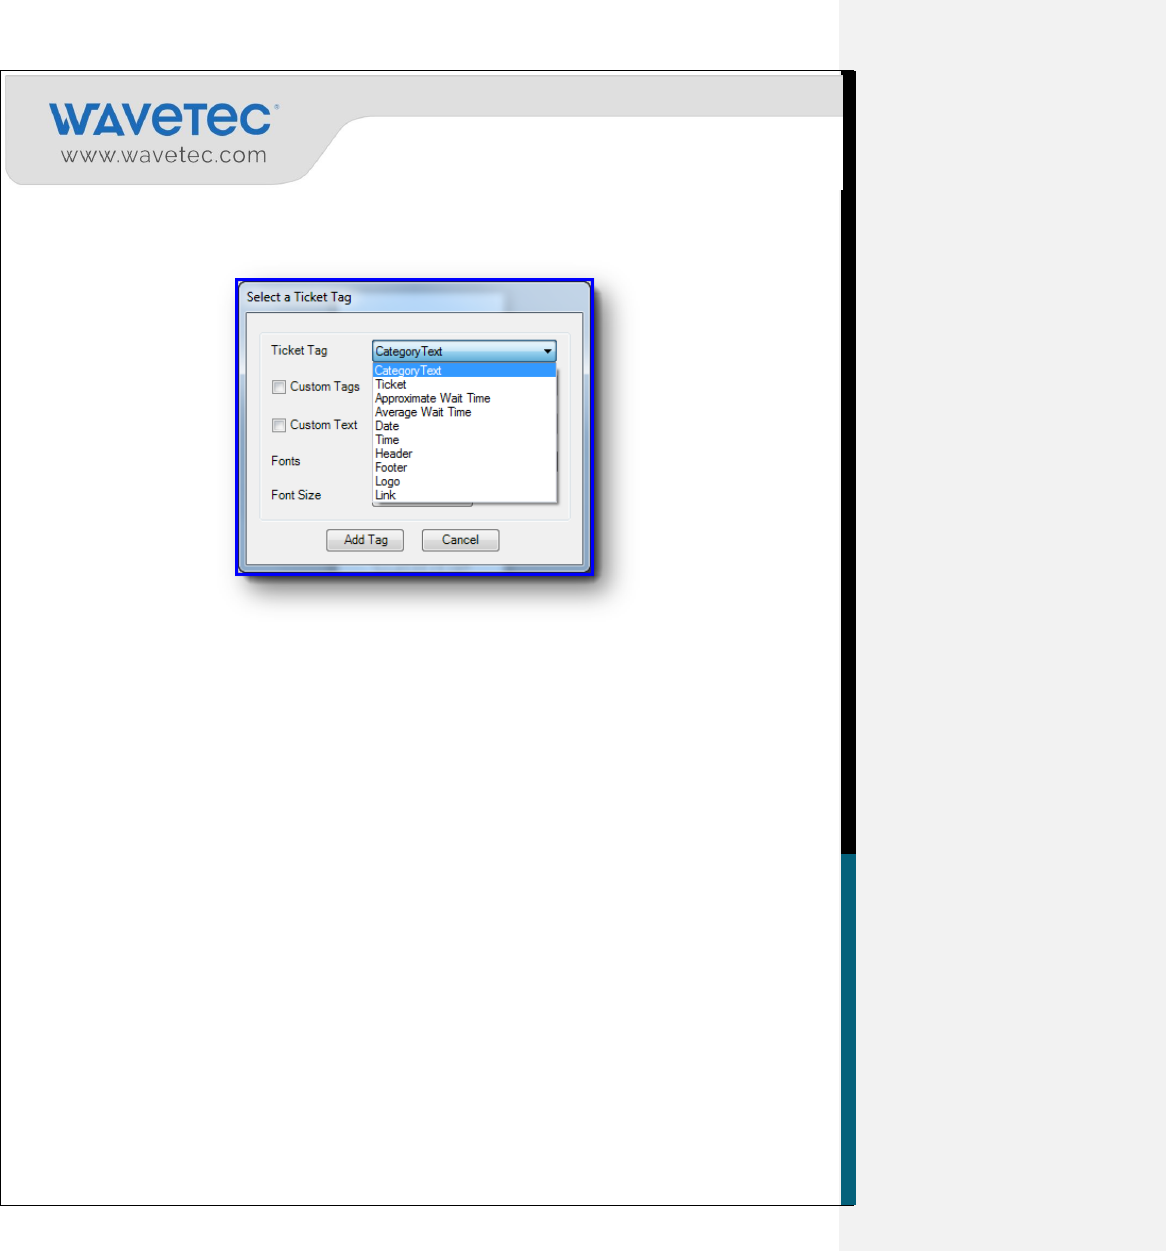
Select the Ticket from the Ticket tag drop down as shown:
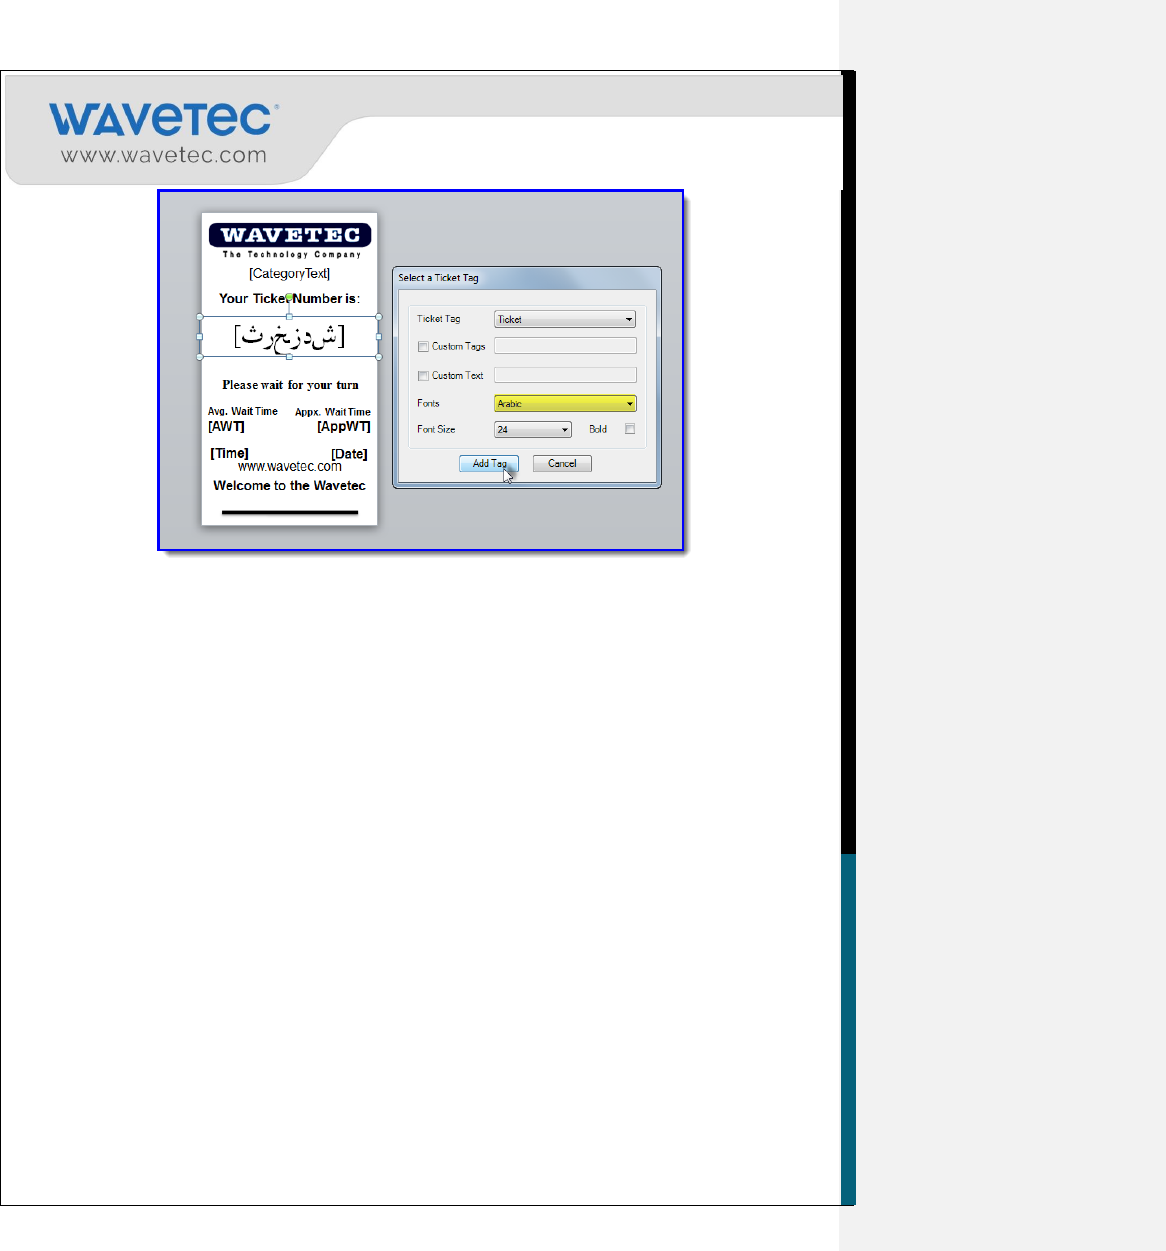
Now select the Arabic font from the list of Fonts drop down and click Add Tag.
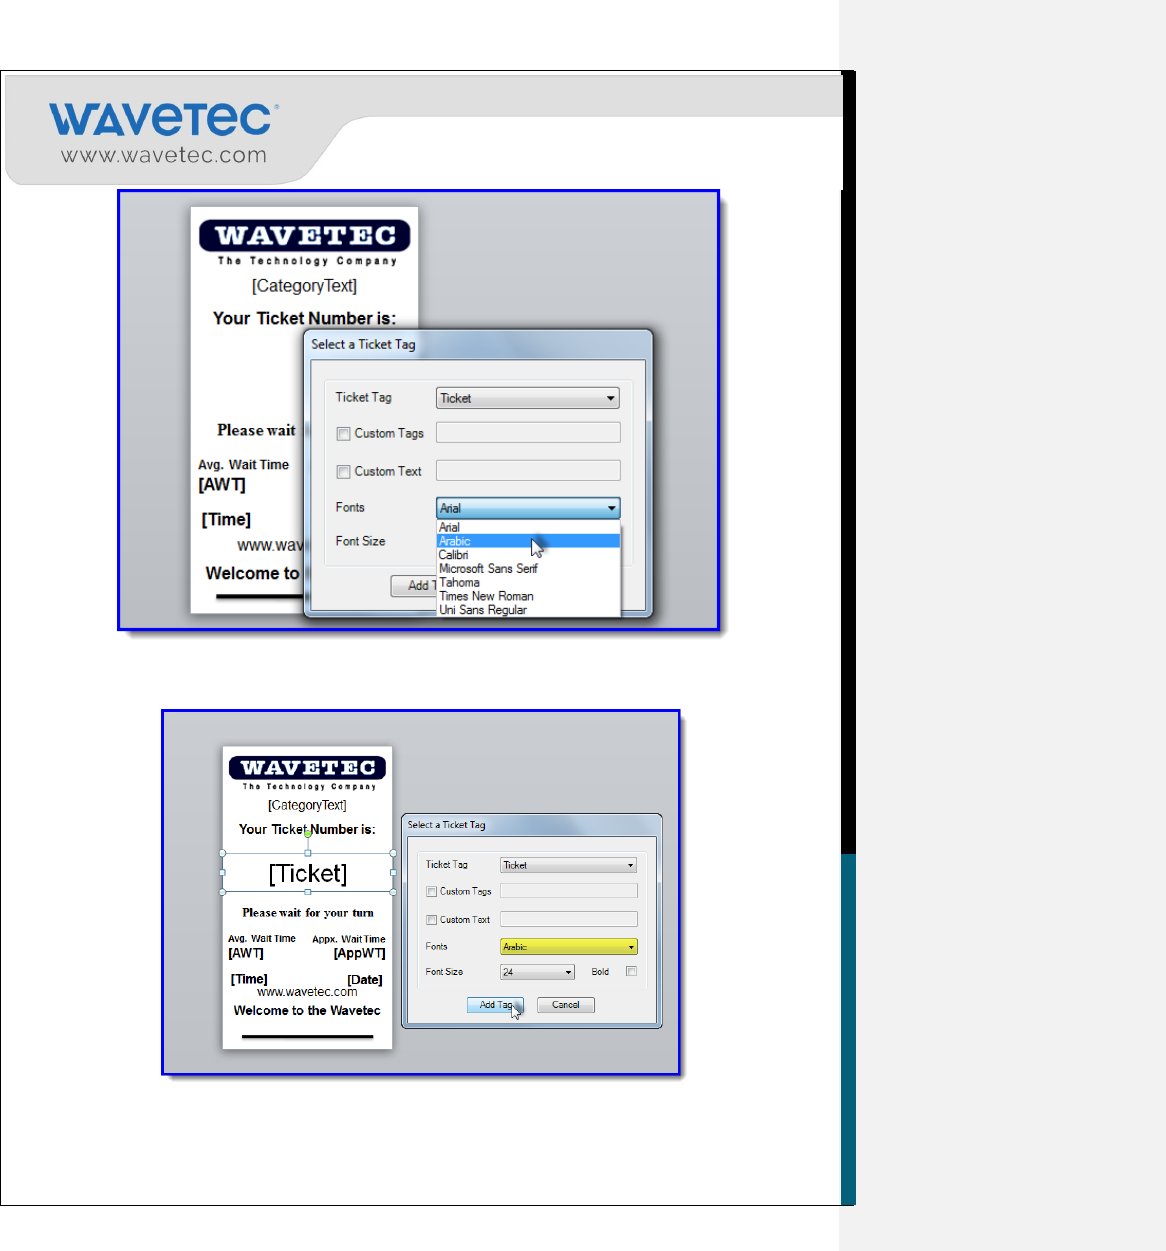
15
On clicking, the tag will be added in the ticket design like illustrated in the snapshot below.
In case, if Arabic font has installed in your system, the ticket tag on the ticket will be appeared
like the snapshot below:
16
For both cases, the ticket number will be displayed in the Arabic font when ticket is printed from
SmartKIOSK.
*Note: Please note that the Arabic font is only valid for ticket tag only. Don’t use the
Arabic font for any other tags.
2.4 Ticket Calculator
The Ticket Calculator ribbon features a calculator which precisely tells the users to estimate how
many tickets of the designed size can be generated in a paper roll that is installed on the Android
SmartKIOSK. This is calculated in two ways:
1. When the user enters the Number of Tickets and Length of Paper Roll, the Height of the ticket
is auto adjusted to cater to the defined number of tickets.
2. Alternately, user can define a particular Height of the ticket and enter the Length of Paper Roll
which tells the Number of Tickets generated for the defined Height.
17
2.4.1 NUMBER OF TICKETS
This is used to change the number of Tickets to be printed in a roll. If the number of tickets to be
printed in a roll is less, the size of ticket will be large. Otherwise, if the number ticket to be printed in
a roll is more, the size of ticket will be small.
2.4.2 LENGTH OF PAPER ROLL
This is used to change the length of paper roll from which tickets are to be printed in order to
determine the number of tickets that can be printed with the defined height.
2.4.3 WIDTH OF TICKET
This is used to change the width of Ticket manually in order to customize a Ticket with Ticket Tags
as per the requirement.
Ticket width can be 80mm for TDU-Lite (Bixolon) Printer and 55mm or 56mm can be used for
SmartKIOSK (TL60) Printers. This can be further expounded with respect to the SmartKIOSK
model below:
Model
Printer Type
Paper Size (Ticket Size)
M13 SmartKIOSK
Custom TL60
55mm or 56mm
M13 TDU-Lite
Bixolon
80mm
M13 TDU-Lite (Custom)
Custom TL60
55mm or 56mm
B14 TDU-Lite
Bixolon
80mm
M13 Normal
Custom TL60
55mm or 56mm
18
2.4.4 HEIGHT OF TICKET
This is used to change the height of Ticket manually in order to customize a Ticket with Ticket Tags
as per requirement. If the size of Ticket is large then the number of Tickets to be printed in a roll will
be less.
Otherwise if the size of Ticket is small the number of Tickets to be printed in a roll will be more.
The maximum height of Tickets cannot be greater than 150mm, whereas the minimum height of
Tickets cannot be less than 20mm.
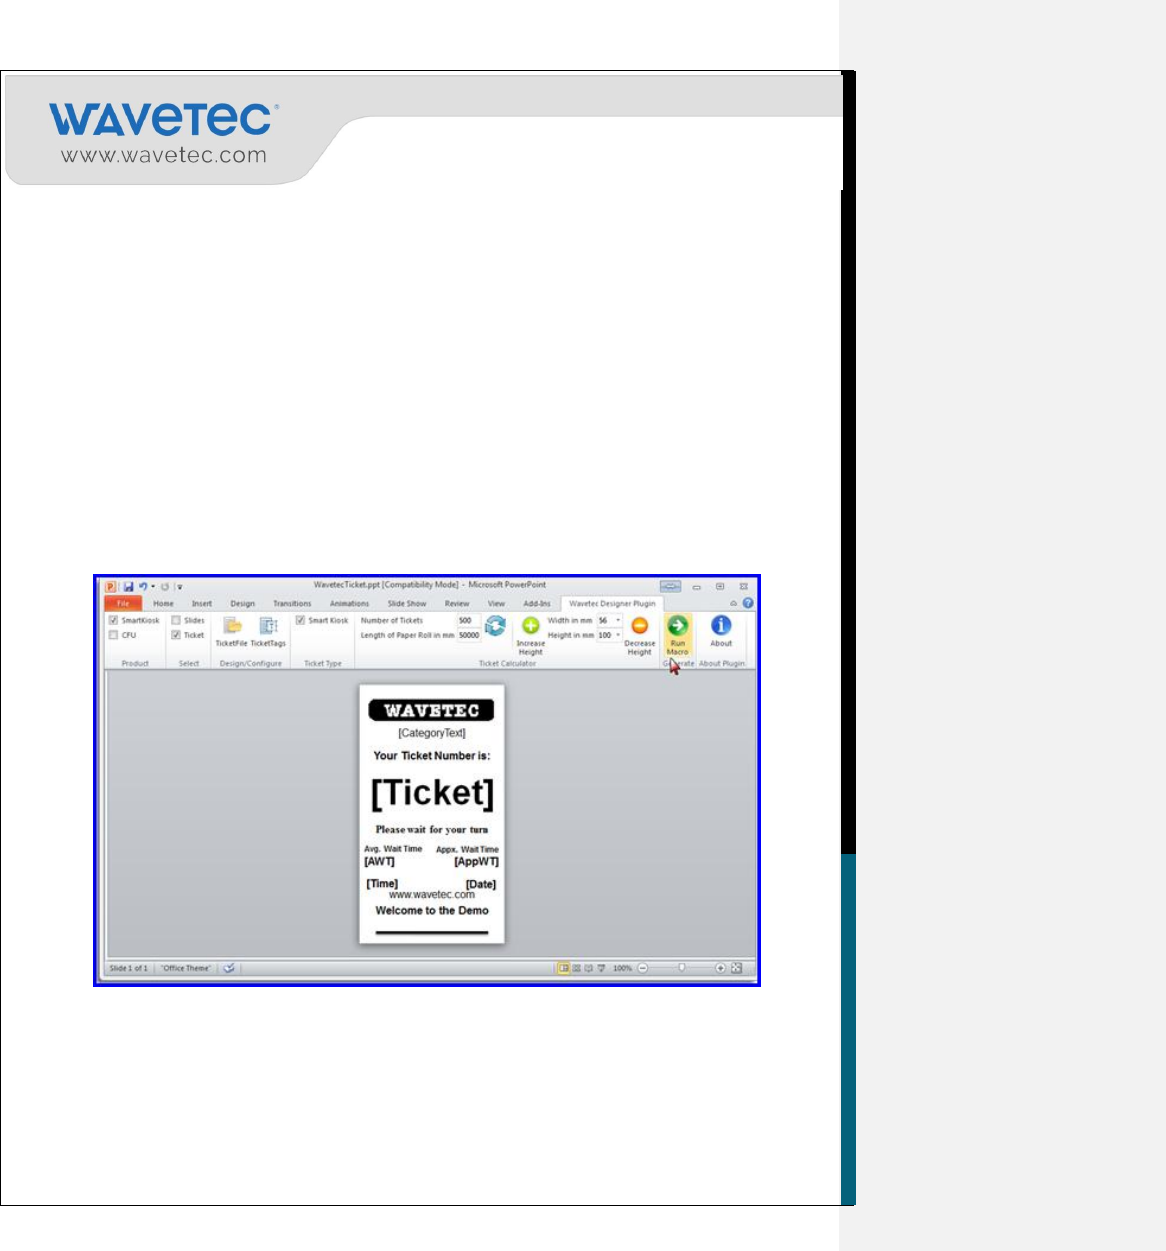
2.5 Generating output files for ticket
To generate output files for your ticket on default parameters, go to the Generate ribbon and select
Run Macros. This executes a macro on the designed tickets to generate a Ticket folder containing
the ticket design and its configurations.
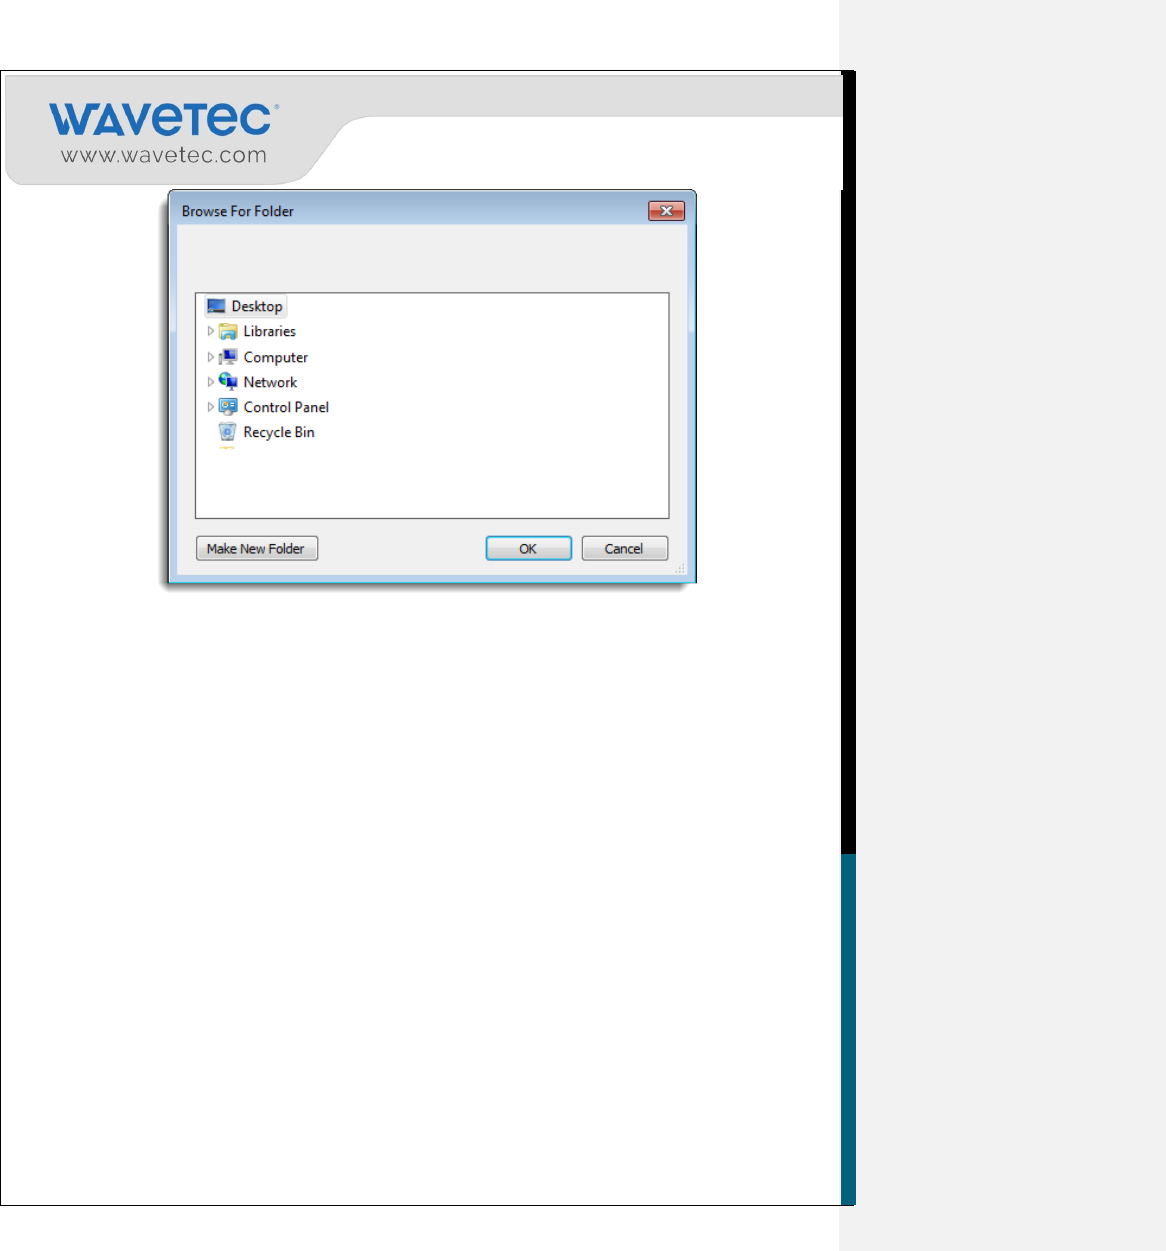
Browse to the folder where you want to Save the ticket output folder and Click OK. Remember
this is the same folder will be used in designing screens and menus.
19
2.6 Designing screens and menus
After generating ticket file the second step is to design slides. In order to design screens and menus,
following components are required to be configured.
1. Installing the Wavetec Designer plugin.
2. Adding background to screens.
3. Inserting the Action buttons
i. Aspect Ratio.
ii. Idle Time Video.
iii. Ticket Print Actin buttons.
iv. Configuring timeout settings (automatic navigation).
v. Navigating to other screens.
vi. Configuring the Info Ticket.
vii. Inserting Execute Action Button (for executing custom scripts).
viii. Inserting Text Box.
ix. Inserting Borders.
x. Designing the custom keyboard.
xi. Card Reader Action
xii. Barcode Reader action
4. Generating Output Files (Running Macros)
20
Download the Pre-define templates from the eQ Release site under the section “Smart KIOSK
Android”. The access is for authorized people only so if you have any issue in accessing please
contact your regional CSE.
2.7 Adding background to the Android SmartKIOSK screens
Backgrounds are the images that the customers will see on the screen when the Android
SmartKIOSK application starts. This section shall explain on adding background images to the
Android SmartKIOSK screens.
2.7.1 THE BACKGROUND SETTINGS
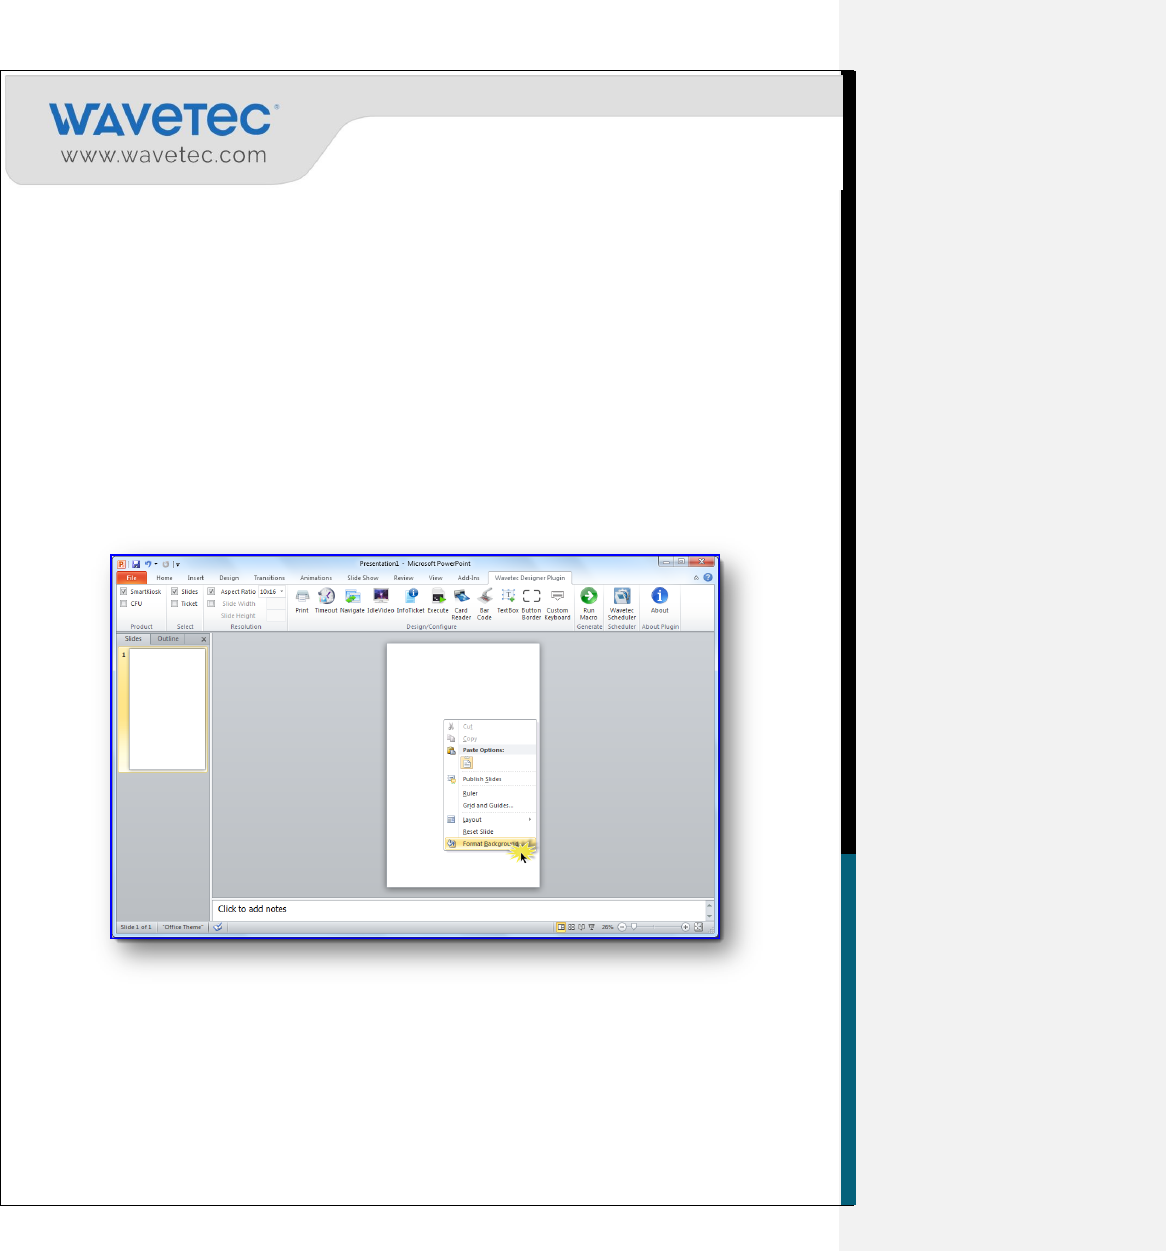
Follow the steps explained below to add background images to the screens.
1. Insert a new slide.
2. Right-click and select Format Background.
3. Now select the picture from the File browsing window

21
4. For Android TDU-Lite, make sure that 56pixels space line is leave from the bottom of the screen
while adjusting the background as TDU Lite doesn‟t display this area. It has been illustrated in the
figure below:
22
Note: Repeat all of these steps to specify all of the individual slides which will
be included in the presentation.
56 pixel heights is
not use
23
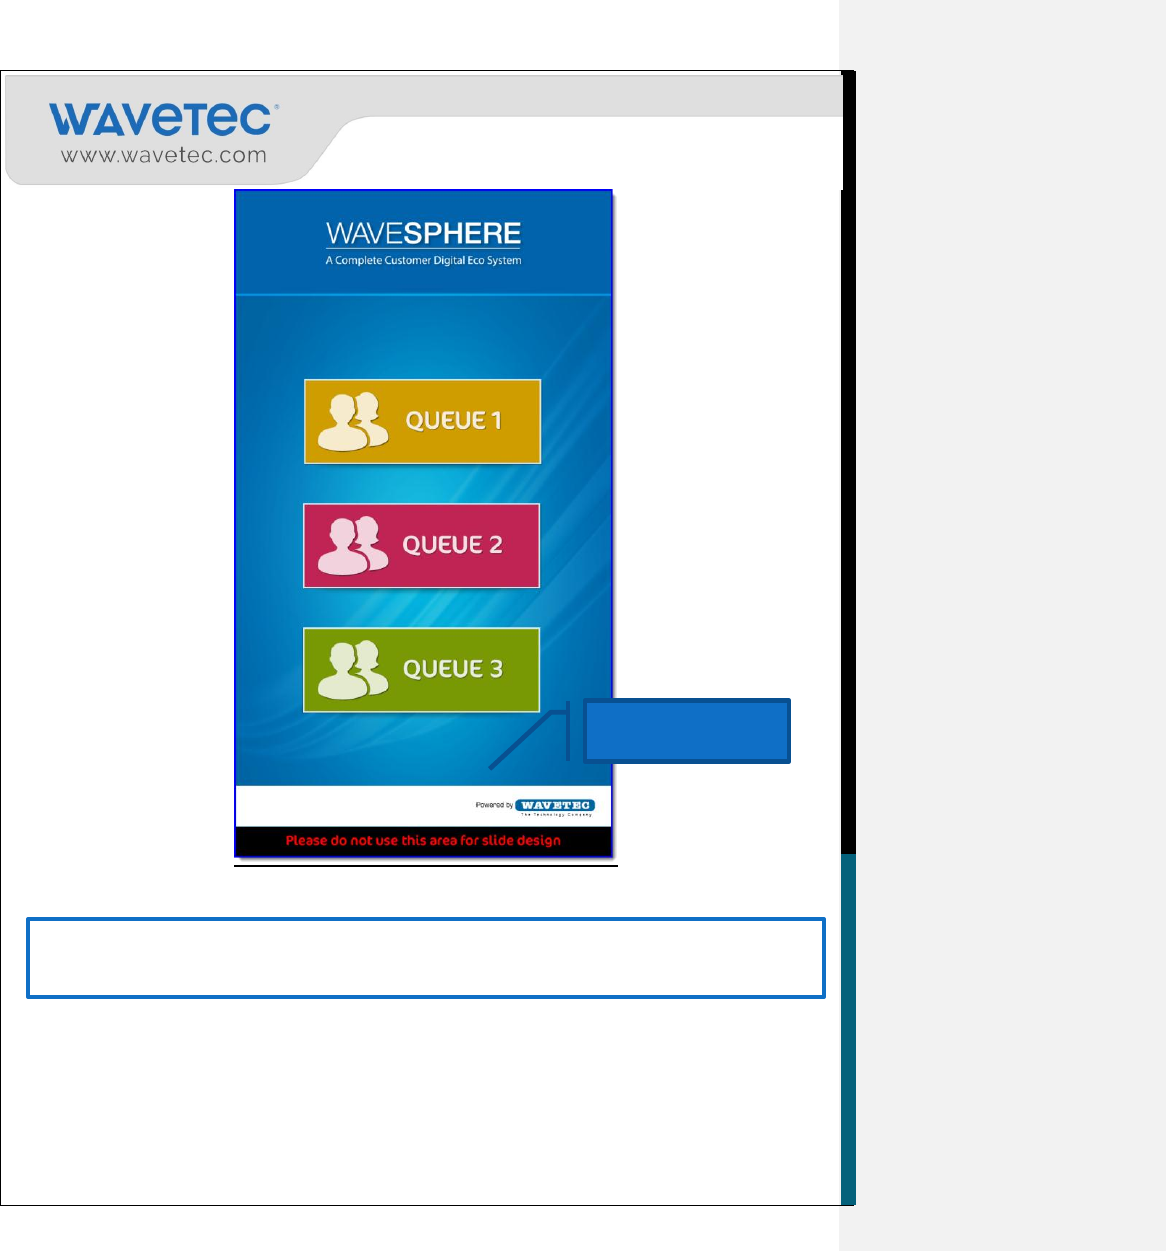
2.8 Inserting the Action buttons
Buttons are the hotspots on your image that perform some action as the user touches them. These
actions can be:
Generating a ticket
Navigating to another screen
Assigning idle time video etc.
Action Settings tell the Android SmartKIOSK application about the actions to perform on touching
the hot spots that you create on your screen. For Example, in a slide for language selection, if there
are two language options, English and Arabic, there would be two buttons for these options. As the
user touches each button, Android SmartKIOSK shall navigate to the respective slide with options in
English and Arabic languages.
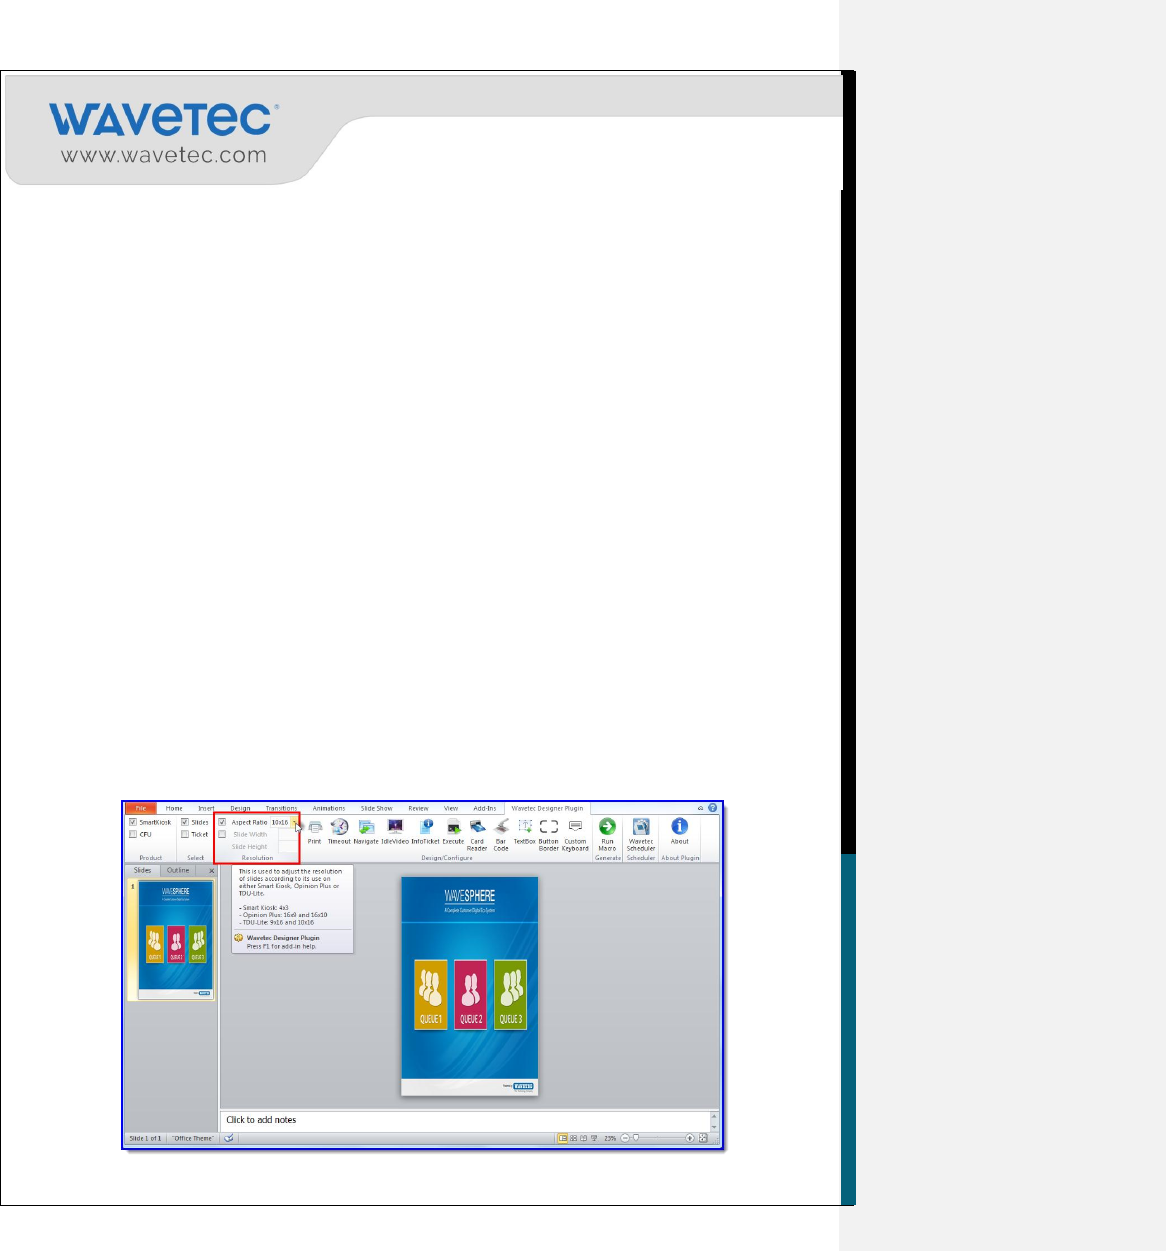
2.8.1 SELECTING ASPECT RATIO
Aspect ratio in resolution menu provides the screen resolution of the Android SmartKIOSK which can
be selected in order to design slides.
For Android TDU-Lite, there are two options that are 10 x 16 or 9 x 16 in aspect ratio which can
be selected depending upon on the resolution of the screen.
For SmartKIOSK, there are three options provided that are 4 x 3 or 16 x 10 or 16 x 9 aspect ratio
depending upon the resolution of the screen.
Following screen is design using TDU-Lite Screen Resolution only for example:
24
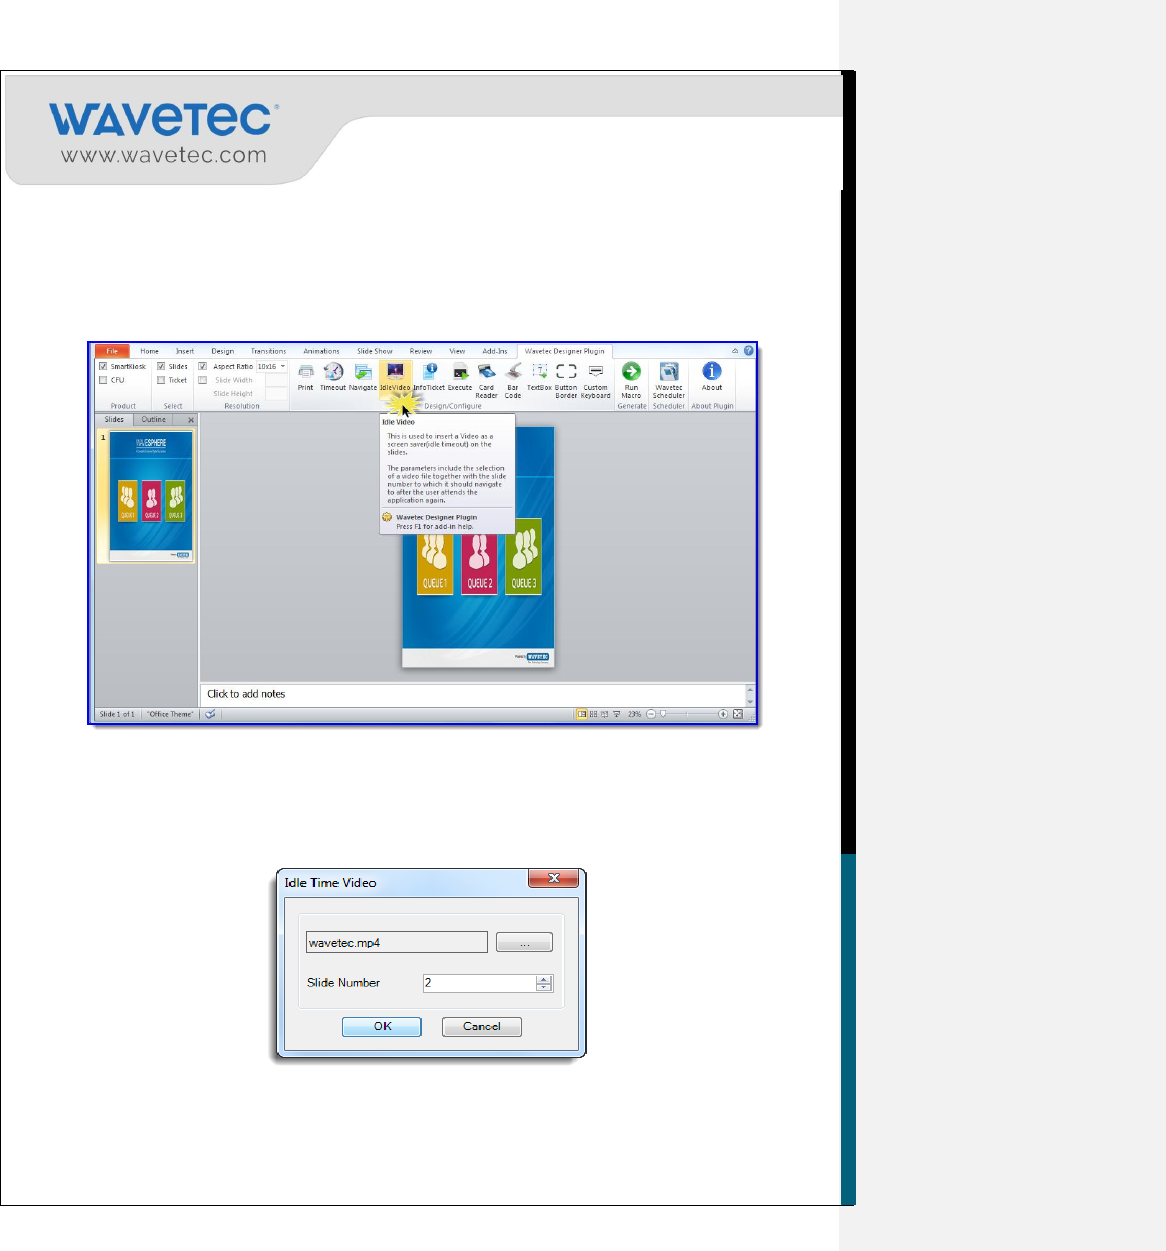
2.8.2 CONFIGURING IDLE TIME VIDEOS
Idle time Videos works as screen saver for Android SmartKIOSK, whenever there is no activity on
KIOSK screens, it moves to First Screen where Idle Time Video is configured. The Video is interrupted
by the onscreen touch. For adding a video to the presentation, the steps given below have to be followed:
1. Open Idle Video action from Design/Configure ribbon.
2. The Idle Video Setting Video will open.
3. Browse the video file which will run in Idle Time (Only .mkv and .mp4 formats are supported)
4. Select Slide Number which is the slide to which the Android SmartKIOSK will navigate to when a
user clicks on the video.
Note: After clicking Browse button you can also select more than 1 video if you want to run
multiple videos on your smartkiosk. Also, please make sure that the length of the selected video
shouldn’t be less than 3 minutes.
25
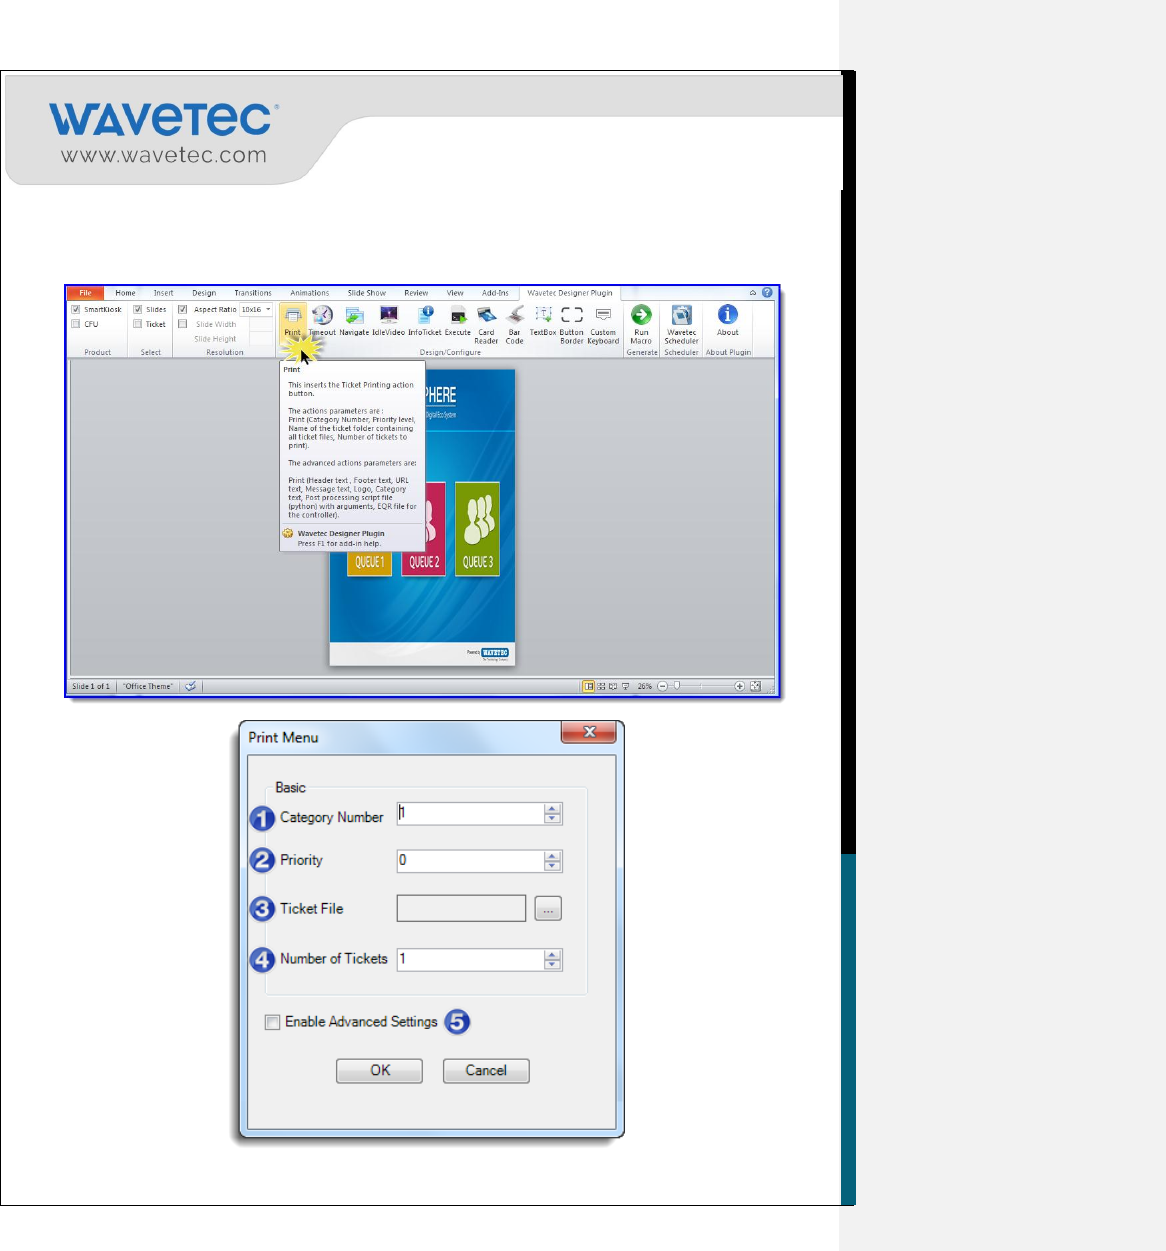
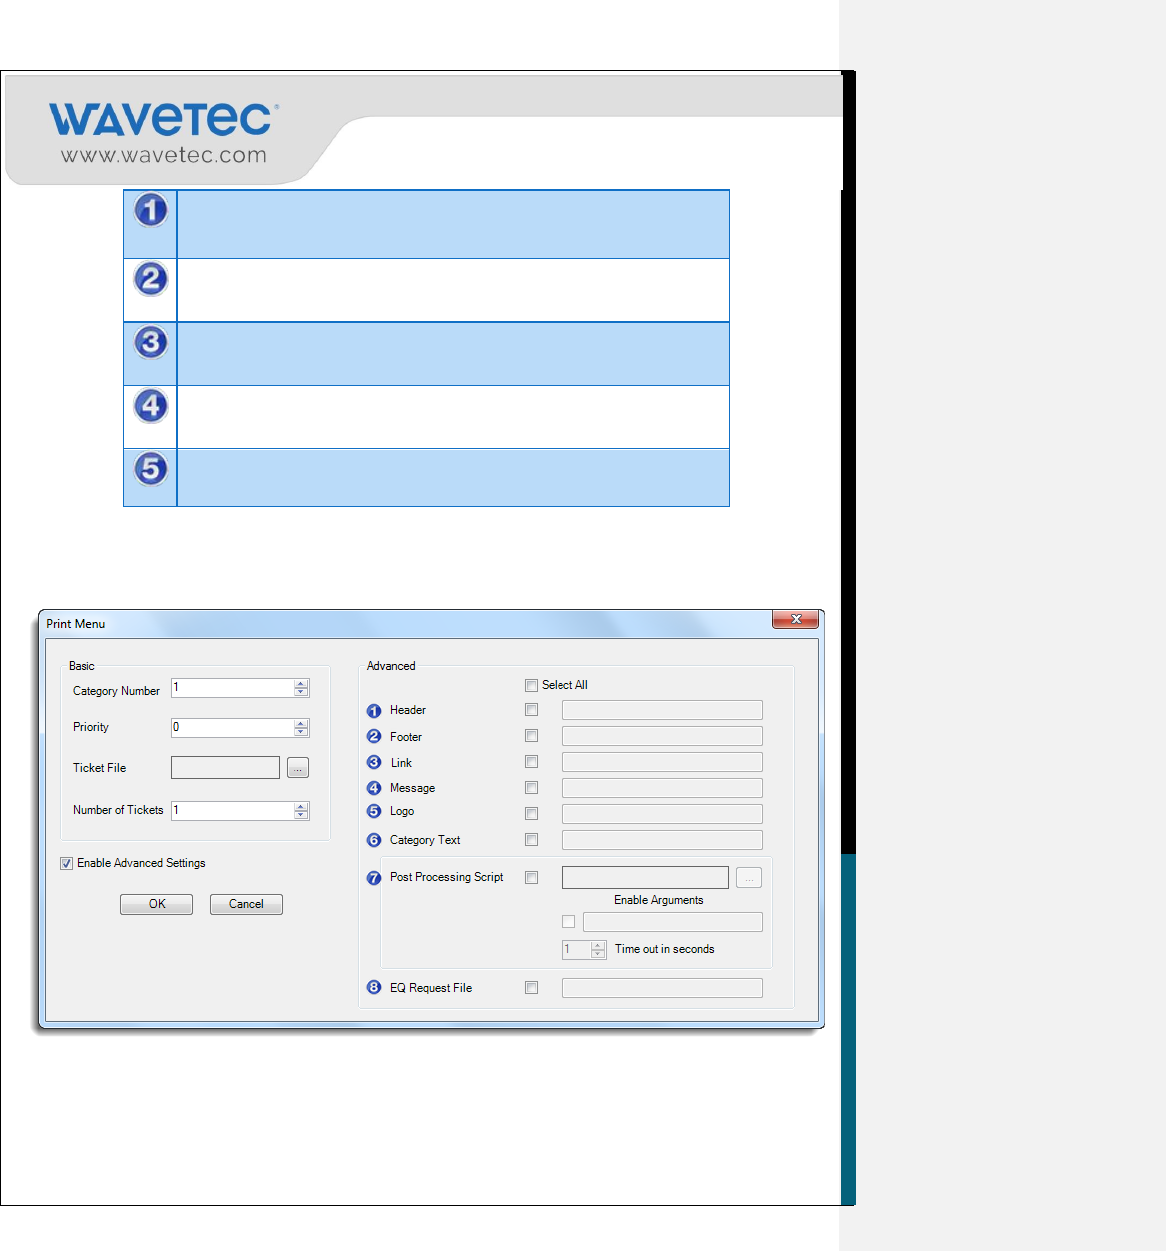
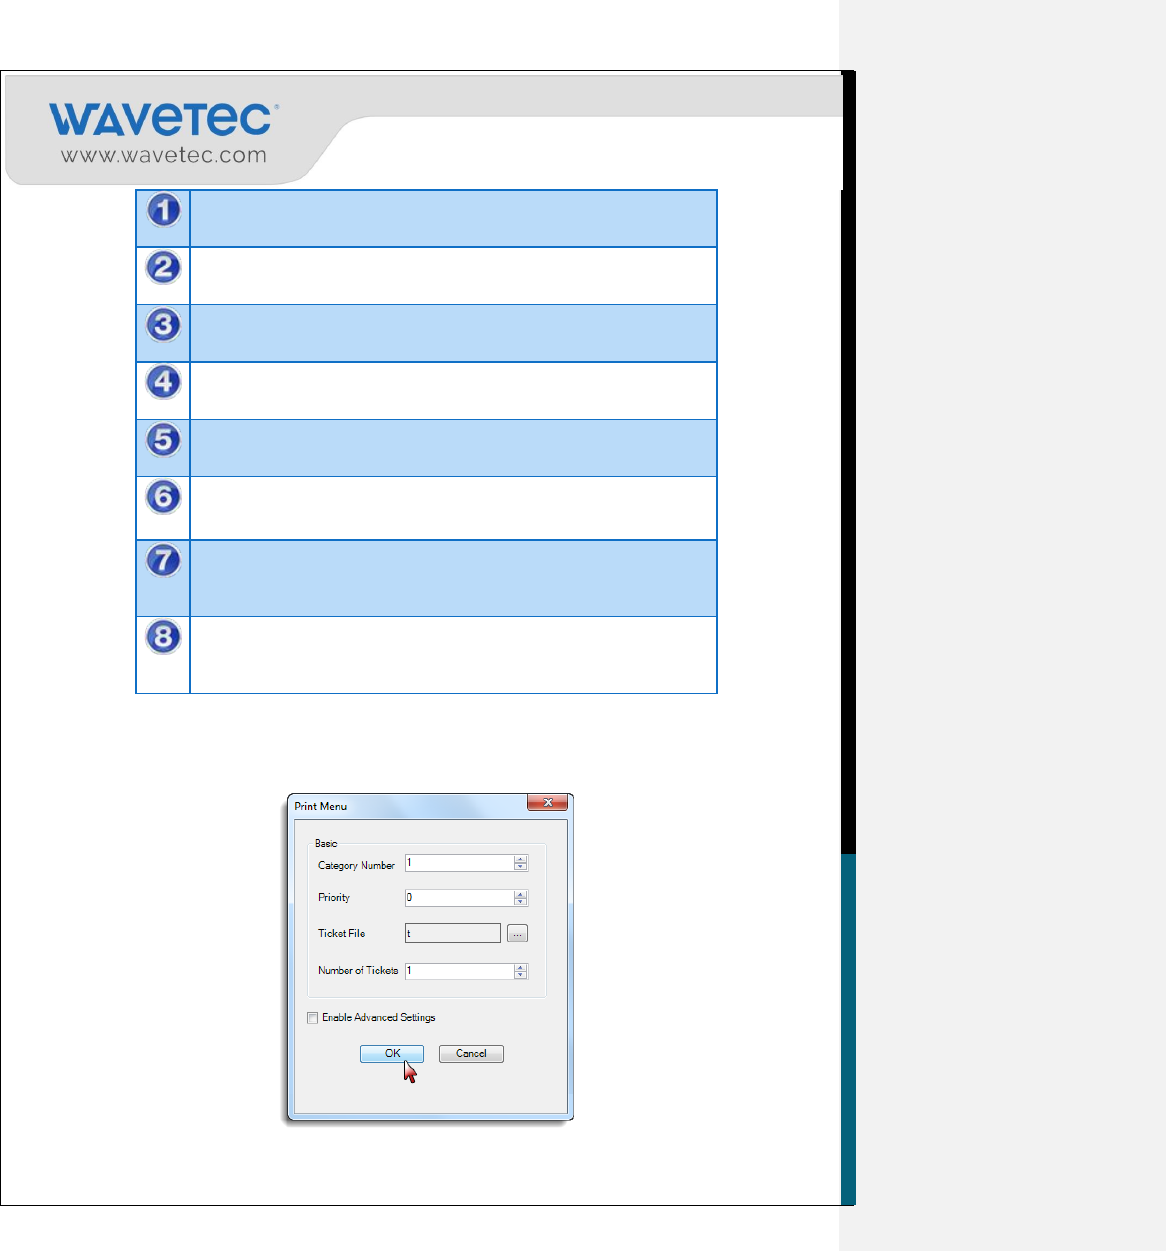
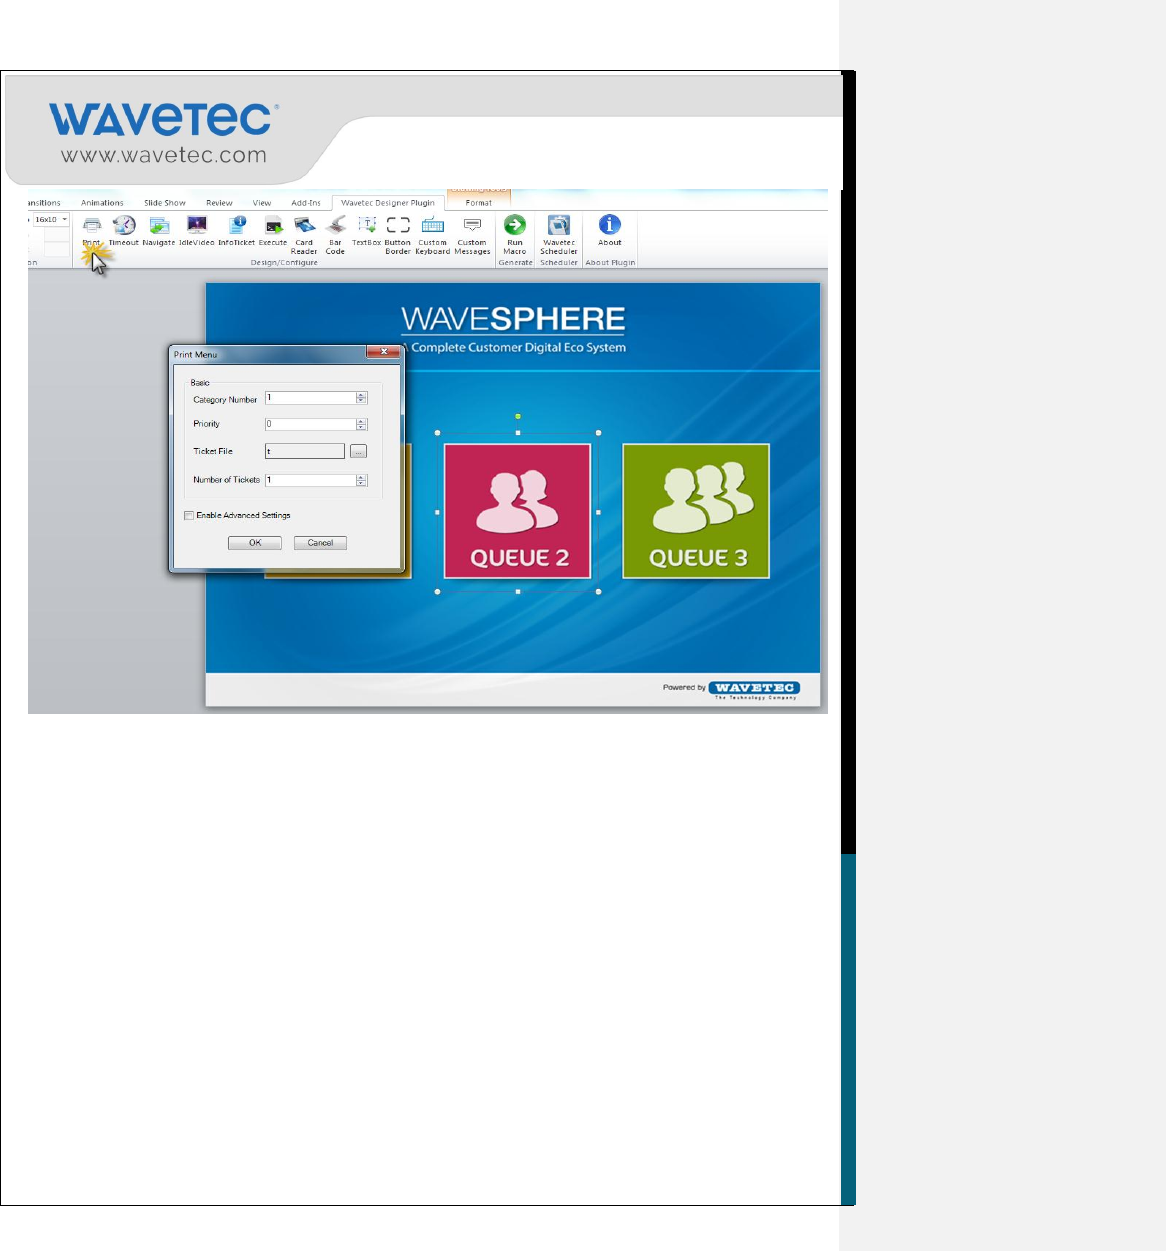
2.8.3 TICKET PRINT ACTION BUTTON
In Smart KIOSK plugin, there is an execution command that would generate a ticket.
1. For using the Ticket Print Action Button Select Print from the Design/Configure ribbon.
26
Category button: Button ID for the respective category for which
ticket is required to be generated.
Priority level: Defines the severity of the category. (1 is lowest
priority and 9 is highest priority level).
Ticket Fie: Name of the folder that contains ticket file, which will be
printed against the category.
Number of tickets to print: Number of tickets that are to be printed
on a single click/touch.
Open Advanced Settings.
2. The Advanced Settings of the Print window defines the second level of Tags which will be
available in Ticket Design, these Advance setting defines;
27
Header: User defined parameter (User can insert any name here)
Footer: User defined parameter (User can insert any name here)
Link: User defined parameter (User can insert any web link here).
Message: The message that is to be printed on the ticket.
Logo: Appears at the top of the page, which usually is the
company logo.
Category Text: Name of the category as selected by the customer
shall appear here.
Post Processing Script: This is use to add extra tag with print
functions, like Customer name, ID card number, Account number
and Prefix etc.
EQ Request File: File name generated by post processing script
to be sent to controller like saving customer phone number or ID
card number etc.
3. After Providing Print Settings, select OK to insert the action button. This will add Print Action
button on Screen.

28
4. The Action Buttons will be place in the middle of Slide, Move this button over screen design button
and resize it according to the requirement.
Notes:
1. In case of no priority set ‘0’ as its value.
2. Following parameters are mandatory to be specified with the Print command:
Category button
Priority level
Name of ticket
Number of tickets to print
5- Remember to put navigation with print button. To do this you have to select the print area drawn on
slide as shown in below image
29
6- Press the navigate button to define the slide number to which user will be navigated after printing
ticket.
30
7- Press Ok.
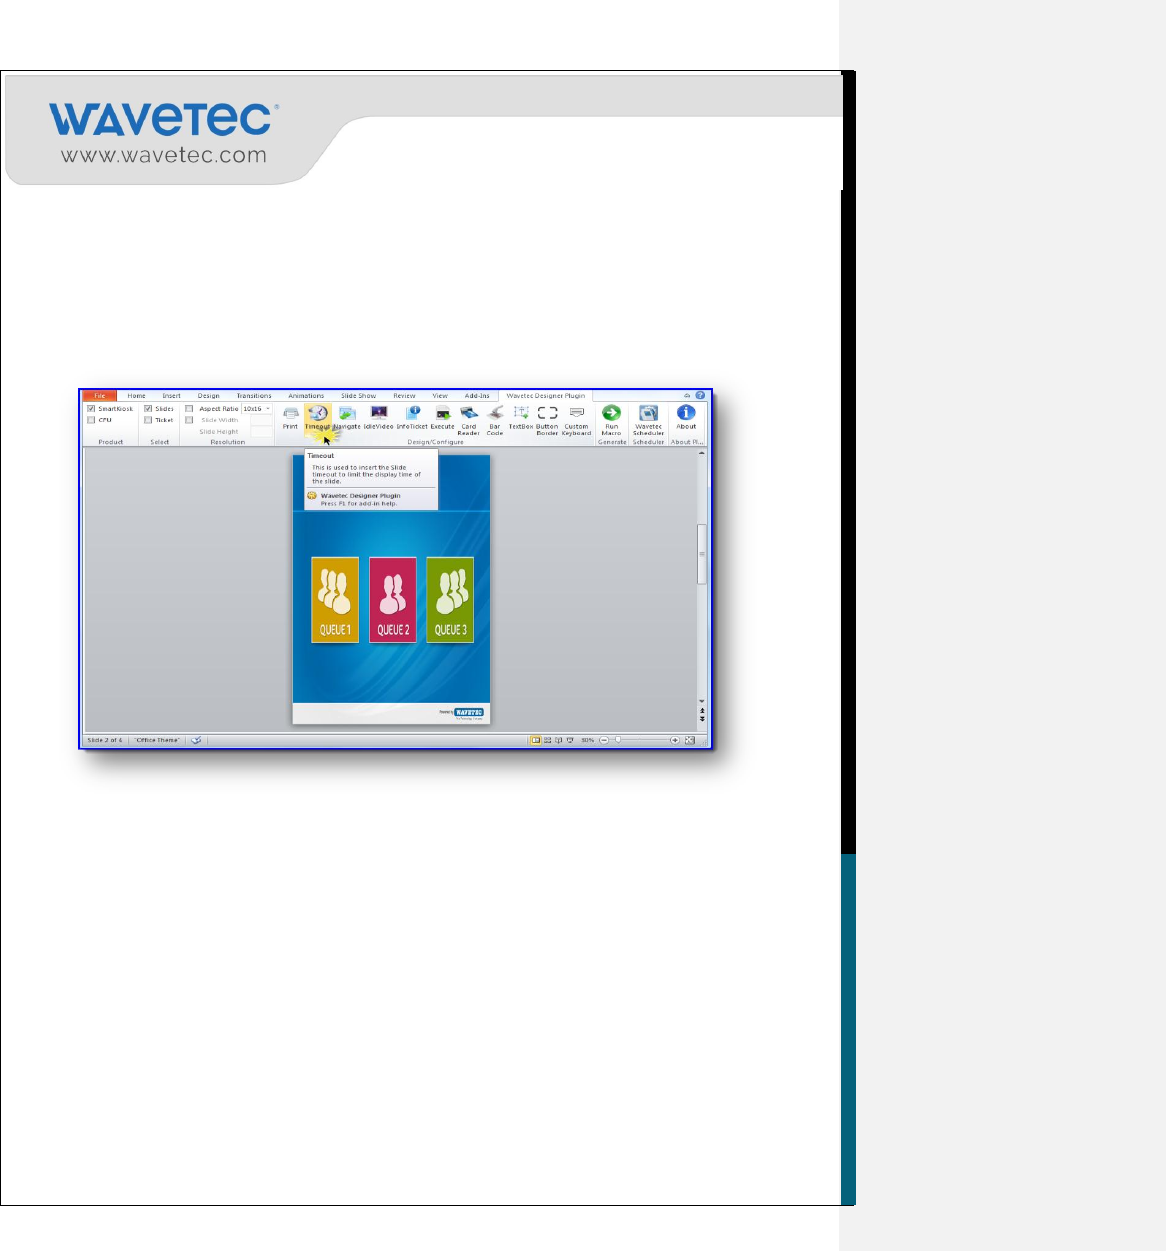
2.8.4 CONFIGURING TIMEOUT SETTINGS (AUTOMATIC NAVIGATION)
Timeout setting is use to route between screens when the display screen is inactive. It limit the display
time for each slide. Follow the steps described below:
1. Select the Timeout button in the Design/Configure ribbon.
2. The Timeout setting window will open,
3. In this windows Slide Number represent the slide on which user will move to when Android
SmartKIOSK is inactive.
4. Timeout in Seconds is the timeout after which the screen will auto navigate to the slide defined in
the first option.
5. Enable the check for LastSlide if you are using timeout on lastslide of the presentation.
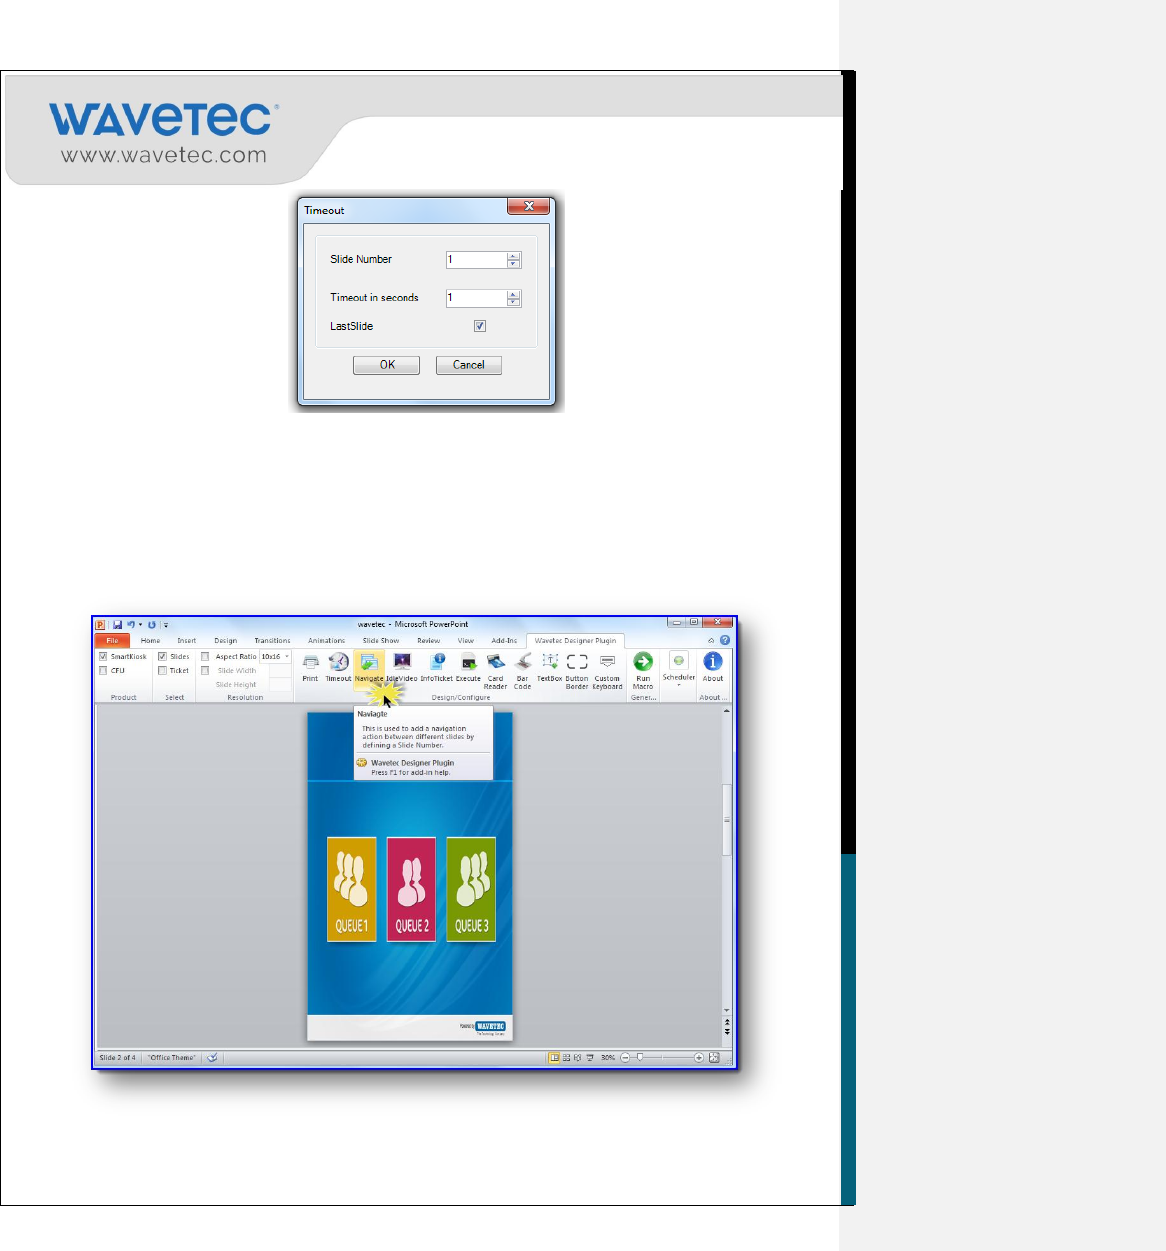
31
Repeat this step for all the other slides, where timeout is required.
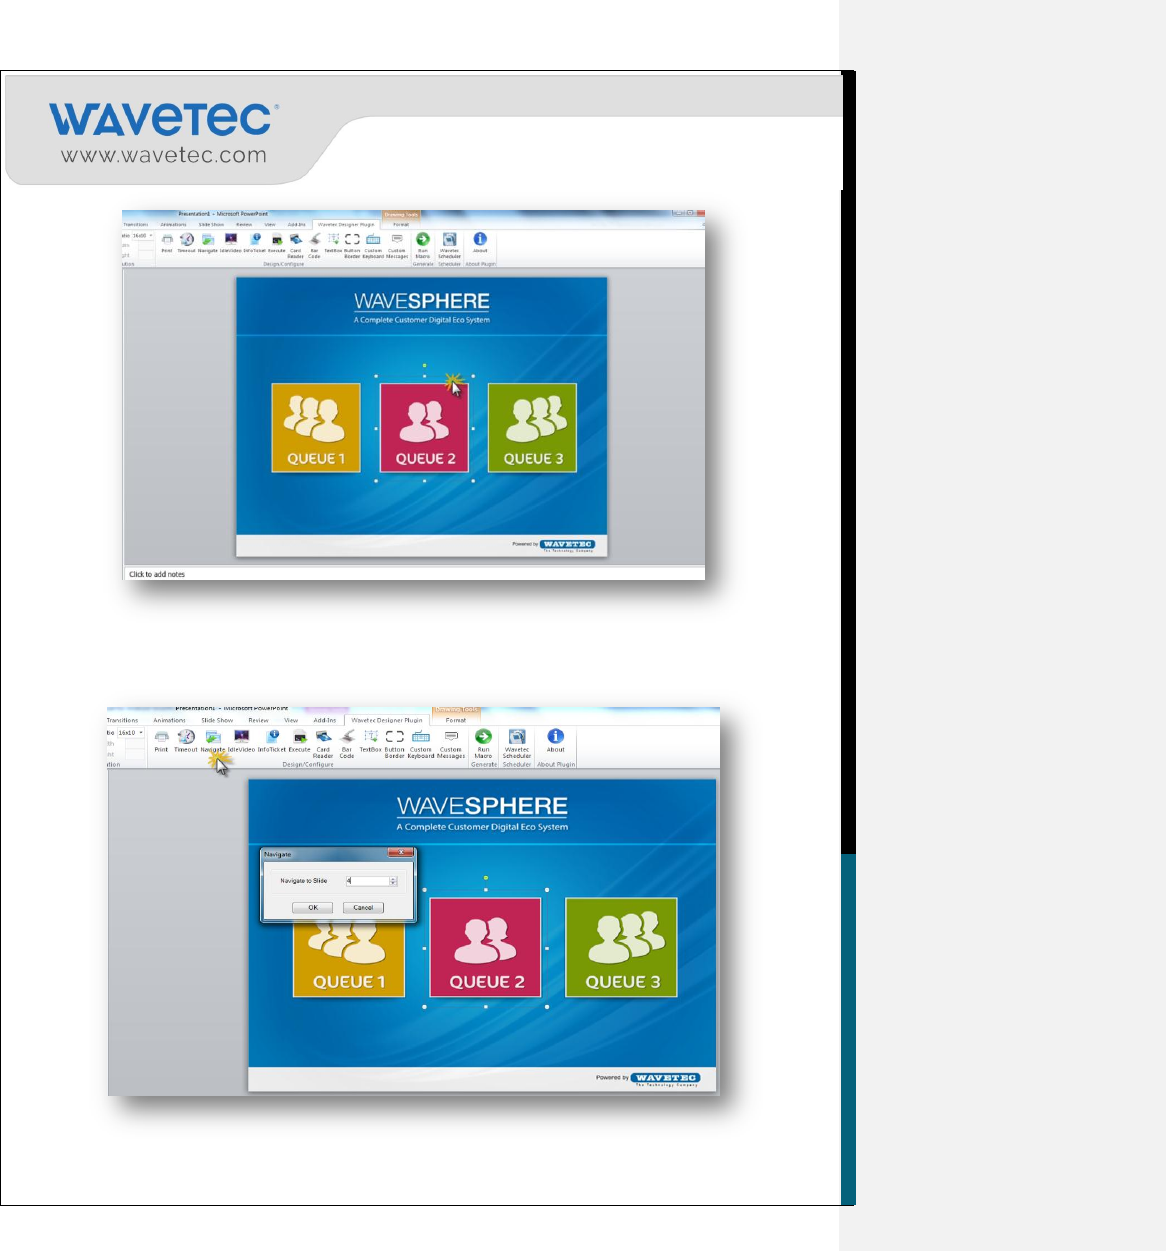
2.8.5 NAVIGATING TO OTHER SCREENS
After adding all of the slides, users will need to specify the order of navigation between different
slides. Follow the steps described below:
1. Select Navigation from the Design/Configure ribbon.
32
2. The Navigation setting windows will open.
3. In this window, Slide Number defines the navigation between current slide to slide which was
mention in Slide number.
Repeat this step for all the slides from which you want to navigate to other screens.
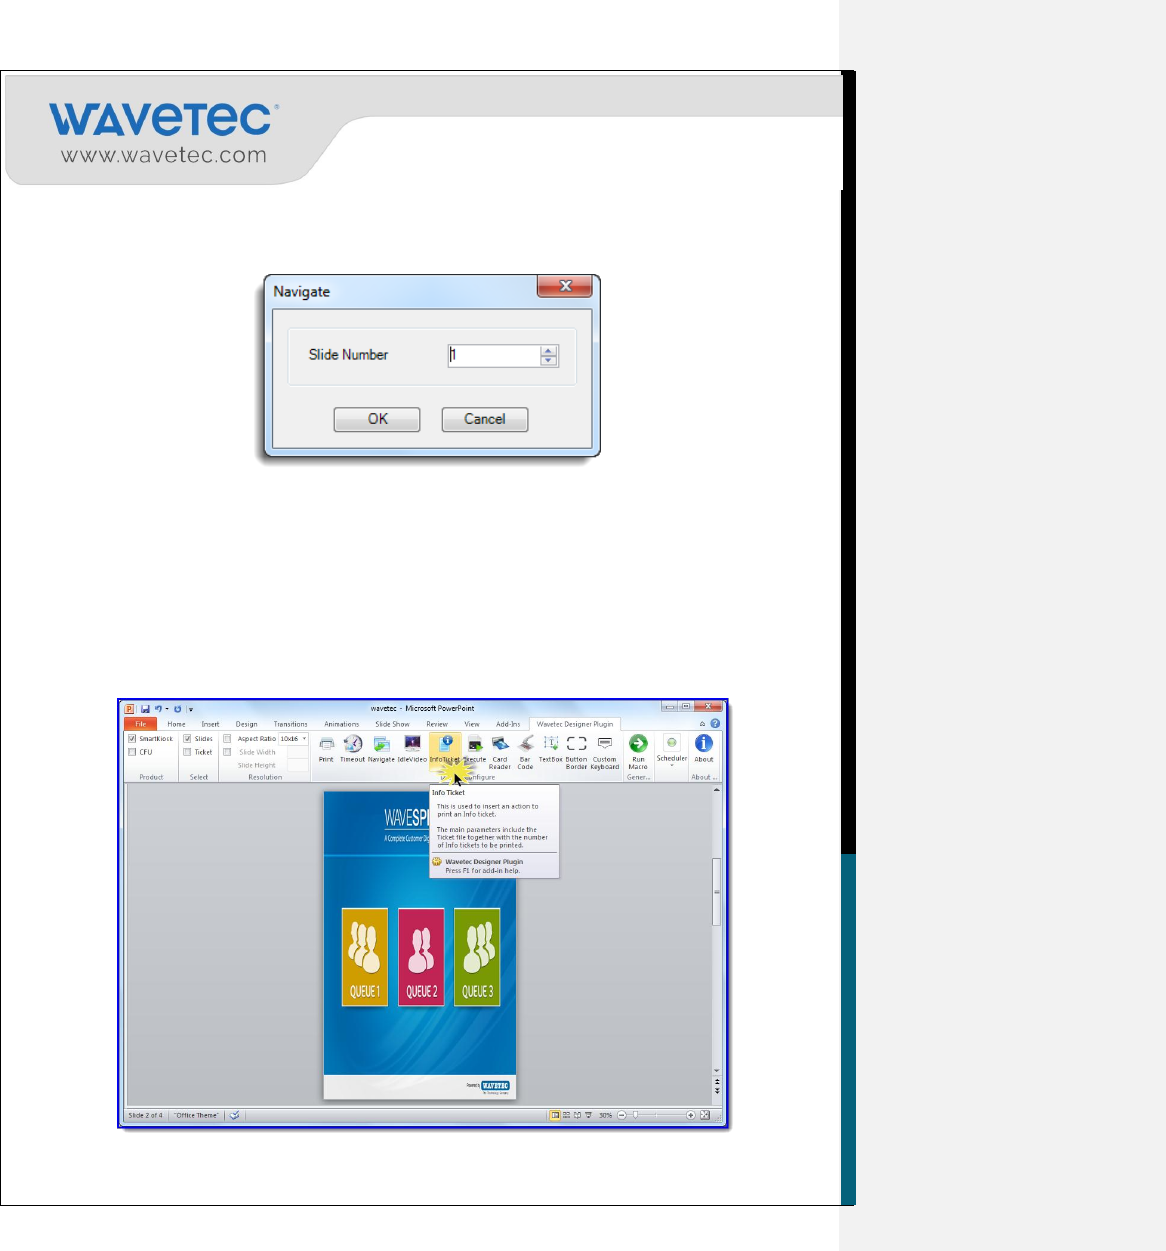
2.8.6 CONFIGURING THE INFO TICKET
In certain cases, an informative ticket is required to be generated for Android SmartKIOSK. Please note
that ticket number is not specified on Info Ticket and it does not contain any Tag. A separate ticket
needs to be created for this purpose which shall be placed under a separate folder of Ticket in the final
package.
1. Open Info Ticket option from the Design/Configure ribbon.
33
2. This will open Info Ticket window.
3. In this window, browse Info Ticket Folder and provide number of prints. The number of prints
define the number of Info Tickets are to be printed on a single button click.
4. The Info Ticket folder is the Ticket file which has been generated using the Plugin previously.
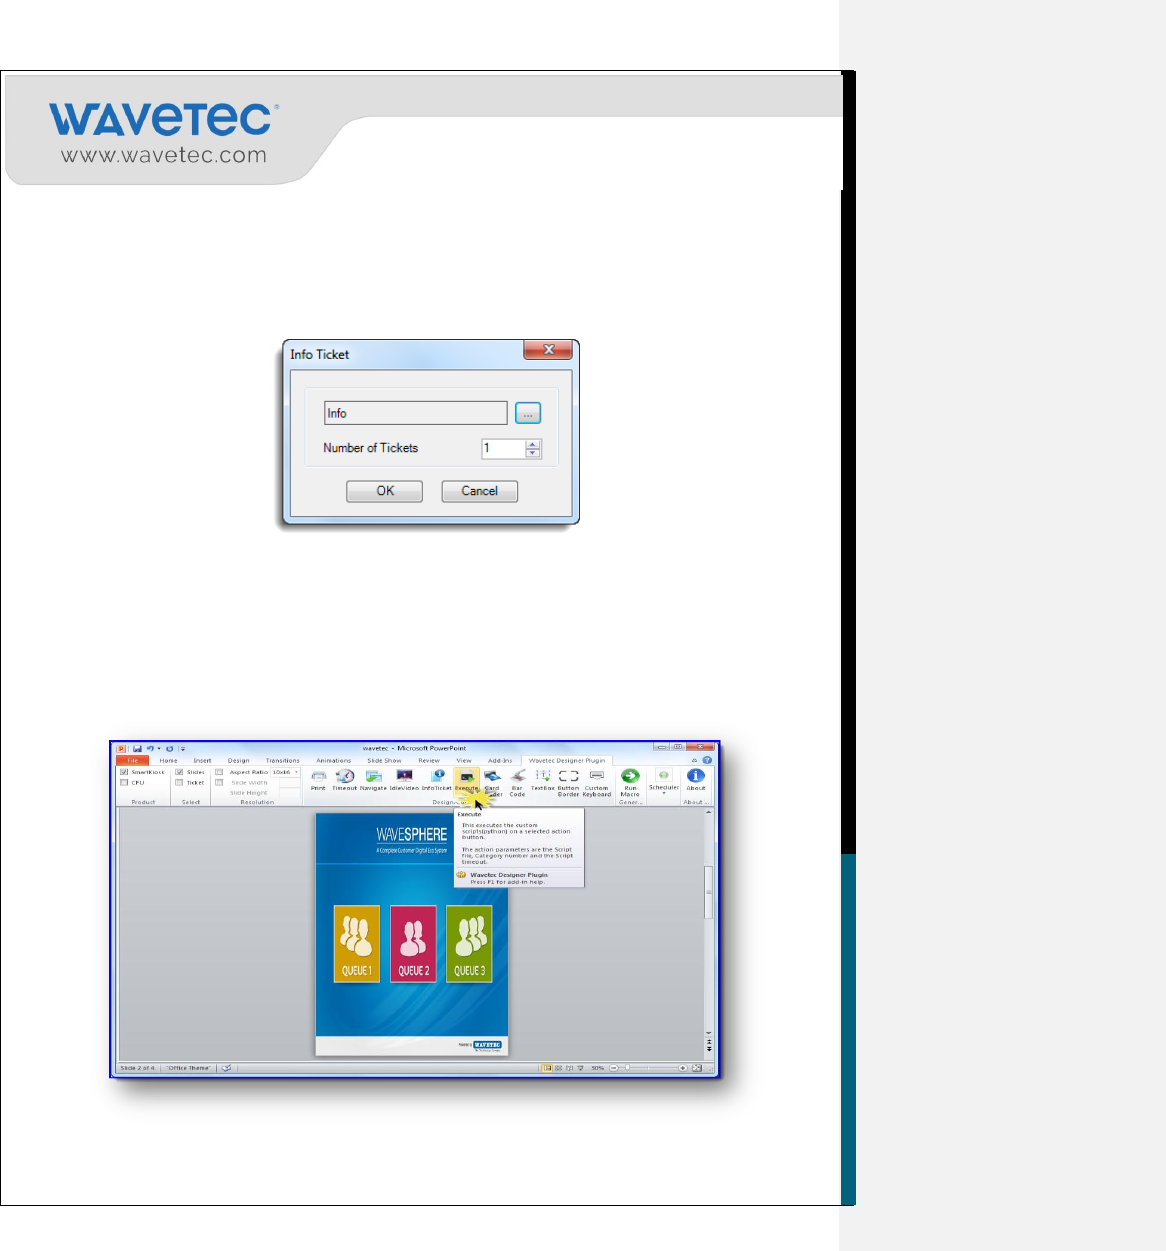
2.8.7 INSERTING THE EXECUTE ACTION BUTTON (FOR EXECUTING CUSTOM
SCRIPTS)
The Execute Action button is used to run custom scripts on the Android SmartKIOSK. Instances which
require running a custom script are adding customs tags on Ticket, displaying information in different
format/language on ticket etc.
1. Open the Execute option from the Design/Configure ribbon.

34
2. This will open Execute configuration windows.
If you want to Print the ticket after executing Script then select the execute button area drawn on slide as
shown in the image.
Then press the Print button to define all the required properties of print button and then press Ok.
Script Name
Browse the Custom Script, in which any custom functions like
fetching name from web service will executed.
Script Argument
Enter the number to be used as an argument for the calling script
Time Out
After how long script will stop executing.
35
Repeat the above steps to add the user navigation after executing script/printing ticket.
2.8.8 ADDING THE CARD READER ACTION BUTTON
This inserts action button to read data from the magnetic cards using an attached Card reader device.
This command includes success and failure slide where when a data from Magnetic Card is read
properly, this will route to a success slide, if it not properly read or in case of invalid card was inserted,
customer will route to a failure slide.
1. Open Card Reader option from the Design/Configure ribbon.
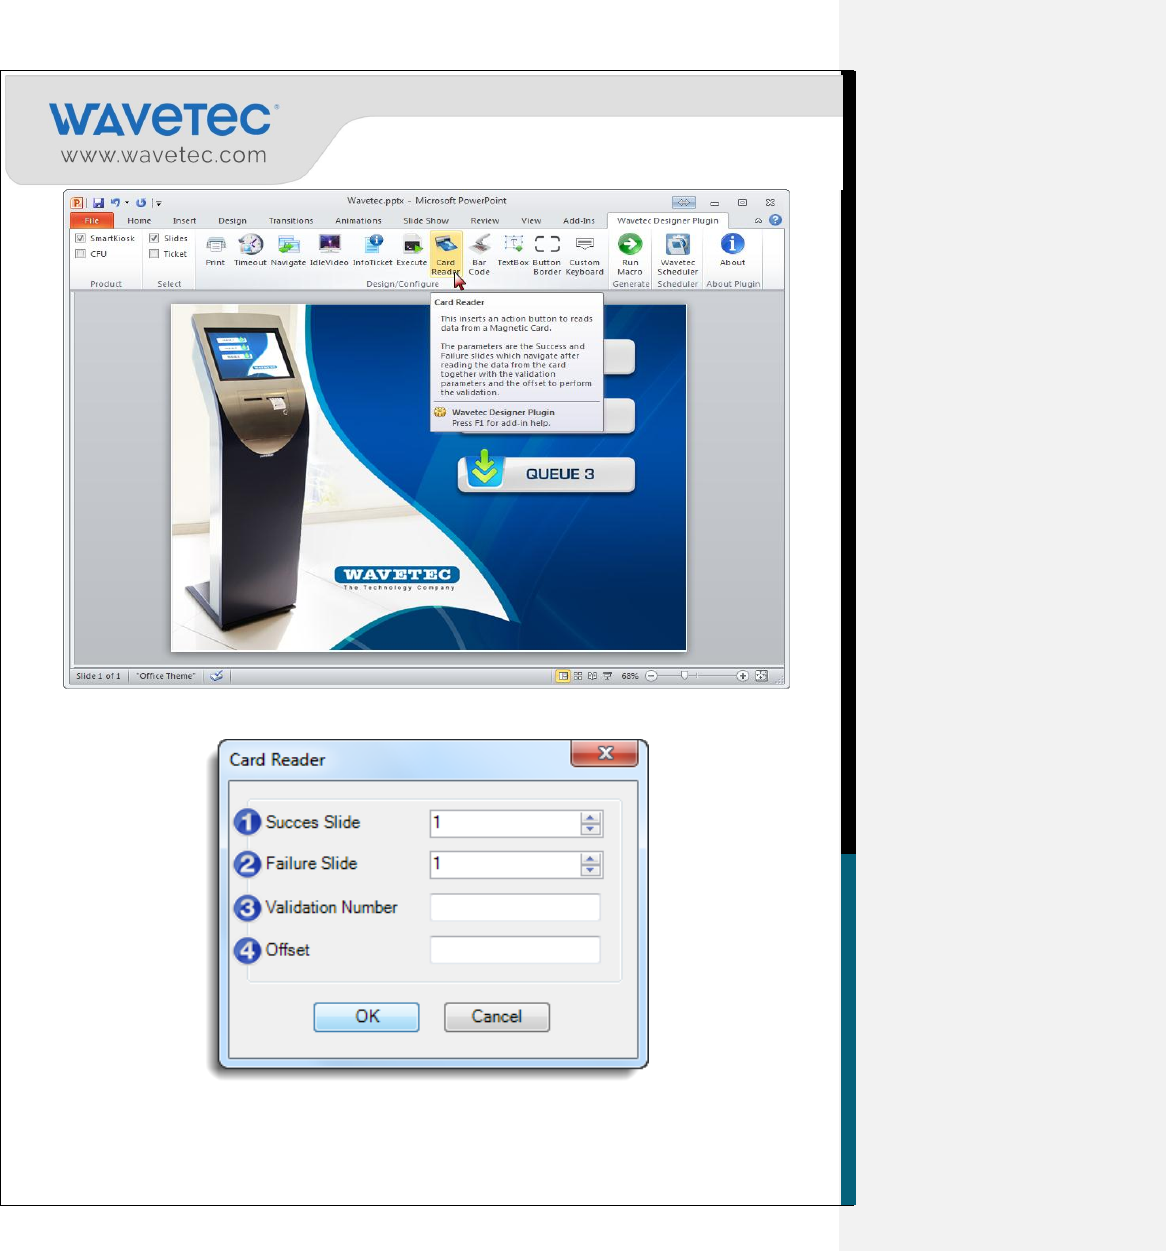
36
3. The Card Reader configuration window will open.
37
Success Slide: On acceptance of the Magnetic Card Smart KIOSK will navigate
the user to Success slide.
Failure Slide: On Rejection of Magnetic Card Smart KIOSK will display a slide
with an error message.
Validation Number: Provide the Card Verification Number.
Offset: Defines the number of digits to be discarded to reach the verification
digits of card number. e.g: Entering 4 will discard first four digits of card number
and will then start verifying the card number.
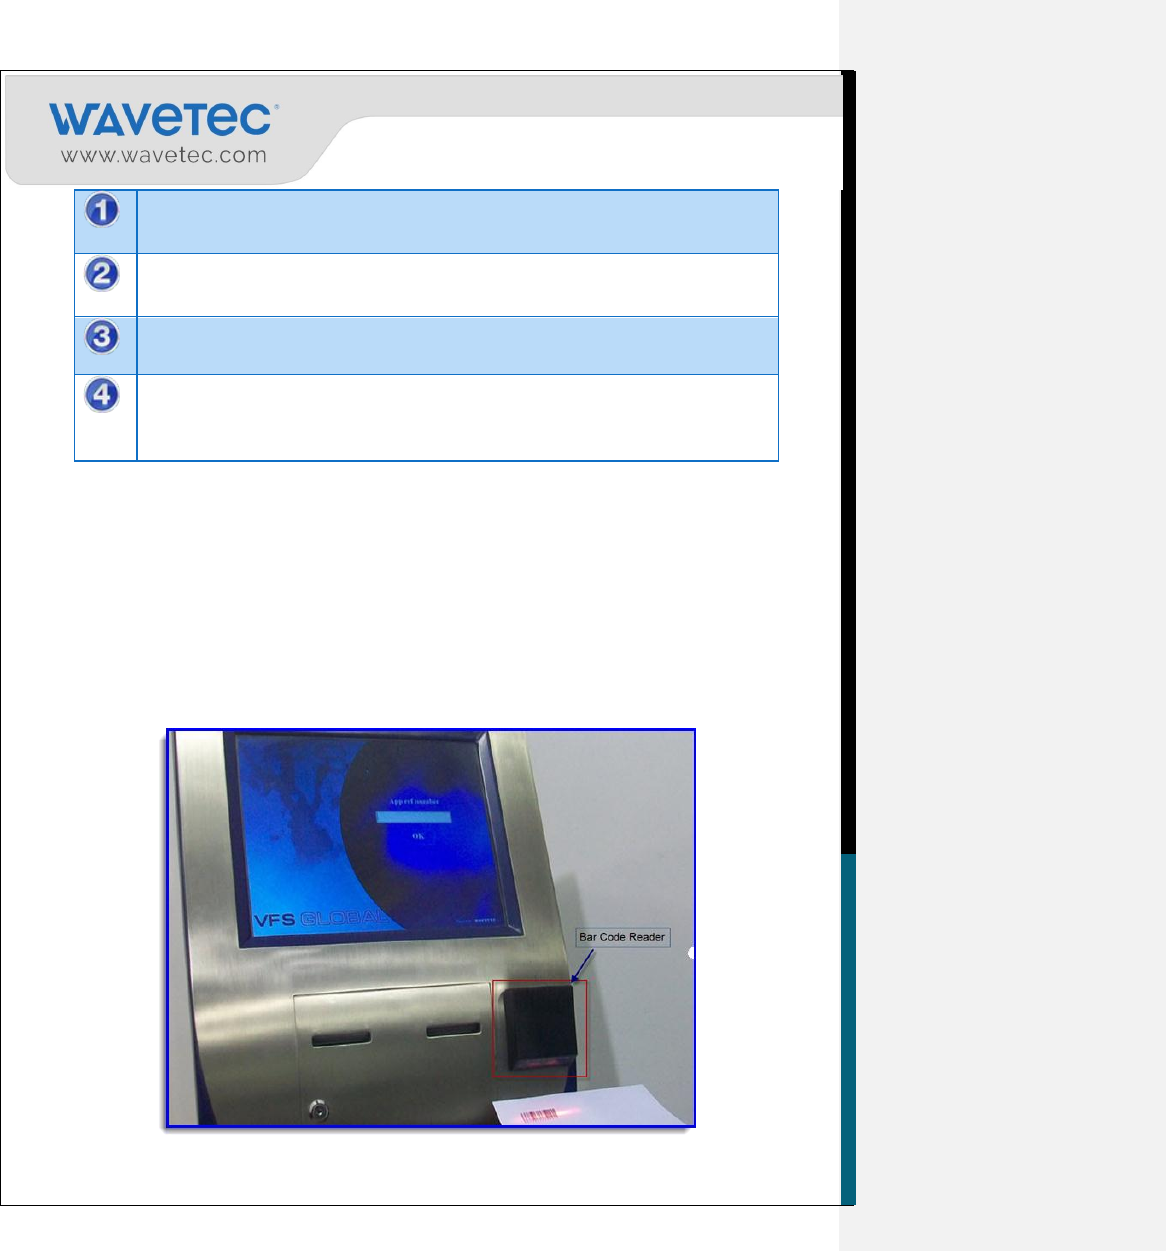
2.8.9 ADDING THE BAR CODE READER ACTION BUTTON
This method of generating tickets uses a bar code reader that is located on the right side of the Smart
Kiosk. Bar code reader scans the bar code on the card that the user sticks against the bar code reader and
generates the ticket accordingly.
This feature is used for the generation of tickets, validating customer information from his card as well
as for the re-printing of tickets.
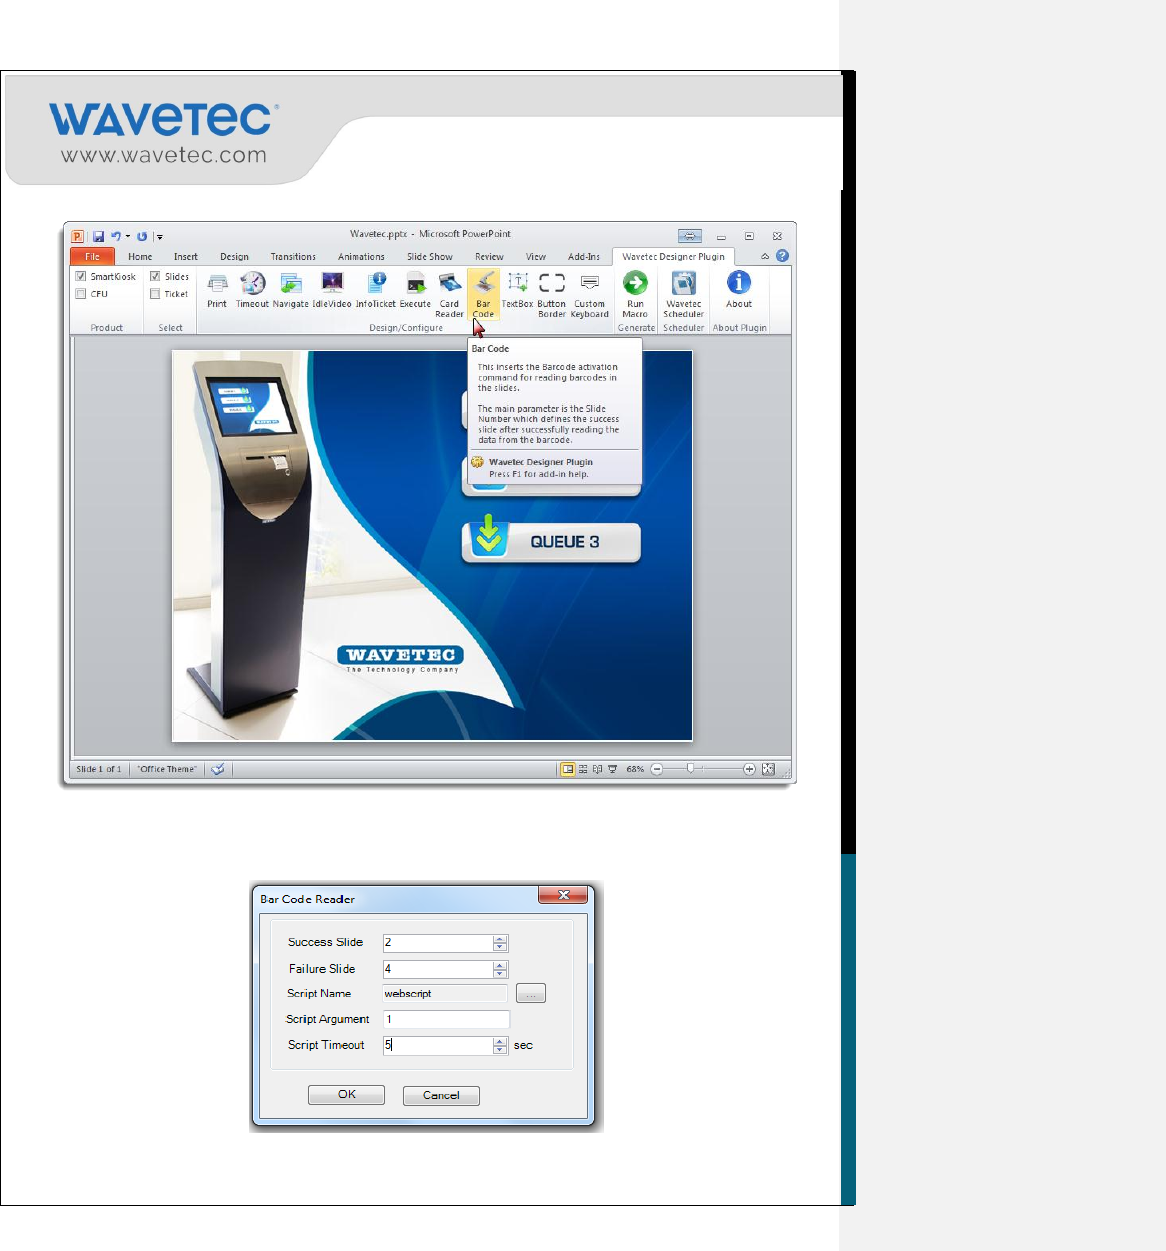
38
1. To apply Bar Code Action on screen, select Bar Code from the Design/Configure ribbon.
2. The Barcode Reader configuration window will open.
39
Success Slide:
On acceptance of the Barcode Smart KIOSK will navigate the user to
Success slide.
Failure Slide:
On Rejection of Barcode Smart KIOSK will display a slide with an error
message.
Script Name:
Browse the Custom Script, in which any custom functions like fetching
name from web service will executed.
Script Argument
Enter the number to be used as an argument for the calling script
Script Timeout:
After how long script will stop executing.
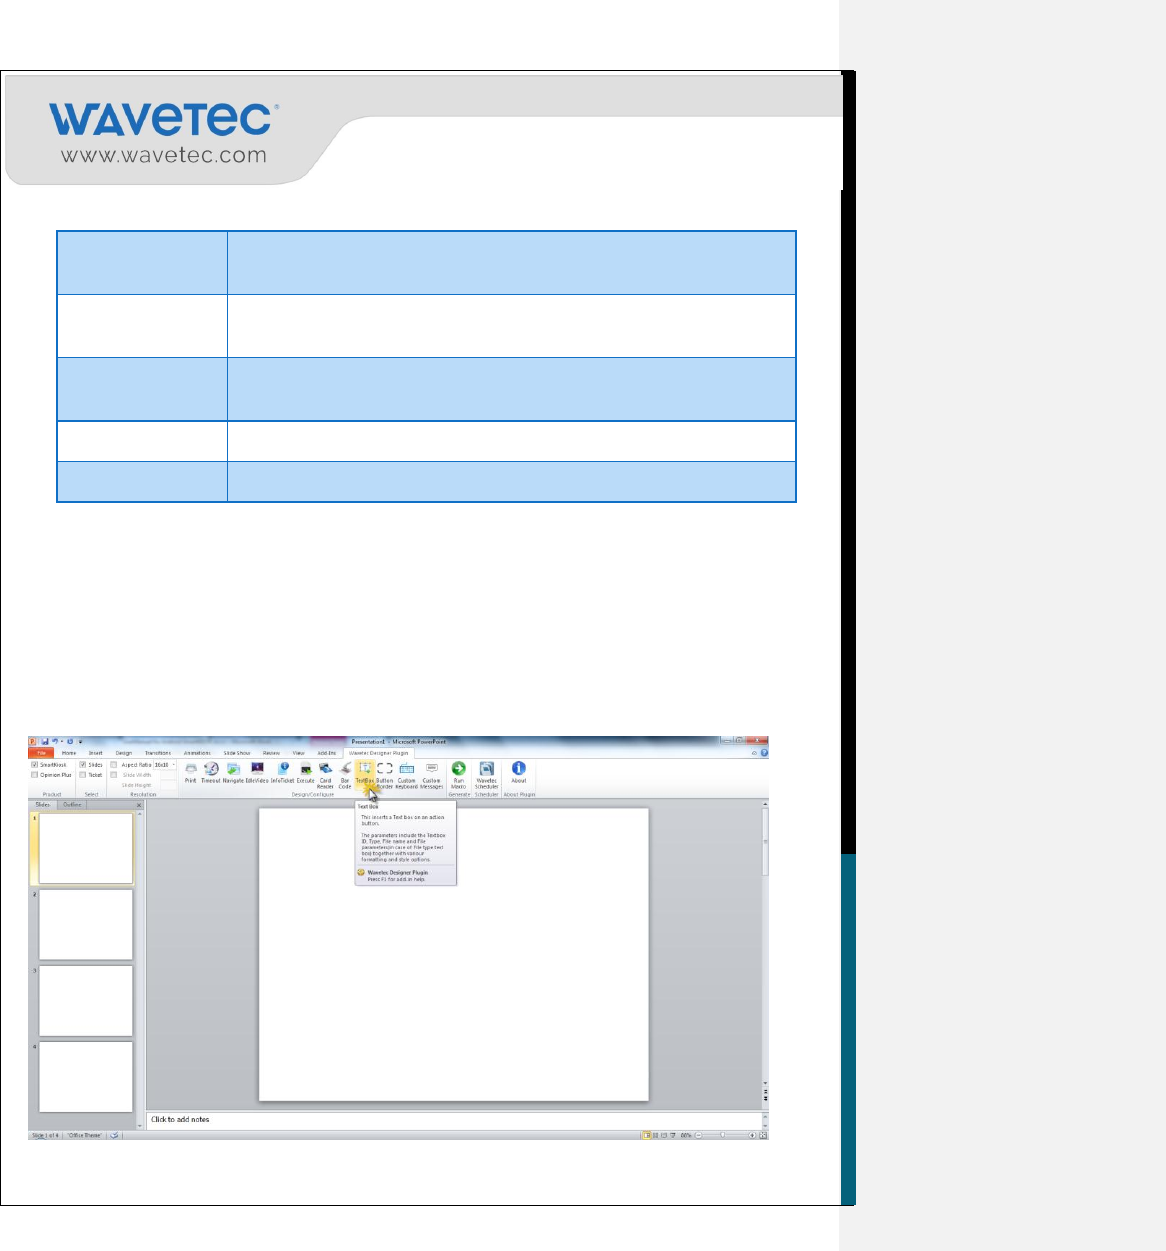
2.8.10 ADDING THE TEXT BOX
Use this Action to insert Text box on the slides. Text box is generally an area where customer is required
to insert information in the Android SmartKIOSK; like in Telecommunication industry a walk-in
customer may put his cellphone number in Android Smart KIOSK to avail priority services.
1. Select the Text Box action from the Design/Configure ribbon.
40
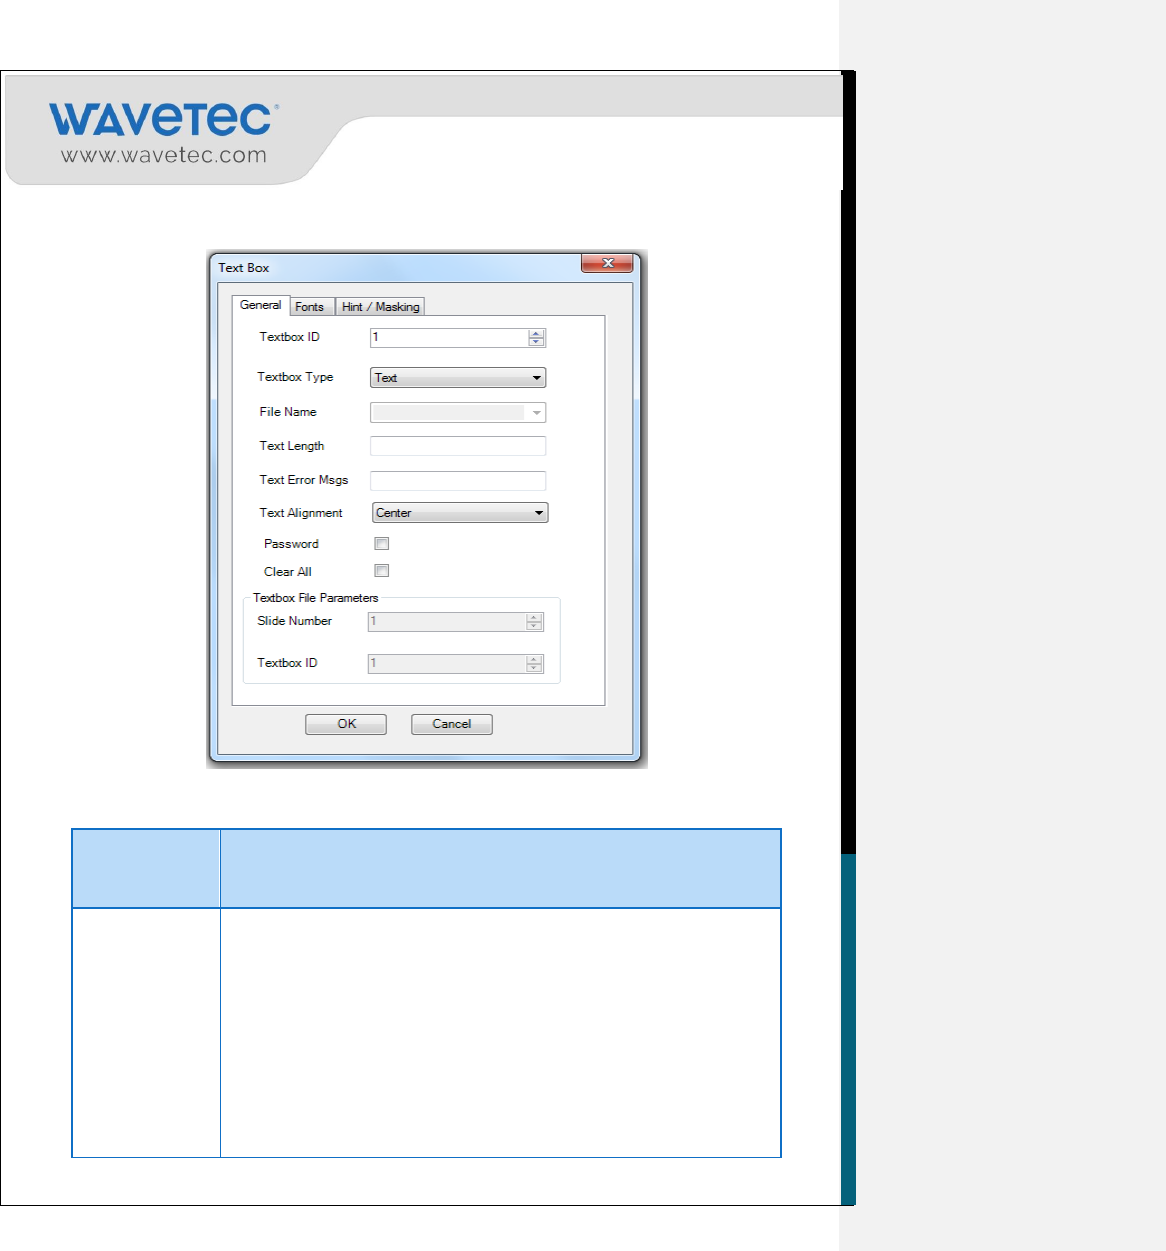
2. The Text Box properties window will open; over here we set Textbox property type and its font‟s
selection.
Textbox ID:
Text Box ID represents number of text box on slide. Like if you have
two and selected second text box its ID will be 2.
Textbox Type:
Define the text box property. It has four selections.
1. Text is use to insert text in text box. When the user selects this
Textbox on the screen a full Text Keyboard will launch on the
screen.
2. Numeric will be used when only numeric values are to be
inserted in the Text Box; this will launch only the numeric
keyboard.
3. Phone Select phone where customer is required to insert his
phone number on the screen, this will launch a dial pad
keyboard.
41
4. File is selected if user data is to be read from some file, File
name must be provided in the Filename box.
5. Custom Keyboard is use to display the text which is entered
by using user designed keyboard on presentation
slides.(Customized keyboard can be designed by Custom
keyboard Feature available in plugin)
File Name:
Provide Name of file from which text box read the data and displays it.
Text Length:
Provide the maximum length of the text which can be inserted.
Text Error
Msgs:
Type the error message that the user wants to display when the
customer leave the textbox empty or provide invalid information.
Text Alignment
Text alignment feature provides an option to align the data inserted in
the test box. i.e: Left,Right and Center
Password
Provides an option to insert data in a secure form in the form of steric
(*)
Clear All
It provides an option to erase all the data inserted in the text box when
text box is clicked.
Slide Number:
Is a Text box file parameter when you need to insert text from some
other slide just provides its slide number.
Textbox ID:
Is a Text box file parameter when you need to insert text from some
other slide just provides its Textbox ID.
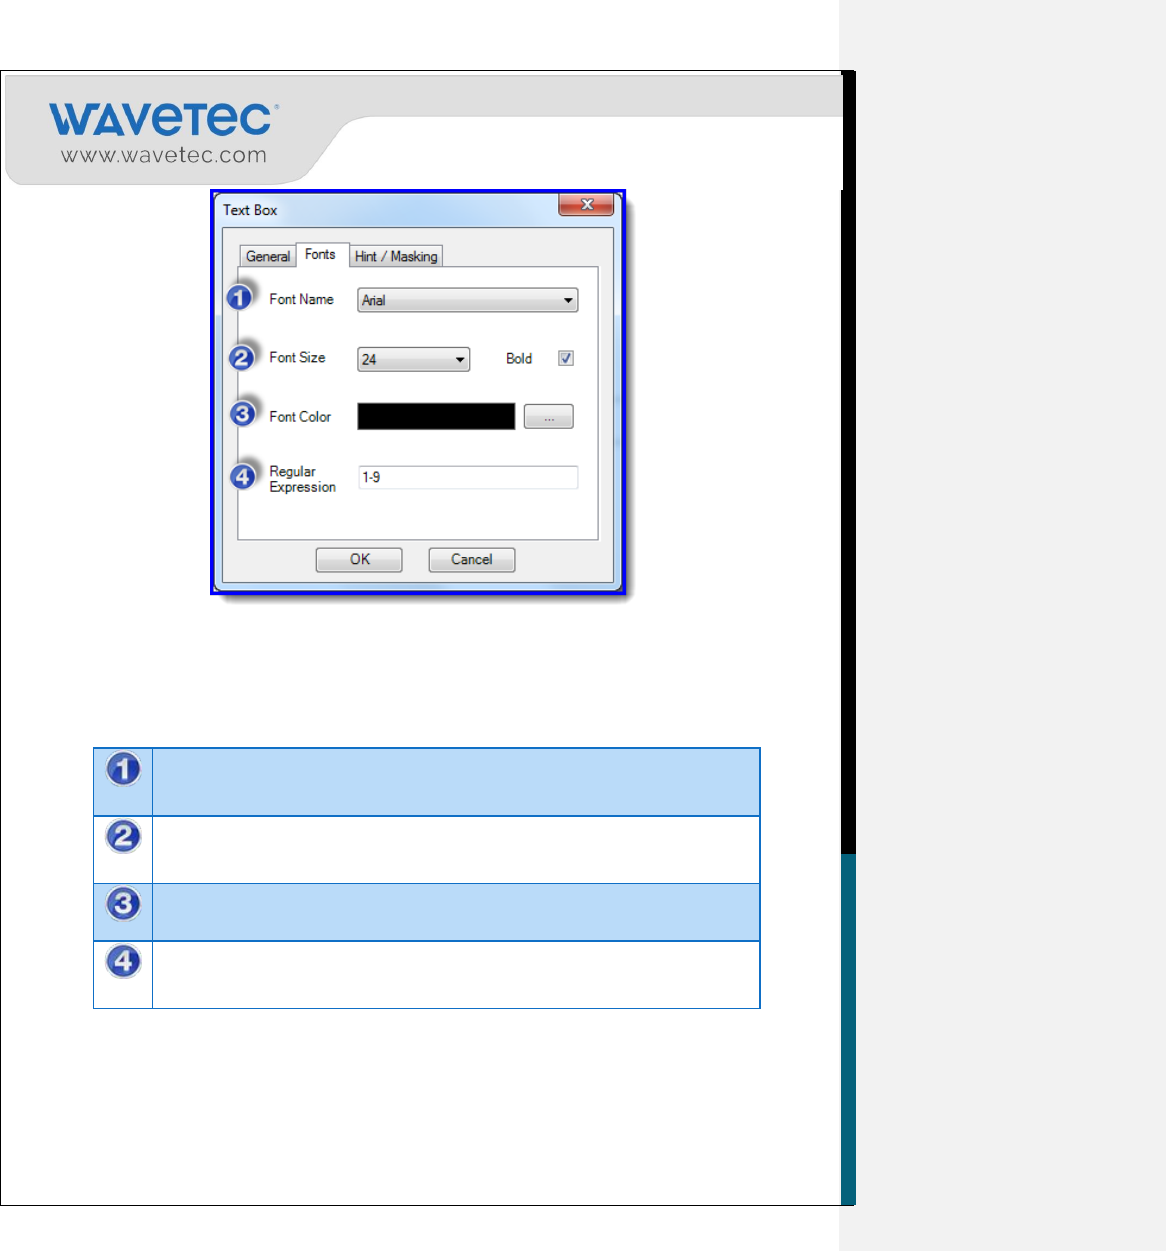
3. The Font tab shows the text box formatting font from where user can change the Font style, font size
and color of the text.
42
Font Name: Provides variety of Fonts style which can be selected from the
drop down.
Font Size: Font size is alter with the range from 1- 72. Also, text can be bold
by bold check box.
Font Color: Adding variety of font color in texts.
Regular Expressions: is a Text box file parameter which is required when
you need to restrict the user to enter the data in prescribed limits.
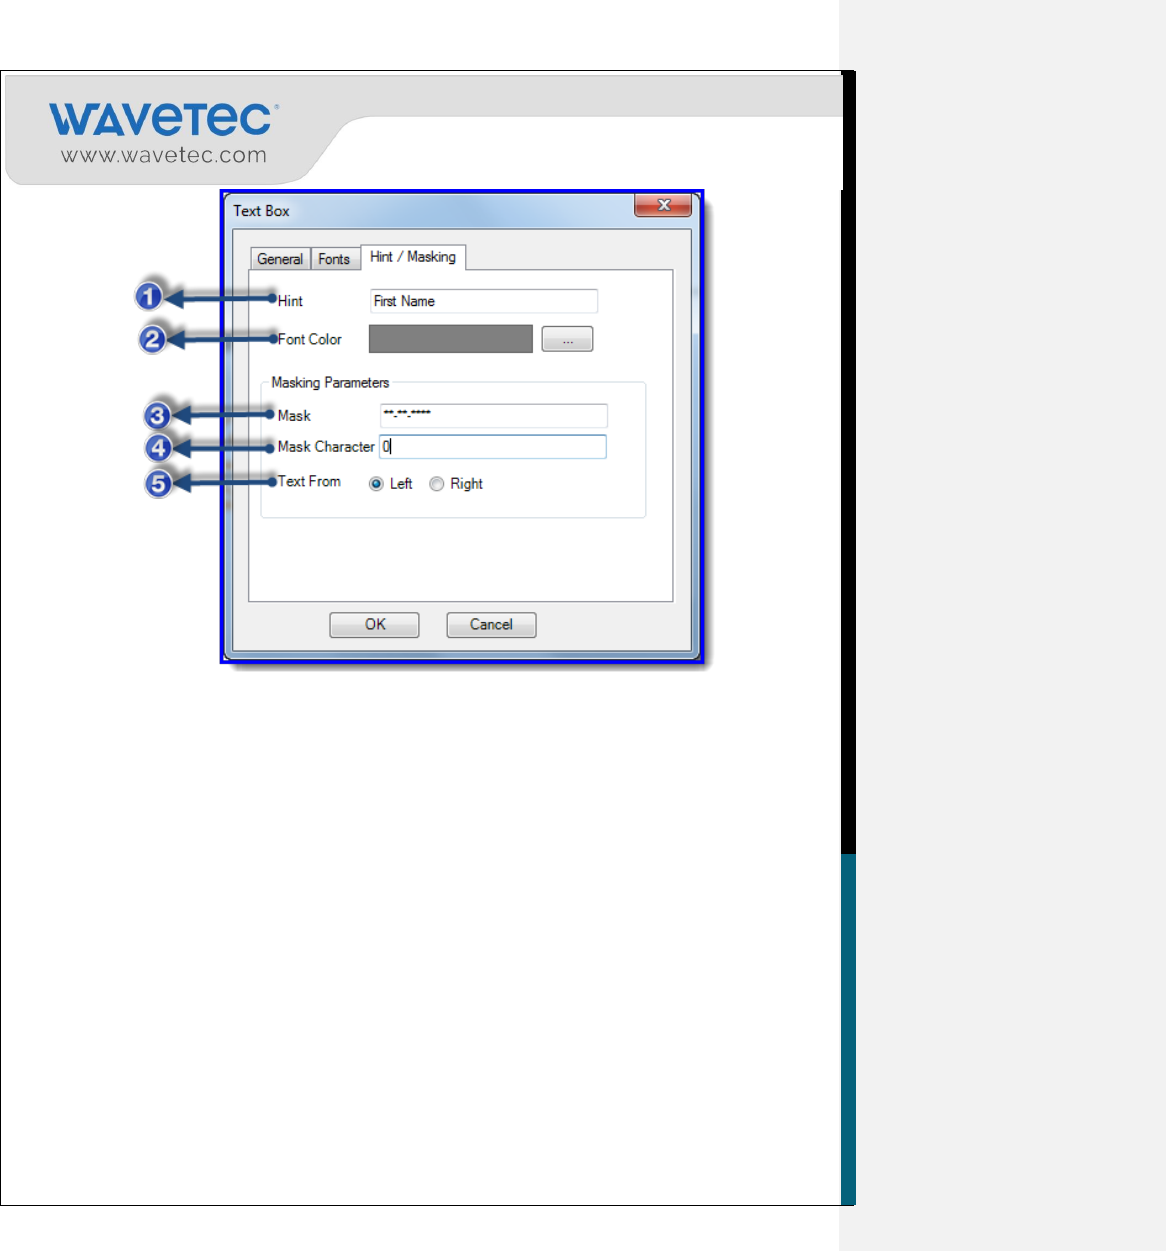
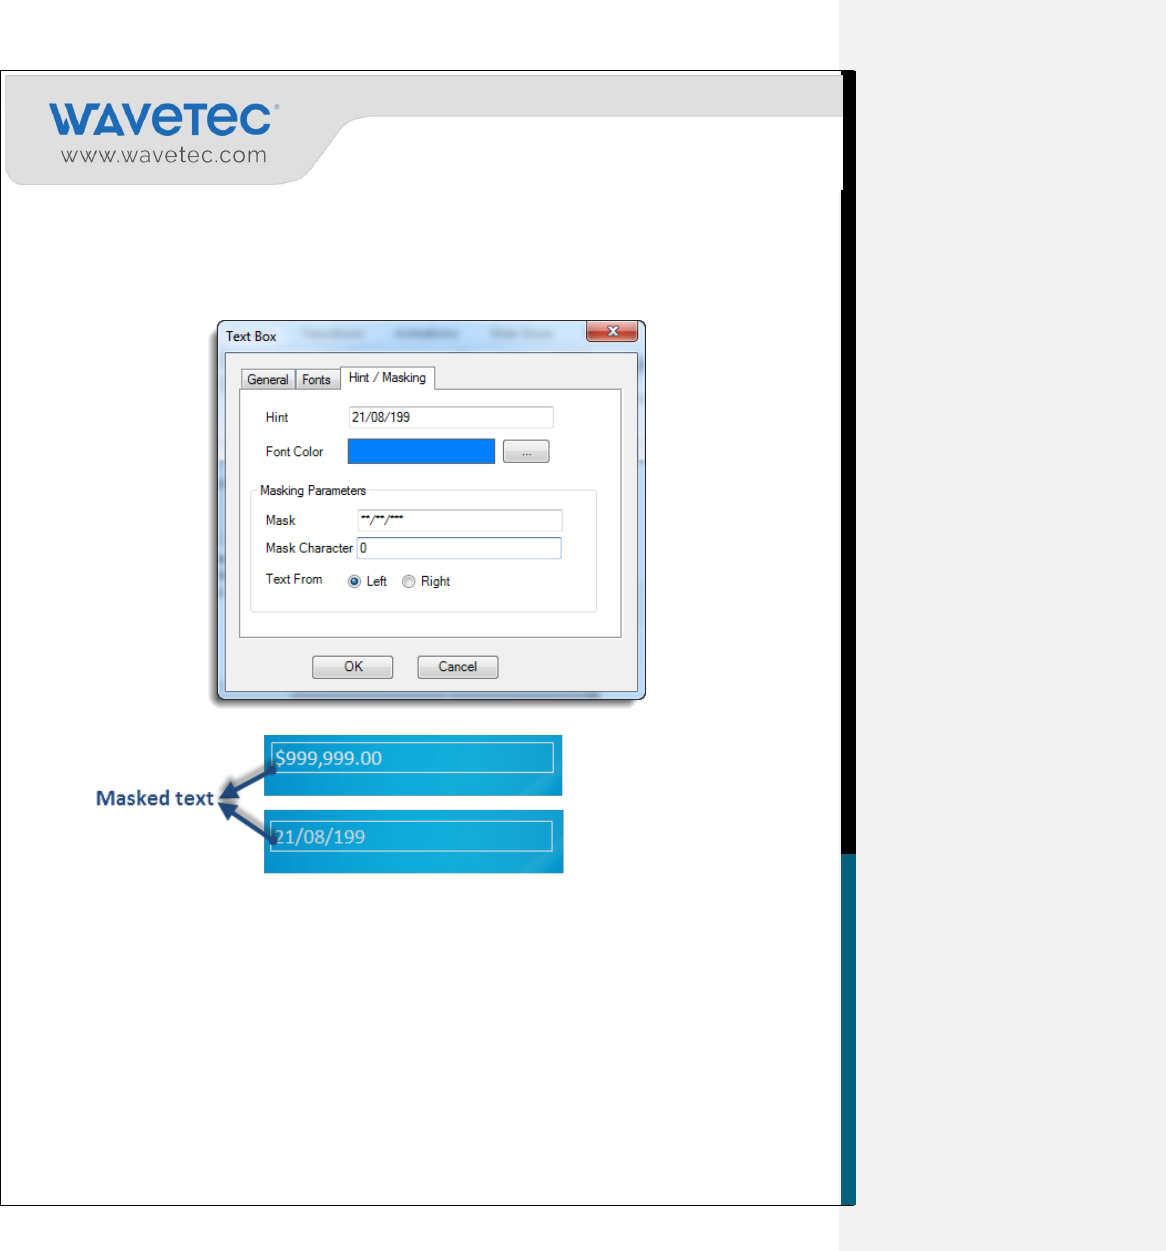
4. The Hint/Masking tab provides the significant features of adding Hint and Masking in text boxes.
43
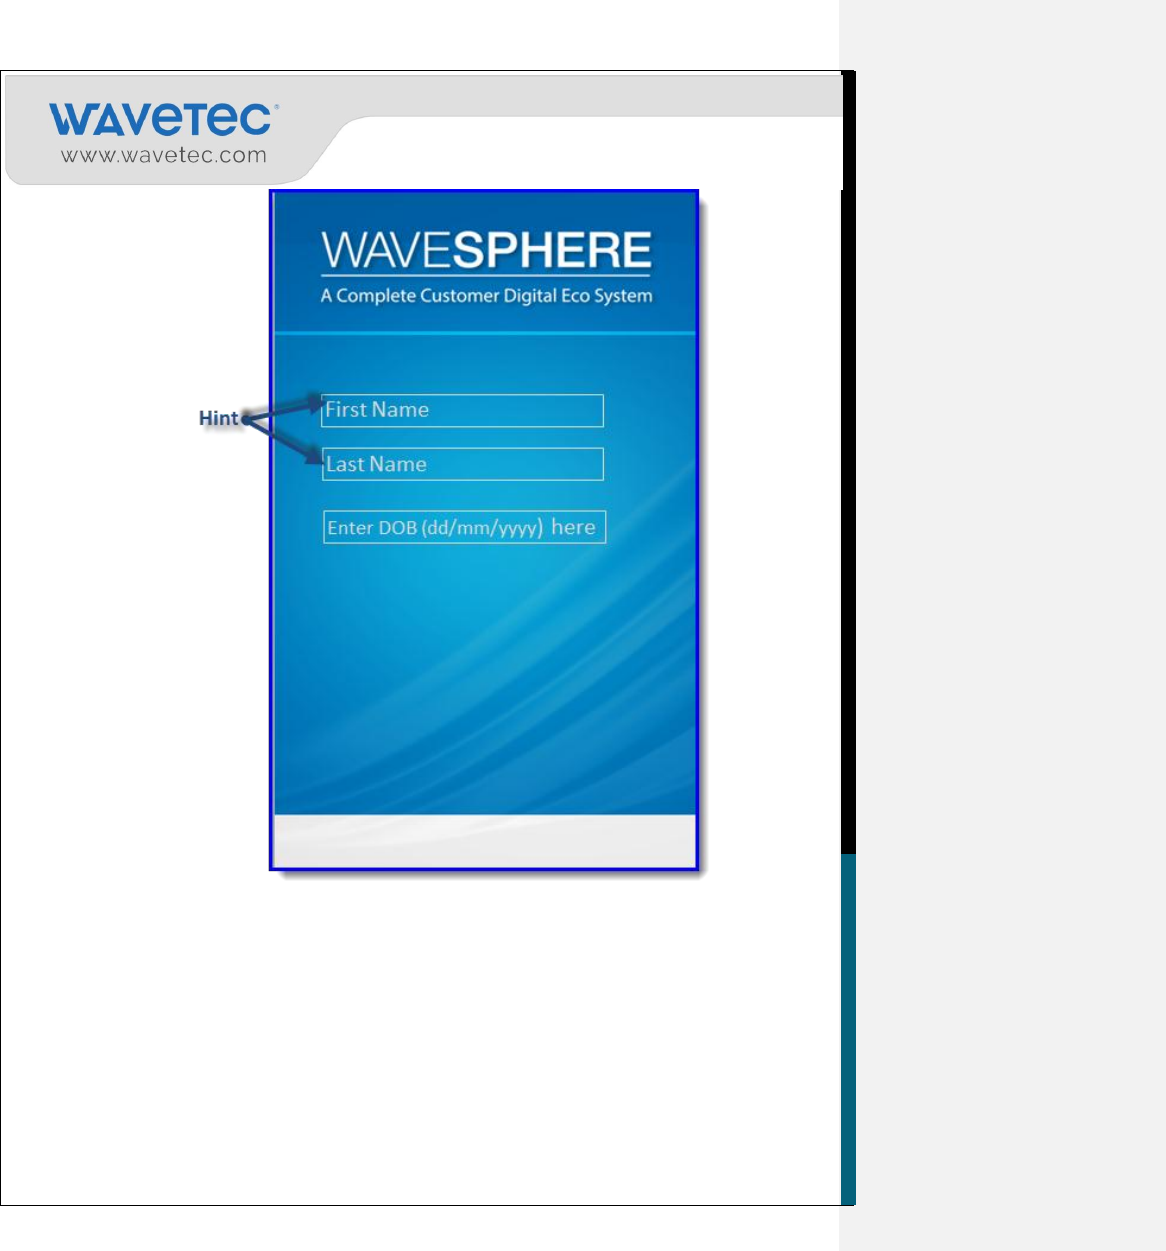
Hint: Hint appears on the text box which guides the user about what to enter and disappears
once the text box is selected. This can be further expound by figure below
44
Text masking: Text masking is a technique which helps the user to organize the entered text by
using the other numeric characters along with the text. Masking parameters can be used to take
some pre-defined format information.
For instance, you need to add text box for entering the date of birth, masking feature will be
recommend to enter information. The date of birth will be added in a masked format like the
figure below.
45
Mask Character: The Mask Character represent a character which will display once the user
start tying, for instance, if you want to display 0 once the user start Inserting Date add Mask
Character 0.
Text From: The user can adjust the position of the insertion of the text. If Left is selected, the text will be inserted
from left to right.
Following is the detail explanation
Text from right.
Text from left.
On selection of text from right, the text input will be entered from right.

46
On selection of text from left, the text input will be entered from left.
2.8.11 INSERTING BORDERS
This used to add a border to the button when clicked, so that user may know that the button has been
pressed.
1. Select the Button Border action from the Design/Configure ribbon.
2. In button border window, select desired Color and thickness of Touch effect.
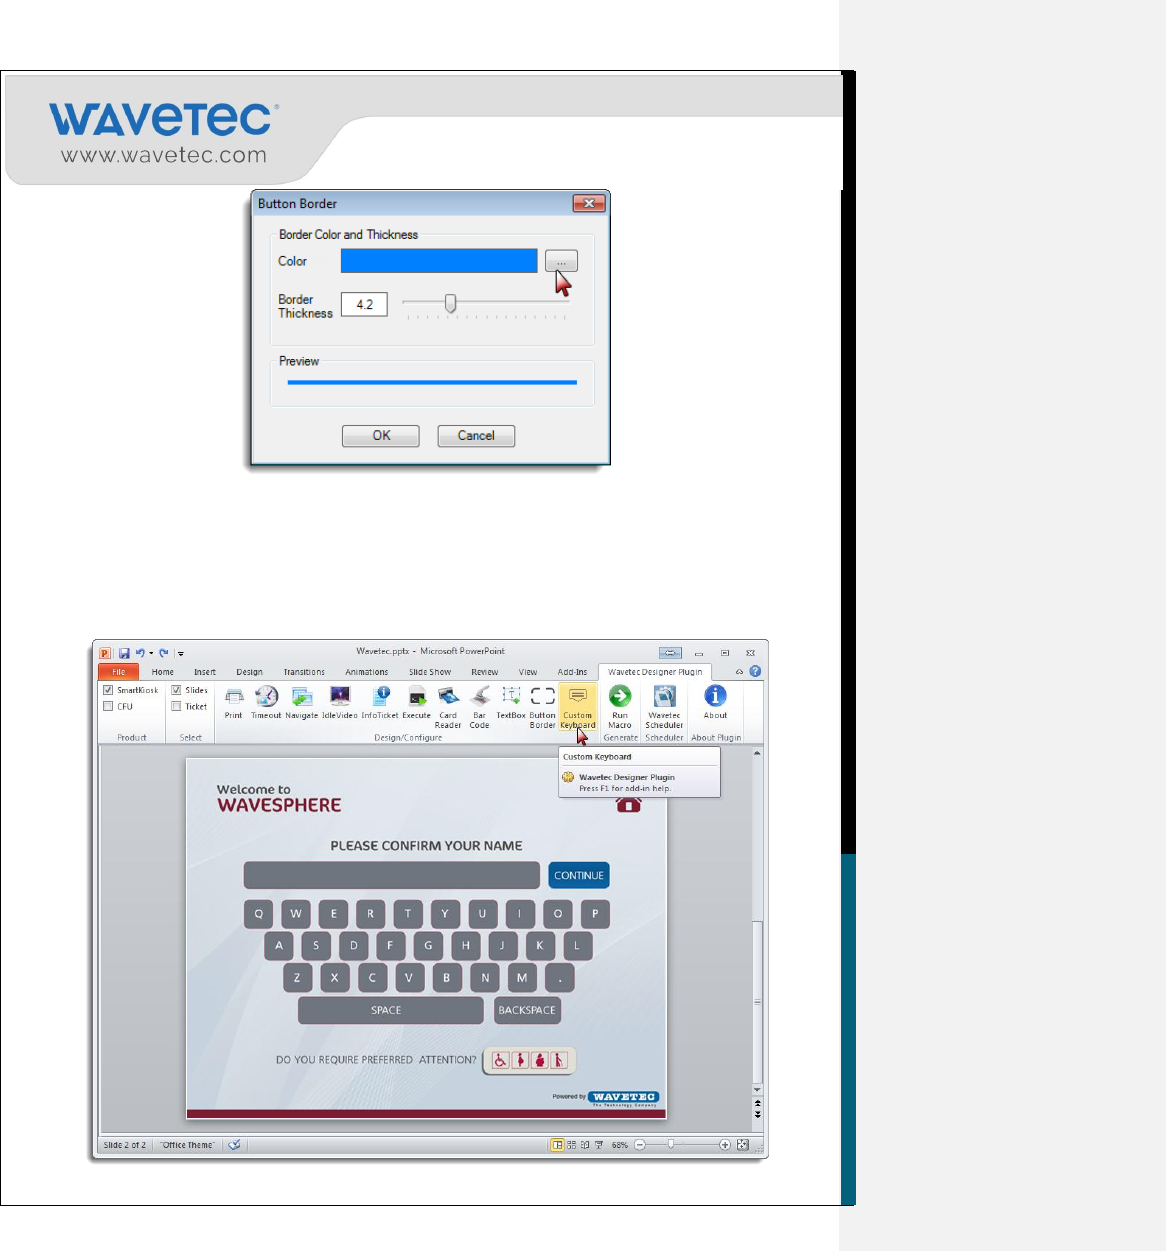
47
2.8.12 DESIGNING THE CUSTOM KEYBOARD
The Custom Keyboard is an option to add a custom made keyboard on Android SmartKIOSK slides
instead of using the default keyboard designs.
1. Select the Custom Keyboard action from the Design/Configure ribbon.
2. Insert background Image with keyboard design on the Slide.
48
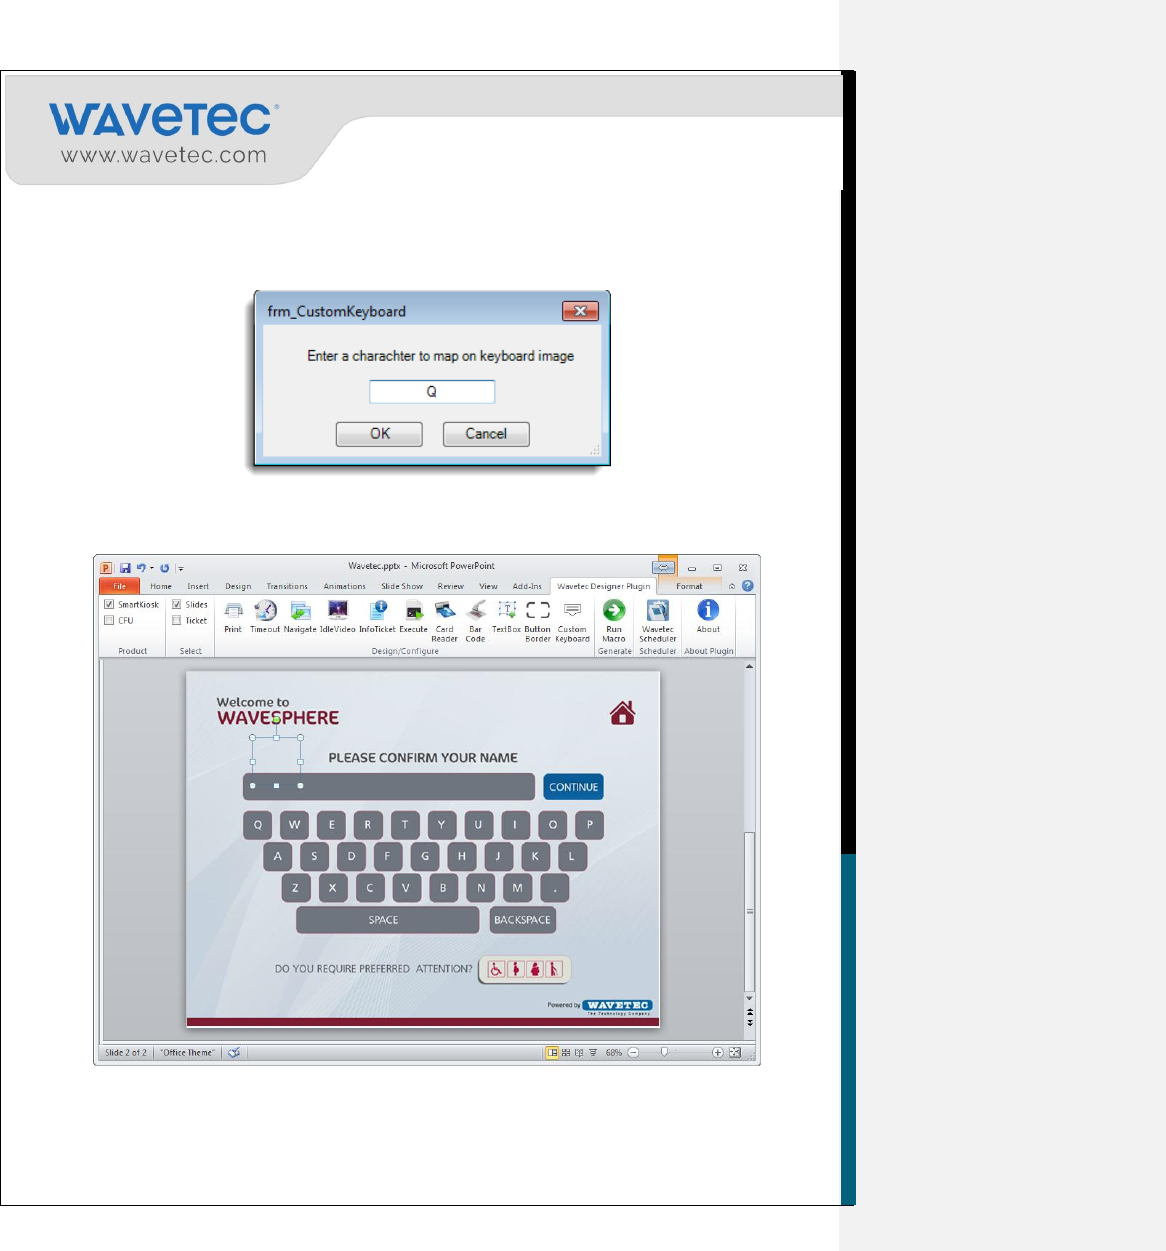
3. Enter the character you want to show when user touch they button on keyboard suppose configuring
Q on keyboard. Enter Q and select OK.
4. This will add an action button on screen, now reposition and resize this button according your
button‟s dimensions.
49
5. Same is the procedure for adding backspace and space just press this button on custom keyboard
configuration window.
In the same manner, continue adding all the alphabets for creating a custom defined keyboard on the
screen.
2.8.13 CUSTOM MESSAGES
The Custom Messages is an option to add any text or note on Android SmartKIOSK slides using
wavetec Designer Plugin.
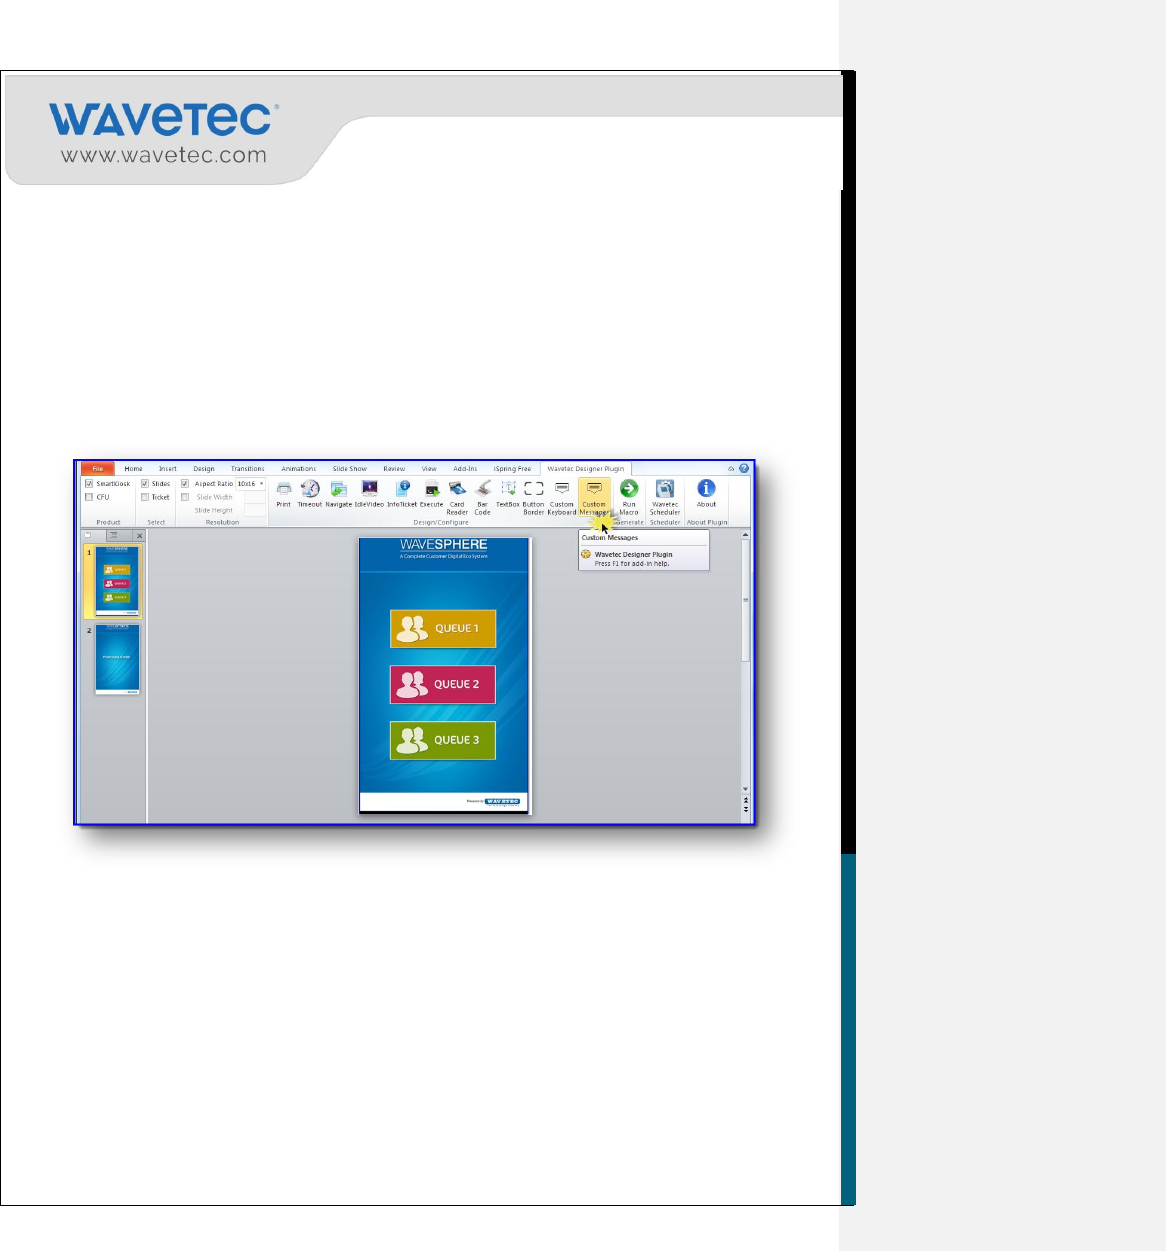
1. Select the Custom Messages action from the Design/Configure ribbon as shown in the figure
below:
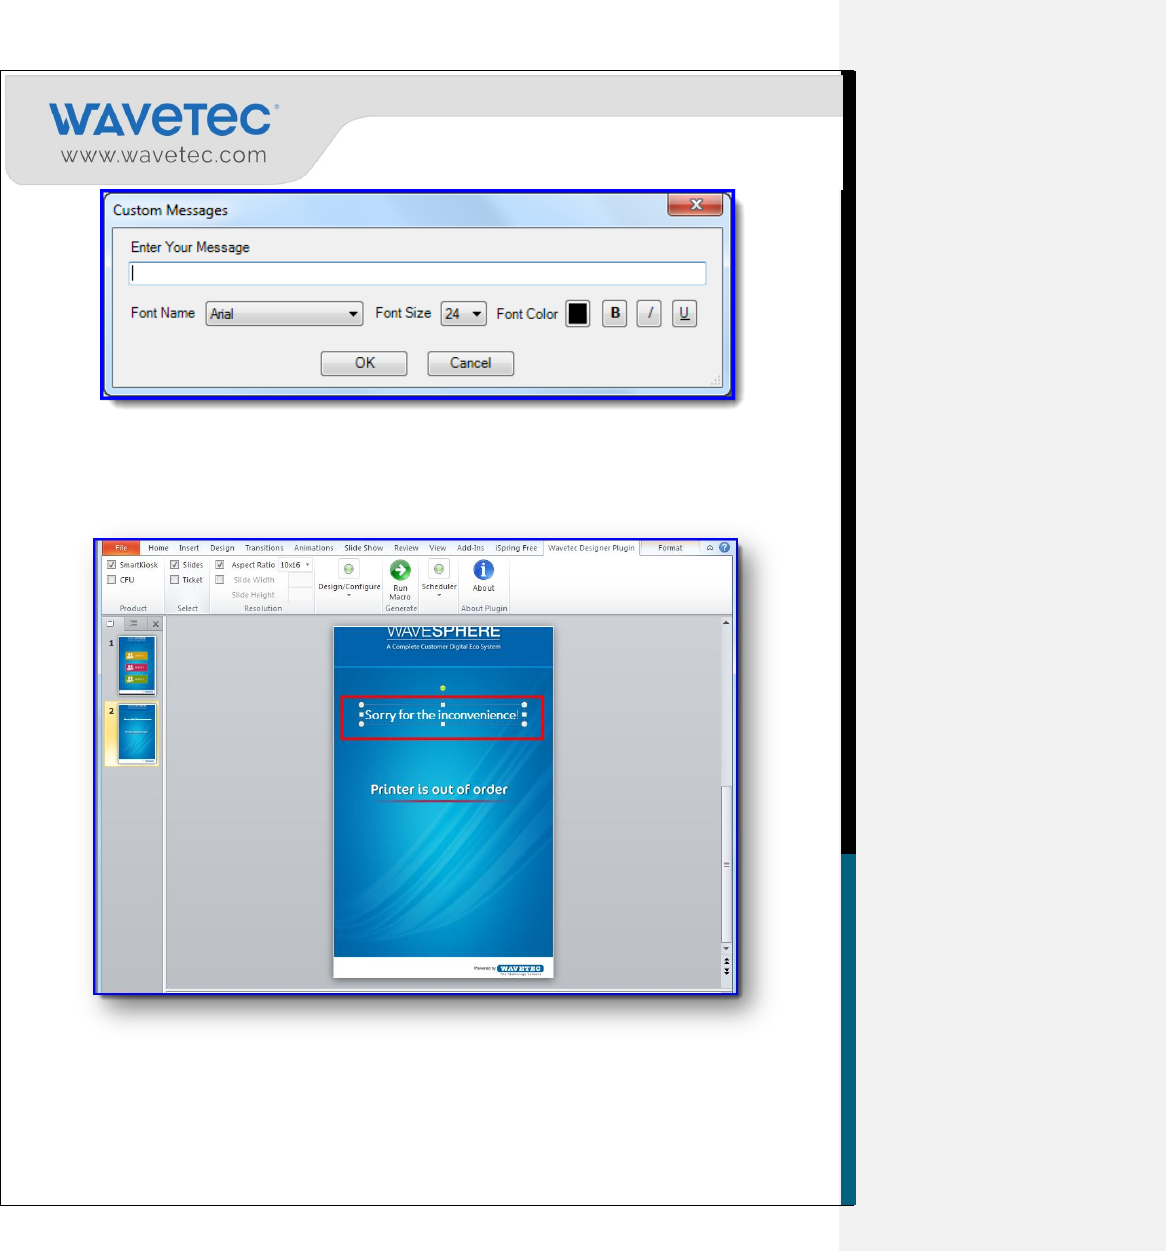
2. Enter the desired message which will be displayed on the screen. Also format the message
according to the requirement and click ‘OK’.
50
3. This will add a text box on slides, now reposition and resize the text box according to the
requirement.
51
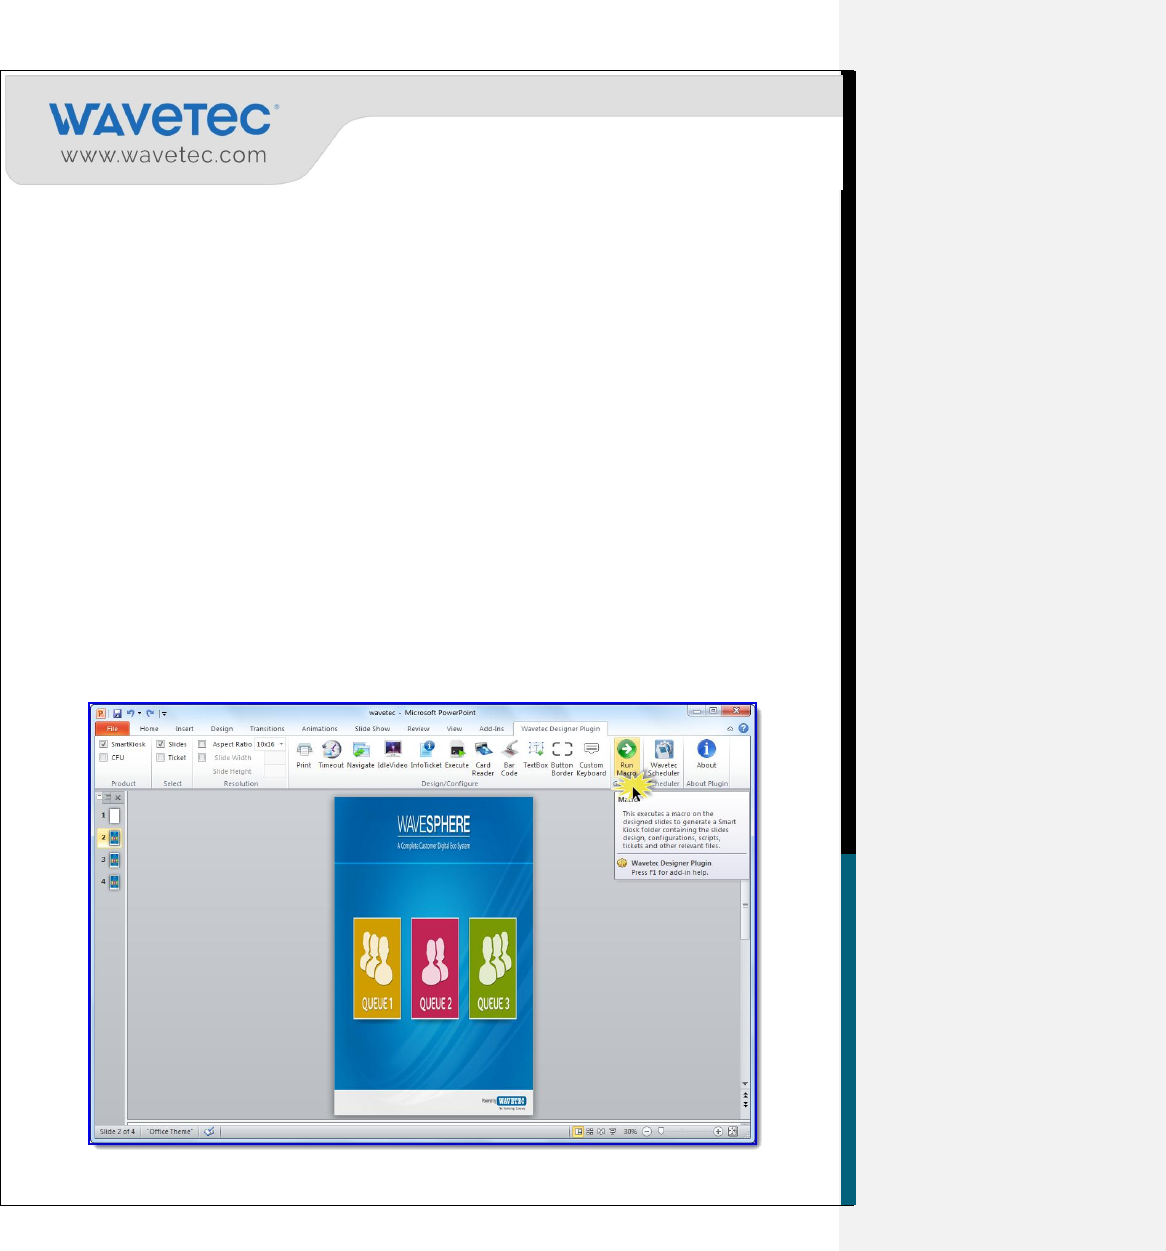
2.9 Generating output files for Slides and Tickets by running
Macros
Once a user have created the presentation and applied action settings and also designed the custom
ticket, it is time to generate the output files from the presentation by running the pre-defined Macros.
Output files are then used by the Android SmartKIOSK application.
The Macro is already programmed into the presentation. This section shall explain on how to run the
Macro to generate the output files. Follow the steps below to run the Macro.
1. Go to the Generate ribbon and click Run Macros.

52
2. Select destination folder where the files are to be saved and click OK.
3. When the Macro will finish running, open the folder in which you have saved the Smart KIOSK
presentation. The folder should be having the following three sub folders as shown in picture below.
4. Android SmartKIOSK has facility to compile all the components in these folders like Tickets,
Scripts and Idle time video. These can then be later on uploaded onto the Android SmartKIOSK by
either using the USB update feature or through the Central Update feature of the eQ Portal.
Please refer to Section 4.2 of this document on how to update slides in the TDU Lite/
SmartKIOSK.
53
3. SECTION II – SCHEDULING THE SLIDES
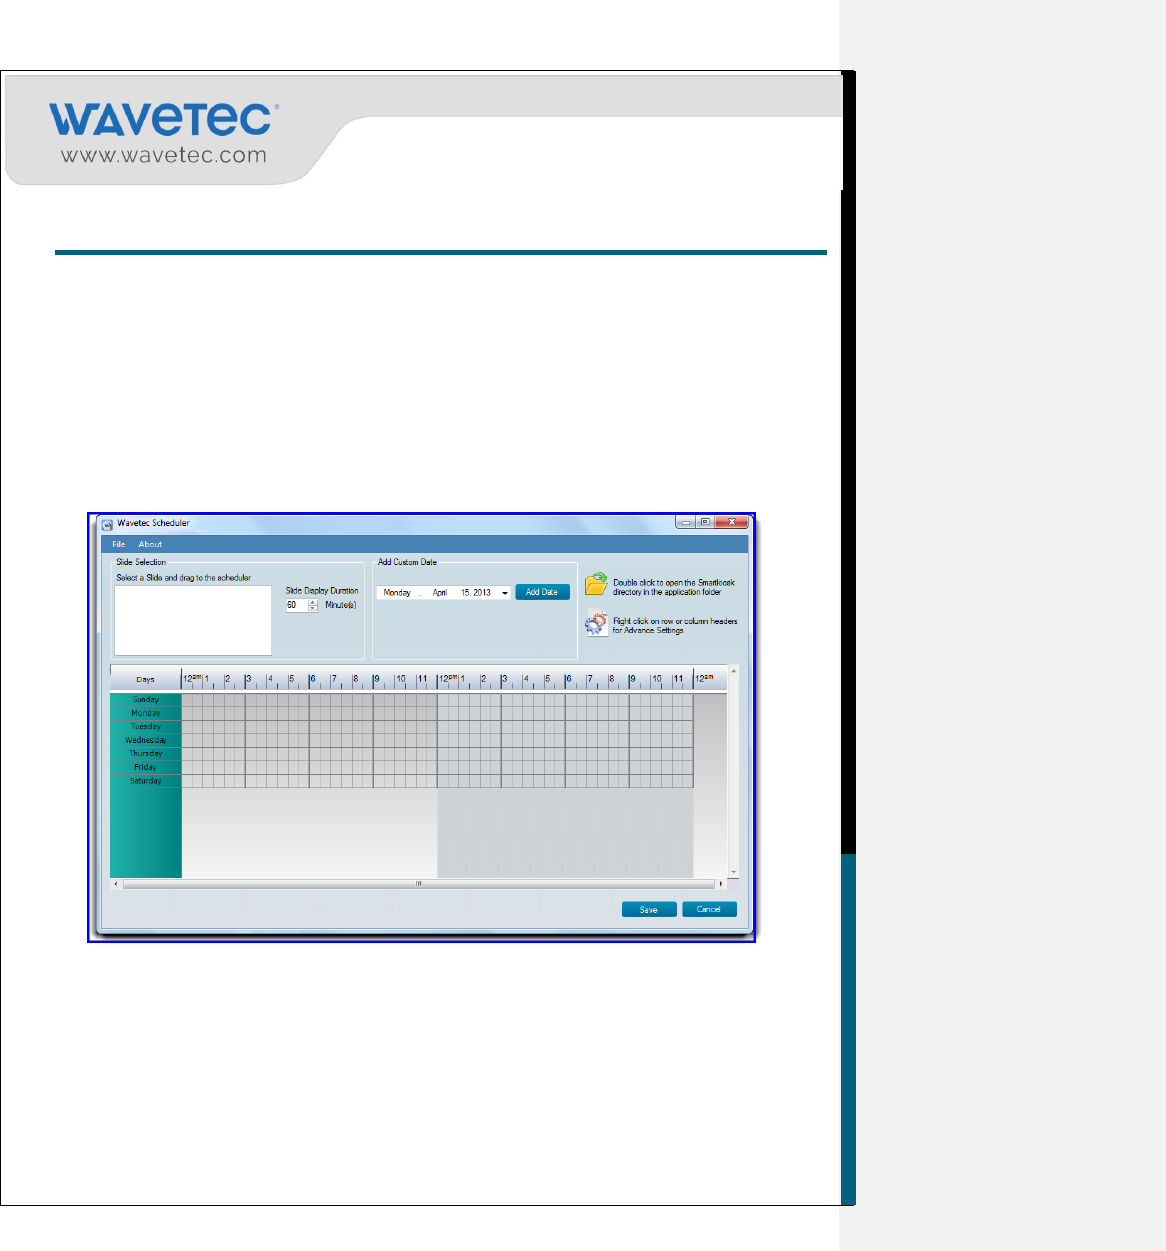
3.1 How to create a Schedule
The Schedule module provides the functionality to Create Slides Schedule. The folder which was
created as a result of generating Macros containing the Slides and Tickets is scheduled on the Wavetec
scheduler. The details of creating the folder can be catered by following the section Generating output
files for Slides and Tickets by running Macros.
1. To create schedules first open the Wavetec Scheduler from the Desktop Shortcut. This is created
while installing the MS Power Point Plugin.
2. To add the Slide folder, open File and select Add Slide.
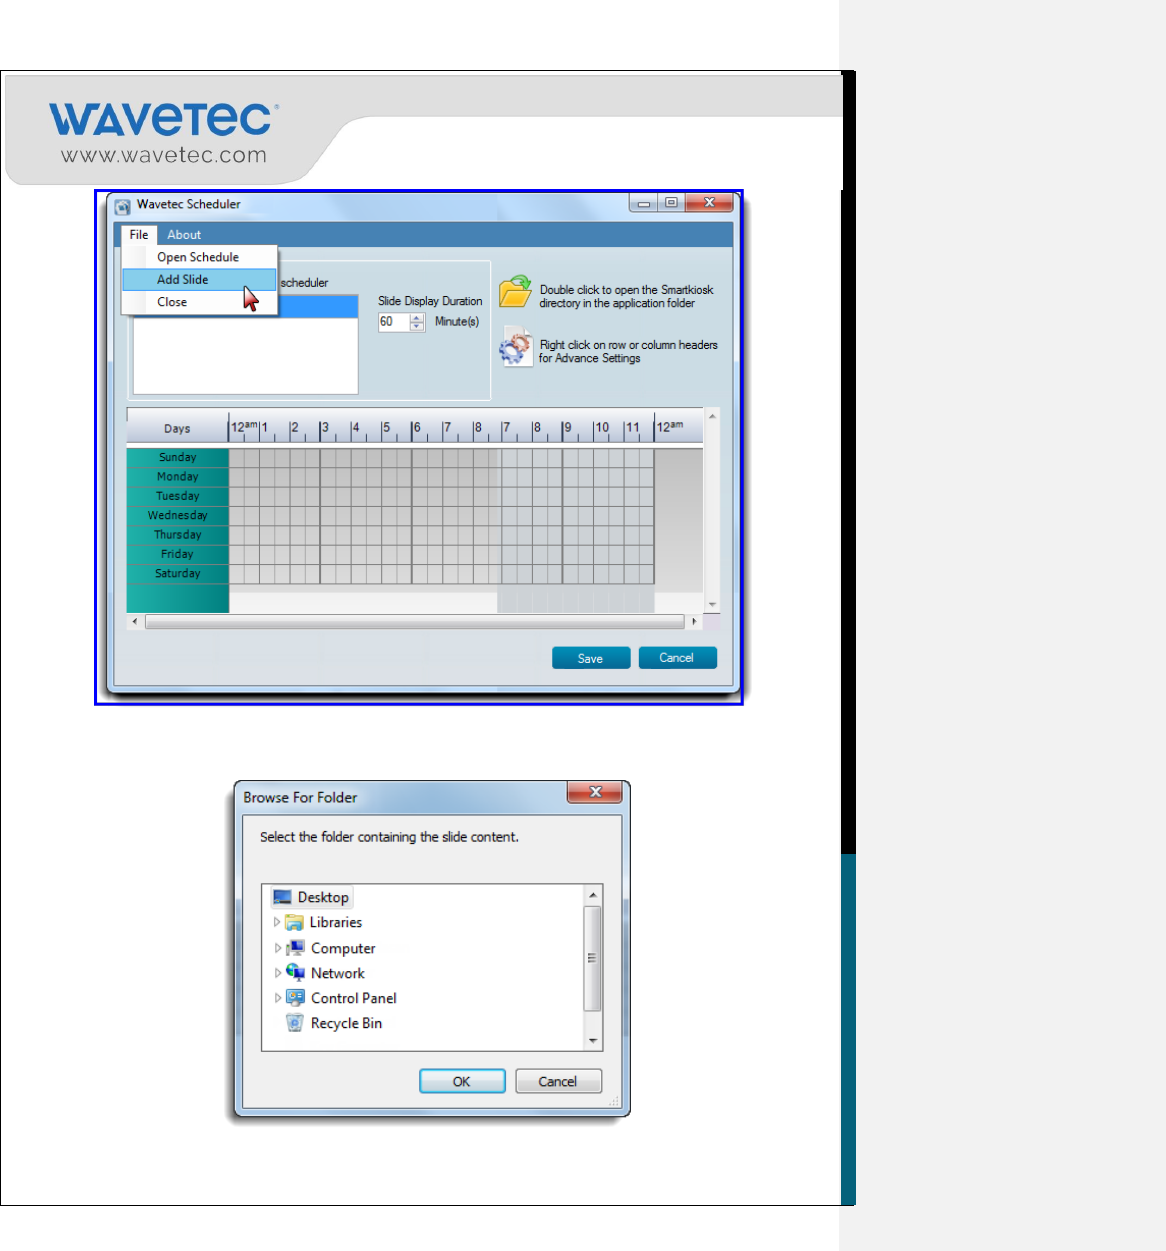
54
3. Browse the Slide folder which was created after running the Macros and select OK.
55
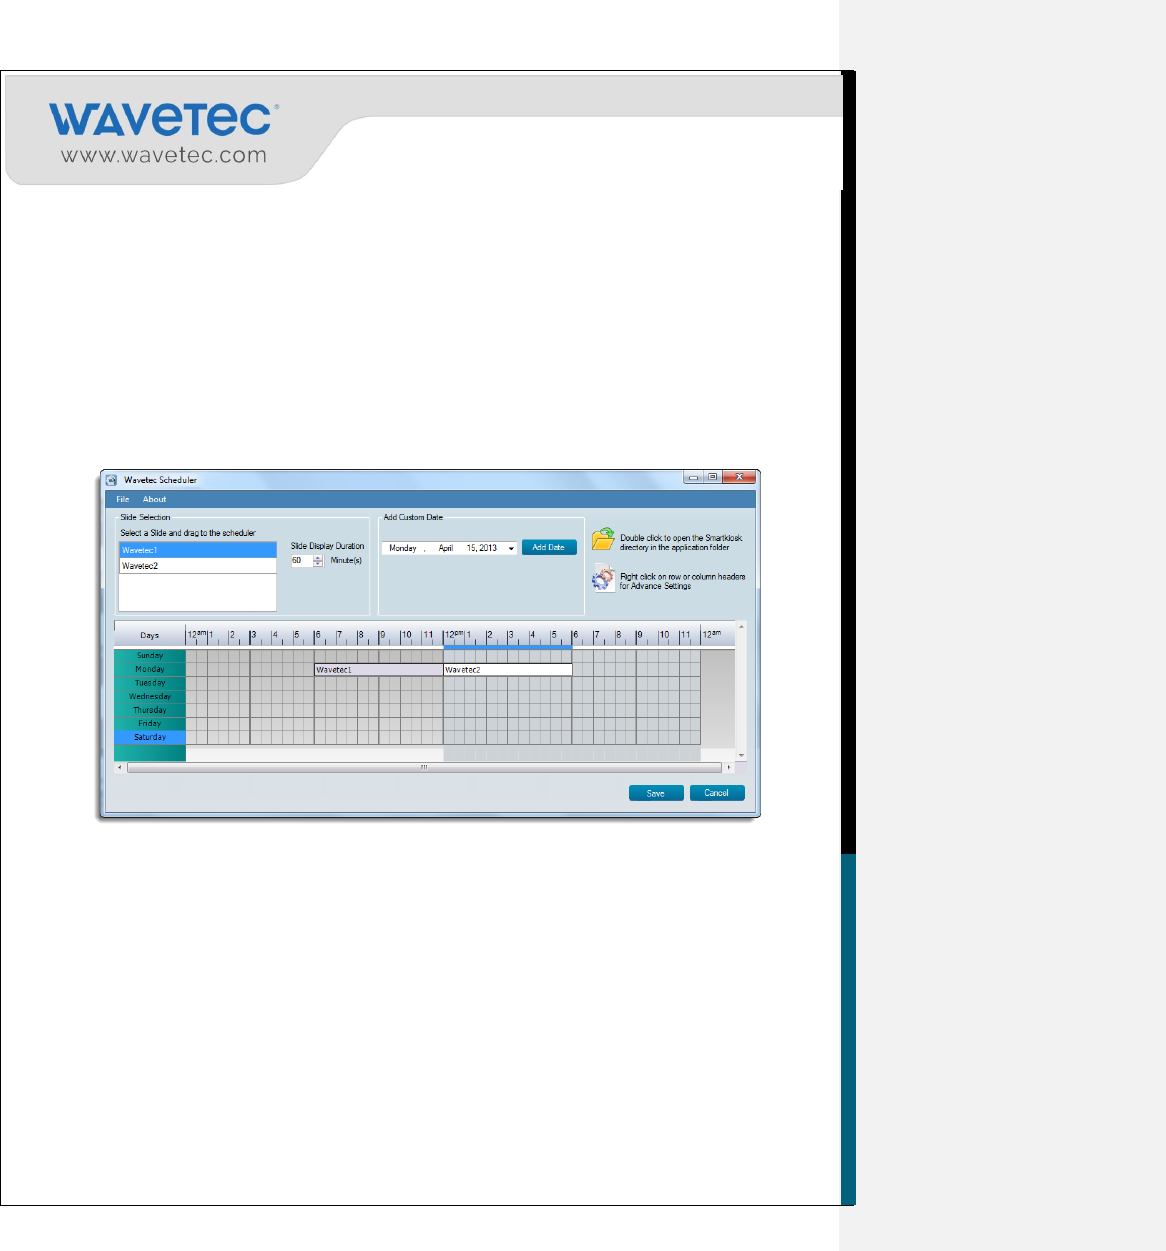
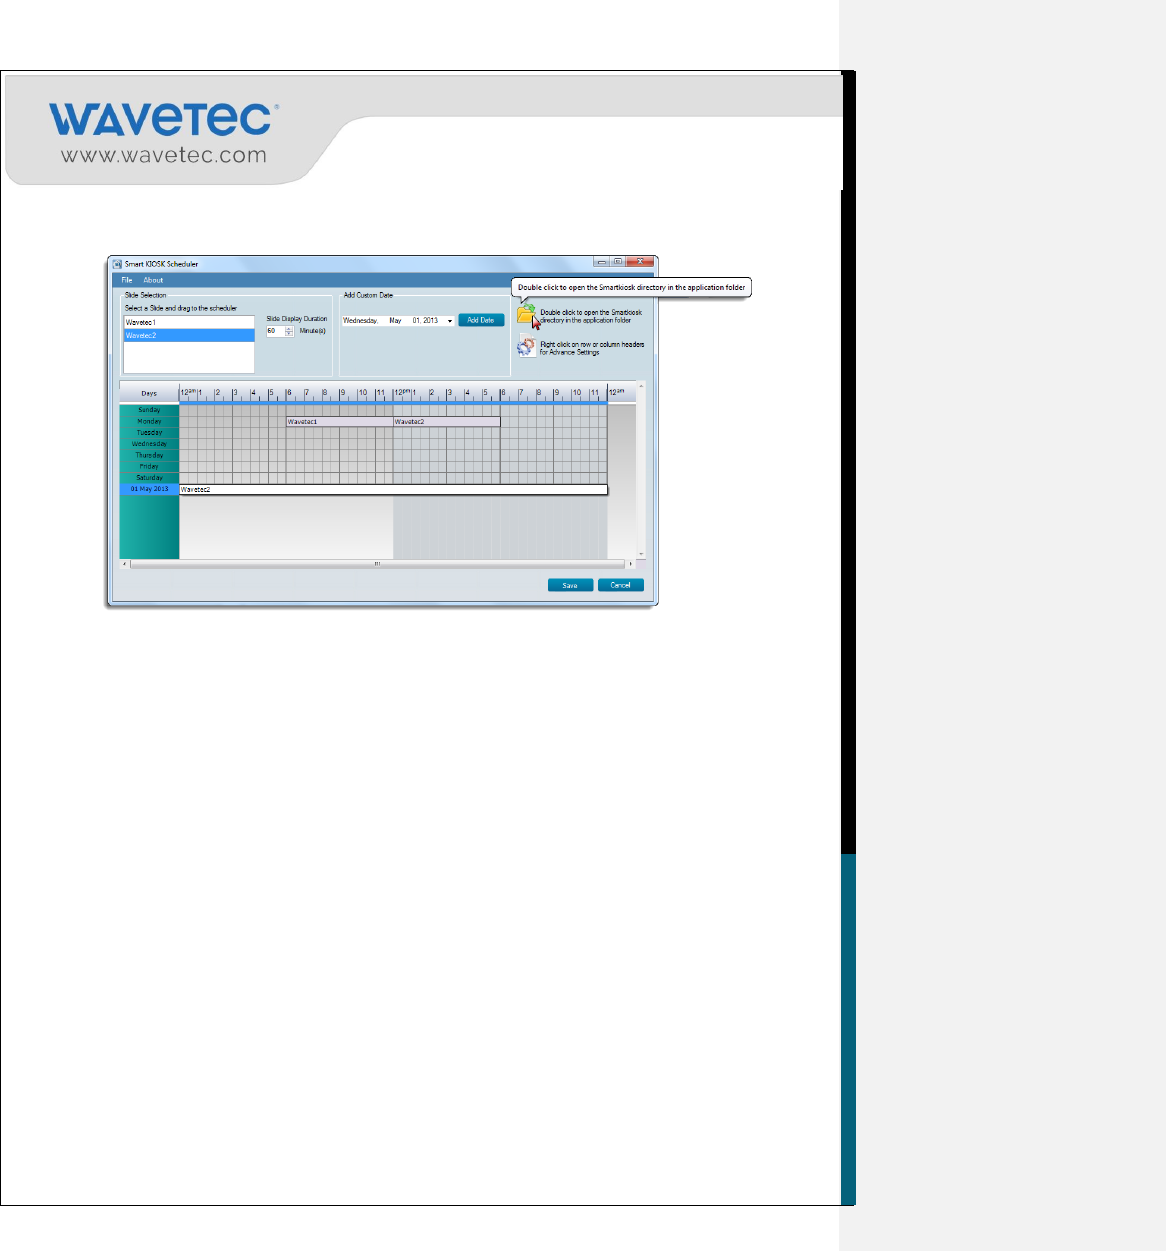
4. Now Select the folder and drag it to the scheduler box. Multiple slides can be added in schedule. All
the Slides created using the plugin are available in the selection list.
5. If the exact time duration of slides execution is known then the user can directly add it in Slide
Display Duration box. This duration is in minutes. By doing so the slide of the same time duration
is added in the scheduler.
6. The time range or duration can be readjusted by dragging the time slots.
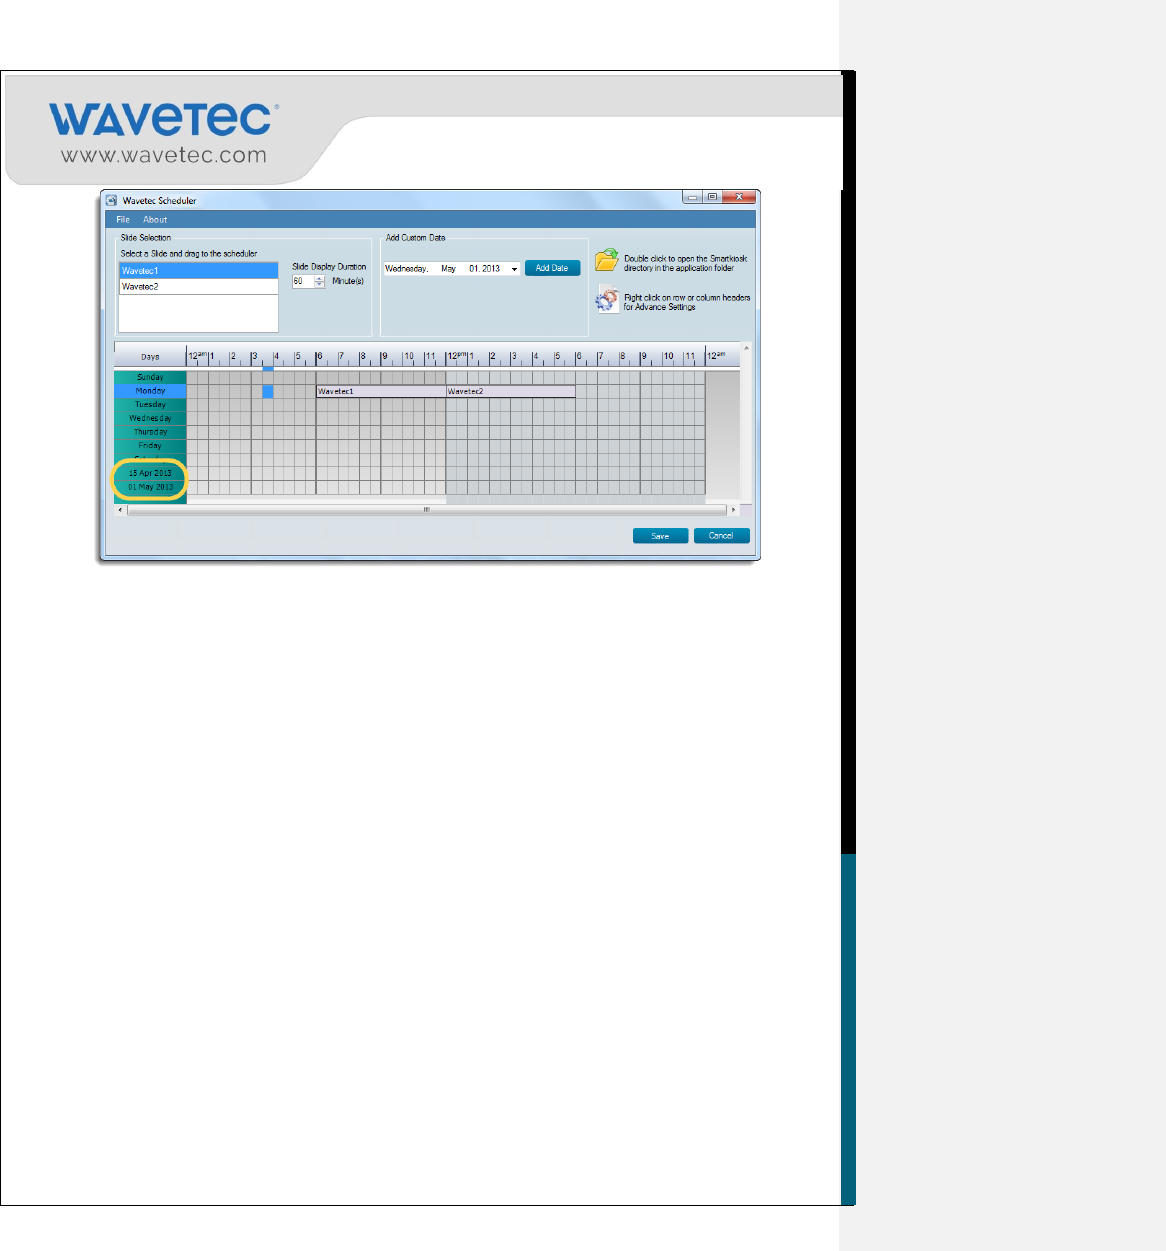
7. By default seven days of week are available in scheduler. But custom dates can also be added in the
scheduler through „Add Custom Date’ feature. Select a date from the calendar and „Add Date’.
Important Note: The precedence of custom dates is greater than week days.
56
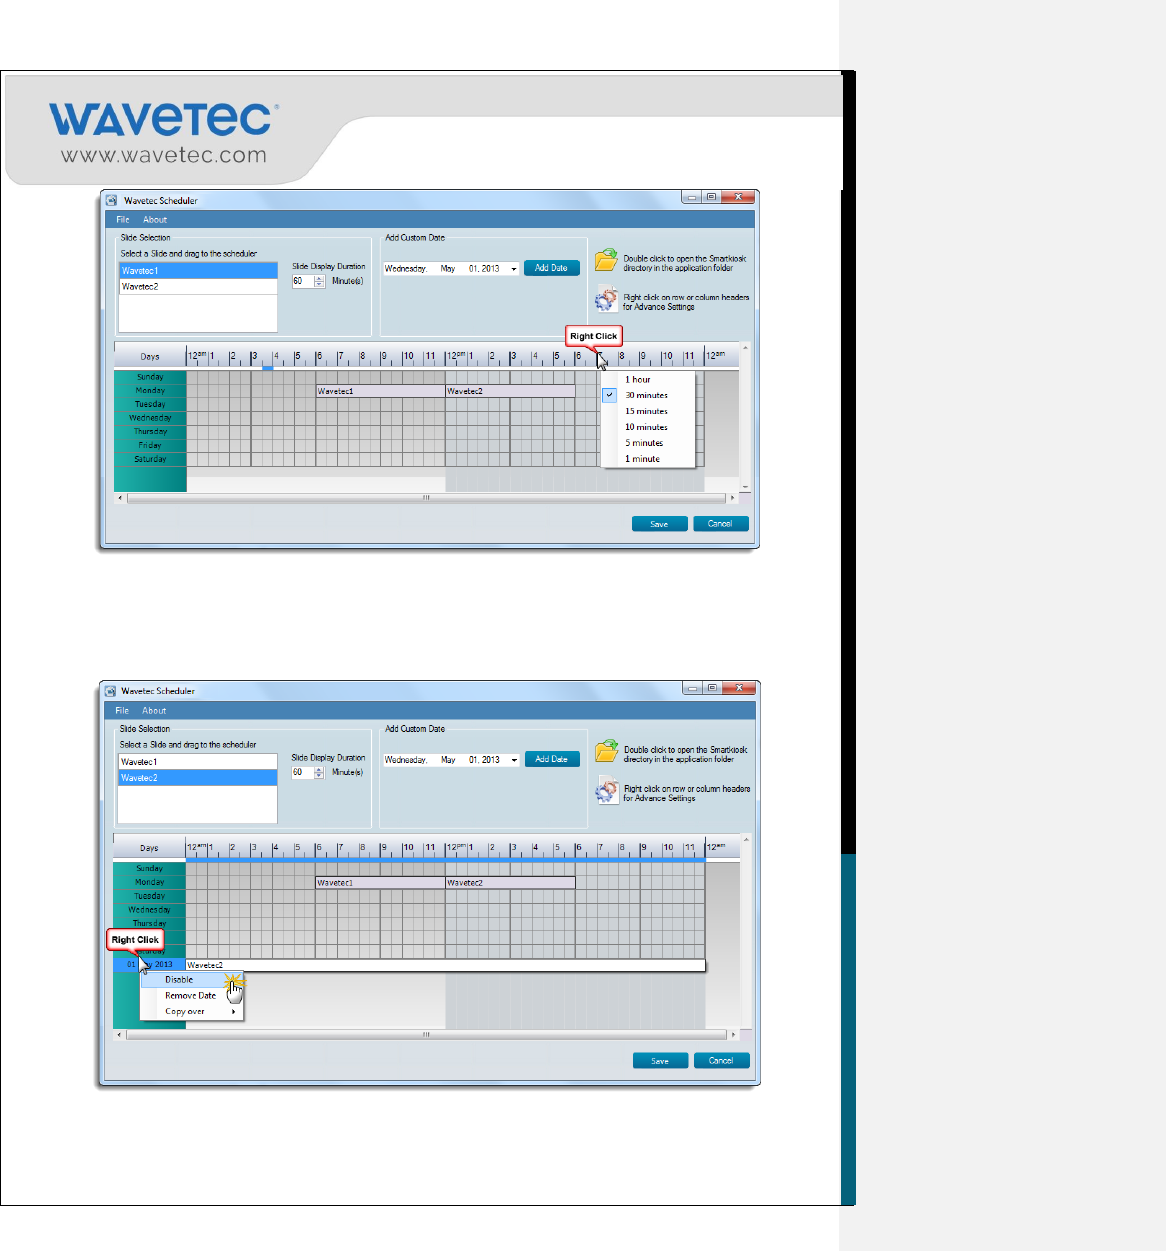
8. The time slot interval can be managed according to the requirement by using the advance time
feature. Right click on the time slots header. This will open a menu opens listing the slot intervals.
Slot interval can be the following:
i. 1 hour
ii. 30 minutes
iii. 15 minutes
iv. 10 minute
v. 5 minutes
vi. 1 minute.
Select any of the slot intervals and the time slicing will change according to the selected interval.
57
9. The Schedule of any weekday or custom date can be enabled or disabled.
10. To „Enable’ or „Disable’ any weekday or date schedule right click on the weekday or date to be
modified and select Enable/Disable. By default it is enabled.

58
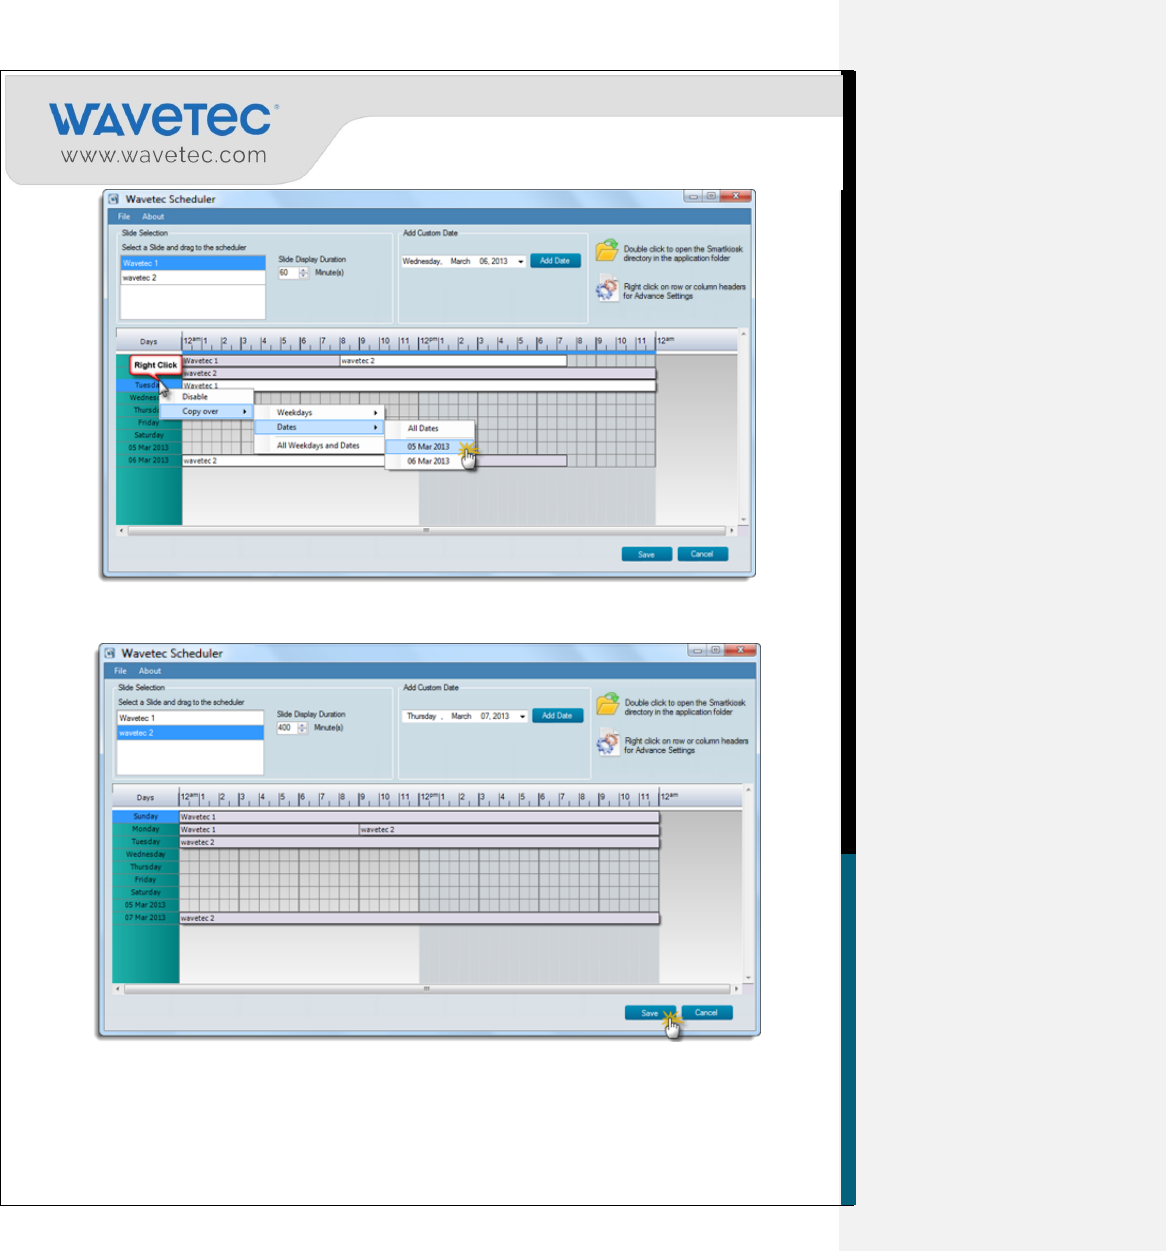
11. The schedule of any weekday or custom date can be copied over to any other weekday or all
weekdays, to any other date or all dates, or to all weekdays and dates.
12. To copy over the schedule right click on the weekday or date to be copied and select the ‘Copy
Over’. In Copy over menu there are further three options:
i. Weekdays
ii. Dates
iii. All Weekdays and Dates.
Select the Weekdays sub-menu; there are further two options available „All Weekdays’ or select a
particular weekday from list.
13. If „Dates’ sub menu is selected then there are also two options available „All Dates’ or list of all
added custom dates.
59
14. By „Save’ option the user can save the schedule.
15. A confirmation message will appear.
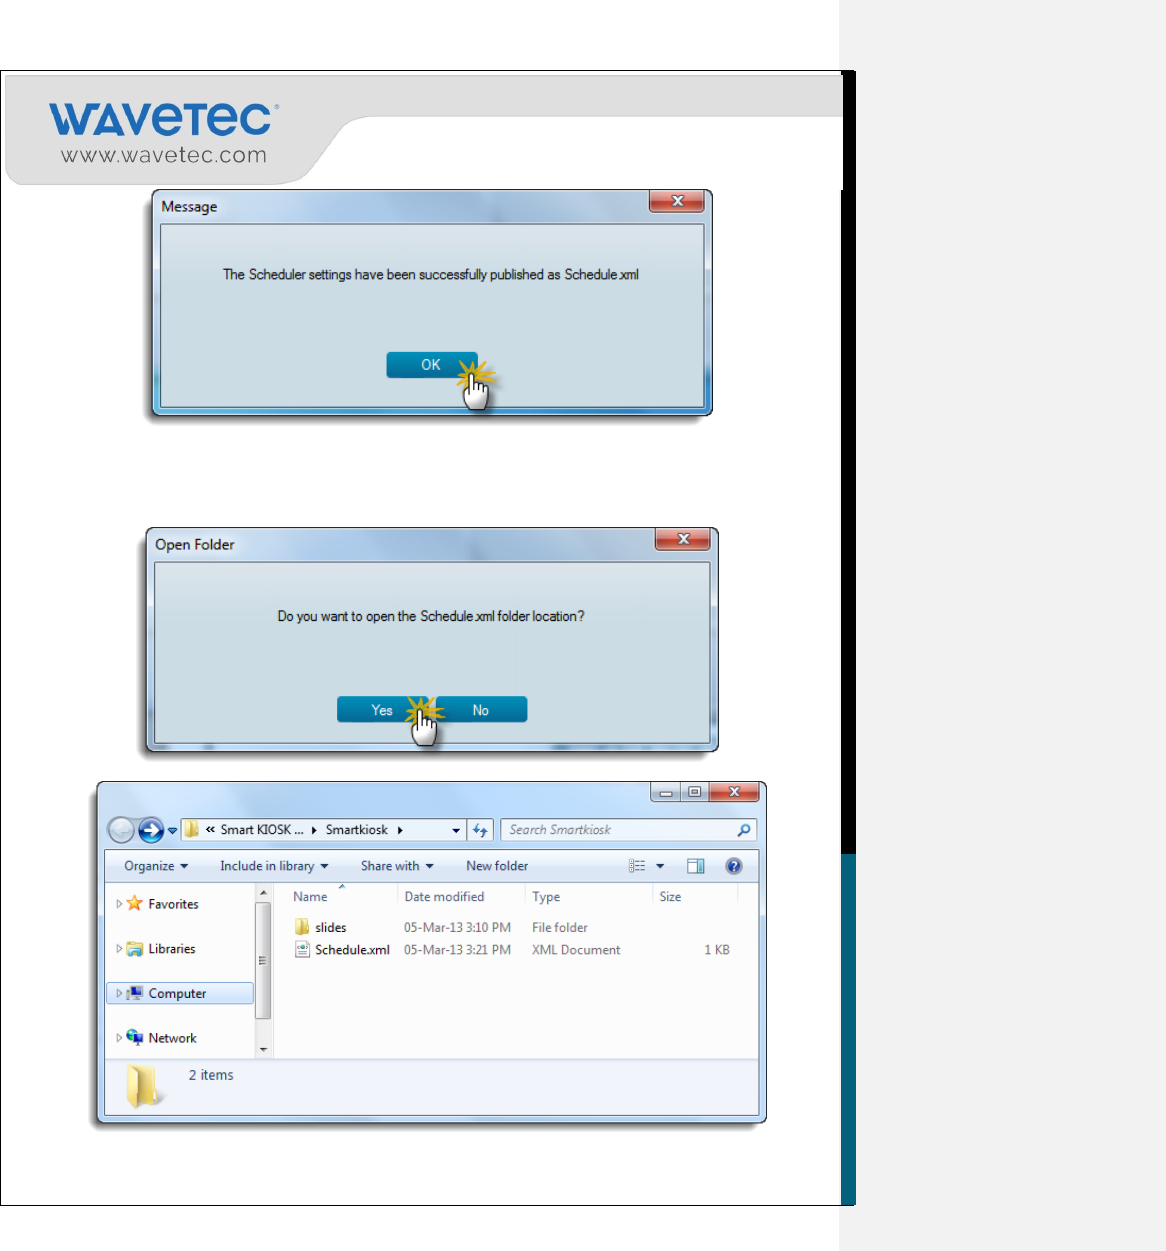
60
16. Select Yes to open the folder containing the schedule.xml file.
61
17. Folder containing Slides and the Schedule file. This can also be opened by double clicking the folder
icon.
3.2 How to Import the Schedule
The Android SmartKIOSK Scheduler has the ability to re-open all saved schedule files which can be
further edited.
1. To open schedule file, open File and Select Open Schedule.
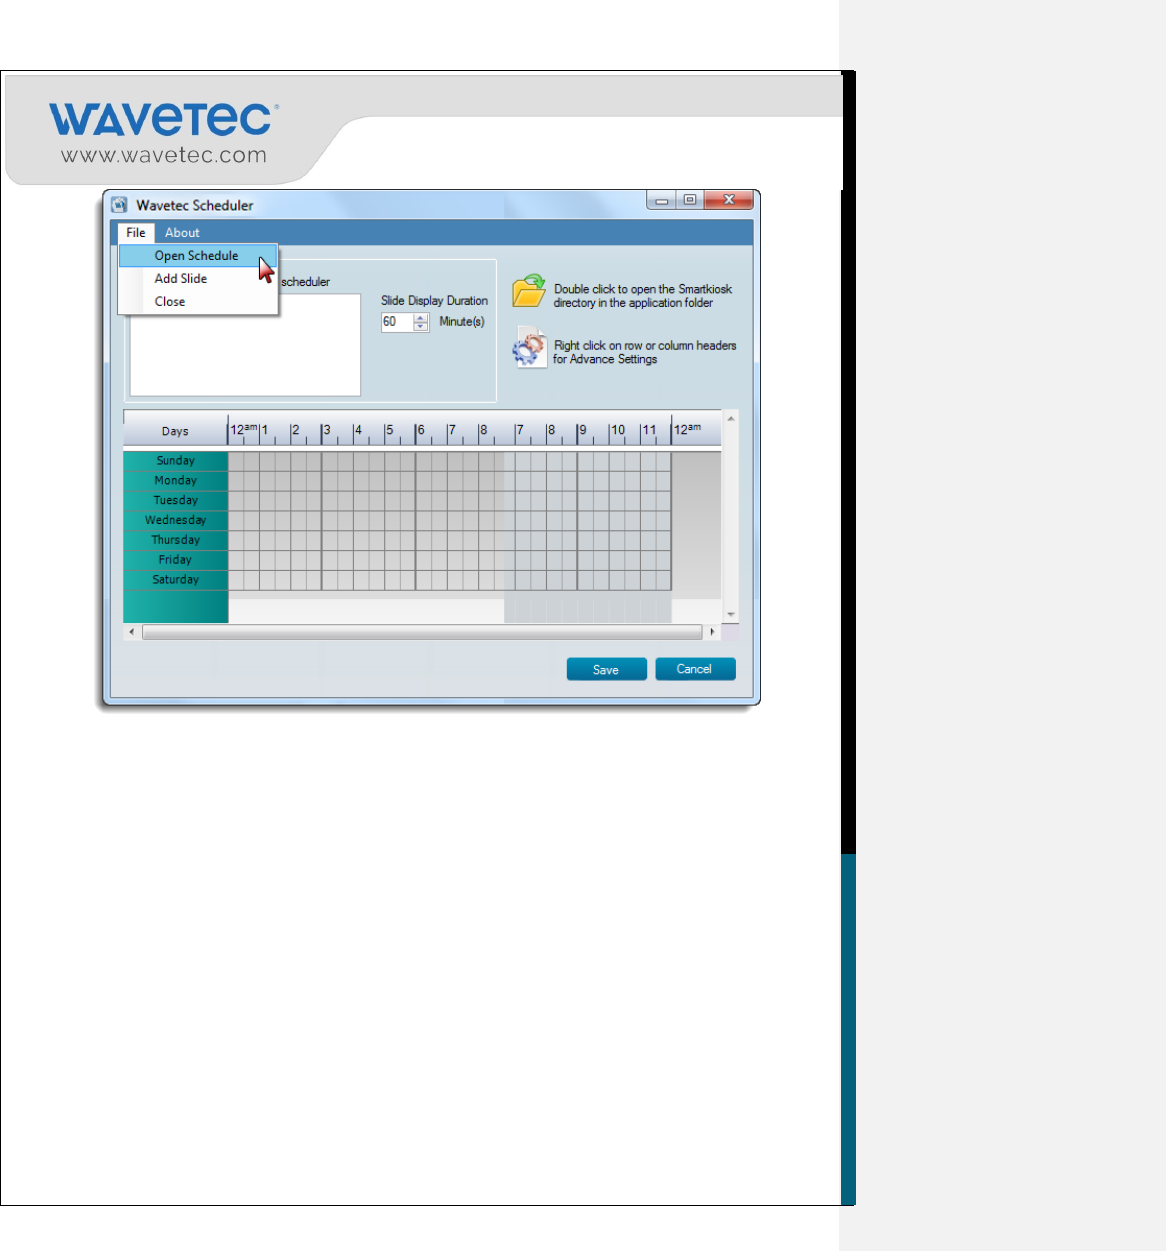
62
2. Browse to Schedule location and select Open.
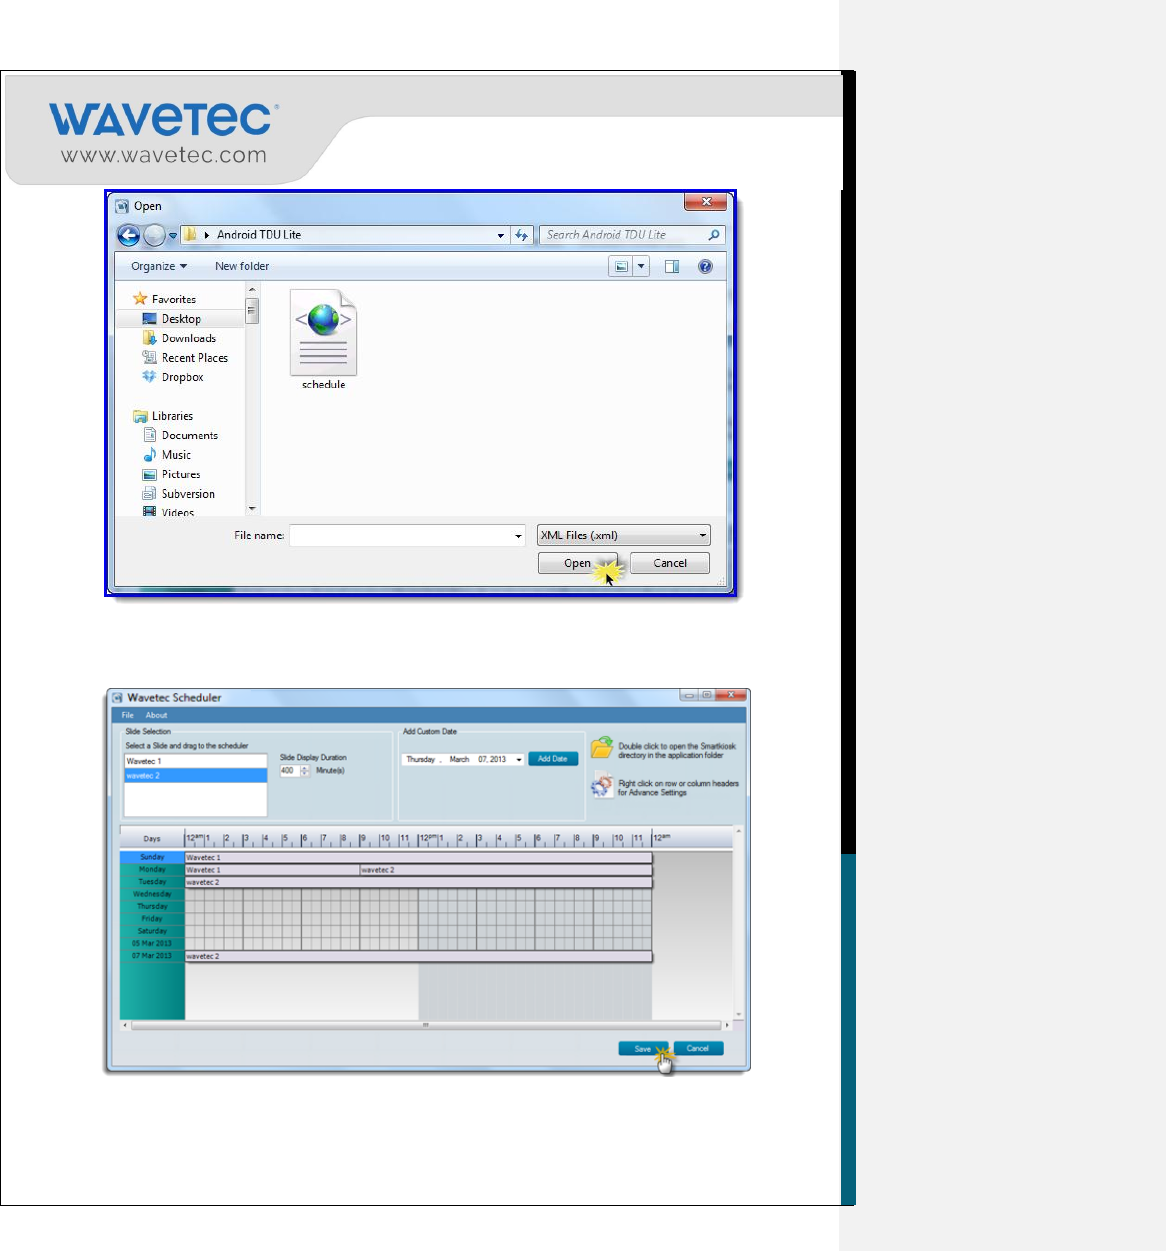
63
3. This will open the schedule on Wavetec scheduler. The user can update this schedule and save it
again to update the Android SmartKIOSK.
64
3.3 How to create package
The smart KIOSK package contains the screen background, designed ticket, idle video and a
schedule.xml file that need to be updated on Android SmartKIOSK through USB Menu which is
detailed discussed in section III.
In order to create a package, you need to do the following steps:
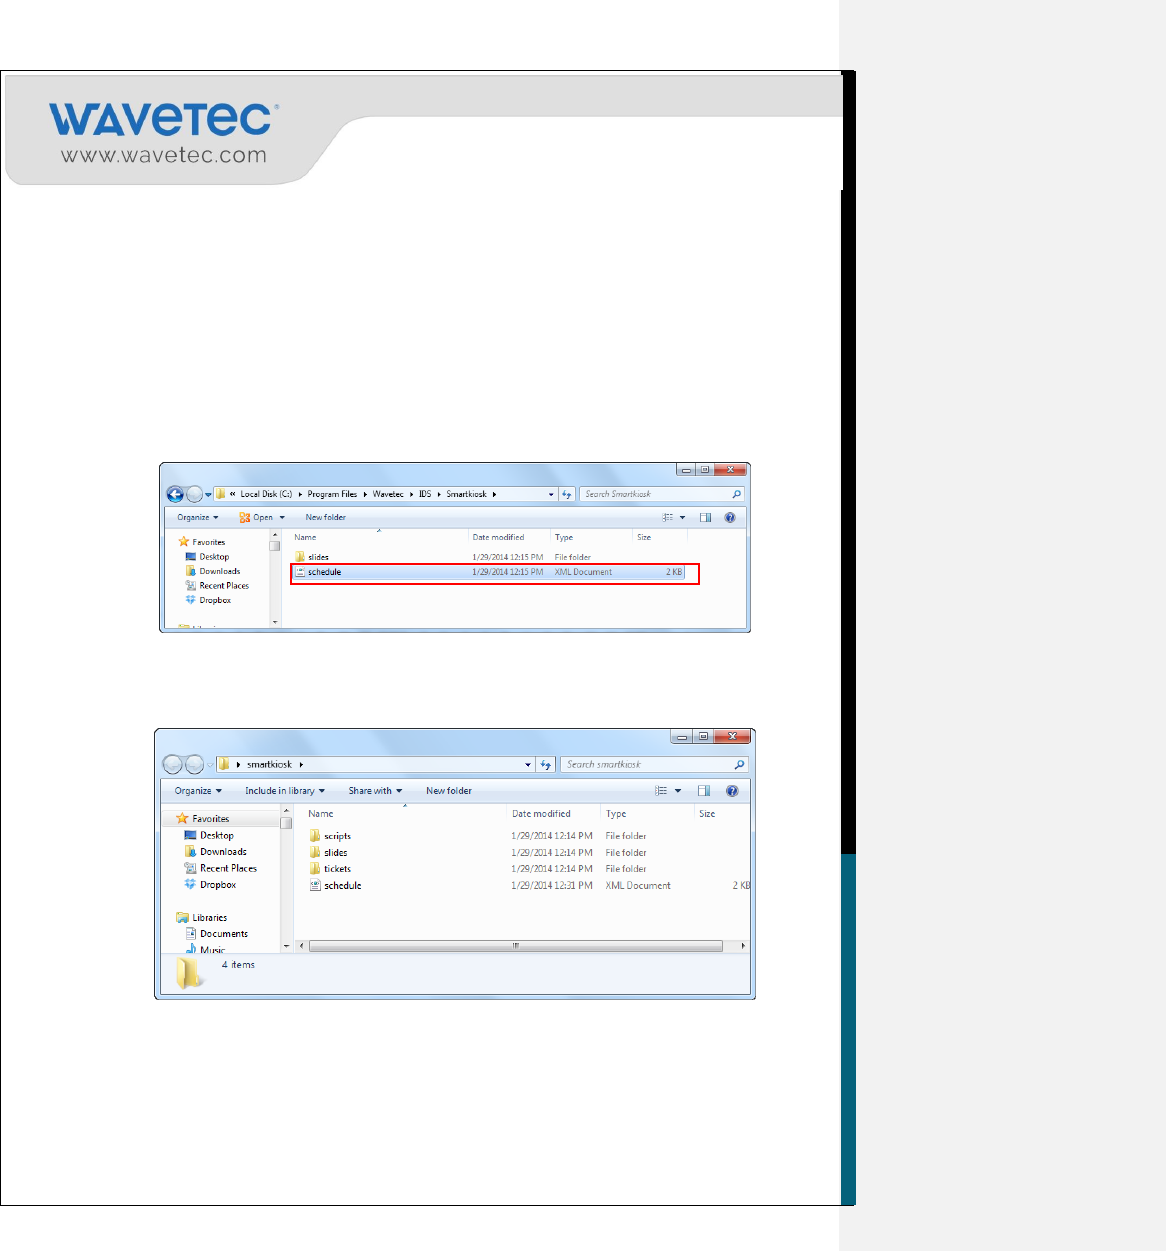
1. Go to the folder where schedule is saved and copy the schedule.xml file as shown:
By default schedule.xml is saved in c-drive so we use the following root:
C:\Program Files\Wavetec\IDS\Smartkiosk
2. After copying schedule.xml file, go to the folder named as “smartkiosk” which have already
been created after running macro. This folder also contains the script, slides and tickets folder by
default. Paste the schedule.xml file here as shown.
3. Now copy this whole folder named as “smartkiosk” and paste it in your USB in order to update
Android SmartKIOSK.
65
4. SECTION III – UPDATING ANDROID TDU LITE OR
SMARTKIOSK USING USB MENU
4.1 Pre-Requisites
The pre-requisites of this section are as follows:
1. A USB Flash Drive
2. The Smart KIOSK Folder with the following updated contents:
i. Slides
ii. Ticket
iii. Slides schedule
4.2 Using the USB Menu
This Menu has the following options for the users:
Following are the steps for updating the Android SmartKIOSK from the USB menu:
1. Insert the USB flash drive in Android SmartKIOSK USB input. The following Menu will pop
up.
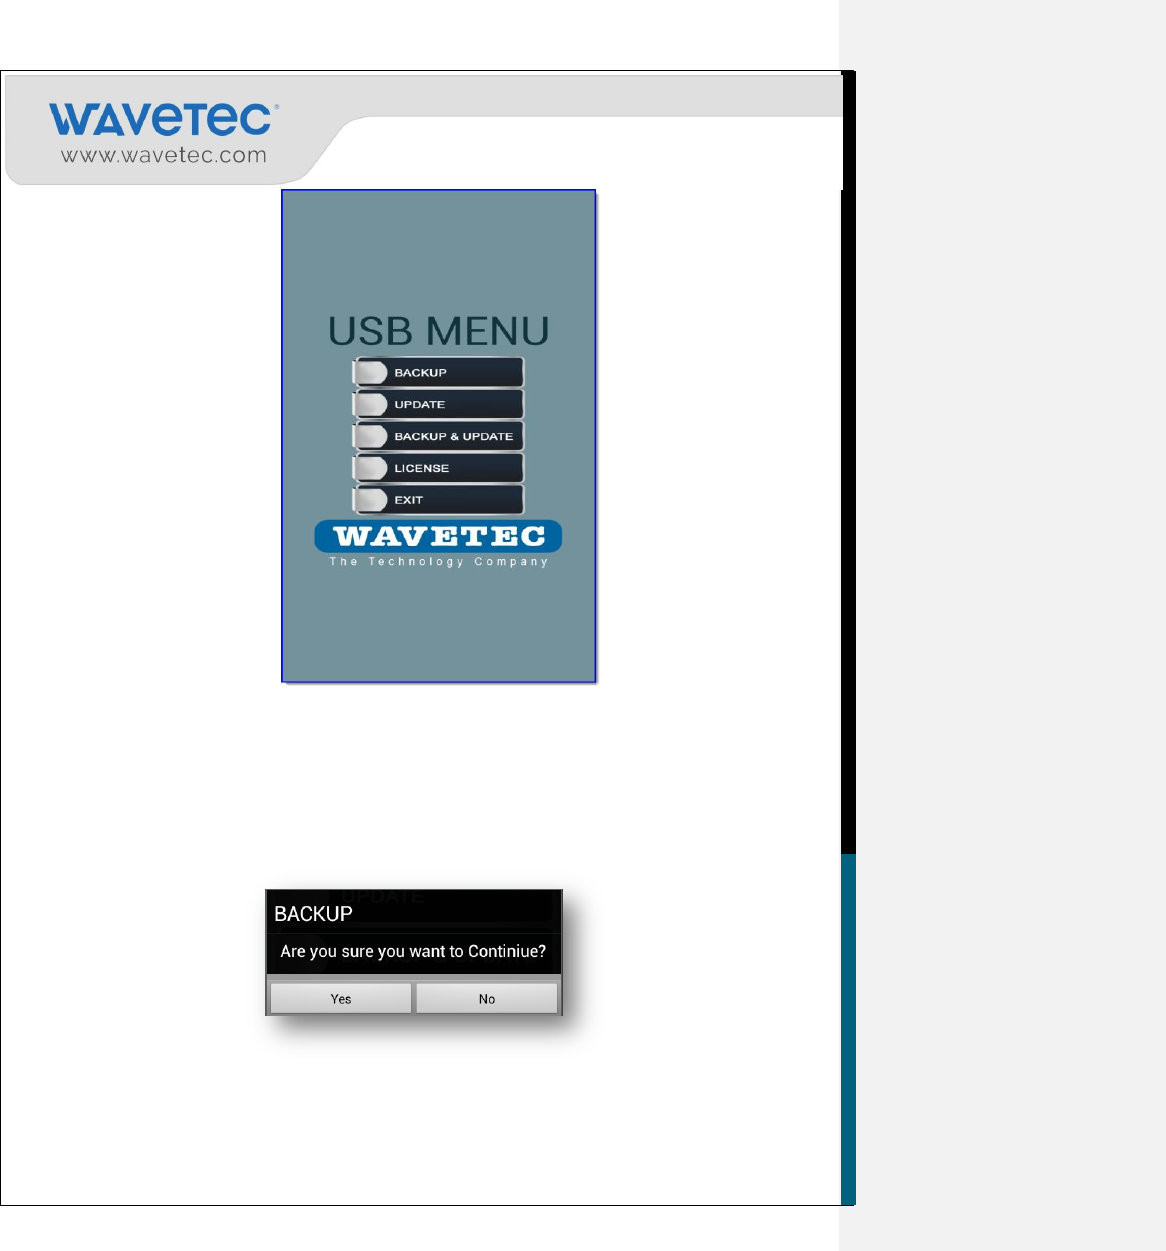
66
This Menu has the following options for the users
4.2.1 BACKUP
This will take the backup of the existing Slides and Ticket on the Android SmartKIOSK and will create
a folder with date and time on the root of the USB Flash Drive.
By clicking Backup, the following screen will appear asking to continue. Click Yes.
67
4.2.2 UPDATE
This will update the Screen Design, Ticket Design and Schedule of Android SmartKIOSK, which were
place in SmartKIOSK folder on the USB Root Drive.
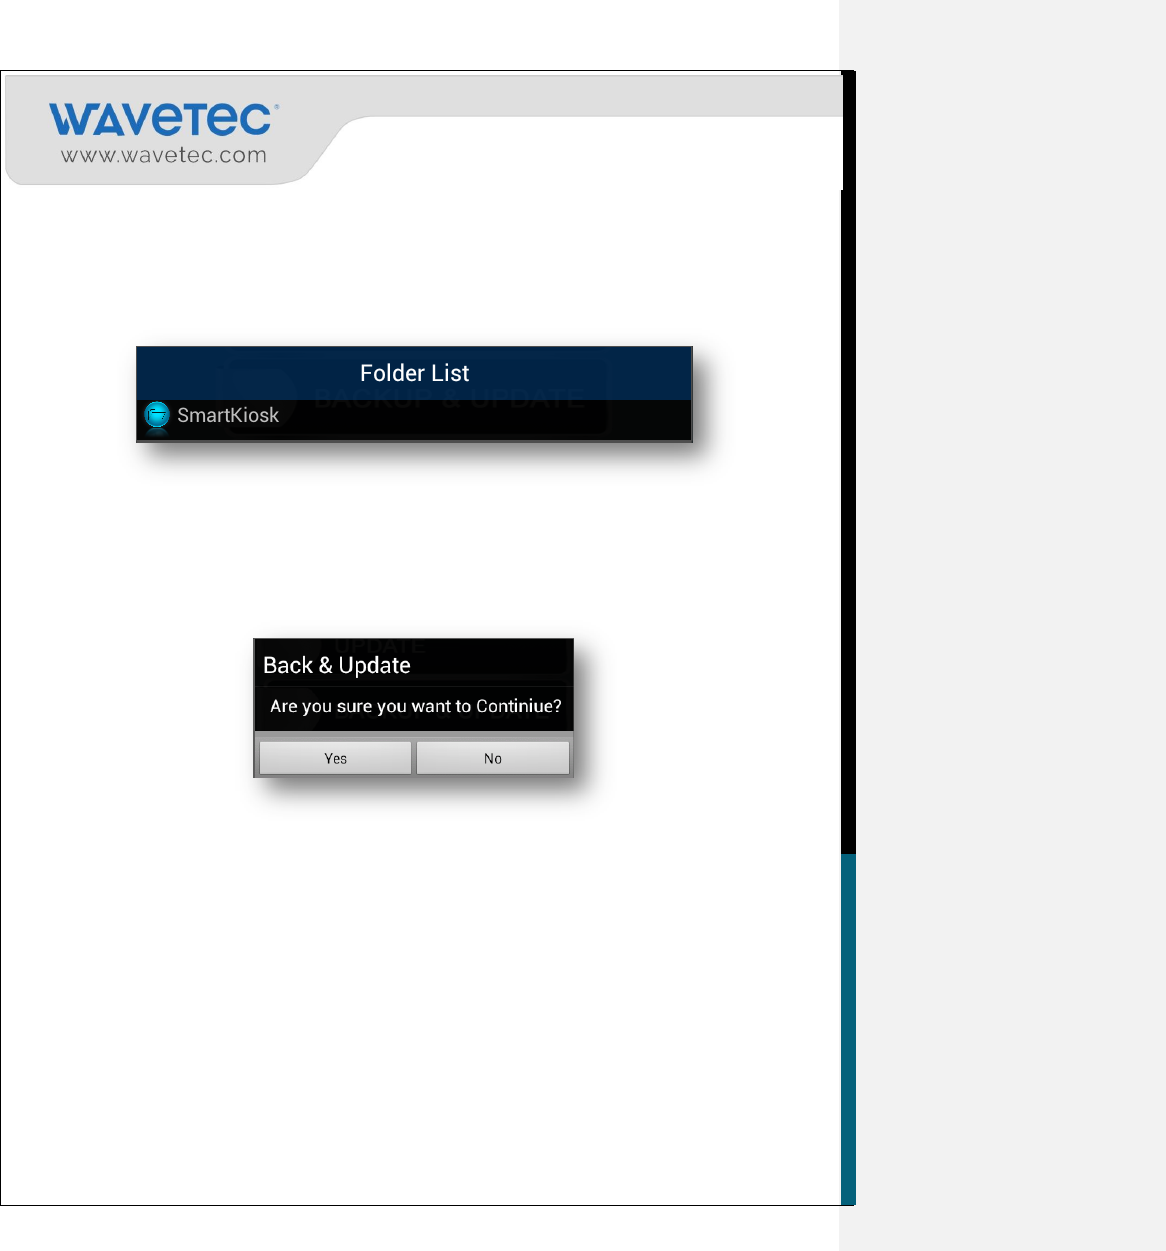
By clicking Update, folder list of USB will appear. Go to smartkiosk.
4.2.3 BACKUP AND UPDATE
This action will create a backup first and then update the Android SmartKIOSK.
By clicking Backup and update, the following screen will appear asking to continue. Click Yes.
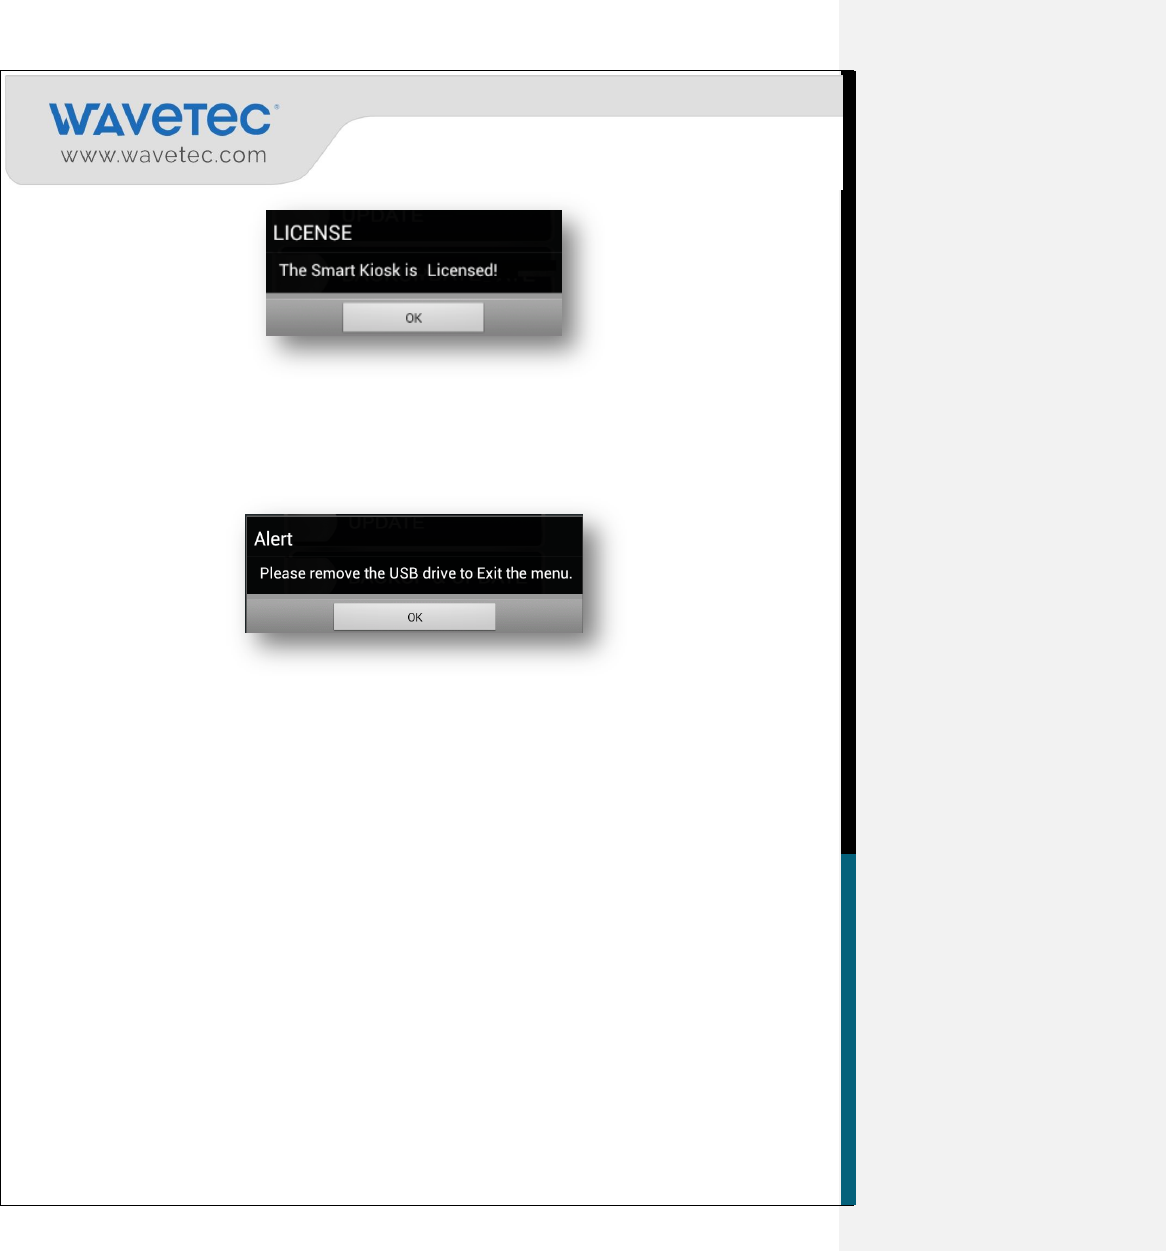
4.2.4 LICENSE
The option is used to license the Android SmartKIOSK only when it is currently un-licensed. Place the
License file in the SmartKIOSK folder on root of the USB Flash Drive and select this option to License
the Android SmartKIOSK application. This option becomes invalid once the license has been
successfully applied on the Android SmartKIOSK application.
Once the Android SmartKIOSK application is licensed, the following screen will appear.
68
4.2.5 EXIT
This option is used to exist from the USB Menu. By clicking Exit, the following alert message will
appear to remove USB drive from the device.
69
5. SECTION IV – PRINTER FUNCTIONALITY
The Android Smart KIOSK offers in two different specifications i.e. the system with single printer and
another one supports dual printers.
In Android Smart KIOSK with dual printer functionality, runs only one printer at a time and will be
printing the ticket. If the user will stand in front of the Android Smart KIOSK the left printer is the
Primary Printer and if this printer stops working for any technical reason or printer is out of paper, the
Android Smart KIOSK will automatically switch from the left side printer to the right side printer,
which is a secondary Printer.
5.1 Pre-Requisites
The pre-requisites of this section are as follows:
1. The Android Smart KIOSK application is installed and tickets are printing.
2. Designed slides and tickets are updated.
5.2 Smart KIOSK Ticket Printing Icons
There are a specific set of Ticket printing Icons and prompt messages which determine the flow and
working of the Android Smart Kiosk. The following section defines their details.
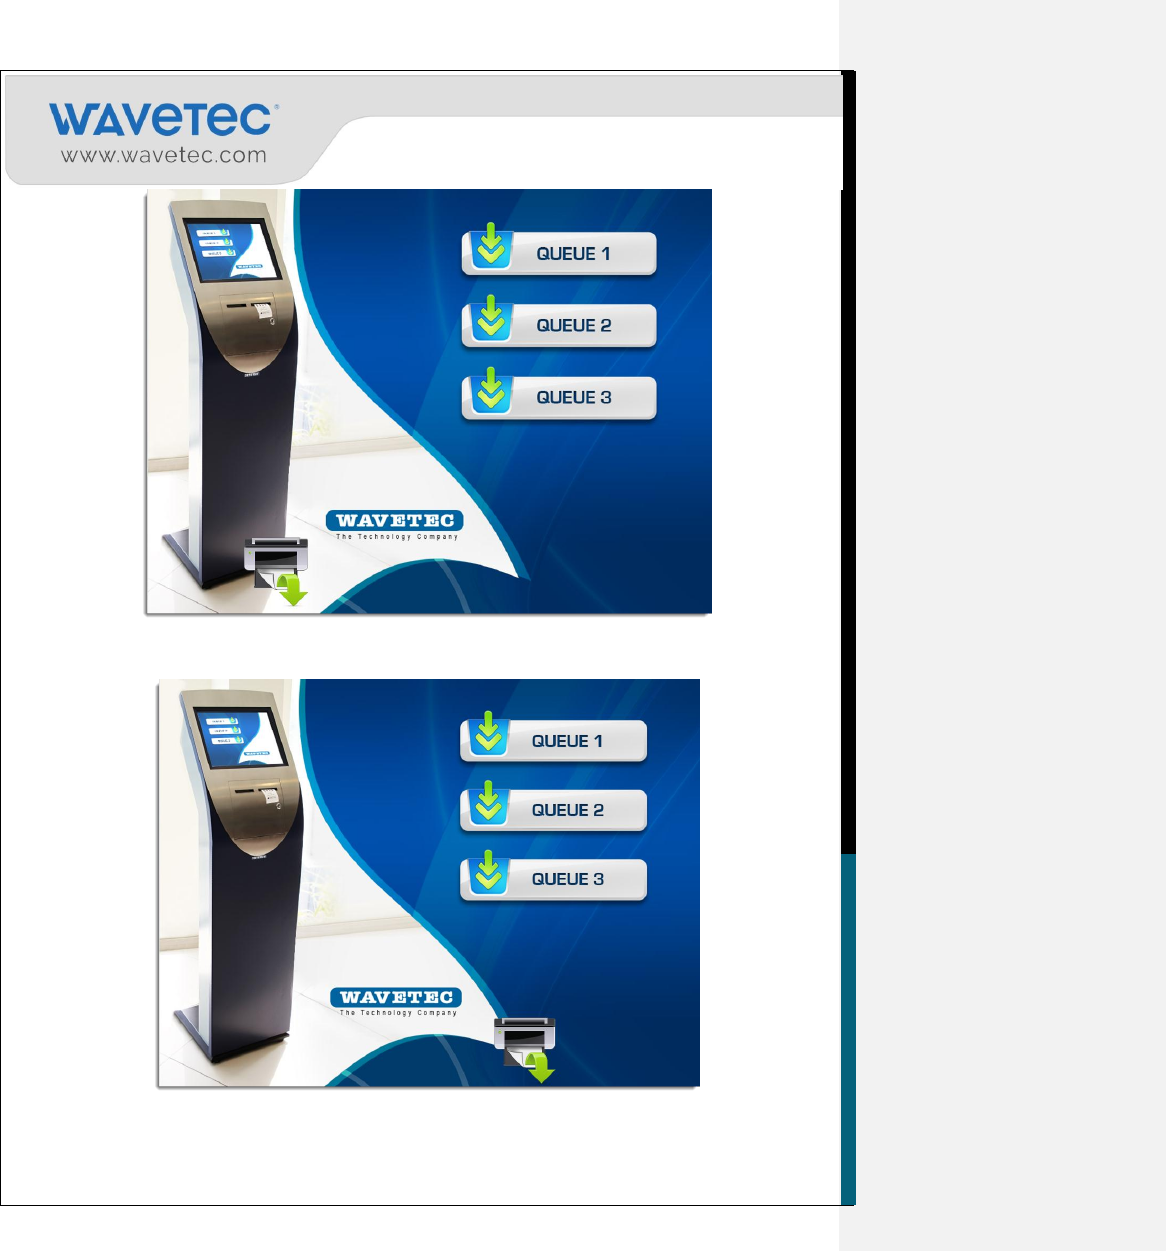
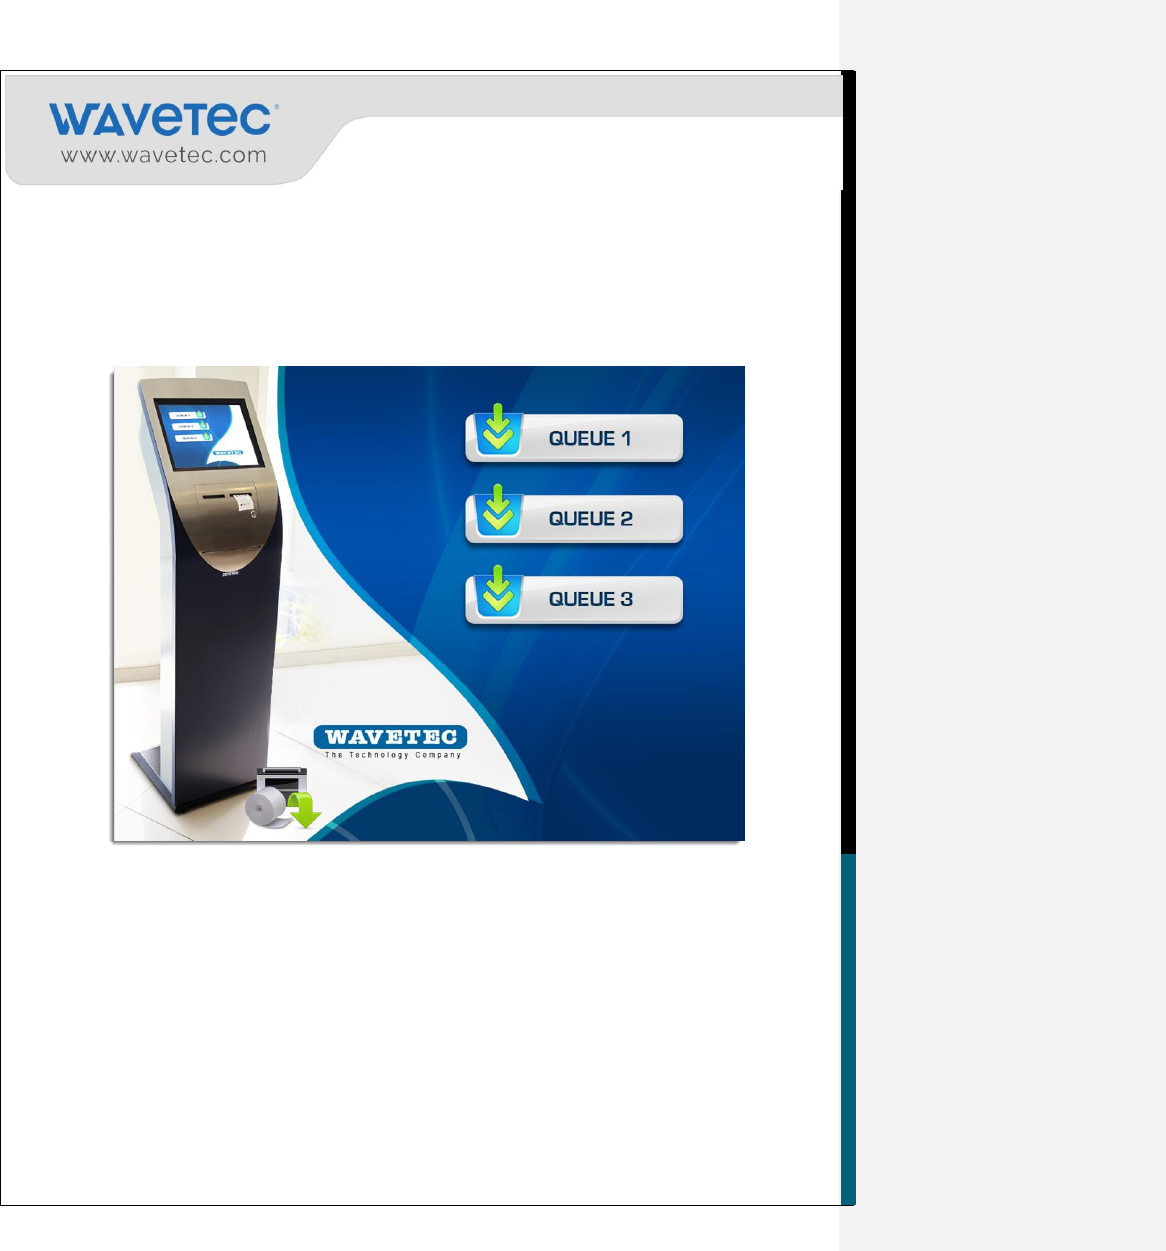
5.2.1 PRINT ICON
The Printer Icon will appear on the screen when the customer selects any Print Action button on
screen. This will prompt the user that the following printer has been initializing to print the respective
ticket.
70
Now Printing from Left Printer Which is the Primary Printer.
Now showing that the Printer is printing from Right Printer which is the Secondary
Printer.
71
5.2.2 PRINTER ERROR ICON
This icon will appear on the screen when the customer select the Print Action Button and the Primary
printer stop working for any technical or it is out of paper, this icon will show on screen.
Printer error icon on left printer means this printer is out of paper. The support personnel at the
respective location are being asked by the Android Smart KIOSK to enter the paper in this respective
printer (primary or secondary).
Now showing that the Printer on the left is Out of Paper and paper roll is to be inserted there.

72
Now showing that the Printer on the right is Out of Paper and paper roll is to be inserted there.
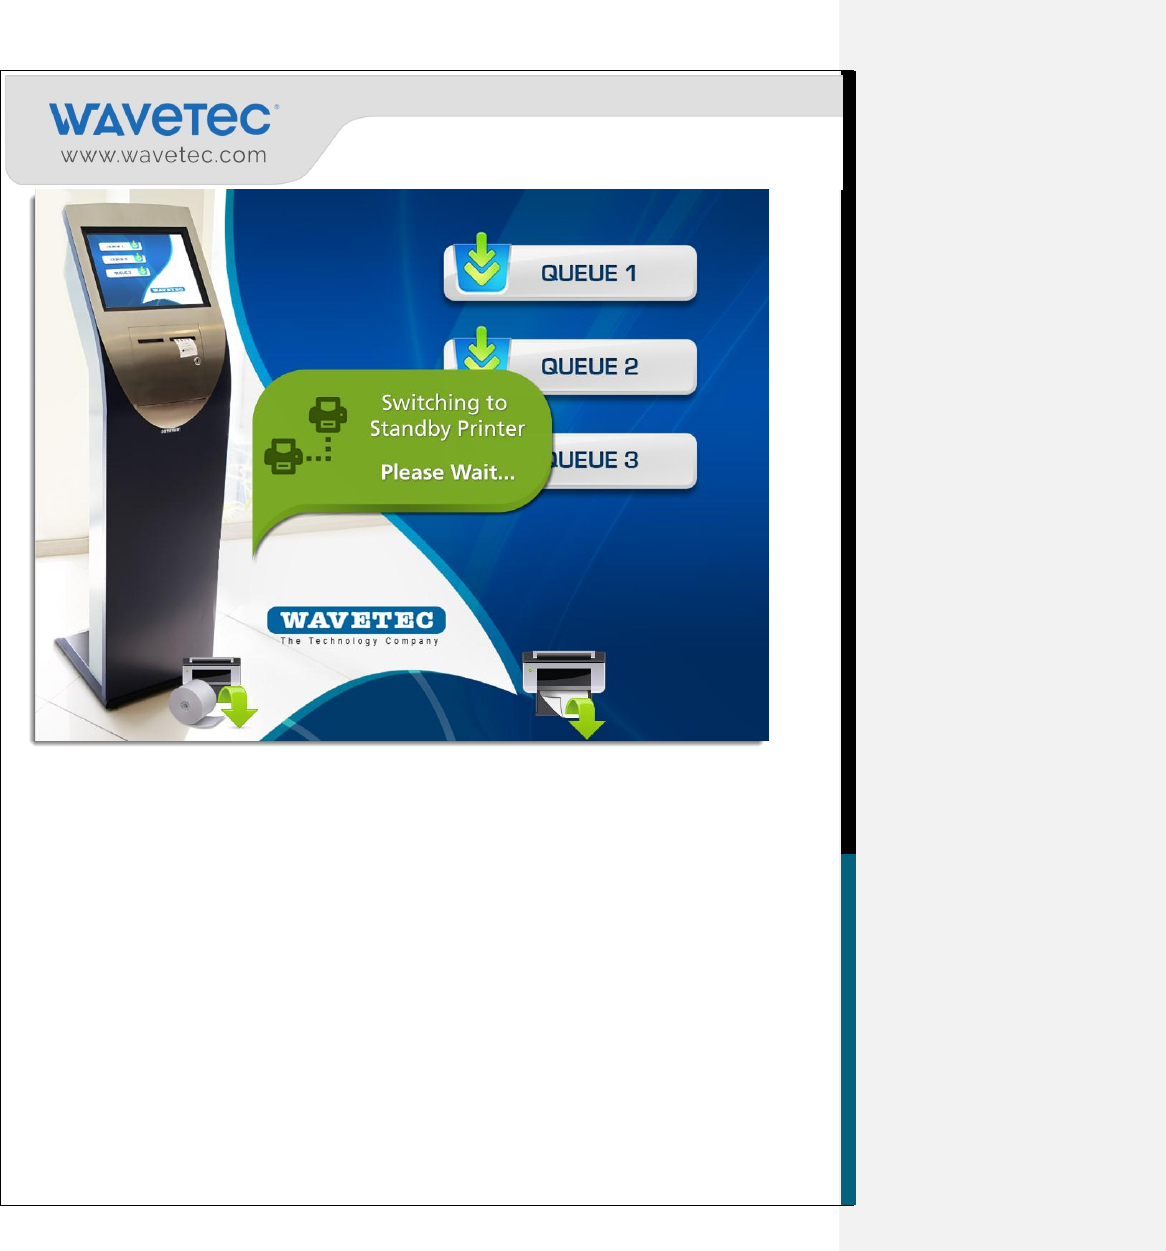
5.2.3 AUTOMATIC PRINTER SWITCHING
The Android Smart KIOSK Printer mechanism facilitates the user to automatically switch from the
default printer to the secondary printer (left printer to right printer). With this automatic printer switch
there will be no need to switch the printer manually during operations and the tickets printing will move
in a smooth flow.
This always ensures that there is a backup printer ready and working so that during the normal day
operations minimal delay in incurred in case one printer malfunctions or it out of paper.
Whenever printer switches from Default Printer to Secondary Printer or vice versa, a pop message will
appear on screen to inform the customer about printer switching.
73
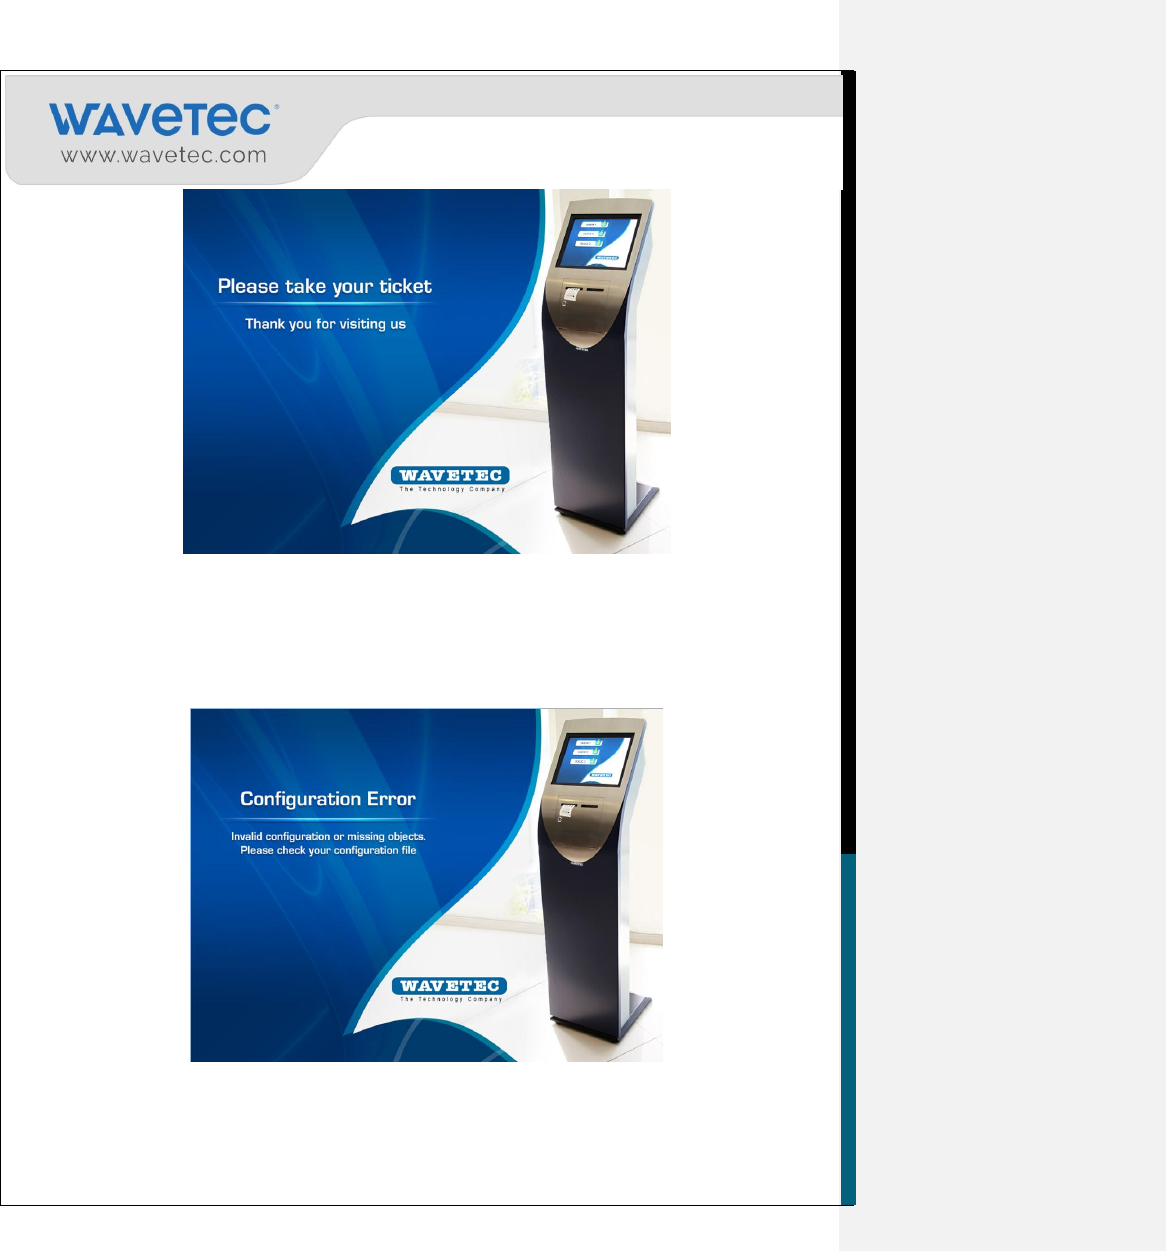
5.2.4 THANK YOU SCREEN
Once the ticket printing command is executed, the user will get the screen to collect ticket.
This would be the last screen and screen will move to first ticket main slide after the described delay.
74
5.2.5 PRINTER PAPER OUT TAGLINE
When there is some error in configuring the device or printer is out of order and customer selects the
Print Action Button, the screen will automatically switch to last slide and the showing
“Configuration” will appear on the screen. This tagline is being appeared by the Android SmartKIOSK
to enter the paper in the printer.
This slide will be added as the last slide so that when the device is unable to find any printer or printer is
out of paper, the application will move into the last slide and showing the respective message on the
screen.
75
6. CONTACT US
In case you may require further assistance regarding the ‘Android SmartKIOSK , please contact us
at support.int@wavetec.com
Head Office
United Arab Emirates, Dubai
Wavetec FZCO
Address: Industrial License No. 175
Light Industrial Unit # 9
Dubai Silicon Oasis
P.O. Box 341133
Phone:+971 (4) 326 31 93
Fax: +971 (4) 326 31 92
Email:support.int@wavetec.com
Web: http://www.wavetec.com
Warning:
This device complies with Part 15 of the FCC Rules. Operation is subject to the
following two conditions: (1) this device may not cause harmful interference, and (2)
this device must accept any interference received, including interference that may
cause undesired operation. changes or modifications not expressly approved by the
party responsible for compliance could void the user's authority to operate the
equipment.
NOTE: This equipment has been tested and found to comply with the limits for a
Class B digital device, pursuant to Part 15 of the FCC Rules. These limits are
designed to provide reasonable protection against harmful interference in a
residential installation. This equipment generates, uses and can radiate radio
frequency energy and, if not installed and used in accordance with the
instructions, may cause harmful interference to radio communications. However,
there is no guarantee that interference will not occur in a particular installation.
If this equipment does cause harmful interference to radio or television reception,
which can be determined by turning the equipment off and on, the user is
encouraged to try to correct the interference by one or more of the following
measures:
-- Reorient or relocate the receiving antenna.
-- Increase the separation between the equipment and receiver.
-- Connect the equipment into an outlet on a circuit different
from that to which the receiver is connected.
-- Consult the dealer or an experienced radio/TV technician for help.
NOTE: This device and its antenna(s) must not be co-located or operation in
conjunction with any other antenna or transmitter.
RF Exposure Statement
To maintain compliance with FCC’s RF Exposure guidelines, This equipment should be
installed and operated with minimum distance of 20cm the radiator your body.
This device and its antenna(s) must not be co-located or operation in conjunction
with any other antenna or transmitter