Weber Fireplace Assembly Instruction FireplaceAssembly OwnersGuide 39935 1093
FirePlace to the manual fef34bf4-19ca-4e3d-b265-ee2ae14761d6
2015-01-05
: Weber Weber-Fireplace-Assembly-Instruction-162292 weber-fireplace-assembly-instruction-162292 weber pdf
Open the PDF directly: View PDF ![]() .
.
Page Count: 4
®®
DANGER
Please read the following warnings carefully before using your FirePlace. Failure to follow these
warnings may result in serious bodily injury or death, or in a fire causing damage to property.
WARNINGS
䡵The Weber FirePlace is designed solely for
outdoor use. Indoor use can be lethal.
䡵Use only on noncombustible surfaces,
such as brick, flagstone, concrete, etc.
Do not use on a wooden deck.
䡵Keep away from flammable materials,
buildings and vehicles when in use.
䡵Exercise the same care that you would
with an open campfire.
䡵Your Weber FirePlace is not to be used by
children.
䡵Keep away from flammable fluids such as
gasoline, charcoal lighter fluid and
alcohol, etc.
䡵Keep children and pets away from the
FirePlace when in use.
䡵Never wear loose-fitting or flammable
clothing (such as nylon) when in use.
䡵Do not overload. Before starting the fire
make sure the lid is capable of closing.
Overloading can be dangerous if the lid
cannot extinguish the fire.
䡵Do not use soft woods, like pine or cedar.
Soft woods may "pop" and throw sparks.
䡵Do not burn leaves, paper, plywood or
trash in the Weber FirePlace.
䡵Do not use volatile fluids, such as
gasoline, charcoal lighter fluid or alcohol,
to light or relight fires.
䡵Use only sturdy, long-handled fireplace
equipment, when adding or moving logs.
䡵Do not attempt to move the FirePlace when
in use or hot.
䡵Use barbecue mitts when handling,
because surfaces will be hot when in use.
䡵Fill the Weber FirePlace bottom with
approximately two pounds of sand before
use. This helps to insulate the bottom of
the FirePlace.
䡵Always extinguish fire with the lid. Do not
douse with water; this will fracture the
porcelain finish. Wood fires take a long
time to extinguish. The Weber FirePlace
and the ashes inside may remain hot for
some time. Leave the lid closed until the
Weber FirePlace is cold.
䡵Do not store the Weber FirePlace with
combustible materials or ashes inside.
®®
39935 10/93
FirePlace Assembly
Instructions
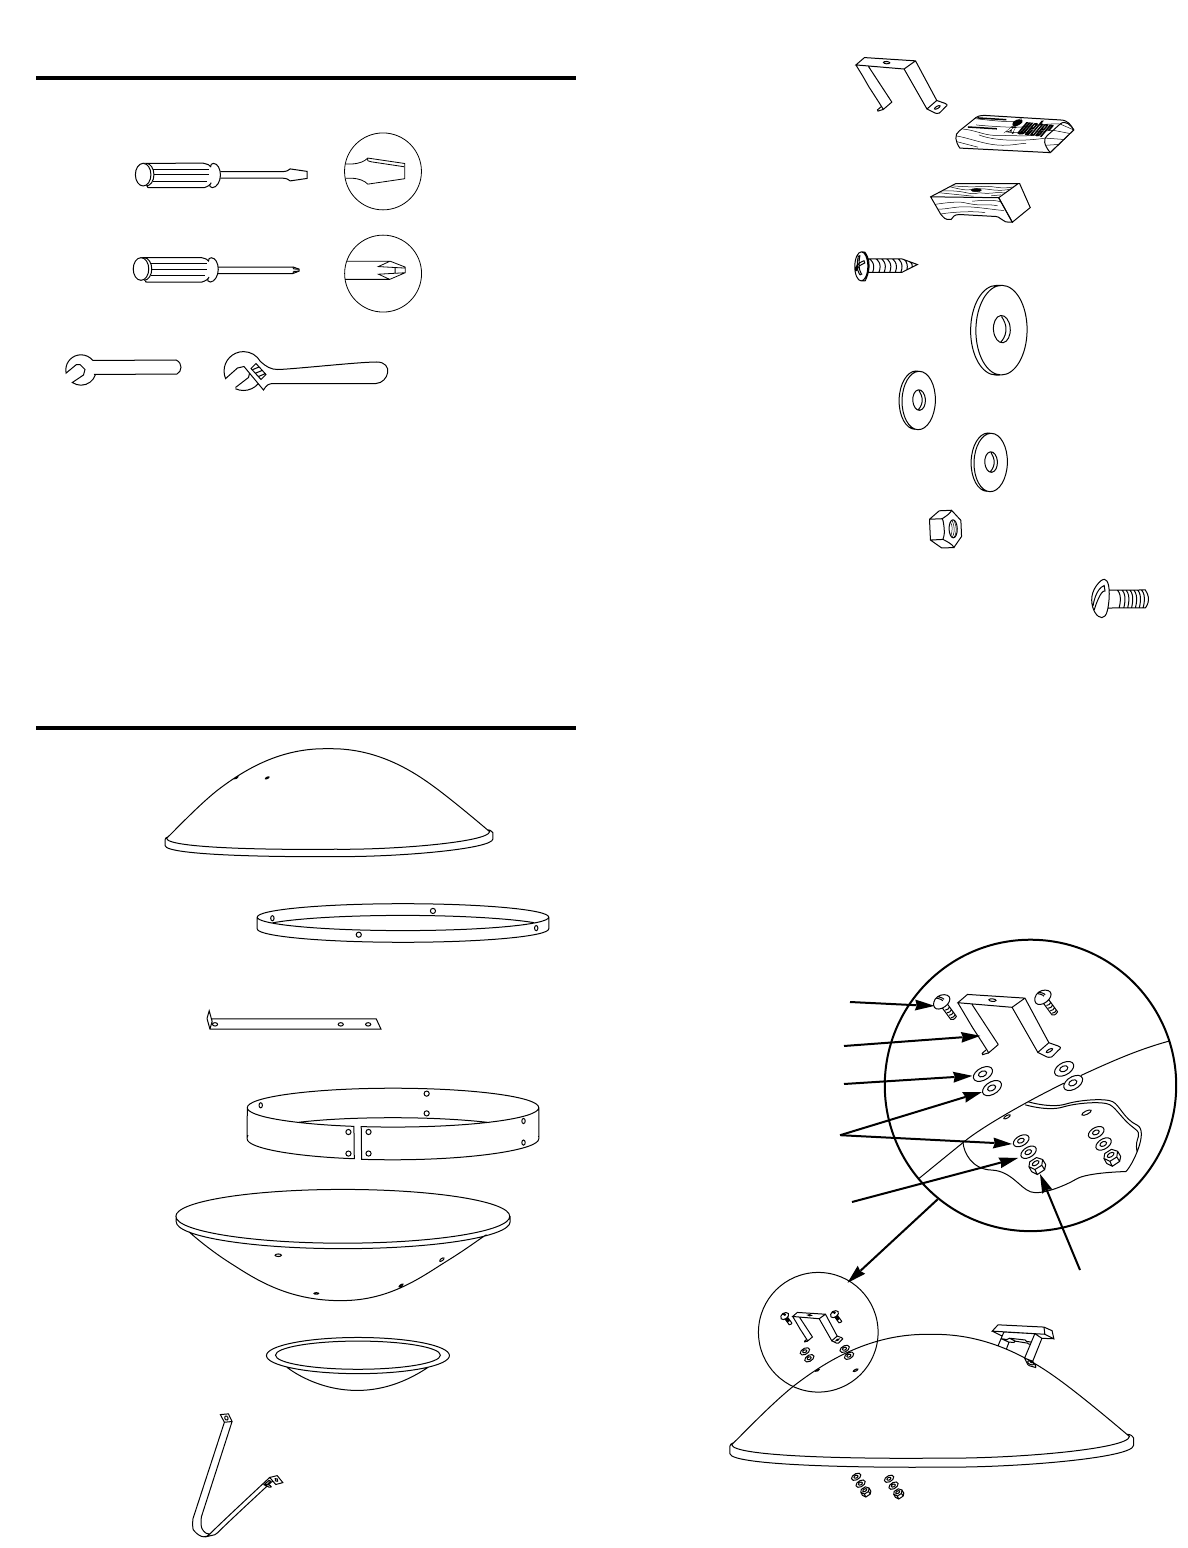
Assembly
Tools needed
Screwdrivers, regular
and Phillips
7/16 inch open-end or an adjustable wrench
Two steel handles
Two top wood handles
Two bottom wood handles
Two wood screws
Sixteen large fiber washers
Eight small fiber washers
Twenty 1/4 inch steel washers
Twenty-four 1/4-20 hex nuts
Twenty-four 1/4-20 x 5/8 inch machine screws
Step 2
Install Steel Handles
You will need: lid, eight small fiber washers, eight steel
washers, two steel handles, four machine screws, four hex
nuts, a regular screwdriver and wrench.
Install handles as shown in Figure 1.
CAUTION: Do not overtighten; you may crack the
porcelain finish.
Figure 1
Machine screw
Steel handle
Steel washer
Steel washer
Hex nut
Small fiber washers
®®
Step 1
Check Package Contents
You should have received the parts shown below with your
Weber FirePlace. In the unlikely event a part is missing or
damaged, do not return the FirePlace, instead contact:
WEBER-STEPHEN PRODUCTS COMPANY
Customer Service Center
250 South Hicks Road
Palatine, IL 60067-6241 (708) 705-8660
(800) 446-1071
Parts
Lid
Upper support ring
Four uprights
Lower support ring
Bottom
Heat deflector
Four legs
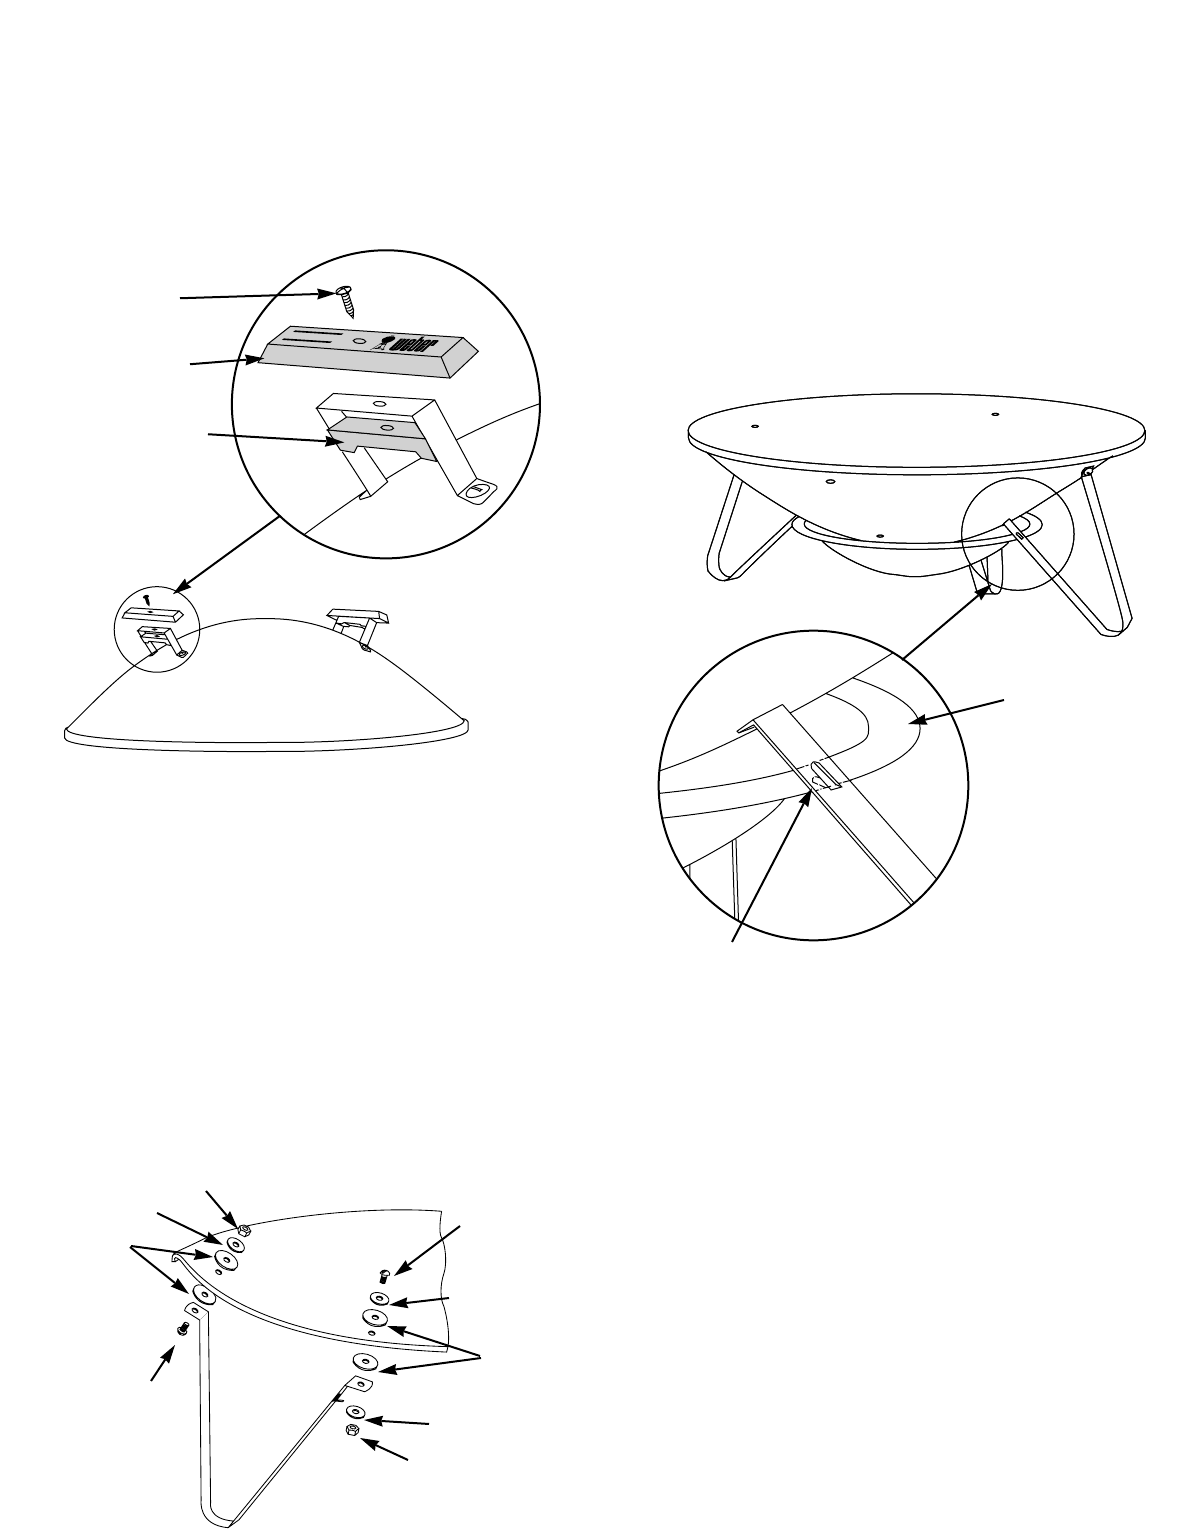
Step 4
Install Three Legs
You will need: three legs, bottom, six machine screws,
twelve large fiber washers, nine steel washers, six hex nuts,
a regular screwdriver and wrench.
Install only three legs as shown in Figure 3. Note that the
machine screws are not installed in the same direction.
CAUTION: Do not overtighten; you may crack the
porcelain finish.
Hex nut
Steel washer
Steel washer
Steel washer
Large fiber
washer
Machine screw
Machine screw
Large fiber
washer
Hex nut
Figure 3
Step 3
Install Wood Handles
You will need: lid assembly, two top wood handles, two
bottom wood handles, two wood screws and a Phillips
screwdriver.
Install handles as shown in Figure 2.
®®
Wood screw
Top wood handle
Bottom wood handle
Figure 2
Step 5
Install Heat Deflector and Fourth Leg
You will need: heat deflector, bottom assembly, one leg,
two machine screws, four large fiber washers, three steel
washers, two hex nuts, a regular screwdriver and wrench.
Insert the heat deflector between the three legs and
position it so it rests on all the leg tabs, as shown in Figure
4.
Now install the fourth leg using the procedure shown in
Figure 3, and making sure the heat deflector rests on all
leg tabs.
Heat deflector
Leg tab
Figure 4
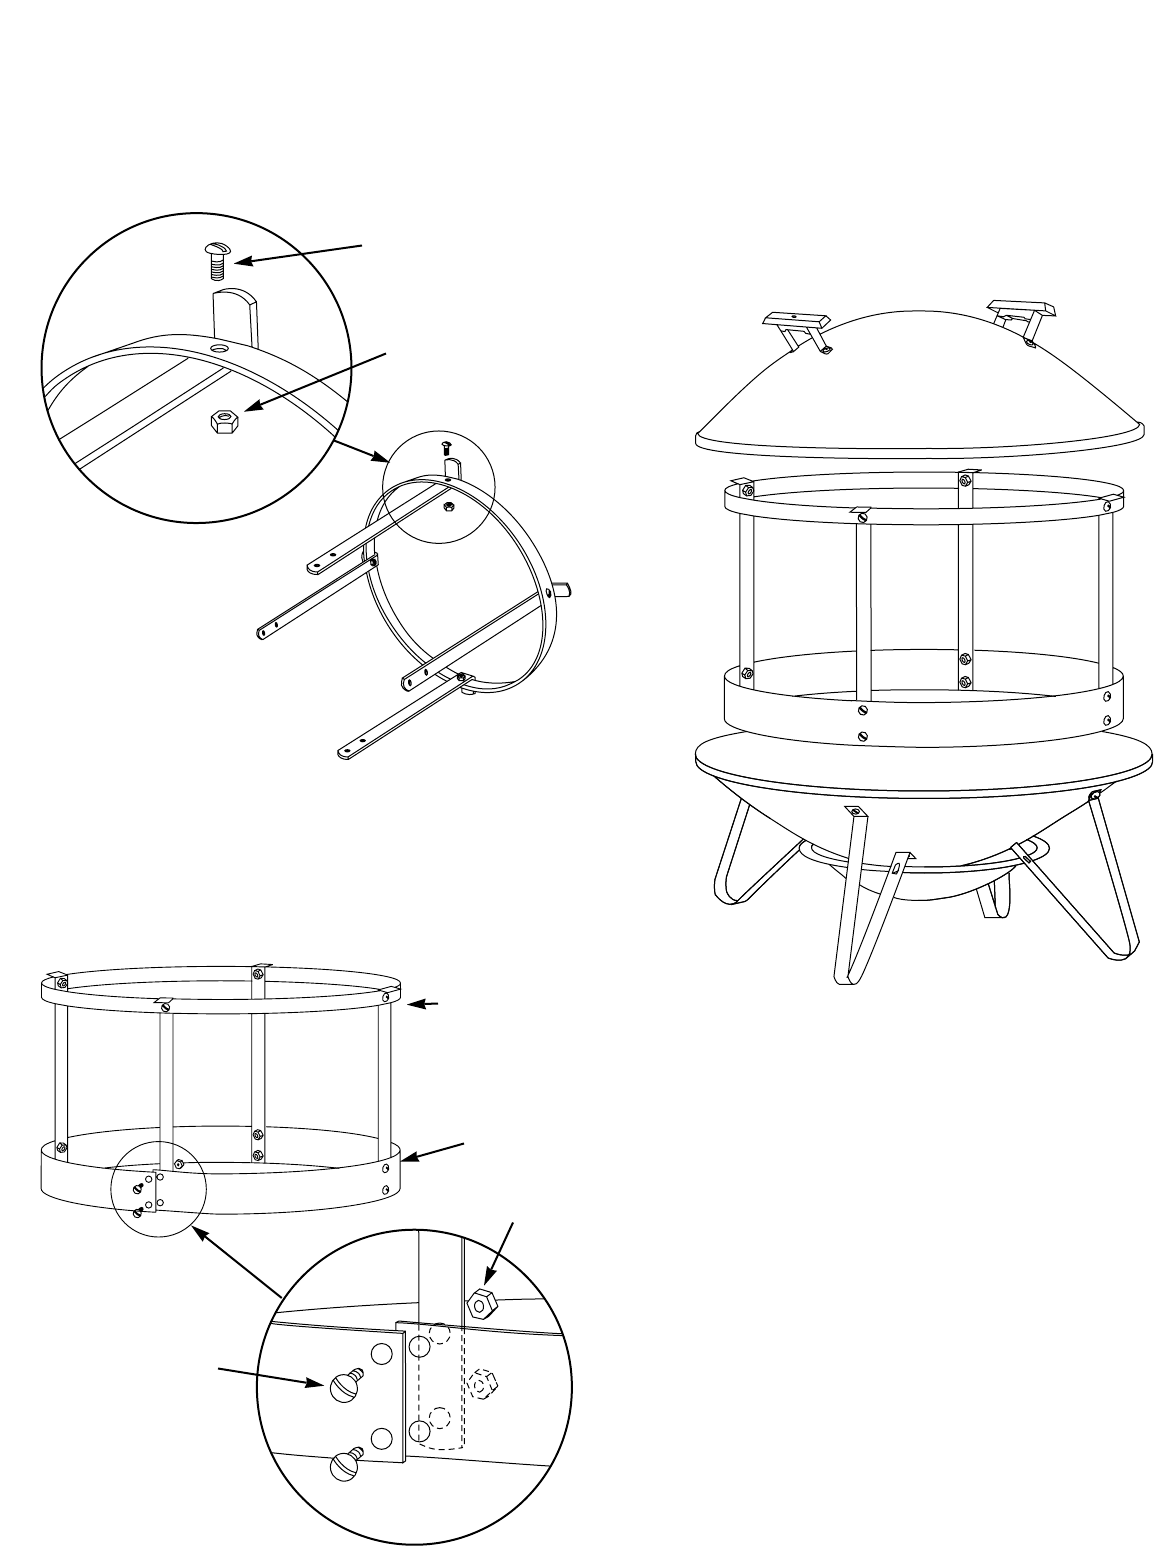
Step 7
Assemble Lower Support Ring
You will need: lower support ring, upright assembly, eight
machine screws, eight hex nuts, a screwdriver and wrench.
Assemble lower support ring as shown in Figure 6.
Figure 6
Upper ring
assembly from
Step 5
Hex nut
Machine screw
Lower
support ring
Step 6
Assemble Upper Support Ring
You will need: four uprights, upper support ring, four
machine screws, four hex nuts.
Assemble uprights as shown in Figure 5.
Figure 5
Machine screw
Hex nut
Step 8
Final Assembly
You will need: bottom assembly, ring assembly, lid assembly.
Place the ring assembly inside the FirePlace bottom with the
lower support ring down. Figure 7.
Place the FirePlace lid on the upper support ring. It should
rest on the upright tabs.
Figure 7
