Weifang Goertek Electronics TITANBTL 3D Eyewear User Manual BTL OI 20111207a
Weifang Goertek Electronics Co.,Ltd 3D Eyewear BTL OI 20111207a
UserManual.wiki
>
Weifang Goertek Electronics
>
TITANBTL User Manual
user manual
Navigation menu
Upload a User Manual
Namespaces
Wiki Guide
HTML
PDF
Info
Views
User Manual
Discussion / Help
Navigation
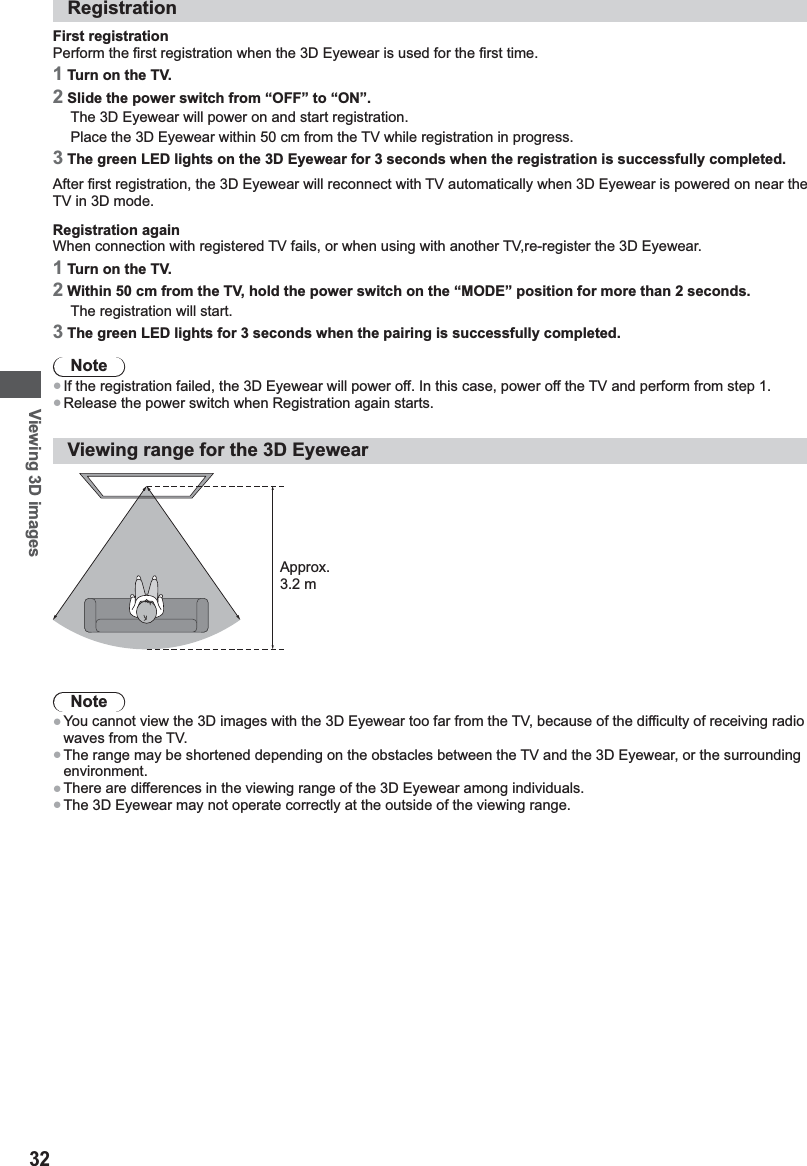
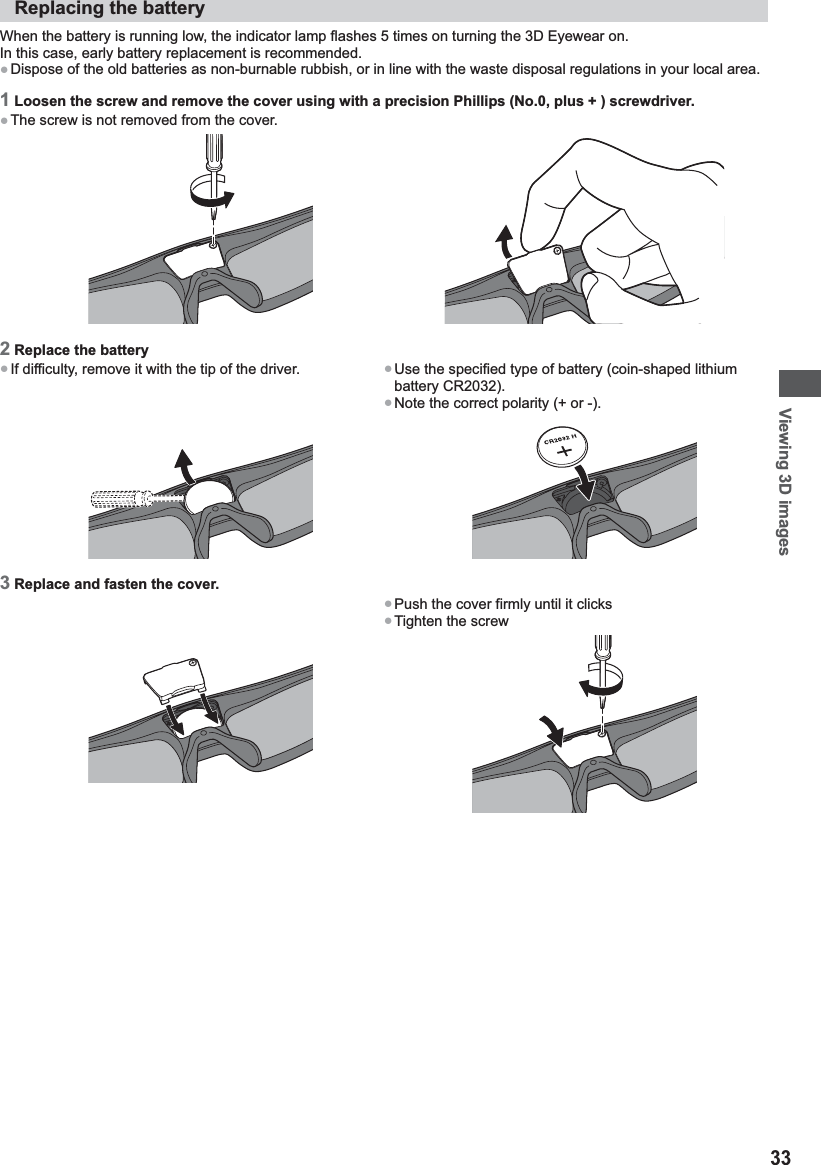
![Viewing 3D images29 Viewing 3D images You can enjoy viewing 3D images with contents or programmes corresponding to the 3D effect by wearing the 3D Eyewear (supplied). “Standard accessories” (p. 6) This TV supports [Frame Sequential]1, [Side by Side]2 and [Top and Bottom]3 3D formats. 1: The 3D format that the images for the left and right eyes are recorded with the high definition quality and alternately played back. 2, 3: Other available 3D formatsƔ How to use the 3D Eyewear (p. 31)Ɣ How to view the 3D images (p. 34) Warning Small PartsƔ 3D Eyewear contains small parts (battery, etc.) and must be kept out of reach of small children to avoid accidental ingestion. DisassemblyƔ Do not disassemble or modify the 3D Eyewear. Lithium BatteryƔ Batteries must not be exposed to excessive heat such as sunshine, fire or the like. Caution To enjoy 3D images safely and comfortably, please read these instructions fully. 3D EyewearƔ Do not drop, exert pressure on, or step on the 3D Eyewear.Ɣ Be careful of the tips of the frame when putting on the 3D Eyewear.Ɣ Always keep the 3D Eyewear in a cool, dry place.Ɣ Be careful not to trap a finger in the hinge section of the 3D Eyewear.](https://usermanual.wiki/Weifang-Goertek-Electronics/TITANBTL/User-Guide-1604421-Page-2.png)
![Viewing 3D images30 Viewing 3D ContentƔ Do not use the 3D Eyewear if you have a history of over-sensitivity to light, heart problems, or have any other existing medical conditions.Ɣ Please stop using the 3D Eyewear immediately, if you feel tired, are not feeling well or experience any other uncomfortable sensation. When you set the effect by using [3D Adjustment], take into account that the vision of 3D images varies among different individuals.Ɣ Take an appropriate break after viewing a 3D movie.Ɣ Take a break of between 30 - 60 minutes after viewing 3D content on interactive devices such as 3D games or computers.Ɣ Be careful not to strike the TV screen or other people unintentionally. When using the 3D Eyewear the distance between the user and screen can be misjudged.Ɣ The 3D Eyewear must only be worn when viewing 3D content.Ɣ If you do not look toward the TV screen for a while when viewing 3D images, the 3D Eyewear may be turned off automatically.Ɣ Use the 3D Eyewear where there is no interference from other devices with Bluetooth signal.Ɣ If you suffer from any eyesight problems (short / far-sighted, astigmatism, eyesight differences in left and right), please ensure to correct your vision before using the 3D Eyewear.Ɣ Stop using the 3D Eyewear if you can clearly see double images when viewing 3D content.Ɣ Do not use the 3D Eyewear at a distance less than the recommended distance. The recommended viewing distance is at least 3 times of the image height. TH-P50ST50A: 1.9 m or more When the top and bottom area of the screen is blackened, such as movies, view the screen at a distance at least 3 times of the height of the actual image. (That makes the distance closer than above recommended figure.) 3D Eyewear UseƔ Pay special attention when children are using the 3D Eyewear. 3D Eyewear should not be used by children younger than about 5 - 6 years old, as a guideline. All children must be fully supervised by parents or guardians who must ensure their safety and health throughout the using 3D Eyewear.Ɣ Before using the 3D Eyewear, ensure no breakable objects surrounding the user to avoid any accidental damage or injury.Ɣ Remove the 3D Eyewear before moving around to avoid falling or accidental injury.Ɣ Use the 3D Eyewear only for the intended purpose and nothing else.Ɣ Do not use 3D Eyewear in the condition of high temperature.Ɣ Do not use if the 3D Eyewear is physically damaged.Ɣ Do not use devices (such as mobile phones or personal transceivers) that emit strong electromagnetic waves near the 3D Eyewear as this may cause the 3D Eyewear to malfunction.Ɣ Stop using the 3D Eyewear immediately if a malfunction or fault occurs.Ɣ Stop using the 3D Eyewear immediately if you experience any redness, pain, or skin irritation around the nose or temples.Ɣ In rare cases, the materials used in the 3D Eyewear may cause an allergic reaction. Lithium BatteryƔ Danger of explosion if battery is incorrectly replaced. Replace only with the same or equivalent type.](https://usermanual.wiki/Weifang-Goertek-Electronics/TITANBTL/User-Guide-1604421-Page-3.png)