Wherify Wireless LPG550 GSM 900/1800/1900 Mobile Phone with GPRS and E-GPS User Manual G500 Series User Guide
Wherify Wireless, Inc. GSM 900/1800/1900 Mobile Phone with GPRS and E-GPS G500 Series User Guide
Contents
- 1. FCC Notices
- 2. User Guide
User Guide

WHERIFONE™
G500 Series (G550/G560)
User Guide

My Wherifone Information
To access the Wherify Global Location Service Center on the Web:
http://www.wherify.com
To access the Global Location Service Center by phone:
1-877-WHERIFY (943-7439)
Wherifone ID:
Primary Contact:
IMEI Number:
S/N Number:
User ID:
Password:
(Chosen by you at time of activation)
Key Phrase:
(Chosen by you at time of activation)
Secondary Contact:
G500 Series (G550/G560)
WHERIFONE™
User Guide

i
Table of Contents
My Wherifone Information . . . . . . . . . . . . . . . . . inside front cover
Part One—The Wherifone™ G500 Series
GPS Locator Phone
Your Wherifone G500 Series . . . . . . . . . . . . . . . . . . . . . . . . . . . . . 2
How It Works . . . . . . . . . . . . . . . . . . . . . . . . . . . . . . . . . . . . . . . . . 8
The System Behind the Wherifone . . . . . . . . . . . . . . . . . . . . . . . . 8
Setup . . . . . . . . . . . . . . . . . . . . . . . . . . . . . . . . . . . . . . . . . . . . . . . 9
Step 1: Charge the Battery . . . . . . . . . . . . . . . . . . . . . . . . . . 9
Step 2: Insert your SIM Card . . . . . . . . . . . . . . . . . . . . . . . . 11
Step 4: Activating Your Account . . . . . . . . . . . . . . . . . . . . . 12
Getting to Know Your Wherifone G500 Series
GPS Locator Phone . . . . . . . . . . . . . . . . . . . . . . . . . . . . . . . . . . . 15
Main Display . . . . . . . . . . . . . . . . . . . . . . . . . . . . . . . . . . . . . . . . 15
Signal Strength . . . . . . . . . . . . . . . . . . . . . . . . . . . . . . . . . 15
Ring Mode . . . . . . . . . . . . . . . . . . . . . . . . . . . . . . . . . . . . . 16
Lock . . . . . . . . . . . . . . . . . . . . . . . . . . . . . . . . . . . . . . . . . . . 16
Battery Level . . . . . . . . . . . . . . . . . . . . . . . . . . . . . . . . . . . . 17
Using the Wherifone: . . . . . . . . . . . . . . . . . . . . . . . . . . . . . . . . . 18
Turning On the Wherifone . . . . . . . . . . . . . . . . . . . . . . . . . 18
Turning Off the Wherifone . . . . . . . . . . . . . . . . . . . . . . . . . 18
Emergency Requests . . . . . . . . . . . . . . . . . . . . . . . . . . . . . . 19
Changing Phone Settings . . . . . . . . . . . . . . . . . . . . . . . . . . . . . . 21
Menu Operations and Selections . . . . . . . . . . . . . . . . . . . . . 21
Setting Ring Tones . . . . . . . . . . . . . . . . . . . . . . . . . . . . 23
Setting Phone Volume and Activating
the Speakerphone . . . . . . . . . . . . . . . . . . . . . . . . . . . . 24
Setting Ringer Volume . . . . . . . . . . . . . . . . . . . . . . . . . 25
Keypad Lock . . . . . . . . . . . . . . . . . . . . . . . . . . . . . . . . . 26
Ring/Vibrate Mode . . . . . . . . . . . . . . . . . . . . . . . . . . . . 27
Adjust Screen Contrast . . . . . . . . . . . . . . . . . . . . . . . . . 28
Set Backlight Timer . . . . . . . . . . . . . . . . . . . . . . . . . . . 29
Please read this user guide, including its Safety Information and Warnings
section, prior to using your Wherifone G500 Series GPS locator phone and
the Wherify location services. Please keep a copy of this user guide for your
future reference.
© Wherify Wireless, Inc. 2005. All rights reserved.
Software, Web Content and User Guide Restrictions. Laws in the United
States of America and other countries provide Wherify Wireless, Inc. with
certain exclusive rights with respect to this user guide, the web pages made
available by Wherify Wireless, Inc., the contents of this user guide and such
web pages, and the software and firmware provided on your Wherifone
device. Such rights include copyright, trade secret, and other applicable
intellectual property and proprietary rights. Accordingly, no portion of this
user guide or such web pages, or any derivative of this guide or such web
pages, may be reproduced, distributed, or transmitted, and no derivative
(including translations) may be created, without the prior written agree-
ment of Wherify Wireless, Inc. Similarly, no portion of the software or
firmware provided with your Wherifone device, or any derivative of such
software or firmware, may be reproduced, distributed, or transmitted, and
no derivative may be created, without the prior written agreement of
Wherify Wireless, Inc. The software and firmware provided on your
Wherifone device, and the trade secrets therein, shall not be used except
on the Wherifone device on which such software was installed at the time
of distribution, and such software, firmware, and trade secrets shall not be
altered, disassembled, de-compiled, interrogated, translated, transmitted,
decoded, or otherwise reverse engineered in any manner.
No Licenses. No purchase, transmission or distribution of products, docu-
mentation or services of Wherify Wireless, Inc. shall be considered to grant
any license, whether express, implied, or otherwise, under any patent,
copyright, trademark, trade secret or other intellectual property or propri-
etary right of Wherify Wireless, Inc. or its suppliers and licensors. ALL SUCH
RIGHTS ARE RESERVED EXCLUSIVELY TO WHERIFY WIRELESS, INC. AND ITS
SUPPLIERS AND LICENSORS.
WHERIFY, WHERIFONE and the W logo are among the registered and
unregistered trademarks of Wherify Wireless, Inc. in the United States and
other jurisdictions.

iii
ii
Device Setup Menu . . . . . . . . . . . . . . . . . . . . . . . . . . . . . . . 30
Set Time . . . . . . . . . . . . . . . . . . . . . . . . . . . . . . . . . . . . 31
Set Date . . . . . . . . . . . . . . . . . . . . . . . . . . . . . . . . . . . 31
Message Center . . . . . . . . . . . . . . . . . . . . . . . . . . . . . . 32
IMEI Number . . . . . . . . . . . . . . . . . . . . . . . . . . . . . . . . 32
Software Version . . . . . . . . . . . . . . . . . . . . . . . . . . . . . 32
Reset to Factory Defaults . . . . . . . . . . . . . . . . . . . . . . 32
Performing a Locate . . . . . . . . . . . . . . . . . . . . . . . . . . . . . . . . . . 33
How to Perform a “Remote” Locate Via the Internet . . . . . 33
How to Perform a “Local” Locate Directly from
the Wherifone . . . . . . . . . . . . . . . . . . . . . . . . . . . . . . . . . . . 33
Making Voice Calls . . . . . . . . . . . . . . . . . . . . . . . . . . . . . . . . . . . . 35
Program the Dial Buttons . . . . . . . . . . . . . . . . . . . . . . . . . . 35
Receive, Make, and End Calls . . . . . . . . . . . . . . . . . . . . . . . . 35
Part Two—Wherify Global Location Services
The Wherify Global Location Service Center . . . . . . . . . . . . . . . . 38
Connecting to the Wherify Global Location Service Center
via Phone . . . . . . . . . . . . . . . . . . . . . . . . . . . . . . . . . . . . . . . . . . . 38
Connecting to the Wherify Global Location Service Center
via the Web . . . . . . . . . . . . . . . . . . . . . . . . . . . . . . . . . . . . . . . . . 38
Logging On . . . . . . . . . . . . . . . . . . . . . . . . . . . . . . . . . . . . . 39
Main Menu Page . . . . . . . . . . . . . . . . . . . . . . . . . . . . . . . . . 40
Locator Functions . . . . . . . . . . . . . . . . . . . . . . . . . . . . . . . . . . . . 42
Locator Functions Menu . . . . . . . . . . . . . . . . . . . . . . . . . . . 42
Set Up Breadcrumb . . . . . . . . . . . . . . . . . . . . . . . . . . . . . . . 43
Program Buttons . . . . . . . . . . . . . . . . . . . . . . . . . . . . . . . . . 46
Display History . . . . . . . . . . . . . . . . . . . . . . . . . . . . . . . . . . . 48
Viewing and Managing Location Information . . . . . . . . . . 50
Account Management . . . . . . . . . . . . . . . . . . . . . . . . . . . . . . . . . 53
Manage Account Menu . . . . . . . . . . . . . . . . . . . . . . . . . . . . 53
Subscriber Information . . . . . . . . . . . . . . . . . . . . . . . . . . . . 54
Edit Security Code . . . . . . . . . . . . . . . . . . . . . . . . . . . . . . . . 55
Edit Device Information . . . . . . . . . . . . . . . . . . . . . . . . . . . . 56
LIMITED WARRANTIES;
LIABILITY AND WARRANTY DISCLAIMERS . . . . . . . . . . . . . . . . . . 58
PROCEDURES TO OBTAIN REPAIR SERVICE . . . . . . . . . . . . . . . . . 60
Safety Information and Warnings . . . . . . . . . . . . . . . . . . . . . . . . 62
FCC Compliance Information . . . . . . . . . . . . . . . . . . . . . . . . . . . . 65
Index . . . . . . . . . . . . . . . . . . . . . . . . . . . . . . . . . . . . . . . . . . . . . . 71

iv 1
Part One
The Wherifone™G500 Series
GPS Locator Phone
HOW TO OBTAIN SUPPORT
If you have any difficulty understanding or using your Wherifone
G550/G560 GPS locator phone or the location services provided by Wherify
Wireless, Inc. as described in this user guide, additional information may
be found at http://www.wherify.com. You may also email us at: customer-
care@wherify.com; and call us at: 1-877-WHERIFY (1-877-943-7439). Support
for third party services and affiliate services are not the responsibility of
Wherify Wireless, Inc., and must be contacted directly for service support.
Troubleshooting Guide: The Wherify Web site, at http://www.wherify.com,
contains a Troubleshooting Guide discussing solutions to possible problems.
User Guide and Product Changes. This user guide is based on the production
version of the Wherify Wherifone G500 Series (G550/G560) phones. Software
changes may have occurred after this printing. Information in this user
guide may be changed by Wherify Wireless, Inc. from time to time in its sole
discretion, without notice. Additionally, Wherify Wireless, Inc. reserves the
right to at all times make any changes in its products and services, including
without limitation the Wherifone GPS locator phone and the Wherify
Wireless, Inc. locations services, in each case without notice and without any
obligation to provide updates and upgrades to you. Wherify’s web site may
have information regarding changes made by Wherify in its products and
services from time to time.
NOTE TO PARENTS AND GUARDIANS. If your Wherifone GPS locator phone
is to be used by an individual that is not a fully competent adult (e.g. some-
one in the beginning stages of Alzheimer’s, a child, or other special needs
condition) or other individual that has not read or may be unlikely to read
or understand this user guide, it is important that you carefully explain to
such individuals the features and operation of the Wherifone GPS locator
phone as described in this user guide, including confirming that they under-
stand and are able to use the Wherifone GPS locator phone and the func-
tionality and features of the phone; they understand the requirements and
limitations on its performance (including the circumstances and conditions
under which the location functionality and features will and will not work),
and they understand what to do in an emergency.
IT IS IMPORTANT THAT YOU READ ALL SAFETY WARNINGS, LIMITATIONS,
AND DISCLAIMERS IN THIS USER GUIDE PRIOR TO USING YOUR WHERIFONE
GPS LOCATOR PHONE AND THE WHERIFY LOCATION SERVICES.
32
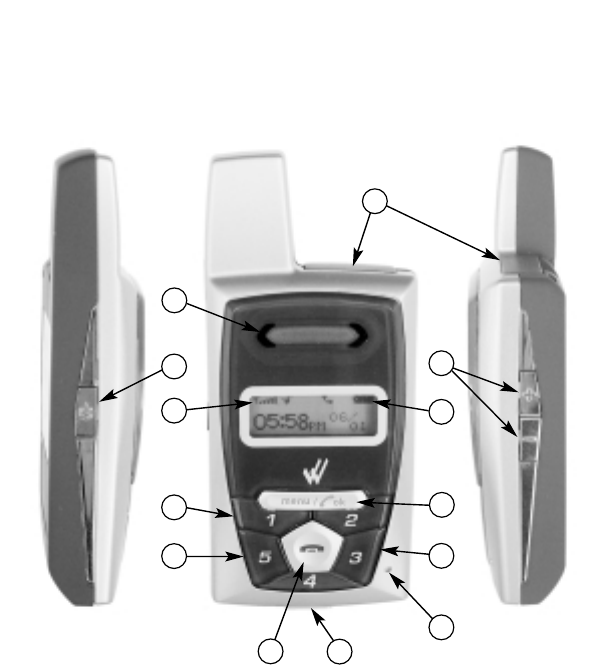
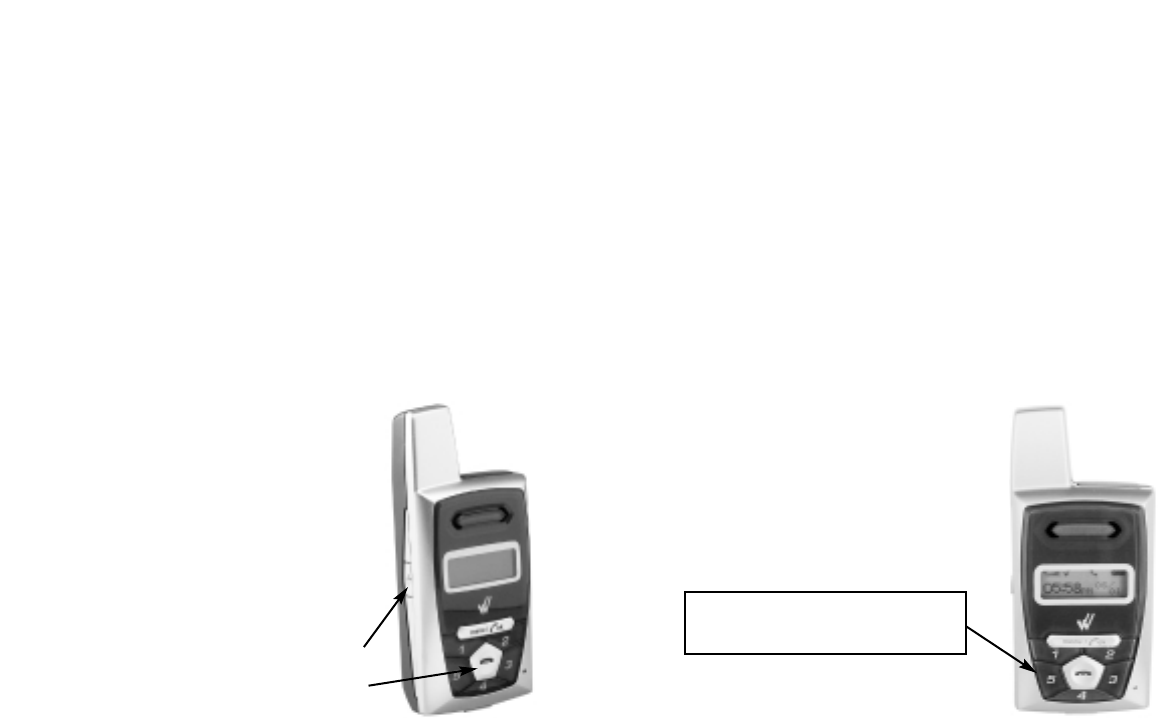
1. SIM Card Holder: Pull out SIM card drawer and slide in your
SIM card until it snaps into place.
2. Dual Function—Volume Control and Navigation: Press these
buttons to control speakerphone volume. Press (+) to increase
volume or (-) to decrease volume. While in the Menu use
buttons to move to select desired feature.
3. Battery Strength Indicator: Indicates the percentage of charge
left in the battery.
4. Menu/OK Button: Use this button to scroll through menu
options AND to select features.
5. Dual Purpose Buttons—Scroll and Programmable Buttons:
While in the Menu, buttons 5and 3can be used to move the
cursor left or right to select the desired feature OR during
normal operation can be preprogrammed and used for
making a phone call.
6. Reset Button: DO NOT USE unless directed to by a Wherify
Customer Service Representative.
7. Charging Port: Plug in the AC power adaptor here to charge
battery.
8. Power Off/End Button: Press and release to hang up or
disconnect a call. Press and HOLD for five (5) seconds to turn
your Wherifone “OFF”.
9. Programmable Buttons 1 through 5: Press any numbered
button once to display a pre-programmed phone number;
then press the menu/OK button to dial that number. Or you
can press and hold a numbered key for four (4) seconds to
dial the selected number.
10. Cellular Phone Network Signal Strength Indicator: Indicates
the signal strength of the GSM network.
11
6
1
8
10 3
7
5
2
12
4
9
5
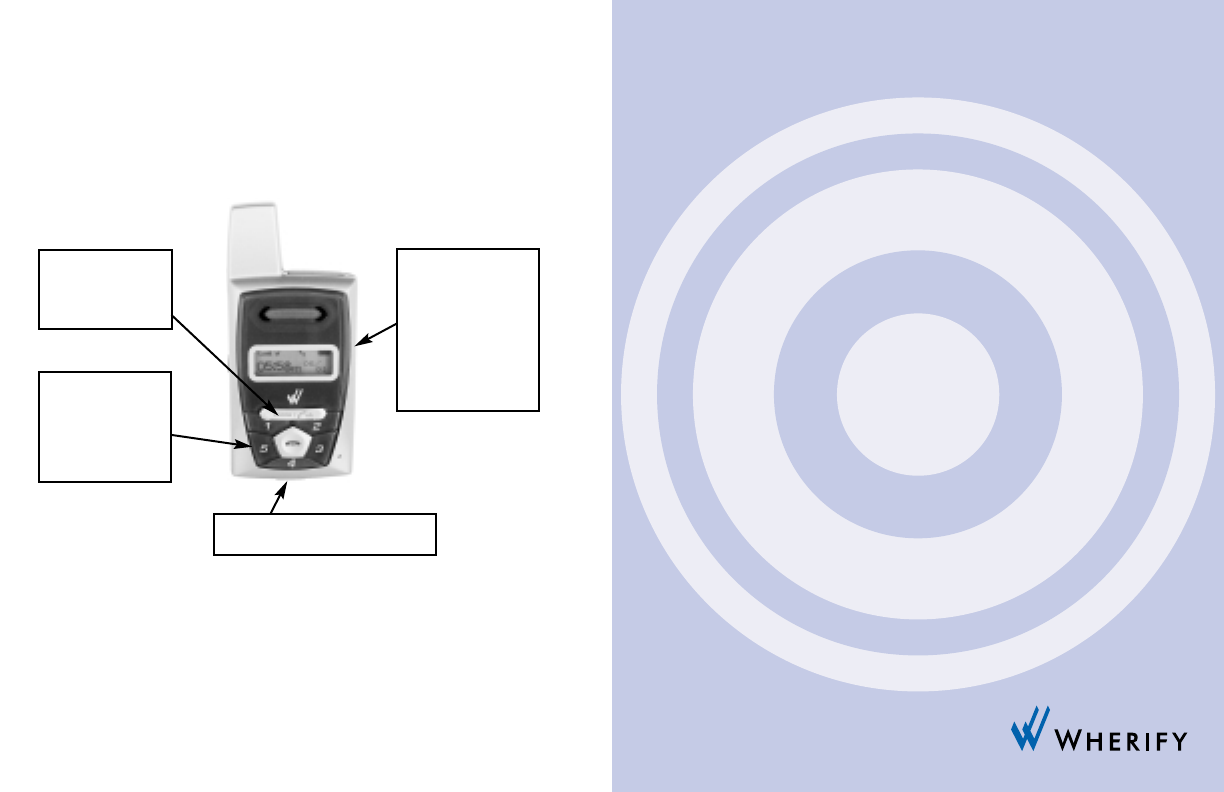
Your Wherifone G500 Series
Figure 1.1

4 5
The Wherifone G500 Series GPS Locator Phone
Congratulations on your purchase of the Wherifone GPS Locator
Phone. The Wherifone is the world’s smallest GSM/GPS Locator
Phone and provides a totally unique and affordable way for fami-
lies with pre-teens, seniors, or those with special medical needs, to
stay connected and in contact with each other. Wherify’s integra-
tion of digital cellular GSM technology with Global Positioning
System (GPS) technologies is designed to enable you to locate and
track the Wherifone GPS Locator Phone. Because Wherify’s tech-
nology is designed to improve location performance over conven-
tional GPS technology, locating and tracking the Wherifone G500
Series phone may be possible even when there is no direct line of
sight between the phone and the GPS satellites, such as when the
phone is being used in vehicles, homes and offices. Whether you
are at work, at home, or traveling, you can use the Internet or
any telephone to quickly and precisely identify the location of the
Wherifone.
Please read the entire User Guide to become familiar with
the Wherifone and how it works.
In order to use Wherify’s location technology, you will need the
following:
1. A GSM cellular account with Wherify Wireless, Inc., or
designated service provider;
2. Your Wherifone GPS locator phone;
3. A Wherify Wireless locations services account or a location
services account provided by a third party for the Wherifone
under authority of Wherify Wireless (each requires activation
in addition to your cellular account); and
4. Internet and/or telephone access (not provided by Wherify),
including (i) for Internet access, appropriate computer
11. Power On/Off Button: Hold this button down for 2 seconds to
power the unit “ON” or 4 seconds to power the unit “OFF.”
12. Speaker: Plays Ring Tones when phone rings. Also used to
listen to inbound caller during a conversation.
Other required equipment:
1. A Personal Computer with Internet account, or a standard
home/office phone or non-Wherify cellular phone (not included):
Once you have activated your account, your Wherifone is part
of location and emergency network. Use a computer with an
Internet account, or a phone, to access the network.
2. Global Location Service Center: The behind-the-scenes back-
bone of the location and emergency network (included after
account activation with Wherify).
76
equipment, software and an Internet account and (ii) for
telephone access, a home/office phone or other non-Wherify
cellular phone.
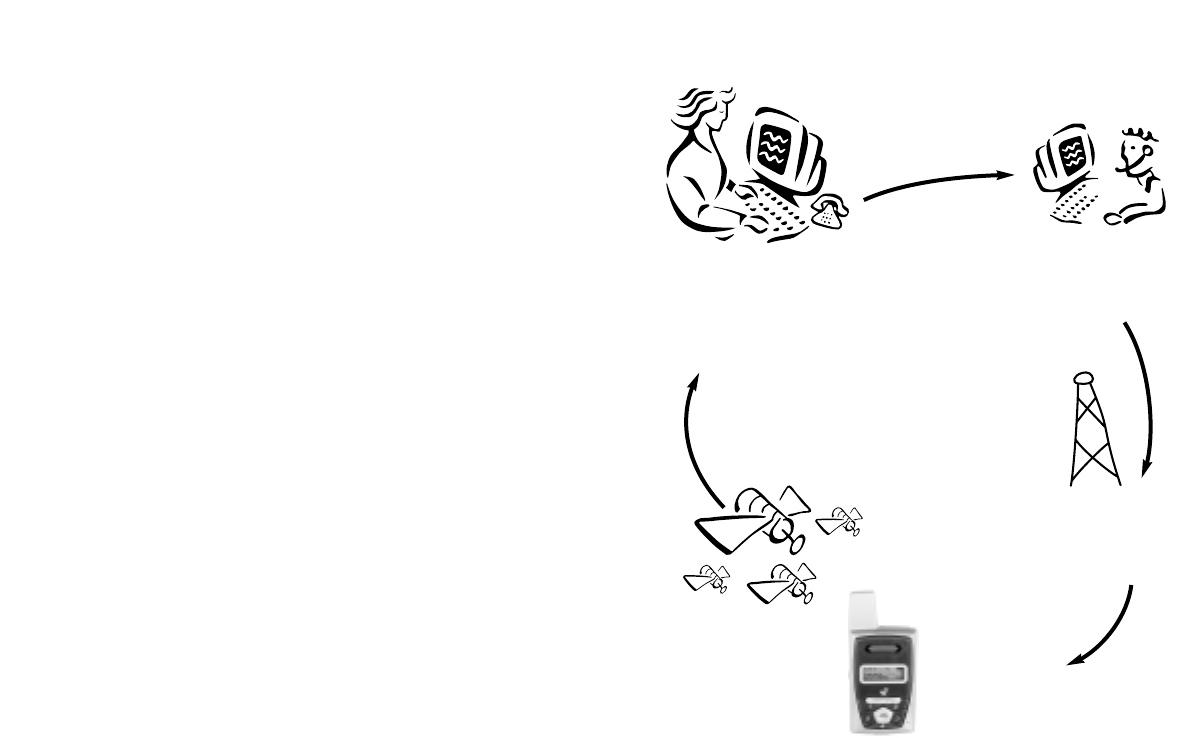
Later in this user guide, we will provide additional detail regard-
ing each of these portions of the system. But, to provide you with
an overview, you can better understand the general operation of
Wherify’s technology from the following figure.
Note
It is not possible to track or locate the Wherifone using the
location services or GPS satellites when it is not powered “ON.”
The Wherifone GPS locator phone is designed to obtain location
information using both GPS satellites and GSM cellular phone
towers, and to communicate with Wherify’s state-of-the-art auto-
mated Global Location Service Center over the GSM network in
order to make the location information available to you by tele-
phone and over the Internet. The Wherify Global Location Service
Center processes the location information it receives from the
Wherifone and makes it available to you via the secure Wherify
website in the form of map and aerial/satellite photography
showing the location of your G500 Series phone, or an approxi-
mate street address if you do not have internet access. The
Wherify service center is also backed by Wherify’s customer care
representatives to provide you with assistance.
Should GPS satellites be obscured or a GPS fix otherwise be
unavailable, the Wherify system will provide the approximate
position of a Wherifone by using location information taken from
the GSM network, such as the location of the serving cell phone
tower (Cell ID), where this information is made available to
Wherify. GSM network location information may also be used by
safety officials during an emergency 911 call to determine the
approximate position of the Wherifone user.
2. The Global Location
Service Center processes
your request and…
1. Request a
Locate on our
Web site or
over the phone.
5. Receive your
Location Report
on the Web site or
over the phone.
4. The Wherifone
uses GPS
satellites to
determine
its location.
3. …sends a
wireless
call to the
Locator.
System Overview
Figure 1.2

98
How It Works
You can locate the Wherifone in two easy ways:
1. Log onto the Internet at www.wherify.com (see page 42)
to view location information on street and aerial maps.
2. Call us at 1-877-WHERIFY (see page 38) to obtain a verbal
location report from a Wherify Customer Care representative.
We’ll map your loved-one’s location and give you a nearby/
approximate street address, typically in less than a minute.
An e-mail of the same information is also available.
The System Behind the Wherifone
The Wherifone works by combining Wherify’s patented location
technology with the United States Department of Defense’s
Global Positioning System (GPS) of satellites—plus the digital,
nationwide cellular networks.
We integrate all this into our state-of-the-art automated Global
Location Service Center—utilizing the same type of mainframe
computers used by banks, telephone companies and airlines, and
backed by Wherify’s Customer Care representatives standing by to
provide assistance when needed.
When you request a Locate either through our Web site at
www.wherify.com or over the phone at 1-877-WHERIFY (943-
7439), our Global Location Service Center contacts the Wherifone
with a silent signal via a nationwide GSM cellular network. The
Wherifone then zeros in on the closest GPS satellites orbiting the
Earth, determines its location, and reports its latitude and longi-
tude coordinates back to the Global Location Service Center.
Our Global Location Service Center processes those coordinates,
pinpoints them with advanced mapping software, and gives you
an approximate street address (if one is available) with your
Wherifone location plotted onto two types of maps: 1) Standard
online street maps and 2) a detailed high resolution photo map
(using either aerial or satellite imagery).
Setup
We make it easy for you to set up your Wherifone and your
accompanying account. YOU MUST FULLY COMPLETE THE
ACTIVATION PROCESS FOR YOUR WHERIFONE TO WORK.
Before you can use your Wherifone you need to:
Step 1: Fully charge the battery
Step 2: Insert the SIM card
Step 3: Turn on Your Wherifone
Step 4: Activate your account
Step 1: Charge the Battery
Before using your Wherifone, we recommend charging the bat-
tery for at least twelve hours (12) hours. After this charge time,
the battery icon should indicate that the phone is fully charged.
The battery must be fully charged before you can continue to
“Step 2: Insert the SIM Card”on page 11. Do not insert the SIM
Card until the battery has been fully charged.
Battery Strength: The battery icon on the LCD indicates the
charge state of the battery. The more filled-in the icon, the more
battery power is left in the Wherifone. If it indicates very low
power or less, your Wherifone may not be able to receive a
location request, take incoming phone calls, or make outgoing
phone calls.
Battery Charge Life: The Wherifone uses a miniaturized, built-in
rechargeable Lithium Ion Polymer battery. In order to maximize
battery life and reduce the risk of inoperable location and/or cel-
lular services in an emergency, we recommend that the battery be
charged whenever possible by plugging the Wherifone G500
1110
Series phone into its charger whenever an outlet is available, but
no less often than a full overnight charge each evening. You will
NOT harm the battery by leaving the G500 Series in the charger
for long periods of time, and it is NOT necessary to drain the bat-
tery before charging.
The length of time the phone will work on a charge varies
depending upon individual use, including factors such as signal
strength, GSM network coverage, GPS satellite positions, age of
the battery, length of time the phone is left on, time spent mak-
ing voice calls, whether or not functions are used that power on
the GPS receiver (e.g. location requests).
WARNING: Only use the Wherify battery charger that came
with the Wherifone to charge it. Do not use any other battery
charger. Other battery chargers may damage the battery and the
Wherifone, and may also be dangerous to anyone near the unit.
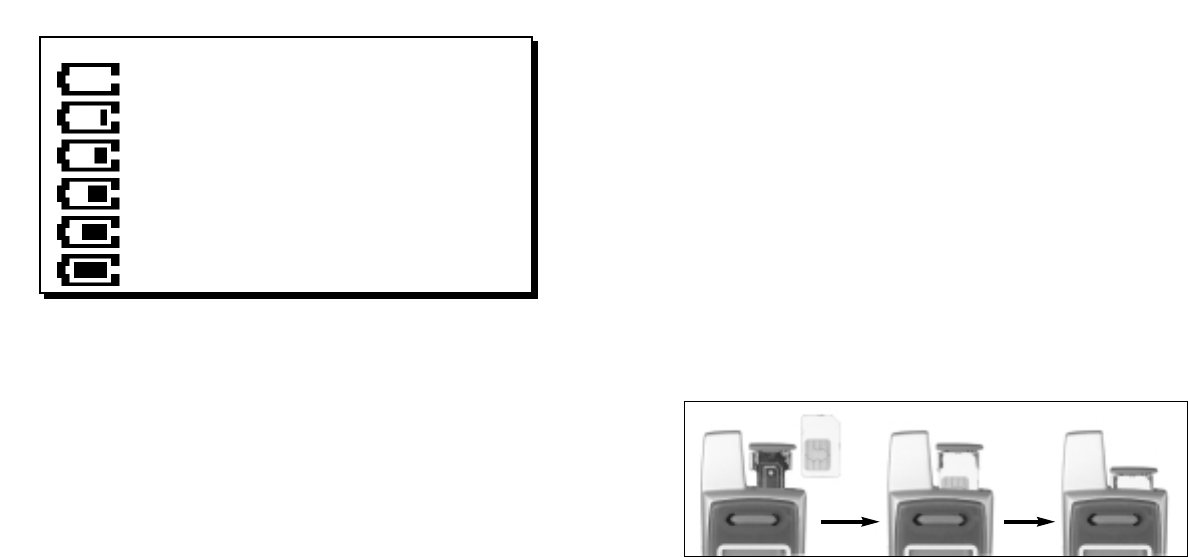
Step 2: Insert your SIM Card
When you register as a subscriber with Wherify or another GSM
network operator, you get a SIM (Subscriber Identity Module)
card. The SIM card contains a computer chip that keeps track of
your phone number, the services included in your subscription,
phonebook information, and other information.
To insert your SIM card, remove the SIM drawer on the top of the
phone and snap in your SIM card with the notched corner in the
top right and the GOLD pads facing forward. Please refer to the
photos below.
Note
The Wherifone requires a valid SIM Card to function. The SIM card
must be in the phone prior to activation. If you do not have a SIM
card the unit will not make or receive phone calls. The phone
must be off when you insert or extract the SIM card.
Figure 1.3
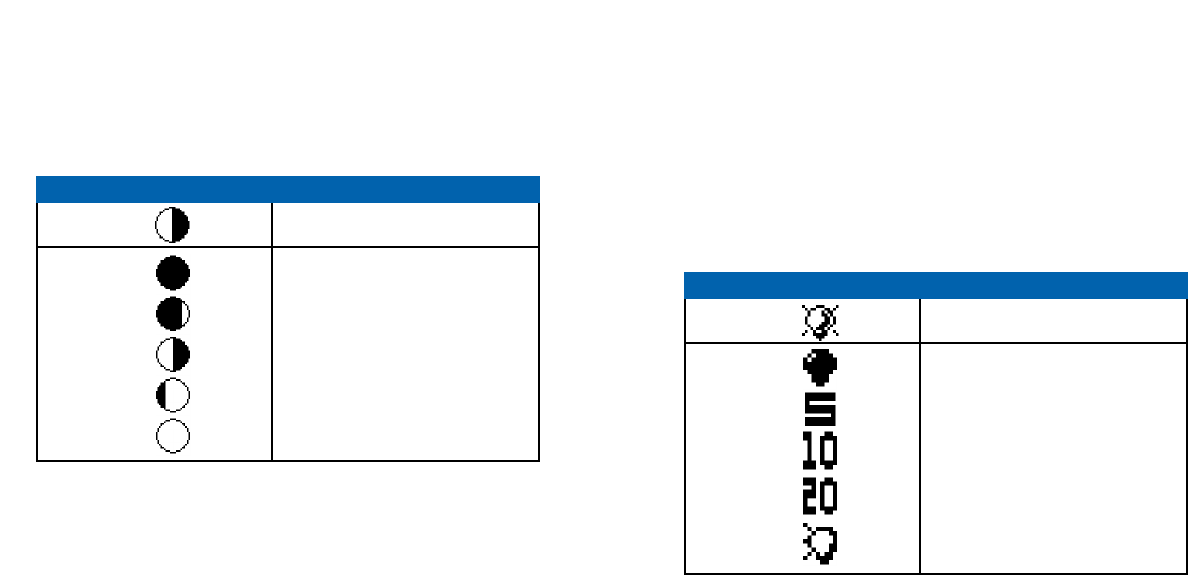
BATTERY LEVEL ICON
CHARGING IS REQUIRED
VERY LOW POWER (<20% OF BATTERY LIFE).
UNIT SHOULD BE CHARGED
LOW POWER (<40% OF BATTERY LIFE)
MEDIUM POWER (60% OF BATTERY LIFE)
MEDIUM HIGH (80% OF BATTERY LIFE)
FULLY CHARGED BATTERY

1312
Step 3: Turn On the Wherifone
The Wherifone must be ON to operate and to communicate infor-
mation about your location, to receive incoming phone calls, or
make outgoing phone calls. To turn on the Wherifone, press and
hold the Power button for 2 seconds.
To turn off your Wherifone, press and hold the Power button
for 4 seconds, OR; press and hold the Power Off/End button for
5 seconds.
Step 4: Activating Your Account
IMPORTANT: YOU MUST SIGN UP FOR WHERIFY SERVICE AND
ACTIVATE YOUR ACCOUNT TO USE YOUR WHERIFONE. Activation
gives you access to Wherify’s Global Location Service Center and
“links” your Wherifone to you.
Activating Your Account
To activate your account, you’ll need to select a Wherify service
plan for both your cellular and location services. You can get
information concerning the latest service plans made available by
Wherify where you purchased your Wherifone, on our Web site at
www.wherify.com or by calling 1-877-WHERIFY (1-877-943-7439).
You should choose the plan that’s right for you and that matches
how you intend to use your Wherifone GPS locator phone and the
location services.
Wherify provides service plans for both cellular phone service and
location services. The cellular and location services may or may
not be bundled together depending upon what Wherify elects to
make available at the time. All Wherify service plans are subject
to Wherify’s then most recent terms and conditions, published on
the Wherify web site, as being applicable to the particular service.
Wherify reserves the right to revise its plans, and its service terms
and conditions, at any time in its sole discretion without notice.
Additional Information for Account Activation
In addition to the required phone set up and plan selection
described above, you will be required to provide the following
information in order to activate your cellular and location service
accounts (to help speed up the activation process, we suggest you
write this information down before starting. You can use the “My
Wherifone Info” page, which is inside the front cover of this user
guide, to keep track of this information).
•The two serials numbers from the back of your Wherifone.
These numbers can also be found on your package, they are
called the IMEI and S/N. The IMEI is fifteen (15) characters in
length; and the S/N is eleven (11) characters in length.
•A security password you create for your account. The password
needs to be at least six (6) characters (up to twelve (12) charac-
ters is permitted). Characters can be any combination of num-
bers, symbols, or letters you choose.
•A key phrase you create to help you remember your password,
in case you forget it.
•Your credit card information: number and expiration date.
Once you have set up your phone, identified the desired Wherify
service plan and collected this information, you’re ready to activate!
At this point, simply go online to www.wherify.com and click the
Activate button, then follow the activation instructions and
prompts. If you do not have access to the Internet, call 1-877-
WHERIFY (1-877-943-7439) and a Wherify Customer Care repre-
sentative will help you activate your account.
Record your User ID and Phone Number: At the end of the activa-
tion process, you will be provided with two important numbers
that allow you to access your account:
•User ID—a 10-digit number (like a phone number) you will use

1514
with the Password you created to access secure Wherify
Services from our Web site.
•Phone Number—a 10-digit number (for the USA) used for
receiving incoming phone calls (including area code).
Please write these numbers in the “My Wherifone Info” page,
located inside the front cover of this guide. Please keep them in a
safe and confidential place.
Your Wherifone is now ready to use!
Getting to Know Your Wherifone G500
Series GPS Locator Phone
Main Display
Important information about the
status and features of the Wherifone
appear in the main display. There are
three types of displays on the
Wherifone:
Icon Display: The top icons show the vital Wherifone functions.
Scrolling Display: The middle line is scrolling text that indicates
carrier, locate, and other status information.
Message Display: The bottom line shows the date and time
during regular use.
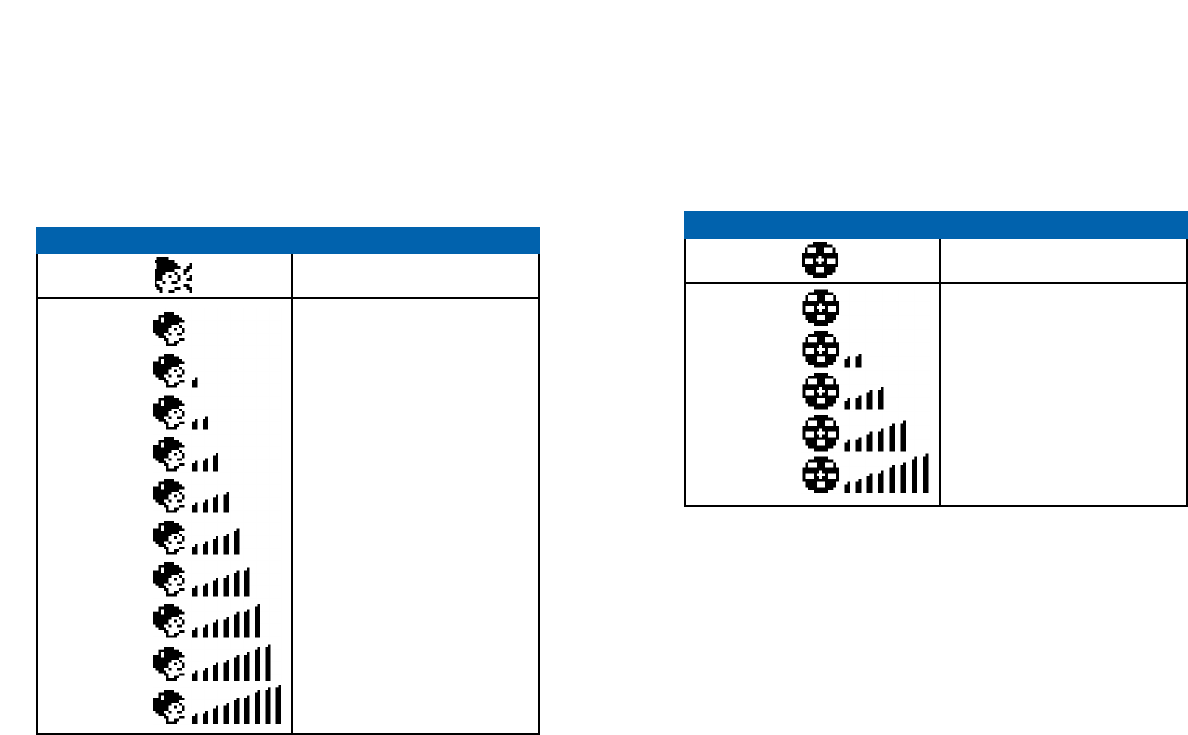
Signal Strength
The number of bars in the Signal Strength icon indicates the
strength of the GSM network signal the Wherifone is receiving.
More bars mean a stronger GSM signal. The Wherifone uses the
GSM network for all communication activities: making calls,
receiving calls, receiving pages, receiving location requests, and
sending location reports to the Global Location Service Center.
If the signal strength is low or non-existent, your Wherifone may
not be able to receive a location request, send its location infor-
mation, or make incoming or outgoing phone calls.
17
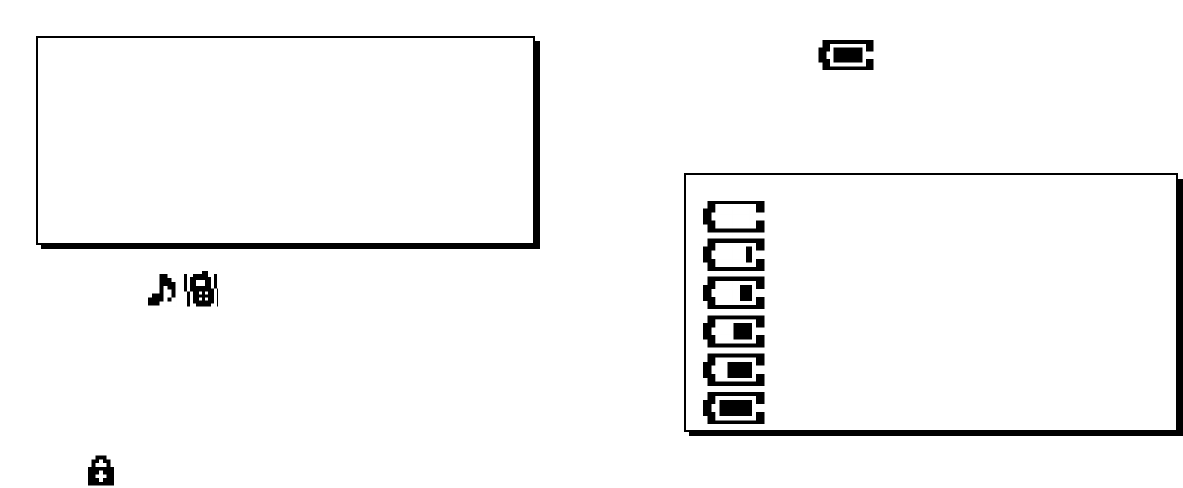
Battery Level
The Battery Level icon shows the battery charge. The more filled
in the icon, the more battery power is left in the Wherifone. If
the Battery Power icon is empty, you may not be able to perform
locates, receive or send phone calls, or receive pages.
BATTERY LEVEL ICON
CHARGING IS REQUIRED
VERY LOW POWER (<20% OF BATTERY LIFE).
UNIT SHOULD BE CHARGED
LOW POWER (<40% OF BATTERY LIFE)
MEDIUM POWER (60% OF BATTERY LIFE)
MEDIUM HIGH (80% OF BATTERY LIFE)
FULLY CHARGED BATTERY
16
Ring Mode
The Ring Mode icon indicates that the Wherifone is set either to
“Ring Mode” or “Vibration Mode.” Set this mode using the Menu
function. In Ring Mode the Wherifone will alert the user to an
incoming call via the ringtone selected by the user. When the
phone is in Vibration Mode the phone will vibrate to alert the
user to an incoming call.
Lock
The Lock icon indicates that the Wherifone keypad is locked. The
Lock icon will only appear when the keypad has been locked
using the Menu function. If the keypad is locked you may tem-
porarily unlock it by holding down on the menu/OK button for
three seconds. The keypad will automatically re-lock one minute
after you’ve completed your call or locate. The 911 button will
work even if the keypad is locked.
GSM NETWORK SIGNAL STRENGTH ICON
NO BARS NO SIGNAL ON GSM NETWORK
ONE BAR VERY LOW OR WEAK SIGNAL ON THE GSM
NETWORK
TWO BARS LOW SIGNAL ON THE GSM NETWORK
THREE BARS MEDIUM SIGNAL ON THE GSM NETWORK
FOUR BARS MEDIUM HIGH SIGNAL ON THE GSM NETWORK
FIVE BARS HIGH SIGNAL ON THE GSM NETWORK
1918
Emergency Requests
In the event of an emergency, you can dial 911directly from the
Wherifone. Button 5has been set at the factory as the default
Emergency button for making 911 calls. The phone will always
have an emergency 911 calling ability through this button, with
or without a valid SIM card.
To send an emergency request from the Wherifone: Press button 5
and hold for four (4) seconds to access the Emergency number (911).
After validating the emergency request with the user or a desig-
nated contact, the Emergency Operator can dispatch the request
to the nearest Public Safety Answering Point (PSAP) 911 operator.
The proper emergency authority can then be sent to the user’s
location.
Note
Emergency Operators must be able to validate the emergency
before the Emergency Providers (Police, Fire Department,
Ambulance, etc.) are dispatched to
your location.
The current release of the Wherifone
G500 Series cannot do a simultaneous
GPS locate and voice call. In case of a
911 emergency call, GSM network loca-
tion information (such as the location
Emergency/911 Request: Press button 5
and hold for 4 seconds to initiate a 911
Emergency Request.*
Figure 1.5
Using the Wherifone:
Your Wherifone has the ability to communicate your location
whenever it is powered on, within the range of the GSM and GPS
signals, and a Location Report is requested either online at
www.wherify.com or 1-877-WHERIFY (943-1769), or by requesting
a locate directly from the Wherifone.
Turning On the Wherifone
The Wherifone must be ON to operate and to communicate infor-
mation about your location, to receive incoming phone calls, or
make outgoing phone calls. To turn on the Wherifone, press and
hold the Power button for 2 seconds.
Turning Off the Wherifone
You should turn off your Wherifone if you will not be using it for
an extended period of time. Just like a cellular phone, you MUST
turn the Wherifone off when you are traveling on any commercial
airplane.
When you turn off the Wherifone, all
locating and phone call functions are
suspended.
To turn off the Wherifone:
1. Press and hold the Power button
for 4 seconds, OR;
2. Press and hold the Power Off/End
button for 5 seconds.
Power button
Power Off/End button
Figure 1.4

2120
Changing Phone Settings
You may change your Wherifone default settings through the
main Menu, including Ring Tones, Volume Level, Ring Tone
Volume, Display Contrast/Level, Keyboard Lock, Ring/Vibrate
Function, and Backlight Timer.
To access the Menu, press the menu/OK button, and hold it down
for two seconds. Once in the Menu, you may scroll to the feature
you wish to set by using the 3button to scroll to the right, and
the 5button to scroll to the left. You may also use the volume
buttons to scroll between menu items. The “+” button will scroll
your selection to the right, and the “-” button will scroll your
selection to the left.
Once you have scrolled to the menu icon you wish to select, press
the menu/OK button. Your selection will be set, and you will be
returned to the main display. To cancel your selection and quit the
Menu function, press the Power Off/End button and you will be
returned to the main display.
Menu Operations and Selections
•Enter menu: push menu/OK and hold for 2 seconds
•Scroll menu: use 5and 3, or “+” and “-”
•Select icon: press menu/OK
•Cancel selection: press Power Off/End
•Return to main display: press Power Off/End
•Accept incoming calls while in the menu: press menu/OK
button to connect to the call
of the serving cell phone tower) may be used to determine the
approximate location of the caller by emergency authorities.
Wherify may offer subscribers the opportunity to subscribe to
managed emergency services through qualified partners that
would be able to manage an emergency call such that the caller’s
position could be determined using GPS. If the GPS satellites are
obscured during this process, and GPS coordinates are not avail-
able, where a GSM signal and network location information are
available, the GSM network location information will be used
determine the approximate location of the caller.
2322
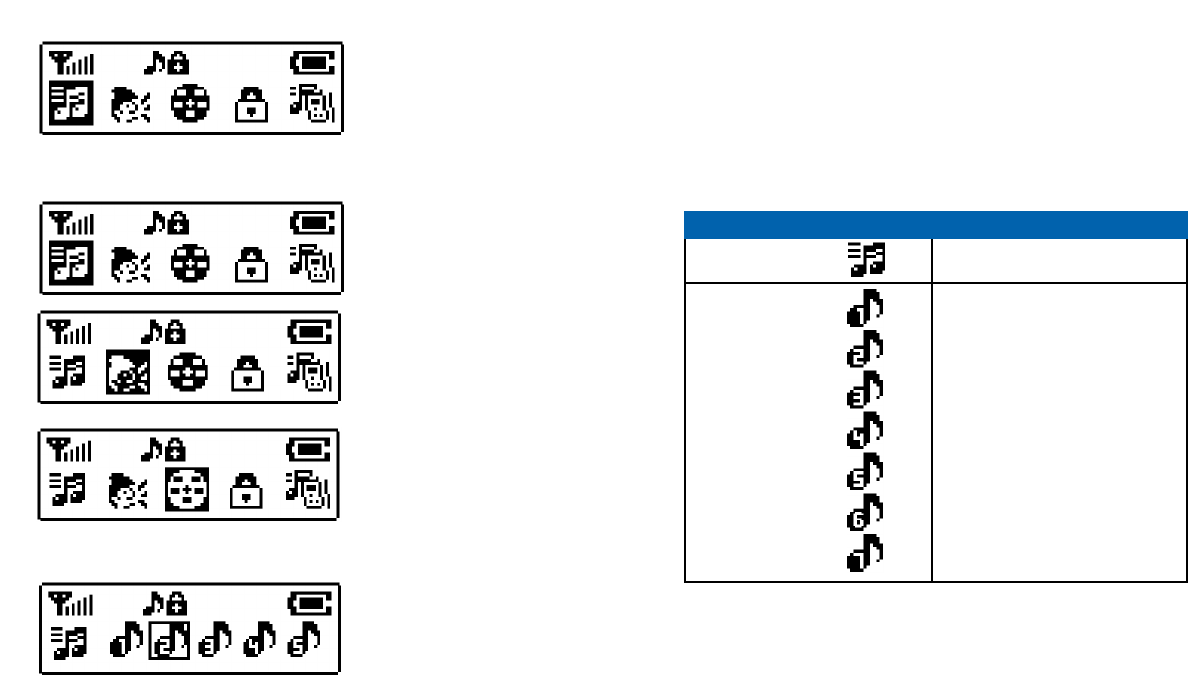
Setting Ring Tones
Your Wherifone comes with a choice of seven (7) different Ring
Tones. To set your Ring Tone, enter the Menu by pressing the
menu/OK button. Then scroll to and select the Ring Tones icon.
Once you are in the Ring Tone menu you may select one of seven
Ring Tones by scrolling through them using the number 3and 5
buttons, or the “+” and “-” volume buttons. Pressing the
menu/OK button will set your Ring Tone.
Scroll Menu
with 5 and 3,
or “+” and “-”
Enter Menu with
menu/OK held for
2 seconds
Select icon with
menu/OK button
Figure 1.6
Icon Description
Main Menu Ring Tone Selection
Submenu Ring Tone 1
Ring Tone 2
Ring Tone 3 (default)
Ring Tone 4
Ring Tone 5
Ring Tone 6
Ring Tone 7
2524
Setting Ringer Volume
To set your Ringer Volume, enter the Menu by pressing the
menu/OK button. Then scroll to and select the Ringer Volume
icon. The volume level of the Ringer is shown by the number of
bars in the icon. More bars means a higher volume. Adjust the
volume level by scrolling through them using the number 3and 5
buttons, or the “+” and “-” volume buttons. Pressing the
menu/OK button will set your Phone Volume.
Setting Phone Volume and Activating the Speakerphone
To set your Phone Volume or activate your Speakerphone, enter
the Menu by pressing the menu/OK button. Then scroll to and
select the Phone Volume icon. The volume level of your Wherifone
is represented by the number of bars in the icon. More bars means
a higher volume. The Speakerphone will start functioning at vol-
ume level 6. Adjust the volume level by scrolling through them
using the number 3and 5buttons, or the “+” and “-” volume but-
tons. Pressing the menu/OK button will set your Phone Volume.
Icon Description
Main Menu Speaker Volume
Submenu Level 1
Level 2
Level 3 (default)
Level 4
Level 5
Level 6 (speakerphone starts)
Level 7
Level 8
Level 9
Level 10
Icon Description
Main Menu Ringer Volume
Submenu Volume 1
Volume 2
Volume 3 (default)
Volume 4
Volume 5
2726
Ring/Vibrate Mode
The Wherifone may be set to either Ring or Vibrate when it
receives an incoming call or page. To set the Ring/Vibrate mode,
enter the Menu by pressing the menu/OK button. Then scroll to
and select the Ring/Vibrate icon. You may then set the phone to
either “Ring” or “Vibrate” using the scroll and select commands.
If the Wherifone is set to “Ring” it will alert the user with the
selected Ring Tone. If the Wherifone is set to “Vibrate” it will
alert the user by vibrating.
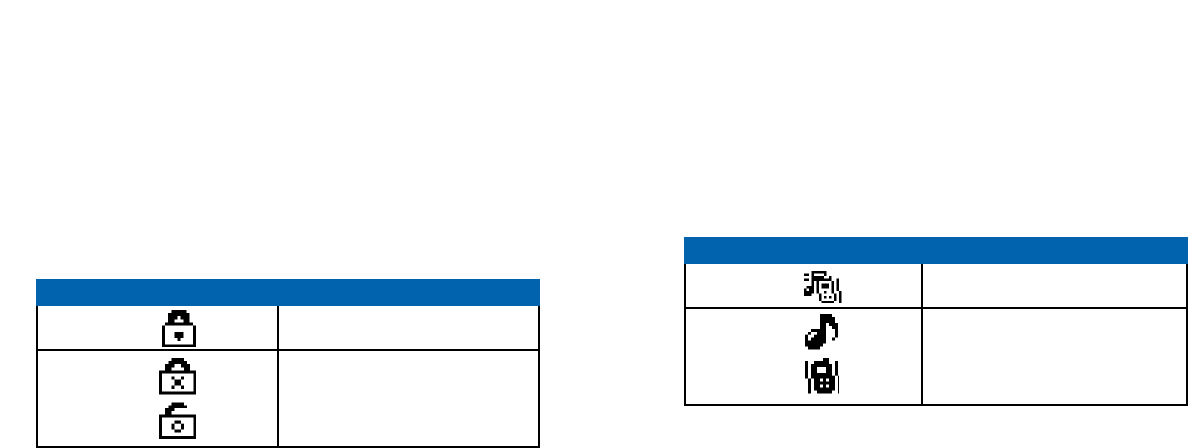
Keypad Lock
You may lock the Keypad of the Wherifone to prevent accidental
calls, or to limit access to the Wherifone. To lock, enter the Menu
by pressing the menu/OK button. Then scroll to and select the
Keypad Lock icon. You may then set “Active” or “Inactive” using
the scroll and select commands. The Lock icon indicates that the
Wherifone keypad is locked. The Lock icon will only appear when
the it has been locked using the Menu function. If the keypad is
locked you may temporarily unlock it by holding down on the
menu/OK button for three seconds. The keypad will then automati-
cally re-lock one minute after you’ve completed your call or locate. Icon Description
Main Menu Ring/Vibration Mode Selection
Submenu Ring Mode (default)
Vibration Mode
Icon Description
Main Menu Auto Keypad Lock
Submenu Active
Inactive (default)
2928
Set Backlight Timer
The Wherifone display screen has a backlight feature that makes
it easier to operate the phone. The backlight consumes battery
power, so to conserve power the Wherifone has a Backlight Timer
that adjusts how long the backlight stays “on” during operation.
To set the Backlight Timer simply enter the Menu by pressing the
menu/OK button. Then scroll to and select the Backlight Timer
icon. Set the duration of the backlight, ranging from “Always
Off” to five-, ten-, and 20-second intervals, to “Always On,” by
using the scroll and select commands. Once the Backlight Timer
has reached its time limit the backlight will automatically turn off.
Adjust Screen Contrast
The screen may be adjusted to set the desired level of Black/White
contrast. To set Screen Contrast, enter the Menu by pressing the
menu/OK button. Then scroll to and select the Screen Contrast
icon. You may then set the contrast level by using the scroll and
select commands.
Icon Description
Main Menu Set Backlight Timer
Submenu Always OFF
5 Seconds (default)
10 Seconds
20 Seconds
Always ON
Icon Description
Main Menu Adjust Screen Contrast
Submenu Level -2
Level -1
Level 0 (default)
Level 1
Level 2
3130
Set Time
When setting time, you must individually set each digit of the
hour, minute and second. To Set Time, select this menu icon from
the Device Setup Menu. Then select either a 12-hour, or a 24-hour
clock by highlighting your preference, and press the menu/OK
button.
Use the scroll buttons, 5and 3, or “+” and “-” to choose the cor-
rect number of 0 to 9. Press the menu/OK key to set each desired
time digit entry. Once you have set a part of the time entry, you
will be prompted to the next digit of the time-set entry. If you
make a mistake, you can press the Power Off/End button to go
back to the previous digit. If the time is set for the 12-hour mode,
you will be prompted to set either AM or PM when you have
entered the last digit.
Use the same procedure to set the time for a 24-hour time clock.
You will not have to select AM or PM.
There is no error checking as single digits are entered, but your
Wherifone will not accept an invalid time setting, such as
88:95:00.
Set Date
To Set the Date, select this menu icon from the Device Setup
Menu. You will then be able to set the date displayed on your
Wherifone.
The screen will display the initial date setting with the number
“0” under the first Y in the YY column (Year), with no numbers
under the MM (Month) and DD (Day) columns.
You must individually set each digit of the year, month and day.
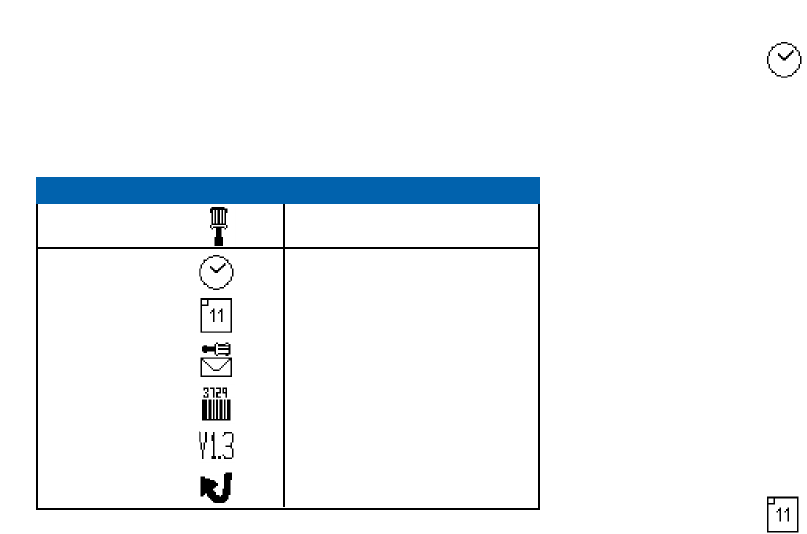
Device Setup Menu
The Device Setup Menu allows you to set the date and time on
your Wherifone, check messages and check the support software
version and IMEI number. To access these features, simply scroll to
the Device Set-up icon in the main menu and press the menu/OK
button. You can then scroll through the Device Set-up Menu.
Icon Description
Main Menu Device Set-up
Submenu Set Time
Set Date
Message Center
IMEI Number
Software Version
Reset to Factory Defaults

3332
Performing a Locate
Once your Wherifone account has been activated and is part of
Wherify’s Global GPS location system, you may perform Locates.
You may do both “remote” Locates through the Wherify website,
and “local” Locates that are initiated directly from the phone.
How to Perform a “Remote” Locate Via the Internet
1. Log onto our Web site: www.wherify.com
2. Enter your User ID and Password and click the Locate button.
We have instructions that take you through the process in
“Connecting to the Global Location Service Center via the
Web” on page 38 (and through the HELP links on the Web site).
3. Click the Locate Now button. You have now initiated a loca-
tion request to your Wherifone. In about a minute you will be
able to view the location of your Wherifone on street map
and on an aerial map (see page 42 for more details).
How to Perform a “Local” Locate Directly from
the Wherifone
You may initiate Locate requests directly from your Wherifone to
request a Managed Location Service such as Roadside Assistance
or Concierge Service, or to summon help via 911 or a Managed
Emergency Calling Service. While dial button 5is pre-set to emer-
gency 911 , the other dial buttons may be programmed to request
other Managed Location Services.
1. First, make sure the Wherifone is powered on. Depress the
Power button and check the Battery Strength Icon and GSM
Network Signal Strength Icon on the Liquid Crystal Display
(LCD). Both Icons on the LCD should illuminate. If the Battery
Icon shows low power or less, your Wherifone needs charging.
If the GSM Signal Strength Icon has NO BARS displayed, you
Use the scroll buttons, 5and 3, or “+” and “-” to choose the cor-
rect number of 0 to 9. Press the menu/OK key to set each desired
date digit entry. Once you have set a part of the date entry, you
will be prompted to the next digit until it is complete.
There is no error checking as single digits are entered, but your
Wherifone will not accept an invalid date setting, such as
05:49:00.
Message Center
Your Wherifone does not support numeric paging in the current
release, but future releases will allow you to receive and store
numeric pages that you access through the Check Messages icon.
IMEI Number
Check the IMEI of your Wherifone by selecting this icon from the
Device Setup Menu. You may be asked for this information from a
customer Wherify representative during a troubleshooting call.
Software Version
To see what software version your Wherifone is using, select the
Software Version icon from the Device Setup Menu. You may be
asked for this information from a Wherify customer service repre-
sentative during a troubleshooting call.
Reset to Factory Defaults
Select this icon to reset your Wherifone to default settings for
Ring Tones, Speaker Volume, Ring Tone Volume, Display Contrast,
Keyboard Lock, Ring/Vibrate Function, and Backlight Timer.

35
Making Voice Calls
Your Wherifone is capable of taking incoming calls from any num-
ber or making outgoing calls to a total of five (5) preprogrammed
numbers (Four preprogrammed numbers in addition to 911 for
emergencies).
Program the Dial Buttons
To program your programmable dial buttons, log-on to the
Wherify Location Service Center at www.wherify.com, enter your
User ID and Password; then click on Account Services; then click
on Programmable Buttons. Just enter in the phone number,
including area code, in the box corresponding to each program-
mable button (See Account Services on Wherify’s web page).
You can use either the speakerphone for talking or turn the vol-
ume down and use your Wherifone like a standard hand phone.
To control speaker volume, press (+) button to increase volume or
(-) to decrease volume.
Receive, Make, and End Calls
To receive a phone call, you will hear the Wherifone’s distinctive
ring, then press the menu/OK button to pick-up and begin talk-
ing. The phone number of the incoming call will be displayed on
the screen unless the number is blocked, in which case the word
“CALL” will be displayed.
To make a phone call, press any numbered button 1 through 5
once to display a pre-programmed phone number, then press the
menu/OK button to dial that number. Or you can press and hold a
numbered button for four (4) seconds to dial the selected number.
To end a phone call, press the Power Off/End button in the mid-
dle of the dial pad. Please note that if you press and hold the
Power Off/End button down for more than five seconds the
phone will turn off.
are outside of the GSM network coverage (go to www.wheri-
fy.com to view national GSM coverage maps for your area) and
will not be able to locate the Wherifone or make voice calls.
2. To make a Managed Location Service request from the
Wherifone, press your programmed dial button (numbers 1–4
on the button pad) once to pull up the Service number and
then press and HOLD for four (4) seconds (Figure 1.7). You will
then be connected to a Managed Location Service operator
who can assist you.
3. In the event of an emergency, you can request a 911 emergency
response directly from your Wherifone. Button 5has been set
at the factory as the default Emergency button for making 911
calls. The phone will always have an emergency 911 calling
ability through this button, with or without a valid SIM card
inserted into the phone. To send an emergency request from
the Wherifone, press your preprogrammed Emergency button
(“911”) once to pull up the Emergency number and then press
and HOLD for four (4) seconds (Figure 1.5).
After validating the emergency request with you or your designat-
ed contact, the Emergency Operator can dispatch the request to
the nearest Public Safety Answering Point (PSAP) 911 operator. The
proper emergency authority can then be sent to your location.
Emergency Operators must be able to validate the emergency
before the Emergency Providers (Police, Fire Department,
Ambulance, etc.) are dispatched to your location.
NOTE: If your Wherifone is not within a GSM coverage area, we
will not immediately receive a Emergency or Service request. The
Wherifone holds the request until the unit returns to a coverage
area and then the request is transmitted.
3736
To use a headset with your Wherifone, simply plug the headset
connector into the Charger/Headset port located on the bottom
of the Wherifone. Then insert the headset bud into your ear.
Please note that you should only use a headset intended for use
with the Wherifone as you may damage your Wherifone if you
try to use a non-Wherifone headset.
Menu/OK Button:
Press this button
to answer an
incoming call.
Adapter Port: Plug your charger
or hands-free headset in here.
Volume Control for
Speakerphone and
Headset: Press
either of these
buttons to control
volume. Press (+)
to increase volume
or (-) to decrease
volume.
Programmable
Buttons: Press any
of the numbered
buttons to dial a
pre-programmed
phone number.
Figure 1.7
Part Two
Wherify Global Location Services
3938
able to you when you log-on through this Web page, including
locating the individual with the Wherifone. While you are logged
on as a subscriber, you can also manage your Wherifone GPS
Locator(s), your account preferences, and contact information.
On the site, you can learn more about your Wherifone and order
additional Wherifone accessory items. You can also find out more
about Wherify and our future GPS Locator technology products.
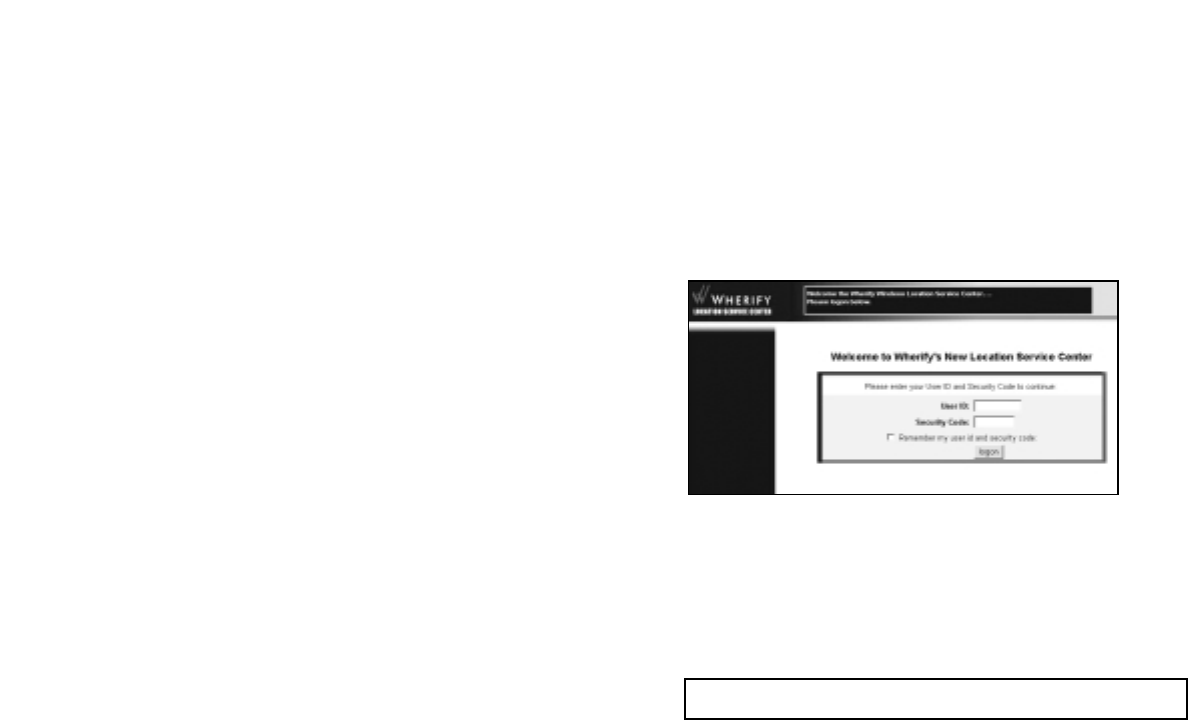
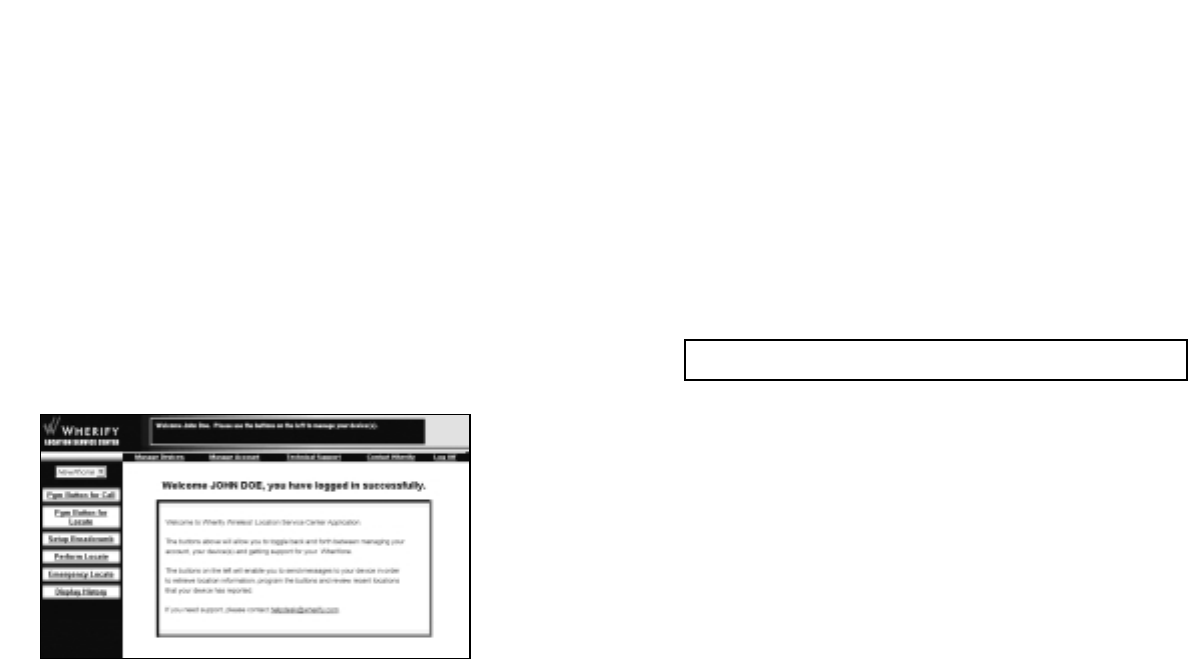
Logging On
At the Wherify Global Location Service Center home page, enter
your User ID and Security Code then click Logon.
Fill in the requested information to log-on:
If you click the Remember my User ID and Security Code check-
box, your browser automatically enters your User ID and Security
Code on your next visit.
The Wherify Global Location Service Center
The Wherifone is only part of this amazing new technology that
allows you to determine the location of the individual with the
Wherifone, whether they are next door or 3000 miles away. The
only way to connect to the Wherifone is through Wherify’s Global
Location Service Center via www.wherify.com or by phone at
1-877-WHERIFY (943-7439).
Access to the Global Location Service Center is included in the
Wherify Service Plan you selected when you activated the
Wherifone. Please refer to the Wherify Service Plan you selected
to determine what features are included.
Connecting to the Wherify Global Location
Service Center via Phone
If you do not have access to the Internet, you can contact the
Location Service Center by phone. When you call Wherify’s
Customer Care, all the same features that are available online are
available over the phone. Just call toll-free 1-877-WHERIFY (1-877-
943-7439).
Connecting to the Wherify Global Location
Service Center via the Web
To access the Global Location Service Center online, you need:
•A computer with Internet access
•Microsoft IE 4.0+ or Netscape Navigator 4.0+ (recommended)
•800 x 600 minimum monitor resolution (recommended)
Enter our Web address: http://www.wherify.com
All the features of the Global Location Service Center are avail-
Figure 2.1
Since we are constantly updating and improving our Web site, elements
of the Web pages shown in this User Guide may change without notice.
4140
Site Navigation Bar
The Site Navigation bar appears at the top of all of our subscriber
pages. Use this to navigate to the different functional areas of
your account. Listed below are the Site Navigation bar options
and where the links take you.
MANAGE DEVICES: click here to view or perform Wherifone
options.
MANAGE ACCOUNT: click here to manage your subscriber
account.
TECHNICAL SUPPORT: click here to view our knowledge bank.
CONTACT WHERIFY: click here to contact one of our customer
service representatives.
CAUTION: To ensure privacy for you and your family:
•DO NOT select this option on public computers.
•BE AWARE that anyone who uses your computer can
automatically log-on to your account.
If you log-on to your account using a different browser or
different computer, your User ID and Security Code are not
automatically entered.
Main Menu Page
All Wherifone and Account Management functions are available
from the Main Menu page.
The Site Navigation bar appears at the top of this page and the
Locator Functions menu on the left-hand side of the page.
The Quick Instructions box near the Wherify logo at the top of
this and every page provides notes or instructions for the avail-
able features, and shows the status of the actions you request.
Figure 2.2
The Help button on every page brings up our Help page. You can leave
the Help page open for easy reference as you go through the site.

4342
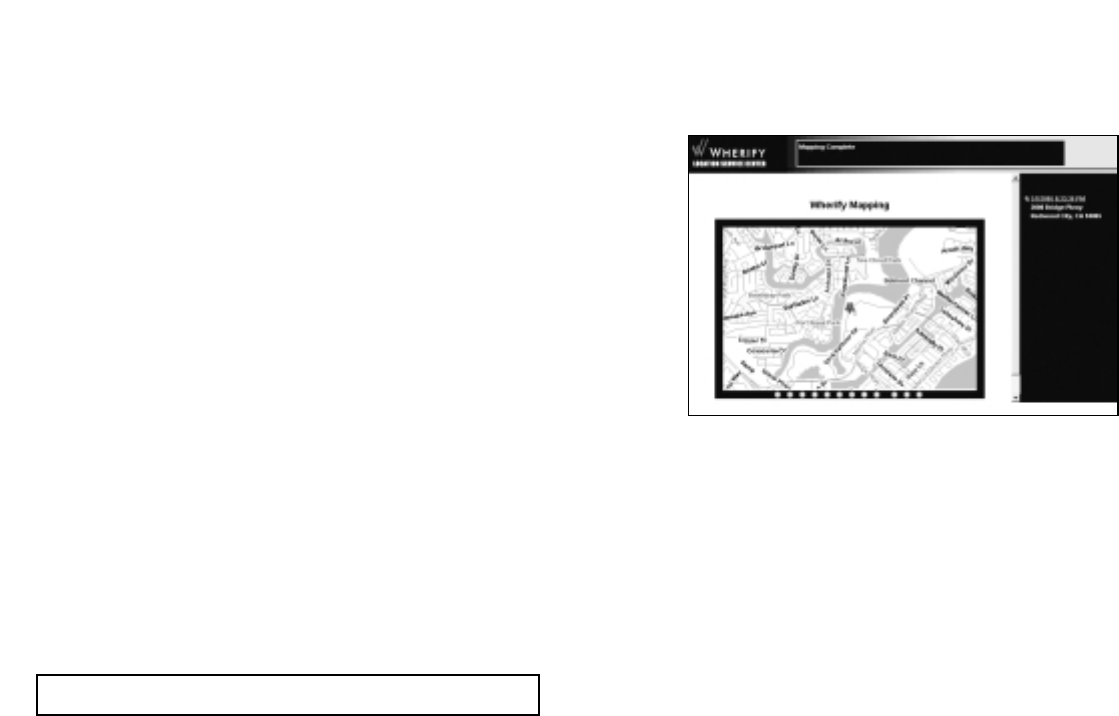
Perform Locate
Click here to locate your Wherifone. The screen shown directly
below will pop up once the locate is completed after you’ve
clicked the “Perform Locate” button (in the middle of the page).
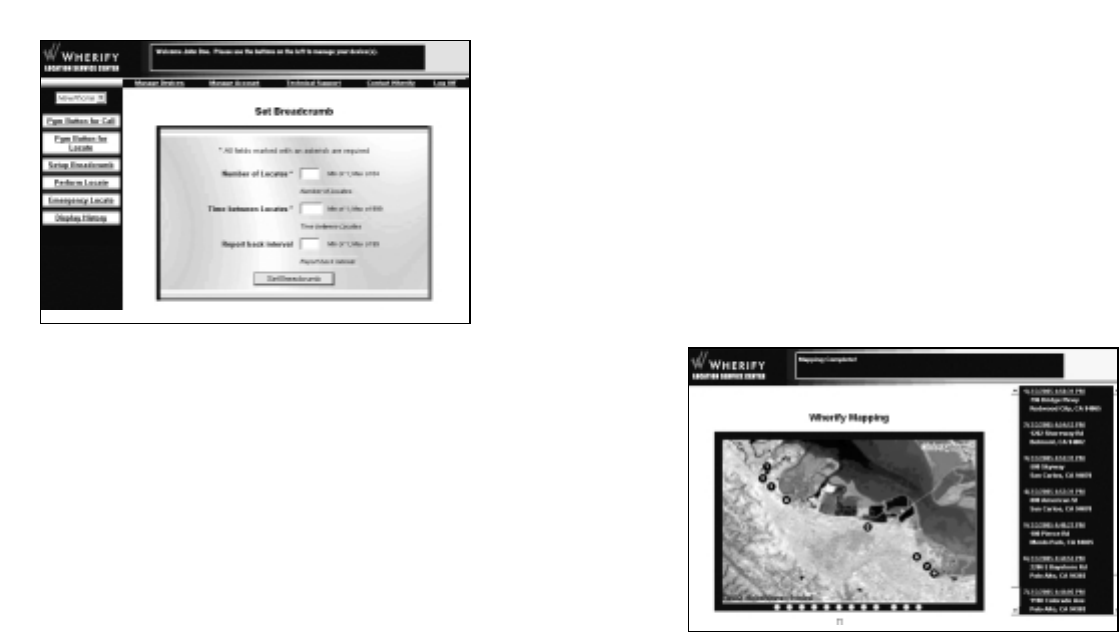
Set Up Breadcrumb
Our “Breadcrumb” feature allows you to check on your loved-
one’s progress throughout the day and ensure that he or she
arrives at a destination as expected. “Breadcrumbs” are the loca-
tions of a Wherifone at intervals of time that you can preset. Just
as you could follow a trail of breadcrumbs your loved-one
dropped every few steps, you can follow their locations through
our Global Location Service Center. For example, you could set the
interval to have the Wherifone leave eight “Breadcrumbs,” one
every half-hour. This would allow you to create a trail of locations
for a four-hour duration.
To set up a Breadcrumb trail:
1. Click SET UP BREADCRUMB in the MANAGE DEVICES menu.
Locator Functions
Click the MANAGE DEVICES button in the Site Navigation bar to
access the Wherifone features.
Locator Functions Menu
The MANAGE DEVICES menu appears on the left side of the page
when you click the MANAGE DEVICES button on the site naviga-
tion bar. This menu also appears when you first log-on to the site.
This is the launching point for all Wherifone functions and online
features of the Global Location Service Center. It’s where you go
to connect with the Wherifone and manage its functionality.
Your Wherifone appears in the Phone Selection pull-down menu
in the upper left of the page. If you have more than one
Wherifone on your account, click the down arrow and select
the Wherifone you want from the list.
The selections on the Locator Functions menu are:
PERFORM LOCATE: click here to locate your Wherifone.
SET UP BREADCRUMB: click here to set up a reporting schedule
for your Wherifone.
PROGRAM BUTTONS: click here to program the buttons on the
Wherifone.
DISPLAY HISTORY: click here to review recent positions that your
device has reported.
Figure 2.3
4544
5. In the Report Back Interval box, enter the number of positions
you would like to store before reporting back to our Global
Location Service Center.
6. Click the Set Breadcrumb button at the bottom of the page
when you have set up the breadcrumbs you want.
7. Check the Display History page at the time specified to view
the complete Breadcrumb report.
8. The series of Breadcrumbs (Locates) you requested begins
immediately.
All the Locates completed by the Breadcrumb feature appear in
the Display History page of the Web site. Instructions for viewing
the Breadcrumbs and the other Locates for your Wherifone are
found in the “Display History” and can be found on page 48.
2. Your Wherifone appears in the Locator List box on the top
left side of the page. If you have more than one Wherifone,
click the down arrow and select the Wherifone for which you
want to set a breadcrumb trail.
3. In the Number of Locates box, enter the total number of
Locates you’d like to have generated. For example, if you have
Locates performed every half-hour, and you’d like to have a
trail over an afternoon, enter “8” in this box to cover a 4-hour
period. PLEASE NOTE: the maximum number of locates you
can request (at one time) is 12.
4. In the Time Between Locates box, enter the number of min-
utes you’d like to have between Locates. For example, if you’d
like to have a Locate every half-hour, enter 30 in the box. The
time interval can range from one minute to four hours (240
minutes).
Figure 2.5
Figure 2.4
4746
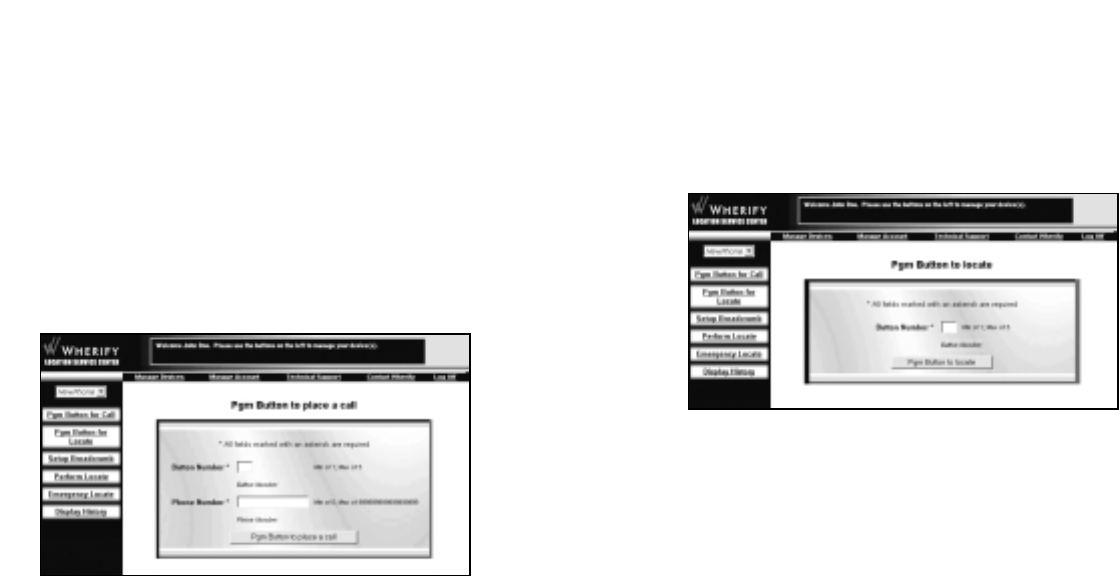
Program Button to Locate Wherifone:
You can select one of these buttons to perform a location request
and send the information back to our Global Location Service
Center, where you can review your Wherifone’s location history.
Just select the button number (1 – 5), choose Program Button for
Locate and click Update. Your device will be updated, usually in a
matter of seconds.
Program Buttons
The Wherifone has five programmable buttons, which can be pro-
grammed to either (A) dial a phone number,or (B) send a position
report back to our Global Location Service Center. Please note that
the factory default setting for button #5 is to place a call to “911.”
Program Button to Place Call:
Just select the button number (1 – 4), choose Program Button For
Call and input the phone number that you would like it to dial.
Once you submit your information we will configure the device
over the air, and within a few minutes the button you selected
will be able to dial the phone number you just chose. You can
change any of your programmed numbers at any time, and as
often as you wish.
Figure 2.7
Figure 2.6
4948
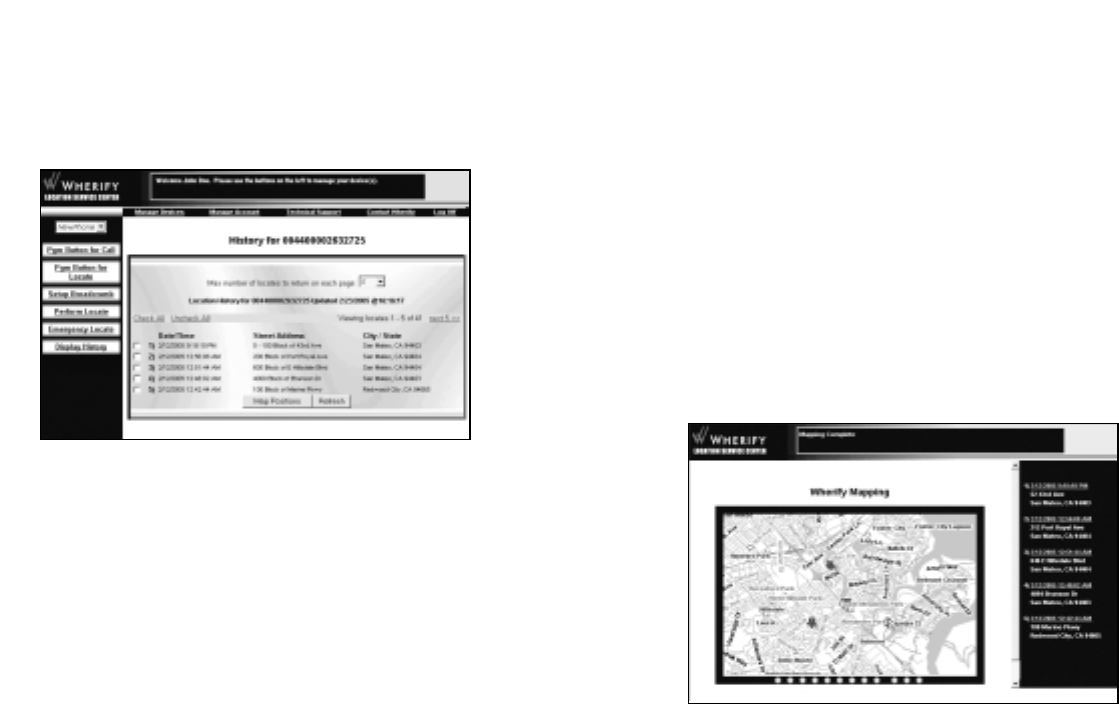
You can also specify how many Locates you want to appear
(between 2 and 200) on each page in the bar above the Locate list.
Location History Maps
You can map the Locates in the Location History list, and may dis-
play up to 30 positions at one time. To map Locates from the
Location History list:
1. Click the box on the left of any Locate, or click the Check All
link above the column of boxes. Only those locates that
appear on the current page are selected. If you want to map
Locates that do not appear on the page, you must advance to
the next page or increase the number of Locates displayed on
each page.
2. If you would like to clear your marks from the boxes on this
page, click the Uncheck All link or deselect individual Locates.
3. When you have checked the boxes for the Locates you’d like
to see on a map, click the Map Positions button.
Display History
The Display History page shows a log of all locations reported for
a specific Wherifone. You can also map a series of Locates to get a
graphic view of where your Wherifone has been. All addresses
default to a 100-digit range illustrating the closest block found to
the position reported.
Location History stores all Locates for each Wherifone on your
account.
To view the locations in the Location History:
1. Click on Display History from the left menu.
2. Click the Refresh History button to update the Display History
page. This page will automatically refresh every three minutes.
A list of Locates (including the date and time and nearby street
address) appears, with the most recent Locate at the top of the
list. You can view older Locates in the history list by advancing to
the next page. Figure 2.9
Figure 2.8
5150
Street Map
Once you have successfully located your Wherifone, you will first
see its location on a street map, with its location indicated by a
thumbtack.
You can control the view of the map in several ways, including
ZOOM IN and ZOOM OUT, and PAN VIEW.
•To Zoom In or Zoom Out, click the round buttons to show the
map at a particular magnification level, from the closest
amount of detail to the widest area view.
•To Pan View, click on the arrows located at the edges of the
map to scroll the map view towards that direction.
A nearby/approximate street address appears in the column on
the right. The date and time the locate was generated is also
reported. Click the date/time to center the map on the location
address.
A Street Map appears with the series of Locates listed in a column
on the right. Each Locate you requested is numbered both on the
map and on the list. Click the time/date stamp of any Locate to
center the map on that specific location.
To view the aerial map, click the Aerial Map tab at the top of the
map.
Viewing a Breadcrumb Trail
To view the map of the breadcrumb trail you set up, check the
Locates within the time you requested and click Map Positions.
Viewing and Managing Location Information
Mapping Options
You can see your Wherifone location either on a street map or
aerial map. You can also toggle back and forth between these
two options.
Street Map: an illustrated map that provides street names.
Aerial Map: an aerial photograph of the area. This map shows
you buildings, landscaping and geographic features that may
provide additional information on your Wherifone’s location.
Both maps show the same area. You can switch between the two
options by clicking the tabs at the bottom of a map.
Since we are constantly updating and improving our Web site, elements
of the Web pages shown in this User Guide may change without notice.
Figure 2.10
5352
Account Management
Click the Manage Account button on the Main Menu page to
manage your account.
Manage Account Menu
The Account Management menu appears on the left side of the
page when you click the Account Management button on the site
navigation bar.
This is the area you use to manage your account, update your
contact information, and specify features of your Wherifone.
Importantly, this is how we know where you are so we can con-
tact you if there’s an emergency.
The selections on the Manage Account menu are:
Edit Subscriber: update or modify contact information and billing
information.
Edit Security Code: change your security code and key phrase.
Edit Device Info: change the name of your device on the
networkYou can return to this page at any time by clicking the
Manage Account button on the site navigation bar, which appears
across the top of every page.
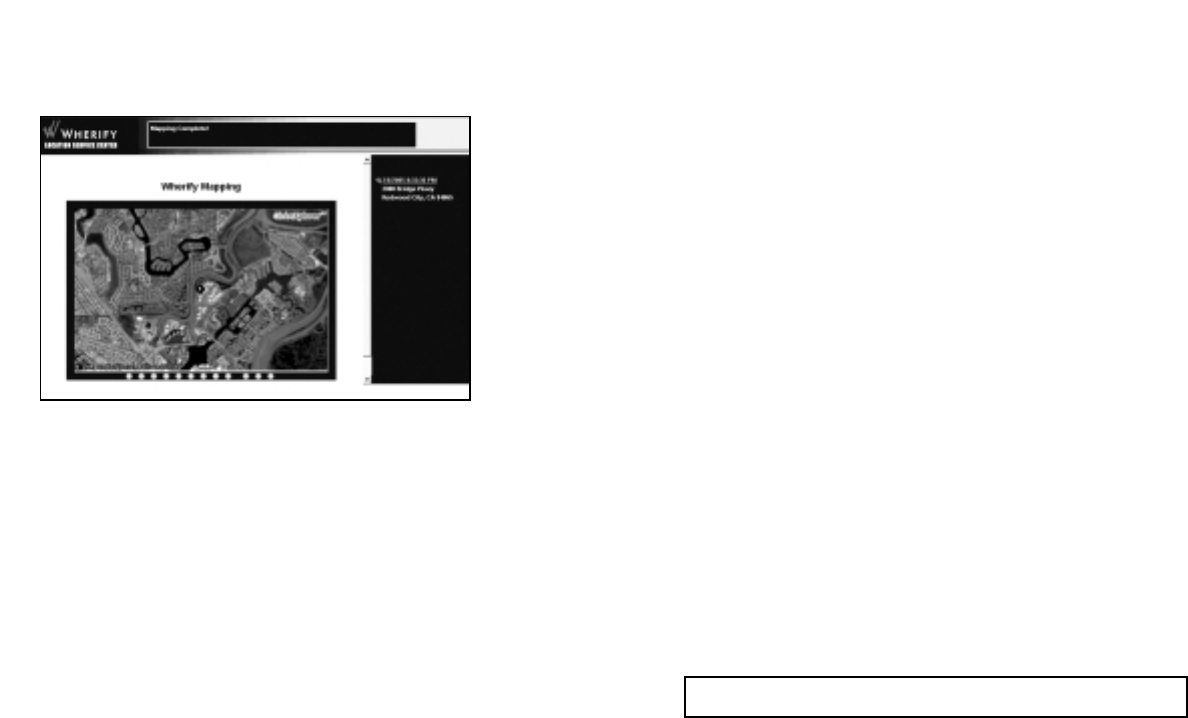
Aerial Map
Click the Aerial Map tab to see an aerial photograph of the same
location covered by the street map.
At higher magnifications, you may notice that aerial photography
has a sharper focus in some geographic areas than in others.
•To Zoom In or Zoom Out, click the round buttons to show the
map at a particular magnification level, from the closest
amount of detail to the widest area view.
•To Pan View, click on the arrows located at the edges of the
map to scroll the map view towards that direction.
The Help button on every page brings up our Help page. You can leave
the Help page open for easy reference as you go through the site.
Figure 2.11
5554
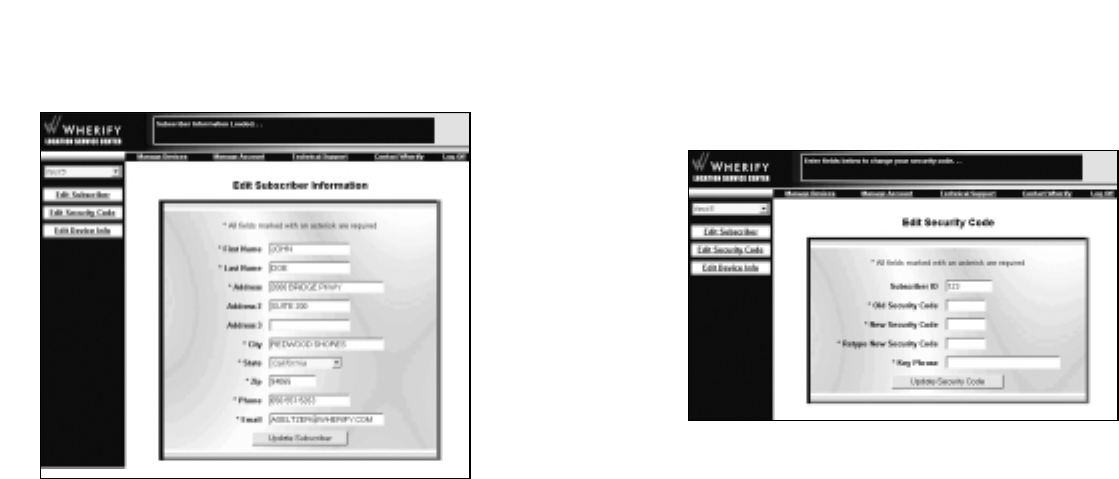
Edit Security Code
You can change the Security Code you use to access the Location
Service Center. Since this number provides access to your account
and the Wherifone functions, we recommend you change your
Security Code periodically.
Your Security Code can be as few as six (6) and as many as twelve
(12) numbers long. Your Code must be numbers only (no letters,
spaces, punctuation, or other kinds of characters).To change your
Security Code:
1. Click Edit Security Code in the Manage Account menu.
2. Enter your current Security Code in the Old Security Code box.
3. Enter your new Security Code in the New Security Code box.
4. Enter your new Security Code again in the next box.
5. Enter a key phrase to help you remember your new Security
Code in the last box on the page.
Subscriber Information
Please update this page when any of your contact information
changes.
This page contains the primary contact information linked to your
account.
Whenever you make changes to your account, be sure to click the
Update Subscriber button to update and save the record changes.
An acknowledgement that the change has been accepted appears
in the Quick Instructions box.
Figure 2.13
Figure 2.12

5756
3. Click the Update Device Name button to update our records.
An acknowledgement that the change has been accepted appears
in the Quick Instructions box at the top of the page.
6. Click the Update Security Code button to update our records.
An acknowledgement that the change has been accepted appears
in the Quick Instructions box.
Edit Device Information
You can change the name used for each device on Wherify’s
Location Service Center. This will not be transferred to your
Wherifone, but will simply help you keep track of your devices on
our network.
Your Device Name can be as few as four (4) and as many as six-
teen (16) characters, and should be unique (don’t use the same
name for two different Wherifones). To change your Device
Name:
1. Click Edit Device Info in the Manage Account menu.
2. Your current device name will appear in the Device Name box.
Change this field as desired.
Figure 2.14

5958
LOCATION SERVICES, WILL BE UNINTERRUPTED OR TROUBLE FREE.
THIRD PARTY PRODUCTS AND SERVICES. EXCEPT FOR THE LIMITED
PHONE WARRANTY PROVIDED BY WHERIFY WIRELESS AS DESCRIBED ABOVE,
WHERIFY WIRELESS, INC. MAKES NO REPRESENTATIONS OR WARRANTIES IN CON-
NECTION WITH, AND SHALL HAVE NO LIABILITY OR RESPONSIBILITY OF ANY KIND
ARISING OUT OF OR RESULTING FROM, ANY PRODUCTS OR SERVICES OF A THIRD
PARTY (INCLUDING LOCATION SERVICES PROVIDED BY ANY THIRD PARTY AND
WHETHER OR NOT THE PRODUCT OR SERVICE IS PROVIDED UNDER AUTHORITY OF
WHERIFY); ANY FAILURE OF SUCH PRODUCTS OR SERVICES; OR ANY FAILURE OF
THE WHERIFONE GPS LOCATOR PHONE TO WORK WITH SUCH PRODUCTS OR SER-
VICES. EACH THIRD PARTY IS SOLELY RESPONSIBLE FOR ITS PRODUCTS AND SER-
VICES, WHETHER OR NOT BASED UPON THE WHERIFY TECHNOLOGY.
DISCLAIMER AND LIMITATION OF LIABILITY. IN NO EVENT SHALL WHER-
IFY WIRELESS, INC. BE LIABLE FOR ANY SPECIAL, INCIDENTAL, CONSEQUENTIAL,
EXEMPLARY, OR PUNITIVE DAMAGES OF ANY KIND ARISING OUT OF OR RELATED
TO THE WHERIFONE GPS LOCATOR PHONE, THE USER GUIDE, WHERIFY’S WEB SITE,
THE WHERIFY CELLULAR AND LOCATION SERVICES, OR ANY REPRESENTATIONS OR
WARRANTIES, WHETHER ARISING FROM CONTRACT, TORT, NEGLIGENCE, PRODUCT
LIABILITY, OR OTHERWISE. WHERIFY’S TOTAL AGGREGATE LIABILITY ARISING OUT
OF OR RELATING TO THE WHERIFONE LOCATOR PHONE AND THIS USER GUIDE
SHALL NOT EXCEED THE PURCHASE PRICE PAID BY THE CUSTOMER FOR THE
PHONE, LESS A REASONABLE USAGE CHARGE. WHERIFY’S TOTAL AGGREGATE LIA-
BILITY ARISING OUT OF ANY CELLULAR OR LOCATION SERVICE SHALL NOT EXCEED
THE AVERAGE AMOUNT THAT HAS BEEN PAID BY THE CUSTOMER DIRECTLY TO
WHERIFY WIRELESS, INC. FOR THREE (3) CALENDAR MONTHS OF THE SERVICE. THE
LIMITATIONS AND EXCLUSIONS ABOVE AND IN ANY WARRANTY SHALL APPLY
WHETHER OR NOT WHERIFY HAS BEEN ADVISED OF THE POSSIBILITY OF THE
APPLICABLE DAMAGES AND NOTWITHSTANDING THE FAILURE OF ESSENTIAL PUR-
POSE OF ANY LIMITED REMEDY.
SAFETY RECOMMENDATIONS, WARNINGS, AND LIMITATIONS.
WHERIFY WIRELESS SHALL HAVE NO LIABILITY OR RESPONSIBILITY IN CONNEC-
TION WITH ANY FAILURE TO COMPLY WITH THE SAFETY RECOMMENDATIONS OR
WARNINGS IN THIS USER GUIDE OR AS A RESULT OF ANY OF THE LIMITATIONS
DESCRIBED IN THIS USER GUIDE ON THE PHONE AND SERVICE PERFORMANCE,
FUNCTIONS, OR FEATURES.
LIMITED WARRANTIES;
LIABILITY AND WARRANTY DISCLAIMERS
WHILE WHERIFY WIRELESS, INC. HAS ATTEMPTED TO ACCURATELY REFLECT IN THIS
USER GUIDE THE OPERATION OF THE WHERIFONE GPS LOCATOR PHONE AND THE
WHERIFY LOCATION SERVICES, THIS USER GUIDE IS NOT A WARRANTY, AND
WHERIFY WIRELESS DOES NOT WARRANT THAT THIS GUIDE IS ACCURATE OR COM-
PLETE. RATHER, THE SOLE WARRANTY PROVIDED BY WHERIFY IS WITH RESPECT TO
THE WHERIFONE GPS LOCATOR PHONE AS DESCRIBED BELOW. Some states and
jurisdictions do not allow the exclusion or limitation of implied warranties or the
limitation of incidental or consequential damages, so any limitations and exclu-
sions may be limited in their application to you. When implied warranties may not
be excluded in their entirety, they will be limited in duration to the express war-
ranty described below. None of the limitations and exclusions below affect your
rights to the extent that your rights cannot be limited or excluded by law.
PHONE LIMITED WARRANTY. EXCEPT AS EXPRESSLY SET FORTH IN THE WAR-
RANTY CARD ENCLOSED WITH YOUR PHONE AND TITLED “LIMITED WARRANTY
FOR WHERIFONE GPS LOCATOR PHONE,” YOUR WHERIFONE LOCATOR PHONE IS
PROVIDED “AS-IS” WITHOUT WARRANTY OF ANY KIND. A copy of the limited war-
ranty set forth in such warranty card has been reproduced in Appendix A of this
user guide.
NO WARRANTY FOR CELLULAR OR LOCATION SERVICES. THE CELLU-
LAR PHONE AND LOCATION SERVICES PROVIDED BY WHERIFY WIRELESS ARE PRO-
VIDED “AS-IS” WITHOUT WARRANTY OF ANY KIND, SUBJECT TO THE THEN CUR-
RENT [CELLULAR PHONE SERVICE TERMS AND CONDITIONS AND THE WHERIFY
LOCATION SERVICE TERMS AND CONDITIONS] TO WHICH YOU ARE REQUIRED TO
AGREE WHEN SIGNING UP FOR SUCH SERVICES. A copy of the cellular phone and
location services terms and conditions that were in effect at the time this user
guide was published have been reproduced in Appendix B of this user guide. Such
terms and conditions may be updated from time to time by Wherify Wireless, and
THE THEN CURRENT TERMS AND CONDITIONS ARE ON WHERIFY’S WEB SITE AT
WWW.WHERIFY.COM.
NO OTHER WARRANTY. EXCEPT FOR THE LIMITED PHONE WARRANTY
DESCRIBED ABOVE, NO WARRANTIES ARE PROVIDED BY WHERIFY WIRELESS, INC.
FOR, OR IN CONNECTION, WITH THE WHERIFONE LOCATOR PHONE, ANY CELLU-
LAR OR LOCATION SERVICES, ITS WEB SITE, OR THIS USER GUIDE, WHETHER
EXPRESS, IMPLIED, OR OTHERWISE, AND ALL OTHER WARRANTIES ARE HEREBY
DISCLAIMED AND EXCLUDED, INCLUDING WITHOUT LIMITATION ANY WAR-
RANTIES OF MERCHANTABILITY AND FITNESS FOR A PARTICULAR PURPOSE. WHER-
IFY DOES NOT WARRANT THAT THE OPERATION OF THE WHERIFONE GPS LOCA-
TOR PHONE, OR THE OPERATION OR AVAILABILITY OF THE WHERIFY CELLULAR OR

6160
Customer Service Information Form
Contact Wherify Wireless Customer Service for return authorization
at 1-877-943-7489.
RMA Number
Customer Information:
Name
Street
(Please provide street address, as is not possible to ship to a P.O. Box)
City State Zip
Phone: Home Business
Explanation of Problem (please use additional paper if necessary)
Wherify Service Agreement
Caution
The user is cautioned that changes or modifications not expressly approved by
Wherify Wireless, Inc. will void the warranty and the user’s authority to operate
this device on Wherify’s network.
PROCEDURES TO OBTAIN REPAIR SERVICE:
1. Product in need of service should be returned directly to Wherify Wireless, Inc.
not to the dealer from whom it was purchased.
2. A Return Merchandise Authorization (RMA) number is required from WHERIFY
WIRELESS Customer Service prior to the return of any product or component.
Please contact Wherify’s Customer Service Department to acquire one; they can
be reached via phone, fax, or e-mail.
Phone: (877) 943-7439
FAX: (801) 222-4561
E-mail: customerservice@wherify.com
3. Carefully pack (shipping damage will nullify your warranty) and send freight
prepaid, adequately insured to the address listed below:
Wherify Wireless, Inc.
Attention: Returns Department
500 South 500 West
Lindon, UT 84042
4. Enclosed copy of original bill of sale or other proof of purchase or receipt date.
5. Mark package with the Return Merchandise Authorization number on outside
of return carton.
6. Enclose completed Customer Service Information Form for proper
identification.
Please allow 4 to 6 weeks for processing and repair.
You will be notified of repair service charges if a bill of sale or other proof of pur-
chase date is not provided, if instructions were not followed, if product is beyond
the Limited Warranty period or is otherwise outside the scope of the Limited
Warranty. Remittance of quoted repair service charges by check or a credit card
number will be required prior to repair.
Return enclosed RMA card, or copy the following page and include with product
returned to Wherify Wireless, Inc.

6362
OTHER FACTORS AND CONDITIONS. AT TIMES, ACTIONS OR INACTIONS OF THIRD
PARTIES, FAILURES OF EQUIPMENT AND SERVICES (INCLUDING THOSE OF WHERI-
FY), AND ENVIRONMENTAL FACTORS AND CONDITIONS, MAY PREVENT SUCH
COMMUNICATIONS FROM OCCURING PROPERLY. ALTHOUGH WHERIFY WIRELESS,
INC. WILL USE COMMERCIALLY REASONABLE EFFORTS TO TAKE ALL ACTIONS IT
CONSIDERS APPROPRIATE TO MANAGE ITS OWN EQUIPMENT AND FACILITIES,
DOWNTIME MAY RESULT, FOR EXAMPLE, FROM MAINTENANCE, UPGRADES, AND
UNEXPECTED FAILURES. ACCORDINGLY, OTHER THAN ITS RESPONSIBILITY
EXPRESSLY SET FORTH IN THE SERVICE TERMS AND CONDITIONS, AND IN THE LIM-
ITED WARRANTIES DESCRIBED IN THIS USER GUIDE, WHERIFY WIRELESS SHALL
HAVE NO LIABILITY OR RESPONSIBILITY RESULTING FROM OR RELATED TO ANY
FAILURE OF SUCH COMMUNICATIONS TO OCCUR OR ANY FAILURE OF EQUIPMENT,
SERVICES, OR NETWORKS, INCLUDING THE WHERIFONE GPS LOCATOR PHONE.
Global Positioning System (GPS). GPS is a system of satellites, and associated equip-
ment and facilities, operated by the United States government that can be used to
determine the location of a GPS receiver, such as the GPS receiver in your Wherifone
locator phone, under proper conditions. GPS is operated by the United States
Government, and Wherify cannot control or ensure its operation, reliability or avail-
ability. Additionally, because GPS relies upon wireless communication, a variety of
environmental factors and conditions will prevent proper communication between
GPS satellites and your Wherifone GPS locator phone, such as whether you are in a
building, near or under metal, under trees, are underground, or otherwise do not
have a direct line of sight to at least three GPS satellites. Accordingly, the location
functionality of the phone, and associated location functionality of the location
services, will not be available at all times and all phone locations.
GSM Cellular Network. Your Wherifone GPS locator phone operates using a GSM cel-
lular network that is made available by a third party not controlled by Wherify. The
GSM signals required for operation of the cellular phone and location functionality
of your Wherifone GPS locater phone, and the Wherify location services, may be
unavailable at particular times and locations and under a variety of environmental
conditions. Additionally, the GSM cellular service is subject to all of the limitations
under which the services are provided to or for Wherify by the third party.
Driving Safety. Always obey all traffic laws, rules, and regulations, and do not use
your Wherifone GPS locator phone, or attempt to access the Wherify location serv-
ices, while driving if it may cause or contribute to a failure to obey such laws, rules,
or regulations or may otherwise cause or contribute to a hazardous condition for
you or other drivers. Do not use your Wherifone locator phone, or access the
Wherify location service, if it might divert your attention from driving. Without
limiting the foregoing, do not use your Wherifone device, or access the Wherify
location services, during hazardous (e.g. snow, rain, sleet, low visibility, and slip-
pery conditions) or busy traffic conditions. Do not use a laptop or car computer
when driving to access the Wherify location services.
Safety Information and Warnings
This section of the user guide sets forth important safety information, recommen-
dations, and warnings that you should read and explain to the Wherifone G500
Series phone user before the phone is used.
Phone Changes. The user is cautioned that changes or modifications to the
Wherifone G500 Series phone that are not expressly approved by Wherify Wireless,
Inc. in writing will void the warranty and the user’s authority to operate this device
on Wherify’s networks. It may also create a hazardous condition by damaging the
phone or causing it to not work properly with the Wherify networks.
Regular Inspection and Testing of the Phone. The functions and features of your
Wherifone GPS locator phone may not work if the phone is damaged or has a
defect. Accordingly, it is important that you frequently test and monitor the oper-
ation of Wherifone GPS locator phone, including the location functionality and
features, to confirm proper operation and inspect the phone and battery to con-
firm that they are not damaged. If you notice any abnormal or unusual behavior
or performance, the phone should not be used. We recommend that you replace
any phone and battery that has been dropped, submerged in water, overheated,
improperly used or serviced, or otherwise exposed to conditions which may cause
the phone or battery to fail to operate properly. You should also regularly moni-
tor battery charge levels to be sure the locator phone is charging, and maintain-
ing a charge, properly.
Phone Operation. It is important that you read and understand this user guide
prior to using the Wherifone GPS locator phone or the Wherify location services.
THE LOCATION FUNCTIONALITY AND FEATURES OF THE WHERIFONE GPS LOCATOR
PHONE, AND OF THE WHERIFY LOCATION SERVICES, WILL WORK ONLY WHILE THE
PHONE IS POWERED ON, IS PROPERLY RECEIVING AND PROCESSING BOTH GPS AND
GSM SIGNALS OF SUFFICIENT STRENGTH, AND IS USING A SUFFICIENTLY CHARGED
AND PROPERLY FUNCTIONING BATTERY. IF THE PHONE IS OFF, THE BATTERY DIS-
CHARGED OR TOO WEAK, OR IF EITHER GPS OR GSM RECEPTION IS NOT OF SUFFI-
CIENT STRENGTH, THE LOCATION FUNCTIONALITY AND FEATURES OF THE PHONE
AND THE LOCATION SERVICES WILL NOT WORK.
Failure and Disruptions of Networks, Equipment, and Services; Third Party
Services. The Wherify Wireless location services, and the location functionality and
features in your Wherify GPS locator phone, will work properly only if there is
proper communication among the Wherifone GPS locator phone, the required GPS
satellites, the GSM cellular network used by your phone, and the Wherify Wireless,
Inc. location service center. [WHERIFY WIRELESS, INC. DOES NOT AND CANNOT
ENSURE THE AVAILABILITY OR RELIABILITY OF THESE COMMUNICATIONS. SUCH
COMMUNICATIONS DEPEND IN LARGE PART ON CELLULAR, GPS AND OTHER NET-
WORKS AND SERVICES PROVIDED AND/OR CONTROLLED BY THIRD PARTIES AND
MAY BE IMPAIRED AND/OR DISRUPTED BY A VARIETY OF ENVIRONMENTAL AND

6564
Approved Accessories.
Use only Wherify Wireless, Inc. approved accessories with the Wherifone. Use of
any unauthorized accessories may cause equipment to malfunction and/or fail, pos-
sibly causing the phone and/or location services to not function when needed, and
will invalidate the warranty. If said accessories cause damage or defect to the
Wherifone they will not be covered under warranty.
FCC Compliance Information
This device complies with Part 15 of the FCC Rules. Operation is subject to the fol-
lowing two conditions: (1) This device may not cause harmful interference, and (2)
this device must accept any interference received, including interference that may
cause undesired operation.
Information to User
This device has been tested and found to comply with the limits for a Class B digi-
tal device, pursuant to Part 15 of the FCC Rules. These limits are designed to pro-
vide reasonable protection against harmful interference in a residential installa-
tion. This device generates, uses and can radiate radio frequency energy and, if not
used in accordance with the instructions, may cause harmful interference to radio
communications. However, there is no guarantee that interference will not occur
in a particular environment.
If this device does cause harmful interference to radio or television reception,
which can be determined by turning the device off and on, the user is encouraged
to try to correct the interference by one or more of the following measures:
•Reorient or relocate the receiving antenna.
•Increase the separation between the equipment and receiver.
•Connect the equipment into an outlet on a circuit different from that to which
the receiver is connected.
•Consult the dealer or an experienced radio/TV technician for help.
Caution to User
The user is cautioned that changes or modifications not expressly approved by
Wherify Wireless, Inc. will void the user’s authority to operate this device. In addi-
tion, such changes or modifications will void the warranty and the user’s authority
to operate on Wherify Wireless, Inc.’s s network.
Electrical Interference. The Wherifone GPS locator phone may interfere with the
operation of any other electrical or electronic device that is not properly or suffi-
ciently shielded, including electronics in automobiles, radios, televisions, tele-
phones, hearing aids, and the like.
Water Resistance. The Wherifone is NOT water resistant. Similar to a cellular phone
or other advanced electronic device, care must be taken not to get the Wherifone
wet. If the Wherifone gets wet, please dry it off immediately and allow the unit to
air dry for 24 hours BEFORE trying to use it again.
Do not use in heath care facilities or near medical devices. Do not use the
Wherifone GPS locator phone in the vicinity of any medical devices or equipment
without consulting with the device or equipment manufacturer to confirm that the
medical devices and equipment are properly shielded and that their operation will
not be affected. Do not use the Wherifone GPS locator phone in any hospital or
other medical or health care facility. Without limiting the foregoing, the
Wherifone GPS locator phone should not be used by or near any individual that is
using any sort of personal medical device, such as without limitation a pacemaker,
defibrillator, heart rate monitor, blood pressure monitor, other biological or phys-
ical monitor, or the like, without confirming with the device manufacturer that
such equipment and devices are properly shielded and will not be affected by the
Wherifone GPS locator phone.
Pacemakers. The Health Industry Manufacturers Association recommends that no
less than 6 inches be maintained between devices, such as your Wherifone GPS
locator phone and any pacemaker. Individuals using a pacemaker, or any similar
device, should never carry the Wherifone GPS locator phone in a shirt or coat pock-
et; should use the phone in the ear opposite the pacemaker or device; and should
turn off the phone immediately if there is any reason to think that interference
with the pacemaker or medical device may be occurring.
Commercial Aircraft; Restricted Areas. Do not use your Wherifone GPS locator
phone in commercial aircraft or any other area or facility where use of telephones,
radios, or other electronic devices is restricted or prohibited.
Explosive Atmospheres. Do not use your Wherifone GPS locator phone, or change
its battery, in or near any explosive or potentially explosive atmosphere; such as at
or near a gasoline, propane, or natural gas or chemical station or storage facility;
near a natural gas leak; below deck in boats; near paints, paint cleaners, or other
chemicals; when working on automobiles or other gasoline or hydrogen powered
vehicles; or in any other atmosphere containing chemicals or a concentration of
particles (such as grain dust, flour, or metal particles).
Airbags. Do not place your Wherifone GPS locator phone in any location that may
interfere with or trigger airbag electronics or explosive devices. Speak with your
vehicle manufacturer to confirm safe locations.

6766
RF Exposure
The Wherifone G500 series GPS Locator Phones comply with the localized
specific absorption rate (SAR) for uncontrolled environment/general population
exposure limits of ANSI/IEEE Std. C95.1-1992 when tested and measured in
accordance with the procedures specified in FCC OET 65 Supplement C (June 29,
2001). Therefore, operation within safety guidelines established by the FCC
requires no minimum separation distance from humans. The FCC Guidelines for
Human Exposure to Radiofrequency Electromagnetic Fields are available at
http://www.fcc.gov/oet/info/documents/bulletins/ - 65).
Mobile phones such as the Wherifone are tested at their highest FCC authorized
power level. However, in operation the phone will normally adjust its power down-
ward to the minimum necessary to communicate with a Wherify base station.
Consequently, in practice SAR levels will generally be lower.
The Wherifone G500 Series GPS Locator Phone’s values comply with FCC Guidelines
for Human Exposure to Radiofrequency Electromagnetic Fields.
U.S. Food and Drug Administration Consumer Update on
Mobile Phones
The following information concerning radio frequency signals and cellular phones
has been reproduced from a consumer information Web site sponsored by the U.S
Food & Drug Administration (FDA) and the Federal Communications Commission
(FCC) entitled “Cell Phone Facts: Consumer Information on Wireless Phones.”
The information reproduced herein is dated July 29, 2003. For updates to this infor-
mation, please visit this web site at http://www.fda.gov/cellphones/qa.html.
Do wireless phones pose a health hazard?
The available scientific evidence does not show that any health problems are asso-
ciated with using wireless phones. There is no proof, however, that wireless phones
are absolutely safe. Wireless phones emit low levels of radiofrequency energy (RF)
in the microwave range while being used. They also emit very low levels of RF
when in the stand-by mode. Whereas high levels of RF can produce health effects
(by heating tissue), exposure to low level RF that does not produce heating effects
causes no known adverse health effects. Many studies of low level RF exposures
have not found any biological effects. Some studies have suggested that some bio-
logical effects may occur, but such findings have not been confirmed by addition-
al research. In some cases, other researchers have had difficulty in reproducing
those studies, or in determining the reasons for inconsistent results.
What is FDA’s role concerning the safety of wireless phones?
Under the law, FDA does not review the safety of radiation-emitting consumer
products such as wireless phones before they can be sold, as it does with new drugs
or medical devices. However, the agency has authority to take action if wireless
phones are shown to emit radiofrequency energy (RF) at a level that is hazardous
to the user. In such a case, FDA could require the manufacturers of wireless phones
to notify users of the health hazard and to repair, replace or recall the phones so
that the hazard no longer exists.
Although the existing scientific data do not justify FDA regulatory actions, FDA has
urged the wireless phone industry to take a number of steps, including the following:
Support needed research into possible biological effects of RF of the type emitted
by wireless phones;
Design wireless phones in a way that minimizes any RF exposure to the user that is
not necessary for device function; and
Cooperate in providing users of wireless phones with the best possible information
on possible effects of wireless phone use on human health
FDA belongs to an interagency working group of the federal agencies that have
responsibility for different aspects of RF safety to ensure coordinated efforts at the
federal level. The following agencies belong to this working group:
National Institute for Occupational Safety and Health
Environmental Protection Agency
Federal Communications Commission
Occupational Safety and Health Administration
National Telecommunications and Information Administration
The National Institutes of Health participates in some interagency working group
activities, as well.
FDA shares regulatory responsibilities for wireless phones with the Federal
Communications Commission (FCC). All phones that are sold in the United States
must comply with FCC safety guidelines that limit RF exposure. FCC relies on FDA
and other health agencies for safety questions about wireless phones.
FCC also regulates the base stations that the wireless phone networks rely upon.
While these base stations operate at higher power than do the wireless phones
themselves, the RF exposures that people get from these base stations are typically
thousands of times lower than those they can get from wireless phones. Base stations
are thus not the primary subject of the safety questions discussed in this document.

6968
What kinds of phones are the subject of this update?
The term “wireless phone” refers here to hand-held wireless phones with built-in
antennas, often called “cell,” “mobile,” or “PCS” phones. These types of wireless
phones can expose the user to measurable radiofrequency energy (RF) because of
the short distance between the phone and the user’s head. These RF exposures are
limited by Federal Communications Commission safety guidelines that were devel-
oped with the advice of FDA and other federal health and safety agencies. When
the phone is located at greater distances from the user, the exposure to RF is dras-
tically lower because a person’s RF exposure decreases rapidly with increasing dis-
tance from the source. The so-called “cordless phones,” which have a base unit
connected to the telephone wiring in a house, typically operate at far lower power
levels, and thus produce RF exposures well within the FCC’s compliance limits.
What are the results of the research done already?
The research done thus far has produced conflicting results, and many studies have
suffered from flaws in their research methods. Animal experiments investigating
the effects of radiofrequency energy (RF) exposures characteristic of wireless
phones have yielded conflicting results that often cannot be repeated in other lab-
oratories. A few animal studies, however, have suggested that low levels of RF
could accelerate the development of cancer in laboratory animals. However, many
of the studies that showed increased tumor development used animals that had
been genetically engineered or treated with cancer-causing chemicals so as to be
pre-disposed to develop cancer in the absence of RF exposure. Other studies
exposed the animals to RF for up to 22 hours per day. These conditions are not sim-
ilar to the conditions under which people use wireless phones, so we don’t know
with certainty what the results of such studies mean for human health.
Three large epidemiology studies have been published since December 2000.
Between them, the studies investigated any possible association between the use
of wireless phones and primary brain cancer, glioma, meningioma, or acoustic neu-
roma, tumors of the brain or salivary gland, leukemia, or other cancers. None of
the studies demonstrated the existence of any harmful health effects from wireless
phone RF exposures. However, none of the studies can answer questions about
long-term exposures, since the average period of phone use in these studies was
around three years.
What research is needed to decide whether RF exposure from wireless phones
poses a health risk?
A combination of laboratory studies and epidemiological studies of people actual-
ly using wireless phones would provide some of the data that are needed. Lifetime
animal exposure studies could be completed in a few years. However, very large
numbers of animals would be needed to provide reliable proof of a cancer pro-
moting effect if one exists. Epidemiological studies can provide data that is direct-
ly applicable to human populations, but 10 or more years’ follow-up may be need-
ed to provide answers about some health effects, such as cancer. This is because the
interval between the time of exposure to a cancer-causing agent and the time
tumors develop - if they do - may be many, many years. The interpretation of epi-
demiological studies is hampered by difficulties in measuring actual RF exposure
during day-to-day use of wireless phones. Many factors affect this measurement,
such as the angle at which the phone is held, or which model of phone is used.
What is FDA doing to find out more about the possible health effects of wireless
phone RF?
FDA is working with the U.S. National Toxicology Program and with groups of
investigators around the world to ensure that high priority animal studies are con-
ducted to address important questions about the effects of exposure to radiofre-
quency energy (RF).
FDA has been a leading participant in the World Health Organization International
Electromagnetic Fields (EMF) Project since its inception in 1996. An influential
result of this work has been the development of a detailed agenda of research
needs that has driven the establishment of new research programs around the
world. The Project has also helped develop a series of public information docu-
ments on EMF issues.
FDA and the Cellular Telecommunications & Internet Association (CTIA) have a for-
mal Cooperative Research and Development Agreement (CRADA) to do research
on wireless phone safety. FDA provides the scientific oversight, obtaining input
from experts in government, industry, and academic organizations. CTIA-funded
research is conducted through contracts to independent investigators. The initial
research will include both laboratory studies and studies of wireless phone users.
The CRADA will also include a broad assessment of additional research needs in the
context of the latest research developments around the world.
What steps can I take to reduce my exposure to radiofrequency energy from my
wireless phone?
If there is a risk from these products—and at this point we do not know that there
is—it is probably very small. But if you are concerned about avoiding even poten-
tial risks, you can take a few simple steps to minimize your exposure to radiofre-
quency energy (RF). Since time is a key factor in how much exposure a person
receives, reducing the amount of time spent using a wireless phone will reduce RF
exposure.
If you must conduct extended conversations by wireless phone every day, you could
place more distance between your body and the source of the RF, since the expo-
sure level drops off dramatically with distance. For example, you could use a head-

7170
set and carry the wireless phone away from your body or use a wireless phone con-
nected to a remote antenna
Again, the scientific data do not demonstrate that wireless phones are harmful.
But if you are concerned about the RF exposure from these products, you can use
measures like those described above to reduce your RF exposure from wireless
phone use.
What about children using wireless phones?
The scientific evidence does not show a danger to users of wireless phones, includ-
ing children and teenagers. If you want to take steps to lower exposure to radiofre-
quency energy (RF), the measures described above would apply to children and
teenagers using wireless phones. Reducing the time of wireless phone use and
increasing the distance between the user and the RF source will reduce RF exposure.
Some groups sponsored by other national governments have advised that children
be discouraged from using wireless phones at all. For example, the government in
the United Kingdom distributed leaflets containing such a recommendation in
December 2000. They noted that no evidence exists that using a wireless phone
causes brain tumors or other ill effects. Their recommendation to limit wireless
phone use by children was strictly precautionary; it was not based on scientific evi-
dence that any health hazard exists.
What about wireless phone interference with medical equipment?
Radiofrequency energy (RF) from wireless phones can interact with some electron-
ic devices. For this reason, FDA helped develop a detailed test method to measure
electromagnetic interference (EMI) of implanted cardiac pacemakers and defibril-
lators from wireless telephones. This test method is now part of a standard spon-
sored by the Association for the Advancement of Medical instrumentation (AAMI).
The final draft, a joint effort by FDA, medical device manufacturers, and many
other groups, was completed in late 2000. This standard will allow manufacturers
to ensure that cardiac pacemakers and defibrillators are safe from wireless phone
EMI.
FDA has tested hearing aids for interference from handheld wireless phones and
helped develop a voluntary standard sponsored by the Institute of Electrical and
Electronic Engineers (IEEE). This standard specifies test methods and performance
requirements for hearing aids and wireless phones so that that no interference
occurs when a person uses a “compatible” phone and a “compatible” hearing aid
at the same time. This standard was approved by the IEEE in 2000.
FDA continues to monitor the use of wireless phones for possible interactions with
other medical devices. Should harmful interference be found to occur, FDA will
conduct testing to assess the interference and work to resolve the problem.
Index
a
Activating your account
Activating your Wherifone
message
automated data transfer call
b
battery
How to charge
icon
overcharging
when to charge
battery Icon & display
Buttons
Power (On/Off)
Programmable
Menu/OK
Emergency
Hang-up
c
Cellular telephone system
d
Delete an SMS message or page
e
Emergency, sending from Wherifone
f
Find your Wherifone

7372
g
GPS
Office buildings, obscuring reception
Satellite system
Seeding your Wherifone
h
How to:
Activate
Request a locate
Requesting an Emergency from your Wherifone
i
Icon
k
ID code
remove button
l
Locate(s)
Logon
Location Service Center
Lock icon
p
Password (or Password)
Primary Contact
r
Reminder phrase
s
Scroll
Secondary contact
Signal Strength
u
User ID
w
Wherifone activating
Wherifone ID
Wherifone, finding position of

Wherify Wireless, Inc.
2000 Bridge Parkway, Suite 201
Redwood Shores, CA 94065
Part No: MC05111 Rev. A