Whirlpool Europe S r l COMBOEMS00 BUILT-IN MICROWAVE OVEN User Manual III
Whirlpool Europe S.r.l. BUILT-IN MICROWAVE OVEN Users Manual III
UserManual.wiki
>
Whirlpool Europe S r l
>
COMBOEMS00 User Manual
>
Users Manual III
Contents
1.
Users Manual I
2.
Users Manual III
3.
Users Manual II
4.
Users Manual IV
5.
Users Manual V
6.
Users Manual VI
7.
Users Manual VII
8.
Users Manual VIII
9.
Users Manual IX
10.
Users Manual X
11.
Users Manual XI
Users Manual III
Navigation menu
Upload a User Manual
Namespaces
Wiki Guide
HTML
PDF
Info
Views
User Manual
Discussion / Help
Navigation

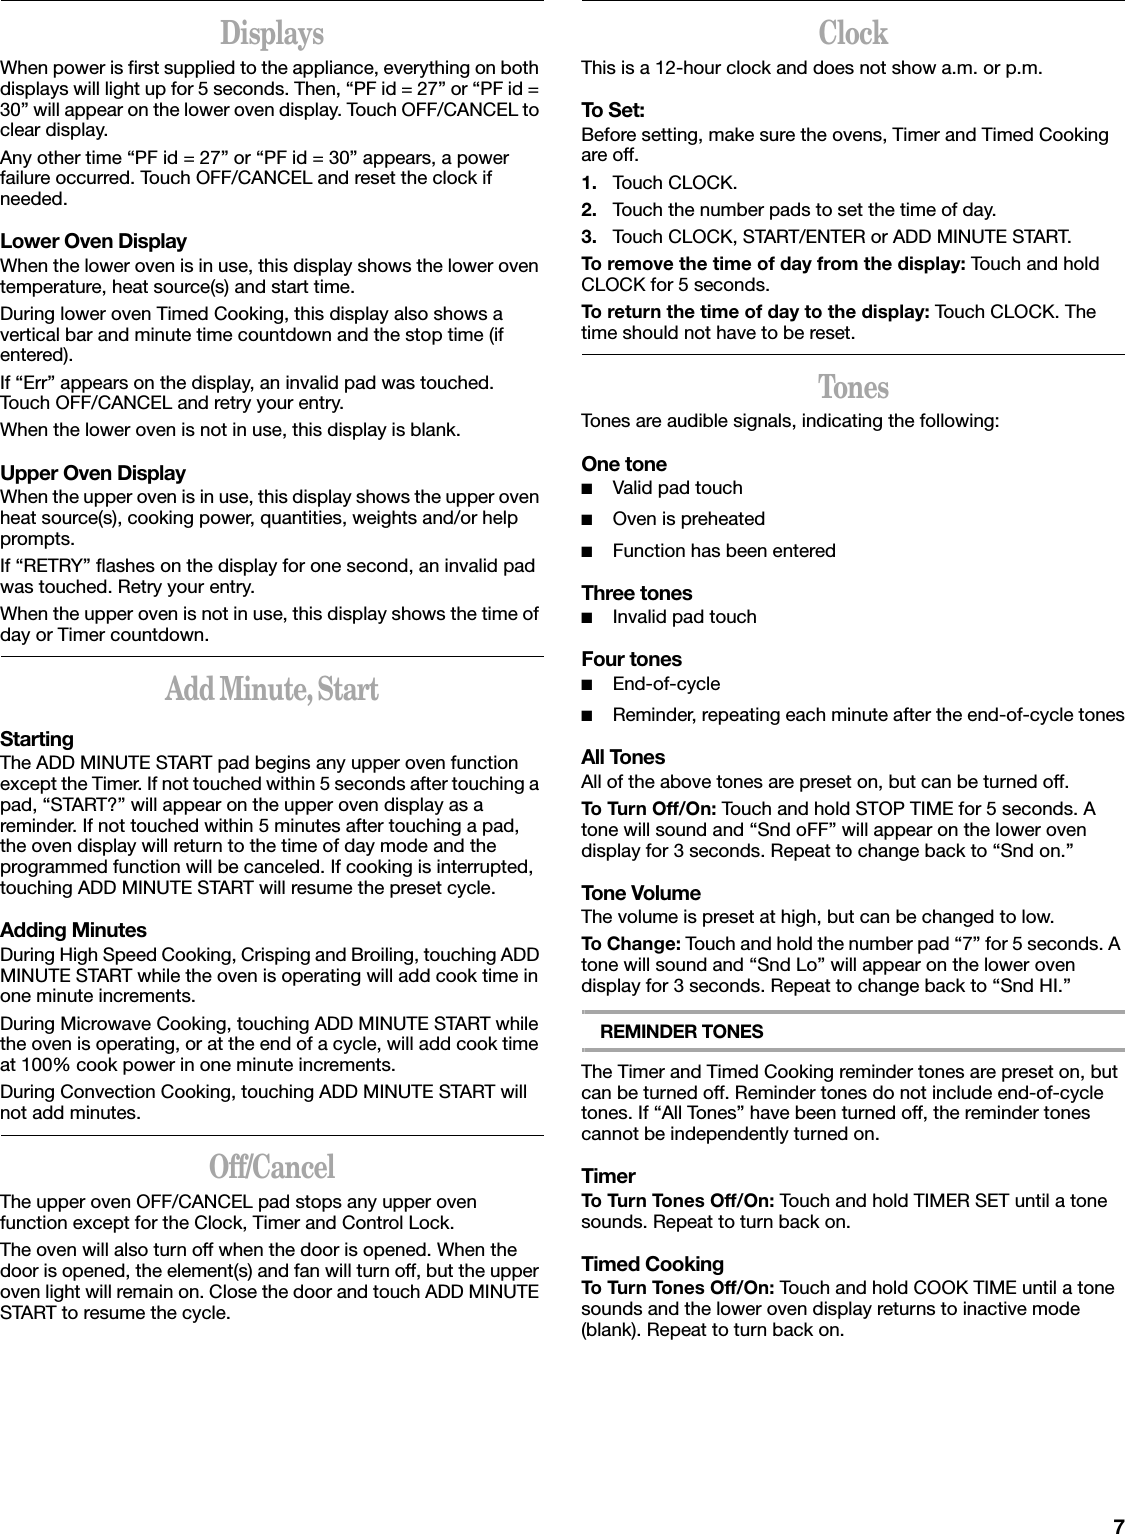
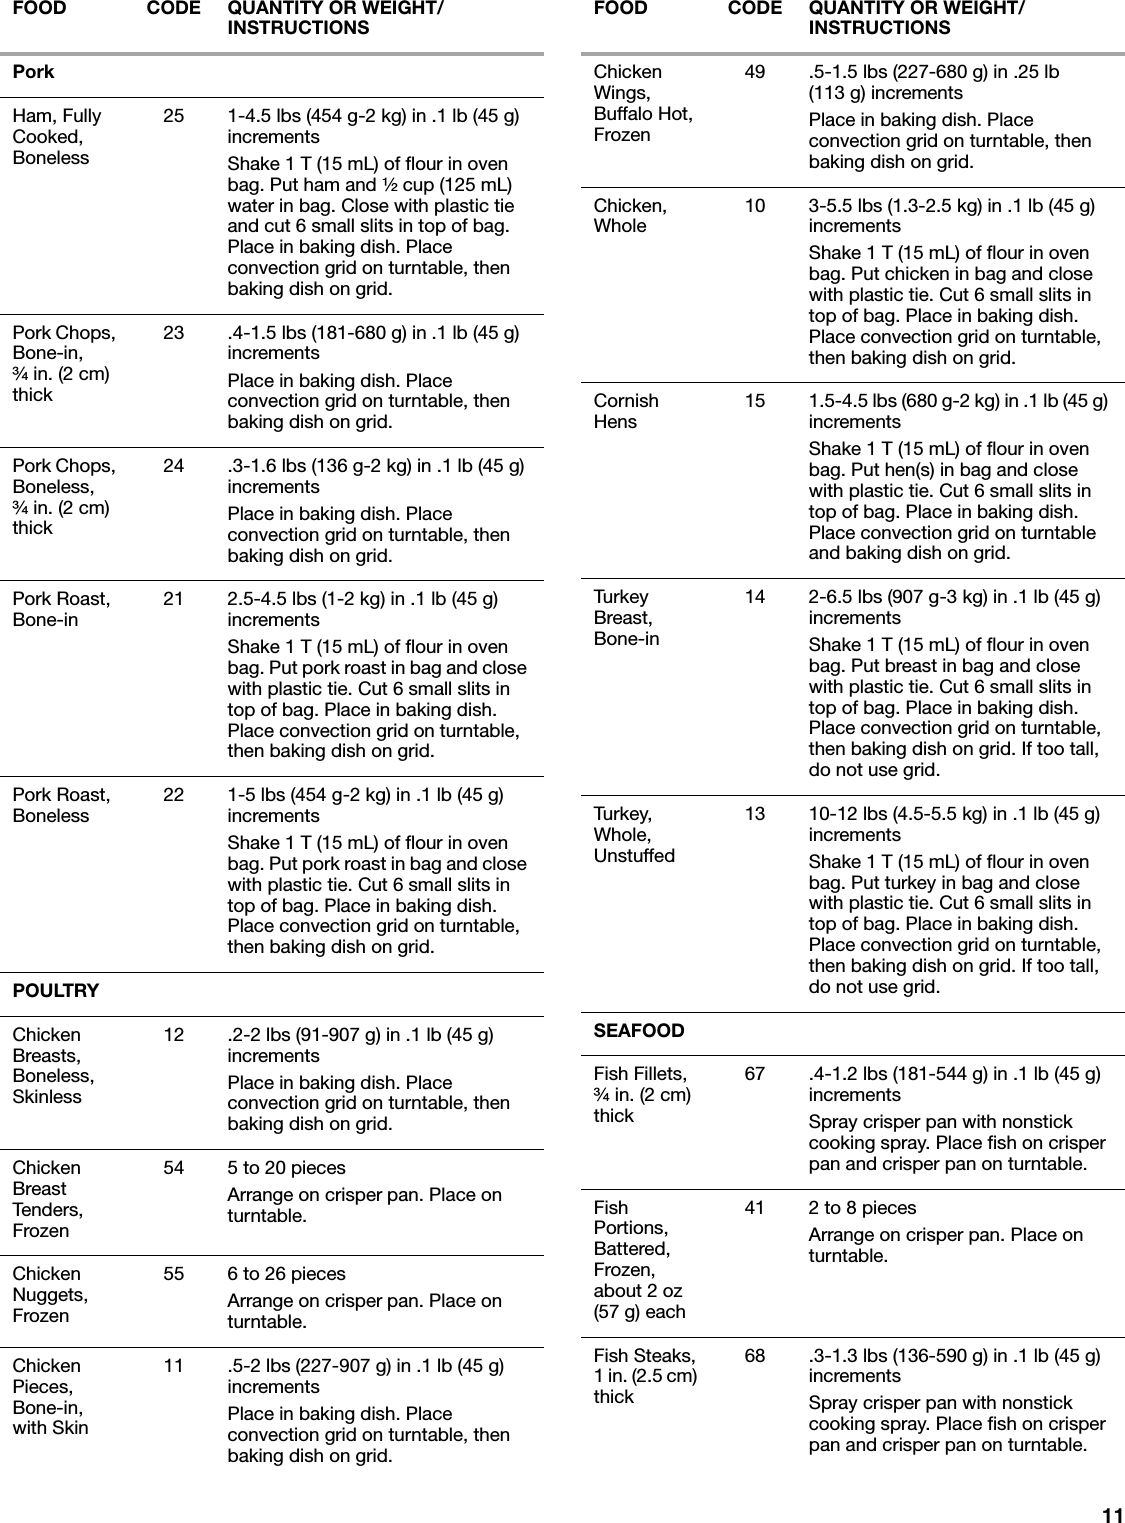

![20MICROWAVE COOK CHARTThese times are approximate and may need to be adjusted to suit individual taste.FOOD COOK TIME COOK POWERMeats, Poultry, Fish, SeafoodBacon (per slice) 45 sec to 1 min 15 sec per slice 100%Ground Beef for Casseroles (1 lb [.45 kg]) 4 to 6 min 100%Ground Beef Patties (2)Ground Beef Patties (4) 1st side 2 min, 2nd side 1½ to 2½ min1st side 2½ min, 2nd side 2 to 3 min 100%100%Meat Loaf (1½ lbs [.7 kg]) 13 to 19 min 70%Chicken PiecesInternal temperature should be 185ºF (85ºC) after standing. 6 to 9 min/lb (454 g) 100%Turkey BreastInternal temperature should be 185ºF (85ºC) after standing. 5 min, then8 to 12 mins 100%,70%Fish Fillets (1 lb [.45 kg]) 5 to 6 min 100%Scallops and Shrimp (1 lb [.45 kg]) 3½ to 5½ min 100%VegetablesBeans, Green or Yellow (1 lb [.45 kg]) 6 to 12 min 100%Broccoli (1 lb [.45 kg]) 6 to 10 min 100%Carrots (1 lb [.45 kg]) 8 to 12 min 100%Cauliflower (medium head) 6 to 9 min 100%Corn on the Cob (2)Corn on the Cob (4) 4 to 9 min6 to 16 min 100%100%Potatoes, Baked (4 medium) 13 to 19 min 100%Summer Squash (1 lb [.45 kg]) 3 to 8 min 100%OtherApplesauce (4 servings) 7 to 9 min 100%Baked Apples (4) 4 to 6 min 100%Chocolate (melt 1 square) 1 to 2 min 50%Eggs, Scrambled (2)Eggs, Scrambled (4) 1 min 15 sec to 1 min 45 sec2 to 3 min 100%100%Hot Cereals (1 serving)Hot Cereals (4 servings) 1½ to 5 min4½ to 7 min 100%100%Nachos (large plate) 1½ to 2½ min 50%Water for Beverage (1 cup [250 mL])Water for Beverage (2 cups [500 mL]) 2½ to 4 min4½ to 6 min 100%100%](https://usermanual.wiki/Whirlpool-Europe-S-r-l/COMBOEMS00.Users-Manual-III/User-Guide-760685-Page-20.png)
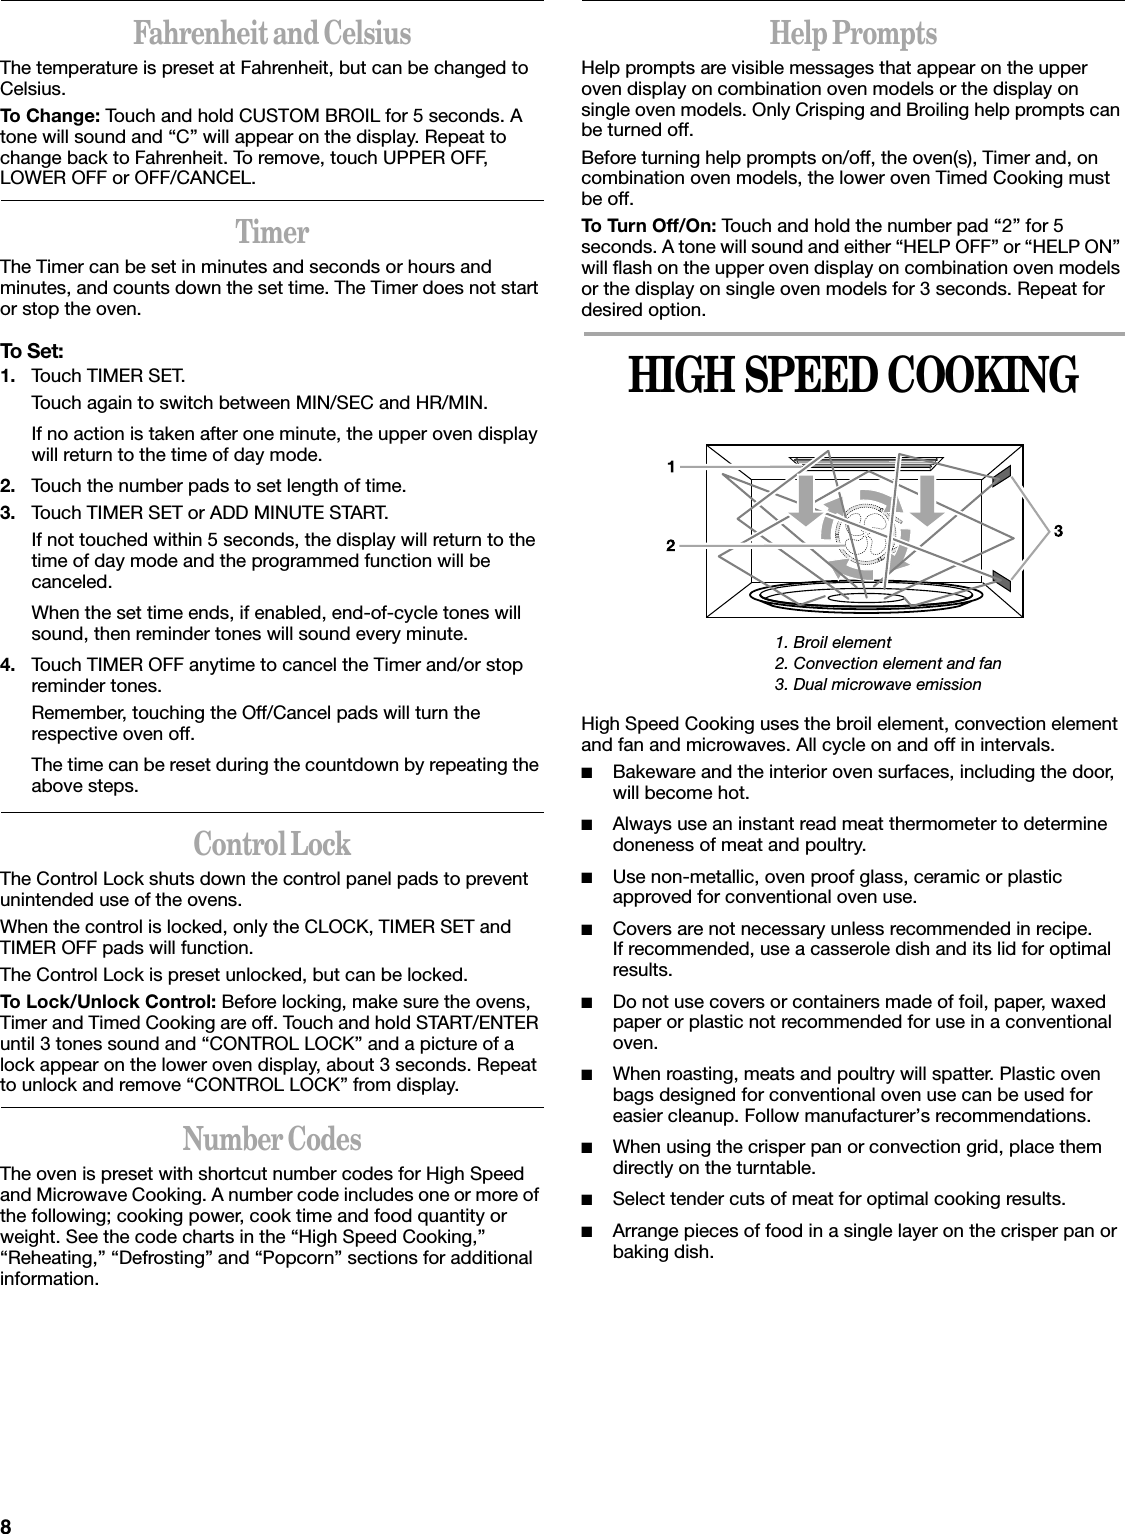
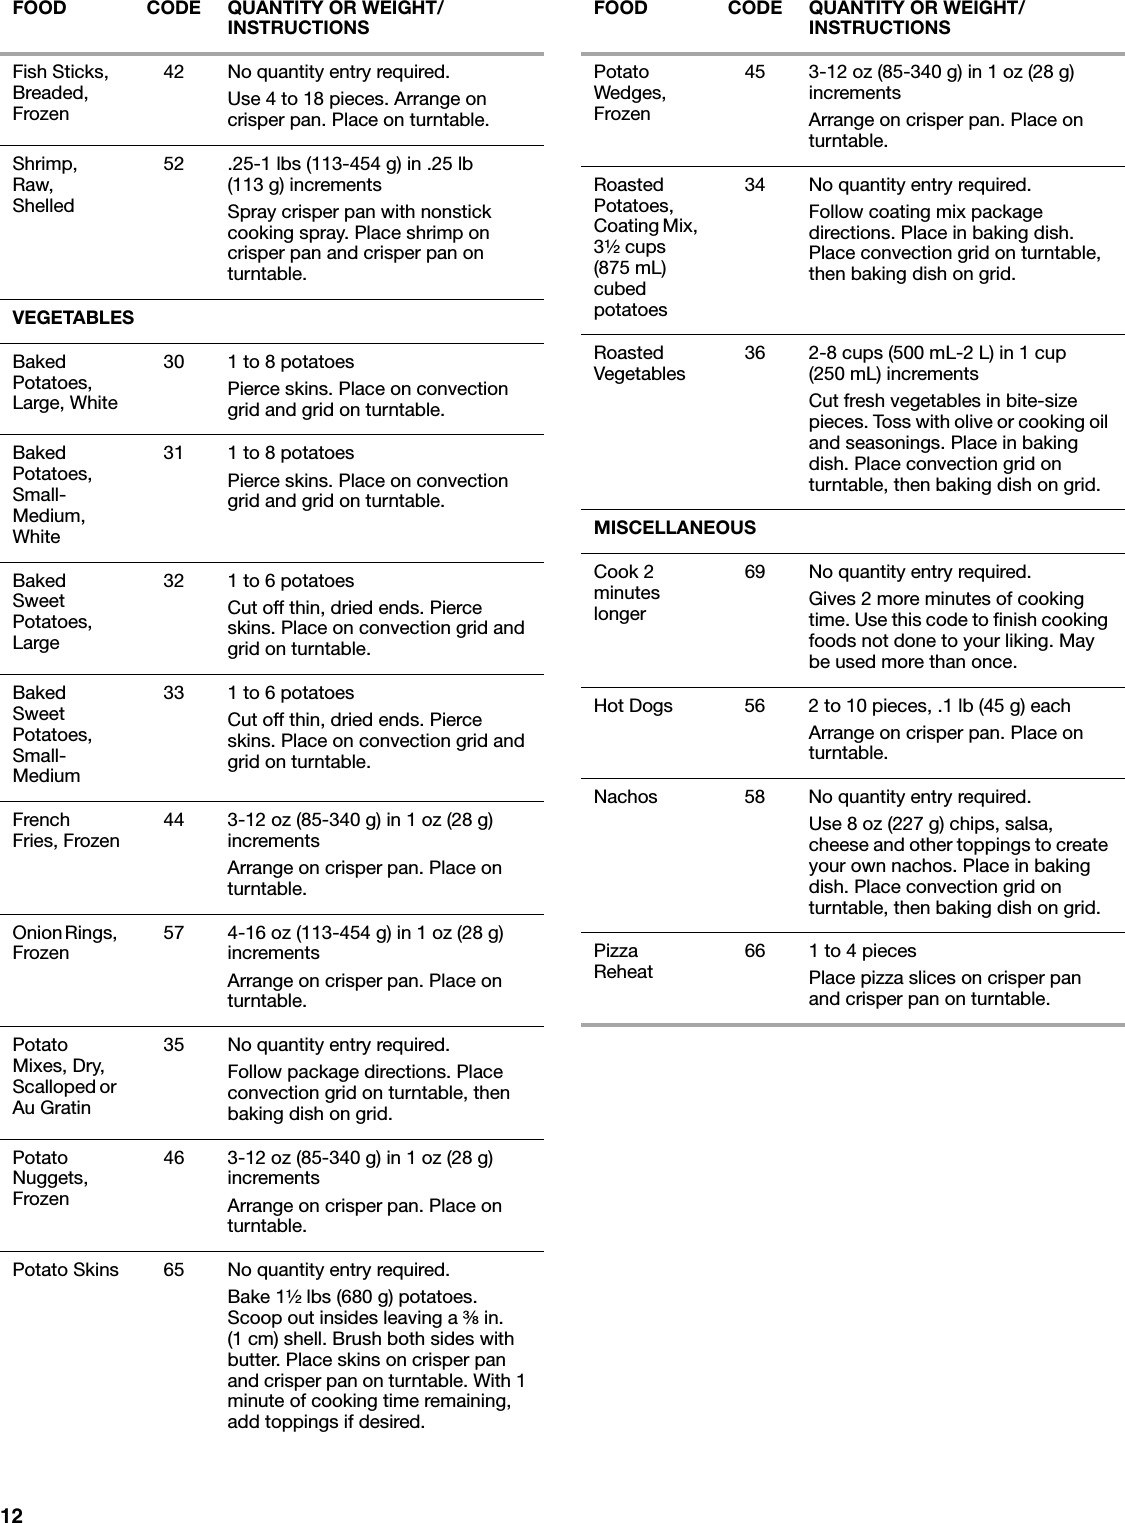
![21MICROWAVE REHEAT CHARTThese times are approximate and may need to be adjusted to suit individual taste. If using Broil to reheat, do not cover food.FOOD/STARTING TEMPERATURE COOK TIME COOK POWER PREPARATIONMeat (Chicken pieces, chops, hamburgers, meat loaf slices)1 serving/Refrigerated2 servings/Refrigerated 1-2 min2½-4½ min 70% 70%Cover loosely.Meat Slices (Beef, ham, pork, turkey) 1 or more servings/Room Temp.1 or more servings/Refrigerated 45 sec-1 min per serving1-3 min per serving 50%50%Cover with gravy or wax paper. Check after 30 sec per serving.Stirrable Casseroles and Main Dishes1 serving/Refrigerated2 servings/Refrigerated4-6 servings/Refrigerated2-4 min4-6 min6-8 min100%100%100% Cover. Stir after half the time.Nonstirrable Casseroles and Main Dishes1 serving/Refrigerated2 servings/Refrigerated4-6 servings/Refrigerated5-8 min9-13 min13-16 min50%50%50% Cover with wax paper.Soup, Cream1 cup (250 mL)/Refrigerated1 can (10 oz [284 mL])/Room Temp. 3-4½ min5-7 min 50%50% Cover. Stir after half the time.Soup, Clear1 cup (250 mL)/Refrigerated1 can (10 oz [284 mL]) 2½-3½ min4-5½ min 100%100% Cover. Stir after half the time.Pizza (Medium slice)1 slice/Room Temp.2 slices/Room Temp.1 slice/Refrigerated2 slices/Refrigerated15-25 sec30-40 sec30-40 sec45-55 sec100%100%100%100%Vegetables1 serving/Refrigerated2 servings/Refrigerated 45 sec-1½ min1½-2½ min 100%100% Cover. Stir after half the time.Baked Potato1/Refrigerated2/Refrigerated 1-2 min2-3 min 50%50%Cut lengthwise, then several times crosswise. Cover with wax paper.Breads (Dinner or breakfast roll)1 roll/Room Temp.2 rolls/Room Temp.4 rolls/Room Temp.8-12 sec11-15 sec18-22 sec50%100%100%Wrap single piece in paper towel. Place several pieces on paper towel, then cover with another paper towel.PieWhole/Refrigerated1 slice/Refrigerated 5-7 min30 sec 70%100%](https://usermanual.wiki/Whirlpool-Europe-S-r-l/COMBOEMS00.Users-Manual-III/User-Guide-760685-Page-21.png)