Whirlpool Europe S r l COMBOEMS00 BUILT-IN MICROWAVE OVEN User Manual IX
Whirlpool Europe S.r.l. BUILT-IN MICROWAVE OVEN Users Manual IX
UserManual.wiki
>
Whirlpool Europe S r l
>
COMBOEMS00 User Manual
>
Users Manual IX
Contents
1.
Users Manual I
2.
Users Manual III
3.
Users Manual II
4.
Users Manual IV
5.
Users Manual V
6.
Users Manual VI
7.
Users Manual VII
8.
Users Manual VIII
9.
Users Manual IX
10.
Users Manual X
11.
Users Manual XI
Users Manual IX
Navigation menu
Upload a User Manual
Namespaces
Wiki Guide
HTML
PDF
Info
Views
User Manual
Discussion / Help
Navigation
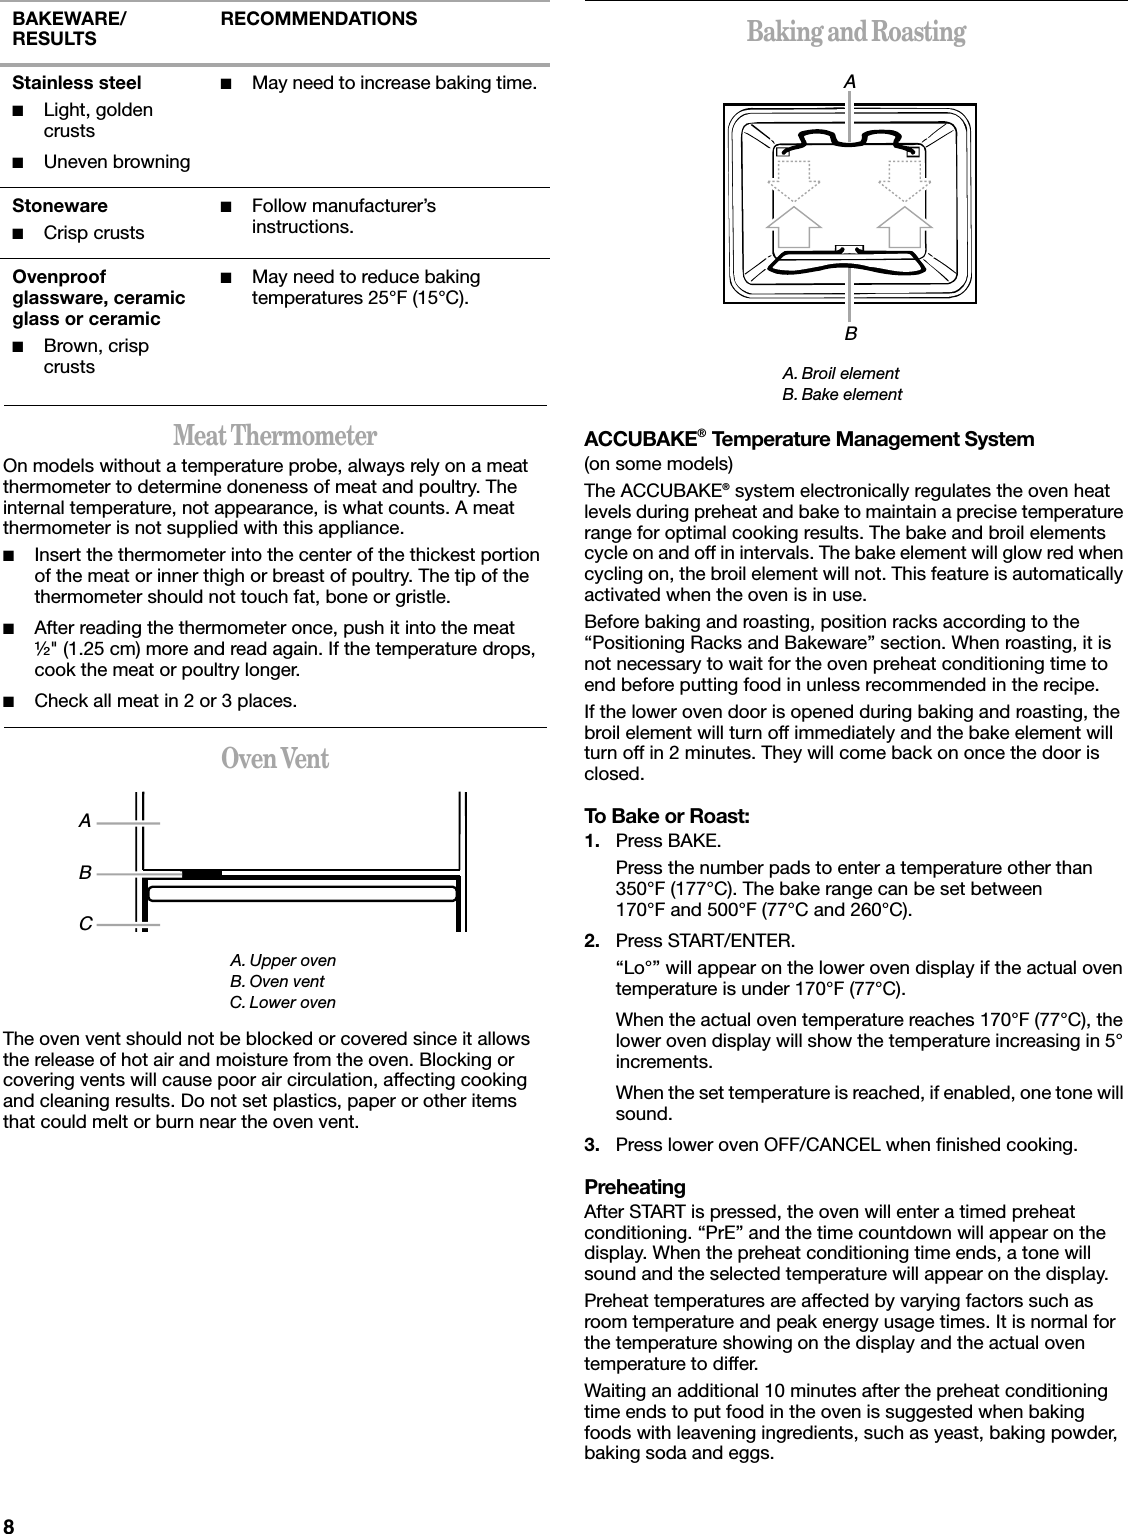
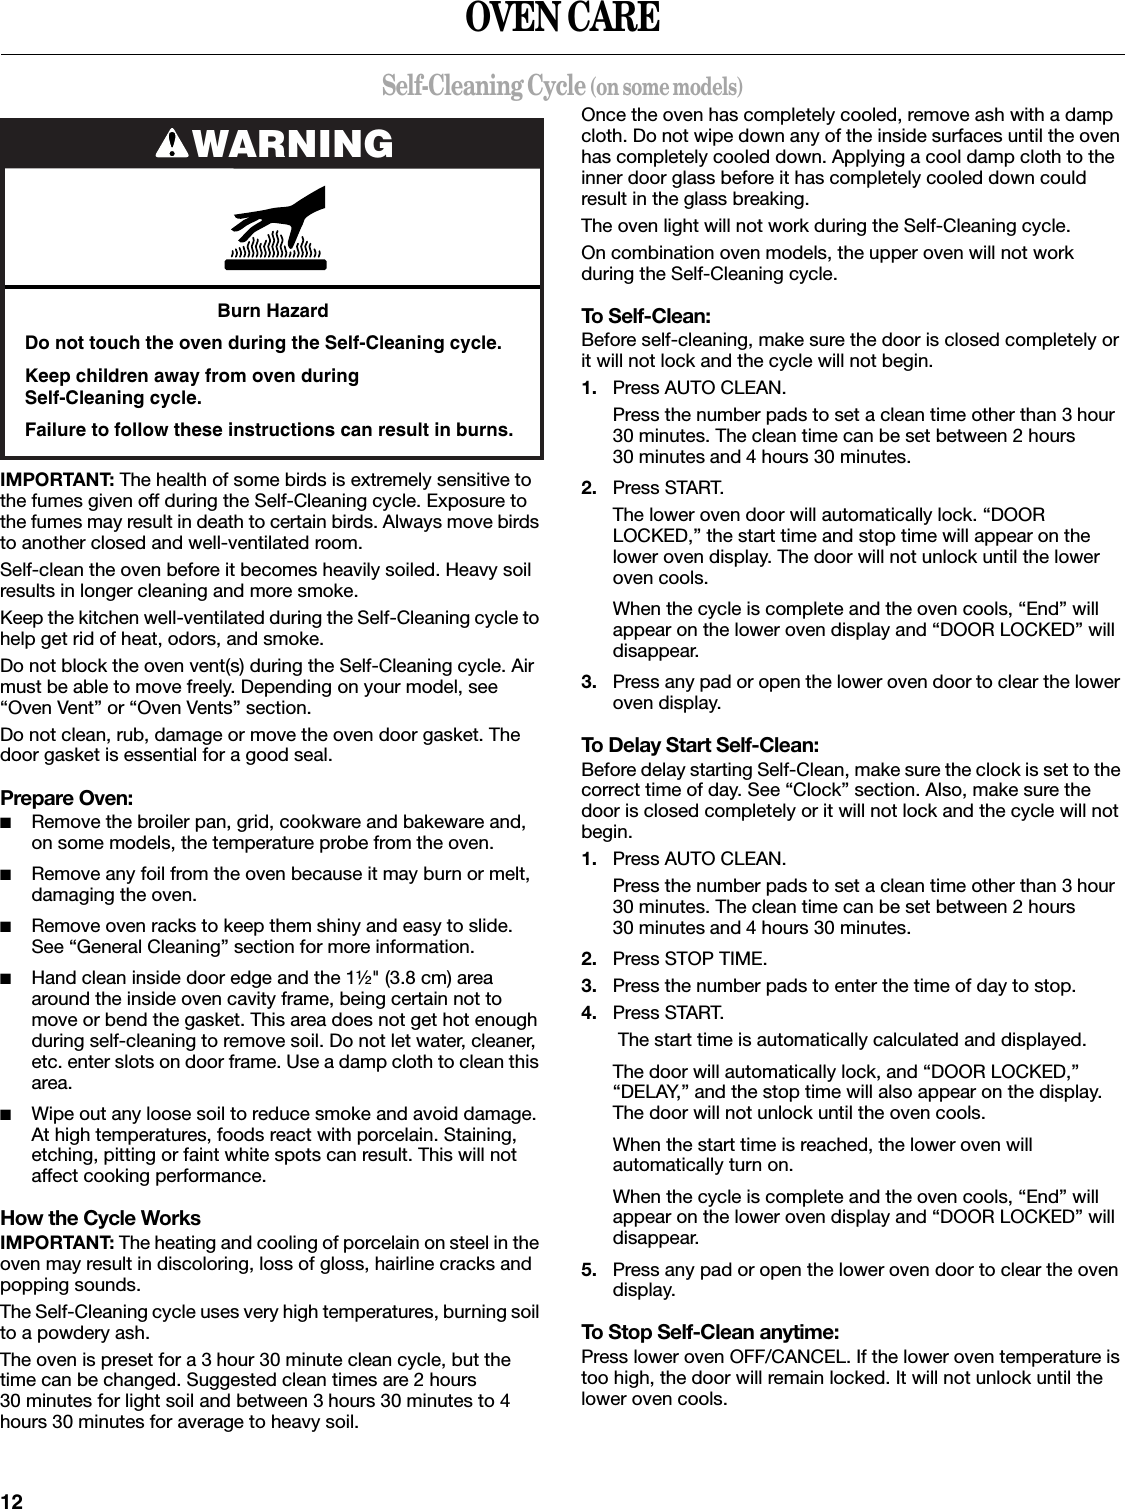
![10■Use a meat thermometer or the temperature probe to determine the doneness of meats and poultry. Check the temperature of pork and poultry in 2 or 3 places.Convection Baking and RoastingDuring convection baking or roasting, the bake and broil elements cycle on and off in intervals to maintain the oven temperature, while the fan constantly circulates the hot air.If the lower oven door is opened during convection baking or roasting, the broil element and fan will turn off immediately and the bake element will turn off in 2 minutes. They will come back on once the door is closed.■For optimal cooking results, do not use aluminum foil.■Reduce recipe temperature 25°F (14°C). The cook time may need to be reduced also.To Convection Bake or Roast:Before convection baking or roasting, position the racks according to the “Positioning Racks and Bakeware” section. When using two racks, place them on rack positions 2 and 4.When roasting with CONVECT BAKE, use the roasting rack on top of the broiler pan and grid. It is not necessary to wait for the oven to preheat before putting food in, unless it is recommended in the recipe.1. Press CONVECT BAKE.Press the number pads to enter a temperature other than 325°F (163°C). The convection bake range can be set between 170°F and 500°F (77°C and 260°C).2. Press START.“Lo°” will appear on the lower oven display if the actual oven temperature is under 170°F (77°C).When the actual oven temperature reaches 170°F (77°C), the lower oven display will show the oven temperature increasing in 5° increments.When the set temperature is reached, if enabled, one tone will sound.3. Press lower oven OFF/CANCEL when finished cooking.CONVECTION ROASTING CHARTA. Broil elementB. Convection fanC. Bake elementA. Roasting rackB. Broiler gridC. Broiler panACBA BCFOOD/RACK POSITIONCOOK TIME (min. per 1 lb [454 g])OVEN TEMP. INTERNAL FOOD TEMP.Beef, Rack Position 2Rib Roastraremediumwell-doneRib Roast (boneless)raremediumwell-doneRump, Sirloin Tip Roastraremediumwell-doneMeat Loaf20-2525-3030-3522-2527-3032-3520-2525-3030-3520-25300°F (149°C)300°F (149°C)300°F (149°C)325°F (163°C)140°F (60°C)160°F (71°C)170°F (77°C)140°F (60°C)160°F (71°C)170°F (77°C)140°F (60°C)160°F (71°C)170°F (77°C)165°F (74°C)Veal, Rack Position 2Loin, Rib, Rump Roastmediumwell-done 25-3530-40 325°F (163°C) 160°F (71°C)170°F (77°C)Pork, Rack Position 2Loin Roast (boneless)Shoulder Roast30-4035-40325°F (163°C)325°F (163°C)160°F-170°F (71°C-77°C)160°F-170°F (71°C-77°C)Ham, Rack Position 2Fresh (uncooked)Fully Cooked25-3515-20300°F (149°C)300°F (149°C)160°F (71°C)160°F (71°C)Lamb, Rack Position 2Leg, Shoulder Roastmediumwell-done 25-3030-35 300°F (149°C) 160°F (71°C)170°F (77°C)](https://usermanual.wiki/Whirlpool-Europe-S-r-l/COMBOEMS00.Users-Manual-IX/User-Guide-760692-Page-10.png)
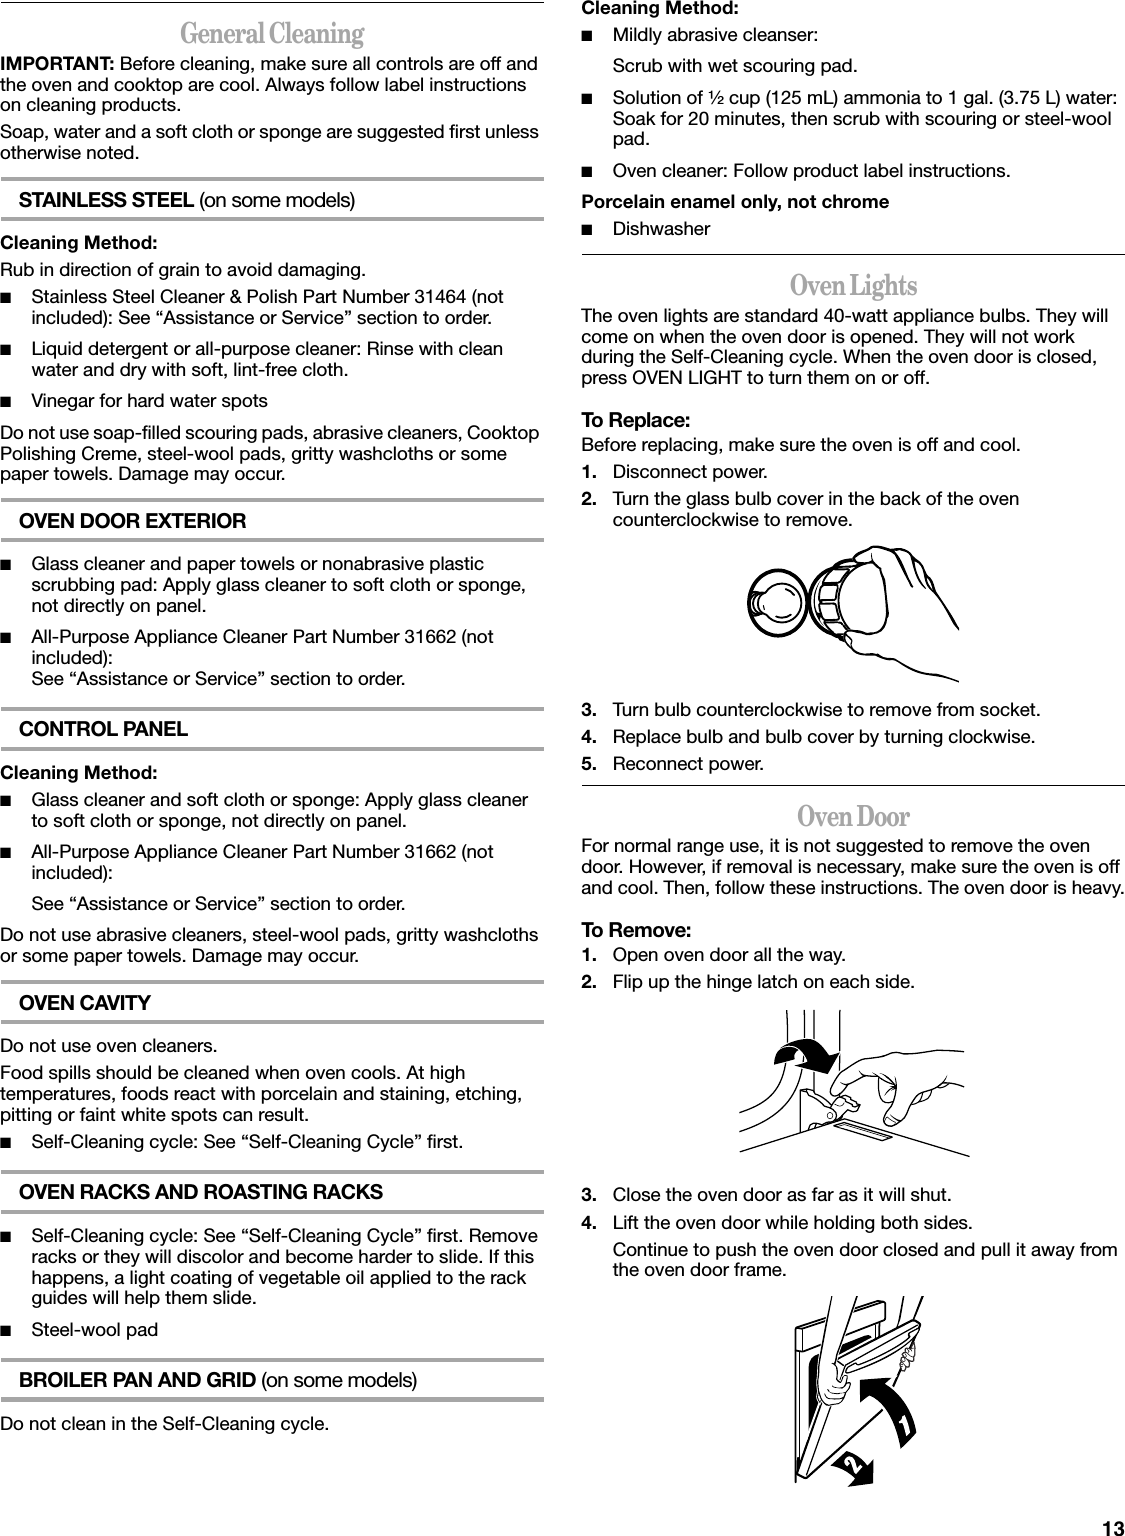
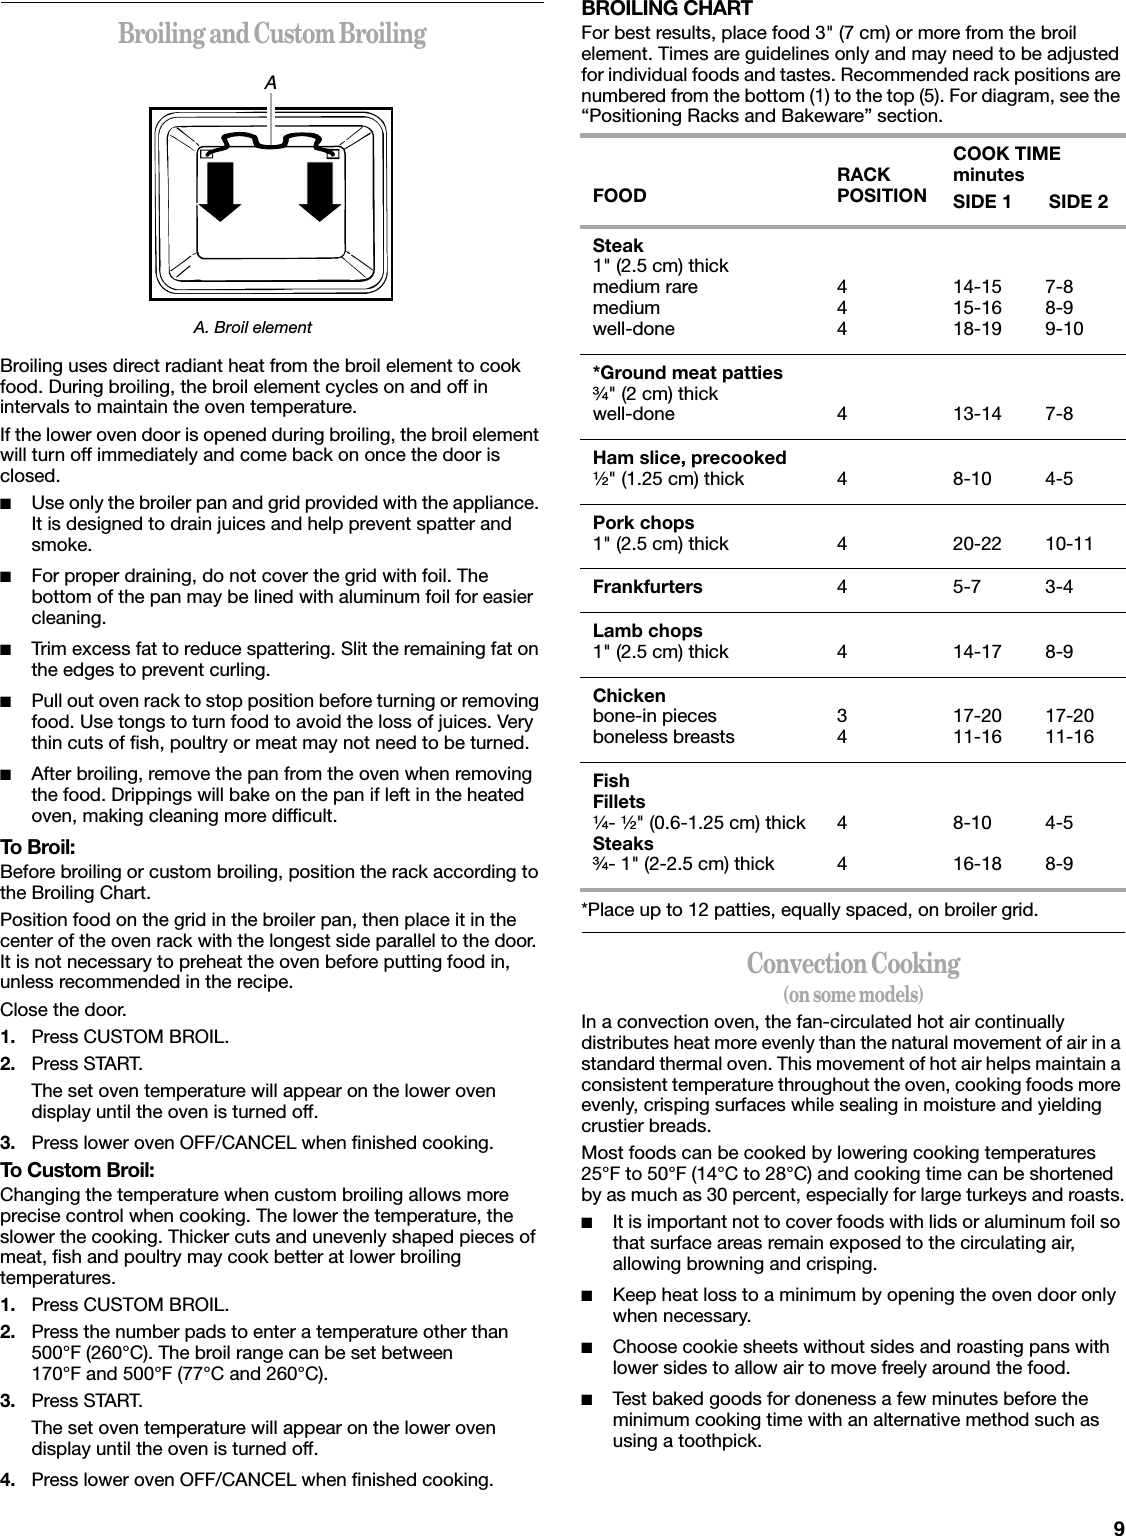
![11*Do not stuff poultry when convection roasting.Convection BroilingDuring convection broiling, the broil element cycles on and off in intervals to maintain the oven temperature, while the fan constantly circulates the hot air.If the lower oven door is opened during convection broiling, the broil element and fan will turn off immediately. They will come back on once the door is closed.To Convection Broil:Before convection broiling, see the “Broiling and Custom Broiling” section for general broiling guidelines and rack positioning.Allow the oven to preheat for 5 minutes. Position food on the grid in the broiler pan, then place it in the center of the oven rack with the longest side parallel to the door.Close the door.1. Press CONVECT BROIL.Press the number pads to enter a temperature other than 450°F (232°C). The convection broil range can be set between 170°F and 500°F (77°C and 260°C).2. Press START.The set oven temperature will appear on the lower oven display until oven is turned off.3. Press OFF/CANCEL when finished cooking.Timed CookingTimed Cooking allows the oven(s) to be set to turn on at a certain time of day, cook for a set length of time, and/or shut off automatically. Delay start should not be used for food such as breads and cakes because they may not bake properly.To Set a Cook Time:1. Press CONVECT BAKE.Press the number pads to enter a temperature other than the one displayed.2. Press COOK TIME.3. Press number pads to enter the length of time to cook.4. Press START.The start time, stop time, vertical bar countdown and minute time countdown will appear on the oven display.When the stop time is reached, the oven will shut off automatically and “End” will appear on the oven display.If enabled, end of cycle tones will sound, then reminder tones will sound every minute.5. Press UPPER OVEN CANCEL/OFF or LOWER OVEN CANCEL/OFF or open the oven door to clear the display and/or stop reminder tones.To Set a Cook Time and Stop Time:Before setting, make sure the clock is set to the correct time of day. See “Clock” section.1. Press CONVECT BAKE.Press the number pads to enter a temperature other than the one displayed.2. Press COOK TIME.3. Press number pads to enter the length of time to cook.4. Press STOP TIME.5. Press the number pads to enter time of day to stop.6. Press START.The start time is automatically calculated and displayed.“DELAY” and the stop time will also appear on the oven display.When the start time is reached, the oven will automatically turn on. The minute time countdown will appear on the oven display.When the stop time is reached, the oven will shut off automatically and “End” will appear on the oven display.If enabled, end-of-cycle tones will sound, then reminder tones will sound every minute.7. Press CANCEL/OFF, UPPER OVEN CANCEL/OFF or LOWER OVEN CANCEL/OFF or open the oven door to clear the display and/or stop reminder tones.Chicken*, Rack Position 2Whole3-5 lbs(1.5-2.2 kg)5-7 lbs(2.2-3.1 kg)20-2515-20325°F (163°C)325°F (163°C)180°F (82°C)180°F (82°C)Turkey*, Rack Positions 1 or 213 lbs and under(5.85 kg)Over 13 lbs(5.85 kg)10-1510-12300°F (149°C)300°F (149°C)180°F (82°C)180°F (82°C)Cornish Game Hens*, Rack Position 2 or 31-1.5 lbs(0.5-0.7 kg) 50-60 325°F (163°C) 180°F (82°C)A. Broil elementB. Convection fanFOOD/RACK POSITIONCOOK TIME (min. per 1 lb [454 g])OVEN TEMP. INTERNAL FOOD TEMP.ABWARNINGFood Poisoning HazardDo not let food sit in oven more than one hour before or after cooking.Doing so can result in food poisoning or sickness.](https://usermanual.wiki/Whirlpool-Europe-S-r-l/COMBOEMS00.Users-Manual-IX/User-Guide-760692-Page-11.png)