Whirlpool Microwave Development GH7208Y Microwave Oven User Manual W10220014A
Whirlpool Microwave Products Development Limited. Microwave Oven W10220014A
UserManual.wiki
>
Whirlpool Microwave Development
>
GH7208Y User Manual
User Manual
Navigation menu
Upload a User Manual
Namespaces
Wiki Guide
HTML
PDF
Info
Views
User Manual
Discussion / Help
Navigation


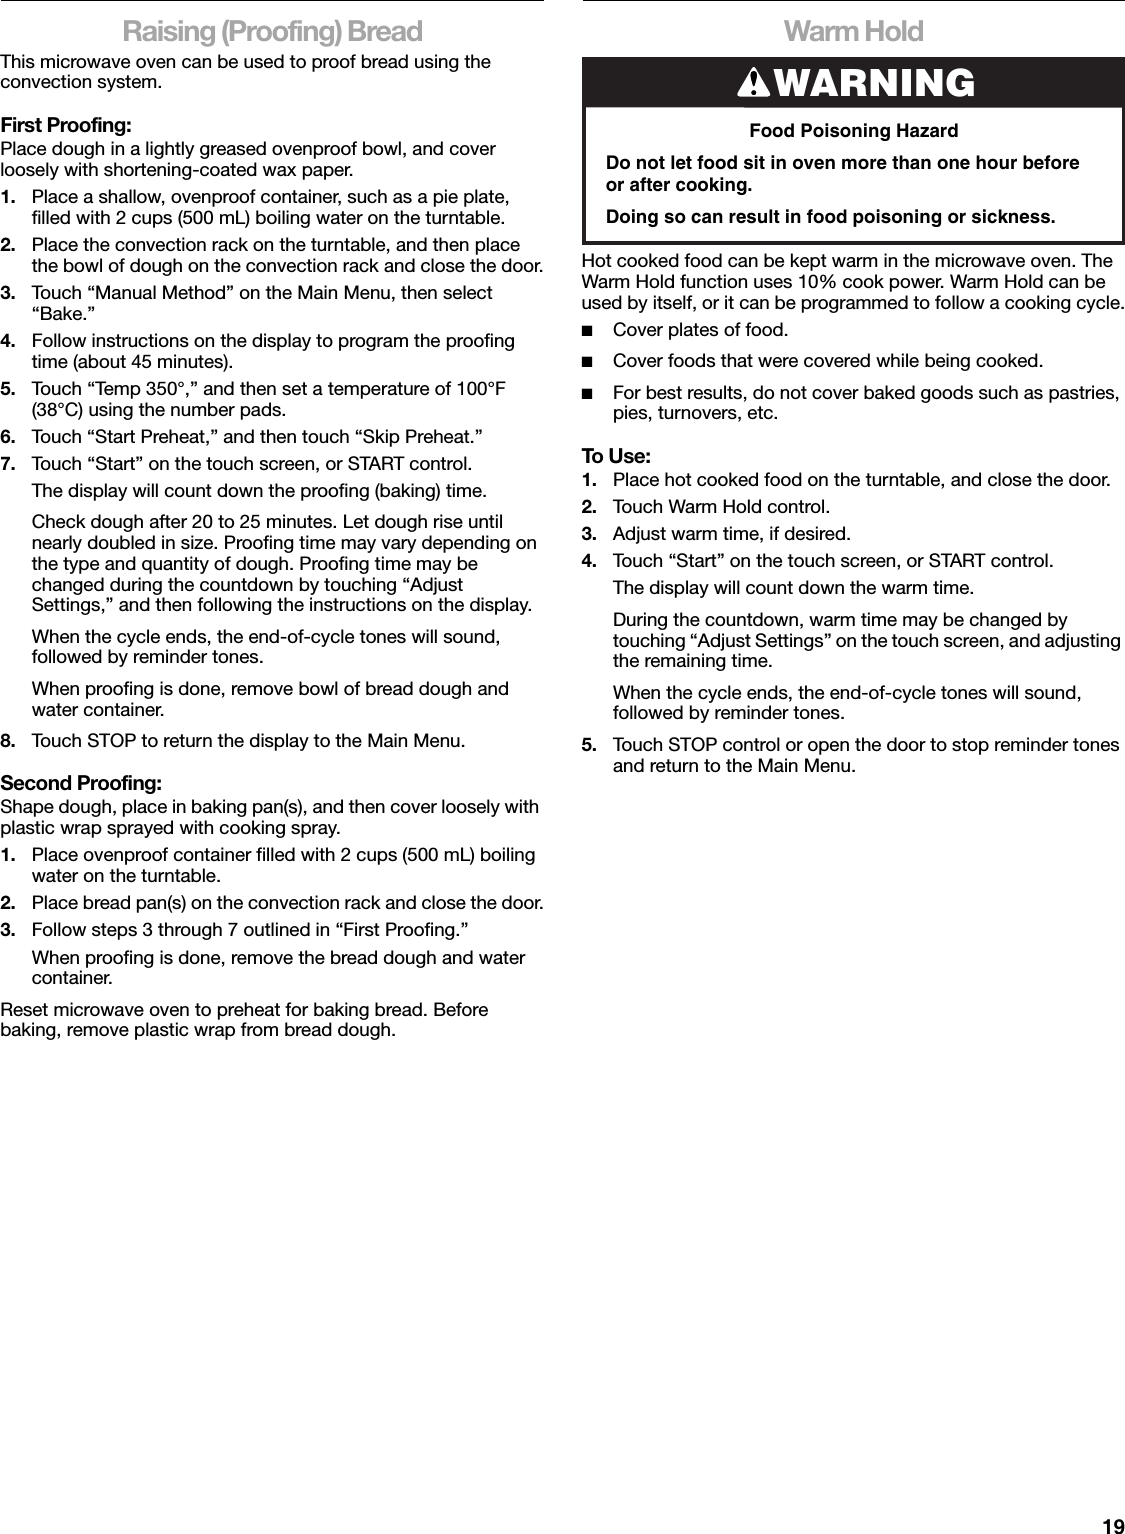


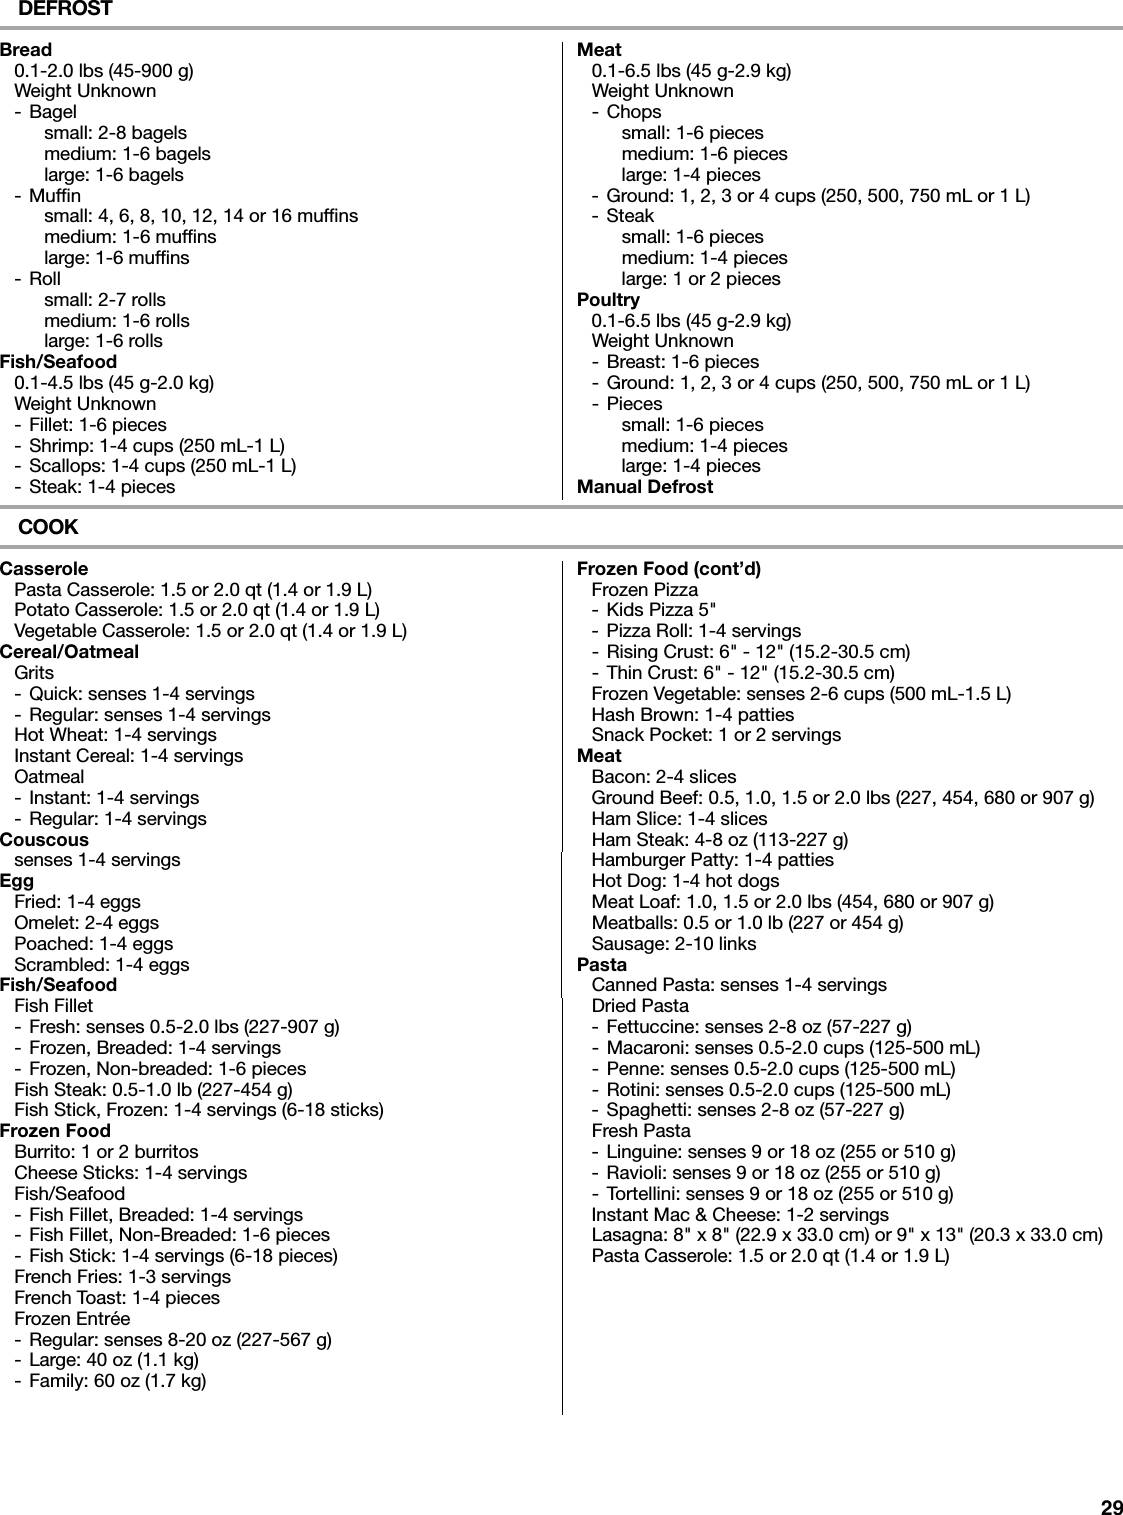
![26Food Type ChartUse this chart as a reference for menu items available in the “Food Type” menuBREAKFAST FOODBacon Grits OatmealCook Quick InstantCereal Instant - Cook - CookCook Regular RegularEgg - Cook - CookFried Hash Brown Quiche- Cook or Browning Pan Cook or Browning Pan BakeOmelet Hot Wheat Sausage- Cook or Browning Pan Cook Cook or Browning PanPoached Muffin Soufflé- Cook Fresh BakeScrambled - Bake, Browning Pan or Reheat- Cook Frozen- Defrost or ReheatDAIRY/DESSERTAngel Food Cake Cheese MarshmallowsBake Melt MeltBrown Sugar Chocolate NutsSoften Melt Browning PanBrownies Cookies PieBake or Browning Pan Bake or Browning Pan FreshButter/Margarine Cream Cheese -BakeMelt or Soften Soften FrozenCaramel Ice Cream -BakeMelt Soften SouffléCaramel Dip BakeSoftenFROZEN FOODFrozen Entrée Garlic Bread Pot PieRegular (8-20 oz [227-567 g]) Bake Bake- Cook Hash Brown PoultryLarge (40 oz [1.1 kg]) Cook or Browning Pan Defrost- Cook Pie SoupFamily Size (60 oz [1.7 kg]) Bake Reheat- Cook Pizza VegetableFish Kids Pizza 5" Cook or Steam CookFillet, Breaded - Cook- Cook Pizza RollFillet, Non-breaded - Cook- Defrost or Cook Rising CrustFish Stick - Cook or Browning Pan- Cook Thin CrustFrench Toast - Cook or Browning PanCook or Browning PanLIQUIDSBeverage Sauce Soup, ThickReheat Thick ReheatFrozen Juice -Reheat Soup, ThinSoften Thin ReheatSoup, Frozen -ReheatReheat](https://usermanual.wiki/Whirlpool-Microwave-Development/GH7208Y/User-Guide-1057880-Page-26.png)


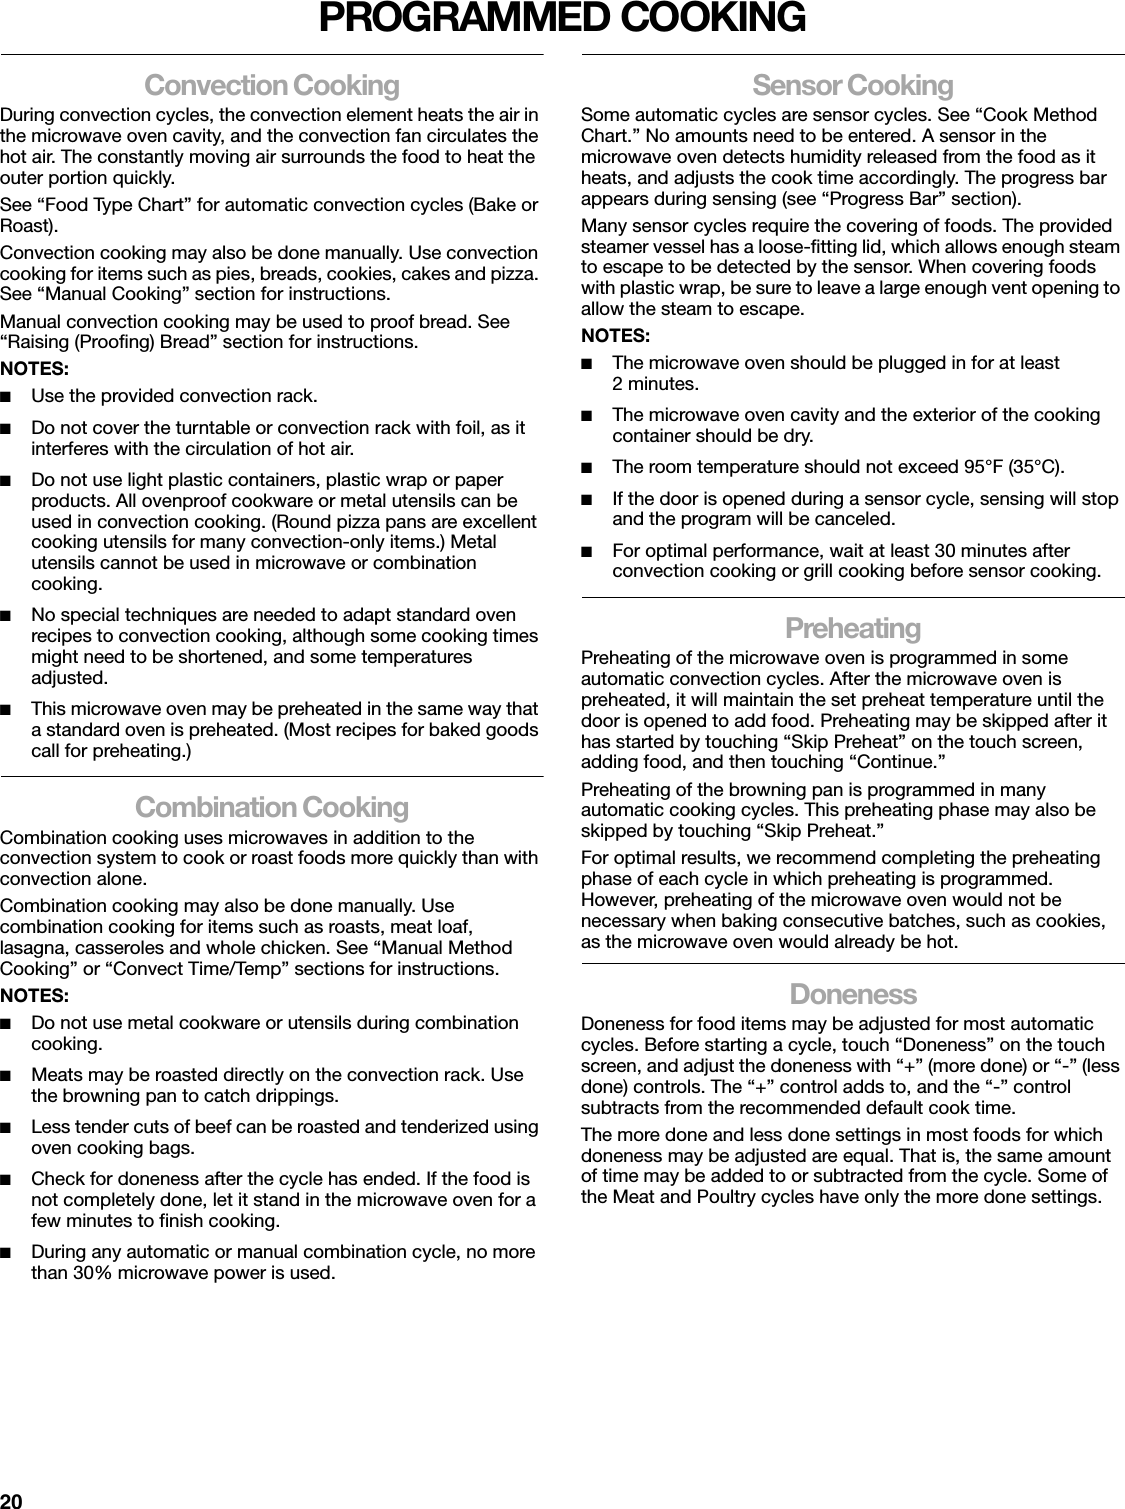
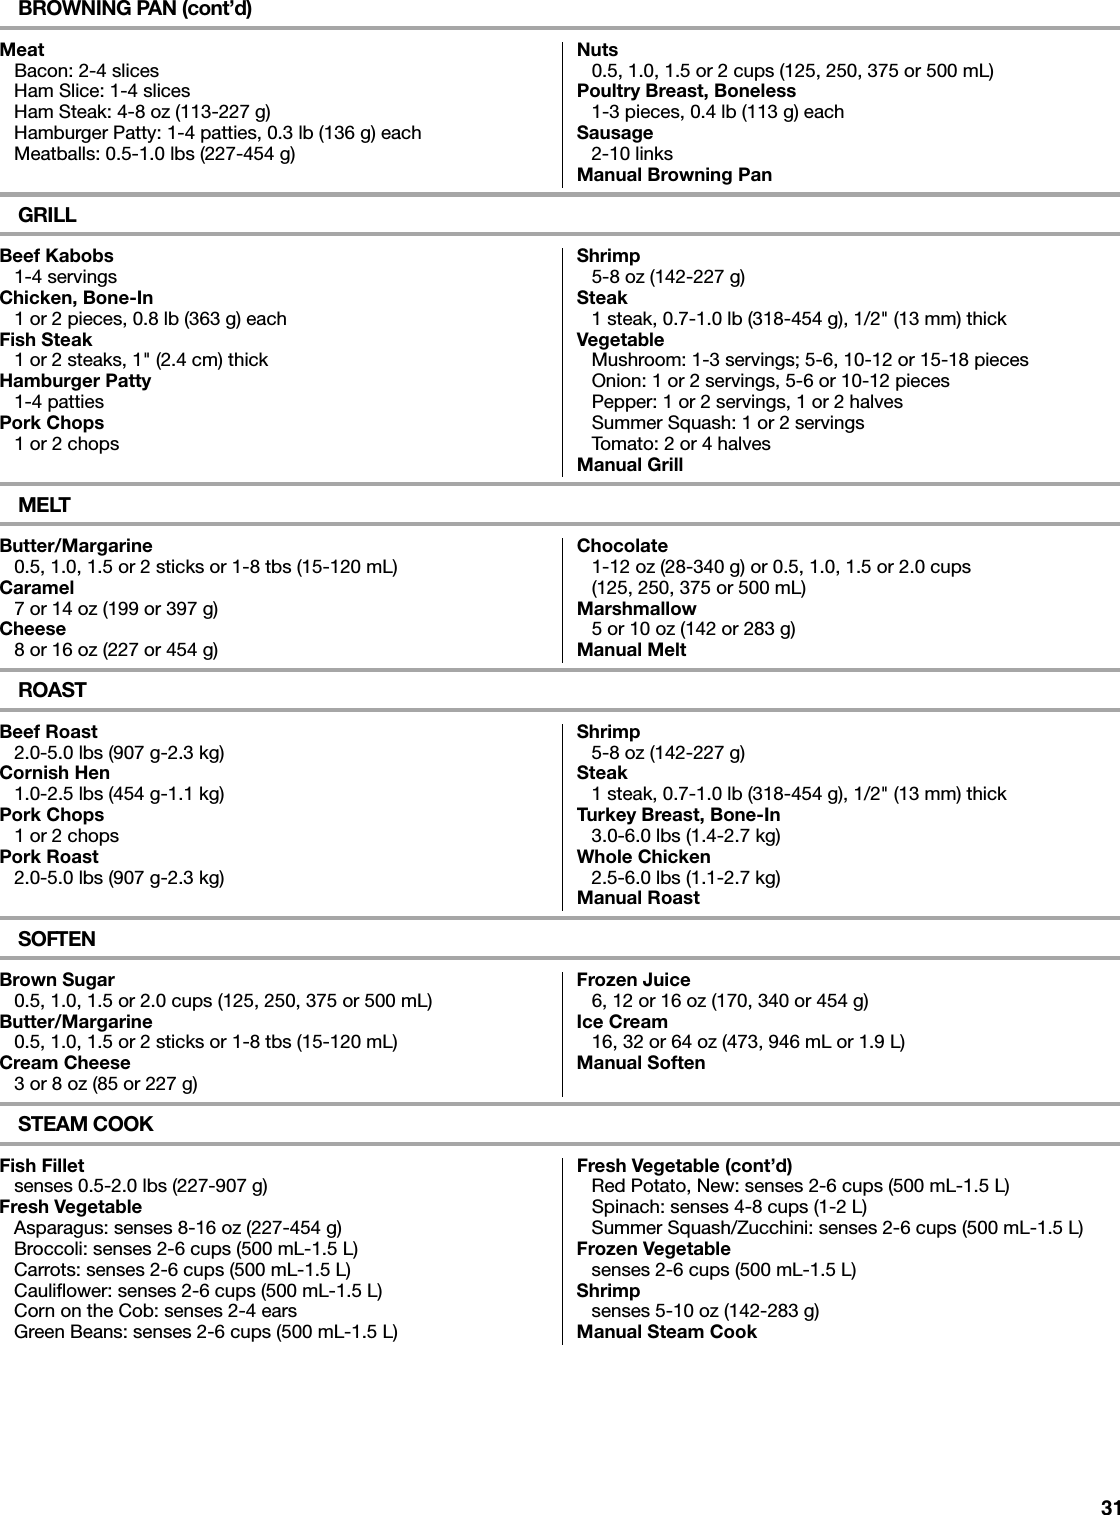
![30COOK (cont’d)Poultry VegetableChicken Nuggets: 1-4 servings (4-16 pieces) Canned Vegetable: 8-32 oz (237-946 mL)Chicken Fresh Vegetable- Bone-In: 0.5-3.5 lbs (227 g-1.5 kg) - Asparagus: senses 8-16 oz (227-454 g)- Boneless: 0.2-2.0 lbs (90-907 g) - Broccoli: senses 1-6 cups (250 mL-1.5 L)Chicken Tenders: 1-4 servings - Carrots: senses 1-6 cups (250 mL-1.5 L)Chicken Wings: 1-4 servings - Cauliflower: senses 1-6 cups (250 mL-1.5 L)Ground Poultry: 0.5, 1.0, 1.5 or 2.0 lbs (227, 454, 680 or 907 g) - Corn on the Cob: senses 1-4 earsPoultry Breast Boneless - Green Beans: senses 1-6 cups (250 mL-1.5 L)- Pan Brown: 1-3 pieces - Mushroom: senses 1-6 cups (250 mL-1.5 L)- Poached: 0.2-1.5 lbs (90-680 g) - Potato, Baked/Sweet: senses 1-4 potatoesRice - Spinach: senses 2-6 cups (500 mL-1.5 L)Brown Rice Instant: senses 0.5-2.0 cups (125-500 mL) - Summer Squash/Zucchini: senses 1-6 cups (250 mL-1.5 L)Brown Rice Long Grain: senses 0.5-2.0 cups (125-500 mL) Frozen Vegetable: senses 2-6 cups (500 mL-1.5 L)White Rice Instant: senses 0.5-2.0 cups (125-500 mL) Vegetable Casserole: 1.5-2.0 qt (1.4-1.9 L)White Rice Long Grain: senses 0.5-2.0 cups (125-500 mL) Manual CookWhite Rice Short Grain: senses 0.5-2.0 cups (125-500 mL)BAKEAngel Food Cake Pie1 cake Fresh: 9" (22.9 cm)Biscuit, Refrigerated Frozen: 9" (22.9 cm)Large: 5 or 8 biscuits Pot PieRegular: 5 or 10 biscuits 1 or 2 piesBread QuicheGarlic Bread: 8-10 oz (227-283 g) loaf 9" (22.9 cm)Quick: 1 or 2 loaves Roll, RefrigeratedYeast: 1 or 2 loaves Large: 5 or 6 rollsBrownies Regular: 4 or 8 rolls8" x 8" (20.3 x 20.3 cm) or 9" x 13" (22.9 x 33.0 cm) SouffléCookies 1 soufflé (2.0 qt [1.9 L])1 cookie sheet Manual BakeMuffin6 or 12 muffinsBOIL & SIMMERCouscous Fresh Pastasenses 1-4 servings Linguine: senses 9 or 18 oz (255 or 510 g)Dried Pasta Ravioli: senses 9 or 18 oz (255 or 510 g)Fettuccine: senses 2-8 oz (57-227 g) Tortellini: senses 9 or 18 oz (255 or 510 g)Macaroni: senses 0.5-2.0 cups (125-500 mL) RicePenne: senses 0.5-2.0 cups (125-500 mL) Brown Rice Instant: senses 0.5-2.0 cups (125-500 mL)Rotini: senses 0.5-2.0 cups (125-500 mL) Brown Rice Long Grain: senses 0.5-2.0 cups (125-500 mL)Spaghetti: senses 2-8 oz (57-227 g) White Rice Instant: senses 0.5-2.0 cups (125-500 mL)White Rice Long Grain: senses 0.5-2.0 cups (125-500 mL)White Rice Short Grain: senses 0.5-2.0 cups (125-500 mL)Manual Boil & SimmerBROWNING PANBaked Goods Frozen FoodBiscuit Cheese Sticks: 1-4 servings- Large: 5 or 8 biscuits Chicken Nuggets: 1-4 servings (4-16 pieces)- Regular: 5 or 10 biscuits Chicken Tenders: 1-4 servingsBrownies: 20 oz (567 g) package FishCookies: 4, 6 or 8 cookies - Fillet, Frozen, Breaded: 1-4 servingsMuffins: 4, 6 or 8 muffins - Fish Stick Frozen: 1-4 servings (6-18 pieces)Roll, Refrigerated French Fries: 1-3 servings- Large: 5 or 6 rolls French Toast: 1-4 pieces- Regular: 4 or 8 rolls Hash Brown: 1-4 pattiesEgg PizzaFried: 1-4 eggs - Rising Crust: 6"-11" (15.2-27.9 cm)Omelet: 2-4 eggs - Roll: 1-4 servingsFish Steak - Thin Crust: 6"-12" (15.2-30.5 cm)0.5-1.0 lb (227-454 g) Potato Nuggets: 1-4 servingsSausage: 2-10 links](https://usermanual.wiki/Whirlpool-Microwave-Development/GH7208Y/User-Guide-1057880-Page-30.png)
![32MICROWAVE OVEN CAREGeneral CleaningIMPORTANT: Before cleaning, make sure all controls are off and the microwave oven is cool. Always follow label instructions on cleaning products.Soap, water and a soft cloth or sponge are suggested unless otherwise noted.GREASE FILTERSDo not use ammonia or corrosive cleaning agents such as lye-based oven cleaners.■Hot water and mild detergent:Soak filters, then scrub and swish to remove embedded dirt and grease. Rinse well and shake to dry.■Dishwasher:Wash separately, not with dirty dishes, because food can be trapped in the filters.NOTE: Some discoloration of the filters may occur after cleaning them in the dishwasher. This is normal, and will not affect the performance of the grease filters.MICROWAVE OVEN CAVITY AND DOORThe gray finish inside the microwave oven cavity is a durable, nonstick coating that makes soils easier to remove.To avoid damage to the microwave oven cavity, do not use metal or sharp utensils or scrapers, soap-filled scouring pads, abrasive cleaners, steel-wool pads, gritty washcloths or some recycled paper towels. If damage occurs, special touch-up paint may be applied. Call 1-800-4-MY-HOME® to order. See “Replacement Parts” section for part number.The inside of the door should be cleaned after every use in order to avoid accumulation of “baked-on” food.The area where the microwave oven door and frame touch when closed should be kept clean.Average soil■Mild, nonabrasive soaps and detergents:Rinse with clean water and dry with soft, lint-free cloth.Heavy soil■Mild, nonabrasive soaps and detergents:Heat 1 cup (250 mL) of water for 2 to 5 minutes in microwave oven. Steam will soften soil. Rinse with clean water and dry with soft, lint-free cloth.Odors■Lemon juice or vinegar:Heat 1 cup (250 mL) of water with 1 tbs (15 mL) of either lemon juice or vinegar for 2 to 5 minutes in microwave oven.Microwave Inlet CoverTo avoid arcing and damage to the microwave oven, the microwave inlet cover (see “Parts and Features”) should be kept clean.■Wipe with wet cloth.CONTROL PANEL/INTERACTIVE TOUCH DISPLAYActivate the Control Lock to avoid touch screen activation during cleaning. See “Control Lock” section.To avoid damage to the control panel/touch display, do not use abrasive cleaners, steel-wool pads or gritty washcloths.Use gentle pressure when wiping the touch screen.■Glass cleaner and soft cloth:Apply glass cleaner to soft cloth, not directly on panel.■Mild soap, water and soft washclothMICROWAVE OVEN DOOR AND EXTERIORThe area where the microwave oven door and frame touch when closed should be kept clean.■Mild, nonabrasive soaps and detergents:Rinse with clean water and dry with soft, lint-free cloth.■Glass cleaner and paper towels or nonabrasive plastic scrubbing pad:Apply glass cleaner to towel, not directly to surface.Stainless Steel (on some models)To avoid damage to the microwave oven door and exterior, do not use soap-filled scouring pads, abrasive cleaners, steel-wool pads, gritty washcloths or some paper towels. Rub in direction of grain.■Stainless Steel Cleaner and Polish (not included):Call 1-800-4-MY-HOME® to order. See “Replacement Parts” section for part number.■Liquid detergent or all-purpose cleaner:Rinse with clean water and dry with soft, lint-free cloth.■Vinegar for hard water spotsSTEAMER VESSEL■Soft brush, if necessary, to clean holes in steamer insert.■DishwasherStubborn StainsTo remove stains such as tomato sauce, use a nonabrasive cleanser, a no-scratch pad, or a solution of dishwasher detergent and water (1/4 cup [60 mL] detergent to 1 cup [250 mL] warm water).TURNTABLEReplace turntable immediately after cleaning. Do not operate the microwave oven without the turntable in place.■Mild cleanser and scouring pad■Dishwasher](https://usermanual.wiki/Whirlpool-Microwave-Development/GH7208Y/User-Guide-1057880-Page-32.png)