Widex A S UI Hearing aid with radio transceiver User Manual
Widex A/S Hearing aid with radio transceiver
User Manual
WIDEX UNIQUE
USER INSTRUCTIONS
THE WIDEX UNIQUE™ FAMILY
U-IM/U-IP model
In-the-canal/In-the-ear

YOUR HEARING AID
To be filled out by the hearing care professional)
Vent No vent
Extraction cord Volume control Push button
Your hearing aid series:
PROGRAMS
Universal Audibility Extender
Quiet Audibility Extender
Transport Audibility Extender
Urban Audibility Extender
Party Audibility Extender
Music Audibility Extender
T Audibility Extender
SPECIAL PROGRAMS
Zen Audibility Extender
Phone Audibility Extender
2

SMARTTOGGLE PROGRAMS
Zen+ Audibility Extender
Phone+ Audibility Extender
NOTE
The program names in the table are the default names. If you have chosen to
use some of the other names available, write the new names in the table. That
way you will always know which programs you have in your hearing aids.
NOTE
Read this booklet carefully before your start using your hearing aid.
3

CONTENTS
YOUR HEARING AID...................................................................................6
Welcome...........................................................................................................6
Important safety information.........................................................................7
THE HEARING AID......................................................................................9
Indications for use........................................................................................... 9
Intended use.....................................................................................................9
The battery.......................................................................................................9
Sound signals...................................................................................................11
How to tell right from left..............................................................................12
Turning the hearing aid on and off...............................................................12
Putting on and removing your hearing aid.................................................13
Programs.........................................................................................................14
Program and sound adjustment.................................................................. 16
CLEANING.................................................................................................19
Tools.................................................................................................................19
Cleaning the hearing aid................................................................................19
Cleaning the microphone grids.....................................................................21
The wax guard............................................................................................... 23
ACCESSORIES.......................................................................................... 26
TROUBLESHOOTING.................................................................................27
4

REGULATORY INFORMATION.................................................................. 30
EC directives...................................................................................................30
FCC and IC statements...................................................................................31
SYMBOLS.................................................................................................34
5
YOUR HEARING AID
Welcome
Congratulations on your new hearing aid.
Use your hearing aid regularly, even if it takes some time getting used to it.
Infrequent users don’t usually get the full benefit of a hearing aid.
NOTE
Your hearing aid and its accessories may not look exactly as illustrated in this
booklet. We also reserve the right to make any changes we consider necessary.
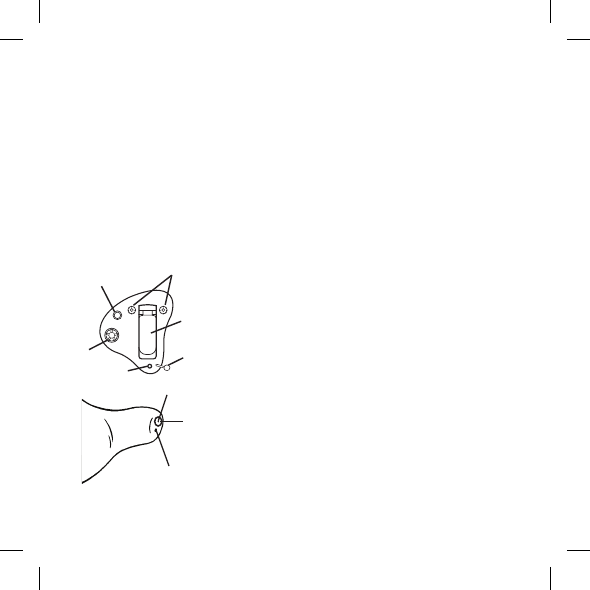
Your hearing aid at a glance
1
6
3
2
4
5
1. Microphone openings
2. Push button (optional)
3. Volume control (optional)
4. Vent (optional)
5. Extraction cord (optional)
6. Battery compartment
7
8
9
7. Sound outlet
8. Wax guard
9. Vent (optional)
6
Important safety information
Read these pages carefully before you begin using your hearing aid.
Hearing aids and batteries can be dangerous if swallowed or used im-
properly. Swallowing or improper use can result in severe injury or even
fatalities. In case of ingestion, contact a doctor immediately.
Take your hearing aids out when you are not using them. This will help to
ventilate the ear canal and prevent ear infections.
Contact your doctor or hearing care professional immediately if you sus-
pect you may have an ear infection.
Remove your hearing aids before showering, swimming or using a hair
dryer.
Do not wear your hearing aids when applying perfume, spray, gels, lotion
or cream.
Do not dry your hearing aid in a microwave oven - this will ruin it.
Never use other people’s hearing aids and never allow others to use
yours, as this could damage your hearing.
Never use your hearing aids in environments where there may be explo-
sive gases, such as in mines, etc.
Keep hearing aids, their parts, accessories and batteries away from chil-
dren.
Never try to open or repair the hearing aid yourself. Contact your hearing
care professional if you need to have your hearing aid repaired.
7
Your hearing aids contain radio communication technology. Always ob-
serve the environment in which you are using them. If any restrictions ap-
ply, you must take precautions to comply with these.
Your hearing aid is very powerful and it can play sounds that exceed a
level of 132 dB. There may therefore be a risk of damaging your remain-
ing hearing.
Do not expose your hearing aids to extreme temperatures or high humid-
ity, and dry them quickly if they get wet, or if you perspire heavily.
Your hearing aids should be stored and transported within the temperature
and humidity ranges of -20°C to +55°C (-4°F to 131°F) and 10%-95% rH.
Your hearing aids are designed to operate from 0°C (32°F) to 50°C (122°F).
For more information about your hearing aids, visit: www.widex.com.
8

THE HEARING AID
Indications for use
The hearing aids are indicated for individuals older than 36 months with a
range of hearing loss from minimal (10 dB HL) to severe (90 dB HL) and all
hearing loss configurations.
They are to be programmed by licensed hearing care professionals (audiol-
ogists, hearing aid specialists, otolaryngologists) who are trained in hearing
(re)habilitation.
Intended use
The hearing aids are intended as air conduction amplification devices to be
used in everyday listening environments. The hearing aids may be equipped
with the Zen program intended to provide a relaxing sound background (i.e.
music/noise source) for adults who desire to listen to such a background in
quiet.
The battery
Use a type 312 zinc-air battery for your hearing aid.
Always use a fresh, new battery that is precisely the kind recommended by
your hearing care professional.
9
NOTE
Check that the battery is completely clean and free of any residue before insert-
ing it in the hearing aid. Otherwise your hearing aid may not function as expec-
ted.
Never attempt to recharge your hearing aid batteries, as they could ex-
plode.
Never leave a flat battery in the hearing aids while storing them. It could
leak and ruin your hearing aid.
Dispose of used batteries as indicated on the packaging and take note of
the expiry date.
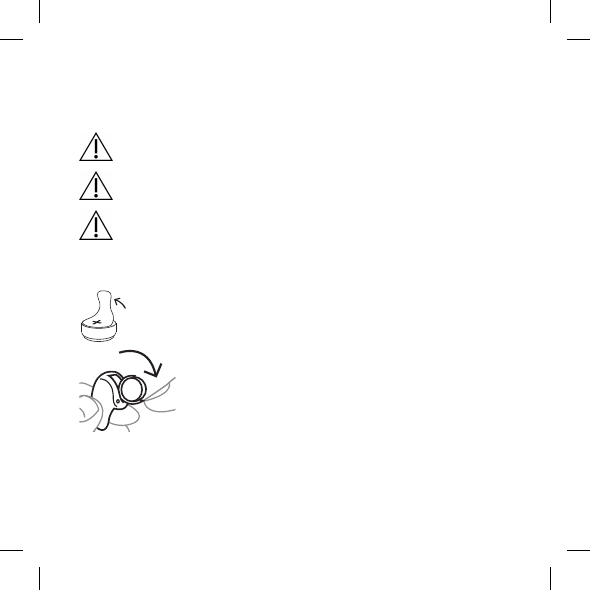
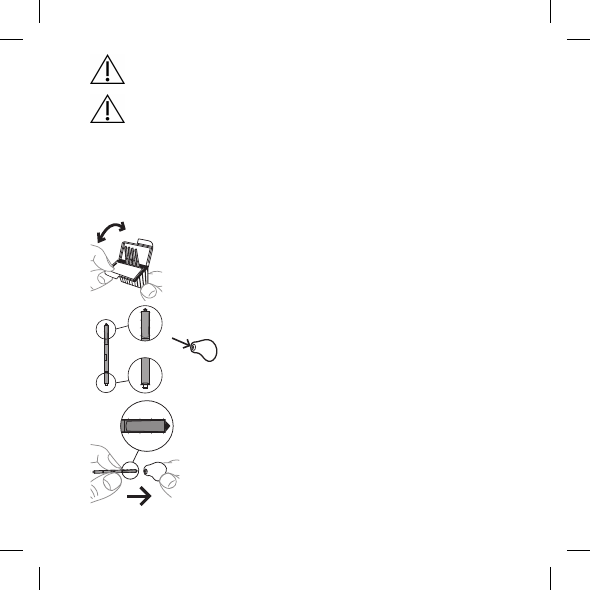
Changing the battery
To change the battery, do as follows:
Take the adhesive tab off the new battery and make
sure there is no sticky substance left on it. Let it
"breathe" for 60 seconds.
Use the nail grip to gently swing the battery door open
and remove the old battery. Place the new battery in
the battery compartment as shown.
10
Close the drawer. If it doesn't close easily, the battery
is not placed correctly.
If you are not using the hearing aid for a few days,
keep the battery compartment open.
NOTE
Avoid dropping your hearing aid - hold the hearing aid above a soft surface
while changing the battery.
Low battery indication
When the battery is flat, a sound signal will play. If the battery drains sud-
denly there may however be no warning. We recommend carrying a spare
battery with you wherever you go.
Sound signals
Your hearing aid plays sounds to inform you that certain features have been
activated or that you have changed programs. These sounds may be spoken
messages or tones, depending on your needs and preferences.
Program 1 Message/one short beep
Program 2 Message/two short beeps
Program 3 Message or three short beeps
Program 4 Message/one short and one long beep
Program 5 Message/one long beep and two short beeps
11
Zen+ Message/tone
Ask your hearing care professional to turn these sounds signals off if you
don't need them.
Lost partner
(Only available in 440-series)
Your hearing care professional can turn on a feature in your hearing aid that
warns you whenever it loses contact with the hearing aid in the opposite
ear. You will hear a spoken message in your ear.
How to tell right from left
The hearing aid for your right ear has a red mark. The hearing aid for your
left ear has a blue mark.
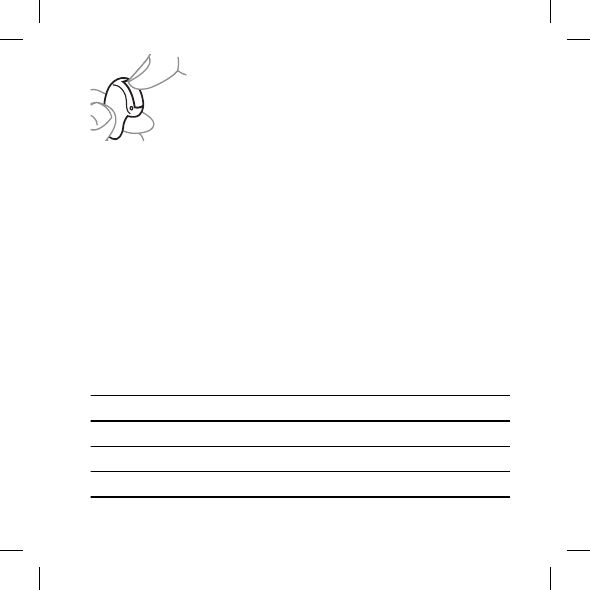
Turning the hearing aid on and off
To turn the hearing aid on, close the battery compart-
ment. The hearing aid will play a sound signal to indi-
cate that it is on, unless your hearing care professio-
nal has deactivated this function.
Open the battery compartment to turn the hearing
aid off.
NOTE
You can also cup the hearing aid in your hand to verify that it is turned on. If it's
on, it will whistle. Don't forget to turn off the hearing aid when it is not in use.
12
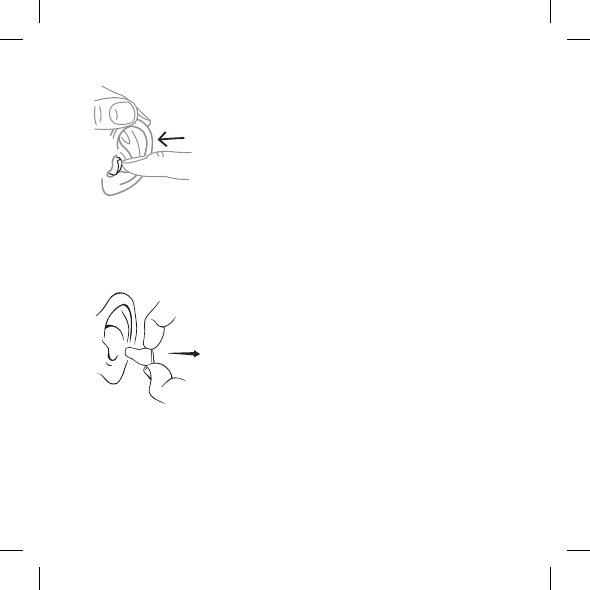
Putting on and removing your hearing aid
Close the battery lid completely. Hold the hearing aid
with your thumb and forefinger and insert it slowly into
your ear until you feel resistance.
Then use the tip of your forefinger to gently push the
hearing aid into your ear until it feels comfortable.
Pulling the outer ear upwards and backwards while you
insert the hearing aid can be helpful.
NOTE
If the hearing aid doesn't feel comfortable, or if it doesn't fit properly, causing
irritation, redness or the like, contact your hearing care professional.
Removing the hearing aid
Hold the hearing aid with your thumb and forefinger and
pull carefully.
NOTE
If you find it difficult to take out the hearing aid, move it carefully from side to
side.
13

Programs
PROGRAMS USE
Universal For everyday use
Quiet Special program for listening in quiet envi-
ronments
Transport For listening in situations with noise from
cars, trains, etc.
Urban For listening in situations with changing
sound levels (in supermarkets, noisy work-
places or similar)
Party For listening in situations with many people
talking at the same time
Music For listening to music
SPECIAL PROGRAMS USE
Zen Plays tones or noise for a relaxing sound
background
Phone This program is designed for listening to
phone conversations
14

SMARTTOGGLE PROGRAMS USE
Zen+ This program is similar to Zen but allows
you to listen to different types of tones or
noise
Phone+ This program lets you listen to the phone
and avoid the surrounding sounds. One of
your hearing aids transmits the phone con-
versation to the other, so that you can listen
with both ears
NOTE
The names in the list of programs are the default names. Your hearing care pro-
fessional can also select a program name from a preselected list. Then it is even
easier for you to select the right program in each listening situation.
NOTE
You can only have one SmartToggle program in your hearing aid.
Depending on your hearing loss, your hearing care professional can activate the
Audibility Extender feature. Ask your hearing care professional if you could ben-
efit from this. If your needs and preferences change over time, your hearing care
professional can easily change your program selection.
15
The Zen program
Your hearing aid may be provided with a unique optional listening program
called Zen. It makes musical tones (and sometimes a rushing noise) in the back-
ground.
If you perceive a decrease in loudness, tolerance of sounds, speech not as
clear, or worsening tinnitus, contact your hearing care professional.
Use of the Zen program may interfere with hearing everyday sounds in-
cluding speech. It should not be used when hearing such sounds is impor-
tant. Switch the hearing aid to a non-Zen program in those situations.
Program and sound adjustment
Adjusting the sound level using the volume control
Your hearing aid adjusts the sound level automatically according to your
sound environment, but you can also adjust it manually depending on your
needs and preferences. To do so, turn the volume control towards the front
to increase the volume and turn it towards the rear to reduce it.
Each time you operate the volume control, you will hear a beep-tone unless
your hearing care professional has deactivated this function. When you
reach the maximum or minimum setting, you will hear a steady tone.
NOTE
Your hearing aid will also play a tone when you reach the default sound level
programmed for you by your hearing care professional. In this way you can easi-
ly return to the optimal setting for most listening situations.
16

You can also mute your hearing aid if you need to. Do as follows:
●Keep turning the volume control towards the rear until you can hear the
steady sound
To turn the sound on again:
●Turn the volume control towards the front or
●Change program
Any adjustment of the volume will be cancelled when you turn off your
hearing aid or if you change program.
Using the push button to change programs and adjust the sound level:
If you have two hearing aids, the push button can be programmed in several
ways:
As a dedicated program button:
To change programs, just tap the button. To access and exit SmartToggle
programs, push and hold the push button down for more than one second
(this setting is optional). Once you have accessed the SmartToggle pro-
gram, you can change among the different Zen styles by short taps on the
button.
As a dedicated sound adjustment button:
Tap the button on your hearing aid if you’d like more audibility and more
volume. If you need to decrease the volume or you’d like more comfort, tap
the button on your hearing aid.
A long push on either of your hearing aids will mute and unmute the sound
(this setting is optional).
17

As a combined program and sound adjustment button:
If you have this option, tap the button on your hearing aid if you’d like more
audibility and more volume. If you need to decrease the volume or if you’d
like more comfort, just tap the button on your hearing aid. A long push on
either of your hearing aids will change programs.
If you only have one hearing aid, a short tap will change programs and a
long tap will allow you to access the SmartToggle programs.
18
CLEANING
Tools
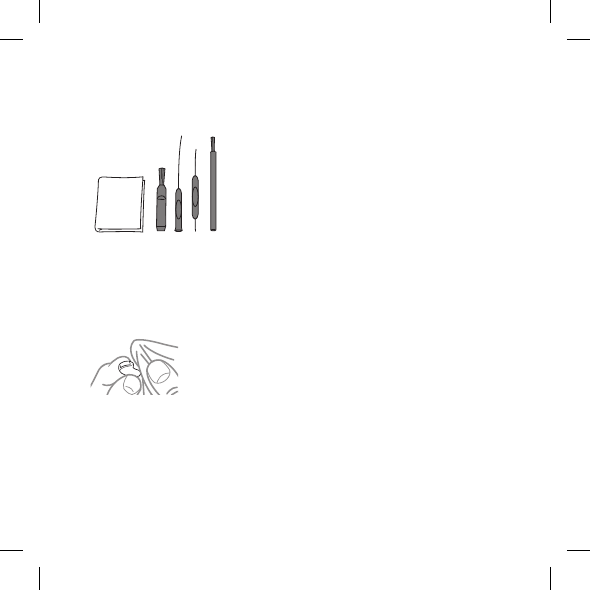
You will receive the following cleaning tools with your hearing aid:
1. 2. 3. 4. 5.
1. Cloth
2. Brush
3. Long wax-removing tool
4. Short wax-removing tool
5. Battery magnet
Cleaning the hearing aid
Cleaning your hearing aid every day will make it more efficient and more
comfortable to wear.
The hearing aid Just wipe it with the a soft cloth (for example the
cloth you received from your hearing care profes-
sional).
19

The sound outlet Remove any visible earwax from around the sound
outlet with the small brush or cloth. Never try to
clean the wax guard.
NOTE
If you can't clean the sound outlet, contact your hearing care professional. Never
insert anything into the sound outlet as this can ruin your hearing aid.
The vent
Clean the vent every day by passing the long wax removing tool (no. 4) all
the way through the vent. When you are done, leave the hearing aid open
to ventilate it.
NOTE
It is important for the performance of your hearing aid that you keep the vent
clean and free of earwax, dirt and the like. Clean it every day after use and con-
sult your hearing care professional if the vent is blocked.
Dry your hearing aid quickly if it gets wet, or if you perspire heavily. Some
people use a special dehumidifier like Widex Dry-Go to help keep their hear-
ing aids dry and clean. Ask your hearing care professional if this is right for
you.
20
Do not use any kind of liquid or disinfectant to clean your hearing aid.
Clean and inspect your hearing aid every day after use to check that it is
not broken. If the hearing aid breaks while you are wearing it, leaving
small fragments in your ear canal, contact your doctor. Never try to take
out the fragments yourself.
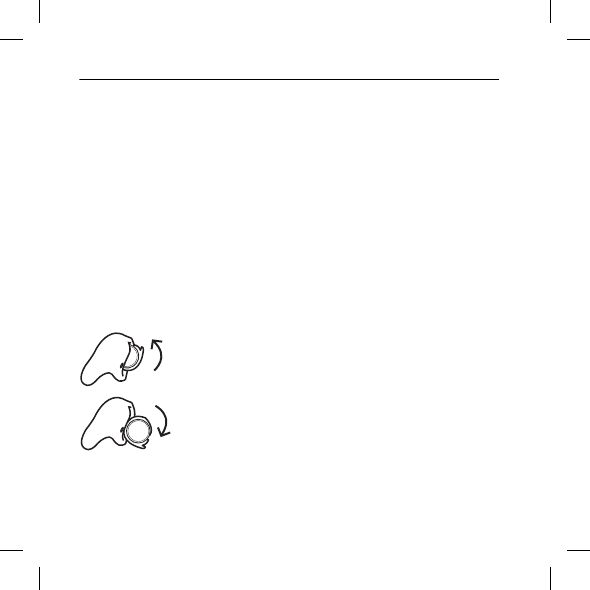
Cleaning the microphone grids
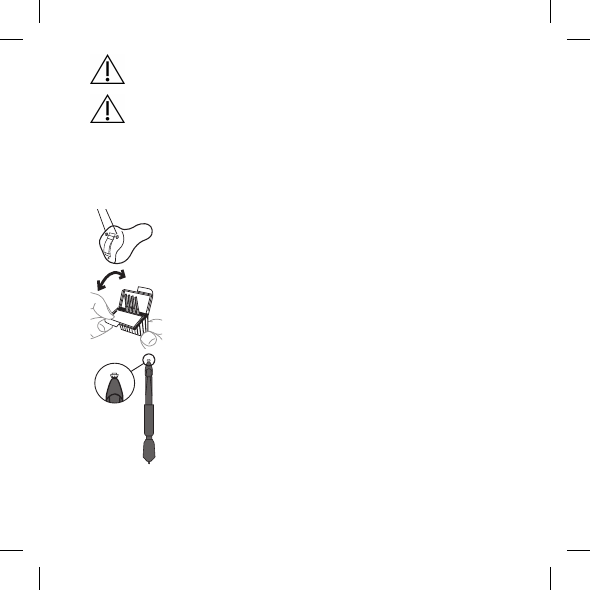
Changing the microphone grid:
The microphone grid helps to protect the hearing aid mi-
crophones against dirt and earwax. Always use micro-
phone grids supplied by Widex with your hearing aid.
Open the case as illustrated.
The microphone grid tool consists of the following parts:
1. Removal hook
2. New microphone grid
21
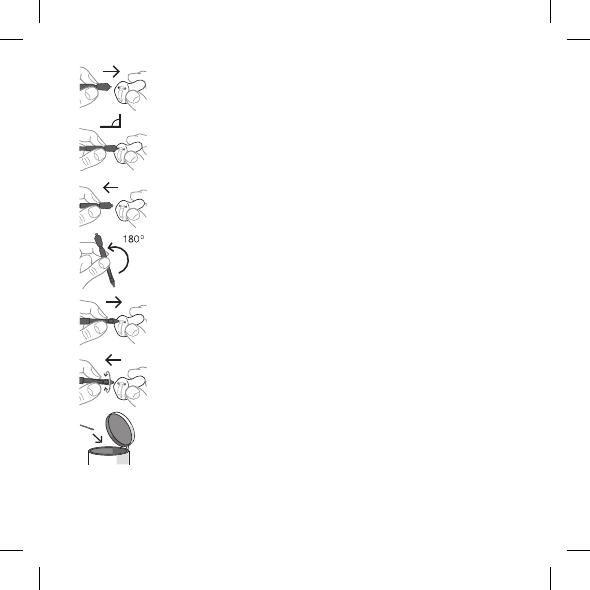
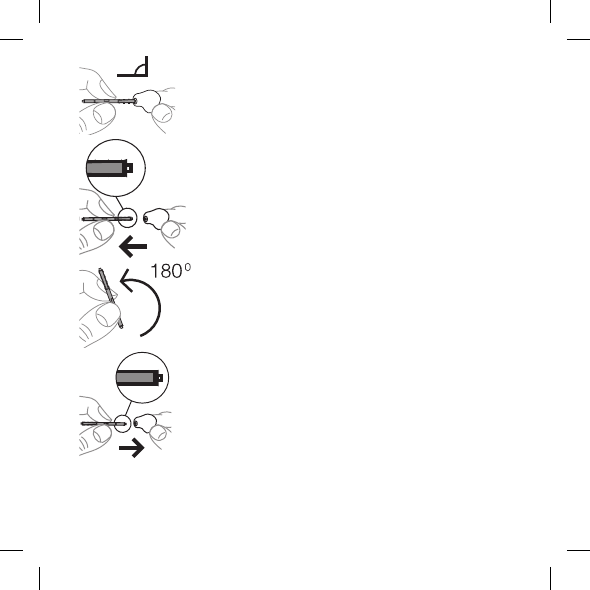
Insert the removal hook into the used grid.
Keep the holder at a right angle.
Pull the used grid straight out.
Insert the new grid into the microphone opening.
Pull the holder straight out while turning it slightly to
make sure the grid remains in place.
Ask your hearing care professional about how often you should change the
microphone grid.
22
The grid is for one-time use only and is not intended to be cleaned.
If the grid fits loosely, discard it and use a new one.
The wax guard
The wax guard helps to protect the hearing aid against earwax. Always use
wax guards supplied by Widex with your hearing aid.
Changing the wax guardOpen the wax guard case as illustrated.
2
1
The wax guard consists of the following parts:
1. Removal hook
2. New wax guard
Insert the removal hook into the used wax guard.
23
Keep the holder at a right angle.
Pull the used wax guard straight out.
Insert the new wax guard into the opening of the
sound outlet and press it gently.
24
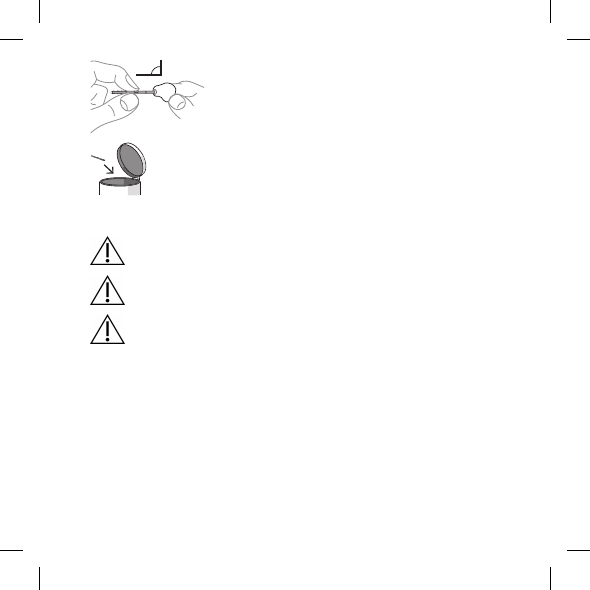
Pull the holder straight out.
Ask your hearing care professional about how often you should change the
wax guard.
The wax guard is for one-time use only and is not intended to be cleaned.
If the wax guard fits loosely, discard it and use a new one.
If the wax guard falls off inside your ear, contact your doctor or hearing
care professional to have it removed. Do NOT attempt to remove the wax
guard yourself.
25

ACCESSORIES
You can use a variety of accessories with your hearing aid. To see whether
you could benefit from using these accessories, ask your hearing care pro-
fessional.
Name Use
RC-DEX remote control
TV-DEX for listening to TV and audio
PHONE-DEX for easy landline use
FM+DEX for streaming audio and FM signals
UNI-DEX for connecting hearing aids to mobile phones
CALL-DEX for easy wireless connection to mobile phones
COM-DEX for wireless connection to mobile phones and other
devices via Bluetooth
COM-DEX Remote
Mic for helping hearing aid users hear speech in difficult
listening situations
Available in some countries only.
26

TROUBLESHOOTING
These pages contain advice on what to do if your hearing aid stops working
or if it doesn't work as expected. If the problem persists, contact your hear-
ing care professional.
Problem Possible cause Solution
The hearing aid is
completely silent It is not turned on Make sure the battery is
placed correctly and the
battery compartment cover
is closed correctly.
The battery does not
work Insert a new battery in the
hearing aid
The sound outlet is
blocked See the cleaning section
The microphone open-
ing is blocked See the cleaning section
The hearing aid vol-
ume is not powerful
enough
The sound outlet is
blocked See the cleaning section
Your ear is blocked by
earwax Contact your doctor
Your hearing may
have changed Contact your hearing care
professional/doctor
27

Problem Possible cause Solution
The hearing aid whis-
tles continuously Your ear is blocked by
earwax Contact your doctor
It is not correctly
placed in your ear ca-
nal
Take it out and reinsert it
It fits loosely in your
ear canal Contact your hearing care
professional
The hearing aid is un-
comfortable to wear It is not correctly
placed in your ear ca-
nal.
Consult your hearing care
professional
It does not fit your ear
properly Contact your hearing care
professional
Your outer ear or ear
canal is sore It is important that first-
time users only wear the
hearing aid for short peri-
ods of time at the begin-
ning. Take 2-3 weeks to
gradually get used to the
hearing aid. If the soreness
continues, contact your
hearing care professional
28

Problem Possible cause Solution
Your hearing aids are
not working in syn-
chrony
The connection be-
tween the hearing aids
is lost
Turn them off and on again
The hearing aids do
not respond with a
corresponding change
in volume or program
to the device
a. The device is used
beyond the transmis-
sion range
b. Strong electromag-
netic interference in
the vicinity
c. The device and the
hearing aids are not
matched
a. Move the device closer to
the hearing aids
b. Move away from known
source of EM interference
c. Check with your hearing
care professional to make
sure device is matched with
the hearing aids
You hear “interrupted”
speech (on and off)
from the hearing aids
or no speech (muted)
from the transmitting
hearing aid.
a. The battery in one of
the hearing aids has
expired
b. Strong electromag-
netic interference in
the vicinity
a. Replace battery in one or
both hearing aids
b. Move away from known
sources of interference
29
REGULATORY INFORMATION
EC directives
Directive 2014/53/EU
Hereby, Widex A/S declares that this U-IM/U-IP is in compliance with the
essential requirements and other relevant provisions of Directive
2014/53/EU.
The U-IM/U-IP contains a radio transmitter operating at 10.6 MHz, -54
dBμA/m @10 m .
A copy of the Declaration of Conformity according to 2014/53/EU can be
found at:
http://global.widex.com/doc
N26346
Information regarding disposal
Do not dispose of hearing aids, hearing aid accessories and batteries with
ordinary household waste.
Hearing aids, batteries and hearing aid accessories should be disposed of at
sites intended for waste electrical and electronic equipment, or given to
your hearing care professional for safe disposal.
30

FCC and IC statements
FCC ID: TTY-UI
IC: 5676B-UI
Federal Communications Commission Statement
This device complies with part 15 of the FCC Rules. Operation is subject to
the following two conditions:
(1) This device may not cause harmful interference, and
(2) this device must accept any interference received, including interference
that may cause undesired operation.
NOTE:
This equipment has been tested and found to comply with the limits for a
Class B digital device, pursuant to part 15 of the FCC Rules. These limits are
designed to provide reasonable protection against harmful interference in a
residential installation. This equipment generates, uses and can radiate radio
frequency energy and, if not installed and used in accordance with the in-
structions, may cause harmful interference to radio communications. How-
ever, there is no guarantee that interference will not occur in a particular in-
stallation. If this equipment does cause harmful interference to radio or tele-
vision reception, which can be determined by turning the equipment off and
on, the user is encouraged to try to correct the interference by one or more
of the following measures:
— Reorient or relocate the receiving antenna.
— Increase the separation between the equipment and receiver.
31

— Connect the equipment into an outlet on a circuit different from that to
which the receiver is connected.
— Consult the dealer or an experienced radio/TV technician for help.
NOTE:
This equipment complies with FCC radiation exposure limits set forth for an
uncontrolled environment. This transmitter must not be co-located or oper-
ating in conjunction with any other antenna or transmitter.
Changes or modifications to the equipment not expressly approved by Wi-
dex could void the user’s authority to operate the equipment.
Industry Canada Statement / Déclaration d’industrie Canada
Under Industry Canada regulations, this radio transmitter may only operate
using an antenna of a type and maximum (or lesser) gain approved for the
transmitter by Industry Canada.
To reduce potential radio interference to other users, the antenna type and
its gain should be so chosen that the equivalent isotropically radiated power
(e.i.r.p.) is not more than that necessary for successful communication.
This device complies with Industry Canada licence-exempt RSS standard(s).
Operation is subject to the following two conditions:
(1) this device may not cause interference, and
(2) this device must accept any interference, including interference that may
cause undesired operation of the device.
32

Conformément à la réglementation d’Industrie Canada, le présent émetteur
radio peut fonctionner avec une antenne d’un type et d’un gain maximal (ou
inférieur) approuvé pour l’émetteur par Industrie Canada.
Dans le but de réduire les risques de brouillage radioélectrique à l’intention
des autres utilisateurs, il faut choisir le type d’antenne et son gain de sorte
que la puissance isotrope rayonnée équivalente (p.i.r.e.) ne dépasse pas l’in-
tensité nécessaire à l’établissement d’une communication satisfaisante.
Le présent appareil est conforme aux CNR d’Industrie Canada applicables
aux appareils radio exempts de licence. L’exploitation est autorisée aux
deux conditions suivantes :
(1) l’appareil ne doit pas produire de brouillage, et
(2) l’utilisateur de l’appareil doit accepter tout brouillage radioélectrique
subi, même si le brouillage est susceptible d’en compromettre le fonc-
tionnement.
33
SYMBOLS
Symbols commonly used by Widex A/S in medical device labelling (la-
bels/IFU/etc.)
Symbol Title/Description
Manufacturer
The product is produced by the manufacturer whose name and address are
stated next to the symbol. If appropriate, the date of manufacture may also
be stated.
Catalogue number
The product’s catalogue (item) number.
Consult instructions for use
The user instructions contain important cautionary information (warn-
ings/precautions) and must be read before using the product.
Warning
Text marked with a warning symbol must be read before using the
product.
WEEE mark
“Not for general waste”. When a product is to be discarded, it must be
sent to a designated collection point for recycling and recovering to
prevent the risk of harm to the environment or human health as a re-
sult of the presence of hazardous substances.
34
Symbol Title/Description
CE mark
The product is in conformity with the requirements set out in European
CE marking directives.
RCM mark
The product complies with electrical safety, EMC and radio spectrum regula-
tory requirements for products supplied to the Australian or New Zealand
market.
Interference
Electromagnetic interference may occur in the vicinity of the product.
35
WIDEX A/S Nymoellevej 6, DK-3540 Lynge, Denmark
www.widex.com
Manual no.:
9 514 0398 001 #01
Issue:
2017-03 9 514 0398 001 #01