Wistron NeWeb DRUA WLAN 802.11G USB ADAPTER User Manual DRUA Manual Eng FCC
Wistron NeWeb Corporation WLAN 802.11G USB ADAPTER DRUA Manual Eng FCC
Contents
- 1. Manual Pt1
- 2. Manual Pt2
Manual Pt2
25
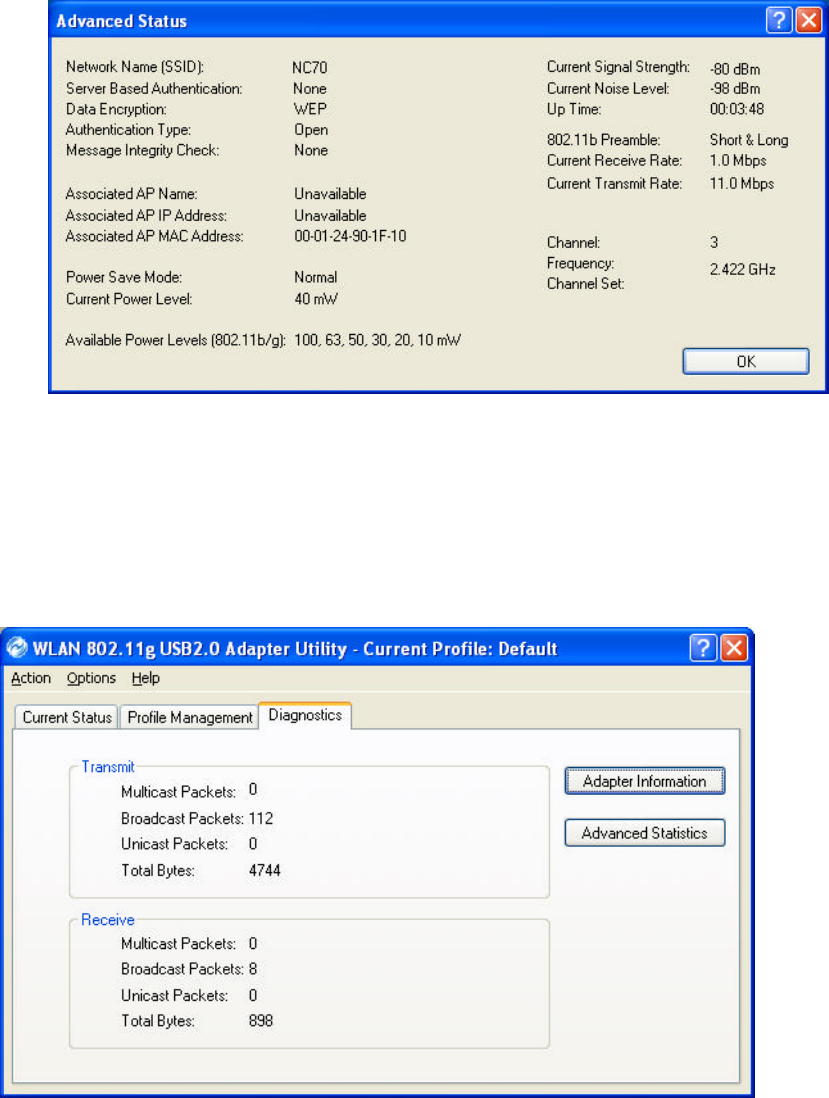
n Advanced: Click Advanced button to view related info of SSID, Encryption,
Current Power Level or Channel etc.
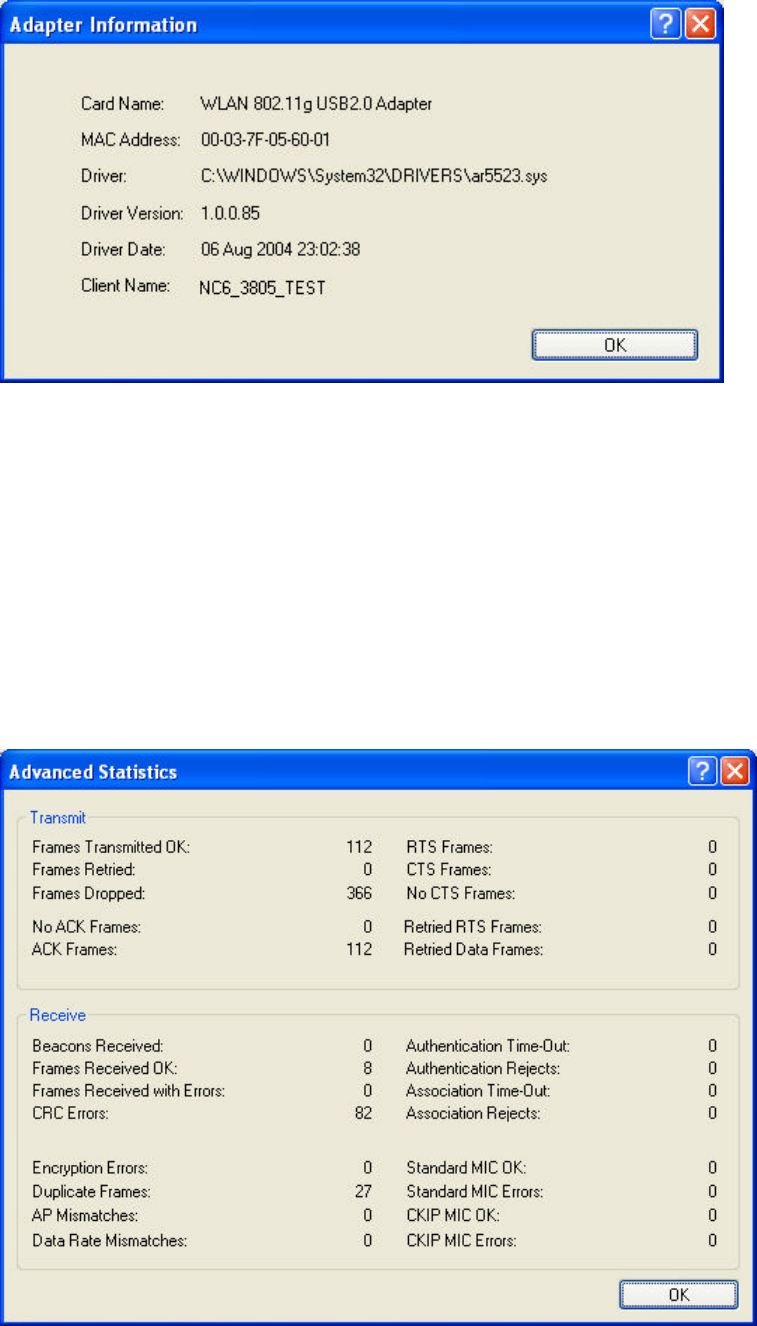
4.2 Diagnostics
In Diagnostics tab, you can check Transmit and Receive Data: Multicast Packets,
Broadcast Packets, Unicast Packets and Total Bytes.
26
Adapter Information
n Card Name: The name of the wireless network adapter.
n MAC Address: The MAC address of the wireless network adapter.
n Driver: The driver name and path of the wireless network adapter driver.
n Driver Version: The version of the wireless network adapter driver.
n Driver Date: The creation date of the wireless network adapter driver.
n Client Name: The name of the client computer.
Advanced Statistics: Shows receive and transmit statistical information for the
following receive and transmit diagnostics for frames received by or transmitted to the
wireless network adapter:
27
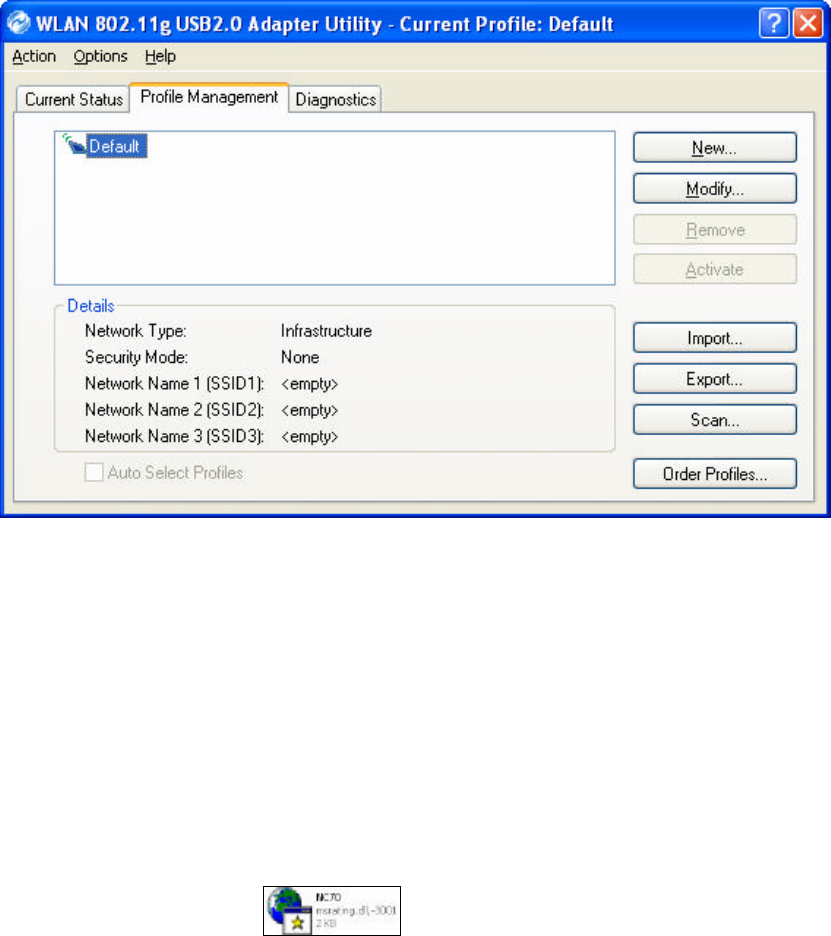
Transmitted Frames:
n Frames transmitted OK
n Frames retried
n Frames dropped
n No ACK frames
n ACK frames
n RTS Frames
n Clear-to-send (CTS) Frames
n No CTS frames
n Retried RTS frames
n Retried data frames
Received Frames:
n Frames received OK
n Beacons
n Frames with errors
n CRC errors
n Encryption errors
n Duplicate frames
n AP mismatches
n Data rate mismatches
n Authentication time-out
n Authentication rejects: the number of AP authentication failures received by the
wireless network adapter
n Association time-out
n Association rejects: the number of access point authentication rejects received by
the wireless network adapter
n Standard MIC OK
n Standard MIC errors
n CKIP MIC OK
n CKIP MIC errors
28
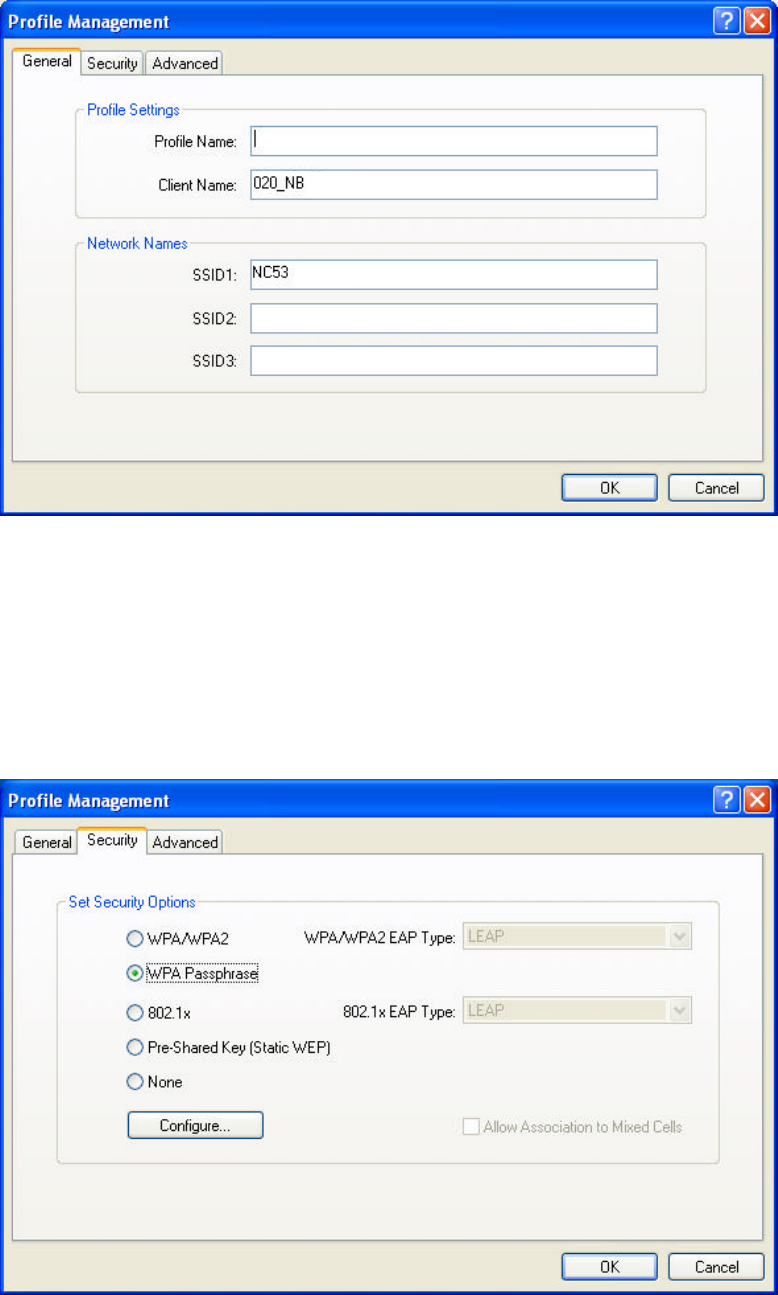
4.3 Profile Management
n Network Type: Indicates whether the current activated network type is
Infrastructure or Ad Hoc mode.
n Security Mode: Indicates current connected network’s security mode.
n Network Name: Indicates current connected network’s name.
n New: To create new profile.
n Modify: To edit settings of chosen profile.
n Remove: To remove the chosen profile from the list.
n Activate: To activate the chosen profile.
n Import: To import a pre-set profile (pre-saved as a Config File *.prf)
n Export: To export the chosen profile, so you can save the profile as a Config File
(*.prf) for future use.
n Scan: To scan all available network in vicinity.
n Order Profiles: To place the order of preferred profiles.
4.3.1 Creating or Modifying a Configuration Profile
1. To add a New configuration profile, click New on the Profile Management tab. To
modify a configuration profile, select the configuration from the Profile list and
click the Modify button.
2. The Profile Management dialog box displays the General, Security and
Advanced tabs.
29
3. Edit the fields in the General tab to configure the configuration profile.
n Profile Name: Identifies the configuration profile. This name should be
unique. Profile names are not case sensitive.
n Client Name: Identifies the client machine.
n Network Names (SSIDs): The IEEE 802.11 wireless network name. This
field has a maximum limit of 32 characters. Configure up to three SSIDs
(SSID1, SSID2, SSID3).
4. Edit the fields in the Security tab to configure the configuration profile.
n WPA/WPA2: Enables the use of Wi-Fi Protected Access (WPA).
30
n WPA Passphrase: Enables WPA Passphrase security. Click on the
Configure button and fill in the WPA Passphrase.
n 802.1x: Enables 802.1x security. This option requires IT administration.
n Pre-Shared Key (Static WEP): Enables the use of pre-shared keys that are
defined on both the access point and the station.
n None: No security (not recommended).
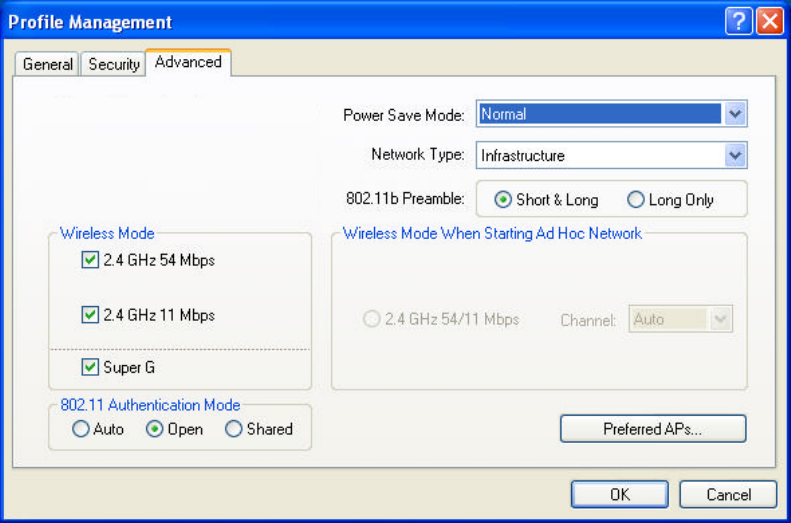
5. Edit the fields in the Advanced tab to configure the configuration profile.
n Transmit Power Level: Selects the transmit power level for 802.11b/g in mW.
Actual transmit power may be limited by regulatory domain or hardware
limitations.
n Power Save Mode: Specify:
ü Maximum mode: causes the access point to buffer incoming messages for
the wireless adapter. The adapter up periodically polls the access point to
see if any messages are waiting.
ü Normal mode: uses maxim when retrieving a large number of packets, then
switches back to power save mode after retrieving the packets.
ü Off: turns power saving off, thus powering up the wireless adapter
continuously for a short message response time.
n Network Type: Specifies the network as either Infrastructure or Ad Hoc.
n 802.11b Preamble: Specifies the preamble setting in 802.11b. The default
setting is Short & Long (access point mode), which allows both short and
long headers in the 802.11b frames. The adapter can only use short radio
headers if the access point supports and uses them. Set to Long Only to
31
override allowing short frames.
n Wireless Mode: Specifies 2.4GHz 54Mbps, 2.4GHz 11Mbps, or Super G
operation in an access point network. The wireless adapter must match the
wireless mode of the access point it associates to.
n Wireless Mode when Starting Ad Hoc Network: Specifies 2.4GHz
54/11Mbps, to start an Ad Hoc network if no matching network name is found
after scanning all available modes. This mode also allows selection of the
channel the wireless adapter uses. The channels available depend on the
regulatory domain. If the adapter finds no other ad hoc adapters, this selection
specifies which channel with the adapter starts the Ad Hoc network with. The
wireless adapter must match the wireless mode of the access point it associates
to.
n 802.11 Authentication Mode: Select what mode the wireless adapter uses to
authenticate to an access point:
ü Auto: causes the adapter to attempt authentication using shared, but
switches it to open authentication if shared fails.
ü Open: enables an adapter to attempt authentication regardless of its WEP
settings. It will only associate with the access point if the WEP keys on both
the adapter and the access point match.
ü Shared: only allows the adapter to associate with access points that have
the same WEP key.
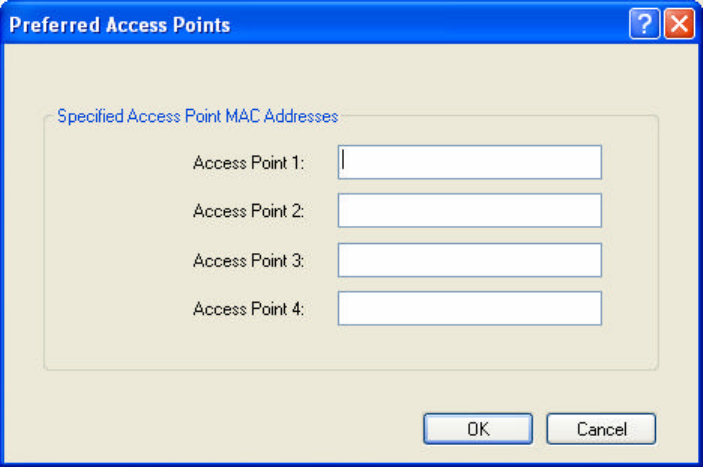
n Preferred APs: User can set up to five preferred APs.

32
4.3.2 Removing a Profile
1. Go to the Profile Management tab.
2. Select the profile to remove from the list of configuration profiles.
3. Click Remove.
4.3.3 Profile Auto Selection
n Including a profile in the auto selection feature allows the wireless adapter to
automatically select that profile from the list of profiles and use it to connect to
the network.
n Including a profile in auto profile selection:
1. On the Profile Management tab, click Order Profiles.
2. The Auto Profile Selection Management window pops up, with a list of all
created profiles in the Available Profile box.
3. Highlight the profiles to add to Auto Profile selection, and then click Add. The
profiles appear in the Auto Selected Profiles box.
n Ordering the auto selected profiles:
1. On the Profile Management tab, click Order Profiles.
2. Highlight a profile in the Auto Selected Profiles box.
3. Click Move up or Move down as appropriate.
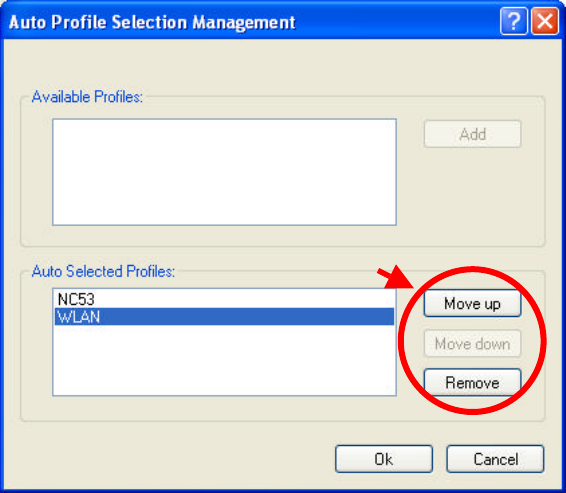
33
4. Click OK.
5. Check the Auto Selected Profiles box.
6. Save the modified configuration file.
7. With Auto Profile Selection enabled, the wireless adapter scans for available
networks. The highest priority profile with the same SSID as a found network is
used to connect to the network. On a failed connection, the client adapter tries
with the next highest priority profile.
NOTE! When Auto Profile Selection is enabled by checking Auto Select Profiles
on the Profile Management tab, the client adapter scans for an available
network. The profile with the highest priority and the same SSID as one of
the found networks is the one that is used to connect to the network. If the
connection fails, the client adapter tries the next highest priority profile that
matches the SSID, and so on.
4.3.4 Switching Profiles
1. To switch to a different profile, go to the Profile Management tab.
2. Click on the Profile Name in the Profile List.
3. Click Activate.
4. The Profile List provides icons that specify the Operational State for that profile.
The list also provides icons that specify the Signal Strength for that profile.
34
4.4 Security
4.4.1 Using EAP-TLS Security
To use EAP-TLS security in the Utility, access the Security tab in the Profile
Management window.
1. On the Security tab, click WPA/WPA2 or 802.1x.
2. Select EAP-TLS from the drop-down menu.
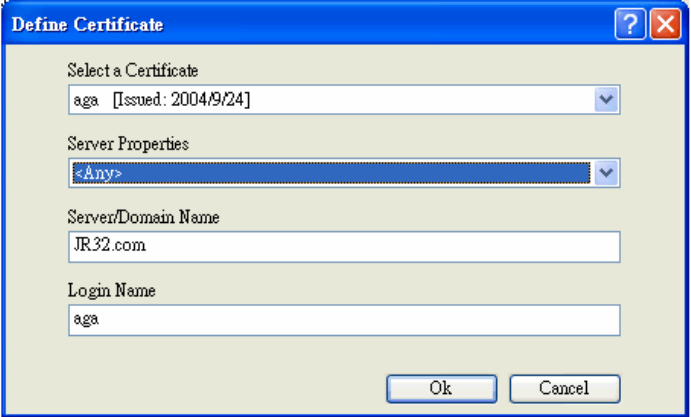
4.4.2 Enabling EAP-TLS Security
To use EAP-TLS security, the machine must already have the EAP-TLS certificates
downloaded onto it. Check with the IT manager.
1. Click Configure.
2. Select the appropriate certificate authority. Select Server Properties. The
Server/Domain Name and the Login Name are filled in automatically from the
certificate information.
3. Click OK again.
4. Activate the profile.
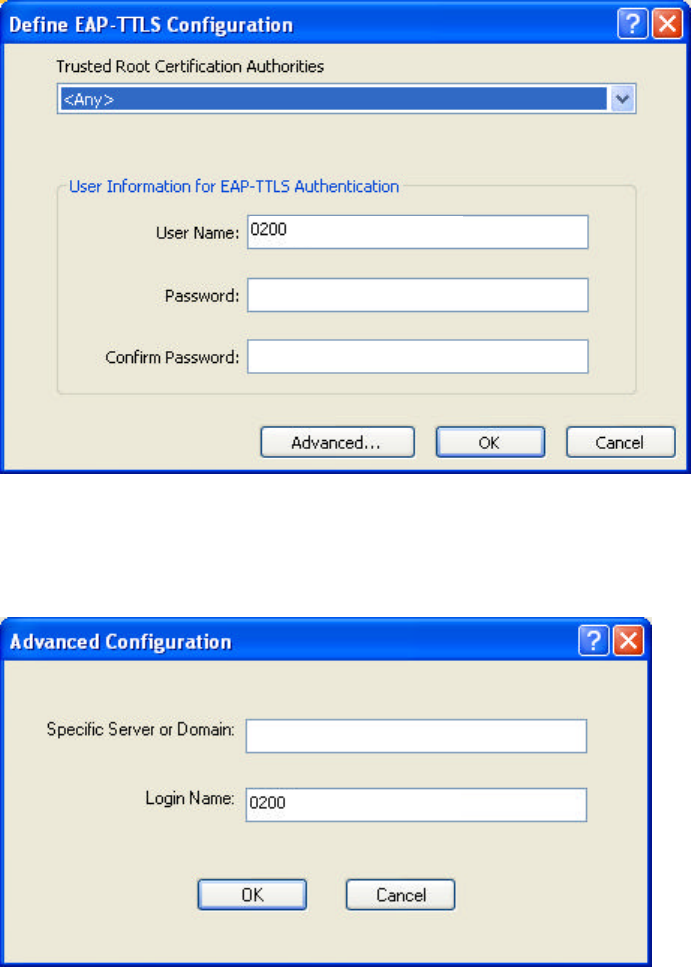
4.4.3 Using EAP-TTLS Security
To use EAP-TTLS security in the WLAN 802.11g Utility, access the Security tab in
the Profile Management window.
1. On the Security tab, click WPA/WPA2 or 802.1x.
2. Select EAP-TTLS from the drop-down menu.
35
4.4.4 Enabling EAP-TTLS Security
To use EAP-TTLS security, the machine must already have the EAP-TTLS
certificates downloaded onto it. Check with the IT manager.
1. Click Configure.
2. Select the appropriate certificate from the drop-down list and click OK.
3. Specify a user name for EAP authentication:
ü Enter an EAP user name in the User Name field to use a separate user name
and password and start the EAP authentication process.
4. Click Advanced and:
ü Enter the Specific Server or Domain name of the server from which the client
will accept a certificate.
ü Change the login name if needed.
5. Click OK.
6. Enable the profile.
36
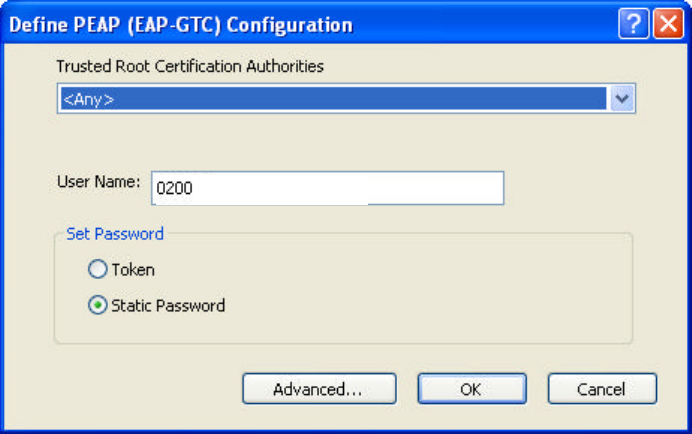
4.4.5 Using PEAP(EAP-GTC) Security
To use PEAP-GTC security in the WLAN 802.11g Utility, access the Security tab in
the Profile Management window.
1. On the Security tab, click WPA/WPA2 or 802.1x.
2. Select PEAP(EAP-GTC) from the drop-down menu.
4.4.6 Enabling PEAP(EAP-GTC) Security
To use PEAP-GTC security, the server must have the PEAP-GTC certificates, and the
server properties must already be set. Check with the IT manager.
1. Click Configure.
2. Select the appropriate network certificate authority from the drop-down list.
3. Specify a user name for inner PEAP tunnel authentication:
ü Enter a PEAP user name in the User Name field to use a separate user name
and start the PEAP authentication process.
4. Select Token or Static Password, depending on the user database.
NOTE! Token uses a hardware token device or the Secure Computing SofToken
program (version 1.3 or later) to obtain and enter a one-time password during
authentication.
37
5. Click Advanced and Advanced Configuration window appears.
ü Enter the Specific Server or Domain name of the server from which the
client will accept a certificate.
ü The login name used for PEAP tunnel authentication fills in automatically as
PEAP-XXXXXXXXXX, where XXXXXXXXXX is the computer’s MAC
address. Change the login name if needed.
6. Click OK.
7. Enable the profile.
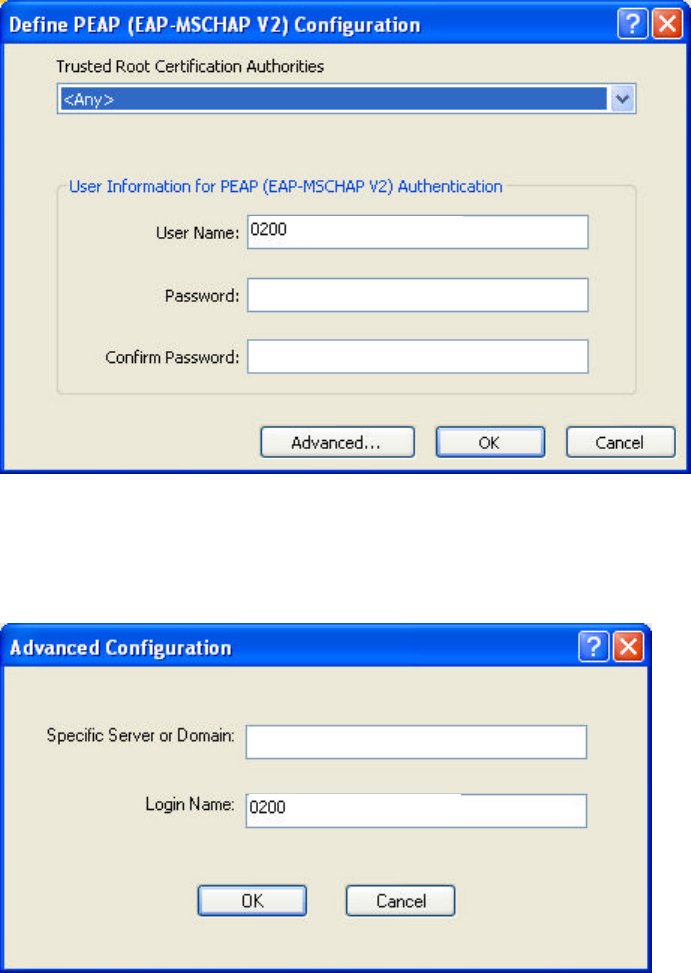
4.4.7 Using PEAP-MSCHAP V2 Security
To use PEAP-MSCHAP V2 security in the WLAN 802.11g Utility, access the
Security tab in the Profile Management window.
1. On the Security tab, click WPA/WPA2 or 802.1x.
2. Select PEAP- MSCHAP V2 from the drop-down menu.
4.4.8 Enabling PEAP- MSCHAP V2 Security
To use PEAP-MSCHAP V2 security, the server must have the PEAP-MSCHAP V2
certificates, and the server properties must already be set. Check with the IT manager.
1. Click Configure.
2. Select the appropriate network certificate authority from the drop-down list.
38
3. Specify a user name for inner PEAP tunnel authentication:
ü Enter a PEAP user name in the User Name field to use a separate user name
and start the PEAP authentication process.
4. Click Advanced and:
ü Enter the Specific Server or Domain name of the server from which the client
will accept a certificate.
ü Change the login name if needed.
5. Click OK.
6. Enable the profile.
4.4.9 Using LEAP Security
To use LEAP security in the WLAN 802.11g Utility, access the Security tab in the
Profile Management window.
1. On the Security tab, click WPA/WPA2 or 802.1x.
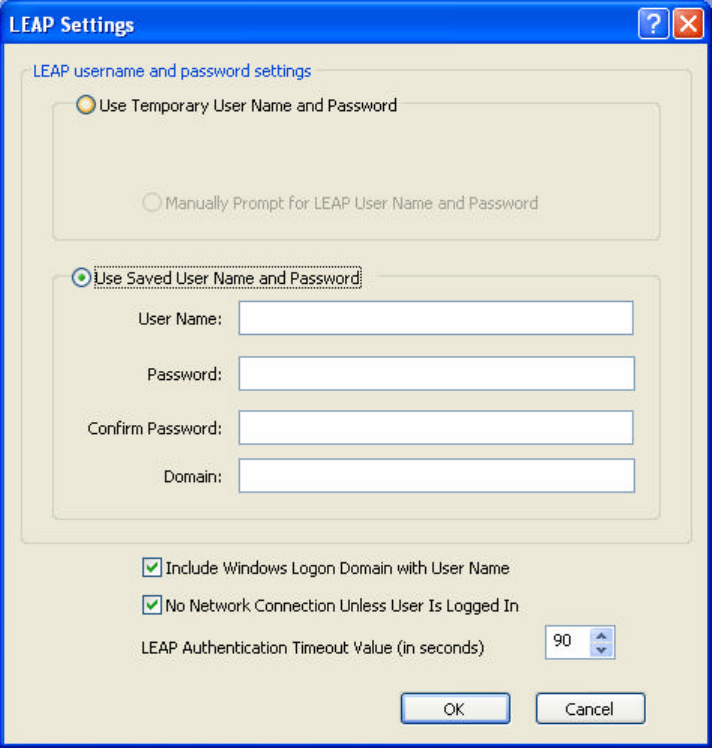
39
2. Select LEAP from the drop-down menu.
4.4.10 Configuring LEAP
1. Click Configure.
2. Specify a user name and password:
Option 1: Select to Use Temporary User Name and Password by choosing the
radio button:
(1) Manually Prompt for Leap User Name and Password is
checked automatically.
Option 2: Select to Use Saved User Name and Password by choosing the radio
button:
(1) Enter the user name and password.
(2) Confirm the password.
(3) Enter a specific domain name.
40
3. Check the Include Windows Logon Domain with User Name setting to pass the
Windows login domain and user name to the RADIUS server (default).
4. Check No Network Connection Unless User Is Logged In to force the wireless
adapter to disassociate after logging off (default).
5. Enter the LEAP authentication timeout time (between 30 and 500 seconds) to
specify how long LEAP should wait before declaring authentication failed, and
sending an error message. The default is 90 seconds.
6. Click OK.
7. Enable the profile.
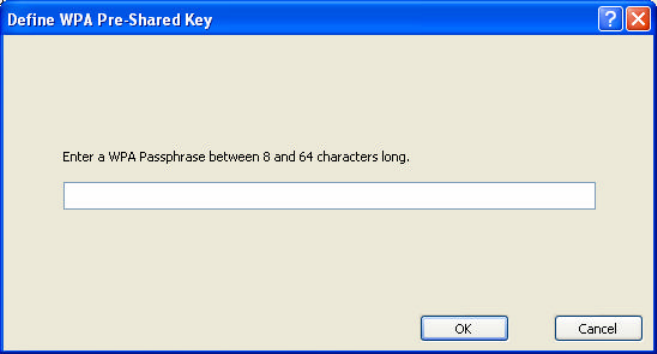
4.4.11 Using WPA Passphrase Security
To use WEAP Passphrase security in the WLAN 802.11g Utility, access the Security
tab in the Profile Management window.
1. On the Security tab, click WPA Passphrase.
2. Click Configure.
3. Fill in the WPA Passphrase.
4. Click OK.
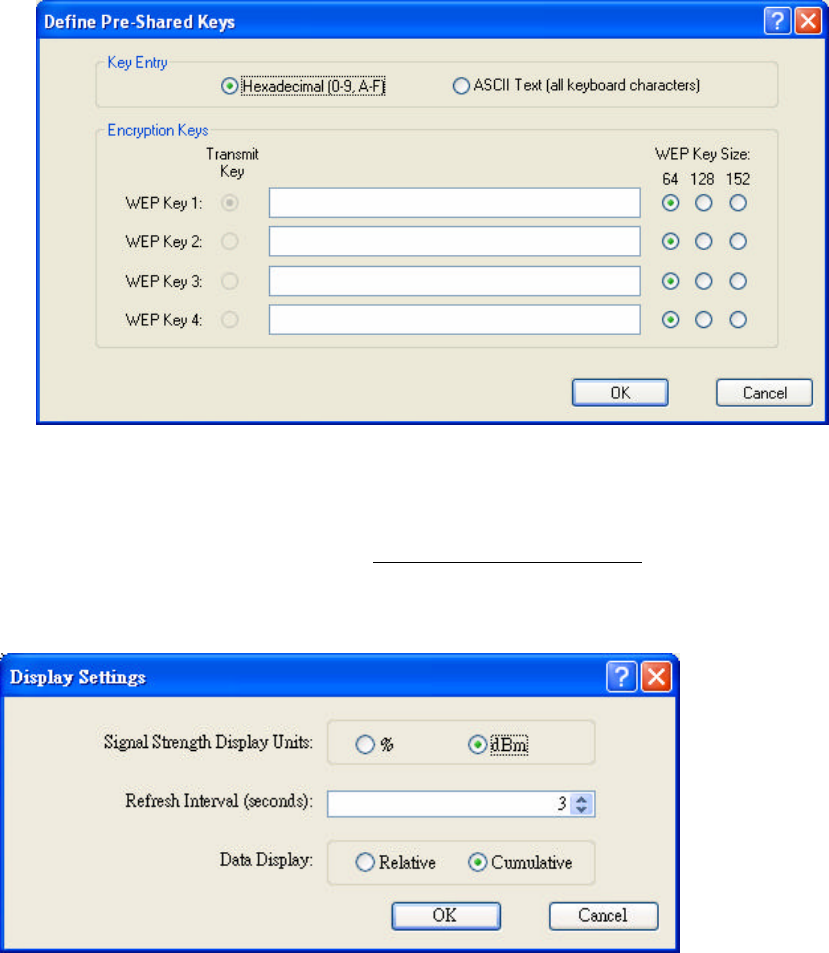
4.4.12 Using Pre-Shared Key (Static WEP) Security
To use Pre-Shared Key (Static Web) security in the WLAN 802.11g Utility, access
the Security tab in the Profile Management window.
1. On the Security tab, click Pre-Shared Key (Static WEP).
2. Click Configure.
3. Choose Hexadecimal or ASCII Text and then fill in the value of each WEP Key.
41
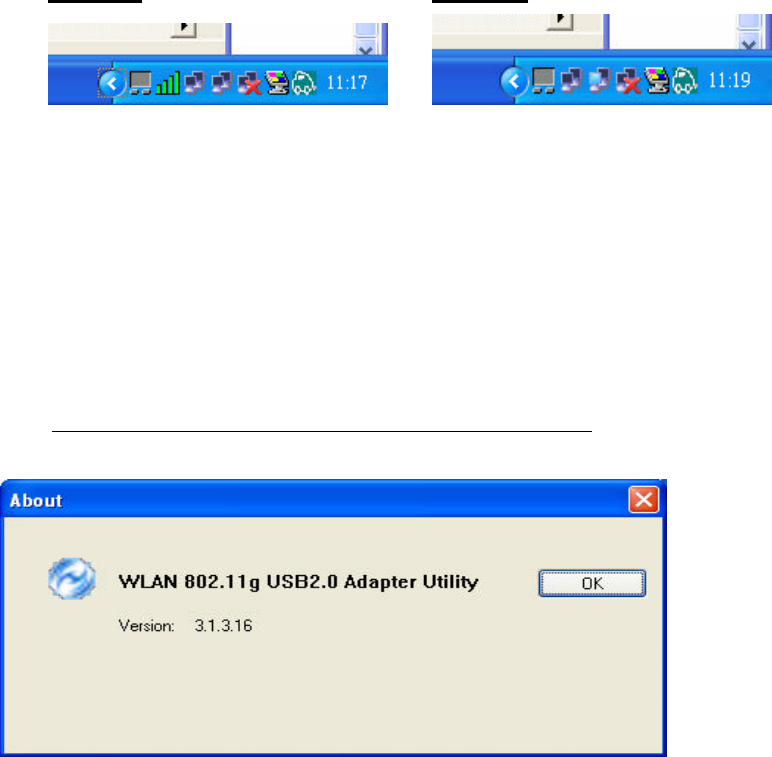
4.5 Display Settings
To change the display settings, choose Options → Display Settings from the menu.
The Display Settings dialog box contains tools to set the Signal Strength Display
Units, Refresh Interval and Data Display.
n Signal Strength Display Units: Sets the units used when displaying signal
strength: percentage (%) or dBm.
n Refresh Interval: Use the up/down arrows to set the display refresh interval in
seconds.
n Data Display: Sets the display to cumulative or relative. Relative displays the
change in statistical data since the last update. Cumulative displays statistical data
collected since opening the profile.
42
4.6 Actions Tools
Click Action from the menu to access the tools.
n Enable/Disable Radio: Enable or disable the RF Signal.
n Enable/Disable Tray Icon: Enable or disable the tray icon.
Enabled: Disabled:
n Manual LEAP Login: Log in to LEAP manually, if LEAP is set to manually
prompt for user name and password on each login. See Chapter 4 Security for
enabling LEAP.
n Reauthenticate: Reauthenticate to a LEAP-configured access point.
n Exit: Exit the Utility application.
4.7 About Utility Version
Click Help → About WLAN 802.11g USB2.0 Adapter Utility to check Utility
version.
43
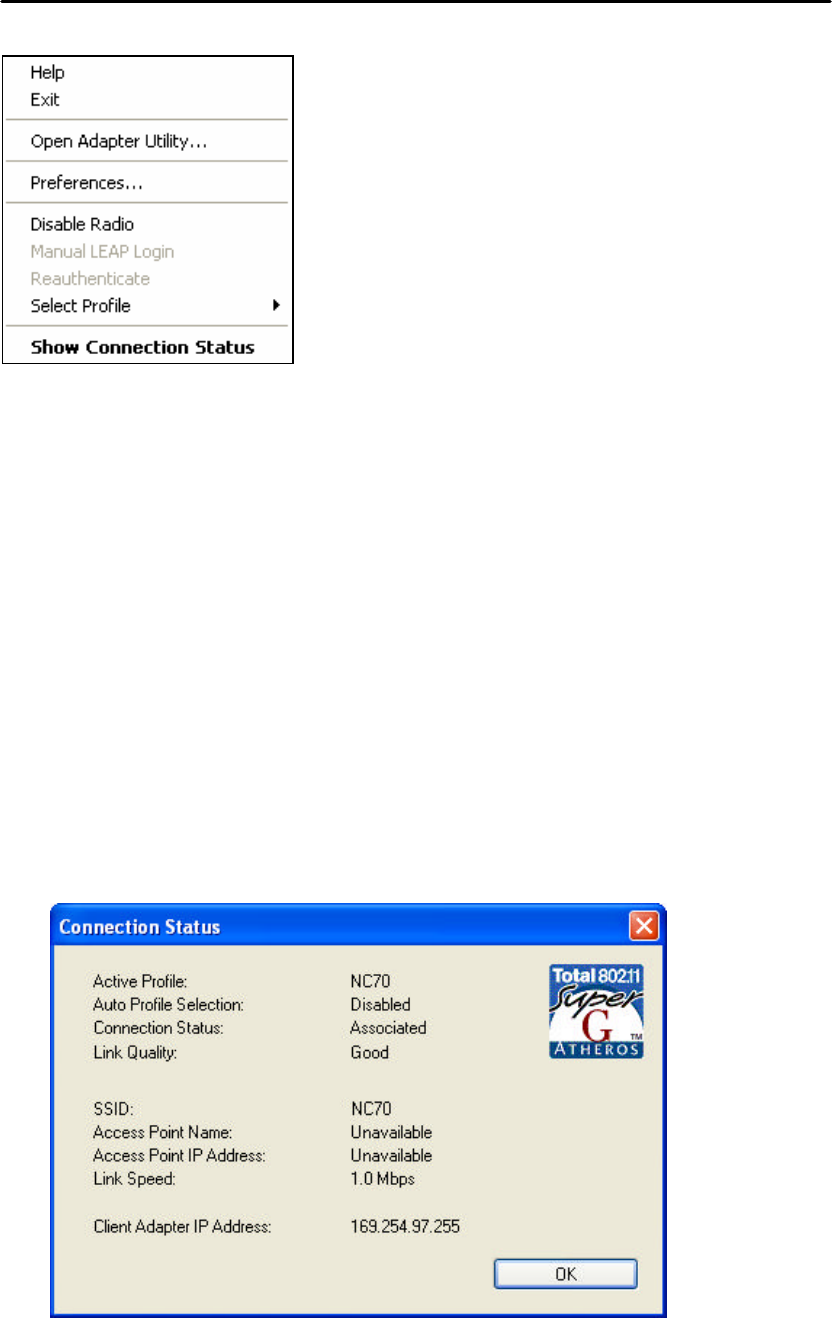
5. Right clicking the tray icon
Right-click on the tray icon to access the following options:
n Help: Open the online help.
n Exit: Exit the Utility application.
n Open Adapter Utility: Launch the Utility.
n Preferences: Set the startup options and menu options for the Utility. Check
whether the program should start automatically when Windows starts, and check
the menu items that should appear on the popup menu.
n Enable/Disable Radio: Enable or disable the RF Signal.
n Manual LEAP Login: Log in to LEAP manually, if LEAP is set to manually
prompt for user name and password on each login. See Chapter 4 Security for
enabling LEAP.
n Reauthenticate: Reauthenticate to a LEAP-configured access point.
n Select Profile: Click a configuration profile name to switch to it. If no
configuration profile exists for a connection, see Chapter 3 Profile Management
to add a profile first.
n Show Connection Status: Display the Connection Status window.

44
6. Network Application
This section consists of the network applications of 802.11g USB 2.0 Adapter,
including:
1. To survey the network neighborhood
2. To share your folder with your network member(s)
3. To share your printer with your network member(s)
4. To access the shared folder(s)/file(s) of your network members(s)
5. To use the shared printer(s) of your network member(s)
In fact, the network applications of WLAN 802.11g USB 2.0 Adapter are the same as
they are in a wired network environment. You may refer to the following 3
examples of Surveying the Network Neighborhood, File Sharing and Using the
Shared Folder.
6.1 Surveying the Network Neighborhood
When multiple base stations are up and running in your wireless network, you can use
the procedure described below to display the other computers:
1. Double-click My Network Places to display all stations in your Microsoft
Windows Network Group.
2. To display other workgroups in the network environment, double-click Entire
Network.
3. If there is a second network operating system running in your network
environment (for example a Novell NetWare network), the “Entire Network”
window will also display available servers running under the second network
operating system. If you click on these servers, you may be asked to enter your
user name and password that applies to the other network operating system. If
you cannot find it, verify whether the other wireless computers are:
n Powered up and logged on to the network.
n Configured to operate with identical Microsoft Network settings concerning:
ü Networking Protocol.
ü Wireless Network Name.
To enable the sharing of Internet access, you should set your WLAN mode as
“Infrastructure” and connect to the access point.
45
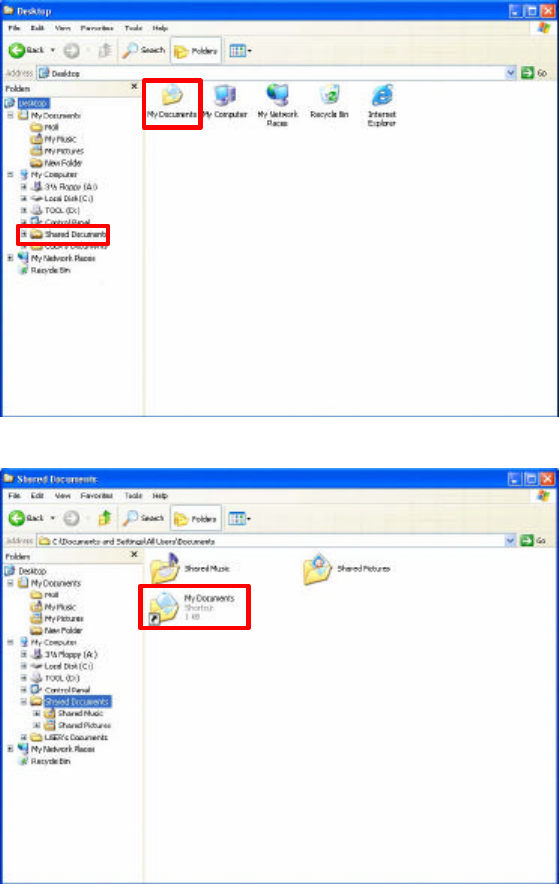
6.2 File Sharing
802.11g USB 2.0 Adapter allows the sharing of files between computers that are
logged onto the same wireless network. If you want to share your folder “My
Documents” with other computers of the wireless network, please highlight the
folder “My Documents” and drag it to Shared Documents folder.
Sharing files in the IEEE802.11g wireless network will be like sharing files on a
wired LAN.
46
6.3 Using the Shared Folder
If you would like to access a shared folder stored in other stations of same network,
please follow the process below:
1. Double-click the “My Network Places” icon, and then double-click the computer
where the shared folder is located.
2. Double-click the folder you want to connect to.
3. Now you may open the needed file(s).
NOTE! If a password is required, the Windows will prompt a password column to
you. Then you need to enter the password that had been assigned to this
shared folder.

47
6. Product Specifications
Frequency range USA and Taiwan: 2400 – 2483.5MHz,
Europe: 2400 – 2483.5MHz,
Japan: 2400 – 2483.5MHz,
Modulation technique 802.11b/g
DSSS (DBPSK, DQPSK, CCK)
OFDM (BPSK,QPSK, 16-QAM, 64-QAM)
Host interface USB 2.0
Compatible with USB specification revision 2.0
A true "Plug & Play" connection supports hot swapping function.
Get power directly from USB port
No external power or batteries required
Channels support 802.11b/g
US/Canada/Taiwan: 11 (1 ~ 11)
Major European country: 13 (1 ~ 13)
France: 4 (10 ~ 13)
Japan: 11b: 14 (1~13 or 14th), 11g: 13 (1 ~ 13)
China: 13 (1 ~ 13)
Operation voltage 5.0V +/- 10%
Power consumption Max. 500mA
Output Power Max. 17dBm
Operation distance 802.11b
Outdoor:250m@11Mbps, 300m@1Mbps
Indoor: 30m@11Mbps, 50m@1Mbps
802.11g
Outdoor: 80m@54Mbps, 250m@6Mbps
Indoor: 15m@54Mbps, 35m@6Mbps
Operation System
supported
Windows® 98SE, ME, 2K, XP
Dimension 94mm (L) x 32.2mm (W) x 7.3 mm (H)
Security 64-bit,128-bit, 152-bit WEP Encryption
802.1x Authentication
AES-CCM & TKIP Encryption
Operation mode Infrastructure & Ad-hoc mode
Transfer data rate 802.11b/g

48
11, 5.5, 2, 1 Mbps, auto-fallback, up to 54 Mbps
802.11g (Super mode)
up to 108 Mbps
Operation temperature 0 0C ~ 700C
Storage temperature -200C ~ 800C
Wi-Fi® Alliance WECA Compliant
WHQL Microsoft®2K, XP Compliant
USB 2.0 IF USB 2.0 IF Compliant
EMC certificate FCC part 15 (USA)
LP0002(Taiwan)
IC RSS210 (Canada)
Telec (Japan)
ETSI, EN301893, EN60950 (Europe)
Media access protocol CSMA/CA with ACK architecture 32-bit MAC
Advance Function Super GTM
Extended Range
Antenna type and gain Printed Antenna,-0.17dBi