Wistron 2008MMAPER6 GPS Handheld Device User Manual 604 0046 001 A UM 4200
Wistron Corporation GPS Handheld Device 604 0046 001 A UM 4200
Wistron >
User manual

Table of Contents
English
What is MobileMapper 6?............................................................1
Package Content & Product Specifications....................................2
Package Content....................................................................2
Software Provided as Standard................................................2
Optional Software ..................................................................2
Operating System ..................................................................2
GPS Characteristics ...............................................................2
Physical Characteristics..........................................................2
Environmental Characteristics.................................................3
Memory Characteristics ..........................................................3
Communication Capabilities ...................................................3
Power Requirements ..............................................................3
Other Features ......................................................................3
Other Features ......................................................................3
Description ................................................................................4
Front View ............................................................................4
Rear View .............................................................................5
Side View (Left).....................................................................5
Side View (Right)...................................................................6
Top View...............................................................................6
Rubber Flaps ........................................................................6
First-Time Use ...........................................................................7
Inserting Fresh Batteries ........................................................7
Turning the Receiver On.........................................................7
Adjusting the Backlight ..........................................................8
Other Preliminary Settings......................................................8
How to Hold the Receiver .......................................................9
Installing New Software ............................................................10
From an SD Card .................................................................10
From your Office Computer...................................................10
Using the Pictures & Videos Application .....................................12
Using the Camera ................................................................12
Making a Video....................................................................13
Changing Picture Settings ....................................................14
Accessing the Internet ..............................................................15
Creating a Bluetooth Connection with a Mobile Phone .............15
Creating a GPRS Connection Via a Mobile Phone ....................16
Using Internet Explorer ........................................................17
Subsequent Uses.................................................................17
Wireless Manager - Ending a GPRS Connection ......................17
Using Windows Mobile 6 Software .............................................18

English
English
1
What is MobileMapper 6?
Thank you for purchasing a MobileMapper 6 from Magellan.
This Getting Started Guide will give you useful information
about your receiver. It will also guide you in your first steps
using MobileMapper 6 in the field.
MobileMapper 6 is a professional GPS/GIS handheld receiver
that incorporates an SBAS-enabled, high-sensitivity GPS
receiver as well as Microsoft Windows Mobile® operating
system (version 6).
MobileMapper 6 comes in a rugged design suitable for all
your mobile mapping applications. Being an open platform,
MobileMapper 6 allows you to choose the Windows Mobile-
compatible, GIS software that is right for you.

English
2
Package Content & Product Specifications
Package Content • MobileMapper 6 GPS receiver
• USB data cable
• 2 x AA batteries
• Spare stylus (5)
• Getting Started CD containing the present manual.
Optional
Accessories
• External GPS antenna
• Windshield mount
• Cigarette lighter power adapter
• AC power adapter
• Carrying case.
Operating System • Microsoft Windows Mobile version 6
• Processor: 400 MHz
• Bluetooth wireless technology
• USB interface: 1.1 (device only)
GPS
Characteristics
• GPS chipset: SiRFstarIII
• GPS accuracy (with SBAS): 2-5 meters
• Channels: 12 (L1 code only)
• Antenna type: Patch
• Supported protocols: NMEA and SiRF
• Update Rate: 1 Hz
User Interface • Touch screen
• Virtual keyboard
• Handwriting recognition
• Audio notifications
• Screen backlight

English
3
Software Provided
as Standard
Windows Mobile Operating System Version 6, including the
following applications:
• ActiveSync
• Calculator
• Calendar
• Notes
• File Explorer
• E-mail messaging
• Internet Explorer
• Office Mobile (Excel Mobile, PowerPoint Mobile, Word
Mobile)
• Pictures and Videos Viewer
• Windows Media Player, etc.
Physical
Characteristics
• Size: 14.6 x 6.4 x 2.9 cm (5.75 x 2.5 x 1.13”)
• Weight (batteries included): 224 g (7.9 oz)
• Screen size: 2.7” (6.86 cm)
• Screen resolution: QVGA (240 x 320 pixels)
• Environmental: IPX7, -20° to +50°C, withstands 1-meter
drop.
Memory
Characteristics
• SD memory card slot
• 128-MB NAND Flash memory
• 64-MB SDRAM memory
Power
Requirements
• 2 x standard AA batteries
• Battery life: 10 hours
Other Features • Camera: Integrated 2-megapixel CMOS
• Loudspeaker and microphone
• Sensors: e-Compass, G-sensor, barometer
• LED Flashlight
• Language supported: English, French, German, Greek,
Italian, Japanese, Korean, Portuguese, Simplified
Chinese, Spanish, Traditional Chinese.
English
4
Description
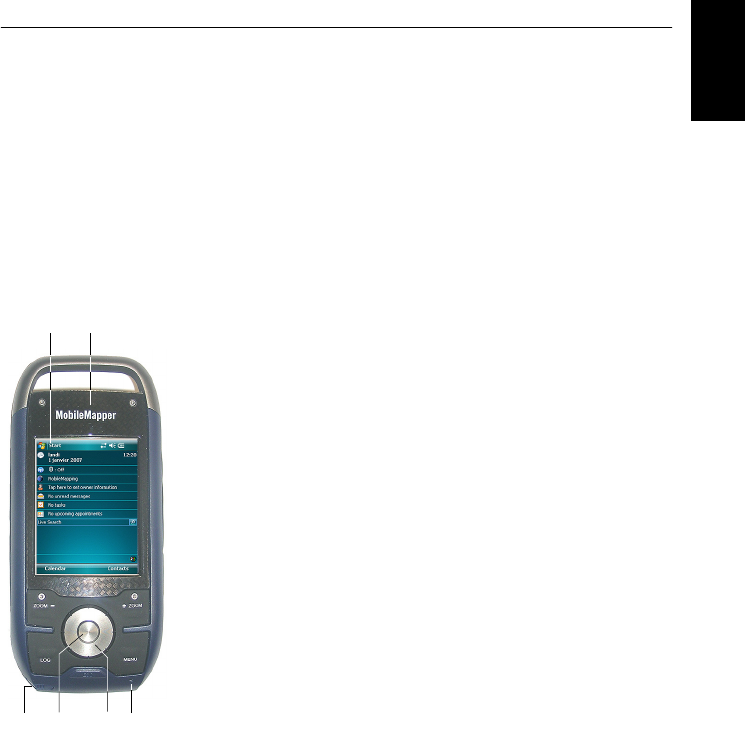
Front View
Display Screen
The display screen [1] is a large 2.7-inch QVGA color touch
screen.
Keypad, Scroll and Enter Buttons
The keypad [2] consists of the following items:
• ZOOM+ and ZOOM-: Use these buttons to adjust the scale
of the map displayed on the screen (only applicable to
software displaying maps).
• LOG, MENU, ESC buttons: These buttons are specific to
software applications designed to use these buttons. They
have no effect with the standard Windows Mobile utilities,
except for the ESC button in some cases.
The Enter button [3] is used to accept highlighted input and
initiate various functions.
The Scroll button [4] is the ring around the Enter button. It
is used to move the cursor on the screen, from a data field to
the next on a parameter screen, from an option to another in
a menu, from a geographical location to another on a map
screen. Pressing the ring has an effect only in the up, down,
left and right directions.
Stylus and Stylus Holder
The stylus [5] is a short plastic stick, which you can use to
work directly from the touch screen. When not used, the
stylus can conveniently be stored in the receiver by inserting
it into the dedicated holder [5].
Built-in Antenna
The MobileMapper 6 incorporates a built-in antenna [6].
Because of the presence of a built-in antenna, the receiver
should be held properly to optimize satellite reception.
Microphone
A microphone is used by the voice recorder. Keep the small
aperture [7] clear when recording a vocal comment.
[6]
[7]
[2]
[1]
[5] [3] [4]
English
5
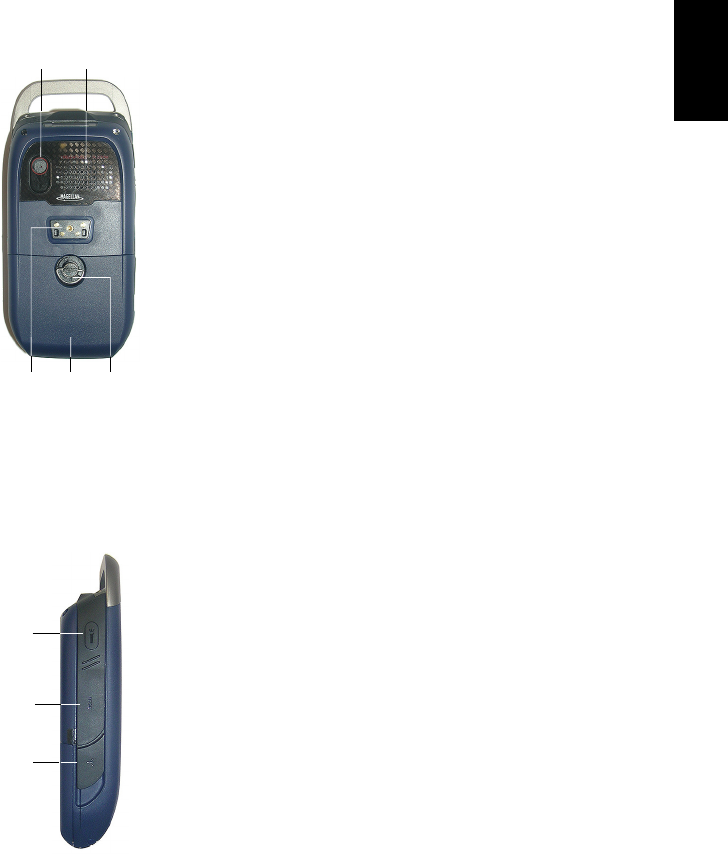
Rear View
Camera Lens
Keep the camera lens [8] clear when taking pictures or
recording videos.
Loudspeaker
As a multi-media device, MobileMapper includes a high-
quality loudspeaker [9] used by any voice-based software
application.
USB Data Connector
Use this connector [10] to secure the Magellan USB Data
cable onto the receiver. The MobileMapper 6’s USB port is
used exclusively for a connection to a computer via Microsoft
ActiveSync.
Battery Compartment
The receiver uses two standard AA batteries, whether
rechargeable or not. To access the battery compartment [11],
loosen the quarter-turn finger screw [12].
Side View (Left) Flashlight Button
The flashlight button [13] has two functions:
• Screen backlight: Press the button shortly to change the
screen backlight setting. There are five different backlight
levels (off, low, medium, high, very high). Each new short
press on the button allows you to select the next backlight
level.
• Flashlight: A long press on this button (about two
seconds) will indefinitely turn on the flashlight. Orientate
the receiver accordingly to use the flashlight. To turn it off,
hold the button pressed until it goes out.
Hold Slide Switch
Setting the Hold slide switch [14]* to “HOLD” freezes the
screen and makes the stylus and buttons unusable. Use this
button to suspend the use of the receiver and protect it from
any accidental action.
External Antenna Input
Use the external antenna input [15]* to connect an external
antenna to the receiver. When an external antenna is
connected, the built-in antenna is automatically
disconnected from the receiver input.
[8]
[11][10] [12]
[9]
[13]
[14]
[15]
English
6
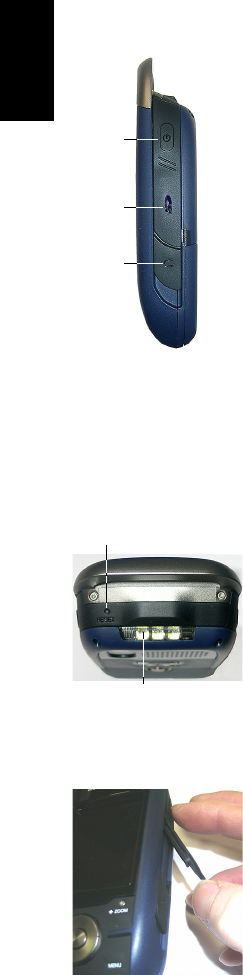
Side View (Right) Power Button
Use the Power button [16] to turn on or off the MobileMapper
6. In both cases, a short press is enough to turn on or off the
receiver.
Rather than actually turning off the MobileMapper 6, the
Power button in fact puts the receiver in suspend mode. This
means that when you next turn it on, the receiver will restore
the context in which it was when you last turned it off.
Only complete removal of the internal battery, disconnection
of the external AC adapter or a reset action will actually shut
down the receiver.
SD Card Slot
Gives access to a slot [17]* where you can insert or extract an
SD card.
Earphone Output
A 1/4-inch jack (TRS connector) [18]* used to connect an
earphone to the MobileMapper 6.
Top View
Three-LED Flashlight
This is a powerful white flashlight [19] that can
advantageously be used in dim light conditions. Using
MobileMapper 6 as a flashlight may however be incompatible
with GPS reception, i.e. in the way you hold the receiver.
Reset button
Press the Reset button [20] using the stylus when you need
to perform a software reset. This will re-boot the Windows
Mobile Operating System.
Rubber Flaps
Items [14], [15], [17] and [18] presented above are all
marked with a “*” symbol indicating that a black rubber flap
is used to protect each of them.
To access one of these items, just insert a nail underneath the
flap and pull it open.
[16]
[17]
[18]
[20]
[19]

English
7
First-Time Use
Inserting Fresh
Batteries
• Turn the finger screw anticlockwise by a quarter turn and
pull the battery door open. The battery door stays attached
to the receiver via a short black strap.
• Insert the two AA batteries head-to-tail. Observe the
polarity for each battery by reading the “+” and “-” signs
carved onto the bottom of the battery compartment.
• Put the battery door back into place by first inserting the
two lugs, located on either side of the strap, into the
receiver case. Then push the door against the case and
rotate the finger screw clockwise by one-quarter turn to
secure the door.
Turning the
Receiver On
• Press the Power button briefly. (This button is located at
the top and on the right side of the receiver).
After a few seconds, the Magellan Professional logo will
appear on the screen, followed by the Windows Mobile
splash screen. Then MobileMapper 6 will emit a beep
suggesting that you tap anywhere on the screen (Tap the
screen to set up your Windows Mobile-based device) to initiate
the setup sequence described below:
1. Screen alignment: Tap the target firmly and accurately
at each location on the screen. The target will continue
to move until the screen is aligned.
2. Stylus: Run this step to learn how to perform single-tap
and tap-and-hold actions with the stylus.
3. Date & Time: Choose your time zone and enter your
local date and time parameters.
4. Password: You can protect your data by requiring a
password when the device is turned on. A password
also helps to protect networks that you access. Tap Next
to set up a password.
English
8
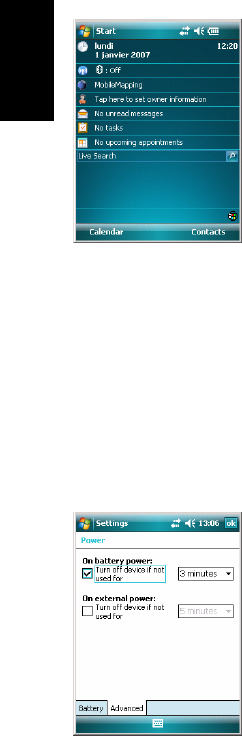
Start Screen 5. Email: You may set up an e-mail account. Press Next
and enter successively your email address, name,
account display name, user name, password and
automatic send/receive time interval. Then close the
Inbox window. This takes you to the Windows Mobile
Start screen.
Adjusting the
Backlight
• Press the Flashlight button briefly and repeatedly until
you get the desired level of backlight. (This button is
located at the top and on the left side of the receiver).
Other Preliminary
Settings
• Tap Start, then Settings.
• Below are the other settings you can now perform:
Power Management
• Double-tap on the Power icon.
The Battery tab shows the energy left in the battery, in
percentage. This indication is irrelevant when the
MobileMapper 6 is powered from a computer through the
USB data cable.
• Tap on the Advanced tab. This tab allows you to ask for
automatic power shutdown if the receiver stays idle for the
period of time you choose. Settings are for both battery
and external power source.
• Tap ok to validate all your changes and close the Power
window.
English
9
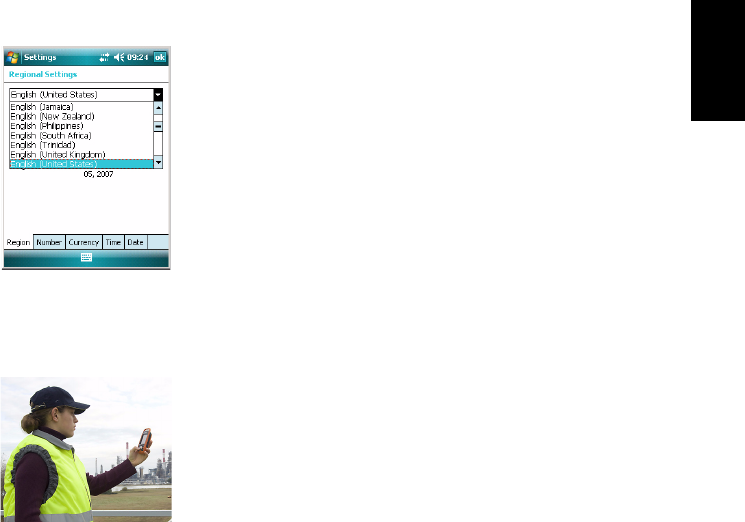
Regional Settings
• Double-tap on the Regional Settings icon.
•On the Region tab, select your country.
• Use the other tabs to set local settings:
– Number format
– Currency choice
– Time and date formats
• Tap ok to validate all your changes and close the Regional
Settings window.
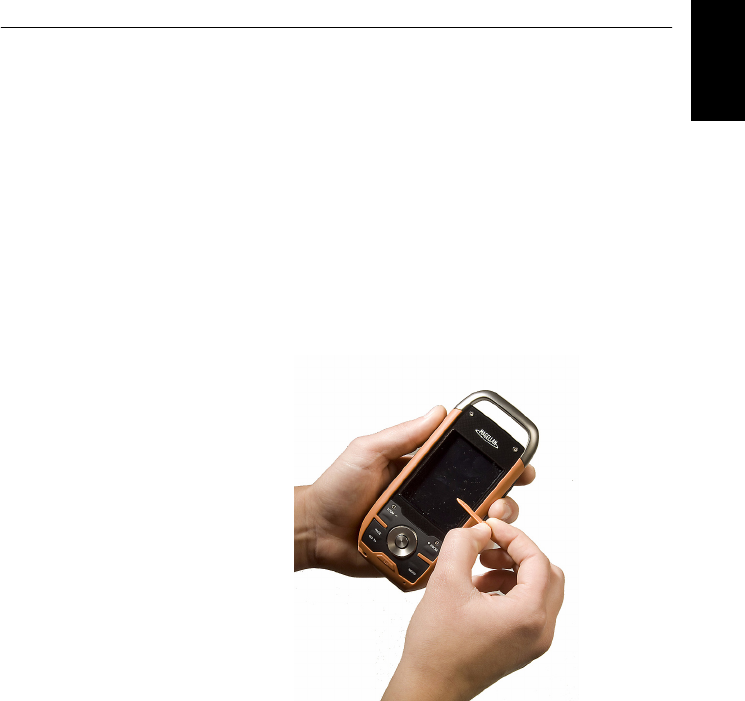
How to Hold the
Receiver
Use of the MobileMapper 6 while receiving satellites requires
that you hold the receiver properly.
The receiver will have the best view of the sky when you hold
it at an angle of 45 degrees from horizontal and not too close
to you.

English
10
Installing New Software
From an SD Card If it is provided on an SD card, follow the instructions below
to install the new software:
• Insert the SD card into MobileMapper 6’s SD card slot.
• Tap Start, then File Explorer.
• In the menu bar, tap on My Device and select Storage Card.
File Explorer now lists the content of the SD card
• Scroll through the list of files to find the setup file of the
new software.
• Tap on the file name to start installation and then follow
the instructions to complete the installation.
From your Office
Computer
If the installation files cannot be handled directly by
MobileMapper 6, you can use your office computer and a
Microsoft ActiveSync connection to transfer the installation
files from the computer to MobileMapper 6.
This means ActiveSync should first be installed on your
computer. You can download this software for free from the
following web site:
http://www.microsoft.com/windowsmobile/activesync/
Choose the ActiveSync version that is suitable for your
computer. Nothing needs to be done on MobileMapper 6 as
ActiveSync is pre-installed by default.
Follow the instructions below.
• Connect the USB Data cable between MobileMapper 6
and a USB port on your computer
• Turn on MobileMapper 6. Wait for the computer to activate
the ActiveSync connection. A sound alarm will be heard
when this happens.
• On the computer, close the Synchronization Setup Wizard
by clicking Cancel.
• In the menu bar of the Microsoft ActiveSync window, click
Explore.
• From the Mobile device window, navigate to the computer
drive and folder containing the software to install.
• Run the setup file located on the computer and instruct
the installation procedure to install the software on the
MobileMapper 6. Please refer to the software
documentation for more information and detailed
instructions.

English
11
For some applications, you may have to copy the setup file to
MobileMapper 6. In this case, follow the instructions below:
• From the Mobile device window, navigate to the computer
drive and folder containing the software to install.
• Copy the file or files needed for the software installation.
• Navigate to the Mobile Device and paste the files in one
of your folders. If you want to paste the files on the SD
card, if there is one, first double-click “My Windows
Mobile-Based Device” and then “Storage Card” before
pasting.
• Run the setup file and follow the instructions to complete
the installation. Make sure you install your program in the
non-volatile memory.
English
12
Using the Pictures & Videos Application
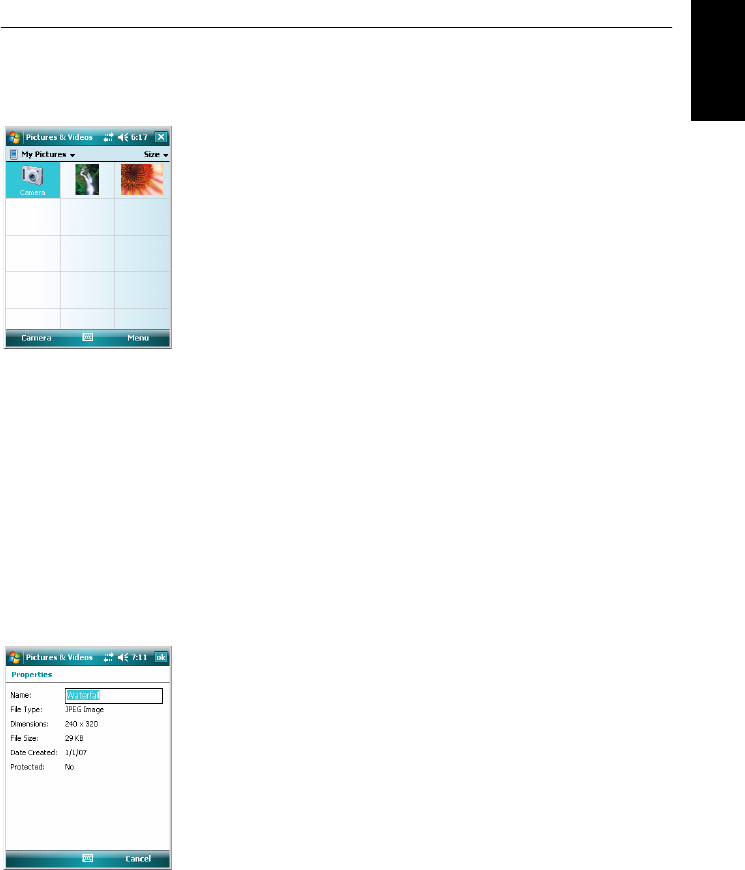
Using the Camera Taking a Picture
• Tap Start, Programs and Pictures & Videos. This opens the
“My Pictures” folder in which you can see the list of
existing images and videos. The first item in the list is the
Camera, the tool you will now be using to take pictures.
The light-blue background means the camera is currently
selected.
• Tap Camera, or press the Enter button, to turn on the
camera. Wait about five seconds until the center of the
window displays the viewfinder of the camera. You then
have about one minute to take a picture. After this delay,
the screen will display “Standby”. If this happens, just tap
anywhere on the blank area. The viewfinder will re-appear
after about two seconds.
• Now use the MobileMapper 6 as a camera. Look at the
viewfinder to frame the picture you want to take.
• When you are ready, stay as still as possible and press the
Enter button to take the picture. You can hear the click of
the camera.
• Tap ok to turn off the camera and close the window. The
picture you have taken is now visible in the “My Pictures”
folder.
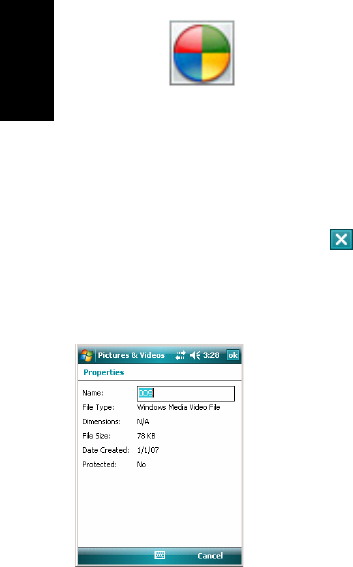
Renaming a Picture
• With the “My Pictures “folder open, tap on the desired
picture. This opens a new window showing a larger view of
the picture.
• Tap Menu and then Properties.
• Rename the file and tap ok.
Deleting a Picture
• With the “My Pictures” folder open, select the desired
picture using the Scroll button.
• Tap Menu and then Delete.
• Tap Yes to confirm file deletion.
English
13
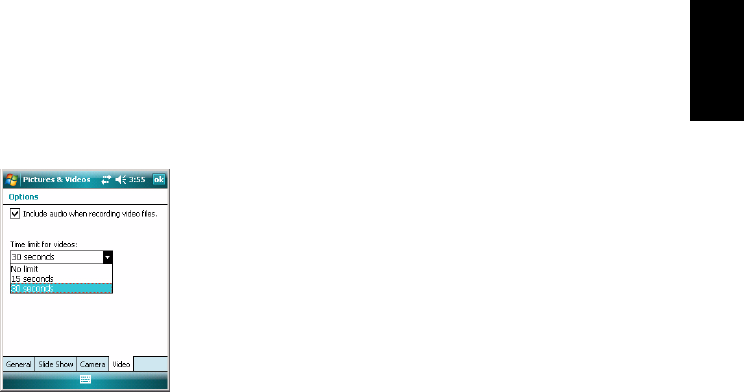
Making a Video Setting the Duration of a Video Film
• Tap Start and then Pictures & Videos. This opens the “My
Pictures” folder in which you can see the list of existing
images and videos.
• Tap Menu and then Options.
• Tap on the Video tab.
• Tap within the Time limit... field and select one of the
options below:
– No limit: Choose this option to be able to film a video
over an unlimited period of time.
– 15 seconds: Choose this option to limit the duration of
every video you’ll film to 15 seconds.
– 30 seconds: Choose this option to limit the duration of
every video you’ll film to 30 seconds.
• Tap ok to accept the changes and close the Options
window.
Starting a Video
• Tap Camera to turn on the camera. Wait about five seconds
until the center of the window displays the viewfinder of
the camera. You then have about one minute to start
filming. After this delay, the screen will display
“Standby”. If this happens, just tap anywhere on the
blank area. The viewfinder will re-appear after about two
seconds.
• When you are ready to film, tap Menu and then Video. This
temporarily freezes the viewfinder. Wait about five
seconds until the viewfinder returns to the active state.
• Press the Enter button to start filming.
Ending a Video
• Depending on the video settings, the video camera will
stop filming as explained below:
– With a preset time limit (15 or 30 seconds), the video
camera will stop filming automatically and close the
video file after this time has elapsed. A down counter
under the viewfinder will keep you informed of the
remaining time as you film.
– With no time limit, the video camera will film
indefinitely. A counter under the viewfinder will tell
you the current duration of the video. To stop filming
and close the video file, press the Enter button again.
English
14
• At the end of the video shooting, a process time is
indicated by a spinning hourglass.
• When the hourglass disappears, tap ok to turn off the
camera and close the window. The video file you have
created is now listed in the “My Pictures” folder.
Playing Back a Video
• With the “My Pictures” folder open, tap on the desired
video file. This will automatically launch the Windows
Media player.
• Tap to close Windows Media player and return to the
“My Pictures” folder.
Renaming a Video
• With the “My Pictures” folder open, select the desired
video file using the Scroll button.
• Tap Menu and then Properties.
• Rename the file and tap ok.
Deleting a Video
• With the “My Pictures” folder open, select the desired
video file using the Scroll button.
• Tap Menu and then Delete.
• Tap Yes to confirm deletion.
Changing Picture
Settings
• Tap Start, Programs and Pictures & Videos. This opens the
“My Pictures” folder.
• Tap Camera, or press the Enter button, to turn on the
camera. Wait about five seconds until the center of the
window displays the viewfinder of the camera.
• Tap Menu, then Zoom. Choose between x1 (zoom1:1), x2
(zoom2:1) and x3 (zoom 3:1). The zoom setting impacts
what you see on the viewfinder and therefore on the
picture you take.
• Tap Menu, then Resolution. Choose one of the dimensions
available (expressed in pixels). The resolution setting
impacts the quality and size of the picture you take.
• Tap Menu, then Mode. Choose between Normal (one picture
taken), Burst (five pictures taken at a one-second interval
once you have pressed Enter) and Timer (picture taken 5
seconds after pressing Enter).
English
15
Internet Connection
You can easily access the Internet from your MobileMapper 6
if you have a mobile phone available with Bluetooth and
GPRS capabilities. To perform the connection to the Internet,
you need to use the following three items:
• Bluetooth for a wireless connection to the mobile phone.
• Modem connection for a GPRS connection to your access
provider.
• Internet Explorer to access the desired site and view its
web pages.
Creating a
Bluetooth
Connection with a
Mobile Phone
• Turn on your mobile phone and make sure its Bluetooth is
enabled and visible. If necessary, refer to the phone
manufacturer’s documentation for more information on
how to operate Bluetooth in this phone.
• Keep the mobile phone at a distance less than 10 meters
from MobileMapper 6.
• Turn on MobileMapper 6.
• On MobileMapper 6, tap Start, then Settings.
• Tap on the Connections tab.
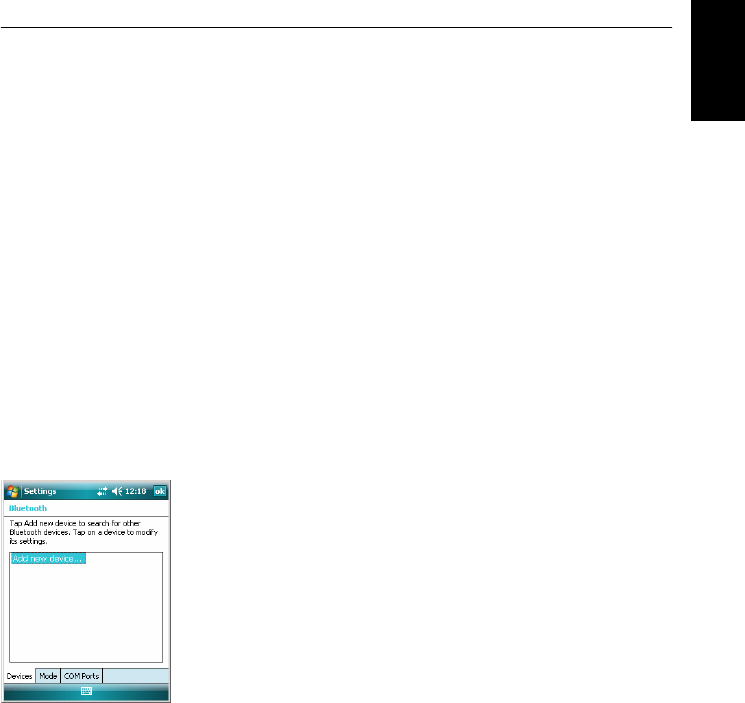
• Tap on the Bluetooth icon.
• Tap on the Add New Device... line in the list box. Bluetooth
then starts searching.
After the search sequence, the names of the detected
units are listed on the screen. Your mobile phone should
normally be part of the list.
• Tap on the name of your mobile phone and then tap Next
(bottom right).
• Using the virtual keyboard, enter a passcode. This step is
for pairing and securing the connection with the mobile
phone.
• Tap Next. Wait until the spinning hourglass disappears.
• Whatever the model used, your mobile phone should now
respond by asking you to confirm the Bluetooth
connection to MobileMapper 6 and enter the same
passcode. In the meantime, a spinning hourglass is shown
on the MobileMapper 6 screen.
English
16
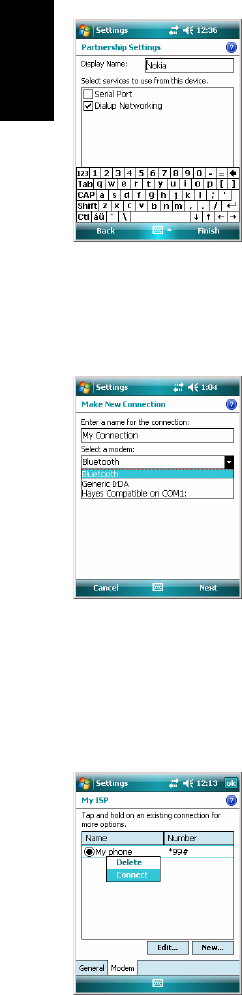
• When the Bluetooth connection is established, the
MobileMapper 6 screen lists the Bluetooth services
available from your mobile phone. Make sure the Dialup
Networking option is enabled.
• Tap Finish to complete the connection procedure. This
takes you back to the Bluetooth Settings window on which
you can now see your phone as a properly connected unit.
• Tap ok to close this window.
Creating a GPRS
Connection Via a
Mobile Phone
• In the Settings window, tap on the Connections icon.
• Tap on the upper Add a new modem connection hyperlink
displayed on the screen.
• Name your GPRS connection (example: My phone)
• Select Bluetooth as the modem used for the GPRS
connection.
• Tap Next.
• Tap on the name of your mobile phone
• Enter the call number exactly as it should be dialed
(example: *99#).
• Tap Next.
• Enter your user name and password, if any.
• Enter the domain name (APN) of your GPRS provider
(example: a2bouygtel.com).
• Tap Finish. This takes you back to the Connections
window.
• Tap on the Manage existing connections hyperlink now
displayed just underneath the Add a new modem connection
hyperlink you opened at the beginning of this procedure.
• Tap and hold on the connection name and then select
Connect. This opens the Network Log On window on which
you can see some of the connections parameters you have
just entered.
• Tap OK (bottom left). Depending on the model used, the
phone may now ask you to confirm the connection
request. Respond accordingly. The GPRS connection is
then active.
English
17
Using Internet
Explorer
Once the GPRS connection is active, do the following to view
a web page:
• Tap Start, then Internet Explorer.
• Just underneath the Internet Explorer title bar, type in the
URL address of the web site you want to visit.
• Tap Go (bottom left). The screen should now display the
home page of the chosen web site.
Subsequent Uses • Run Internet Explorer.
• Type in or select the URL address of the desired web site.
This automatically opens the Network Log On window.
• Tap OK to re-activate the connection. When the
connection is re-established, Internet Explorer will display
the requested web page.
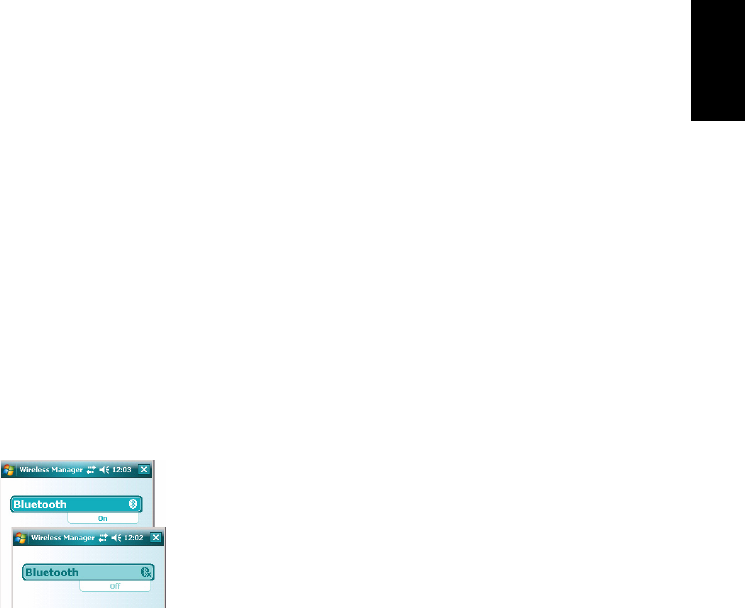
Wireless Manager
- Ending a GPRS
Connection
In the Settings window is the Wireless Manager icon that
gives full control over Bluetooth by allowing you to:
• Quickly enable (On) or disable (Off) Bluetooth. Just tap in
the Bluetooth frame and then Done (bottom left).
• Access the Bluetooth settings through the Menu function.
Use this icon during a work session to turn off the Bluetooth
connection and so put an end to the current GPRS
connection. If you do that, don’t forget to turn Bluetooth back
on before running Internet Explorer for a new Internet access.

English
18
Using Windows Mobile 6 Software
The operating system used in MobileMapper 6 is the standard
Microsoft Windows Mobile version 6 software. For more
information on how to use the different applications part of
this software, you can also visit the following web site:
http://www.microsoft.com/windowsmobile/gettingstarted/
default.mspx

IMPORTANT SAFETY WARNINGS
Federal Communication Commission Interference Statement
This equipment has been tested and found to comply with the limits for a Class B digital device, pursuant to Part 15 of the
FCC Rules. These limits are designed to provide reasonable protection against harmful interference in a residential
installation. This equipment generates, uses and can radiate radio frequency energy and, if not installed and used in
accordance with the instructions, may cause harmful interference to radio communications. However, there is no guarantee
that interference will not occur in a particular installation. If this equipment does cause harmful interference to radio or
television reception, which can be determined by turning the equipment off and on, the user is encouraged to try to correct
the interference by one of the following measures:
• -Reorient or relocate the receiving antenna.
• -Increase the separation between the equipment and receiver.
• -Connect the equipment into an outlet on a circuit different from that to which the receiver is connected.
• -Consult the dealer or an experienced radio/TV technician for help.
This device complies with Part 15 of the FCC Rules. Operation is subject to the following two conditions: (1) This device
may not cause harmful interference, and (2) this device must accept any interference received, including interference that
may cause undesired operation.
FCC Caution: Any changes or modifications not expressly approved by the party responsible for compliance could void the
user's authority to operate this equipment.
IMPORTANT NOTE:
FCC Radiation Exposure Statement:
This equipment complies with FCC radiation exposure limits set forth for an uncontrolled environment. End users must
follow the specific operating instructions for satisfying RF exposure compliance.
This transmitter must not be co-located or operating in conjunction with any other antenna or transmitter.
In order to maintain compliance with FCC regulations, shielded cables must be used with this equipment. Operation with
non-approved equipment or unshielded cables is likely to result in interference to radio and TV reception. The user is
cautioned that changes and modifications made to the equipment without the approval of manufacturer could void the user's
authority to operate this equipment.
The Magellan Maestro must be installed and operated at a distance no closer then 8 inches (20 cm) from the user.
This Class B digital apparatus meets all requirements of the Canadian Interference-Causing Equipment Regulations.
Cet appareil numerique de la classe B respecte toutes les exigences du Reglement sur le materiel brouilleur du Canada.
IMPORTANT SAFETY WARNINGS
IC statement
Operation is subject to the following two conditions:
1. This device may not cause interference and
2. This device must accept any interference, including interference that may cause undesired operation of the
device.
IMPORTANT NOTE:
IC Radiation Exposure Statement:
This equipment complies with IC radiation exposure limits set forth for an uncontrolled environment. End users must follow
the specific operating instructions for satisfying RF exposure compliance.
This transmitter must not be co-located or operating in conjunction with any other antenna or transmitter.
The information provided in this document is subject to change without notice. Improvements and enhancements to the
product may occur without any formal notification. Check the Magellan website (www.magellanGPS) for product updates
and additional information.