Wistron TP00019A LENOVO NOTEBOOK COMPUTER (WITH WACOM DIGITIZER, MODEL: SU6E-12W04AU, SU6C-12W04AU) User Manual 2
Wistron Corporation LENOVO NOTEBOOK COMPUTER (WITH WACOM DIGITIZER, MODEL: SU6E-12W04AU, SU6C-12W04AU) Users Manual 2
Wistron >
Contents
- 1. Users Manual 1
- 2. Users Manual 2
- 3. Users Manual 3
Users Manual 2

RemovinganExpressCard,aashmediacard,orasmartcard
Attention:BeforeremovingastorageExpressCard,suchasaashmemoryExpressCard,asolidstate
ExpressCard,oramemorycardreaderExpressCard,fromanExpressCardslot,youmuststopthe
ExpressCard.Otherwise,dataontheExpressCardmightbecorruptedorlost.
Attention:DonotremoveanExpressCardwhilethecomputerisinsleep(standby)modeorhibernation
mode.Ifyoudo,thesystemwillnotrespondwhenyoutrytoresumeoperation.
ForinformationaboutthelocationoftheExpressCardslot,ashmediacardreaderslot,andsmartcardslot,
see“Locatingcomputercontrols,connectors,andindicators”onpage1.
ToremoveanExpressCard,aashmediacard,orasmartcard,dothefollowing:
ForWindows7:
1.ClicktheShowhiddeniconsinthetaskbar.
2.Right-clickSafelyRemoveHardwareandEjectMediaicon.
3.SelectcorrespondingitemtoejectthecardfromtheWindowsoperatingsystem.
4.Pressthecardtoejectitfromyourcomputer.
5.Removethecardfromyourcomputerandstoreitsafelyforfutureuse.
ForWindowsVistaandWindowsXP:
1.ClicktheSafelyRemoveHardwareiconinthetaskbar
2.SelectcorrespondingitemtoejectthecardfromtheWindowsoperatingsystem.
3.Pressthecardtoejectitfromyourcomputer.
4.Removethecardfromyourcomputerandstoreitsafelyforfutureuse.
Note:IfyoudonotremovethecardfromyourcomputerafteryouejectthecardfromtheWindows
operatingsystem,thecardcannolongerbeaccessed.Toaccessthecard,youmustremoveitonce,
theninsertitagain.
Chapter2.Usingyourcomputer83

84UserGuide
Chapter3.Youandyourcomputer
Thischapterprovidesyouinformationaboutaccessibilityandtravelingwithyourcomputer.
Thischaptercontainsthefollowingtopics:
•“Accessibilityandcomfort”onpage85
•“Travelingwithyourcomputer”onpage88
Accessibilityandcomfort
Becauseyourcomputerenablesyoutoworkinsomanyplaces,itisimportantthatyouremainattentive
togoodposture,goodlightingandproperseating.Bykeepingtheseconsiderationsinmind,youcan
improveperformanceandachievegreatercomfort.
Lenovoiscommittedtoprovidingthelatestinformationandtechnologytoourcustomerswithdisabilities.
Refertoouraccessibilityinformationwhichoutlinesoureffortsinthisarea.
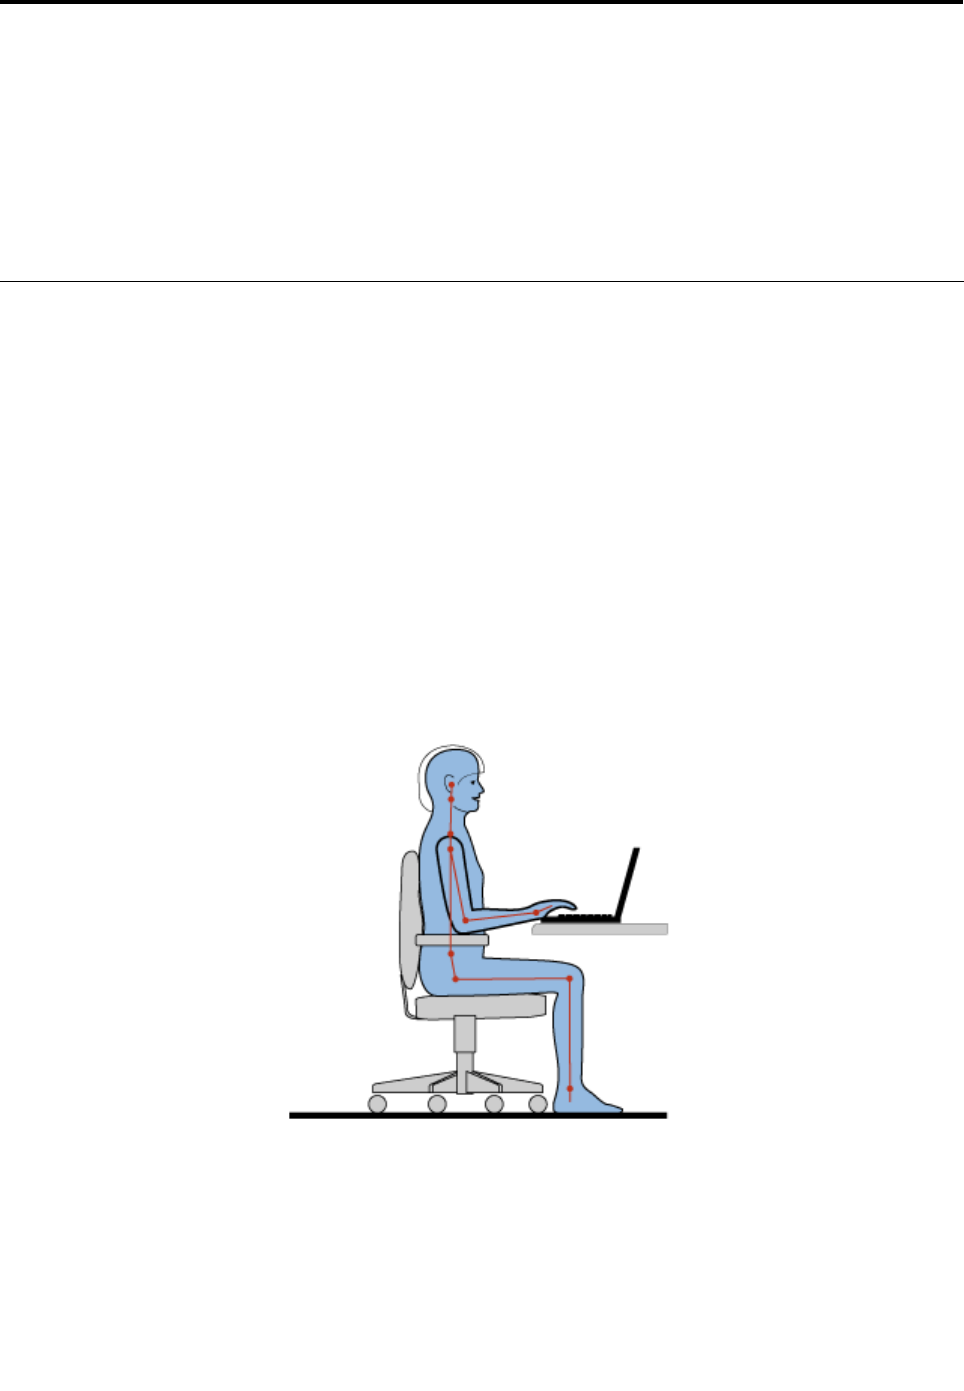
Ergonomicinformation
Workinginthevirtualofcemaymeanadaptingtofrequentchangesinyourenvironment.Followingsome
simpleruleswillmakethingseasierandbringyouthemaximumbenetsofyourcomputer.Keepinginmind
suchbasicsasgoodlightingandproperseating,forexample,canhelpyouimproveyourperformance
andachievegreatercomfort.
Note:Thisexampleshowssomeoneinaconventionalsetting.Evenwhennotinsuchasetting,youcan
followmanyofthesetips.Developgoodhabits,andtheywillserveyouwell.
GeneralPosture:Belowaresomegeneralrecommendationsforassumingahealthyworkingposture.It
isbesttoperiodicallymakeminormodicationsinyourworkingposturetodetertheonsetofdiscomfort
causedbylongperiodsofworkinginthesameposition.Frequent,shortbreaksfromyourworkwillalsohelp
topreventanyminordiscomfortassociatedwithyourworkingposture.
Display:Positionthedisplaytomaintainacomfortableviewingdistanceof510-760mm(20-30inch).Avoid
glareorreectionsonthedisplayfromoverheadlightingoroutsidesourcesoflight.Keepthedisplayscreen
©CopyrightLenovo201185

cleanandsetthebrightnesstolevelsthatenableyoutoseethescreenclearly.PressFn+HomeorEnd
toadjustdisplaybrightness.
HeadPosition:Keepyourheadandneckinacomfortableandneutral(vertical,orupright)position.
Chair:Useachairthatgivesyougoodbacksupportandseatheightadjustment.Usechairadjustmentsto
bestsuityourdesiredposture.
ArmandHandPosition:Ifavailable,utilizechairarmrestsoranareaonyourworkingsurfacetoprovide
weightsupportforyourarms.Keepyourforearms,wrists,andhandsinarelaxedandneutral(horizontal)
position.Typewithasofttouchwithoutpoundingthekeys.
LegPosition:Keepyourthighsparalleltotheoorandyourfeetatontheoororonafootrest.
Whatifyouaretraveling?
Itmaynotbepossibletoobservethebestergonomicpracticeswhenyouareusingyourcomputerwhileon
themoveorinacasualsetting.Regardlessofthesetting,trytoobserveasmanyofthetipsaspossible.
Sittingproperlyandusingadequatelighting,forexample,willhelpyoumaintaindesirablelevelsofcomfort
andperformance.
Questionsaboutvision?
ThinkPadnotebook'svisualdisplayscreensaredesignedtomeetthehigheststandardsandtoprovideyou
withclear,crispimagesandlarge,brightdisplaysthatareeasytosee,yeteasyontheeyes.Ofcourse,
anyconcentratedandsustainedvisualactivitycanbetiring.Ifyouhavequestionsoneyefatigueorvisual
discomfort,consultavisioncarespecialistforadvice.
Adjustingyourcomputertotyou
Becauseyourcomputerenablesyoutoworkinsomanyplaces,itisimportantthatyouremainattentive
togoodposture,goodlightingandproperseating.Refertothefollowingtipstoimproveperformance
andachievegreatercomfort:
Activesittingandrestbreaks:Thelongeryousitandworkwithyourcomputerthemoreimportantitis
toobserveyourworkingposture.Following“generalrecommendationsformaintainingahealthyworking
posture”onpage85andpracticing“activesitting”arethebestwaystoavoiddiscomfortassociatedwith
yourworkingpostures.Makingminorvoluntaryposturalchangesandtakingshortfrequentworkbreaks
arethekeyingredientsforhealthycomputing.Yourcomputerisalightandmobilesystem;remember
thatitcaneasilyberepositionedonyourworkingsurfacetoaccommodatemanyposturemodications
youmightwishtomake.
Workareasetupoptions:Familiarizeyourselfwithallofyourofcefurnituresothatyouknowhowtoadjust
yourworksurface,seat,andotherworktoolstoaccommodateyourpreferencesforcomfort.Ifyourwork
areaisnotinanofcesetting,besuretotakespecialnoteofemployingactivesittingandutilizingwork
breaks.NotethattherearemanyThinkPadproductsolutionsavailabletohelpyoumodifyandexpand
yourcomputertobestsuityourneeds.AccessthefollowingWebsitetoviewsomeoftheseoptions:
http://www.lenovo.com/accessories/services/index.html.Exploreyouroptionsfordockingsolutionsand
externalproductsthatcanprovidetheadjustabilityandfeaturesthatyouwant.
ThinkPadfeaturesthatpromotecomfort:ThereareeasytouseThinkPadfeaturesthatcanhelpmake
yourcomputermorecomfortabletouse.
86UserGuide

Accessibilityinformation
Lenovoiscommittedtoprovidingpeoplewithdisabilitiesgreateraccesstoinformationandtechnology.
Asaresult,thefollowinginformationprovideswaystohelpusersthathavehearing,vision,andmobility
limitationsgetthemostoutoftheircomputerexperience.
Assistivetechnologiesenableuserstoaccessinformationinthemostappropriateway.Someofthese
technologiesarealreadyprovidedinyouroperatingsystem,otherscanbepurchasedthroughvendors,or
accessedthroughtheWorldWideWeb.
Assistivetechnologies
SomeaccessibilitytechnologiesareavailablethroughtheAccessibilityOptionsprogram.Depending
onyouroperatingsystem,thenumberofaccessibilityoptionsavailablevaries.Ingeneral,accessibility
optionsenhancethewayuserswithhearing,vision,ormobilitylimitationsnavigateandusetheircomputer.
Forexample,someusersmightnothavethenemotorskillsrequiredtouseamouseorselectkey
combinations.Otherusersmightrequirelargerfontsorhigh-contrastdisplaymodes.Insomecases,
magniersandbuilt-inspeechsynthesizersareavailable.Fordetailedinformationabouteachofthese
features,consulttheMicrosofthelpsystem.
TousetheAccessibilityOptionsprogram,doasfollows:
ForWindows7andWindowsVista:
1.ClickStart,andthenclickControlPanel.
2.ClickEaseofAccess.
3.ClickEaseofAccessCenter.
ForWindowsXP:
1.ClickStart,andthenclickControlPanel.
2.ClickAccessibilityOptions.
ThishelpsystemsupportstheaccessibilityfeaturesprovidedbyyourWindowsoperatingsystem,screen
readersdesignedtooperateintheWindowsenvironment,andWindowskeyboardnavigation.Fora
completelistingofMicrosoftWindowsKeyboardGuide,goto:
http://www.microsoft.com/enable/Products/altkeyboard.aspx
Screenreadertechnologiesareprimarilyfocusedonsoftwareapplicationinterfaces,helpsystems,anda
varietyofonlinedocuments.However,inthecasewhereascreenreadercannotreaddocuments,the
documentmustrstgothroughaconversionprocess.OnesolutionconvertsAdobePDFlesintoaformat
thatisreadbythescreen-readerprograms.ThissolutionisaWeb-basedserviceprovidedbyAdobe
SystemsIncorporated.Throughhttp://access.adobe.com,AdobePDFdocumentscanbeconvertedto
HTMLorplaintextinmanylanguages.OneconversionoptionsconvertsPDFdocumentsontheInternet.A
secondoptionenablesuserstosubmittheURLofanAdobePDFlethroughe-mailtoconvertittoHTMLor
ASCIItext.AdobePDFlesonalocalharddiskdrive,localCD-ROM,orlocalareanetwork(LAN)canalso
beconvertedbyattachingtheAdobePDFletoane-mailmessage.
FullScreenMagnierfunction
SomemodelssupporttheFullScreenMagnierfunction,whichenlargestheactivewindowandmakesit
easierforyoutousethecomputerdisplay.
ToenabletheFullScreenMagnierfunction,pressFn+Spacebar.Theactivewindowismagniedandthe
FullScreenMagniericonisdisplayedinthesystemtrayatbottomrightofyourscreen.Thenyoucan
changethezoomresolution.ClicktheFullScreenMagniericonandmakeyourchoice.
Chapter3.Youandyourcomputer87

TodisabletheFullScreenMagnierfunction,clicktheFullScreenMagniericonandselectExitorpress
Fn+Spacebar.
Travelingwithyourcomputer
Whenyoutravelabroad,yourcomputercanhelpyoufeelmoreathomeandatease.Withyourowncomputer
anditsles,youcanbecondentaboutgatheringandofferinginformationtoclientsandcoworkers.
Attendingtosomeimportantdetailsthatcanhelpforeigntravelgosmoothly:
•“Traveltips”onpage88
•“Travelaccessories”onpage88
Traveltips
Usethefollowingtraveltipstotravelmorecondentlyandefcientlywithyourcomputer.
1.Whileitissafetoallowyourcomputertogothroughthexraymachinesatairportsecuritystations,itis
importanttokeepyoureyesonthecomputeratalltimestopreventtheft.
2.Considerbringinganairplaneorautomobileadapterforyourcomputer.
3.Becauseyoumightneedtouseyourcomputerinlessthanperfectlightingconditions,turnonthe
ThinkLightbypressingFn+PgUptoilluminatethekeyboard.
4.Ifyoucarryanacpoweradapter,detachtheaccordfromittoavoiddamagingthecord.
Note:IfyouusetheThinkLight,thebatterylifeisslightlyreduced.
Traveltipsonairplanes
Ifyoucarryyourcomputerintoanairplane,checkthetraveltips.
Attention:
•Forusingonboardcomputerorwireless(suchasInternet,Bluetooth,etc.)service,checktheservices
withtheairlinebeforeboardingtheairplane.
•Iftherearerestrictionsontheuseofcomputerswiththewirelessfeatureonanairplane,youneedto
disableitbeforeboarding.Todisableit,refertotheinstructionsin“Enablingordisablingthewireless
feature”onpage72.
Followthetipsbelow.
1.Becarefulabouttheseatinfrontofyouonairplanes.Angleyourcomputerdisplaysothatitdoesnot
getcaughtwhenthepersoninfrontofyouleansback.
2.Remembertohibernateorturnoffyourcomputerwhentakingoff.
Travelaccessories
Hereisachecklistofthingstoconsiderpackingwhenyouaregoingtobeoutoftheofce:
TravelEssentials:
•ThinkPadacpoweradapter
•Externalmouse,ifyouareaccustomedtousingone
•Ethernetcable
•Standardphonecableandmodularjack(RJ-11)
•Extrabattery,charged
88UserGuide

•Aqualitycarryingcasethatprovidesadequatecushionandprotection
Ifyouaretravelingtoanothercountryyoumightwanttoconsidertheseitems:
•Anacpoweradapterforthecountrythatyouaretravelingto
•Anadaptertoconnecttoaphonelineinthatcountry
Otheritemsyoumaywishtoconsider:
•ThinkPadac/dcComboAdapter
•Externalstoragedevice
•Phonelinesplitter,incaseyouneedtodialmanuallyoruseyourmodemwithoutdisconnectingthe
phoneline
Chapter3.Youandyourcomputer89

90UserGuide

Chapter4.Security
Thischapterprovidesinformationabouthowtoprotectyourcomputerfromtheftandunauthorizeduse.
•“Attachingamechanicallock”onpage91
•“Usingpasswords”onpage91
•“Harddisksecurity”onpage97
•“Settingthesecuritychip”onpage98
•“Usingangerprintreader”onpage99
•“Noticeondeletingdatafromyourharddiskdriveorsolidstatedrive”onpage107
•“Usingandunderstandingrewalls”onpage108
•“Protectingdataagainstviruses”onpage108
Attachingamechanicallock
Youcanattachamechanicallocktoyourcomputer,tohelppreventitfrombeingremovedwithoutyour
permission.
Attachamechanicallocktothekeyholeofthecomputer;thensecurethechainonthelocktoastationary
object.Refertotheinstructionsshippedwiththemechanicallock.
Note:Youareresponsibleforevaluating,selecting,andimplementingthelockingdevicesandsecurity
features.Lenovomakesnocomments,judgments,orwarrantiesaboutthefunction,quality,orperformance
oflockingdevicesandsecurityfeatures.
Usingpasswords
Byusingpasswords,youcanhelppreventyourcomputerfrombeingusedbyothers.Onceyouseta
password,apromptappearsonthescreeneachtimeyoupoweronthecomputer.Enteryourpasswordat
theprompt.Youcannotusethecomputerunlessyoutypethecorrectpassword.
Makesurethatonlyauthorizedindividualsaccessyourcomputer.Establishingdifferentkindsofpasswords
requiresthatotherpossibleusersknowtheproperpasswordsinordertoaccessyourcomputeroryourdata.
Ifthisiconappears,enterthePower-onpasswordorSupervisorpassword.
Ifthisiconappears,entertheHarddiskpassword.
Ifthisiconappears,entertheSupervisorpassword.
Clickontheitemsbelowtondoutmoreaboutpasswordsandhowtousethemtoprotectyourcomputer.
•“Passwordsandsleep(standby)mode”onpage92
•“Power-onpassword”onpage92
•“Harddisksecurity”onpage97
©CopyrightLenovo201191

•“Supervisorpassword”onpage95
Passwordsandsleep(standby)mode
Ifyouhavesetpasswordsandyouputyourcomputerintosleep(standby)modebypressingFn+F4,the
procedureforresumingoperationisasfollows:
•Youarenotpromptedtotypethepasswordwhenresumingoperation.
•Ifanyharddiskorthesolidstatedrivehasaharddiskpassword,itisunlockedautomaticallywhen
youresumeoperation.
Typingpasswords
Ifthisiconappears,enterthePower-onpasswordorSupervisorpassword.
Ifthisiconappears,entertheHarddiskpassword..Ifyouwanttoenteramasterharddiskpassword,
dothefollowing:
1.PressF1.Theiconchangestothis:
2.Nowtypethemasterharddiskpassword.
Note:Toreturntothersticon,pressF1again.
Ifthisiconappears,entertheSupervisorpassword.
Note:YoucanpressBackspaceifyoupressawrongkeywhileyouaretypingyourpassword.
Power-onpassword
Youcansetapower-onpasswordtohelpprotectyourcomputeragainstaccessbyunauthorizedusers.
Ifyousetapower-onpassword,thepasswordpromptappearsonthescreenwheneveryouturnonthe
computer.Youmustenterthecorrectpasswordtostartusingthecomputer.
Settingapower-onpassword
1.Printtheseinstructions.
2.Saveallopenles,andexitallapplications.
3.Turnyourcomputeroffandthenturnitonagain.
4.Whenthelogoscreenisdisplayed,pressF1.TheThinkPadSetupopens.
5.SelectSecurity,usingthecursordirectionalkeystomovedownthemenu.
6.SelectPassword.
7.SelectPower-onPassword.
8.Chooseyourpower-onpassword,andtypeitwithinthebracketsontheEnterNewPasswordeld.
Note:Youcansettheminimumlengthofapower-onpasswordintheThinkPadSetupmenu.For
details,referto“Securitymenu”onpage185.
9.PressEnteroncetomovetothenextline.Retypethepasswordyoujustenteredtoverifyit.
10.CommityourpasswordtomemoryandpressEnter.ASetupNoticewindowisdisplayed.
92UserGuide

Note:Youmightwanttonoteyourpower-onpasswordinasafeplace.Otherwise,ifyouforgetit,you
havetotakeyourcomputertoaLenovoreselleroramarketingrepresentativetohavethepassword
canceled.
11.PressF10toexit.
Changingorremovingthepower-onpassword
Tochangethepower-onpassword,followthesteps1through9abovein“Settingapower-onpassword”on
page92,typingyourpasswordtogetaccesstotheThinkPadSetup.
Tochangethepassword,dothefollowing:
1.IntheEnterCurrentPasswordeld,typethecurrentpower-onpassword.
2.IntheEnterNewPasswordeld,typethenewpower-onpassword;thenretypethepasswordyoujust
enteredtoverifyitintheConrmNewPasswordeld.
3.Followstep10andstep11abovein“Settingapower-onpassword”onpage92tochangeyour
power-onpassword.
Toremovethepassword,dothefollowing:
1.IntheEnterCurrentPasswordeld,typethecurrentpower-onpassword.
2.LeavetheEnterNewPasswordandConrmNewPasswordeldsblank.
3.Followstep10andstep11abovein“Settingapower-onpassword”onpage92toremoveyour
power-onpassword.
Harddiskpasswords
Twotypesofharddiskpasswordshelpprotecttheinformationstoredontheharddisk:
•Userharddiskpassword
•Masterharddiskpassword,whichrequiresauserharddiskpassword
Ifauserharddiskpasswordhasbeenset,butnomasterharddiskpasswordhasbeen,theusermustenter
theuserharddiskpasswordinordertogainaccesstolesandapplicationsontheharddisk.
Themasterpasswordcanbesetandusedonlybyasystemadministrator.Likeamasterkey,itenables
theadministratortogetaccesstoanyharddriveinasystem.Theadministratorsetsthemasterharddisk
password;andnooneelseknowsit.Thentheadministratorsetsauserharddiskpasswordforeach
computerinthenetwork,andtellseachuserthepasswordforhisorhercomputer.Theusercanchangethe
userharddiskpasswordasdesired,buttheadministratorcanstillgetaccessbyusingthemasterpassword.
Note:Whenamasterharddiskpasswordisset,onlytheadministratorcanremovetheuserharddisk
password.
Settingaharddiskpassword
1.Printtheseinstructions.
2.Saveallopenles,andexitallapplications.
3.Turnyourcomputeroffandthenonagain.
4.Whenthelogoscreenisdisplayed,pressF1.TheThinkPadSetupopens.
5.SelectSecurity,usingthecursordirectionalkeystomovedownthemenu.
6.SelectPassword.
7.SelectHardDiskxPassword,wherexisthenumberoftheharddiskdriveforwhichyouwantto
setapassword.
Chapter4.Security93

8.ASetupConrmationwindowopens.YouarepromptedtoselectUserorUser+Master.SelectUserif
youwanttosetonlyoneharddiskpassword.Ifyouareanadministratororsupervisor,youcanselect
User+Mastertosettwopasswords.(Theusercanchangetheuserpasswordlater.)
9.IfyouselectUser+Master,gotostep12.
10.IfyouselectUseronly,anew-passwordwindowopens.TypeyournewpasswordintheEnterNew
Passwordeld.
Notes:
•YoucansettheminimumlengthofaharddiskpasswordintheThinkPadSetupmenu.Fordetails,
referto“Securitymenu”onpage185.
•Ifyousetaharddiskpasswordofoversevencharacters,theharddiskdrivecanbeusedonlywitha
computerthatcanrecognizeaharddiskpasswordofoversevencharacters.Ifyoutheninstallthe
harddiskdriveinacomputerthatcannotrecognizeaharddiskpasswordthatcontainsmorethan
sevencharacters,youcannotgetaccesstothedrive.
11.PressEnteroncetomovetothenextline.Retypethepasswordyoujustenteredtoverifyit.Goto
step18tocompletetheprocedure.
12.IfyouselectUser+Master,amessagewindowopensandpromptsyoutosetupauserharddisk
passwordrst.ClickContinue.
13.Anewharddiskuserpasswordwindowopens.TypeyournewpasswordintheEnterNewPassword
eld.
14.PressEnteroncetomovetothenextline.Retypethepasswordyoujustenteredtoverifyit.
15.Amessagewindowopensandpromptsyoutosetthemasterharddiskpassword.ClickContinue.
16.Anewmasterhard-diskpasswordwindowopens.TypeyournewpasswordintheEnterNew
Passwordeld.
17.PressEnteroncetomovetothenextline.Retypethepasswordyoujustenteredtoverifyit.
18.CommityourpasswordtomemoryandpressEnter.ASetupNoticewindowisdisplayed.
Attention:Youmightwanttonoteyourpasswordsandkeeptheminasafeplace.Otherwise,if
youforgettheuser-onlypassword,orbothuserandmasterpasswords,Lenovocannotresetyour
passwordsorrecoverdatafromtheharddisk.YoumusttakeyourcomputertoaLenovoresellerora
marketingrepresentativetohavetheharddiskdrivereplaced.Proofofpurchaseisrequired,andafee
willbechargedforpartsandservice.
19.PressF10toexitfromtheSetupNoticewindow.
Thenexttimeyouturnonyourcomputer,youwillhavetotypetheuserormasterharddiskpasswordin
ordertostartyourcomputerandgetaccesstoyouroperatingsystem.
Changingorremovingaharddiskpassword
Followsteps1through7in“Settingaharddiskpassword”onpage93above,typingyourpasswordtoget
accesstotheThinkPadSetupprogram.
TochangeorremovetheUseronlyharddiskpassword,doasfollows:
•Tochangetheharddiskpassword,typethecurrentpasswordintheEnterCurrentPasswordeld.Then
typethenewpasswordintheEnterNewPasswordeld,andretypethepasswordyoujustenteredto
verifyitintheConrmNewPasswordeld.PressEnter,andaSetupNoticewindowisdisplayed.Press
F10toexitfromtheSetupNoticewindow.Theuserharddiskpasswordwillbechanged.
•Toremovetheharddiskpassword,typethecurrentpasswordintheEnterCurrentPasswordeld.
ThenleavetheEnterNewPasswordandConrmNewPasswordeldsblank,andpressEnter.A
94UserGuide

SetupNoticewindowisdisplayed.PressF10toexitfromtheSetupNoticewindow.Theuserhard
diskpasswordwillberemoved.
TochangeorremovetheUser+Masterharddiskpassword,selectUserHDPorMasterHDP.
IfyouchooseUserHDP,dooneofthefollowing:
•Tochangetheuserharddiskpassword,typethecurrentuserharddiskpasswordorthecurrentmaster
harddiskpasswordintheEnterCurrentPasswordeld.Thentypethenewuserharddiskpasswordin
theEnterNewPasswordeld,andretypethepasswordyoujustenteredtoverifyitintheConrmNew
Passwordeld.PressEnter,andaSetupNoticewindowisdisplayed.PressF10toexitfromtheSetup
Noticewindow.Boththeuserandmasterharddiskpasswordswillbechanged.
•Toremovetheuserharddiskpassword,typethecurrentmasterharddiskpasswordintheEnterCurrent
Passwordeld.ThenleavetheEnterNewPasswordandConrmNewPasswordeldsblank,and
pressEnter.ASetupNoticewindowisdisplayed.PressF10toexitfromtheSetupNoticewindow.Both
theuserandmasterharddiskpasswordswillberemoved.
IfyouchooseMasterHDP,dooneofthefollowing:
•Tochangethemasterharddiskpassword,typethecurrentmasterharddiskpasswordintheEnter
CurrentPasswordeld.ThentypethenewmasterharddiskpasswordintheEnterNewPassword
eld,andretypethepasswordyoujustenteredtoverifyitintheConrmNewPasswordeld.Press
Enter,andaSetupNoticewindowisdisplayed.PressF10toexitfromtheSetupNoticewindow.The
masterharddiskpasswordwillbechanged.
•Toremovethemasterharddiskpassword,typethecurrentmasterharddiskpasswordintheEnter
CurrentPasswordeld.ThenleavetheEnterNewPasswordandConrmNewPasswordeldsblank,
andpressEnter.ASetupNoticewindowisdisplayed.PressF10toexitfromtheSetupNoticewindow.
Boththeuserandmasterharddiskpasswordswillberemoved.
Supervisorpassword
ThesupervisorpasswordprotectsthesysteminformationstoredintheThinkPadSetup.Withoutit,noone
canchangethecongurationofthecomputer.Itprovidesthefollowingsecurityfeatures:
•Ifasupervisorpasswordisset,apasswordpromptappearswhenyoutrytostarttheThinkPadSetup.
Unauthorizeduserscannotgetaccesstocongurationdata.
•Thesystemadministratorcanusethesupervisorpasswordtogetaccesstoacomputereveniftheuserof
thatcomputerhassetapower-onpassword.Thesupervisorpasswordoverridesthepower-onpassword.
•Ifbothasupervisorpasswordandapower-onpasswordareset,youcandothefollowingonlyifyou
havethesupervisorpassword:
–Deletingthepower-onpassword
–Changingordeletingthesupervisorpassword
–EnablingordisablingtheWakeonLAN®andFlashoverLANfeatures
–EnablingordisablingtheInternalNetworkOptionROMfeature
–Changingdateandtime
–EnablingordisablingtheLockUEFIBIOSSettingfeature
–EnablingordisablingthePasswordatunattendedboot
–Specifyingtheminimumlengthforpower-onpasswordsandharddiskpasswords
–Changingthesettingforthesecuritychip
–EnablingordisablingtheBootDeviceListF12Option
–EnablingordisablingtheBootOrderLock
Chapter4.Security95

–EnablingordisablingtheFlashBIOSUpdatingbyEnd-Usersfeature
–EnablingordisablingtheInternalNetworkdevice
–EnablingordisablingtheInternalWirelessdevice
–EnablingordisablingtheInternalBluetoothdevice
–EnablingordisablingtheInternalWirelessWANdevice
–EnablingordisablingtheSecuritymode
–EnablingordisablingtheReaderpriority
–Erasingthengerprintdata
Notes:
•ThesystemadministratorcansetthesamesupervisorpasswordonmanyThinkPadnotebookstomake
administrationeasier.
•ByenablingtheLockUEFIBIOSSettingsinthePasswordmenuwhenyousetthesupervisorpassword,
youmakeitimpossibleforanyonebutyoutomakechanges.
Settingasupervisorpassword
Onlyasystemadministratorwillbeabletoapplythisprocedure.
1.Printtheseinstructions.
2.Saveallopenles,andexitallapplications.
3.Turnyourcomputeroffandthenturnitonagain.
4.Whenthelogoscreenisdisplayed,pressF1.TheThinkPadSetupopens.
5.SelectSecurity,usingthecursordirectionalkeystomovedownthemenu.
6.SelectPassword.
7.SelectSupervisorPassword.
8.Awindowopensthatpromptsyoutoenteranewpassword.
9.ChooseyoursupervisorpasswordandtypeitintheEnterNewPasswordeld;thenpressEnter.
10.PressEntertomovetothenextline.Retypethepasswordyoujustenteredtoverifyit.
11.CommityourpasswordtomemoryandpressEnter.ASetupNoticewindowisdisplayed.
Attention:Youmightwanttonoteyourpasswordandkeepitinasafeplace.Ifyouforgetyour
supervisorpassword,Lenovocannotresetyourpassword.YoumusttakeyourcomputertoaLenovo
reselleroraLenovomarketingrepresentativetohavethesystemboardreplaced.Proofofpurchaseis
required,andafeewillbechargedforpartsandservice.
12.PressF10toexitfromtheSetupNoticewindow.
ThenexttimeyouopentheThinkPadSetup,youwillbepromptedtotypeyourpasswordtoproceed.
Changingorremovingthesupervisorpassword
Tochangeorremovethesupervisorpassword,followsteps1through8abovein“Settingasupervisor
password”onpage96,typingyourpasswordtogetaccesstotheThinkPadSetup.
Tochangethepassword,dothefollowing:
1.IntheEnterCurrentPasswordeld,typethecurrentsupervisorpassword.
2.IntheEnterNewPasswordeld,typethenewsupervisorpassword;thenretypethepasswordyoujust
enteredtoverifyitintheConrmNewPasswordeld.
96UserGuide

3.Followstep11andstep12abovein“Settingasupervisorpassword”onpage96tochangeyour
supervisorpassword.
Toremovethepassword,dothefollowing:
1.IntheEnterCurrentPasswordeld,typethecurrentsupervisorpassword.
2.LeavetheEnterNewPasswordandConrmNewPasswordeldsinblank.
3.Followstep11andstep12abovein“Settingasupervisorpassword”onpage96toremoveyour
supervisorpassword.
Harddisksecurity
Yourcomputersupportsanenhancedsecuritysolutionforsolidstatedriveorharddiskdrive.Toprotect
passwordsfromunauthorizedsecurityattacks,severalofthelatesttechnologiesandalgorithmsare
integratedintoUEFIBIOSandhardwaredesignofThinkPadnotebooks.
Tomaximizesecurity,dothefollowing:
1.Setapower-onpasswordaswellasaharddiskpasswordforyourinternalsolidstatedriveorharddisk
drive.Refertotheproceduresin“Power-onpassword”onpage92and“Harddiskpasswords”onpage
93.Forsecurity,alongerpasswordisrecommended.
2.ToprovidereliablesecurityforUEFIBIOS,usethesecuritychipandasecurityapplicationwithaTrusted
PlatformModulemanagementfeature.Referto“Settingthesecuritychip”onpage98.
Note:MicrosoftWindows7andWindowsVistasupportTPMmanagementfeature.
3.Ifa“DiskEncryptionharddiskdriveandEncryptionsolidstatedrive”onpage98isinstalledinyour
computer,besuretoprotectthecontentsofyourcomputermemoryfromunauthorizedaccessbyuse
ofdriveencryptionsoftware,suchasMicrosoftWindowsBitLocker®DriveEncryptioninWindows7and
WindowsVista.Referto“UsingWindowsBitLockerDriveEncryption”onpage97.
4.Beforeyoudisposeof,sell,orhandoveryourcomputer,makesuretodeletedatastoredonit.Referto
“Noticeondeletingdatafromyourharddiskdriveorsolidstatedrive”onpage107.
Notes:Thefollowingdrive(s)canbeprotectedbyUEFIBIOS:
•Theharddiskdrivebuiltintoyourcomputer.
UsingWindowsBitLockerDriveEncryption
Tohelpprotectyourcomputerfrombeingsubjecttounauthorizedaccess,besuretousedriveencryption
software,suchasWindowsBitLockerDriveEncryption.
WindowsBitLockerDriveEncryptionisanintegralsecurityfeatureofWindows7andWindowsVista.Itis
supportedinUltimateandEnterpriseeditionsofWindows7andWindowsVista.Itcanhelpyouprotectthe
operatingsystemanddatastoredinyourcomputerdata,evenifyourcomputerislostorstolen.BitLocker
worksbyencryptingalluserandsystemles,includingtheswapandhibernationles.
BitLockerusesaTrustedPlatformModuletoprovideenhancedprotectionforyourdataandtoensureearly
bootcomponentintegrity.AcompatibleTPMisdenedasaV1.2TPM.
TochecktheBitLockerstatus,clickStart➙ControlPanel➙SystemandSecurity(inWindowsVista,
Security)➙BitLockerDriveEncryption.
FordetailsaboutWindowsBitLockerDriveEncryption,gototheHelpandSupportforWindows7or
WindowsVista,orsearchfor“MicrosoftWindowsBitLockerDriveEncryptionStep-by-StepGuide”on
Microsoftwebsite.
Chapter4.Security97

DiskEncryptionharddiskdriveandEncryptionsolidstatedrive
SomemodelscontaintheDiskEncryptionharddiskdriveorEncryptionsolidstatedrive.Thisfeature
helpstoprotectyourcomputeragainstsecurityattacksonmedia,NANDashordevicecontrollersbyuse
ofahardwareencryptionchip.Fortheefcientuseoftheencryptionfeature,besuretosetaHarddisk
passwordsfortheinternalstoragedevice.
Settingthesecuritychip
Strictsecurityrequirementsareimposedonnetworkclientcomputersthattransfercondentialinformation
electronically.Dependingontheoptionsyouordered,yourcomputermighthaveanembeddedsecuritychip,
acryptographicmicroprocessor.WiththesecuritychipandClientSecuritySolution,youcandothefollowing:
•Protectyourdataandsystem
•Strengthenaccesscontrols
•Securecommunications
SettingtheSecurityChip
ThechoicesofferedintheSecurityChipsubmenuundertheSecuritymenuoftheThinkPadSetupare
asfollows:
•SecurityChip:activates,inactivates,ordisablestheSecurityChip.
•SecurityReportingOptions:enablesordisableseachSecurityReportingOption.
•ClearSecurityChip:clearstheencryptionkey.
Notes:
1.BesurethattheSupervisorpasswordhasbeensetintheThinkPadSetup.Otherwiseanyonecan
changethesettingsfortheSecurityChip.
2.IfyouareusingClientSecuritySolution,handletheSecurityChipasfollows:
•DonotcleartheSecurityChip.Ifyoudo,thefunctionsassignedtothekeyswillbeerased.
•DonotdisabletheSecurityChip.Ifyoudo,ClientSecuritySolutionwillnotwork.
3.IftheSecurityChipisremovedorreplaced,oranewonehasbeenadded,thecomputerwillnotstart.
Youwillhear4cyclesof4beepseach,oryouseeerrormessage0176or0192.
4.IftheSecurityChipisinactiveordisabled,ClearSecurityChipwillnotbedisplayed.
5.WhenyoucleartheSecuritychip,besuretoturnyourcomputeroffandthenturnitonagainafteryou
settheSecuritychiptoActive.Otherwise,thechoiceofClearSecurityChipisnotdisplayed.
TosetanitemintheSecurityChipsubmenu:
1.Printtheseinstructions.TosettheSecurityChip,youmustturnyourcomputeroffandthenonagain.
2.Saveallopenles,andexitallapplications.
3.Turnyourcomputeroffandthenturnitonagain.
4.Whenthelogoscreenisdisplayed,pressF1.TheThinkPadSetupopens.
5.Usingthecursorkeys,movetoSecurity.TheSecuritymenuopens.
6.Usingthecursorkeys,movetoSecurityChip,andpressEnter.TheSecurityChipsubmenuopens.
7.Usingthecursorkeys,movetoanitemyouwanttoset.Whentheitemyouwantishighlighted,press
Enter.
8.Settheitemsyouwanttoset.
9.PressF10toexit.
98UserGuide

10.ClickYesintheSetupConrmationwindow.
TosettheSecurityChip,youhavetoopentheClientSecuritySolution,andfollowtheinstructionson
thescreen.
Note:IfyourcomputerisaWindows7model,ClientSecuritySolutionisnotpreinstalledonyoursystem.To
congurethesecuritychip,youneedtodownloadthelatestversionofClientSecuritySolutionfromthe
LenovoWebsite.TodownloadClientSecuritySolution,goto:http://www.lenovo.com/support.Then
followtheinstructionsonthescreen.
Usingangerprintreader
Thissectionintroduceshowtouseangerprintreaderinyourcomputer.
UsingangerprintreaderinThinkPadX220andX220i
Dependingontheoptionsyouordered,yourcomputermayhaveanintegratedngerprintreader.By
enrollingyourngerprintandassociatingitwithapower-onpassword,aharddiskpassword,orboth
passwordsbeforehand,youcanstartthecomputer,logontothesystem,andentertheThinkPadSetupby
swipingyourngeroverthereader,withouttypingapassword.Thusngerprintauthenticationcanreplace
passwordsandenablesimpleandsecureuseraccess.
Formoreadvancedsecurity,ClientSecuritySolutioncanbeinstalled.Thesoftwareiscompatiblewitha
varietyofuserauthenticationmechanisms,suchasthoseinvolvingngerprintauthentication.Thisngerprint
readercanworkwiththesoftware.
Note:IfyourcomputerisaWindows7model,ClientSecuritySolutionisnotpreinstalledonit.
Enrollingyourngerprint
1.Turnonyourcomputer.
2.TostartLenovoFingerprintsoftware,referto“FingerprintSoftware”onpage36.
3.Followtheinstructionsonthescreentoenrollyourngerprint.Fordetails,refertotheHelpforthe
program.
Chapter4.Security99
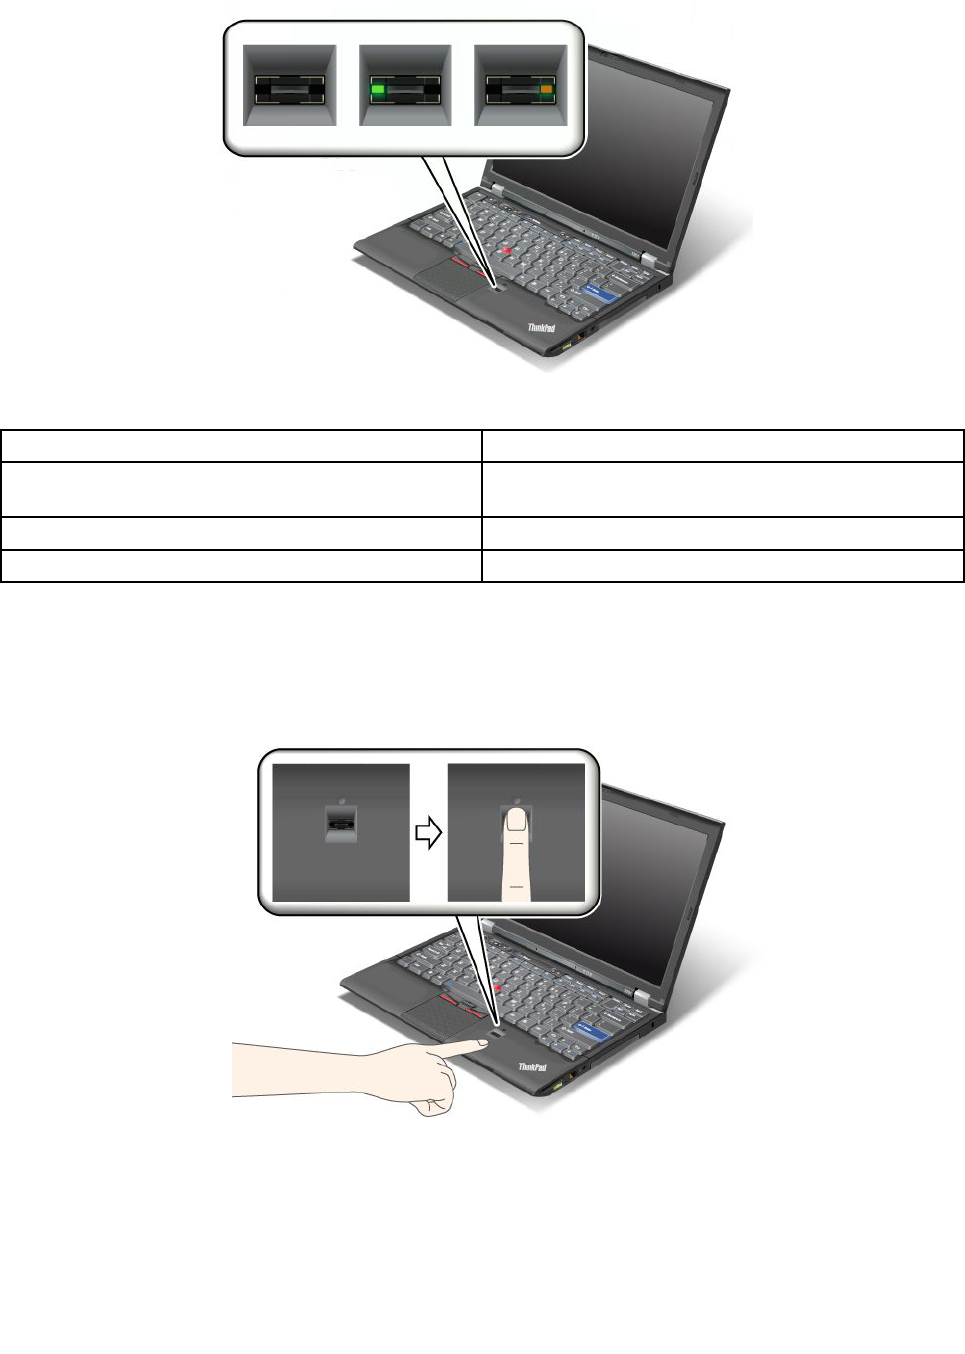
LEDbehaviorofthengerprintreader
Table4.LEDbehaviorlist_ngerprintreader
IndicatorDescription
LEDblinksgreen.Thengerprintisbeingauthenticatedorhasbeen
authenticated.
LEDissolidgreen.Thengerprintreaderisreadytoswipe.
LEDblinksamber.Thengerprintcouldnotbeauthenticated.
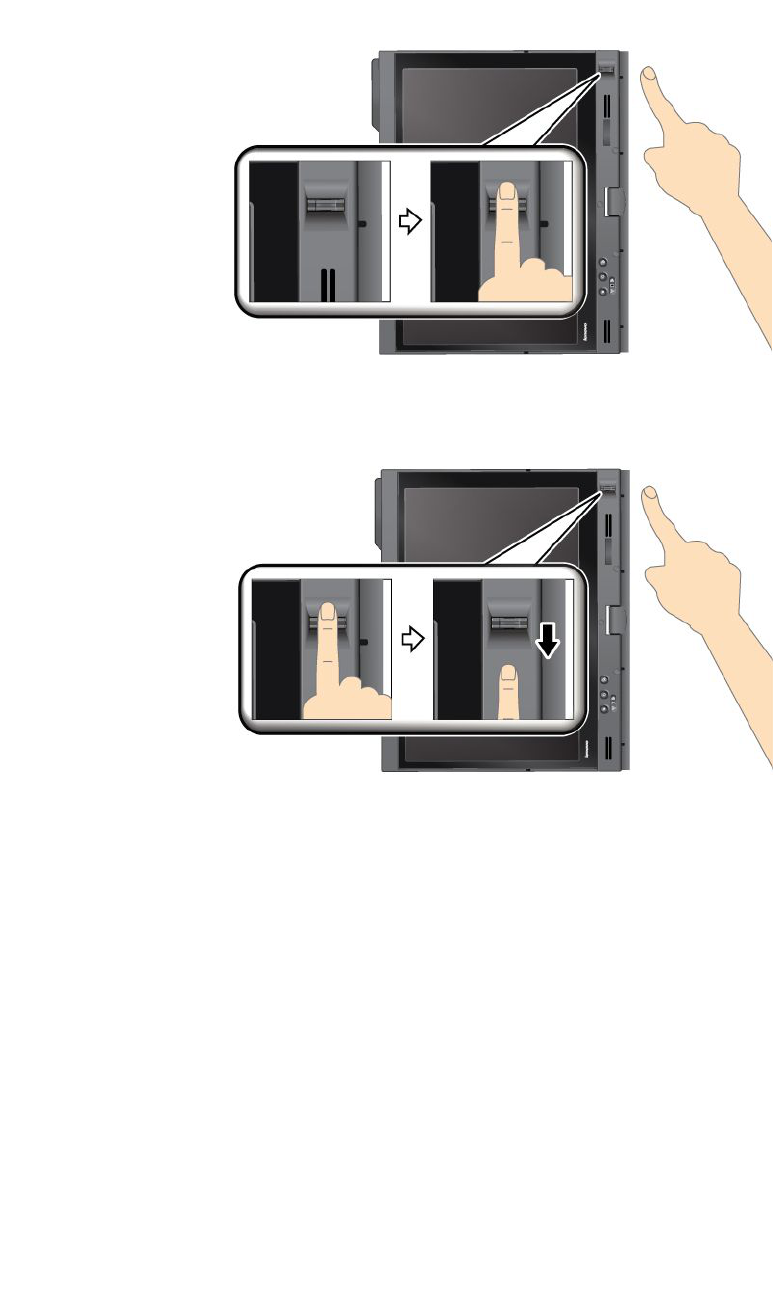
Swipingyourngeroverthereader
Toswipeyourngeroverthereader,doasfollows:
1.Placetheballofyournger—thatis,thecentralpartofthengerprint—onthesmallcircleabovethe
reader.Makesurethattheentiretopjointofthengerisonthereader.
100UserGuide

2.Applylightpressureandswipeyourngeracrossthereaderinonesmoothmotion.
Loggingontothesystem
Afteryouenrollyourngerprint,logontothesystemasfollows:
1.SetaPower-onpasswordoraHarddisksecurity,orboth.
2.Turnyourcomputeroffandthenonagain.
3.Whenprompted,swipeyourngeroverthereader.
4.Onrequest,typeyourpower-onpassword,yourharddiskpassword,orboth.Theenrolledngerprintis
nowassociatedwithyourpower-onpassword,yourharddiskpassword,orboth.
Thenexttimeyoustartthecomputer,youcanlogontothesystembyswipingyourngeroverthe
readeronce.
Attention:Ifyoualwaysuseyourngerprinttologontothesystem,youmayforgetyourpassword.Write
downyourpassword,andkeepitinasafeplace.Ifyouforgetitandforsomereasonyoucannotswipeyour
ngeracrossthereader—forexample,ifyouinjurethatnger—youcannotstartthecomputerorchangethe
password.Ifyouforgetyourpower-onpassword,youmusttakeyourcomputertoaLenovoauthorized
serviceroramarketingrepresentativetohavethepasswordcanceled.Ifyouforgetyourharddiskpassword,
Lenovocannotresetyourpasswordorrecoverdatafromtheharddisk.Youmusttakeyourcomputerto
aLenovoauthorizedserviceroramarketingrepresentativetohavetheharddiskdrivereplaced.Proofof
purchaseisrequired,andafeewillbechargedforpartsandservice.
Settingthengerprintreader
Ifyouwanttochangethesettingsofthengerprintreader,followtheprocedurebelow.
ThengerprintsubmenuundertheSecuritymenuoftheThinkPadSetupoffersthefollowingchoices:
•PredesktopAuthentication:Enablesordisablesngerprintauthenticationbeforetheoperatingsystem
isloaded.
•ReaderPriority:Denesthepriorityforngerprintreadersifanexternalngerprintreaderisattached.
•SecurityMode:Speciesthesettingsofthesecuritymode.
•PasswordAuthentication:Enablesordisablespasswordauthentication.
Note:ThisitemappearsifHighsecuritymodeisselected.
•ResetFingerprintData:Bychoosingthisitem,youeraseallofthengerprintdatastoredineitherthe
internalorexternalngerprintreader.
Chapter4.Security101

Tosetaniteminthengerprintsubmenu:
1.Printtheseinstructions.Tocongurethengerprintreader,youmustturnyourcomputeroffand
thenonagain.
2.Saveallopenles,andexitallapplications.
3.Turnyourcomputeroffandthenonagain.
4.Whenthelogoscreenisdisplayed,pressF1.TheThinkPadSetupopens.
5.Usingthecursorkeys,movetoSecurity,andpressEnter.TheSecuritymenuopens.
6.Usingthecursorkeys,movetoFingerprint,andpressEnter.TheFingerprintsubmenuopens.
7.Usingthecursorkeys,movetoanitemyouwanttoset.Whenthatitemishighlighted,pressEnter.
8.Settheitemsyouwanttoset.
9.PressF10toexit.
10.IntheSetupConrmationwindow,selectY es.
Careforthengerprintreader
Thefollowingactionscoulddamagethengerprintreaderorcauseitnottoworkproperly:
•Scratchingthesurfaceofthereaderwithahard,pointedobject.
•Scrapingthesurfaceofthereaderwithyourngernailoranythinghard.
•Usingortouchingthereaderwithadirtynger.
Ifyounoticeanyofthefollowingconditions,gentlycleanthesurfaceofthereaderwithadry,soft,lint-free
cloth:
•Thesurfaceofthereaderisdirtyorstained.
•Thesurfaceofthereaderiswet.
•Thereaderoftenfailstoenrollorauthenticateyourngerprint.
Ifyourngerhasanyofthefollowingconditions,youmaynotbeabletoregisterorauthenticateit:
•Yourngeriswrinkled.
•Yourngerisrough,dry,orinjured.
•Yourngerisverydry.
•Yourngerisstainedwithdirt,mud,oroil.
•Thesurfaceofyourngerisverydifferentfromwhenyouenrolledyourngerprint.
•Yourngeriswet.
•Angerisusedthathasnotbeenenrolled.
Toimprovethesituation,trythefollowing:
•Cleanorwipeyourhandstoremoveanyexcessdirtormoisturefromthengers.
•Enrollanduseadifferentngerforauthentication.
•Ifyourhandsaretoodry,applylotiontothem.
UsingangerprintreaderinThinkPadX220T ableandX220iTablet
Dependingontheoptionsyouordered,yourcomputermayhaveanintegratedngerprintreader.By
enrollingyourngerprintandassociatingitwithapower-onpassword,aharddiskpassword,orboth
passwordsbeforehand,youcanstartthecomputer,logontothesystem,andentertheThinkPadSetupby
102UserGuide
swipingyourngeroverthereader,withouttypingapassword.Thusngerprintauthenticationcanreplace
passwordsandenablesimpleandsecureuseraccess.
Formoreadvancedsecurity,ClientSecuritySolutioncanbeinstalled.Thesoftwareiscompatiblewitha
varietyofuserauthenticationmechanisms,suchasthoseinvolvingngerprintauthentication.Thisngerprint
readercanworkwiththesoftware.
Note:IfyourcomputerisaWindows7model,ClientSecuritySolutionisnotpreinstalledonit.
Enrollingyourngerprint
1.Turnonyourcomputer.
2.TostartLenovoFingerprintsoftware,referto“FingerprintSoftware”onpage36.
3.Followtheinstructionsonthescreentoenrollyourngerprint.Fordetails,refertotheHelpforthe
program.
LEDbehaviorofthengerprintreader
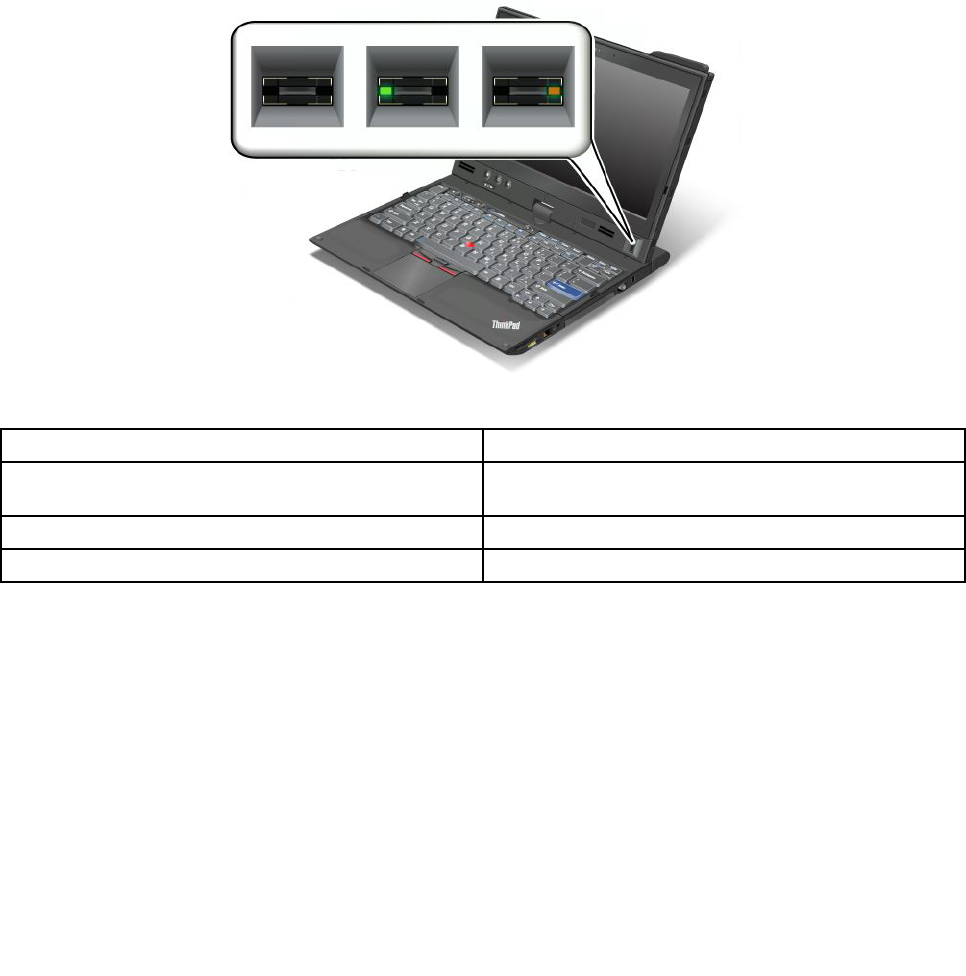
Table5.LEDbehaviorlist_ngerprintreader
IndicatorDescription
LEDblinksgreen.Thengerprintisbeingauthenticatedorhasbeen
authenticated.
LEDissolidgreen.Thengerprintreaderisreadytoswipe.
LEDblinksamber.Thengerprintcouldnotbeauthenticated.
Swipingyourngeroverthereader
Toswipeyourngeroverthereaderinnotebookmode,doasfollows:
Chapter4.Security103
1.Placetheballofyournger—thatis,thecentralpartofthengerprint—onthesmallcircleabovethe
reader.Makesurethattheentiretopjointofthengerisonthereader.
2.Applylightpressureandswipeyourngeracrossthereaderinonesmoothmotion.
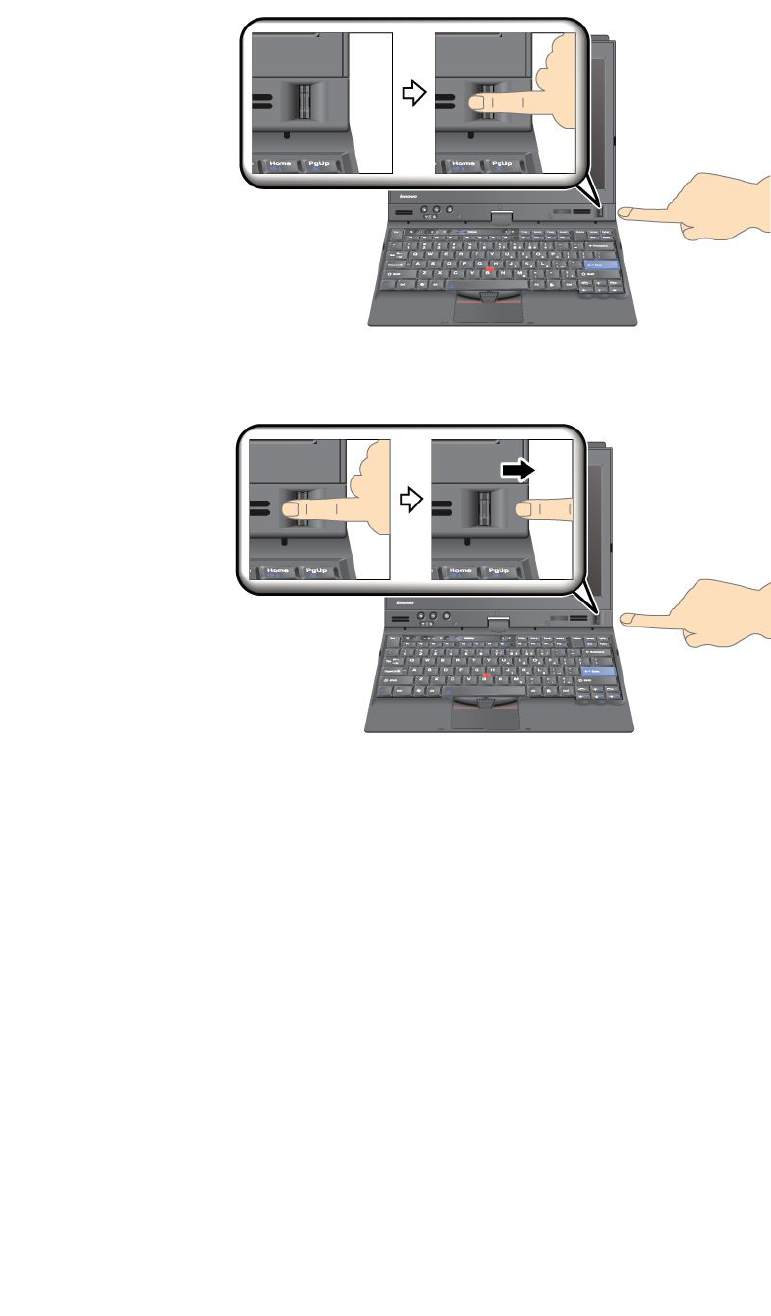
Toswipeyourngeroverthereaderintabletmode,doasfollows:
104UserGuide
1.Placetheballofyournger—thatis,thecentralpartofthengerprint—onthesmallcircleabovethe
reader.Makesurethattheentiretopjointofthengerisonthereader.
2.Applylightpressureandswipeyourngeracrossthereaderinonesmoothmotion.
Loggingontothesystem
Afteryouenrollyourngerprint,logontothesystemasfollows:
1.SetaPower-onpasswordoraHarddisksecurity,orboth.
2.Turnyourcomputeroffandthenonagain.
3.Whenprompted,swipeyourngeroverthereader.
4.Onrequest,typeyourpower-onpassword,yourharddiskpassword,orboth.Theenrolledngerprintis
nowassociatedwithyourpower-onpassword,yourharddiskpassword,orboth.
Thenexttimeyoustartthecomputer,youcanlogontothesystembyswipingyourngeroverthe
readeronce.
Attention:Ifyoualwaysuseyourngerprinttologontothesystem,youmayforgetyourpassword.Write
downyourpassword,andkeepitinasafeplace.Ifyouforgetitandforsomereasonyoucannotswipeyour
ngeracrossthereader—forexample,ifyouinjurethatnger—youcannotstartthecomputerorchange
thepassword.Ifyouforgetyourpower-onpassword,youmusttakeyourcomputertoaLenovoauthorized
serviceroramarketingrepresentativetohavethepasswordcanceled.
Chapter4.Security105

Ifyouforgetyourharddiskpassword,Lenovocannotresetyourpasswordorrecoverdatafromthehard
disk.YoumusttakeyourcomputertoaLenovoauthorizedserviceroramarketingrepresentativetohavethe
harddiskdrivereplaced.Proofofpurchaseisrequired,andafeewillbechargedforpartsandservice.
Settingthengerprintreader
Ifyouwanttochangethesettingsofthengerprintreader,followtheprocedurebelow.
ThengerprintsubmenuundertheSecuritymenuoftheThinkPadSetupoffersthefollowingchoices:
•PredesktopAuthentication:Enablesordisablesngerprintauthenticationbeforetheoperatingsystem
isloaded.
•ReaderPriority:Denesthepriorityforngerprintreadersifanexternalngerprintreaderisattached.
•SecurityMode:Speciesthesettingsofthesecuritymode.
•PasswordAuthentication:Enablesordisablespasswordauthentication.
Note:ThisitemappearsifHighsecuritymodeisselected.
•ResetFingerprintData:Bychoosingthisitem,youeraseallofthengerprintdatastoredineitherthe
internalorexternalngerprintreader.
Tosetaniteminthengerprintsubmenu:
1.Printtheseinstructions.Tocongurethengerprintreader,youmustturnyourcomputeroffand
thenonagain.
2.Saveallopenles,andexitallapplications.
3.Turnyourcomputeroffandthenonagain.
4.Whenthelogoscreenisdisplayed,pressF1.TheThinkPadSetupopens.
5.Usingthecursorkeys,movetoSecurity,andpressEnter.TheSecuritymenuopens.
6.Usingthecursorkeys,movetoFingerprint,andpressEnter.TheFingerprintsubmenuopens.
7.Usingthecursorkeys,movetoanitemyouwanttoset.Whenthatitemishighlighted,pressEnter.
8.Settheitemsyouwanttoset.
9.PressF10toexit.
10.IntheSetupConrmationwindow,selectY es.
Careforthengerprintreader
Thefollowingactionscoulddamagethengerprintreaderorcauseitnottoworkproperly:
•Scratchingthesurfaceofthereaderwithahard,pointedobject.
•Scrapingthesurfaceofthereaderwithyourngernailoranythinghard.
•Usingortouchingthereaderwithadirtynger.
Ifyounoticeanyofthefollowingconditions,gentlycleanthesurfaceofthereaderwithadry,soft,lint-free
cloth:
•Thesurfaceofthereaderisdirtyorstained.
•Thesurfaceofthereaderiswet.
•Thereaderoftenfailstoenrollorauthenticateyourngerprint.
Ifyourngerhasanyofthefollowingconditions,youmaynotbeabletoregisterorauthenticateit:
•Yourngeriswrinkled.
•Yourngerisrough,dry,orinjured.
106UserGuide

•Yourngerisverydry.
•Yourngerisstainedwithdirt,mud,oroil.
•Thesurfaceofyourngerisverydifferentfromwhenyouenrolledyourngerprint.
•Yourngeriswet.
•Angerisusedthathasnotbeenenrolled.
Toimprovethesituation,trythefollowing:
•Cleanorwipeyourhandstoremoveanyexcessdirtormoisturefromthengers.
•Enrollanduseadifferentngerforauthentication.
•Ifyourhandsaretoodry,applylotiontothem.
Noticeondeletingdatafromyourharddiskdriveorsolidstatedrive
Ascomputersspreadintoeverycorneroflife,theyprocessmoreandmoreinformation.Thedataonyour
computer,someofwhichissensitive,isstoredonastoragedevice,eitheraharddiskdriveorsolidstate
drive.Beforeyoudisposeof,sell,orhandoveryourcomputer,makesuretodeletedatastoredonit.
Handingyourcomputerovertosomeoneelsewithoutdeletingtheloadedsoftware,suchasoperating
systemsandapplicationsoftware,mayevenviolateLicenseAgreements.Youareadvisedtocheckthe
termsandconditionsofthoseAgreements.
Therearemethodsthatseemtodeletethedata:
•Movethedatatotherecyclebin,andthenchoosetheEmptyrecyclebincommand.
•UsetheDeletecommand.
•Formatyourharddiskdriveorsolidstatedrive,usingthesoftwareforinitializingit.
•Usingtherecoveryprogram,providedbyLenovo,bringtheharddiskdriveorthesolidstatedriveback
tofactory-shipstate.
Theseoperations,however,onlychangetheleallocationofthedata;theydonotdeletethedataitself.In
otherwords,thedataretrievalprocessingisdisabledunderanoperatingsystemsuchasWindows.The
dataisstillthere,eventhoughitseemstobelost.Thus,itissometimespossibletoreadthedatabyuseof
specialsoftwarefordatarecovery.Thereisariskthatpeopleofbadfaithmayreadandmisusethecritical
dataonharddiskdrivesorsolidstatedrivesforunexpectedpurposes.
Topreventleakageofdata,itbecomesveryimportantthatyoutakeresponsibilityfordeletingallthedata
fromtheharddiskdriveorsolidstatedrivewhenyoudisposeof,sell,orhandoveryourcomputer.Youcan
destroythedataphysicallybysmashingtheharddiskdrivewithahammer,ormagneticallybymeansof
strongmagneticpower,thusmakingthedataunreadable.Butwerecommendthatyoumakeuseofthe
software(payware)orservice(payservice)specicallydevelopedforthepurpose.
Fordisposingofdataontheharddiskdrive,LenovoprovidessuchsoftwareasPCDoctorforDOSandthe
SecureDataDisposaltool.Softwareprovidestheinterfaceforfullerasureofthecontentsofaharddisk.To
downloadeitherapplication,gototheLenovoWebsiteat:
http://www.lenovo.com/support
Note:Runningtheapplicationwilltakeacoupleofhours.
IfEncryptionsolidstatedriveorDiskEncryptionharddiskdriveissupportedandinstalledinyourcomputer,
youcanlogicallydisposeofallthedataonadeviceinaveryshorttimebyerasingthecryptographickey.
Thedataencryptedwiththeoldkeyisnotphysicallyerasedbutremainsonthedisk;however,itcannotbe
Chapter4.Security107

decryptedwithouttheoldkey.ThisfeatureisenabledbytheThinkPadSetupMenuExtensionUtilityandis
availableasamenuitemintheThinkPadSetup.
Usingandunderstandingrewalls
Ifyoursystemispreintalledwitharewallprogram,itprotectsagainstcomputerInternetsecuritythreats,
unauthorizedaccess,intrusions,andInternetattacks.Italsoprotectsyourprivacy.
Formoreinformationabouthowtousetherewallprogram,refertotheon-linehelpthatcomeswith
theprogram.
Protectingdataagainstviruses
Yourcomputerispreinstalledwithanantivirusprogramsoyoucandetectandeliminateviruses.The
antivirusprogramisdesignedtohelpyoudetectandeliminateviruses.
Lenovoprovidesafullversionofantivirussoftwareonyourcomputerwithafree30-daysubscription.After
30days,youmustrenewthelicensetocontinuereceivingtheantivirussoftwareupdates.
Formoreinformationabouthowtouseyourantivirussoftware,refertothehelpsystemofyourantivirus
software.
108UserGuide

Chapter5.Recoveryoverview
ThischapterprovidesinformationabouttherecoverysolutionsprovidedbyLenovo.
Thischaptercontainsthefollowingtopics:
•“Creatingandusingrecoverymedia”onpage109
•“Performingbackupandrecoveryoperations”onpage111
•“UsingtheRescueandRecoveryworkspace”onpage112
•“Creatingandusingarescuemedium”onpage113
•“Reinstallingpreinstalledapplicationsanddevicedrivers”onpage114
•“Solvingrecoveryproblems”onpage115
Notes:
1.Thereareavarietyofmethodstochoosefromwhenconsideringhowtorecoverintheeventofa
software-orhardware-relatedproblem.Somemethodsvarydependingonthetypeofyouroperating
system.
2.Theproductontherecoverymediamaybeusedonlyforthefollowingpurposes:
•Restoretheproductpreinstalledonyourcomputer
•Reinstalltheproduct
•ModifytheproductusingtheAdditionalFiles
Notes:Topreventpotentialperformancerisksorunexpectedbehaviorthatmightbecausedbythenew
harddiskdrivetechnology,itisrecommendedthatyouuseoneofthefollowingback-upsoftwareprograms:
•ThinkVantageRescueandRecoveryversion4.23orlater(forWindowsXPandWindowsVista),4.3or
later(forWindows7)
•SymantecNortonGhostversion15orlater
Notes:Tousethisprogram,dothefollowing:
1.ClickStart➙Run.TheRunwindowopens.
2.Typecmdintheeld.ThenclickOK.
3.Typeghost-align=1mbandpressEnter.
•AcronisTrueImage2010orlater
•ParagonBackup&Recovery10Suitorlater,ParagonBackup&Recovery10Homeorlater
Creatingandusingrecoverymedia
Youcanuserecoverymediatorestoretheharddiskdrivetothefactorydefaultsettings.Recoverymedia
areusefulifyoutransferthecomputertoanotherarea,sellthecomputer,recyclethecomputer,orputthe
computerinanoperationalstateafterallothermethodsofrecoveryhavefailed.Asaprecautionarymeasure,
itisimportanttocreaterecoverymediaasearlyaspossible.
Note:Therecoveryoperationsyoucanperformusingrecoverymediavarydependingontheoperating
systemfromwhichtherecoverymediawerecreated.Therecoverymediamightcontainabootmedium
andadatamedium.YourMicrosoftWindowslicensepermitsyoutocreateonlyonedatamedium,soitis
importantthatyoustoretherecoverymediainasafeplaceafteryouhavemadethem.
©CopyrightLenovo2011109

Creatingrecoverymedia
ThissectionprovidesinstructionsonhowtocreaterecoverymediaontheWindows7operatingsystem.
Note:OntheWindows7operatingsystem,youcancreaterecoverymediausingdiscsorexternalUSB
storagedevices.OntheWindowsVistaandWindowsXPoperatingsystems,youcancreaterecoverymedia
usingonlydiscs,sothisoperationisalsocalled“creatingProductRecoverydiscs.”
•TocreaterecoverymediaontheWindows7operatingsystem,clickStart➙AllPrograms➙Lenovo
ThinkVantageTools➙FactoryRecoveryDisks.Then,followtheinstructionsonthescreen.
•TocreateProductRecoverydiscsontheWindowsVistaoperatingsystem,clickStart➙AllPrograms➙
ThinkVantage➙CreateProductRecoveryMedia.Then,followtheinstructionsonthescreen.
•TocreateProductRecoverydiscsontheWindowsXPoperatingsystem,clickStart➙AllPrograms➙
ThinkVantage➙CreateRecoveryMedia.Then,followtheinstructionsonthescreen.
Usingrecoverymedia
Thissectionprovidesinstructionsonhowtouserecoverymediaondifferentoperatingsystems.
•OntheWindows7operatingsystemandtheWindowsVistaoperatingsystem,youcanuserecovery
mediatorestorethecomputertothefactorydefaultsettingsonly.Youcanuserecoverymediatoputthe
computerinanoperationalstateafterallothermethodsofrecoveryhavefailed.
Attention:Whenyouuserecoverymediatorestorethecomputertothefactorydefaultsettings,allthe
lescurrentlyontheharddiskdrivewillbedeletedandreplacedbythefactorydefaultsettings.
TouserecoverymediaontheWindows7operatingsystemortheWindowsVistaoperatingsystem,
dothefollowing:
1.Dependingonthetypeofyourrecoverymedia,connectthebootmedium(memorykeyorotherUSB
storagedevice)tothecomputer,orinsertthebootdiscintotheopticaldrive.
2.RepeatedlypressandreleasetheF12keywhenturningonthecomputer.WhentheStartupDevice
Menuopens,releasetheF12key.
3.SelectthedesiredstartupdeviceandpressEnter.Therestoreprocessbegins.
4.Followtheinstructionsonthescreentocompletetheoperation.
Notes:
1.Afterrestoringyourcomputertothefactorydefaultsettings,youmighthavetoreinstalldevicedrivers
forsomedevices.See“Reinstallingpreinstalledapplicationsanddevicedrivers”onpage114.
2.SomecomputerscomewithMicrosoftOfceorMicrosoftWorkspreinstalled.Ifyouneedtorecover
orreinstallyourMicrosoftOfceorMicrosoftWorksapplications,youmustusetheMicrosoftOfce
CDorMicrosoftWorksCD.ThesediscsareprovidedonlywithcomputerspreinstalledwithMicrosoft
OfceorMicrosoftWorks.
•OntheWindowsXPoperatingsystem,youcanuseProductRecoverydiscstorestoreyourcomputerto
thefactorydefaultsettings,performacustomfactoryrecovery,orperformotherrescueandrecovery
operationssuchasrescuingindividualles.YouwillbegiventheoptiontoentertheRescueandRecovery
workspaceandchoosefromavarietyofrecoveryoperations.
Attention:WhenyouuseProductRecoverydiscstorestorethecomputertothefactorydefaultsettings,
allthelescurrentlyontheharddiskdrivewillbedeletedandreplacedbythefactorydefaultsettings.
Duringtherestoreprocess,youwillbegiventheoptiontosaveoneormorelescurrentlyonthehard
diskdrivetoothermediabeforethedataisdeleted.
TouseProductRecoverydiscsontheWindowsXPoperatingsystem,dothefollowing:
110UserGuide

1.RepeatedlypressandreleasetheF12keywhenturningonthecomputer.WhentheStartupDevice
Menuopens,releasetheF12key.
2.Insertthebootdiscintotheopticaldrive.
3.SelecttheopticaldrivewiththebootdiscasthestartupdeviceandpressEnter.Afterashortdelay,
theRescueandRecoveryworkspaceopens.
4.OntheRescueandRecoverymenu,clickRestoreyoursystem.
5.Followtheinstructionsonthescreen.InserttheappropriateProductRecoverydiscwhenprompted.
Performingbackupandrecoveryoperations
TheRescueandRecoveryprogramenablesyoutobackupallyourharddiskdrivecontentsincludingthe
operatingsystem,datales,softwareprograms,andpersonalsettings.Youcandesignatewherethe
RescueandRecoveryprogramstoresthebackup:
•Inaprotectedareaofyourharddiskdrive
•Onthesecondaryharddiskdriveifasecondaryharddiskdriveisinstalledinyourcomputer
•OnanattachedexternalUSBharddiskdrive
•Onanetworkdrive
•Onrecordablediscs(arecordableopticaldriveisrequiredforthisoption)
Afteryouhavebackedupthecontentsontheharddiskdrive,youcanrestorethecompletecontentsofthe
harddiskdrive,restoreonlytheselectedles,orrestoreonlytheWindowsoperatingsystemandapplications.
Performingabackupoperation
ThissectionprovidesinstructionsonhowtoperformabackupoperationusingtheRescueandRecovery
programondifferentoperatingsystems.
•ToperformabackupoperationusingtheRescueandRecoveryprogramontheWindows7operating
system,dothefollowing:
1.FromtheWindowsdesktop,clickStart➙AllPrograms➙LenovoThinkVantageT ools➙
EnhancedBackupandRestore.TheRescueandRecoveryprogramopens.
2.IntheRescueandRecoverymainwindow,clicktheLaunchadvancedRescueandRecoveryarrow.
3.ClickBackupyourharddriveandselectbackupoperationoptions.Then,followtheinstructionson
thescreentocompletethebackupoperation.
•ToperformabackupoperationusingtheRescueandRecoveryprogramontheWindowsVistaoperating
systemortheWindowsXPoperatingsystem,dothefollowing:
1.FromtheWindowsdesktop,clickStart➙AllPrograms➙ThinkVantage➙RescueandRecovery.
TheRescueandRecoveryprogramopens.
2.IntheRescueandRecoverymainwindow,clickLaunchadvancedRescueandRecovery➙Back
upyourharddrive,andselectbackupoperationoptions.
3.Followtheinstructionsonthescreentocompletethebackupoperation.
Performingarecoveryoperation
ThissectionprovidesinstructionsonhowtoperformarecoveryoperationusingtheRescueandRecovery
programondifferentoperatingsystems.
•ToperformarecoveryoperationusingtheRescueandRecoveryprogramontheWindows7operating
system,dothefollowing:
Chapter5.Recoveryoverview111

1.FromtheWindowsdesktop,clickStart➙AllPrograms➙LenovoThinkVantageT ools➙
EnhancedBackupandRestore.TheRescueandRecoveryprogramopens.
2.IntheRescueandRecoverymainwindow,clicktheLaunchadvancedRescueandRecoveryarrow.
3.ClicktheRestoreyoursystemfromabackupicon.
4.Followtheinstructionsonthescreentocompletetherecoveryoperation.
•ToperformarecoveryoperationusingtheRescueandRecoveryprogramontheWindowsVistaoperating
systemortheWindowsXPoperatingsystem,dothefollowing:
1.FromtheWindowsdesktop,clickStart➙AllPrograms➙ThinkVantage➙RescueandRecovery.
TheRescueandRecoveryprogramopens.
2.IntheRescueandRecoverymainwindow,clickLaunchadvancedRescueandRecovery.
3.ClicktheRestoreyoursystemfromabackupicon.
4.Followtheinstructionsonthescreentocompletetherecoveryoperation.
FormoreinformationaboutperformingarecoveryoperationfromtheRescueandRecoveryworkspace,see
“UsingtheRescueandRecoveryworkspace”onpage112.
UsingtheRescueandRecoveryworkspace
TheRescueandRecoveryworkspaceresidesinaprotected,hiddenareaofyourharddiskdrivethat
operatesindependentlyfromtheWindowsoperatingsystem.Thisenablesyoutoperformrecovery
operationsevenifyoucannotstarttheWindowsoperatingsystem.Youcanperformthefollowingrecovery
operationsfromtheRescueandRecoveryworkspace:
•RescuelesfromyourharddiskdriveorfromabackupTheRescueandRecoveryworkspace
enablesyoutolocatelesonyourharddiskdriveandtransferthemtoanetworkdriveorotherrecordable
media,suchasaUSBdeviceoradisc.Thissolutionisavailableevenifyoudidnotbackupyourlesorif
changesweremadetothelessinceyourlastbackupoperation.Youcanalsorescueindividuallesfrom
aRescueandRecoverybackuplocatedonyourlocalharddiskdrive,aUSBdevice,oranetworkdrive.
•RestoreyourharddiskdrivefromaRescueandRecoverybackupIfyouhavebackedupyourhard
diskdriveusingtheRescueandRecoveryprogram,youcanrestoretheharddiskdrivefromaRescue
andRecoverybackup,evenifyoucannotstarttheWindowsoperatingsystem.
•RestoreyourharddiskdrivetothefactorydefaultsettingsTheRescueandRecoveryworkspace
enablesyoutorestorethecompletecontentsofyourharddiskdrivetothefactorydefaultsettings.Ifyou
havemultiplepartitionsonyourharddiskdrive,youhavetheoptiontorestorethefactorydefaultsettings
totheC:partitionandleavetheotherpartitionsintact.BecausetheRescueandRecoveryworkspace
operatesindependentlyfromtheWindowsoperatingsystem,youcanrestorethefactorydefaultsettings
evenifyoucannotstarttheWindowsoperatingsystem.
Attention:IfyourestoretheharddiskdrivefromaRescueandRecoverybackuporrestoretheharddisk
drivetothefactorydefaultsettings,alllesontheprimaryharddiskdrivepartition(usuallydriveC:)willbe
deletedintherecoveryprocess.Ifpossible,makecopiesofimportantles.Ifyouareunabletostartthe
Windowsoperatingsystem,youcanusetherescuelesfeatureoftheRescueandRecoveryworkspaceto
copylesfromyourharddiskdrivetoothermedia.
TostarttheRescueandRecoveryworkspace,dothefollowing:
1.Makesurethecomputeristurnedoff.
2.RepeatedlypressandreleasetheF11keywhenturningonthecomputer.Whenyouhearbeepsor
seealogoscreen,releasetheF11key.
3.IfyouhavesetaRescueandRecoverypassword,typeyourpasswordwhenprompted.TheRescue
andRecoveryworkspaceopensafterashortdelay.
112UserGuide

Note:IftheRescueandRecoveryworkspacefailstoopen,see“Solvingrecoveryproblems”on
page115.
4.Dooneofthefollowing:
•Torescuelesfromyourharddiskdriveorfromabackup,clickRescuelesandfollowthe
instructionsonthescreen.
•TorestoreyourharddiskdrivefromaRescueandRecoverybackuportorestoreyourharddiskdrive
tothefactorydefaultsettings,clickRestoreyoursystemandfollowtheinstructionsonthescreen.
FormoreinformationaboutthefeaturesoftheRescueandRecoveryworkspace,clickHelp.
Notes:
1.Afterrestoringyourharddiskdrivetothefactorydefaultsettings,youmighthavetoreinstalldevice
driversforsomedevices.See“Reinstallingpreinstalledapplicationsanddevicedrivers”onpage114.
2.SomecomputerscomewithMicrosoftOfceorMicrosoftWorkspreinstalled.Ifyouneedtorecover
orreinstallyourMicrosoftOfceorMicrosoftWorksapplications,youmustusetheMicrosoftOfce
CDorMicrosoftWorksCD.ThesediscsareprovidedonlywithcomputerspreinstalledwithMicrosoft
OfceorMicrosoftWorks.
Creatingandusingarescuemedium
Witharescuemedium,suchasadiscoraUSBharddiskdrive,youcanrecoverthecomputerfromfailures
thatpreventyoufromgainingaccesstotheRescueandRecoveryworkspaceonyourharddiskdrive.
Notes:
1.Therecoveryoperationsyoucanperformusingarescuemediumvarydependingontheoperating
system.
2.Therescuedisccanbestartedinalltypesofopticaldrives.
Creatingarescuemedium
Thissectionprovidesinstructionsonhowtocreatearescuemediumondifferentoperatingsystems.
•TocreatearescuemediumontheWindows7operatingsystem,dothefollowing:
1.FromtheWindowsdesktop,clickStart➙AllPrograms➙LenovoThinkVantageT ools➙
EnhancedBackupandRestore.TheRescueandRecoveryprogramopens.
2.IntheRescueandRecoverymainwindow,clicktheLaunchadvancedRescueandRecoveryarrow.
3.ClicktheCreateRescueMediaicon.TheCreateRescueandRecoveryMediawindowopens.
4.IntheRescueMediaarea,selectthetypeoftherescuemediumyouwanttocreate.Youcancreate
arescuemediumusingadisc,aUSBharddiskdrive,orasecondaryinternalharddiskdrive.
5.ClickOKandfollowtheinstructionsonthescreentocreatearescuemedium.
•TocreatearescuemediumontheWindowsVistaoperatingsystemortheWindowsXPoperatingsystem,
dothefollowing:
1.FromtheWindowsdesktop,clickStart➙AllPrograms➙ThinkVantage➙CreateRecovery
Media.TheCreateRescueandRecoveryMediawindowopens.
2.IntheRescueMediaarea,selectthetypeoftherescuemediumyouwanttocreate.Youcancreate
arescuemediumusingadisc,aUSBharddiskdrive,orasecondaryinternalharddiskdrive.
3.ClickOKandfollowtheinstructionsonthescreentocreatearescuemedium.
Usingarescuemedium
Thissectionprovidesinstructionsonhowtousetherescuemediumyouhavecreated.
Chapter5.Recoveryoverview113

•Ifyouhavecreatedarescuemediumusingadisc,usethefollowinginstructionstousetherescuemedium:
1.Turnoffyourcomputer.
2.RepeatedlypressandreleasetheF12keywhenturningonthecomputer.WhentheStartupDevice
Menuopens,releasetheF12key.
3.OntheStartupDeviceMenu,selectthedesiredopticaldriveastherstbootdevice.Then,insert
therescuediscintotheopticaldriveandpressEnter.Therescuemediumstarts.
•IfyouhavecreatedarescuemediumusingaUSBharddiskdrive,usethefollowinginstructionsto
usetherescuemedium:
1.AttachtheUSBharddiskdrivetooneoftheUSBconnectorsonyourcomputer.
2.RepeatedlypressandreleasetheF12keywhenturningonthecomputer.WhentheStartupDevice
Menuopens,releasetheF12key.
3.OntheStartupDeviceMenu,selecttheUSBharddiskdriveastherstbootdeviceandpressEnter.
Therescuemediumstarts.
•Ifyouhavecreatedarescuemediumusingthesecondaryinternalharddiskdrive,setthesecondary
internalharddiskdriveastherstbootdeviceinthestartupdevicesequencetostarttherescuemedium.
See“Startupmenu”onpage186.
Whentherescuemediumstarts,theRescueandRecoveryworkspaceopens.Thehelpinformationfor
eachfeatureisavailablefromtheRescueandRecoveryworkspace.Followtheinstructionstocomplete
therecoveryprocess.
Reinstallingpreinstalledapplicationsanddevicedrivers
Yourcomputerhasprovisionsthatenableyoutoreinstallselectedfactory-installedapplicationsanddevice
drivers.
Reinstallingpreinstalledapplications
Toreinstallselectedapplicationprograms,dothefollowing:
1.Turnonyourcomputer.
2.UseWindowsExplorerorComputer(inWindowsXP,MyComputer)todisplaythedirectorystructureof
yourharddisk.
3.OpentheC:\SWTOOLSfolder.
4.OpentheAPPSfolder.Initareseveralsubfoldersnamedforthevariouspreinstalledapplications.
5.Openthesubfolderfortheapplicationyouarereinstalling.
6.Double-clickSetup,andthenfollowtheon-screenstepstoreinstalltheprogram.
Reinstallingpreinstalleddevicedrivers
Attention:Whenyoureinstalldevicedrivers,youarechangingthecurrentcongurationofyourcomputer.
Reinstalldevicedriversonlywhenitisnecessarytocorrectaproblemwithyourcomputer.
Toreinstalladevicedriverforafactory-installeddevice,dothefollowing:
1.Turnonyourcomputer.
2.UseWindowsExplorerorComputer(inWindowsXP,MyComputer)todisplaythedirectorystructureof
yourharddiskdrive.
3.OpentheC:\SWTOOLSfolder.
4.OpentheDRIVERSfolder.WithintheDRIVERSfolderareseveralsubfoldersnamedforthevarious
devicesinstalledinyourcomputer(forexample,AUDIOandVIDEO).
114UserGuide

5.Openthesubfolderforthedevice.
6.Reinstallthedevicedriverusingoneofthefollowingmethods:
•Inthesubfolderforthedevice,lookforatextle(alewiththeextension.txt).Thetextlecontains
informationonhowtoreinstallthatdevicedriver.
-OR-
•Ifthesubfolderforthedevicecontainsaleofsetupinformation(alewiththeextension.inf),you
canusetheAddNewHardwareprogram(intheWindowsControlPanel)toreinstallthedevicedriver.
Notalldevicedriverscanbereinstalledbyuseofthisprogram.IntheAddNewHardwareprogram,
whenpromptedforthedevicedriveryouwanttoinstall,clickHaveDiskandBrowse.Thenselect
thedevicedriverlefromthedevicesubfolder.
-OR-
•Inthesubfolderforthedevice,lookforthelefortheapplication(alewiththeextension.exe).
Double-clickthele,andfollowtheinstructionsonthescreen.
Attention:Ifyouneedupdateddevicedrivers,donotdownloadthemfromtheWindowsUpdateWebsite.
ObtainthemfromLenovo.Formoreinformation,see“Makingsuredevicedriversarecurrent”onpage204.
Solvingrecoveryproblems
IfyouareunabletoaccesstheRescueandRecoveryworkspaceortheWindowsenvironment,doone
ofthefollowing:
•UsearescuemediumtostarttheRescueandRecoveryworkspace.See“Usingarescuemedium”on
page113.
•Userecoverymediaifallothermethodsofrecoveryhavefailedandyouneedtorestoretheharddisk
drivetothefactorydefaultsettings.See“Usingrecoverymedia”onpage110.
Note:IfyouareunabletoaccesstheRescueandRecoveryworkspaceortheWindowsenvironmentfrom
arescuemediumorrecoverymedia,youmightnothavetherescuedevice(aninternalharddiskdrive,a
disc,aUSBharddiskdrive,orotherexternaldevices)setastherstbootdeviceinthestartupdevice
sequence.Youmustrstmakesurethatyourrescuedeviceissetastherstbootdeviceinthestartup
devicesequenceintheSetupUtilityprogram.See“Startupmenu”onpage186fordetailedinformation
abouttemporarilyorpermanentlychangingthestartupdevicesequence.Formoreinformationaboutthe
SetupUtilityprogram,see“ThinkPadSetup”onpage183.
Itisimportanttocreatearescuemediumandasetofrecoverymediaasearlyaspossibleandstorethem
inasafeplaceforfutureuse.
Chapter5.Recoveryoverview115

116UserGuide

Chapter6.Replacingdevices
Youcanincreasethecapacityofthememoryortheharddiskdrivebyreplacingtheoriginal,built-in
devicewithanoptionalone.Or,ifyouneedto,youcanreplacethePCIExpressMiniCardbyfollowing
theproceduresinthissection.
•“Staticelectricityprevention”onpage117
•“Replacingthebattery”onpage118
•“Replacingtheharddiskdrive”onpage127
•“Replacingthekeyboard”onpage120
•“Replacingmemory”onpage145
•“InstallingandreplacingthemSATAsolidstatedrive”onpage143
•“InstallingandreplacingthePCIExpressMiniCardforwirelessLAN/WiMAXconnection”onpage133
•“InstallingandreplacingthePCIExpressMiniCardforwirelessWANconnection”onpage139
•“ReplacingtheSIMcard”onpage148
•“Replacingthesolidstatedrive”onpage130
Staticelectricityprevention
Staticelectricity,althoughharmlesstoyou,canseriouslydamagecomputercomponentsandoptions.
Improperhandlingofstatic-sensitivepartscancausedamagetothepart.Whenyouunpackanoption
orCRU,donotopenthestatic-protectivepackagecontainingthepartuntiltheinstructionsdirectyou
toinstallit.
WhenyouhandleoptionsorCRUs,orperformanyworkinsidethecomputer,takethefollowingprecautions
toavoidstatic-electricitydamage:
•Limityourmovement.Movementcancausestaticelectricitytobuilduparoundyou.
•Alwayshandlecomponentscarefully.Handleadapters,memorymodules,andothercircuitboardsbythe
edges.Nevertouchexposedcircuitry.
•Preventothersfromtouchingcomponents.
•Whenyouinstallastatic-sensitiveoptionorCRU,touchthestatic-protectivepackagecontainingthe
parttoametalexpansion-slotcoverorotherunpaintedmetalsurfaceonthecomputerforatleasttwo
seconds.Thisreducesstaticelectricityinthepackageandyourbody.
•Whenpossible,removethestatic-sensitivepartfromthestatic-protectivepackagingandinstallthepart
withoutsettingitdown.Whenthisisnotpossible,placethestatic-protectivepackagingonasmooth,
levelsurfaceandplacethepartonit.
•Donotplacethepartonthecomputercoverorothermetalsurface.
©CopyrightLenovo2011117

Replacingthebattery
Beforeyoustart,printtheseinstructions.
ThissystemmaynotsupportbatteriesthatarenotgenuineLenovo-madeorauthorized.Thesesystemswill
continuetoboot,butmaynotchargeunauthorizedbatteries.
Attention:Lenovohasnoresponsibilityfortheperformanceorsafetyofunauthorizedbatteries,and
providesnowarrantiesforfailuresordamagearisingoutoftheiruse.
Toreplacethebatterywithanewone,readthefollowingprerequisites,andselectyourmodelfromthe
listbelowfortheinstruction.
Prerequisitesfortheprocedure
DANGER
Iftherechargeablebatterypackisincorrectlyreplaced,thereisdangerofanexplosion.Thebattery
packcontainsasmallamountofharmfulsubstances.Toavoidpossibleinjury:
•ReplaceonlywithabatteryofthetyperecommendedbyLenovo.
•Keepthebatterypackawayfromre.
•Donotexposeittoexcessiveheat.
•Donotexposeittowaterorrain.
•Donotshort-circuitit.
•Donotdrop,crush,puncture,orsubjecttostrongforces.Batteryabuseormishandlingcan
causethebatterytooverheat,whichcancausegassesorameto“vent”fromthebattery
packorcoincell.
Toreplacethebattery,followtheproceduresbelow.
Replacingthebatteryinstalledinthebatteryspaceofyourcomputer
1.Turnoffthecomputer,orenterhibernationmode.Thendisconnecttheacpoweradapterandallcables
fromthecomputer.
2.Closethecomputerdisplay,andturnthecomputerover.
118UserGuide
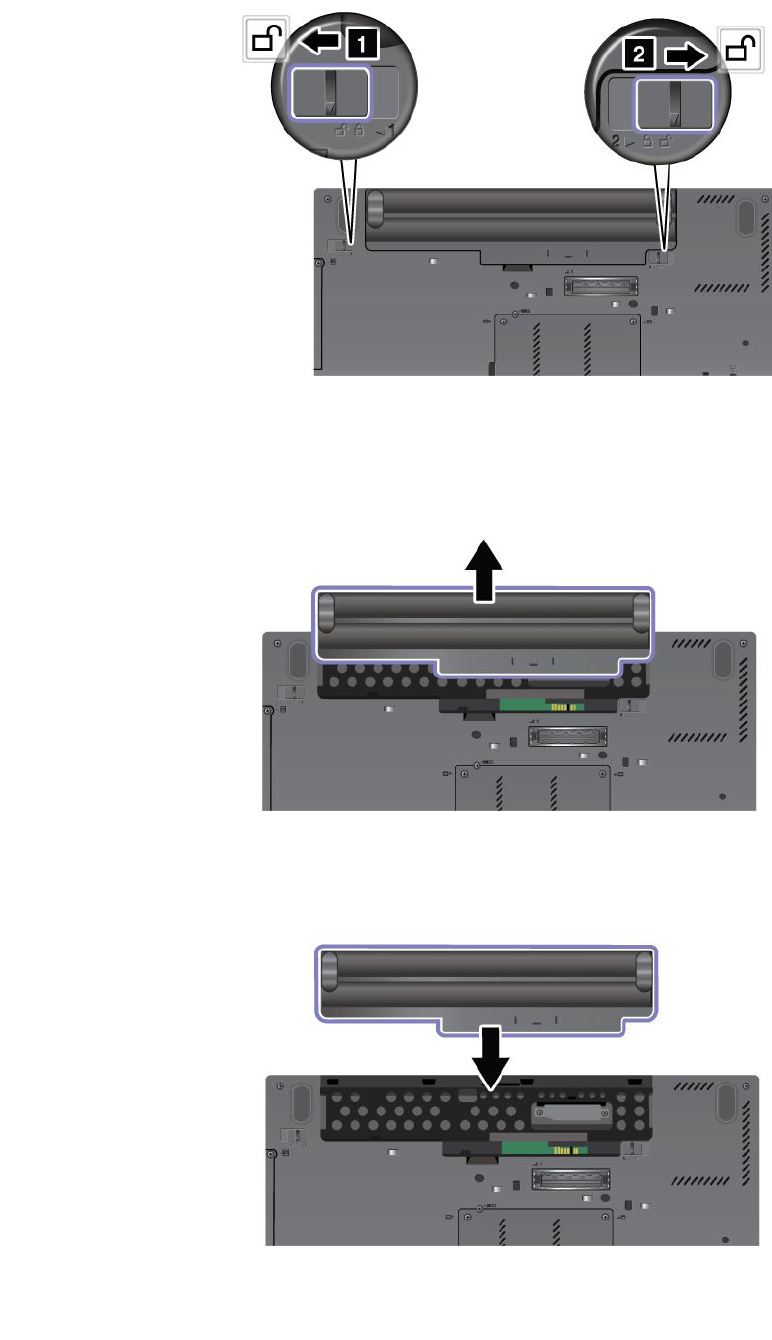
3.Unlockthebatterylatchbyslidingittotheunlockposition.
4.Removethebattery.
5.Slidethebatteryintothecomputer.
Chapter6.Replacingdevices119
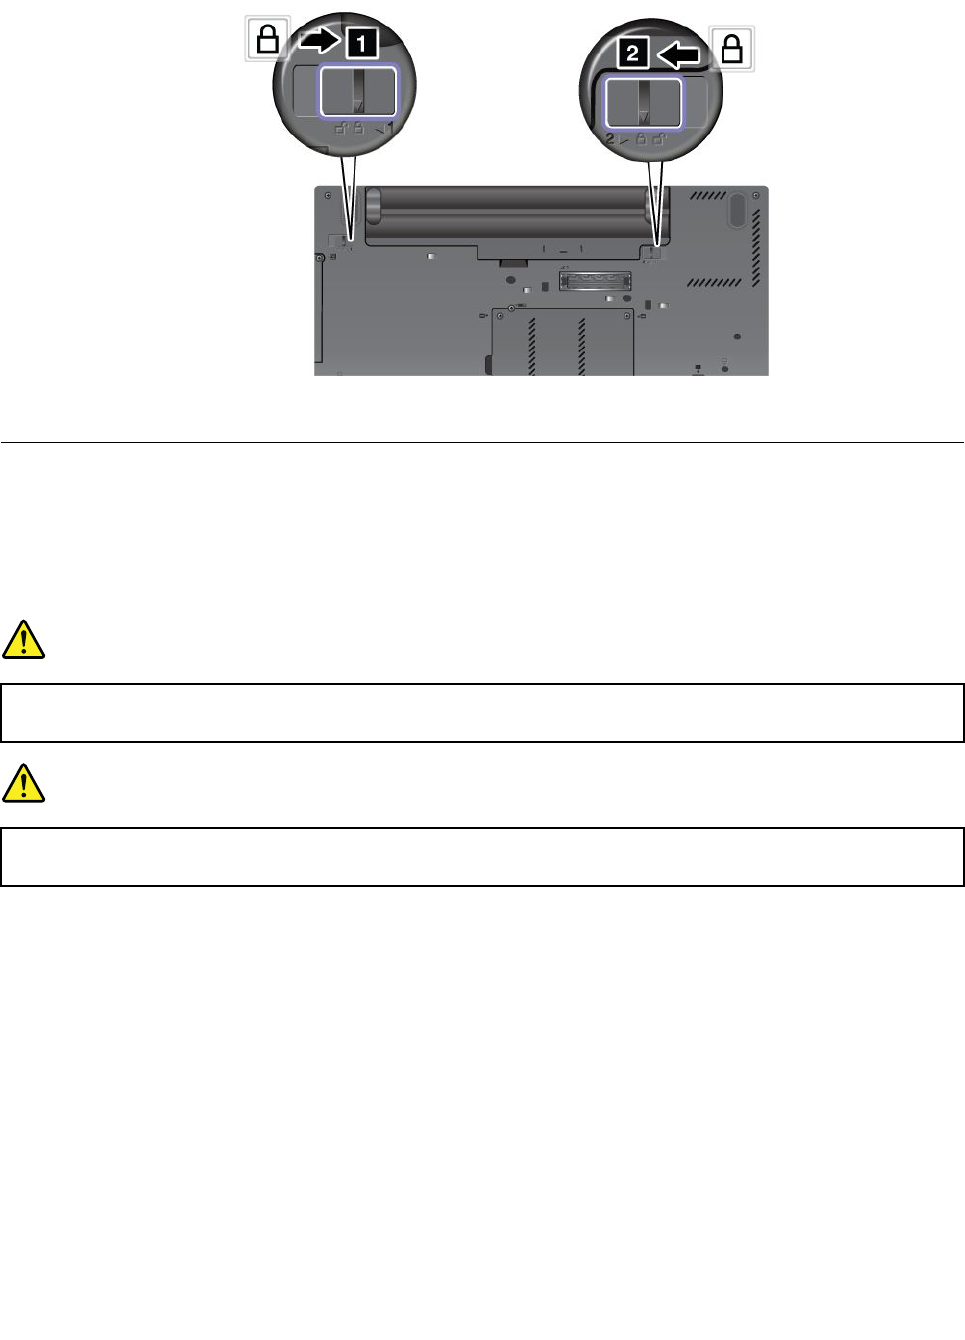
6.Slidethebatterylatchtothelockedposition.
7.Turnthecomputeroveragain.Connecttheacpoweradapterandthecablestothecomputer.
Replacingthekeyboard
Beforeyoustart,printtheseinstructions.
Youcanusethefollowingprocedurestoreplacethekeyboardwithanewone,availableasanoption.
Prerequisitesfortheprocedure
DANGER
Duringelectricalstorms,donotconnectthecabletoordisconnectitfromthetelephoneoutlet
onthewall.
DANGER
Electriccurrentfrompower,telephone,andcommunicationcablesishazardous.Toavoidshock
hazard,disconnectthecablesbeforeopeningthecoverofthisslot.
Toreplacethekeyboard,doasfollows.
Removingthekeyboard
1.Turnoffthecomputer;thendisconnecttheacpoweradapterandallcablesfromthecomputer.Waitfor
afewminutes,tilltheinsideofthecomputercools,beforeyoustartthefollowingprocedures.
2.Closethecomputerdisplay,andturnthecomputerover.
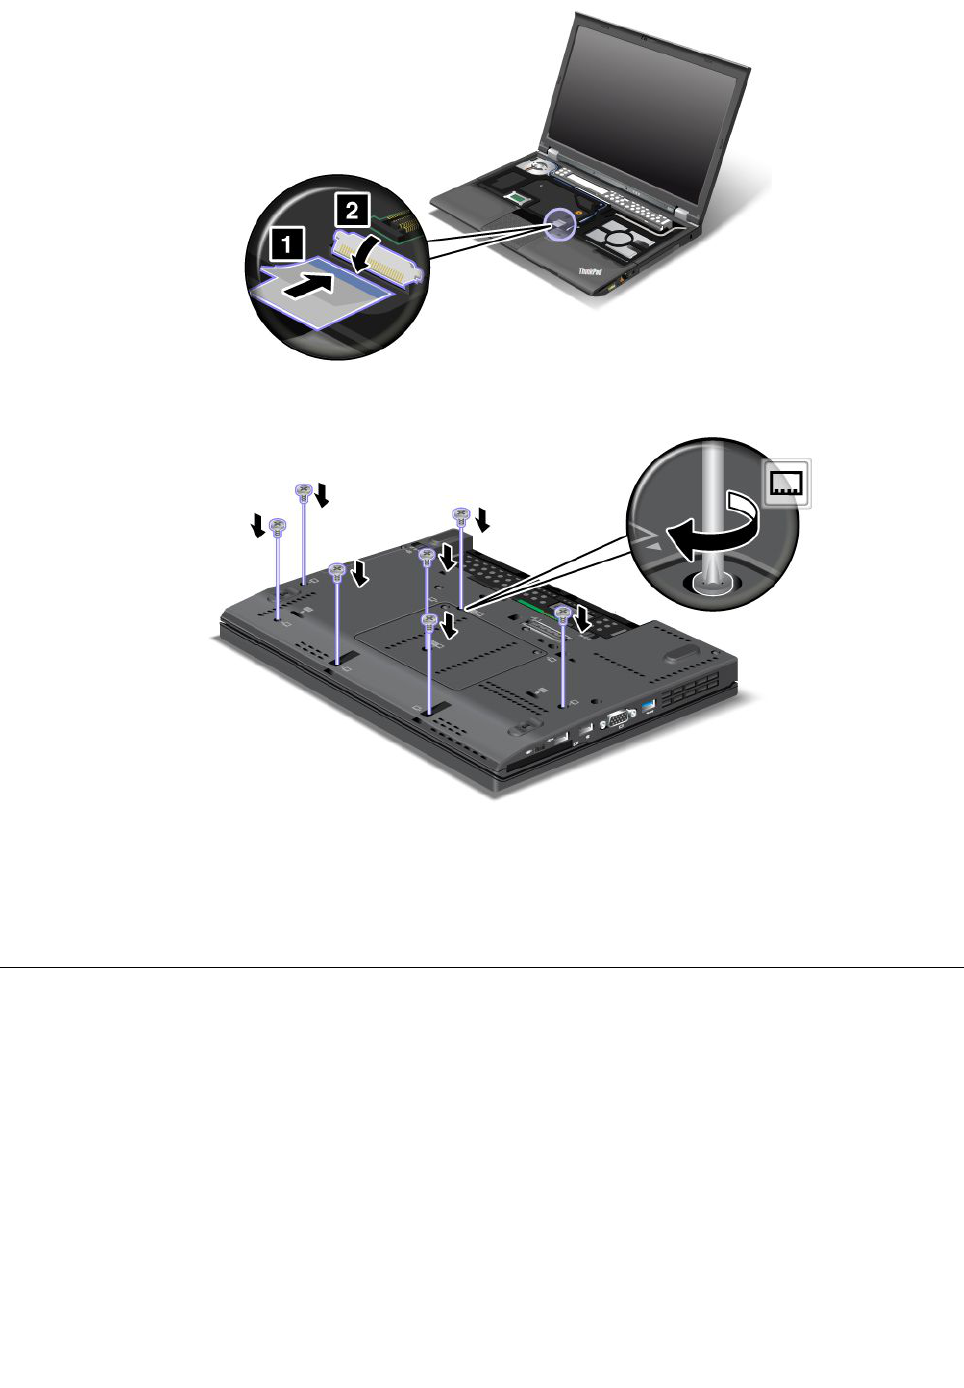
3.Removethebattery.Fordetails,refertotheinstructionsin“Removethebattery”onpage118.
120UserGuide
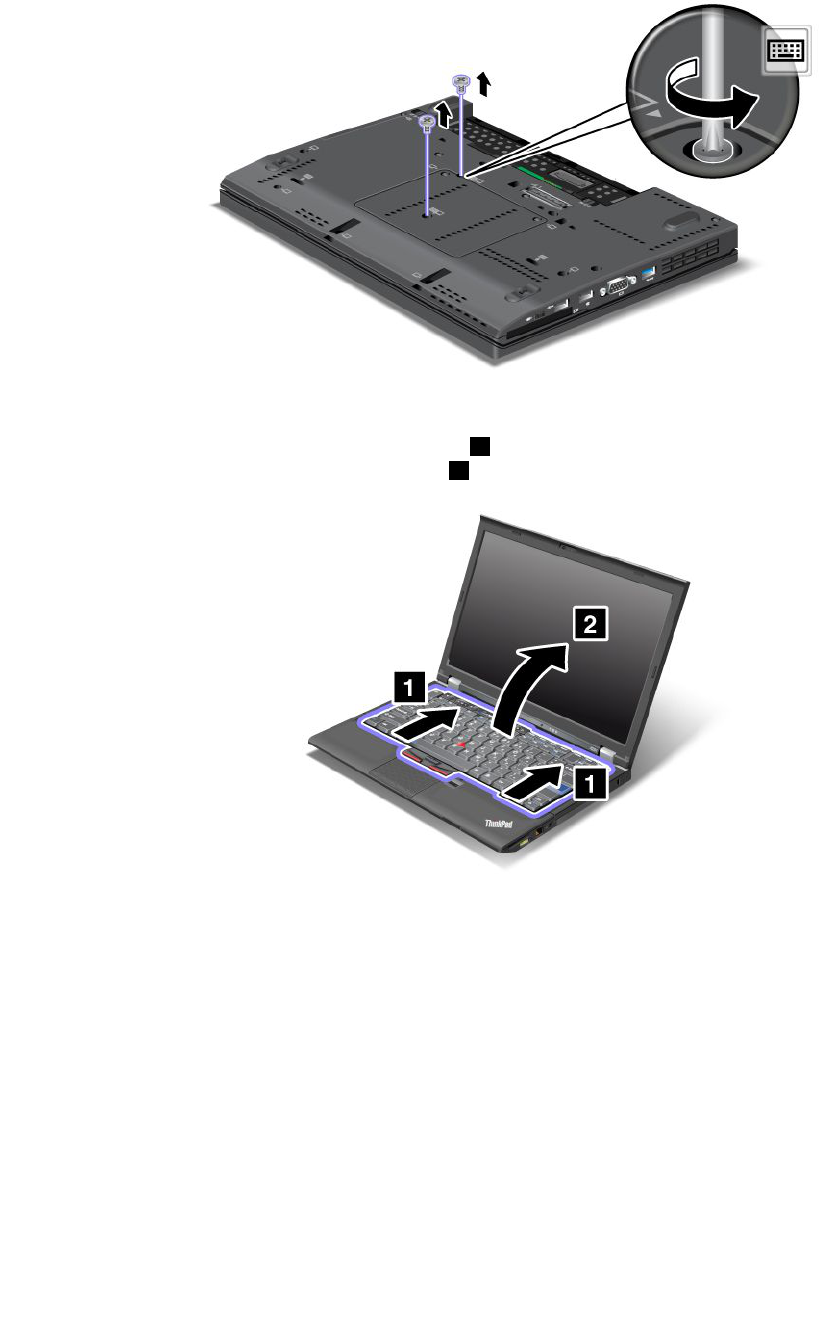
4.Loosenthetwoscrewsonthememoryslotcover,thenremovethecover.
5.Turnthecomputeroverandopenthedisplay.
6.Pushhardinthedirectionshownbythearrows1inthedrawingtounlatchthefrontsideofthe
keyboard.Thekeyboardwillopenupslightly2.
Chapter6.Replacingdevices121
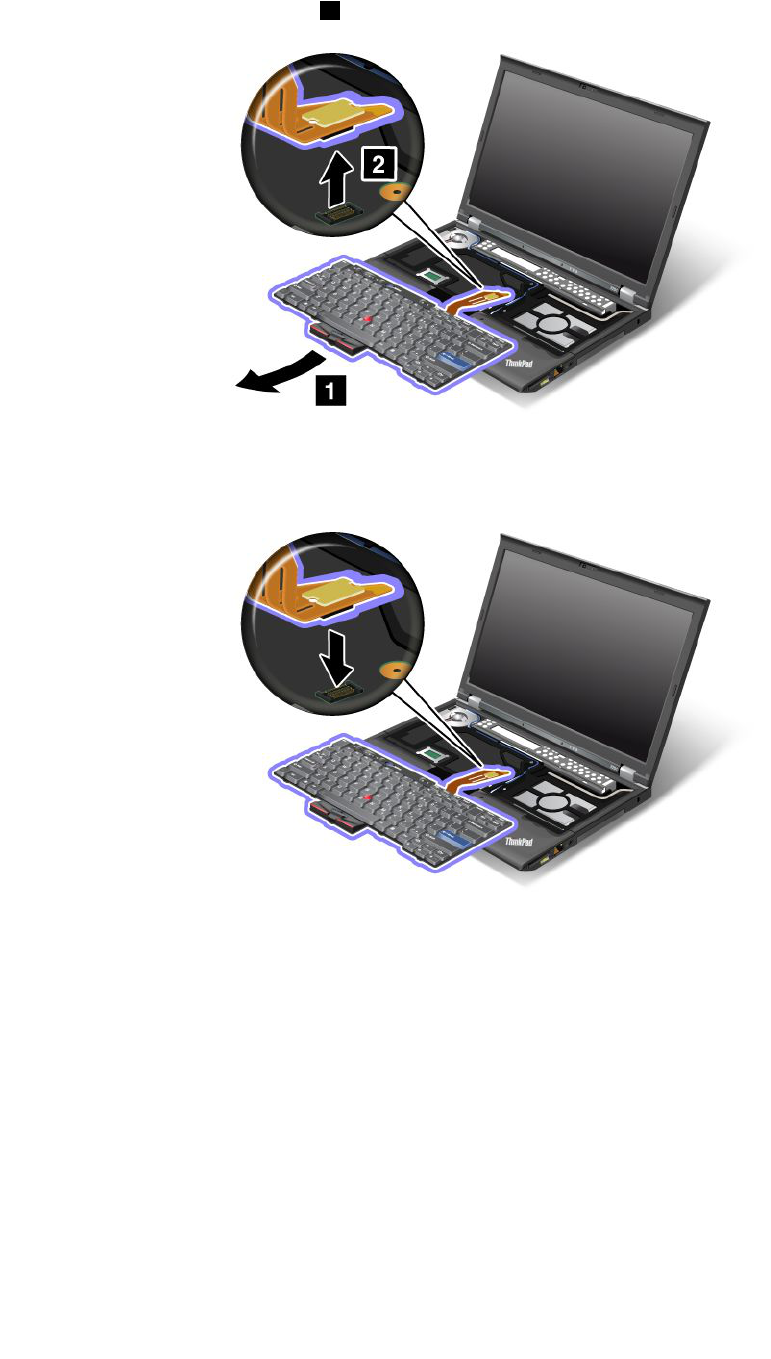
7.Carefullyliftthekeyboarduntilyoucanseehowit'sconnected.Holdthekeyboardabovethecomputer,
andthendetachtheconnector2.Nowthekeyboardhasbeenremoved.
Installingthekeyboard
1.Attachtheconnector.
122UserGuide

2.Insertthekeyboard.Makesurethattherearedgesofthekeyboardareundertheframeasshownby
thearrows.
3.Pressgentlyontheareasmarkedinthedrawing,andslidethekeyboardtowardyou.Makesurethatthe
edgesofthekeyboardmarkedinthedrawing,areundertheframe.
Chapter6.Replacingdevices123
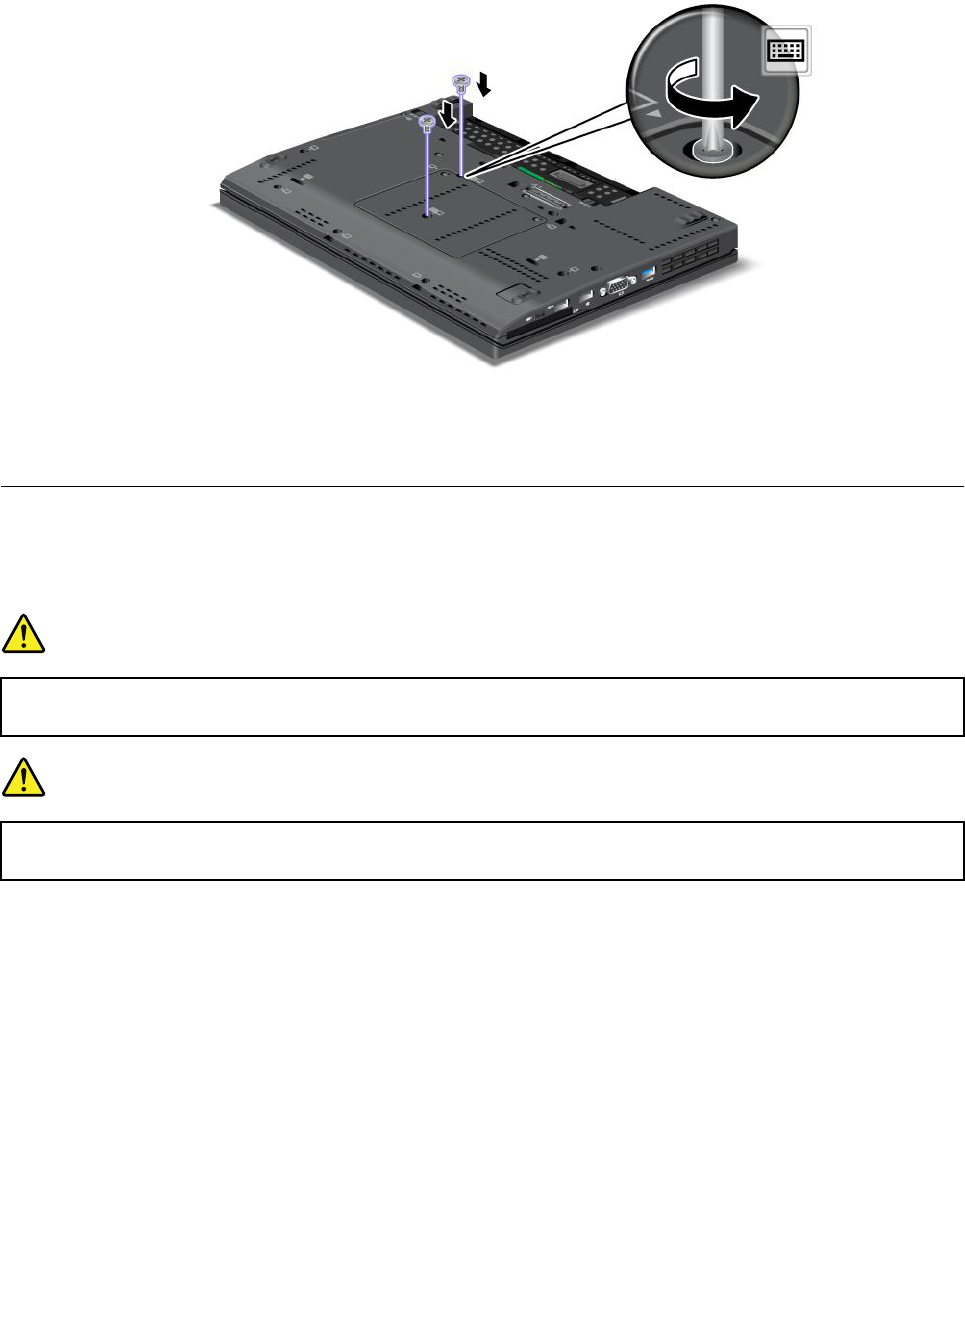
4.Putthememoryslotcoverbackinplace,closethecover,andthentightenthescrews.
5.Reinstallthebattery.Fordetails,refertotheinstructionsin“Reinstallthebattery”onpage118.
6.Turnthecomputeroveragain.Connecttheacpoweradapterandcablestothecomputer;thenturniton.
Replacingthepalmrest
Beforeyoustart,printtheseinstructions.
Prerequisitesfortheprocedure
DANGER
Duringelectricalstorms,donotconnectthecabletoordisconnectitfromthetelephoneoutlet
onthewall.
DANGER
Electriccurrentfrompower,telephone,andcommunicationcablesishazardous.Toavoidshock
hazard,disconnectthecablesbeforeopeningthecoverofthisslot.
Replacementinstructions
1.Turnoffthecomputer;thendisconnecttheacpoweradapterandallcablesfromthecomputer.Waitfor
afewminutes,tilltheinsideofthecomputercools,beforeyoustartthefollowingprocedures.
2.Closethecomputerdisplay,andturnthecomputerover.
3.Removethebattery.Formoreinformation,refertoReplacingthebattery.
4.Removethekeyboard.Formoreinformationabouthowtoremovethekeyboard,refertoReplacingthe
keyboard.
5.Removethescrewsthatsecurethepalmrest.
124UserGuide
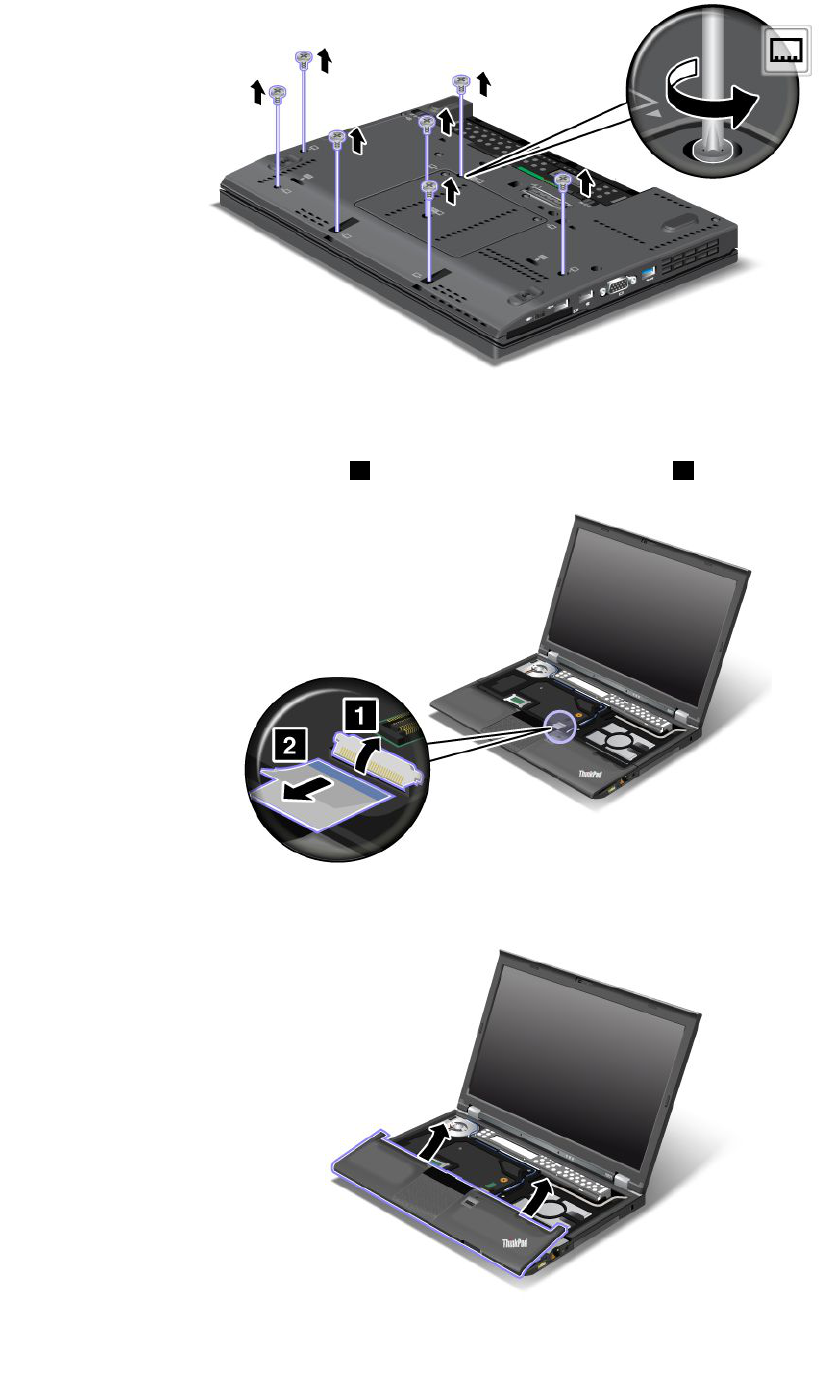
6.Turnthecomputeroverandopenthedisplay.Liftuptheleftandrighttopedgesofthepalmrestto
removeit.
7.Detachtheip-lockZIFconnector1,thenremovethepalmrestcable2.
8.Liftupandremovethepalmrest.
Chapter6.Replacingdevices125
9.Releasethepalmrestfromthecomputer.Nowthepalmresthasbeenremoved.
Installingthepalmrest
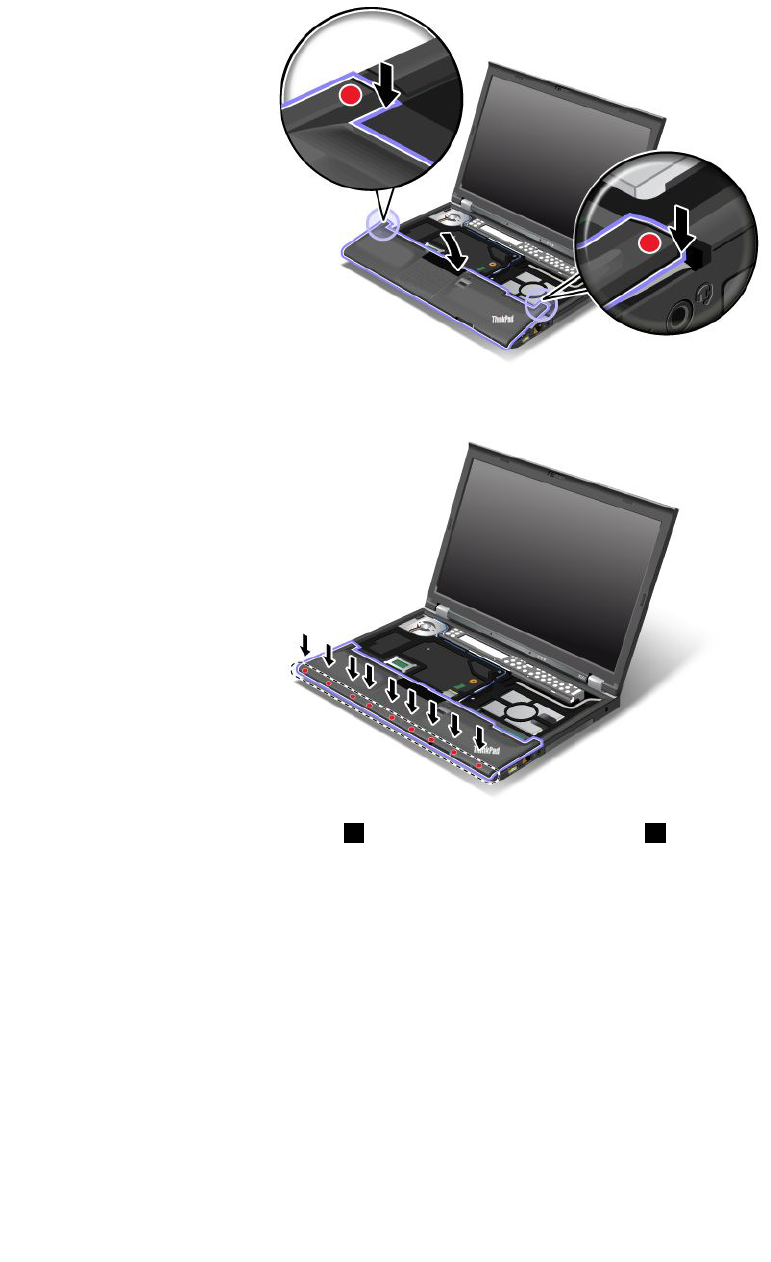
1.Attachthepalmrest,makingsurethelatchesnearthetopleftandrightedgesofthepalmrestaresecure.
2.Pushthefrontsideofthepalmrestuntilitclicksintoplace.
3.Attachtheip-lockZIFconnector1,thenpushthepalmrestcable2.
126UserGuide
4.Reinstallthescrewsforthepalmrest.
5.Reinstallthekeyboard.Formoreinformationabouthowtoremovethekeyboard,refertoReplacingthe
keyboard.
6.Reinstallthebattery.Formoreinformation,refertoReplacingthebattery.
7.Turnthecomputeroveragain.Connecttheacpoweradapterandcablestothecomputer;thenturniton.
Replacingtheharddiskdrive
Beforeyoustart,printtheseinstructions.
YoucanreplacetheharddiskdrivewithanewonewhichcanbepurchasedfromyourLenovoresellerora
marketingrepresentative.Toreplacetheharddiskdrive,readthefollowingprerequisites.
Note:Replacetheharddiskdriveonlyifyouupgradeitorhaveitrepaired.Theconnectorsandslotofthe
harddiskdrivewerenotdesignedforfrequentchanges,ordriveswapping.
Prerequisitesfortheprocedure
Whenreplacingthedrive,besuretofollowtheprecautions.
Attention:Whenyouarehandlingaharddiskdrive:
Chapter6.Replacingdevices127
•Donotdropthedriveorsubjectittophysicalshocks.Putthedriveonamaterial,suchassoftcloth,that
absorbsanyphysicalshocks.
•Donotapplypressuretothecoverofthedrive.
•Donottouchtheconnector.
Thedriveisverysensitive.Incorrecthandlingcancausedamageandpermanentlossofdata.
Beforeremovingtheharddiskdrive,makeabackupcopyofalltheinformationonit,andthenturnthe
computeroff.
Neverremovethedrivewhilethesystemisoperating,insleep(standby)mode,orinhibernationmode.
Toreplacetheharddiskdrive,doasfollows:
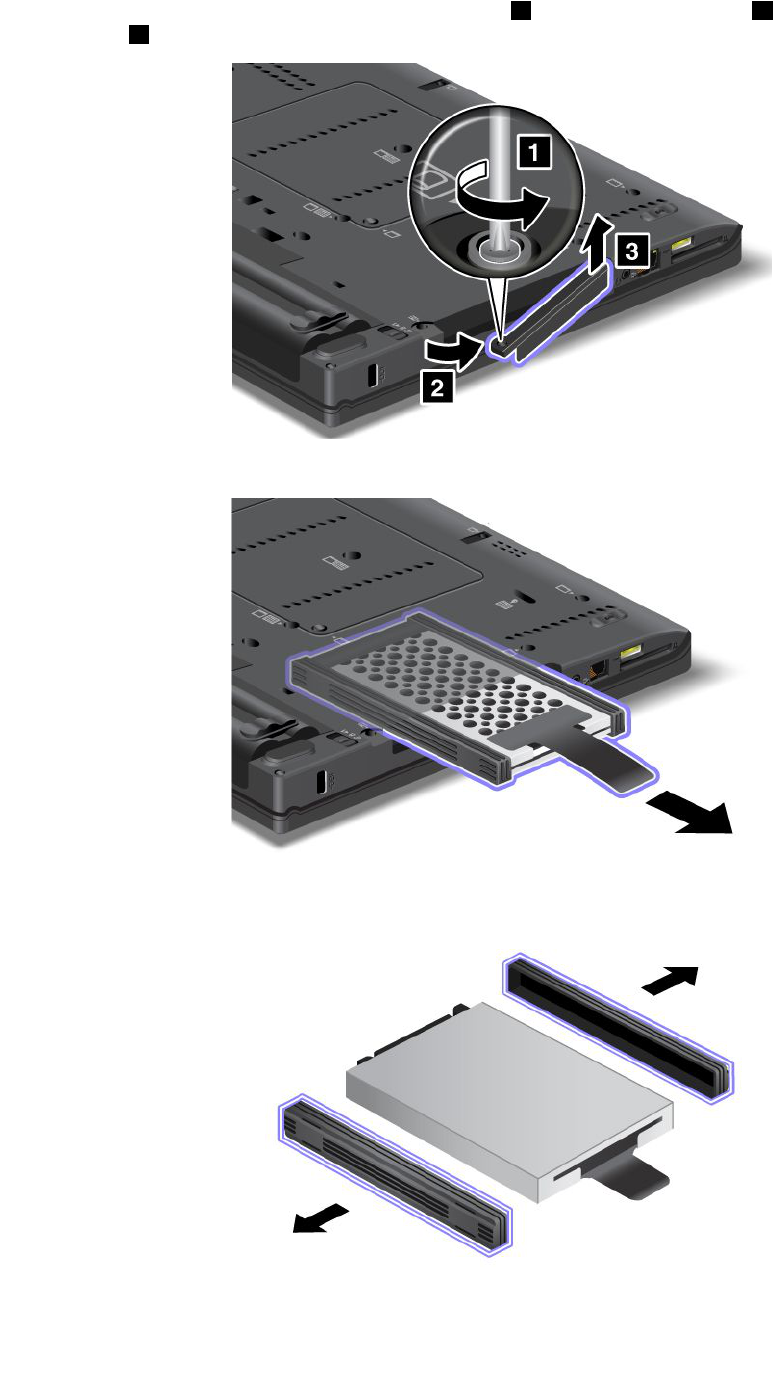
1.Turnoffthecomputer;thendisconnecttheacpoweradapterandallcablesfromthecomputer.
2.Closethecomputerdisplay,andturnthecomputerover.
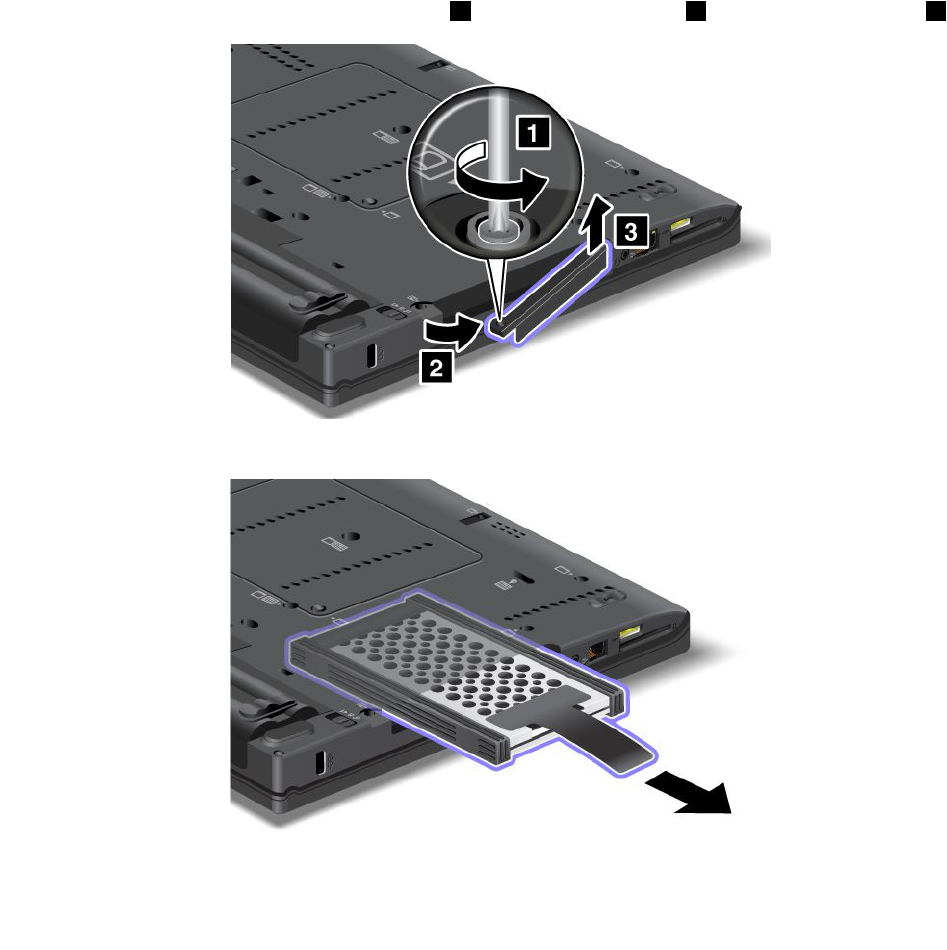
3.Removethebattery.Fordetails,refertotheinstructionsin“Removethebattery”onpage118.
4.Removethescrewthatsecurestheslotcover1.Thenipoutthecover2andpulluptoremoveit3.
5.Removetheharddiskdrivebypullingoutthetab.
128UserGuide
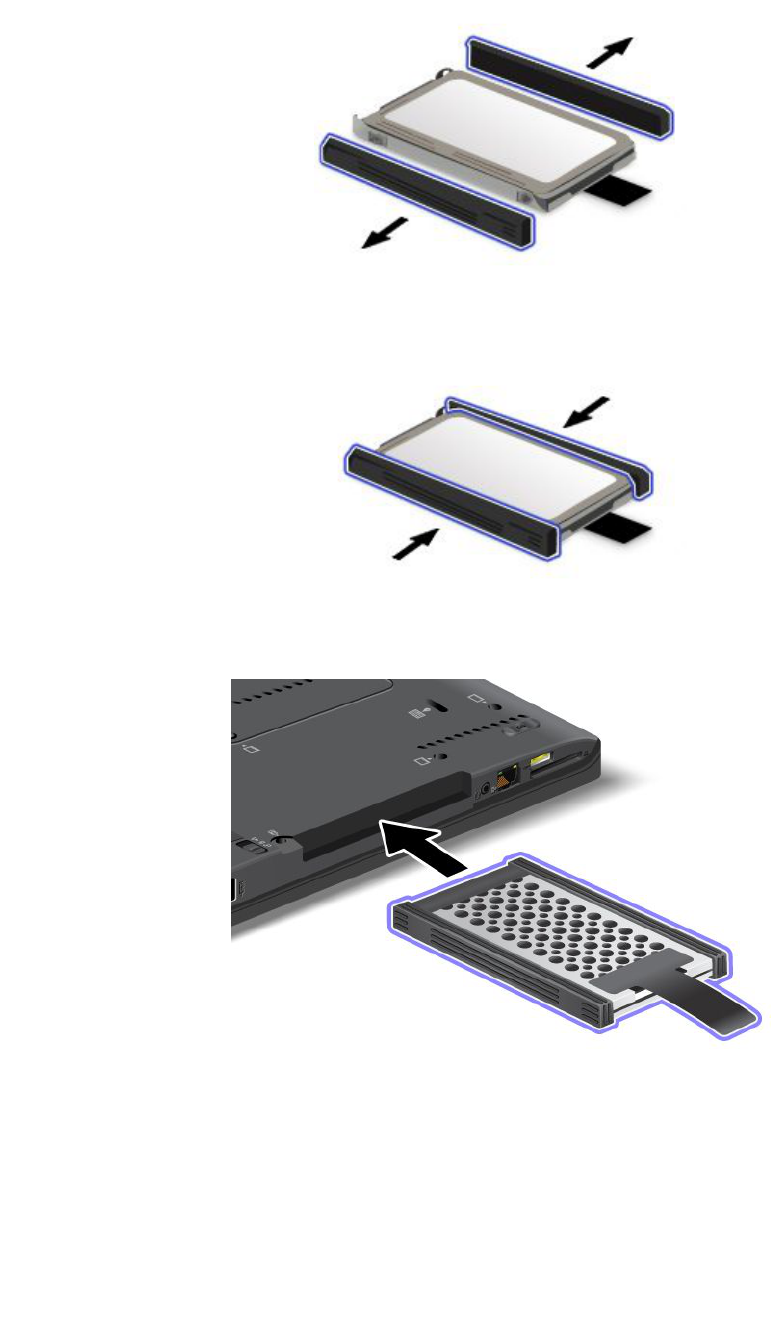
6.Detachthesiderubberrailsfromtheharddiskdrive.
7.Attachthesiderubberrailstoanewharddiskdrive.
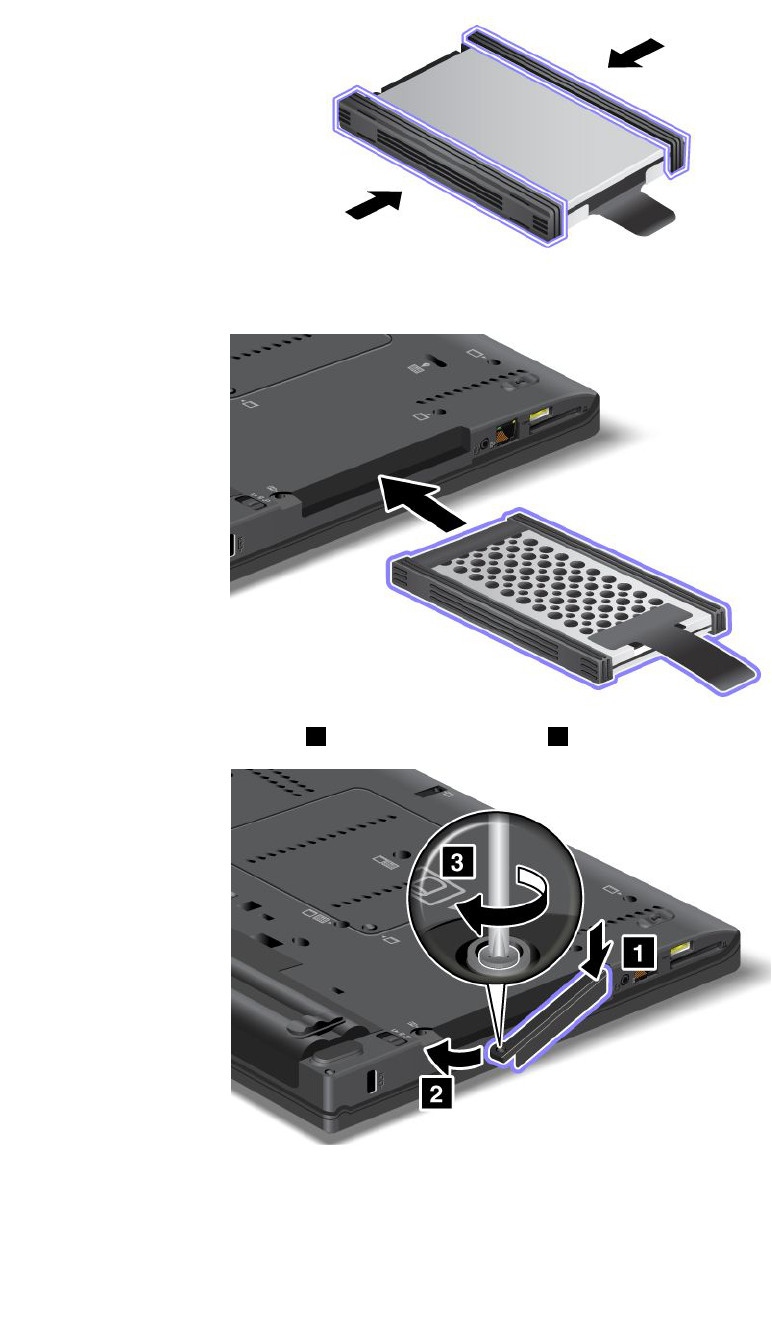
8.Inserttheharddiskdriveintotheharddiskdrivebay,thenpressitrmlyintoplace.
Chapter6.Replacingdevices129
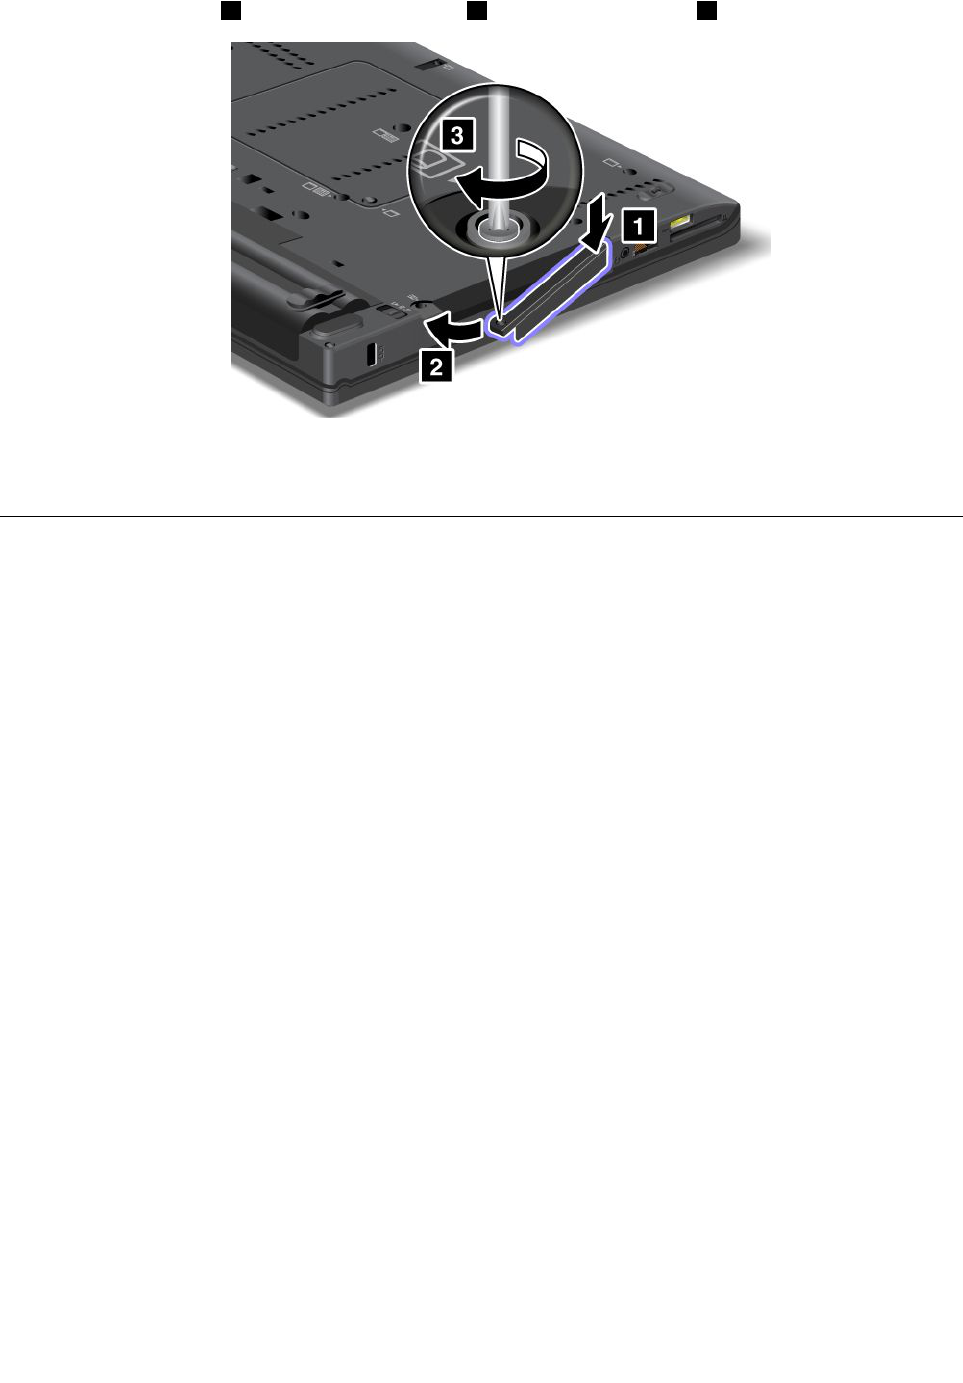
9.Inserttheslotcover1.Then,slideinthecover2andreinstallthescrew3.
10.Reinstallthebattery.Fordetails,refertotheinstructionsin“Reinstallthebattery”onpage118.
11.Turnthecomputeroveragain.Connecttheacpoweradapterandthecablestothecomputer.
Replacingthesolidstatedrive
YoucanreplacethesolidstatedrivewithanewonewhichcanbepurchasedfromyourLenovoresellerora
marketingrepresentative.Toreplacethesolidstatedrive,readthefollowingprerequisitesandselectyour
modelfromthelistbelowforinstructions.
Note:Replacethesolidstatedriveonlyifyouneedtohaveitrepaired.Theconnectorsandslotofthesolid
statedrivewerenotdesignedforfrequentchanges,ordriveswapping.
Prerequisitesfortheprocedure
Whenreplacingthedrive,besuretofollowtheprecautions.
Attention:Whenyouarehandlingasolidstatedrive:
•Donotdropthedriveorsubjectittophysicalshocks.Putthedriveonamaterial,suchassoftcloth,that
absorbsanyphysicalshocks.
•Donotapplypressuretothecoverofthedrive.
•Donottouchtheconnector.
Thedriveisverysensitive.Incorrecthandlingcancausedamageandpermanentlossofdata.
Beforeremovingthesolidstatedrive,makeabackupcopyofalltheinformationonit,andthenturnthe
computeroff.
Neverremovethedrivewhilethesystemisoperating,insleep(standby)mode,orinhibernationmode.
Replacementinstructions
Toreplacethesolidstatedrive,doasfollows:
1.Turnoffthecomputer;thendisconnecttheacpoweradapterandallcablesfromthecomputer.
2.Closethecomputerdisplay,andturnthecomputerover.
3.Removethebattery.Formoreinformation,referto“Replacingthebattery”onpage118.
130UserGuide
4.Removethescrewthatsecuresthesolidstatedrive1.Thenipoutthecover2andpullupto
removeit3.
5.Removethesolidstatedrivebypullingoutthetab.
6.Detachthesidespacerrailsfromtheharddiskdrive.
Chapter6.Replacingdevices131
7.Attachthesidespacerrailstoanewharddiskdrive.
8.Insertthesolidstatedriveintotheharddiskdrivebay,thenpressitrmlyintoplace.
9.Reinstallthecoverofthebay1,thenreinstallthescrew2.
10.Reinstallthebattery.Formoreinformationabouthowtoreinstallthebattery,referto“Replacingthe
battery”onpage118.
11.Turnthecomputeroveragain.Connecttheacpoweradapterandthecablestothecomputer.
132UserGuide

InstallingandreplacingthePCIExpressMiniCardforwireless
LAN/WiMAXconnection
Beforeyoustart,printtheseinstructions.
YourcomputerhasaPCIExpressMiniCardslotforconnectiontoawirelessLAN/WiMAX.ToreplacethePCI
ExpressMiniCardwithanewone,readthefollowingprerequisites.
Prerequisitesfortheprocedure
DANGER
Duringelectricalstorms,donotconnectthecabletoordisconnectitfromthetelephoneoutlet
onthewall.
DANGER
Electriccurrentfrompower,telephone,andcommunicationcablesishazardous.Toavoidshock
hazard,disconnectthecablesbeforeopeningthecoverofthisslot.
Attention:BeforeyoustartinstallingaPCIExpressMiniCard,touchametaltableoragroundedmetal
object.Thisactionreducesanystaticelectricityfromyourbody.Thestaticelectricitycoulddamagethecard.
YourcomputerhasaPCIExpressMiniCardslotforconnectiontoawirelessLAN/WiMAX.Toreplacethe
PCIExpressMiniCardwithanewone,followtheprocedurebelow.
ReplacingaPCIExpressMiniCardwithtwoconnectors
1.Turnoffthecomputer;thendisconnecttheacpoweradapterandallcablesfromthecomputer.Waitfor
afewminutes,tilltheinsideofthecomputercools,beforeyoustartthefollowingprocedures.
2.Closethecomputerdisplay,andturnthecomputerover.
3.Removethebattery.Fordetails,refertotheinstructionsin“Removethebattery”onpage118.
4.Removethepalmrest.Fordetails,refertotheinstructionsin“Removethepalmrest”onpage124.
Chapter6.Replacingdevices133
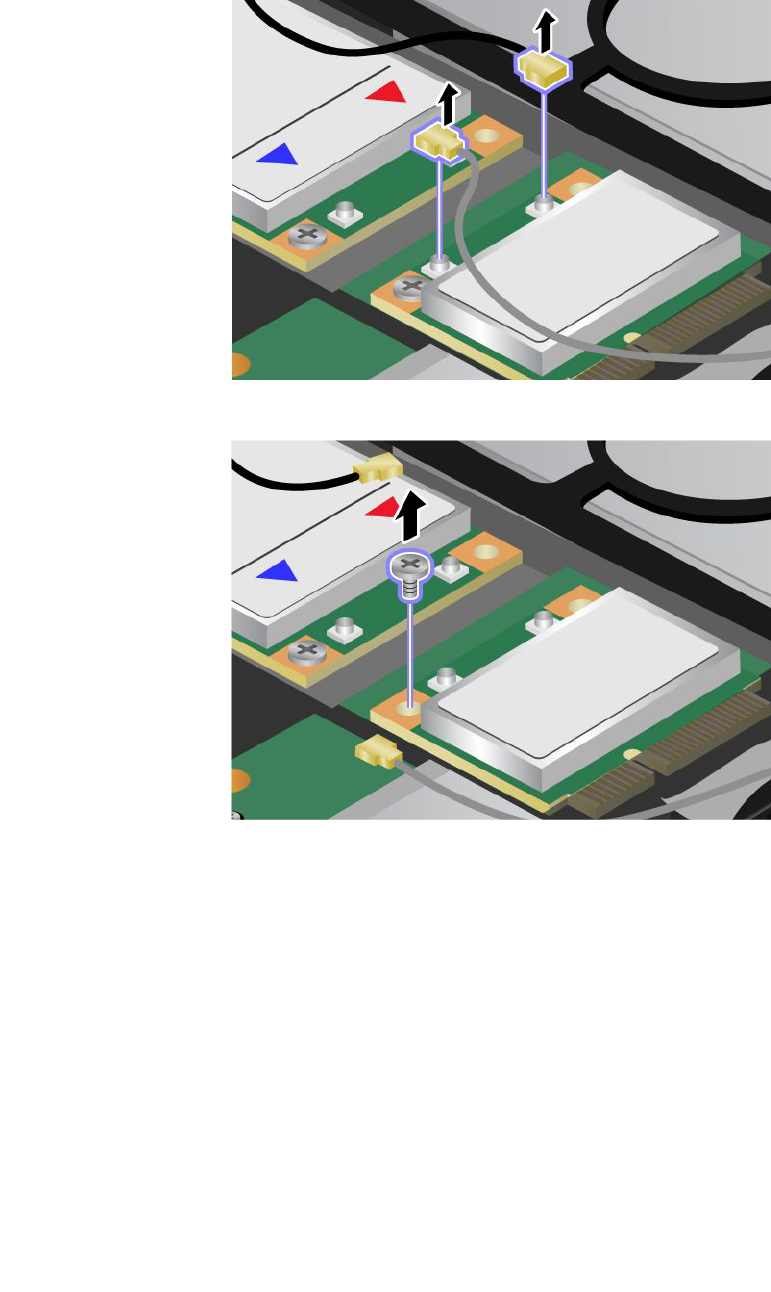
5.Ifatoolforremovingconnectorsisincludedinthepackagewiththenewcard,useittodisconnectthe
cablesfromthecard.Ifnosuchtoolisincluded,disconnectthecablesbypickinguptheconnectors
withyourngersandgentlyunpluggingthem.
6.Removethescrew.Thecardpopsup.
134UserGuide
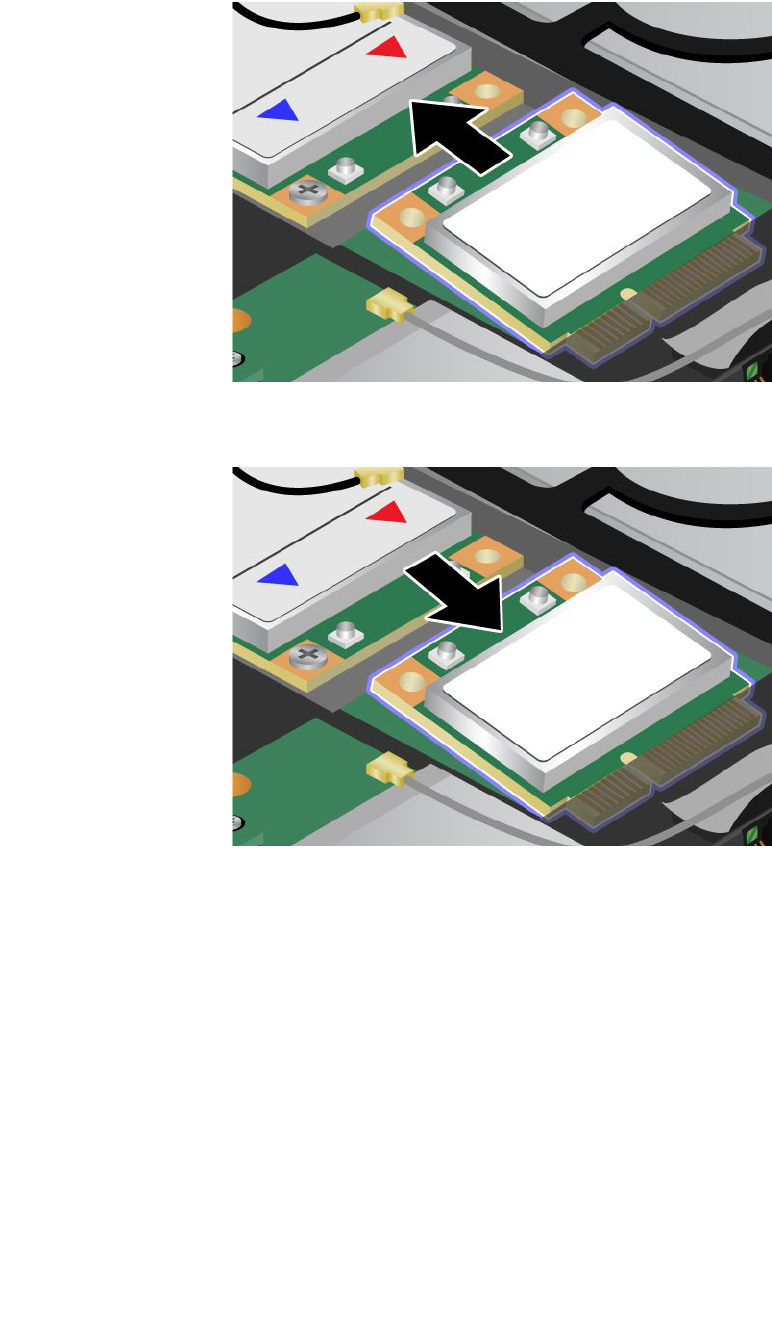
7.Removethecard.
8.AlignthecontactedgeofthenewPCIExpressMiniCardwiththecorrespondingsocketcontactofthe
computer.
Chapter6.Replacingdevices135
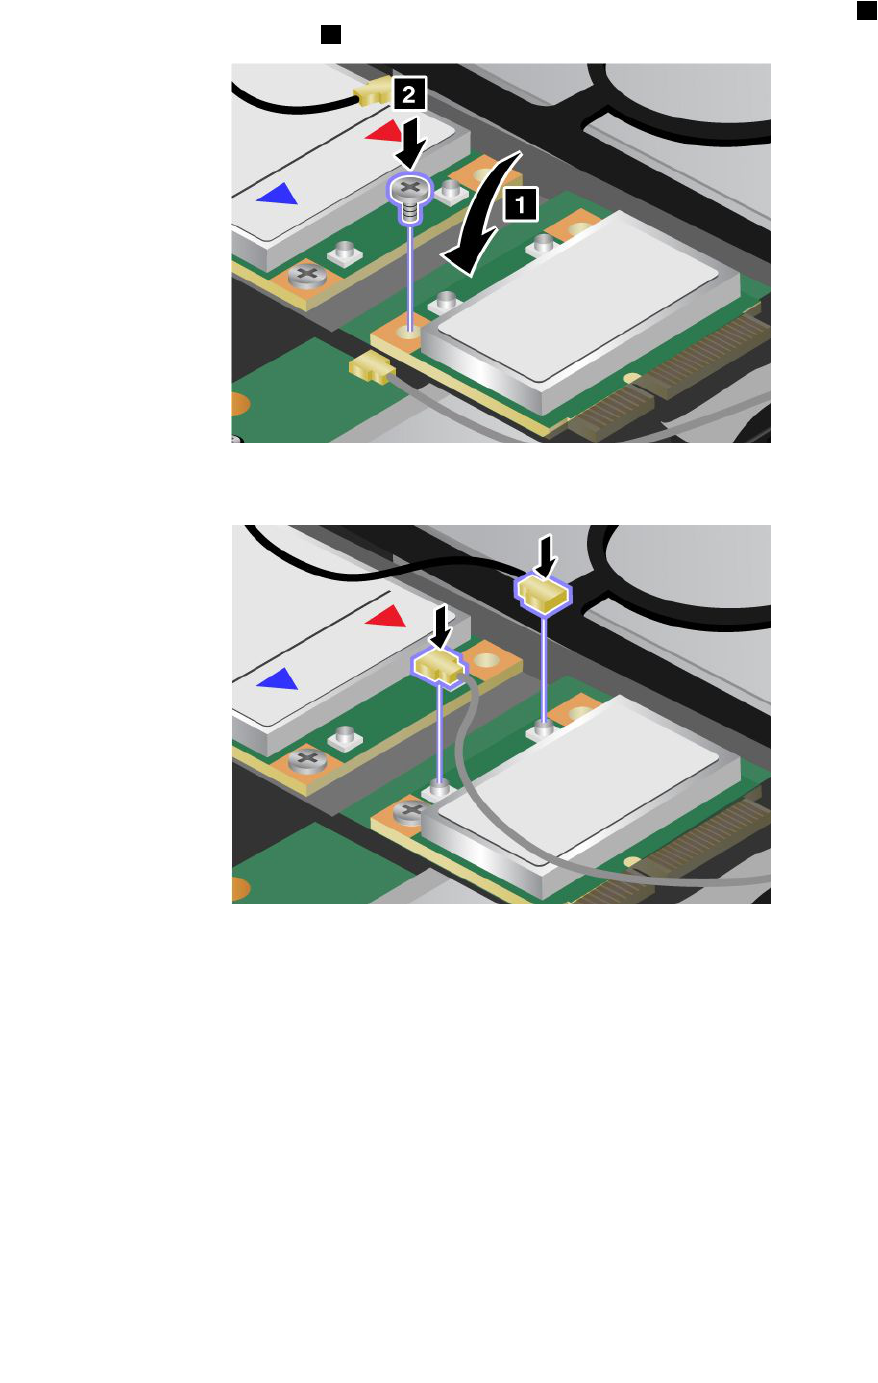
9.Pivotthecarduntilyoucansnapitintoplacebypressingtheuppersideoftheconnectors1,and
securethecardwiththescrew2.
10.ConnectthecablestothenewPCIExpressMiniCard.Besuretoattachthegraycabletotheconnector
marked“MAIN”or“M”onthecard,andtheblackcabletotheconnectormarked“AUX”or“A.”
Note:IfthenewPCIExpressMiniCardhasthreeconnectors,besuretoattachthegraycabletothe
connectormarked“TR1”onthecard,andtheblackcabletotheconnectormarked“TR2”.Ifyouattach
eithercabletothecenterconnector,theconnectionspeedwillbelower.
11.Reinstallthepalmrest.Fordetails,refertotheinstructionsin“Reinstallthepalmrest”onpage124.
12.Reinstallthebattery.Fordetails,refertotheinstructionsin“Reinstallthebattery”onpage118.
13.Turnthecomputeroveragain.Connecttheacpoweradapterandcablestothecomputer;thenturniton.
ReplacingaPCIExpressMiniCardwiththreeconnectors
1.Turnoffthecomputer;thendisconnecttheacpoweradapterandallcablesfromthecomputer.Waitfor
afewminutes,tilltheinsideofthecomputercools,beforeyoustartthefollowingprocedures.
2.Closethecomputerdisplay,andturnthecomputerover.
3.Removethebattery.Fordetails,refertotheinstructionsin“Removethepalmrest”onpage124.
4.Removethekeyboard.Fordetails,refertotheinstructionsin“Removethekeyboard”onpage120.
136UserGuide

5.Ifatoolforremovingconnectorsisincludedinthepackagewiththenewcard,useittodisconnectthe
cablesfromthecard.Ifnosuchtoolisincluded,disconnectthecablesbypickinguptheconnectors
withyourngersandgentlyunpluggingthem.
6.Removethescrew.Thecardpopsup.
Chapter6.Replacingdevices137
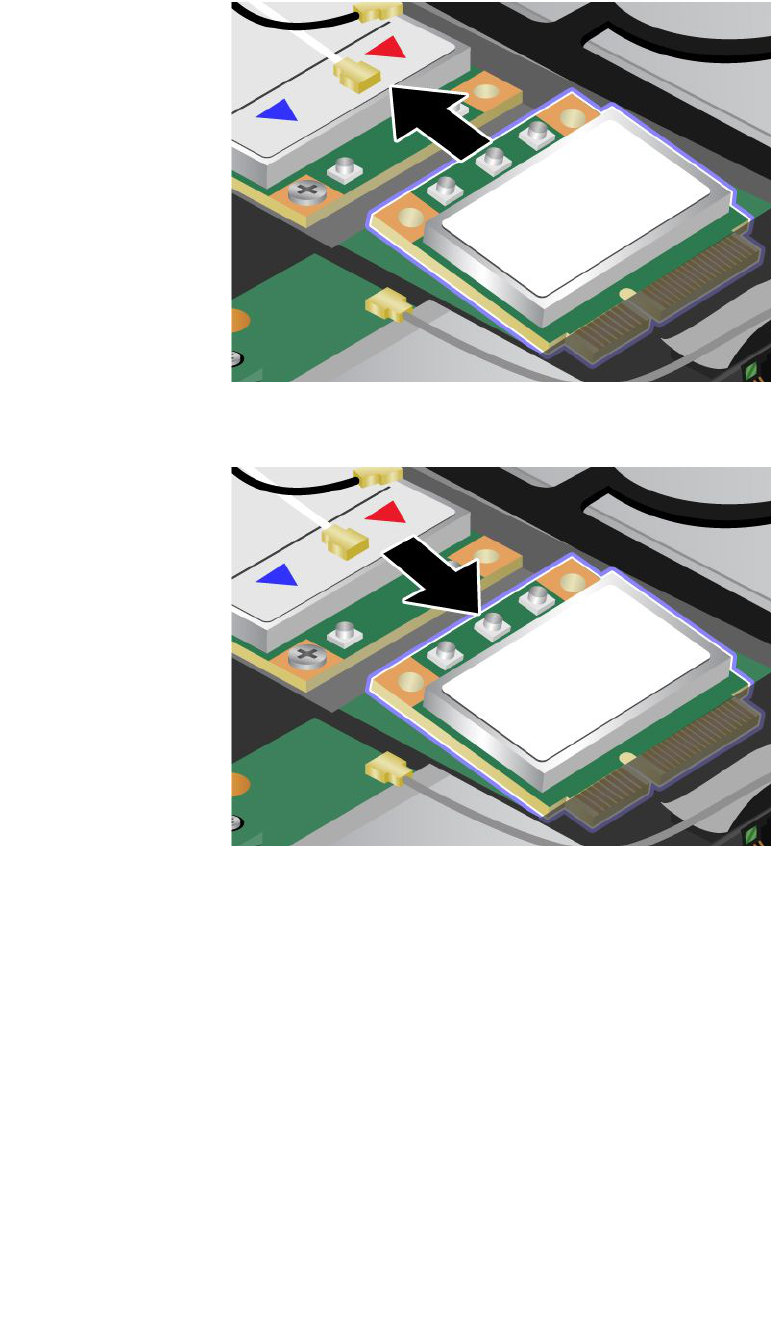
7.Removethecard.
8.AlignthecontactedgeofthenewPCIExpressMiniCardwiththecorrespondingsocketcontactofthe
computer.
138UserGuide
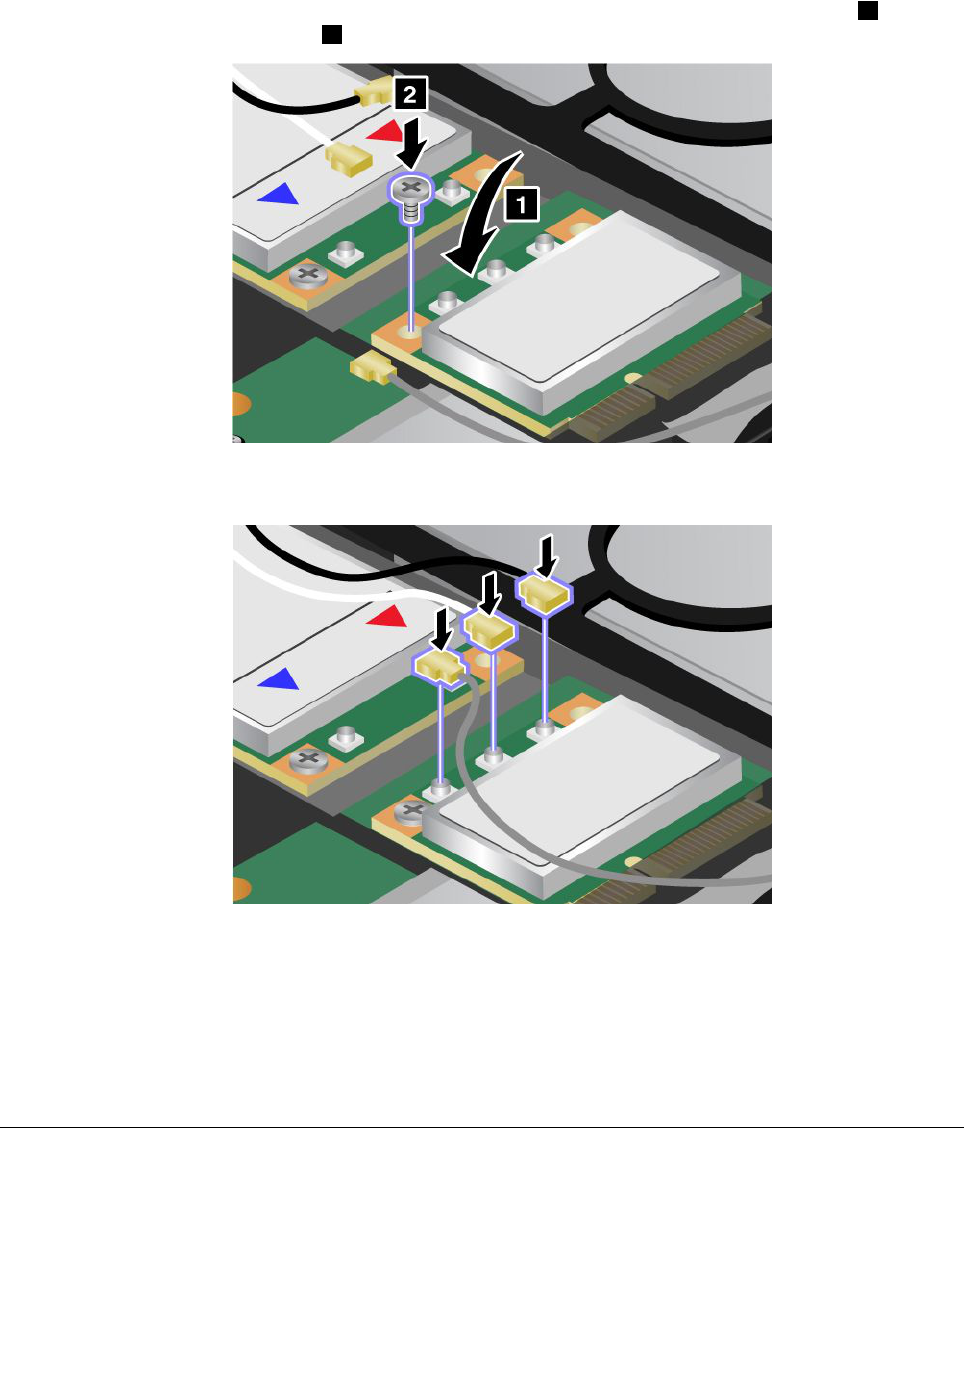
9.Pivotthecarduntilyoucansnapitintoplacebypressingtheuppersideoftheconnectors1,and
securethecardwiththescrew2.
10.ConnectthecablestothenewPCIExpressMiniCard.Besuretoattachthegraycabletotheconnector
marked“MAIN”or“M”onthecard,andtheblackcabletotheconnectormarked“AUX”or“A.”
Note:IfthenewPCIExpressMiniCardhasthreeconnectors,besuretoattachthegraycabletothe
connectormarked“TR1”onthecard,andtheblackcabletotheconnectormarked“TR2”.Ifyouattach
eithercabletothecenterconnector,theconnectionspeedwillbelower.
11.Reinstallthekeyboard.Fordetails,refertotheinstructionsin“Reinstallthepalmrest”onpage124.
12.Reinstallthebattery.Fordetails,refertotheinstructionsin“Reinstallthebattery”onpage118.
13.Turnthecomputeroveragain.Connecttheacpoweradapterandcablestothecomputer;thenturniton.
InstallingandreplacingthePCIExpressMiniCardforwirelessWAN
connection
Beforeyoustart,printtheseinstructions.
SomeThinkPadmodelshaveaPCIExpressMiniCardslotforconnectiontoawirelessWAN.Toreplacethe
PCIExpressMiniCardwithanewone,readthefollowingprerequisites.
Chapter6.Replacingdevices139
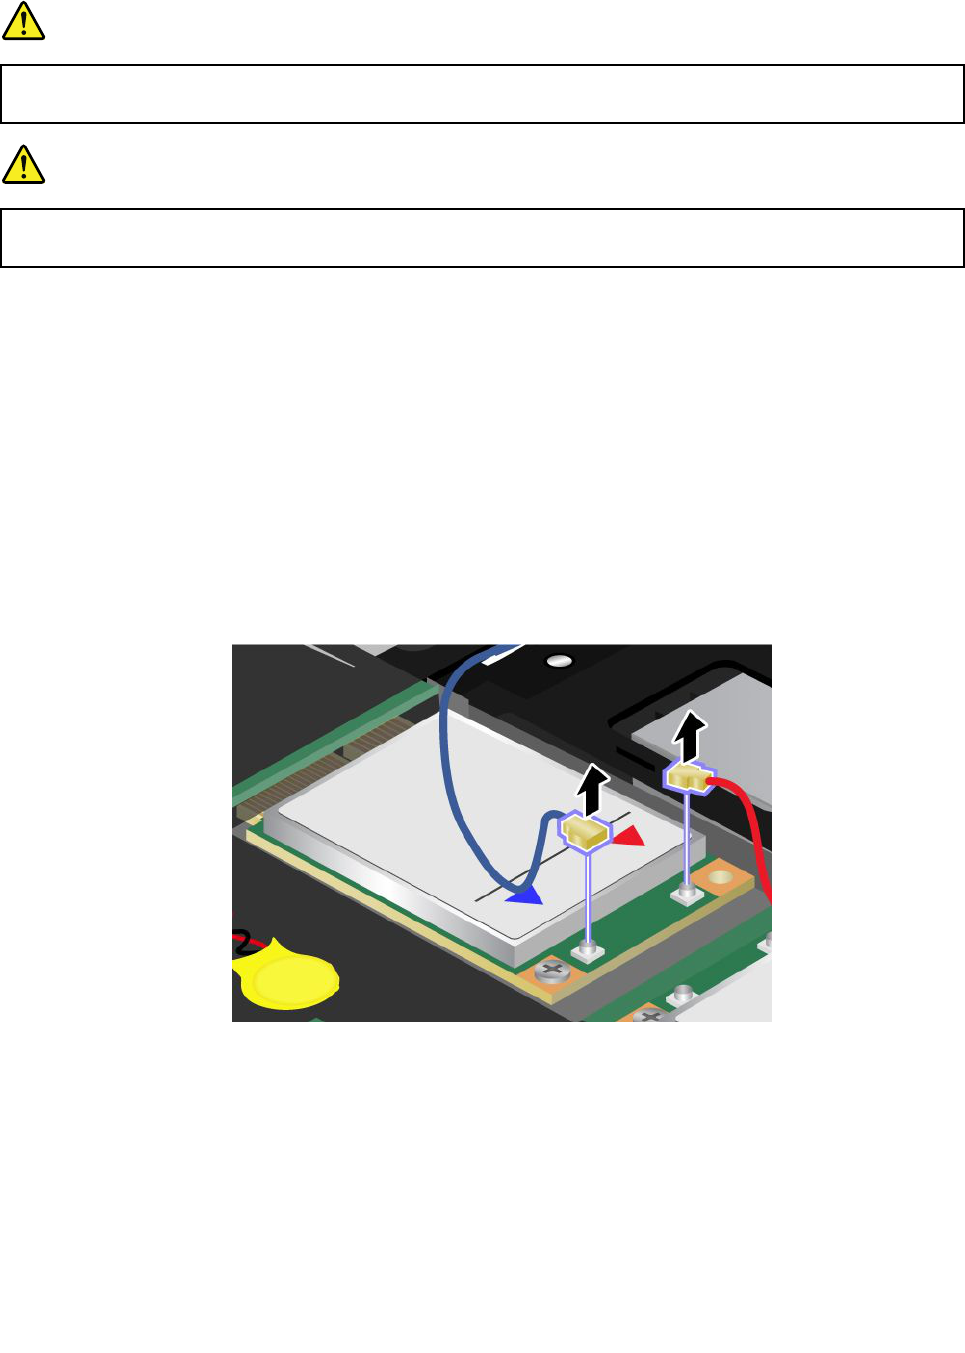
Prerequisitesfortheprocedure
DANGER
Duringelectricalstorms,donotconnectthecabletoordisconnectitfromthetelephoneoutlet
onthewall.
DANGER
Electriccurrentfrompower,telephone,andcommunicationcablesishazardous.Toavoidshock
hazard,disconnectthecablesbeforeopeningthecoverofthisslot.
Attention:BeforeyoustartinstallingaPCIExpressMiniCard,touchametaltableoragroundedmetal
object.Thisactionreducesanystaticelectricityfromyourbody.Thestaticelectricitycoulddamagethecard.
IfaWirelessWANisavailableinyourcomputer,toreplacethePCIExpressMiniCard,doasfollows.
1.Turnoffthecomputer;thendisconnecttheacpoweradapterandallcablesfromthecomputer.Waitfor
afewminutes,tilltheinsideofthecomputercools,beforeyoustartthefollowingprocedures.
2.Closethecomputerdisplay,andturnthecomputerover.
3.Removethebattery.Fordetails,refertotheinstructionsin“Removethebattery”onpage118.
4.Removethepalmrest.Fordetails,refertotheinstructionsin“Removethepalmrest”onpage124.
5.Ifatoolforremovingconnectorsisincludedinthepackagewiththenewcard,useittodisconnectthe
cablesfromthecard.Ifnosuchtoolisincluded,disconnectthecablesbypickinguptheconnectors
withyourngersandgentlyunpluggingthem.
Note:Dependingonthesystemcongurationofyourcomputer,thecardmayhaveonlyoneconnector.
140UserGuide

6.Removethescrew.Thecardpopsup.
7.Removethecard.
Chapter6.Replacingdevices141
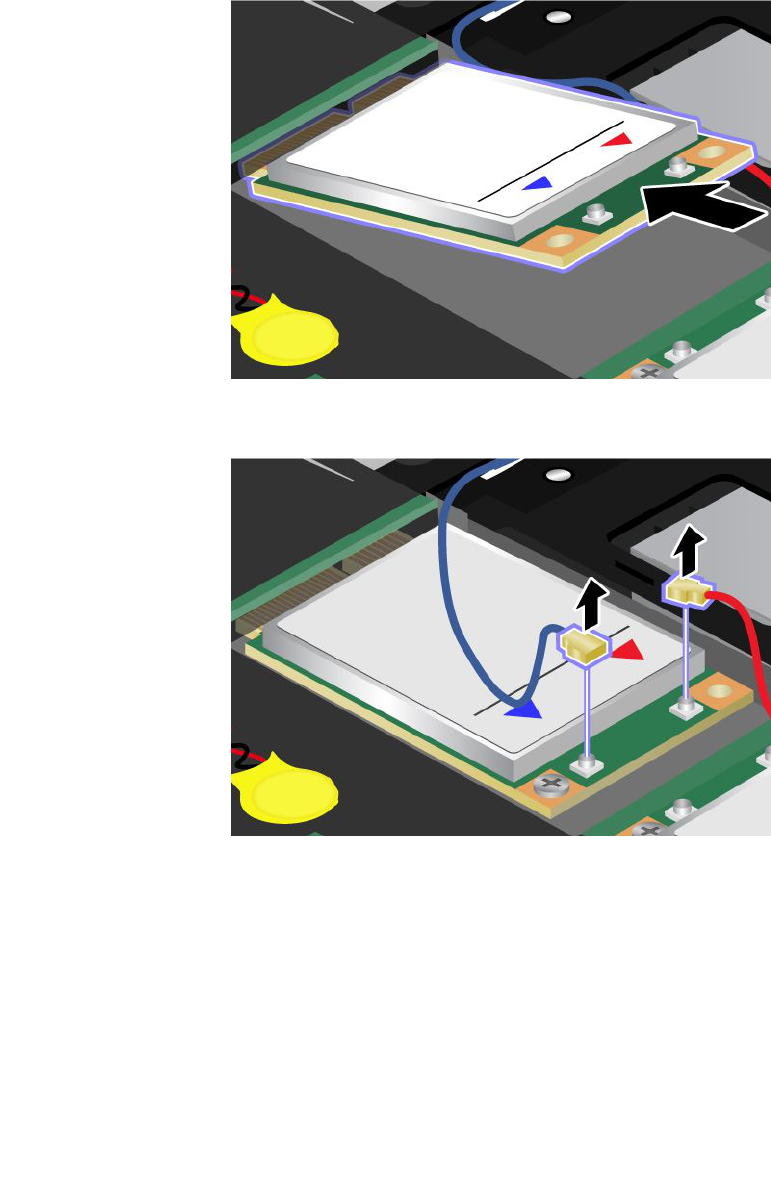
8.AlignthecontactedgeofthenewPCIExpressMiniCardwiththecorrespondingsocket.
Notes:
•YoucanalsoreplacethePCIExpressMiniCardforWirelessWANwithanmSATAsolidstatedrive.
•ToinstallanewmSATAsolidstatedrive,referto“InstallingandreplacingthemSATAsolidstate
drive”onpage143.
9.Pivotthecarduntilyoucansnapitintoplacebypressingtheuppersideofeachconnector.Secure
thecardwiththescrew.
Note:Dependingonthesystemcongurationofyourcomputer,thecardmayhaveonlyoneconnector.
142UserGuide
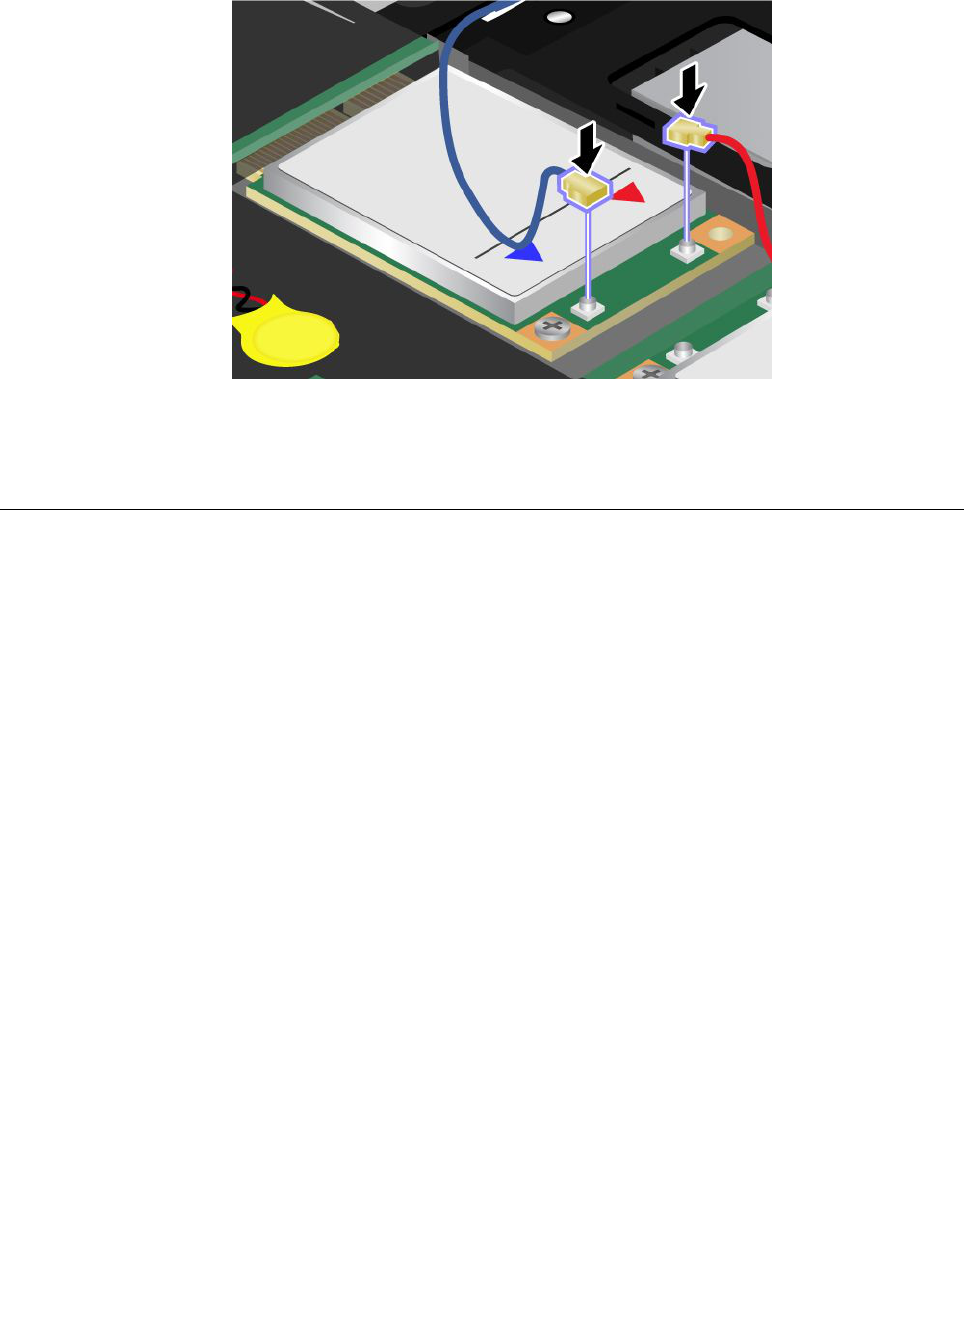
10.ConnectthecablestothenewPCIExpressMiniCard.
11.Reinstallthekeyboard.Fordetails,refertotheinstructionsin“Reinstallthepalmrest”onpage124.
12.Reinstallthebattery.Fordetails,refertotheinstructionsin“Reinstallthebattery”onpage118.
13.Turnthecomputeroveragain.Connecttheacpoweradapterandcablestothecomputer;thenturniton.
InstallingandreplacingthemSATAsolidstatedrive
Beforeyoustart,printtheseinstructions.
SomeThinkPadmodelshaveanmSATAsolidstatedrive.YoucanreplacethemSATAsolidstatedrivewitha
newonewhichcanbepurchasedfromyourLenovoreselleroramarketingrepresentative.Toreplacethe
mSATAsolidstatedrive,readthefollowingprerequisites.
Notes:
•YoucanalsoreplacethemSATAsolidstatedrivewithaWirelessPCIExpressMiniCardforWirelessWAN.
•ReplacethemSATAsolidstatedriveonlyifyouneedtohaveitrepaired.
Prerequisitesfortheprocedure
WhenreplacingthemSATAsolidstatedrive,besuretofollowtheprecautions.
Attention:WhenyouarehandlinganmSATAsolidstatedrive:
•DonotdropthemSATAsolidstatedriveorsubjectittophysicalshocks.PutthemSATAsolidstatedrive
onamaterial,suchassoftcloththatabsorbsanyphysicalshocks.
•DonotapplypressuretothecoverofthemSATAsolidstatedrive.
ThemSATAsolidstatedriveisverysensitive.Incorrecthandlingcancausedamageandpermanentlossof
data.
BeforeremovingthemSATAsolidstatedrive,makeabackupcopyofalltheinformationonit,andthen
turnthecomputeroff.
NeverremovethemSATAsolidstatedrivewhilethesystemisoperating,insleep(standby)mode,orin
hibernationmode.
Chapter6.Replacingdevices143
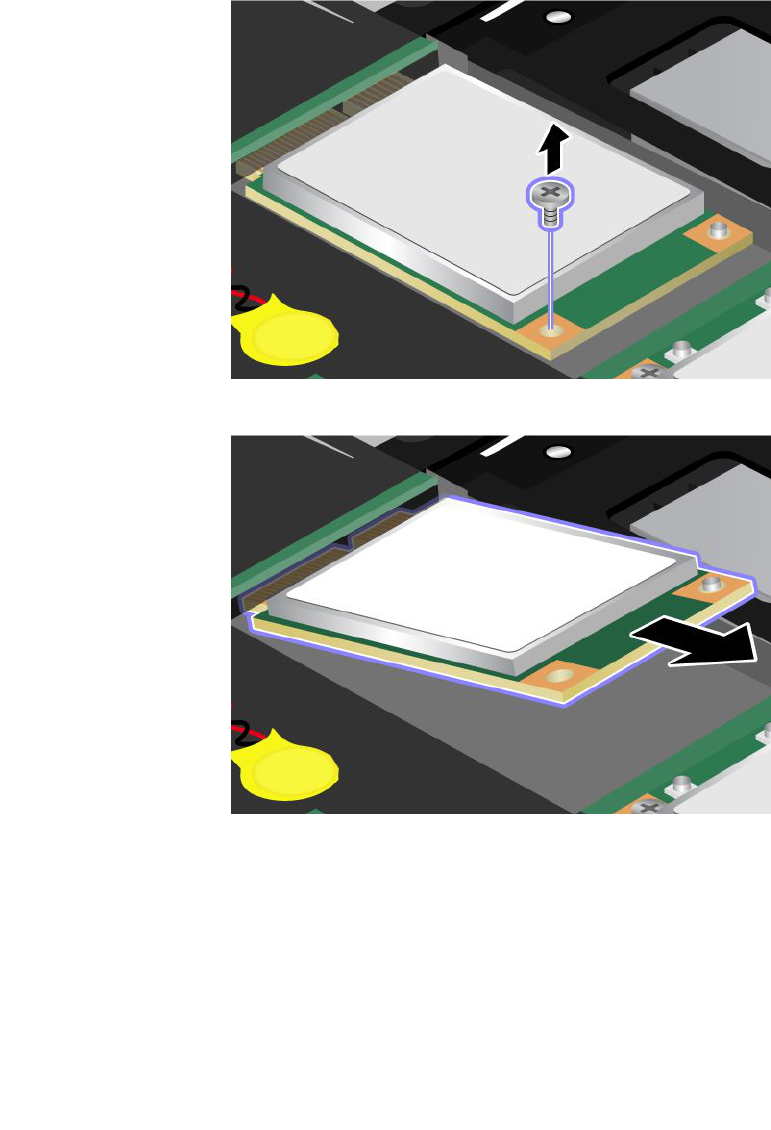
IfanmSATAsolidstatedriveisavailableinyourcomputer,toreplacethemSATAsolidstatedrive,do
asfollows.
1.Turnoffthecomputer;thendisconnecttheacpoweradapterandallcablesfromthecomputer.Waitfor
afewminutes,tilltheinsideofthecomputercools,beforeyoustartthefollowingprocedures.
2.Closethecomputerdisplay,andturnthecomputerover.
3.Removethebattery.Fordetails,refertotheinstructionsin“Removethebattery”onpage118.
4.Removethepalmrest.Fordetails,refertotheinstructionsin“Removethepalmrest”onpage124.
5.Removethescrew.Thecardpopsup.
6.Removethecard.
144UserGuide
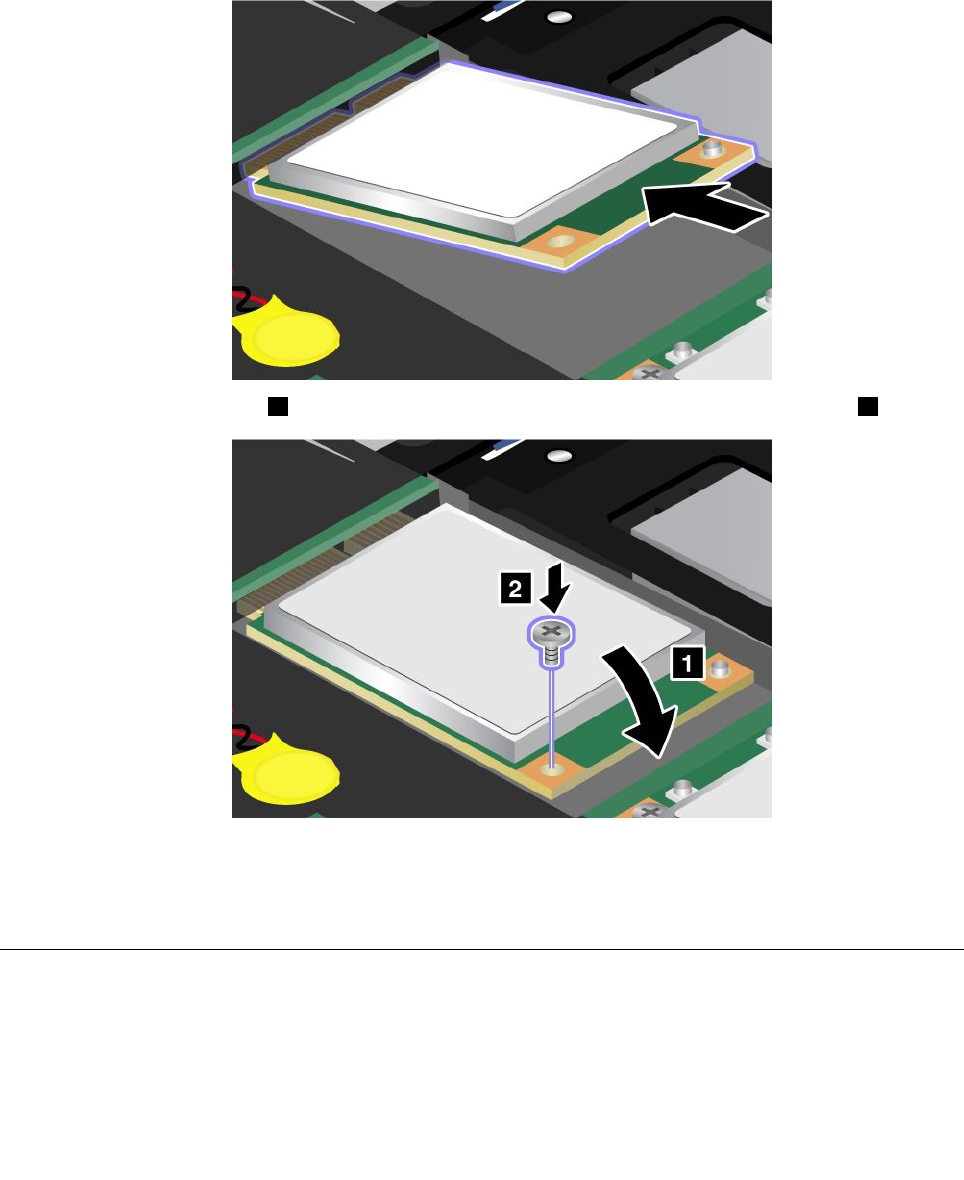
7.AlignthecontactedgeofanewmSATAsolidstatedrivewiththecorrespondingsocket.
Notes:
•YoucanalsoreplacethemSATAsolidstatedrivewithaWirelessPCIExpressMiniCardforWireless
WAN.
•ToinstallanewPCIExpressMiniCard,referto“InstallingandreplacingthePCIExpressMiniCard
forwirelessWANconnection”onpage139.
8.Pivotthecarddownward1untilyoucansnapitintoplace.Securethecardwiththescrew2.
9.Reinstallthekeyboard.Fordetails,refertotheinstructionsin“Reinstallthepalmrest”onpage124.
10.Reinstallthebattery.Fordetails,refertotheinstructionsin“Reinstallthebattery”onpage118.
11.Turnthecomputeroveragain.Connecttheacpoweradapterandcablestothecomputer;thenturniton.
Replacingmemory
Beforeyoustart,printtheseinstructions.
Prerequisitesfortheprocedure
Whenreplacingthememory,besuretofollowtheprecautions:
Chapter6.Replacingdevices145
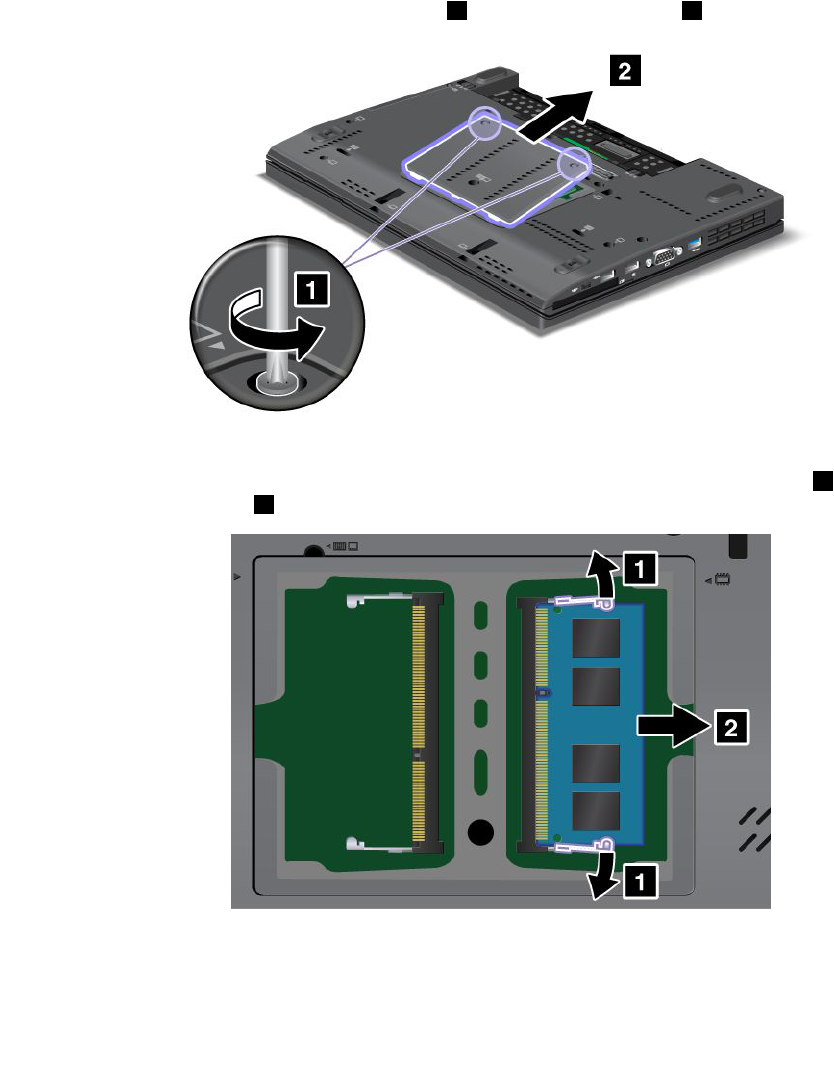
Note:Theoperatingspeedofthememorymoduledependsonthesystemcongurationofyourcomputer
anditscombinationwiththememorymoduleinstalledonyourcomputer.Insomeconditions,thememoryin
yourcomputermaynotbeabletooperateatthemaximumspeed.
Attention:Beforeyoustartinstallingamodule,touchametaltableoragroundedmetalobject.Thisaction
reducesanystaticelectricityfromyourbody.ThestaticelectricitycoulddamagetheSO-DIMM.
ToreplacetheSO-DIMM,dothefollowing:
1.Turnoffthecomputer;thendisconnecttheacpoweradapterandallcablesfromthecomputer.
2.Closethecomputerdisplay,andturnitover.
3.Removethebattery.Referto“Replacingthebattery”onpage118fordetailsabouthowtoreplacing
thebattery.
4.Loosenthescrewsonthememoryslotcover1,thenremovethecover2.
IfthetwoSO-DIMMsarealreadyinthememoryslots,removeanSO-DIMMtomakeroomforthe
newonebypressingoutonthelatchesonbothedgesofthesocketatthesametime1.Besure
tosaveitforfutureuse2.
5.FindthenotchonthecontactedgesideoftheSO-DIMMyouareinstalling.
Attention:ToavoiddamagingtheSO-DIMM,donottouchitscontactedge.
146UserGuide
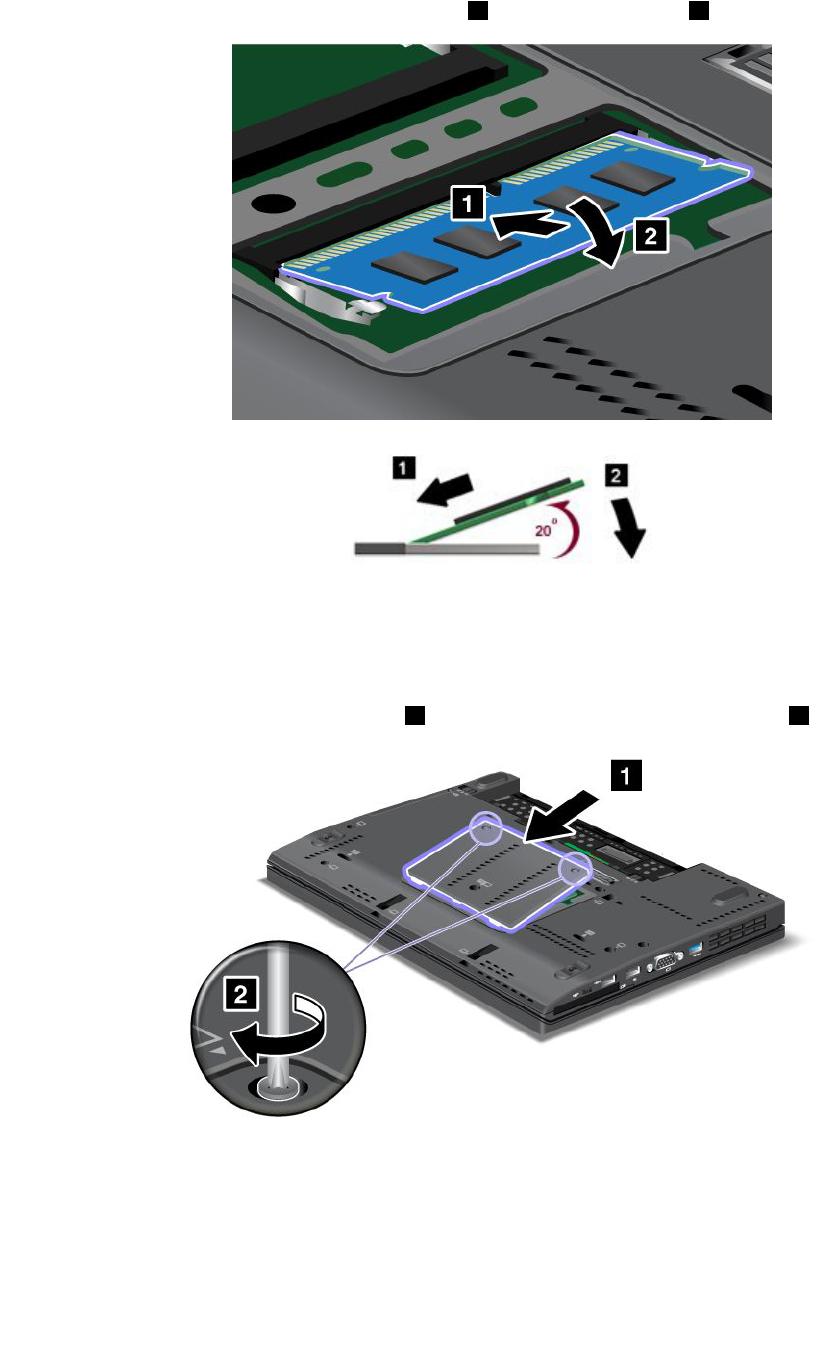
6.WiththenotchedendoftheSO-DIMMtowardthecontactedgesideofthesocket,inserttheSO-DIMM
intothesocketatanangleofabout20degrees1;thenpressitinrmly2.
Note:Ifyouinstallamemorymoduleinonlyoneofthetwomemoryslots,installitinthelowerslot.
7.PivottheSO-DIMMdownwarduntilitsnapsintoplace.
8.MakesurethattheSO-DIMMisrmlyxedintheslotandcannotbemovedeasily.
9.Putthememoryslotcoverbackinplace1,closethecover,andtightenthescrews2.
10.Putthebatterybackinplace,turnthecomputeroveragain,andreconnectthecables.Forinformation
abouthowtoreplacethebattery,referto“Replacingthebattery”onpage118.
TomakesurethattheSO-DIMMisinstalledcorrectly,doasfollows:
1.Turnthecomputeron.
Chapter6.Replacingdevices147
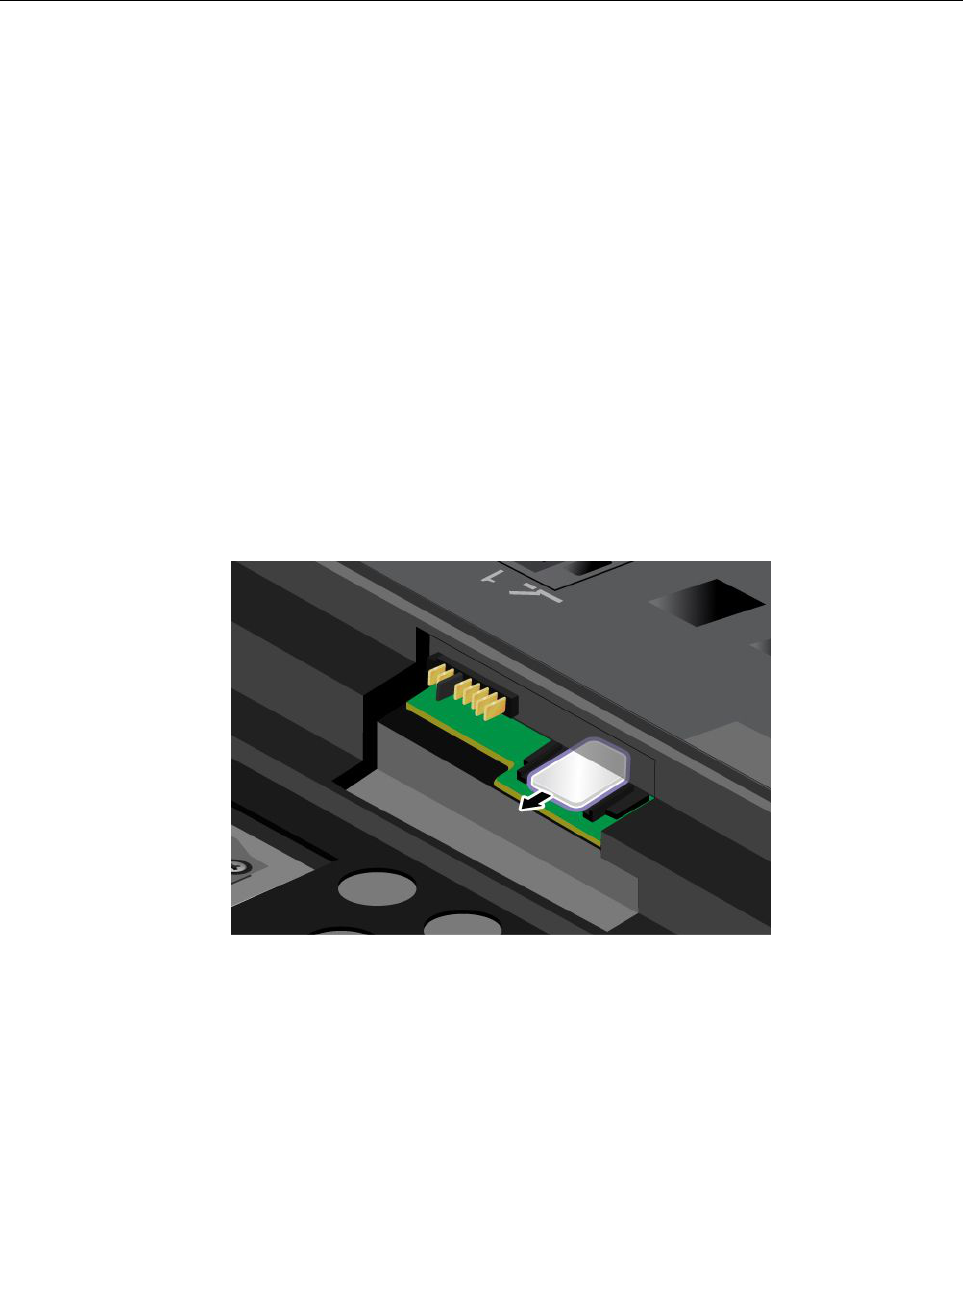
2.Whenthelogoscreenisdisplayed,presstheF1key.TheThinkPadSetupopens.The“Installed
memory”itemshowsthetotalamountofmemoryinstalledinyourcomputer.
ReplacingtheSIMcard
Beforeyoustart,printtheseinstructions.
YourcomputermayrequireaSIM(SubscriberIdenticationModule)cardtoestablishawirelessWAN(Wide
AreaNetwork)connections.Dependingonthecountryofdelivery,theSIMcardmaybealreadyinstalledin
yourcomputerorwillbepartoftheshippingcontentsthatcamewithyourcomputer.
IfyoundtheSIMcardsincludedintheshippingcontents,adummycardisinstalledintheSIMcard
slot.Thenproceedtothefollowinginstructions.
Ifyoundthedummycardintheshippingcontents,theSIMcardisalreadyinstalledintheSIMcard
slot,andnofurtherinstallationisneeded.
Note:TheSIMcardisidentiedbytheICchipmountedononesideofthecard.
ToreplacetheSIMcard,doasfollows.
1.Turnoffthecomputer;thendisconnecttheacpoweradapterandallcablesfromthecomputer.
2.Closethecomputerdisplay,andturnitover.
3.Removethebattery.Fordetails,refertotheinstructionsin“Removethebattery”onpage118.
4.FindtheSIMcardslotinsidetheopenbatterycompartment.Removethecard.
148UserGuide
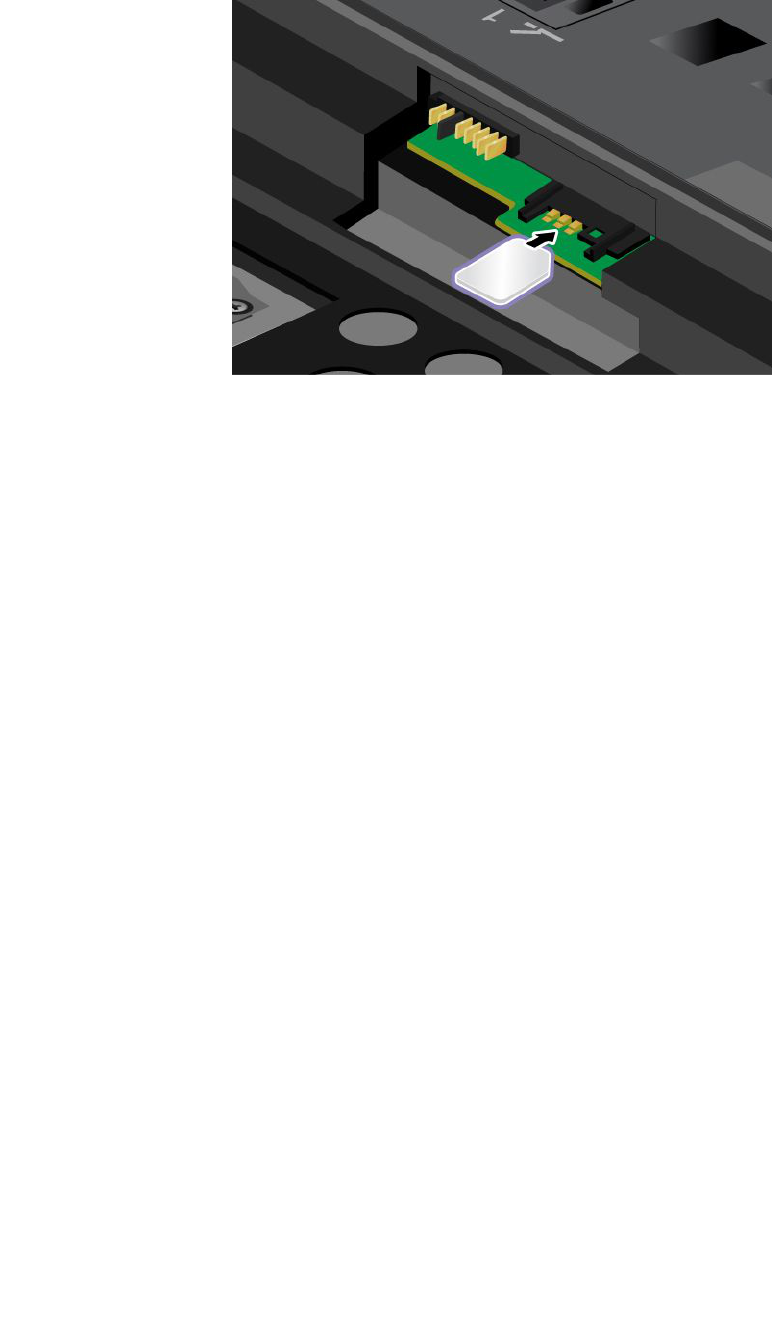
5.InserttheSIMcardrmlyintotheslot.
Note:MakesurethatyouinserttheSIMcardallthewayintotheslot.
6.Putthebatterybackinplace.Formoredetails,referto“Replacingthebattery”onpage118.
7.Turnthecomputeroveragain,andreconnectthecables.
Chapter6.Replacingdevices149

150UserGuide

Chapter7.Enhancingyourcomputer
Thissectionprovidesinformationoninstallingdevicesandtakingadvantageofyourcomputer's
high-technologyfeatures.
•“FindingThinkPadoptions”onpage151
•“ThinkPadX220UltraBase”onpage151
•“ThinkPadPortReplicatorSeries3,ThinkPadMiniDockSeries3,andThinkPadMiniDockPlusSeries
3”onpage161
FindingThinkPadoptions
Ifyouwanttoexpandthecapabilitiesofyourcomputer,Lenovohasanumberofhardwareaccessoriesand
upgradestomeetyourneeds.Optionsincludememory,storage,modems,networkingadapters,docking
stationsandportreplicators,batteries,poweradapters,printers,scanners,keyboards,mice,andmore.
YoucanshopatLenovo24hoursaday,7daysaweekdirectlyovertheWorldWideWeb.Allyouneedisan
Internetconnectionandacreditcard.
ToshopatLenovo,goto:
http://www.lenovo.com/accessories/services/index.html
ThinkPadX220UltraBase
YourThinkPadX220,X220i,X220Tablet,andX220iTabletsupporttheThinkPadX220UltraBase.
AfteryouattachyourcomputertotheThinkPadX220UltraBase,youcanuseitsconnectorsinplaceof
thecomputer's.
WhenthecomputerisattachedtotheThinkPadX220UltraBase,neverpickuptheassemblybytakinghold
ofthecomputeralone.Alwaysholdthewholeassembly.
FormoredetailsabouttheThinkPadX220UltraBase,refertothefollowing:
•ThinkPadX220Ultrabasetopview
•ThinkPadX220Ultrabasebottomview
•“AttachingaThinkPadX220Ultrabase”onpage153
•“DetachingaThinkPadX220Ultrabase”onpage155
•Securityfeature
©CopyrightLenovo2011151
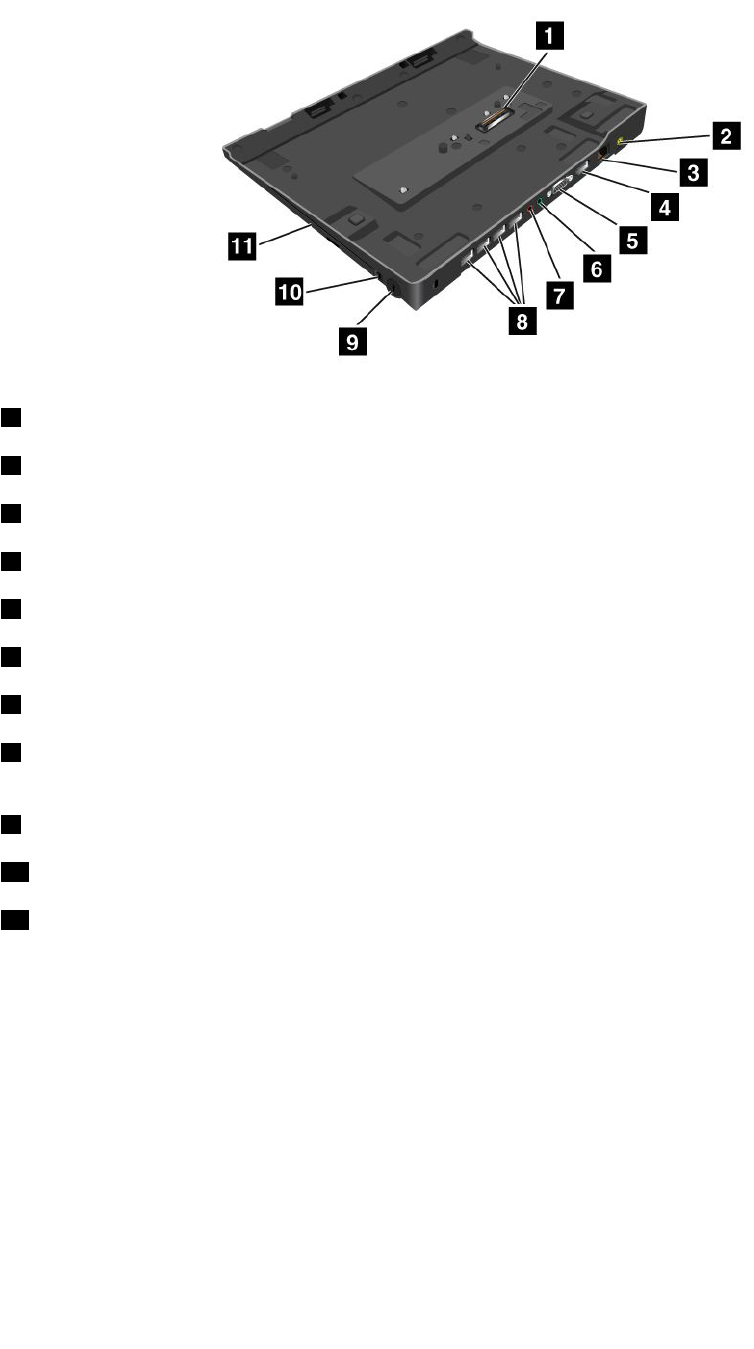
ThinkPadX220Ultrabasetopview
1ThedockingconnectorisusedforattachingtheThinkPadcomputertotheThinkPadX220UltraBase.
2ThepowerjackiswhereyouconnecttheACadapter.
3TheEthernetconnectorisforconnectingtheThinkPadX220UltraBasetoaLAN.
4TheDisplayPortconnectorisforconnectingaDisplayPort-compatibledisplaydevice.
5TheMonitorconnectorisforattachinganexternalmonitororaprojectortoyourcomputer.
6Theheadphonejack,ajack1/8inch(3.5mm)indiameter,isforconnectinganexternalheadphone.
7Themicrophonejack,ajack1/8inch(3.5mm)indiameter,isforconnectinganexternalmicrophone.
8TheUniversalSerialBus(USB)connectorisforconnectingthedevicesthatconformtotheUSB
interface.
9Thesecuritykeyholeisforlockingthedock.
10Thesystemlockkeyisforlockingtheejectbutton.
11Thebayisforopticaldiskdriveorsecondharddiskdrive.
152UserGuide
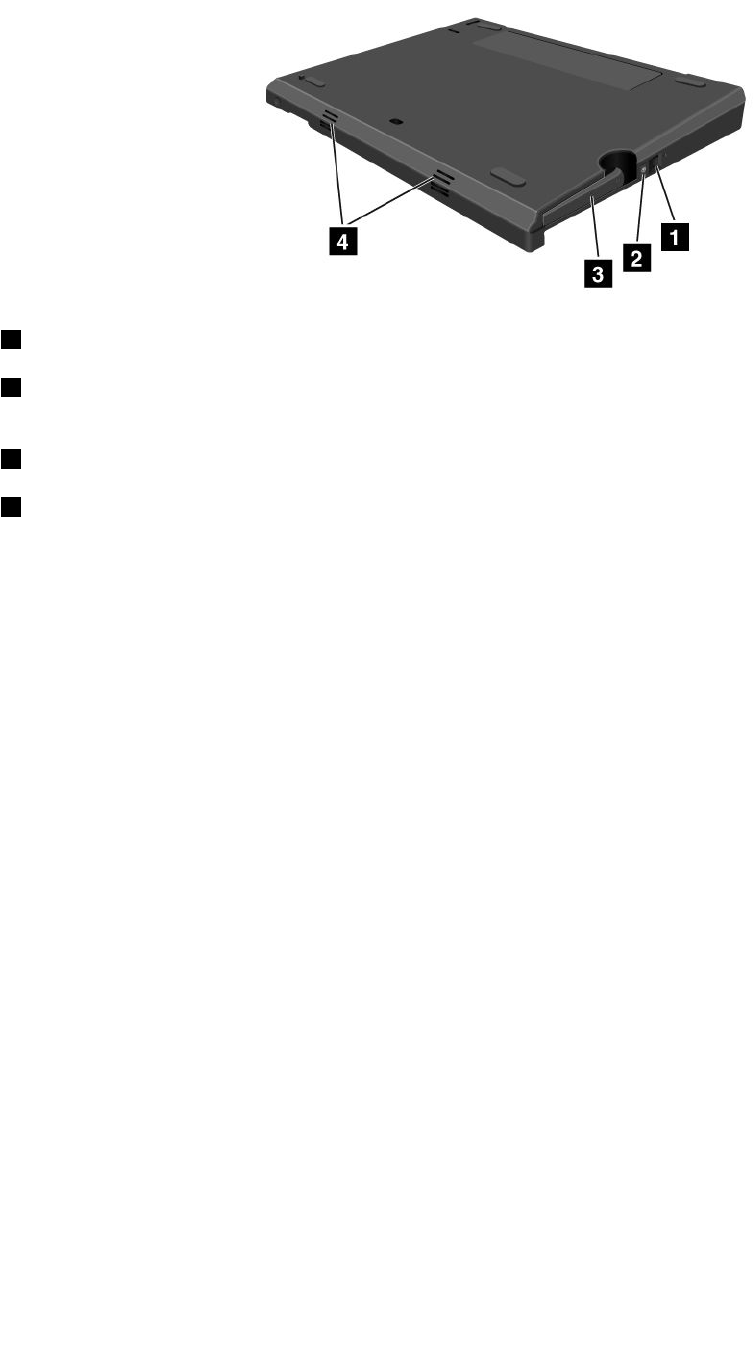
ThinkPadX220Ultrabasebottomview
1Bypressingtheejectrequestbutton,youcantelltheoperatingsystemtogetreadyforundocking.
2Thedockingindicatorisredwhenyourcomputerisdocked.Itblinkswhentheejectrequestbutton
ispressed.
3TheejectleverdetachesyourcomputerfromtheThinkPadX220UltraBase.
4Theholesareforthesystemspeakers.
AttachingaThinkPadX220Ultrabase
Attention:DisconnecttheACpowerfromyourcomputerbeforeyouattachtheThinkPadX220UltraBase.
TheACadapterconnectorwillbedamagedifitremainsconnectedtothecomputerduringtheattachment
YoucanhotattachorwarmattachthecomputertotheThinkPadX220UltraBase.Hotattachisattachingthe
computertotheThinkPadX220UltraBasewhileinoperatingmode;warmattachisattachingthecomputer
totheThinkPadX220UltraBasewhileinsleep(standby)mode.
Indoingahot-orwarm-attach,observethefollowing:
•Forhot-attaching:ThedockingindicatoroftheThinkPadX220UltraBaseshouldturnonafterafew
seconds.
•Forwarm-attaching:Whenthecomputerreturnsfromsleep(standby)mode,thedockingindicator
oftheThinkPadX220UltraBaseshouldturnon.
ToattachyourcomputertoaThinkPadX220Ultrabase,dothefollowing:
Chapter7.Enhancingyourcomputer153
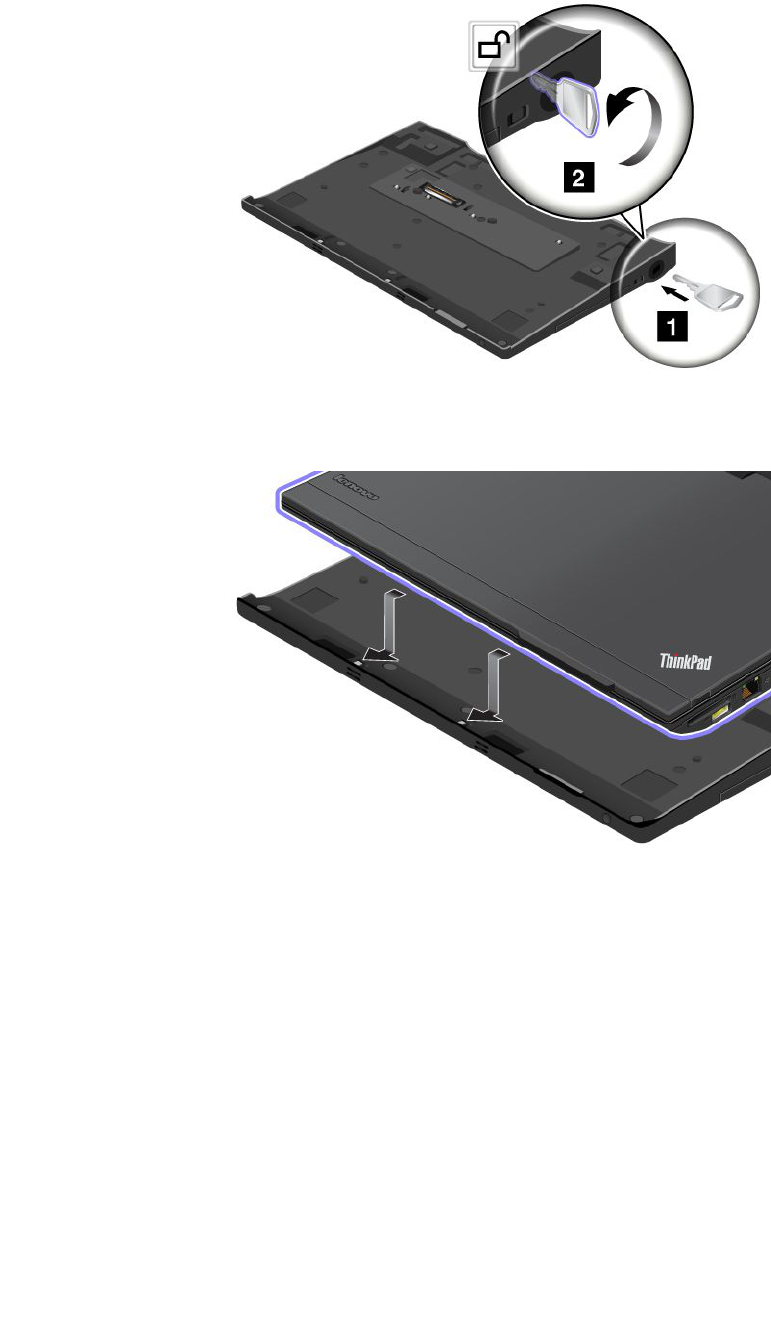
1.MakesurethatthesystemlockkeyoftheThinkPadX220UltraBaseisintheunlocked(vertical)position.
2.AlignthefrontofthecomputerwiththefrontoftheThinkPadX220UltraBase.
154UserGuide
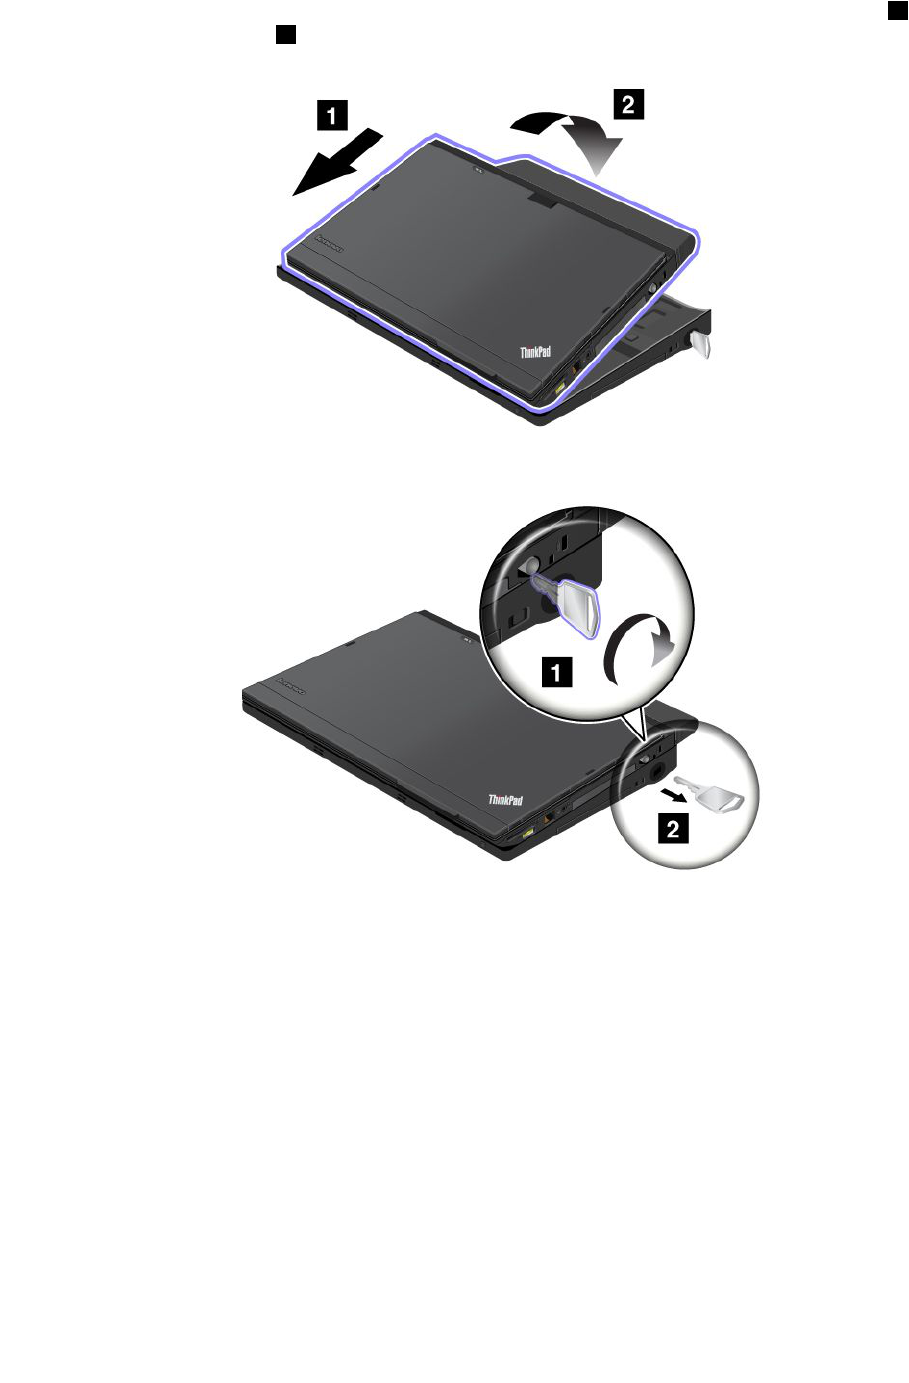
3.MakesurethattheguidesoftheThinkPadX220UltraBasealignwiththeholesofthecomputer1.Then
putthecomputerinplace2.Thedockingindicatorlights.
4.WhenthecomputerisalreadydockedtotheThinkPadX220UltraBase,youcanstartthecomputer.
Note:Youcanturnthekeyclockwisetolockit.Then,keepthesecuritykeyinasafeplace.Donotlosethis
key;otherwise,youwillbeunabletodetachthecomputerfromtheThinkPadX220UltraBase.
DetachingaThinkPadX220Ultrabase
Attention:DonotdetachyourcomputerfromtheThinkPadX220UltraBasewhilethedockingindicatorof
theThinkPadX220UltraBaseisblinkingoron.Waituntilthedockingindicatorturnsoff.Detachingwhilethe
indicatorisblinkingoroncausesthesystemtobeep,andthecomputermayhalt.
YoucanhotdetachorwarmdetachthecomputerfromtheThinkPadX220UltraBase.Hotdetachis
detachingthecomputerfromtheThinkPadX220UltraBasewhileinoperatingmode;warmdetachis
detachingthecomputerfromtheThinkPadX220UltraBasewhileinsleep(standby)mode.
Toperformahot-detach,followthestepsbelow:
ForWindows7andWindowsVista:
Chapter7.Enhancingyourcomputer155
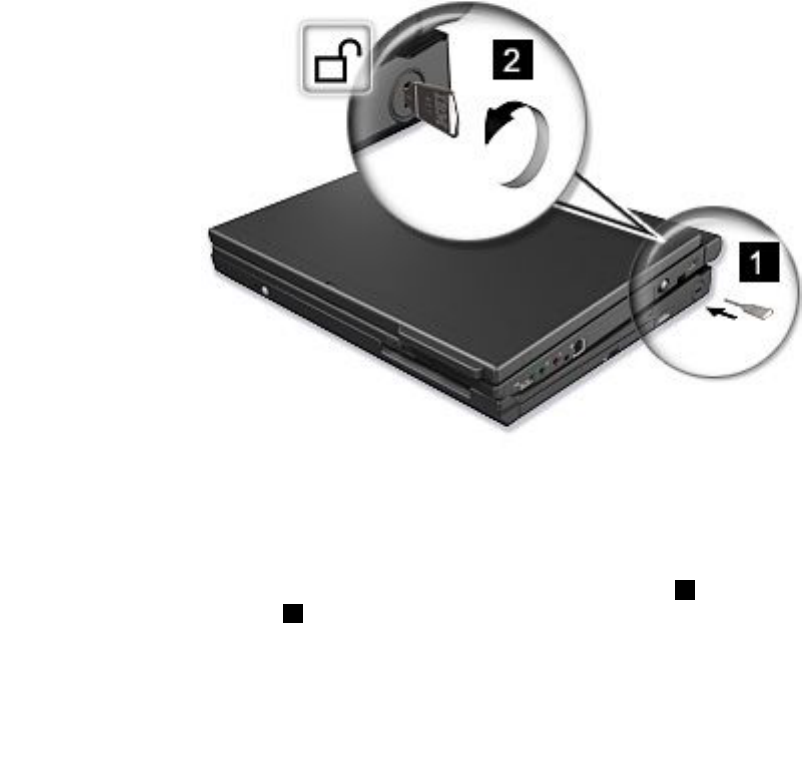
1.ClickStart,andthenpresstherightarrowbutton.
2.SelectUndock.
3.MakesurethatthedockingindicatoroftheThinkPadX220UltraBaseisoff.
ForWindowsXP:
1.SelecttheUndockComputerintheStartmenu.
2.MakesurethatthedockingindicatoroftheThinkPadX220UltraBaseisoff.
Note:DetachingtheUltraBasesuddenlywhilethecomputerisoperatingwithoutperformingtheprocedure
abovemaycausethesystemtomalfunctionorhang.
Toperformawarm-detach,presstheejectrequestbuttonoftheThinkPadX220UltraBase.Thesystemwill
thenresumewithanOKmessage.MakesurethatthedockingindicatoroftheThinkPadX220UltraBaseis
off.Thecomputerwillre-entersleep(standby)mode.
Ifyouarehot-orwarm-detachingthecomputer,makesurethat
•thedevicesconnectedtoUSB,Serial,andParallelconnectorsarenotinuse.
•theconnectiontoaModemorEthernetporthasended.
•thebatteryisfullycharged.
TodetachyourcomputerfromtheThinkPadX220Ultrabase,dothefollowing:
1.MakesurethatthesystemlockkeyoftheThinkPadX220UltraBaseisintheunlocked(vertical)position.
2.Closethecomputerdisplay.
3.Ifyouarehot/warm-detachingthecomputer,presstheejectrequestbuttonoftheThinkPadX220
UltraBase.ThenmakesurethattheejectinhibitindicatoroftheThinkPadX220UltraBaseisoff,andthe
ejectreadyindicatorlightsup.
4.ReleasetheejectleverontheleftsideoftheThinkPadX220UltraBase1untilthecomputerliftsup;
thenremovethecomputer2.
156UserGuide
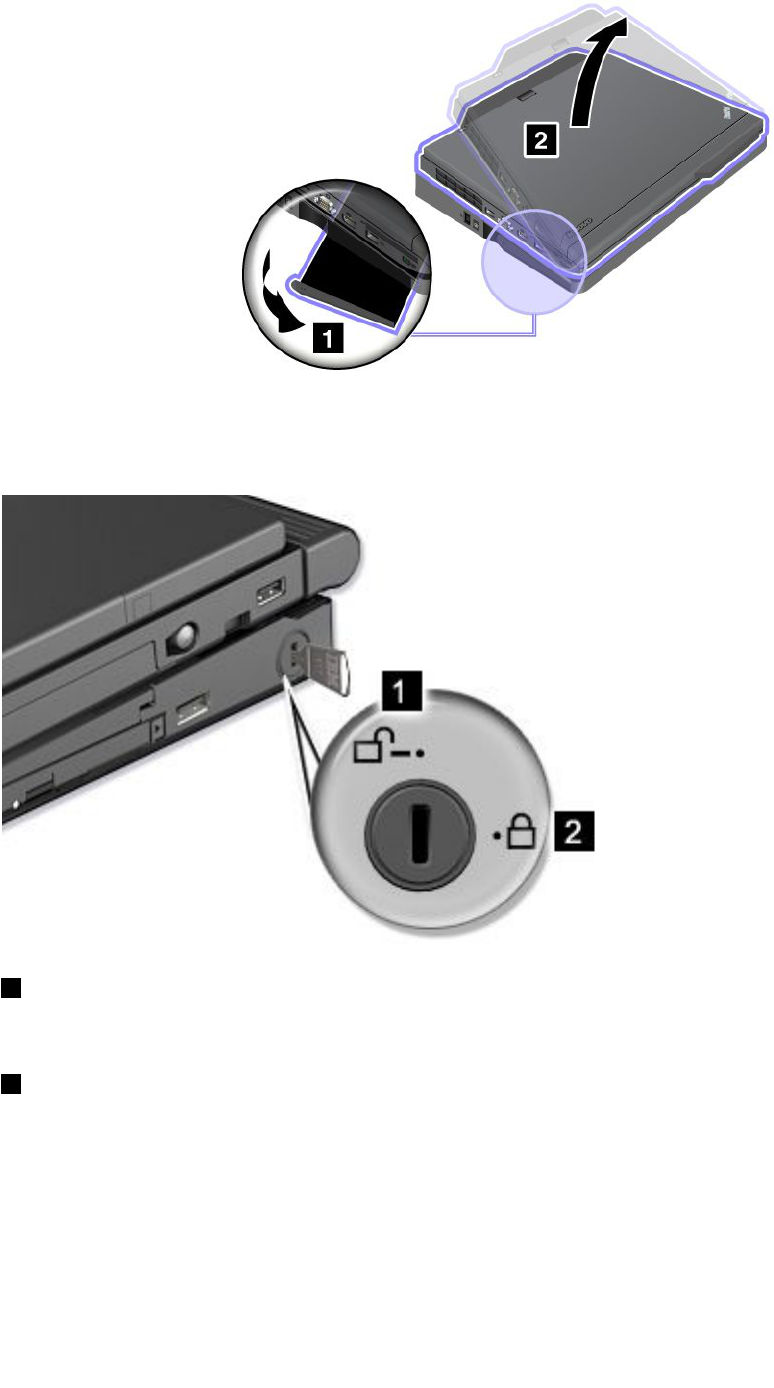
Securityfeature
ThelockoftheThinkPadX220UltraBasehastwopositions.
1Unlockposition:
IftheUltraBaselockisinthisposition,yourcomputerisnotsecured.
1Baselockposition:
IftheUltraBaselockisinthisposition,theThinkPadX220UltraBaseislocked,andthecomputercannotbe
removedfromtheThinkPadX220UltraBase.TheSerialUltrabaySlimdeviceisalsolockedandcannotbe
removedfromtheUltraBase.
Note:Keepthesecuritykeyinasafeplace.Donotlosethiskey;otherwise,youwillbeunabletodetach
thecomputerfromtheThinkPadX220UltraBase
Chapter7.Enhancingyourcomputer157
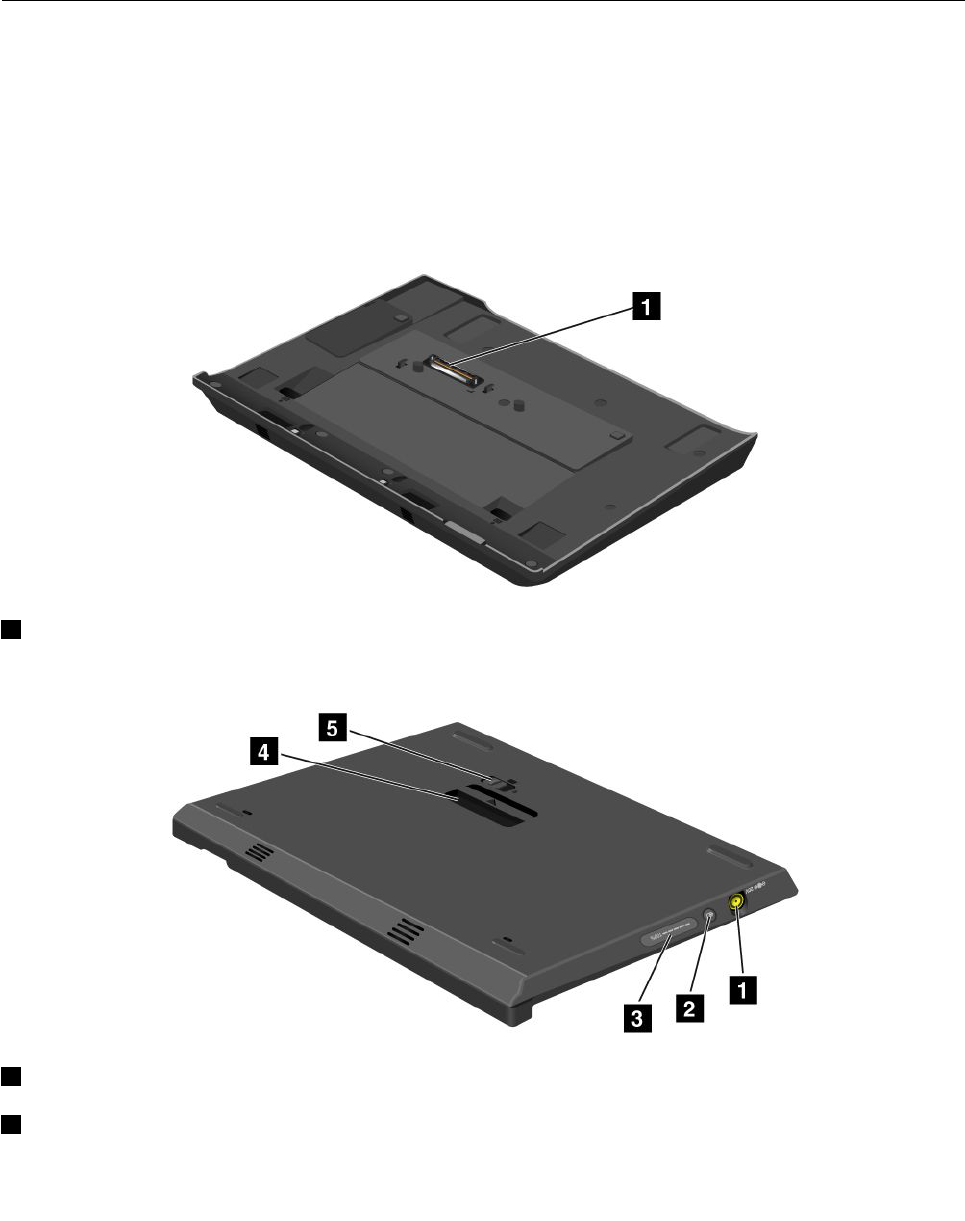
IfyouattachamechanicallocktothesecuritykeyholeoftheThinkPadX220UltraBase,theThinkPadX220
UltraBasecannotbetakenoutofthelockedposition,andyoucansecureyourcomputerandtheThinkPad
X220UltraBase.
Note:Youneedtopurchasethemechanicallockcommercially.Youareresponsibleforevaluating,selecting,
andimplementingthelockingdevicesandsecurityfeatures.
ThinkPadBattery19+
YourThinkPadX220,X220i,X220Tablet,andX220iTabletsupporttheThinkPadBattery19+.
WithThinkPadBattery19+,youcanextendtheoperatingtimeofyournotebookcomputer.
WhenthecomputerisattachedtotheThinkPadBattery19+,neverpickuptheassemblybytakingholdof
thecomputeralone.Alwaysholdthewholeassembly.
ThinkPadBattery19+topview
1ThedockingconnectorisusedforattachingtheThinkPadcomputertotheThinkPadBattery19+.
ThinkPadBattery19+bottomview
1ThepowerjackiswhereyouconnecttheACadapter.
2Bypressingtheindicatorbutton,thestatusindicatorshowstheThinkPadBattery19+chargestatus.
158UserGuide
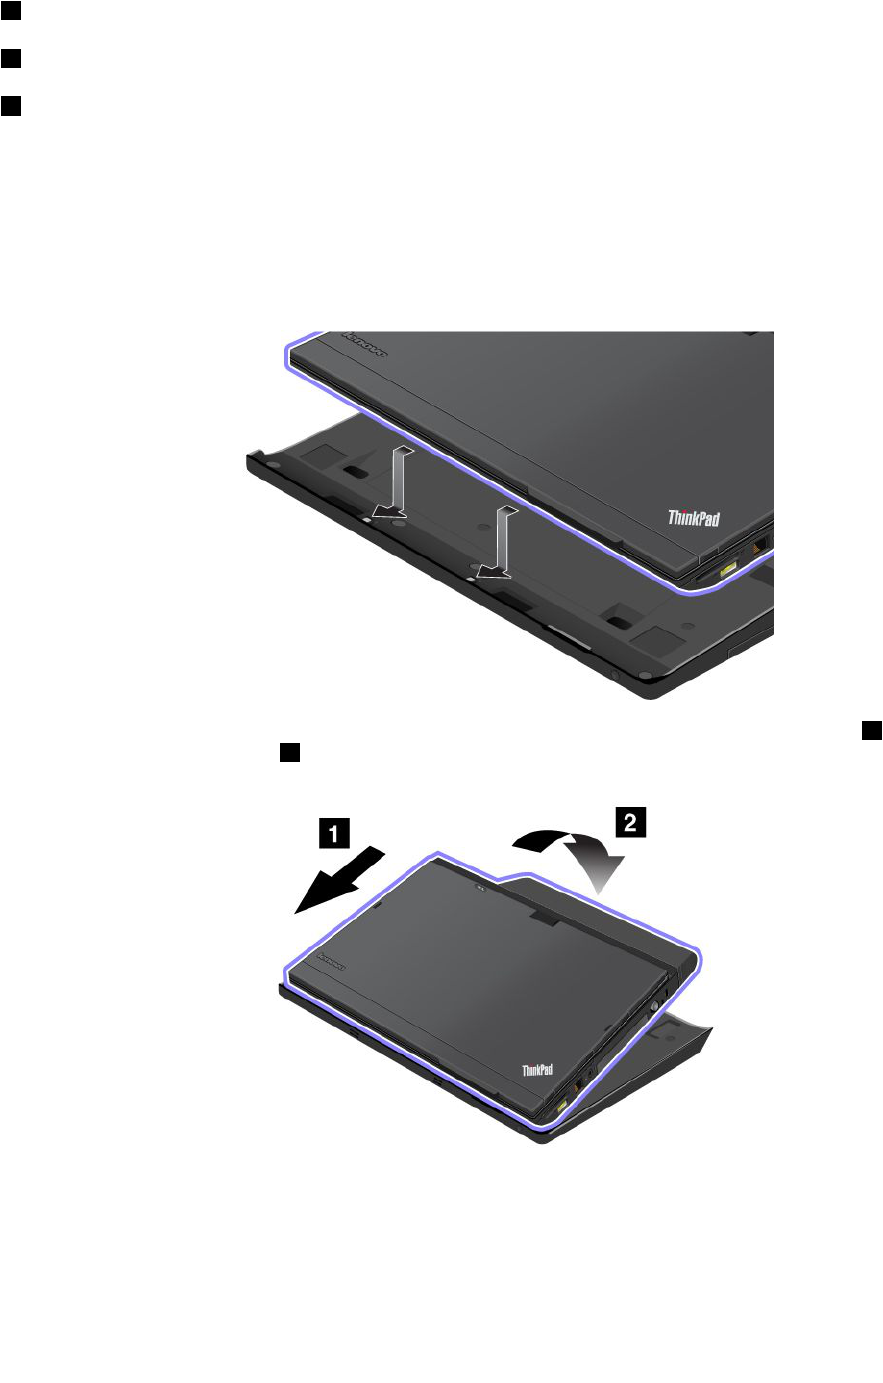
3ThestatusindicatoristoshowtheThinkPadBattery19+chargestatus.
4TheejectleveristoreleasetheThinkPadBattery19+fromthedockingconnectorinthecomputer.
5Thebatterylatchpreventstheejectleverfrombeingreleased.
AttachingaThinkPadBattery19+
Attention:DisconnecttheACpowerfromyourcomputerbeforeyouattachtheThinkPadBattery19+.The
ACadapterconnectorwillbedamagedifitremainsconnectedtothecomputerduringtheattachment.
ToattachaThinkPadBattery19+,dothefollowing:
1.AlignthefrontofthecomputerwiththefrontoftheThinkPadBattery19+.
2.MakesurethattheguidesoftheThinkPadBattery19+alignwiththeholesofthecomputer1.Then
putthecomputerinplace2.
DetachingaThinkPadBattery19+
TodetachaThinkPadBattery19+,dothefollowing:
1.Unlockthebatterylatchbyslidingittotheunlockposition.
Chapter7.Enhancingyourcomputer159
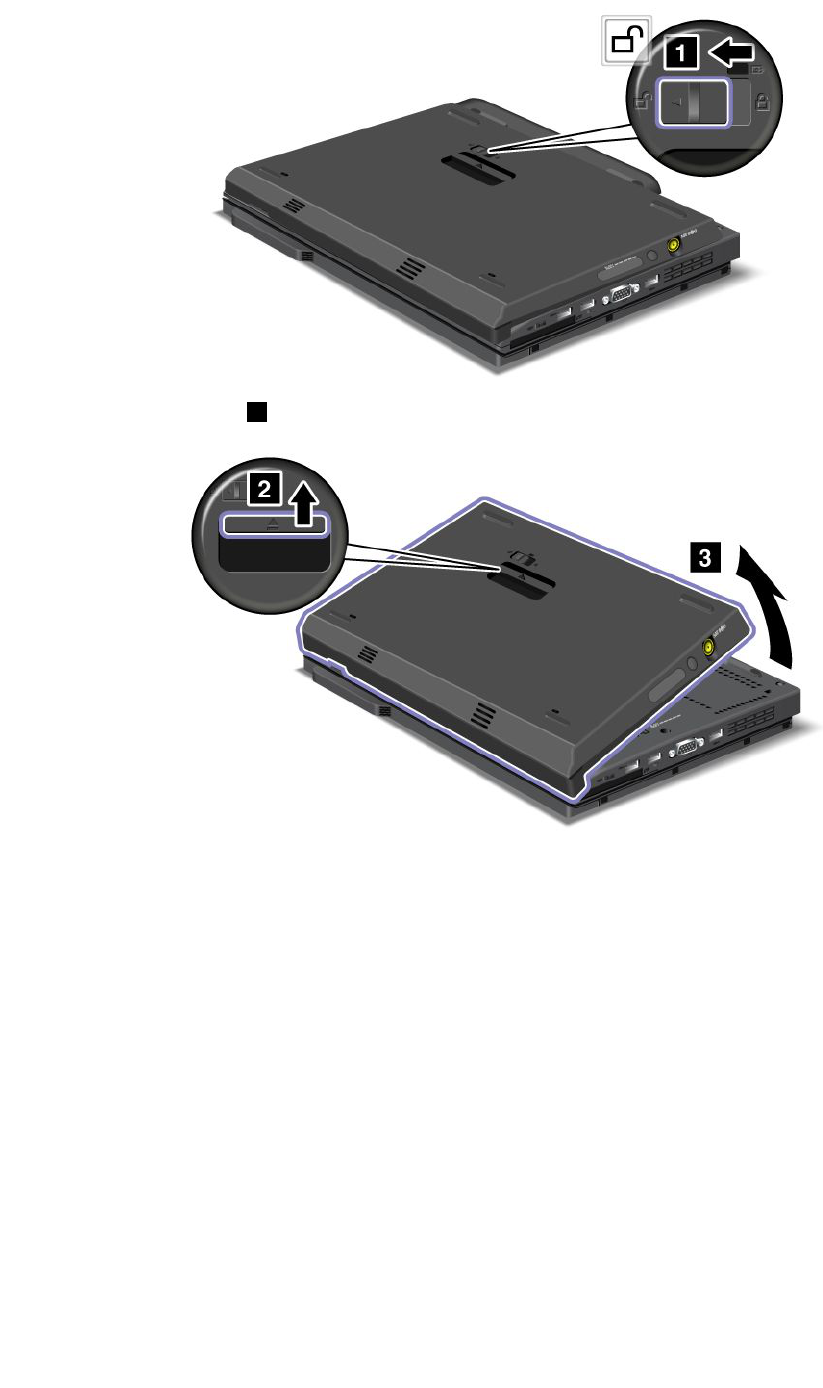
2.Releasetheejectlever2andpulluptheThinkPadBattery19+.
ChargingaThinkPadBattery19+
TheThinkPadBattery19+canbechargedseparately.
160UserGuide
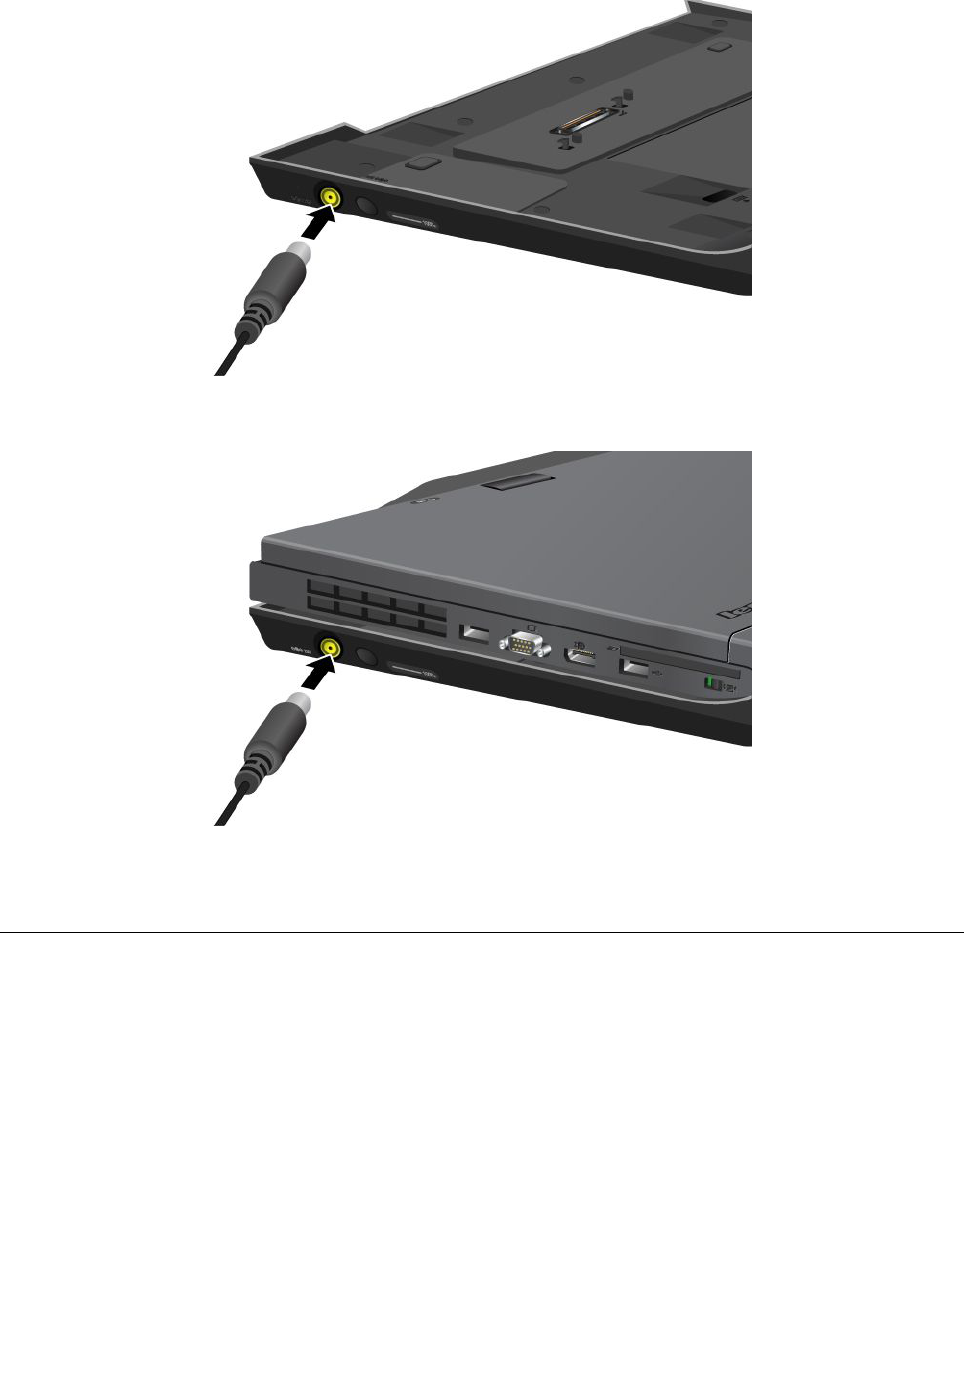
TheThinkPadBattery19+canalsobechargedwithacomputer.
WhentheThinkPadBattery19+ischargedwithacomputer,boththemainbatteryandThinkPadBattery
19+canbechargedsimultaneously.
ThinkPadPortReplicatorSeries3,ThinkPadMiniDockSeries3,and
ThinkPadMiniDockPlusSeries3
Note:OnlyThinkPadX220andX220isupportThinkPadPortReplicatorSeries3,ThinkPadMiniDock
Series3,andThinkPadMiniDockPlusSeries3.
AfteryouattachyourcomputertotheThinkPadPortReplicatorSeries3,theThinkPadMiniDockSeries3,or
theThinkPadMiniDockPlusSeries3,youcanuseitsconnectorsinplaceofthecomputer's.
WhenthecomputerisattachedtotheThinkPadPortReplicatorSeries3,theThinkPadMiniDockSeries
3,ortheThinkPadMiniDockPlusSeries3,neverpickuptheassemblybytakingholdofthecomputer
alone.Alwaysholdthewholeassembly.
FormoredetailsabouttheThinkPadPortReplicatorSeries3,theThinkPadMiniDockSeries3,orthe
ThinkPadMiniDockPlusSeries3,refertothefollowing:
Chapter7.Enhancingyourcomputer161
•“Frontview”onpage162
•“Rearview”onpage165
•“AttachingaThinkPadPortReplicatorSeries3,ThinkPadMiniDockSeries3,orThinkPadMiniDock
PlusSeries3”onpage168
•“DetachingaThinkPadPortReplicatorSeries3,ThinkPadMiniDockSeries3,andThinkPadMiniDock
PlusSeries3”onpage170
•“Securityfeature”onpage172
•“Usingthesystemlockkey”onpage174
Frontview
ThinkPadPortReplicatorSeries3
1Thepowerswitchturnsthecomputeronandoff.
2TheejectbuttonreleasesthecomputerfromtheThinkPadPortReplicatorSeries3whenpressed.
3Theslidingadjusterisaguideusedtoalignthedockingconnectoronyourcomputerasyouattach
theThinkPadPortReplicatorSeries3.
4Thedockingconnectoriswhereyouattachyourcomputer.
162UserGuide
ThinkPadMiniDockSeries3
1Thepowerswitchturnsthecomputeronandoff.
2Thekeylockindicatorlightswhenthesystemlockkeyisinthelockedposition.Whenthesystemlock
keyisinthelockedposition,theejectbuttonoftheThinkPadMiniDockSeries3islocked;youcannot
attachorremoveyourcomputer.
3Thedockingindicatorlightswhenyourcomputerisdocked.
4TheejectbuttonreleasesthecomputerfromtheThinkPadMiniDockSeries3whenpressed.
5Theslidingadjusterisaguideusedtoalignthedockingconnectoronyourcomputerasyouattachthe
ThinkPadMiniDockSeries3.
6Thedockingconnectoriswhereyouattachyourcomputer.
7Thesystemlockkeyisforlockingtheejectbutton.
Chapter7.Enhancingyourcomputer163
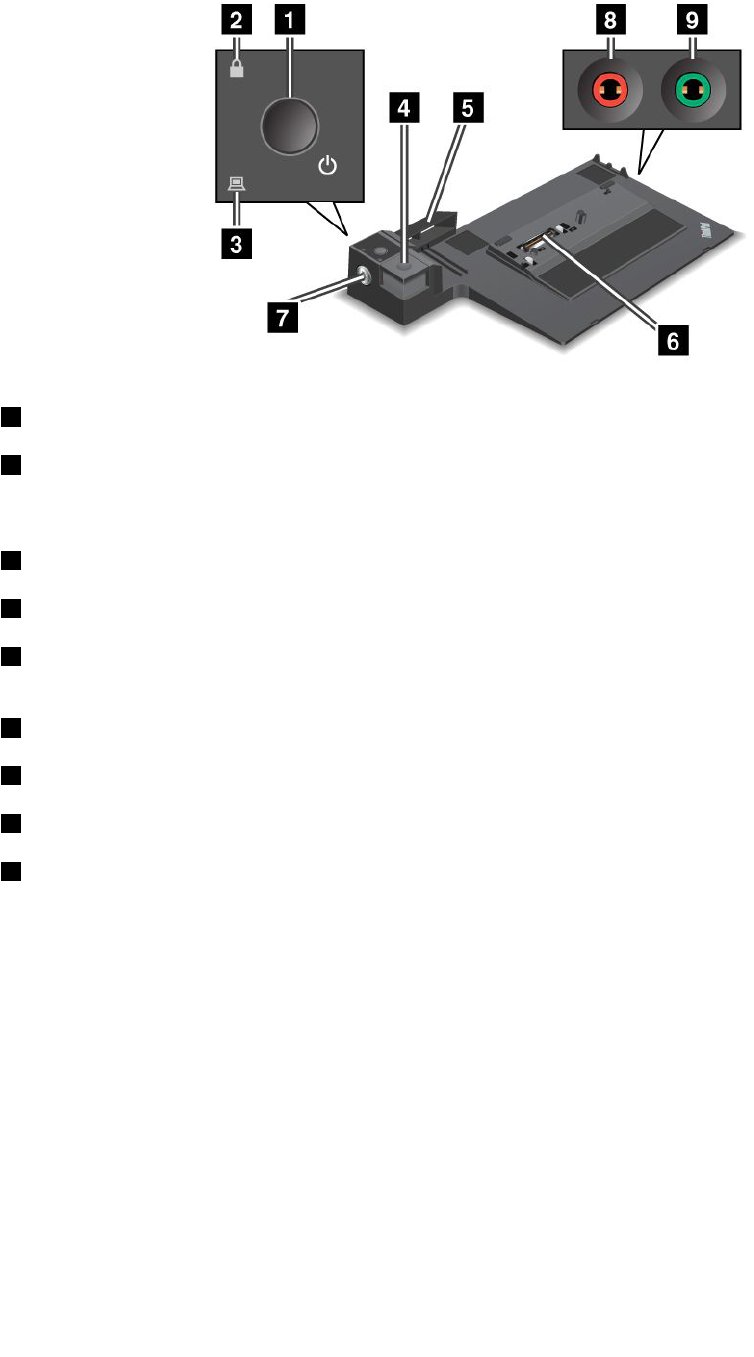
ThinkPadMiniDockPlusSeries3
1Thepowerswitchturnsthecomputeronandoff.
2Thekeylockindicatorlightswhenthesystemlockkeyisinthelockedposition.Whenthesystem
lockkeyisinthelockedposition,theejectbuttonoftheThinkPadMiniDockPlusSeries3islocked;you
cannotattachorremoveyourcomputer.
3Thedockingindicatorlightswhenyourcomputerisdocked.
4TheejectbuttonreleasesthecomputerfromtheThinkPadMiniDockPlusSeries3whenpressed.
5Theslidingadjusterisaguideusedtoalignthedockingconnectoronyourcomputerasyouattach
theThinkPadMiniDockPlusSeries3.
6Thedockingconnectoriswhereyouattachyourcomputer.
7Thesystemlockkeyisforlockingtheejectbutton.
8Themicrophonejack,ajack1/8inch(3.5mm)indiameter,isforconnectinganexternalmicrophone.
9Theheadphonejack,ajack1/8inch(3.5mm)indiameter,isforconnectinganexternalstereoheadphone.
164UserGuide
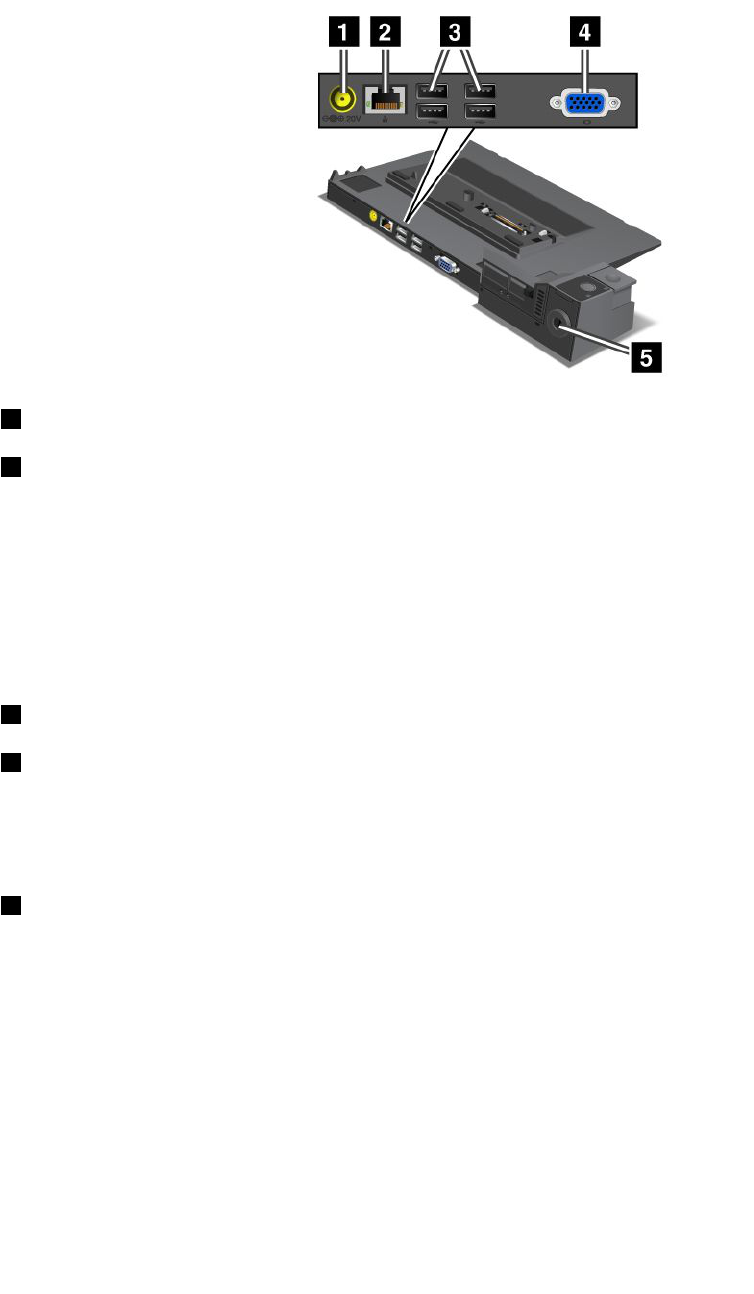
Rearview
ThinkPadPortReplicatorSeries3
1Thepowerjackisforconnectingtheacpoweradapter.
2TheEthernetconnectorisforconnectingtheThinkPadPortReplicatorSeries3toanEthernetLAN.
Theindicatorontheconnectoristhesameasthatonthecomputer.
Notes:
•YoucannotusetheTokenRingcableforthisconnector.
•Youcanusethisconnectorfora10BASE-T/100BASE-TX/1000BASE-TEthernet.
IfyouattachyourcomputertotheThinkPadPortReplicatorSeries3anduseanEthernetconnector,usethe
EthernetconnectorontheThinkPadPortReplicatorSeries3,nottheoneonthecomputer.
3TheUniversalSerialBusconnectorsareforconnectingUSB1.1andUSB2.0devices.
4Theexternalmonitorconnectorisforconnectinganexternalmonitor.
Note:IfyouattachyourcomputertotheThinkPadPortReplicatorSeries3anduseanexternalmonitor
connector,usetheexternalmonitorconnectorontheThinkPadPortReplicatorSeries3,nottheoneonthe
computer.
5Whenyouattachamechanicallocktothesecuritykeyhole,theejectbuttonislockedsothatthe
computercannotberemovedfromtheThinkPadPortReplicatorSeries3.
Chapter7.Enhancingyourcomputer165
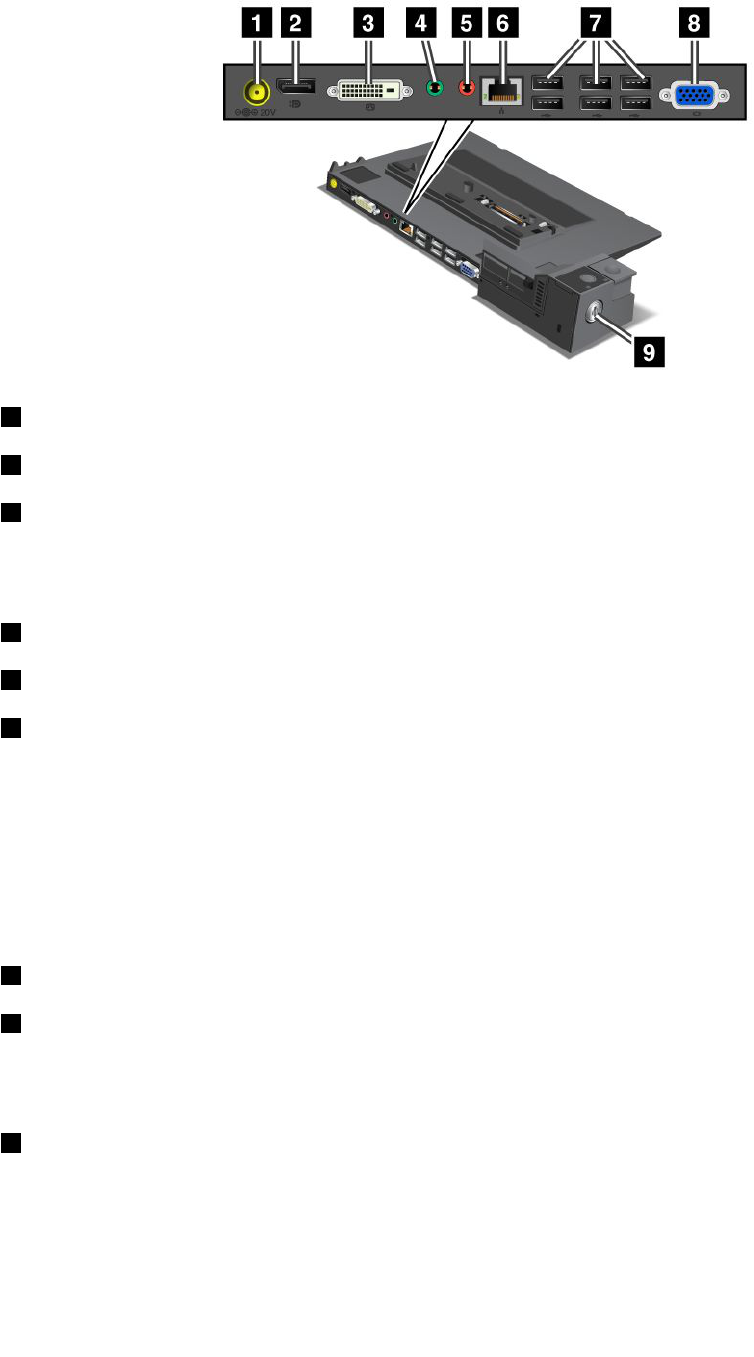
ThinkPadMiniDockSeries3
1Thepowerjackisforconnectingtheacpoweradapter.
2TheDisplayPortisforconnectingadisplaydevice.
3ThedigitalvisualinterfaceconnectorisforconnectingamonitorthatsupportsSingle-LinkDVI.
Note:TheDVIconnectorprovidesadigitalinterfaceonly.Thisconnectorcanbeusedwithacomputerthat
supportsDVIviadockingonly.
4Theheadphonejack,ajack1/8inch(3.5mm)indiameter,isforconnectinganexternalstereoheadphone.
5Themicrophonejack,ajack1/8inch(3.5mm)indiameter,isforconnectinganexternalmicrophone.
6TheEthernetconnectorisforconnectingtheThinkPadMiniDockSeries3toanEthernetLAN.The
indicatorontheconnectoristhesameasthatonthecomputer.
Notes:
•YoucannotusetheTokenRingcableforthisconnector.
•Youcanusethisconnectorfora10BASE-T/100BASE-TX/1000BASE-TEthernet.
IfyouattachyourcomputertotheThinkPadMiniDockSeries3anduseanEthernetconnector,usethe
EthernetconnectorontheThinkPadMiniDockSeries3,nottheoneonthecomputer.
7TheUniversalSerialBusconnectorsareforconnectingUSB1.1andUSB2.0devices.
8Theexternalmonitorconnectorisforconnectinganexternalmonitor.
Note:IfyouattachyourcomputertotheThinkPadMiniDockSeries3anduseanexternalmonitorconnector,
usetheexternalmonitorconnectorontheThinkPadMiniDockSeries3,nottheoneonthecomputer.
9Whenyouattachamechanicallocktothesecuritykeyhole,theejectbuttonislockedsothatthe
computercannotberemovedfromtheThinkPadMiniDockSeries3.
166UserGuide

ThinkPadMiniDockPlusSeries3
1TheDisplayPortisforconnectingadisplaydevice.
2ThedigitalvisualinterfaceconnectorisforconnectingamonitorthatsupportsSingle-LinkDVI.
Note:TheDVIconnectorprovidesadigitalinterfaceonly.Thisconnectorcanbeusedwithacomputerthat
supportsDVIviadockingonly.
3TheDisplayPortisforconnectingadisplaydevice.
4ThedigitalvisualinterfaceconnectorisforconnectingamonitorthatsupportsSingle-LinkDVI.
Note:TheDVIconnectorprovidesadigitalinterfaceonly.Thisconnectorcanbeusedwithacomputerthat
supportsDVIviadockingonly.
5TheEthernetconnectorisforconnectingtheThinkPadMiniDockPlusSeries3toanEthernetLAN.
Theindicatorontheconnectoristhesameasthatonthecomputer.
Notes:
•YoucannotusetheTokenRingcableforthisconnector.
•Youcanusethisconnectorfora10BASE-T/100BASE-TX/1000BASE-TEthernet.
IfyouattachyourcomputertotheThinkPadMiniDockPlusSeries3anduseanEthernetconnector,usethe
EthernetconnectorontheThinkPadMiniDockPlusSeries3,nottheoneonthecomputer.
6TheUniversalSerialBusconnectorsareforconnectingUSB1.1andUSB2.0devices.
7Thepowerjackisforconnectingtheacpoweradapter.
8TheeSATAisforconnectinganeSATAdevice.
9Theexternalmonitorconnectorisforconnectinganexternalmonitor.
Note:IfyouattachyourcomputertotheThinkPadMiniDockPlusSeries3anduseanexternalmonitor
connector,usetheexternalmonitorconnectorontheThinkPadMiniDockPlusSeries3,nottheoneonthe
computer.
Chapter7.Enhancingyourcomputer167
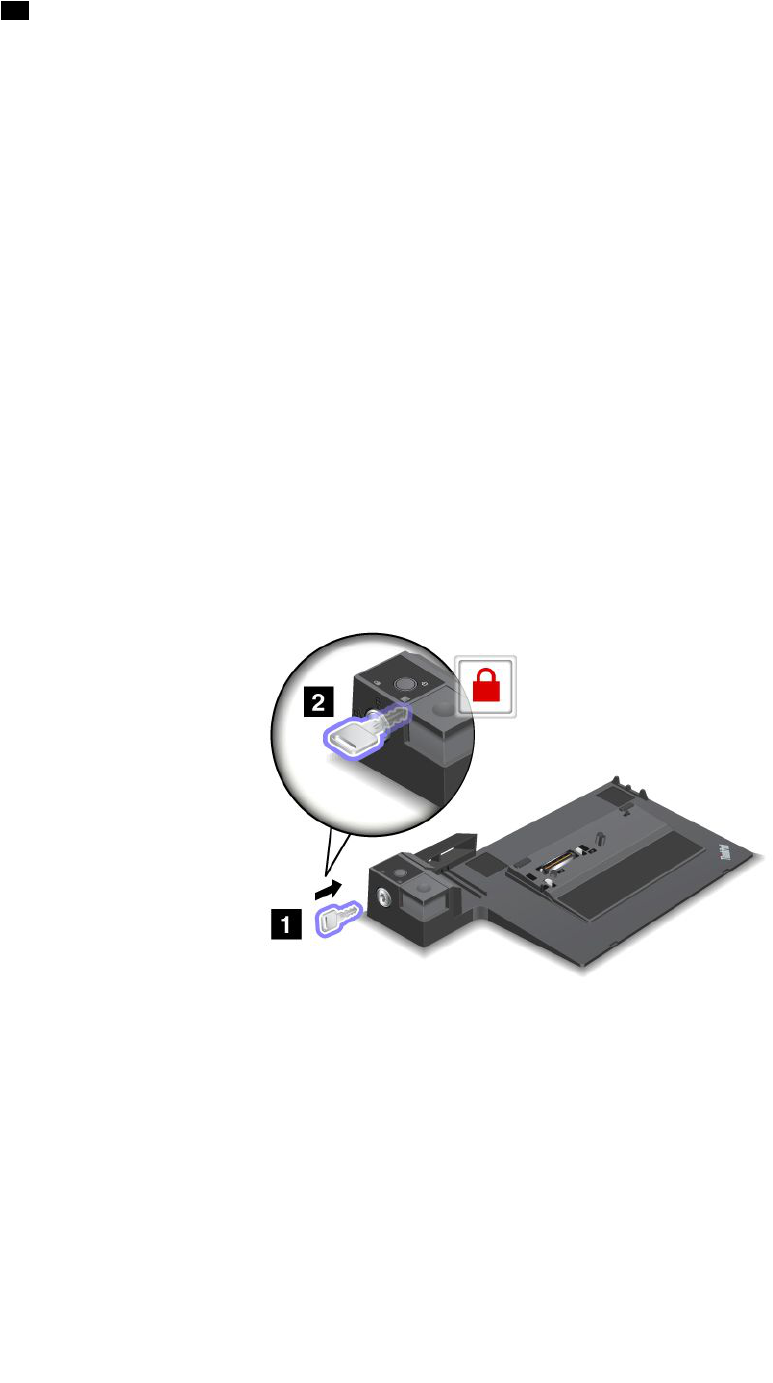
10Whenyouattachamechanicallocktothesecuritykeyhole,theejectbuttonislockedsothatthe
computercannotberemovedfromtheThinkPadMiniDockPlusSeries3.
AttachingaThinkPadPortReplicatorSeries3,ThinkPadMiniDock
Series3,orThinkPadMiniDockPlusSeries3
ToattachyourcomputertoaThinkPadPortReplicatorSeries3,aThinkPadMiniDockSeries3,ora
ThinkPadMiniDockPlusSeries3,dothefollowing:
ThefollowingdrawingsarefortheThinkPadMiniDockSeries3ortheThinkPadMiniDockPlusSeries3.
TheprocedureisthesamefortheThinkPadPortReplicatorSeries3.
Notes:
•BeforeyouattachthecomputertoaThinkPadPortReplicatorSeries3,aThinkPadMiniDockSeries3,or
aThinkPadMiniDockPlusSeries3,disconnectanacpoweradapterfromthecomputer.
•Ifyourcomputerisoperating,makesurethatithasnishedanyoperationsinvolvingdevicesthatare
connectedtoaUSBconnectorandaUSB/eSATAconnector.Alsomakesurethatanyconnectionto
anEthernetporthasended.
•BeforeyouattachyourcomputertoaThinkPadMiniDockSeries3,oraThinkPadMiniDockPlusSeries
3),makesurethatthesystemlockkeyisinplaceandintheunlocked(horizontal)position.
1.Toattachyourcomputer,makesurethatthesystemlockkeyisinplaceandintheunlocked(horizontal)
positionfortheThinkPadMiniDockSeries3,ortheThinkPadMiniDockPlusSeries3.Makesurethat
themechanicallockisdetachedfortheThinkPadPortReplicatorSeries3.
168UserGuide
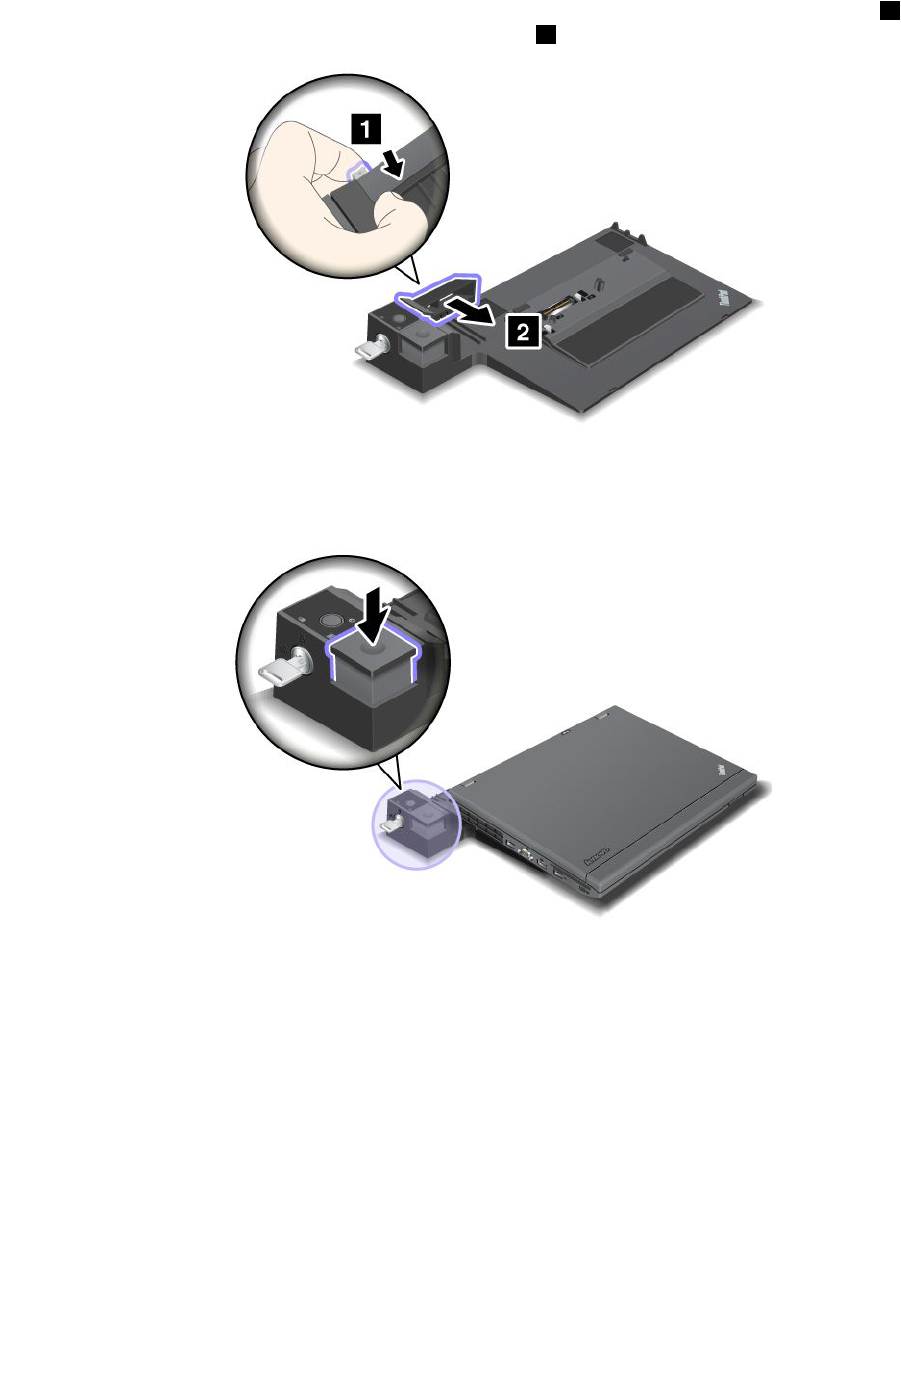
2.PressthebuttonoftheThinkPadMiniDockSeries3,ortheThinkPadMiniDockPlusSeries31.Pull
theslidingadjusterinthedirectionshownbythearrow2.
3.PutyourcomputerontheplatformoftheThinkPadMiniDockSeries3,ortheThinkPadMiniDockPlus
Series3,makingsurethatthetop-leftcornerofthecomputerisalignedtotheguideplateonthe
ThinkPadMiniDockSeries3,ortheThinkPadMiniDockPlusSeries3.
4.InsertyourcomputerintotheThinkPadMiniDockSeries3,ortheThinkPadMiniDockPlusSeries3,
alongthesurface,untilyouhearaclick.ThecomputerisnowattachedtotheThinkPadMiniDock
Series3,ortheThinkPadMiniDockPlusSeries3).
Note:IfthedockingindicatorisnotlightedafteryouattachtheThinkPadMiniDockSeries3,orthe
ThinkPadMiniDockPlusSeries3,yourcomputerisnotproperlyconnectedtothedock.Checkthe
acpoweradapterofthedock,ordisconnectandre-attachtheacpoweradapter.Thenattachyour
computertothedock.
Notes:
•IfyouattachtheThinkPadPortReplicatorSeries3,theThinkPadMiniDockSeries3,ortheThinkPadMini
DockPlusSeries3toyourcomputer,butdonotconnecttheacpoweradapterofthatattachmenttothe
powerjack,yourcomputergoesintobatterymode.
Chapter7.Enhancingyourcomputer169
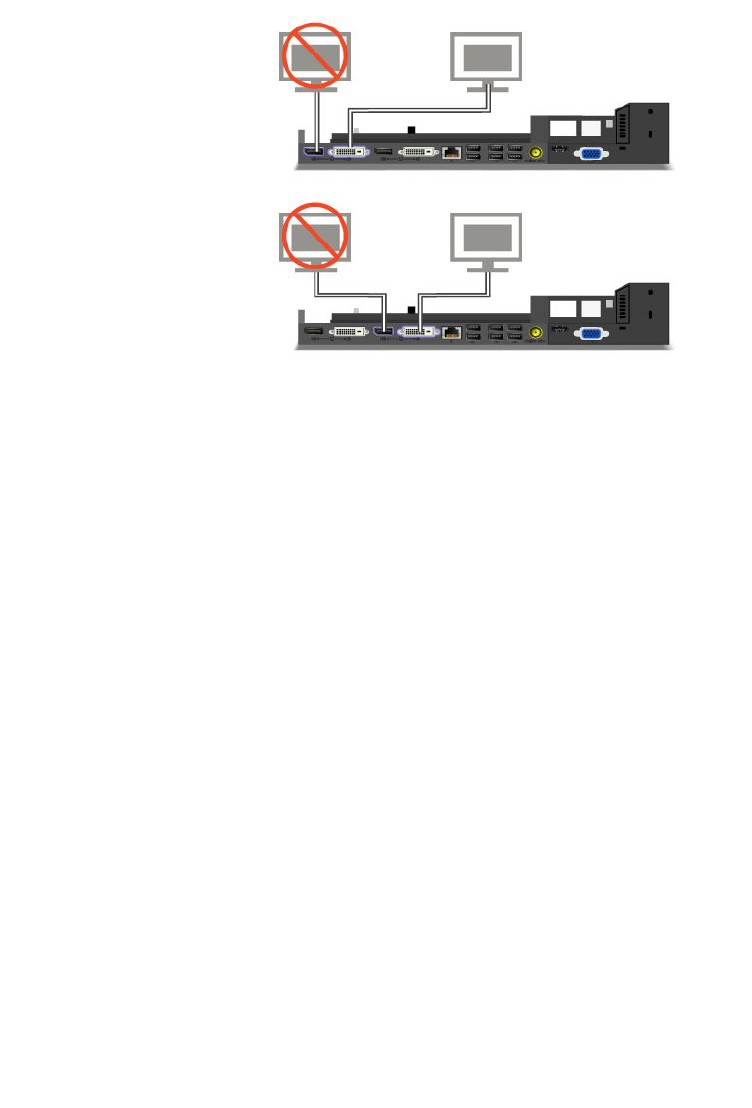
•IfyourcomputerandtheThinkPadPortReplicatorSeries3,theThinkPadMiniDockSeries3,orthe
ThinkPadMiniDockPlusSeries3areconnectedtoseparateacpoweradapters,yourcomputergoesinto
batterymoderst,andthenshiftsintoacmode.
•Ifineitherofthetwoprecedingsituationsthebatteryofyourcomputerisdetached,orhasnobattery
charge,yourcomputershutsdown.
ConnectinganexternaldisplaytotheThinkPadMiniDockPlusSeries3
Group1(topgure)andGroup2(lowergure)areindependentofeachother.EachhasaDisplayPortanda
digitalvisualinterface.IfyouconnectadisplaytoaDisplayPortandaDVIthatareinthesamegroup,the
DisplayPortisinactive.
DetachingaThinkPadPortReplicatorSeries3,ThinkPadMiniDock
Series3,andThinkPadMiniDockPlusSeries3
TodetachyourcomputerfromtheThinkPadMiniDockSeries3,andtheThinkPadMiniDockPlusSeries3,
dothefollowing:
1.Makesurethat:
•ThedevicesconnectedtoUSBconnectorsarenotinuse.
•TheconnectiontoanEthernetporthasbeenended.
•ThedevicesconnectedtoaneSATAportarenotinuse(ThinkPadMiniDockPlusSeries3).
170UserGuide
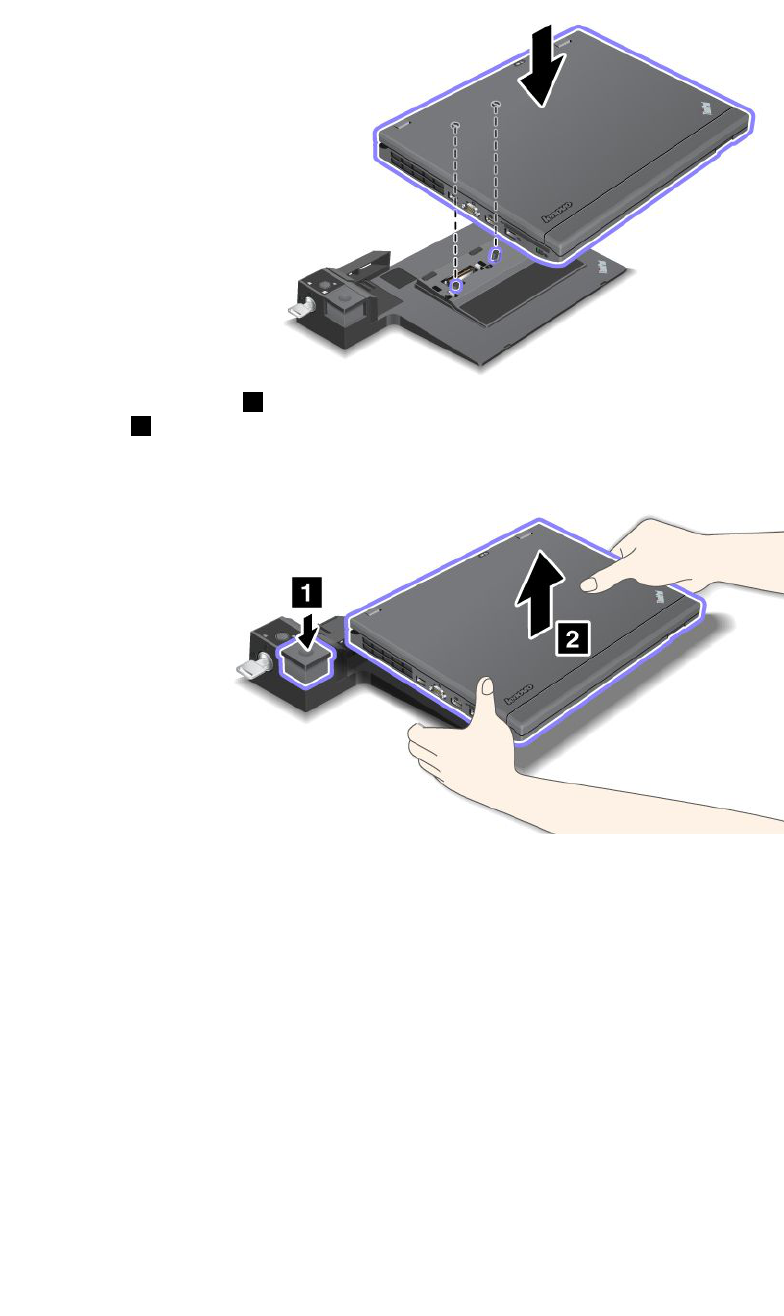
2.MakesurethatthesystemlockkeyoftheThinkPadMiniDockSeries3,ortheThinkPadMiniDock
PlusSeries3isinplaceandintheunlocked(horizontal)position.
3.Presstheejectbutton1untilthecomputermovesup;then,graspbothsides,andremovethe
computer2.
TodetachyourcomputerfromtheThinkPadPortReplicatorSeries3,dothefollowing:
Notes:
•Ifyourcomputerisoperating,makesurethatithasnishedoperationsinvolvingdevicesthatare
connectedtotheUSBconnector.AlsomakesurethatanyEthernetconnectionisstopped.
•Makesurethatthebatterypackisfullycharged.
1.MakesurethatallejectabledevicesconnectedtotheThinkPadPortReplicatorSeries3arestopped.
Chapter7.Enhancingyourcomputer171
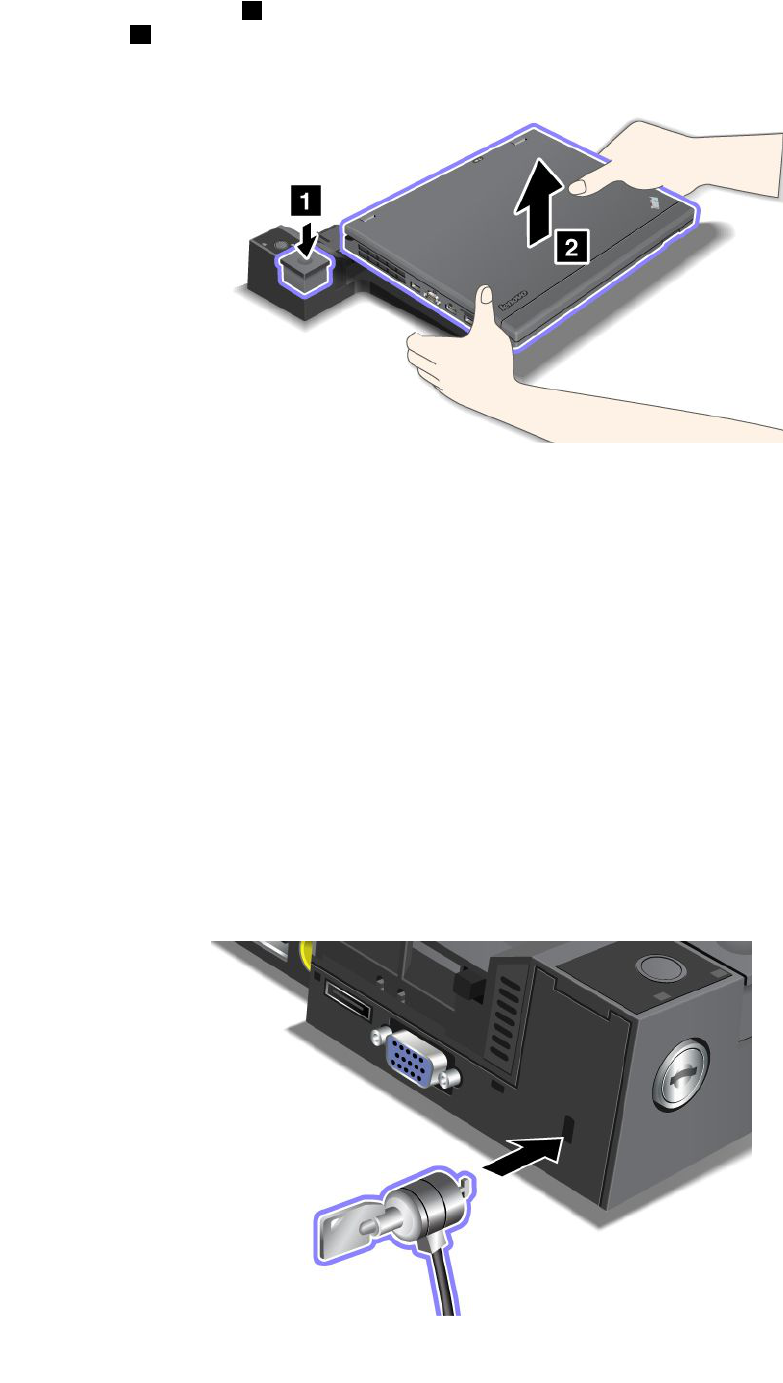
2.Presstheejectbutton1untilthecomputermovesup;then,graspbothsides,andremovethe
computer2.
Securityfeature
TheThinkPadPortReplicatorSeries3,theThinkPadMiniDockSeries3,ortheThinkPadMiniDockPlus
Series3hasasecuritykeyholeforamechanicallock.Byattachingamechanicallockwithcablethere,you
cansecuretheThinkPadPortReplicatorSeries3,theThinkPadMiniDockSeries3,ortheThinkPadMini
DockPlusSeries3toaheavyobject,suchasadesk.
IfyouusetheThinkPadPortReplicatorSeries3,andattachamechanicallock,theejectbuttonisalso
locked,sothatthecomputercannotbedetachedfromtheThinkPadPortReplicatorSeries3.
IfyouusetheThinkPadMiniDockSeries3ortheThinkPadMiniDockPlusSeries3,andattachamechanical
lock,theejectbuttonisnotlocked.Tolocktheejectbutton,usethesystemlockkey.
Lenovodoesnotofferamechanicallock.Youwillneedtopurchaseoneelsewhere.Youareresponsible
forevaluating,selecting,andimplementinganylockingdeviceandsecurityfeature.Lenovomakesno
comments,judgments,orwarrantiesaboutthefunction,quality,orperformanceofanylockingdeviceor
securityfeatures.
AttachamechanicallocktotheThinkPadMiniDockPlusSeries3asfollows:
172UserGuide
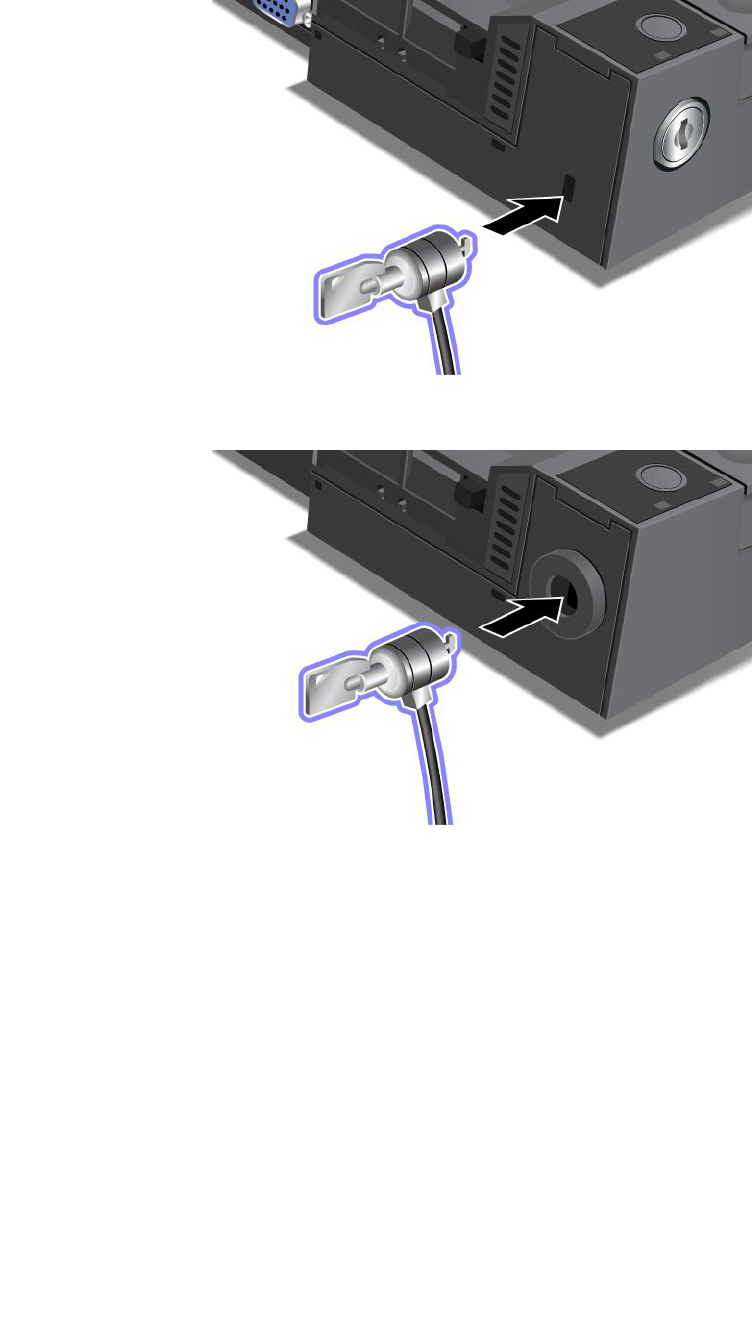
AttachamechanicallocktotheThinkPadMiniDockSeries3asfollows:
AttachamechanicallocktotheThinkPadPortReplicatorSeries3asfollows:
Chapter7.Enhancingyourcomputer173
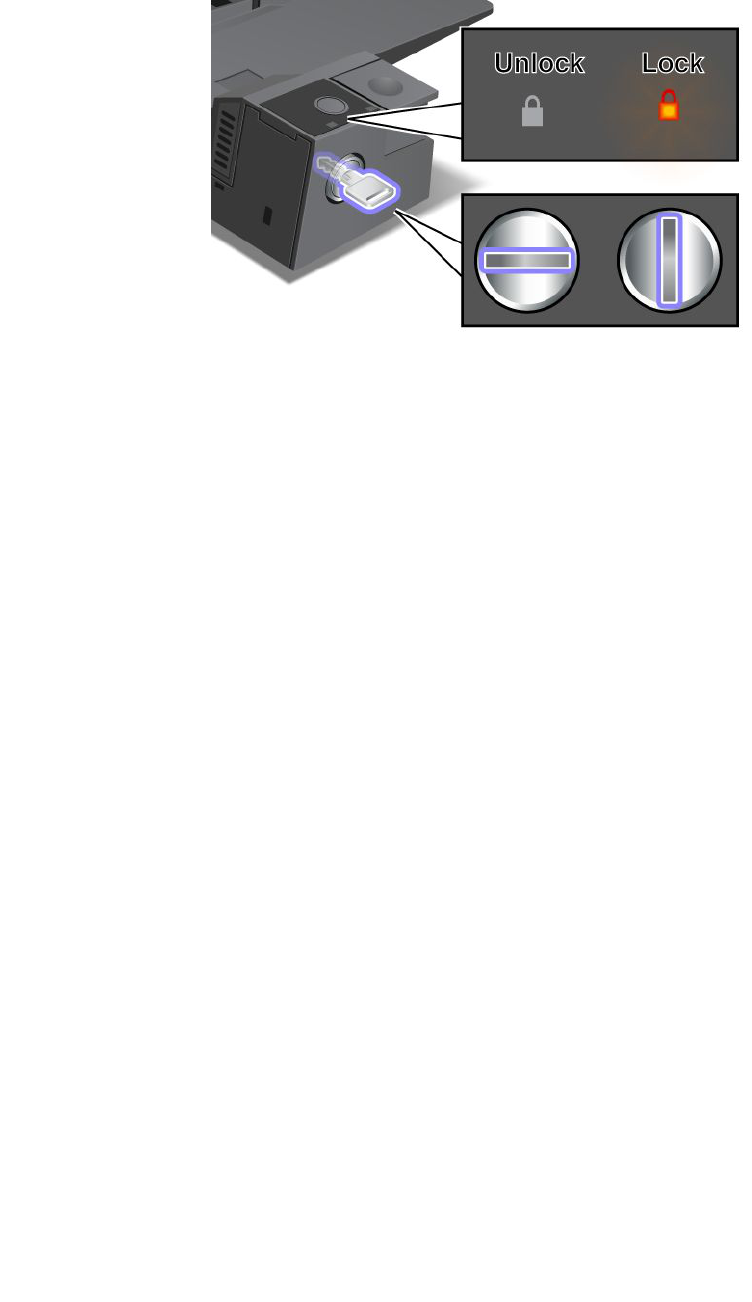
Usingthesystemlockkey
Thesystemlockkeyhastwopositions,unlockedandlocked.
Whenthekeyisinthelockedposition,theejectbuttonoftheThinkPadMiniDockSeries3ortheThinkPad
MiniDockPlusSeries3islocked,andyoucannotremoveyourcomputer.Thekeylockindicatorlights
whentheejectbuttonislocked.
174UserGuide

Chapter8.Advancedconguration
Whileitisimportanttoprotectles,data,andsettingsthatareontheharddiskoronthesolidstatedrive,
youmayalsoneedtoinstallanewoperatingsystem,installnewdevicedrivers,updateyourUEFIBIOS,or
recoverpreinstalledsoftware.Thisinformationwillhelpyouhandleyourcomputerwithpropercareand
keepitintopworkingshape.
•“Installinganewoperatingsystem”onpage175
•“Installingdevicedrivers”onpage180
•“ThinkPadSetup”onpage183
•“Usingsystemmanagement”onpage199
Installinganewoperatingsystem
Ifyouinstallanewoperatingsysteminyourcomputer,youneedtoinstalltheSupplementlesandThinkPad
devicedriversforitatthesametime.Thenecessarylesarelocatedinthefollowingdirectoriesofyoursolid
statedriveorharddiskdrive:
•TheSupplementlesfortheoperatingsystemsupportedareintheC:\SWTOOLS\OSFIXESdirectory.
•ThedevicedriversfortheoperatingsystemsupportedareintheC:\SWTOOLS\DRIVERSdirectory.
•ThepreloadedsoftwareapplicationsareintheC:\SWTOOLS\APPSdirectory.
Notes:
•Theprocessofinstallingthenewoperatingsystemdeletesallthedataonyourharddisk,including
backupsorimagesthatwerestoredinahiddenfolderbyuseoftheRescueandRecoveryprogram.
•IfyoucannotndtheSupplementles,thedevicedrivers,andapplicationsoftwareyouneedonyour
harddiskdrive,orifyouwanttoreceiveupdatesandthelatestinformationaboutthem,goto:
http://www.lenovo.com/support/site.wss/document.do?sitestyle=lenovo&lndocid=tpad-matrix
Beforeyoubegin
Beforeyouinstalltheoperatingsystem,dothefollowing:
•CopyallthesubdirectoriesandlesintheC:\SWTOOLSdirectorytoaremovablestoragedevice,toavoid
losinglesduringtheinstallation.
•Printthesectionsyouwillbeusing.Gotothesectionfortheoperatingsystemyouareusing:
–“Windows7”onpage176
–“WindowsVista”onpage177
–“WindowsXP”onpage178
Notes:IfyourcomputerisaWindowsVistaSP2orWindows7model,
–32-bitversionsofWindowsdonotsupportUEFIBIOSfeatures.Only64-bitversionsofWindowscan
takeadvantageofthefeaturesenabledby64-bitUEFIBIOS.
–IfyouwanttostartWindowsRecoveryEnvironment(WinRE)using64-bitversionofMicrosoftWindows
InstallationDVD,youshouldnotchangetheinitialUEFI/LegacyBootsettinginThinkPadSetup.The
UEFI/LegacyBootsettingmustbethesameasitwaswhentheWindowsOSimagewasinstalled.Or,
youwillseeanerror.
Forthecountryorregioncoderequiredintheinstallation,useoneofthefollowing:
©CopyrightLenovo2011175

Countryorregion:Code
China:SC
Denmark:DK
Finland:FI
France:FR
Germany:GR
Italy:IT
Japan:JP
Netherlands:NL
Netherlands:NL
Norway:NO
Spain:SP
Sweden:SV
TaiwanandHongKong:TC
UnitedStates:US
InstallingWindows7
Beforeyoustart,printtheseinstructions.
ToinstallWindows7anditsrelatedsoftwareonyourcomputer,doasfollows:
1.StarttheThinkPadSetup.
2.SelectStartupmenu.
3.SelectUEFI/LegacyBoot.
4.Dooneofthefollowing:
•IfyouwanttoinstalltheWindows732–bitoperatingsystem,selectLegacyOnlyorBoth.
•IfyouwanttoinstalltheWindows764–bitoperatingsysteminLegacymode,selectLegacyOnly.
•IfyouwanttoinstalltheWindows764–bitoperatingsysteminUEFImode,selectUEFIOnly.
5.PressF10.
6.ToinstallWindows7,inserttheDVDforWindows7intotheDVDdrive,andinstallWindows7fromthe
DVD.Thenrestartthecomputer,andfollowtheinstructionsonthescreen.
7.InstalltheIntelChipsetSupportforWindows2000/XP/Vista/7.Todothis,referto“InstallingIntel
ChipsetSupportforWindows2000/XP/Vista/7”onpage182.
8.Installdevicedrivers.Todothis,referto“Installingdriversandsoftware”onpage183.
InstallingRegistryPatchesforWindows7
InstallthefollowingRegistryPatches:
•RegistrypatchenablingWakeUponLANfromStandbyforEnergyStar
•FixforIssueofHDDwithHDDetection
ToinstalltheseRegistryPatches,goto:
http://www.lenovo.com/support
InstallingtheWindows7UpdateModulePackage
TheWindows7UpdateModulesareinthefollowingdirectory:
C:\SWTOOLS\OSFIXES\.
Thenameofeachsubfolderisthenumberofaxmodule.Forinformationabouteachxmodule,goto
theMicrosoftKnowledgeBasehomepageathttp://support.microsoft.com/,typethenumberofthex
moduleyouneedinthesearcheld,andclickSearch.
176UserGuide

Note:TheWebsiteaddressmightchangewithoutnotice.Ifthehomepageisnotdisplayed,searchforit
fromtheMicrosofttoppage.
Toinstallaxmodule,runtheEXEleinasubfolderandfollowtheinstructionsonthescreen.
Note:Ifyouremovetheharddiskdrivefromthecomputerwithasingle-coreprocessorandinstallitona
computerwithadual-coreprocessor,youcangetaccesstotheharddiskdrive.Theopposite,however,is
nottrue:Ifyouremovetheharddiskdrivefromacomputerwithadual-coreprocessorandinstallitona
computerwithasingle-coreprocessor,youcannotgetaccesstotheharddiskdrive.
InstallingWindowsVista
Beforeyoustart,printtheseinstructions.
Note:YourcomputersupportsWindowsVistawiththeServicePack2.BeforeyouinstallWindowsVista
ServicePack2,makesureyouinstalltheWindowsVistaServicePack1rst.
ToinstallWindowsVistaanditsrelatedsoftwareonyourcomputer,doasfollows:
1.StarttheThinkPadSetup.
2.SelectStartupmenu.
3.SelectUEFI/LegacyBoot.
4.Dooneofthefollowing:
•IfyouwanttoinstalltheWindowsVista32–bitoperatingsystem,selectLegacyOnlyorBoth.
•IfyouwanttoinstalltheWindowsVista64–bitoperatingsysteminLegacymode,selectLegacyOnly.
•IfyouwanttoinstalltheWindowsVista64–bitoperatingsysteminUEFImode,selectUEFIOnly.
5.PressF10.
6.InserttheDVDforWindowsVistaintegratedwithServicePack1intotheDVDdrive,andrestartthe
computer.
7.CompletetheinstallationofWindowsVistaServicePack1byfollowingOSinstallinginstructions.
8.InstalltheWindowsVistaServicePack2.YoucaninstalltheWindowsVistaServicePack2usingthe
WindowsVistaServicePack2InstallationCDordownloaditfromeitherMicrosoftDownloadCenteror
MicrosoftWindowsupdateWebsite.
9.InstalltheIntelChipsetSupportforWindows2000/XP/Vista/7.Todothis,referto“InstallingIntel
ChipsetSupportforWindows2000/XP/Vista/7”onpage182.
10.Installdevicedrivers.Todothis,referto“Installingdriversandsoftware”onpage183.
InstallingRegistryPatchesforWindowsVista
InstallthefollowingRegistryPatches:
•RegistryPatchenablingDeviceInitiatedPowerManagementonSATA
•RegistryPatchenablingUSBS3PowerManagement
•RegistrypatchtochangeIDLEIRPtimingbyFingerprintreader
•RegistrypatchenablingWakeUponLANfromStandbyforEnergyStar
•RegistrypatchtoimproveUSBdevicedetectiononresumefromsleep
•FixforIssueofHDDwithHDDetection
ToinstalltheseRegistryPatches,goto:
http://www.lenovo.com/support
Chapter8.Advancedconguration177

InstallingtheWindowsVistaUpdateModulePackage
TheWindowsVistaUpdateModulesareinthefollowingdirectory:
C:\SWTOOLS\OSFIXES\.
Thenameofeachsubfolderisthenumberofaxmodule.Forinformationabouteachxmodule,goto
theMicrosoftKnowledgeBasehomepageathttp://support.microsoft.com/,typethenumberofthex
moduleyouneedinthesearcheld,andclickSearch.
Note:TheWebsiteaddressmightchangewithoutnotice.Ifthehomepageisnotdisplayed,searchforit
fromtheMicrosofttoppage.
Toinstallaxmodule,runthe.exeleinasubfolderandfollowtheinstructionsonthescreen.
Note:Ifyouremovetheharddiskdrivefromthecomputerwithasingle-coreprocessorandinstallitona
computerwithadual-coreprocessor,youcangetaccesstotheharddiskdrive.Theopposite,however,is
nottrue:Ifyouremovetheharddiskdrivefromacomputerwithadual-coreprocessorandinstallitona
computerwithasingle-coreprocessor,youcannotgetaccesstotheharddiskdrive.
InstallingWindowsXP
Beforeyoustart,printtheseinstructions.
Note:OnlyThinkPadX220andThinkPadX220isupportWindowsXP.
Note:YourcomputersupportsWindowsXPwithServicePack3.BeforeyouinstalltheWindowsXPService
Pack3,makesureyouinstalltheWindowsXPServicePack2rst.
YoumustinstallIntelRapidStorageTechnologyDriverbeforeinstallingtheoperatingsystem.Toinstallit,you
mayneedtoattachadiskettedrivetoyourcomputer.Ifyouhaveadiskettedrive,followtheprocedurebelow.
Beforeinstallingtheoperatingsystem,installIntelRapidStorageT echnologyDriverasfollows:
Note:BesuretoinstallIntelRapidStorageTechnologyDriverbeforeinstallingtheoperatingsystem.
Otherwiseyourcomputerwillnotrespond;itwillonlydisplayabluescreen.
1.Attachadiskettedrivetoyourcomputer.
2.CopyIntelRapidStorageTechnologyDriverfromC:\SWTOOLS\DRIVERS\IMSMtoadiskette.
3.TomakesurethatSATAAHCIisenabled,starttheThinkPadSetup.
4.SelectCong.
5.SelectSerialATA(SATA).
6.SelectAHCI.
7.Changethestartupsequenceofyourcomputer.SelectStartupmenu.
8.SelectUEFI/LegacyBoot.
9.SelectBothorLegacyOnly.
10.PressF10.
11.InserttheCDforWindowsXPintegratedwithServicePack2intotheCDorDVDdrive,andrestartthe
computer.
12.Toinstallathird-partySCSIdriverrst,pressF6.
13.Whenprompted,selectSforSpecifyAdditionalDevice.
14.Whenprompted,insertthediskettethatyoucreatedinstep2,andpressEnter.
15.Scrollthelistofdrivers.IftheSATAsettingofyoucomputerissettoAHCI,selectIntel®Mobile
ExpressChipsetSATAAHCIController.
178UserGuide

16.Tocontinuetheinstallation,pressEnteragain.Leavethedisketteinthedriveuntilthenextreboot;the
softwaremayneedtobecopiedfromthedisketteagainwhenthelesarecopiedduringsetup.
17.CompletetheinstallationofWindowsXPServicePack2byfollowingOSinstallinginstructions.
18.InstallWindowsXPServicePack3.YoucaninstalltheWindowsXPServicePack3usingtheWindows
XPServicePack3InstallationCDordownloaditfromeitherMicrosoftDownloadCenterorMicrosoft
WindowsupdateWebsite.
19.InstalltheIntelChipsetSupportforWindows2000/XP/Vista/7.Todothis,referto“InstallingIntel
ChipsetSupportforWindows2000/XP/Vista/7”onpage182.
20.ApplythePCMCIAPowerPolicyRegistryPatch.Todothis,gotoC:\SWTOOLS\OSFIXES\PCMCIAPW\,
double-clickinstall.bat.Thenfollowtheinstructionsthatappearonthescreen.
21.Installdevicedrivers.Todothis,referto“Installingdriversandsoftware”onpage183.
Ifyoudonothaveadiskettedrive,youcaninstallIntelRapidStorageTechnologyDriverbythefollowing
alternativeprocedure:
Note:IfyouselectAHCIforSerialATA(SATA)intheThinkPadSetupbeforeinstallingIntelRapidStorage
TechnologyDriver,yourcomputerwillnotrespond;itwillonlydisplayabluescreen.
1.StarttheThinkPadSetup.
2.SelectCong.
3.SelectSerialATA(SATA).
4.SelectCompatibility.
5.Changethestartupsequenceofyourcomputer.SelectStartupmenu.
6.SelectUEFI/LegacyBoot.
7.SelectLegacyOnlyorBoth.
8.PressF10.
9.InserttheinstallationCDforWindowsXPintegratedwithServicePack2intotheCDorDVDdrive,and
restartthecomputer.
10.CompletetheinstallationofWindowsXPServicePack2byfollowingOSinstallinginstructions.
11.InstallWindowsXPServicePack3.YoucaninstalltheWindowsXPServicePack3usingtheWindows
XPServicePack3InstallationCDordownloaditfromeitherMicrosoftDownloadCenterorMicrosoft
WindowsupdateWebsite.
12.RunIntelRapidStorageTechnologyDriver.Todothis,gotoC:\DRIVERS\WIN\IRST\PREPARE,and
double-clickinstall.cmd.
13.Turnthecomputeroffandthenonagain.
14.StarttheThinkPadSetup.
15.SelectCong.
16.SelectSerialATA(SATA).
17.SelectAHCI.
18.StartWindowsXP.TheWelcometotheFoundNewHardwareWizardappears.
19.SelectNo,notthistime,andthenclickNext.
20.SelectInstallfromalistorspeciclocation(Advanced),andthenclickNext.
21.SelectSearchforthebestdriverintheselocations.ThenselectIncludethislocationinthesearch:,
specifythepath,C:\DRIVERS\WIN\IRST,andclickNext.TheCompletingtheFoundNewHardware
Wizardappears.
22.ClickFinish.
Chapter8.Advancedconguration179

23.WhentheSystemSettingsChangewindowappears,clickYes.Thecomputerrestarts.
24.InstalltheIntelChipsetSupportforWindows2000/XP/Vista/7.Todothis,referto“InstallingIntel
ChipsetSupportforWindows2000/XP/Vista/7”onpage182.
25.ApplythePCMCIAPowerPolicyRegistryPatch.Todothis,gotoC:\SWTOOLS\OSFIXES\PCMCIAPW\,
double-clickinstall.bat,andthenfollowtheinstructionsthatappearonthescreen.
26.Installdevicedrivers.Todothis,referto“Installingdriversandsoftware”onpage183.
Installingdevicedrivers
Toinstalldevicedrivers,refertothewebsite:
http://www.lenovo.com/support
Installingthedriverforthe4-in-1MediaCardReader
Tousethe4-in-1MediaCardReader,youneedtodownloadandinstalltheRicohMultiCardReaderDriver
forWindowsXP/Vistax86/x64.Todownloadit,gotoLenovoWebsiteat:
http://www.lenovo.com/support/site.wss/document.do?sitestyle=lenovo&lndocid=tpad-matrix
Note:IfyouareinstallingWindowsXPanew,besuretoinstallRICOHSD/MMCBusHost
AdapterdriverforWindows2000/XP77sp05wwrst.Todownloadit,visitLenovoWebsite
athttp://www.lenovo.com/support/site.wss/document.do?sitestyle=lenovo&lndocid=tpad-matrix,andthen
installthedriver.
Toinstallthedriver,doasfollows:
1.ClickStart➙AllPrograms➙Accessories➙CommandPrompt.TheDOSpromptwindowappears.
2.TypeStandardInstall.batattheDOSprompt.TheWelcometotheDeviceDriverInstallationWizardfor
theRICOHMediaDriveropens.
3.ClickNext.Ifthedevicedriverisalreadyinstalled,clickNo.Otherwise,followtheinstructionson
thescreen.
InstallingthedriverforUSB3.0
IfyourcomputersupportsUSB3.0,andyouhavereinstalledtheoperatingsystem,youneedtodownload
andinstalltheUSB3.0drivertousetheUSB3.0.Dothefollowing:
ForWindows7andWindowsVista
1.AccessLenovoWebsiteat
http://www.lenovo.com/support/site.wss/document.do?sitestyle=lenovo&lndocid=HOME-LENOVO
Whenyougettothesite,ndyourmodelanddisplaythedriverlinks.
2.SelecttheUSB3.0driverfor32-bitor64-bitandextractittoyourlocalharddisk.
3.Double-clickSetup.exeinC:\DRIVERS\WIN\USB3.0\.
4.ClickNext.Ifthedevicedriverisalreadyinstalled,clickCancel.Followtheinstructionsonthescreen
untiltheinstallationisnished.
ForWindowsXP
1.AccessLenovoWebsiteat
http://www.lenovo.com/support/site.wss/document.do?sitestyle=lenovo&lndocid=HOME-LENOVO.
Whenyougettothesite,ndyourmodelanddisplaythedriverlinks.
2.SelecttheUSB3.0driverfor32-bitandextractittoyourlocalharddisk.
3.Double-clickSetup.exeinC:\DRIVERS\WIN\USB3.0\.
180UserGuide

4.ClickNext.Ifthedevicedriverisalreadyinstalled,clickCancel.Followtheinstructionsonthescreen
untiltheinstallationisnished.
InstallingThinkPadMonitorFileforWindows2000/XP/Vista/7
ThinkPadMonitorFileforWindows2000/XP/Vista/7isinthefollowingdirectory:
C:\SWTOOLS\DRIVERS\MONITOR.
Note:Ifyoucannotndthisdirectoryonyourharddiskdriveorsolidstatedrive,downloadtheThinkPad
MonitorFileforWindows2000/XP/Vista/7fromtheThinkPadWebsiteat:
http://www.lenovo.com/support/site.wss/document.do?sitestyle=lenovo&lndocid=tpad-matrix
Note:Beforeyouinstallthisle,makesurethatthecorrectvideodriverhasbeeninstalled.
ForWindows7
1.Right-clickonthedesktop,andclickPersonalize.
2.ClickDisplayattheleft.
3.ClickChangedisplaysettings.
4.ClickAdvancedSettings.
5.ClicktheMonitortab.
6.ClickProperties.
7.ClicktheDrivertab.
8.ClickUpdateDriver.
9.SelectBrowsemycomputerfordriversoftware,andthenclickLetmepickfromalistofdevice
driversonmycomputer.
10.ClickHaveDisk.
11.Specifypath“C:\SWTOOLS\DRIVERS\MONITOR”tothismonitorINFthenclickOpen.
12.ClickOK.
13.Conrmthecorrectdisplaytype,thenclickNext.
14.Windowshasnishedinstalling.ClickClose.
15.ClickCloseforDisplayProperties.
16.ClickOKintheMonitortab.
17.ClickOKandclosetheDisplaySettingswindow.
ForWindowsVista
1.Right-clickonthedesktop,andclickPersonalize.
2.ClickDisplaySettings.TheDisplaySettingswindowopens.
3.ClickAdvancedSettings.
4.ClicktheMonitortab.
5.ClickProperties.(ForWindowsVista,alsoclickContinue.)
6.ClicktheDrivertab.
7.ClickUpdateDriver.
8.SelectBrowsemycomputerfordriversoftware,andthenclickLetmepickfromalistofdevice
driversonmycomputer.
9.ClickHaveDisk.
10.Specifypath“C:\SWTOOLS\DRIVERS\MONITOR”tothismonitorINFthenclickOpen.
Chapter8.Advancedconguration181

11.ClickOK.
12.Conrmthecorrectdisplaytype,thenclickNext.
13.Windowshasnishedinstalling.ClickClose.
14.ClickCloseforDisplayProperties.
15.ClickOKintheMonitortab.
16.ClickOKandclosetheDisplaySettingswindow.
ForWindowsXP
1.Right-clickonthedesktopandselectPropertiesfromthepop-upmenu.
2.SelecttheSettingstab.
3.ClicktheAdvancedtab.
4.SelecttheMonitortab.
5.SelectPlugandPlayMonitorfromthemonitortypelist.
6.ClickProperties.
7.SelecttheDrivertabandclickUpdateDriver.TheHardwareUpdateWizardstarts.
8.SelectNo,notthistimeforWindowsUpdateconnection,andthenclickNext.
9.SelectInstallfromalistorspeciclocation(Advanced).
10.ClickNext.
11.SelectDon'tsearch,Iwillchoosethedrivertoinstall.
12.ClickNext.
13.ClickHaveDisk.
14.ClickBrowse.
15.Specify“C:\SWTOOLS\DRIVERS\MONITOR”aslocationdirectoryandselectTPLCD.INF.
16.ClickOK.
17.SystemwillshowThinkPadDisplay.ClickNext.SystemwillcopyThinkPadMonitorINFleandcolor
prole.
18.ClickFinishandthenClose.
19.ClicktheColorManagementtab.
20.ClickAdd.
21.SelectTPFLX.ICMorTPLCD.ICMandclickAdd.
22.ClickOKandclosetheDisplayPropertieswindow.
InstallingIntelChipsetSupportforWindows2000/XP/Vista/7
Beforeyoubegin
Beforeyouinstalltheoperatingsystem,CopyallthesubdirectoriesandlesintheC:\SWTOOLSdirectorytoa
removablestoragedevice,toavoidlosinglesduringtheinstallation.
ToinstallIntelChipsetSupportforWindows2000/XP/Vista/7,dothefollowing:
1.RestoreC:\SWTOOLSfromthebackupcopyyoumadebeforestartingtheinstallation.
2.Runinnst_autol.exeinC:\SWTOOLS\DRIVERS\INTELINF.
182UserGuide