Wolf Steel NEW70006 Digital Cooking Thermometer User Manual
Wolf Steel Ltd. Digital Cooking Thermometer
User Manual
EN
FR
PG.17
DE
PG.33
ES
PG.49
CZ
PG.65
RU
PG.81
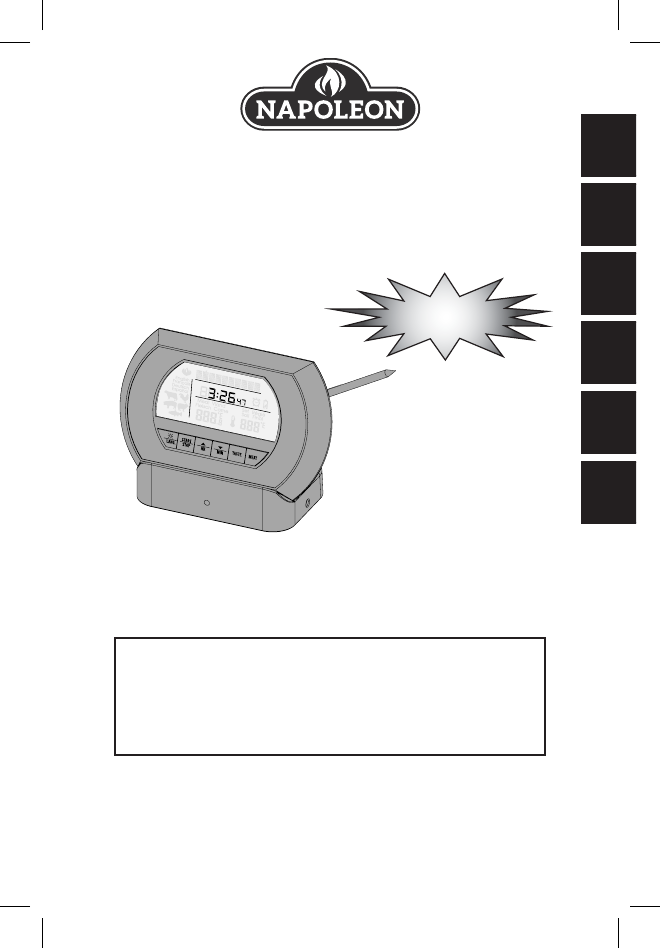
Digital Cooking
Thermometer
CUSTOMER SOLUTION INFORMATION
PLEASE READ!
DO NOT DISCARD
H H M M
SS
N415-0282 OCT 23.17
2
EN
One Year Limited Warranty
Napoleon warrants this product to be free from defects in material or
workmanship for one (1) year from date of original purchase for the original
purchaser, excluding baeries. It does not cover damages or wear resulng
from accident, misuse, abuse, commercial use, or unauthorized adjustment
and/or repair.
If service is required, do not return to retailer. Should this product require
service (or replacement at our opon), please contact us at:
There are no express warranes except as listed above. This warranty gives
you specic legal rights, and you may have other rights which vary from
region to region.
Wolf Steel Ltd.
214 Bayview Drive,
Barrie, Ontario
CANADA L4N 4Y8
grills@napoleonproducts.com
Wolf Steel Europe BV
Poppenbouwing 29-31,
4191 NZ Geldermalsen,
CCI No. 51509970,
THE NETHERLANDS
info@napoleongrills.nl
Symbol for Separate Collecon in European Union Countries
Wolf Steel is commied to protecng the quality of the
environment and human health through the responsible use
of natural resources and fully endorses the adopon of waste
management strategies that focus on recycling and reuse.
This symbol indicates that when the last end user wishes to
discard this product, it must be sent to appropriate facilies
for recovery and recycling. The following apply only to users in
EU member countries:
● This product is designated for separate collecon at an appropriate
collecon point. Do not dispose of as household waste.
● For more informaon, please contact your dealer or the local
authories in charge of waste management.

3
TABLE OF CONTENTS:
WARRANTY & QUESTIONS .............................................................. 2
IDENTIFICATION IMAGES ................................................................ 4
BATTERY INFORMATION ................................................................. 5
BATTERY INSTALL/REPLACEMENT ................................................... 6
ON/OFF PROCEDURE ...................................................................... 7
THERMOMETER POSITIONING & PROGRAMMING ..................8 & 9
GENERAL COOKING PROCEDURE ................................................. 10
TIMER OPERATION ....................................................................... 11
CLOCK AND LANGUAGE SELECTION ............................................. 12
CARE & PRECAUTION ................................................................... 13
USDA COOKING TEMPERATURES .................................................. 14
TRANSMISSION COLLISION ........................................................... 15
4
EN
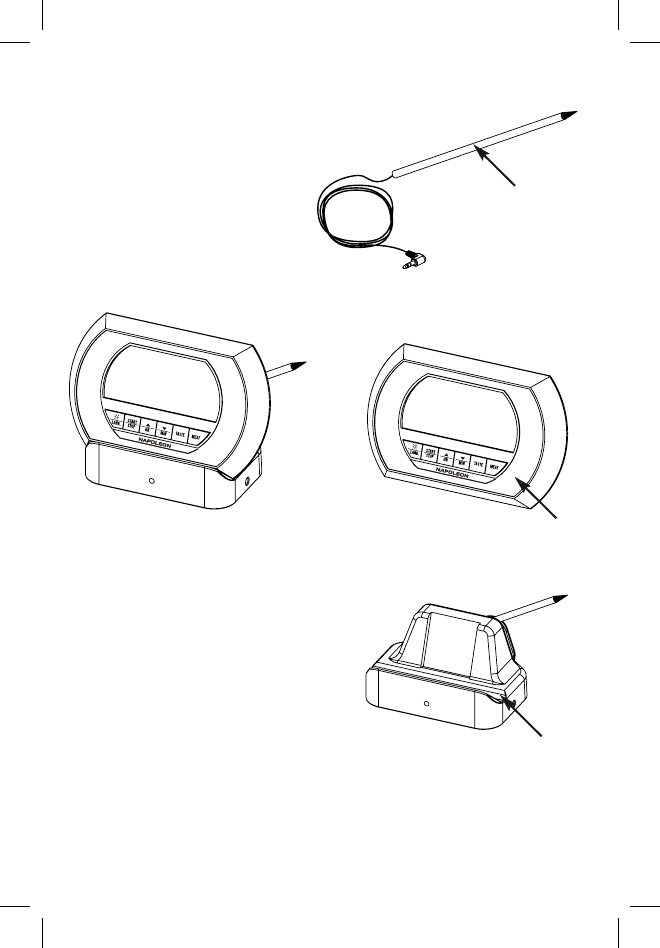
Unit Idencaon
PROBE
RECEIVER
BASE TRANSMITTER
5
Thank you for purchasing a Napoleon Wireless
Thermometer with Timer
This product helps to eliminate over-cooking or under-cooking foods. Preseng
the thermometer to the recommended cooking temperatures and/or cooking
mes is simple and ensures that food will be cooked to your preferred taste.
Please read this instrucon manual carefully before use. Keep these instrucons
handy for future reference.
Baery Informaon
The base transmier unit operates on 2 AAA (included).
The receiver operates on 2 AAA baeries (included)
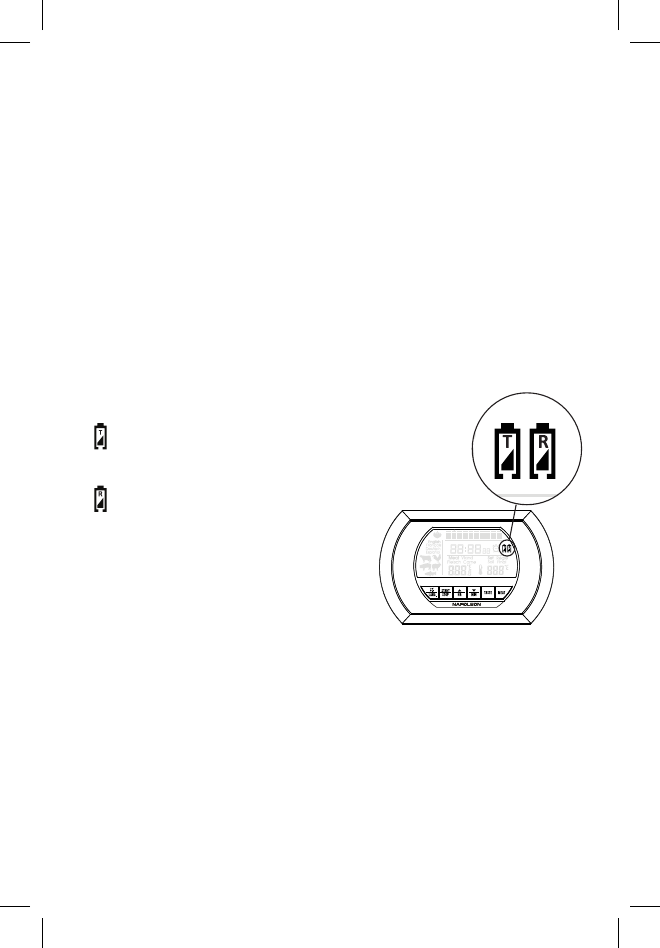
Low Power Indicator
The receiver has a built-in low baery warning
1. “ ” Icon indicates Base Transmier’s
baery is low
2. “ ” Icon indicates Receiver’s baery is low
If the above indicators appear, or if reading
grows dim or irregular, replace the baeries.
H H M M
SS
SS
RECEIVER
BASE TRANSMITTER
6
EN
To install or replace the baeries on both units:
1. Use 2 AAA baeries for each unit. Always replace both baeries at the same
me; do not combine old and new baeries.
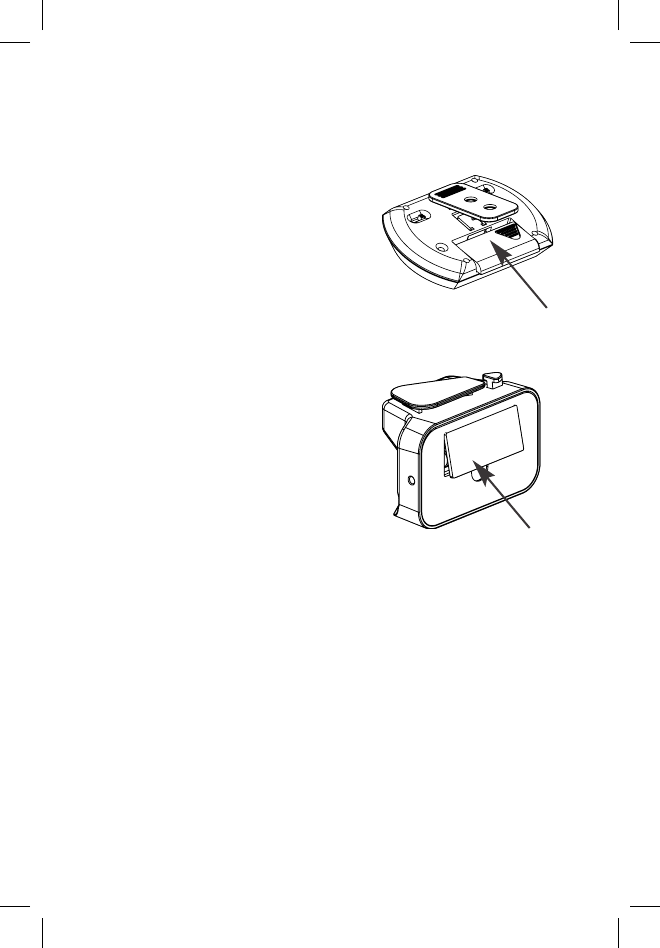
2. Remove the baery compartment cover,
located on the back of the unit.
3. Remove the old baeries from the
baery compartment. (If applicable)
4. Place the new baeries into the
compartment as indicated.
5. Replace the baery compartment cover.
NOTE: Do not dispose of baeries in re. Baeries may explode or leak. Do
not mix old and new baeries. Do not mix Alkaline, Carbon-Zinc (Standard)
or Nickel-Cadmium (recharable) baeries. Remove the baeries if the
thermometer will not be used for a long period of me.
Baery Cover
Receiver
Baery Cover
Base Transmier
7
Operaons
1. Keep the base transmier as close as possible to the receiver sensor to
ensure consistent synchronizaon between base transmier and receiver.
Aer setup is complete, keep the units within 200 feet of each other.
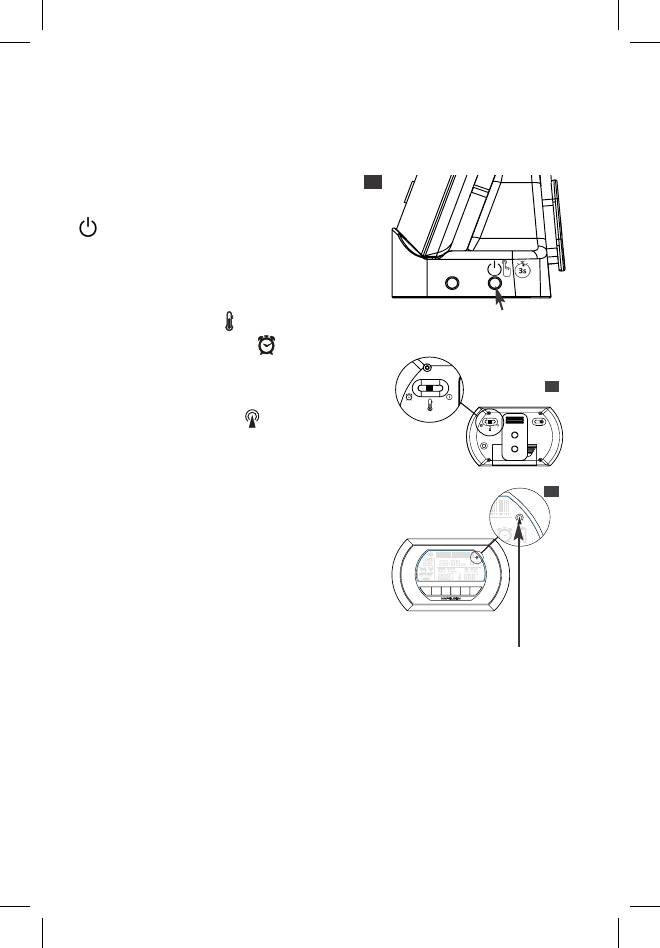
2. Turn on the base transmier by pressing
and holding the On/O buon for 3 seconds.
“ ” LED will light and blink intermiently
when the base transmier powers up.
3. Turn on the receiver unit by moving the
le toggle to the middle posion
(Temperature mode), “ ” or to the
le posion (Timer mode) “ ”
4. The receiver will automacally search
for the signal from the base transmier.
The receiver’s signal light “ ” will blink
intermiently indicang the receiver is
searching for a signal from the base transmier.
The Black triangle of the signal light will remain
it when the connecon has been established.
5. The Base/Transmier will power down if the
probe reads below 120 °F (50 °C) for more than
2 hours. To restart, press and hold the On/O
buon for 3 seconds.
2
On/O Buon
Base Transmier
3
4
H H M M
SS
H H M M
SS
Signal Light:
Black Triangle stays lit
when connected
8
EN
Thermometer Posioning
1. The base transmier unit should be placed on a at surface as far away from
the grilling area as possible.
2. The receiver’s clip stand maybe used to stand the remote on a at surface,
or clip on a belt loop. The magnets maybe used to aach onto a metal surface,
or it maybe placed on the base unit. Ensure the remote does not come into
contact with hot items.
3. During use, keep base transmier and receiver within eecve transmission
range of 200 feet.
4. Do not keep either the receiver nor the base transmier on surfaces that
exceed 200°F (100°C)
Thermometer
Programming
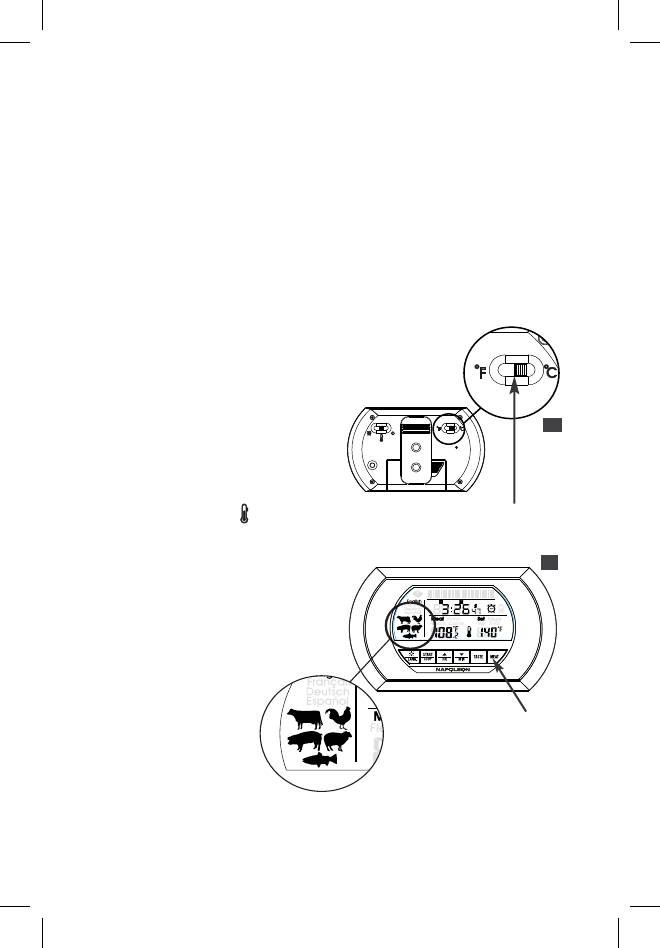
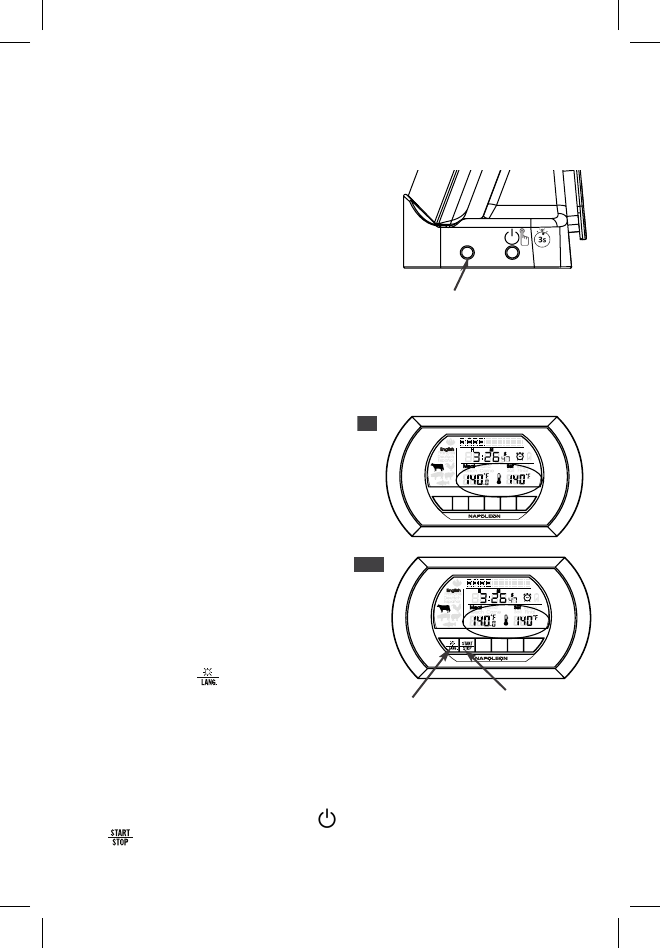
1. The thermometer is capable of
reading temperatures in Fahrenheit
or Celsius. To switch temperature
readings, use the right toggle at the
back of the receiver to switch between
Fahrenheit “°F” to Celsius “°C”
2. In Temperature mode “ ”, press the
“Meat” buon to bring up the standard
thermometer programming menu.
3. Press the “Meat” Buon to cycle
through the various standard meat to
match the food you are cooking.
1
Temperature
Selecon
3
H M
S
H M
S
Meat
Buon
Meat Selecon
9
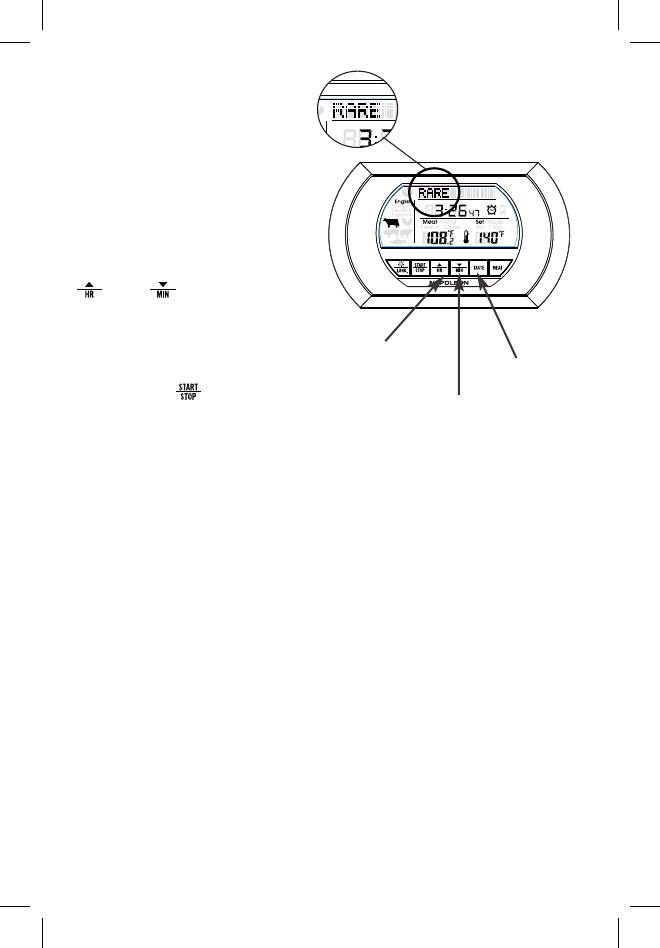
4. Press the “Taste” Buon and the
set temperature display will ash,
press the “Taste” buon again to
cycle through the various standard
temperatures for each type of Meat
and the varying internal temperature
as dened by the USDA. (Available
only in Beef and Lamb mode)
5. The programmed temperature
can be customized while the set
temperature is ashing, press the
“ ” and “ ” to adjust the set
temperature to your desired level.
The Taste display will change to
“Customize”
6. When desired temperature is
reached, press “ ” to program the
desired temperature into the remote.
7. To change the programming,
repeat from Step 3
H M
S
H M
S
Raise
Temperature
Lower
Temperature
Taste Buon
10
EN
H M
S
5
H M
S
6,7
General Cooking Procedures
1. Preheat the grill or oven to desired cooking temperature.
2. Sterilize the metal probe by submerging the probe into boiling water for
several minutes. Ensure the sensor plug on the end of the cord is plugged into
the base transmier. (Note: if the probe is not
plugged in properly, the “Meat” temperature
display will show “LL.L”)
3. Insert the metal probe into the thickest part of
the food to be cooked. Do not come in contact
with bone, fat or gristle, as these areas will not
provide accurate temperature readings.
4. Place the food into the oven or grill. The
thermometer must be placed outside of the oven or grill (do not put the
receiver or the base transmier in the oven or grill). The probe cord will be
held in place by the oven/grill door. Do not excessively bend or crease the cord
during use. The cord should not come into direct contact with cooking surfaces
or ame.
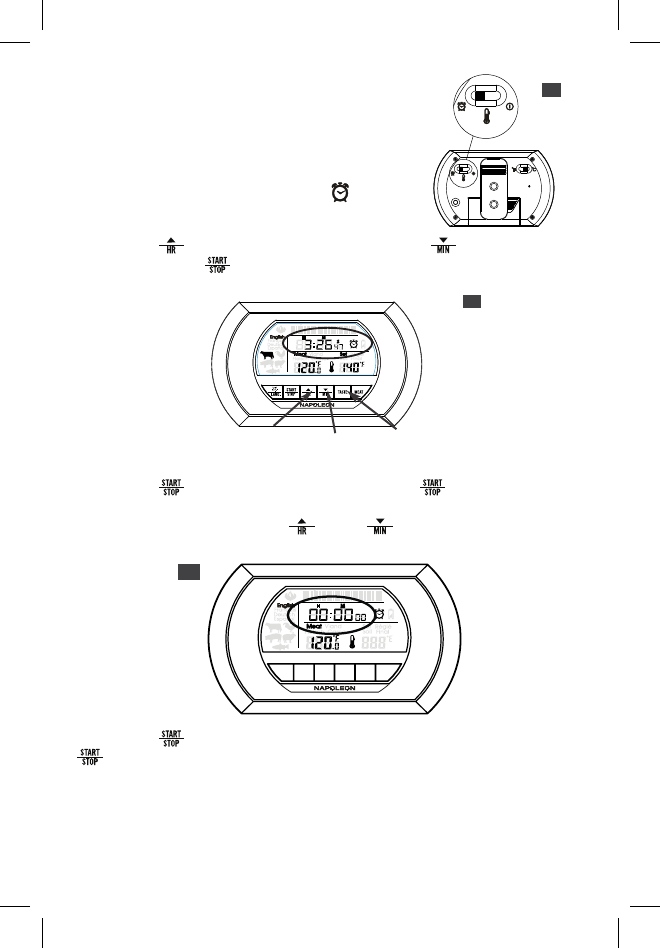
5. The current internal temperature of the
food appears on the LCD screen of the
receiver. As cooking progresses, the receiver
will display the internal temperature, unl
desired temperature is reached, at which
point, the unit will beep consistently and
ash.
6. When the food is ready, remove it from
the oven or grill with heat resistant gloves.
Do not touch the Hot Probe or Food with
bare hands.
7. The base transmier unit has a backlight
feature. Press the “ ” buon to turn on
the backlight for 5 seconds.
8. The food may connue to cook aer
removed from heat. The probe maybe
le in the food to connue monitoring internal temperature.
9. If the probe temperature is below 122°F (50°C) for more than 2 hours, the
base transmier will automacally shut down. To re-connect the units, turn on
the base transmier by pressing the “ ” for 3 seconds, then press and hold
the “ ” on the receiver unl it beeps. The receiver should then reconnect to
the base transmier.
Sensor Plug
Backlight
Buon
Start/Stop
Buon
11
Timer Operaon
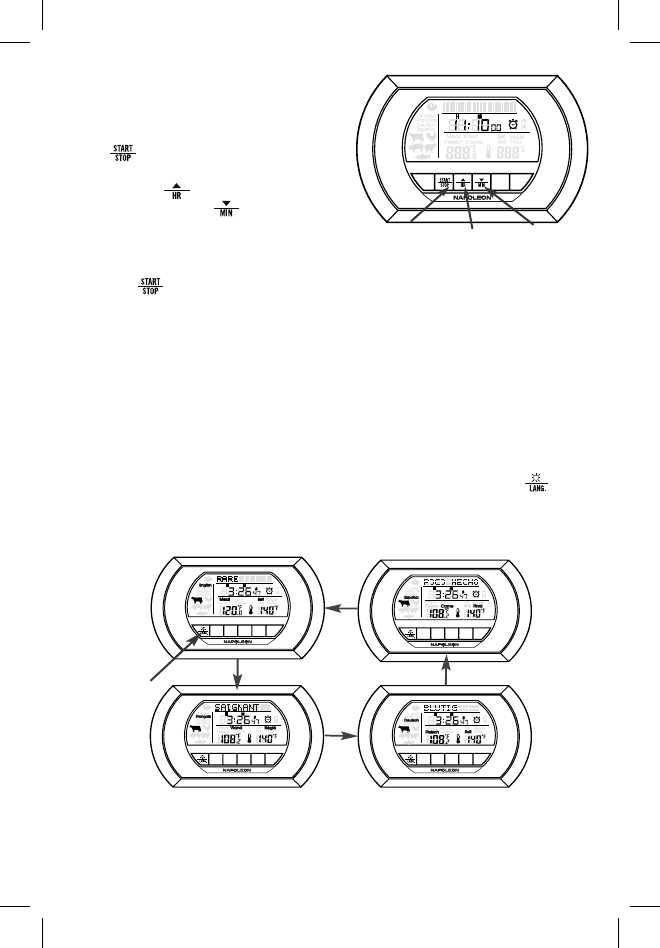
This unit is equipped with a mer mode.
It can operate independently or work
alongside the thermometer
1. Set the Mode toggle to Timer Mode “ ”
2. Press the “ ” buon to set the hours. Press the “ ” buon to set
the minutes. Press “ ” to start the mer countdown. Press and hold the
Hour or Minute buons to advance the digits quickly.
3. Press the “ ” buon to pause mer. Press the “ ” again to resume the
mer.
4. To reset the mer, press both “ ” and “ ” at the same me to clear.
5. When the mer reaches zero, the unit will beep consistently and ash.
6. Press the “ ” buon on the remote to stop the alarm and mer. Press the
“ ” again to display the previous me.
7. The mer will me up to 23 hours, 59 minutes, and 0 seconds.
1
H M
S
2
5
H M
SS
Start/Stop
Buon Hour
Buon
Minute
Buon
12
EN
Clock Feature
To program the clock:
1. While the receiver is o, press and hold
the “ ” buon. The clock digits ash.
2. Press the “ ” buon to change
the hour. Press the “ ” to change the
minutes. Press and hold the buons to
advance the digits quickly.
3. Press “ ” to set the clock.
RESET: If you are having problems with the unit, you can press the reset buon
on the back of the receiver. This will cause the same eect as taking the
baeries out. The unit will reset itself.
Language Feature
The receiver is programmed to display 4 languages. To change the language:
1. In either Thermometer mode or Timer mode, press and hold the “ ”
buon unl the display language changes. Press and hold again to change the
language again.
2. The receiver can cycle through English, French, German, and Spanish.
H M
SS
H M
S
H M
S
H M
S
H M
S
Start/Stop
Buon Hour
Buon
Minute
Buon
Language
Buon
English
French German
Spanish

13
Care and Precauons:
1. Always wear a heat resistant glove when touching the metal probe or cord
during or just aer cooking. DO NOT TOUCH WITH BARE HANDS!
2. Keep the metal probe and cord away from children
3. Sterilize the metal probe each me before use
4. Do not expose the thermometer to water, direct heat, a hot surface or direct
sunlight for an extended period of me. This may cause damage to the plasc
casing or the eletric circuits and components inside.
5. Do not expose the probe directly to ames. Do not put the probe in foods
that exceed cooking temperatures of 500°F (260°C), as this may reduce the life
and accuracy of the thermometer sensor.
6. Do not use this thermometer in a microwave oven.
7. Moisture inside the plug-in opening of the base transmier will result in an
incorrect temperature reading. Dry sensor plug with a cloth every me before
plugging it into the base transmier.
8. DO NOT USE THE CORD AND PROBE FOR OVEN TEMPERATURES HIGHER THAN
500°F (260°C)
9. Do not dispose of baeries in re. Baeries may explode or leak. Do not mix
old and new baeries. Do not mix Alkaline, Carbon-Zinc (standard) or Nickel-
Cadmium (rechargeable) baeries. Remove the baeries if the thermometer
will not be used for a long period of me.

14
EN
Minimum Internal Cooking Temperatures as
recommended by the USDA*
IMPORTANT! These are the minimum internal temperatures that food must
reach to be considered safe to eat, no maer how you prepare them. The
following guidelines are recommended, but personal taste temperatures
may dier from below:
Fresh Ground Beef, Veal, Pork 160°F /71°C
Beef, veal, Lamb – Roast, Steaks, Chops
*Rare (with 3 min rest) 140°F /60°C
Medium Rare (with 3 min rest) 145°F /63°C
Medium 160°F /71°C
Well Done 170°F /77°C
Fresh Pork – Roast, Steaks, Chops
Medium Rare (with 3 min rest) 145°F /63°C
Medium 160°F /71°C
Well Done 170°F /77°C
Ham
Fresh Raw (with 3 min rest) 145°F /63°C
Precooked (to reheat) 140°F /60°C
Poultry
Ground Chicken, Turkey 165°F /74°C
Whole Chicken, Turkey 165°F /74°C
Breast, Roasts, Thighs, and wings 165°F /74°C
Fish-Cook unl opaque and akes easily with fork 145°F /63°C
Stung-Cook alone or in bird 165°F /74°C
Egg Dishes 160°F /72°C
Leovers, Casseroles 165°F /74°C
*The USDA does NOT recommend RARE 140°F as a safe eang temperature.

15
Transmission Interference
Signals from other household devices, such as doorbells, home security systems,
and entry controls, may interfere with the operaon of the thermometer. This
is normal and does not aect the general performance of this product. The
transmission will resume once the interference recedes.
NOTE: This equipment has been tested and found to comply with the limits
for a Class B digital device, pursuant to Part 15 of the FCC Rules. These limits
are designed to provide reasonable protecon against harmful interference
in a residenal installaon. This equipment generates, uses and can radiate
radio frequency energy and, if not installed and used in accordance with
the instrucons, may cause harmful interference to radio communcaons.
However, there is no garantee that interference will not occur in a parcular
installaon. If this equipment does cause harmful interference to radio or
television recepon, which can be determined by turning the equipment o and
on, the user is encouraged to try to correct the interference by one or more of
the following measures:
- Reorient or relocate the receiving antenna.
- Increase the separaon between the equipment and receiver. Modicaon
not authorized by the manufacturer may void users authority to operate this
device.
Wolf Steel Ltd.
24 Napoleon Road
Barrie ON L4M 0G8
Canada
Wolf Steel USA Ltd.
103 Miller Drive
Crienden KY 41030
USA
Wolf Steel Europe BV
Poppenbouwing 29-31
4191 NZ Geldermalsen
CCI No. 51509970
The Netherlands
Wolf Steel (UK) Ltd.
The Old Grain Store
10-12 Home Farm
Meriden Road
Berkswell CV7 7SL
UK
16
Radiation Exposure Statement
The device has been evaluated to meet general RF exposure requirement. The device can be used in
portable exposure condition without restriction.

17
ISED Statement
- English: This device complies with Industry Canada license‐exempt RSS standard(s). Operation is
subject to the following two conditions: (1) This device may not cause interference, and (2) This device
must accept any interference, including interference that may cause undesired operation of the
device. The digital apparatus complies with Canadian CAN ICES‐003 (B)/NMB‐3(B).
- French: Le présentappareilestconforme aux CNR d'Industrie Canada applicables aux appareils
radio exempts de licence. L'exploitationestautorisée aux deux conditions suivantes: (1) l'appareil ne
doit pas produire de brouillage, et (2) l'utilisateur de l'appareildoit accepter tout
brouillageradioélectriquesubi, mêmesi le brouillageest susceptible d'encompromettre le
fonctionnement. L'appareil numérique est conforme à la canadienne CAN ICES‐003 (B)/NMB‐
3(B).
Radiation Exposure Statement
The device has been evaluated to meet general RF exposure requirement. The device can be usedin
portable exposure condition without restriction.
L'appareil a été évalué pour répondre aux exigences générales d'exposition aux
radiofréquences. L'appareil peut être utilisé en condition d'exposition portable sans restriction.