Woodstock Shop Fox W1758 Users Manual
W1758 to the manual b241e2b2-2a86-415c-b731-7d167ec04958
2015-02-03
: Woodstock Woodstock-Shop-Fox-W1758-Users-Manual-478118 woodstock-shop-fox-w1758-users-manual-478118 woodstock pdf
Open the PDF directly: View PDF ![]() .
.
Page Count: 40
Phone: (360) 734-3482 • Online Technical Support: tech-support@shopfox.biz
COPYRIGHT © JUNE, 2007 BY WOODSTOCK INTERNATIONAL, INC., REVISED APRIL, 2010 (TS)
WARNING: NO PORTION OF THIS MANUAL MAY BE REPRODUCED IN ANY SHAPE OR FORM WITHOUT
THE WRITTEN APPROVAL OF WOODSTOCK INTERNATIONAL, INC. (FOR MODELS MANUFACTURED SINCE 3/10)
Printed in China
OWNER'S MANUAL
MODEL W1758
VARIABLE SPEED WOOD LATHE
WITH DIGITAL READOUT
#9397TS

This manual provides critical safety instructions on the proper setup,
operation, maintenance and service of this machine/equipment.
Failure to read, understand and follow the instructions given in this
manual may result in serious personal injury, including amputation,
electrocution or death.
The owner of this machine/equipment is solely responsible for its safe
use. This responsibility includes but is not limited to proper installa-
tion in a safe environment, personnel training and usage authoriza-
tion, proper inspection and maintenance, manual availability and
comprehension, application of safety devices, blade/cutter integrity,
and the usage of personal protective equipment.
The manufacturer will not be held liable for injury or property
damage from negligence, improper training, machine modifications or
misuse.
Some dust created by power sanding, sawing, grinding, drilling, and
other construction activities contains chemicals known to the State of
California to cause cancer, birth defects or other reproductive harm.
Some examples of these chemicals are:
• Lead from lead-based paints.
• Crystalline silica from bricks, cement and other masonry products.
• Arsenic and chromium from chemically-treated lumber.
Your risk from these exposures varies, depending on how often you
do this type of work. To reduce your exposure to these chemicals:
Work in a well ventilated area, and work with approved safety equip-
ment, such as those dust masks that are specially designed to filter
out microscopic particles.

ACCESSORIES ....................................... 26
Wood Lathe Accessories ....................... 26
MAINTENANCE ..................................... 27
General .......................................... 27
Cleaning ......................................... 27
Lathe Bed ........................................ 27
Tailstock ......................................... 27
Lubrication ...................................... 27
SERVICE ............................................. 28
General .......................................... 28
Aligning Headstock & Tailstock Centers .... 28
Changing V-Belt ................................. 28
Electrical Components & Wiring Diagram .. 29
Troubleshooting ................................. 30
PARTS ............................................... 32
Label Placement ............................... 34
INTRODUCTION ...................................... 2
Woodstock Technical Support .................. 2
SAFETY ................................................ 6
Standard Safety Instructions ................... 6
Additional Safety for Wood Lathes ............ 8
ELECTRICAL .......................................... 9
110V Operation ................................... 9
Extension Cords .................................. 9
Electrical Specifications ........................ 9
SETUP ............................................... 10
Unpacking ....................................... 10
Inventory ........................................ 10
Machine Placement ............................ 11
Cleaning Machine ............................... 11
Mounting to Shop Floor ........................ 12
Assembly ......................................... 12
Test Run .......................................... 14
OPERATIONS ........................................ 15
General .......................................... 15
Adjusting Headstock ........................... 16
Adjusting Tailstock ............................. 17
Adjusting Tool Rest ............................. 17
Installing/Removing Headstock Center ..... 18
Installing/Removing Tailstock Center ....... 19
Installing/Removing Faceplate ............... 20
Selecting Turning Tools ........................ 21
Spindle Turning ................................. 22
Faceplate Turning .............................. 24
Outboard Turning ............................... 25
Sanding/Finishing Using the Lathe .......... 25

-2-
W1758 Owner's Manual (Mfg. Since 3/10)
This machine has been specially designed to provide many years of trouble-free service. Close attention
to detail, ruggedly built parts and a rigid quality control program assure safe and reliable operation.
Woodstock International, Inc. is committed to customer satisfaction. Our intent with this manual is to
include the basic information for safety, setup, operation, maintenance, and service of this product.
We stand behind our machines! In the event that questions arise about your machine, please contact
Woodstock International Technical Support at (360) 734-3482 or send e-mail to:
. Our knowledgeable staff will help you troubleshoot problems and process warranty claims.
If you need the latest edition of this manual, you can download it from .
If you have comments about this manual, please contact us at:

-3-
W1758 Owner's Manual (Mfg. Since 3/10)
Phone #: (360) 734-3482 • Online Tech Support: tech-support@shopfox.biz • Web: www.shopfox.biz
MACHINE
SPECIFICATIONS
Motor
Type .......................................................................................... TEFC Capacitor Start Induction
Horsepower ................................................................................................................. 2 HP
Voltage ...................................................................................................................... 110V
Phase ....................................................................................................................... Single
Amps .......................................................................................................................... 14A
Speed .................................................................................................................. 1725 RPM
Cycle ........................................................................................................................ 60 Hz
Number Of Speeds ............................................................................................................. 1
Power Transfer .................................................................................................... V-Belt Drive
Bearings ............................................................................................... Sealed and Lubricated
Main Specifications
Operation Information
Swing Over Bed ........................................................................................................ 16"
Maximum Distance Between Centers .............................................................................. 46"
Swing Over Tool Rest ................................................................................................. 13"
Number Of Spindle Speeds ....................................................................................Variable
Range Of Spindle Speeds ................................................................................600–2400 RPM
Floor To Center Height ............................................................................................... 43"
Headstock Rotation Stops ....................................................................... 0, 60, 90, 120, 180°
Spindle Information
Spindle Taper ....................................................................................................... MT#2
Spindle Diameter ....................................................................................................... 1"
Spindle Bore ............................................................................................................3⁄8"
Spindle Center ....................................................................................................... Spur
Spindle TPI ............................................................................................................... 8
Spindle Type .................................................................................................. Right Hand
Tailstock Information
Tailstock Taper ...................................................................................................... MT#2
Tailstock Center ......................................................................................................Live
Overall Dimensions
Weight .................................................................................................................. 287 lbs.
Length ...................................................................................................................... 721⁄2"
Width .......................................................................................................................... 19"
Height ......................................................................................................................... 48"
Foot Print (Length/Width) ........................................................................................ 54" x 133⁄4"
MOdEl W1758
VARIABlE SPEEd WOOd lATHE WITH dIGITAl REAdOUT

-4-
W1758 Owner's Manual (Mfg. Since 3/10)
Construction Materials
Bed ................................................................................................ Precision Ground Cast Iron
Legs ..................................................................................................................... Cast Iron
Headstock .............................................................................................................. Cast Iron
Tool Rest ............................................................................................................... Cast Iron
Tailstock ................................................................................................................ Cast Iron
Paint ............................................................................................................... Powder Coat
Shipping Dimensions
Carton 1
Weight............................................................................................................. 199 lbs.
Length ................................................................................................................... 63"
Width .................................................................................................................... 16"
Height ................................................................................................................ 161⁄2"
Carton 2
Weight............................................................................................................. 106 lbs.
Length ................................................................................................................... 32"
Width ................................................................................................................. 151⁄2"
Height ................................................................................................................... 10"
Electrical
Switch .............................................................................................. Paddle With Lockout Key
Switch Voltage .............................................................................................................110V
Cord Length ................................................................................................................. 8 ft.
Cord Gauge ....................................................................................................................16
Recommended Circuit Size ................................................................................................ 20A
Plug .......................................................................................................................... 5-15
Other
Country Of Origin ......................................................................................................... China
Warranty .................................................................................................................. 2 Year
Serial Number Location .................................................................................... Machine ID Label
Assembly Time ........................................................................................................... 1 hour
Features
Variable spindle speed from 600 to 2400 RPM
Heavy Duty, Precision Ground Cast Iron Bed
Cast Iron Legs Ensures Stability and Minimal Vibration
Quick Lock/Release Levers for Headstock and Tailstock
Outboard Turning with Standard Tool Rest Extension
Spindle Tachometer with Digital Readout
-5-
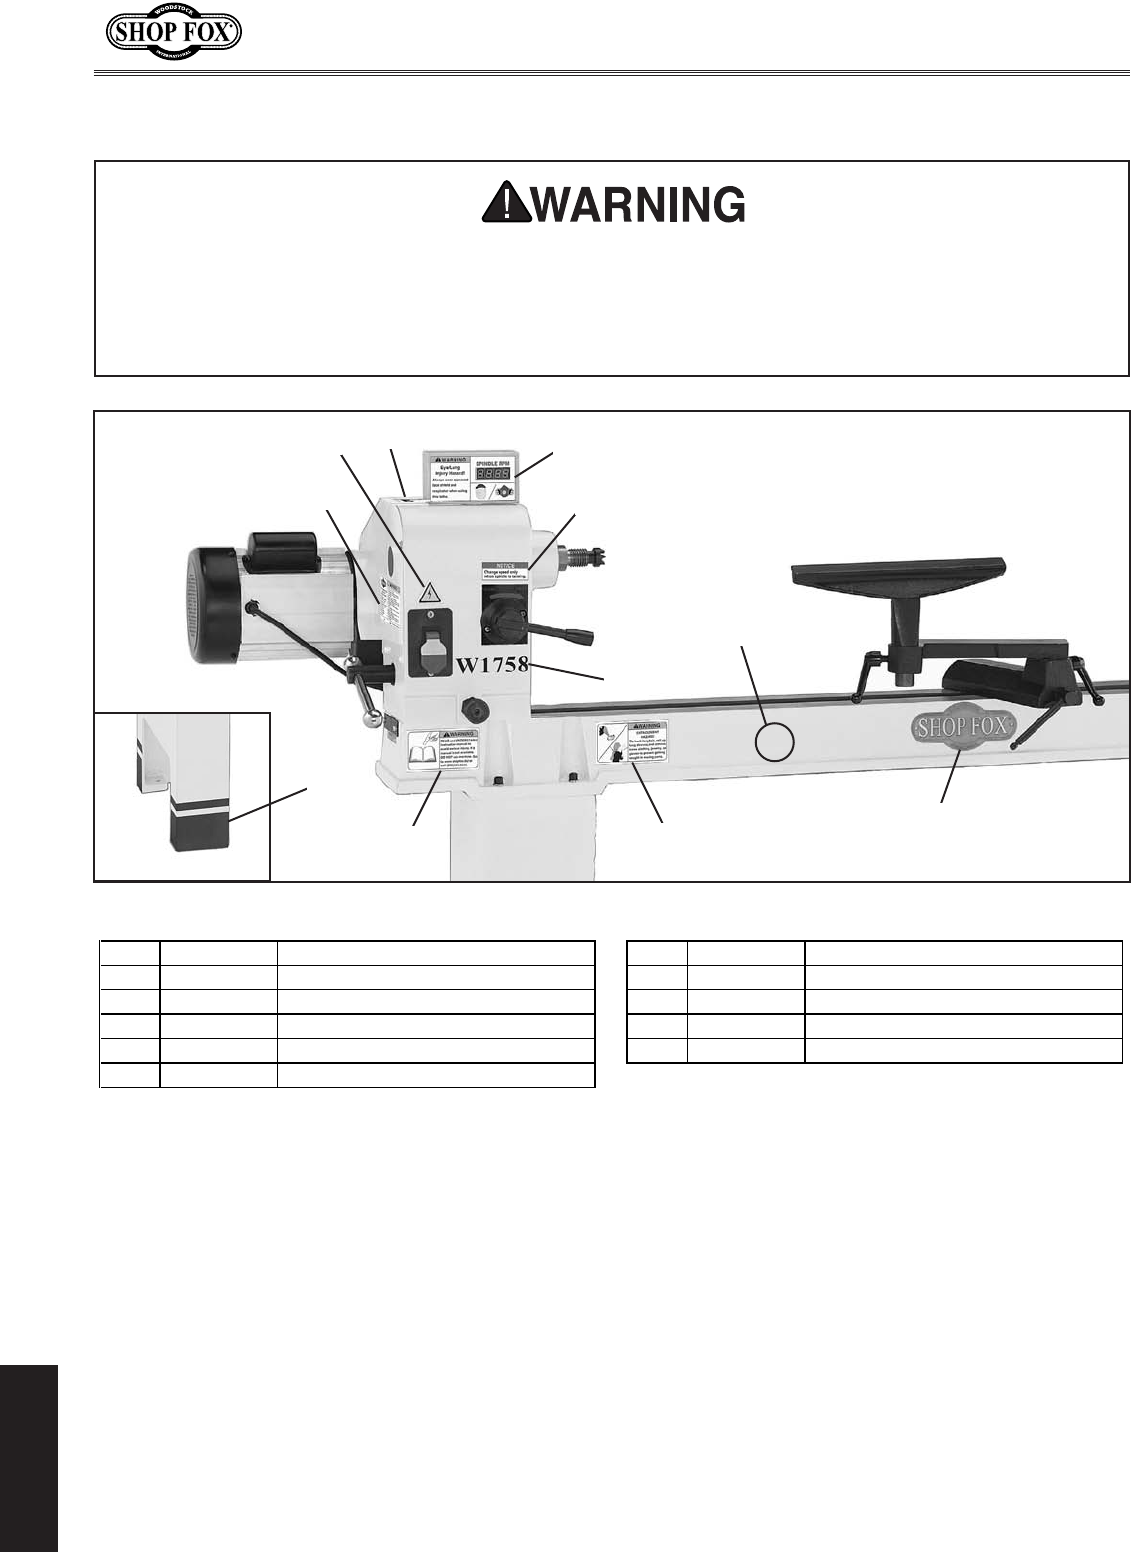
W1758 Owner's Manual (Mfg. Since 3/10)
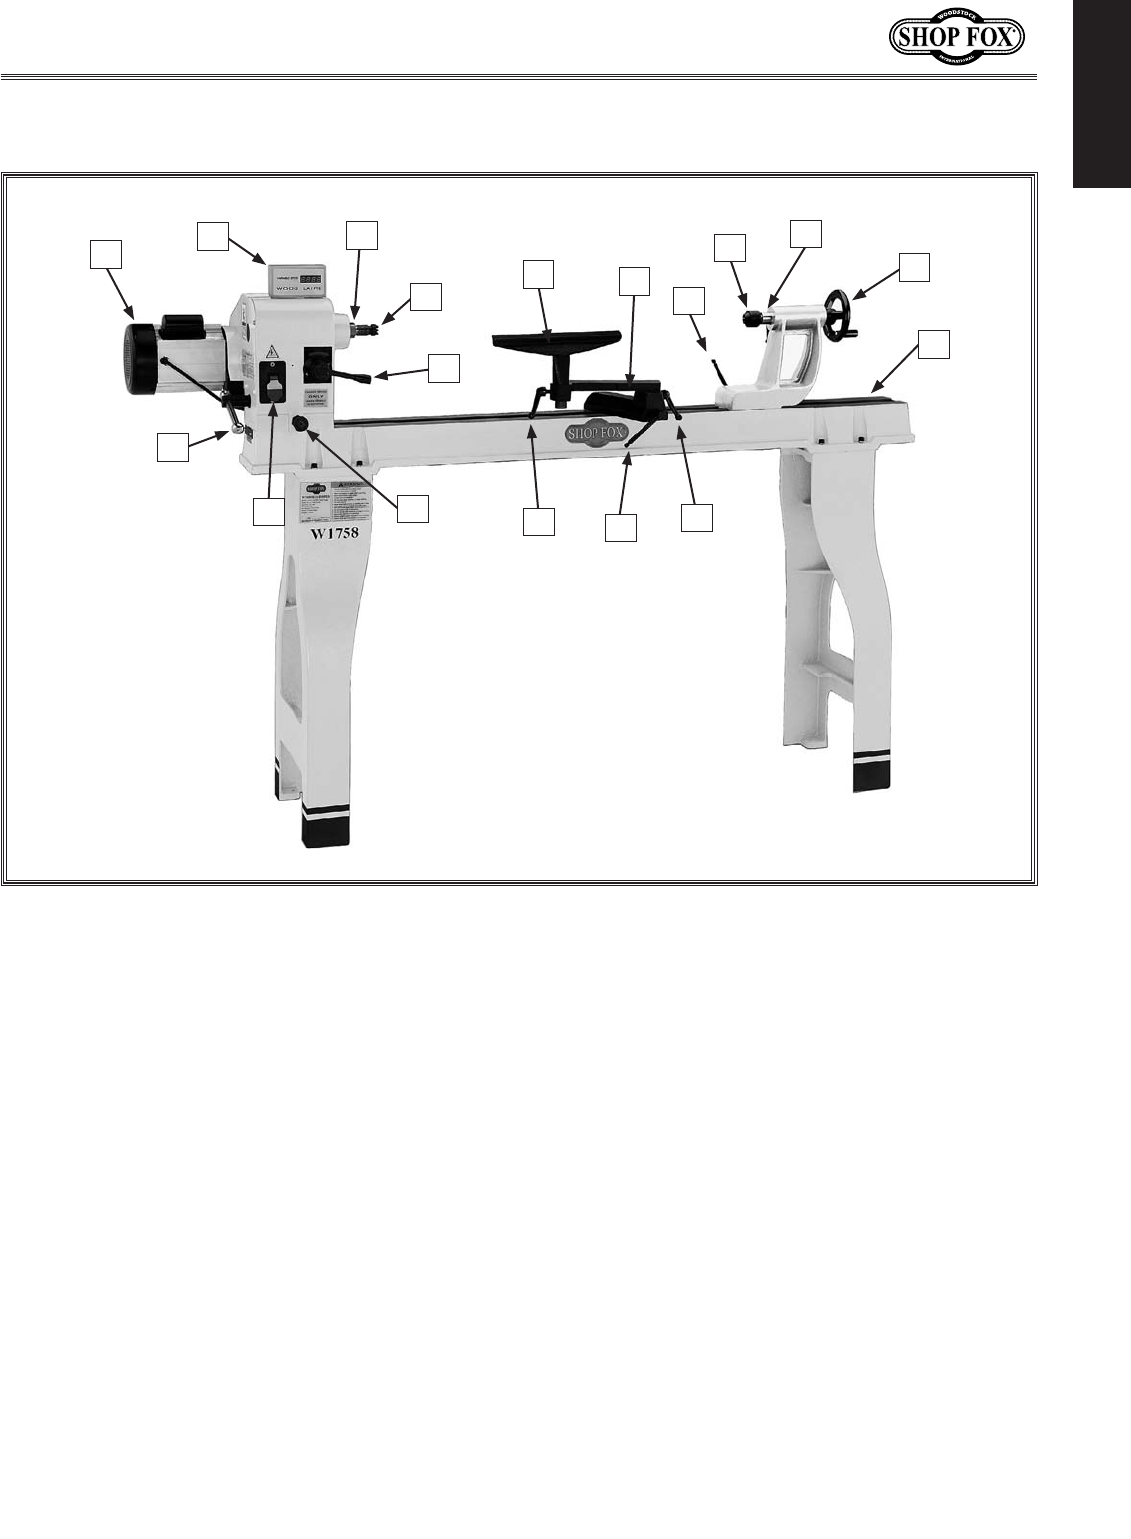
Motor
Digital Readout
Spindle
Spur Center
Speed Control Lever
Tool Rest
Tool Rest Base with Extension
Tailstock Locking Lever
Live Center
A
H
P
Q
R
IJ
K
M
N
O
BC
D
E
FG
L
Quill Locking Lever
Quill Handwheel
Lathe Bed
Tool Rest Extension Locking Lever
Tool Rest Base Locking Lever
Tool Rest Locking Lever
Headstock Rotation Locking Pin
ON/OFF Switch with Lockout Key
Headstock Locking Lever

-6-
W1758 Owner's Manual (Mfg. Since 3/10)
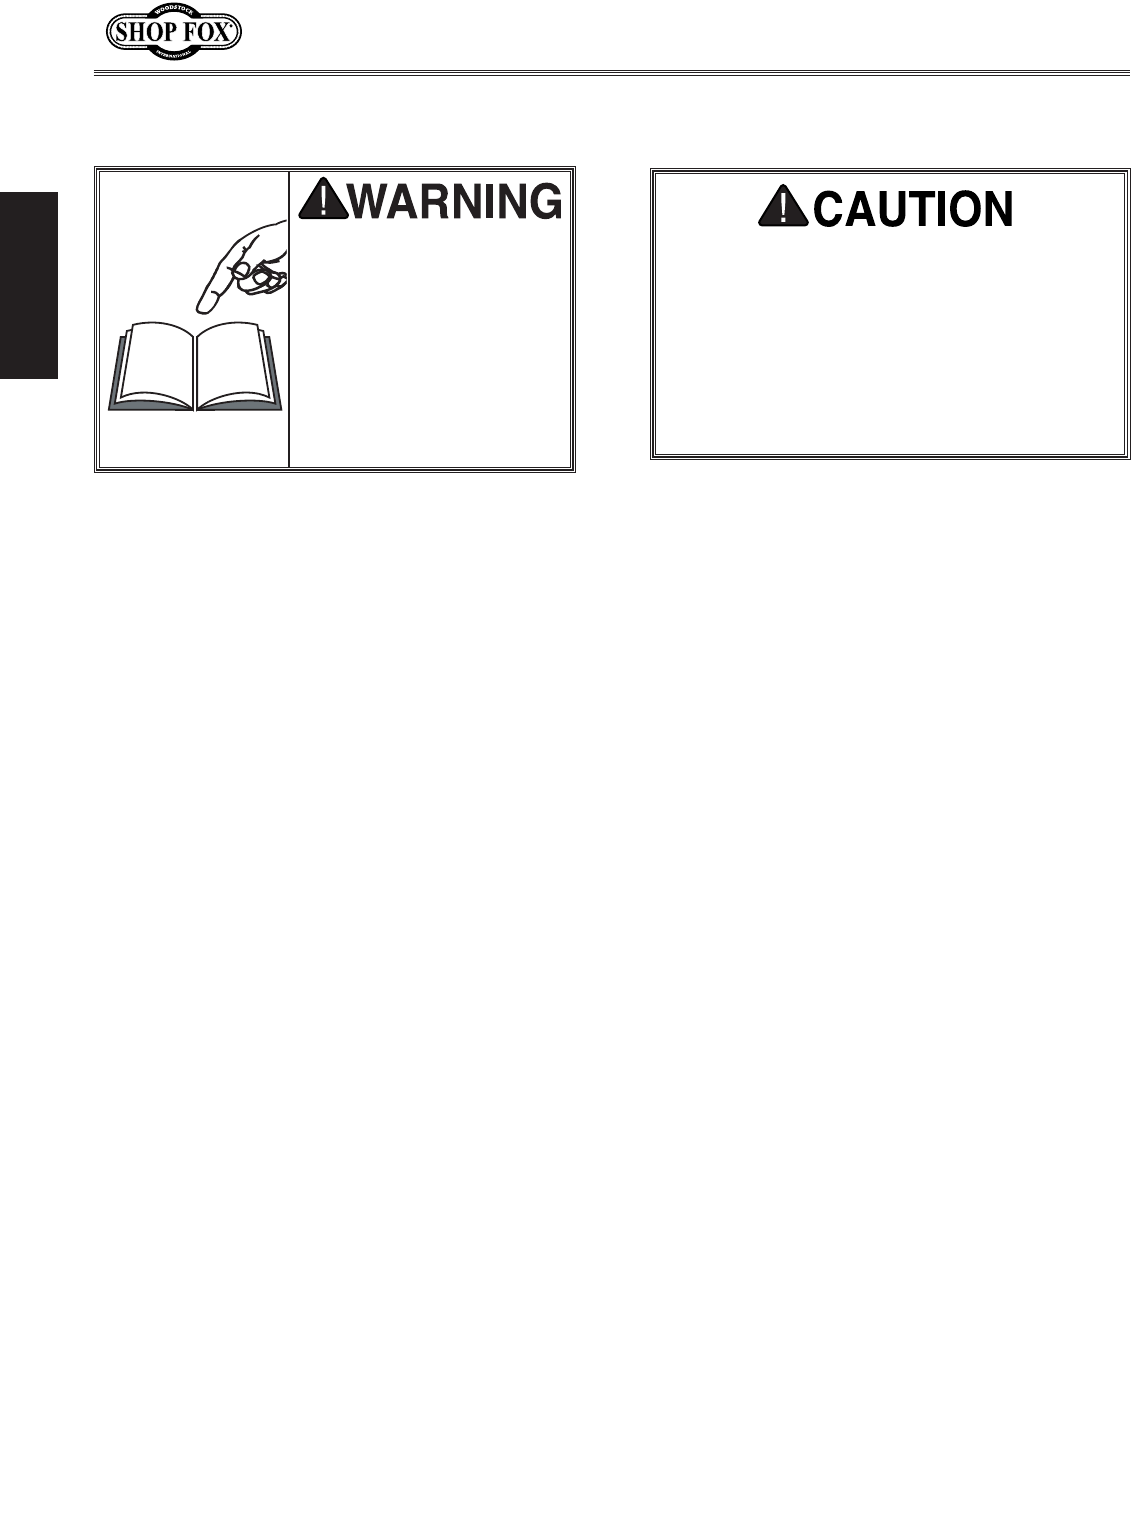
Machinery presents serious
injury hazards to untrained users.
Everyday eye-
glasses only have impact resistant lenses—they are NOT safety glasses.
Wood dust is a carcinogen and can cause cancer and severe respiratory illnesses.
Machinery noise can cause
permanent hearing damage.
DO NOT wear loose clothing, gloves, neckties, rings, or jewelry which may
get caught in moving parts. Wear protective hair covering to contain long hair and wear non-slip
footwear.
Be mentally alert at all times when running machinery.
Make
sure operation instructions are safe and clearly understood.
Keep all children and visitors a safe distance from the work
area.
Use padlocks, master switches, and remove start switch keys.
Indicates an imminently hazardous situation which, if not avoided, WILL
result in death or serious injury.
Indicates a potentially hazardous situation which, if not avoided, COULD
result in death or serious injury.
Indicates a potentially hazardous situation which, if not avoided, MAY
result in minor or moderate injury.
This symbol is used to alert the user to useful information about proper
operation of the equipment, and/or a situation that may cause damage
to the machinery.
NOTICE

-7-
W1758 Owner's Manual (Mfg. Since 3/10)
Turn power off and allow all moving parts to come to
a complete stop before leaving machine unattended.
DO NOT use machinery in damp, wet locations, or
where any flammable or noxious fumes may exist.
. Clutter and dark shadows may cause accidents.
Undersized cords over-
heat and lose power. Replace extension cords if they become damaged. DO NOT use extension cords
for 220V machinery.
1 . Make sure switch is
in OFF position before reconnecting.
. Make a habit of checking for keys and adjusting wrench-
es before turning machinery ON.
Check for binding and alignment of
parts, broken parts, part mounting, loose bolts, and any other conditions that may affect machine
operation. Repair or replace damaged parts.
. Refer to the instruction manual for recommended accessories.
The use of improper accessories may cause risk of injury.
. Work at the speed for which the machine or accessory was designed.
. Always secure the workpiece with the use of hold-downs, miter gauge, or
fence. Use jigs or fixtures when possible. A secured workpiece reduces the risk of kickback.
. Keep proper footing and balance at all times.
. Know and avoid condi-
tions that cause the workpiece to "kickback."
to the respiratory systems of people and
animals, especially fine dust. Make sure you know the hazards associated with the type of dust you
will be exposed to and always wear a respirator approved for that type of dust.
-8-
W1758 Owner's Manual (Mfg. Since 3/10)
Always wear an approved face shield when operating this lathe.
Always wear a respirator rated for wood dust when using this lathe.
Wood dust may cause allergies or long-term respiratory health problems.
Before starting the lathe, be certain the workpiece has been properly
embedded on the headstock and tailstock centers or faceplate, and that there is adequate clearance
for full rotation of the workpiece.
Adjust tool rest to provide proper support for the turning tool in use. Test
tool rest clearance by rotating workpiece by hand before starting lathe.
Select the correct turning speed for your operation, and allow the lathe to gain the
desired speed before applying turning tool.
Keep lathe chisels properly sharpened and held firmly in position against the
tool rest when using.
Never operate the lathe with damaged or worn parts.
Make sure lathe is disconnected from power and the spindle has come
to a complete stop before starting any inspection, adjustment, or maintenance procedures.
DO NOT attempt to stop the lathe by using your hand against the workpiece, face
plate, or spindle. Allow the lathe to stop on its own.
Keep long hair and loose clothing, belts, jewelry away from lathe during
operation. Tie back long hair and button long sleeves. DO NOT wear gloves during lathe operations.
When faceplate turning, use lathe chisels on the downward spinning side of
the workpiece only.
Always use the tool rest and extension to safely support turning tools when
doing outboard turning. If the provided tool rest assembly will not safely reach the workpiece, use a
free-standing tool rest. Never use the lathe without proper turning tool rest support.
DO NOT turn stock with knots, splits, and other potentially dangerous condi-
tions. Make sure glue joints have high quality bonds and will not fly apart during lathe operation.
-9-
W1758 Owner's Manual (Mfg. Since 3/10)
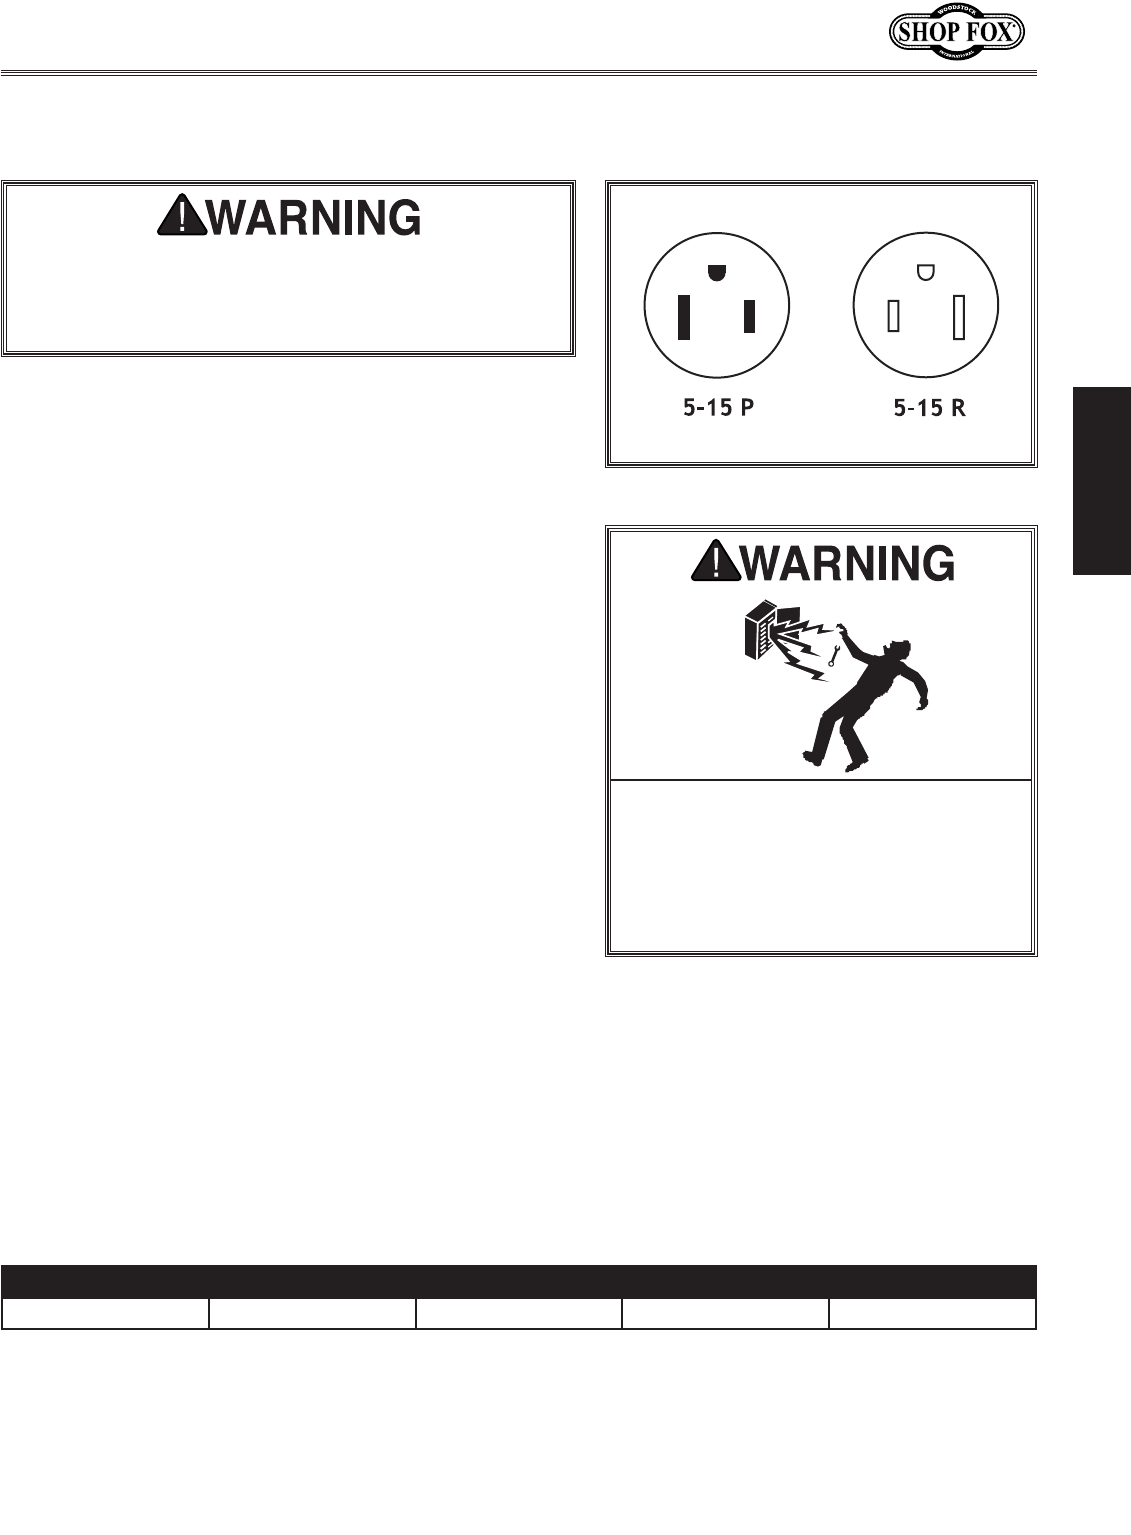
The Model W1758 is wired for 110V operation. We recom-
mend connecting this machine to a dedicated circuit with
a verified ground, using the circuit size below as a mini-
mum. Never replace a circuit breaker with one of higher
amperage without consulting a qualified electrician to
ensure compliance with wiring codes.
This machine must be grounded! The electrical cord sup-
plied with this machine comes with a grounding pin. If
your outlet does not accommodate a ground pin, have it
replaced by a qualified electrician.
110V Operation 14 Amps 20 Amps NEMA 5-15 14 Gauge
NEMA 5-15 plug and receptacle.
We do not recommend using an extension cord; however,
if you have no alternative, use the following guidelines:
• UseacordratedforStandardService(S).
• Do not use an extension cord longer than 50 feet.
• Ensurethatthecordhasagroundwireandpin.
• Usethegaugesizelistedbelowasaminimum.
-10-
W1758 Owner's Manual (Mfg. Since 3/10)
This machine has been carefully packaged for safe trans-
portation. If you notice the machine has been damaged
during shipping, please contact your authorized Shop Fox
dealer immediately.
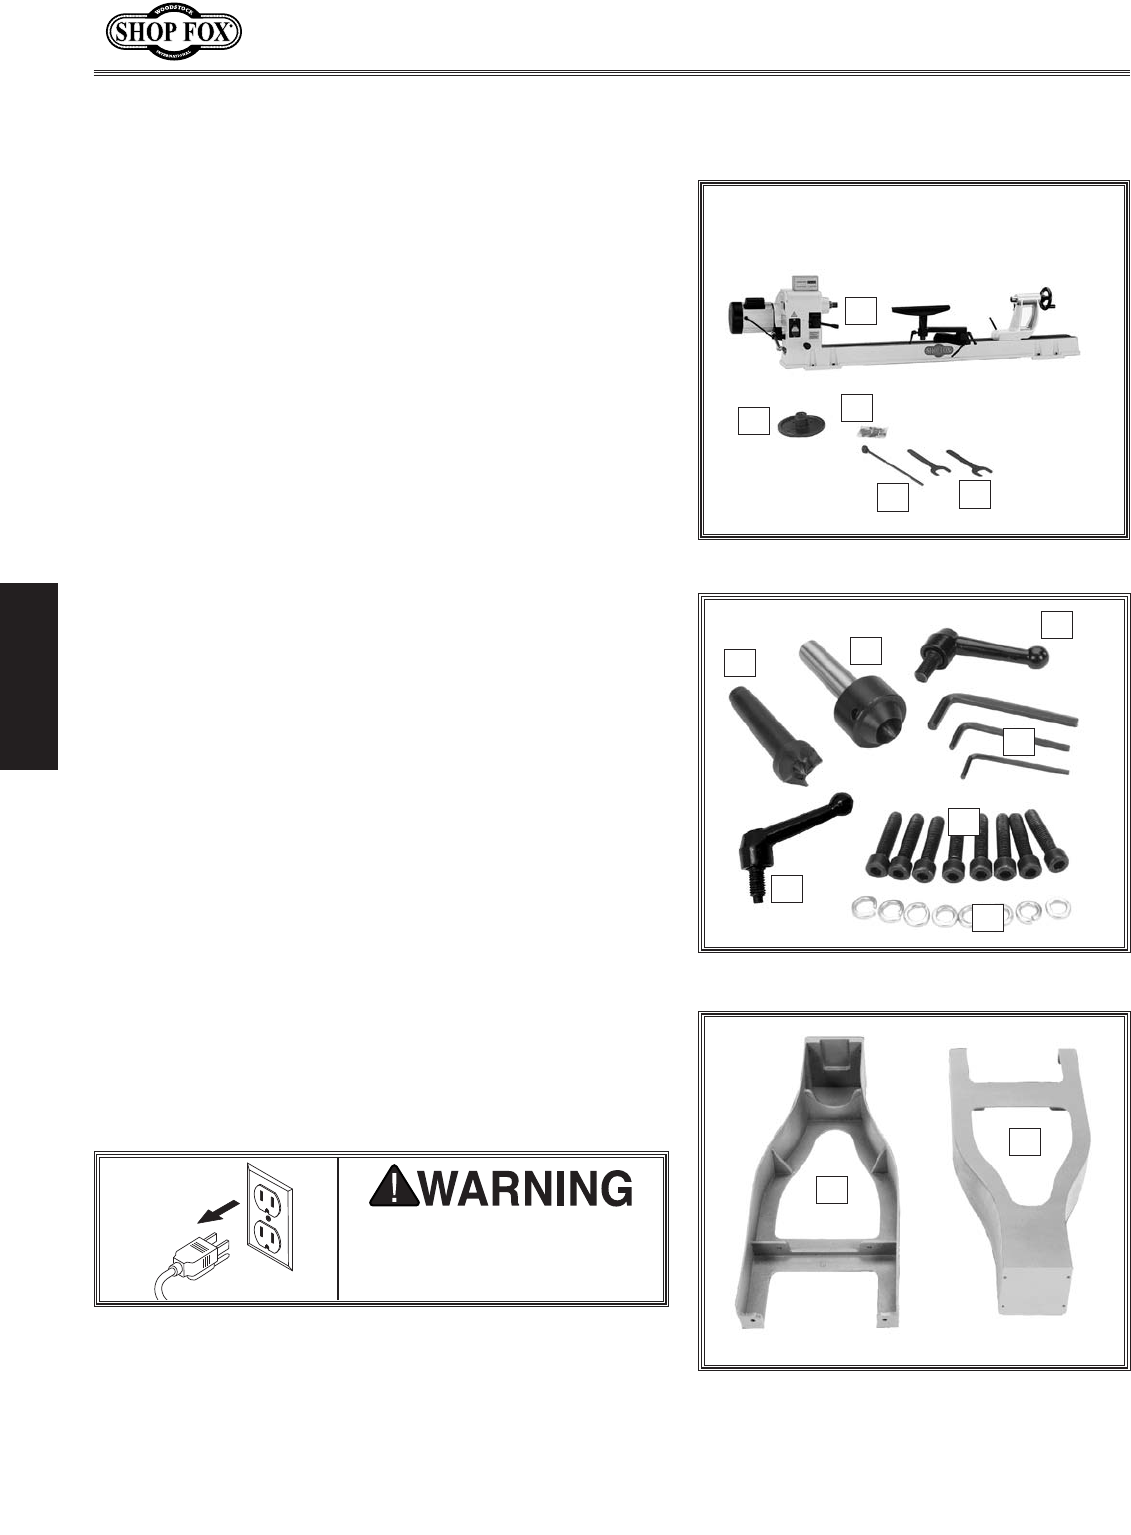
The following is a description of the main components
shipped with the Model W1758. Lay the components out
to inventory them.
If you can't find an item on this list, check the
mounting location on the machine or examine the pack-
aging materials carefully. Occasionally we pre-install cer-
tain components for safer shipping.
Lathe Unit ..................................................1
Faceplate 6" ................................................1
Hardware Bag ..............................................1
Knockout Tool ..............................................1
Flat Wrenches 32mm ......................................2
Spur Center .................................................1
Live Center .................................................1
Tool Rest Handle ...........................................1
Hex Wrenches 3, 4, 6mm ............................1 Ea
Cap Screws M8-1.25 x 35mm ............................8
Quill locking lever .........................................1
Lock Washers 8mm ........................................8
Right Leg ....................................................1
Left Leg .....................................................1
M
N
Box 2 inventory.
A
BC
DE
Box 1 inventory.
Hardware bag inventory.
FG
H
I
J
K
L

-11-
W1758 Owner's Manual (Mfg. Since 3/10)
This lathe distributes a heavy
load in a small footprint. Some residential
floors may require additional bracing to
support both machine and operator.
Consider existing and
anticipated needs, size of material to be
processed through the machine, and space
for auxiliary stands, work tables or other
machinery when establishing a location for
your wood lathe.
Lighting should be bright enough
to eliminate shadow and prevent eye strain.
Electrical circuits must be
dedicated or large enough to handle
amperage requirements. Outlets must be
located near each machine, so power or
extension cords are clear of high-traffic
areas. Follow local electrical codes for
proper installation of new lighting, outlets,
or circuits.
The table and other unpainted parts of your
machine type are coated with a waxy grease
that protects them from corrosion during ship-
ment. Clean this grease off with a solvent clean-
er or citrus-based degreaser. DO NOT use chlo-
rine-based solvents such as brake parts cleaner
or acetone—if you happen to splash some onto a
painted surface, you will ruin the finish.
-12-
W1758 Owner's Manual (Mfg. Since 3/10)
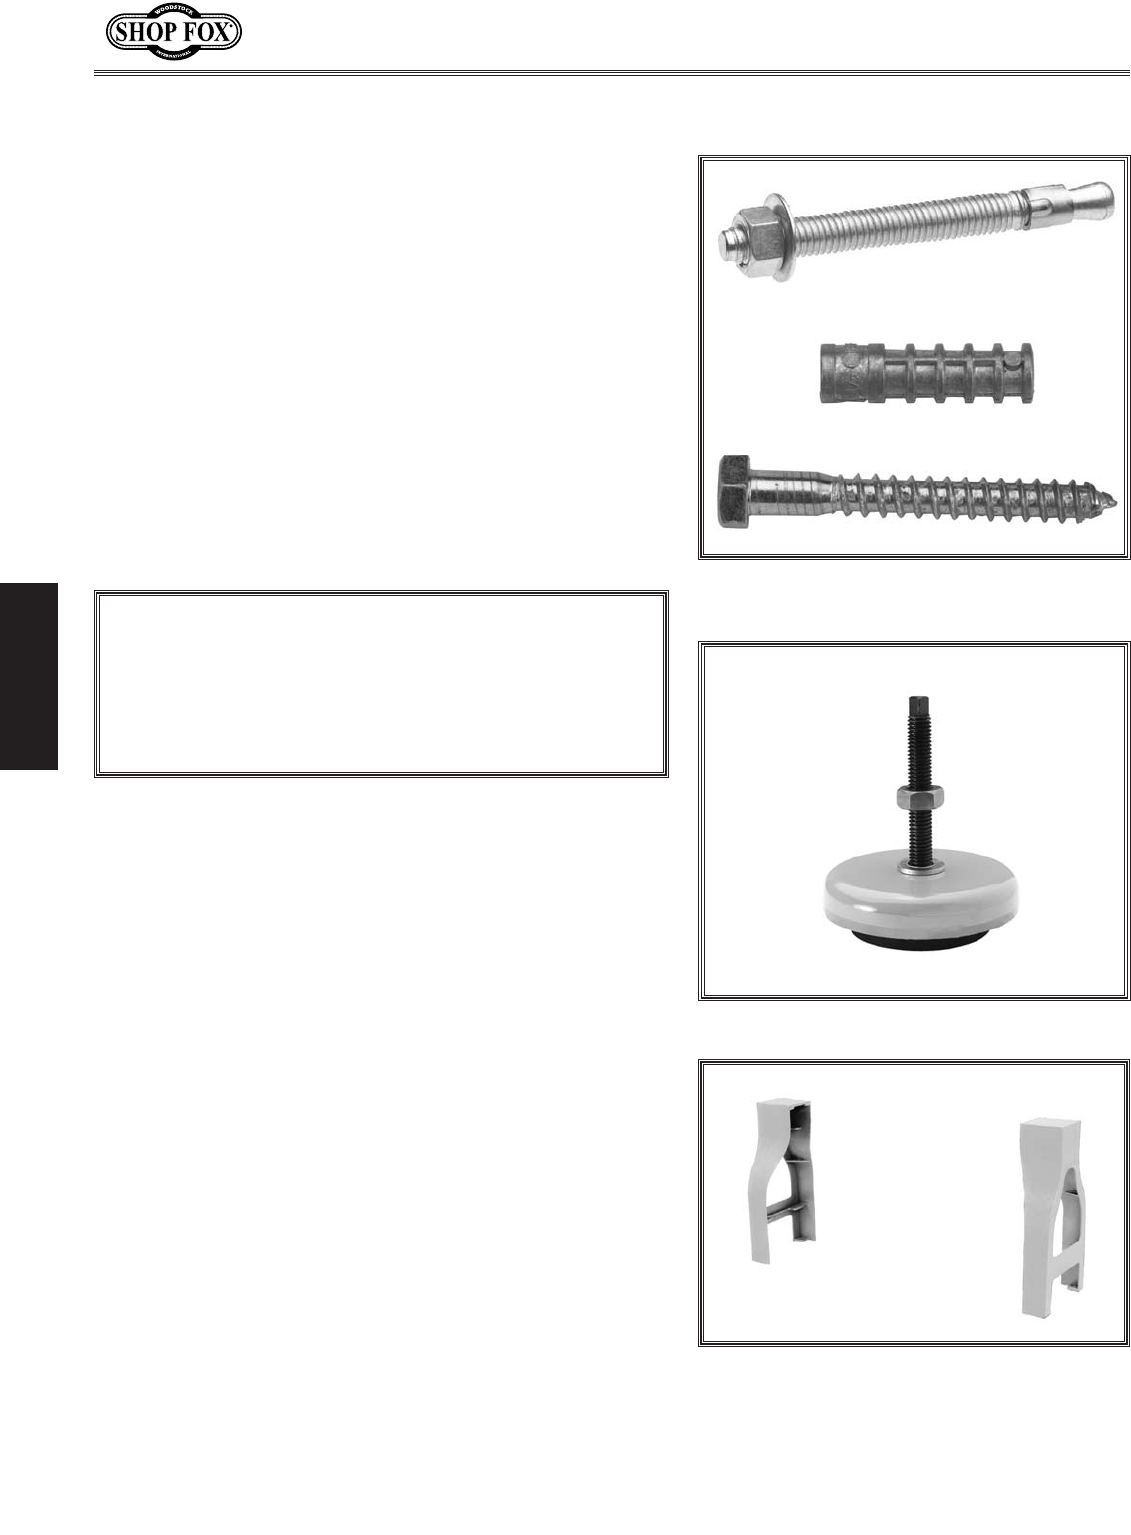
Although not required, we recommend that you mount
your new machine to the floor. Because this is an optional
step and floor materials may vary, floor mounting hard-
ware is not included. Generally, you can either bolt
your machine to the floor or mount it on machine feet.
Both options are described below. Whichever option you
choose it will be necessary to use a precision level to
level your machine.
Lag shield anchors with lag bolts and anchor studs (
) are two popular methods for anchoring an object to a
concrete floor. We suggest you research the many options
and methods for mounting your machine and choose the
best that fits your specific application.
NOTICE
Typical fasteners for mounting
to concrete floors.
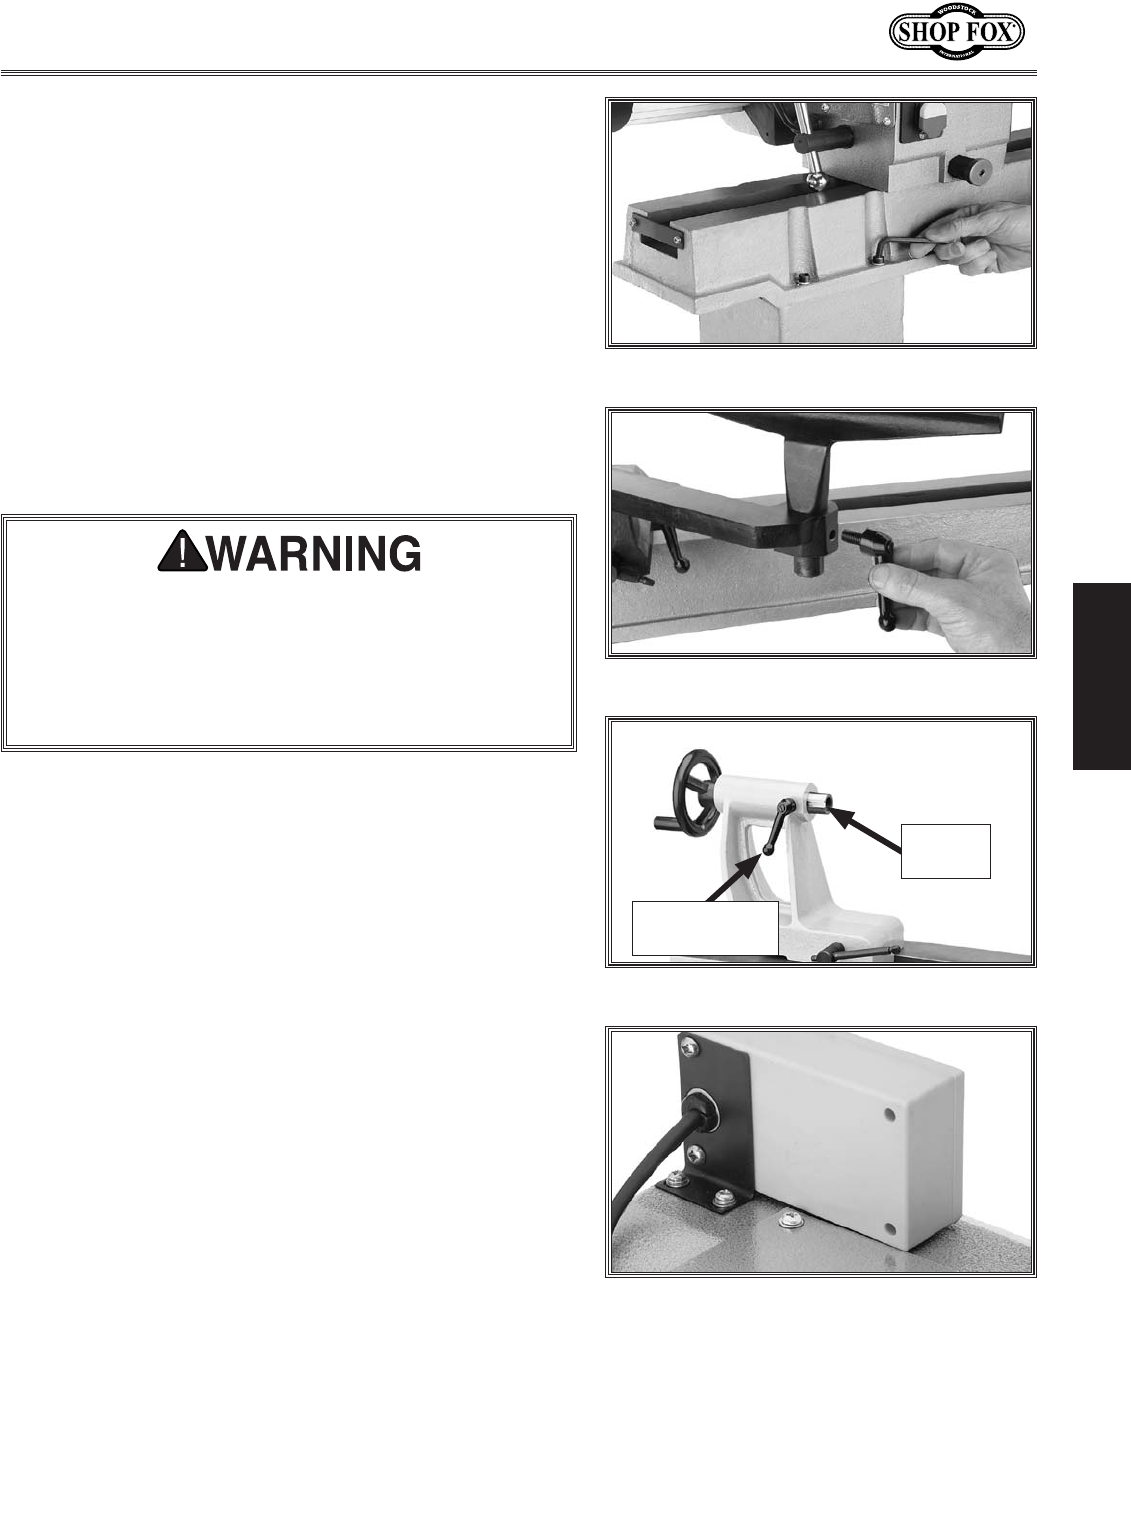
Using machine feet, shown in , gives the advan-
tage of fast leveling and vibration reduction. The large
size of the foot pads distributes the weight of the
machine to reduce strain on the floor.
Machine foot example.
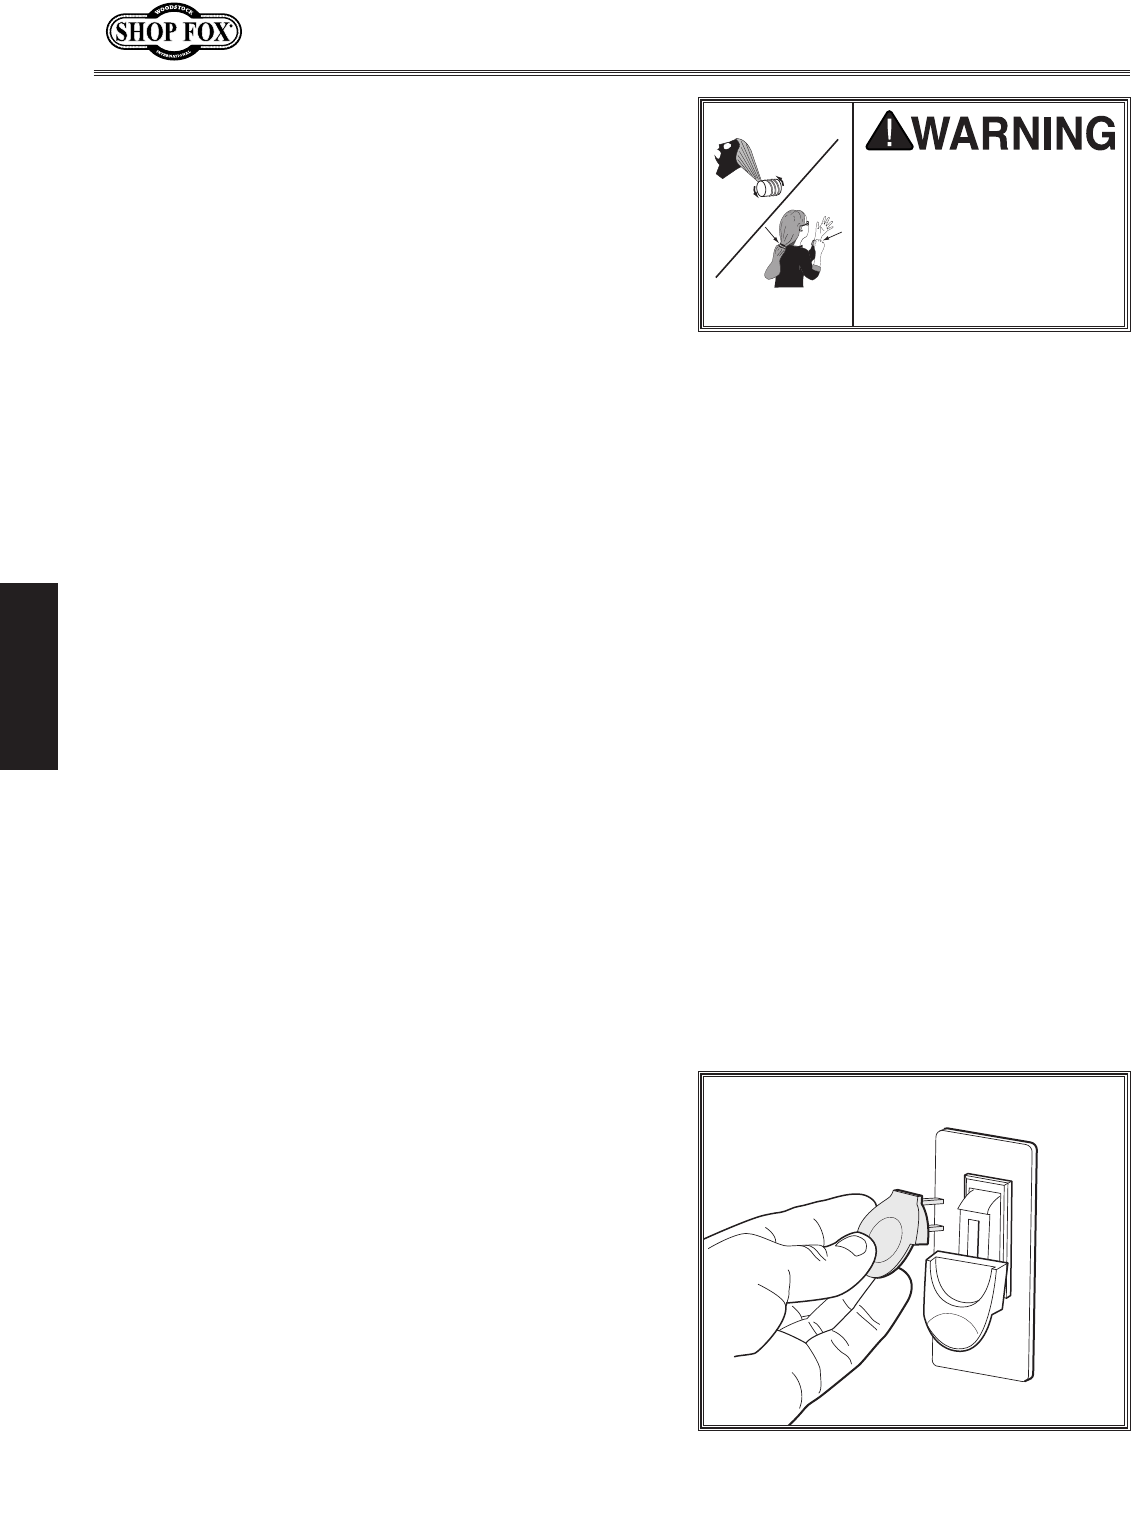
Legs approximately 41" apart.
Stand the right and left legs upright approximately
41" apart, and get them reasonably aligned, as
shown in .
Using the help of assistants, carefully lift the lathe
onto the stands and align the mounting holes.
The headstock end is the heaviest and usually
requires two people lifting at that end.
-13-
W1758 Owner's Manual (Mfg. Since 3/10)
Using the 6mm hex wrench, secure the lathe to the
legs with the eight cap screws and lock washers, as
shown in .
Install the handle into the tool rest, as shown in
.
Align the quill keyway with the entry hole of the
quill lock lever (see , then install the
lever into the tailstock so that the end of it mates
with the quill keyway.
Make sure the dog-end of the lock lever fits
into the quill keyway so that the quill can move in
and out of the tailstock without rotating.
Securing lathe to legs.
Installing tool rest handle.
Digital readout installed onto
the headstock (viewed from the back).
Secure the digital readout to the top of the head-
stock, as shown in .
Quill locking lever installed.
Quill
Keyway
Quill Locking
Lever
-14-
W1758 Owner's Manual (Mfg. Since 3/10)
Once the assembly is complete, test run your machine to
make sure it runs properly and is ready for regular opera-
tion.
The test run consists of verifying the following: 1) The
motor powers up and runs correctly, and 2) the switch
disabling mechanism works correctly.
If, during the test run, you cannot easily locate the source
of an unusual noise or vibration, stop using the machine
immediately, then review on
If you still cannot remedy a problem, contact our Tech
Support at (360) 734-3482 for assistance.
Make sure you understand the safety instructions at
the beginning of the manual and that the machine is
setup properly.
Make sure all tools and objects used during setup are
cleared away from the machine.
Connect the machine to the power source.
Turn the lathe ON by lifting up on the ON/OFF
switch, and verify that it operates correctly.
— When operating correctly, the machine runs
smoothly with little or no vibration or rubbing
noises.
— Investigate and correct strange or unusual noises
or vibrations before operating the machine fur-
ther. Always disconnect the machine from power
when investigating or correcting potential prob-
lems.
Turn the machine OFF by pushing down on the ON/
OFF switch.
Remove the switch disabling key (see ).
Try to start the machine with the switch.
— If the machine does not start, the switch disabling
feature is working as designed.
— If the machine starts, immediately stop the
machine. The switch disabling feature is not work-
ing correctly. Call Tech Support for help.
Removing lockout key from
switch.
-15-
W1758 Owner's Manual (Mfg. Since 3/10)
This lathe will perform many types of operations that are
beyond the scope of this manual. Many of these operations
can be dangerous or deadly if performed incorrectly.
The instructions in this section are written with the under-
standing that the operator has the necessary knowledge
and skills to operate this machine.
If you are an inexperienced operator, we strongly recom-
mend that you read books, trade articles, or seek training
from an experienced wood lathe operator before perform-
ing any unfamiliar operations.
OFF
-16-
W1758 Owner's Manual (Mfg. Since 3/10)
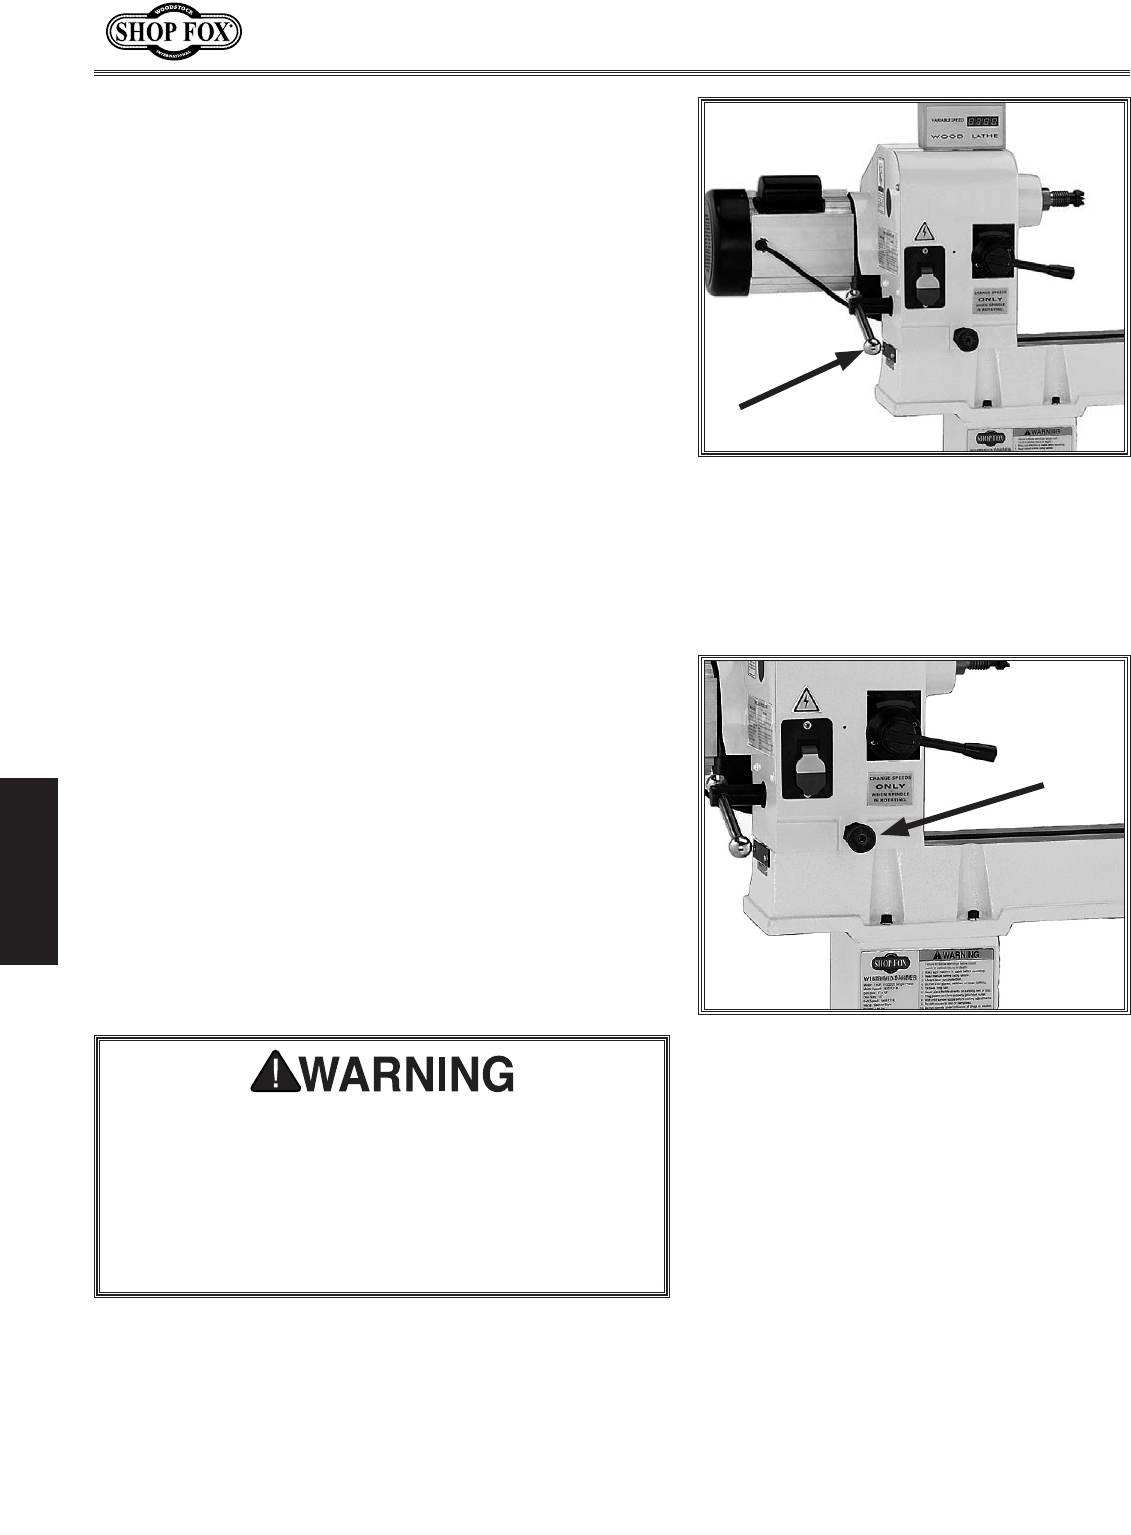
The Model W1758 headstock can be positioned anywhere
along the bed and swiveled 360°.
DISCONNECT THE LATHE FROM POWER!
Loosen the headstock locking lever (see ).
Position the headstock along the lathe bed and
secure it in place by tightening the locking lever.
The large clamping hex nut underneath the
headstock may require occasional adjusting to
ensure proper clamping pressure of the headstock to
the bed.
DISCONNECT THE LATHE FROM POWER!
Loosen the headstock locking handle (see
).
Pull out the headstock rotation locking pin (see
), and rotate the headstock in place.
Release the locking pin to secure the headstock in
one of the five pre-set positions: 0°, 60°, 90°, 120°,
or 180°.
Re-tighten the headstock locking lever.
Headstock locking lever.
Headstock rotation locking pin.

-17-
W1758 Owner's Manual (Mfg. Since 3/10)
The tailstock is equipped with a cam-action clamping sys-
tem to secure it to the lathe bed. When the locking lever
is tightened, a locking plate lifts up underneath the bed
and secures the tailstock in place.
Loosen the tailstock locking lever (see ),
and move the tailstock in position.
Re-tighten the locking lever to secure the tailstock
in place.
The large clamping hex nut underneath the
tailstock may require occasional adjusting to ensure
proper clamping pressure of the headstock to the
bed.
Tailstock locking lever.
The Model W1758 comes with a three-way adjustable tool
rest (see ).
• Usethebaselockinglevertopositionthetoolrest
along the length of the bed.
• Usetheextensionlockinglevertosecurethetool
rest a working distance from the bed or workpiece.
• Usethetoolrestlockinglevertoadjusttheheight
of the tool rest relative to the workpiece.
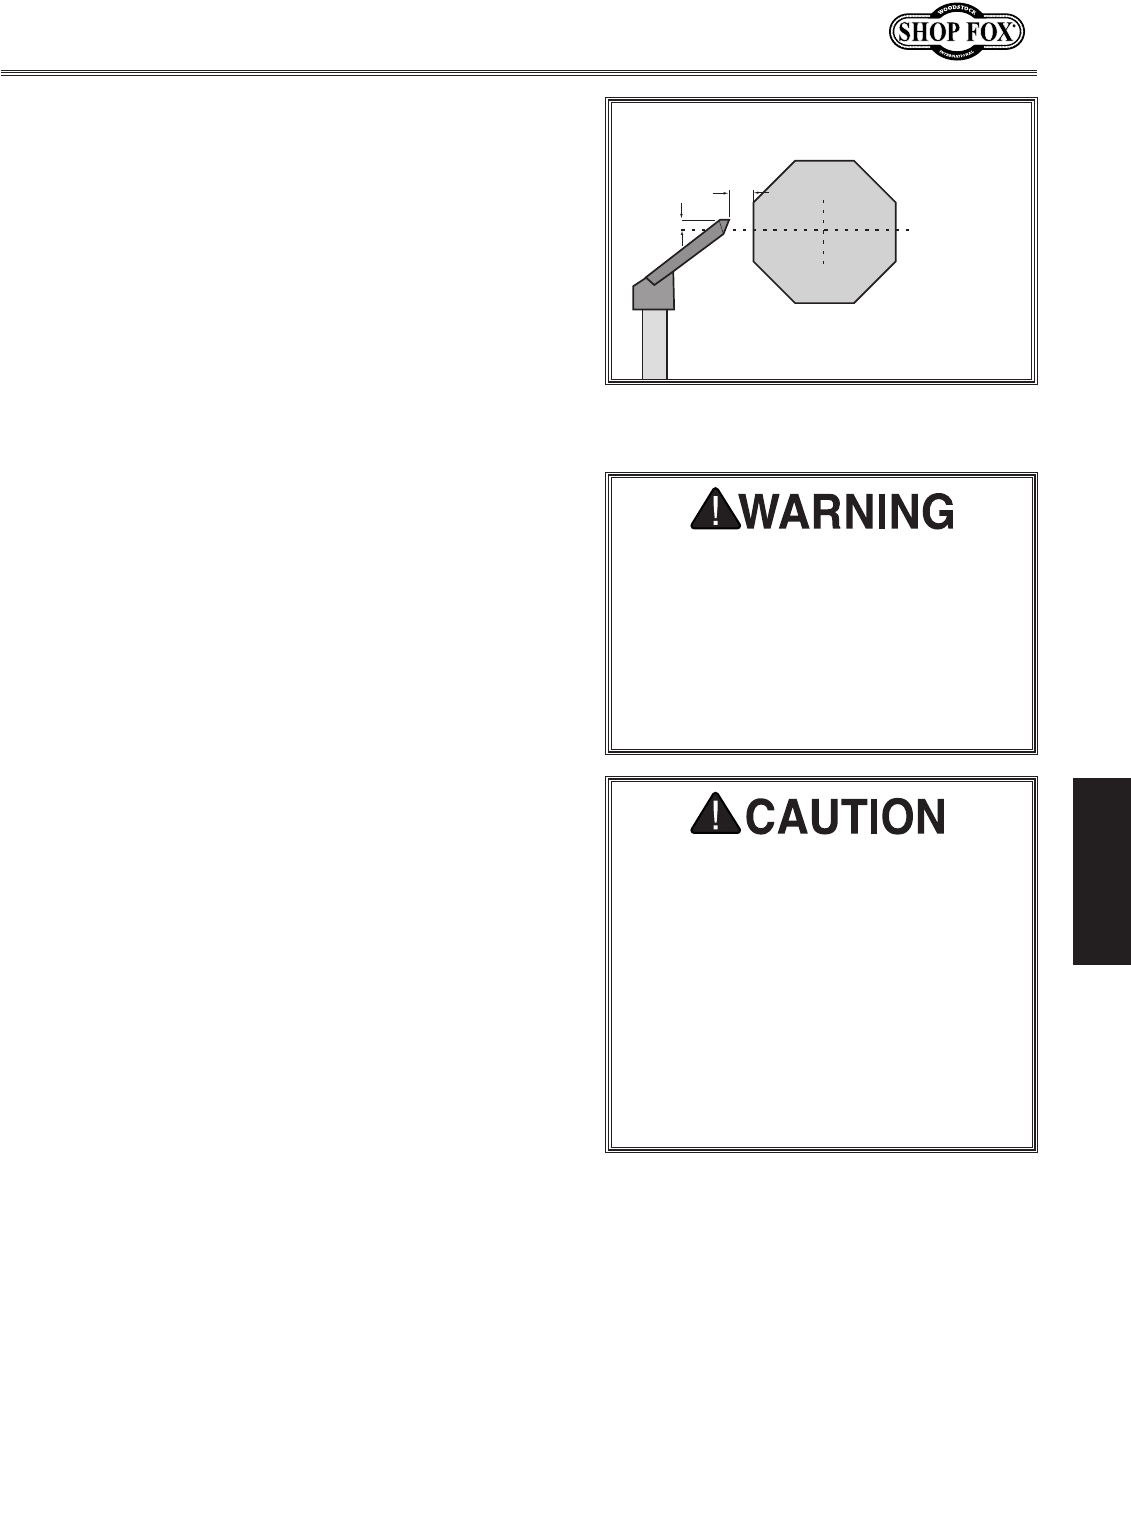
For safety and good turning results, we recommend the
tool rest be positioned approximately 1⁄4" away from the
workpiece, and approximately 1⁄8" above the workpiece
center line (see ).
Tool rest controls.
Tool Rest
Locking Lever
Base Locking
Lever Extension Locking
Lever
Workpiece
Center Line
Distances
Tool Rest
1
/
8
"
1
/
4
"
Tool rest position relative to
workpiece.
-18-
W1758 Owner's Manual (Mfg. Since 3/10)
The included spur center installs into the headstock spin-
dle with an MT#2 tapered fit.
DISCONNECT THE LATHE FROM POWER!
Move the tailstock and tool rest to a safe working
distance from the headstock.
If the faceplate is installed, remove it (refer to
for instructions).
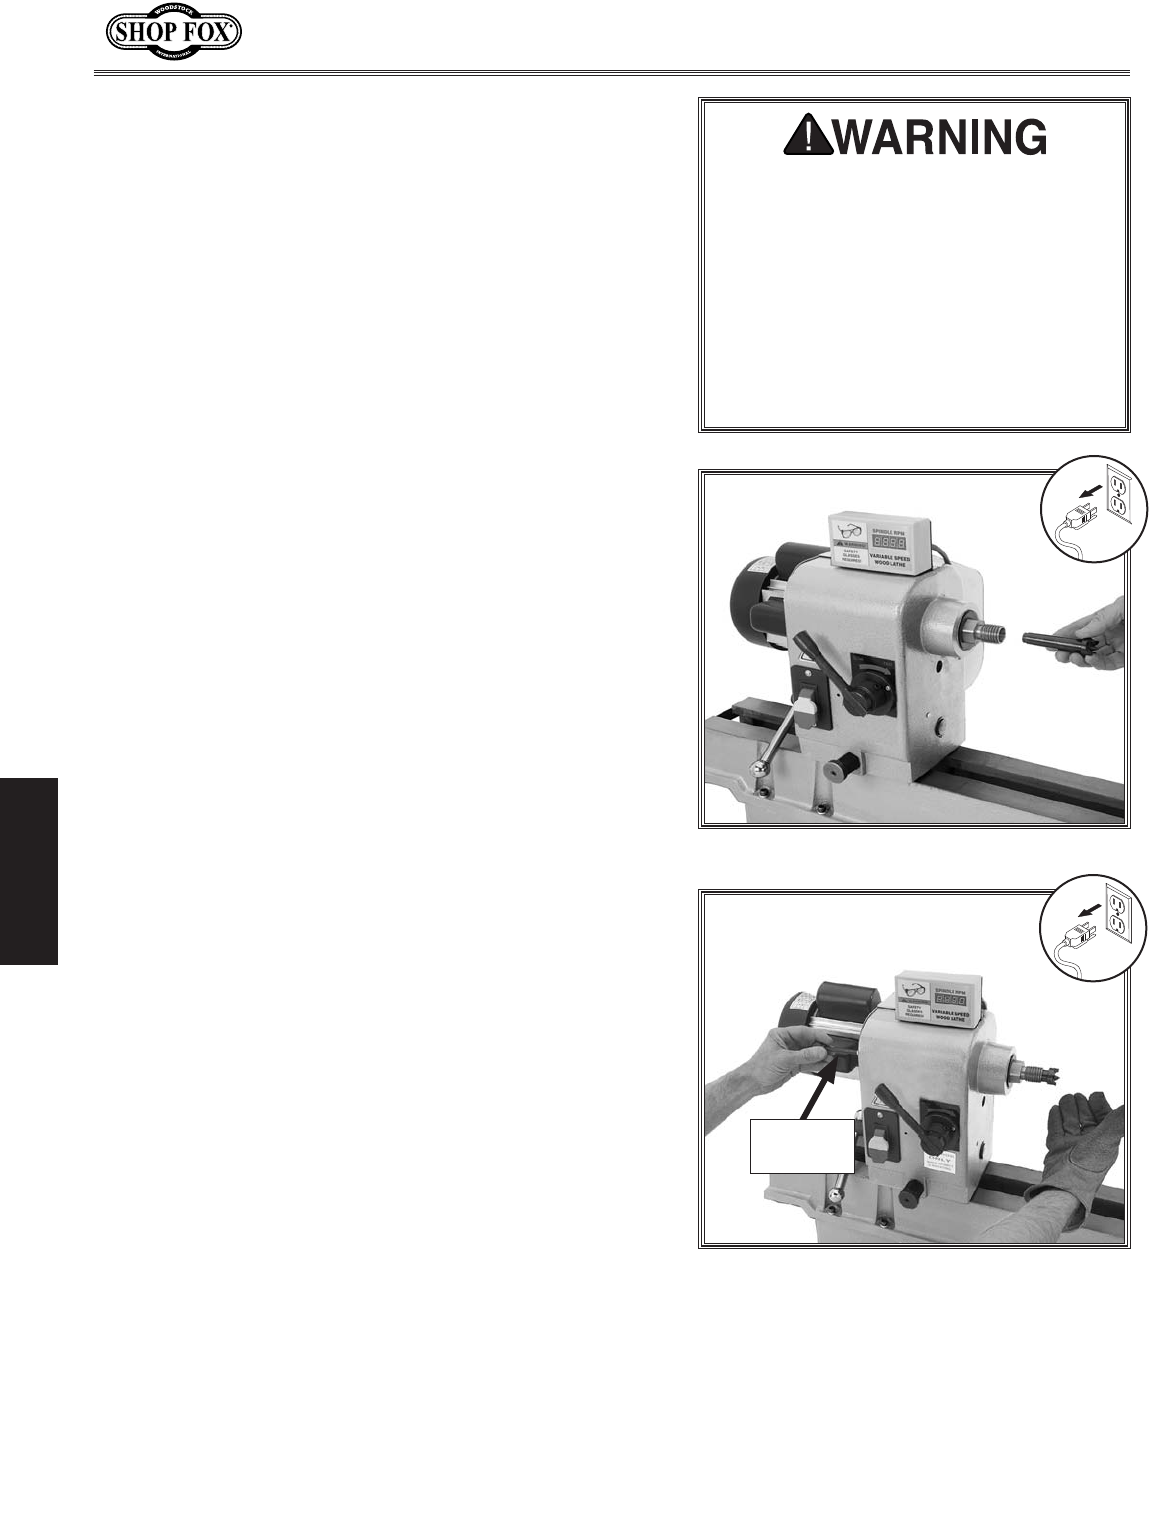
Make sure the mating surfaces of the spur center and
spindle are free of debris and oily substances before
inserting the center.
Insert the tapered end of the center into the spin-
dle, and push it in with a quick, firm motion (see
).
Make sure the spur center is securely installed
by attempting to pull it out by hand—a properly
installed center will not pull by hand.
DISCONNECT THE LATHE FROM POWER!
Hold a clean rag under the spindle or wear a glove
to catch the spur center when you remove it.
Insert the knockout tool through the outboard end of
the spindle and firmly tap the center, catching it as
it falls (see ).
Aligning Headstock
& Tailstock CentersPage 28
Installing the headstock center.
Removing the headstock
center.
Knockout
Tool
-19-
W1758 Owner's Manual (Mfg. Since 3/10)
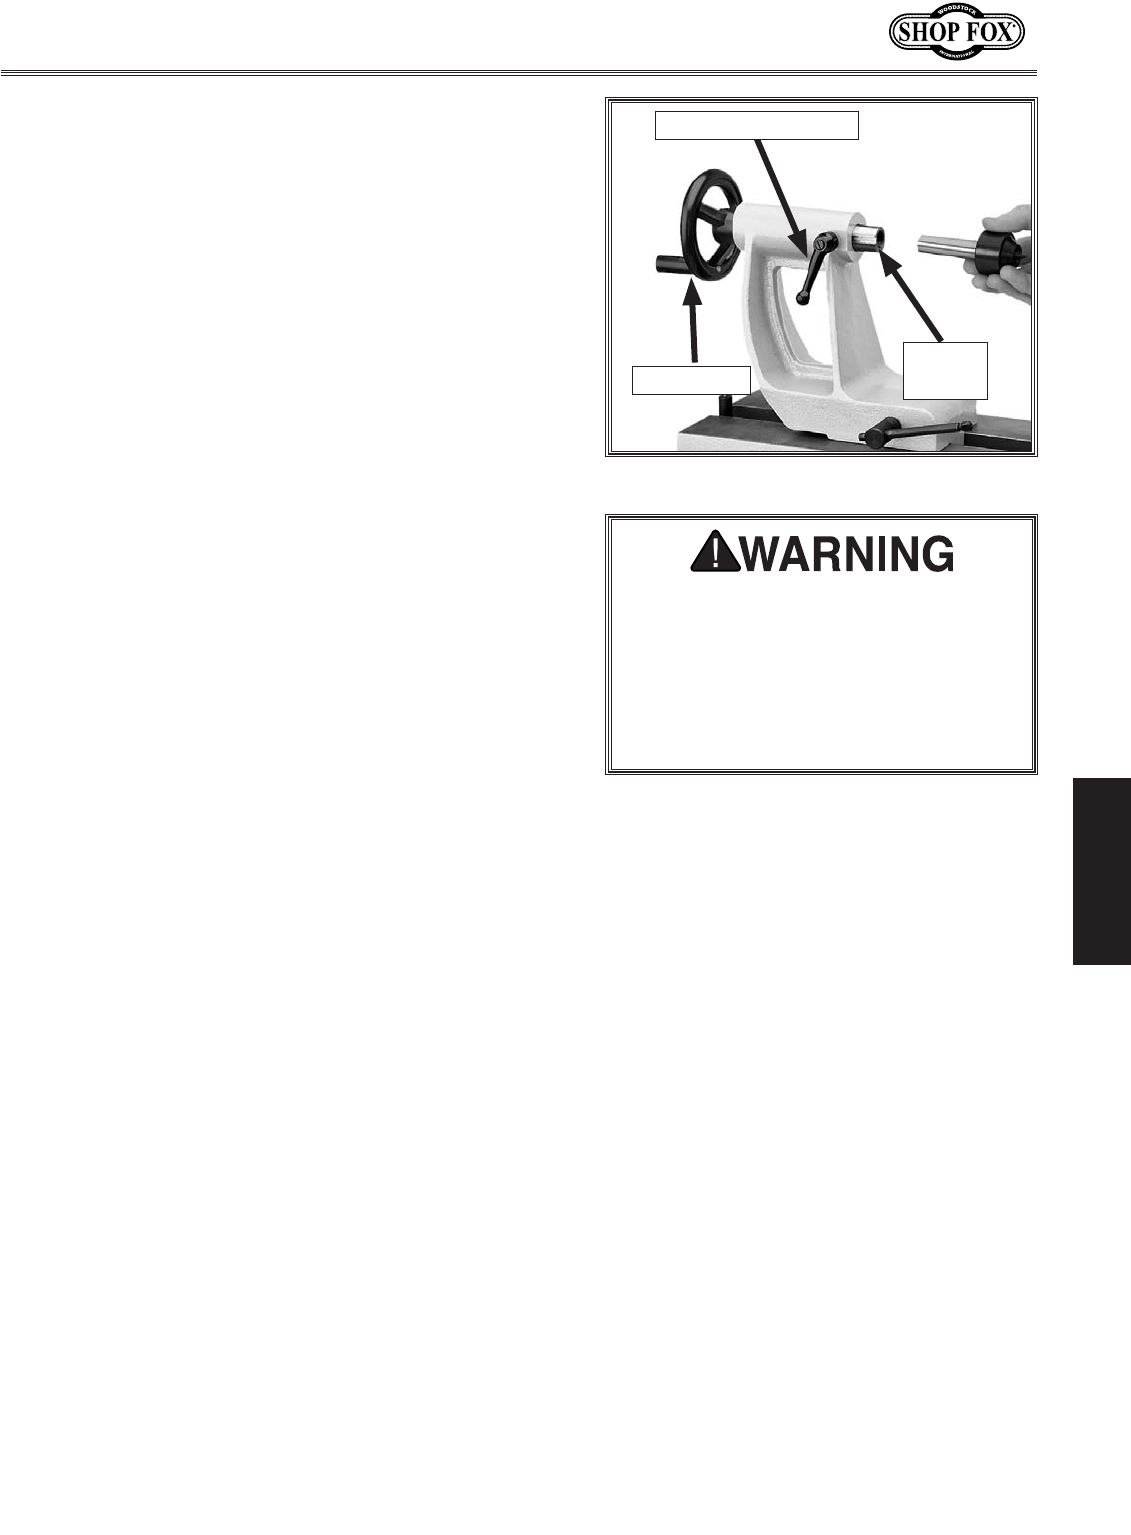
The included live center installs into the tailstock quill
with an MT#2 tapered fit.
Move the tailstock to a safe working distance away
from the tool rest and headstock.
Loosen the quill locking lever, then rotate the quill
handwheel clockwise until the quill extends out from
the tailstock about 1" (see ).
Make sure the mating surfaces of the live center and
quill are free of debris and oily substances before
inserting the center.
Insert the tapered end of the center into the quill
with a quick, firm motion.
Make sure the center is secure by attempting to pull
it out by hand—a properly installed center will not
pull out by hand.
Tighten the quill locking lever to hold the quill and
center in place.
Make sure the quill locking lever is aligned with
the quill keyway to prevent the quill from rotating
during use.
Loosen the quill locking lever.
Hold a clean rag under the center or wear a glove to
catch the center when you remove it.
Rotate the quill handwheel counterclockwise—the
quill will retract back into the tailstock causing the
center to be forced out.
Installing the tailstock center.
Quill Locking Lever
Handwheel
Quill
Keyway
-20-
W1758 Owner's Manual (Mfg. Since 3/10)
The faceplate is used for removing material from the face
of the workpiece, such as in hollowing operations. The
faceplate can be installed only if the center has been
removed from the headstock spindle.
DISCONNECT THE LATHE FROM POWER!
If the headstock center is installed, remove it (refer
to for instructions).
Thread the faceplate onto the headstock spindle.
Using the two included 34mm flat wrenches, tighten
the faceplate, as shown in .
To remove the faceplate, reverse Steps 3–4.
For detailed instructions on mounting a workpiece to the
faceplate, refer to on .
Tightening faceplate onto
headstock spindle.
ON
Installing Faceplate
-21-
W1758 Owner's Manual (Mfg. Since 3/10)
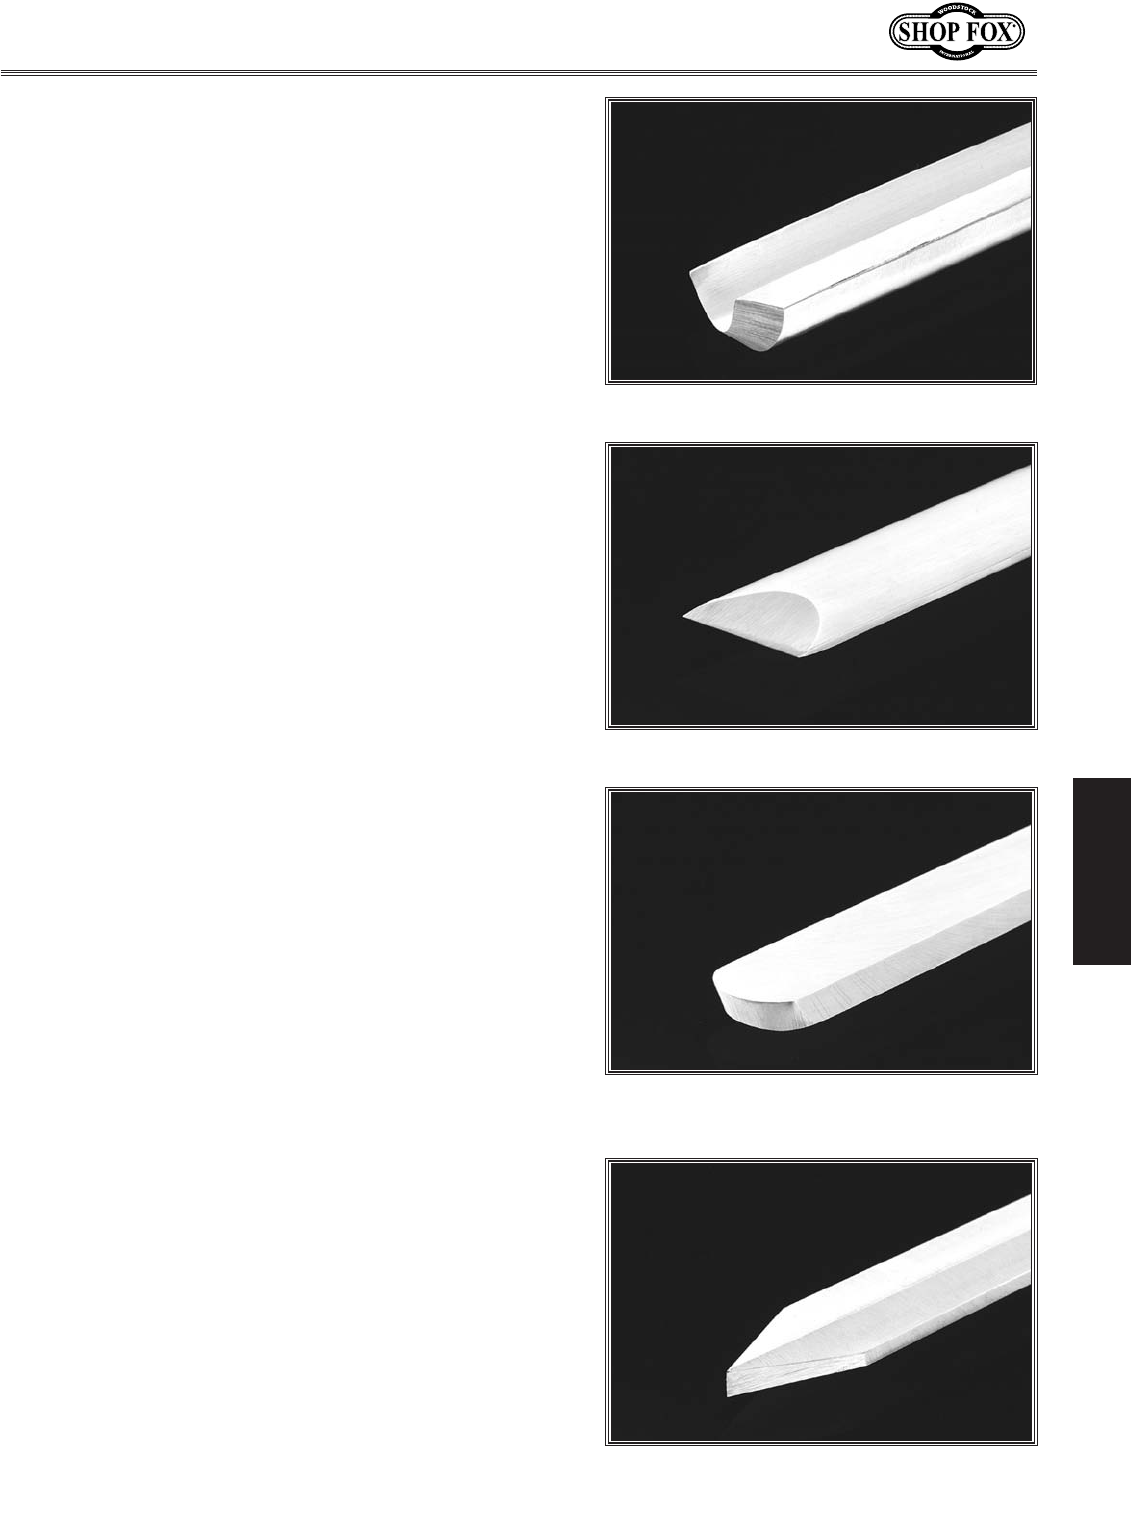
Lathe chisels come in a variety of shapes and sizes, and
usually fall into five major categories. See
for some examples.
Mainly used for rough cutting, detail cutting, and
cove profiles. The rough gouge is a hollow, double-ground
tool with a round nose, and the detail gouge is a hollow,
double-ground tool with either a round or pointed nose.
A very versatile tool that can be used for
planing, squaring, V-cutting, beading, and parting off. The
skew chisel is flat, double-ground with one side higher
than the other—usually at an angle of 20°–40°.
Typically used where access for other tools is
limited, such as hollowing operations. This is a flat, dou-
ble-ground tool that comes in a variety of profiles (round
nose, spear point, square nose, etc.) to match many dif-
ferent contours.
Used for sizing and cutting off work. This
is a flat tool with a sharp pointed nose that may be single
or double-ground.
These unique, special function tools aid
in hollowing, bowl making, cutting profiles, etc.
Refer to on for examples of recom-
mended wood chisels.
Example of a gouge.
Example of a skew chisel.
Example of a round nose
scraper.
Example of a parting tool.
-22-
W1758 Owner's Manual (Mfg. Since 3/10)
Spindle turning is the operation performed when a
workpiece is mounted between the headstock and
tailstock centers (see ).
Typical spindle turning
operation.
Workpiece
Workpiece
Center
Pencil Lines
Marked
Diagonally
Across Corners
Workpiece marked diagonally
from corner to corner to determine the
center.
Aligning Headstock & Tailstock
CentersPage 28
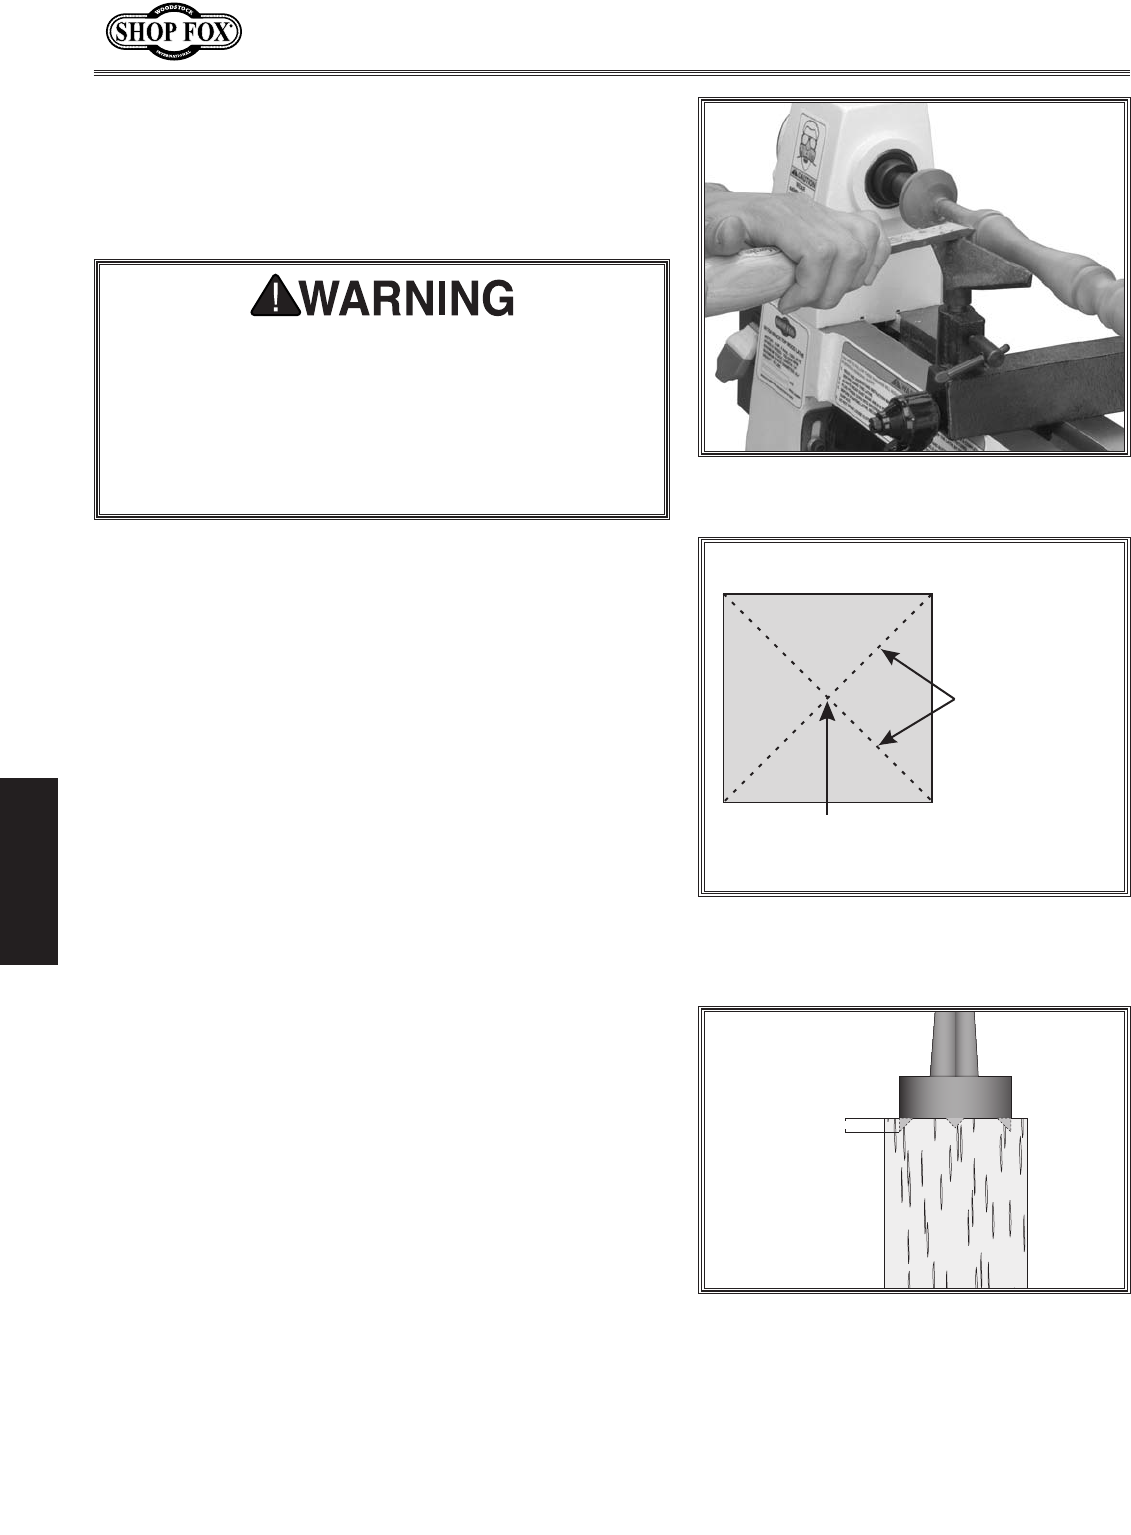
Find the center point of both ends of your workpiece
by drawing diagonal lines from corner to corner
across the end of the workpiece (see ).
Using a wood mallet, tap the point of the spur cen-
ter into the center of the workpiece on both ends,
leaving an indented center mark.
Use a 1⁄4" drill bit to drill a 1⁄4" deep hole at the
center mark on the workpiece end to be mounted on
the headstock spur center.
To help embed the spur center into the workpiece,
cut 1⁄8" deep saw kerfs into the same workpiece end
along the diagonal lines marked in .
If your workpiece is over 2" x 2", cut the corners off
the workpiece length-wise to make turning the cor-
ners safer and easier.
Drive the spur center into the workpiece end center
mark with a wood mallet to embed it at least 1⁄4"
into the workpiece (see ).
With the workpiece still attached, insert the spur
center into the headstock spindle (refer to
on for instructions).
Spindle Turning
1/4"
Spur center properly
embedded.
-23-
W1758 Owner's Manual (Mfg. Since 3/10)
Install the live center into the tailstock quill, and
lock the quill in place with the quill locking lever
(refer to on for
instructions).
Slide the tailstock toward the workpiece until the
point of the tailstock center touches the workpiece
end center mark, then secure the tailstock in place
with the tailstock locking lever.
Loosen the quill locking lever and rotate the quill
handwheel clockwise to push the tailstock center
into the workpiece at least 1⁄4".
Position the tool rest approximately 1⁄4" away from
the workpiece, and approximately 1⁄8" above the
workpiece center line (see ).
Before turning the lathe ON, rotate the workpiece
by hand to ensure that there is safe clearance on all
sides.
• When turning the lathe ON, stand away from the
vertical path of the spinning workpiece until the
lathe reaches full speed and you can verify that the
lathe will not throw the workpiece.
• Usetheslowestspeedwhenstartingthelathe.
• Selecttherightspeedforthesizeoftheworkpiece
you are turning:
— Use the slower speeds for large workpieces of
diameters of 4" and over, and for rough cutting.
— Use the middle range speeds for workpiece diam-
eters of 2–4".
— Use the faster speeds for workpieces under 2", and
for finish turning.
• KeeptheturningtoolonthetoolresttheENTIRE
time that it is approaching the workpiece and it is in
contact the workpiece.
• Learnthecorrecttechniquesforeachtoolyouwill
use. If you are unsure about how to use the lathe
tools, read books or magazines about lathe tech-
niques, and seek training from experienced and
knowledgeable lathe users.
Workpiece
Center Line
Distances
Tool Rest
1
/
8
"
1
/
4
"
Relative position of tool rest to
workpiece.
Tool Rest Height
-24-
W1758 Owner's Manual (Mfg. Since 3/10)
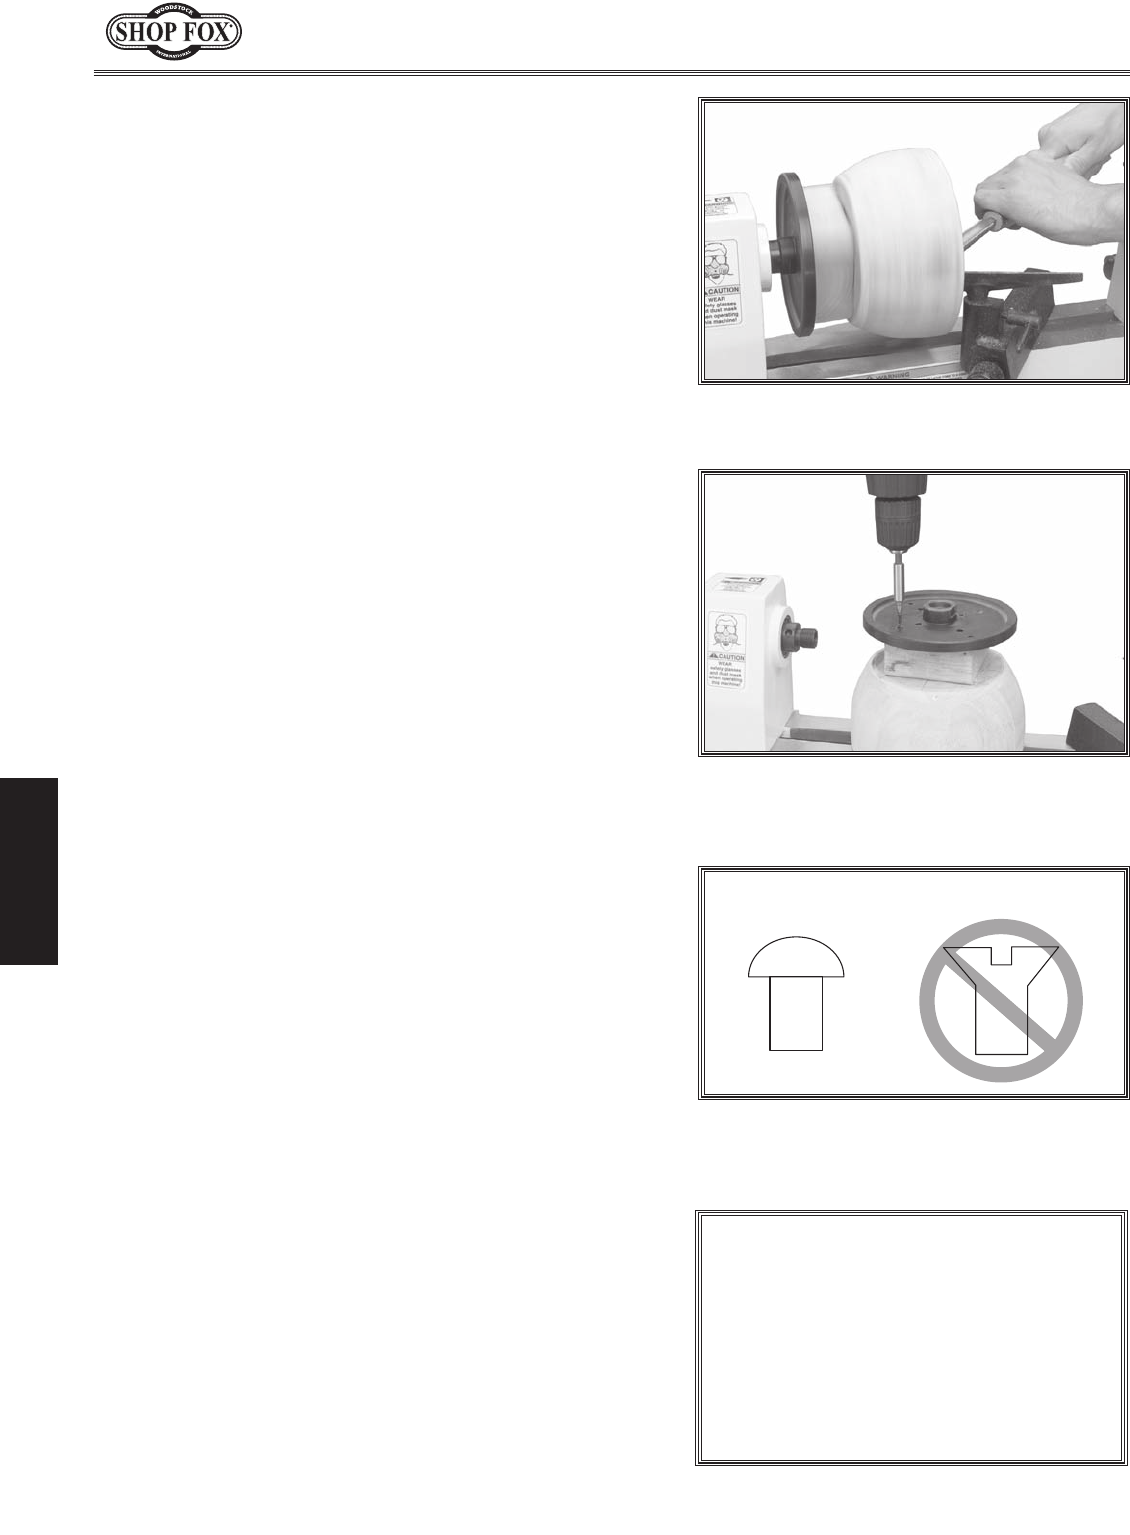
Faceplate turning is when a workpiece is mounted to the
faceplate that, in turn, is secured to the headstock spin-
dle. This type of turning is usually done with open-faced
workpieces like bowls or plates (see ).
Mark the center of the workpiece back, as in
on .
Cut off the excess corners of the workpiece to
make it as close to "round" as possible.
Use the mark made from to center the face-
plate on the workpiece back, and attach it with
wood screws that do not have tapered heads (see
).
Thread and secure the faceplate onto the headstock
spindle (refer to on for
detailed instructions).
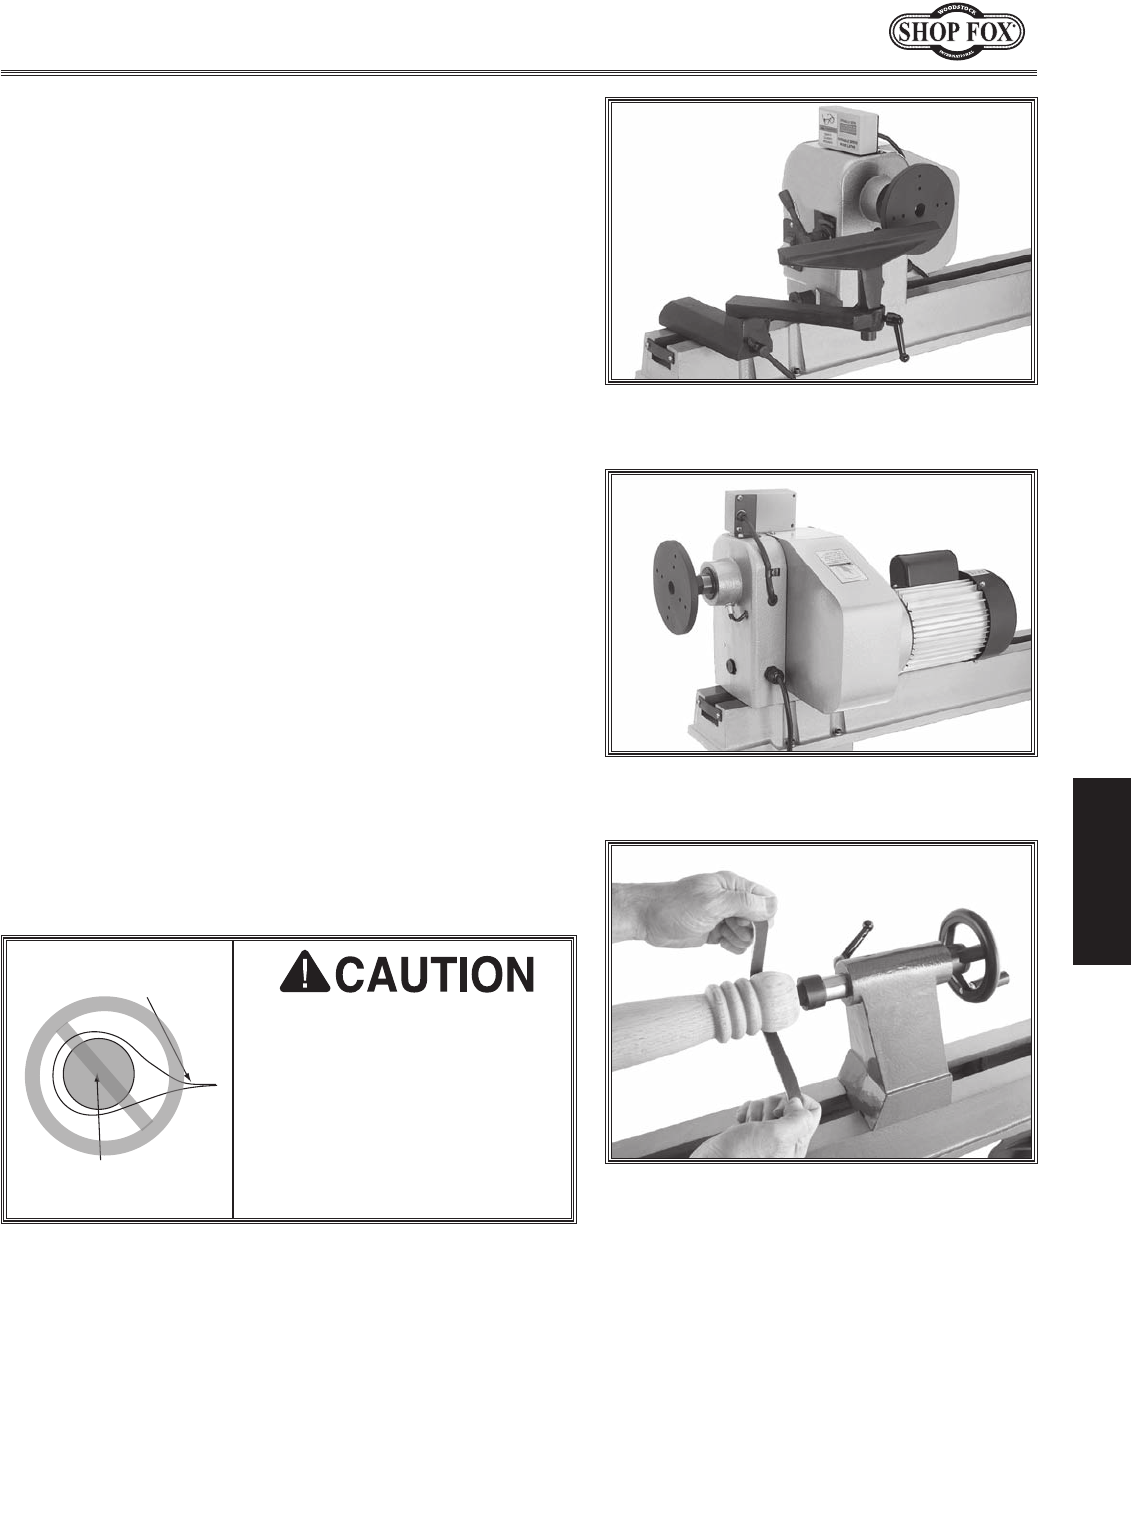
If wood screws cannot be placed in the workpiece, then
the faceplate can be mounted to a backing block that is
securely glued to the workpiece.
Make the backing block from a piece of scrap wood
that is flat on both sides, and is free of knots and
splits.
Locate and mark the center of both the workpiece
and the backing block.
Drill a 1⁄4" hole completely through the backing block
at its center.
Looking through the hole in the backing block to line
it up with the center of the workpiece, glue and
clamp the backing block to the workpiece.
Allow the glue joint to completely cure
according to the manufacturer's instructions.
Typical faceplate turning
operation.
Typical attachment of
faceplate to workpiece (shown with
backing block).
Correct Incorrect
Correct and incorrect
screw types for mounting faceplate to
workpiece.
NOTICE
Figure 32
Faceplate Turning
-25-
W1758 Owner's Manual (Mfg. Since 3/10)
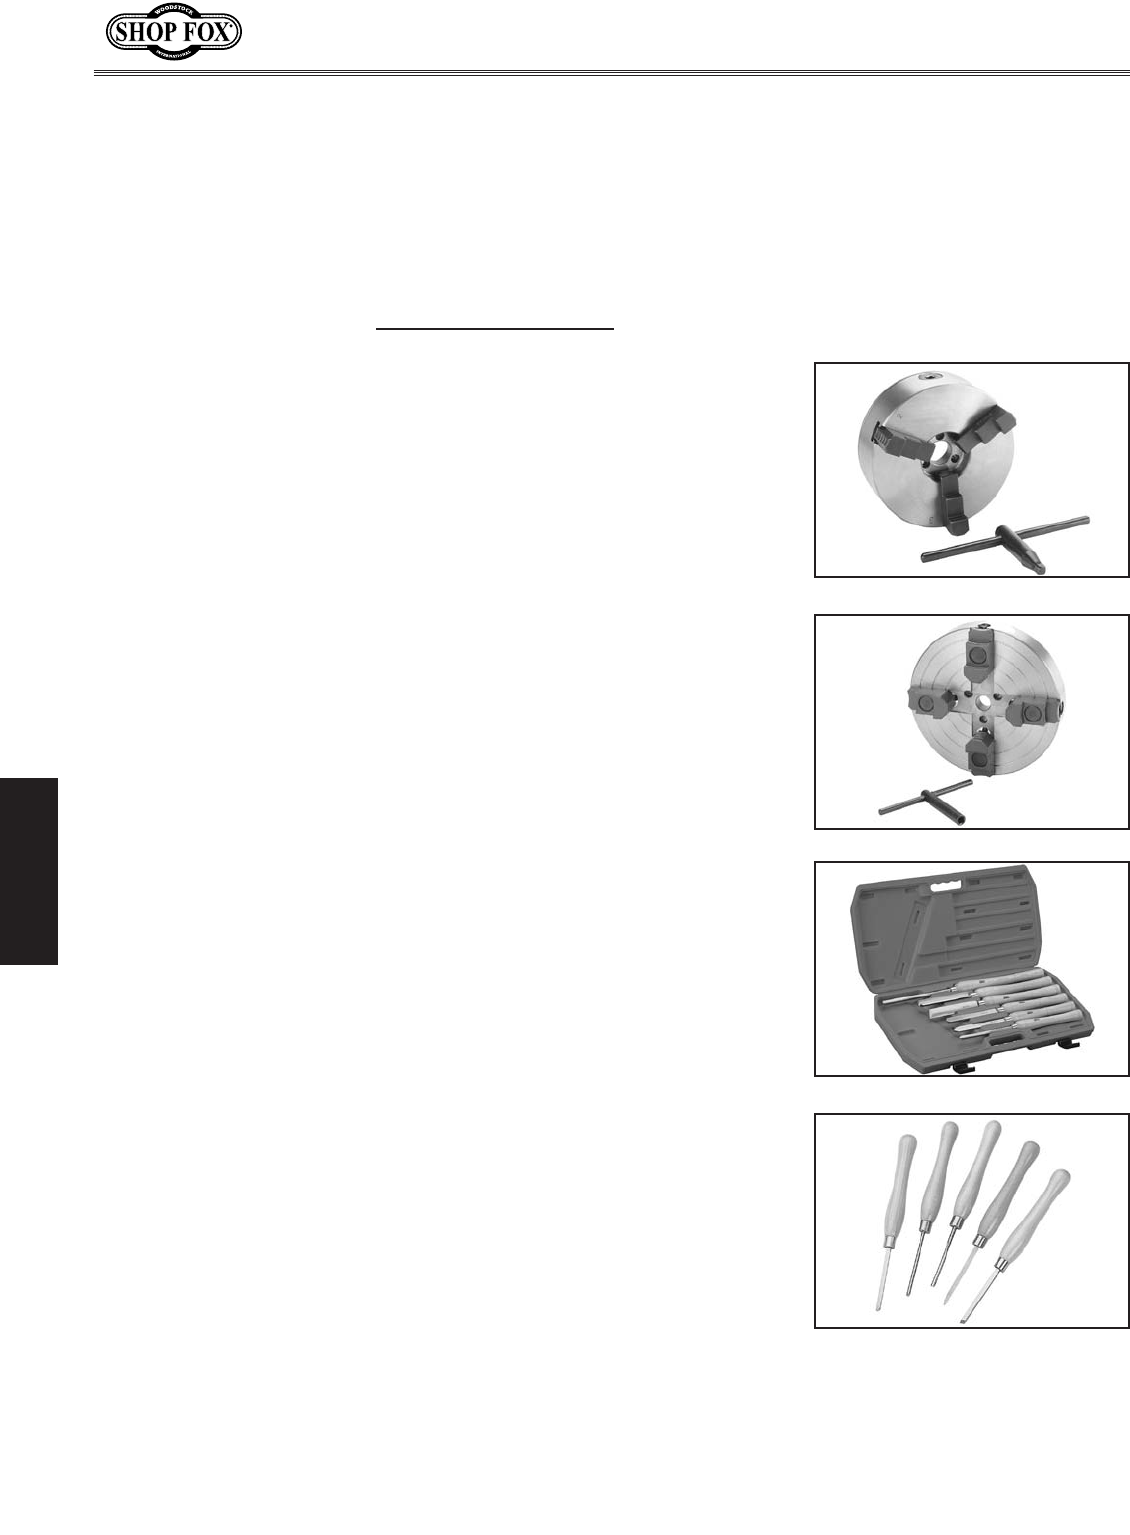
Outboard turning is a variation of faceplate turning and
is usually done when stock diameter is greater than 12".
For the size of the Model W1758 and its minimum turn-
ing speed, we recommend not exceeding a maximum
workpiece diameter of 17".
depicts the lathe setup at 90° and using the
provided tool rest extension. shows the head-
stock setup for outboard turning at 180°.
It is important for safety and performance to use the pro-
vided tool rest extension in a manner that will offer the
greatest stability and range for your turning tool. If this
tool rest assembly will not work for your operation, you
must use a free-standing tool rest (not supplied).
Headstock positioned outboard
at 90°.
Headstock positioned outboard
at 180°.
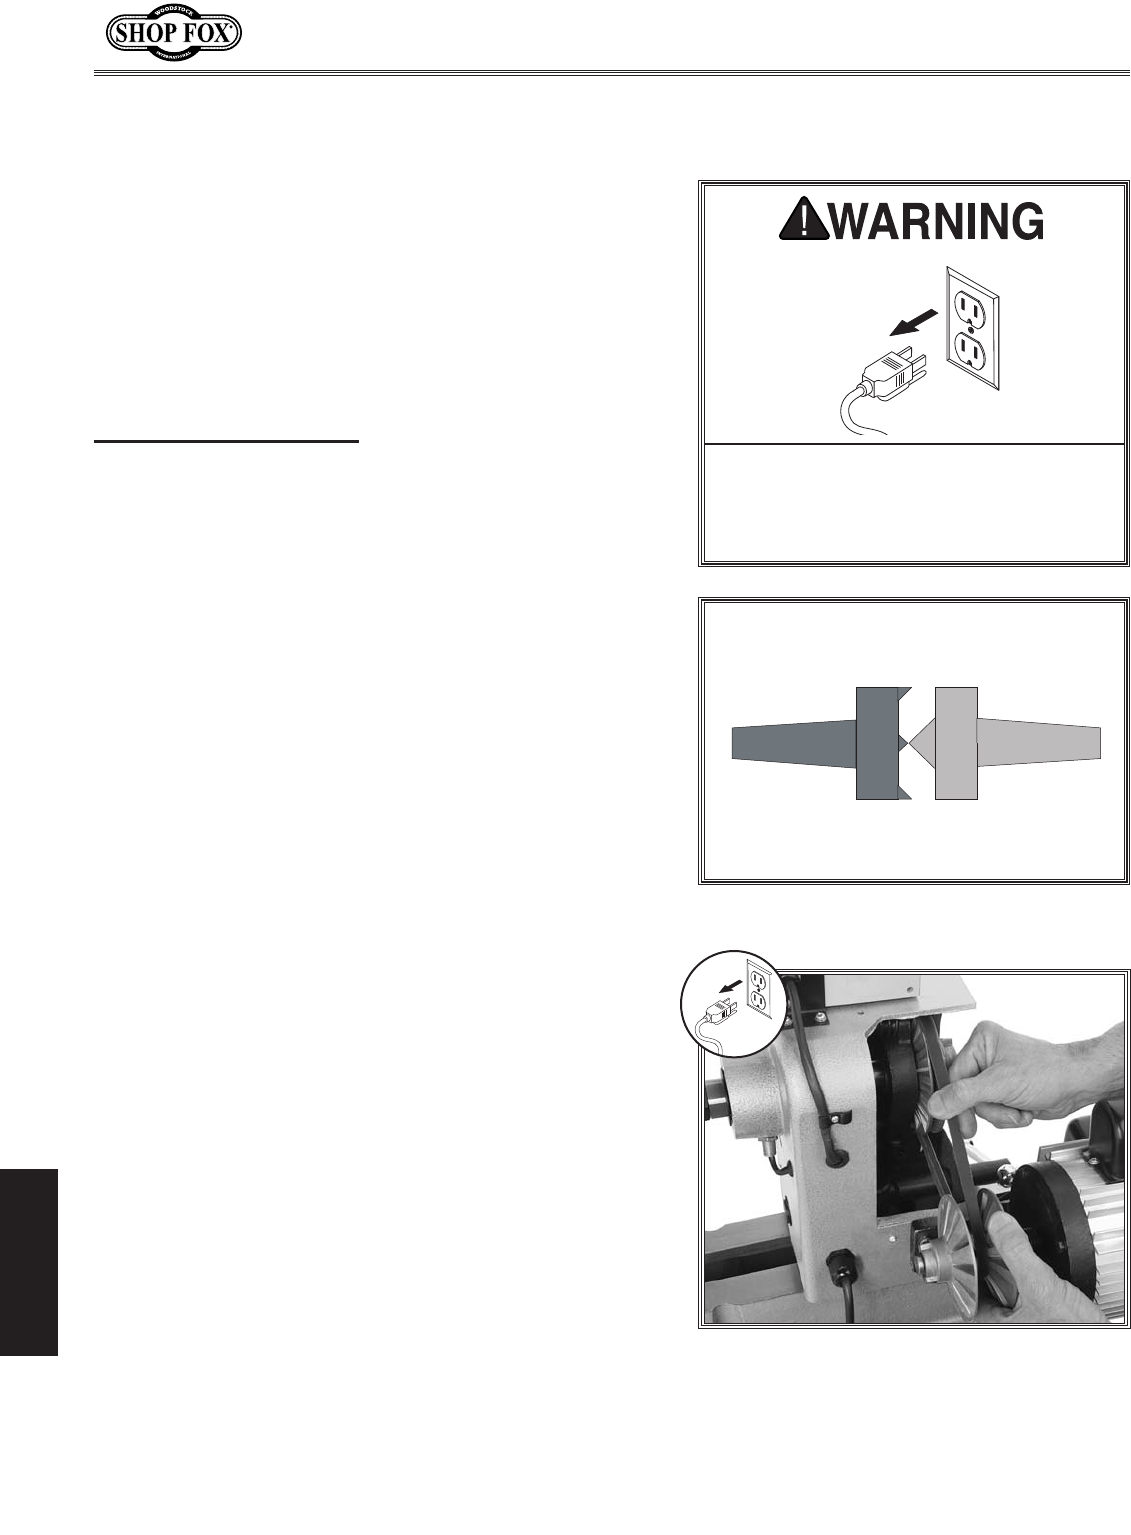
The lathe can be used for finishing procedures after the
turning operations are complete, such as sanding, polish-
ing, and applying finishes by hand (see ).
Whenever performing finishing procedures to your
workpiece, remove the tool rest to avoid entanglement.
Use the slowest speeds for safer control and better
results.
Sandpaper
Workpiece
Typical sanding operation on a
lathe.
-26-
W1758 Owner's Manual (Mfg. Since 3/10)
The following wood lathe accessories may be available through your local Woodstock International Inc.
Dealer. If you do not have a dealer in your area, these products are also available through online deal-
ers. Please call or e-mail Woodstock International Inc. Customer Service to get a current listing of deal-
ers at: 1-800-545-8420 or at sales@woodstockint.com.
TheSteelex is a "must have"
for the serious wood turner. This 3-jaw chuck is a self-centering style
chuck used mostly for round work. All three jaws tighten together
to aid in centering the workpiece. Jaws are reversible for expanded
work holding capacity. Threaded insert required for mounting, such
as the D1098 Steelex 1" x 8 TPI RH threaded insert.
The Steelex is another "must
have" for the serious wood turner. This 4-jaw chuck is an indepen-
dent type chuck that is used for square and odd-shaped pieces. Each
jaw tightens individually and can be turned around to hold larger
dimension workpieces. Threaded insert required for mounting, such
as the D1098 Steelex 1" x 8 TPI RH threaded insert.
Accessories
The Steelex features
beefy ash handles for unsurpassed control, brass ferrules, and high-
speed steel blades. Includes: a 17" long 13⁄16" parting tool, 13⁄16" round
nose, 3⁄8" gouge, 19" long 1" skew, 5⁄8" gouge, and a 223⁄4" long 3⁄8"
gouge. Comes in a beautiful red blow-molded carrying case.
The Steelex is for those fine
detail turning operations. This set features well balanced hardwood
handles and high carbon steel cutting edges. Includes: a 1⁄16" radius
gouge, 1⁄8" radius gouge, 3⁄16" parting tool, 1⁄4" spear point, and a 1⁄4"
skew. All tools are 101⁄2" overall in length.

-27-
W1758 Owner's Manual (Mfg. Since 3/10)
Since all bearings for the Model W1758 are
sealed and permanently lubricated, simply
leave them alone until they need to be
replaced. Do not lubricate them.
Wipe a lightly oiled shop rag on the outside
of the headstock spindle. DO NOT allow any
oil to get on the inside mating surface of
the spindle.
Use the quill handwheel to extend the
tailstock quill all the way out, and apply
a thin coat of white lithium grease to the
outside of the quill. DO NOT allow any
lubricant to get on the inside mating sur-
face of the quill.
Cleaning the Model W1758 is relatively easy. Vacuum
excess wood chips and sawdust, and wipe off the remain-
ing dust with a dry cloth. If any resin has built up, use a
resin dissolving cleaner to remove it.
Remove any debris or oily substances from the inside of
the spindle and quill.
Regular periodic maintenance on your machine will
ensure its optimum performance. Make a habit of
inspecting your machine each time you use it.
Loose mounting bolts.
Worn switch.
Worn or damaged cords and plugs.
Damaged V-belt.
Any other condition that could hamper the safe
operation of this machine.
Protect the unpainted cast iron lathe bed by wiping it
clean after every use—this ensures moisture from wood
dust does not remain on the bare metal surfaces. Keep
your lathe bed rust-free with regular applications of qual-
ity lubricants.
To disassemble the tailstock for cleaning, loosen the set
screw above the handwheel, then completely unthread
the handwheel from the threads of the quill. Except for
the live center, thoroughly clean all of the unpainted
parts with mineral spirits and apply a thin coat of light
machine oil to these surfaces.
When re-assembling the tailstock, thread the handwheel
back onto the quill, tighten down the set screw that
secures it, then back the screw off one full turn so that
the handwheel can freely rotate.
-28-
W1758 Owner's Manual (Mfg. Since 3/10)
This section covers the most common service adjustments
or procedures that may need to be made during the life
of your machine.
If you require additional machine service not included
in this section, please contact Woodstock International
Technical Support at (360) 734-3482 or send e-mail to:
.
To ensure accurate and safe results, make sure that the
headstock and tailstock centers are aligned before you
begin your lathe operation.
DISCONNECT THE LATHE FROM POWER!
With the headstock and tailstock centers installed,
slide the tailstock up to the headstock.
Loosen the headstock locking lever and swivel the
headstock so that the tips of the centers touch, as
illustrated in , then lock the headstock
securely in place.
Center tips touching to ensure
proper alignment.
Align Headstock &
Tailstock
DISCONNECT THE LATHE FROM POWER!
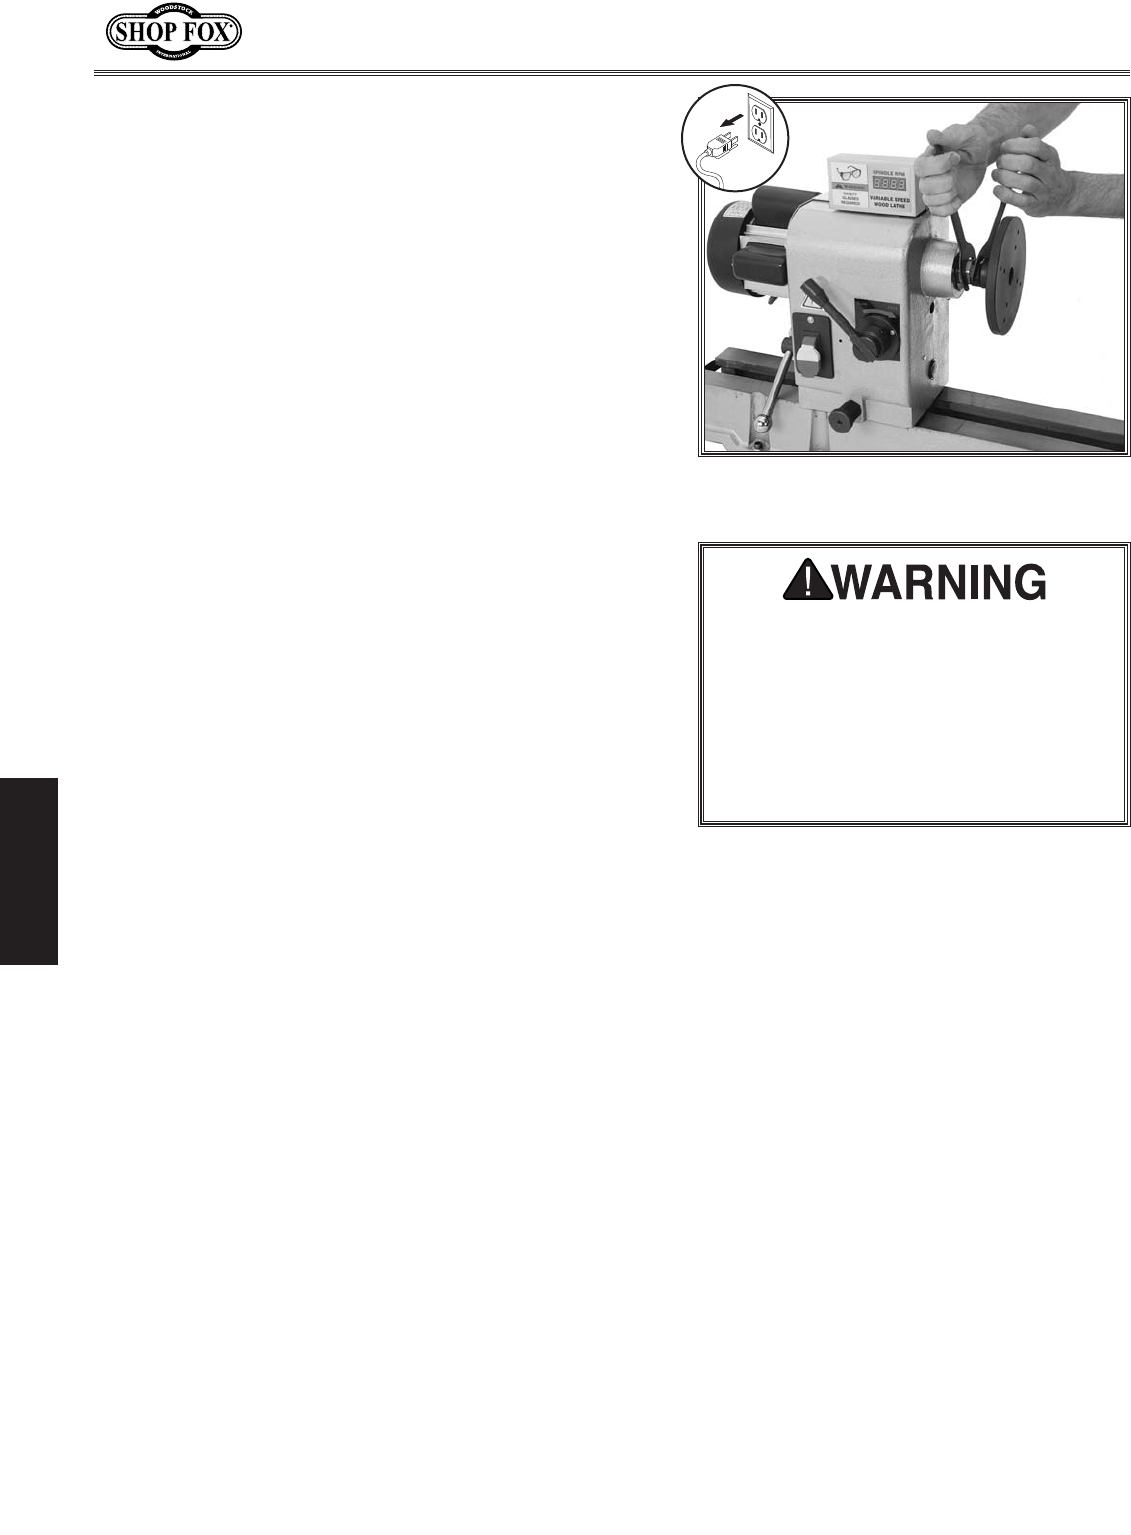
Remove the belt safety cover from the back of the
lathe.
Pull the motor pulley plates apart so that the V-belt
will slip down to the motor arbor—this will loosen
the V-belt tension (see ).
While keeping the tension off the V-belt, roll it off
the spindle pulley and remove it.
Install the new V-belt by reversing .
Changing the V-belt.
V-Belt
-29-
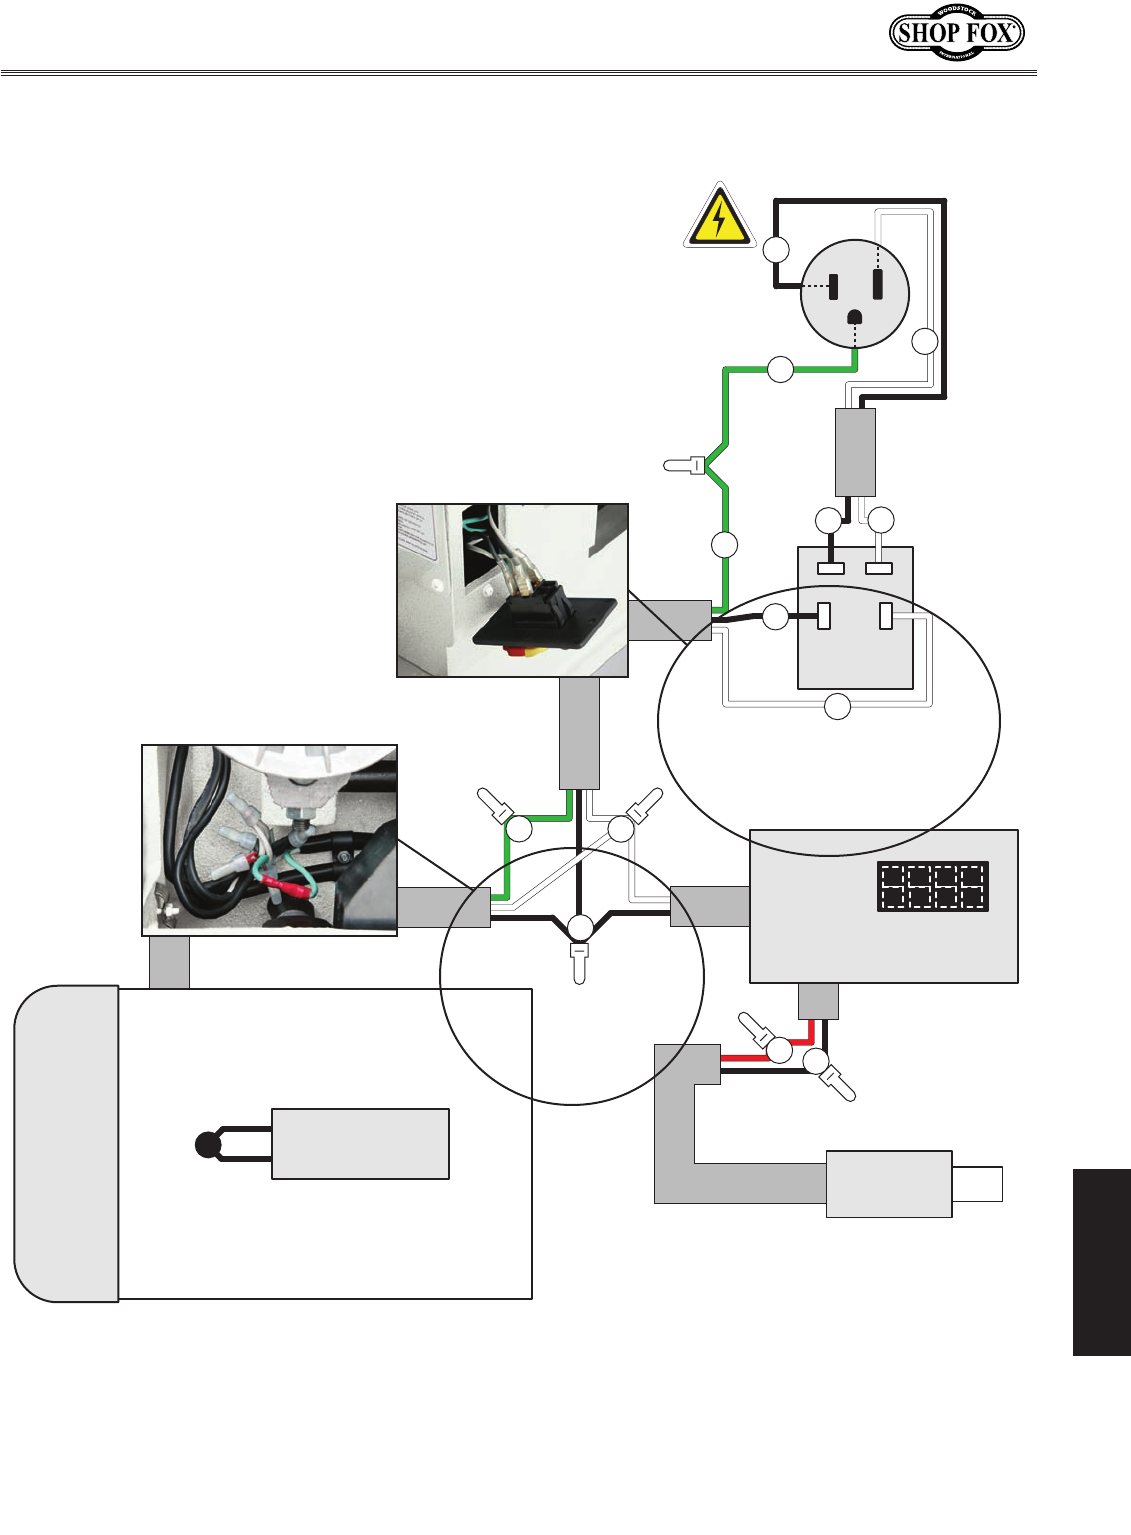
W1758 Owner's Manual (Mfg. Since 3/10)
Neutral
Hot
Ground
110 VAC
NEMA 5-15 Plug
(As Recommended)
Paddle
Switch
Digital Readout
Spindle Speed Sensor
Motor
Bk
Bk
Bk
Bk
Bk
Wt
Wt
Wt
Wt
Gr
Gr
Gr
Rd
Capacitor
100MFD 250VAC

-30-
W1758 Owner's Manual (Mfg. Since 3/10)
This section covers the most common problems and corrections with this type of
machine.
Lathe will not start, or it
growls on start up.
1. Power supply fuse or circuit break-
er has tripped.
2. Motor fan cover is dented, stop-
ping the fan from being able to
spin.
3. Paddle switch is broken or faulty.
4. Start capacitor is at fault.
5. Motor is at fault.
1. Disconnect power, and inspect circuit for electrical
shorts and repair. Replace circuit breaker if it is
old or has tripped many times.
2. Replace or adjust fan cover; inspect motor fan and
replace if damaged.
3. Disconnect power, and use an ohmmeter to check
switch terminals for continuity, and replace switch
if required.
4. Replace start capacitor.
5. Replace motor.
Fuses or circuit breakers
trip open.
1. Short circuit in line cord or plug.
2. Short circuit in motor or loose
connections.
3. Incorrect fuses or circuit breakers
in power supply.
1. Inspect cord or plug for damaged insulation and
shorted wires, and replace extension cord.
2. Replace or adjust fan cover; inspect motor fan and
replace if damaged.
3. Install correct fuses or circuit breakers.
Vibration noise while
machine is running; noise
changes when speed is
changed.
1. V-belt cover loose.
2. V-belt cover bent or dented and is
making contact with motor pulley
or V-belt.
3. Bad spindle bearing(s).
1. Tighten the four screws securing V-belt cover;
if necessary, install a soft, vibration dampening
material between V-belt cover and headstock.
2. Remove V-belt cover and inspect for dents, bends,
or indications of rubbing. Tap out dents with rub-
ber mallet, bend back into proper shape, or shim
away from the motor pulley.
3. Replace spindle bearing(s).
Vibration noise while
machine is running; noise
remains constant when
speed is changed.
1. Dented motor fan cover.
2. Bad spindle bearing(s).
1. Replace or adjust fan cover; inspect motor fan and
replace if damaged.
2. Replace spindle bearing(s).
Troubleshooting

-31-
W1758 Owner's Manual (Mfg. Since 3/10)
Bad surface finish. 1. Wrong spindle speed.
2. Dull chisel or wrong chisel being
used for operation.
1. Use trail-and-error to find better spindle speed.
2. Sharpen chisel or try a different chisel.
Tailstock moves. 1. Tailstock mounting bolt loose.
2. Bed surface is oily or greasy.
1. Tighten.
2. Clean bed surface to remove excess oil/grease.
Excessive vibration. 1. Workpiece mounted incorrectly.
2. Workpiece warped, out of round,
or is flawed.
3. Spindle speed is set too fast for
mounted workpiece.
4. Lathe is resting on uneven surface.
5. Motor mounting bolts are loose.
6. V-belt is worn or damaged.
7. Spindle bearing(s) are worn.
1. Re-mount workpiece, making sure centers are
aligned and are fully embedded in true center of
workpiece.
2. Cut workpiece to correct, or use a different
workpiece.
3. Reduce spindle speed.
4. Shim legs or adjust machine feet to ensure lathe is
even and stable on the floor.
5. Tighten motor mounting bolts.
6. Replace V-belt (refer to ).
7. Replace spindle bearing(s).
Chisels grab or dig into
workpiece.
1. Tool rest adjusted too low.
2. Tool rest set too far from
workpiece.
3. Wrong chisel/tool being used.
4. Chisel/tool is dull.
1. Adjust tool rest higher (refer to ).
2. Move tool rest closer to workpiece (refer to
).
3. Use correct chisel/tool; educate yourself by read-
ing books, trade magazines, or seeking help from
an experienced lathe operator.
4. Sharpen or replace chisel/tool being used.
Inaccurate turning results
from one end of the
workpiece to the other.
1. Headstock and tailstock are not
properly aligned with one another.
1. Re-align headstock and tailstock to one another
(refer to ).
Cannot remove tapered
tool from tailstock barrel.
1. Tailstock quill not fully retracted
into tailstock.
2. Debris or oily substance not
removed from quill and tapered
tool mating surfaces before
installing.
1. Turn quill handwheel until it forces tapered tool
out of quill.
2. Always make sure the mating surfaces of the quill
and tapered tool are free from debris and oily sub-
stances.
-32-
W1758 Owner's Manual (Mfg. Since 3/10)
101
102
103
104
105V2
105-1V2 105-2V2
105-4V2
105-5V2
105-6V2
106
107
108
109
110111 112 113
114 115
115-1
115-2
115-4
116
116-1
117
118 119 120
121
122
123
124
125
126
127
128
129
129-1 130
131
132
133
134
135
136
137
138
139
140
141 142
143
144
145
146
147
148
149
150
151
152
153
154
157
158
159
160
161
162
163
164 165
166
167
168
169
170
171
172V2
173V2
174V2
175V2 176V2
177V2
178V2
180V2
181V2
182V2
183
184
185
186
187
108
200
201
183
184
187
173V2A

-33-
W1758 Owner's Manual (Mfg. Since 3/10)
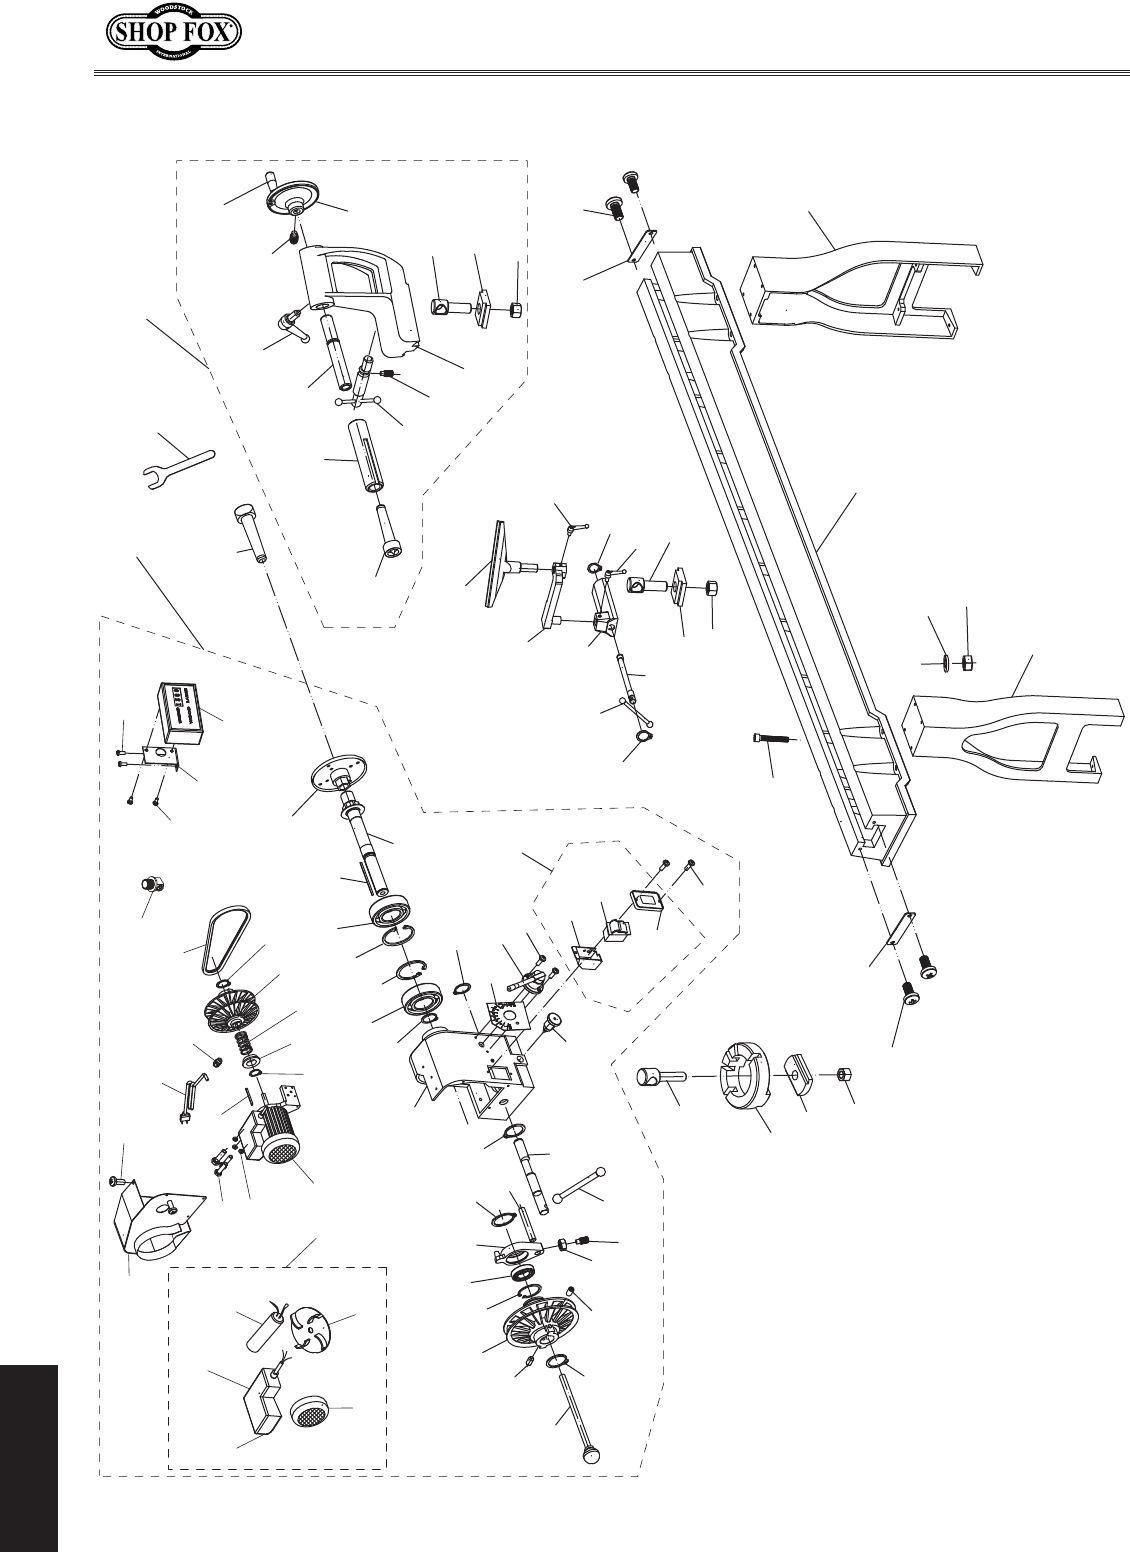
REF PART # DESCRIPTION REF PART # DESCRIPTION
101 XPS05M PHLP HD SCR M5-.8 x 8 140 XPR58M EXT RETAINING RING 24MM
102 X1758102 MOTOR COVER 141 X1758141 SPEED CHANGE LABEL
103 XPB26M HEX BOLT M8-1.25 X 30 142 X1758142 SPEED CONTROL LEVER ASSY
104 XPLW04M LOCK WASHER 8MM 143 XPS08M PHLP HD SCR M5-.8 X 12
105V2 X1758105V2 MOTOR 2HP 110V 60HZ V2.10.08 144 XPS02M PHLP HD SCR M4-.7 X 12
105-1V2 X1758105-1V2 MOTOR FAN COVER V2.10.08 145 X1758145 PIVOT LOCKING PIN
105-2V2 X1758105-2V2 MOTOR FAN V2.10.08 146 X1758146 HEADSTOCK PIVOT BOLT
105-4V2 X1758105-4V2 S CAPACITOR 100M 250V V2.10.08 147 X1758147 PIVOT BASE
105-5V2 X1758105-5V2 MOTOR JUNCTION BOX V2.10.08 148 X1758148 BED CLAMP PLATE
105-6V2 X1758105-6V2 JUNCTION BOX COVER V2.10.08 149 XPN29M HEX NUT M18-2.5
106 X1758106 KNOCKOUT TOOL 150 XPR58M EXT RETAINING RING 24MM
107 XPR12M EXT RETAINING RING 35MM 151 X1758151 HEADSTOCK ECCENTRIC SHAFT
108 X1758108 CENTER-DRILLED SET SCR M6-1 X 10 152 X1758152 LEVER
109 X1758109 MOTOR PULLEY SET 153 XPSS21M SET SCREW M8-1.25 X 25
110 XPR38M INT RETAINING RING 62MM 154 XPN03M HEX NUT M8-1.25
111 XP6007ZZ BALL BEARING 6007ZZ 157 X1758157 BED
112 X1758112 SHIFTING LEVER BRACKET 158 XPCAP12M CAP SCREW M8-1.25 X 40
113 XPR12M EXT RETAINING RING 35MM 159 XPR08M EXT RETAINING RING 19MM
114 X1758114 RACK 160 X1758160 BALL LEVER
115 X1758115 SWITCH ASSEMBLY 161 X1758161 TOOL REST ECCENTRIC SHAFT
115-1 X1758115-1 SWITCH BOX 162 X1758162 TOOL REST BASE
115-2 D2751 PADDLE SWITCH W/KEY 163 XPN29M HEX NUT M18-2.5
115-4 X1758115-4 SWITCH BOX PLATE 164 X1758164 TOOL REST CLAMP PLATE
116 X1758116 HEADSTOCK CASTING 165 X1758165 TOOL REST PIVOT BOLT
116-1 X1758116-1 HEADSTOCK ASSEMBLY 166 X1758166 LOCK HANDLE ASSY M10-1.5 X 15
117 XPK93M KEY 4 X 4 X 80 167 XPR08M EXT RETAINING RING 19MM
118 XPR06M EXT RETAINING RING 16MM 168 X1758166 LOCK HANDLE ASSY M10-1.5 X 15
119 X1758119 MOTOR SHAFT SLEEVE 169 X1758169 TOOL REST EXTENSION ARM
120 X1758120 COMPRESSION SPRING 170 X1758170 TOOL REST
121 X1758121 SPINDLE PULLEY SET 171 X1758171 TAILSTOCK LIVE CENTER MT#2
122 XPVM24 V-BELT M24 3L240 172V2 X1758172V2 TAILSTOCK LOCK LEVER V2.11.09
123 XPR06M EXT RETAINING RING 16MM 173V2A X1758173V2A TAILSTOCK ASSEMBLY V2.11.09
124 X1758124 STRAIN RELIEF M20-1.5 173V2 X1758173V2 TAILSTOCK CASTING V2.11.09
125 X1758125 POWER WIRE 16G 3W 5-15 PLUG 174V2 X1758174V2 TAILSTOCK QUILL V2.11.09
126 XPS68M PHLP HD SCR M6-1 X 10 175V2 X1758175V2 QUILL LOCK HANDLE ASSY V2.11.09
127 XPS68M PHLP HD SCR M6-1 X 10 176V2 X1758176V2 HANDWHEEL SET SCREW V2.11.09
128 X1758128 DIGITAL READOUT BRACKET 177V2 X1758177V2 TAILSTOCK HANDWHEEL V2.11.09
129 X1758129 DIGITAL READOUT ASSEMBLY 178V2 X1758178V2 HANDWHEEL HANDLE V2.11.09
129-1 X1758129-1 RPM SENSOR 180V2 X1758180V2 TAILSTOCK PIVOT BOLT V2.11.09
130 X1758130 FLAT WRENCH 32MM 181V2 X1758181V2 TAILSTOCK CLAMP PLATE V2.11.09
131 X1758131 SPUR CENTER MT#2 182V2 XPN29M HEX NUT M18-2.5
132 X1758132 FACEPLATE 6" 183 XPS08M PHLP HD SCR M5-.8 X 12
133 X1758133 SPINDLE 1" x 8" 184 X1758184 BED END PLATE
134 XPK93M KEY 4 X 4 X 80 185 XPLW04M LOCK WASHER 8MM
135 XP6205ZZ BALL BEARING 6205ZZ 186 XPN03M HEX NUT M8-1.25
136 XPR26M INT RETAINING RING 52MM 187 X1758187 STAND LEG
137 XPR26M INT RETAINING RING 52MM 200 X1758200 TAILSTOCK LEADSCREW V2.11.09
138 XP6205ZZ BALL BEARING 6205ZZ 201 XPSS04M SET SCREW M6-1 X 12
139 XPR11M EXT RETAINING RING 25MM
-34-
W1758 Owner's Manual (Mfg. Since 3/10)
()
191 194 190
192
199
196
198
195
193
197
189
REF PART # DESCRIPTION REF PART # DESCRIPTION
189 X1758189 MACHINE ID LABEL 195 X1758195 ENTANGLEMENT WARNING LABEL
190 X1758190 DIGITAL READOUT LABEL 196 XPPAINT-1 SHOP FOX WHITE TOUCH-UP PAINT
191 X1758191 ELECTRICITY LABEL 197 X1758197 BLACK PIN STRIPE LABEL
192 X1758192 SPEED CHANGE NOTICE LABEL 198 X1758198 SHOP FOX NAMEPLATE
193 X1758193 READ MANUAL LABEL 199 X1758199 MODEL NUMBER LABEL
194 X1758194 DISCONNECT POWER LABEL

W1758 Owner's Manual (Mfg. Since 3/10)
CUT ALONG DOTTED LINE
Name ___________________________________________________________________________________
Street __________________________________________________________________________________
City _________________________ State ___________________________Zip ________________________
Phone # ______________________ Email___________________________Invoice # ___________________
Model #_________Serial #______________Dealer Name__________________Purchase Date___________
The following information is given on a voluntary basis. It will be used for marketing purposes to help us
develop better products and services. Of course, all information is strictly confidential.
How did you learn about us?
_____ Advertisement _____ Friend ____ Local Store
_____ Mail Order Catalog _____ Website ____ Other:
How long have you been a woodworker/metalworker?
_____ 0-2 Years _____ 2-8 Years ____ 8-20 Years _____ 20+ Years
How many of your machines or tools are Shop Fox?
_____ 0-2 _____ 3-5 ____ 6-9 _____ 10+
Do you think your machine represents a good value? _____ Yes ____ No
Would you recommend Shop Fox products to a friend? _____ Yes ____ No
What is your age group?
_____ 20-29 _____ 30-39 ____ 40-49
_____ 50-59 _____ 60-69 ____ 70+
What is your annual household income?
_____ $20,000-$29,000 _____ $30,000-$39,000 ____ $40,000-$49,000
_____ $50,000-$59,000 _____ $60,000-$69,000 ____ $70,000+
Which of the following magazines do you subscribe to?
Comments:
____ Cabinet Maker
____ Family Handyman
____ Hand Loader
____ Handy
____ Home Shop Machinist
____ Journal of Light Cont.
____ Live Steam
____ Model Airplane News
____ Modeltec
____ Old House Journal
____ Popular Mechanics
____ Popular Science
____ Popular Woodworking
____ Practical Homeowner
____ Precision Shooter
____ Projects in Metal
____ RC Modeler
____ Rie
____ Shop Notes
____ Shotgun News
____ Today’s Homeowner
____ Wood
____ Wooden Boat
____ Woodshop News
____ Woodsmith
____ Woodwork
____ Woodworker West
____ Woodworker’s Journal
____ Other:

TAPE ALONG EDGES--PLEASE DO NOT STAPLE
FOLD ALONG DOTTED LINE
FOLD ALONG DOTTED LINE
Place
Stamp
Here

Woodstock International, Inc. warrants all Shop Fox machinery to be free of defects from workman-
ship and materials for a period of two years from the date of original purchase by the original owner.
This warranty does not apply to defects due directly or indirectly to misuse, abuse, negligence or acci-
dents, lack of maintenance, or reimbursement of third party expenses incurred.
Woodstock International, Inc. will repair or replace, at its expense and at its option, the Shop Fox
machine or machine part which in normal use has proven to be defective, provided that the original
owner returns the product prepaid to a Shop Fox factory service center with proof of their purchase
of the product within two years, and provides Woodstock International, Inc. reasonable opportunity to
verify the alleged defect through inspection. If it is determined there is no defect, or that the defect
resulted from causes not within the scope of Woodstock International Inc.'s warranty, then the original
owner must bear the cost of storing and returning the product.
This is Woodstock International, Inc.'s sole written warranty and any and all warranties that may be
implied by law, including any merchantability or fitness, for any particular purpose, are hereby lim-
ited to the duration of this written warranty. We do not warrant that Shop Fox machinery complies
with the provisions of any law or acts. In no event shall Woodstock International, Inc.'s liability under
this warranty exceed the purchase price paid for the product, and any legal actions brought against
Woodstock International, Inc. shall be tried in the State of Washington, County of Whatcom. We shall
in no event be liable for death, injuries to persons or property or for incidental, contingent, special or
consequential damages arising from the use of our products.
Every effort has been made to ensure that all Shop Fox machinery meets high quality and durability
standards. We reserve the right to change specifications at any time because of our commitment to
continuously improve the quality of our products.

High Quality Machines and Tools
Woodstock International, Inc. carries thousands of products designed
to meet the needs of today's woodworkers and metalworkers.
Ask your dealer about these fine products:
