World Excel WT530TC15 Wireless Thermostat User Manual
World Excel Company Ltd Wireless Thermostat
User Manual

WT530 Programmable Thermostat Heat/Cool/Off
Instruction Manual 24Vac (915MHz) 170803
Before Installation
Turn off WT530R Receiver, all electronic source and electrical devices
which will be connected before installation and maintenance.
The installer must be a trained service personnel.
Installation Location
The WT530T thermostat should be mounted on an inner wall ~5 feet
above the floor in a position where it is readily affected by changes of
the general room temperature with freely circulating air.
Prevent direct exposure to sunlight, drip or splash. Do not place the unit
at a location where air circulation is low, or where there are great
temperature changes (e.g. near door). Do not place the thermostat
near heat generating sources (e.g. radiators, hot air vents, TV or lights).
WT530T transmitter Installation
Opening
Pull out the battery
drawer.
Then lightly press on the
spot shown below in order
to detach the front shell
from the base.
Mounting
1. Ensure that the surface is level.
2. Place the cables at the hole near the
terminal block.
3. Insert 2 pcs of wall anchors into the
holes
of the wall.
4. Fasten the thermostat with 2 pcs of
long screws through the 2 mounting
holes.
Communication address
Set communication address for
Communication Setup you
wish to use.
Batteries Insertion
Pull out the battery drawer
and insert 2 fresh AAA alkaline
batteries into the drawer
according to the polarity
marked inside, then slide the
drawer back into place.
Dimension in mm(Transmitter)
WT530R receiver Installation
Using the accessory screws and wall anchors provided, mount the
receiver with the key-hole at the back.
Open the front door and remove the battery compartment that
hide the second screw hole. (This unit does not use battery; the
battery compartment is a dummy to cover the screw hole.)
Wiring
There are 5 terminals. R and C connect to 24V power supply.
Terminal W is for heating , terminal Y is for cooling and terminal
G is for fan.
WT530T Operation
When the unit is powered on, all the LCD segments are ON and
then the first display screen is Normal Display Mode as below
picture.
Button Description
MODE
For
chang
ing
the system mode:
OFF: system off
HEAT: heating only on
COOL: cooling only on.
SET
For
chang
ing
the
S
etting
M
enu
.
(Fan, Time, Program)
UP & DOWN
To adjust temperature setpoint (temporary
override)
LCD Description
DEFROST
In heat mode,
w
hen temperature is below
5°C / 40°F, Heater is on regardless of the
setting temperature.
LO
Below 0°C
/ 32°F,
hea
ting will be activated in
Heat Mode.
HI
Above 40°C/ 99°F
.
c
ooling will be activated in
Cool Mode.
- -
Sensor
is short
ened
or not connected
.
Communication Setup
1. Power on WT530R receiver, all LED light up then turn off.
2. Select the communication address at the WT530T transmitter.
3. Power on the WT530T transmitter (thermostat).
4. Press and hold the setup key on the receiver for 1 second, then the
setup LED will be flashing.
5. Press and hold MODE and SET buttons on the thermostat, enter to the
initial pairing mode (“PA” shown on screen for 5 second).
6. If the pairing is completed, the receiver setup LED will turn on.
In case the RF receiver is interfered by other wireless products, power OFF the
receiver and change to other address. Redo the above steps with another
address to reestablish a communication with the receiver.
Time Setting
1. Press SET button to enter Setting Menu.
2. Press UP or DOWN button to display CLOC and press SET button.
3. Press NEXT button to select the item that you want to change (Day of
week, Hour or Minute).
4. Press UP or DOWN button to adjust the item.
5. Press MODE button to confirm the setting and return to Setting Menu.
6. *** Press MODE button to return to Normal Display Mode.
Temperature Control
This product can work as a simple setback thermostat or a programmable
thermostat. By default, this product is configured as a simple setback
thermostat (Program Off).
Program On
When program is on, this thermostat will control the output according to the
programmed time and temperature.
The Default Program Settings are as below:
Heat Mode:
Time
Zone
MON~FRI SAT SUN
Time
°F/°C
Time
°F/°C
Time
°F/°C
WAKE 6AM
70/21.0
8AM
70/21.0
8AM
70/21.0
OUT 8AM
61/16.0
10AM
61/16.0
10AM
61/16.0
BACK 6PM 70/21.0
6PM 70/21.0
6PM 70/21.0
SLEEP 10PM
61/16.0
11PM
61/16.0
11PM
61/16.0
UP
Button
DOWN
Button
MODE
Button
SET Button
Room
Temperature
Time
Upper position: 1
Lower position: 0
Cool Mode:
Time
Zone
MON~FRI SAT SUN
Time
°F/°C Time
°F/°C Time
°F/°C
WAKE
6AM
75/24.0
8AM
75/24.0
8AM
75/24.0
OUT
8AM
85/29.5
10AM
85/29.5
10AM
85/29.5
BACK
6PM
75/24.0
6PM
75/24.0
6PM
75/24.0
SLEEP
10PM
85/29.5
11PM
85/29.5
11PM
85/29.5
Program Setting
The above program time and temperature can be modified.
To adjust Heat/Cool program settings:
1. In Heat/Cool Mode, press SET button to enter Setting Menu.
2. Press UP or DOWN button to display PROG.
3. Press SET button to enter program setting: “ON”/”OFF”.
4. Press UP or DOWN button to select program on / program off.
5. Make sure “On” is selected, press SET button to select the item that
you want to change (Weekday/Weekend, Four Zones, Hour, Minute
or Setting Temperature).
6. Press UP or DOWN button to adjust the item.
7. Press MODE button to return to Weekday/Weekend program
8. Press MODE button again, to confirm the setting and return to Setting
Menu.
9. *** Press MODE button to return to Normal Display Mode.
Temporary Override
When Program is On, this thermostat controls the output according to
the program.
If you want to override the programmed temperature temporarily:
1. Press UP or DOWN button to adjust Heat / Cool setting temperature
setpoint with displayed.
2. In Heat Mode, only Heat setting temperature can be adjusted.
3. In Cool Mode, only Cool setting temperature can be adjusted.
4. The Heat / Cool setting temperature will be confirmed and the
thermostat will return to Normal Display Mode, if no key is pressed for
10 sec.
Temporary Override Mode will last until the next programmed time (zone)
begins. At that time, the Heat / Cool setting temperature will follow the
programmed setting temperature and will disappear. Or
can be stopped manually by pressing MODE key.
Program Off
(default)
When Program is Off, this thermostat controls the output according to a
single setpoint like a simple setback thermostat. To set the unit to be
Program Off, follow the above “Program Setting” to select Program Off.
When this thermostat is Program Off, the Program Mode will be disabled
and the time zone icons will disappear in Normal Display Mode.
To adjust the setpoint at Program Off:
1. Press UP or DOWN button to adjust the Heat / Cool setting
temperature. The icon will NOT be shown in Program
Off.
2. In Heat Mode, only Heat setting temperature can be adjusted.
3. In Cool Mode, only Cool setting temperature can be adjusted.
4. *** The Heat / Cool setting temperature will be confirmed.
Fan Operation
If FAN ON is selected, fan runs continuously.
If FAN AUTO is selected, fan runs only when the Heating or Cooling
system is on. Fan will be turned off 2 minutes after the Heating / Cooling
system is off.
Fan Mode setting:
1. Press SET button to enter Setting Menu.
2. Press UP or DOWN button to display FAN and press SET button.
3. Press UP or DOWN button to select FAN ON / FAN AUTO.
4. Press MODE button to confirm the setting and return to Setting
Menu.
5. *** Press MODE button to resume to Normal display mode
Advanced Setting
Advanced Setting contains Function Setting Selection and
Temperature Calibration and Room Temperature Display.
Function Setting Selection
1. Press and hold SET and DOWN buttons for 2 seconds to enter
Advanced Setting Mode.
2. The left letters represent Function Type; the right letters
represent the settings.
3. Press UP or DOWN button to adjust the setting.
4. *** Press MODE button to select Function Type or to return to
Normal Display Mode at the end of Function Setting selection.
Table of the Function Setting Selection
Function Type
Setting
Description
LCD Display
Fan Control FC
E (
E
lectrical
H
eat)
(
default)
O (Gas/Oil
H
eat)
Temperature
Display Unit dE
°C
°F (default)
Temperature
Control Span SP
05 (+/
-
0.5
°
C )
10 (+/
-
1
.0
°
C )
10 (+/
-
1
°
F) (default)
20 (+/
-
2
°
F)
12hr/24hr
Selection hr
12 (default)
24
Heater
Minimum-Off
Delay
dL
S (10 seconds) (default)
L (4 minutes off time)
Temperature Control Span :
It controls how much the room
temperature can be deviated from the setpoint. A smaller degree
will result in a more accurate control. A larger degree will result in
less on/off cycling and it usually saves more energy.
Fan Control :
It should be set according to the type of Heating
system used. Select “E” for Electric Heat, fan will be On when Heat
is On. Select “O” for Gas Heating or Oil Heating, fan will NOT be on
when Heat is On.
Heater Minimum Off Delay :
It should be set according to the
heater type. Select “L” if compressor is used for heating. Select “S”
when a compressor is not used.
Temperature Calibration
This thermostat is calibrated at factory and calibration is generally
not required. However, in the event that a deviation is found.
1. In Normal Display Mode, press and hold UP and DOWN buttons for 5
seconds to change the temperature calibration display and the current
temperature will flash,
2. Press UP and DOWN button to calibrate the temperature. The maximum
range to be adjusted is +/- 3.0°C or +/- 6°F, in step of 0.5°C / 1°F.
3. ***Press MODE key to confirm the setting and return to Normal Display
Mode.
Specification
WT530T Transmitter
1. RF transmission: 915MHz
2. Power Supply: 2 x AAA Alkaline Batteries
3. Temperature Measurement: 0 - 40°C / 32 - 99°F
4. Accuracy: ±0.5°C / 1°F
5. Resolution: 0.5°C /1°F
6. Heat/Cool Setting: 5 - 35°C / 40 - 95°F
7. Sensing Element: NTC Thermistor
RT530R Receiver
1. RF transmission: 915MHz
2. Power Supply: 24Vac 50/ 60Hz
3. Rating: 24Vac 50/ 60Hz 1A Max
4. Relay Contact Voltage: 24Vac Max. 50/60 Hz
5. Relay Contact Current: 1A Max.
6. Operating Temperature: 0 - 50°C / 32 - 122°F
7. Storage Temperature: -5 - 50°C / 23 -122°F
FCC STATEMENT
Warning: Changes or modifications to this unit not expressly approved
by the party
responsible for compliance could void the user’s authority to operate
the equipment.
NOTE: This equipment has been tested and found to comply with the
limits for a Class B digital device, pursuant to Part 15 of the FCC Rules.
These limits are designed to provide reasonable protection against
harmful interference in a residential installation.
This equipment generates, uses and can radiate radio frequency
energy and, if not installed and used in accordance with the instructions,
may cause harmful interference to radio communications.
However, there is no guarantee that interference will not occur in a
particular installation. If this equipment does cause harmful interference
to radio or television
reception, which can be determined by turning the equipment off and
on, the user is encouraged to try to correct the interference by one or
more of the following measures:
Reorient or relocate the receiving antenna.
Increase the separation between the equipment and receiver.
Connect the equipment into an outlet on a circuit different from that
to which the receiver is connected.
Consult the dealer or an experienced radio/TV technician for help.
The Responsible party information:
World Excel Company Limited
Room B ,26/F, Capital
Trade Centre, 62 Tsun Yip St.,
Kwun Tong, H.K.
Technical Helpline Tel:
852 - 2304 0993
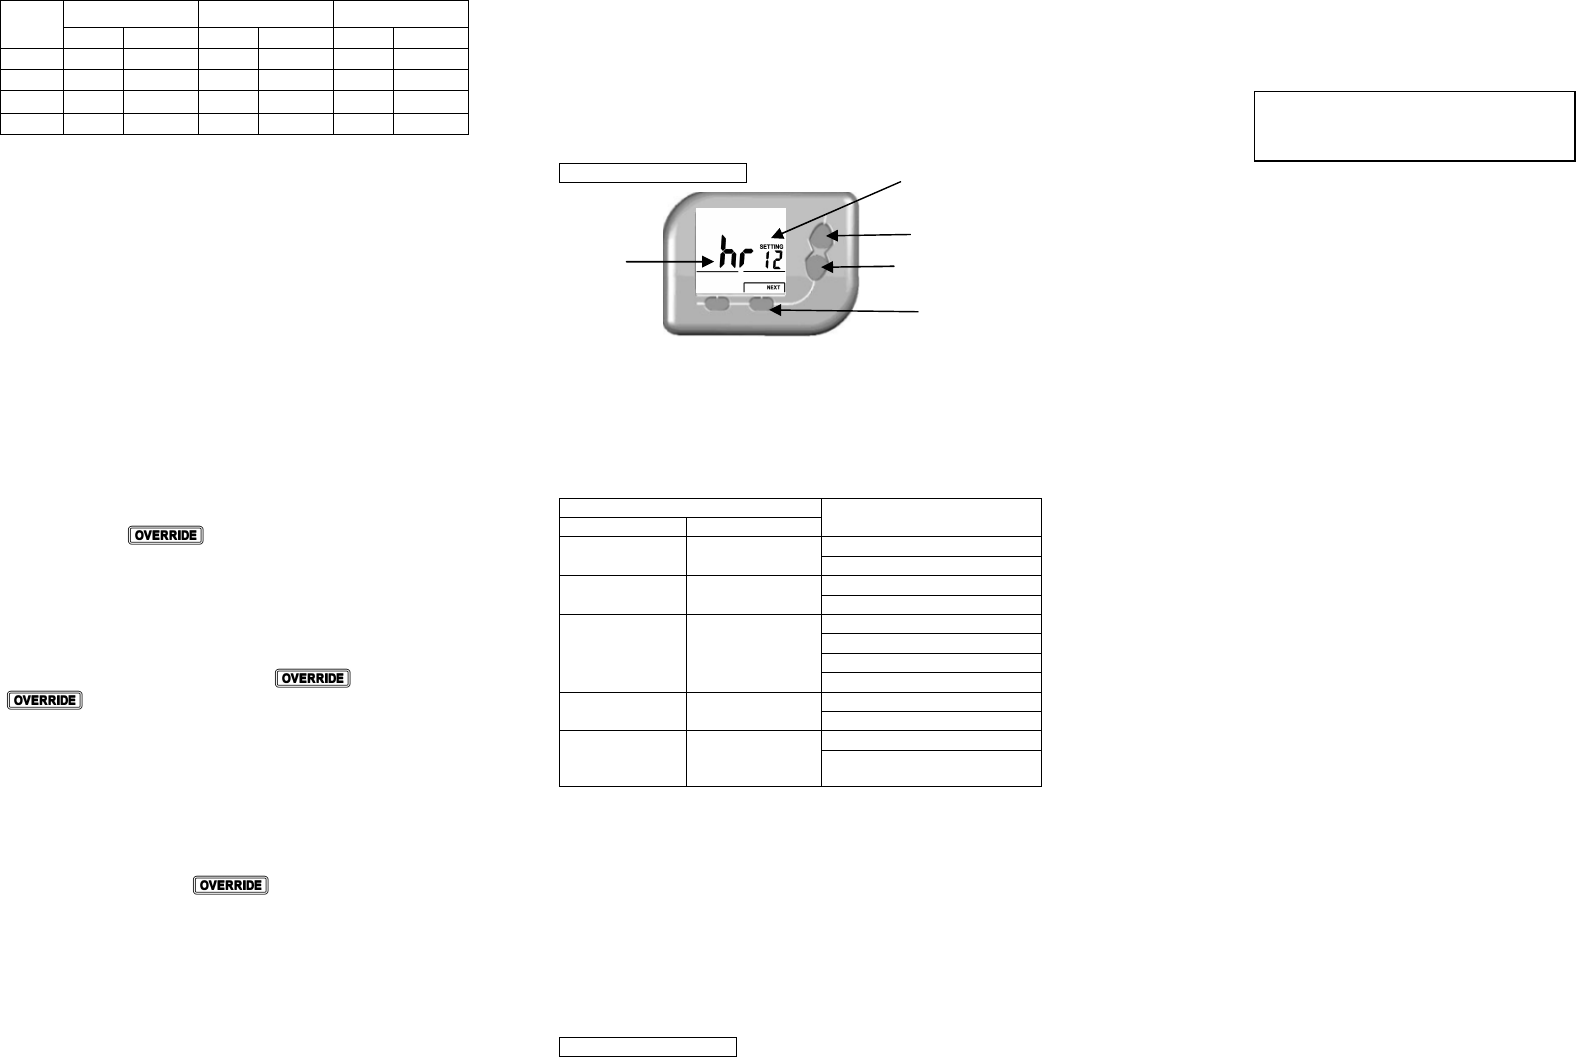
<Down> button
Function
Type
<SET> button
Setting
<Up> button
***
T
he operation will
return
to Normal
Display Mode if no key is pressed for 10
sec.