Worldline n v IMOCMEH19B Wifi/BT Portable Payment terminal User Manual YOXIMO Owner Manual
Worldline s.a./n.v. Wifi/BT Portable Payment terminal YOXIMO Owner Manual
Contents
- 1. User Manual
- 2. yoximo_brochure
- 3. User Manual addendum
User Manual
OWNER MANUAL
an atos company
••••••
YOXIMO
innovation
on the move

YOXIMO owner manual
Legal disclaimer and copyrights
The information in this document is subject to change without notice and shall not be construed as a
commitment by Worldline S.A./N.V. (“Worldline”)
The content of this document, including but not limited to trademarks, designs, logos, text, images, is
the property of Worldline and is protected by the Belgian Act of 30.06.1994 related to authors’ rights and
by the other applicable Acts.
Linux is a registered trademark of Linus Torvalds, Java is a registered trademark of Sun Microsystems
Inc. and ARM is a registered trademark of ARM Limited.
The contents of this document can be reproduced by or on behalf of third parties with the prior written
consent of Worldline and following its instructions. Worldline accepts no responsibility for errors and
omissions introduced when translating or reworking this document.
Except with respect to the limited licence to download and print certain material from this document for
non-commercial and personal use only, nothing contained in this document shall grant any licence or
right to use any of Worldline's proprietary material.
While Worldline has made every attempt to ensure that the information contained in this document is
correct, Worldline does not provide any legal or commercial warranty on the document that is described
in this specification. The technology is thus provided “as is” without warranties of any kind, expressed
or implied, included those of merchantability and fitness for a particular purpose. Worldline does not
warrant or assume any legal liability or responsibility for the accuracy, completeness, or usefulness of
any information, product or processes disclosed.
To the fullest extent permitted under applicable law, neither Worldline nor its affiliates, directors,
employees and agents shall be liable to any party for any damages that might result from the use of the
technology as described in this document (including without limitation direct, indirect, incidental, special,
consequential and punitive damages, lost profits).
These terms shall be governed by and construed in accordance with the laws of Belgium. You
irrevocably consent to the jurisdiction of the courts located in Brussels for any action arising from or
related to the use of this document.
Document information
document title YOXIMO owner manual
security unrestricted
last modified September 2015
owner Philippe Lesire
author Niels Grundtvig Nielsen
document release 1.1
© Worldline 2013 - 2015

public i
om_YoximoTOC.fm document release 1.0 last updated 30/9/15
Contents
Introduction ...........................................................................................................................1
About this manual..............................................................................................................1
About the YOXIMO................................................................................................................3
Terminal – top view ...........................................................................................................3
Terminal – side view..........................................................................................................4
Terminal – bottom view .....................................................................................................4
Installing the YOXIMO...........................................................................................................5
Unpacking the terminal......................................................................................................5
Preparing the terminal for operation..................................................................................6
Where to use the YOXIMO..........................................................................................6
Installing SIM and/or SAM – optional ..........................................................................7
Fitting the battery.........................................................................................................8
Removing the battery ................................................................................................10
Loading printer paper ................................................................................................11
Powering up the YOXIMO for the first time .....................................................................13
Using the YOXIMO ..............................................................................................................15
Reading a chip card ........................................................................................................ 15
Reading a magstripe card ...............................................................................................15
Reading a contactless card/device..................................................................................16
PIN privacy shield............................................................................................................16
Printer.............................................................................................................................. 17
Resetting the YOXIMO....................................................................................................17
Powering down the YOXIMO ..........................................................................................17
Connecting a USB peripheral..........................................................................................18
Power supply and power consumption ............................................................................19
Charging the battery........................................................................................................19
Caring for batteries..........................................................................................................19
Power consumption.........................................................................................................20
Using the YOXIMO with a power adaptor – indoors........................................................20
Using the YOXIMO with a power adaptor – in a vehicle .................................................22
Carrying case and cradle ...................................................................................................23
Carrying case ..................................................................................................................23
Clipping the terminal into the case ............................................................................24

public ii
om_YoximoTOC.fm document release 1.0 last updated 30/9/15
YOXIMO owner manual
Taking the terminal out of the case ...........................................................................25
Shoulder-strap and belt-clip ......................................................................................26
Cradle.............................................................................................................................. 27
Unpacking the cradle.................................................................................................28
Selecting a location for the cradle .............................................................................28
Fixing the cradle on a countertop or other horizontal surface ...................................29
Fixing the cradle on a wall or other vertical surface ..................................................30
Placing the terminal on the cradle............................................................................. 31
Removing the terminal from the cradle .....................................................................32
Powering the cradle.........................................................................................................32
Indoors ......................................................................................................................33
In a vehicle ................................................................................................................33
Maintaining the YOXIMO ....................................................................................................35
Cleaning the terminal ...................................................................................................... 35
Cleaning the card reader.................................................................................................35
Cleaning the cradle ......................................................................................................... 35
Cleaning the carrying case..............................................................................................35
Safety information...............................................................................................................37
Certification .....................................................................................................................37
Safety recommendations.................................................................................................37
Electrical installations................................................................................................ 37
Operating the YOXIMO .............................................................................................37
Opening the terminal................................................................................................. 39
Servicing.................................................................................................................... 39
Disposing of the terminal and battery........................................................................39
Technical specifications.....................................................................................................41

public iii
om_YoximoLOF.fm document release 1.0 last updated 30/9/15
Figures
Figure 1. Terminal (PIN privacy shield closed) .......................................................................3
Figure 2. Side view, with detail of USB port............................................................................ 4
Figure 3. Terminal (rear view) and SIM/SAM slots .................................................................4
Figure 4. SIM / SAM holders................................................................................................... 7
Figure 5. Sliding a SIM/SAM card into its holder.....................................................................7
Figure 6. Closing a SIM / SAM holder.....................................................................................8
Figure 7. Opening the battery cover........................................................................................8
Figure 8. Positioning the battery .............................................................................................9
Figure 9. Clicking the battery into place.................................................................................. 9
Figure 10. Closing the battery cover .....................................................................................10
Figure 11. Removing the battery...........................................................................................10
Figure 12. Opening the printer cover ....................................................................................11
Figure 13. Inserting printer paper..........................................................................................12
Figure 14. Plugging the power cable into the terminal..........................................................13
Figure 15. Inserting a chip card in the terminal..................................................................... 15
Figure 16. Swiping a magstripe card through the card reader..............................................15
Figure 17. Reading a contactless card/device ......................................................................16
Figure 18. PIN privacy shield – closed (left) and open (right) ...............................................16
Figure 19. Tearing off a ticket ...............................................................................................17
Figure 20. Connecting a USB peripheral to the YOXIMO terminal .......................................18
Figure 21. Power adaptors for connection to the YOXIMO – European / universal..............21
Figure 22. Vehicle power cable.............................................................................................22
Figure 23. YOXIMO in carrying case ....................................................................................23
Figure 24. Clipping the terminal into carrying case............................................................... 24
Figure 25. Removing YOXIMO from carrying case...............................................................25
Figure 26. Security stud and belt-clip....................................................................................26
Figure 27. Opening the belt-clip............................................................................................ 26
Figure 28. Cradle .................................................................................................................. 27
Figure 29. Mounting the drop protection on to the cradle .....................................................30
Figure 30. Placing YOXIMO on its cradle .............................................................................31
Figure 31. Removing YOXIMO from its cradle......................................................................32
Figure 32. Power inputs on the cradle ..................................................................................32
Figure 33. Vehicle power cable socket .................................................................................33

YOXIMO owner manual
iv empty for double-sided printing
om_YoximoLOF.fm

public 1
om_yxm_introduction.fm document release 1.1 last updated 30/9/15
Introduction
The YOXIMO is a mobile payment terminal offering the ideal solution for a variety of situations: on-
the-road transactions, in-store promotion sales, the hospitality sector, and so on.
The main features of the terminal are the following:
•compact, lightweight and truly portable
•backlit ergonomic keypad, bright large display, card interfaces with easy access
•fast silent printer
•rechargeable, long-life lithium-ion battery
•revolving PIN privacy shield incorporated into the design of the terminal
•standard WiFi/Bluetooth and optional GSM/GPRS communication interfaces
A full-featured YOXIMO kit consists of two main pieces of equipment:
•YOXIMO terminal for performing payment transactions
•optional YOXIMO cradle, combining safe storage and easy battery-charging
You can use it indoors on a countertop or a wall mount, but also in a vehicle.
We care for our environment: the package is as small as possible, contains no toxic materials and
is recyclable. The terminal and all accessories follow the RoHS2 directives, meaning that no
hazardous substances are used.
About this manual
This manual contains the following information for YOXIMO owners:
•the terminal and its accessories
•installing the terminal
•using the terminal
•maintaining the terminal
•troubleshooting
•safety information
•technical specifications

YOXIMO owner manual
2 empty for double-sided printing
om_yxm_introduction.fm
public 3
om_yxm_description.fm document release 1.1 last updated 30/9/15
About the YOXIMO
This chapter gives an overview of the terminal.
•for information on the power supply options, see Power supply and power consumption, on
page 19, and Powering the cradle, on page 32.
•for information about accessories, see Carrying case and cradle, on page 23
Terminal – top view
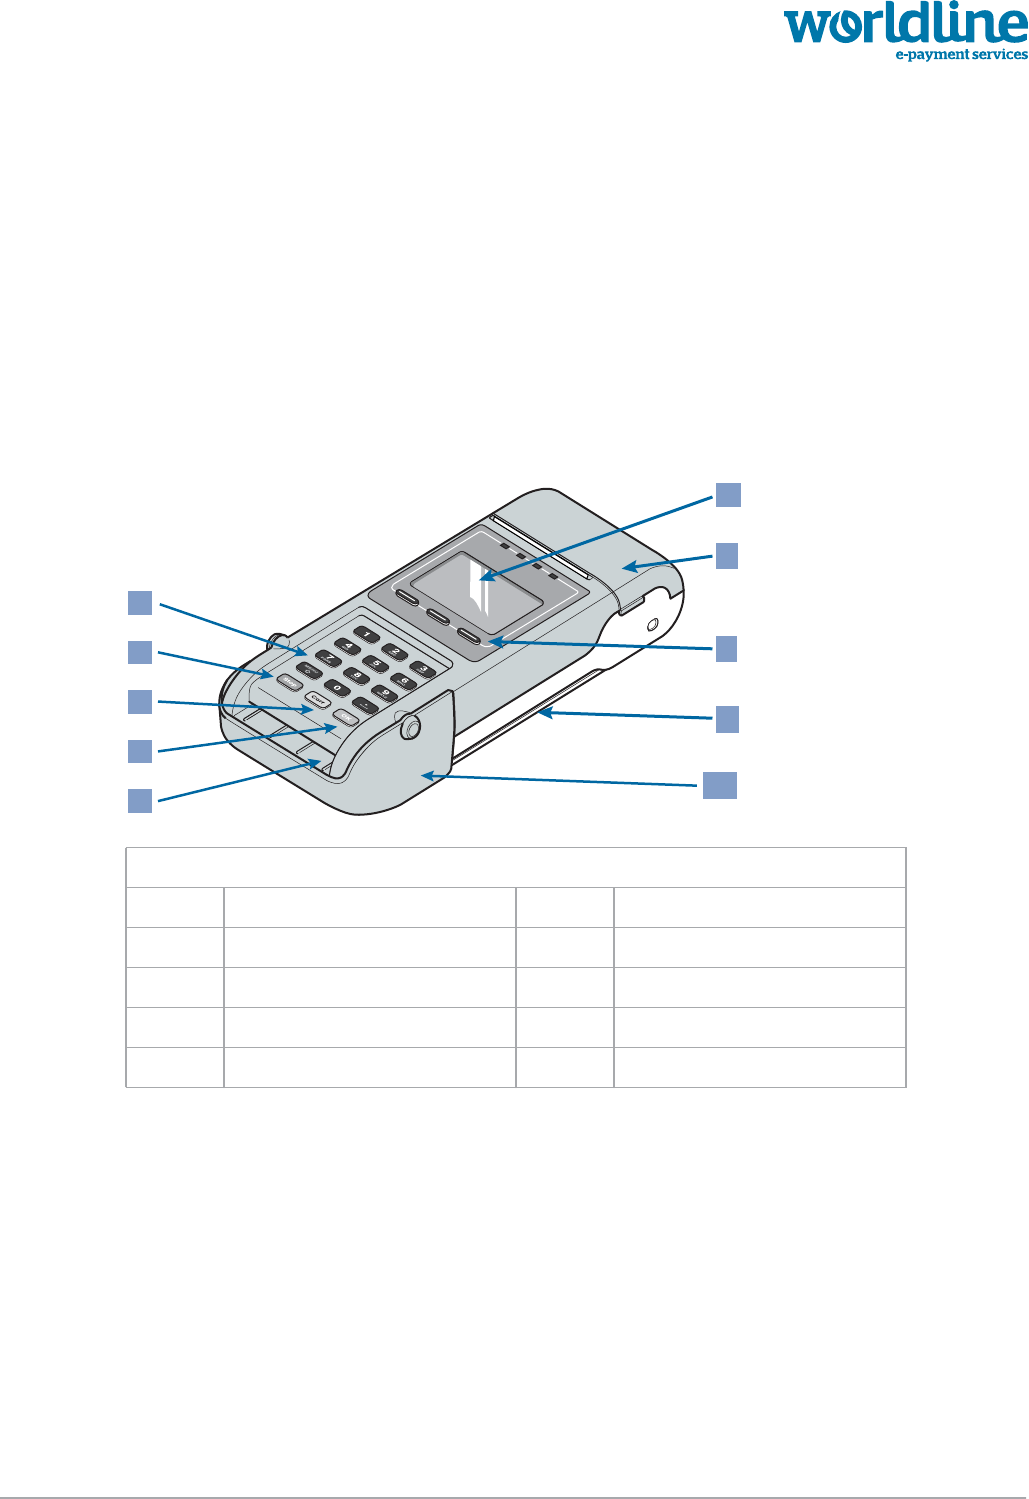
Figure 1. Terminal (PIN privacy shield closed)
1 keypad 6 display
2 Corr / On / reset button 7 printer cover
3 Stop / power-down button 8 function keys
4 OK button 9 magstripe-card reader
5 chip-card reader 10 PIN privacy shield
7
8
9
10
2
1
3
4
6
5
YOXIMO owner manual
4 public
last updated 30/9/15 document release 1.1 om_yxm_description.fm
Terminal – side view
Terminal – bottom view
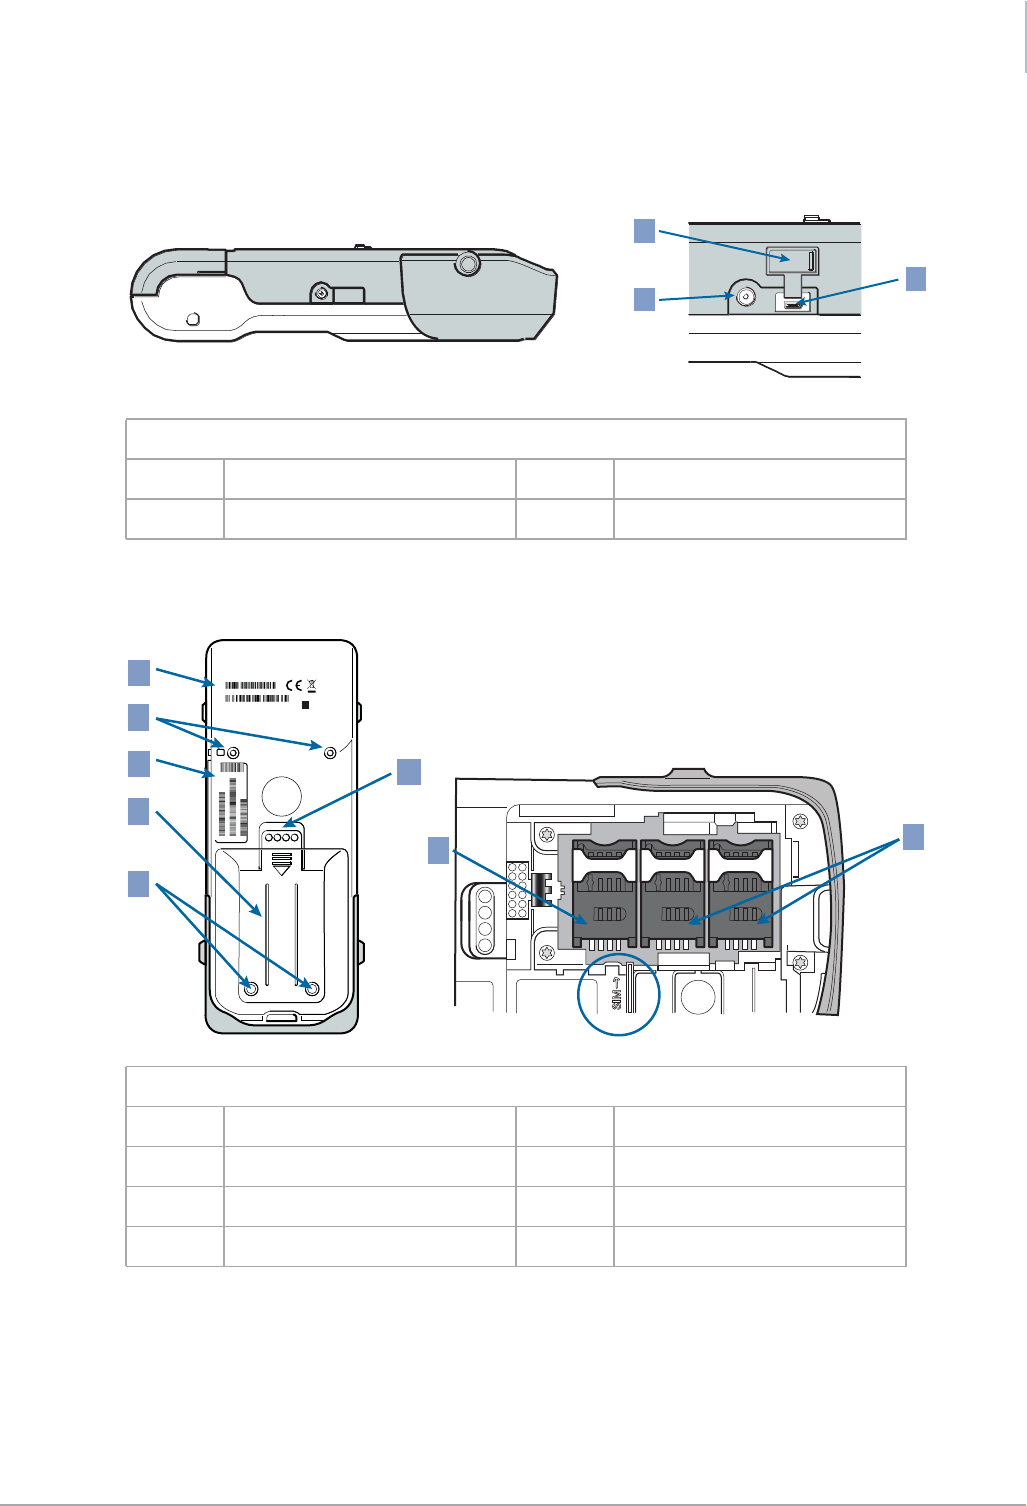
Figure 2. Side view, with detail of USB port
1 USB protection cap 3 USB device port
2 external power socket
2
1
3
Figure 3. Terminal (rear view) and SIM/SAM slots
1 product label 5 charging contacts
2 rubber feet 6 SIM slot
3 MAC label 7 SAM slots
4 battery cover
YOXIMO TERMINAL Manufactured by Atos
Worldline SA/NV
Made in Singapore
Article N°: 90700000001
Serial N°: AVT7491
Registered Design
1235
®
12V 3,2A
HW/ID 424B 000819211906AE
ABCDEF012346
FX001
REV. AB
MACHW
1
3
2
2
4
5
67

public 5
om_yxm_installation.fm document release 1.1 last updated 30/9/15
Installing the YOXIMO
You can call upon a technician or a field engineer to help you install your terminal or you can do it
yourself. If you decide to install the terminal yourself, remember the guidelines below.
•if you decide to install the YOXIMO yourself, Worldline nor its vendor will bear any
responsibility or cost for malfunctioning, breakdowns or any anomaly that may result from
incorrect manipulation of the terminal
•read the safety recommendations on page 48 before starting to install your YOXIMO.
•if you notice that any part of the YOXIMO does not fit, blocks or shows any other malfunction,
contact your vendor – do not try yourself to repair or alter it in any way.
•use only accessories (battery, power adaptor, cables and so on) provided by your vendor or
by an approved source
Unpacking the terminal
1. Open the package and check the contents.
The package should contain a YOXIMO terminal, a battery, a mains adaptor and a roll of
paper for the printer. If any of these is missing, contact your vendor immediately.
Your vendor may also have included documentation.
2. Inspect the package and its contents for damage.
If anything is missing or damaged, contact your shipping company immediately and notify
your vendor.
Save the box for repacking or moving your equipment in the future.
!

YOXIMO owner manual
6 public
last updated 30/9/15 document release 1.1 om_yxm_installation.fm
Preparing the terminal for operation
Before you start, make sure the operating conditions are suitable. If you need to install the SIM
and/or SAMs, do this first; then fit the battery. Finally, put a roll of paper in the printer.
Where to use the YOXIMO
YOXIMO is a mobile payment terminal, designed for easy payment on the go. The terminal can be
used in the following environmental conditions:
•operating temperature between -10°C and +50°C
Remember that the temperature of the battery has an influence on the autonomy of the
terminal. When the operating temperature drops below freezing point, the battery will
need charging more frequently.
•operating humidity between 20 % and 95 % RH, non-condensing
Avoid environments where the humidity may fluctuate.
Avoid exposing the YOXIMO to:
•shocks and vibrations
•excessive heat and dust
•explosive environments
•oil, water, moisture or condensation
•devices that cause excessive voltage fluctuations and/or electromagnetic fields such as
electric motors or high-frequency devices
•direct sunlight or objects that radiate heat
public 7
om_yxm_installation.fm document release 1.1 last updated 30/9/15
YOXIMO owner manual
Installing SIM and/or SAM – optional
To communicate via GSM/GPRS-EDGE-3G, you need a SIM installed in the YOXIMO terminal.
Some applications also require one or more SAMs to be installed. The SIM and SAM slots are
located inside the terminal underneath the battery.
•Make sure that the mains power adaptor is not connected to the YOXIMO.
•Avoid electrostatic discharge as it can severely damage the equipment. For guidelines on
minimising the risk of electrostatic discharge, see Safety recommendations, on page 37.
1. If you have already installed the battery, start by removing the battery cover and battery. See
Removing the battery, on page 10, for more information.
2. Open the correct holder for inserting the SIM or SAM.
–the SIM holder is the holder to the left, marked SIM
–the SAM slots are the two remaining holders
Shift the appropriate latch upwards, until you hear a click, then hinge the holder open.
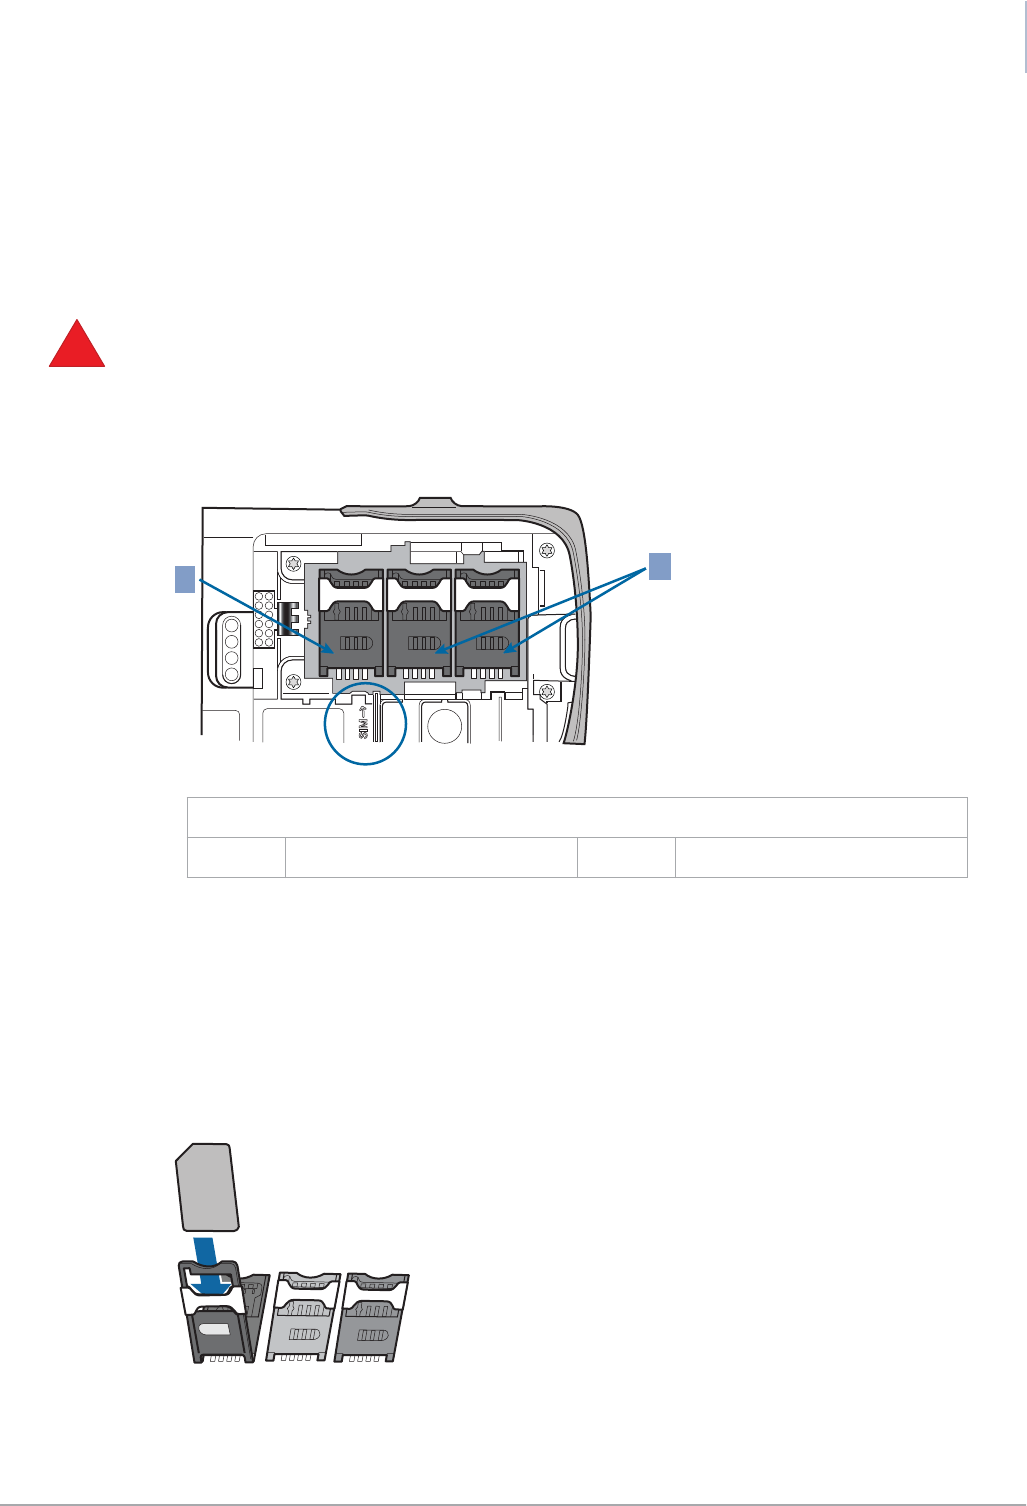
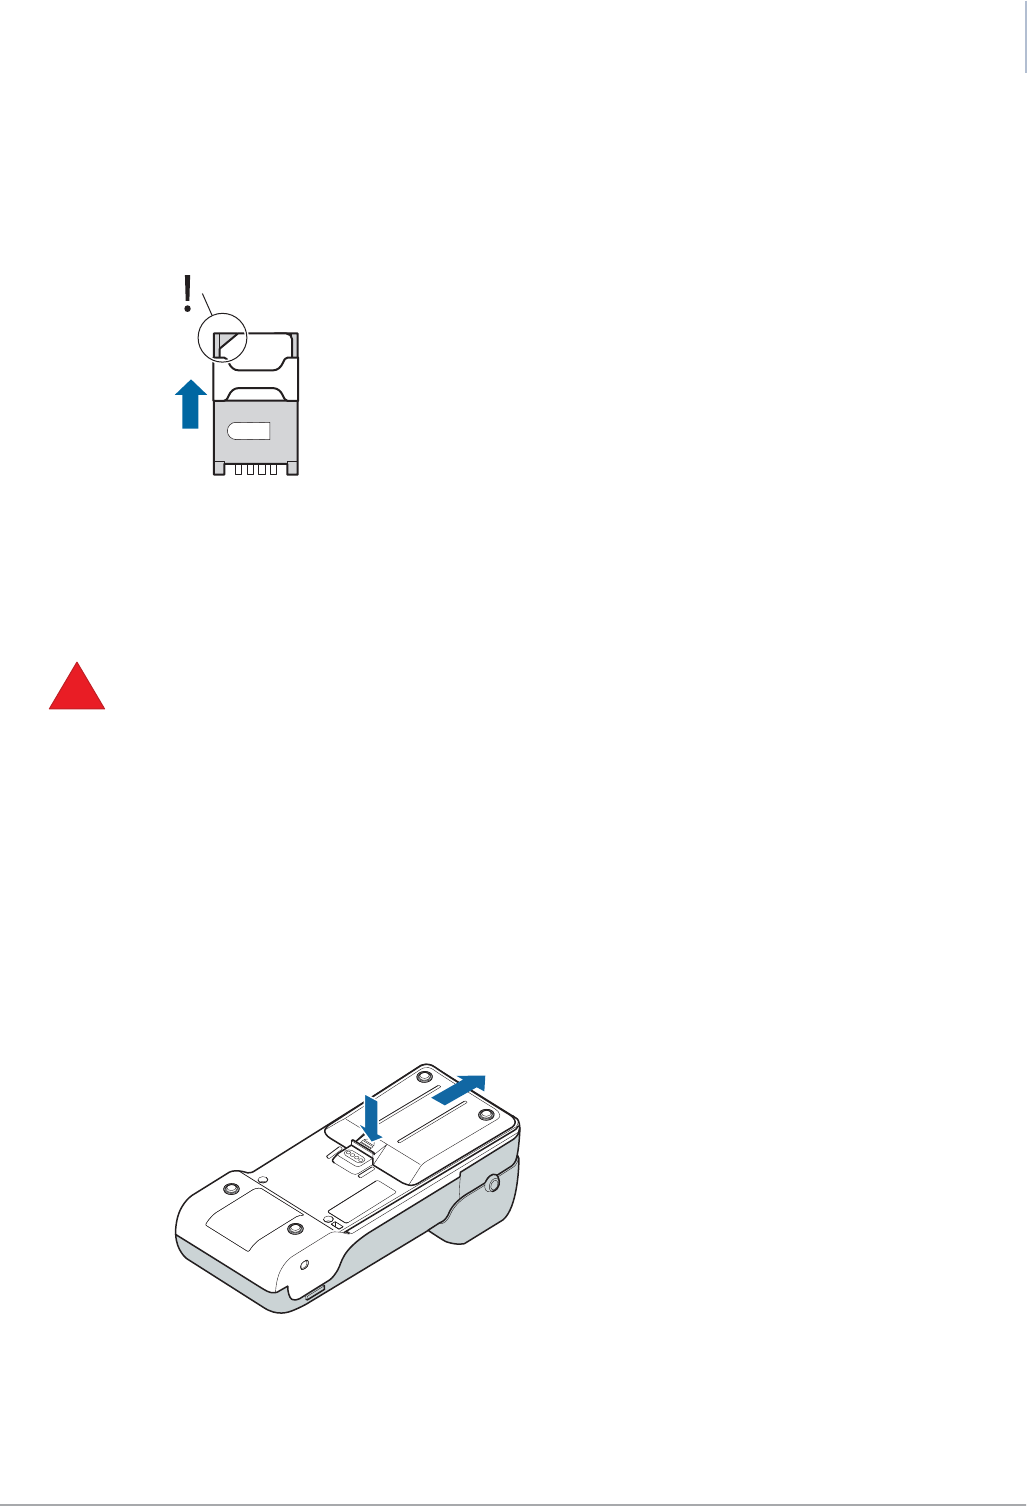
3. Insert the SIM or SAM with the bevel in the direction as shown in the next figure. Make sure
the card is completely inserted.
Figure 5. Sliding a SIM/SAM card into its holder
!
Figure 4. SIM / SAM holders
1 SIM holder 2 SAM holders
12
YOXIMO owner manual
8 public
last updated 30/9/15 document release 1.1 om_yxm_installation.fm
4. Close the holder.
Make sure the bevel fits behind the corner, then shift the latch up until you hear a click.
5. Make sure that all holders (SIM and SAM) are closed.
Figure 6. Closing a SIM / SAM holder
6. Put the battery back in its recess and close the battery cover again.
Fitting the battery
•never operate the YOXIMO terminal without a battery
Trying to operate the terminal without a battery will damage the terminal.
•only use the battery that is supplied with your YOXIMO
•to get the best performance from the battery, make sure it is at room temperature (20°C) when
operating YOXIMO
•do not touch the terminal battery contacts
To install the battery:
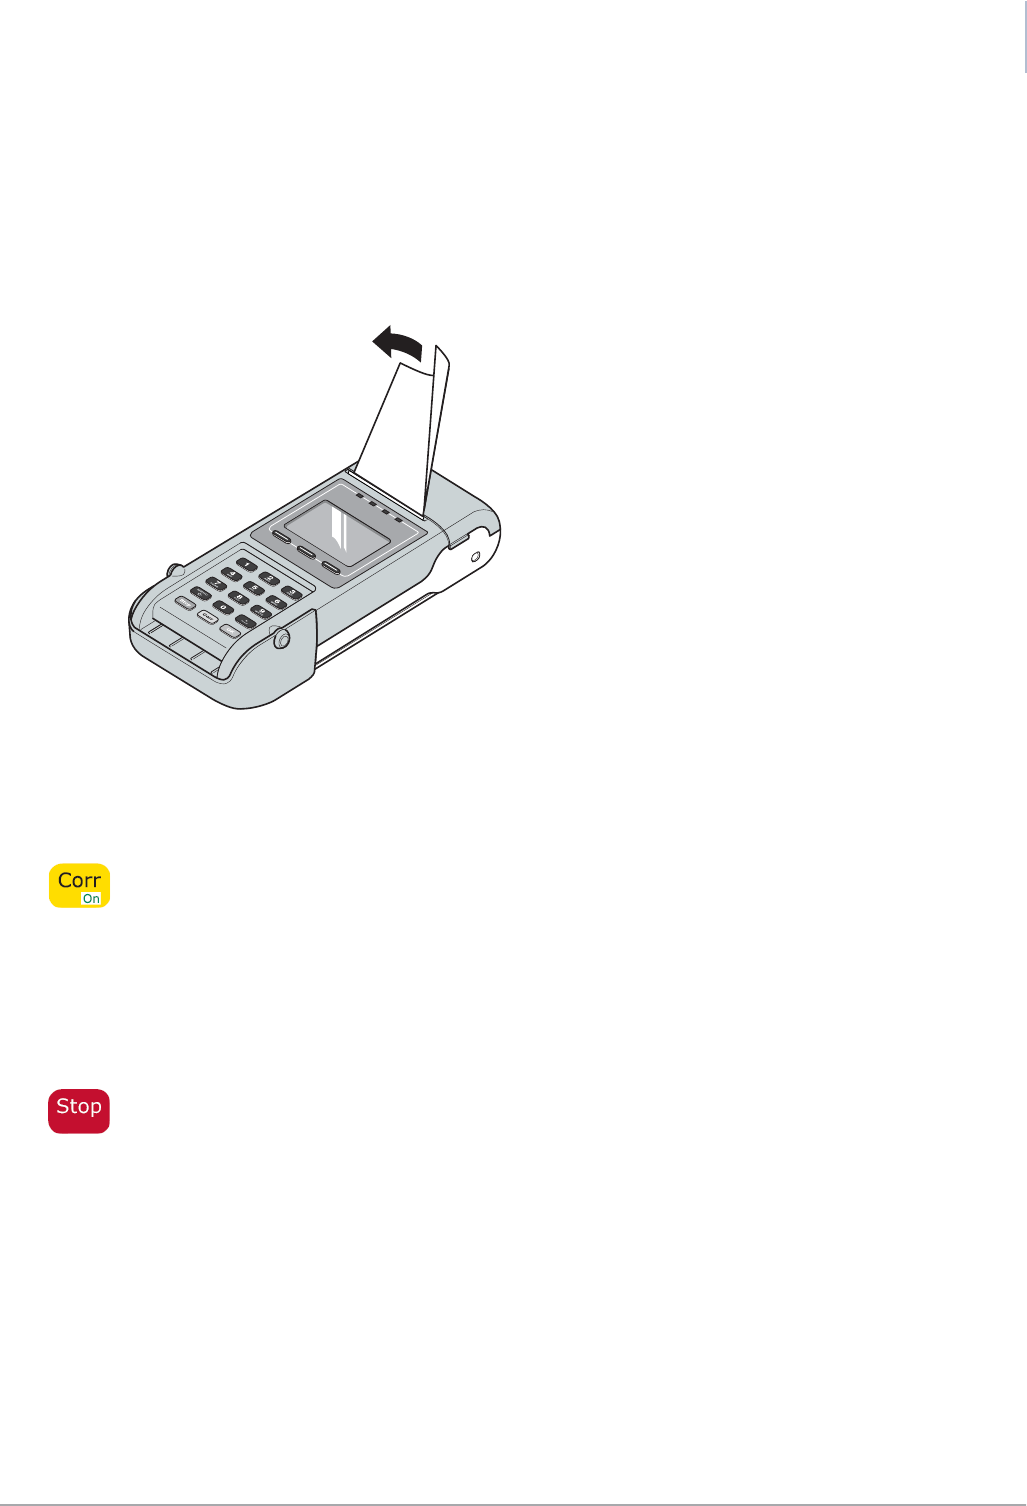
1. Put the PIN privacy shield in the upright position.
2. Remove the battery cover at the rear side of the terminal.
Press with your thumb on the top of the battery cover to release it, then slide the cover
backwards.
Figure 7. Opening the battery cover
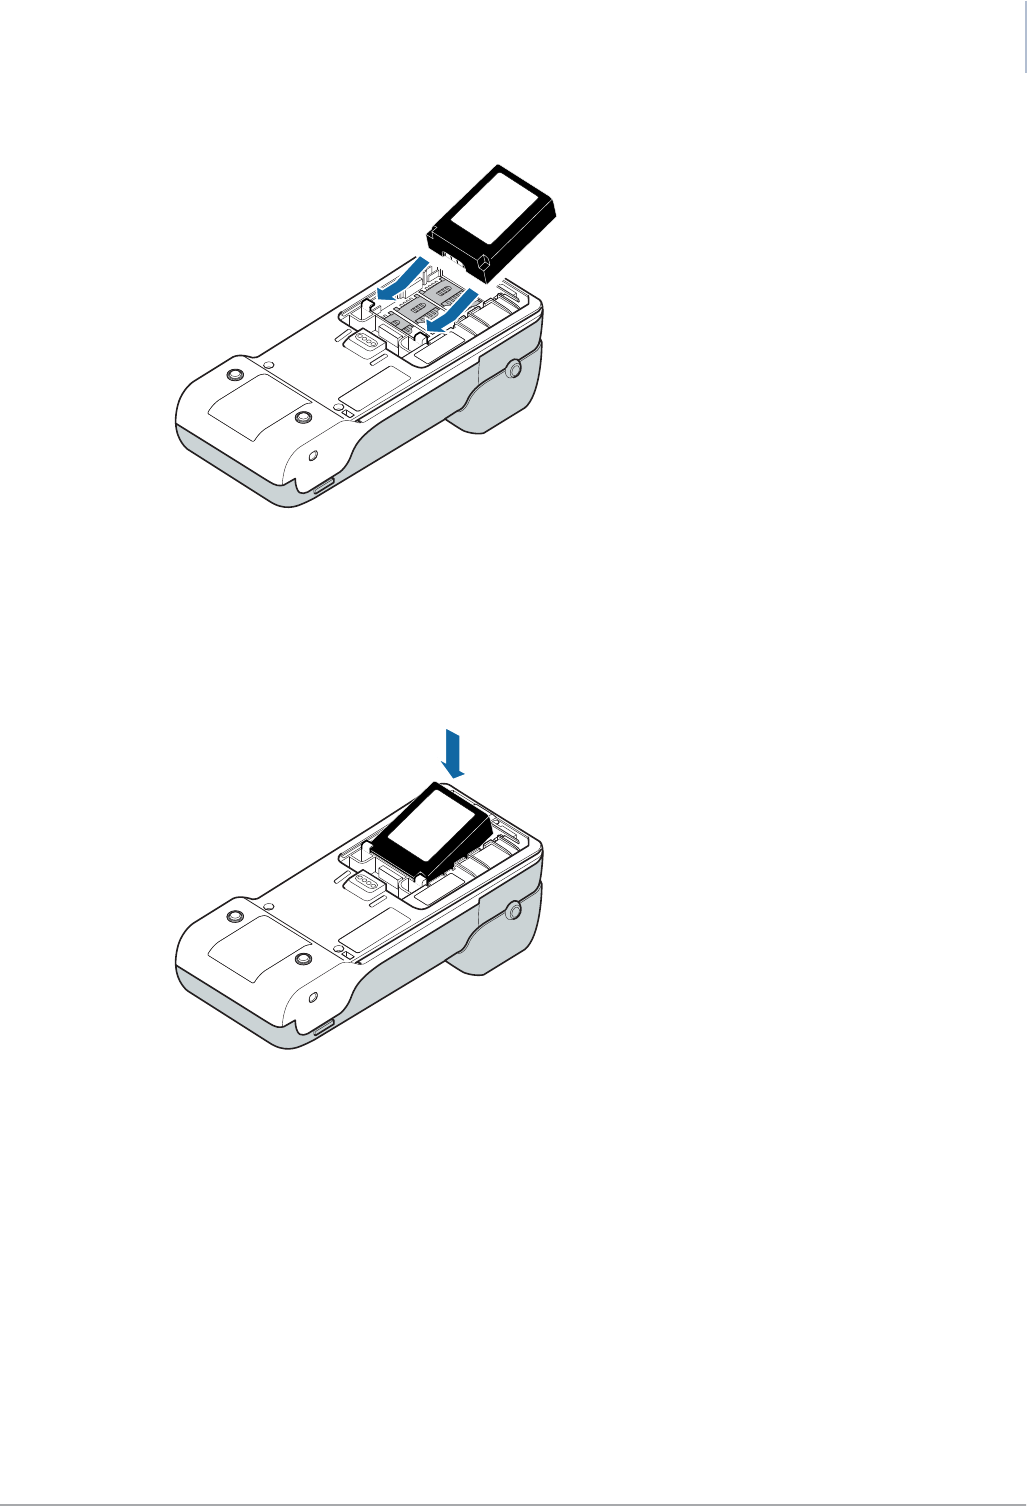
3. Lower the battery into its recess.
!
public 9
om_yxm_installation.fm document release 1.1 last updated 30/9/15
YOXIMO owner manual
Figure 8. Positioning the battery
Position the battery with the label facing upwards and the battery contacts facing
forwards.
4. Make sure that the battery contacts touch the ones in the terminal, then press the battery
down until you hear a click.
Figure 9. Clicking the battery into place
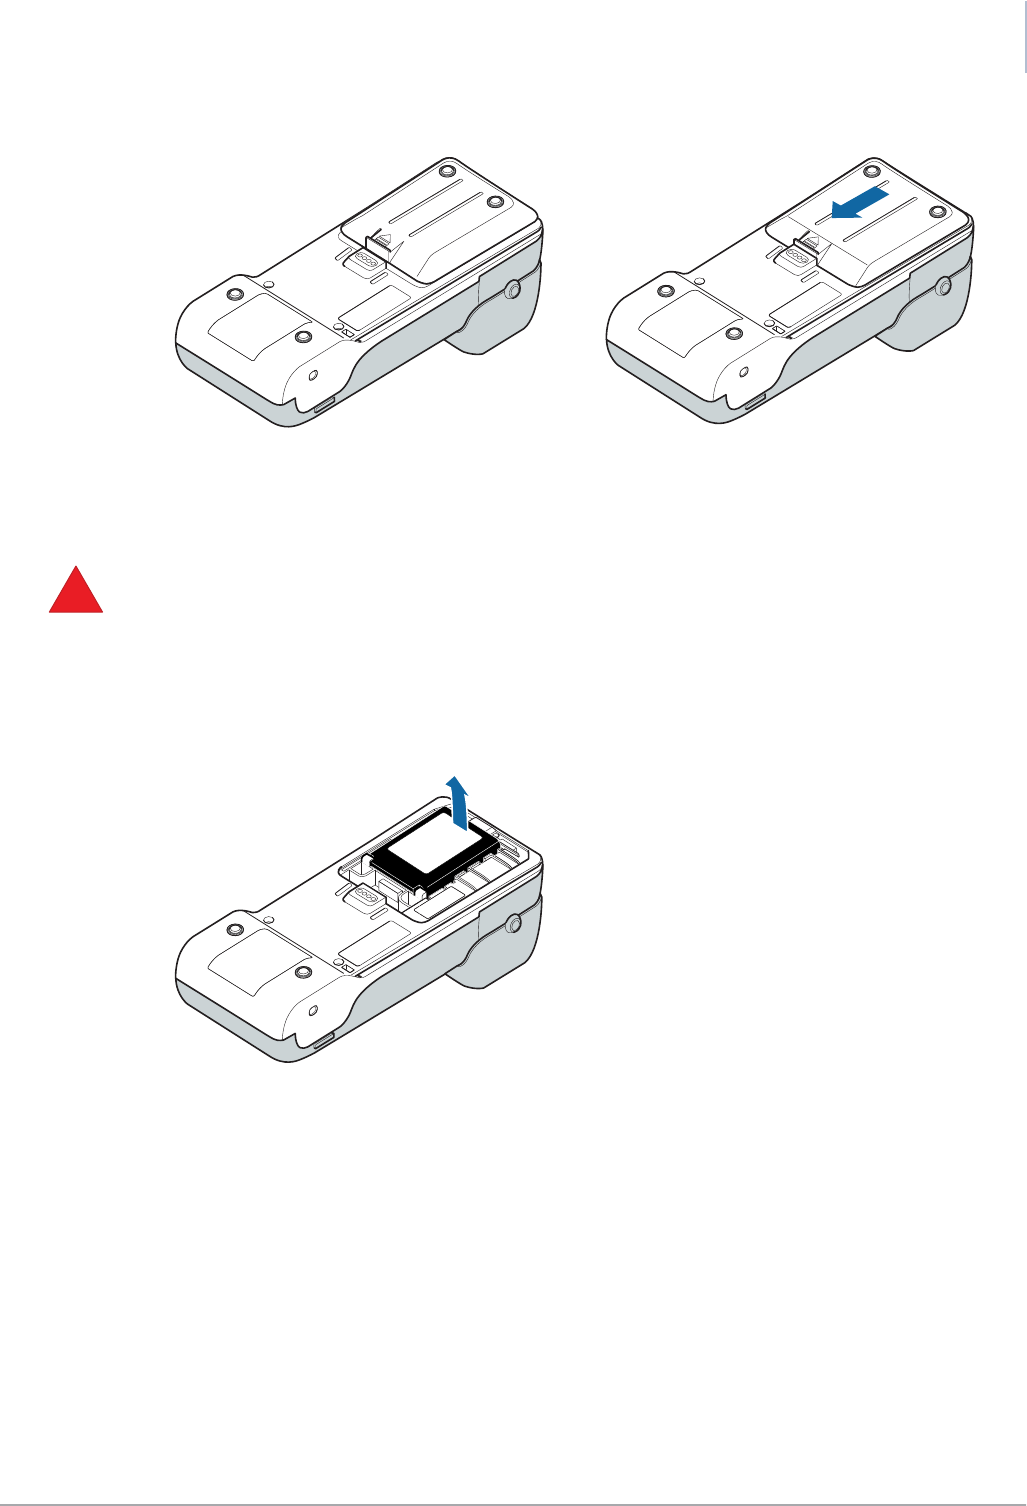
5. Position the battery cover on the terminal, then slide it forwards until you hear a click.
YOXIMO owner manual
10 public
last updated 30/9/15 document release 1.1 om_yxm_installation.fm
Figure 10. Closing the battery cover
Removing the battery
1. Always unplug the power adaptor before removing the battery
2. Put the PIN privacy shield in the upright position.
3. Remove the YOXIMO battery cover at the rear side of the terminal.
4. Lift the battery out of the terminal.
Never use a sharp or pointed object when removing the battery, because this may
damage the terminal
Figure 11. Removing the battery
5. Close the battery cover again.
!
public 11
om_yxm_installation.fm document release 1.1 last updated 30/9/15
YOXIMO owner manual
Loading printer paper
•only use Worldline-approved paper, which you can recognise by the Worldline approval seal
printed on the back of the paper.
To order paper from your local paper supplier, contact your vendor.
•do not remove the roller on the inside of the printer cover.
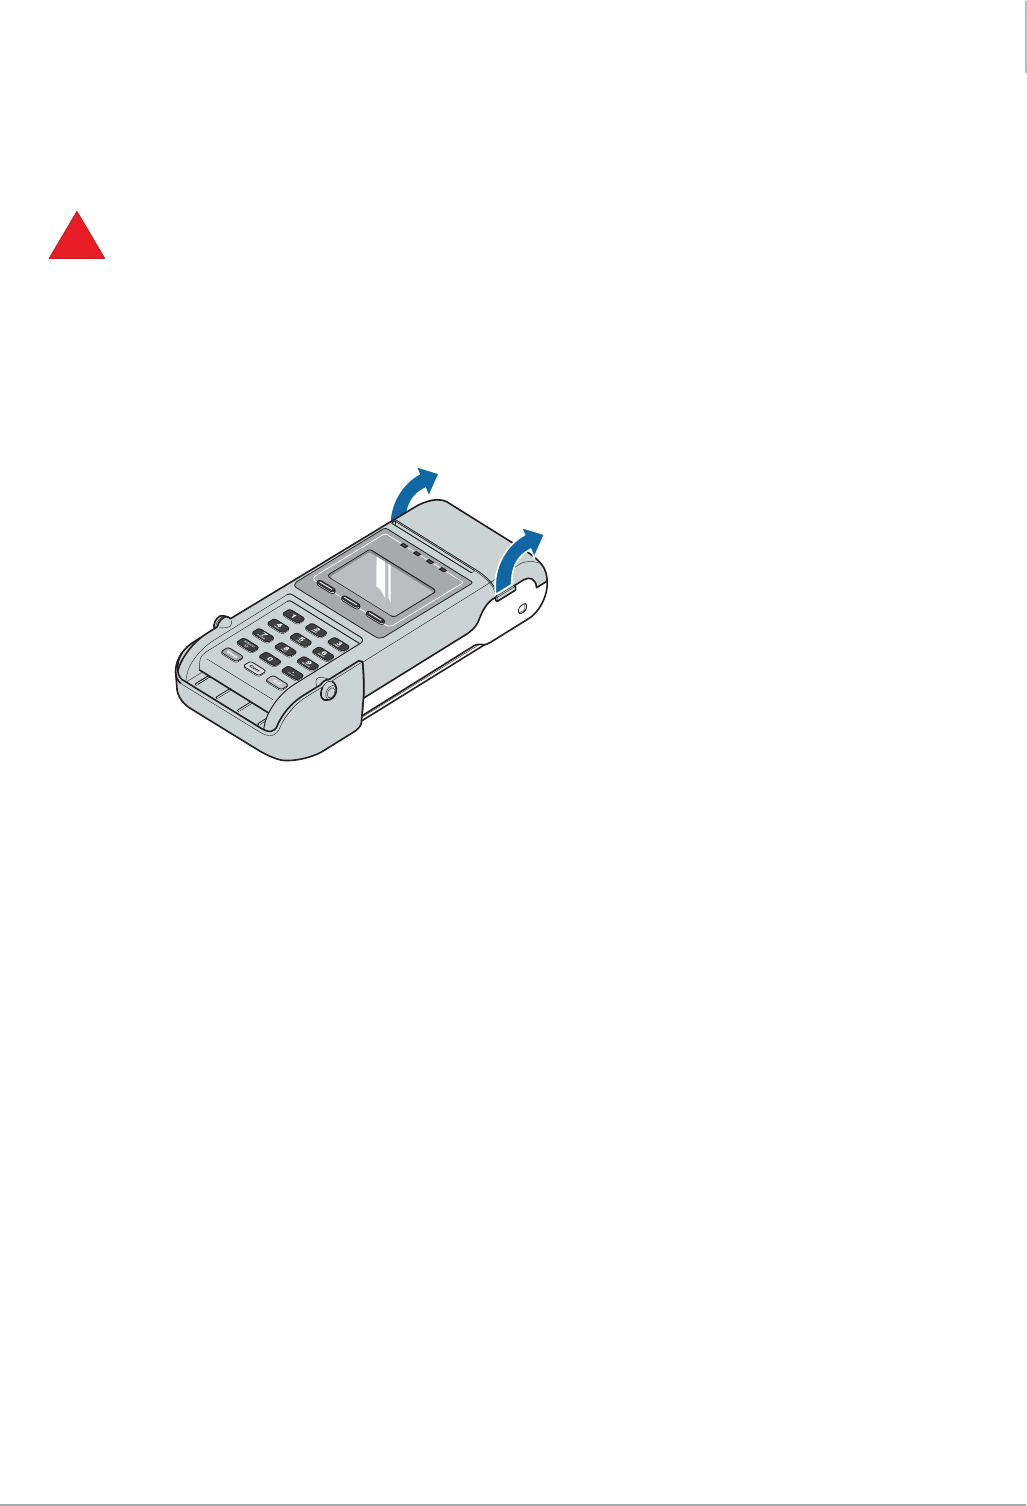
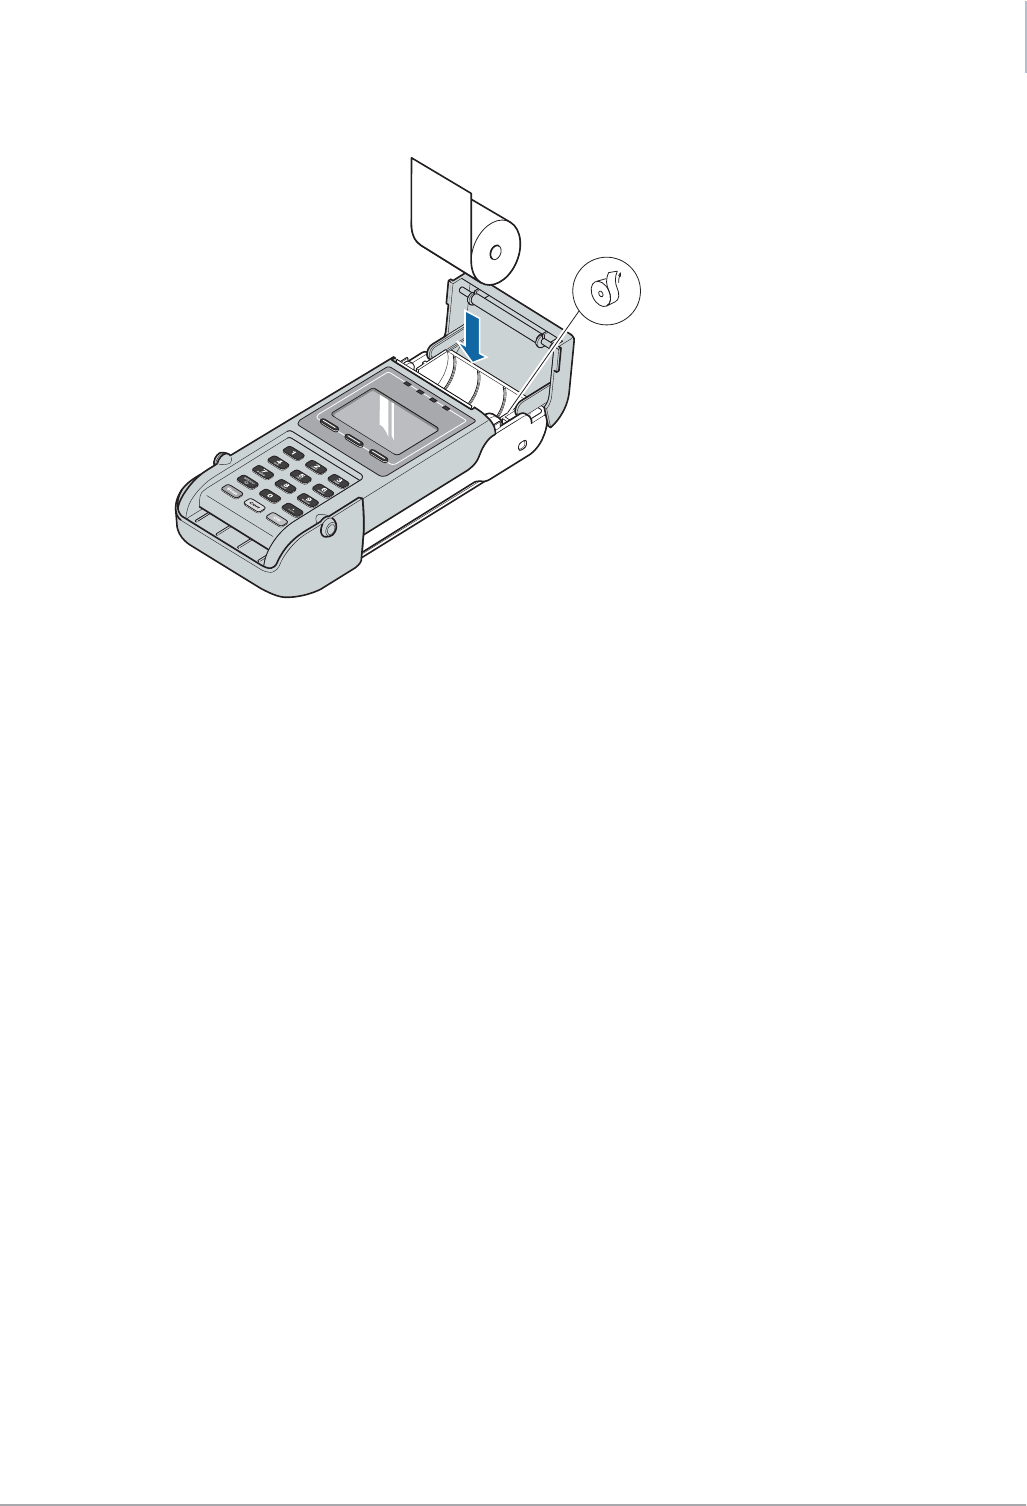
1. Open the printer cover.
Put your fingers on the notches at the left- and right-hand side of the printer cover, then
pull the cover open.
Figure 12. Opening the printer cover
2. Take a paper roll and unroll about 5 centimetres of it.
3. Insert the paper as shown on the sticker inside the printer compartment.
When inserting a paper roll, make sure that:
–the paper-holder is empty
–the paper is not cracked, wrinkled or sealed
–the paper comes out straight
!
YOXIMO owner manual
12 public
last updated 30/9/15 document release 1.1 om_yxm_installation.fm
Figure 13. Inserting printer paper
4. Close the printer cover. Press firmly until you hear a click.
public 13
om_yxm_installation.fm document release 1.1 last updated 30/9/15
YOXIMO owner manual
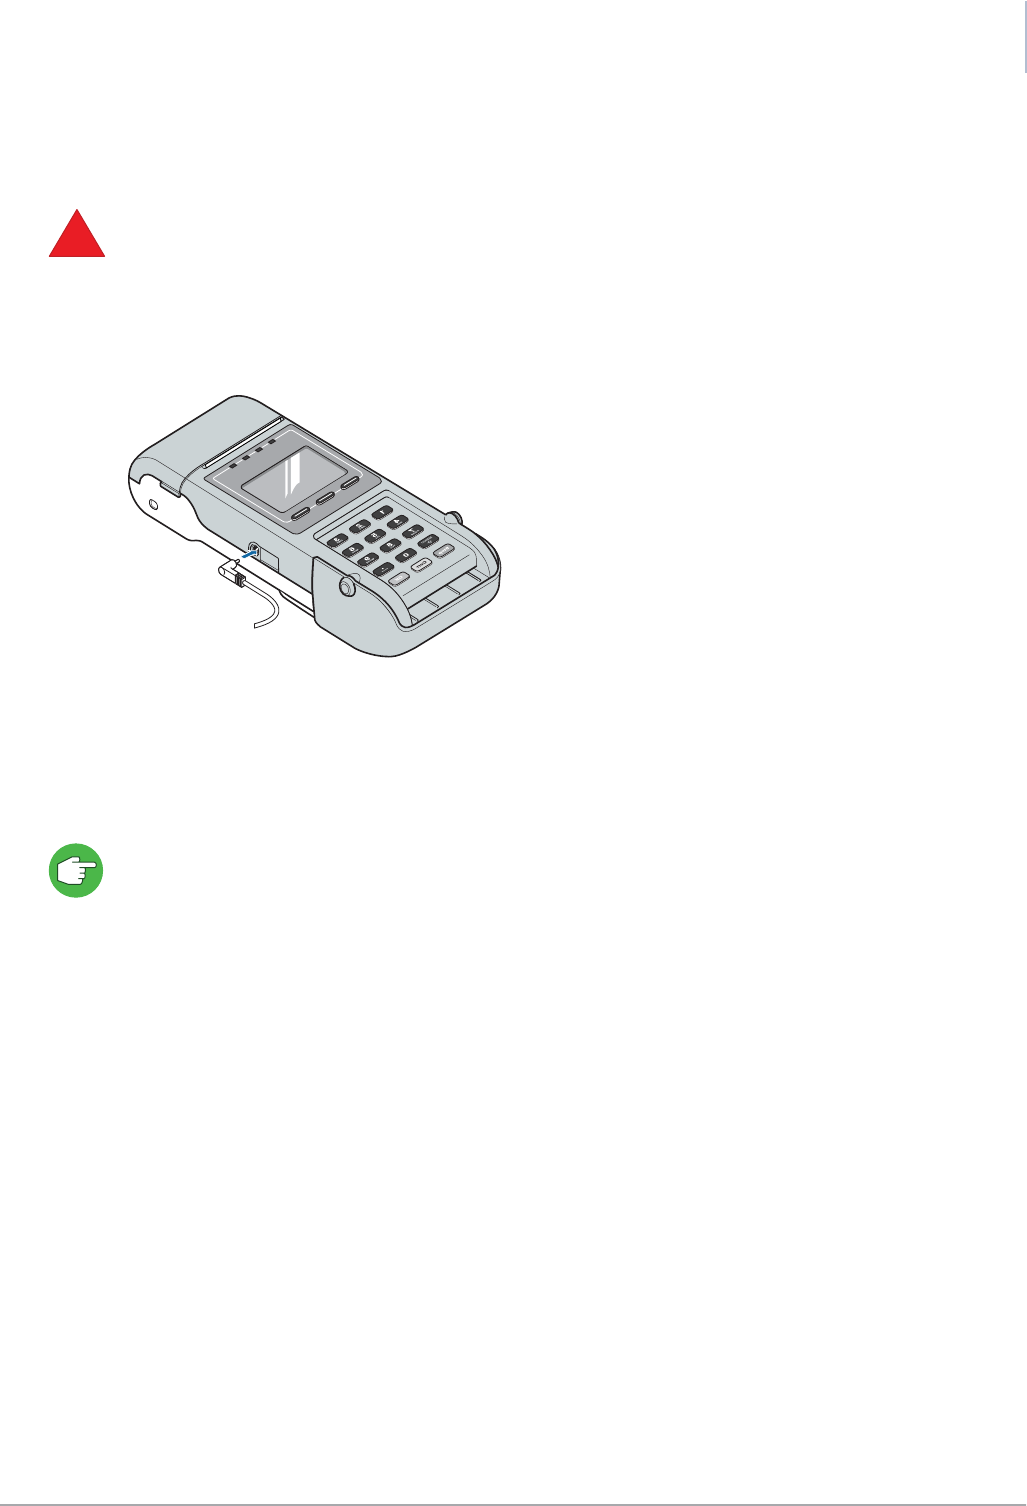
Powering up the YOXIMO for the first time
•the first time you power up your YOXIMO, make sure it is connected to the power adaptor
•make sure the battery has been fitted, and that there is a roll of paper in the printer
To power up your YOXIMO for the first time:
1. Plug the power cable from the mains adaptor into the socket on the left-hand side of the
YOXIMO terminal.
Figure 14. Plugging the power cable into the terminal
2. Connect the mains adaptor to a wall socket and wait for the YOXIMO keypad backlight and
display to light up.
This takes five minutes at most, depending on the state of the battery.
The battery that is delivered with your terminal is not fully charged. Charge the battery completely
before switching to battery-only operation. A complete charging cycle takes approximately 2.5
hours. The display indicates when the battery is fully charged.
!

YOXIMO owner manual
14 empty for double-sided printing om_yxm_installation.fm
public 15
om_yxm_usage.fm document release 1.1 last updated 30/9/15
Using the YOXIMO
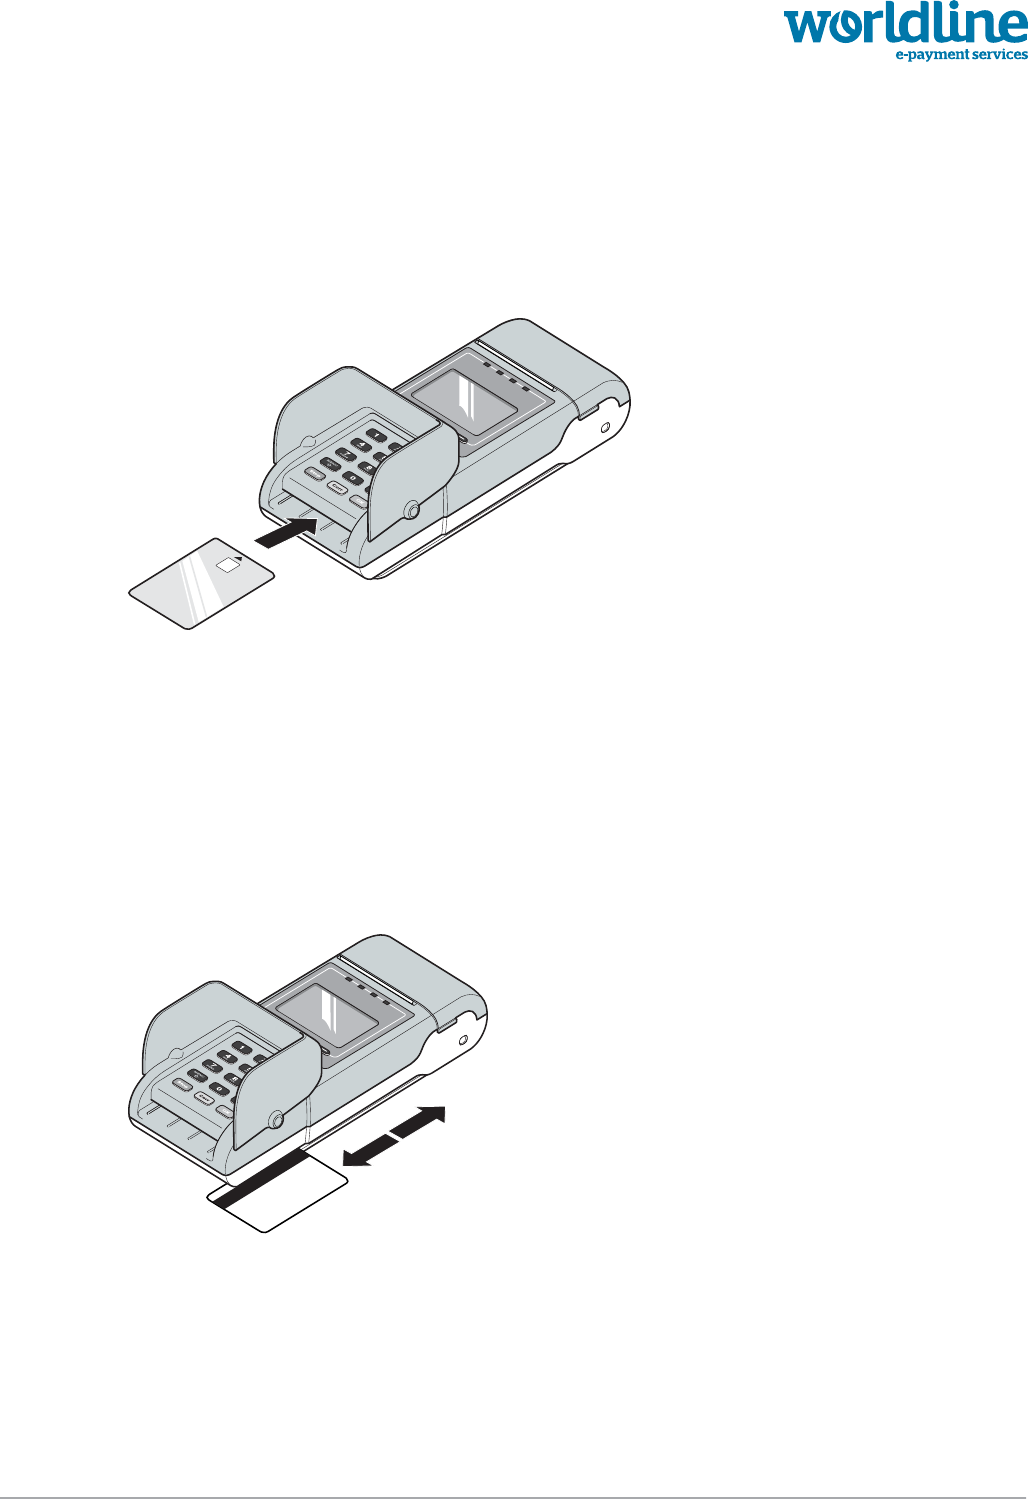
Reading a chip card
Figure 15. Inserting a chip card in the terminal
To read a chip card:
1. Put the privacy shield in the upright position.
2. Insert the chip card face-up in the slot at the front side of the terminal, as shown by the
pictogram
Reading a magstripe card
Figure 16. Swiping a magstripe card through the card reader
To swipe a magstripe card:
1. Put the privacy shield in the upright position.
2. Swipe the card through the reader located at the righthand side of the terminal.
Hold the card with the stripe upward, as indicated on the pictogram on the terminal
public 16
om_yxm_usage.fm document release 1.1 last updated 30/9/15
YOXIMO owner manual
housing. You can slide the card in either direction. For reliable card reading, swipe the
card in one smooth movement.
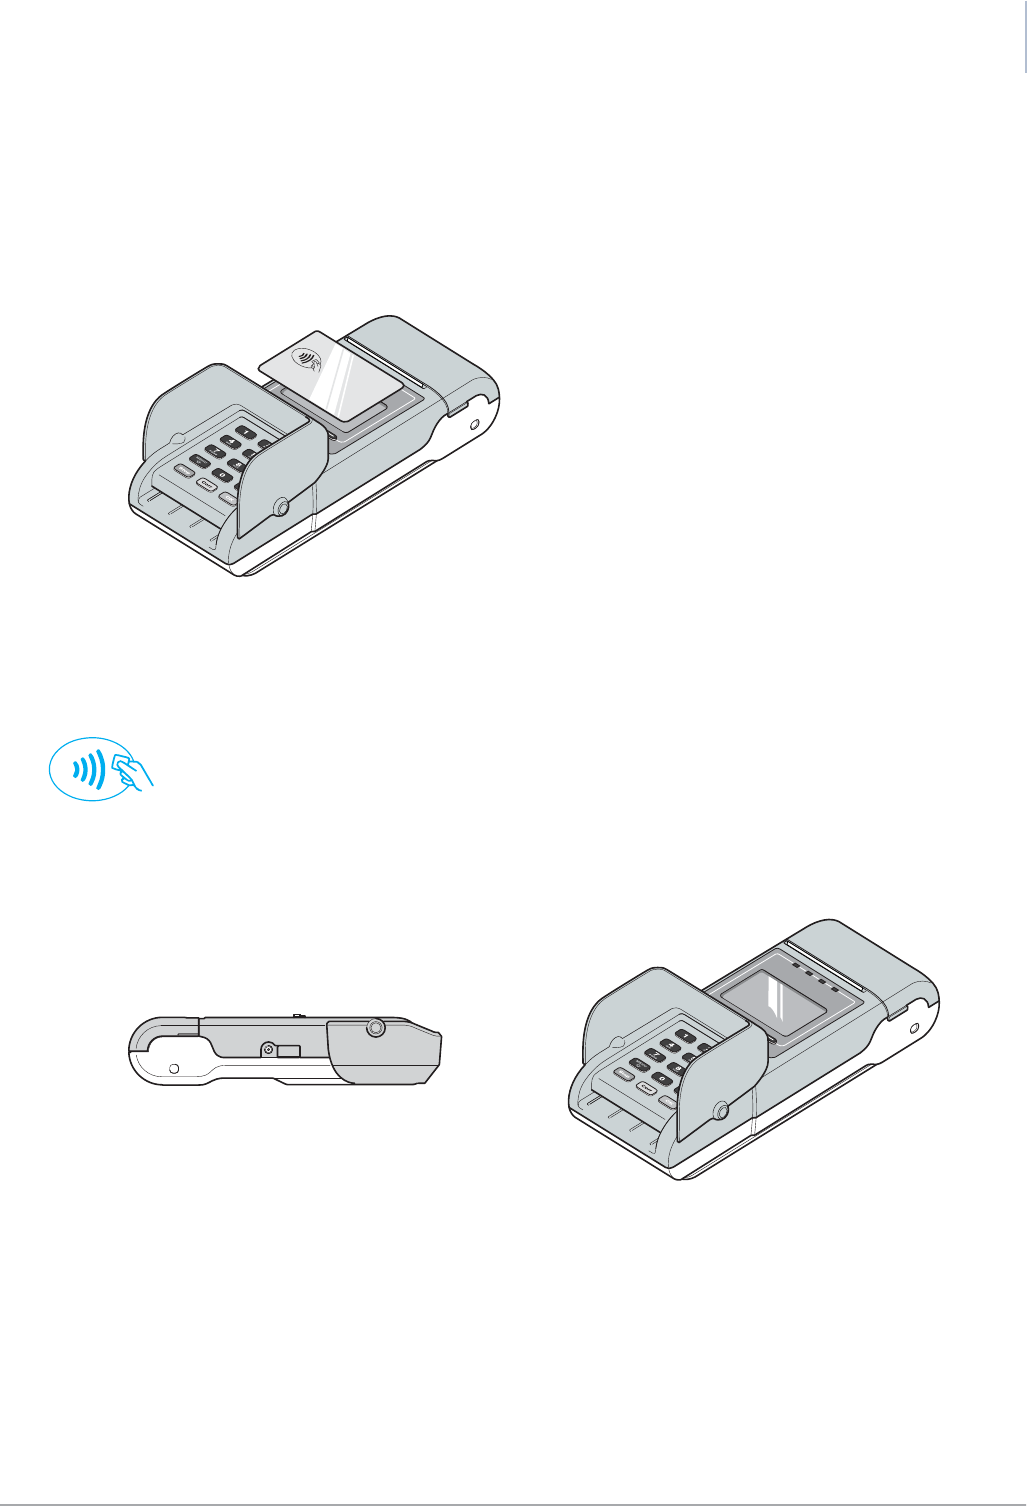
Reading a contactless card/device
Figure 17. Reading a contactless card/device
To reading a contactless card/device:
1. Hold the card above the display, centred on the landing point.
When the payment application supports contactless cards/devices, the landing-point
symbol appears on the display.
PIN privacy shield
Figure 18. PIN privacy shield – closed (left) and open (right)
The integrated YOXIMO privacy shield is to prevent shoulder surfing when entering a PIN. Raising
the privacy shield uncovers both the chip-card interface and the magnetic stripe reader so you can
operate the terminal.
When you are not using the terminal, fold in the privacy shield in. This makes the terminal flat and
easy to carry.
public 17
om_yxm_usage.fm document release 1.1 last updated 30/9/15
YOXIMO owner manual
Printer
How to insert a paper roll is described in Loading printer paper, on page 11.
To tear off a ticket, hold the top of the ticket and tear the ticket off along the cutting edge. To avoid
damage, do not pull paper out of the printer.
Figure 19. Tearing off a ticket
Resetting the YOXIMO
To reset the YOXIMO, press the yellow Corr button for at least 5 seconds and wait for the terminal
to reboot.
If the Power down function is not supported by your application, you have to remove the battery,
wait for 10 seconds and insert the battery again.
Powering down the YOXIMO
To power down the YOXIMO, press the red Stop button for at least 5 seconds. In this mode the
battery consumes almost no energy. This function is useful when, for example, entering health
care facilities or when boarding an aircraft.
To power up the terminal, press the yellow On button again. It takes longer to power up a terminal
than it does to wake the terminal from sleep mode.
If the Power down function is not supported by your application, you have to remove the battery.
YOXIMO owner manual
18 public
last updated 30/9/15 document release 1.1 om_yxm_usage.fm
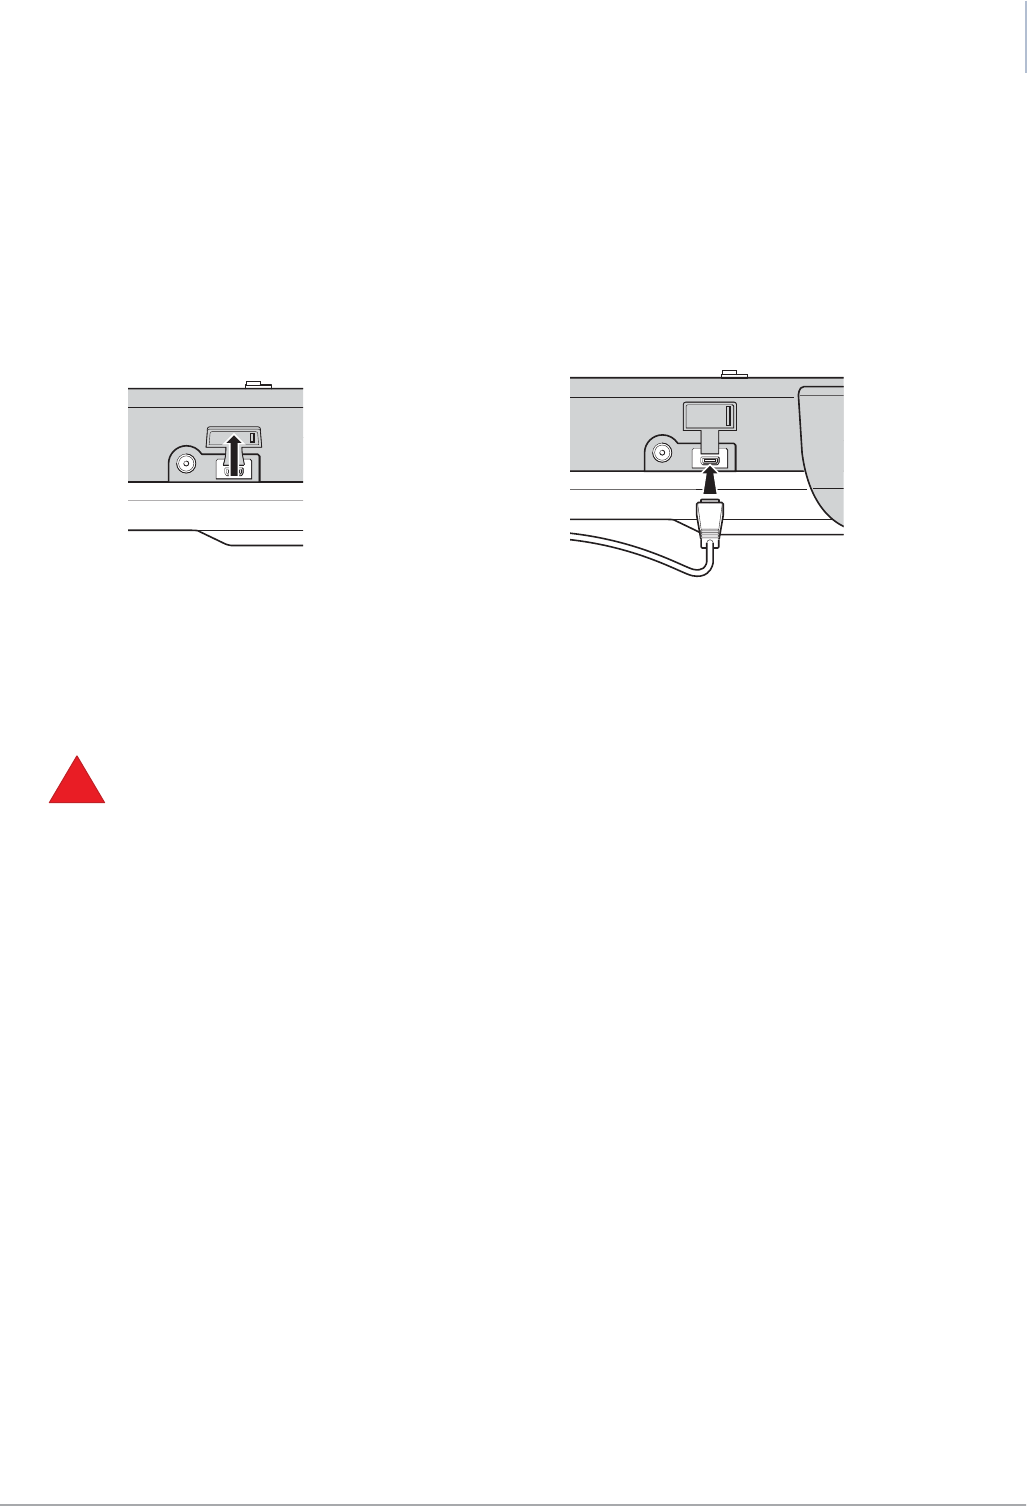
Connecting a USB peripheral
The YOXIMO terminal is equipped with a USB socket, for communication with external equipment
such as an ePOS terminal or a PC. The appropriate cable is available as an option. To find out
what equipment is supported, contact your vendor.
Figure 20. Connecting a USB peripheral to the YOXIMO terminal
To access the socket, open the small rubber cap with your fingers. Leave the cap connected to the
terminal so that the connector can be protected when not used.
•do not use a sharp object to remove the rubber cap
!

public 19
om_yxm_powerSupply.fm document release 1.1 last updated 30/9/15
Power supply and power consumption
For portability, the YOXIMO is powered by a rechargeable, high-energy Lithium-Ion battery with a
capacity of 1200 mAh at a nominal voltage of 7.6 VDC. The battery management system features
a fuel gauge, so the user always has accurate information on battery status. The user can replace
the battery when necessary.
Charging the battery
The battery can be charged:
•by connecting the power adaptor to the YOXIMO
•by placing the YOXIMO on its cradle (for indoor or in-vehicle use)
The YOXIMO terminal uses a high-energy Lithium-Ion battery. To to get the best performance and
the longest life from the battery:
•always disconnect the power adaptor from the terminal before removing the battery
•always operate the YOXIMO terminal with the battery in place to avoid damage to the terminal
•only charge the battery when it is in the YOXIMO terminal
•charge the battery regularly – do not wait for it go flat
You can charge the battery by connecting the power adaptor to the YOXIMO or by placing the
YOXIMO on its cradle. As Lithium-Ion batteries do not suffer from being continuously charged, you
can do so without affecting the battery performance. When the low battery message appears on
the display, the terminal needs to be charged.
•a new battery achieves full performance only after two or three complete charge-discharge
cycles
•for quick and efficient results, charge the battery at room temperature
When the terminal is connected to the power adaptor or placed on its cradle, charging is software-
controlled depending on the battery charge status.
When you will not be using the terminal for more than a week, charge the battery to around 40%
before removing it from the terminal and storing it. Do not leave the battery inside the terminal.
Another option is to keep the battery powered (directly or via the cradle) all the time.
Caring for batteries
Lithium-Ion batteries can be left charging all the time, because they do not suffer from the “memory
effect”. Recharging an empty battery takes about 2.5 hours. A separate battery charger is not
available for this type of battery.
!

YOXIMO owner manual
20 public
last updated 30/9/15 document release 1.1 om_yxm_powerSupply.fm
A Li-Ion battery normally delivers peak performance for around three years after it is built or until it
has been recharged 500 times. After this, it may need charging more frequently. Depending on
how intensively the battery is used, and on how often it is charged, it can continue to deliver
acceptable performance for another three years. Operating at extremely high or low temperatures
may also have an adverse impact on performance and battery life.
Worldline specifies a double-cell Lithium-Ion battery for the YOXIMO because this type of battery:
•offers at least 30% more capacity than their NiMH counterparts
•weigh at least 30% less than NiMH
•has a long life cycle
•provides excellent discharge performance
•is more environmentally-friendly
In stock, YOXIMO terminals are stored without a battery. This is because Li-Ion batteries discharge
slowly inside the terminal, even when the terminal is switched off.
Power consumption
The current consumption of the YOXIMO Terminal depends on the mode:
•working: ~160mA drawn from Li-ion battery (backlights on, CPUs at 264MHz)
•idle: ~70mA drawn from Li-ion battery (backlights off, CPUs at 24MHz)
•stand by: around 7 days with either WiFi or GSM/GPRS module in sleep-mode
To have YOXIMO ready whenever needed, power-management is crucial at every implementation
level. Tests show that reducing the intensity of the display backlight to 50% for half the transaction
time offers a 20% extra operational time. In normal operating conditions, a fully charged battery
allows:
•around 300 transactions a day, with one ticket printed per transaction
•an average of 40 transactions a day over a period of 4 days
•around 7 days on stand-by, with GSM/GPRS active
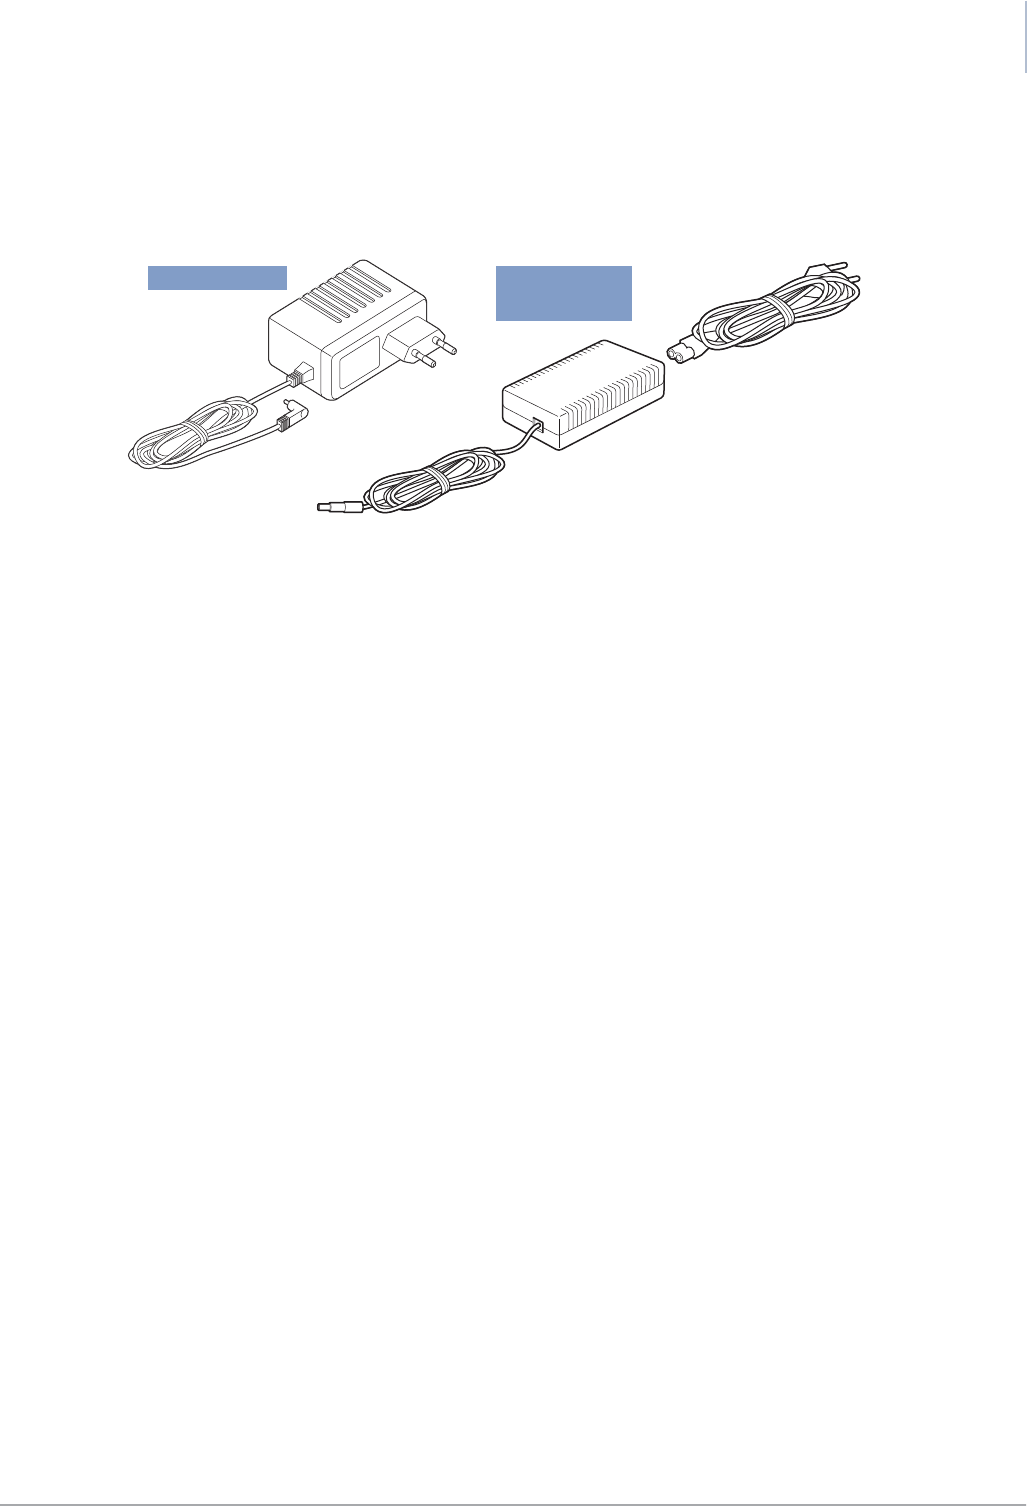
Using the YOXIMO with a power adaptor – indoors
Do not remove the battery when using the YOXIMO with a power adaptor.
•in all European countries except the United Kingdom and Ireland, YOXIMO comes with a
small plug-in adaptor (for indoor use) with a Euro plug.
Adaptor input is 220 – 240 VAC, 50 Hz. The built-in cable is 2 m long.
•elsewhere, YOXIMO comes with a universal adaptor (for indoor use) in combination with
different country-specific mains power cables
Adaptor input is 100 – 240 VAC, 50 – 60 Hz. The standard adaptor cables are 2 m long.
!
public 21
om_yxm_powerSupply.fm document release 1.1 last updated 30/9/15
YOXIMO owner manual
The adaptor output is 12 VDC at 1.0 A. Leaving the adaptor cable plugged in when the YOXIMO
is connected but not in use makes sure the battery is always charged and the terminal is always
ready to use.
Figure 21. Power adaptors for connection to the YOXIMO – European / universal
The power adaptor can be connected either to the YOXIMO or to the cradle, using the socket on
the side of the terminal or the side of the cradle.
plug-in adaptor universal
mains-adaptor
YOXIMO owner manual
22 public
last updated 30/9/15 document release 1.1 om_yxm_powerSupply.fm
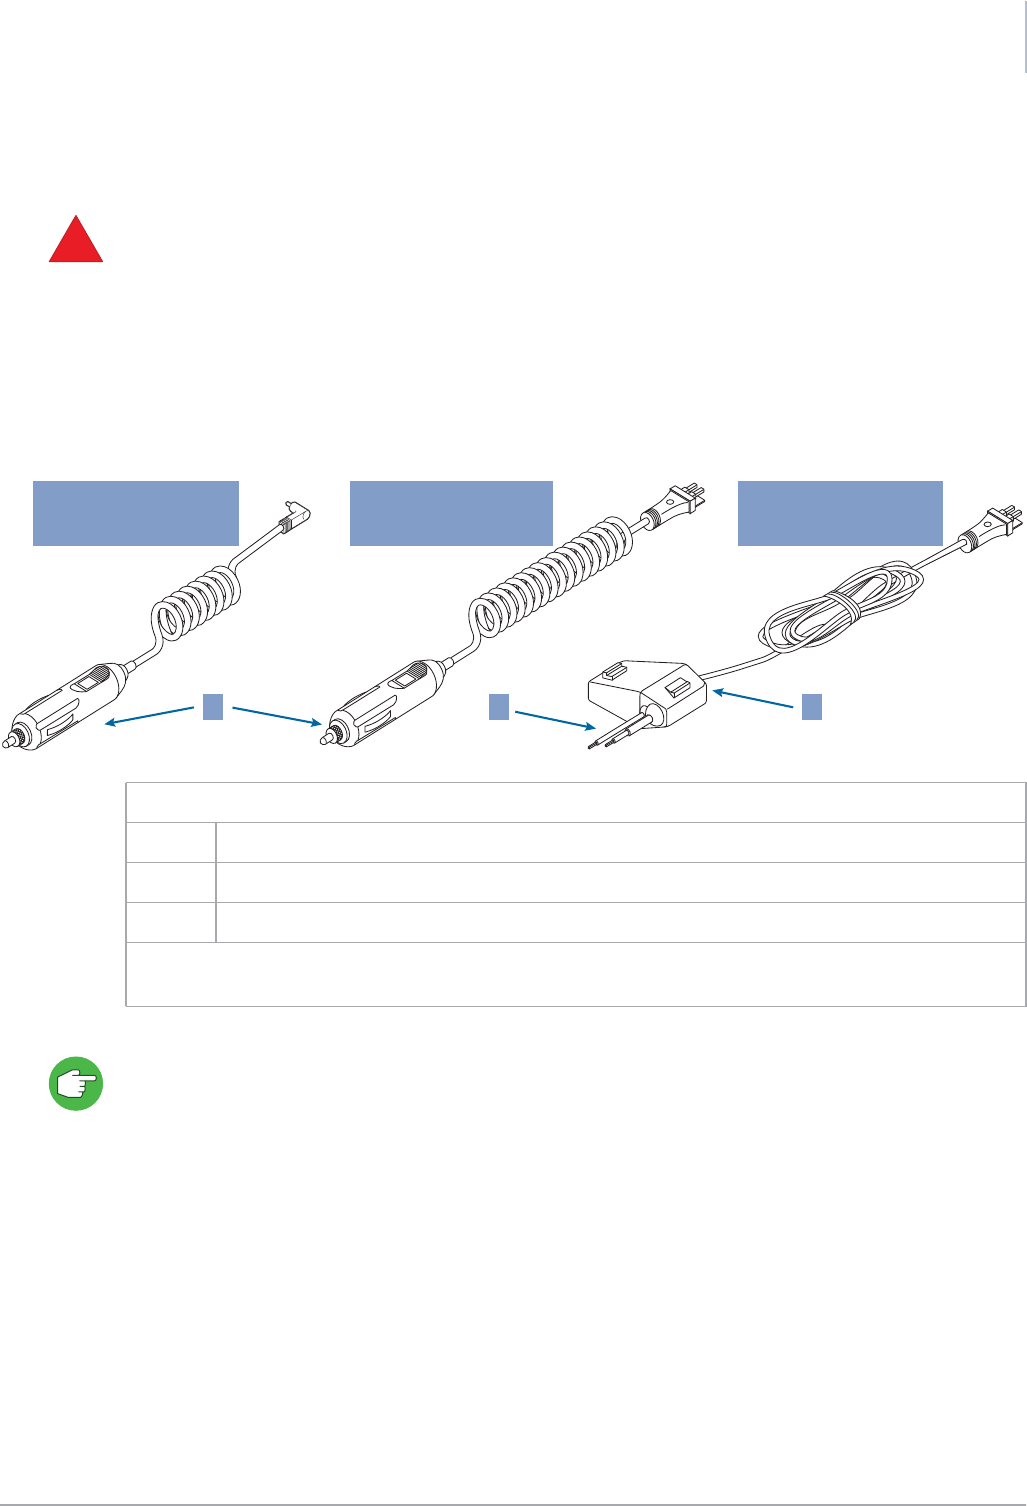
Using the YOXIMO with a power adaptor – in a vehicle
Do not remove the battery when using the YOXIMO with a power adaptor.
There are three options for using the YOXIMO with a power adaptor in a vehicle:
•power the terminal from the cigarette-lighter
•put the terminal in the cradle, and use the co-ax or the flat-pin connector to power the cradle
from the cigarette-lighter
•put the terminal in the cradle, and use the flat-pin connector to power the cradle from a built-
in connection to the vehicle’s electrical system
Cables/adaptors for these options have to be purchased separately, as accessories.
!
plug-in vehicle adaptor –
at-pin connector
for cradle
plug-in vehicle adaptor –
co-ax connector
for terminal or cradle
built-in vehicle adaptor –
at-pin connector
for cradle
31 2
Figure 22. Vehicle power cable
1 cigarette lighter plug
2 connection to vehicle electrical system
3 fuse box
The cradle transforms the car or truck voltage to the 12 VDC needed to charge the battery in the
YOXIMO terminal.
public 23
om_yxm_accessories.fm document release 1.1 last updated 30/9/15
Carrying case and cradle
For user comfort and to protect the terminal, a carrying case and a cradle are available. Both these
items help keep your YOXIMO safe in daily use. The cradle also includes a charger.
Carrying case
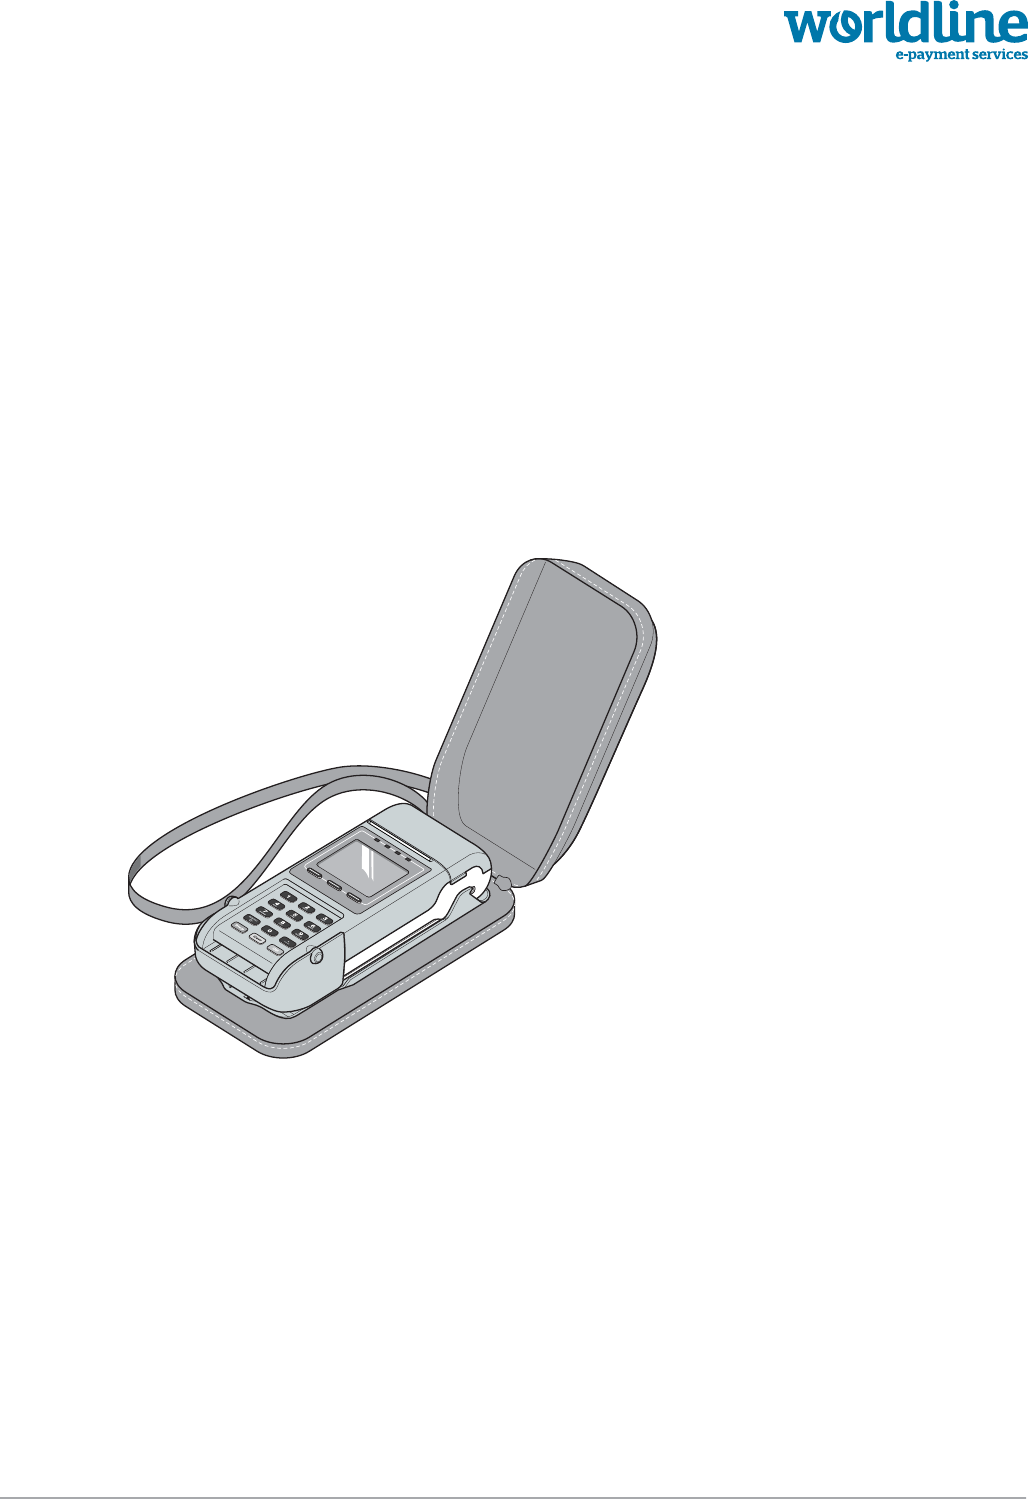
The case protects the YOXIMO against shocks and bumps, and has both a shoulder strap and an
optional belt clip. All interfaces – chip card, magstripe card, contactless and USB – remain fully
accessible when the YOXIMO is in the open case.
The carrying-case includes a clip to hold the YOXIMO securely in place.
Figure 23. YOXIMO in carrying case
YOXIMO owner manual
24 public
last updated 30/9/15 document release 1.1 om_yxm_accessories.fm
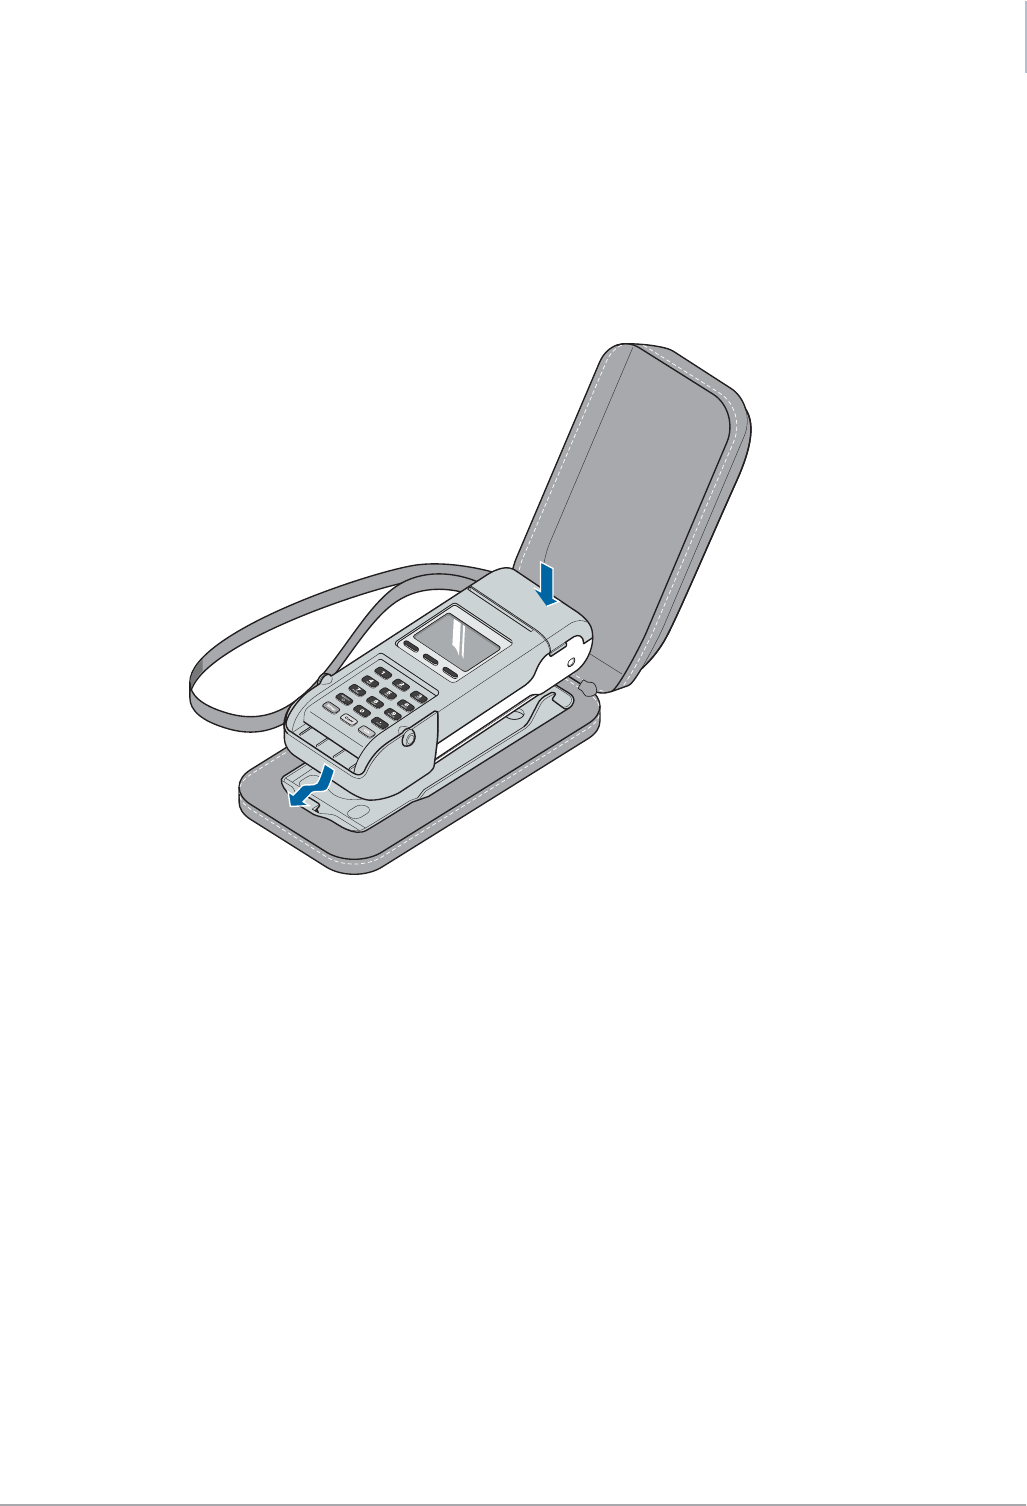
Clipping the terminal into the case
1. slip the recess at the front of the terminal over the tab at the front of the clip
2. line up the terminal between the two tabs (one either side of the terminal) at the back of the
clip
3. press the terminal down until it clicks into place
Figure 24. Clipping the terminal into carrying case
public 25
om_yxm_accessories.fm document release 1.1 last updated 30/9/15
YOXIMO owner manual
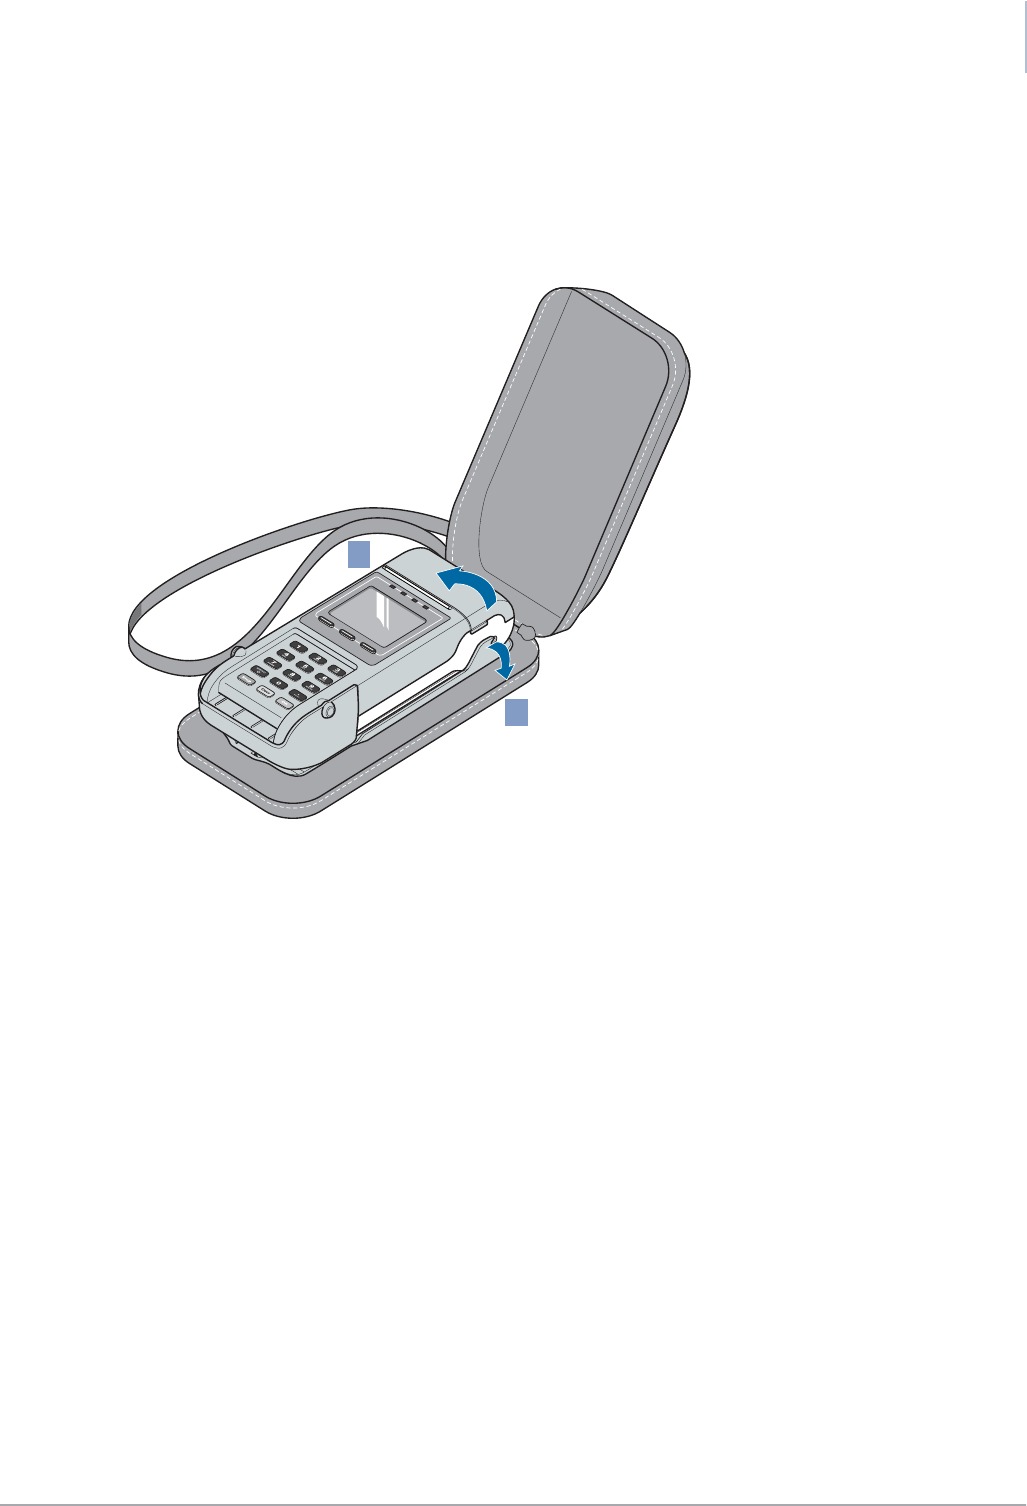
Taking the terminal out of the case
1. push open the right-hand tab at the back of the clip with your thumb
2. lift the terminal out of the clip with your other hand
Figure 25. Removing YOXIMO from carrying case
1
2
YOXIMO owner manual
26 public
last updated 30/9/15 document release 1.1 om_yxm_accessories.fm
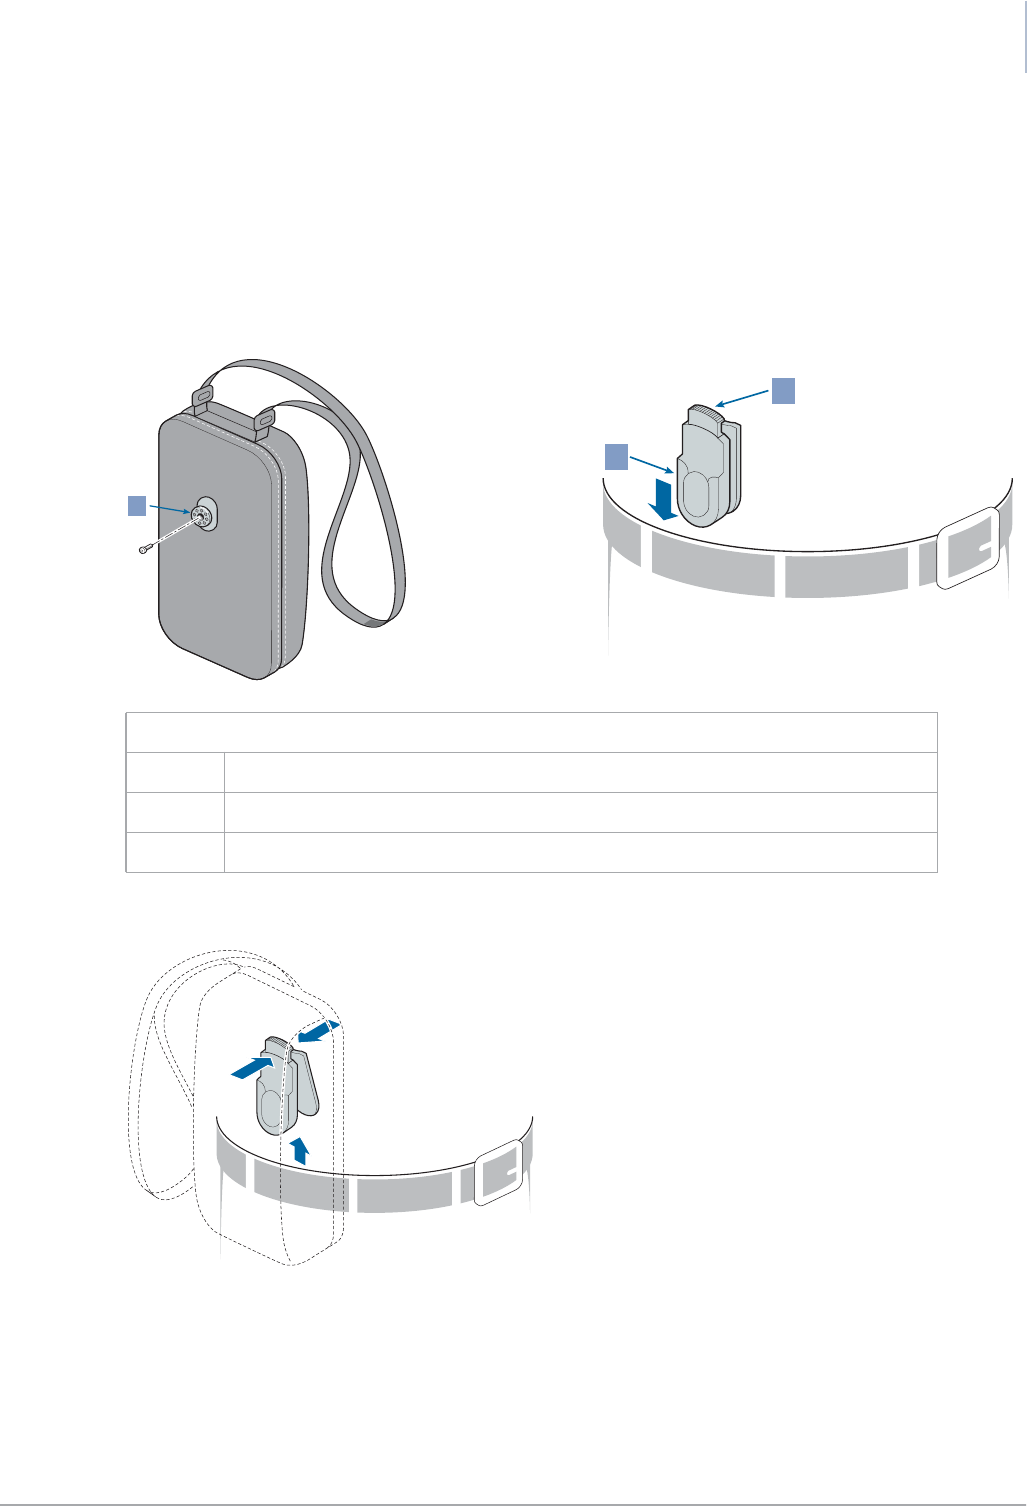
Shoulder-strap and belt-clip
The carrying case comes with both a shoulder-strap and a belt-clip. To use the belt-clip
1. screw the security stud on to the carrying case
2. slip the belt-clip over your belt: it includes a spring to keep it securely in place
3. slip the security stud into the belt-clip and wait for it to click into place
Pinch the belt-clip open before pulling it off your belt.
Figure 27. Opening the belt-clip
Figure 26. Security stud and belt-clip
1 security stud
2 belt-clip
3 release button – press to take carrying-case off belt-clip
2
3
1
public 27
om_yxm_accessories.fm document release 1.1 last updated 30/9/15
YOXIMO owner manual
Cradle
The optional cradle gives you a safe place to put the YOXIMO when you are not using it
immediately. It is ideal for use in vehicles and busy environments indoors. The cradle can also be
used to charge the YOXIMO.
The cradle can be:
•screwed to a wall or other vertical surface
•fixed to a horizontal surface using ruggedised Velcro tape
Without the drop protection attached, the cradle measures 178 mm long x 120 mm wide x 47 mm
high and weighs 120 g.
Without the drop protection attached, the cradle measures 180 mm long x 120 mm wide x 70 mm
high, and weighs 145 g.
The YOXIMO cradle is available in dark grey (colour code ncs s6000-n). The drop protection has
the same colour.
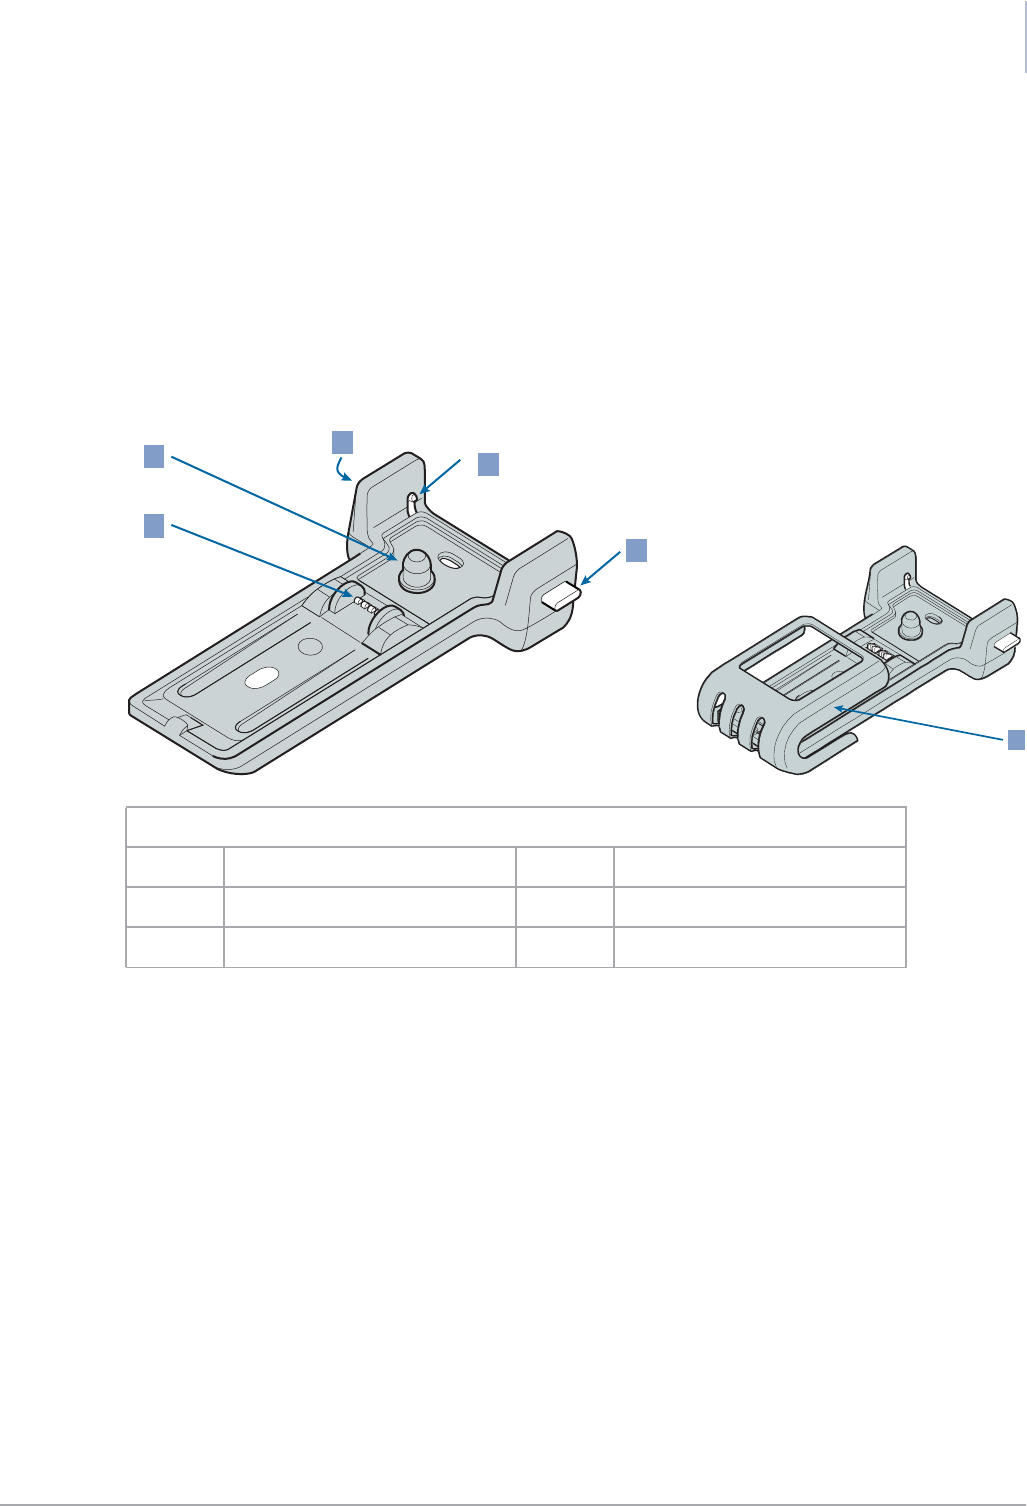
Figure 28. Cradle
1 release spring 4 retaining clip
2 power contacts 5 drop protection
3 release buttons
2
3
14
3
5

YOXIMO owner manual
28 public
last updated 30/9/15 document release 1.1 om_yxm_accessories.fm
Unpacking the cradle
1. Open the YOXIMO cradle package and check the contents.
The package should contain at least a YOXIMO cradle, a drop protection and two
mounting screws
If any of these is missing, contact your vendor immediately.
2. Inspect the package and its contents for damage.
If anything appears damaged, contact your shipping company immediately and notify
your vendor.
Save the box for repacking or moving your equipment in the future.
Selecting a location for the cradle
Select a convenient location for the YOXIMO cradle, where you can comfortably put the terminal
aside temporarily, charge the battery and possibly operate the terminal.You can install the cradle
on a countertop (horizontal) or on a wall or other vertical surface.
•avoid direct light sources as they can interfere with the readability of the display or the keypad
•make sure that the cables are not hindering you or your customer. always guide cables
through a strain relief
•circulation of air around the YOXIMO is not obstructed. if the YOXIMO terminal is not
freestanding, provide adequate ventilation.
•for quick and efficient results, charging should be performed between 0°C and 40°C
The cradle can also be installed in a vehicle.
•only qualified personnel should install the YOXIMO in a vehicle – faulty installation may
invalidate any warranty that applies to the unit
•do not attach the cradle to the floor of the vehicle, as vibrations and dust may disrupt its
operation
!
public 29
om_yxm_accessories.fm document release 1.1 last updated 30/9/15
YOXIMO owner manual
Fixing the cradle on a countertop or other horizontal surface
You can use the cradle simply by resting it on its four rubber feet. For stability, you can also screw
it to a flat surface.
Before fixing the cradle, make sure there will be enough space to:
•fold the privacy shield in and out
•insert a chip card in the chip-card reader
•slide a magstripe card through the magstripe-card reader
•open the printer cover and replace the paper
To fix the cradle to a flat surface:
1. make sure that the surface is stable
2. put the fixing screws through the oval holes
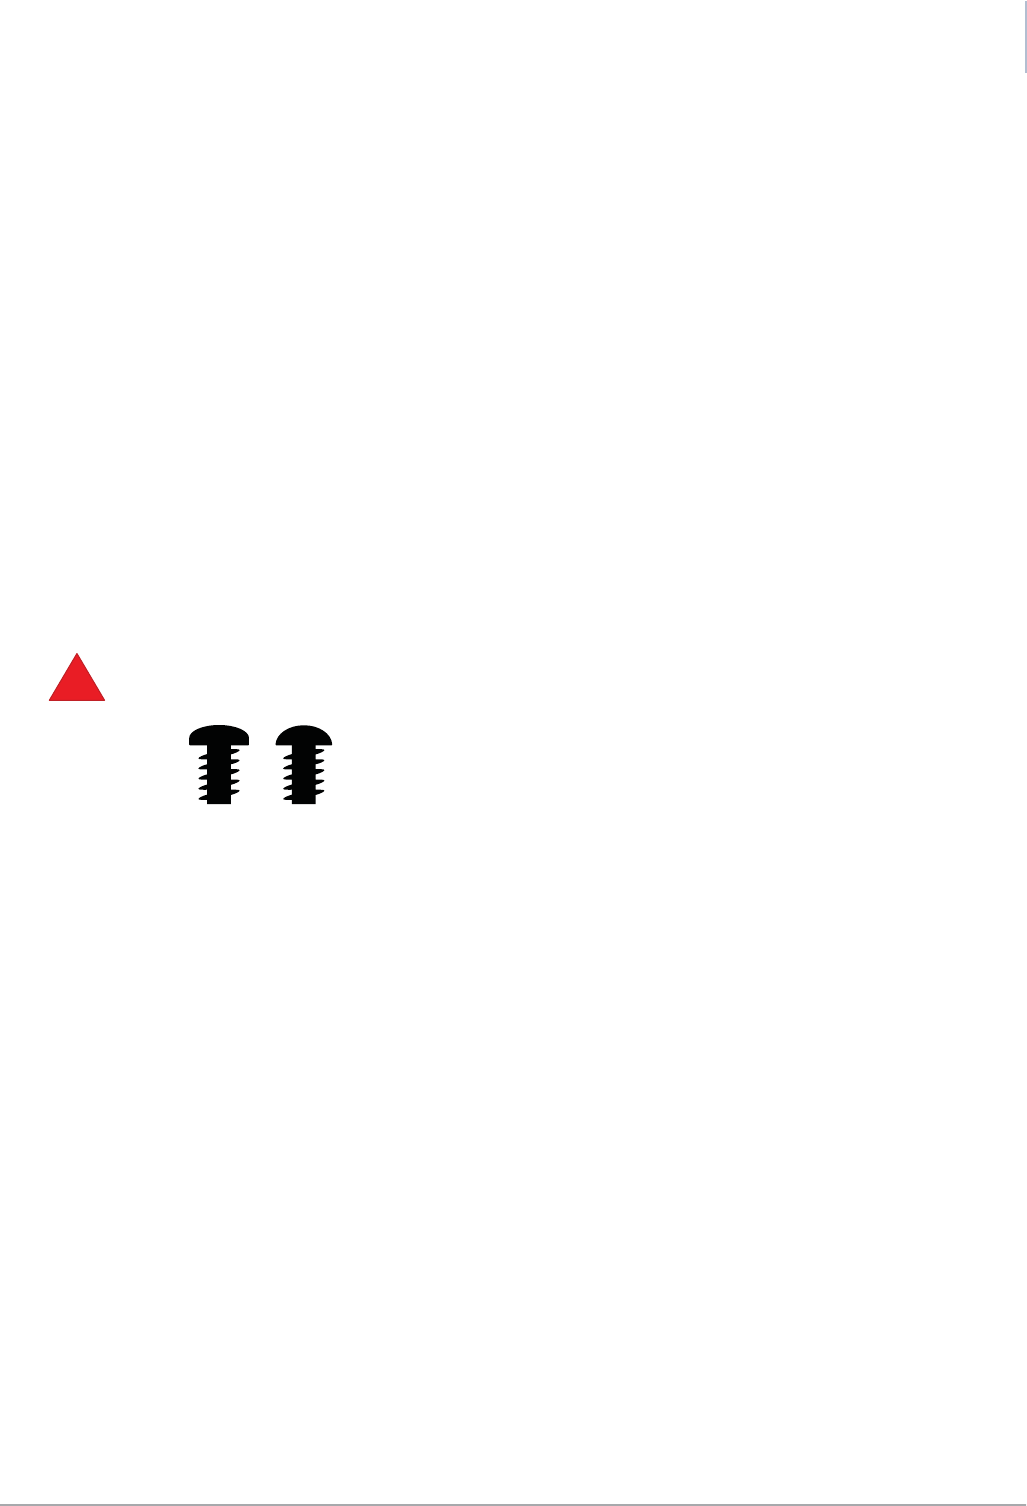
Fixing screws are not supplied with the cradle. Use screws appropriate for the surface,
and with a maximum diameter of 4.5 mm
Always use two screws to attach the cradle firmly. We recommend screws with a domed
or pan head, as shown.
When you are ready to use the cradle, attach the power cable as described under Powering the
cradle, on page 32
!
YOXIMO owner manual
30 public
last updated 30/9/15 document release 1.1 om_yxm_accessories.fm
Fixing the cradle on a wall or other vertical surface
For convenience, you can also mount the cradle vertically. If you do this, you are advised to fit the
drop protection before you screw the cradle to the wall. Note that the card interfaces are not
accessible when the terminal is in a cradle with drop protection fitted.
Always fit the drop protection when the cradle is mounted vertically. This will prevent the terminal
from falling if it is not positioned correctly on the cradle. The drop protection is supplied as
standard, and can easily be screwed on to the cradle.
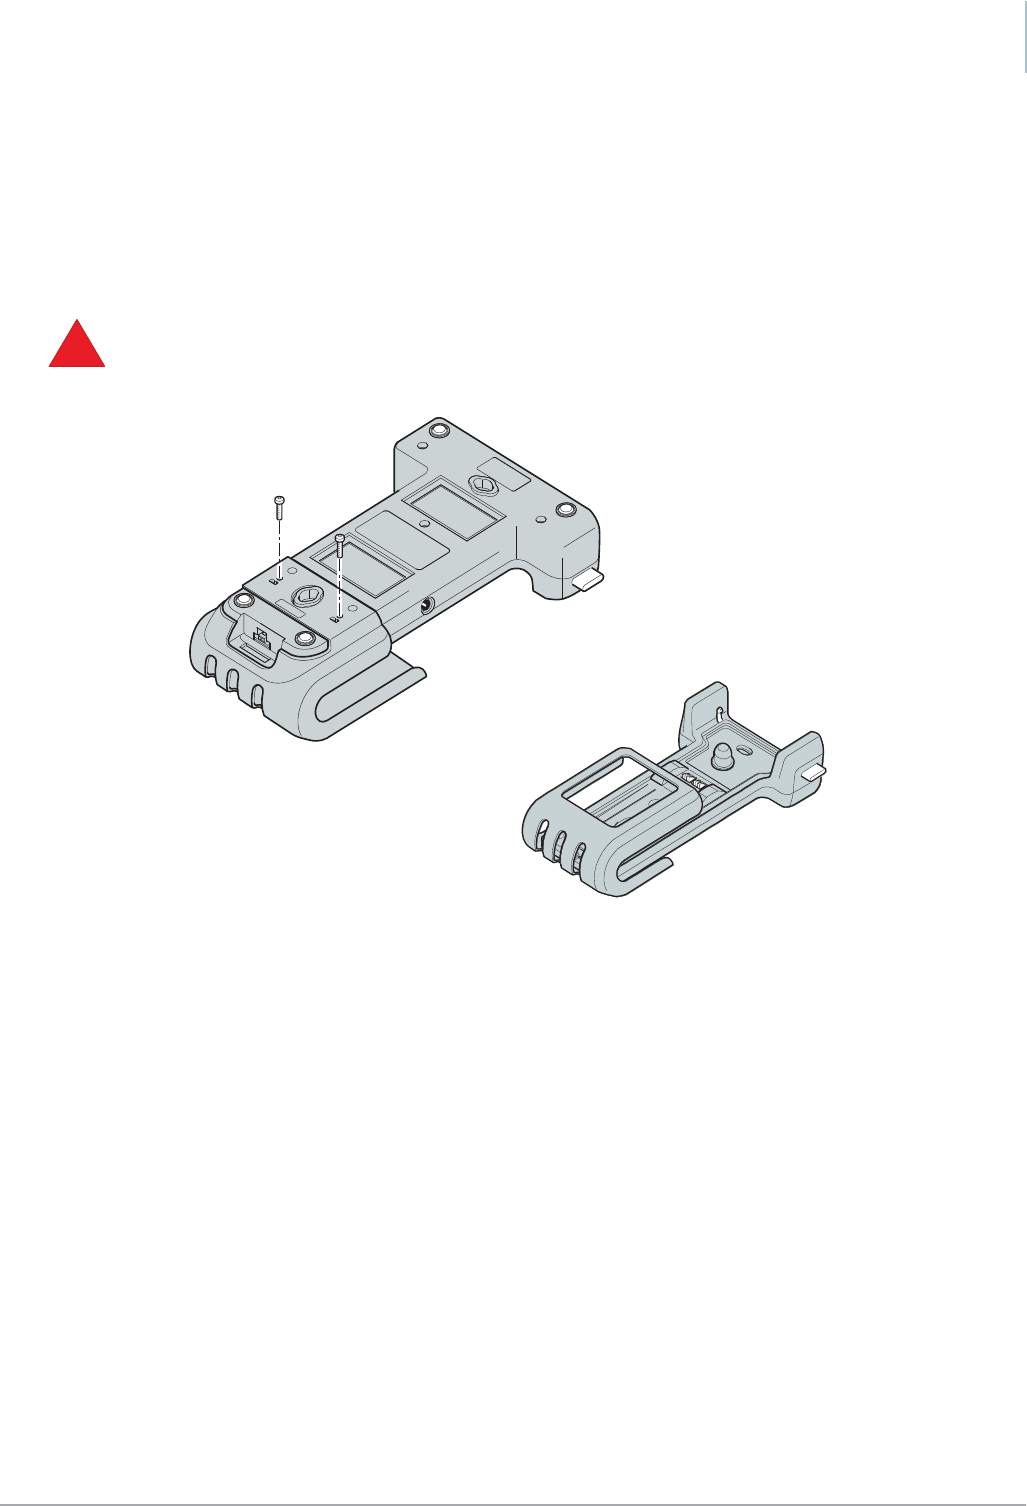
Figure 29. Mounting the drop protection on to the cradle
1. Fit the cradle in the drop protection, using the two screws supplied.
Use a torx T8 screwdriver to screw the drop protection on to the cradle.
2. After fitting the drop protection to the cradle, fix the cradle to the flat surface as described
under Fixing the cradle on a countertop or other horizontal surface, on page 29.
!
public 31
om_yxm_accessories.fm document release 1.1 last updated 30/9/15
YOXIMO owner manual
Placing the terminal on the cradle
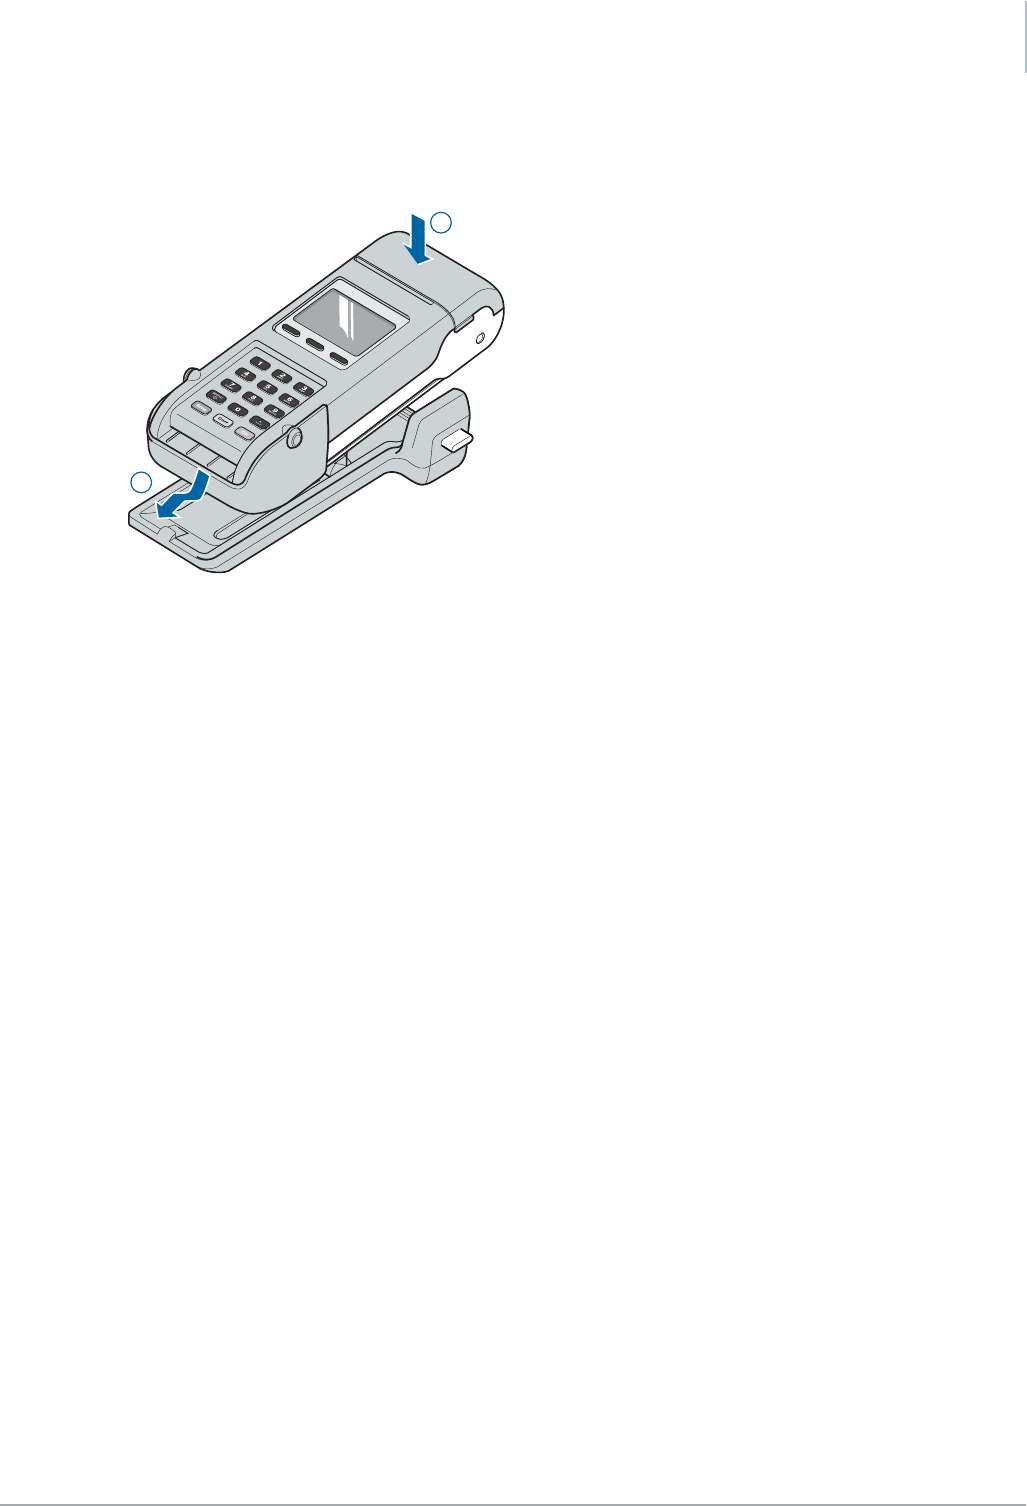
Figure 30. Placing YOXIMO on its cradle
To place the YOXIMO on its cradle:
1. Position the lower end of the YOXIMO on its cradle and make sure it engages with the catch.
2. Press the YOXIMO down, until you hear a click.
When the cradle is powered and the YOXIMO is correctly connected, the YOXIMO
display lights up.
2
1
YOXIMO owner manual
32 public
last updated 30/9/15 document release 1.1 om_yxm_accessories.fm
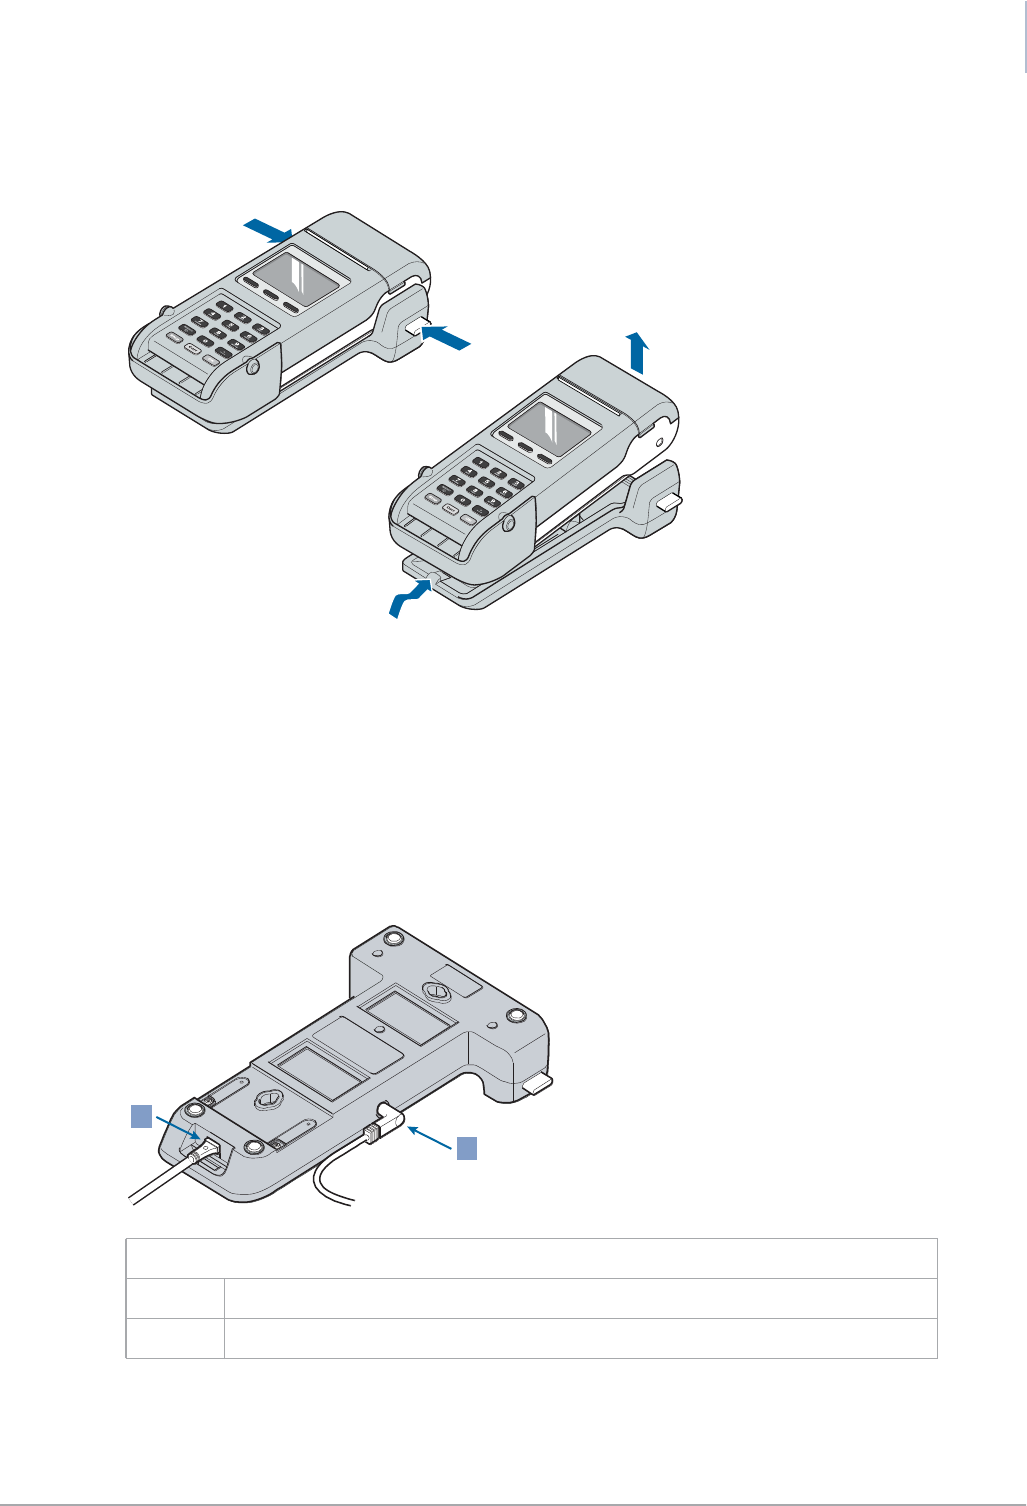
Removing the terminal from the cradle
Figure 31. Removing YOXIMO from its cradle
To remove the YOXIMO from its cradle, put your hand over the YOXIMO and press the two release
buttons on the cradle. A spring on the cradle makes sure that the YOXIMO is released.
Powering the cradle
There are different sockets for the power cable from a mains adaptor and the power cable (hard-
wired or from the cigarette lighter) in a vehicle.
Figure 32. Power inputs on the cradle
1 vehicle power ((hard-wired or from the cigarette lighter)
2 external power cable from mains adaptor
1
2
public 33
om_yxm_accessories.fm document release 1.1 last updated 30/9/15
YOXIMO owner manual
Indoors
Only use the power adaptor that is supplied with your YOXIMO terminal.
1. Plug the power cable from the mains adaptor into the socket on the side of the cradle.
2. Connect the mains adaptor to a wall socket.
3. Put the YOXIMO on its cradle as described in Placing the terminal on the cradle, on page 31,
and wait for the YOXIMO keypad backlight and display to light up.
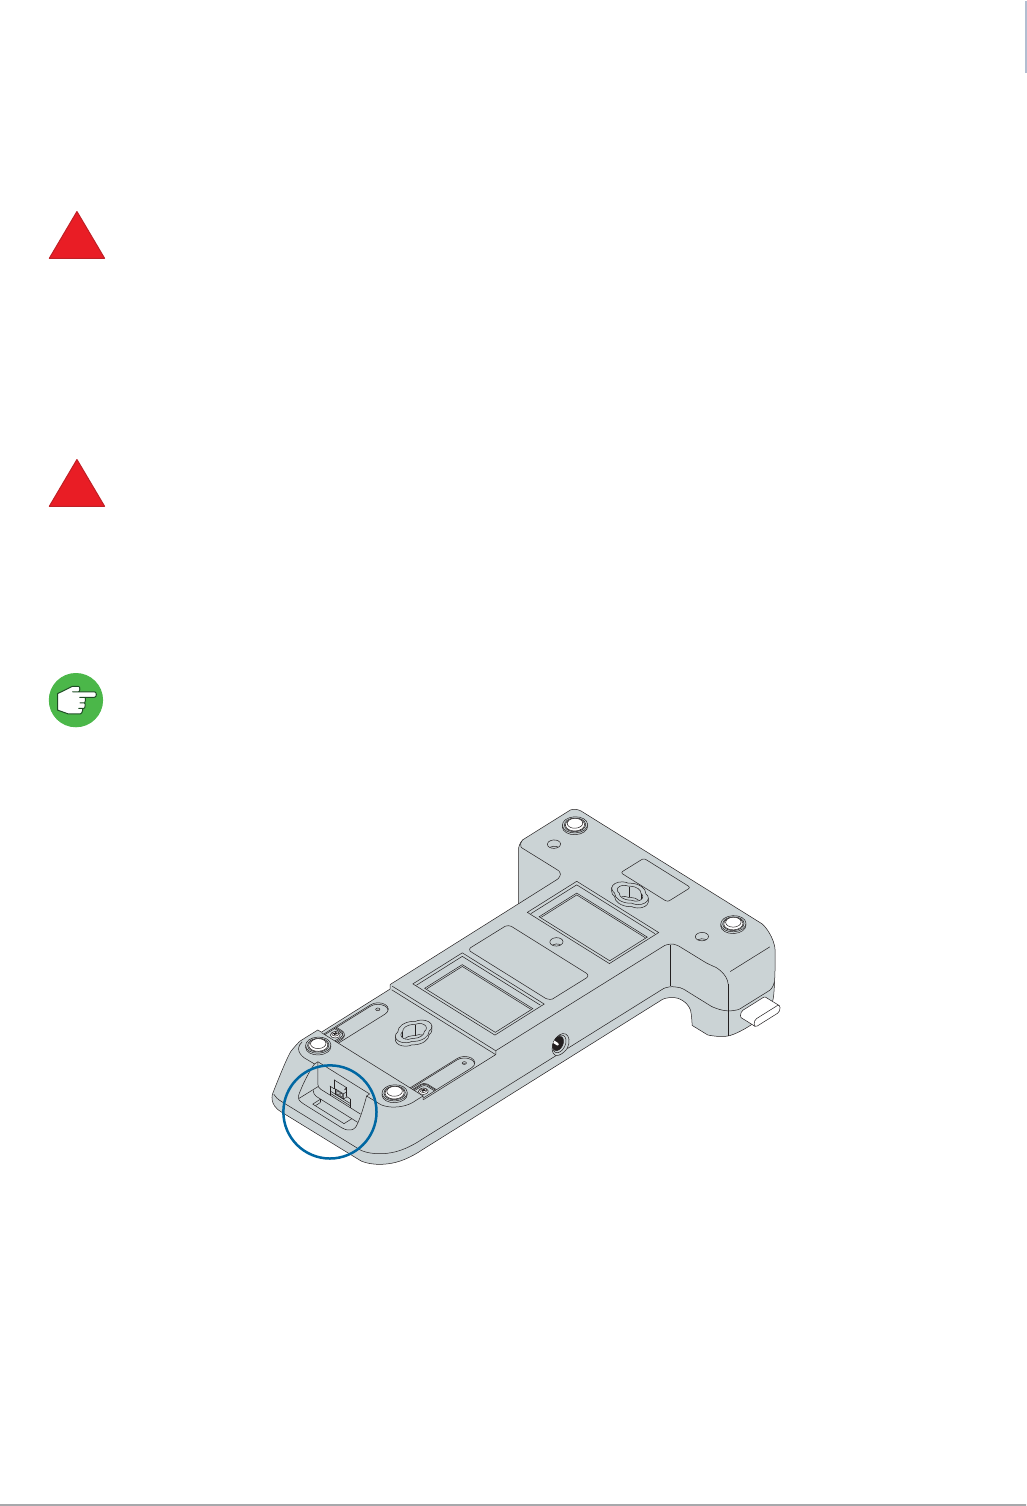
In a vehicle
•Only qualified personnel should install the YOXIMO in a vehicle. Faulty installation may
invalidate any warranty that applies to the unit.
•Only use the vehicle power cable that is supplied by your vendor.
In a vehicle, a power cable for direct wiring or with cigarette lighter plug is connected to the cradle.
The cradle transforms the car or truck voltage to the 12 VDC needed to charge the battery in the
YOXIMO terminal.
For more information, see Vehicle power cable, on page 22.
The straight car power cable for direct wiring has a length of 2 m. The coiled cable with a cigarette
lighter plug has a length of 0.60 m, and can be extended to 2.35 m. Worldline can supply these
cables.
Figure 33. Vehicle power cable socket
1. Take the appropriate vehicle power cable.
2. Plug it into the connector underneath the front of the YOXIMO cradle.
3. Connect the power cable to the vehicle‘s electrical system (12 or 24 VDC) directly, or use the
cigarette lighter plug.
4. Put the YOXIMO on its cradle as described in Placing the terminal on the cradle, on page 31,
and wait for the YOXIMO keypad backlight and display to light up.
!
!

YOXIMO owner manual
34 public
last updated 30/9/15 document release 1.1 om_yxm_accessories.fm
Disconnecting the vehicle power cable
To unplug the vehicle power cable from the cradle, push the release clip on the connector down
firmly and pull the cable.

public 35
om_yxm_maintenance.fm document release 1.1 last updated 30/9/15
Maintaining the YOXIMO
For optimal functioning of the YOXIMO terminal and cradle, clean them regularly.
•do not immerse the products in water, or use a lot of water while cleaning
•do not let dirt enter the card readers
•do not use detergents, solvents, alcohol or abrasive products
These products may damage surfaces and make transparent parts opaque
Cleaning the terminal
1. Disconnect the power adaptor from your YOXIMO terminal or remove the terminal from its
cradle.
2. Remove the battery.
3. Clean the display, the keypad and the terminal housing with a soft damp cloth.
Cleaning the card reader
Clean the card readers for chip cards and magstripe cards with a cleaning card, following the
instructions in the cleaning-card kit.
We suggest cleaning the card readers every two weeks. Contact your vendor for additional
information about cleaning cards.
Cleaning the cradle
1. Disconnect the power adaptor from the cradle.
2. Clean the cradle with a soft damp cloth.
Cleaning the carrying case
Clean the carrying case with a soft damp cloth.
!

YOXIMO owner manual
36 empty for double-sided printing
om_yxm_maintenance.fm

public 37
om_yxm_safety.fm document release 1.1 last updated 30/9/15
Safety information
Worldline declines any liability if the instructions and precautions contained in this manual are not
observed.
Certification
CE
Worldline declares that the YOXIMO mobile payment terminal complies with relevant EU
directives.
The declaration of conformity (DoC) can be consulted on the Worldline website.
FCC
This equipment has been tested and found to comply with the limits for a Class A digital
device, pursuant to Part 15 of the FCC Rules.
Other regions
Contact your vendor for safety information on regions outside the EU and the US.
Safety recommendations
Electrical installations
The YOXIMO operates safely when used according to its marked electrical ratings and product
usage instructions. To ensure the safe operation of the YOXIMO, use it only in premises that have
electrical installations in compliance with local and regional office and residential electrical wiring
codes.
Operating the YOXIMO
•The YOXIMO is a payment terminal and is not to be used for any other purposes. Keep the
YOXIMO and its cradle away from heat, fire, cold, moisture or oil, electricity, radiation, water,
humidity, shocks, vibrations, chemicals or any other product that may affect electronic
devices. The YOXIMO terminal and the cradle should not be kept in refrigerators, defrosting
systems, microwaves, or treated with a hairdryer or any high pressure cleaning equipment.
•Do not drop the YOXIMO terminal or cradle, throw it or slam it; do not put any heavy
equipment on top of it or squeeze it. Do not store it with food or any consumable goods. Do
not store it with explosive substances such as lighter fuel, petrol, ether or the like.
!

public 38
om_yxm_safety.fm document release 1.1 last updated 30/9/15
YOXIMO owner manual
•Do not operate the YOXIMO while driving a vehicle. Always secure the terminal in its cradle;
do not place it on the passenger seat or anywhere it can come loose in a collision or sudden
stop. Do not place it in the area over the air bag or in the air bag deployment area.
•Before using the YOXIMO in a vehicle powered by liquefied petroleum gas (LPG), ensure that
the vehicle complies with the relevant fire and safety regulations.
•Handle your YOXIMO with care: there is no warranty against breakage.
•Your YOXIMO is equipped with a WiFi/Bluetooth interface operating in the 2.4 GHz spectrum.
Various other electronic devices in a home, such as cordless phones, garage door openers,
baby intercoms, and microwave ovens, may use the same frequency range. Any such device
can interfere with a WiFi home network, slowing down its performance or breaking network
connections.
•Your YOXIMO may be equipped with a GSM/GPRS interface that uses low power radio
frequencies (RF) for its communication. Most electronic equipment, for example in hospitals
and motor vehicles, are shielded from radio frequencies. Beware, however, that radio
frequencies might affect damaged or improperly shielded equipment. Always switch your
YOXIMO off in areas that instruct you to, for example when entering health care facilities or
when boarding an aircraft.
•YOXIMO is a battery-operated device; only use the battery that is supplied with your
YOXIMO.
•Use the battery only for its intended purpose. Keep the battery out of reach of children. The
battery may explode if damaged or exposed to fire or high temperatures.
Do not dismantle or short-circuit the battery. Accidental short-circuiting can occur when
a metallic object causes direct connection between battery contacts. This might happen
when carrying a spare battery in your pocket together with for example a coin, a clip, a
necklace, a hairpin.
Do not pierce the battery with nails, strike it with a hammer, step on it or otherwise subject
it to strong impacts or shocks. Do not solder directly onto the battery. Do not place the
battery in microwave ovens, high-pressure containers or on induction cooking plates.
Do not expose the battery to water or salt water, or allow the battery to get wet.
Immediately discontinue use of the battery if, while using, charging or storing, it emits an
unusual smell, feels hot, changes colour or shape, or appears abnormal in any way.
•Leaving the battery in cold or hot places, such as in a closed car in winter or summer
conditions, will reduce the capacity and lifetime of the battery. The best temperature for the
battery is between 15°C and 25°C.
•Only use the power adaptor that is supplied with your YOXIMO to charge the battery. Check
regularly that there is no overheating of the power adaptor.
•Disconnect the power adaptor when you want to clean the terminal housing or the display and
when the YOXIMO needs servicing or repair.
•Never use extension cables for the DC outlet of the power adaptor.

public 39
om_yxm_safety.fm document release 1.1 last updated 30/9/15
YOXIMO owner manual
•Impact, friction, temperature, humidity, light, and oil affect the coloring and storage
characteristic of thermal printer paper. Only load paper rolls that do not have folds, wrinkles,
tears, or holes. Do not pull paper out of the printer; this could damage the feed mechanism.
Only use Worldline-approved paper.
Opening the terminal
•Only open the YOXIMO terminal for adjustments that are described in this manual. Never
remove or open any part that is not described in this manual.
•When opening the YOXIMO terminal take the necessary precautions to avoid electrostatic
discharge (ESD). An electrostatic charge can build up on the human body and then be
discharged when you touch a circuit board. ESD can damage equipment and impair electrical
circuitry. To minimize the risk, always follow these guidelines when removing and replacing
SAM or SIM cards:
– Ground yourself while holding the YOXIMO and touching a metal surface on the
ground.
For example, if your computer has a metal case and is plugged into a standard
grounded outlet, then touching the case should discharge the ESD on your body
– Make sure not to wear any clothing that conducts a lot of electrical charge, such as
a woollen sweater
– Unless absolutely necessary, try not to work on the YOXIMO during a thunderstorm
– Remove all jewellery
Never open the cradle.
Servicing
All servicing other than the actions described in this manual must by performed by Worldline or an
approved service centre.
Disposing of the terminal and battery
When your YOXIMO is at the end of its life, return it to your vendor for disposal. The terminal
contains materials that have to be disposed of professionally.
Do not throw batteries away with the household waste: use an appropriate recycling channel or
return them to your vendor.
!

YOXIMO owner manual
40 empty for double-sided printing
om_yxm_safety.fm

public 41
om_yxm_techSpecs.fm document release 1.1 last updated 30/9/15
Technical specifications
For part numbers, refer to your vendor’s catalogue
item specification
product name YOXIMO
type mobile payment terminal
keypad backlit ergonomic keypad
display backlit 64k colour display, 44.64mm wide x 33.48mm high (2.2” diagonal), 320
pixels wide x 240 pixels high
card readers chip-card reader conforms to EMV 4.3 Level 1
triple-track magstripe-card reader conforms to ISO 1/2/3
NFC (contactless) reader conforms to EMV 4.3 Level 1
printer integrated thermal graphic printer, easy-paper-load mechanism, paper 58 mm
width and 10 m length
wireless
communication WiFi, IEEE 802.11 (standard) b/g/n
3G/GSM/GPRS worldwide (850-900-1800-1900-2100 MHz)
interface USB for connection to an ePOS (point of sales) terminal, a PC or as a peripheral
chip security
modules 2 SAM slots type ID 0
1 SIM slot (for GSM/GPRS/Edge/3G)
processing
capabilities 2 x 32 bit ARM™ processor cores
128 Mbytes RAM
128 Mbytes Flash memory
hardware cryptographic accelerators
power supply rechargeable Lithium-Ion battery, 1200 mAh @7.6 V
direct battery charging via power adaptor 220-240 VAC, 50 Hz or 100-120 VAC,
60 Hz
dimensions 190 mm long x 84 mm wide x 46 mm high
weight 380 g (including printer, paper roll and battery)
operating
conditions operating temperature -10°C to +50°C
operating humidity 20 % to 95 % RH non-condensing
environmental
compliance RoHS2 directive 2011/65/EU
WEEE directive 2002/96/EC
European directive 1907/2006/EC on Registration, Evaluation, Authorisation and
Restriction of Chemicals (REACH)
software full-featured Linux® operating system
Linux-based development kit (C and Java™
secured remote download of software

YOXIMO owner manual
42 public
last updated 30/9/15 document release 1.1 om_yxm_techSpecs.fm
approvals EMV 4.3 level 2 approved kernel for payment application development
PCI PED, CE and other country-specific standards (see vendor)
optional
accessories carrying case
cradle and drop protection
vehicle power cables
USB cable for connection to ePOS terminal
item specification