Wuerth Elektronik eiSos and Co KG AMB2561 Low Power Transceiver User Manual Handbuch AMB8420 AMB2520
AMBER Wireless GmbH Low Power Transceiver Handbuch AMB8420 AMB2520
UserManual.wiki
>
Wuerth Elektronik eiSos and Co KG
>
AMB2561 User Manual
User manual
Navigation menu
Upload a User Manual
Namespaces
Wiki Guide
HTML
PDF
Info
Views
User Manual
Discussion / Help
Navigation
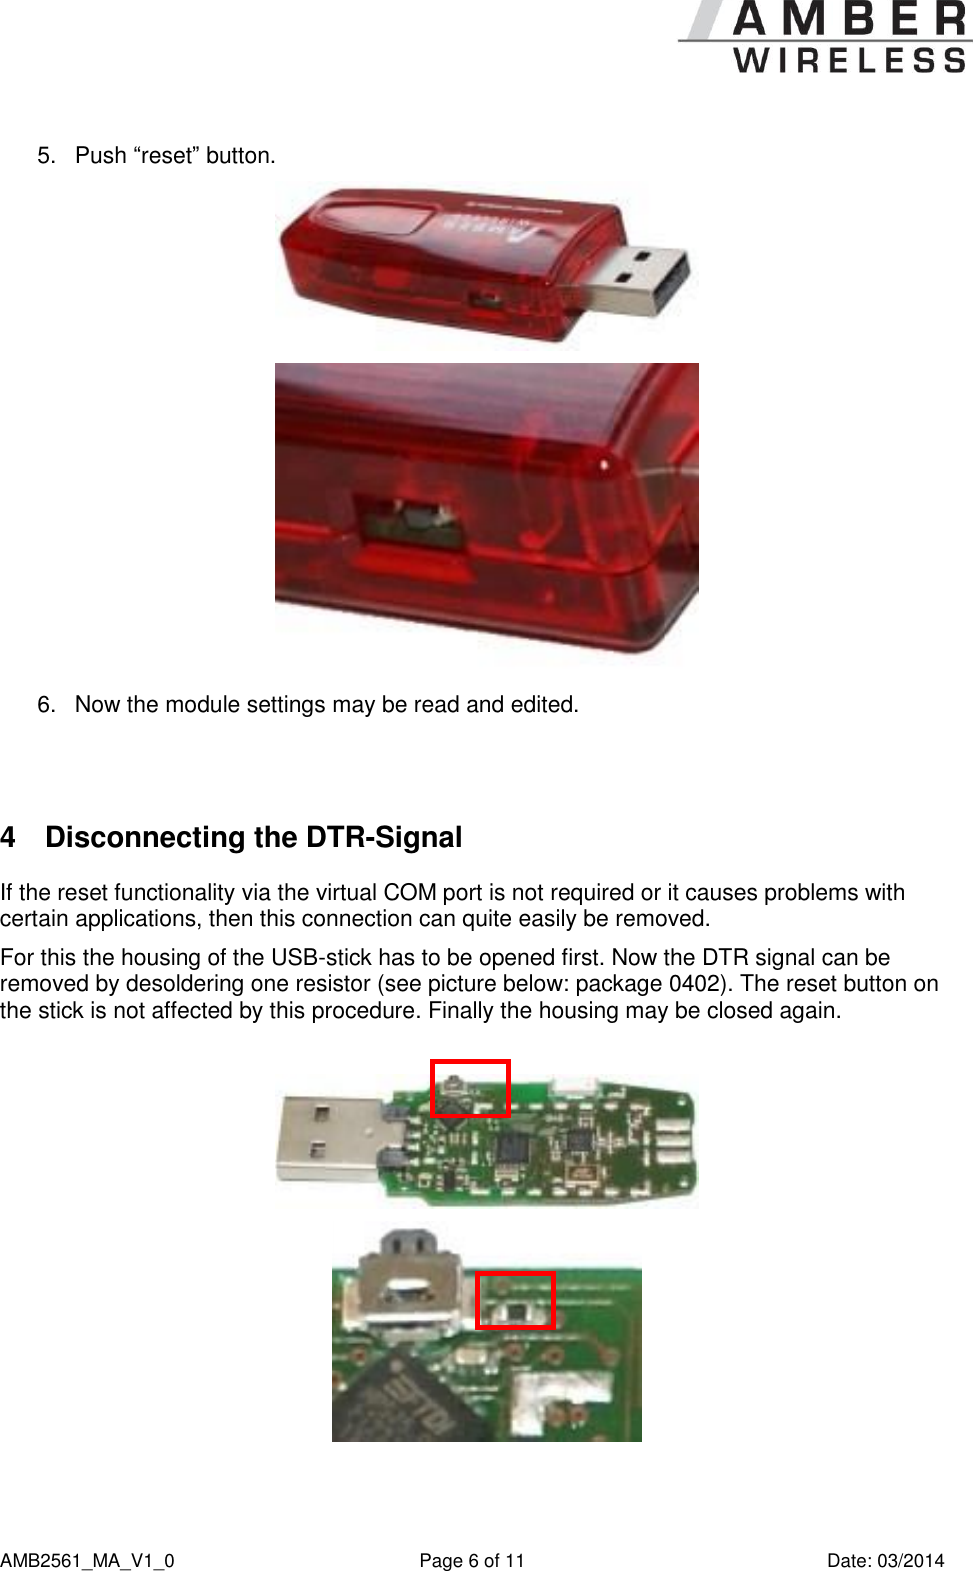
![AMB2561_MA_V1_0 Page 3 of 11 Date: 03/2014 1 Startup „Step-by-step“ 1. Driver Installation The first step of the startup procedure of the USB Stick is to install the driver for the virtual COM Port. Therefor the installation zip archive for the USB IC, namely the FT231XQ, first has to be downloaded from the manufacturer website (FTDI [5]). Afterwards the extraction and installation according to the displayed guidelines takes place until the installation has successfully finished. 2. Plug in the USB-stick Now the USB stick can be connected to a free USB slot on the pc, the red power LED lights up. Windows automatically identifies the connected device. A Windows routine for the allocation of the driver starts automatically. 3. Serial Port The driver now creates a virtual serial port on your system with the following default port settings: 38400 Baud, 8 data bits, no parity and 1 stop bit. 4. Using the stick Now the USB-Stick can be accessed via serial port as described in the AMB2520 manual [1]. 5. Demo program [2] By the use two USB Sticks with the same RF settings (e.g. in default channel 79 / 2440,0MHz) and the demo program, it is possible to conduct a range measurement. The Demo program uses the default settings of 38400 baud 8n1 on the COM interface. For the range measurement the demo program has to be started for each USB stick respectively (e.g. the first stick on a PC and the second Stick on a Laptop). The corresponding COM-Port has to be opened. If the sticks are operated in close proximity of each other it may occur that the receiver amplifiers are overdriven which could result in failure of communication. By clicking on the button “Toggle Mode” both modules are set into “Command Mode”. To start the signal strength measurement click on “Start RSSI test” on one of the demo programs. If the progress bar under the button “Start RSSI test” makes no further progress you can restart the measurement by a renewed click on “Start RSSI test”. The stick has an internal LED to signal incoming data.](https://usermanual.wiki/Wuerth-Elektronik-eiSos-and-Co-KG/AMB2561/User-Guide-2558185-Page-3.png)
![AMB2561_MA_V1_0 Page 4 of 11 Date: 03/2014 The detailed description of the configuration possibilities, operating modes, commands, etc. can be found in the manual [1]. A “high” level on the DTR line holds the module in reset state. Some terminal programs automatically set the DTR line to “high” when opening the COM port, which prevents normal operation of the stick. The signal level on the DTR line has to be set to “low”. 2 Using the USB-Stick with a terminal program Since not all terminal programs offer the possibility to configure the DTR line, it has to be mentioned that “Terminal.exe” is a program which does offer this necessary functionality. It can be downloaded free of charge from [3]. 2.1 Example Terminal.exe The program can be started directly after haven been downloaded and extracted onto your PC, without any further installation. In the upper left corner you can select the COM port (between COM1 and COM20). If the stick is assigned to a higher port number by Windows, you may follow the instructions under [4] to release COM ports that are not in use. Thereafter the remaining settings can be selected (38400 Baud, 8n1, no handshaking), and the COM port may be opened by clicking the “Connect” button. By clicking on the DTR LED (see red arrow) it is possible to switch the DTR line to “high” or to “low” (LED is gray). With DTR set to “low” the stick is now able to transmit the data which is entered in the “send” field at the bottom. The received data is displayed in the “Receive” field above.](https://usermanual.wiki/Wuerth-Elektronik-eiSos-and-Co-KG/AMB2561/User-Guide-2558185-Page-4.png)
![AMB2561_MA_V1_0 Page 5 of 11 Date: 03/2014 Terminal program 3 Using the configuration software “ACC” The configuration software AMBER Config Center, ACC, is available for registered users [6]. The connection process is shown below: 1. Connect the USB-Stick to a free slot on your PC. 2. Determine the associated COM-Port in the device manager. 3. Start the ACC software and enter the correct COM-Port. 4. Click on “Connect”. …](https://usermanual.wiki/Wuerth-Elektronik-eiSos-and-Co-KG/AMB2561/User-Guide-2558185-Page-5.png)
![AMB2561_MA_V1_0 Page 7 of 11 Date: 03/2014 5 References [1] Download “AMB8420_AMB2520_MA” on http://amber-wireless.de/files/amb8420_2520_ma.pdf (Stand 29.01.14) [2] Download “AMB8460 + AMB2560 Tools” http://amber-wireless.de/files/amb2560_amb8460_tools.zip (Stand 29.01.14) [3] https://sites.google.com/site/terminalbpp/ [4] Download “AN02_COM-PORT_loeschen” on http://amber-wireless.de/files/an02_com-port_loeschen.pdf (Stand 29.01.14) [5] Download on http://www.ftdichip.com/Drivers/VCP.htm (Date: 29.01.14) [6] Download “ACC Software” on http://amber-wireless.de/files/acc.zip (Date: 29.01.14)](https://usermanual.wiki/Wuerth-Elektronik-eiSos-and-Co-KG/AMB2561/User-Guide-2558185-Page-7.png)