Wyse Technology WT3720 User Manual
Wyse Technology Users Manual
Users Manual

Winterm 3000 Series Windows®-based Terminal
Reference Guide

Winterm 3000 Series
Windows®-based Terminal
Reference Guide
883590-08 Rev. A
August 1999
Wyse Technology Inc.
3471 North First Street
San Jose, CA 95134-1803
ii
Copyright Notice
© 1999 ALL RIGHTS RESERVED.
This manual and the software and firmware described in it are copyrighted. You
may not reproduce, transmit, transcribe, store in a retrieval system, or translate into
any language or computer language, in any form or by any means, electronic,
mechanical, magnetic, optical, chemical, manual or otherwise, any part of this
publication without express written permission.
Trademarks
WYSE is a registered trademark and Winterm is a trademark of Wyse Technology
Inc.
ICA 3 is a registered trademark and MetaFrame is a trademark of Citrix Systems
Inc.
Microsoft and Windows are registered trademarks of Microsoft Corporation.
All other products are trademarks and/or registered trademarks of their respective
companies.
The Energy Star emblem does not represent endorsement of any product or
service.
Specifications subject to change without notice.
Restricted Rights Legend
Use, duplication, or disclosure by the Government is subject to restrictions as set
forth in subparagraph (c)(1)(ii) of the Rights in Technical Data and Computer
Software clause at 252.227-7013.
Ordering Information
For availability, pricing, and ordering information in the United States and Canada,
call 1-800-GET-WYSE (1-800-438-9973). In all other countries, contact your sales
representative.
Wyse Technology Inc.
3471 North First Street
San Jose, CA 95134-1803 U.S.A.

iii
FCC Statement
This equipment has been tested and found to comply with the limits for either Class
A or Class B digital devices (refer to “Terminal Requirements Compliance”),
pursuant to Part15 of the FCC Rules. These limits are designed to provide
reasonable protection against harmful interference in a residential installation. This
equipment generates, uses, and can radiate radio frequency energy and, if not
installed and used in accordance with the instructions, may cause harmful
interference to radio communications. However, there is no guarantee that
interference will not occur in a particular installation. If this equipment does cause
harmful interference to radio or television reception, which can be determined by
turning the equipment off and on, the user is encouraged to try to correct the
interference by one or more of the following measures:
• Reorient or relocate the receiving antenna.
• Increase the separation between the equipment and the receiver.
• Connect the equipment to an outlet on a circuit different from that to which the
receiver is connected.
• Consult the dealer or an experienced radio/TV technician for help.
Caution
Changes or modifications not covered in this manual
must be approved in writing by the manufacturer’s
Regulatory Engineering department. Changes or
modifications made without written approval may void
the user’s authority to operate the equipment.
Terminal Requirements Compliance
Models 3315SE, 3320SE, 3350SE, 3515SE, 3715SE, and 3720SE terminals meet
Class B requirements.
iv
Canadian DOC Notices
Refer to the previous section, “Terminal Requirements Compliance,” to find out
what model terminal each of the statements below refers to.
Class A
This digital apparatus does not exceed the Class A limits for radio noise emissions
from digital apparatus set out in the Radio Interference Regulations of the
Canadian Department of Communications.
Le présent appareil numérique n’émet pas de bruits radioélectriques dépassant les
limites applicables aux appareils numériques de la classe A prescrites dans le
Réglement sur le brouillage radioélectrique édicté par le Ministère des
Communications du Canada.
Class B
This digital apparatus does not exceed the Class B limits for radio noise emissions
from digital apparatus set out in the Radio Interference Regulations of the
Canadian Department of Communications.
Le présent appareil numérique n’émet pas de bruits radioélectriques dépassant les
limites applicables aux appareils numériques de la classe B prescrites dans le
Réglement sur le brouillage radioélectrique édicté par le Ministère des
Communications du Canada.
IEC/EN Notice
This product conforms to the requirements of IEC950 and EN60950.
This product conforms to requirements of EN55022 for Class A equipment or
EN55022 for Class B equipment (refer to “Terminal Requirements Compliance”).
Cable Notice
The use of shielded I/O cables is required when connecting this equipment to any
and all optional peripheral or host devices. Failure to do so may cause interference
and violate FCC and international regulations for electromagnetic interference.
v
Control No. 075B
License Agreement
YOU SHOULD CAREFULLY READ THE FOLLOWING TERMS AND
CONDITIONS BEFORE USING THIS EQUIPMENT WHICH CONTAINS
SOFTWARE IN A NON-VOLATILE FORMAT AND CERTAIN OTHER
INTELLECTUAL PROPERTY (HEREAFTER “FIRMWARE”). USING THIS
EQUIPMENT INDICATES YOUR ACCEPTANCE OF THE FOLLOWING TERMS
AND CONDITIONS.
Grant
You may use the Firmware in or in conjunction with the Equipment as provided to
You. You may transfer ownership of the Equipment, including the right to use the
Firmware to another party so long as that party agrees to accept these terms and
conditions.
YOU MAY NOT USE, COPY, MODIFY, TRANSLATE OR TRANSFER THE
FIRMWARE, OR MODIFICATION THEREOF, IN WHOLE OR IN PART, EXCEPT
AS EXPRESSLY PROVIDED FOR IN THIS LICENSE. YOU MAY NOT
DECOMPILE, REVERSE ENGINEER OR OTHERWISE DECODE OR ALTER
THE SOFTWARE CONTAINED IN THE FIRMWARE.
Limited Software Warranty and Disclaimer
WYSE warrants that, for a period of ninety (90) days from the date of shipment, the
Firmware will, under normal use, be free from defects in materials and
workmanship in the EPROM (or similar storage device). The foregoing warranty
shall not apply to any Firmware which has been used in violation of this Agreement.
During this limited warranty period WYSE will provide support by phone on a
best-efforts basis. WYSE may, in addition to the above, replace any defective
Firmware with a functionally equivalent product. The foregoing shall be Your
exclusive remedy for any breach of warranty hereunder. You assume responsibility
for choosing the Equipment containing the Firmware to achieve your intended
results, and for the installation, use and results obtained from the Equipment and
Firmware.
EXCEPT FOR THE ABOVE EXPRESS LIMITED WARRANTIES, WYSE MAKES
AND YOU RECEIVE NO WARRANTIES ON THE FIRMWARE, EXPRESS,
IMPLIED, OR STATUTORY, OR IN ANY OTHER PROVISION OF THIS
AGREEMENT OR COMMUNICATION WITH YOU, AND WYSE DISCLAIMS ANY
IMPLIED WARRANTIES OF MERCHANTABILITY, NON-INFRINGEMENT AND
FITNESS FOR ANY PARTICULAR PURPOSE. WYSE DOES NOT WARRANT
vi
THAT THE FUNCTIONS CONTAINED IN THE PRODUCT WILL MEET YOUR
REQUIREMENTS OR THAT THE OPERATION WILL BE UNINTERRUPTED OR
ERROR FREE.
SOME STATES DO NOT ALLOW LIMITATIONS ON HOW LONG AN IMPLIED
WARRANTY LASTS SO THE ABOVE LIMITATION MAY NOT APPLY TO YOU.
THIS WARRANTY GIVES YOU SPECIFIC LEGAL RIGHTS. YOU MAY ALSO
HAVE OTHER RIGHTS WHICH VARY FROM STATE TO STATE.
Limit of Liability
UNDER NO CIRCUMSTANCES SHALL WYSE BE LIABLE FOR LOSS OF DATA,
COST OF COVER, OR ANY INCIDENTAL OR CONSEQUENTIAL DAMAGES,
HOWEVER CAUSED AND ON ANY THEORY OF LIABILITY. THESE
LIMITATIONS SHALL APPLY EVEN IF WYSE OR ITS RESELLER HAS BEEN
ADVISED OF THE POSSIBILITY OF SUCH DAMAGES, AND
NOTWITHSTANDING ANY FAILURE OF ESSENTIAL PURPOSE OF ANY
LIMITED REMEDY PROVIDED HEREIN.
YOU AGREE THAT THESE ARE THE ONLY APPLICABLE TERMS OF
AGREEMENT BETWEEN US COVERING FIRMWARE AND THAT THEY
SUPERSEDE ANY OTHER COMMUNICATIONS (ORAL OR WRITTEN)
BETWEEN US RELATING TO THE FIRMWARE.
U.S. Government Restricted Rights
The Firmware is provided with RESTRICTED RIGHTS. Use, duplication or
disclosure by the Government is subject to restrictions as set forth in subparagraph
(c)(1)(ii) of the Rights in Technological Data and computer software clause at
DFARS 252.227-7013 or in subparagraphs (c)(1) and (2) of the Commercial
Computer Software-Restricted Rights at 8 C.F.R. 52-227-19 as applicable.
Contractor/Licensor is WYSE Technology Inc.
vii
EULA for Microsoft® Windows® CE Operating System for
Windows-based Terminal Devices
IMPORTANT—READ CAREFULLY
This End User License Agreement (EULA) is a legal agreement between you
(either an individual or a single entity) and the manufacturer
(MANUFACTURER) of the special purpose computing device (SYSTEM) you
acquired which includes certain Microsoft software product(s) installed on
the SYSTEM and/or included in the SYSTEM package (SOFTWARE). The
SOFTWARE includes computer software, the associated media, any printed
materials, and any online or electronic documentation. By installing, copying
or otherwise using the SOFTWARE, you agree to be bound by the terms of
this EULA. If you do not agree to the terms of this EULA, MANUFACTURER
and Microsoft Licensing, Inc. (MS) are unwilling to license the SOFTWARE to
you. In such event, you may not use or copy the SOFTWARE, and you should
promptly contact MANUFACTURER for instructions on return of the unused
product(s) for a refund.
Software License
The SOFTWARE is protected by copyright laws and international copyright
treaties, as well as other intellectual property laws and treaties. The SOFTWARE is
licensed, not sold.
1. Grant of License
SOFTWARE includes software already installed on the SYSTEM (SYSTEM
SOFTWARE) and, if included in the SYSTEM package, software contained on the
CD-ROM disk and/or floppy disk(s) labeled “Desktop Software for Microsoft
Windows CE” (DESKTOP SOFTWARE). This EULA grants you the following rights
to the SOFTWARE:
•SYSTEM SOFTWARE
You may use the SYSTEM SOFTWARE only as installed in the SYSTEM.
•DESKTOP SOFTWARE
DESKTOP SOFTWARE might not be included with your SYSTEM. If DESKTOP
SOFTWARE is included with your SYSTEM, you may install and use the
component(s) of the DESKTOP SOFTWARE in accordance with the terms of
the end user license agreement provided with such component(s). In the
absence of a separate end user license agreement for particular component(s)
of the DESKTOP SOFTWARE, you may install and use only one (1) copy of
such component(s) on a single computer with which you use the SYSTEM.
viii
•Use of Windows CE Operating System for Windows-based Terminal
Devices with Microsoft Windows NT Server, Terminal Server Edition
If the SOFTWARE is Windows CE operating system for Windows-based
Terminal devices, the following special provisions apply. In order to use the
SYSTEM in connection with Windows NT Server, Terminal Server Edition, you
must possess (1) a Client Access License for Windows NT Server, Terminal
Server Edition and (2) an end user license for Windows NT Workstation or an
end user license agreement for Windows NT Workstation for Windows-based
Terminal Devices (please refer to the end user license agreement for Windows
NT Server, Terminal Server Edition for additional information).
MANUFACTURER may have included a Certificate of Authenticity for Windows
NT Workstation for Windows-based Terminal Devices with the SYSTEM. In that
case, this EULA constitutes an end user license for the version of Windows NT
Workstation for Windows-based Terminal Devices indicated on such Certificate
of Authenticity.
•Back-up Copy
If MANUFACTURER has not included a back-up copy of the SYSTEM
SOFTWARE with the SYSTEM, you may make a single back-up copy of the
SYSTEM SOFTWARE. You may use the back-up copy solely for archival
purposes.
2. Description of Other Rights and Limitations
•Speech/Handwriting Recognition
If the SYSTEM SOFTWARE includes speech and/or handwriting recognition
component(s), you should understand that speech and handwriting recognition
are inherently statistical processes; that recognition errors are inherent in the
processes; that it is your responsibility to provide for handling such errors and to
monitor the recognition processes and correct any errors. Neither
MANUFACTURER nor its suppliers shall be liable for any damages arising out
of errors in the speech and handwriting recognition processes.
•Limitations on Reverse Engineering, Decompilation and Disassembly
You may not reverse engineer, decompile, or disassemble the SYSTEM
SOFTWARE, except and only to the extent that such activity is expressly
permitted by applicable law notwithstanding this limitation.
•Single SYSTEM
The SYSTEM SOFTWARE is licensed with the SYSTEM as a single integrated
product. The SYSTEM SOFTWARE installed in Read Only Memory (ROM) of
the SYSTEM may only be used as part of the SYSTEM.
ix
•Single EULA
The package for the SYSTEM SOFTWARE may contain multiple versions of
this EULA, such as multiple translations and/or multiple media versions (e.g., in
the user documentation and in the software). Even if you receive multiple
versions of the EULA, you are licensed to use only one (1) copy of the SYSTEM
SOFTWARE.
•Rental
You may not rent or lease the SOFTWARE.
•Software Transfer
You may permanently transfer all of your rights under this EULA only as part of
a sale or transfer of the SYSTEM, provided you retain no copies, you transfer all
of the SOFTWARE (including all component parts, the media, any upgrades or
backup copies, this EULA and, if applicable, the Certificate(s) of Authenticity),
and the recipient agrees to the terms of this EULA. If the SOFTWARE is an
upgrade, any transfer must include all prior versions of the SOFTWARE.
•Termination
Without prejudice to any other rights, MANUFACTURER or MS may terminate
this EULA if you fail to comply with the terms and conditions of this EULA. In
such event, you must destroy all copies of the SOFTWARE and all of its
component parts.
3. Upgrades
If the SYSTEM SOFTWARE and this EULA are provided separate from the
SYSTEM by MANUFACTURER and the SYSTEM SOFTWARE is on a ROM chip,
CD ROM disk(s) or floppy disk(s), and labeled “For ROM Upgrade Purposes Only”
(“ROM Upgrade”), you may install one copy of the ROM Upgrade onto the
SYSTEM as a replacement copy for the SYSTEM SOFTWARE originally installed
on the SYSTEM and use it in accordance with Section 1 of this EULA.
4. Copyright
All title and copyrights in and to the SOFTWARE (including but not limited to any
images, photographs, animations, video, audio, music, text and “applets,”
incorporated into the SOFTWARE), the accompanying printed materials, and any
copies of the SOFTWARE, are owned by MS or its suppliers (including Microsoft
Corporation). You may not copy the printed materials accompanying the
SOFTWARE. All rights not specifically granted under this EULA are reserved by
MS and its suppliers (including Microsoft Corporation).
x
5. Product Support
Product support for the SOFTWARE is not provided by MS, its parent corporation,
Microsoft Corporation, or their affiliates or subsidiaries. For product support, please
refer to MANUFACTURER’s support number provided in the documentation for the
SYSTEM. Should you have any questions concerning this EULA, or if you desire to
contact MANUFACTURER for any other reason, please refer to the address
provided in the documentation for the SYSTEM.
6. Export Restrictions
You agree that you will not export or re-export the SOFTWARE to any country,
person, or entity subject to U.S. export restrictions. You specifically agree not to
export or re-export the SOFTWARE: (i) to any country to which the U.S. has
embargoed or restricted the export of goods or services, which as of March 1998
include, but are not necessarily limited to Cuba, Iran, Iraq, Libya, North Korea,
Sudan and Syria, or to any national of any such country, wherever located, who
intends to transmit or transport the products back to such country; (ii) to any person
or entity who you know or have reason to know will utilize the SOFTWARE or
portion thereof in the design, development or production of nuclear, chemical or
biological weapons; or (iii) to any person or entity who has been prohibited from
participating in U.S. export transactions by any federal agency of the U.S.
government.
If the SOFTWARE is labeled “North America Only Version” above, on the Product
Identification Card, or on the SOFTWARE packaging or other written materials,
then the following applies: The SOFTWARE is intended for distribution only in the
United States, its territories and possessions (including Puerto Rico, Guam, and
U.S. Virgin Islands) and Canada. Export of the SOFTWARE from the United States
is regulated under “EI controls” of the Export Administration Regulations (EAR, 15
CFR 730-744) of the U.S. Commerce Department, Bureau of Export Administration
(BXA). A license is required to export the SOFTWARE outside the United States or
Canada. You agree that you will not directly or indirectly, export or re-export the
SOFTWARE (or portions thereof) to any country, other than Canada, or to any
person or entity subject to U.S. export restrictions without first obtaining a
Commerce Department export license. You warrant and represent that neither the
BXA nor any other U.S. federal agency has suspended, revoked or denied your
export privileges.
7. Note on Java Support
The SYSTEM SOFTWARE may contain support for programs written in Java. Java
technology is not fault tolerant and is not designed, manufactured, or intended for
use or resale as on-line control equipment in hazardous environments requiring
fail-safe performance, such as in the operation of nuclear facilities, aircraft
navigation or communication systems, air traffic control, direct life support
machines, or weapons systems, in which the failure of Java technology could lead
directly to death, personal injury, or severe physical or environmental damage.
xi
8. Limited Warranty
•Limited Warranty
MANUFACTURER warrants that the SOFTWARE will perform substantially in
accordance with the accompanying written materials for a period of ninety (90)
days from the date of receipt. Any implied warranties on the SOFTWARE are
limited to ninety (90) days. Some states/jurisdictions do not allow limitations on
duration of an implied warranty, so the above limitation may not apply to you.
•Customer Remedies
MANUFACTURER’S and its suppliers’ entire liability and your exclusive remedy
shall be, at MANUFACTURER’S option, either (a) return of the price paid, or (b)
repair or replacement of the SOFTWARE that does not meet the above Limited
Warranty and which is returned to MANUFACTURER with a copy of your
receipt. This Limited Warranty is void if failure of the SOFTWARE has resulted
from accident, abuse, or misapplication. Any replacement SOFTWARE will be
warranted for the remainder of the original warranty period or thirty (30) days,
whichever is longer.
•No Other Warranties
EXCEPT AS EXPRESSLY PROVIDED IN THE LIMITED WARRANTY
SECTION ABOVE, THE SOFTWARE IS PROVIDED TO THE END USER “AS
IS” WITHOUT WARRANTY OF ANY KIND, EITHER EXPRESSED OR
IMPLIED, INCLUDING, BUT NOT LIMITED TO, WARRANTIES OF NON-
INFRINGEMENT, MERCHANTABILITY, AND/OR FITNESS FOR A
PARTICULAR PURPOSE. THE ENTIRE RISK OF THE QUALITY AND
PERFORMANCE OF THE SOFTWARE IS WITH YOU.
•No Liability for Consequential Damages
MANUFACTURER OR MANUFACTURER’S SUPPLIERS, INCLUDING MS
AND ITS SUPPLIERS, SHALL NOT BE HELD TO ANY LIABILITY FOR ANY
DAMAGES SUFFERED OR INCURRED BY THE END USER (INCLUDING,
BUT NOT LIMITED TO, GENERAL, SPECIAL, CONSEQUENTIAL OR
INCIDENTAL DAMAGES INCLUDING DAMAGES FOR LOSS OF BUSINESS
PROFITS, BUSINESS INTERRUPTION, LOSS OF BUSINESS
INFORMATION AND THE LIKE), ARISING FROM OR IN CONNECTION
WITH THE DELIVERY, USE OR PERFORMANCE OF THE SOFTWARE.
If you acquired this EULA in the United States, this EULA is governed by the laws
of the State of Washington.
If you acquired this EULA in Canada, this EULA is governed by the laws of the
Province of Ontario, Canada. Each of the parties hereto irrevocably attorns to the
jurisdiction of the courts of the Province of Ontario and further agrees to commence
any litigation which may arise hereunder in the courts located in the Judicial District
of York, Province of Ontario.
xii
If this EULA was acquired outside the United States, then local law may apply.
Should you have any questions concerning this EULA, please contact the
MANUFACTURER of your SYSTEM.
U.S. GOVERNMENT RESTRICTED RIGHTS
The SOFTWARE and documentation are provided with RESTRICTED RIGHTS.
Use, duplication, or disclosure by the Government is subject to restrictions as set
forth in subparagraph (c)(1)(ii) of the Rights in Technical Data and Computer
Software clause at DFARS 252.227-7013 or subparagraphs (c)(1) and (2) of the
Commercial Computer Software—Restricted Rights at 48 CFR 52.227- 19, as
applicable. MANUFACTURER is Microsoft Corporation/One Microsoft Way/
Redmond, WA 98052-6399.

Contents
Product Overview
1 About the Reference Guide
Overview 3
Guide Conventions 4
Text Format 4
UI Menu Control 5
2 Introducing the 3000 Series Windows-based Terminals
Model 3000 Terminals 7
Models Summary 7
Models 3315SE/3320SE Terminals 8
Model 3350SE Terminal 9
Models 3515SE, 3715SE, and 3720SE Terminals 10
3 General Terminal Information
Using the General Properties Sheet 11
Resetting to Factory Defaults 12
Using the SysInfo Properties Sheet 13
Using the About Properties Sheet 14
4 Terminal Features
Terminal Features 15
5 Terminal Specifications
Terminal Specifications 17
xiv
Installation Procedures
6 Models 3315SE/3320SE Terminal Installation
Locating the Terminal 27
Connecting the Terminal 27
Mounting the Terminal 31
Freestanding Desktop Mounting 31
Wall Mounting 32
Cable Retaining Clip and Shroud Installation 34
Turning On the Terminal 36
7 Model 3350SE Terminal Installation
Locating the Terminal 37
Connecting the Terminal 37
Mounting the Terminal 40
Freestanding Desktop Mounting 40
Permanent Desktop Mounting 41
Wall Mounting 41
Shroud Attachment 43
Turning On the Terminal 44
8 Models 3515SE/3715SE/3720SE Terminal Installation
Locating the Terminal 45
Connecting the Terminal 45
Turning On the Terminal 47
Display Adjustments 48
9 Modem Card Installation
About Modem Cards 53
Installation and Removal 54
Installation 54
Removal 57
Configuration 58
Modem Initialization Strings 58
10 Noise Suppressor Installation
Noise Suppressor Installation 59
xv
Terminal Management
11 Initial Terminal Setup
Using the Setup Wizard 63
12 Changing Terminal Properties
Using the Terminal Properties Dialog Box 72
13 Display Configuration
Using the Display Properties Sheet 74
14 Input Configuration
Using the Input Properties Sheet 76
15 Network Configuration
Using the Network Properties Sheet 80
16 Connections Management
Using the Connections Properties Sheet 84
Using the Configure Properties Sheet 85
17 ICA Client Settings
Setting the Default Hotkeys 87
Setting Terminal Preferences 89
Setting the Server Location 91
18 Multiple Sessions
Starting Multiple Sessions 93
Manipulating Multiple Sessions 94
19 Additional Applications
Using the Apps Properties Sheet 96
20 Shutting Down the Terminal
Using the Shutdown Window Dialog Box 99
Using the Terminal Settings Change Dialog Box 100
xvi
Connection Configuration
21 Creating New Connections
Choosing a Connection Protocol 103
Using the Startup Function 104
Startup Options 105
22 ICA Connections
Using the Specify Connection Type Dialog Box 107
Network Connections 108
Dial-In Connection 112
23 Dial-Up Connections
Using the Dial-Up Configuration Wizard 113
24 Using the Dialing Properties and Configure Command Buttons
Using the Dialing Properties Dialog Box 118
Using the Device Properties Dialog Box 119
Port Settings 120
Call Options 120
25 Using the TCP/IP Settings and Security Command Buttons
Using the TCP/IP Settings Dialog Box 123
Using the Security Settings Dialog Box 125
26 RDP Connections
Using the WTS Connection Wizard 127
27 Terminal Emulation Connections
Using the TE Client Connection Wizard 131
Using the TCP/IP Telnet Configuration Dialog Box 136
Using the Modem Settings Dialog Box 139
Using the Configuration of Serial Cable on Com1 Dialog Box 140
28 Editing Connections
Using the Properties Dialog Box 142
Using the Net Connections Properties Sheet 142
Using the Application Properties Sheet 144
xvii
29 Modem Connection Configuration
Using the Devices Properties Sheet 148
ISDN Settings 149
Adding or Changing Modems 151
Terminal Firmware Upgrades
30 Cable Firmware Upgrades
Setup 155
Flash Parallel Download Procedure 156
Manual Download 156
Auto Download 157
Cable Pinouts 158
Parallel Download Cable Pinouts 158
31 FTP Pull Firmware Upgrades
Using the Upgrade Properties Sheet 162
FTP and Bootstrap.exe 163
The Upgrade Process 163
32 Administering Terminals Using SNMP
Using the SNMP Network Administration Dialog Box 168
33 SNMP Upgrades
Manual SNMP Firmware Upgrades 171
34 Changing DHCP Option IDs
Using the Change DHCP Option IDs Dialog Box 174
35 DHCP Firmware Upgrades
Automatic DHCP Firmware Upgrades 177
Manual DHCP Firmware Upgrades 178
xviii
Client Security
36 Security Properties
Using the Security Properties Sheet 182
37 Terminal Accounts
Guest Accounts 185
User Accounts 186
Administator Accounts 186
Using Terminal Accounts 186
38 Creating Terminal Accounts
Using the Add User Account Dialog Box 188
39 Modifying and Deleting Terminal Accounts
Using the Modify User Account Dialog Box 192
Deleting Terminal Accounts 194
40 Terminal Login
Logging Into the Terminal 197
Autologin and Autoconnect 198
Autologin 198
AutoStart 198
Single Button Connect 199
41 Failover
Getting Help
42 Troubleshooting Your Terminal
43 Terminal Port Pin Assignments
Serial and Parallel Ports 209
44 Terminal Connector Pin Assignments
10Base-T and 100Base-T Connector 211
VGA Connector 212
USB Connector 213
45 Null Modem Cable Pin Assignments
46 Modem AT Commands
xix
Glossary
Index
List of Figures
2-1 3315SE/3320SE Terminal 8
2-2 3350SE Terminal 9
2-3 3515SE/3715SE/3720SE Terminal 10
3-1 General Properties Sheet 11
3-2 System Settings Change Dialog Box 12
3-3 SysInfo Properties Sheet 13
3-4 About Properties Sheet 14
6-1 3315SE/3320SE Terminal Back Panel Connectors 28
6-2 3315SE/3320SE Freestanding Desktop Mounting 31
6-3 3315SE/3320SE Optional Wall Mount Configuration 32
6-4 3315SE/3320SE Cable Retaining Clip Installation 34
6-5 3315SE/3320SE Shroud Installation 35
6-6 3315SE/3320SE Power Management Button 36
7-1 3350SE Terminal Back Panel Connectors 38
7-2 3350SE Wall Mount Configuration 42
7-3 3350SE Power Management Button 44
8-1 3515SE/3715SE/3720SE Terminal Back Panel Connectors 46
8-2 3515SE/3715SE/3720SE Terminal Front Panel 48
8-3 3515SE/3715SE OSD (On-Screen Display) Menu 49
8-4 3515SE/3715SE/3720SE Recall Mode 51
9-1 Modem Card 53
9-2 Installing the Modem Card 55
9-3 Connecting the Modem Card Cable 56
9-4 Inserting the Plug 58
10-1 Noise Suppressor 59
11-1 Welcome Dialog Box 64
11-2 EULA (End User License Agreement) Dialog Box 65
11-3 IP Address Dialog Box 66
11-4 Specify an IP Address Dialog Box 67
11-5 Optional Information Dialog Box 68
11-6 Desktop Area and Refresh Frequency Dialog Box 69
11-7 Finish Dialog Box 70
12-1 Terminal Properties Dialog Box 71
13-1 Display Properties Sheet 73
15-1 Network Properties Sheet 79
16-1 Winterm Connection Manager Dialog Box 83
16-2 Configure Properties Sheet 85
xx
17-1 Default Hotkeys Properties Sheet 87
17-2 Preferences Properties Sheet 89
17-3 Server Location Properties Sheet 91
19-1 Apps Properties Sheet 95
20-1 Shutdown Window Dialog Box 99
20-2 Terminal Settings Change Dialog Box 100
21-1 New Connection Dialog Box 103
21-2 Connection Startup Dialog Box 104
22-1 Specify Connection Type Dialog Box 107
22-2 Citrix Search Message 108
22-3 Select a Citrix Server or Published Application Dialog Box 108
22-4 Server Location Dialog Box 109
22-5 Add Server Address Dialog Box 109
22-6 Specify an Application Dialog Box 109
22-7 Specify Logon Information Dialog Box 110
22-8 Select Window Options Dialog Box 110
22-9 Compression, Cache, and Sound Dialog Box 111
22-10 Select a Title for the ICA Connection Dialog Box 111
22-11 Dial-In Devices Dialog Box 112
23-1 Dial-Up Configuration Wizard 1 113
23-2 Dial-Up Configuration Wizard 2 114
23-3 Dial-Up Configuration Wizard 3 115
24-1 Dialing Properties Dialog Box 117
24-2 Device Properties Dialog Box 119
24-3 Call Options Properties Sheet 120
25-1 TCP/IP Settings Dialog Box 123
25-2 Security Settings Dialog Box 125
26-1 WTS Connection Wizard 1 127
26-2 WTS Connection Wizard 2 128
26-3 WTS Connection Wizard 3 129
26-4 WTS Connection Wizard 4 130
27-1 TE Client Connection Wizard - Connection Information 131
27-2 TE Client Connection Wizard - Host Information 133
27-3 TE Client Connection Wizard - Automate Login Process 134
27-4 TE Client Connection Wizard - Printer Port Settings 135
27-5 TCP/IP Telnet Configuration Dialog Box 136
27-6 Modem Settings DIalog Box 139
27-7 Configuration of Serial Cable on Com1 Dialog Box 140
28-1 Properties Dialog Box 141
28-2 Application Properties Sheet 144
29-1 Devices Properties Sheet 147
29-2 ISDN Settings Dialog Box 149
29-3 Add or Change Modem Dialog Box 151
30-1 Download Utility Dialog Box 156
30-2 Parallel Download Cable Connectors 159
xxi
31-1 Upgrade Properties Sheet 161
31-2 Firmware Upgrade Dialog Box 1 164
31-3 Firmware Upgrade Dialog Box 2 164
31-4 Firmware Upgrade Dialog Box 3 165
32-1 SNMP Network Administration Dialog Box 167
34-1 Change DHCP Option IDs Dialog Box 173
35-1 Obtain an IP Address From DHCP Sever Radio Button 177
35-2 DHCP Automatic Update Enable Check Box 177
36-1 Security Properties Sheet 181
39-1 Modify User Account Dialog Box 191
39-2 Delete User Account Confirmation Dialog Box 195
40-1 Terminal Login Dialog Box 197
40-2 Autologin Dialog Box 198
40-3 Single Button Connect Dialog Box 199
41-1 Failover Message Box 202
41-2 Failover Log Window Dialog Box 202
43-1 Serial Port 209
43-2 Parallel Port (EPP/SPP) 210
44-1 10Base-T and 100Base-T Connector 211
44-2 VGA Connector 212
44-3 USB Connector 213
List of Tables
1-1 Text Format Conventions 4
1-2 UI Menu Control 5
4-1 Terminal Features 15
5-1 Specifications for the 3315SE, 3320SE, and 3350SE Terminals 17
5-2 Specifications for the 3515SE, 3715SE, and 3720SE Terminals 21
6-1 3315SE/3320SE Terminal Back Panel Connectors 29
7-1 3350SE Terminal Back Panel Connectors 38
8-1 3515SE/3715SE/3720SE Terminal Back Panel Connectors 46
8-2 3515SE/3715SE/3720SE Terminal Front Panel 49
8-3 3515SE/3715SE/3720SE OSD Menu 50
13-1 Display Properties Sheet 74
14-1 Input Properties Sheet 76
15-1 Network Properties Sheet 80
16-1 Connections Properties Sheet 84
16-2 Configure Properties Sheet 86
17-1 Default Hotkeys Properties Sheet 88
17-2 Preferences Properties Sheet 90
17-3 Server Location Properties Sheet 91
19-1 Apps Properties Sheet 96
20-1 Shutdown Window Dialog Box 100
xxii
24-1 Dialing Properties Dialog Box 118
24-2 Port Settings Properties Sheet 120
24-3 Call Options Properties Sheet 121
25-1 TCP/IP Settings Dialog Box 124
25-2 Security Settings Dialog Box 125
27-1 Terminal Emulation and Terminal Type 132
27-2 TCP/IP Telnet Configuration 136
27-3 Modem Settings Dialog Box 139
27-4 Configuration of Serial Cable on Com1 Dialog Box 140
28-1 Net Connections Properties Sheet 143
28-2 Application Properties Sheet 145
29-1 Devices Properties Sheet 148
29-2 ISDN Settings Dialog Box 150
29-3 Add or Change Modem Dialog Box 152
30-1 Parallel Download Cable Pinouts 158
31-1 Upgrade Properties Sheet 162
32-1 SNMP Network Administration Dialog Box 168
34-1 Change DHCP Option IDs Dialog Box 174
36-1 Security Properties Sheet 182
38-1 Add User Account Dialog Box 188
39-1 Modify User Account Dialog Box 192
42-1 Troubleshooting Your Terminal 205
45-1 Null Modem Cable Pin Assignments 215
46-1 AT Commands with No Lead-in Character 217
46-2 AT Commands Beginning with “&” 218
46-3 AT Commands Beginning with “\” 219
46-4 AT Commands Beginning with “%” 219

2

1About the Reference Guide
Overview
The Wyse Winterm 3000 Series Windows-based Terminal Reference Guide
contains the information you will need to install, configure, connect, and
troubleshoot a WBT (Windows-based Terminal). This guide is written for both users
and administrators, and covers the Models 3315SE, 3320SE, 3350SE, 3515SE,
3715SE, and 3720SE terminals.
The reference guide consists of the following sections:
• Product Overview
• Installation Procedures
• Terminal Management
• Connection Configuration
• Terminal Firmware Upgrades
• Client Security
• Getting Help
This guide contains information about:
• Terminal features, specifications, installation, and management
• The UI (User Interface)
• Physical and network connections, and protocols used
• Firmware upgrades
• Terminal security
• Getting help
Note
The Adobe Acrobat version of this guide features a link
to the Wyse home page at www.wyse.com.
4Product Overview
Guide Conventions
Text Format
Table 1-1 lists the text format conventions used in this document.
Table 1-1 Text Format Conventions
Convention Where Used
Italic New term, book title or emphasis.
Bold Screen display, keycaps, and user input.
Note Indicates a note. A note adds information.
Caution Indicates a caution. A caution indicates actions that
may cause damage to equipment, erase files, or
destroy data.
+ Keystroke sequences such as:
Ctrl+Alt+Del
| Instructions about invoking a menu such as:
Network | SNMP Network | Location

5
UI Menu Control
Table 1-2 describes the command buttons used for UI menu control on a 3000
series WBT.
Table 1-2 UI Menu Control
Command Button Function
XFound in the upper right corner of a dialog box. Click on
this command button to quit a dialog box or properties
sheet without saving changes.
OK Found in dialog boxes and on properties sheets. Click
on this command button to save your changes and quit
a dialog box or properties sheet.
Cancel Found in dialog boxes and on properties sheets. Click
on this command button at any time to quit a dialog box
or properties sheet without saving changes.
Apply Sometimes not activated and found in dialog boxes and
on properties sheets. Click on this command button to
save changes without quitting a dialog box or
properties sheet.
Next or Accept Found in wizards. Click on these command buttons to
display the next dialog box in the sequence.
Back Found in wizards. Click on this command button to
return to the previous dialog box.
Finish Found in wizards. Click on this command button to
return to finish the wizard.
6Product Overview

2Introducing the 3000 Series
Windows-based Terminals
Model 3000 Terminals
Winterm 3000 series WBTs (Windows-based Terminals) are designed to connect to
WTS (Windows Terminal Server) servers via RDP (Remote Desktop Protocol), to
Windows NT applications servers via ICA (Independent Computing Architecture),
or to various terminal emulations. RDP is the Windows CE-based protocol for
connecting to Windows terminal servers. ICA is a distributed presentation services
protocol for Windows NT servers, allowing an application’s user interface to
execute on a Windows-based terminal while the application’s logic executes on the
server.
Models Summary
There are six models of Winterm 3000 series terminals:
• Modular type, Models 3315SE, 3320SE, and 3350SE
• Integrated-CRT type, Models 3515SE, 3715SE, and 3720SE

8Product Overview
Models 3315SE/3320SE Terminals
The Models 3315SE and 3320SE terminals are standard modular-type 3000 series
terminals. The connections for peripherals such as the monitor, keyboard, and
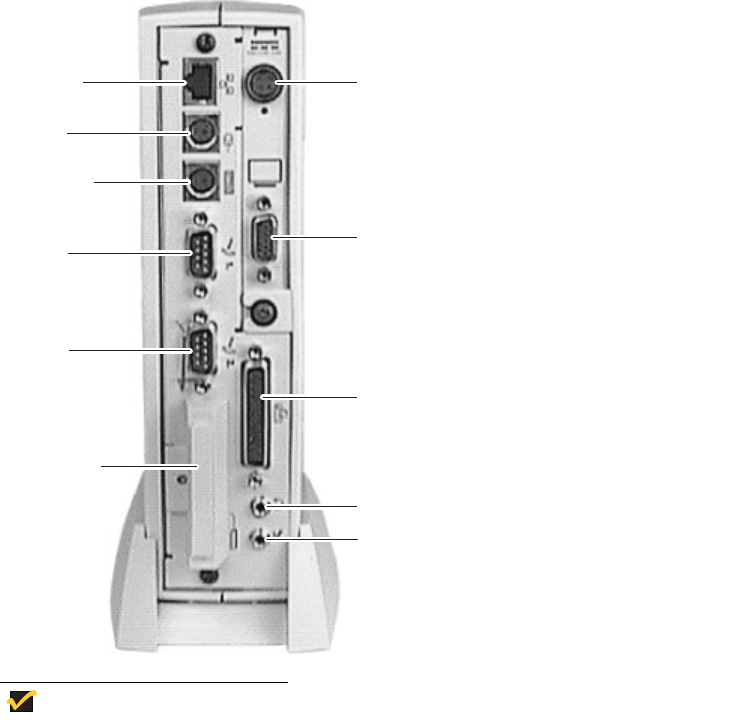
mouse are on the back of the terminal. The following figure shows a modular
terminal.
Figure 2-1 3315SE/3320SE Terminal
The following items are provided with the Models 3315SE and 3320SE terminals:
• Power supply and power cord
• Desktop mounting stand (an optional wall-mount bracket is also available; for
more information call 1-800-800-WYSE (9973))
• Cable shroud and cable clip
• Keyboard (with domestic versions only) and mouse
• Installation and user information

9
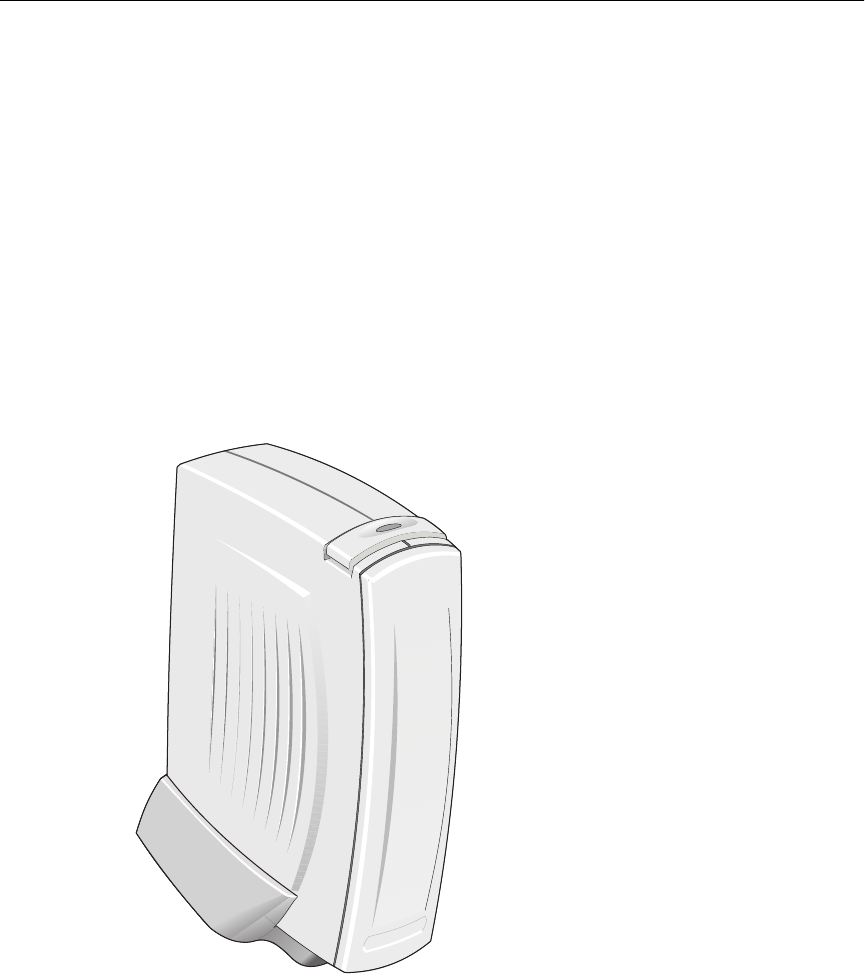
Model 3350SE Terminal
The Model 3350SE terminal is the enhanced modular type 3000 series terminal.
The connections for peripherals such as the monitor, keyboard, and mouse are on
the back of the terminal. The following figure shows a Model 3350SE terminal.
Figure 2-2 3350SE Terminal
The following items are provided with the Model 3350SE terminal:
• Power supply and power cord
• Cable shroud
• Keyboard (with domestic versions only) and mouse
• Installation and user information
• An optional wall-mount bracket is also available. For more information call
1-800-800-WYSE (9973).
Monitors are not provided with Models 3315SE, 3320SE, and 3350SE terminals.
You must provide the standard VGA monitor and video interface cable for your
monitor. The cable must have a 15-pin plug connector to attach to the video
connector on the back of the terminal.

10 Product Overview
Models 3515SE, 3715SE, and 3720SE Terminals
Models 3515SE, 3715SE, and 3720SE, the terminals described below, are the
integrated-CRT 3000 series terminals. The connections for peripherals such as
keyboard and mouse are on the back of the terminal. The following figure shows an
integrated-CRT terminal.
Figure 2-3 3515SE/3715SE/3720SE Terminal
The following items are provided with the 3315SE, 3715SE, and 3720SE terminals:
•Power cord
• Keyboard (with domestic versions only) and mouse
• Installation and user information
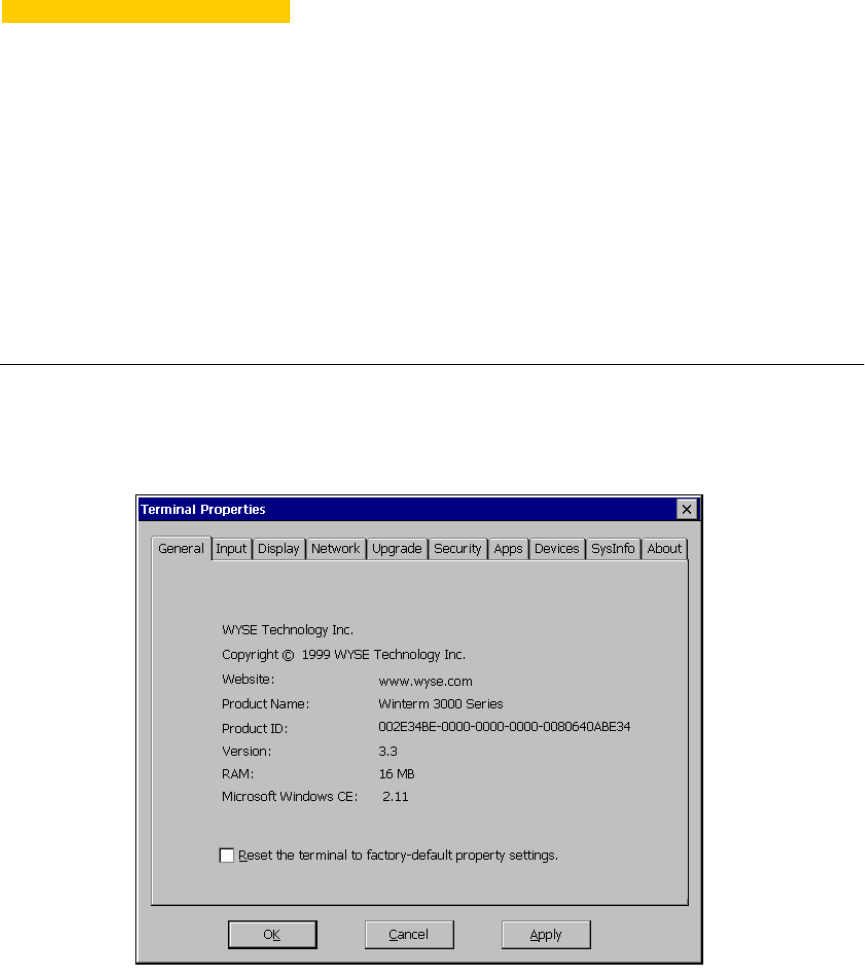
3General Terminal Information
There are three properties sheets in the UI that provide general terminal
information. They are the General properties sheet (Figure 3-1), the SysInfo
properties sheet (Figure 3-2), and the About properties sheet (Figure 3-3).
Using the General Properties Sheet
Figure 3-1 General Properties Sheet
12 Product Overview
Note
The amount of RAM that is available depends on the
model of terminal in use.
The General properties sheet displays information that includes the name of the
product and information about the current software.
Invoke this properties sheet from the Winterm Connection Manager by pressing
the F2 key. The Terminal Properties dialog box displays. The General properties
sheet is the default sheet for the Terminal Properties dialog box. Read the
information on this sheet.
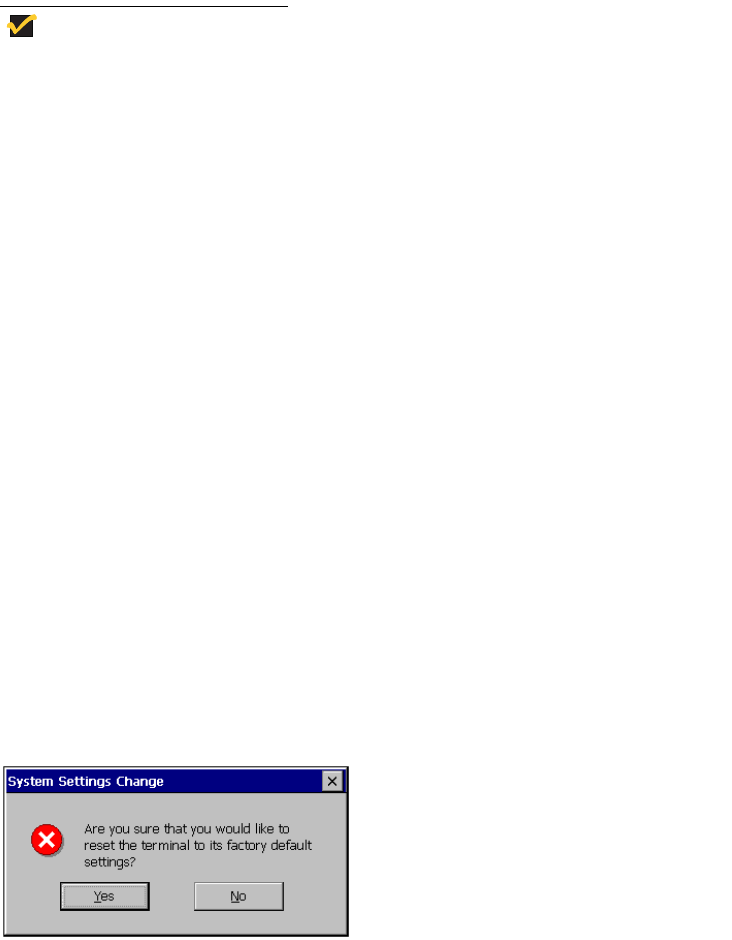
Resetting to Factory Defaults
There is one function on the General properties sheet, Reset the Terminal
Factory Default Property Settings. To use this function to reset the terminal to
factory default settings:
1. Click on the Reset the Terminal Factory Default Property Settings check
box. Figure 3-2 shows the dialog box that displays.
2. Click on Yes to return to the Terminal Properties dialog box.
3. Click on OK in the Terminal Properties dialog box. (The Terminal Settings
Change dialog box displays. See “Shutting Down the Terminal” for more
information about this dialog box).
4. Click on Restart in the Terminal Settings Change dialog box to reset to factory
defaults.
Figure 3-2 System Settings Change Dialog Box

13
Using the SysInfo Properties Sheet
Figure 3-3 SysInfo Properties Sheet
Note
Addresses used in the illustration above are
representative only.
The SysInfo properties sheet contains network information. To invoke this
properties sheet:
1. Press F2 while you are in the Winterm Connection Manager.
2. Click on the SysInfo tab in the Terminal Properties dialog box.
This properties sheet is informational. No user interaction is required.

14 Product Overview
Using the About Properties Sheet
Figure 3-4 About Properties Sheet
The About properties sheet contains copyright information about the terminal. To
invoke this properties sheet:
1. Pressing F2 while you are in the Winterm Connection Manager.
2. Clicking on the About tab in the Terminal Properties dialog box.
The About properties sheet is informational. No user interaction is required.

4Terminal Features
Terminal Features
The following table outlines the features of the different models of 3000 Series
WBTs.
Table 4-1 Terminal Features
Feature 3315SE 3320SE 3350SE 3515SE 3715SE 3720SE
Windows 3.1, Windows 95,
and Windows NT applications
via Windows Terminal Server
✓✓✓✓✓✓
RDP and ICA 3.x application
compliant
✓✓✓✓✓✓
ICA server connections via
serial cable
✓✓✓✓✓✓
10Base-T network
communications
✓✓✓✓✓✓
100Base-T network
communications
✓✓ ✓
Dual high-speed serial ports ✓✓✓✓✓✓
Parallel printer port ✓✓✓✓✓✓
Dual USB ports ✓

16 Product Overview
Optional touch screen ✓✓✓✓✓✓
Support for monochrome or
color monitor
✓✓✓
Desktop (standard) or
wall-mounted (optional)
housing
✓✓✓
Support for PCMCIA modem ✓✓✓✓✓✓
Table 4-1 Terminal Features, Continued
Feature 3315SE 3320SE 3350SE 3515SE 3715SE 3720SE

17
5Terminal Specifications
Terminal Specifications
Table 5-1 lists the specifications for the modular terminals.
Table 5-1 Specifications for the 3315SE, 3320SE, and 3350SE Terminals
Specification 3315SE 3320SE 3350SE
Power Requirements
Voltage 90 to 264V ac, Worldwide
autosensing
90 to 264V ac, Worldwide
autosensing
90 to 264V ac, Worldwide
autosensing
Frequency 47-63 Hz 47-63 Hz 47-63 Hz
Power Consumption 8W operating 16W operating 16W operating
Physical Characteristics
Height 22.6 cm (8.9 in) 22.6 cm (8.9 in) 22.6 cm (8.9 in)
Width 6.0 cm (2.36 in) 6.0 cm (2.36 in) 6.0 cm (2.36 in)
Depth 17.4 cm (6.85 in) 17.4 cm (6.85 in) 17.4 cm (6.85 in)
Net Weight 1.7 kgs (3.7 lbs) 1.7 kgs (3.7 lbs) 1.97 kgs (4.125 lbs)
Power Cord 6 ft (1.83m) 6 ft (1.83m) 6 ft (1.83m)

18 Product Overview
Environmental
Operating Temperature 0° to 40°C
(32° to 104°F)
10° to 40°C
(50° to 104°F)
0° to 40°C
(32° to 104°F)
Nonoperating Temperature –10° to 60°C
(14° to 140°F)
–10° to 60°C
(14° to 140°F)
–10° to 60°C
(14° to 140°F)
Operating Humidity 10% to 95%
noncondensing
20% to 80%
noncondensing
80% maximum,
noncondensing
Storage Humidity 95% maximum,
noncondensing
80% maximum,
noncondensing
95% maximum,
noncondensing
Operating Altitude 0 to 10,000 ft ASL 0 to 10,000 ft ASL 0 to 10,000 ft ASL
Nonoperating Altitude 0 to 40,000 ft ASL 0 to 40,000 ft ASL 0 to 40,000 ft ASL
Cooling System Convection, fanless Convection, fanless Convection, fanless
EPA
Energy Saving Automatic power-down
sleep mode
Automatic power-down
sleep mode
Automatic power-down
sleep mode
Regulatory Compliance
EMC Terminal/Power Brick FCC B FCC B FCC B
Safety Power Brick • UL1950
• CSA950
• Japan T mark
• UL1950
•CSA950
• Japan T mark
• UL1950
•CSA950
• Japan T mark
Table 5-1 Specifications for the 3315SE, 3320SE, and 3350SE Terminals, Continued
Specification 3315SE 3320SE 3350SE

19
Safety, terminal • UL1950
• CSA 950
• TUV-GS approved
• EN 60950 approved
•NOM
• UL1950
•CSA 950
• TUV-GS approved
• EN 60950 approved
•NOM
• UL1950
•CSA 950
• TUV-GS approved
• EN 60950 approved
•NOM
RF Interference • FCC Class B
• EN55022B
• CE Mark
•VCCI
•BCIQ
• FCC Class B
• EN55022B
•CE Mark
•VCCI
•BCIQ
• FCC Class B
• EN55022B
• CE Mark
•VCCI
•BCIQ
Ergonomics •ZH1/618
• EN29241-3
•ZH1/618
• EN29241-3
•ZH1/618
• EN29241-3
Communications Ports
Serial Port • Com1 is a 16C550
(FIFO), up to 115.2
kBaud RS-423/232,
DB-9M connector
• Com2 is a 16C550
(FIFO), up to 115.2
kBaud RS-232, DB-9M
connector
• Com1 is a 16C550
(FIFO), up to 115.2
kBaud RS-423/232,
DB-9M connector
• Com2 is a 16C550
(FIFO), up to 115.2
kBaud RS-232, DB-9M
connector
• Com1 is a 16C550
(FIFO), up to 115.2
kBaud RS-423/232,
DB-9M connector
• Com2 is a 16C550
(FIFO), up to 115.2
kBaud RS-232, DB-9M
connector
Parallel Port Centronics compatible,
DB-25M connector
Centronics compatible,
DB-25M connector
Centronics compatible,
DB-25M connector
Ethernet Port 10Base-T network 10Base-T or 100Base-T
network
10Base-T or 100Base-T
network
Table 5-1 Specifications for the 3315SE, 3320SE, and 3350SE Terminals, Continued
Specification 3315SE 3320SE 3350SE
20 Product Overview
USB N/A N/A Type A 4-pin receptacle
Battery
N/A CR2032 Lithium, coin-type,
3V battery (see Caution)
CR2032 Lithium, coin-type,
3V battery (see Caution)
Caution
Your terminal may contain a battery. There is a danger of explosion if the battery is incorrectly replaced. Replace
the battery with only the same or equivalent type recommended by the manufacturer. Dispose of used batteries
according to the manufacturer’s instructions.
Table 5-1 Specifications for the 3315SE, 3320SE, and 3350SE Terminals, Continued
Specification 3315SE 3320SE 3350SE

21
Table 5-2 lists the specifications for the integrated-CRT terminals.
Table 5-2 Specifications for the 3515SE, 3715SE, and 3720SE Terminals
Specification 3515SE 3715SE 3720SE
Power Requirements
Voltage 90 to 264V ac,
Worldwide autosensing
90 to 264V ac,
Worldwide autosensing
90 to 264V ac,
Worldwide autosensing
Frequency 47-63 Hz 47-63 Hz 47-63 Hz
Power Consumption 80W operating 80W operating 80W operating
Physical Characteristics
Height 38.8cm (15.3 in) 38.8 cm (15.3 in) 38.8 cm (15.3 in)
Width 36.0 cm (14.2 in) 36.0 cm (14.2 in) 36.0 cm (14.2 in)
Depth 40.6 cm (16.0 in) 40.6 cm (16.0 in) 40.6 cm (16.0 in)
Net Weight 40 lbs (18.2 kgs) 48 lbs (21.8 kgs) 48 lbs (21.8 kgs)
Power Cord 6 ft (1.83m) 6 ft (1.83m) 6 ft (1.83m)
Environmental
Operating Temperature 0 to 40°C
(32 to 104°F)
10° to 40°C
(50° to 104°F)
10° to 40°C
(50° to 104°F)
Nonoperating Temperature -10 to 60°C
(-14 to 140°F)
-20° to 60°C
(-4° to 140°F)
-20° to 60°C
(-4° to 140°F)
Operating Humidity 10% to 95%
noncondensing
80% maximum,
noncondensing
80% maximum,
noncondensing
Storage Humidity 80% maximum,
noncondensing
80% maximum,
noncondensing
80% maximum,
noncondensing

22 Product Overview
Operating Altitude 0 to 10,000 ft ASL 0 to 10,000 ft ASL 0 to 10,000 ft ASL
Nonoperating Altitude 0 to 40,000 ft ASL 0 to 40,000 ft ASL 0 to 40,000 ft ASL
Cooling System Convection, fanless Convection, fanless Convection, fanless
EPA
Energy Saving Automatic power-down
sleep mode
Automatic power-down
sleep mode
Automatic power-down
sleep mode
EPA Energy Star EPA Energy Star EPA Energy Star
Regulatory Compliance
EMC Terminal/Power Brick N/A N/A N/A
Safety, power brick N/A N/A N/A
Safety, terminal • UL1950
• CSA 950
• TUV-GS approved
• EN 60950 approved
• DHHS
• SEMKO
• DEMKO
• NEMKO
•FIMKO
• UL1950
•CSA 950
• TUV-GS approved
• EN 60950 approved
•DHHS
• SEMKO
• DEMKO
• NEMKO
•FIMKO
• UL1950
•CSA 950
• TUV-GS approved
• EN 60950 approved
•DHHS
• SEMKO
• DEMKO
• NEMKO
•FIMKO
RF Interference • FCC Class B
• EN55022B
• CE Mark
• FCC Class B
• EN55022B
•CE Mark
• FCC Class B
• EN55022B
• CE Mark
Table 5-2 Specifications for the 3515SE, 3715SE, and 3720SE Terminals, Continued
Specification 3515SE 3715SE 3720SE

23
Ergonomics • German Zh1/618
• EN29241-3, -8
• MPR 1990:10
guidelines for low
electromagnetic and
low electrostatic
emissions
• German Zh1/618
• EN29241-3, -8
• MPR 1990:10
guidelines for low
electromagnetic and
low electrostatic
emissions
• German Zh1/618
• EN29241-3, -8
• MPR 1990:10
guidelines for low
electromagnetic and
low electrostatic
emissions
Communications Ports
Serial • Com1 is a 16C550
(FIFO), up to 115.2
kBaud RS-423/232,
DB-9M connector
• Com2 is a 16C550
(FIFO), up to 115.2
kBaud RS-232, DB-9M
connector
• Com1 is a 16C550
(FIFO), up to 115.2
kBaud RS-423/232,
DB-9M connector
• Com2 is a 16C550
(FIFO), up to 115.2
kBaud RS-232, DB-9M
connector
• Com1 is a 16C550
(FIFO), up to 115.2
kBaud RS-423/232,
DB-9M connector
• Com2 is a 16C550
(FIFO), up to 115.2
kBaud RS-232, DB-9M
connector
Parallel Centronics compatible,
DB-25M connector
Centronics compatible,
DB-25M connector
Centronics compatible,
DB-25M connector
Network 10Base-T network 10Base-T network 10Base-T or 100Base-T
network
Table 5-2 Specifications for the 3515SE, 3715SE, and 3720SE Terminals, Continued
Specification 3515SE 3715SE 3720SE

24 Product Overview
Battery
N/A N/A CR2032 Lithium, coin-type,
3V battery (see Caution)
Caution
Your terminal may contain a battery. There is a danger of explosion if the battery is incorrectly replaced. Replace
the battery with only the same or equivalent type recommended by the manufacturer. Dispose of used batteries
according to the manufacturer’s instructions.
Table 5-2 Specifications for the 3515SE, 3715SE, and 3720SE Terminals, Continued
Specification 3515SE 3715SE 3720SE

26

6Models 3315SE/3320SE Terminal
Installation
This section discusses the procedures for installing the standard modular
terminals. The terminals can be freestanding or, optionally, mounted on a wall. The
following paragraphs describe how to connect and set up the terminals in both
configurations.
Locating the Terminal
Position the terminal on a clean, horizontal surface that is free from vibration and
out of direct sunlight. Refer to “Terminal Specifications” for environmental
specifications.
Connecting the Terminal
Make all connections to the back panel before connecting the terminal to power. A
shroud and cable retaining loop (described in “Shroud and Cable Retaining Loop
Attachment”) can be installed after the cables are connected and the terminal is
mounted in place. The following figure shows a terminal’s back panel connectors.
28 Installation Procedures
Figure 6-1 3315SE/3320SE Terminal Back Panel Connectors
Note
The illustration above shows the back panel of a
3315SE terminal. The back panel of a 3320SE terminal
is nearly identical, except that the pull ring (located by
COM 2 in the illustration above) is made of high-impact
plastic.
Mouse
COM 1
COM 2
Keyboard
Power
Video
Parallel
Option Slot
Network
Headphone
Microphone

29
The following table summarizes the back panel connectors’ functions.
Table 6-1 3315SE/3320SE Terminal Back Panel Connectors
Connector Description
Network Connector LAN connector, 10Base-T (10/100Base-T for 3320SE)
Com1 Serial port 1:
• Can be connected to an external modem.
• Can be used for a direct connection to a local
server.
Com2 Serial port 2:
• Can be connected to an external modem.
• Can be used for a direct connection to a local
server.
Parallel Port Local printer output
Video Monitor interface
Keyboard Keyboard interface
Mouse Mouse interface
Power Power module output cable interface
Option Slot PCMCIA card slot
Headphone Audio output for headphones
Microphone Audio input for microphones

30 Installation Procedures
Proceed as follows to connect the terminal. (If necessary, remove the desktop
mounting stand (one Phillips-head screw on the bottom.)
Note
Before connecting the cables, decide which mounting
configuration will be used and ensure that the cables
are of the correct lengths. If permanent desktop or
wall-mounting configuration is to be used, drill the
desktop mounting holes or install the mounting bracket
wall anchors before connecting the cables.
1. Connect the monitor to the Video connector.
2. Connect the keyboard to the Keyboard connector.
3. Connect the mouse to the Mouse connector.
4. If you will be using a network connection, connect a 10Base-T or 100Base-T
network cable to the Network connector. Depending on your configuration
needs, connect a printer to the parallel port, and/or connect a modem/server
serial cable to the serial ports, as appropriate.
5. Connect the power supply output cable to the Power connector.
Caution
Do not force a connector into its socket. If any undue
resistance is encountered, ensure that the connector is
oriented correctly to the socket.
6. Plug the AC cord into the power supply, then into an AC outlet.
7. After the cables are connected, install the terminal in its planned location, either
on a desktop or mounted to a wall (see the next section “Mounting the
Terminal” ) .
31
Mounting the Terminal
The terminal can be freestanding or attached to a wall (an optional wall mount kit is
required). Instructions for mounting your terminal are provided in the following
paragraphs; use the instructions that are appropriate for the desired method of
mounting your terminal.
Freestanding Desktop Mounting
The terminal is shipped with a desktop mounting stand attached so it can
immediately be put into desktop operation. The mounting stand is weighted and
equipped with non-skid feet. A single screw attaches the mounting stand to the
terminal housing. The following figure shows the terminal mounted on the desktop
mounting stand.
Figure 6-2 3315SE/3320SE Freestanding Desktop Mounting
32 Installation Procedures
Wall Mounting
The terminal can be mounted on a wall using the optional wall-mounting bracket.
The following figure shows the wall-mount configuration.
Note
It is best to connect the cables before mounting the
terminal on a wall. However, cables can be attached at
any convenient time, as long as power is disconnected.
Figure 6-3 3315SE/3320SE Optional Wall Mount Configuration
Wall
Anchors
Wall
Shroud Mounting
Clips
Screws (2)
Wall Mounting
Bracket

33
Follow these instructions to mount the terminal on a wall.
Caution
The following procedure has the bracket mounted to
the terminal first, and then the complete assembly is
placed on wall-anchor screws. If there is any risk that
the terminal could be bumped from its mounting, the
bracket should be securely anchored to the wall first,
and then the terminal housing mounted to the bracket.
1. Use the wall-mount bracket as a template to determine the positions of the
mounting holes on the wall.
2. Mark the locations of the mounting holes.
Note
When determining location, take into account the cable
lengths of the monitor, keyboard, mouse, power supply,
and peripherals.
3. Install the (user-provided) wall anchors. Any standard anchoring method may
be used, such as screws, butterfly anchors, or expansion bolts. The anchor
screw heads must have just enough clearance to allow the bracket to slip onto
them when hanging the assembled terminal (see the Caution above).
4. Loosen (but do not remove) the two screws securing the mounting clips to the
back panel. Leave enough clearance so the lower tabs of the mounting bracket
can slip under the screws.
5. Insert the upper tabs of the mounting bracket into the slotted holes in the back of
the terminal housing.
6. Slip the lower tabs of the mounting bracket under the two screws loosened in
step 4. The tabs should go between the screw heads and the mounting clips.
7. Tighten the screws to hold the bracket firmly in place.
8. Hang the terminal assembly on the wall-anchor mounting screws.
9. Install the cable retaining loop and shroud using the procedure that follows.
34 Installation Procedures
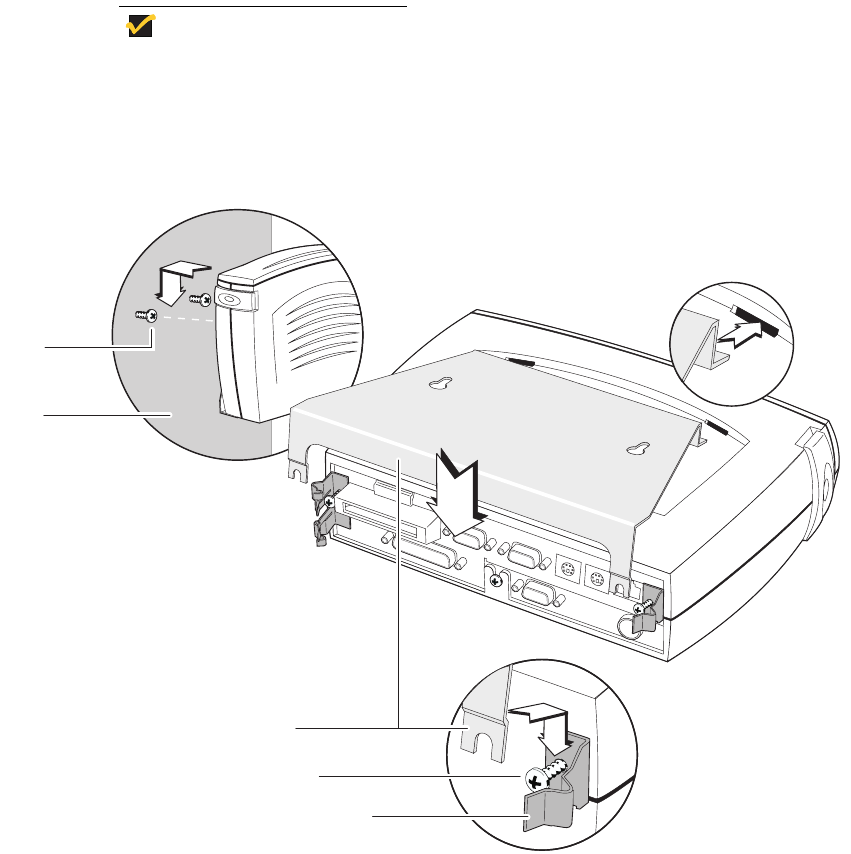
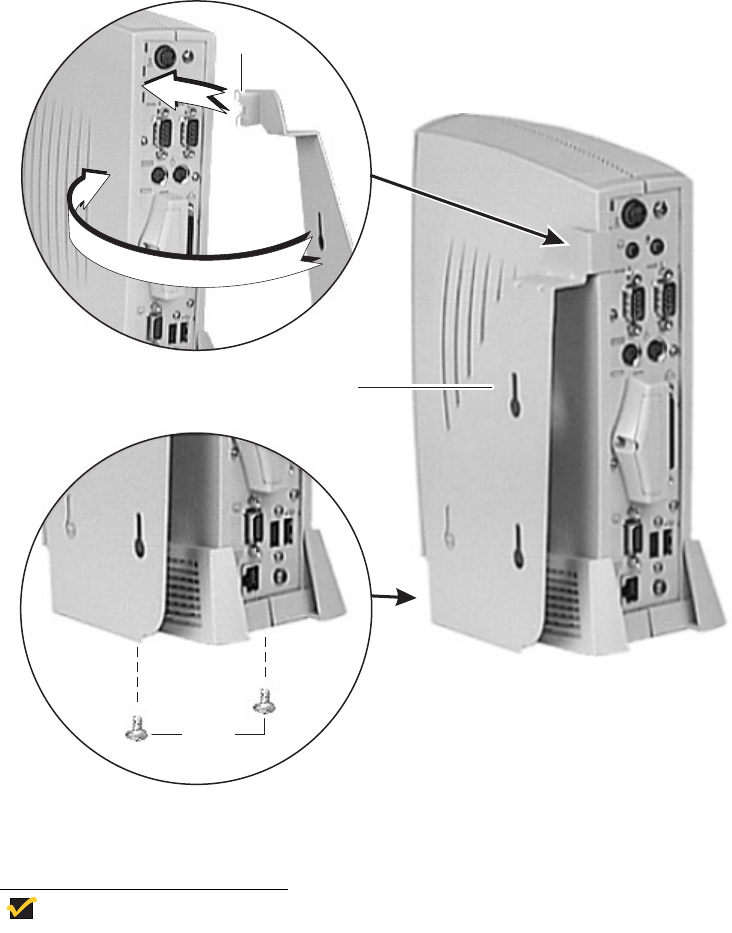
Cable Retaining Clip and Shroud Installation
The plastic shroud may be installed to conceal the cable connectors at the rear of
the terminal housing. A retaining loop is included to keep the cables together.
Proceed as follows.
1. Attach the upper and lower shroud mounting clips as shown in figure 6-5, using
the existing screws.
2. Attach the cables to their respective connectors on the back panel of the
terminal (see “Connecting the Terminal”).
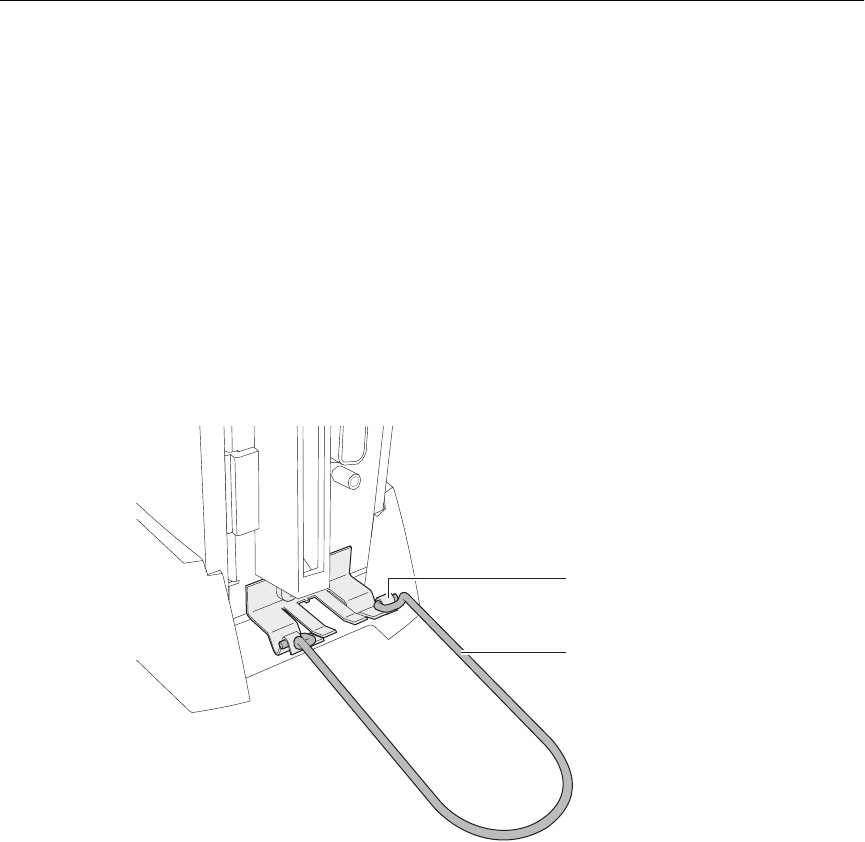
3. Gather the cables together and place the retaining loop over them. Insert the
ends of the retaining loop into the catches on the lower shroud mounting clip
(see the following figure).
Figure 6-4 3315SE/3320SE Cable Retaining Clip Installation
4. Gently pull the lower ends of the shroud apart and place it over the cables.
5. Place the slots in the lower end (split end) of the shroud under the lower shroud
mounting clip, as shown in the following figure.
6. Rotate the upper end of the shroud until the top slot goes over and engages the
upper mounting clip, as shown in the following figure.
Retainer Catches
Cable Retaining
Loop
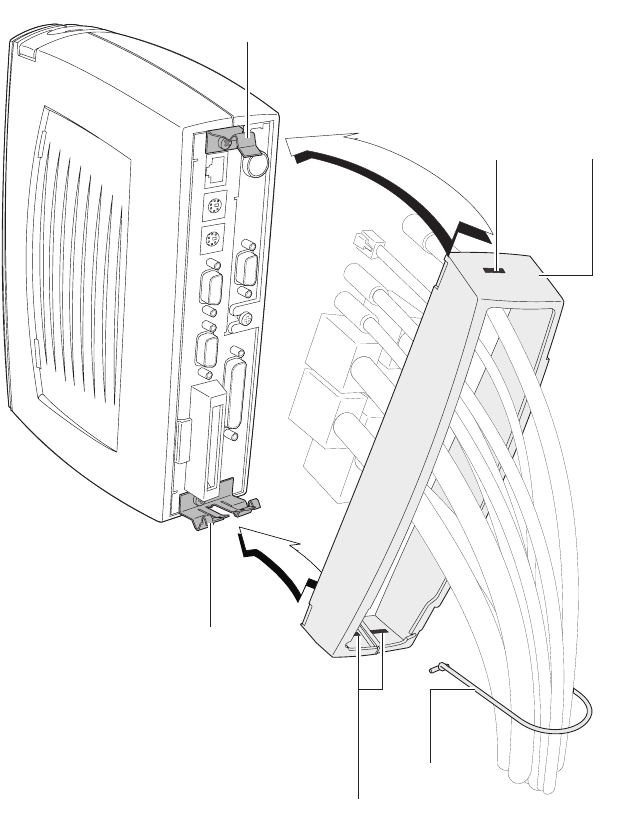
35
Figure 6-5 3315SE/3320SE Shroud Installation
Cable
Retaining
Loop
Upper Shroud
Mounting Clip
Lower Shroud
Mounting Clip
Slot
Slots
Shroud
36 Installation Procedures
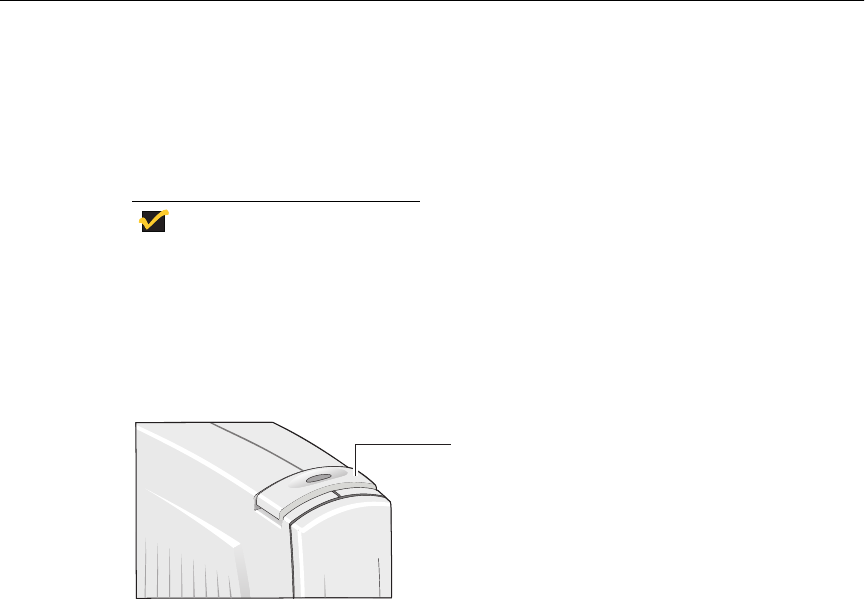
Turning On the Terminal
Once the terminal is installed and all back panel connections have been made,
power it up. If the terminal is a 3315SE, press and release the power management
button. If the terminal is a 3320SE, it is powered-up and operating when the power
supply is connected to AC power; to toggle the display off or on, press and release
the power management button.
Note
For the 3320SE, if the button is continuously depressed
for 3-5 seconds, the unit will perform a hard boot.
See the following figure for the location of the power management button.
Figure 6-6 3315SE/3320SE Power Management Button
The logo will appear on the screen, followed by:
•The
Setup Wizard, if it is the first time that you have turned on your terminal.
•The
Winterm Connection Manager dialog box, if the Setup Wizard has been
completed.
If desired, adjust the display’s geometry and intensities to your preferences.
Adjustments to the display can be made at any time, whether or not the terminal is
connected to a server. See “Changing Terminal Properties” for more information.
Power
Management
Button

7Model 3350SE Terminal
Installation
This section discusses the procedures for installing the 3350SE enhanced modular
terminal. This terminal can be freestanding or, optionally, mounted on a wall; it can
instead be permanently mounted on a desktop, if desired. The following
paragraphs describe how to connect and set up the terminal in all three
configurations.
Locating the Terminal
Position the terminal on a clean, horizontal surface that is free from vibration and
out of direct sunlight. Refer to “Terminal Specifications” for environmental
specifications.
Connecting the Terminal
Make all connections to the back panel before connecting the terminal to power. A
shroud (described in “Shroud Attachment”) can be installed after the cables are
connected and the terminal is mounted in place. The following figure shows the
terminal’s back panel connectors.
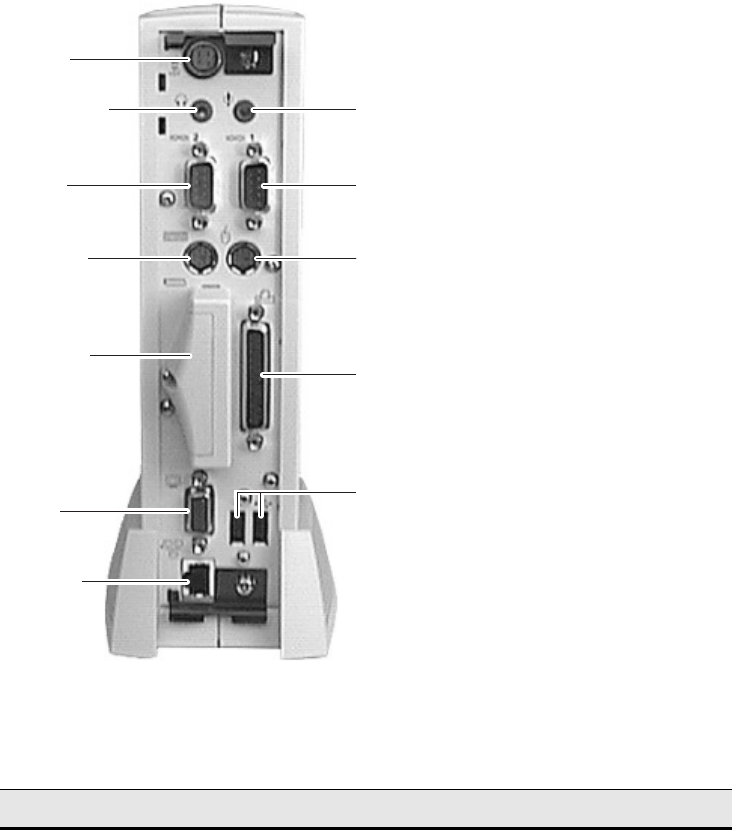
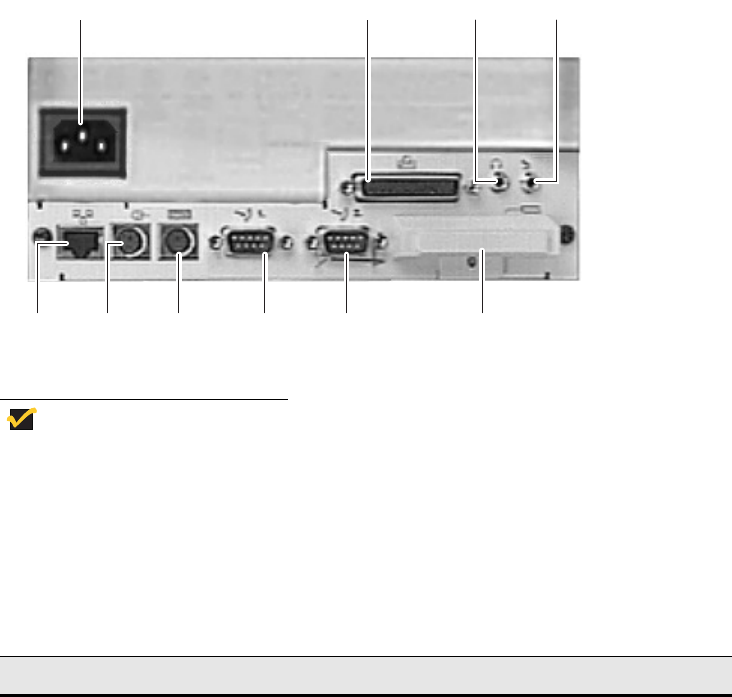
38 Installation Procedures
Figure 7-1 3350SE Terminal Back Panel Connectors
The following table summarizes the back panel connectors’ functions.
Table 7-1 3350SE Terminal Back Panel Connectors
Connector Description
Network Connector LAN connector, 10/100Base-T
Com1 Serial port 1:
• Can be connected to the external modem or used
for direct connection to a local server.
• Can be used for the emergency download of the
operating system programs from the host computer.
COM 2
Power
Card Bus
Keyboard
Microphone
COM 1
Parallel
Video
Network
Headphone
USB
Mouse
39
Proceed as follows to connect the terminal:
Note
Before connecting the cables, decide which mounting
configuration will be used and ensure that the cables
are of the correct lengths. If permanent desktop or
wall-mounting configuration is to be used, drill the
desktop mounting holes or install the mounting bracket
wall anchors before connecting the cables.
1. Connect the monitor to the Video connector.
2. Connect the keyboard to the Keyboard connector.
3. Connect the mouse to the Mouse connector.
4. If you will be using a network connection, connect a CAT5 UTP cable to the
Network connector. Depending on your configuration needs, connect a printer
to the parallel port and/or connect a modem/server serial cable to the serial
ports, as appropriate.
Com2 Serial port 2:
• Can be connected to an external modem.
• Can be used for a direct connection to a local
server.
Parallel Port Local printer output
Video Monitor interface
Keyboard Keyboard interface
Mouse Mouse interface
Power Power module output cable interface
Card Bus PCMCIA card slot
Headphone Audio output for headphones
Microphone Audio input for microphones
USB Universal Serial Bus
Table 7-1 3350SE Terminal Back Panel Connectors, Continued
Connector Description

40 Installation Procedures
5. Connect the power supply output cable to the Power connector.
Caution
Do not force a connector into its socket. If any undue
resistance is encountered, ensure that the connector is
oriented correctly to the socket.
6. Plug the AC cord into the power supply, then into an AC outlet.
7. After the cables are connected, install the terminal in its planned location, either
on a desktop or mounted to a wall (see the next section “Mounting the
Terminal” ) .
Mounting the Terminal
The terminal can be freestanding, attached to a wall (an optional wall mount kit is
required), or mounted permanently on a desktop. Instructions for mounting your
terminal are provided in the following paragraphs; use the instructions that are
appropriate for the desired method of mounting your terminal.
Freestanding Desktop Mounting
Model 3350SE terminals are built with a desktop mounting stand as part of the
housing, so they can immediately be put into desktop operation. The terminal is
also weighted and equipped with non-skid feet. “Terminal Features” shows the
Model 3350SE terminal.
Caution
Always mount the terminal vertically, with the base
down, to ensure proper cooling.

41
Permanent Desktop Mounting
If desired, the terminal can be permanently mounted on a desktop. Holes in the
base plate are threaded to receive the mounting bolts. Two 6 mm (M6) mounting
bolts must be provided by the user.
The mounting bolts must not protrude more than 9 mm (3/8 in) through the top of
the desktop mounting surface. Damage to the terminal housing and internal
components could occur if the mounting bolts protrude past the tops of the guide
holes.
Follow these instructions for permanent desktop mounting:
1. Make a template of the desktop mounting holes using the bottom of the
terminal, and use it to mark the desktop area where you want to mount the
terminal.
2. Drill holes for the mounting bolts through the desktop mounting surface at the
marked locations.
3. Place the terminal in position over the holes drilled in the desktop.
4. Insert the mounting bolts up through the holes in the desktop and into the
threaded holes in the terminal base plate. Tighten the bolts until snug.
Wall Mounting
The terminal can be mounted on a wall using the optional wall-mounting bracket.
The following figure shows the wall-mount configuration.
Note
For wall mounting, it is generally best to connect the
cables before mounting the terminal on a wall.
However, cables can be connected at any convenient
time, as long as power is disconnected.
42 Installation Procedures
Figure 7-2 3350SE Wall Mount Configuration
Follow these instructions to mount the terminal on a wall:
Note
The following procedure has the bracket mounted to
the terminal first, and then the complete assembly is
placed on wall anchor screws.
Mounting
Bracket
Tabs
Bolts

43
1. Use the wall-mount bracket as a template to determine the positions of the
mounting holes on the wall, then mark the locations of the mounting holes.
Note
When determining location, take into account the cable
lengths of the monitor, keyboard, mouse, power supply,
and peripherals.
2. Install the (user-provided) wall anchors. Any standard anchoring method may
be used, such as screws, butterfly anchors, or expansion bolts.
3. Install the anchor screws. The anchor screw heads must have just enough
clearance to allow the bracket to slip onto them when hanging the assembled
terminal (see the Note above).
4. Insert the tabs at the top of the mounting bracket into the slotted holes in the
back of the terminal housing.
5. Swing the mounting bracket to the side of the terminal.
6. Insert the mounting bolts up through the holes in the bottom of the mounting
bracket and into the threaded holes in the terminal base plate.
7. Tighten the mounting bolts to hold the bracket firmly in place.
8. Hang the terminal assembly on the wall-anchor mounting screws.
9. Install the cable retaining loop and shroud using the procedure below.
Shroud Attachment
The plastic shroud may be installed to conceal the cable connectors at the rear of
the terminal housing.
Proceed as follows:
1. Attach the cables to their respective connectors on the back panel of the
terminal (see “Connecting the Terminal”).
2. Install the shroud-mounting clips.
3. Gently pull the lower ends of the shroud apart and place it over the cables.
4. Place the slots in the lower end (split end) of the shroud under the lower shroud
mounting clip.
5. Rotate the upper end of the shroud until the top slot goes over and engages the
upper mounting clip.

44 Installation Procedures
Turning On the Terminal
Once the terminal is installed and all back panel connections have been made,
press and release the power management button (see the following figure) to
power-up the terminal.
Figure 7-3 3350SE Power Management Button
The logo will appear on the screen followed by:
•The
Setup Wizard, if it is the first time that you have powered-up your terminal.
•The
Winterm Connection Manager dialog box, if the Setup Wizard has been
completed.
If desired, adjust the display’s geometry and intensities to your preferences.
Adjustments to the display can be made at any time, whether or not the terminal is
connected to a server.
Power
Management
Button

8Models 3515SE/3715SE/3720SE
Terminal Installation
The following section discusses installation of the integrated-CRT terminals.
Locating the Terminal
Position the terminal on a clean, horizontal surface that is free from vibration and
out of direct sunlight. Allow 75 mm (3 in) of clearance on all sides of the terminal,
for air circulation and movement of the tilt/swivel mechanism. Refer to “Terminal
Specifications” for environmental specifications.
Connecting the Terminal
Before powering-up the terminal, connect it to all of its peripheral devices. The
following figure shows the terminal’s back panel connectors.
46 Installation Procedures
Figure 8-1 3515SE/3715SE/3720SE Terminal Back Panel Connectors
Note
The illustration above shows the back panel of a
3515SE/3715SE terminal. The back panel of a 3720SE
terminal is nearly identical, except that the pull ring
(located by COM 2 in the illustration above) is made of
high-impact plastic.
The following table summarizes the back panel connectors’ functions.
Table 8-1 3515SE/3715SE/3720SE Terminal Back Panel Connectors
Connector Description
Network Connector LAN connector, 10Base-T (10/100Base-T for 3720SE)
Com1 Serial port 1:
• Can be connected to the external modem or used
for direct connection to a local server.
• Can be used for the emergency download of the
operating system programs from the host computer.
Com2 Serial port 2:
• Can be connected to an external modem.
• Can be used for a direct connection to a local
server.
Power Parallel Headphone Microphone
Option Slot
Mouse COM 1 COM 2
KeyboardNetwork

47
Follow these instructions to connect the terminal to its peripheral devices:
1. Connect the keyboard to the Keyboard connector.
2. Connect the mouse to the Mouse connector.
3. Plug the AC cord into the back panel of the terminal, then into an AC outlet.
4. Connect a 10Base-T network cable to the Network connector.
The terminal is now ready for operation.
Turning On the Terminal
Once the terminal is installed and all back panel connections have been made,
power it up. If the terminal is a 3515SE or 3715SE, press and release the power
management button. If the terminal is a 3720SE, it is powered-up and operating
when it is connected to AC power; to toggle the display off or on, press and release
the power management button.
Note
For the 3720SE, if the button is continuously depressed
for 3-5 seconds, the unit will perform a hard boot.
See the figure on the following page for the location of the power management
button.
Parallel Port Local printer output
Keyboard Keyboard interface
Mouse Mouse interface
Power AC power cord interface
Option Slot PCMCIA card slot
Headphone Audio output for headphones
Microphone Audio input for microphones
Table 8-1 3515SE/3715SE/3720SE Terminal Back Panel Connectors,
Connector Description
48 Installation Procedures
The logo will appear on the screen, followed by:
•The
Setup Wizard, if it is the first time that you have turned on your terminal.
•The
Winterm Connection Manager dialog box, if the Setup Wizard has been
completed.
Make sure that the display’s geometry and intensities are set to your preferences.
This can be done at any time, whether or not the terminal is connected to a server.
If your terminal is installed with an optional touchscreen, calibrate it now. Refer to
“Input Configuration” for the procedure.
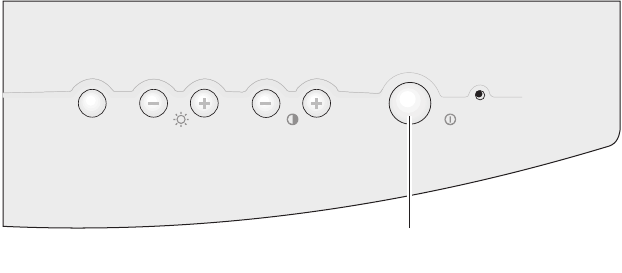
Display Adjustments
The following sections explain how to adjust the screen’s brightness, contrast,
horizontal and vertical size and phase, pincushion, and trapezoid.
The terminal uses an OSD (on-screen display) adjustment feature. The OSD is
invoked with the buttons on the front panel (see Terminal Front Panel below).
Figure 8-2 3515SE/3715SE/3720SE Terminal Front Panel
SELECT ADJUSTMENU
Power Management
Button
49
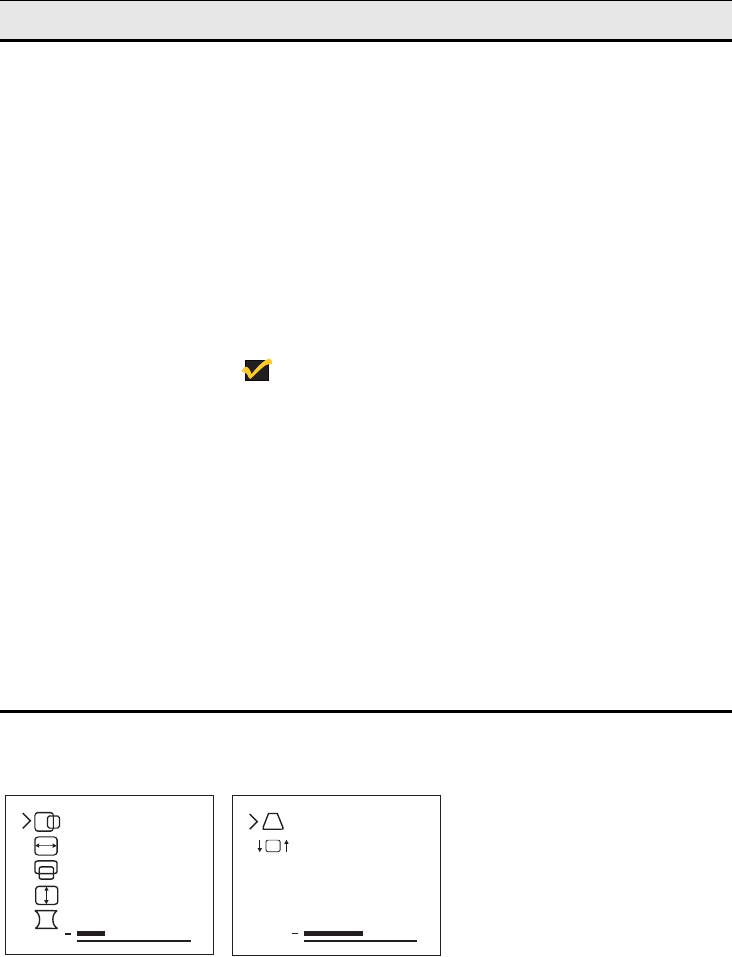
Instructions for using the terminal’s front panel are listed in the following table.
Figure 8-3 3515SE/3715SE OSD (On-Screen Display) Menu
Table 8-2 3515SE/3715SE/3720SE Terminal Front Panel
Button Function
MENU (OSD) To use:
1. Press the MENU button to invoke the OSD (refer to
the following figure).
2. Press the plus [+] or minus [-] SELECT buttons to
select the adjustment you want to make (see the
following table, OSD Alignment, for settings).
3. Press the ADJUST plus [+] or minus [-] buttons to
make your adjustment.
4. Press MENU to save your adjustments and close
the OSD.
Note
The OSD can be invoked at any time the
terminal is on, even while running an
application. It automatically closes after a period
of inactivity (2 minutes). If this happens before
you complete your adjustments, press the
MENU button to invoke the OSD again.
SELECT (Brightness) Press the plus [+] and minus [-] buttons on the
terminal’s front panel to increase or decrease the
display’s brightness.
ADJUST (Contrast) Press the plus [+] and minus [-] buttons on the
terminal’s front panel to increase or decrease the
display’s contrast.
H-CENTER
H-SIZE
V-CENTER
V-SIZE
PIN +
TRAPEZOID
ROTATE
RECALL MODE
+

50 Installation Procedures
The following table describes the functions of the OSD menu.
Table 8-3 3515SE/3715SE/3720SE OSD Menu
Function Description
H-CENTER H-CENTER adjusts the screen’s horizontal center from
left to right.
H-SIZE H-SIZE adjusts the screen’s width.
V-CENTER V-CENTER adjusts the screen’s vertical center, top to
bottom.
V-SIZE V-SIZE adjusts the screen’s height.
PIN PIN (Pincushion) adjusts screen distortion, where both
sides of the display sag inward toward the center or
bow outward from it.
TRAPEZOID TRAPEZOID adjusts the screen’s right- and left-hand
sides so they are parallel.
ROTATE ROTATE corrects the screen’s rotation. Use this
function if the display tilts left or right.
RECALL MODE Select this item to reset the display to the factory
preset color temperatures (also see the following
figure):
RECALL MODE
Preset 1 is 9300ºK
Preset 2 is 6550ºK
Preset 3 is 5500ºK
The color adjustments are:
R
This adjusts the display’s red hues.
G
This adjusts the display’s green hues.
B
This adjusts the display’s blue hues.
51
Figure 8-4 3515SE/3715SE/3720SE Recall Mode
R
G
B+
+
+
9300 K
123
R
G
B+
+
+
USER 1
123
RECALL 9300K
52 Installation Procedures

9Modem Card Installation
This chapter contains the information you need to install a PCMCIA modem card.
About Modem Cards
The modem card option increases the capabilities of your terminal by providing
additional connectivity features and functions. It connects to a telephone line for
standard serial modem communications with another computing device, or network
access through a server. When a modem card is plugged into the terminal, it
operates as a native device. It can be configured from menus seamlessly
integrated into the terminal configuration menu system. The following figure shows
a modem card.
Figure 9-1 Modem Card
Modem card option kits typically include:
• Modem card and cable
• Clamp-on noise suppressor
• Installation guide or compact disc (CD)
Caution
Only modems sold by the manufacturer are known to
meet regulatory compliance. Other modems may not.
54 Installation Procedures
Installation and Removal
The modem card can be configured to connect
• To a server via PPP
• Directly to an ICA server
• To a server with a terminal emulation
Note
This procedure assumes that the terminal is already
installed and configured as described in “Terminal
Installation.”
Note
This procedure is based on the modem card and cable
sold by the terminal manufacturer. Installation will be
similar for other modem cards and cables.
Installation
Refer to the following three figures and proceed as follows:
1. Turn off the power.
2. Remove the screw beneath the security cover.
3. Open the cover over the option slot.
4. Press down on top of the cover to release the top catches and swing the cover
out and down (see the next figure).
Caution
Do not try to open the cover with the logic card
assembly fully seated. The cover could be damaged.
5. Insert the modem card (with product label up) into the option slot and press it
gently until it is seated in the card receptacle.
Note
If a plug is installed in the cover’s rear hole, remove the
plug before proceeding. Save the plug for possible
future use when the card is removed (see figure 9.4).
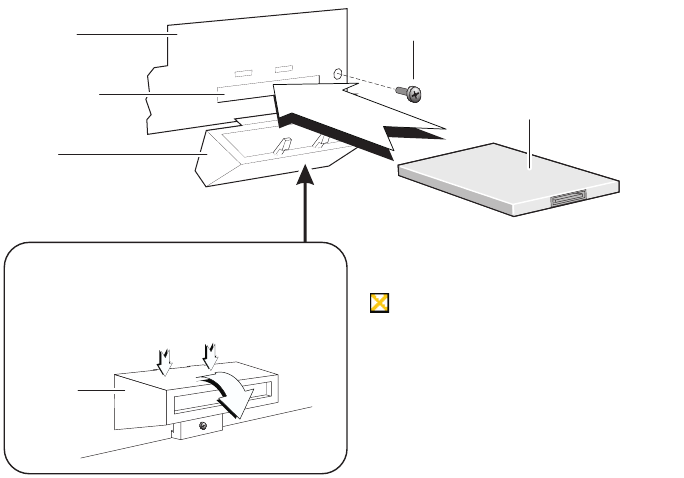
55
Figure 9-2 Installing the Modem Card
6. Close the option slot cover (see the following figure).
7. Install the cover screw.
8. Install the clamp-on noise suppressor on the cable assembly. Position it as
closely as possible to the modem card (may not be necessary for other vendors’
cables).
9. Insert the cable-assembly modem card connector through the hole in the closed
cover and into the modem card. Depress the connector tabs while inserting.
Make sure the catches lock the connector in place (see the following figure).
10.Insert the cable-assembly telephone connector into a telephone jack.
11. Power-up the terminal.
12.Modify the terminal configuration settings as instructed in “Changing Terminal
Properties.”
Modem
Card
To Open Cover
Cover
(Closed)
Press down on top to release
catches and swing down
Option Slot
Terminal
Back Panel
Cover
(Open to insert
modem card)
Back Panel
Screws (2)
CAUTION Product label
is on top of card. Do not
push too hard on card or
connector when installing;
damage could occur if
card or connector is upside-
down.
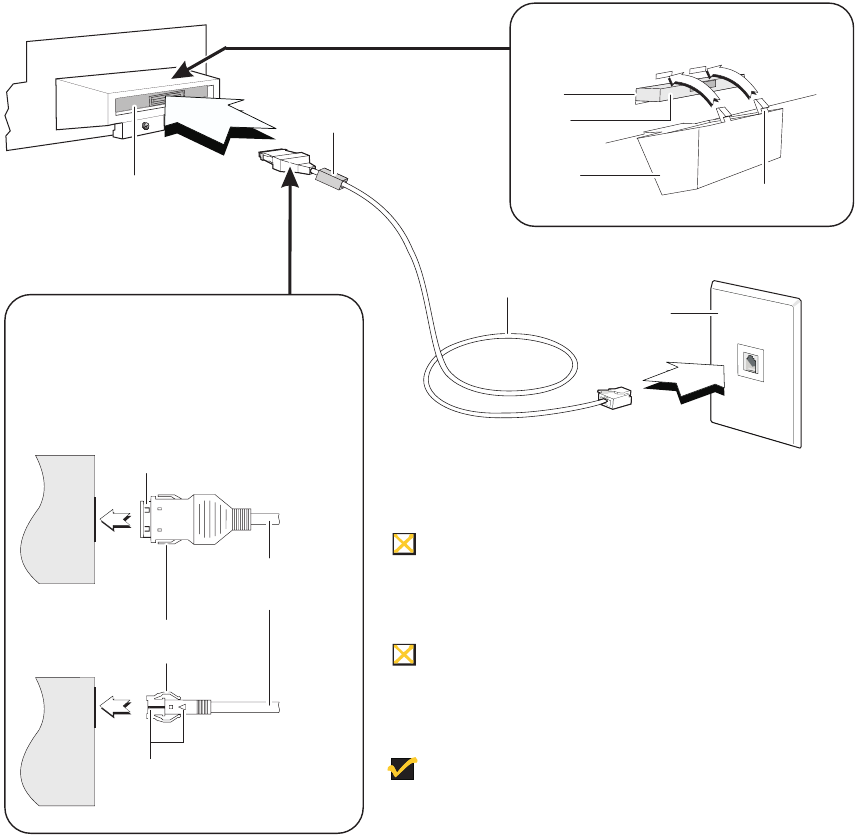
56 Installation Procedures
Figure 9-3 Connecting the Modem Card Cable
Connect cable
through hole in
closed cover
Cable
Assembly
Phone
Jack
Card
Installed
Option
Slot
Cover
(Opened) Catches (2)
To Close Cover
To Insert and Remove Connector
Connector must be square to card for
insertion and removal
Metal surface towards
top of domestic (U.S.)
modem card
Do not pull on cable
to remove card
Depress tabs during
insertion and removal
Arrows toward top of
international modem card
Clamp-On Noise
Suppressor
(see Note)
Caution Product label is on top of card.
Do not push too hard on card or connector
when installing; damage could occur if card or
connector is upside-down.
Caution
Note
Inverted connector, excessive side
loading, or failure to depress connector lock
tabs during insertion or removal may result in
damage to card or connector.
Mount clamp-on noise suppressor as
close as possible to modem card.

57
Removal
Refer to the three figures in this section and proceed as follows:
1. Turn off the power.
2. Disconnect the cable assembly from the modem card by depressing the
connector tabs and pulling the connector out of the card (see the preceding
figure).
3. Remove the two screws securing the terminal back panel (part of logic card
assembly), and pull the panel out approximately 1/2 inch.
4. Remove the option slot cover screw.
5. Open the option slot cover. Press down on top of the cover to release the top
catches and swing the cover out and down (see the figure titled “Installing the
Modem Card”).
Caution
Do not try to open the cover with the logic card
assembly fully seated. The cover could be damaged.
6. Pull the modem card out of the option slot.
7. Close the option slot cover (see the figure titled “Connecting the Modem Card
Cable”).
8. Push the logic card assembly back into the unit and reinstall the two screws
removed in step 3.
9. Install the option slot cover screw.
10.Snap the plug into the option slot cover hole (see the following figure).
11. Disconnect the cable assembly from the telephone jack.
Note
Leave the clamp-on noise suppressor on the cable
assembly (may not be applicable to other vendors’
cables).
58 Installation Procedures
Figure 9-4 Inserting the Plug
Configuration
The modem card can be configured for standard serial communications, or for
network access through a server that can communicate with the modem using PPP
protocol. The following section provides instructions for configuring selections
needed to operate the modem in the desired mode. Refer to “Terminal
Management” and “Connection Configuration” for instructions about how to
configure modems.
Modem Initialization Strings
The initialization string used with the modem option card provided by the
manufacturer is:
AT&F&C1&D2
Refer to modem command sets or the initialization files for other strings.
When card is not
installed, snap plug into
hole in option card cover
Plug

10 Noise Suppressor Installation
Noise Suppressor Installation
Note
This installation procedure applies only to the 3350SE
model WBT.
A noise suppressor (ferrite bead) must be installed on the network cable of your
terminal. This installation is necessary to maintain compliance with US FCC B limits
and Europe CISPR B EN55022 Class B limits. The noise suppressor is supplied by
the manufacturer and should be packed in your terminal’s shipping carton. The
following figure shows the noise suppressor.
Figure 10-1 Noise Suppressor
60 Installation Procedures
1. Open the casing.
2. Fit the casing over the network cable, as close as possible to the back of the
cable’s connector.
3. Snap the casing shut.

62

11 Initial Terminal Setup
Using the Setup Wizard
The Setup Wizard is used for initial setup of the terminal’s properties. The wizard
runs when:
• You power-up your terminal for the first time.
• Your terminal has been restarted with a G key reset (described later).
• A new image has been downloaded to your terminal but is older than the image
currently in use.
• You use the Reset the Terminal to Factory-Default Property Settings
function on the General properties sheet.
The Setup Wizard lets you set terminal network configuration and terminal display
parameters. Any future changes can be made using the Terminal Properties
dialog box. You can launch this dialog box from the Winterm Connection
Manager by pressing the F2 key. See “Resetting Terminal Properties.”
There are seven dialog boxes that display in succession during the process. Each
dialog box is self-explanatory. Some dialog boxes are informational and require no
user input. Other dialog boxes will prompt you for network and display information.
Following are the seven dialog boxes of the wizard.
64 Terminal Management
Figure 11-1 Welcome Dialog Box
This dialog box is informational, providing product information.
65
Figure 11-2 EULA (End User License Agreement) Dialog Box
Read the license agreement carefully. The full text of the agreement is provided in
the front of the guide as the EULA.
66 Terminal Management
Figure 11-3 IP Address Dialog Box
Click on one of the two radio buttons to select a method for supplying IP addresses.
The buttons are mutually exclusive, with No, I will enter static IP information as
the default:
• If you keep the default, the Specify an IP Address and Optional Information
dialog boxes will display in succession.
• If you select Yes, use the IP information supplied by DHCP
, only the
Optional Information dialog box will display.
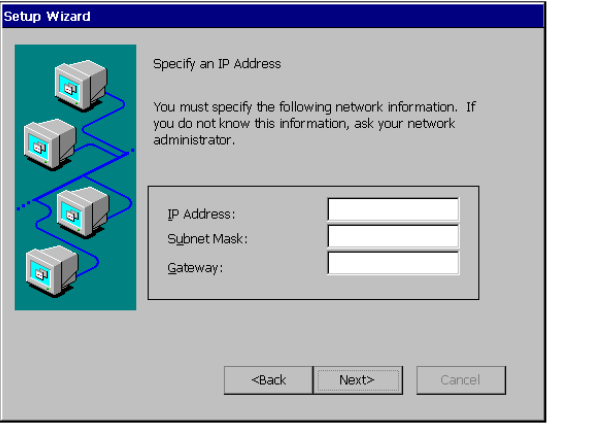
67
Figure 11-4 Specify an IP Address Dialog Box
Enter the information requested in the fields provided. By default the fields are
blank.
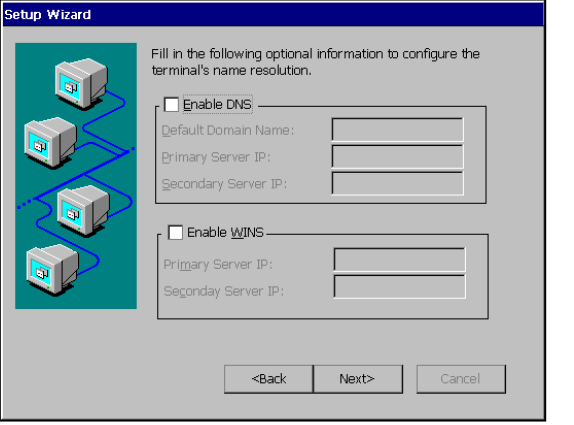
68 Terminal Management
Figure 11-5 Optional Information Dialog Box
Check a box to enable name resolution. Enter the information in the field provided.
If you do not know the information, ask your network administrator. By default the
check boxes are unselected.
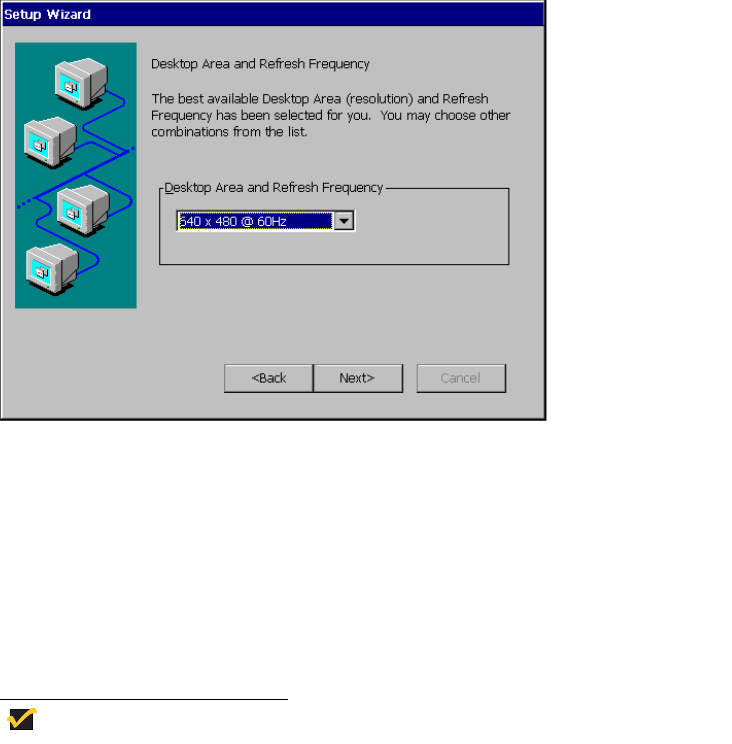
69
Figure 11-6 Desktop Area and Refresh Frequency Dialog Box
Select from the Desktop Area and Refresh Frequency scroll list to set your
resolution. The default setting is 640 x 480 @ 60Hz. Other settings are:
•640 x 480 @ 75Hz
•800 x 600 @ 60Hz
•800 x 600 @ 75Hz
•1024 x 768 @ 60Hz
•1024 x 768 @ 75Hz
Note
There may be more resolution settings in the list on
your terminal.
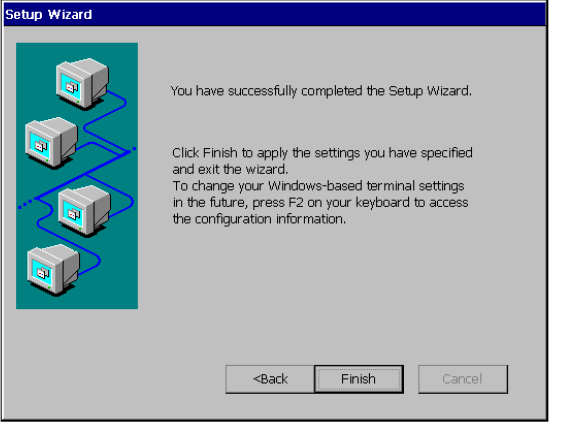
70 Terminal Management
Figure 11-7 Finish Dialog Box
This dialog box is informational.
Click on the Finish command button to apply your selections and quit the Setup
Wizard. After the Setup Wizard closes, the Terminal Settings Change dialog box
displays. See “Resetting Terminal Properties” for further information.
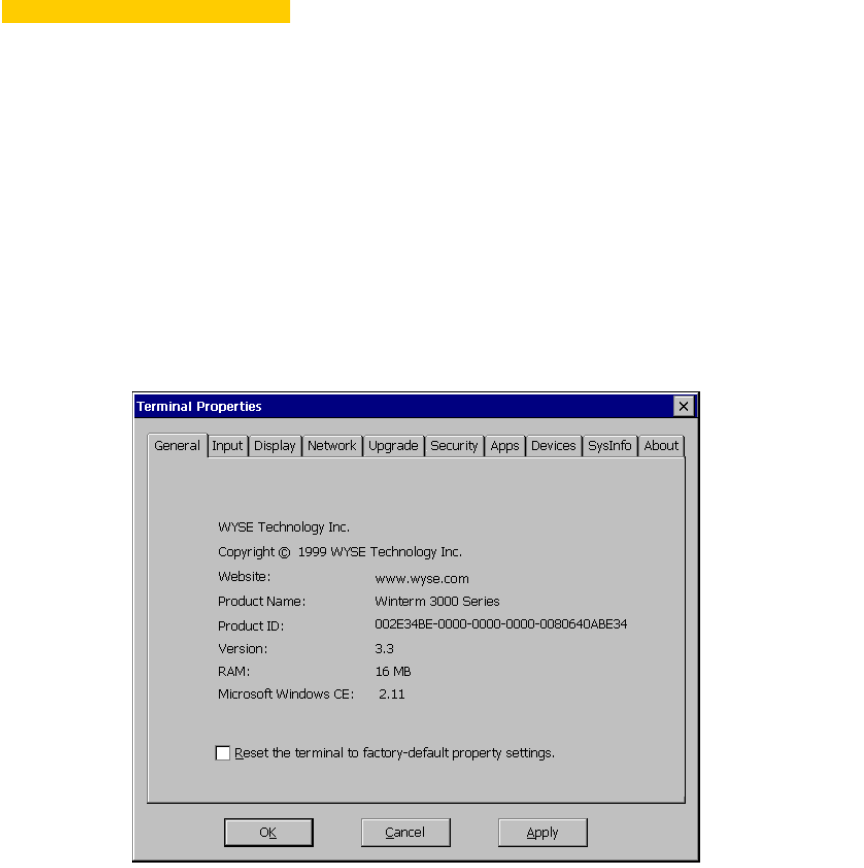
12 Changing Terminal Properties
Terminal properties can be changed at any time during normal terminal operation
using the Terminal Properties dialog box. The following figure shows this dialog
box.
Figure 12-1 Terminal Properties Dialog Box

72 Terminal Management
Note
The amount of RAM that is available depends on the
model of terminal in use.
Using the Terminal Properties Dialog Box
Invoke this dialog box by pressing the F2 key from the Winterm Connection
Manager.
The Terminal Properties dialog box consists of a total of ten properties sheets that
can be invoked by clicking on their individual tabs. The following seven sheets can
be used to change terminal properties:
•Input - discussed in “Input Configuration.”
•Display - discussed in “Display Configuration.”
•Network - discussed in “Network Configuration.”
•Upgrade - discussed in “FTP Pull Firmware Upgrades.”
•Security - discussed in “Security Properties.”
•Apps - discussed in “Additional Applications.”
•Devices - discussed in “Dial-Up Connections.”
These properties sheets are discussed in detail in the following chapters of this
guide. The General, SysInfo, and About properties sheets are discussed in
“General Terminal Information.”
When terminal properties have been changed, the Terminal Settings Change
dialog box is used to restart the terminal. See “Shutting Down the Terminal” for
more information about this dialog box.
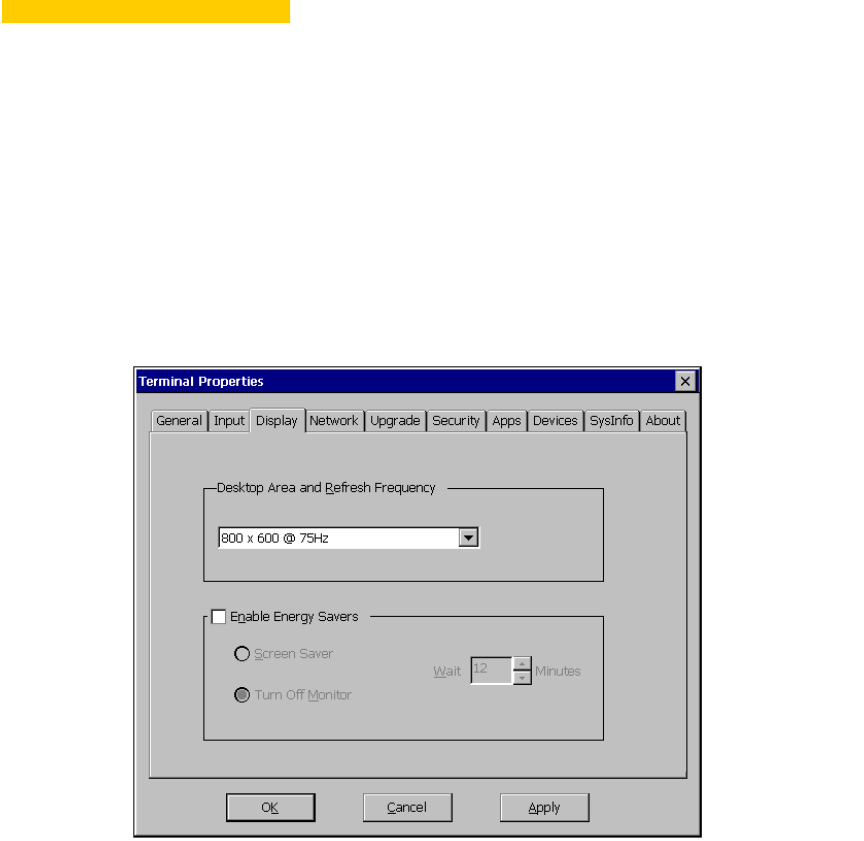

74 Terminal Management
Using the Display Properties Sheet
To invoke this properties sheet:
1. Press F2 to invoke the Terminal Properties dialog box.
2. Click on the Display tab.
The following table discusses the functions of this properties sheet.
Table 13-1 Display Properties Sheet
Function Description
Desktop Area and
Refresh Frequency
The scrolling list box displays the current terminal
display resolution. Scroll and click on a selection to
change resolution. The default is 600 x 480 @ 60 Hz.
Enable Energy
Savers
Click on this check box to enable the energy saver
functions. When you check this box, the three functions
in the group box are activated:
Screen Saver
Click on this radio button to enable the screen saver.
By default this function is not activated.
Turn Off Monitor
Click on this radio button to use this function as an
energy saver. The function works by shutting off the
terminal's display rather than displaying a screen
saver. By default this function is not activated. When it
is activated, this function is enabled.
Wait
Adjust the amount of time (in minutes) that elapses
before the energy saver function you have selected
starts. You can enter your own number or use the
scrolling list. By default the function is not activated.
When it is activated, the default is 12.
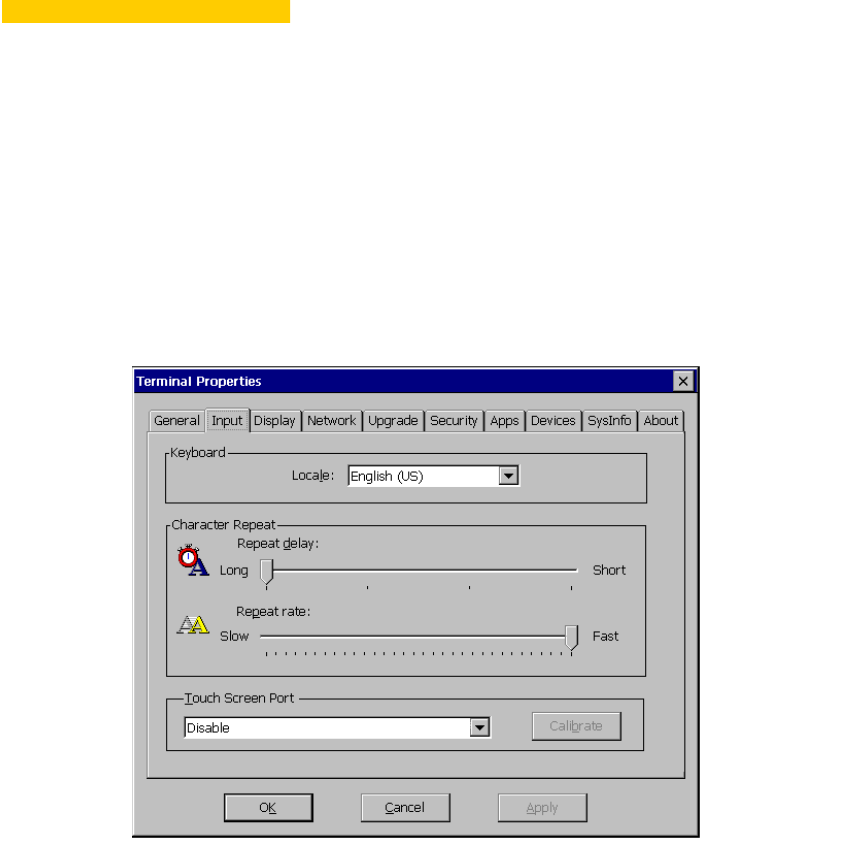
14 Input Configuration
The Input properties sheet lets you configure your terminal’s keyboard and the
optional touch screen. The following figure shows the properties sheet.
Figure 14-1
Figure 14-1Figure 14-1
Figure 14-1 Input Properties Sheet
Input Properties SheetInput Properties Sheet
Input Properties Sheet

76 Terminal Management
Using the Input Properties Sheet
To invoke this properties sheet:
1. Press F2 to invoke the Terminal Properties dialog box.
2. Click on the Input tab in the Terminal Properties dialog box.
The following table describes the functions of this dialog box.
Table 14-1 Input Properties Sheet
Function Description
Keyboard Locale
Use this scroll list to select a language for the
keyboard:
Belgian Dutch
Belgian French
Brazilian (ABNT)
Canadian Eng (Multi)
Canadian Fr (Multi)
Canadian French
Danish
Dutch
English (UK)
English (US) (default)
Finnish
French
German
Italian
Italian (142)
Japanese
Latin American
Norwegian
Portuguese
Spanish
Spanish Variation
Swedish
Swiss French
Swiss German
US International
Note
An IEPC keyboard is required for any language
other than English (US).

77
Character Repeat Group box used to set the character repeat
parameters.
Repeat Delay
Use this slider control to adjust the repeat delay of
keyboard characters. Repeat Delay determines how
quickly the same character will appear on screen when
typed more than once.
Repeat Rate
Use this slider control to adjust the repeat rate of a
keyboard character. Repeat Rate determines how
quickly the same character will appear on screen when
the associated key is held down.
Touch Screen Port Use this drop-down scroll list to name the port that your
optional touch screen will be connected to. The
choices are:
•Disable
•Serial cable on Com1
•Serial cable on Com2
The default is Disable.
Table 14-1 Input Properties Sheet, Continued
Function Description
78 Terminal Management
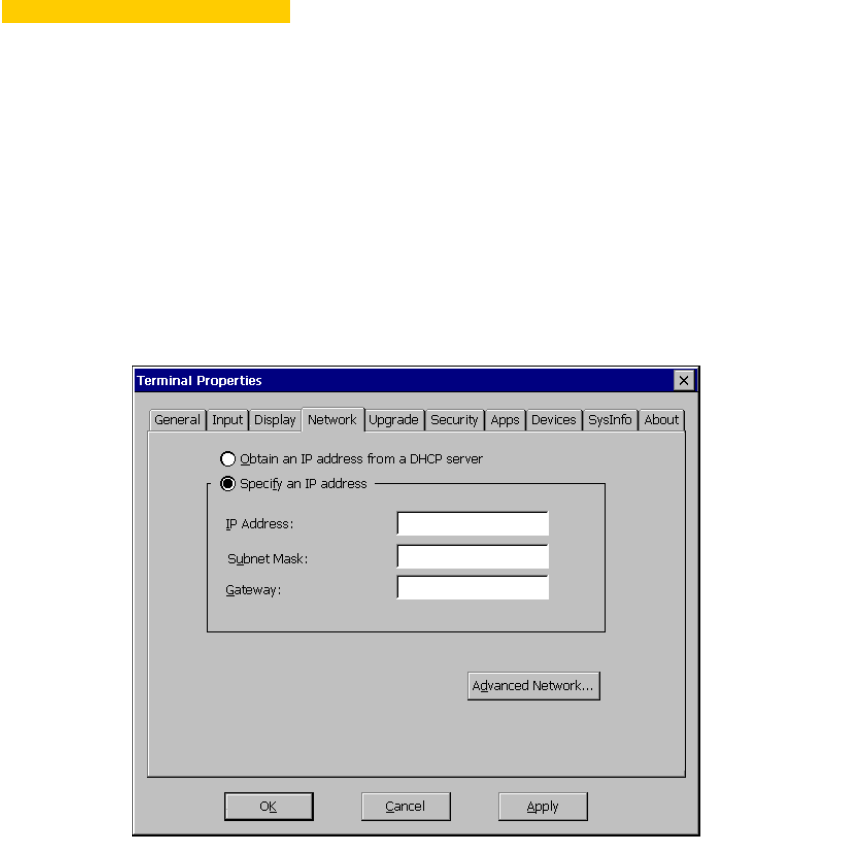

80 Terminal Management
Using the Network Properties Sheet
To invoke this properties sheet:
1. Press F2 to invoke the Terminal Properties dialog box.
2. Click on the Network tab.
The following table discusses the functions of the Network properties sheet.
Table 15-1 Network Properties Sheet
Function Description
Obtain an Address from a
DHCP Server
Click on this radio button to enable DHCP addressing. An IP
address will be automatically assigned to your terminal by the
DHCP server.
Specify an IP Address Use this group box to enter a specific IP address.
IP Address
Enter a static IP address in this field.
Subnet Mask
Enter the subnet mask of the IP address.
Gateway
Enter the gateway of the IP address.
Advanced Network
Note
This command button is activated when Specify an IP
Address is enabled.
Click on this command button to invoke the Advanced
Network Settings dialog box:
Enable DNS
Use this group box to set domain, primary, and secondary
IP addresses for DNS.
Enable WINS
Use this group box to set the primary and secondary IP
addresses of a WINS server.

81
Note
The Network properties sheet on your terminal may
have an extra function. It is named Network Speed.
The functions list for the pull-down scroll box is as
follows:
•Auto Detect
•10 Mbs - Half Duplex
•10 Mbs - Full Duplex
•100 Mbs - Half Duplex
•100 Mbs - Full Duplex
Note
If you do not know your network's communication
speed or whether the communication link should be
half- or full-duplex, contact your system administrator.
82 Terminal Management
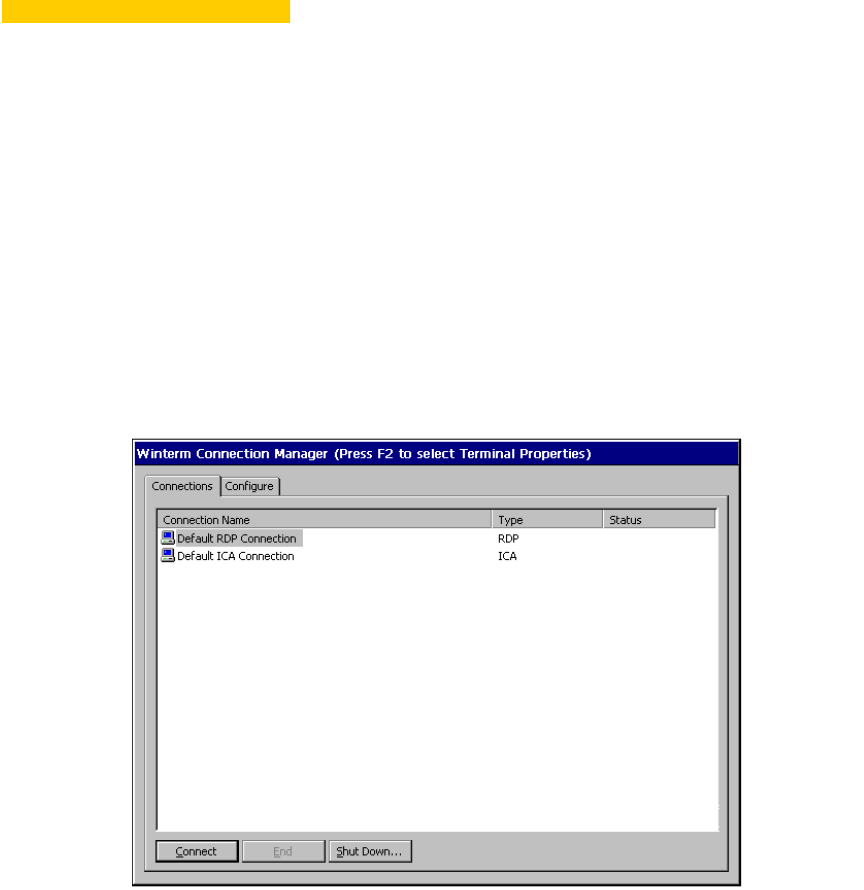
16 Connections Management
The Winterm Connection Manager dialog box is designed to help you manage
your terminal’s network connections. The dialog box displays after the terminal’s
initial splash screen, and consists of the Connections properties sheet and the
Configure properties sheet. Figure 16-1 shows the Winterm Connection
Manager dialog box.
Figure 16-1 Winterm Connection Manager Dialog Box

84 Terminal Management
Using the Connections Properties Sheet
The functions of the Connections properties sheet are used to make (launch)
terminal connections. Figure 16-1 shows the Connections properties sheet, the
default of the Winterm Connection Manager dialog box.
After a connection is created, it will show in the Connection Name list. The
connection’s name will be listed under Connection Name and the type of
connection will be listed under Type. See “Creating New Connections” for further
information.
The Connections properties sheet contains four functions. The following table
identifies and describes each of them.
Table 16-1 Connections Properties Sheet
Function Description
Connection Name This box lists the connections that you have created.
See “Using the Configure Properties Sheet” for
information about creating connections. Default RDP
Connection is the default.
Connect Click on the Connect command button to make the
highlighted connection. Click on a connection in the
Connection Name list box to highlight it. You can also
double-click on a selection to make a connection.
End Click on the End command button to end the
connection process. When you press the End button
and the connection is active, the End Task dialog
displays. This command button is enabled when a
session is active.
Shut Down Click on the Shut Down command button to:
• Log off of the terminal
• Shut down the terminal
• Shut down and restart the terminal
See “Shutting Down the Terminal” for more
information.
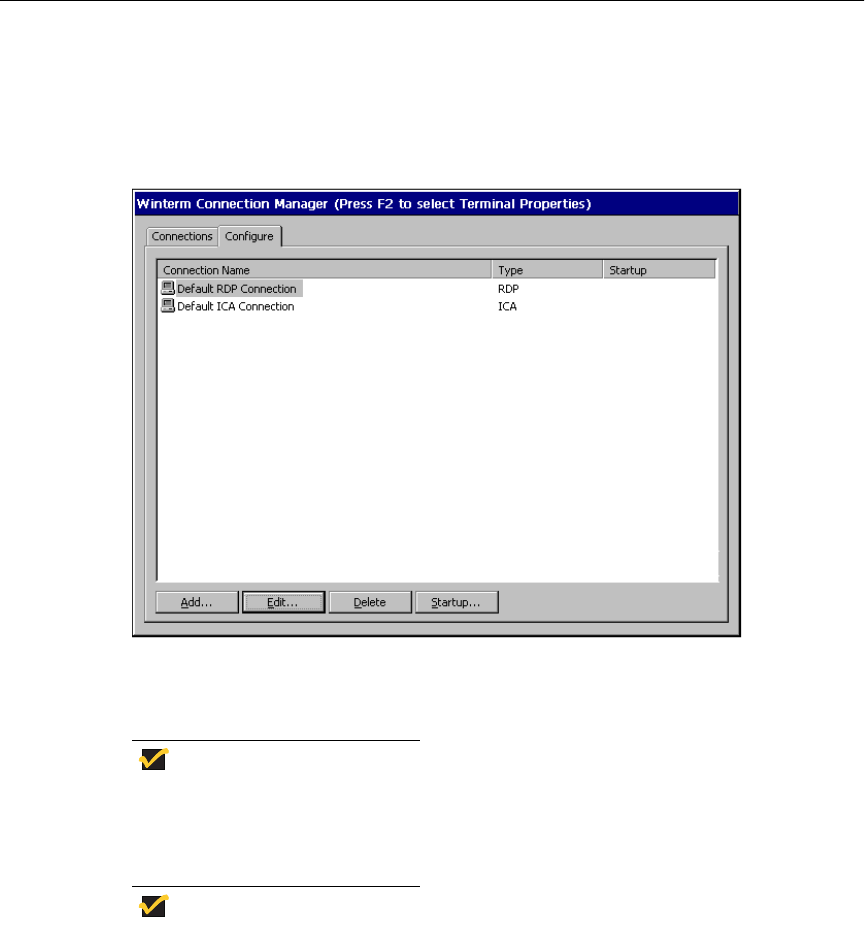
85
Using the Configure Properties Sheet
The Configure properties sheet allows the user to add, modify, delete, and
configure connections. Figure 16-2 shows the Configure properties sheet.
Figure 16-2 Configure Properties Sheet
Invoke this properties sheet by clicking on the Configure tab.
Note
If the Hide Configure Tab function on the Security
properties sheet is enabled, the Configure tab will not
show.
Note
If a Guest or a User logs in with security enabled, the
Configure tab will not show.

86 Terminal Management
After a connection is added or edited, it will appear in the Connection Name list.
The connection’s name will be listed under Connection Name, and the type of
connection will be listed under Type. Also, if the connection is designated as the
start-up connection, a Yes will display in Startup. The remainder of this section
discusses adding connections. See “Editing Connections” and “Using the Startup
Function” for further information.
The Configure properties sheet contains five basic functions. The following table
identifies and describes each of them.
Note
A connection name must be selected for the Edit,
Delete, and Startup functions to be enabled.
Table 16-2 Configure Properties Sheet
Function Description
Add The Add button allows the user to create a new
connection. When this button is pressed, the New
Connection dialog box displays. See “Creating New
Connections” for further information about adding new
connections to the Connection Name list. See
“Multiple Sessions” for running more than one session
at a time.
Edit The Edit command button allows the user to edit or
modify the properties of an existing connection. When
this button is pressed, the Properties dialog box
displays. See “Editing Connections” for more
information about editing connections.
Delete The Delete button lets you delete a connection. When
you click this command button, the Confirm
Connection Delete dialog box displays. Click on Yes
to complete the deletion. Click on No to cancel the
deletion.
Startup... The Startup button allows the user to specify the
startup behavior of a connection. See “Using the
Startup Function” for more information.
Connection Name The Connection Name list box allows the user to view
and select connections for the purposes of adding,
editing, and deleting connections, or for specifying the
startup behavior of a connection.
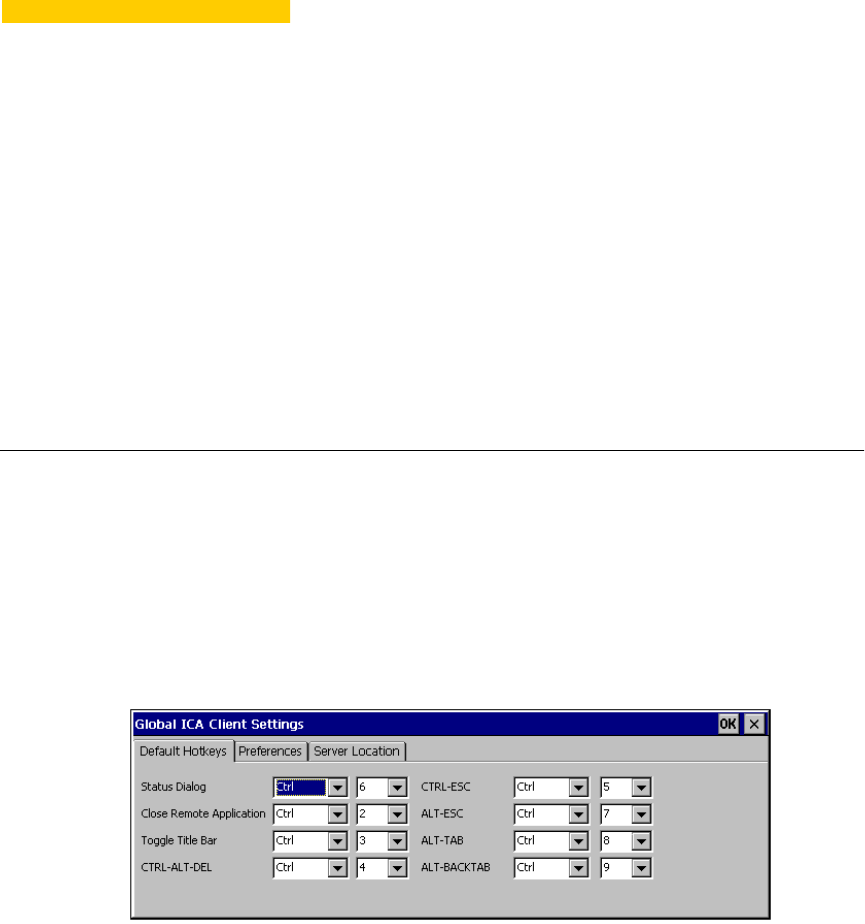
17 ICA Client Settings
ICA client settings are handled in the Global ICA Client Settings dialog box. This
dialog box is invoked through the Apps properties sheet found in the Terminal
Properties dialog box. See “Additional Applications” for detailed information about
the Apps properties sheet.
There are three properties sheets associated with the Global ICA Client Settings
dialog box. A description of the functions of each sheet follows.
Setting the Default Hotkeys
Hotkeys can be used during ICA sessions to invoke various functions. Some
hotkeys control the behavior of ICA Windows, while others emulate standard
Windows hotkeys. To set hotkeys, access the Default Hotkeys properties sheet. It
is the default properties sheet for the Global ICA Client Settings dialog box. The
following figure shows the Default Hotkeys properties sheet.
Figure 17-1 Default Hotkeys Properties Sheet

88 Terminal Management
Use the pull-down scroll boxes on the Default Hotkey properties sheet to
customize default hotkey key sequences. The following table describes the
hotkeys.
Table 17-1 Default Hotkeys Properties Sheet
Function Description
Status Dialog Displays the ICA connection status.
Close Remote
Application
Disconnects an ICA client from the server and closes
the client window on the local desktop. When you use
this hotkey, the open session continues to run on the
server. If you do not want to leave your session running
in a disconnected state, log off.
Toggle Title Bar Alternately hides and displays the client window title
bar:
• Use the title bar to drag the client window to
different positions on the local desktop.
• Remove the title bar to maximize your work space.
Ctrl+Alt+Del Displays the Windows NT Security dialog box.
Ctrl+Esc On WinFrame servers, pressing this key sequence
displays the Remote Task List.
On MetaFrame servers, pressing this key sequence
displays the Windows NT Start menu.
Alt+Esc This hotkey cycles the focus through your minimized
icons and opens the associated applications.
Alt+Tab This hotkey cycles through applications that have been
opened. A window appears, displaying the programs
as you cycle through them.
Alt+Backtab This hotkey sequence cycles through applications that
have been opened in a session, but in the opposite
direction.
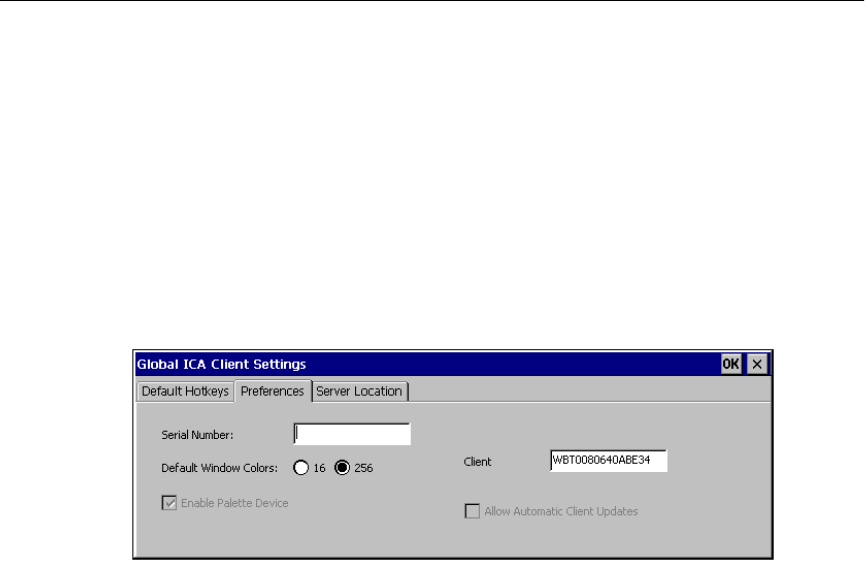
89
Setting Terminal Preferences
Use the Preferences properties sheet to change default settings. To invoke the
Preferences properties sheet:
1. Click on the ICA Client Settings command button on the Apps properties
sheet.
2. Click the Preferences tab.
The Preferences properties sheet displays. Figure 17-2 shows the Preferences
properties sheet.
Figure 17-2 Preferences Properties Sheet

90 Terminal Management
The following table describes each function of the properties sheet.
Table 17-2 Preferences Properties Sheet
Function Description
Serial Number This is the serial number of your ICA Client software.
This field is only necessary when you are using the ICA
Windows CE Client with a product such as WinFrame
Host/Terminal, which requires each client to have a
Citrix PC Client Pack serial number in order to connect
to the server. If a serial number is required, you must
enter it exactly as it appears on the serial number card.
The Serial Number field is not used by MetaFrame
servers.
Default Window
Colors
In the Window Colors field, select 16 or 256 colors.
When using a PPP connection, 16 color mode may
provide better performance. If the window options
specified exceed the capabilities of the client
hardware, the maximum size and color depth
supported by the CE operating system are used.
Enable Palette
Device
This feature is not yet supported.
Client This text box allows you to change the client name of
your client device. The Citrix server uses the client
name to uniquely identify resources (such as mapped
printers) associated with a given client device. The
client name should be unique for each computer
running a copy of a Citrix ICA Client. If you do not use
unique client names, device mapping and application
publishing may not operate correctly. The default is
WBT<mac address>.
Allow Automatic
Client Updates
This feature is not yet supported.
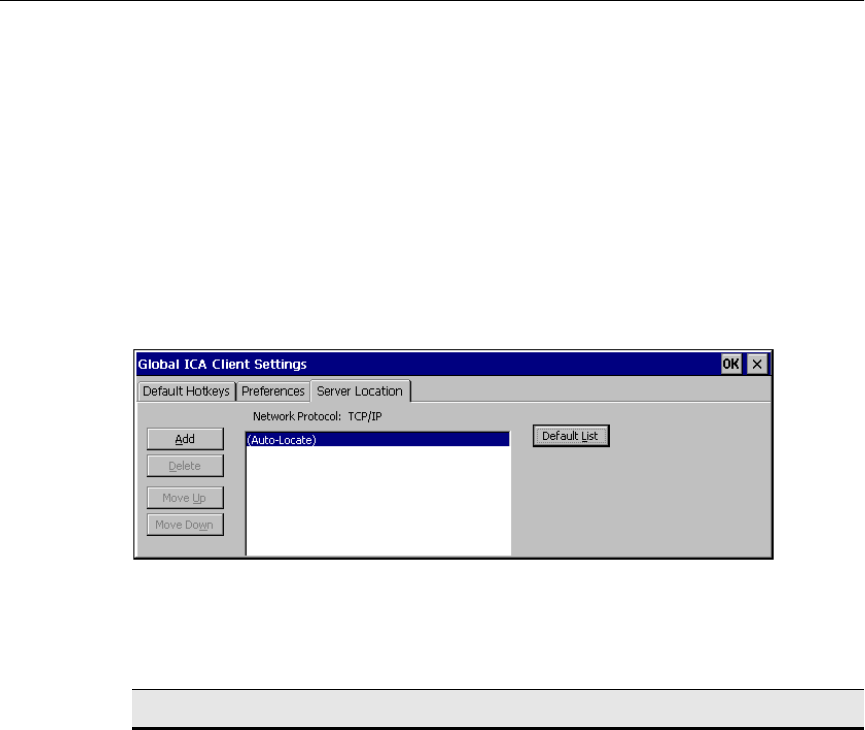
91
Setting the Server Location
Use the Server Location properties sheet to construct a list of ICA servers. To
invoke this properties sheet:
1. Click on the ICA Client Settings command button on the Apps properties
sheet.
2. Click the Server Location tab.
The Server Location properties sheet displays. The following figure shows this
sheet.
Figure 17-3 Server Location Properties Sheet
The following table describes each of the functions of this sheet.
Table 17-3 Server Location Properties Sheet
Function Description
Add Click on this command button to add a server to the
list.
Delete Use this button to delete the name of a server from the
list.
Move Up Click on this button to move the name of a server up in
the list.
Move Down Click on this button to move a server down in the list.

92 Terminal Management
Note
Delete, Move Up, and Move Down are not
activated unless there is at least one ICA server
in Network Protocol: TCP/IP
. See the next
table entry.
Network Protocol:
TCP/IP
Use this list to select an ICA server. The default is
(Auto-Locate).
Default List Use this button to recall the previous list.
Table 17-3 Server Location Properties Sheet, Continued
Function Description

18 Multiple Sessions
Starting Multiple Sessions
To start multiple sessions:
1. From the Winterm Connection Manager:
a. Click on your first connection to create your first session.
b. Press Ctrl+Alt+End to return the Winterm Connection Manager.
c. Click on the next connection to create another session.
2. Using autologin:
a. Click on the Security tab in the Terminal Properties dialog box.
b. Click on the Autologin Enable function.
c. Go to the User Accounts list box and select an account that is not
Administrator and has multiple connections associated with it.
d. Make a connection.
3. Using Multiple AutoStart:
a. Click on the Security tab in the Terminal Properties dialog box.
b. Click on the Modify User command button.
c. Click on the Multiple AutoStart check box.
d. Make a connection.

94 Terminal Management
Manipulating Multiple Sessions
With a session or multiple sessions open, you can toggle between sessions. To
toggle between sessions:
• Press Ctrl+Alt+ to proceed to the previous session.
• Press Ctrl+Alt+ to proceed to the next session.
You can also return to the Winterm Connection Manager by pressing
Ctrl+Alt+End.
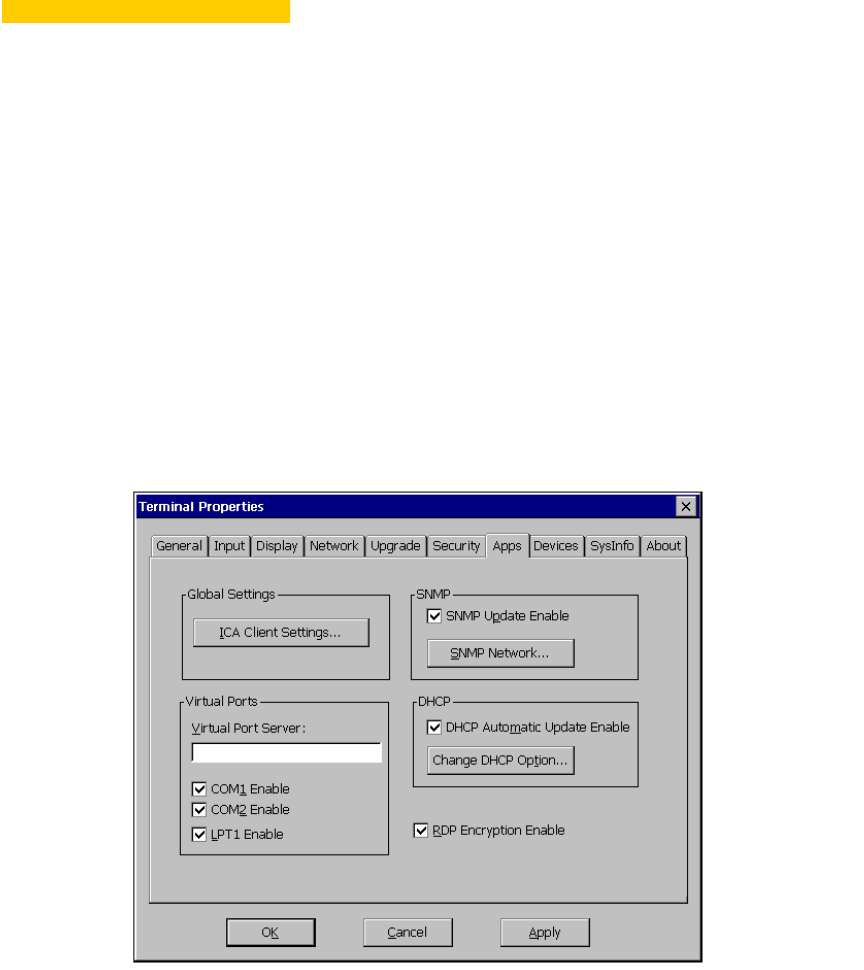
19 Additional Applications
Use the Apps properties sheet to use the following additional applications:
• ICA client settings
• RDP encryption option
• Virtual port option
• SNMP management
• DHCP options
Figure 19-1 Apps Properties Sheet

96 Terminal Management
Using the Apps Properties Sheet
To invoke the Apps properties sheet:
1. Press F2 to invoke the Terminal Properties dialog box.
2. Click on the Apps tab in the Terminal Properties dialog box.
Table 19-1 describes the functions of the Apps properties sheet.
Table 19-1 Apps Properties Sheet
Function Description
Global Settings Group box used to manage ICA sessions.
ICA Client Settings
Click on the ICA Client Settings command button in
the Global Settings group box. See “ICA Session
Management” for detailed information about ICA
session management.
Virtual Ports Group box used to set up the virtual port option.
Virtual Port Server
Type in the address of the virtual port server.
Com1 Enable or Com2 Enable or
LPT1 Enable
Click on one or all of these check boxes to assign that
port as a virtual port. These functions are not mutually
exclusive.
RDP Encryption
Enable
Click this check box to check and enable RDP
encryption. By default this function is enabled.
Caution
If your WTS server does not support encryption,
this function must be disabled.
SNMP Update
Enable
Check this box to enable terminal firmware updates
through SNMP.

97
SNMP Network... Use this command button to invoke the SNMP
Network Administration dialog box. See “SNMP
Network Administration.”
DHCP Automatic
Update Enable
Check this box to enable automatic firmware upgrades.
See “DHCP Firmware Upgrades” and “Changing
DHCP Option IDs.”
Change DHCP
Option...
Use this command button to invoke the Change DHCP
Option IDs dialog box. See “DHCP Option IDs.”
Table 19-1 Apps Properties Sheet, Continued
Function Description
98 Terminal Management
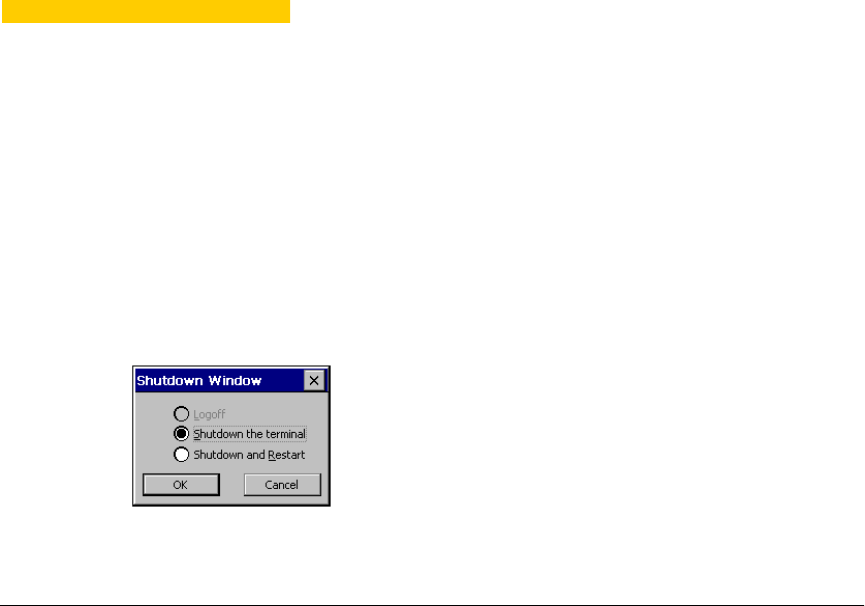
20 Shutting Down the Terminal
Use the Shutdown Window dialog box to log off, shut down, or shut down and
restart the terminal. The following figure shows the Shutdown Window dialog box.
Figure 20-1 Shutdown Window Dialog Box
Using the Shutdown Window Dialog Box
Click on the Shutdown command button in the Winterm Connection Manager to
invoke this dialog box.
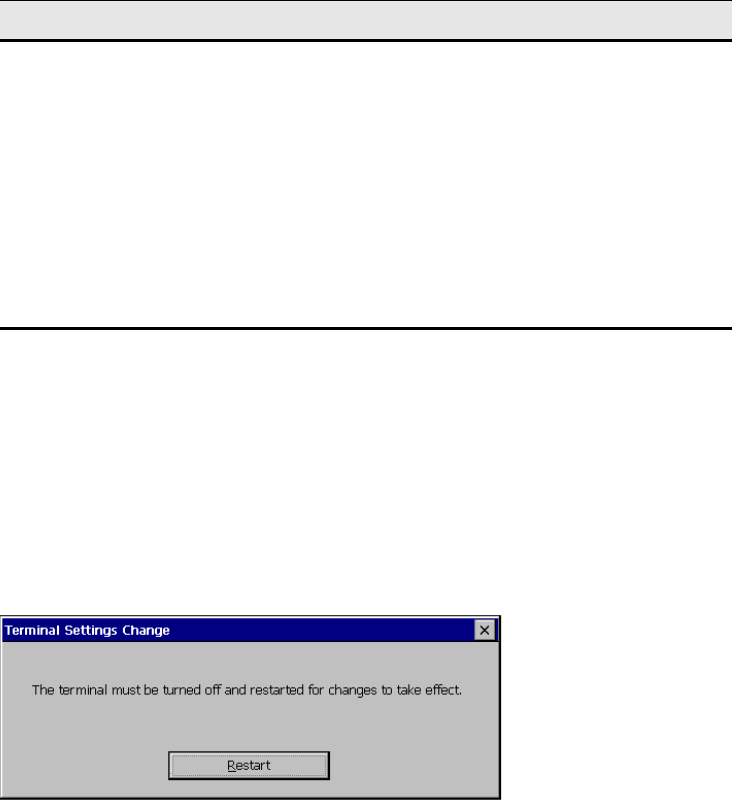
100 Terminal Management
The following table describes the functions of this dialog box.
Using the Terminal Settings Change Dialog Box
When you change terminal properties using the Setup Wizard or the Terminal
Properties dialog box, you will click on either the Finish or OK command button to
save your new settings and close the application. The Terminal Settings Change
dialog box will then display. Figure 20-2 shows the Terminal Settings Change
dialog box.
Figure 20-2 Terminal Settings Change Dialog Box
This dialog box contains the Restart command button. The terminal must be
restarted in order for your new settings to take effect. Click on Restart to restart the
terminal. The Winterm Connection Manager displays. See “Connections
Management” for detailed information about configuring and making terminal
connections.
Table 20-1 Shutdown Window Dialog Box
Function Description
Logout Click on this radio button to invoke the Terminal Login
dialog box. By default this function is not activated. You
must enable the terminal's security function to activate
it.
Shutdown the
Terminal
Click on this radio button to shut down the terminal
without restarting it. A dialog box displays after you
initiate this action. It prompts you as to whether you
want to continue. By default this function is activated.
Shutdown and
Restart
Click on this radio button to shut down then restart the
terminal. By default this function is activated.

Connection Configuration
21 Creating New Connections
22 ICA Connections
23 Dial-Up Connections
24 Using the Dialing Properties and Configure Command
Buttons
25 Using the TCP/IP Settings and Security Command Buttons
26 RDP Connections
27 Terminal Emulation Connections
28 Editing Connections
29 Modem Connection Configuration
102
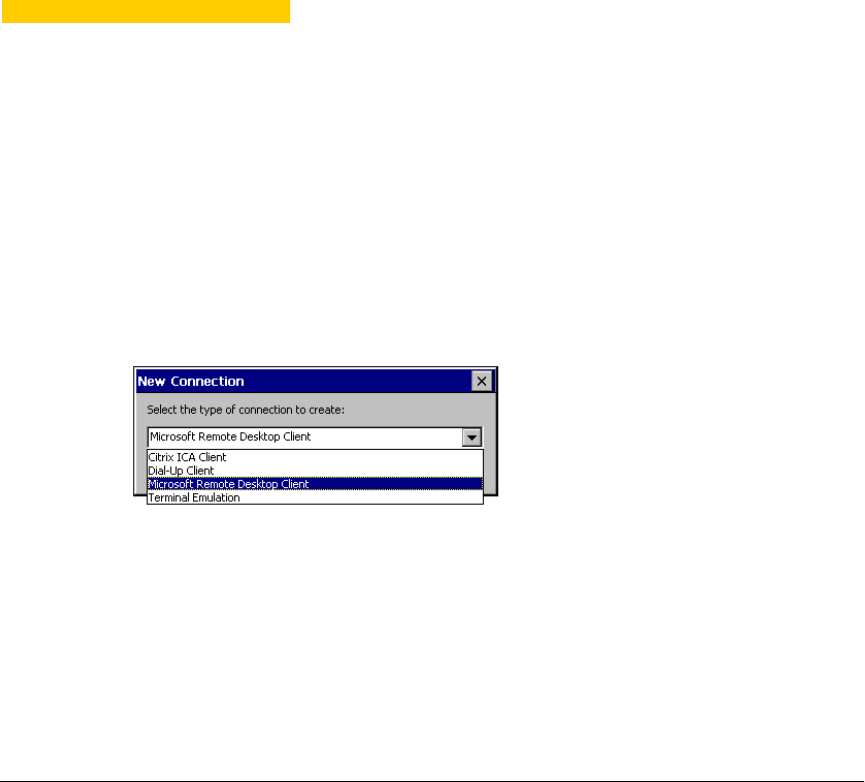
21 Creating New Connections
The New Connection dialog box is used to create new connections. Figure 21-1
shows the New Connection dialog box.
Figure 21-1 New Connection Dialog Box
To invoke the dialog box:
1. Click on the Configure tab in the Winterm Connection Manager dialog box.
2. Click on Add command button on the Configure properties sheet.
See “Connection Management” for details about the Winterm Connection
Manager.
Choosing a Connection Protocol
Use the scroll list shown in the dialog box above to select the type of connection
protocol you want. When you choose from the list above, you are deciding which
connection protocol you want use to connect to a server. Four selections are
available:
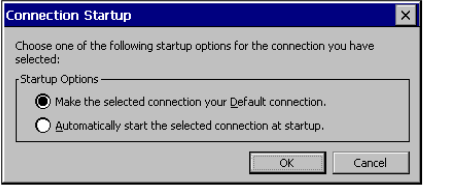
104 Connection Configuration
•Citrix ICA Client
ICA (Independent Computing Architecture) protocol, which connects to an ICA
(Winframe/Metaframe) server. See “ICA Connections” for further instructions
about how to create this kind of connection.
•Dial-Up Client
Connects using a modem and PPP (Point-to-Point Protocol). See “Dial-Up
Connections” for further instructions about how to create this kind of connection.
•Microsoft Remote Desktop Client
RDP (Remote Desktop Protocol), which connects to a WTS (Windows Terminal
Server) server. See “RDP Connections” for further instructions about how to
create this kind of connection.
•Terminal Emulation
Connects to multiple terminal emulation applications. See “Terminal Emulation
Connections” for further instructions about how to create this kind of connection.
Once you have made your selection, click on OK to proceed with creating a
connection.
Using the Startup Function
Your terminal can be set to automatically connect to a server when you turn your
terminal on. This function is set using the Connection Startup dialog box. The
following figure shows this dialog box.
Figure 21-2 Connection Startup Dialog Box
To invoke the Connection Startup dialog box:
1. Click on the Configure tab in the Winterm Connection Manager dialog box.
2. Click on the Startup command button on the Configure properties sheet.

105
Startup Options
Click on one of the two radio buttons in the Startup Options group box (in the
Connection Startup dialog box above) to select a start-up option:
•Make the Selected Connection Your Default Connection
Enable this function to use the connection you selected in the Winterm
Connection Manager as the default connection. The default connection is the
connection that always appears in the Connection Name list.
•Automatically Start the Selected Connection at Startup
When you enable this function, your terminal will automatically use the
connection you selected in the Winterm Connection Manager.
Note
The functions in the Startup Options group box are
mutually exclusive.
106 Connection Configuration
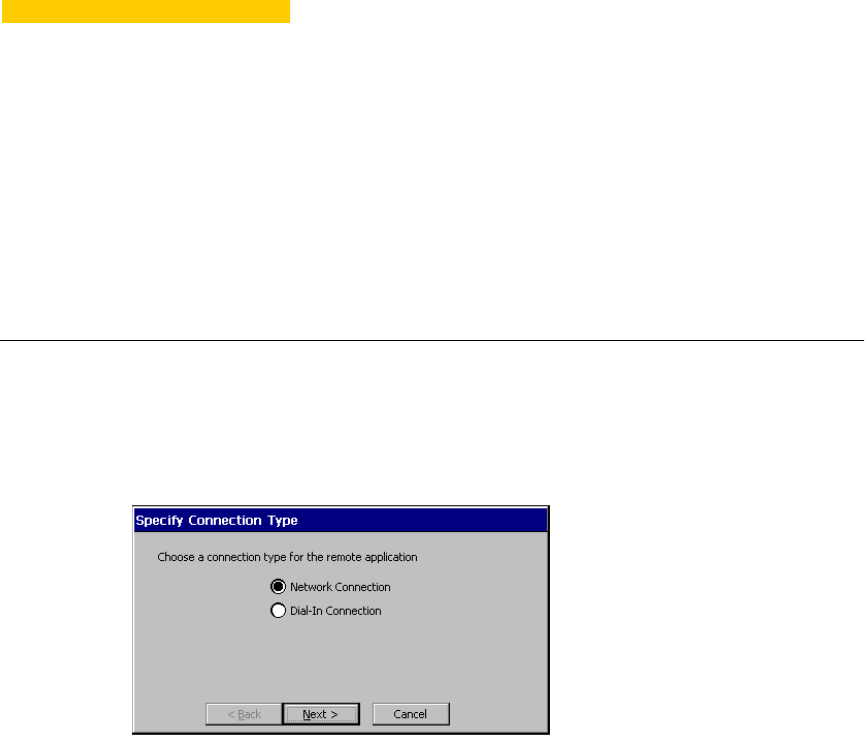
22 ICA Connections
Use the Specify Connection Type dialog box to start configuring an ICA
connection. ICA connects to a server running Citrix WinFrame or MetaFrame.
Using the Specify Connection Type Dialog Box
Figure 22-1 shows the Specify Connection Type dialog box.
Figure 22-1 Specify Connection Type Dialog Box
•Network Connection
• Click on this radio button to create a network ICA connection. This type of
connection requires a direct line to the network, such as 10Base-T. See
“Network Connections.”
•Dial-In Connection
• Click on this radio button to create a serial ICA connection. This type of
connection is made using a modem. See “Dial-In Connections.”
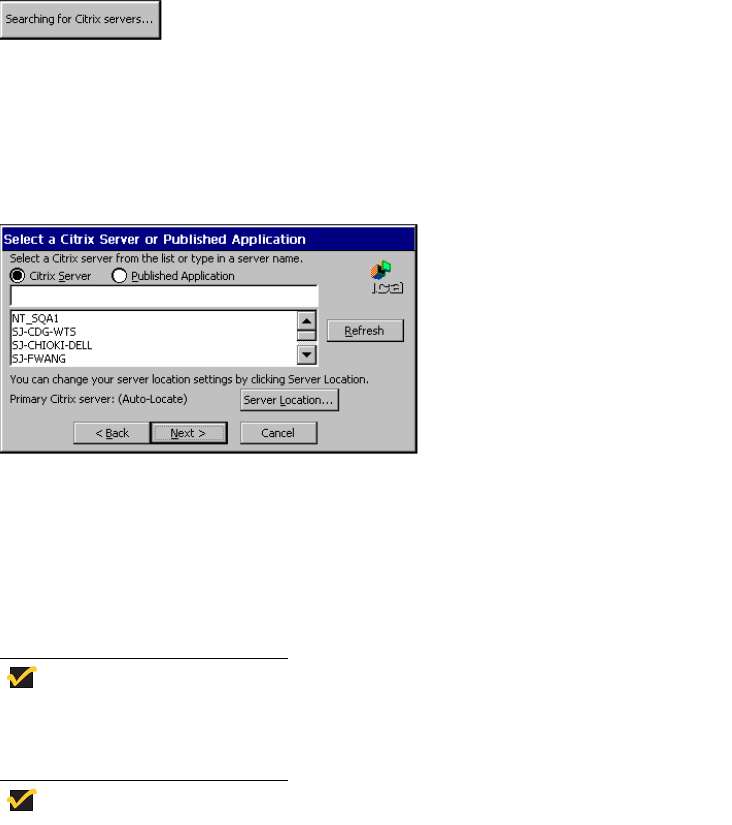
108 Connection Configuration
Network Connections
Select Network Connection, then click on the Next button. A Citrix search
message displays:
Figure 22-2 Citrix Search Message
If the connection is not found, the following sequence of dialog boxes displays. Use
them to set up your network ICA connection.
Figure 22-3 Select a Citrix Server or Published Application Dialog Box
To use the Select a Server or Published Application dialog box:
1. Click on either Citrix Server or Published Application.
2. Select a server or an application from the drop-down scroll list, or type the
information in the text entry box.
Note
The Refresh command button refreshes the
drop-down scroll list.
Note
The Server Location command button invokes the
Server Location dialog box. The server in Server
Location will act as a master browser for creation of
the Address list. See Figure 22-4.
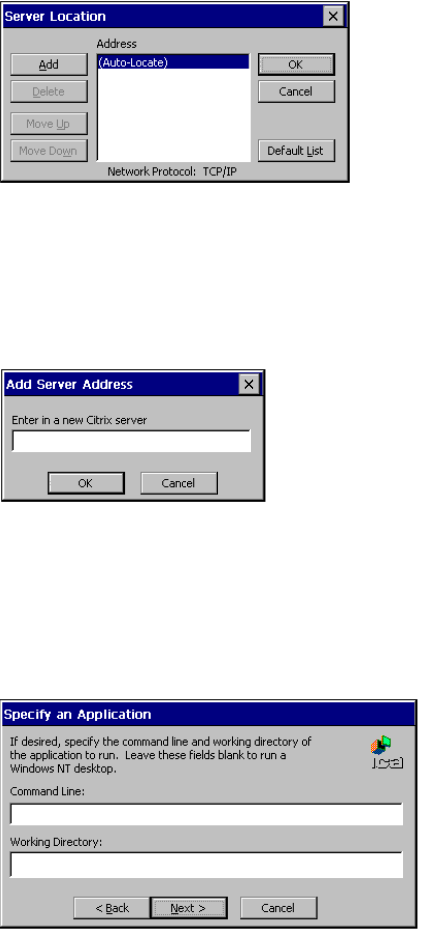
109
Figure 22-4 Server Location Dialog Box
3. If you want to add a server address, click on the Add command button to invoke
the Add Server Address dialog box.
Figure 22-5 Add Server Address Dialog Box
4. Enter the name of the Citrix server.
5. Click on Next.
Figure 22-6 Specify an Application Dialog Box
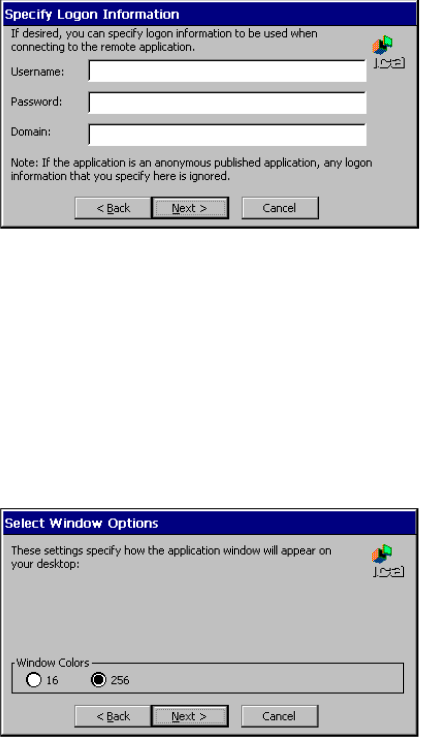
110 Connection Configuration
To use the Specify an Application dialog box:
1. Enter the command line and directory of the application that you intend to
invoke.
2. Click on Next.
Figure 22-7 Specify Logon Information Dialog Box
To use the Specify Logon Information dialog box:
1. If needed, enter a user name, a password, and a domain for connecting to an
application.
2. Click on Next.
Figure 22-8 Select Window Options Dialog Box

111
To use the Select Window Options dialog box:
1. Click on the desired number of colors to display, either 16 or 256.
2. Click on Next.
Figure 22-9 Compression, Cache, and Sound Dialog Box
To use the Compression, Cache, and Sound dialog box:
1. Enable or disable the following functions:
a. Compress Data Stream - Applies compression
b. Cache - Not supported yet
c. Sound - High, Medium, and Low sound quality selectable with this
function.
2. Click on Next.
Figure 22-10 Select a Title for the ICA Connection Dialog Box
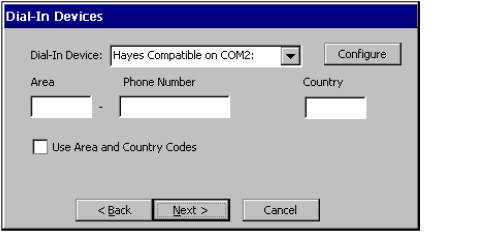
112 Connection Configuration
To use the Select a Title for the ICA Connection dialog box, click on Finish.
Dial-In Connection
Choose Dial-In Connection, then click on the Next button. The following sequence
of dialog boxes displays. Use them to set up your dial-in ICA connection.
Figure 22-11 Dial-In Devices Dialog Box
To use the Dial-In Devices dialog box:
1. From the Dial-In Device drop-down scroll list, select one of the following:
a. A modem connection such as Hayes Compatible on Com1.
b. A serial connection such as Serial Cable on Com1.
2. Enter the area code, the phone number, and the country code in the appropriate
fields.
3. Click on Configure to use the Device Properties dialog box. (See “Using the
Device Properties and Configure Command Buttons” for more information on
the Configure command button).
4. See Figures 22-6 through 22-10 and the related text for information about the
dialog boxes in this sequence.
When you are finished with the configuration, the Winterm Connection Manager
displays, listing your new ICA connection.
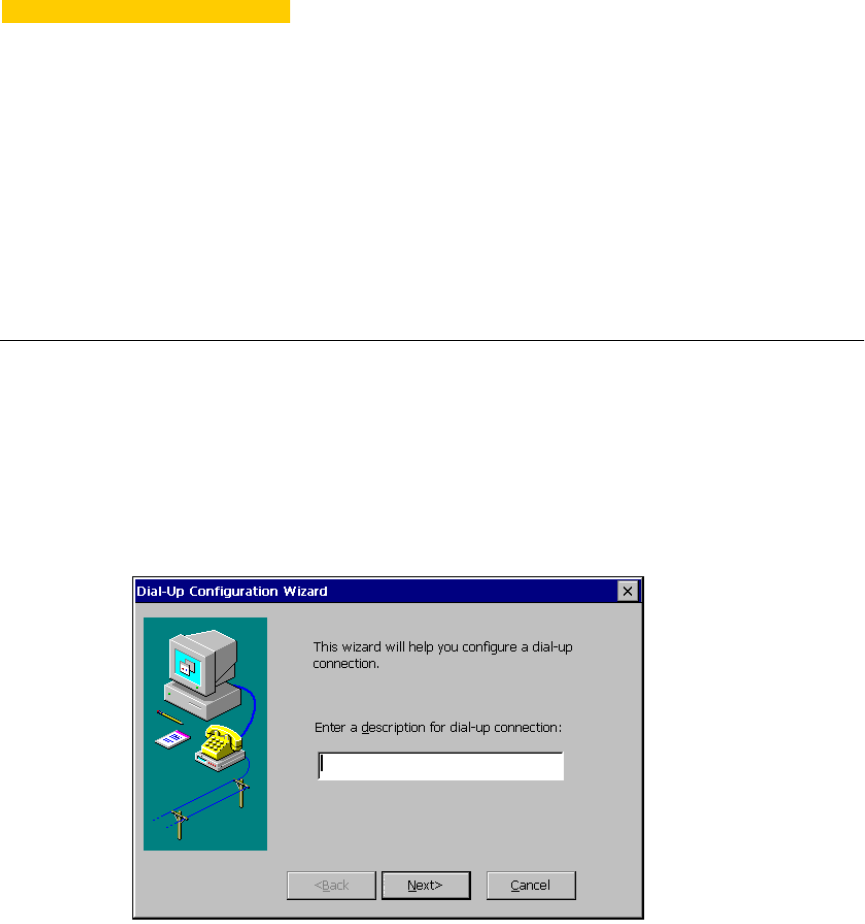
23 Dial-Up Connections
Use the Dial-Up Configuration Wizard to configure a dial-up connection. Dial-up
connections use a modem and PPP to connect to a server.
Using the Dial-Up Configuration Wizard
Following are the three dialog boxes that display in succession during this
configuration process. When you are finished with the configuration, the new
connection will be added to the Connection Name list in the Winterm Connection
Manager.
Figure 23-1 Dial-Up Configuration Wizard 1
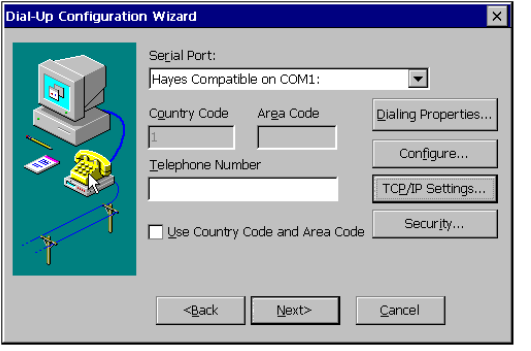
114 Connection Configuration
To use the first dialog box:
1. Enter a name for your dial-up connection.
2. Click on Next.
Figure 23-2 Dial-Up Configuration Wizard 2
To use the second dialog box of the wizard:
1. Select from the Serial Port drop-down scroll list one of the following:
a. A modem connection such as Hayes Compatible on Com1.
b. A cable connection (serial connection) such as Serial Cable on Com1.
2. Enter your information in the pertinent fields. Country Code and Area Code will
activate if Use Country Code and Area Code is enabled.
3. See “Using the Dialing Properties and Configure Command Buttons” to get
information about the Dialing Properties and Configure... command buttons.
4. See “Using the TCP/IP Settings and Security Command Buttons” for information
about the TCP/IP Settings... and Security command buttons.
5. Click on Next.
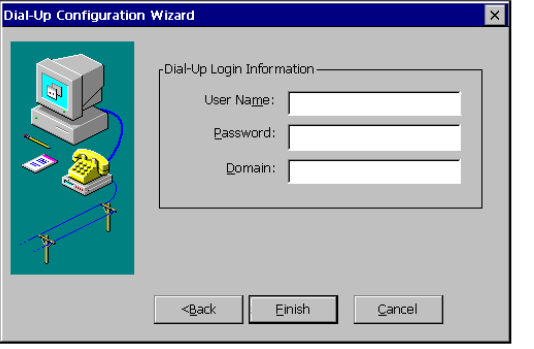
115
Figure 23-3 Dial-Up Configuration Wizard 3
To use the third dialog box:
1. Enter your information in the pertinent fields. If you do not know the information,
call your system administrator.
2. Click on Finish.
The Winterm Connection Manager displays, listing your new dial-up connection.
116 Connection Configuration
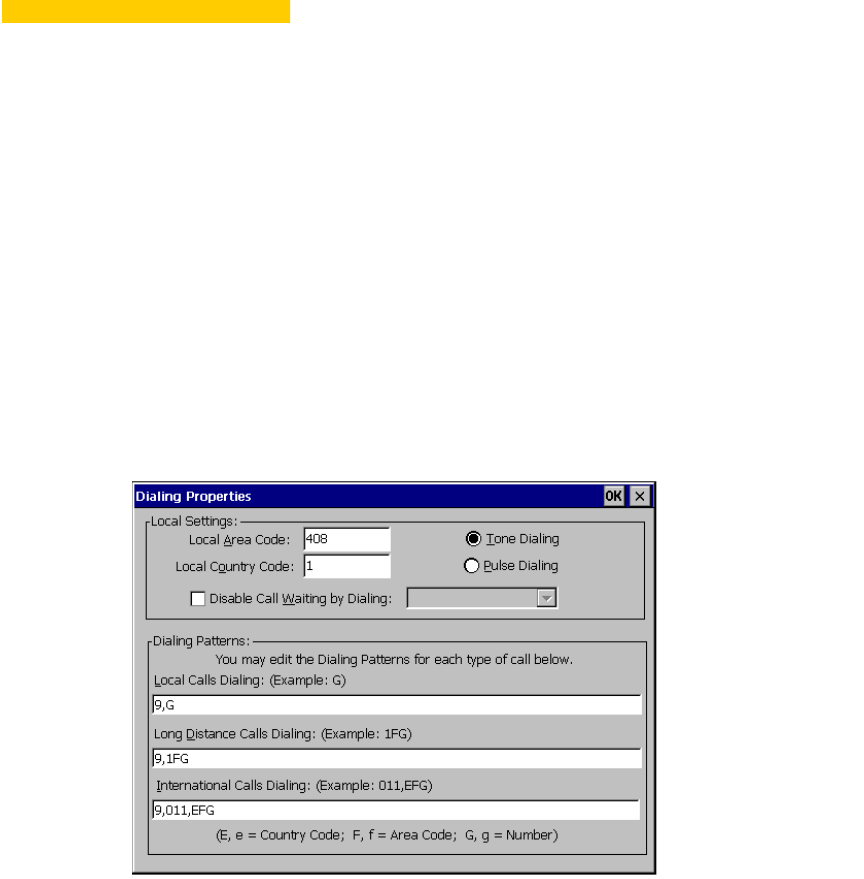
24 Using the Dialing Properties and
Configure Command Buttons
The following sections provide information about some of the elements of the
Dial-Up Configuration Wizard. This chapter covers dialing properties and device
properties.Dialing properties are set using the Dialing Properties dialog box
(Figure 24-1). Device properties are set using the Device Properties dialog box
(Figure 24-2).
Figure 24-1 Dialing Properties Dialog Box

118 Connection Configuration
Using the Dialing Properties Dialog Box
Use the Dialing Properties dialog box to set the dialing properties for your dial-up
connection. See “Dial-Up Connections” to find out how to invoke this dialog box.
The following table discusses the functions of the dialog box.
Table 24-1 Dialing Properties Dialog Box
Function Description
Local Settings Set local dialing locale and dialing type in this group
box.
Local Area Code
Enter the local area code that you want to use.
Local Country Code
Enter the local country code of the country that you are
dialing to. The default for this field is 1.
Note
Refer to a phone directory for country codes.
Disable Call Waiting By Dialing:
1. Click on the check box.
2. Select from the drop-down scroll list one of the
following:
•*70,
•70#,
•1170,
Tone Dialing
Click on this radio button to enable tone dialing. Tone
Dialing is the default.
Pulse Dialing
Click on this radio button to enable pulse dialing.

119
Using the Device Properties Dialog Box
Use the Device Properties dialog box to configure a device (modem) for a dial-up
connection.
Figure 24-2 Device Properties Dialog Box
Dialing Patterns Use this group box to set your modem’s dialing
patterns.
Local Calls Dialing
Enter the local call dialing pattern. The default is 9,G.
Local Long Distance Calls Dialing
Enter the long distance call dialing pattern. The default
is 9,1FG.
International Calls Dialing
Enter the international call dialing pattern. The default
is 9,011,EFG.
Note
An explanation of the lettering scheme for
dialing patterns is located below the function
International Calls Dialing.
Table 24-1 Dialing Properties Dialog Box, Continued
Function Description
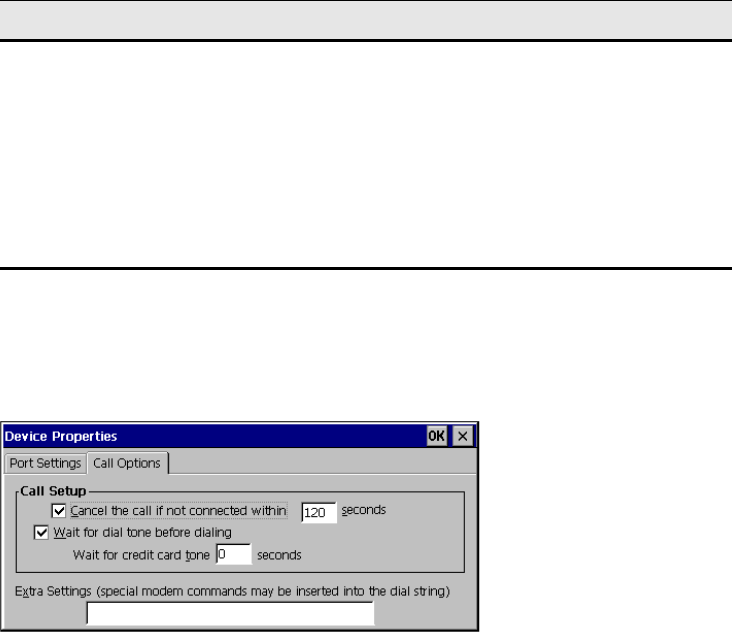
120 Connection Configuration
See “Dial-Up Connections” to find out how to invoke this dialog box.
The Device Properties dialog box contains two properties sheets:
•Port Settings
•Call Options
The following sections discuss these properties sheets.
Port Settings
See Figure 24-2 to view the Port Settings properties sheet. It is the default of the
Device Properties dialog box. The following table discusses the functions of this
properties sheet.
Call Options
Figure 24-3 Call Options Properties Sheet
Table 24-2 Port Settings Properties Sheet
Function Description
Manual Dial Click on this check box to set up for manual dialing.
Terminals Use this group box to record terminal windowing
information:
•Use Terminal Window Before Dialing
•Use Terminal Window After Dialing
Connection
Preferences
Use this group box to set modem connection
parameters.
121
Click on the Call Options tab to invoke the Call Options properties sheet. The
following table discusses the functions of this properties sheet.
Note
See “Null Modem Cable Pin Assignments” for a
suggested null modem cable for use with your terminal.
Table 24-3 Call Options Properties Sheet
Function Description
Call Setup Use this group box to configure the following call
parameters:
Cancel the Call if Not Connected Within
1. Enter in this field the number of seconds to wait
before a call is canceled.
2. Click the check box to enable the function.
The default is 120 with the function enabled.
Wait for Dial Tone Before Dialing
Click on the check box to enable the function. The
default for this function is enabled.
Wait for Credit Card Tone
Enter in the field the period (in seconds) of time to wait.
The default is 0.
Extra Settings Use this field for special modem commands.
122 Connection Configuration
25 Using the TCP/IP Settings and
Security Command Buttons
The following sections provide information about some of the elements of the
Dial-Up Configuration Wizard. This chapter covers TCP/IP settings and dial-up
security.
Using the TCP/IP Settings Dialog Box
Click on the TCP/IP Settings command button in the second dialog box of the
Dial-Up Configuration Wizard to set TCP/IP dial-up settings. When this command
button is pressed, the TCP/IP Settings dialog box displays. Figure 25-1 shows this
dialog box.
Figure 25-1 TCP/IP Settings Dialog Box

124 Connection Configuration
The following table discusses the functions in this dialog box.
Table 25-1 TCP/IP Settings Dialog Box
Function Description
Use Software Compression Click on this check box to enable this
function. By default, this function is
activated and enabled.
Use IP Header Compression Click on this check box to enable Use
IP Header Compression. By default,
this function is activated and enabled.
Use SLIP Click on this check box to enable this
function. SLIP is Serial Line Internet
Protocol. By default, this function is
activated and enabled.
Use Assigned IP Address Click here to activate this text box. By
default, the text entry box is not
activated.
Use Server-Assigned IP Addresses Click here to disable server-assigned
addresses and to activate the text
entry boxes for typing-in addresses.
By default, the text entry box is not
activated.
Use Default Gateway on Remote
Network
Click on this check box to enable this
function. By default, the function is
activated and enabled.
125
Using the Security Settings Dialog Box
Click on the Security... command button in the second dialog box of the
Dial-Up Configuration Wizard to configure dial-up security. When this command
button is pressed, the Security Settings dialog box displays. Figure 25-2 shows
this dialog box.
Figure 25-2 Security Settings Dialog Box
The following table discusses the functions in this dialog box.
Table 25-2 Security Settings Dialog Box
Function Description
Accept Any Authentication
Including Clear Text
Click on this radio button to set your
terminal to accept any authentication
including clear text. Authentication
determines whether a request
originated from the correct user or
application.
Accept Only Encrypted
Authentication
Click on this radio button to set your
terminal to accept only encrypted
authentication. Encryption is a method
of “hiding” data that is transmitted
across a network.
Accept Only Microsoft Encrypted
Authentication
Click on this radio button to set your
terminal to accept only Microsoft
encrypted authentication.
126 Connection Configuration
26 RDP Connections
Use the WTS Connection Wizard to configure an RDP connection. RDP connects
to a server running Microsoft WTS (Windows Terminal Server). See “Creating New
Connections” for more information about how to invoke this wizard.
Using the WTS Connection Wizard
Following are the four dialog boxes that display in succession during the
configuration process. When you are finished with the wizard, the new connection
will be added to the Connection Name list in the Winterm Connection Manager.
Figure 26-1 WTS Connection Wizard 1
128 Connection Configuration
To use the first dialog box:
1. Enter a name for your dial-up connection in Name.
2. Enter the name of the server in Server.
3. Check the Low Speed Connection check box if appropriate.
4. Click on Next.
Figure 26-2 WTS Connection Wizard 2
To use the second dialog box:
1. Check the Automatic Logon check box if appropriate.
2. Enter a user name, password, and a domain to complete the information.
3. Click on Next.
129
Figure 26-3 WTS Connection Wizard 3
To use the third dialog box in the wizard:
1. Click on either the Desktop or Application File Name radio buttons.
2. If you clicked on Desktop, click on Next.
3. If you clicked on Application File Name:
a. Enter the name of the desktop.
b. Enter the name of the directory where it resides.
c. Click on Next.
130 Connection Configuration
Figure 26-4 WTS Connection Wizard 4
To use the fourth dialog box, click on Finish. The Winterm Connection Manager
displays, listing your new RDP connection.
27 Terminal Emulation Connections
Use the TE Client Connection Wizard to set up a terminal emulation connection.
Terminal emulation connections use VT (Virtual Terminal) and Telnet to connect to
servers. See “Creating New Connections” for more information about how to invoke
this wizard.
Using the TE Client Connection Wizard
Following are the three dialog boxes of this wizard. When you are finished
configuring a connection, the new connection will be added to the Connection
Name list in the Winterm Connection Manager.
Figure 27-1 TE Client Connection Wizard - Connection Information

132 Connection Configuration
To use the Connection Information dialog box:
1. Enter the connection name in Connection Name.
2. Select the emulation type in Emulation. Use Table 27-1 to match and select the
terminal type taken from the second drop-down scroll list initially named VT
TerminalID.
3. Click on Next.
Table 27-1 Terminal Emulation and Terminal Type
Terminal Emulation Terminal Type
Select:
VT52, VT100, VT400 7-Bit (default),
or VT400 8-Bit
Then select from VT TerminalID:
vt100, vt101, vt102, vt125, vt220,
vt240, vt320, vt340, vt420 (default),
vt131, or vt132
Select:
ANSI BBS, SCO Console, IBM 3151,
WY50, WY50+, TVI910, TVI920,
TVI925, ADDS A2, HZ1500, or WY60
The function is deactivated.
Select:
IBM3270
Then select from IBM 3270 Model:
3278-2-E, 3278-3-E, 3278-4-E,
3278-5-E, 3279-2, 3279-3, 3279-4,
3279-5, or 3287-1
Select:
IBM5250
1. Select from IBM 5250 Model:
5291-1, 5292-2, 5251-11, 3179-2,
3196-A1, 3180-2, 3477-FC,
3477-FG, 3486-BA, 3487-HA, or
3487-HC
2. Check the Right Ctrl Acts as
Enter Key, the Left Ctrl Acts as
Reset Key, or the IBM5250
Monochrome check boxes if you
want these functions enabled for
5250 emulation.
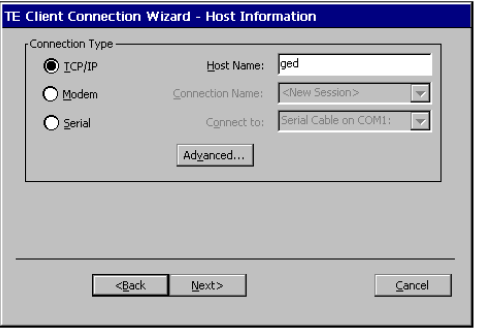
133
Figure 27-2 TE Client Connection Wizard - Host Information
To use the Host Information dialog box:
1. Click on TCP/IP
, Modem, or Serial:
2. If you clicked on TCP/IP:
a. Enter the host name in Host Name.
b. Use the Advanced command button if appropriate. (See “Using the TCP/IP
Telnet Configuration Dialog Box” for information about the Advanced
command button).
c. Click on Next. The Automate Login Process dialog box displays. See
Figure 27-3 and proceed with these instructions.
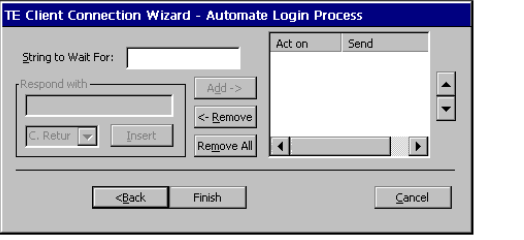
134 Connection Configuration
3. If you clicked on Modem:
a. Select a connection from Connection Name.
b. Use the Configure command button if appropriate. (See “Using the Modem
Settings Dialog Box” for information about the Configure command button).
c. Click on Next. The Automate Login Process dialog box displays. See
Figure 27-3 and proceed with these instructions.
4. If you clicked on Serial:
a. Make a selection from Connect To.
b. Use the Configure command button if appropriate. (See “Using the
Configuration of Serial Cable on Com1 Dialog Box” for information about the
Configure command button).
c. Click on Next. The Automate Login Process dialog box displays. See
Figure 27-3 and proceed with these instructions.
Figure 27-3 TE Client Connection Wizard - Automate Login Process
To use the Automate Login Process dialog box:
1. Fill in the Parameters group box as appropriate.
2. Fill in the Script group box as appropriate.
3. Click on Finish.
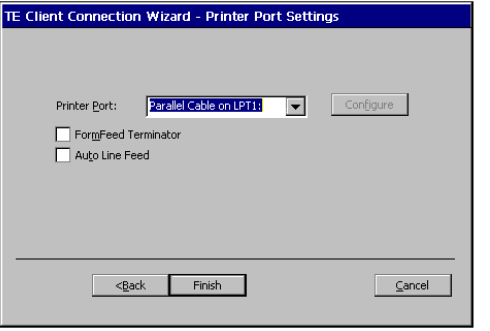
135
Figure 27-4 TE Client Connection Wizard - Printer Port Settings
To use the Printer Port Settings dialog box:
1. Select the appropriate printer port from the Printer Port list.
2. Click on FormFeed Terminator or Auto Line Feed, if appropriate.
3. Use the Configure command button, if appropriate. (See “Using the
Configuration of Serial Cable on Com1” dialog box for information about the
Configure command button).
4. Click on Finish to finish the wizard.
The Winterm Connection Manager displays, listing your new terminal emulation
connection.
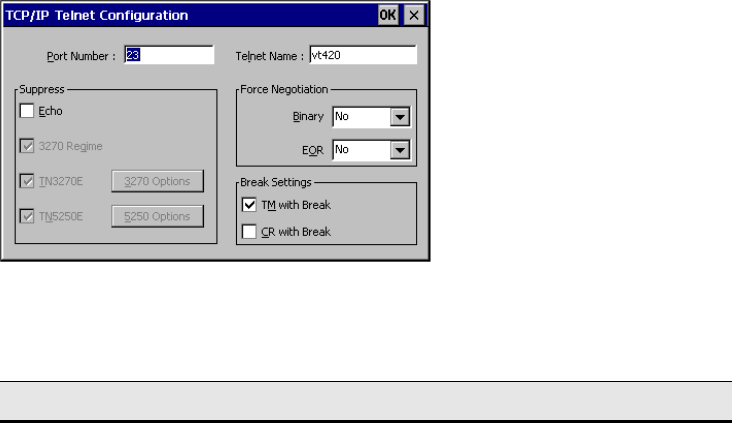
136 Connection Configuration
Using the TCP/IP Telnet Configuration Dialog Box
The Advanced command button invokes the TCP/IP Telnet Configuration dialog
box. Figure 27-5 shows this dialog box.
Figure 27-5 TCP/IP Telnet Configuration Dialog Box
The following table discusses the functions of a Telnet connection.
Table 27-2 TCP/IP Telnet Configuration
Function Description
Port Number Enter the Telnet port number. The default is 23.
Suppress Use the functions of this group box as needed:
•Echo
•3270 Regime
•TN3270E
•TN5250E
•3270 Options
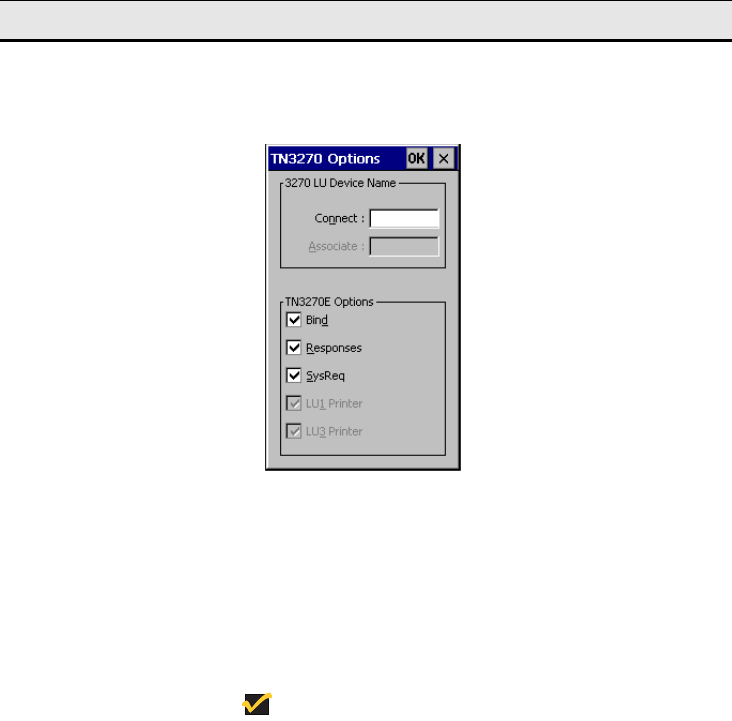
137
The following dialog box shows the TN3270
Options dialog box, displayed when the 3270
Options command button is pressed.
Use this dialog box to set up 3270 options:
· 3270 LU Device Name - This group box is used
to identify the LU (Logical Unit).
· TN3270E Options - This group box is used to
set TN3270E options. The options are Bind,
Responses, and SysReq.
Note
Associate, LU1 Printer, and LU3 Printer are
deactivated.
Table 27-2 TCP/IP Telnet Configuration, Continued
Function Description
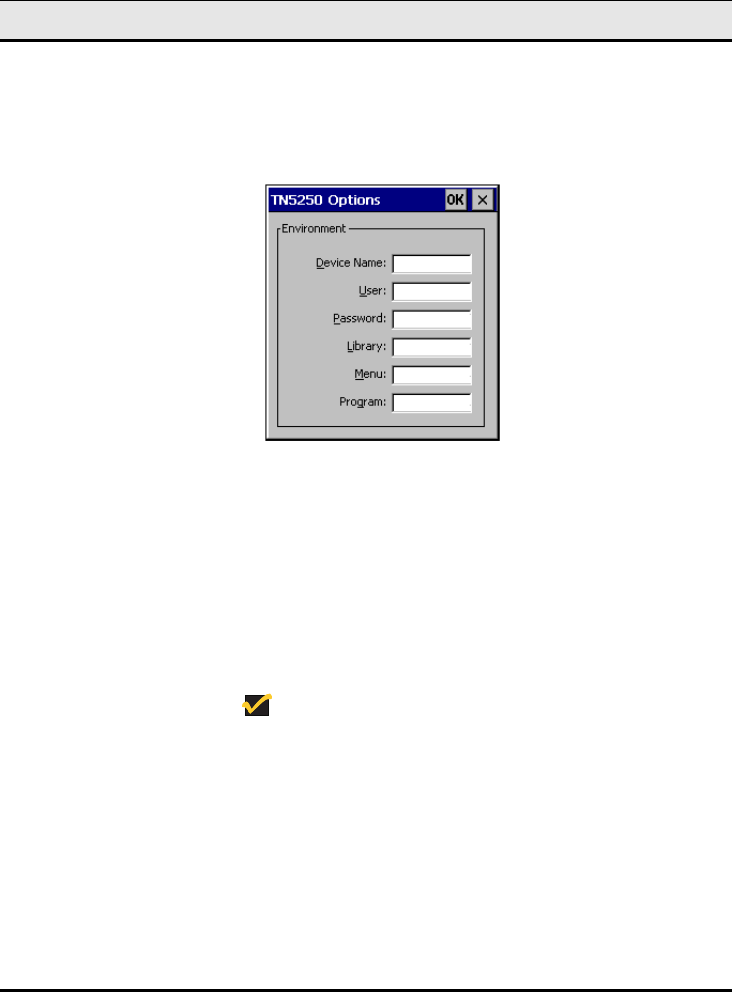
138 Connection Configuration
•TN5250 Options
The following dialog box shows the TN5250
Options dialog box, displayed when the 5250
Options command button is pressed.
Use this dialog box to set up 5250 options. They
are:
· Device Name - Name of the device assigned to
a Telnet session.
·User
, Password, Library, and Menu - Initial
entries on a standard startup screen.
· Program - Name of the initial program.
Note
All entries are 10 characters or less.
Telnet Name Enter the Telnet virtual terminal name. The default
depends on emulation (VT400, 7-bit, default is vt420).
Force Negotiation Use the Binary and EOR drop-down scroll lists to
configure negotiation parameters. The defaults are No
and No.
Break Settings Use the TM with Break and CR with Break check
boxes to configure break settings. The default for both
functions is activated but not enabled.
Table 27-2 TCP/IP Telnet Configuration, Continued
Function Description
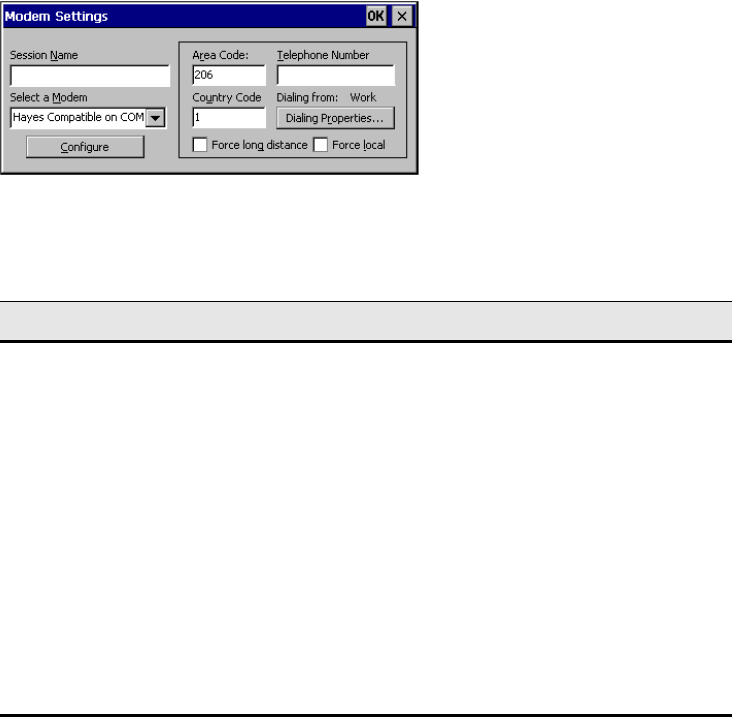
139
Using the Modem Settings Dialog Box
The Configure command button invokes the Modem Settings dialog box.
Figure 27-6 shows this dialog box.
Figure 27-6 Modem Settings DIalog Box
The following table discusses the available modem settings.
Table 27-3 Modem Settings Dialog Box
Function Description
Session Enter the name of your session.
Select a Modem Select a modem from the drop-down scroll list.
Configure See “Using the Dialing Properties and Configure
Command Button” for more information.
Dialing Properties Use this list to configure:
•Area Code
•Country Code
•Force Long Distance
•Telephone Number
•Dialing Properties
•Force Local
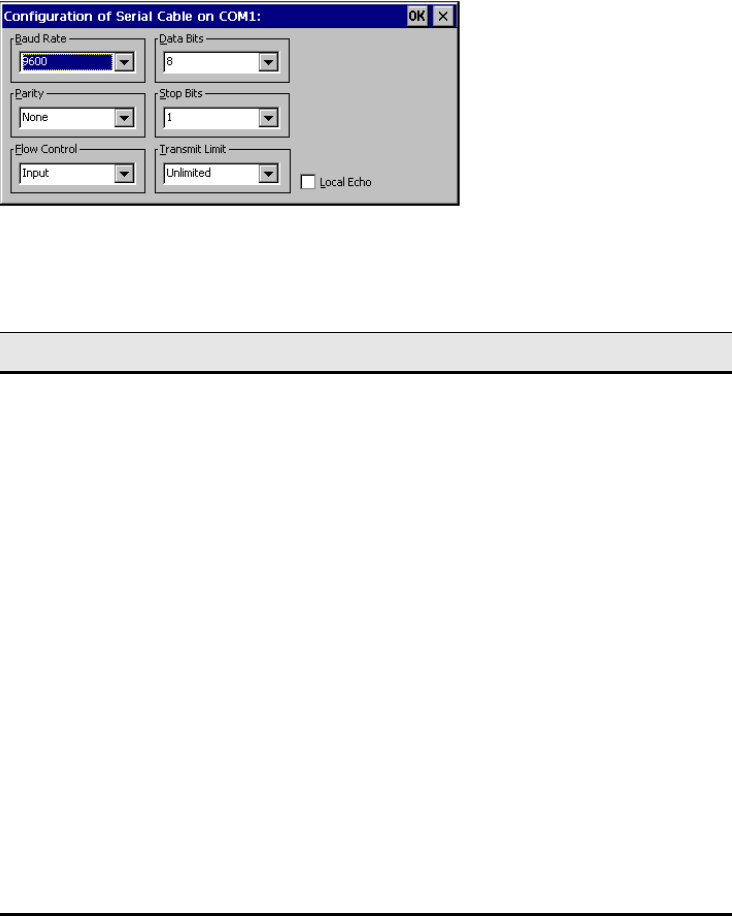
140 Connection Configuration
Using the Configuration of Serial Cable on Com1 Dialog Box
The Configure command button invokes the Configuration of Serial Cable on
Com1 dialog box. Figure 27-7 shows this dialog box.
Figure 27-7 Configuration of Serial Cable on Com1 Dialog Box
The following table discusses this dialog box.
Table 27-4 Configuration of Serial Cable on Com1 Dialog Box
Function Description
Configuration of a
Serial Cable on
Com1
Use these functions to configure a serial cable:
•Baud Rate
•Parity
•Flow Control
•Data Bits
•Stop Bits
•Transmit Limit
Each is presented as a drop-down scroll list. Click on
the upper-right down arrow to display the list and select
a value. The defaults are listed (consecutive to the
Function list to the left) as follows:
•9600
•None
•Input
•8
•1
•Unlimited
Local Echo Click on this check box to enable local echo.

28 Editing Connections
The Winterm Connection Manager lets you edit individual RDP connection
parameters. It is done through the Properties dialog box. The following figure
shows the Properties dialog box.
Figure 28-1 Properties Dialog Box

142 Connection Configuration
Using the Properties Dialog Box
The Properties dialog box consists of two properties sheets. Depending on your
connections configuration, you use one of these properties sheets to edit
connection parameters. To invoke the dialog box:
1. Click on the Configure tab in the Winterm Connection Manager dialog box.
2. Click on the Edit command button on the Configure properties sheet.
Note
The functions of this dialog box are for editing RDP
connections only. ICA, Dial-Up, and Terminal Emulation
connections can be edited using their respective setup
wizards. See “ICA Connections,” “Dial-Up
Connections,” or “Terminal Emulation Connections” for
further information.
Using the Net Connections Properties Sheet
The Net Connections properties sheet is displayed by default for the Properties
dialog box. See Figure 28-1. Use this properties sheet to reconfigure a network
connection.

143
The following table describes the functions of the Net Connections properties
sheet.
Table 28-1 Net Connections Properties Sheet
Function Description
Connection Select a connection from the Connection Name list in
the Terminal Connection Manager. Use the following
functions to change the connection’s network
parameters:
Name
Enter the name of the connection in this field. When
OK is selected, your changes will be saved and Name
will replace what was selected.
Server
Enter the address of the server in this field.
Automatic Logon Click on this check box to enable automatic logon for
your terminal. Enabling this function enables the
Username, Password, and Domain fields:
Username
Enter your user name.
Password
Enter your password.
Domain
Enter your domain.
Connection Speed Low Speed Connection
Click on this to enable low-speed connection.
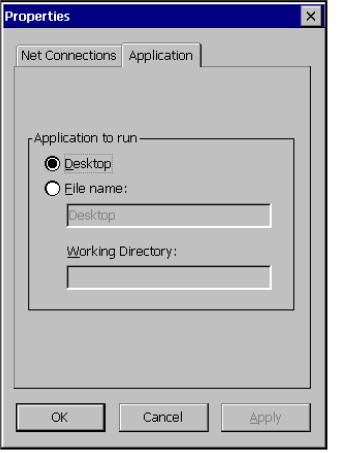
144 Connection Configuration
Using the Application Properties Sheet
Invoke the Application properties sheet by clicking on the Application tab in the
Properties dialog box. The following figure shows this sheet.
Figure 28-2 Application Properties Sheet

145
The following table describes the functions of the Application properties sheet.
Note
Desktop and File Name are mutually exclusive. File
Name must be selected in order to use the File Name
and Working Directory fields.
Table 28-2 Application Properties Sheet
Function Description
Application to Run Select a connection from the Connection Name list in
the Terminal Connection Manager. Use the following
functions to edit application types:
Desktop
Click on this radio button to include a desktop
application in your connection parameters.
File Name
Click on this radio button to include a file in your
connection parameters. Enter the name of the file in
the field provided.
Working Directory
Enter the directory path to the file provided in File
Name.
146 Connection Configuration
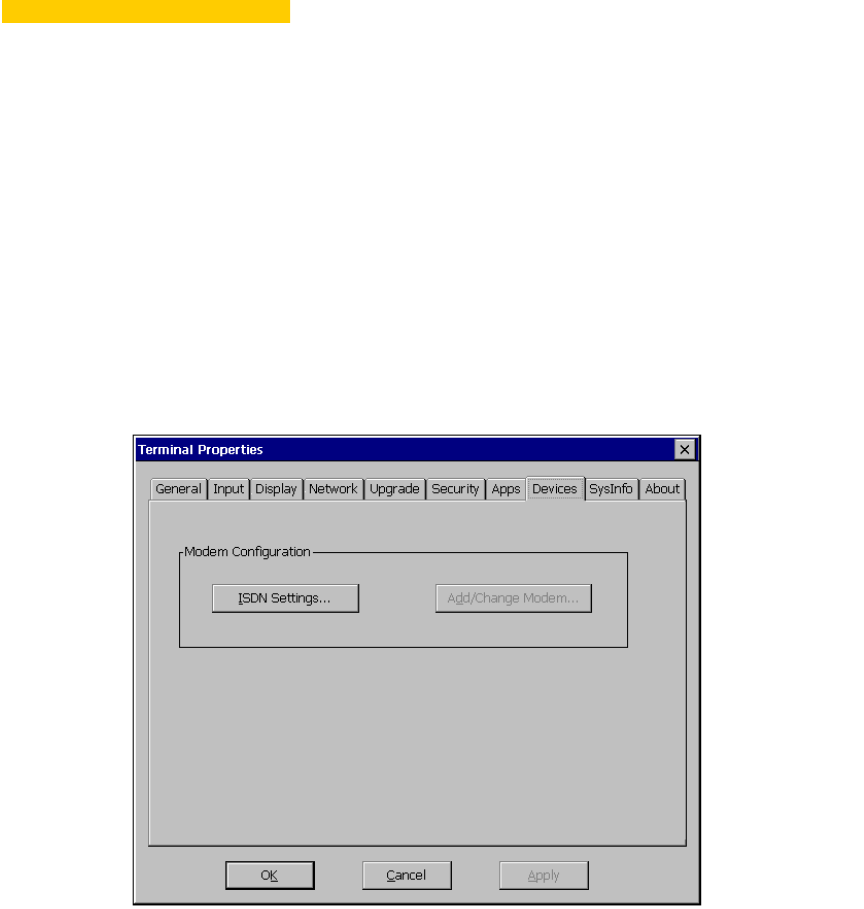

148 Connection Configuration
Using the Devices Properties Sheet
To invoke this properties sheet,
1. Press F2 to invoke the Terminal Properties dialog box.
2. Click on the Devices tab in the Terminal Properties dialog box.
The following table describes the functions of this dialog box.
Table 29-1 Devices Properties Sheet
Function Description
ISDN Settings Click on this command button to invoke the ISDN
Settings dialog box. See the following heading “ISDN
Settings.”
Add/Change Modem Click on this command button to invoke the Adding
New Modems dialog box. See the following heading
“Adding New Modems.”
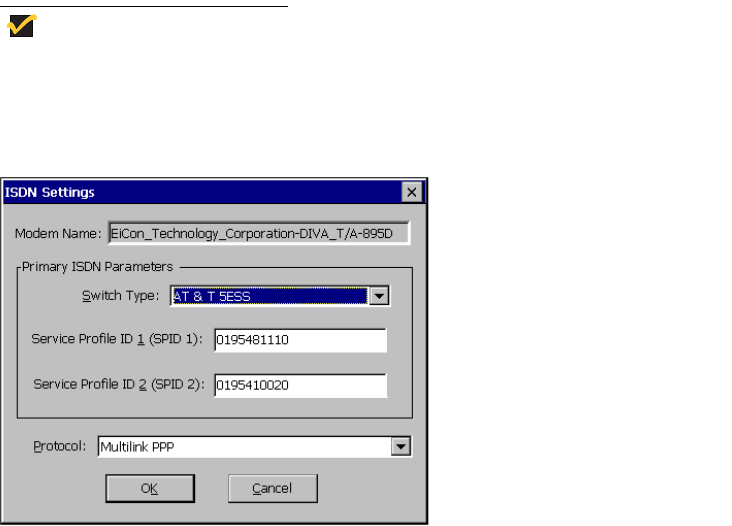
149
ISDN Settings
Use the ISDN Settings dialog box to set the terminal’s ISDN settings. If you do not
know this information, please ask your system administrator.
Note
These settings are specific to Eicon-Tech modems
only.
Figure 29-2 ISDN Settings Dialog Box
To invoke the dialog box, click on the ISDN Settings... command button on the
Devices properties sheet.

150 Connection Configuration
Table 29-2 discusses the functions of the ISDN Settings dialog box.
Table 29-2 ISDN Settings Dialog Box
Function Description
Modem Name This field displays the brand name of the modem in
your system.
Primary ISDN
Parameters
Use this group box to configure the following ISDN
parameters:
Switch Type
Use this drop-down scroll list to select the switch type.
The default is AT & T 5ESS.
Service Profile ID 1
Use this field to enter Service Profile ID 1. This field
only allows numbers. The default is 0195481110.
Service Profile ID 2
Use this field to enter Service Profile ID 2. This field
only allows numbers. The default is 0195410020.
Protocol Use this drop-down scroll list to select a protocol. The
default is Multilink PPP
.
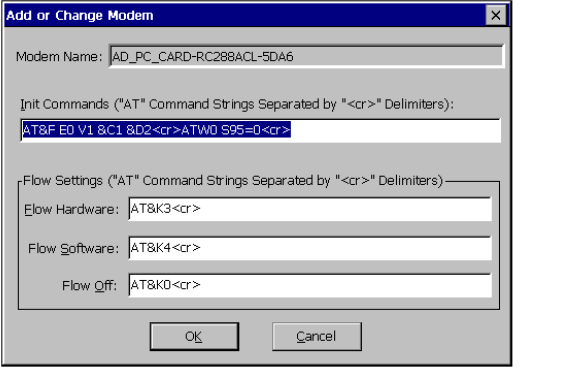
151
Adding or Changing Modems
Use the Add or Change Modem dialog box to add a new modem or change the
parameters for a modem that has already been added.
Figure 29-3 Add or Change Modem Dialog Box
To invoke the dialog box, click on the Add/Change Modem... command button on
the Devices properties sheet.

152 Connection Configuration
Table 29-3 discusses the functions of this dialog box.
Note
The Hayes command set is discussed in greater detail
in “Modem AT Commands.”
Table 29-3 Add or Change Modem Dialog Box
Function Description
Modem Name This field displays the brand name of the modem in
your system.
Init Commands Enter a modem initialization command string in this
field. The default is ATEOV1&C1&D1<cr>.
Flow Settings Use this group box to set the following flow settings:
Flow Hardware
Enter a flow hardware command string in this field. The
default is AT&K3<cr>.
Flow Software
Enter a flow software command string in this field. The
default is AT&K4<cr>.
Flow Off
Enter a flow hardware command string in this field. The
default is AT&K0<cr>.

154

30 Cable Firmware Upgrades
The following section describes the cable method of firmware download. The cable
method for all terminals is parallel download, using a Laplink cable and the
MS-DOS xfer.exe program.
Setup
The following equipment may be needed, depending on the download procedure
used:
• IBM-compatible PC with a CD-ROM drive and a parallel/serial port.
• Terminal firmware upgrade diskette or CD.
• LapLink or equivalent parallel port communications cable (used only if parallel
port is used for downloading).
To validate an image file before downloading, type check <filename.ext> at the
DOS command line, then press Enter. The check utility verifies the image file.
Note
For convenience, drive D:\ is used for the CD drive. You
should substitute the appropriate drive letter for your
PC.
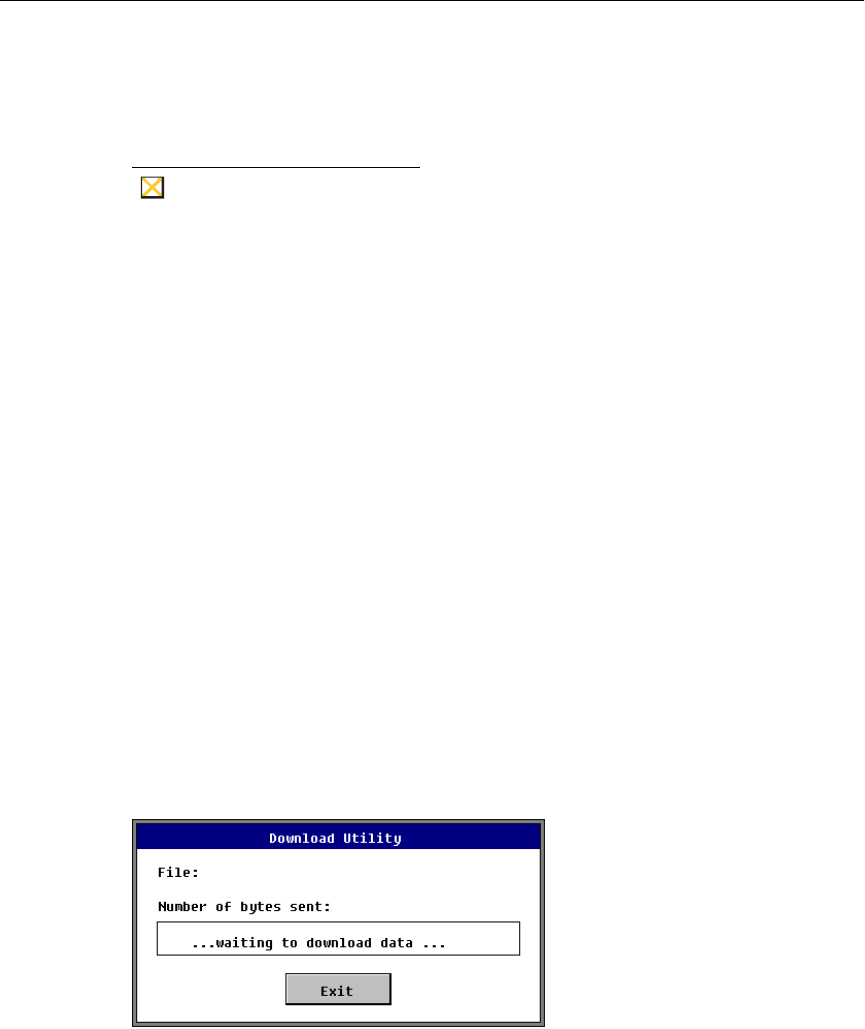
156 Terminal Firmware Upgrades
Flash Parallel Download Procedure
This procedure includes both manual and auto download instructions. The
download procedure will not work unless your PC is booted to DOS.
1. Record the terminal’s current configuration.
Caution
All previous settings will be lost. Upgrading the
firmware defaults the current configuration to the
factory default settings.
2. Turn off the terminal.
3. Connect a parallel LapLink cable from the parallel port of your PC to the parallel
port of the terminal.
4. Insert the firmware upgrade CD into your PC.
5. Type D:\ at the DOS prompt to select the drive where the download files exist.
Use the dir command to find the files.
6. Perform either “Manual Download” or “Auto Download.”
Manual Download
Use the following instructions to perform a manual download.
1. Type xfer <filename.ext> at the DOS prompt
2. Press Enter, and the Download Utility dialog box appears. See the following
figure.
Figure 30-1 Download Utility Dialog Box

157
3. Power-up the terminal to initiate the download.
The Firmware Upgrade dialog box appears, showing that the download is in
progress. When the download is complete, disconnect the parallel cable. The
Setup Wizard will appear.
Note
If the download dialog box remains on the screen
longer than 1 minute, press the Enter key. A prompt to
repeat or quit the operation appears. If the download
fails, quit the procedure, check all cables and
connections, then repeat from Step 2.
Auto Download
Use the following instructions to perform an auto download:
1. Log on to the root of the drive where the installation batch file resides (usually
D:).
2. Type install at the DOS prompt, then press Enter. The Download Utility dialog
box appears and the install program prompts you through the download
procedures.
3. When you are finished with your download, disconnect the LapLink cable and
reconnect the peripheral cables.
4. Power-up the terminal and reconfigure its communications and options settings.
5. Check the About dialog box to verify the download revision.

158 Terminal Firmware Upgrades
Cable Pinouts
Parallel Download Cable Pinouts
The following table lists the parallel download cable pinouts.
Table 30-1 Parallel Download Cable Pinouts
PC Side Terminal Side
Pin 01 Pin 01
Pin 02 Pin 15
Pin 03 Pin 13
Pin 04 Pin 12
Pin 05 Pin 10
Pin 06 Pin 11
Pin 07 *
Pin 08 *
Pin 09 *
Pin 10 Pin 05
Pin 11 Pin 06
Pin 12 Pin 04
Pin 13 Pin 03
Pin 14 Pin 14
Pin 15 Pin 02
Pin 16 Pin 16
Pin 17 Pin 17
Pins 18 to 25 Pin 25 Gnd
* - Pin(s) not connected

159
The following figure shows the connector for the parallel download cable.
Figure 30-2 Parallel Download Cable Connectors
13
25
1
14
DB-25F
160 Terminal Firmware Upgrades
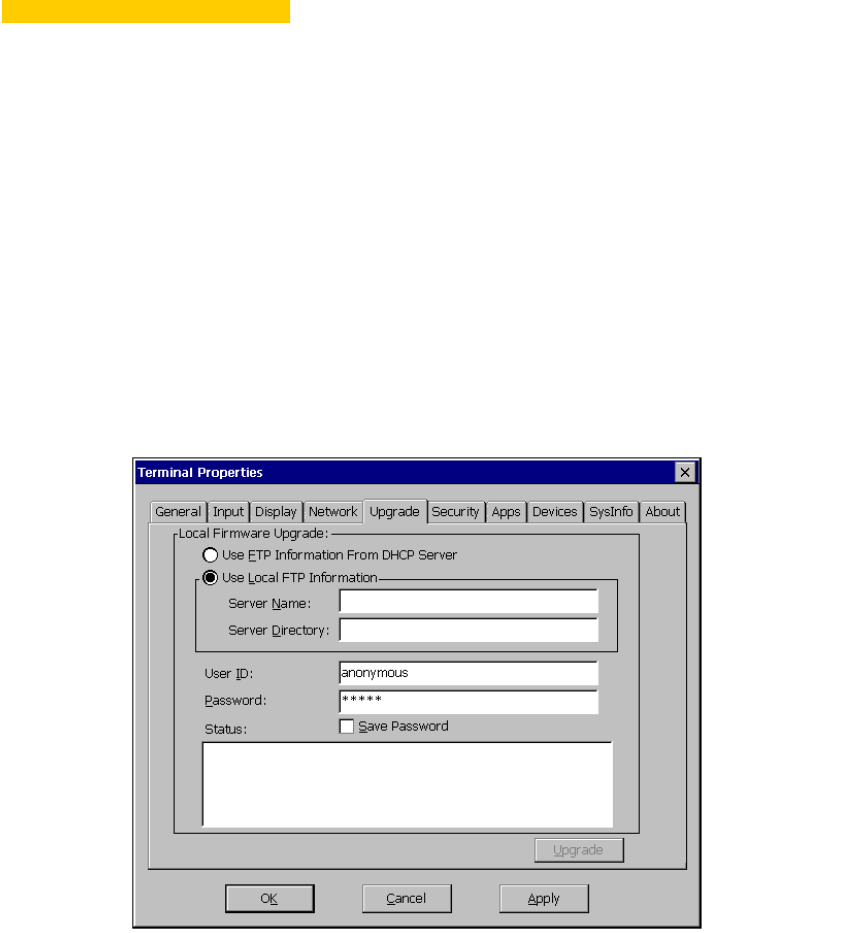

162 Terminal Firmware Upgrades
Using the Upgrade Properties Sheet
To invoke this properties sheet:
1. Press the F2 key.
2. Click on the Upgrade tab in the Terminal Properties dialog box.
The following table describes the functions found on this properties sheet.
Table 31-1 Upgrade Properties Sheet
Function Description
Local Firmware
Upgrade
Use this group box to upgrade your terminal's firmware
using an FTP server. The functions are:
Use FTP Information from DHCP Server
Select this function if you want to get the FTP server
and directory information from a DHCP server. Click on
this radio button to select the function. By default the
function is enabled.
Use Local FTP Information
Select this function if you want to enter the FTP server
you will use for the upgrade. Click on the radio button
to select the function. By default the function is
disabled.
Server Name
Enter the name or IP address of the FTP server where
bootstrap.exe and the upgrade firmware reside. The
default is blank.
Server Directory
Enter the directory on the FTP server where
bootstrap.exe resides. The default is blank.
User ID
Enter your user account in this field. The default is
Anonymous.
Password
Enter your password in this field. The default is *****.

163
FTP and Bootstrap.exe
The download is initiated through the Upgrade command button on the Upgrade
properties sheet. Information in the Upgrade properties sheet must be filled out to
ensure a proper download. See “Resetting Properties” for more details about this
properties sheet.
Bootstrap.exe and params.ini must be installed on your FTP server to use this
method of download. To install these files, drag and drop them from the CD-ROM to
the appropriate directory on your FTP server. The upgrade firmware can be
obtained from manufacturer’s customer support.
The Upgrade Process
To upgrade:
1. Place bootstrap.exe, params.ini, and the new firmware file on your FTP server.
2. Press F2 to invoke the Terminal Properties dialog box.
3. Click on the Upgrade properties sheet tab and enter the appropriate
information.
4. Click on the Upgrade command button.
The bootstrap program uses Server Name, User ID, Password, and Server
Directory from the Upgrade properties sheet to access the FTP server. The
program performs the upgrade, checks for errors, and reboots the terminal.
Status
This display box shows status information about the
connection to the FTP server, and the firmware
download. Connect and download errors are also
reported. The default is blank.
Save Password
Check this box to save the entered password in the
registry.
Upgrade Click on this command button to initiate the upgrade
procedure. By default the button is disabled until an
entry is made in the FTP Server field.
Table 31-1 Upgrade Properties Sheet, Continued
Function Description
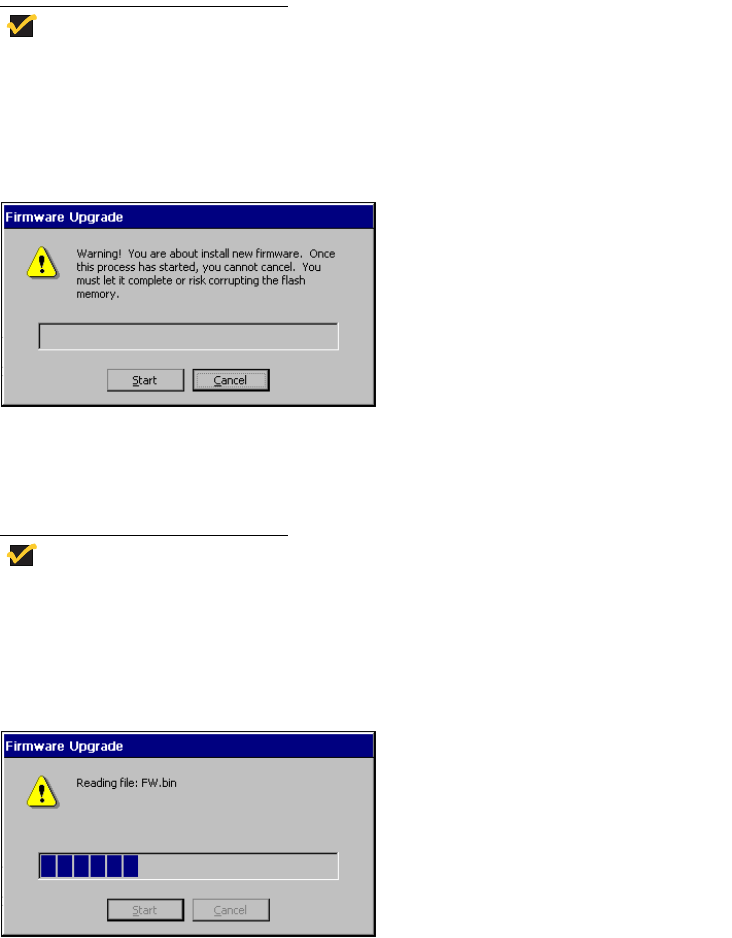
164 Terminal Firmware Upgrades
Note
An upgrade can not be cancelled once it has started.
A series of dialog boxes displays during the upgrade.
Figure 31-2 Firmware Upgrade Dialog Box 1
This is the first dialog box that displays. Read for information and click on Start to
upgrade, or Cancel to quit the process.
Note
If you are downloading the same version of firmware
that is already on the terminal, a dialog box displays
reporting that you are downloading the same version.
Figure 31-3 Firmware Upgrade Dialog Box 2
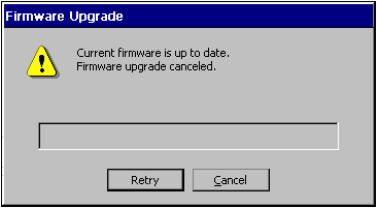
165
After Start is clicked, the download begins.
Figure 31-4 Firmware Upgrade Dialog Box 3
If your current firmware is up to date, the process will automatically stop, displaying
this dialog box. Click on Retry to restart the upgrade. Click on Cancel to quit.
When the upgrade is complete, the terminal will reboot.
166 Terminal Firmware Upgrades
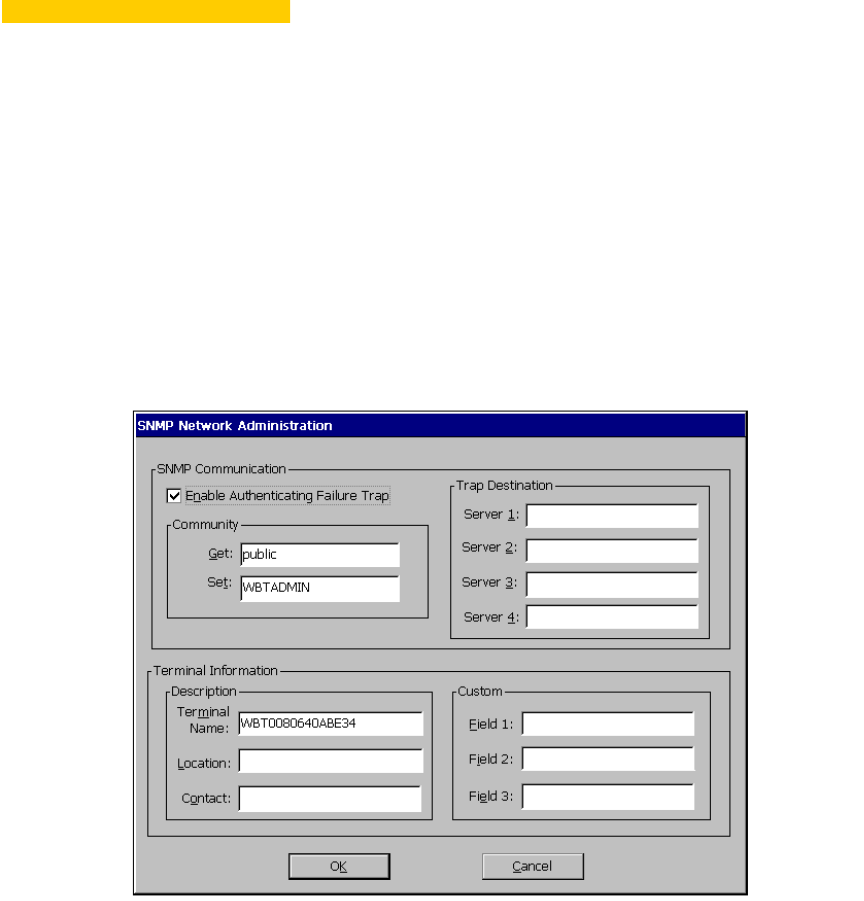

168 Terminal Firmware Upgrades
Using the SNMP Network Administration Dialog Box
To invoke this dialog box:
1. Press the F2 key to invoke the Terminal Properties dialog box.
2. Click on the Apps tab to invoke the Apps properties sheet.
3. Click on the SNMP Network Administration command button.
The following table discusses the functions of this dialog box.
Table 32-1 SNMP Network Administration Dialog Box
Function Description
SNMP
Communication
Use this group box to set up SNMP communication
using the following functions:
Enable Authenticating Failure Trap
Check this box to enable the authenticating failure trap.
Community
Use this group box to configure the network
management of a community.
Get
This field takes the name of the community the SNMP
management software will manage with read
permission only. If this field is left blank, the community
for that terminal will be public. The default for this field
is Public.
Set
This field contains the name of the community the
SNMP management software will manage with write
permission. By default, the set community that the
terminal belongs to is called WBTADMIN. The default
for this field is WBTADMIN.
Note
All Get and Set names are case sensitive and
lower case.
Trap Destination
Server 1:, Server 2:, Server 3:, and Server 4: are
fields that supply the names or IP addresses of the
servers to which the terminal sends SNMP traps.

169
Terminal Information Use this group box to list information about terminals.
Description
Use this group box to describe a terminal.
Terminal Name
Type the name of a terminal in this field. On default,
this displays the WBT and the MAC address of the
product.
Location
Type the location of the terminal in this field.
Contact
Type the name of the administrator of the subject
terminal in this field.
Custom
Use the following fields to type in any custom message
associated with the subject terminal:
•Field 1
•Field 2
•Field 3
Each field will take 23 characters maximum.
Table 32-1 SNMP Network Administration Dialog Box, Continued
Function Description
170 Terminal Firmware Upgrades

33 SNMP Upgrades
Manual SNMP Firmware Upgrades
1. Ensure that the Wyse custom MIB (Management Information Base) is compiled
by your SNMP manager.
Note
In order to initiate an SNMP upgrade, you must know
the FTP or TFTP server’s IP address or machine name,
and the absolute path to the image on the FTP or TFTP
server.
Note
In the Wyse custom MIB the enterprise number for
Wyse is 1.3.6.1.4.1.714. Therefore, in this section
Wyse is equivalent to 1.3.6.1.4.1.714.
2. Enable SNMP Update Enable if it is not enabled.
3. Using the SNMP/Network Administrator dialog box, verify that the community
and set community names for the terminal match the community and set
community names in the SNMP manager.
Note
You can set the Set Community name for a terminal if
you have DHCP enabled by setting DHCP Option 164
to the set community name your SNMP manager uses.

172 Terminal Firmware Upgrades
4. Using your SNMP manager:
a. Go to Wyse 1.2.3.8.1.2 (wbt3UpDnLoadTable).
b. Go to Wyse 1.2.3.8.1.1.2.1.2 (wbt3UpDnLoadID), user defined string.
Note
The above is used in traps to identify the download
operation.
c. Go to Wyse 1.2.3.8.1.1.2.1.3 (wbt3UpDnLoadOp), and set its value to
1 (Download).
d. Go to Wyse 1.2.3.8.1.1.2.1.4 (wbt3UpDnLoadSrcFile), and set its value to
the absolute path of the directory where the image file and params.ini are
located.
e. Go to Wyse 1.2.3.8.1.1.2.1.6 (wbt3UpDnLoadFileType), and set its value to
0 (Binary).
f. Go to Wyse 1.2.3.8.1.1.2.1.7 (wbt3UpDnLoadProtocol), and set its value to 0
(FTP or TFTP).
g. Go to Wyse 1.2.3.8.1.1.2.1.8 (wbt3UpDnLoadFServer), and set its value to
the IP address or DNS name of the FTP or TFTP server.
h. Go to Wyse 1.2.3.8.1.4 (wbt3SubmitLoadJob), and set its value to
1 (Ready).
Step 4h will initiate an SNMP upgrade to your terminal. If the download is
configured properly, the new image will download and the terminal will reboot
automatically to factory defaults.
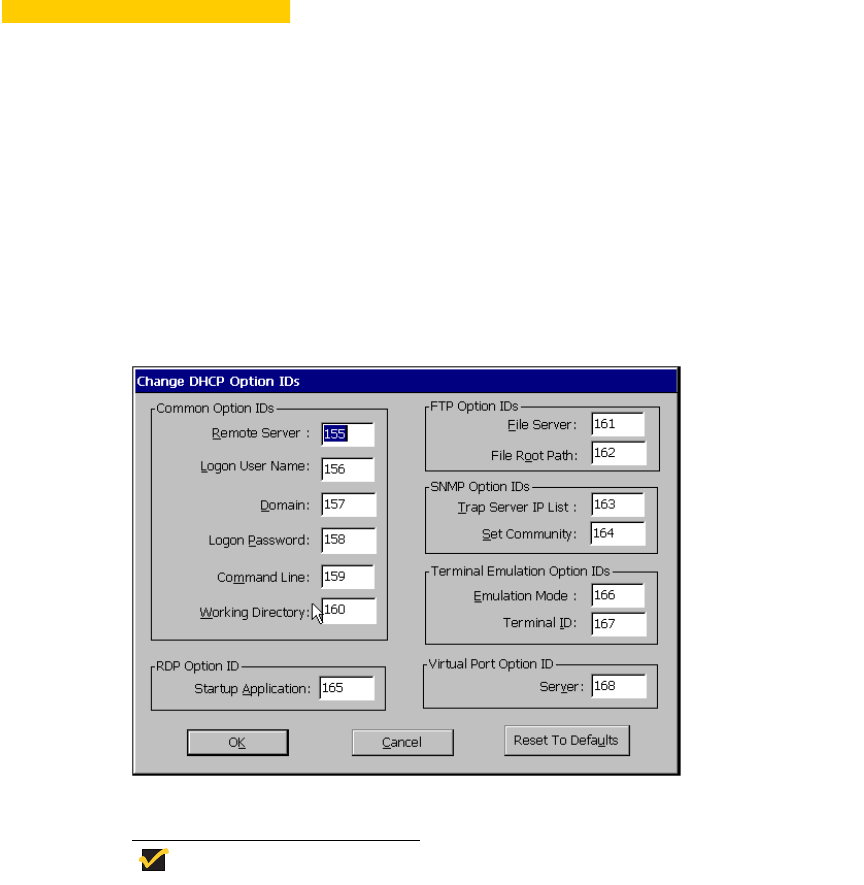

174 Terminal Firmware Upgrades
Using the Change DHCP Option IDs Dialog Box
Your terminal uses DHCP and the information on the Change DHCP Option IDs
dialog box to:
• Help establish ICA and RDP connections
• Perform automated firmware updates
• Help define terminal emulation connections
• Specify the virtual port server
• Implement remote management of SNMP parameters
To invoke this dialog box:
1. Press the F2 key.
2. Click on the Apps tab.
3. Click on the Change DHCP Option command button.
The following table describes the functions of this dialog box.
Table 34-1 Change DHCP Option IDs Dialog Box
Function Description
Common Option IDs Group box used to assign DHCP option IDs to
common DHCP variables. The number in each field is
the DHCP option ID. The following field titles are the
DHCP variables:
•Remote Server
•Logon User Name
•Domain
•Logon Password - reserved for future use
•Command Line
•Working Directory
RDP Option IDs Group box used to set the following RDP option IDs:
Startup Application
FTP Option IDs Group box used to set the following FTP option IDs:
•File Server
•File Root Path
175
SNMP Option IDs Group box used to set the following SNMP option IDs:
•Trap Server IP List
•Set Community
Terminal Emulation
Option IDs
Group box used to set the following terminal emulation
option IDs:
•Emulation Mode
•Terminal ID
Virtual Port Option
IDs
Group box used to set the following virtual port option
IDs:
Server
Reset To Defaults Click on this command button to reset all option IDs to
the default values.
Note
The values shown in Figure 34-1 are the
terminal default values.
Table 34-1 Change DHCP Option IDs Dialog Box, Continued
Function Description
176 Terminal Firmware Upgrades
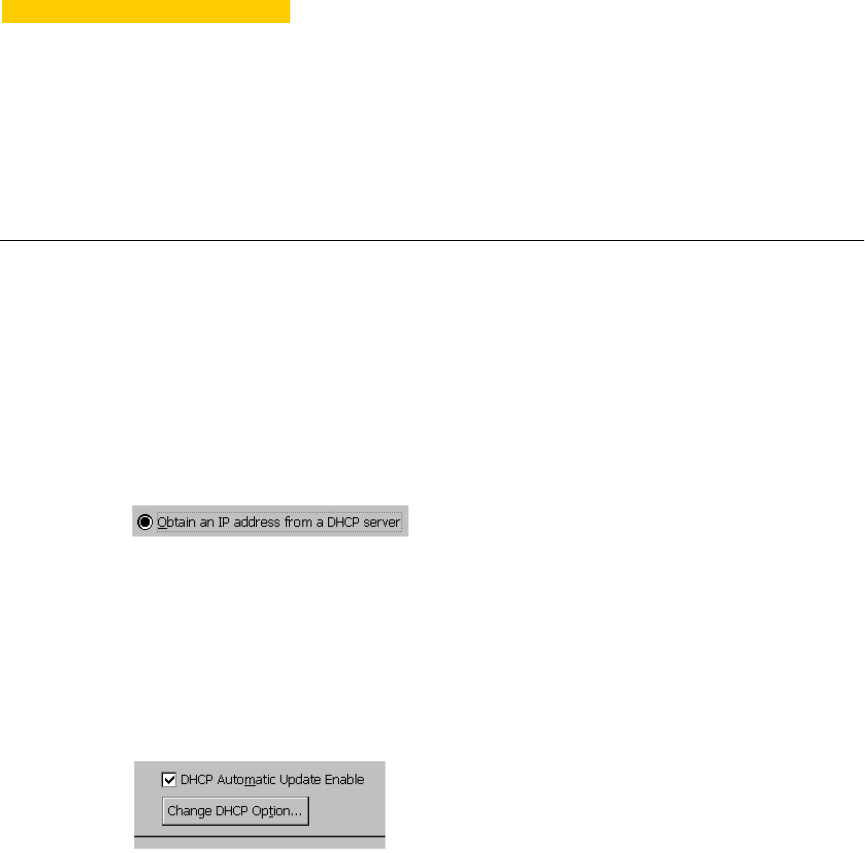
35 DHCP Firmware Upgrades
Automatic DHCP Firmware Upgrades
1. Press the F2 key for the Terminal Properties dialog box.
2. Click on the Network tab.
3. Click on the Obtain an IP Address From DHCP Server radio button, if the
function is not enabled. See Figure 35-1.
Figure 35-1 Obtain an IP Address From DHCP Sever Radio Button
4. Click on the Apps tab.
5. Click on the DHCP Automatic Update Enable check box on the Apps
properties sheet, if the function is not enabled. See Figure 35-2.
Figure 35-2 DHCP Automatic Update Enable Check Box

178 Terminal Firmware Upgrades
Note
You have now enabled the automatic DHCP function.
You will also need to configure your DHCP option IDs.
Make sure your DHCP options match the options on
the DHCP server.
6. Click on the Change DHCP Option... command button.
7. Use the Change Option IDs dialog box to change options, then click on OK to
save.
Note
Pay special attention to these FTP Option IDs
functions: File Server (the location of the server where
the firmware resides), and File Root Path (the location
of the firmware).
8. Click on the Upgrade tab.
9. Click on the Use FTP Information From DHCP Server radio button on the
Upgrade properties sheet.
Note
You will need the image and the params.ini files on the
FTP server to do the upgrade.
10.Shut down the terminal. See “Shutting Down the Terminal” for more information.
Your terminal will automatically upgrade itself when it is powered-up again.
Manual DHCP Firmware Upgrades
1. Follow instruction 1 through 3 and 5 through 8 in “Automatic Firmware
Upgrades.”
2. Click on the Upgrade... command button on the Upgrade properties sheet.
This will initiate the firmware upgrade. Once the upgrade is complete, the terminal
will reboot to the Setup Wizard.

180

182 Client Security
Using the Security Properties Sheet
To invoke the Security properties sheet:
1. Press F2 to invoke the Terminal Properties dialog box.
2. Click on the Security tab.
The following table describes the functions of this properties sheet.
Table 36-1 Security Properties Sheet
Function Description
Security Enable This group box is used to enable terminal security and
connection configuration access. It contains the
following functions:
Security Enable
Click to enable terminal security, and deactivate the
Hide Configure Tab function. By default this function
is disabled.
Hide Configure Tab
Click to enable. This function hides the Configure tab
in the Winterm Connections Manager. By default this
function is disabled.
Failover Enable Use this group box to manipulate connection features.
See “Failover” for more information.
Failover Enable
Click to enable the failover function. Enabling this
function deactivates the PingBeforeConnect function.
and activates Multiple Connect and Verbose
functions. By default this function is disabled.
Multiple Connect
Click to enable this function. Failover must be enabled
before you can access this function. By default this
function is not activated.
PingBeforeConnect
Click to enable this function. Enabling this function will
activate Verbose. By default this function is disabled.

183
Failover Enable,
continued
Verbose
Click to enable the Verbose connection function. By
default the box is not activated. This function becomes
activated when either Failover or PingBeforeConnect
is enabled.
AutoLogin Enable This group box is used to configure login parameters.
See “Autologin and Autoconnect” for more information
about autologin.
AutoLogin Enable
Click to enable the function. AutoLogin is enabled only
for the user name currently highlighted in the User
Accounts list box. Enabling the autologin function
activates Single Button Connect. By default the
function is disabled.
User Name
This field is activated by enabling AutoLogin Enable.
By default the field is blank.
Single Button Connect
Click to enable the function. See the chapter “Terminal
Login” for more information. By default the function is
not activated.
DHCP Connection
Enable
Use this group box to access the DHCP connection
list.
DHCP Connection Enable
Click to enable the function. Enabling this function
activates the Connection Name and Type list. By
default this function is disabled.
Connection Name and Type
A scroll list that displays all connections available to
your terminal. You must select the connection that will
use information supplied by DHCP. By default this
function is not activated.
Table 36-1 Security Properties Sheet, Continued
Function Description

184 Client Security
Auto Fail Recovery Click on the check box to enable the function. Auto fail
recovery is a function that checks the validity of a
disconnect, and closes down a connection if
disconnect checks true. By default, the function is
activated but not enabled.
User Accounts A list box displaying:
Account Name
Lists the account names.
Privilege
Lists the privilege type, either Admin, User, or Guest.
AutoStart
Lists the autostart permission, either Yes or No.
AutoLogin
Lists the autologin permission, either Yes or No. For
more information about user accounts see “Terminal
Accounts.”
Add User See “Adding Terminal Accounts.”
Modify User See “Modifying and Deleting Terminal Accounts.”
Delete User See “Modifying and Deleting Terminal Accounts.”
Table 36-1 Security Properties Sheet, Continued
Function Description

37 Terminal Accounts
A terminal account is a group of connection and configuration parameters
organized into a file (account) and assigned to a terminal user. Terminal accounts
can include specific connections, securtiy enable, password protection, Autologin
and/or Autostart, and Single Button Connect. The three types of accounts are:
•Guest
•User
•Administrator
Guest Accounts
The Guest account has the fewest amount of privileges. With this account you can
not:
• Configure a connection
• Gain access to the password function
With this account type you can only:
•Use the Screen Saver, Touch Screen, Character Repeat, and Keyboard
Locale functions
• Adjust display resolution

186 Client Security
User Accounts
With a User account, you will not be able to configure the connection for the
account. You will be able to access the password function. You can also:
•Use the Network properties sheet
•Use the Apps properties sheet with the exception of SNMP and DHCP
•Use the Devices properties sheet with the exception of Add/Change Modem
Administator Accounts
The Administrator account has the greatest amount of privileges. With this
account you can:
• Use Enable Password Change (change the password for an account)
• Configure or reconfigure the connection for an account
• Use all the other functions of the terminal
Using Terminal Accounts
Terminal accounts are created and managed by using the Add User..., and Modify
User... command buttons. Terminal accounts are deleted using the Delete User...
command button. These buttons are found on the Security properties sheet.
Note
There is a built-in account called Administrator. It can
not be deleted or revised. The account’s password can
be changed and is <blank> by default.
For more information about terminal accounts, see:
• “Security Properties”
• “Creating Terminal Accounts”
• “Modifying and Deleting Terminal Accounts”
38 Creating Terminal Accounts
The Add User Account dialog box is used to create terminal accounts. The
following figure shows this dialog box.
Figure 38-1
Figure 38-1Figure 38-1
Figure 38-1 Add User Account Dialog Box
Add User Account Dialog BoxAdd User Account Dialog Box
Add User Account Dialog Box

188 Client Security
Using the Add User Account Dialog Box
Use the Add User Account dialog box to set up the parameters for new terminal
accounts. To invoke this dialog box:
1. Press F2 while in the Winterm Connection Manager.
2. Click on the Security tab in the Terminal Properties dialog box.
3. Click on the Add User... command button.
The following table describes the functions of the Add User Account dialog box.
Table 38-1 Add User Account Dialog Box
Function Description
Enable Password Change Group box used to set up password functions.
Note
The fields of this group box are limited to 20 characters
or less.
Enable Password Change
Click to enable. Enabling the function will allow the user to
change a password. This function is activated by assigning the
account User account privilege. By default Enable Password
Change is deactivated.
Username
Type in the new user name. By default the field is blank.
Password
Type in the password. By default the field is blank.
Confirm Password
Type in the password again. By default the field is blank.

189
Available Connections This is a list box displaying all the terminal’s connections. It
contains:
Available Connections
This list shows the connections available for terminal
accounts.
Type
This section of the list displays the connection type for each
connection:
•ICA
•DialUp
•RDP
•TEC (terminal emulation)
Assign Click on this command button to copy a connection from
Available Connections to Connection Name. You must first
select (highlight) the connection you want to copy.
Unassign Use this button to delete a connection from Connection
Name. You must first select the connection you want to delete.
Up Select a connection and click on the Up command button to
move it up one place in the Connection Name list. If there is
not two or more connections listed in Connection Name, the
button is deactivated.
Down Select a connection and click on the Down command button to
move it down one place in the Connection Name list. If there
is not two or more connections listed in Connection Name,
the button is deactivated.
Toggle AutoStart Click on this command button to toggle between Yes and No.
These two choices are listed under AutoStart in Connection
Name.
Table 38-1 Add User Account Dialog Box, Continued
Function Description

190 Client Security
Connection Name List box displaying connections. To learn more, see the following:
Connection Name
This list shows the connections available to a terminal account.
Type
This section of the list displays the connection type of each
connection. See Type above.
AutoStart
This section of the list displays whether the connection will or
will not start automatically.
Account Privilege Group box used to assign an account an account privilege:
Administrator
Click this radio button to assign the privileges of administrator
to an account. If this function is enabled:
• All connections in Available Connections are
automatically assigned to Connection Name for use.
•Enable Password Change is deactivated but enabled.
Administrators will always have the ability to change their
passwords.
User
Click this radio button to assign the privilege of user to an
account. If User is enabled, Enable Password Change is
activated. Administrators can give users the ability to change
their password.
Guest
Click this radio button to assign the privilege of guest to an
account. If Guest is enabled, then Enable Password Change
is deactivated. Users with this account type can not change
passwords.
Multiple AutoStart Click to check this box and enable the multiple autostart
function.
Table 38-1 Add User Account Dialog Box, Continued
Function Description
39 Modifying and Deleting Terminal
Accounts
The Modify User Account dialog box is used to modify and delete terminal
accounts. The Delete command button, discussed later in Deleting Terminal
Accounts, is used to delete terminal accounts. Figure 39-1 shows the Modify User
Account dialog box.
Figure 39-1 Modify User Account Dialog Box

192 Client Security
Using the Modify User Account Dialog Box
To invoke this dialog box:
1. Press F2 from the Winterm Connection Manager.
2. Click on the Security tab in the Terminal Properties dialog box.
3. Highlight the account to be modified and click on the Modify User... command
button.
The following table describes the functions of the Modify User Account dialog
box.
Table 39-1 Modify User Account Dialog Box
Function Description
Enable Password
Change
Group box used to set up password functions.
Enable Password Change
Click to enable. Enabling the function will allow the
user to change the password. This function is only
activated for User accounts. By default Enable
Password Change is disabled.
Username
This field can not be modified.
Password
Type in the new password. By default the field is the
old password, represented by several asterisks.
Confirm Password
Retype the password. By default the field is the old
password, represented by several asterisks.
Note
The preceding fields are limited to 20 characters
or less.
Available
Connections
List box displaying connections.
Available Connections
This list shows all the connections available for
terminal accounts.
Type
The section of the list that shows the connection type.

193
Assign Click on this command button to copy a connection
from Available Connections to Connection Name.
You must first select to highlight the connection you
want to copy.
Unassign Use this button to delete a connection from
Connection Name. You must first select (highlight) the
connection you want to delete.
Up Select a connection and click on the Up command
button to move it up one place in the Connection
Name list. If there is not two or more connections listed
in Connection Name, the button is deactivated.
Down Select a connection and click on the Down command
button to move it down one place in the Connection
Name list. If there is not two or more connections listed
in Connection Name, the button is deactivated.
Toggle AutoStart Click on this command button to toggle between Yes
and No. These two choices are listed under AutoStart
in Connection Name.
Connection Name List box displaying connections.
Connection Name
This list shows the connections available for use by a
terminal account.
Type
This is the section of the list that displays the
connection type of each connection.
AutoStart
This is the section of the list that displays whether the
connection will or the connection will not autostart.
Table 39-1 Modify User Account Dialog Box, Continued
Function Description

194 Client Security
Deleting Terminal Accounts
Terminal accounts can be deleted from the User Accounts list on the Security
properties sheet. To delete an account:
Caution
You can not recover a deleted account.
1. Click on the account that you want to delete in the User Accounts list.
2. Click on the Delete User... command button.
Account Privilege Group box used to assign an account an account
privilege:
Administrator
Click this radio button to assign the privileges of
administrator to an account. If this function is enabled:
• All connections in Available Connections are
automatically assigned to Connection Name for
use.
•Enable Password Change is deactivated but
enabled. Administrators will always have the ability
to change their passwords.
User
Click this radio button to assign the privilege of user to
an account. If User is enabled, Enable Password
Change is activated. Administrators can give Users
the ability to change their password.
Guest
Click this radio button to assign the privilege of guest to
an account. If Guest is enabled, then Enable
Password Change is deactivated. Users with this
account type can not change passwords.
Multiple AutoStart Click to check this box and enable the multiple
autostart function.
Table 39-1 Modify User Account Dialog Box, Continued
Function Description
195
The following dialog box will display.
Figure 39-2 Delete User Account Confirmation Dialog Box
To delete the listed account, click on the Yes command button. The terminal
account is removed from the database.
Note
You can not delete the built-in Administrator account.
196 Client Security
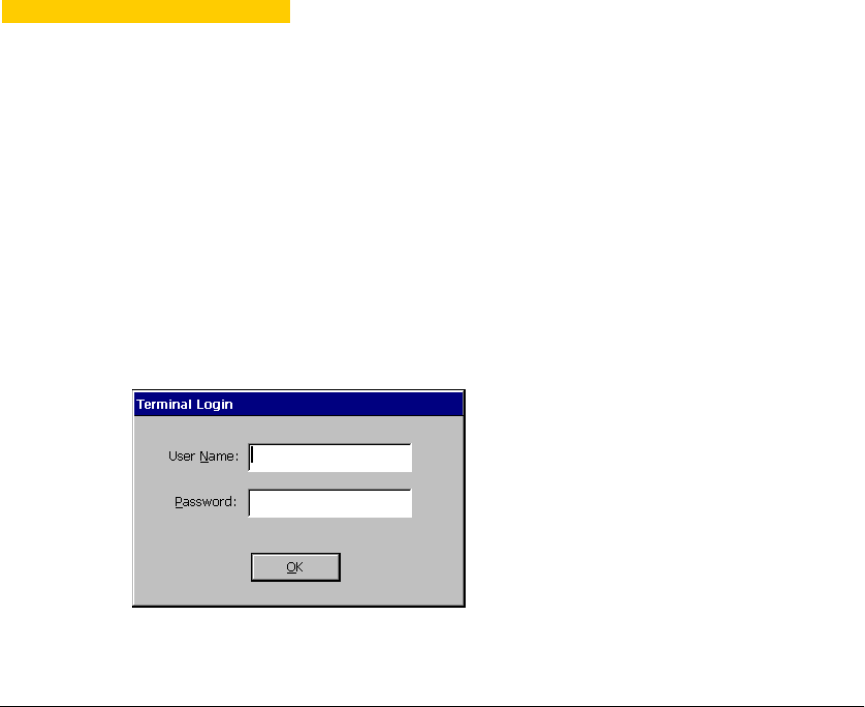
40 Terminal Login
Terminal login is used as a terminal security measure. Only users with the correct
User Name and Password will be able to log into the terminal. Figure 40-1 shows
the Terminal Login dialog box.
Figure 40-1 Terminal Login Dialog Box
Logging Into the Terminal
To use the login feature:
1. Enable security. See “Security Properties” for more details.
2. Log out of the terminal by clicking on the Shutdown command button in the
Winterm Connection Manager.
3. Click on the Logout radio button in the Shutdown Window dialog box.
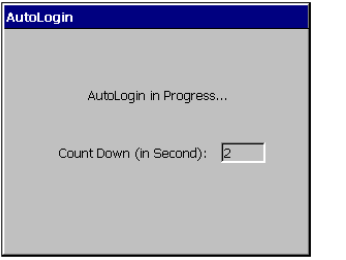
198 Client Security
The Terminal Login dialog box displays. In this dialog box:
1. Type in the correct User Name and Password.
2. Click on OK to log into the terminal again.
Autologin and Autoconnect
Autologin
The autologin feature is an automatic login function that does not use a dialog box
as a prompt to log you into your terminal again. Whether you restart or log off, the
AutoLogin dialog box displays, counts five seconds, then returns you to the
Winterm Connection Manager.
This is a global function, so it does not matter what other functions you have
enabled. Autologin is associated with an account and only one account can have
autologin associated with it. It will always act in the same manner. The following
figure shows the AutoLogin dialog box.
Figure 40-2 Autologin Dialog Box
AutoStart
AutoStart is a function that automatically connects you once you have logged into
your terminal. Autostart can be added to any defined connection in any account.
Each user can have different and/or multiple autostart connections. To use the
function:
200 Client Security
To enable this function:
1. Press F2 to invoke the Terminal Properties dialog box.
2. Click on the Security tab to invoke the Security properties sheet.
3. Highlight the user’s name in User Accounts.
4. Click on the Autologin Enable check box to enable the function.
5. Click on the Single Button Connect check box to enable the function.
6. Click on OK.
7. Click on the Shutdown command button in the Winterm Connection
Manager.
8. Click on the Logout radio button to log out of the terminal.
The Single Button Connect dialog box appears.
Click on Connect to log into the terminal again. If the connection fails, the Winterm
Connection Manager displays.

41 Failover
Failover is a connection feature that is enabled using the Security properties
sheet. It forces the terminal to “ping” the intended device before making a
connection to it. The function operates when Failover Enable is enabled on the
Security properties sheet. Failover is global and wholly automatic to the terminal. It
will work regardless of what connection you are trying to make, or what type of
account you are logged in using. See “Security Properties” for more information
about this function and how to invoke the properties sheet.
Note
Ping (Packet Internet Groper) is a network utility. It
tests communication with nodes in a network by
sending a packet to each selected node. Ping then
waits to receive the echo response from that selected
node.
Failover operates as follows:
1. The terminal pings the intended connection, to determine whether or not it is
available.
2. If pinging the intended device fails, the terminal pings each successive
connection in the list.
3. For each connection:
a. If ping is successful, the connection is made.
b. If ping is not successful, the terminal pings the next connection.
c. If the next connection is a serial connection, ping will stop. Ping will not work
on a serial connection. Failover will not continue after encountering a serial
connection, but will launch the serial connection if it is valid.
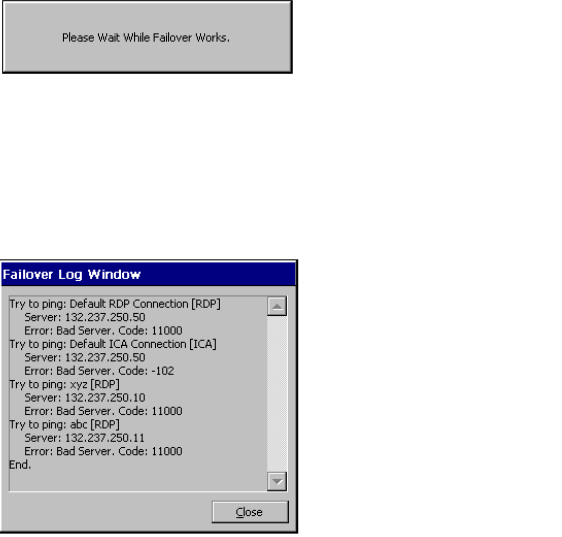
202 Client Security
If failover pings all the connections in the list and a connection is not made, the
function stops. The following figure displays.
Figure 41-1 Failover Message Box
Once failover is finished, the Failover Log Window dialog box displays.
Figure 41-2 shows this dialog box.
Figure 41-2 Failover Log Window Dialog Box
The Failover Log Window is a list of all the connections that were pinged. The list
reports both successful and unsuccessful pings.

204
42 Troubleshooting Your Terminal
This troubleshooting guide provides solutions to problems that may occur when
making a terminal connection to a server. If you can not resolve an issue, call an
authorized service center for assistance.
Table 42-1 lists some common problems and the solutions to those problems.
Table 42-1 Troubleshooting Your Terminal
Problem Solution
When the terminal is powered-up, nothing
happens.
Check the power cord. It should be plugged
into an AC outlet and pushed all the way into
the AC power connector on the terminal’s
back panel or power supply.
When the terminal is powered-up, the screen
remains black. The power-on indicator light is
orange.
Set the terminal to factory defaults. Factory
defaults can be obtained by turning the
terminal off, then on, while holding down the G
key. When you see the terminal's splash
screen, release the G key. The terminal’s
factory defaults are now restored.
When the terminal is turned on, the Winterm
Connection Manager or the WBT Setup
Wizard appears, but the mouse does not
function.
Ensure that the mouse is plugged into the
PS/2 mouse port on the terminal’s back panel.
Note
See the installation section of this guide
for the location of the PS/2 connector.
During the terminal’s Power-On Self-Test, a
message is displayed:
The terminal cannot detect a keyboard.
The keyboard is bad, missing, or not
connected properly.
Ensure that a PS/2 keyboard with a PS/2
connector is firmly connected to the keyboard
connector on the terminal’s back panel.
206 Getting Help
With a serial connection already established,
the mouse cursor moves, but the keyboard
input and mouse clicks do not work, and all
the applications are frozen.
The serial connection to the server is broken.
Turn the terminal off, then on. Log into the
applications server again. If your terminal
sustained a disconnect time-out, the original
desktop prior to the disconnect will be
reestablished (if the connection was defined to
do so). If you can not log in to the terminal
again:
1. Verify that all cables between the terminal
and the applications server are connected.
2. Check to see if any modem connections
between the terminal and server open.
3. Ensure that the applications server’s port
that your session is connected to is
working.
4. Make sure you are using a shielded cable
that meets RS-232 standards, and that you
are operating within RS-232 standards.
The parallel printer connected to my terminal
does not respond when I try to print to it.
1. Make sure that the printer is plugged into
the proper outlet and turned on.
2. Check the cable connection to the printer
and to the terminal.
3. Make sure that the printer is on line.
4. Make sure that the printer is properly
configured in the application server’s Print
Manager, and that the printer has not been
paused.
Note
See “Terminal Port Pin Assignments”
for parallel cable pin assignments.
Table 42-1 Troubleshooting Your Terminal, Continued
Problem Solution
207
The serial printer connected to the terminal
will not print.
1. Ensure that the power to the printer is
turned on.
2. Check the cable from the terminal to the
printer for proper connection.
3. Ensure that the printer is on line.
4. Ensure that both the terminal’s and the
printer’s serial ports are identically
configured. Both must use the same
handshaking protocol.
Note
See the printer’s user’s guide for
information about printing from a serial
connection.
5. Ensure that the printer is configured
properly in the applications server’s print
manager, and that the printer has not been
paused.
Note
Refer to “Terminal Port Pin
Assignments” for serial
communications pin assignments. Pin
assignments must be compatible with
those on your printer’s serial port.
Table 42-1 Troubleshooting Your Terminal, Continued
Problem Solution

208 Getting Help
If any other error messages are displayed, or you have any other problems, you
should restore the terminal to its default settings and reconfigure it. Factory defaults
can be restored by disconnecting the power to the terminal, then reconnecting it
while holding down the G key. Release the G key when the splash screen appears
(for the 3320SE and 3720SE, also press and release the power management
button, then release the G key). The terminal’s defaults will be restored.
You are not able to make a network
connection using the Winterm Connections
Manager.
1. Press F2 to invoke the Terminal
Properties dialog box.
2. Select the Network tab.
3. Verify that the proper method for specifying
the IP address is selected, DHCP or static
IP. If a static IP address is selected, verify
that the IP address, the subnet mask, and
the gateway IP address are correct for the
subnet that the terminal is connected to.
4. Verify that a cable is connected to the
network connector on the back panel of the
terminal.
5. Check the other end of the cable to ensure
that it is connected to a hub or other
network outlet. If DHCP addressing is
selected, check with your network
administrator to ensure that the DHCP
server for your subnet is functioning
properly.
Table 42-1 Troubleshooting Your Terminal, Continued
Problem Solution
43 Terminal Port Pin Assignments
Serial and Parallel Ports
The following two figures show the pin assignments for the serial and parallel ports.
These ports are located on the back panel of your terminal. See “Terminal
Features” for information about the back panel.
Figure 43-1 Serial Port
Pin Signal Name Pin
Carrier Detect (DCD)
Receive Data (RX)
Transmit (TX)
Data Terminal Ready (DTR)
Signal Ground
Data Set Ready (DSR)
Request to Send (RTS)
Clear to Send (CTS)
Ring Indicator (RI)
1
2
3
4
5
6
7
8
9
1
2
3
4
5
6
7
8
9
Server
Com Port
Terminal
Com Port
1
6
5
9
DB-9M

210 Getting Help
Figure 43-2 Parallel Port (EPP/SPP)
Note
The parallel pin assignments are
Centronics-compatible.
1
2
3
4
5
6
7
8
9
10
11
12
13
14
15
16
17
18-25
-Strobe
+ Data Bit 0
- Acknowledge
+ Busy
+ Paper End
+ Select
- Auto Feed
- Error
- Initialize
- Select Input
Ground
+ Data Bit 1
+ Data Bit 2
+ Data Bit 3
+ Data Bit 4
+ Data Bit 5
+ Data Bit 6
+ Data Bit 7
Parallel
Device
Terminal
Parallel
Port
Pin Signal Name
13
25
1
14
DB-25F
44 Terminal Connector Pin
Assignments
10Base-T and 100Base-T Connector
The following figure shows the pin assignments for the 10Base-T and 100Base-T
connector. This connector is located on the back panel of your terminal. See
“Terminal Features” for information about the back panel.
Note
It is recommended that you use Category 5 twisted-pair
cable to connect your terminal to a hub.
Figure 44-1 10Base-T and 100Base-T Connector
Pin Signal Name
1
2
3
6
+Transmit Detect
-Transmit Detect
+Receive Detect
- Receive Detect
Hub
Terminal
10Base-T
Connector
18
RJ-45
212 Getting Help
VGA Connector
The following figure lists the connector pin assignments for the terminal’s VGA
connector. This connector is located on the back panel of your terminal. See
“Terminal Features” for information about the back panel.
Figure 44-2 VGA Connector
1115
1
2
3
4
5
6
7
8
9
10
11
12
13
14
15
Red Video
Green Video
Blue Video
No Connection
Ground
Red Video Ground
Green Video Ground
Blue Video Ground
No Connection
Sync Ground
No Connection
No Connection
HSYNC
VSYNC
No Connection
Monitor
Video
Connector
Video
Signal
Source
Pin Signal Name
1
6
5
10
213
USB Connector
The following figure lists the connector pin assignments for the terminal’s USB
connectors. These connectors are located on the back panel of your terminal. See
“Terminal Features” for information about the back panel.
Figure 44-3 USB Connector
Upstream
Port HUB Port
#4
Port
#3
Port
#1
Port
#2
Port
#5
Port
#7
Port
#6
NCC-1
DNEG-1
DPOS-1
GND
1
2
3
4
Pin
214 Getting Help

45 Null Modem Cable Pin
Assignments
Table 45-1 outlines the pin assignments for a 9-pin serial port to a 25-pin serial port
null modem cable.
Table 45-1 Null Modem Cable Pin Assignments
25 Pin 9 Pin
2 (transmit data) 2 (receive data)
3 (receive data) 3 (transmit data)
4 (request to send) 8 (clear to send)
5 (clear to send) 7 (request to send)
6, 8 (data set ready, carrier detect) 4 (data terminal ready)
7 (ground) 5 (ground)
20 (data terminal ready) 6, 1 (data set ready, carrier detect)
216 Getting Help

46 Modem AT Commands
The tables of this section list the modem AT command sets.
Table 46-1 AT Commands with No Lead-in Character
Command Description
B, B0 ITU-T (CCITT) V.22 mode when at 1200 bps; V.21 at
300 bps
E1 Enable character echo to terminal in command mode
H, H0 Go on-hook (hang up)
N1 Connection speed set to highest possible DCE rate,
Automode
Q, Q0 Modem returns result codes (Quiet disabled)
T Tone dialing
V1 Full-word result codes (Verbose enabled)
W2 Negotiation progress codes disabled. Result code is
DCE rate.
X4 Modem recognizes dialtone and busy, CONNECT
nnnn result code enabled.
Y, Y0 Disable long-space disconnect
Z, Z0 Reset modem and recall User Profile 0

218 Getting Help
Table 46-2 AT Commands Beginning with “&”
Command Description
&B1 Disable port rate adjust
&C1 Carrier detect follows data carrier
&D2 Hang up and go to command mode during On-to-Off
DTR transition
&F, &F0 Recall factory settings as active configuration
&M0 Asynchronous mode
&N, &N0 Microcom QX/4232hs-compatible numeric result codes
displayed
&Q5 Error Correction Mode V.42=> MNP=> Async
&T4 Grant request from remote for remote digital loopback
test
&U1 Data compression enabled
&V View active configuration, profiles (0,1), and numbers
&W, &W0 Save active configuration as User Profile 0
&Y, &Y0 Recall User Profile 0 on power-up

219
Table 46-3 AT Commands Beginning with “\”
Command Description
\A3 Maximum MNP block size = 256 characters
\G, \G0 Disable port flow control DCE to DCE
\J,\J0 Disable port rate adjust
\L,\L0 MNP stream link
\N7 Set Auto-reliable mode (LAPM with fallback to MNP,
then to normal)
\Q3 Bidirectional hardware flow control
\S Display current Configuration, Long Version
\V, \V0 Disable /REL connect codes
\X,\X0 XON/XOFF pass-through disabled
Table 46-4 AT Commands Beginning with “%”
Command Description
%C1 Data compression requested (V.42bis in LAPM, MNP5
in MNP)
%E, %E0 Disable Auto-retrain
%L Report Line Signal Level in -dBm
%Q Report Line Signal Quality
%R Display all S registers
%V Display firmware version
220 Getting Help
Glossary 221
Glossary
The following glossary is a list of commonly used terms in this guide.
Term Definition
10Base-T One of several adaptations of the Ethernet (IEEE 802.3)
standard for Local Area Networks (LANs). The 10Base-T
standard (also called Twisted Pair Ethernet) uses a twisted-pair
cable with a maximum length of 100 meters. The cable is
thinner and more flexible than the coaxial cable used for the
10Base-2 or 10Base-5 standards.
100Base-T A networking standard that supports data transfer rates up to
100 Mbps (100 megabits per second). 100Base-T is based on
the older Ethernet standard. Because it is 10 times faster than
Ethernet, it is often referred to as Fast Ethernet. Officially, the
100Base-T standard is IEEE 802.3u. Like Ethernet, 100Base-T
is based on the CSMA/CD LAN access method. There are
several different cabling schemes that can be used with
100Base-T, including:
• 100Base-TX: two pairs of high-quality twisted-pair wires
• 100Base-T4: four pairs of normal-quality twisted-pair wires
• 100Base-FX: fiber optic cables
Bootstrap A technique designed to cause a circuit, stage, or operation to
bring itself into a desired state by means of its own action. Used
as a machine routine, the bootstrap technique involves loading
the first few instructions into storage; these instructions are then
used to bring in the rest of the routine--usually by entering a few
manual instructions or by using a special keystroke
combination.
CHAP Challenge-Handshake Authentication Protocol. An
authentication scheme used by PPP servers to validate the
identity of the originator of the connection upon connection or
any time later.
CRT Cathode-Ray Tube. A large vacuum tube with a viewing face in
which an electron beam is focused and controlled to form
characters and other images.
Glossary 222
CTS Clear to Send. Control signal sent from the DCE. Indicates that
the DTE may send data.
DCE Data Communications Equipment. Devices that provide the
functions required to establish, maintain, and terminate a data
transmission connection, e.g., a modem.
DHCP Dynamic Host Configuration Protocol. A protocol for assigning
dynamic IP addresses to devices on a network.
DNS Domain Name Service. A general-purpose distributed,
replicated, data query service chiefly used on the Internet for
translating host names into Internet addresses.
Download To transfer data from a processing unit to an attached device.
For example, from a host to the terminal.
DSR Data Set Ready. A hardware signal sent by a communications
device to indicate readiness to send and receive data.
DTE Data Terminal Equipment. A device that acts as the source and/
or destination of data and which controls the communication
channel. DTE includes terminals, computers, protocol
converters, and multiplexors. DTE is usually connected via an
RS-232 serial line to Data Communication Equipment (DCE),
typically a modem. It is necessary to distinguish these two types
of devices because their connectors must be wired differently if
a straight-through cable (pin 1 to pin 1, pin 2 to pin 2 etc.) is to
be used. DTE should have a male connector and should
transmit on pin three and receive on pin two. It is a curious fact
that many modems are actually DTE according to the original
standard.
DTR Data Terminal Ready. A hardware signal sent by a terminal to
indicate readiness to send and receive data.
Ethernet A baseband local area network specification developed jointly
by Digital Equipment Corp., Xerox, and Intel to interconnect
computer equipment using coaxial cable and transceivers. An
Ethernet LAN provides ten million bits per second of capacity for
high-speed terminal-to-computer communication or
computer-to-computer file transfer.
FCC Federal Communications Commission. The Government body
that regulates all telecommunications originating in the U.S.,
including transmission over telephone lines.
Firmware A computer program or software stored permanently in a PROM
or ROM or semi-permanently in an EPROM.
Glossary 223
Flow control The procedure for regulating the flow of data between two
devices, flow control prevents the loss of data when one
device’s receiving buffer has reached its capacity.
FTP File Transfer Protocol. FTP is a program for transferring files in
TCP/IP environments such as the Internet in which a user,
acting as a client, downloads files from a remote server. FTP is a
core component in every TCP/IP system and is implemented at
the Applications layer with respect to the OSI protocol model. Its
operation is based on the Telnet program and TCP. FTP is
available on a wide variety of computer systems and serves as
a common protocol for transferring files between systems.
GUI Graphical User Interface (pronounced “gooey”). The use of
pictures rather than just words to represent the input and output
of a program. A program with a GUI runs under some
windowing system (e.g. Microsoft Windows®). The program
displays certain icons, buttons, and dialog boxes in its windows
on the screen. The user mainly controls these objects by
moving a pointer on the screen (typically controlled by a mouse)
and selecting certain objects by pressing buttons on the mouse
while the pointer is pointing at them.
Hz Hertz. A unit of frequency equal to 1 cycle per second.
ICA Independent Computing Architecture. A three-part server-based
computing technology that separates an application’s logic from
its user interface and allows 100% application execution on the
server.
Integrated CRT terminal A terminal with a monitor and connections on the back for a
keyboard and mouse.
Interface A shared boundary defined by common physical interconnection
characteristics, signal characteristics, and meaning of
interchanged signals.
Internet The Internet is a global web of interconnected computers and
computer networks that are interconnected under a common set
of network protocols that allows them to function as a single
large network (see TCP/IP).
IP address Internet Protocol Address. The 32-bit, 4-byte address assigned
to machines using the Internet with TCP/IP. It is usually
represented in dotted decimal notation. Provides
interconnectivity among a variety of independent host systems.
Glossary 224
ISDN Integrated Services Digital Network. Evolving switched network
standard that provides end-to-end digital voice and data
communication services.
kb or kilobit 1,024 bits. Commonly referred to as 1 thousand bits.
kB or kilobyte 1,024 bytes. Commonly referred to as 1 thousand bytes.
kbps or kb/s Kilobits per second. An abbreviation meaning thousands of bits
per second.
Load Balancing Services A management add-on to Citrix WinFrame and MetaFrame
servers that allows administrators to group multiple WinFrame
and/or MetaFrame servers into scalable “server farms” to
deliver the best application performance and server resource
utilization.
Mb or megabit 1,048,576 bits. Commonly referred to as 1 million bits.
Mbps or Mb/s Megabits per second.
MetaFrame The world’s first Server-based Computing software for Microsoft
Windows NT 4.0 Server, Terminal Server Edition multi-user
software (co-developed by Citrix).
MIB Management Information Base. A database of managed objects
accessed by network management protocols.
Modem (Mo)dulator/(dem)odulator. Data communication equipment
(DCE) devices that provide connections for computers into the
public switched telephone network (PSTN). They convert
(modulate) the digital signals of computers into analog signals
that can be transmitted over telephone lines. A modem at the
other end of the link then demodulates the signals back to digital
bits.
Modular terminal Desktop client that works with existing standard monitors.
Network An interconnected group of nodes; a series of points, nodes, or
stations connected by communications channels; the assembly
of equipment through which connections are made between
data stations.
Glossary 225
Null modem A cable, especially an RS-232 cable, for connecting serial ports
on two computers directly, rather than via modems. Since,
according to the specification, both computers should transmit
on pin three of their RS-232 connectors and receive on pin two,
a null modem cable needs to connect one computer's pin two to
the other's pin three and vice versa. It also needs to have male
connectors at both ends (again, according to the specification).
OSD On Screen Display.
Packet A group of bits (including data and call control signals)
transmitted as an identifiable unit on a packet-switched network
(PSN).
PAP Password Authentication Protocol. An authentication scheme
used by PPP servers to validate the identity of the originator of
the connection. PAP applies a two-way handshaking procedure.
After the link is established the originator sends an id-password
pair to the server. If authentication succeeds the server sends
back an acknowledgment; otherwise it either terminates the
connection or gives the originator another chance.
Parallel port An input/output port that allows the entire bit pattern for a single
character to be sent at one time, usually used to connect a
printer to a computer.
Parity check The addition of non-information bits (specifically, parity bits) to
make up a transmission block (a number of bits transmitted as
unit) that ensures the total number of ones is always either even
(even parity) or odd (odd parity). The parity check is used to
detect transmission errors.
PCMCIA Personal Computer Miniature Connector Interface Adapter.
Hardware and software standards for credit-card-sized
integrated circuit cards.
Ping Packet InterNet Groper. A protocol used in the Transmission
Control Protocol (TCP) environment to test whether a node or
remote device is communicating on a local area network (LAN)
or wide area network (WAN). The protocol provides for
transporting an echo response from a host system, a client, or a
gateway. It is a useful tool for locating problems on the network
related to failed connections and software problems. One
datagram is sent every second over the network and any
response is displayed.
Glossary 226
PPP Point-to-Point Protocol. A serial communication protocol that
operates over dialup or leased (dedicated) lines to provide
connections into IP networks. It sets up and monitors router
sessions and frames the data transmitted over the line.
Protocol A set of formal rules describing how to transmit data, especially
across a network. Low-level protocols define the electrical and
physical standards to be observed, bit- and byte-ordering, and
the transmission and error detection and correction of the bit
stream. High level protocols deal with the data formatting,
including the syntax of messages, the terminal to computer
dialogue, character sets, sequencing of messages, etc.
RAM Random-Access Memory. A mass store that provides fast
access to any storage location by means of vertical and
horizontal coordinates. Information is written in or read out using
the same procedure. The memory cycle time is the same for any
location addressed because there is no waiting or sorting time
required, as there is when data items are stored sequentially.
RAS Remote Access Services. A service provided by Windows NT
that allows most of the services which would be available on a
network to be accessed over a modem link. The service
includes support for dialup and logon, and then presents the
same network interface as the normal network drivers (albeit
slightly slower). It is not necessary to run Windows NT on the
client - there are client versions for other Windows operating
systems.
RDP Remote Desktop Protocol. A computing technology that
separates an application’s logic from its user interface and
allows 100% application execution on the server.
RS-232 cable A cable for serial interfaces between the terminal and
communications devices, such as a modem. The cable
connects to the 25-pin serial port at the back of the terminal.
Maximum cable length is 50 feet; maximum signaling rate is 20
Kbits/sec.
RTS/CTS flow control Request to Send/Clear to Send flow control. Enables flow
control on the local serial line. RTS is pin 4 of the 25-pin RS232/
423 connector. CTS is pin 5 of the connector. RTS is an output
of the terminal; CTS is an input to the terminal.
Glossary 227
Serial port A connector on a computer to which you can attach a serial line
connected to peripherals that communicate using a serial
(bit-stream) protocol. The most common type of serial port is a
25-pin D-type connector carrying RS-232 signals. Smaller
connectors (e.g. 9-pin D-type) carrying a subset of RS-232 are
often used on personal computers.
Server The control computer on a local area network that controls
software access to workstations, printers, and other parts of the
network. Under Citrix’s server-based computing model, the
server performs all application execution functions.
SNMP Simple Network Management Protocol. The industry standard
protocol for managing TCP/IP networks. This protocol queries
agents in managed devices and passes information to the
management console.
Start bit In asynchronous transmission, the first bit of any given
character used to alert the receiving system to recognize the
related incoming data.
Stop bit In asynchronous transmission, the last bit of any given
character, used to alert the receiving system that transmission
of the character is complete.
SVGA Super Video Graphics Adapter. A DRAM-based VGA adapter
that supports both monochrome and color high-resolution
graphics and provides extended resolutions of usually 1024 x
768.
TCP/IP Transmission Control Protocol/Internet Protocol. The de facto
standard Ethernet protocols incorporated into 4.2BSD UNIX.
TCP/IP was developed by DARPA for Internet working and
encompasses both network layer and transport layer protocols
(in the OSI model). While TCP and IP specify two protocols at
specific protocol layers, TCP/IP is often used to refer to the
entire DOD protocol suite based upon these, including Telnet,
FTP, UDP and RDP.
Telnet Telnet is the login and terminal emulation program for
Transmission Control Protocol/Internet Protocol (TCP/IP)
networks such as the Internet. Its primary function is to allow
users to log into remote host systems.
Terminal A data terminal equipment DTE device. An input/output device
made up minimally of a video display, keyboard, and sometimes
a central processing unit, connected to a modem, for data
communications.
Glossary 228
Terminal emulator A program that allows a computer to act like a particular brand
or type of terminal. The computer thus appears as a terminal to
the host computer and accepts the same escape sequences for
functions such as cursor positioning and clearing the screen.
Thin-client A low-cost computing device that works in a server-centric
computing model. Thin clients typically do not require
state-of-the-art, powerful processors and large amounts of RAM
and ROM because they access applications from a central
server or network. Thin clients can operate in a Server-based
Computing environment.
Timeout A time interval within which certain operations must occur; for
example, the time allotment for the terminal to connect to a login
host. After the timeout, the process can either be repeated or
discontinued.
Total Cost of Ownership (TCO) A model that helps IT professionals understand and manage the
budgeted (direct) and unbudgeted (indirect) costs incurred for
acquiring, maintaining and using an application or a computing
system. TCO normally includes training, upgrades, and
administration as well as the purchase price. Lowering TCO
through single-point control is a key benefit of Server-based
Computing.
Touch screen A type of display screen that has a touch-sensitive transparent
panel that can sense when someone is touching it, and is able
to furnish a computer with precise information as to exactly
where on the screen the touch occurred. Touch screens are
used with software that uses the information provided by the
screen touch to respond to user requests.
USB Universal Serial Bus. An external peripheral interface standard
for communication between computer and external peripherals
over an inexpensive cable using biserial transmission. USB is
standard on current (1999) Macintosh computers and is
promoted by Intel as an option for the IBM PC where it is
supported by later versions of Windows 95. USB works at 12
Mbps with specific consideration for low-cost peripherals. It
supports up to 127 devices and both isochronous and
asynchronous data transfers. USB cables can be up to 5 meters
long and include built-in power distribution for low-power
devices. It supports daisy chaining through a tiered star
multidrop topology.
Glossary 229
Virtual Port Incoming Telnet and rlogin connections are not associated with
a physical port. Instead, they are associated with a virtual port,
port 0, which serves for the duration of the connection. Each
virtual port is created with a default set of characteristics. The
Define Port commands can be used to customize a virtual port
during the Telnet/Rlogin session; however, these customizations
can not be saved. The port reverts to the default set of
characteristics when the session is closed.
WAN Wide Area Network. A data-communications system covering a
large geographic area, usually digital circuits having moderate
to high data rates (e.g., 56 to 64 kbps up to 1.5 to 2 Mbps).
Windows Terminal Server A network device that is attached to non-network serial devices,
such as terminals, printers and modems, or to an Ethernet
network.
Windows-based Terminal A fixed-function thin-client device that connects to a Citrix
WinFrame or MetaFrame server and Terminal Server to provide
application access. The key differentiator of a WBT from other
thin devices is that all application execution occurs on the
server; there is no downloading or local processing of
applications at the client.
WinFrame A multi-user Windows application server, based on Windows
NT, developed under license from Microsoft.
WINS Windows Internet Naming Service. WINS allows machines to
dynamically register their name-to-address mappings. WINS is
also a flat name space without the concept of hierarchy and
requires each WINS server to maintain a complete database of
entries through replication.
Winterm Trademarked logo for Windows-based terminals manufactured
by Wyse Technology Inc.
X-ON/X-OFF Transmitter On/Transmitter Off. Control characters used for flow
control, instructing serial devices to start transmission (X-ON)
and stop transmission (X-OFF).
Glossary 230
Index 231
Index
Numerics
100Base-T 15
10Base-T 15, 47
3315SE/3320SE/3350SE specifications 17
3515SE/3715SE/3720SE specifications 21
B
Battery, 3350SE 20, 24
C
Card bus
3350SE 39
Category 5 twisted pair 211
Centronics-compatible 210
Com1
3315SE 29
3320SE 29
3350SE 38
3515SE 46
3715SE 46
3720SE 46
Com2
3315SE 29
3320SE 29
3350SE 39
3515SE 46
3715SE 46
3720SE 46
Command buttons
Add User 184, 186, 188
Add/Change Modem 151
Advanced (login options) 133
Change DHCP Option 97, 178
Configure 114, 134
Default (Server) List 92
Delete User 184, 186, 194
Dialing Properties 114
Edit (connection parameters) 142
Finish 70, 100
ICA Client Settings 89, 96
ISDN Settings 149
Modify User 93, 184, 186, 192
Restart (terminal) 100
Security 114, 125
Shutdown (terminal) 197
SNMP Network 97
SNMP Network Administration 168
Startup (connection) 104
TCP/IP Settings 114, 123
Upgrade 163, 178
Connection protocols
Citrix ICA Client 104
Dial-Up Client 104
Microsoft Remote Desktop Client 104
Terminal Emulation 104
Control keys
Alt+Backtab 88
Alt+Esc 88
Alt+Tab 88
Ctrl+Alt+Del 88
Ctrl+Alt+Down Arrow 94
Ctrl+Alt+End 94
Ctrl+Alt+Up Arrow 94
Ctrl+Esc 88
F2 12
D
DHCP 208
Dialog boxes
About (the terminal) 157
Add or Change Modem 151
Add Server Address 109
Add User Account 187
Automate Login Process 134
Change DHCP Option IDs 173
Change Option IDs 178
Compression, Cache, and Sound 111
Connection Information 132
Connection Startup 104
Desktop Area and Refresh Frequency 69
Device Properties 117
Dialing Properties 117
Index 232
Download Utility 156
Failover Log Window 202
Firmware Upgrade 157
Global ICA Settings 87
Host Information 133
ISDN Settings 149
Modify User Account 191
New Connection 103
Port Settings 120
Printer Port Settings 135
Properties (connections) 141
Security Settings 125
Select a Server or Published
Application 108
Select a Title for the ICA Connection 112
Select Window Options 111
Server Location 108
Shutdown Window 99
SNMP Network Administration 167
Specify an Application 110
Specify Connection Type 107
Specify Logon Information 110
TCP/IP Settings 123
TCP/IP Telnet Configuration 136
Terminal Login 100, 197
Terminal Properties 12
Terminal Settings Change 70, 72, 100
Winterm Connection Manager 13
DOS functions
check 155
dir 156
xfer.exe 155
E
Enhanced modular terminal 9
specifications 17
F
Ferrite bead 59
Firmware download
cable method 155
parallel download 155
Functions
Accept Any Authentication Including Clear
Text 125
Accept Only Encrypted
Authentication 125
Accept Only Microsoft Encrypted
Authentication 125
Add (command button) 86, 91
Add/Change Modem 148
Allow Automatic Client Update 90
Application to Run 145
Assign (connection) 189, 193
AutoLogin Enable 183
Autologin Enable 93, 200
Automatic Logon 143
Available Connections 189
Call Options 120
Call Setup 121
Character Repeat 77
Client (ICA) 90
Close Remote Application 88
Common Option IDs 174
Community 168
Connect 84
Connection 143
Connection Name 84, 190
Connection Preferences 120
Connection Speed 143
Default Windows Colors 90
Delete 86
Delete (connection) 91
Desktop Area and Refresh Frequency 74
DHCP Automatic Update Enable 177
DHCP Connection Enable 183
Dial-In Connection 107
Dialing Patterns 119
Edit (connection) 86
Enable DNS 80
Enable Energy Savers 74
Enable Password Change 186, 188, 192
Enable WINS 80
Extra Settings 121
Failover Enable 182–183, 201
Flow Settings 152
FTP Option IDs 174
Index 233
Get (field) 168
Hide Configure Tab 182
Init Commands 152
ISDN Settings 148
Keyboard 76
Local Settings 118
Logoff 100
Logout 200
Manual Dial 120
Modem Name 152
Move Down 91
Move Up 91
Multiple Autoconnect 190, 194
Multiple AutoStart 93
Multiple Connect 182
Network Connection 107
Obtain an Address from a DHCP
Server 80
Obtain an IP Address From DHCP
Server 177
Parameters 134
Ping Before Connect 182
Port Settings 120
Pulse Dialing 118
RDP Option IDs 174
Repeat Delay 77
Repeat Rate 77
Reset To Defaults 175
Security Enable 182
Set (field) 168
Shutdown 84
Shutdown and Restart 100
Shutdown the Terminal 100
Single Button Connect 183
SNMP Communication 168
SNMP Option IDs 175
SNMP Update Enable 96
Startup 86
Startup Options 105
Status Dialog 88
Terminal Emulation Option IDs 175
Toggle AutoConn 189, 193
Toggle Title Bar 88
Tone Dialing 118
Unassign (connection) 189, 193
Use Assigned IP Address 124
Use Default Gateway on Remote
Network 124
Use FTP InformationFrom DHCP
Server 162
Use IP Header Compression 124
Use Local FTP Information 162
Use Server-Assigned Addresses 124
Use SLIP 124
Use Software Compression 124
User Accounts 184
User Name 197
Verbose (connection) 183
Virtual Port Option IDs 175
G
G key reset 63, 205
H
Headphone jack
3315SE 29
3320SE 29
3350SE 39
3515SE 47
3715SE 47
3720SE 47
I
ICA 7, 15, 174
Image file 172
Independant Computing Architecture 7
Integrated-CRT model numbers
3515SE 7
3715SE 7
3720SE 7
Integrated-CRT terminals 7
specifications 21
ISDN settings 147
Index 234
K
Keyboard connector
3315SE 29
3320SE 29
3350SE 39
3515SE 47
3715SE 47
3720SE 47
L
Logging off the terminal 100
M
Management Information Base 171
MIB 171
Microphone jack
3315SE 29
3320SE 29
3350SE 39
3515SE 47
3715SE 47
3720SE 47
Modem card 53
Modem card kit 53
Modular model numbers
3315SE 7
3320SE 7
3350SE 7
Modular terminal 7
specifications 17
Mouse connector
3315SE 29
3320SE 29
3350SE 39
3515SE 47
3715SE 47
3720SE 47
N
Network connector
3315SE 29
3320SE 29
3350SE 38
3515SE 46
3715SE 46
3720SE 46
Noise suppressor 59
Null modem cable 215
O
Option slot
3315SE 29
3320SE 29
3515SE 47
3715SE 47
3720SE 47
P
Parallel port
3315SE 29
3320SE 29
3350SE 39
3515SE 47
3715SE 47
3720SE 47
Params.ini 172
PCMCIA 16, 53
Pin assignments
10Base-T and 100Base-T
connectors 211
null modem cable 215
serial and parallel ports 209
USB connectors 213
VGA connector 212
Power connector
3315SE 29
3320SE 29
3350SE 39
3515SE 47
3715SE 47
3720SE 47
Index 235
PPP 54, 113
Properties sheets
About 72
About (the terminal) 11
Application 144
Apps 72, 87, 95, 168
Call Options 121
Configure 83, 103–104, 142
Connections 83
Default Hotkeys 87
Devices 72, 147
Display 72–73
General 11, 72
Input 72, 75
Net Connections 142
Network 72, 79
Preferences 89
Security 72, 181, 194, 200–201
Server Location 91
SysInfo 11, 72
Upgrade 72, 161, 163
PS/2 connector 205
R
RDP 7, 15, 174
RDP encryption 95
Remote Desktop Protocol 7
RS-232 206
S
Shutting down and restarting the terminal 100
Shutting down the terminal 100
T
Telnet 131
Terminal accounts
Administrator 93, 186, 190, 194–195
Guest 185, 190, 194
User 186, 190, 194
U
USB
3350SE 39
V
Video connector
3315SE 29
3320SE 29
3350SE 39
Virtual port 95
VT (DEC) 131
W
WBT 3, 7
WBT model numbers
3315SE 3
3320SE 3
3350SE 3
3515SE 3
3715SE 3
3720SE 3
Windows 3.1 15
Windows 95 15
Windows NT 7, 15
Windows Terminal Server 15
Windows-based terminal 7
Wizards
Dial-Up Configuration 113, 117, 123
Setup 36, 44, 48, 63, 100, 157, 178
TE Client Connection 131
WBT Setup 205
WTS Connection 127
Winterm 3000 Series Windows®-based Terminal Reference Guide
Written and published by Wyse Technology Technical Publications
Wyse Technology Inc., August 1999
Created using FrameMaker®, Acrobat®, and Magellan™
The on-line book is provided in both PDF and HTML versions, presented on both
CD-ROM and a website