Users Manual

Gecko Switch
Quick Start Guide
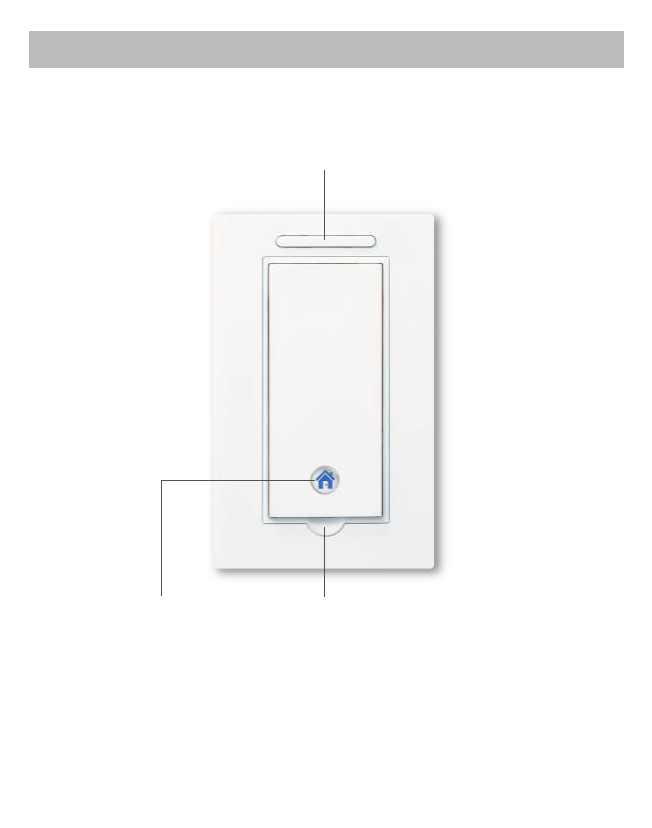
1
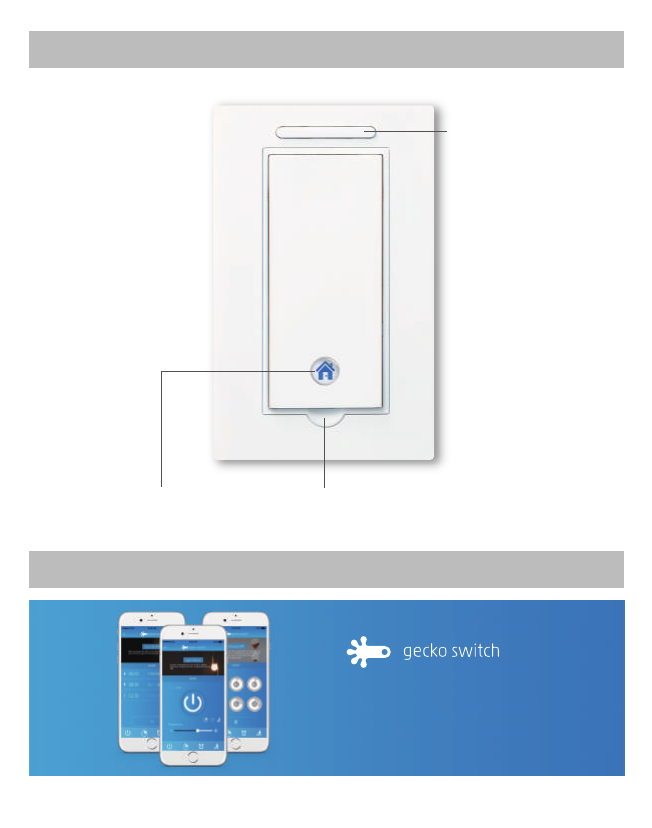
on/off with night light
Dimmer Buon
Dip For Finger To Open Buon
Using Your Switch
2
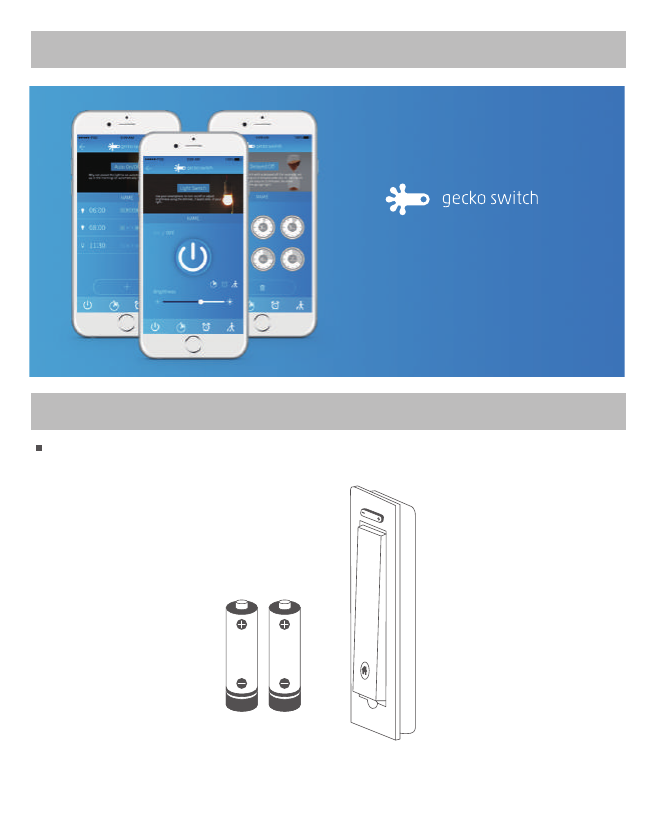
Download our APP for FREE
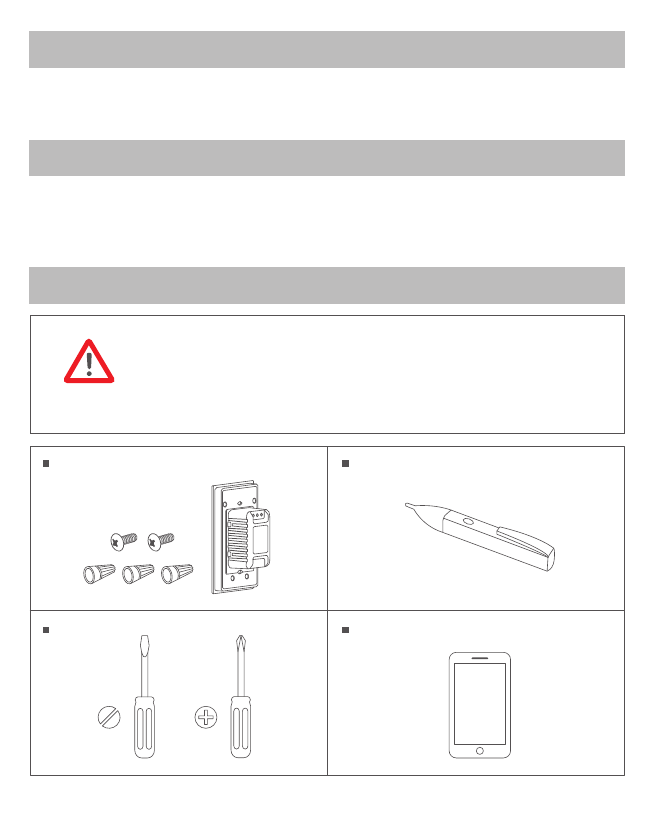
Gecko Switch Installation
Gecko switch & AAA alkaline baery x 2
(come with the box)
AAAAAA
Use your smartphone to turn on/off or
adjust brightness using the dimmer,
if applicable, of your light.”

Inserting AAA batteries.
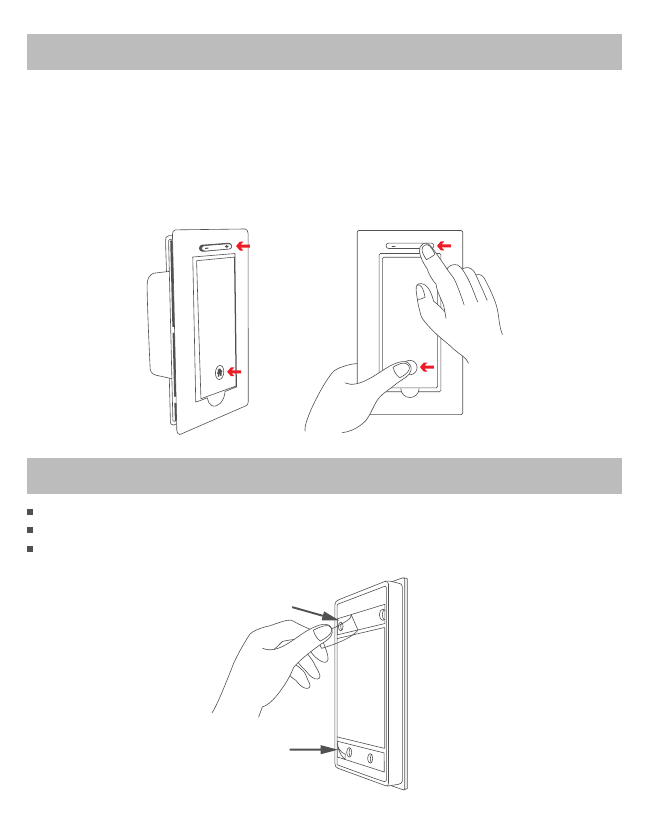
1
3
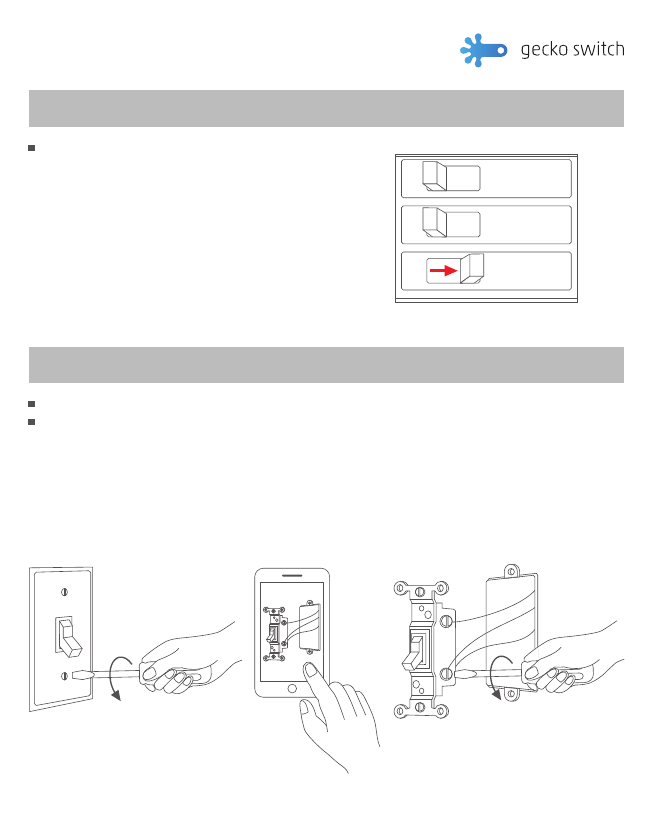
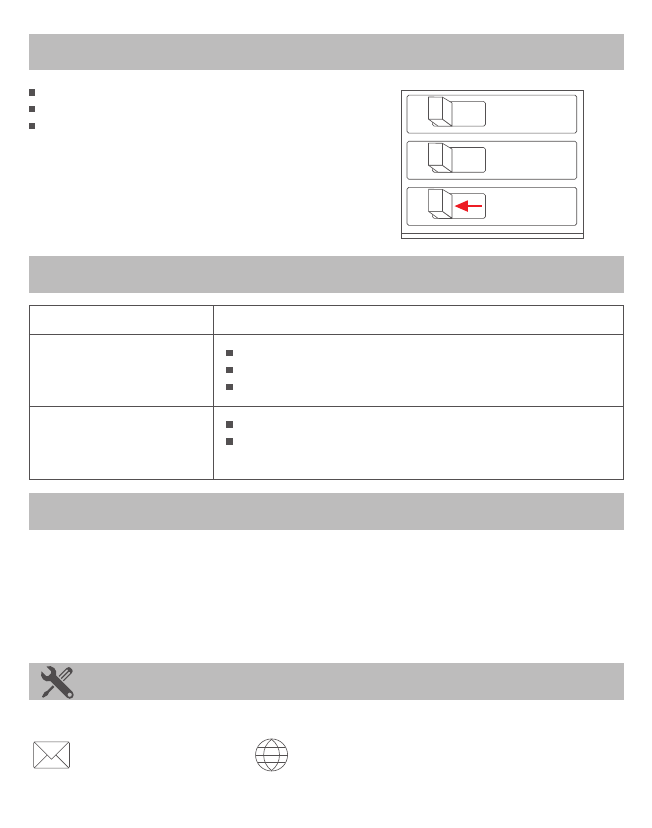
Move your finger to the semi-circle shaped dip at the boom of the press buon. Use your nail to
force open the press buon by pulling upwards and out.
Inserng two new Alkaline AAA baeries into the recess behind the main switch buon of the
Gecko Switch. The LED indicator at boom of Gecko Switch will light up with power.
Reaach the main switch buon.
AAA baeries
AAA
AAA
3 Steps.
3Stick the Gecko Switch anywhere you want
Gecko Glue
Gecko Glue
2Linking to the Base Switch (optional)
If you buy the Gecko switch with a Base Switch in the same package, they are already linked by default
at the factory, so there is no need to manually link these switches. If you bought the Base Switch and
Gecko Switch separately or somehow the link was broken, they can be linked manually by holding
BOTH the main switch buon and the “+” buon for 3 seconds to enter pairing mode for both switches.
A long beep will sound when successfully linked.
3 seconds Simultaneously
GeckoBase
4
Remove peel of the Gecko Glue at the back of the Gecko Switch. Then put it anywhere you like.
To change locaon of the Gecko Switch, remove it very, very slowly. Then put it somewhere else.
The glue pad can be removed and reused over and over again. Try it!
HINT
The Gecko Glue can
be washed with water to
regain its sckiness.

Technical Assistance
help@xmtlab.com www.geckoswitch.com
FCC
The device is approved by the FCC and it complies with Part 15 of the FCC rules. Its operaon is
subject to the following two condions:
1. This device may not cause harmful interference.
2. This device must accept any interference that may cause undesired operaon.
WARNING
Changes or modificaons to this unit not expressly approved by the party responsible of
compliance could void the user’s authority to operate the equipment.
5
LED flashes red
Symptom
Cannot turn on/off the light
Possible Cause
Baery dead
Link to Base Switch broken. Manually relink.
Baery low
Troubleshooting
Specifications
Baery: Two Alkaline AAA baeries
Bluetooth: Bluetooth 4.0
Operang ambient temperature: 32° to 95° F (0° to 35° C)
Relave humidity: 5% to 95% noncondensing
Warranty
If, within one year from date of purchase, this product should become defecve
(except baery and glue), due to faulty workmanship or materials, it will be repaired or replaced,
without charge. Proof of purchase and a Return Authorizaon are required.
If you have any quesons about the installaon or operaon of this product, please contact us at:
Base Switch
Quick Start Guide
1
Using Your Switch
Download our APP for FREE
Use your smartphone to turn on/off or
adjust brightness using the dimmer,
if applicable, of your light.”
on/off with night light
Dimmer Buon
Dip For Finger To Open Buon
2
Warning
Installing the Base Switch is an electrical shock hazard and may result in serious
injury or death. If you are unfamiliar or uncomfortable with electrical work,
please call a qualified electrician for installaon. The Base Switch is designed to
funcon as a standard light switch. It is also compable with dimmable lights and
can act as a dimmer. It is not compable with 3 way switches.
Base Switch Installation
Base switch,
wire nuts & screws
(come with the box)
Screwdriver
Voltage detector
Smartphone
(oponal for taking photos)
Warranty
If, within one year from date of purchase, this product should become defecve
(except baery and glue), due to faulty workmanship or materials, it will be repaired or replaced,
without charge. Proof of purchase and a Return Authorizaon are required.
Specifications
Rated: 100-240 VAC, 50/60Hz
Max Load: 300 was
Operang ambient temperature: 32° to 95° F (0° to 35° C)
Relave humidity: 5% to 95% noncondensing
3
Remove the wall plate; use a voltage detector to make sure that the circuit is dead.
Unscrew the old switch from the electrical box and pull it out with the wires sll aached.
Take some pictures of the wires for later reference then remove the wires from the old switch.
•Turn Screws To Loosen. •Unscrew terminals
•Take photos of the wires
OFF
OFF
OFF
Removing existing switch
2
ON
OFF
ON
OFF
ON
OFF
Turn off power at circuit breaker for the switch
you are replacing with the Base Switch.
5 Steps.
Turning OFF power
1
4
Move your finger to the semi-circle shaped dip at the boom of the press buon. Use your nail to
force open the press buon by pulling upwards and out.
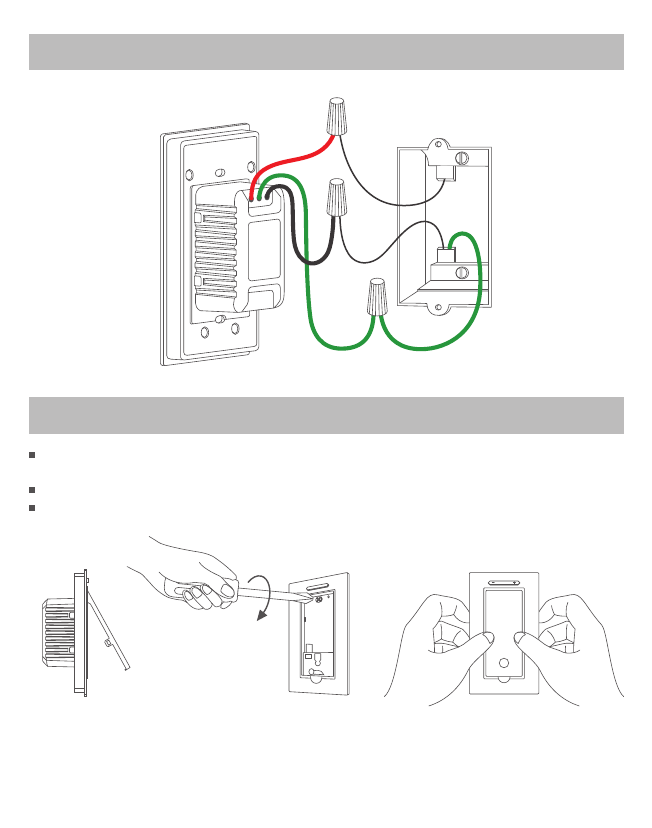
Insert the Base Switch into the wallbox. Then screw it in place.
Push the main buon back into the Base Switch
4Mounting the Base Switch to wallbox
3Wiring the Base Switch
Load
Ground
Hot(live)
5
Turn on power at circuit breaker.
Click the Base Switch to see if it works!
Now you can link it to the Gecko Switch!
HINT
Remember the Base Switch and Gecko Switch
is compable with dimmable light bulbs.
ON
OFF
ON
OFF
ON
OFF
5Turning ON power
Technical Assistance
If you have any quesons about the installaon or operaon of this product, please contact us at:
help@xmtlab.com www.geckoswitch.com
FCC
The device is approved by the FCC and it complies with Part 15 of the FCC rules. Its operaon is
subject to the following two condions:
1. This device may not cause harmful interference.
2. This device must accept any interference that may cause undesired operaon.
WARNING Changes or modificaons to this unit not expressly approved by the party responsible of
compliance could void the user’s authority to operate the equipment.
Symptom
Cannot turn on/off the light
Light flicks or on/off
automacally
Possible Cause
Wiring error.
Burnt out light bulb.
Check circuit breaker is turned back on.
Using the dimmer funcon on a light bulb that is not dimmable.
Light bulb is less than minimal load required by the base switch.
Note that light bulb must be greater than 5 was.
Troubleshooting

RF Radiation Exposure Statement
This equipment complies with FCC RF radiation exposure limits set
forth for an uncontrolled environment.