XYZprinting 3L10X 3D Printer User Manual NOBEL 1 0 EN V1 ai
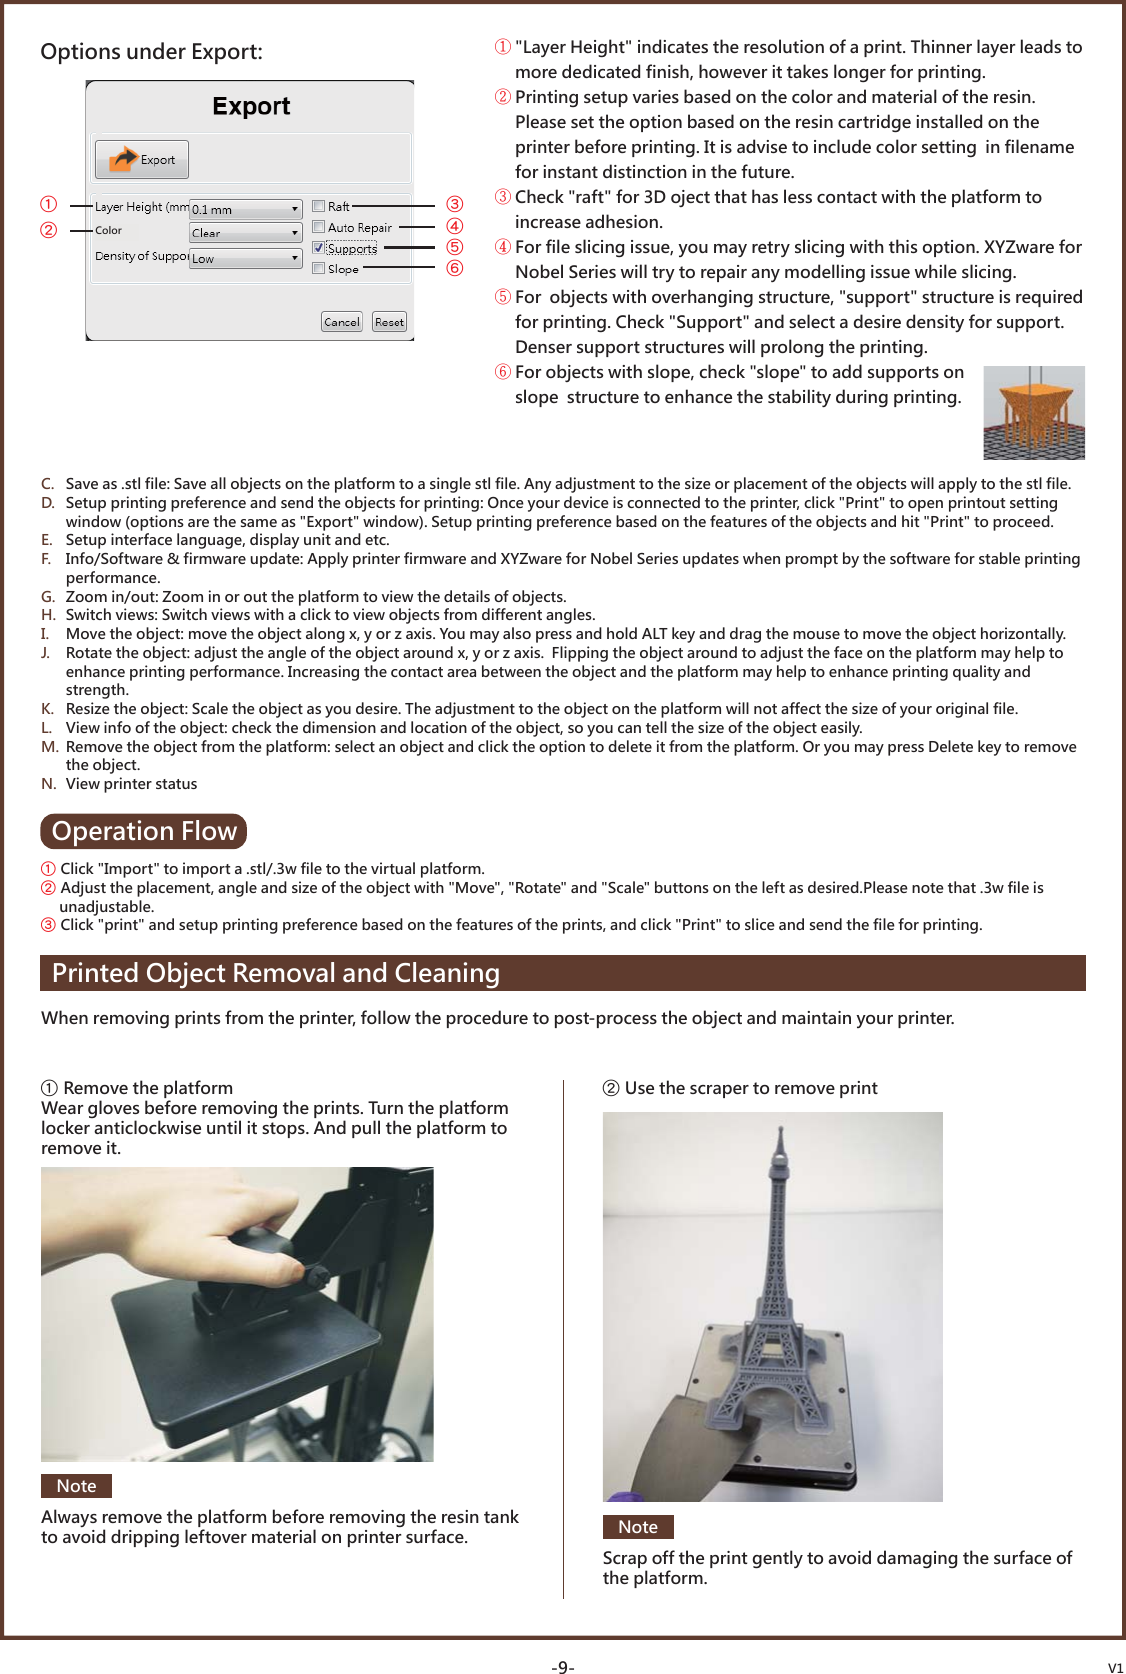
XYZprinting, Inc. 3D Printer NOBEL 1 0 EN V1 ai
UserManual.wiki
>
XYZprinting
>
3L10X User Manual
User Manual
Navigation menu
Upload a User Manual
Namespaces
Wiki Guide
HTML
PDF
Info
Views
User Manual
Discussion / Help
Navigation
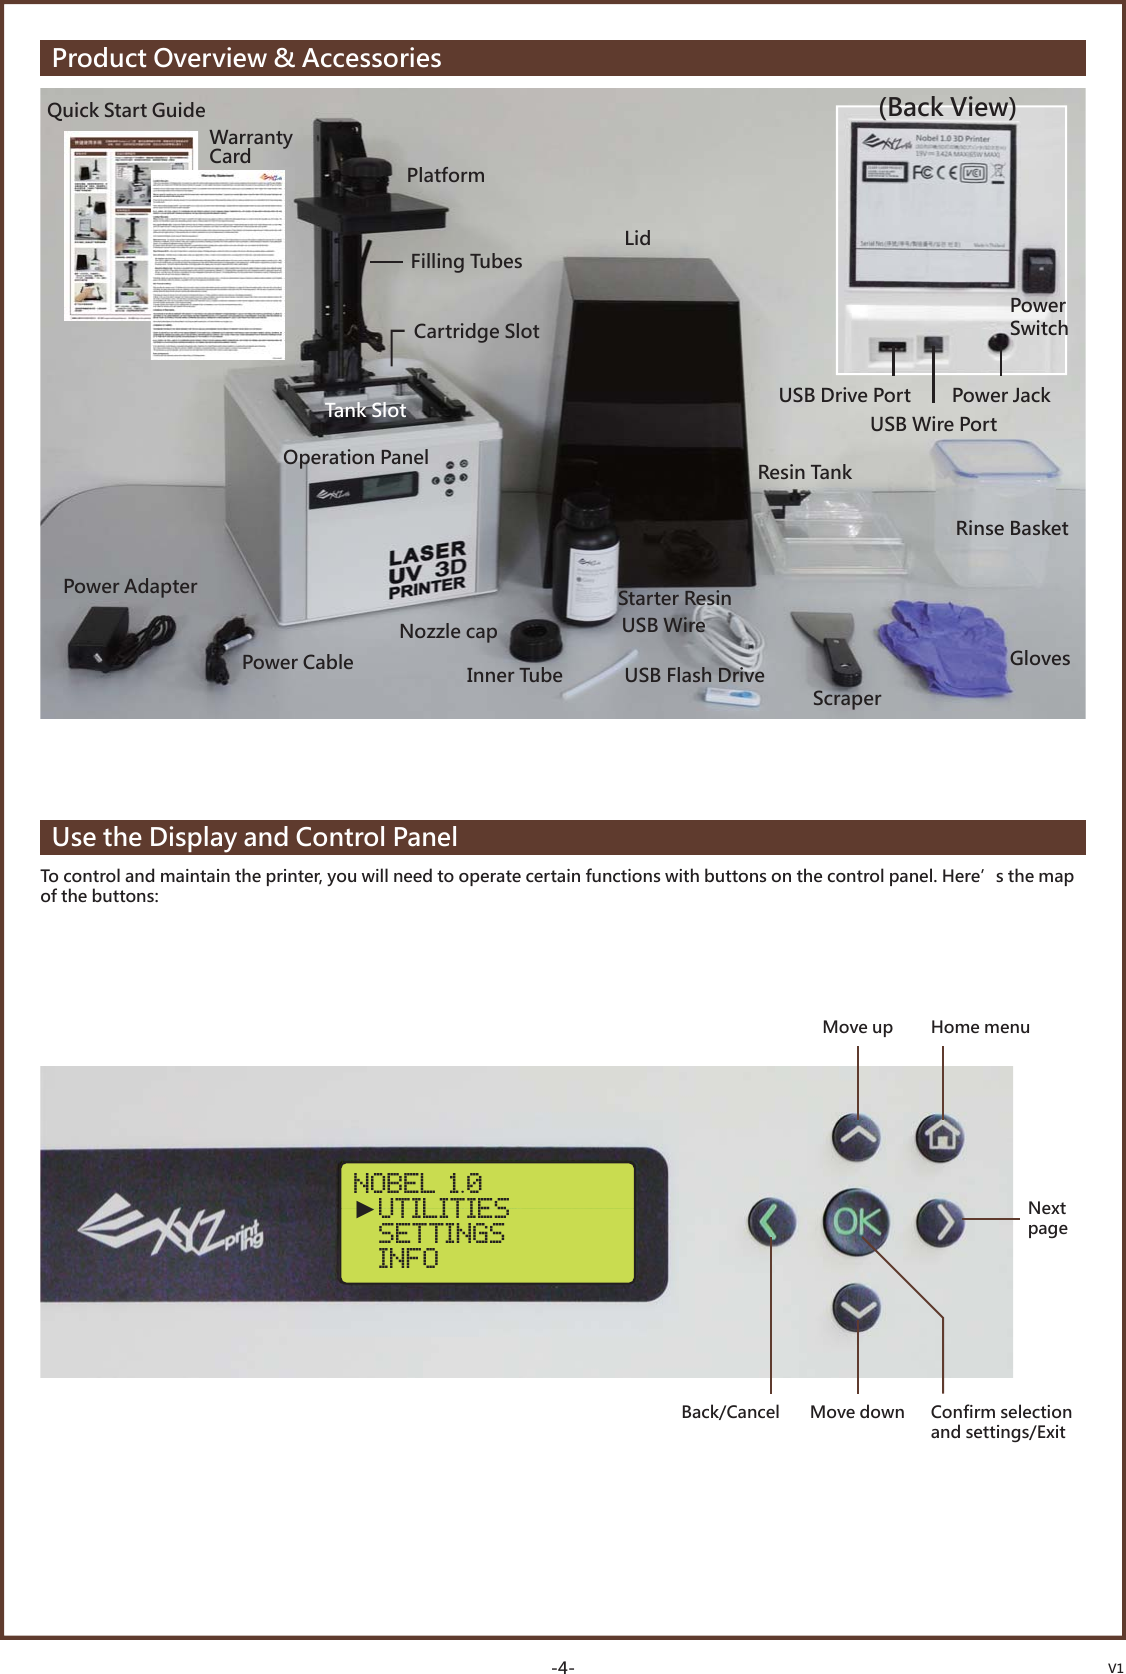
![LCM MenusUTILITIESFILL RESIN TANKV1-5-“Utilities” menu provides the control of the printer. You can instruct to fill the resin tank manually, calibrate the printer when necessary, and print the built-in samples.You can activate resin-filling function manually. Before doing so, make sure the resin cartridge, resin tank and the lid are installed correctly. (See “Unpack & Setup” for details).“Horizon Calibration” ensures the platform is parallel with the resin tank for more stable printing performance. Always perform “Horizon Calibration” after changing to a new tank or a tank different the one used for last print.Select “Yes” and press [OK] to begin:• If “Auto Fill” function under “Settings” menu is disabled, be sure to load resin manually before printing.• Shake the resin cartridge well before use ensures even color.HORIZON CALIBINSTALL RESINBOTTLE BY NOW NO►YESMAKE SURE BOTHPIPE HAS BEEN INSTALL PROPERLY[OK] FOR NEXTRESIN TANK ISFILLING UP NOWPLEASE WAIT…MOVE PLATFORMActivate the function when you need to move the platform manually. Simple select move the platform “to top” or “to bottom” to proceed: PRINT SAMPLEMOVE PLATFORM TO TOP►TO BOTTOMSelect “Yes” and press [OK] to begin:Note3 sample models are built-in the printer. You may begin your first 3D prints with the samples.Simply select one of the sample to begin:See “Printed Object Removal and Cleaning” for post-print steps.PRINT SAMPLE►PRINT SAMPLE01 PRINT SAMPLE02 PRINT SAMPLE03START PRINTING? SAMPLE FILE NO►YESNoteTo ensure the accurracy of calibration, please empty the resin tank before calibrating.NoteSTART HORIZONALCALIBRATION NOW? NO►YESMOVE PLATFORMTO BOTTOM NOW? NO►YESREMOVE OBJECT FROM PLATFORM[OK] TO CONTINUE①②③④Tighten the screws diagonally across the print bed locker to make sure the force is even.TIGHTEN ALL 4SCREWS ABOVETHE PRINT BED[OK] TO FINISHLOOSEN 4 SMALLSCREWS ABOVETHE PRINT BED[OK] TO CONTINUE](https://usermanual.wiki/XYZprinting/3L10X/User-Guide-2520583-Page-5.png)
![SETTINGSBUZZERV1-6-The Settings menu alows you to adjust printer settings.When the buzzer is turned on, the printer will output an audible signal when a button is pressed, print job is finished, or issue is detected. When “Auto Fill” is enabled, the printer will fill the resin tank before printing and when low tank level is detected. With auto fill function, you are free from manual resin filling during printing. This is especially useful when printing large objects.Buzzer is turned on by default. To switch off the buzzer:Select “OFF” and press [OK] to change the setting.AUTO FILLBUZZER [ON]►OFF ONENERGY SAVELED backlight of the LCM enhances the readibility of the content of the display. To save energy consumed, the backlight will go off after the printer idles 3 minutes (shown as 03M on the display) by default.“Auto Fill” is enabled by default. To disable the function:Select “OFF” and press [OK] to change the setting.Be sure to place the printer on a leveled surface, or tank level detection may be inaccurate.NoteTo set a longer time interval:Select an option, and press [OK] to change the setting. Backlight will never go off.Backlight will go off after the printer idles 3 minutes.Backlight will go off after the printer idles 6 minutes.RESTORE DEFAULTAll settings can be reset to factory default with a few clicks.To reset all settings at once:RESTORE DEFAULTARE YOU SURE? NO►YESSimply select “YES” and press [OK] to reset.ENERGY SAVE [OFF]►OFF 03M 06MAUTO FILL [ON]►OFF ON](https://usermanual.wiki/XYZprinting/3L10X/User-Guide-2520583-Page-6.png)
![INFOV1-7-Under “Info” menu, you can check the statistics and firmware version of the printer, status of resin cartridge installed, and information on XYZprinting.SYSTEM VERSIONFirmware version is shown here. To ensure optimal printing performance, it is advised to keep the firmware up to date. To check for firmware updates, please go to XYZware.SYSTEM VERSION1.1.A[OK] TO RETURNSelect a language and press [OK] to change the setting.The content may look like this:RESIN STATUS“Resin Status” provides the information on cartridge level (see REMAINING), and the capacity, color and material of the resin. Press▼to read the second page.RESIN STATUS 1/2REMAINING 10%CAPACITY 500g[OK] TO NEXTRESIN STATUS 2/2COLOR GREY[OK] TO RETURNSENSOR STATUSWhen you encounter exceptional status during the operation of the printer, you may check the status of each sensor here. The information is especially helpful for troubleshooting.SENSOR STATUSC:0 Z-T:1 Z-B:1 T:1 L:0[OK] TO RETURNHELPThe URL to XYZprinting website can be found here. You may go to the website for the latest information, product documents, tutorial video and more. HELPXYZPRINTING.COM[OK] TO RETURNHow to read the satus:C:1 – Lid (Top cover) covered; C:0 – Lid not coveredZ-T:1 – Platform at top; Z-T:0 – Platform away from topZ-B:1 –Platform at bottom; Z-B:0 - Platform away from bottomT:1 – Tank in place; T:2 – Tank not installedL:1 – Tank level low; L:0 – Tank full or tank not installed](https://usermanual.wiki/XYZprinting/3L10X/User-Guide-2520583-Page-7.png)
![• Please slice the 3D model with XYZware and save it in 3w format. Files in other format or not sliced with XYZware will not be shown.• For correct file name display, please name the file with English and Japanese (Katakana preferred) alphabets and numbers.NotePRINT FROM USBV1-8-PC-link Printing via XYZware for Nobel SeriesBefore printing from PC, please first install XYZware for Nobel Series on your device. "XYZware for Nobel Series" Installer can be found in the bundled USB drive and at XYZprinting website: http://support.xyzprinting.com/global_en/Support/download (log in is required)Minimum system requirements for XYZware for Nobel Series:System RAM: 4GB and aboveGraphics RAM: 1GB and above (OpenGL 2.1+ compatible)Hard disk space: 300MB and moreOperating system requirements for XYZware for Nobel Series : Windows 7/8+ (32bits and 64 bits)A. B. Import objects in .stl/.3w format: Open file browser and select the .stl or .3w files to print. ".3w" format is sliced by XYZware based on the printer type selected. For the file set to slice for printer type other than "Nobel 1.0", XYZware for Nobel Series may not import it.Export to .3w format: After selecting a desire printout setting, click on "Export" to save the model to a sliced . 3w file. Once the file is sliced, you may skip repeating settings in the future.AGHIJKLMNBCD EF(Overview of XYZware for Nobel Series)Functions:Insert USB flash drive to the USB drive port at the back of the printer.press ▼ to browse the menu, and press [OK] to select a file to proceed:FILE LIST [1/10] XYZ_KEY.3w►Mini_nobel.3w my_nobel.3wSTART PRINTING? XYZ_KEY NO►YES](https://usermanual.wiki/XYZprinting/3L10X/User-Guide-2520583-Page-8.png)