XYZprinting 3L10X 3D Printer User Manual NOBEL 1 0 EN V1 ai
XYZprinting, Inc. 3D Printer NOBEL 1 0 EN V1 ai
User Manual
V1
-1-
Nobel 1.0 3D Printer
Product Manual
ENGLISH
FEDERAL COMMUNICATIONS COMMISSION INTERFERENCE STATEMENT
This equipment has been tested and found to comply with the limits for a Class B digital device, pursuant to part 15 of the FCC Rules. These limits are designed to provide
reasonable protection against harmful interference in a residential installation. This equipment generates, uses and can radiate radio frequency energy and, if not installed
and used in accordance with the instructions, may cause harmful interference to radio communications. However, there is no guarantee that interference will not occur in a
particular installation. If this equipment does cause harmful interference to radio or television reception, which can be determined by turning the equipment off and on, the
user is encouraged to try to correct the interference by one or more of the following measures:
-Reorient or relocate the receiving antenna.
-Increase the separation between the equipment and receiver.
-Connect the equipment into an outlet on a circuit different from that to which the receiver is connected.
-Consult the dealer or an experienced radio/ TV technician for help.
CAUTION:
Any changes or modifications not expressly approved by the grantee of this device could void the user's authority to operate the equipment.
This device complies with Part 15 of the FCC Rules. Operation is subject to the following two conditions: (1) this device may not cause harmful interference, and (2) this device
must accept any interference received, including interference that may cause undesired operation.
Safety and Compliance
Before you use, operate the product, replace or remove any part, component or material of the product, or maintain
the printer, please ensure that you carefully read this Product Manual and the safety
instructions described below, and strictly follow the instructions of such safety information.
For the latest information about Nobel 1.0 3D Printer and XYZprinting products, please visit XYZprinting website
(http://www.xyzprinting.com) or contact your sales representative.
The following warnings and attention notices are a best effort attempt to cover all scenarios;
unfortunately it is not possible to do so. In the case of performing maintenance procedures that are not described in
this manual the burden of safety falls to the customer side.
Resin Care
•Wear proper protective equipment, avoid raw material contact and vapor inhalation.
•Chemical-resistant gloves should be worn when you may contact resin.
•Avoid exposing resin to high temperatures, localized heat sources (i.e., drum or band heaters), oxidizing
conditions, freezing conditions, direct sunlight, ultraviolet radiation, inert gas blanketing.
•Never pour the waste resin back to the bottle cartridge or down the sink, as it may pollute the remaining resin or
clog the drain.
•You may pour waste resin into plastic bag and expose it to sunlight or UV light source to cure the resin. The cured
resin can be discarded as trash.
•Avoid dripping resin on anything other than the platform or the resin tank, or the printer may be malfunctioned.
★ For complete protection suggestion, precautions, clean-up procedures, handling procedures, storage procedures,
see MSDS for details.
Copyright
All other trade names and trademarks are properties of their respective owners.
Important Safety Information:
•Do not let children operate this device without adult supervision. Moving parts may cause serious injury.
•Electric shock hazard.
•Do not place the printer on an unleveled or unstable surface. Printer may fall or tumble causing harm and/or injury.
Also tank level detection may be inaccurate.
•Do not place any object on top of the printer. Liquid and objects that fall into the printer may lead to printer
damage or safety risks.
•Do not use flammable chemical or alcohol wipes to clean this device.
•Do not disassemble or replace the printer cover with none XYZprinting covers.
•Insert and secure the power cord firmly for proper usage and to avoid potential electricity and fire dangers.
•Do not attempt to service the printer beyond the instructions specified in this document. In the case of
irrecoverable problem, contact XYZprinting service center or your sales representative.
•Do not place the printer in humid or dusty environments such as bathrooms and high traffic areas.
•Some components of the printer move during operation. Do not attempt to touch or change anything inside
before powering off the printer.
•Please keep the lid closed during printing to avoid injury.
•This printer is a Class 1 Laser Product. A Class 3B laser module is used as a light source. Never disassemble the
product.
•For optimized printing quality and well-functioning of the machine, this printer is only to be used with resin
supplied by XYZprinting.
•Make sure to set the power switch to the off position and remove the power cord before transporting the device.
•Only use the grounded power adapter and power cord supplied with the printer to prevent a possible electrical
shock.
•Please place and use the printer in a well ventilated area. The process of printing will produce a small amount of
non-toxic odor. Having a well ventilated area will ensure a more comfortable environment.
V1
-2-
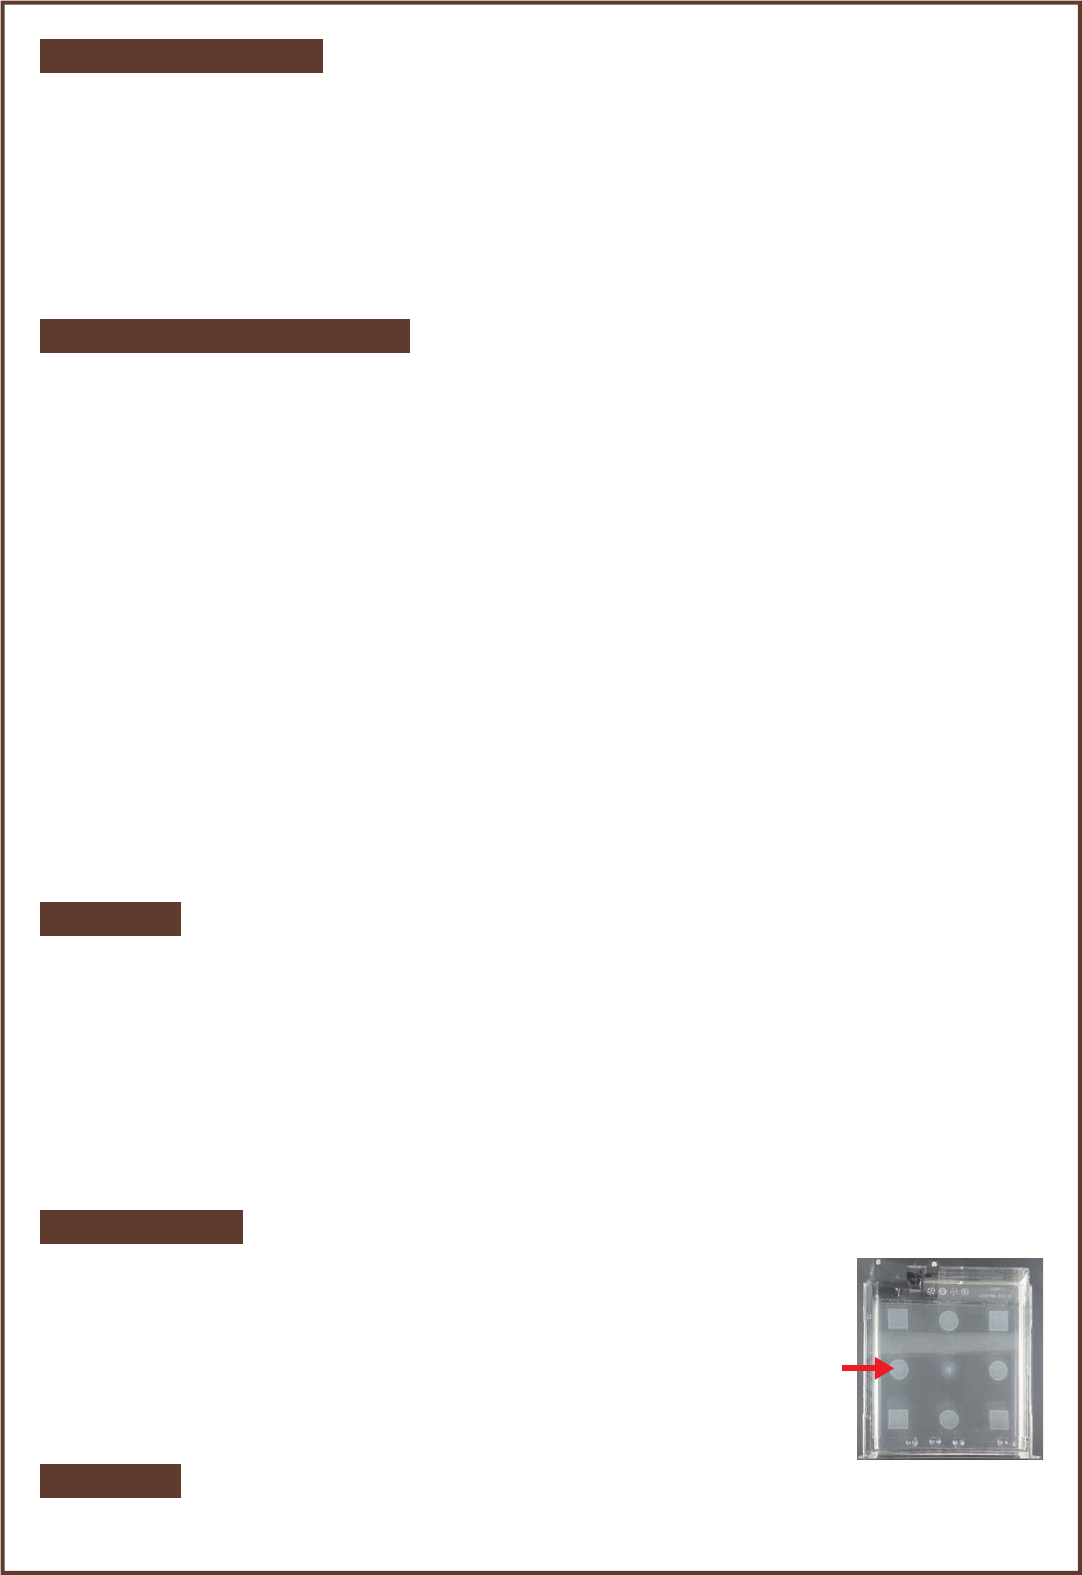
Resin Tank Care
•Due to the nature of the print technology and material, the resin tank may
develop cloudy regions overtime at where the laser spot going through
frequently, and may lead to print fails. Moving the print location around the
platform can help prolong the life of the tank.
•One tank lasts for about 1L of resin. Change to a new tank when over 2/3 of the
surface gets cloudy.
•Use separate resin tank for resin of different color. Mixing resin of different color
may affect printing quality.
Cloudy
V1
-2-
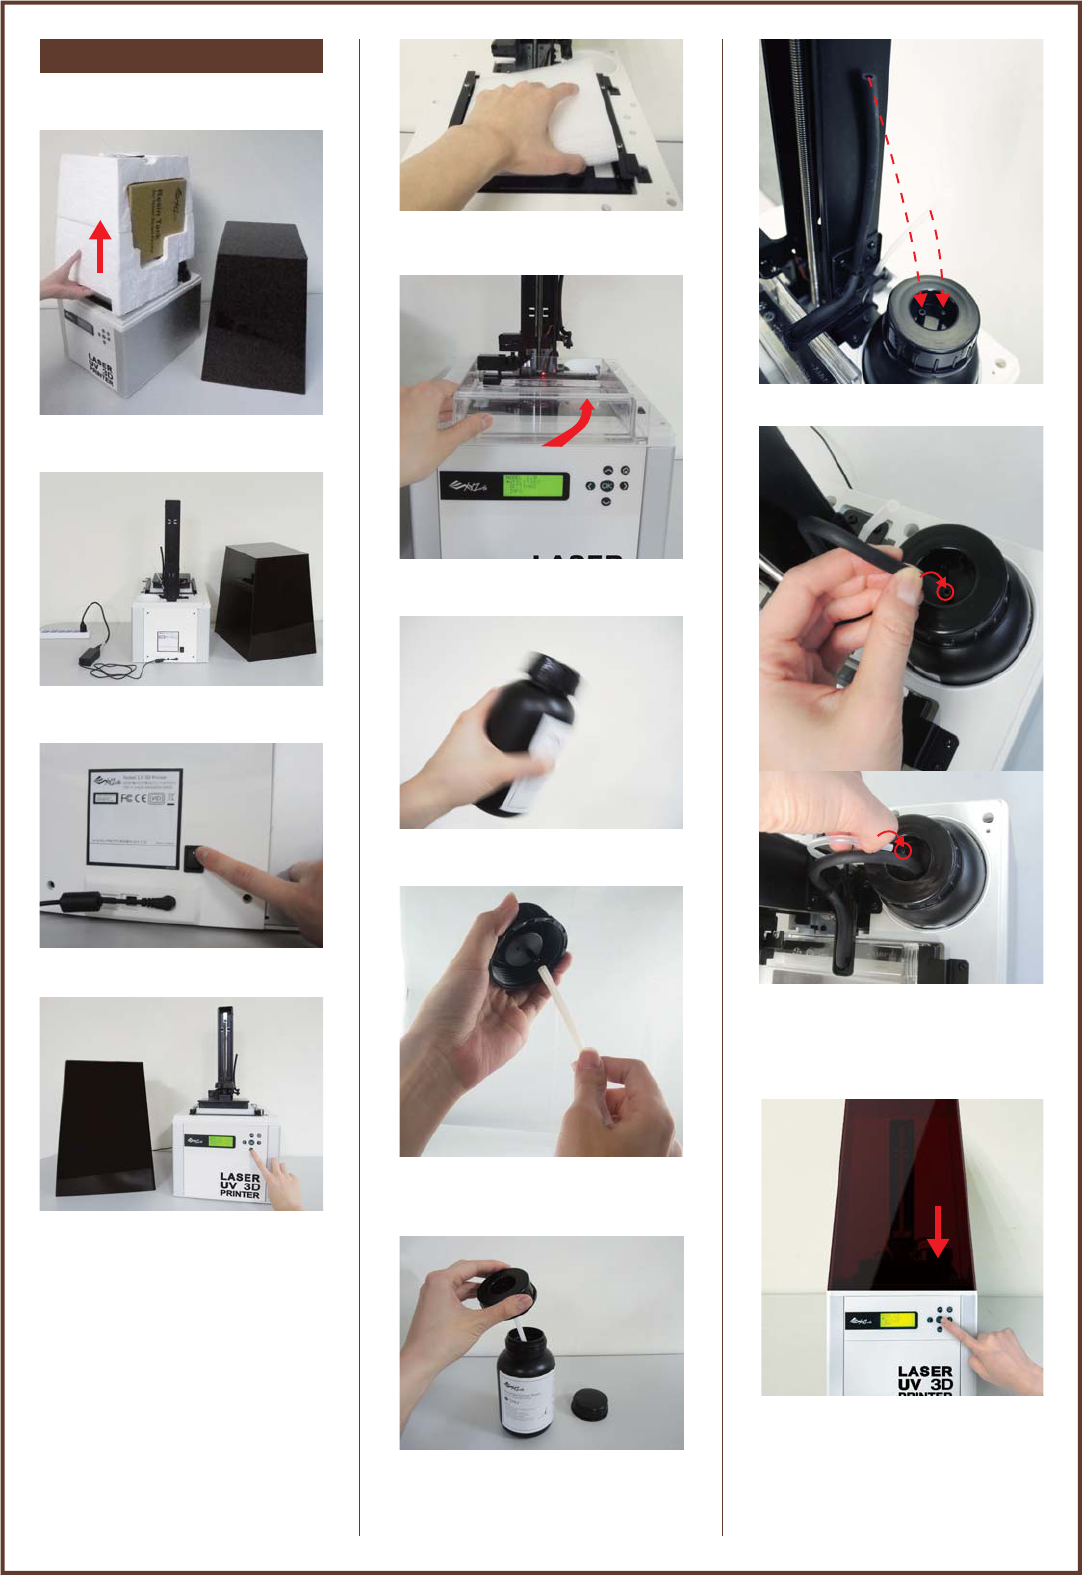
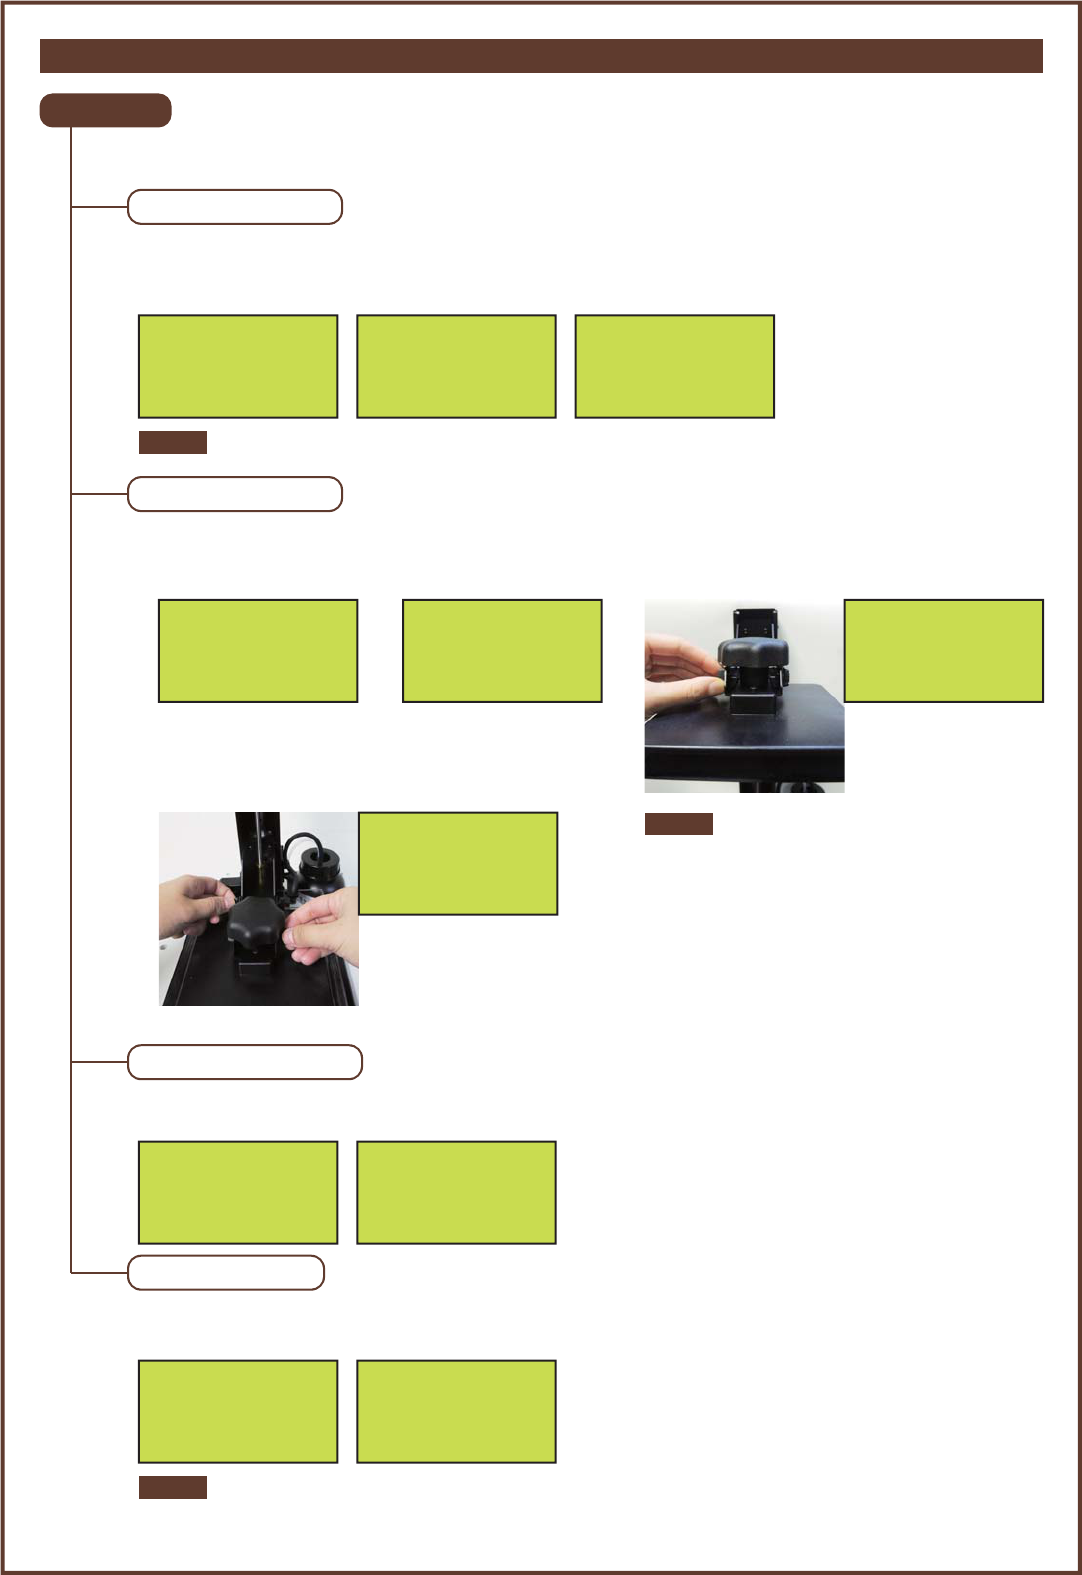
Shake the resin cartridge to ensure
even color.
Assemble nozzle cap and the tube
(placed in rinse basket when
shipped).
Change to nozzle cap.
Unpacking & Setup
After removing all external packing
materials and tapes…
Take off the lid and remove accessory
tray over the platoform.
Connect power adapter, power cord
and the printer.
Switch on the printer.
Raise the platform:
On the printer screen, select
“UTILITIES” and press ► to find
“MOVE PLATFORM”>”TO TOP”.
And press “YES” to raise the
platform.
When the platform is moved to the
top, remove the protecting foam.
V1
-3-
Unpack the resin tank and insert it
into the tank slot.
Install filling tubes.
Push the tubes all the way down.
Black tube (thick) should be
attached to wide nozzle, and
transparent tube (thin) to narrow
nozzle.
Put on the lid, and it’s ready for
printing.
nobel 1.0
►UTILITIES
SETTINGS
INFO
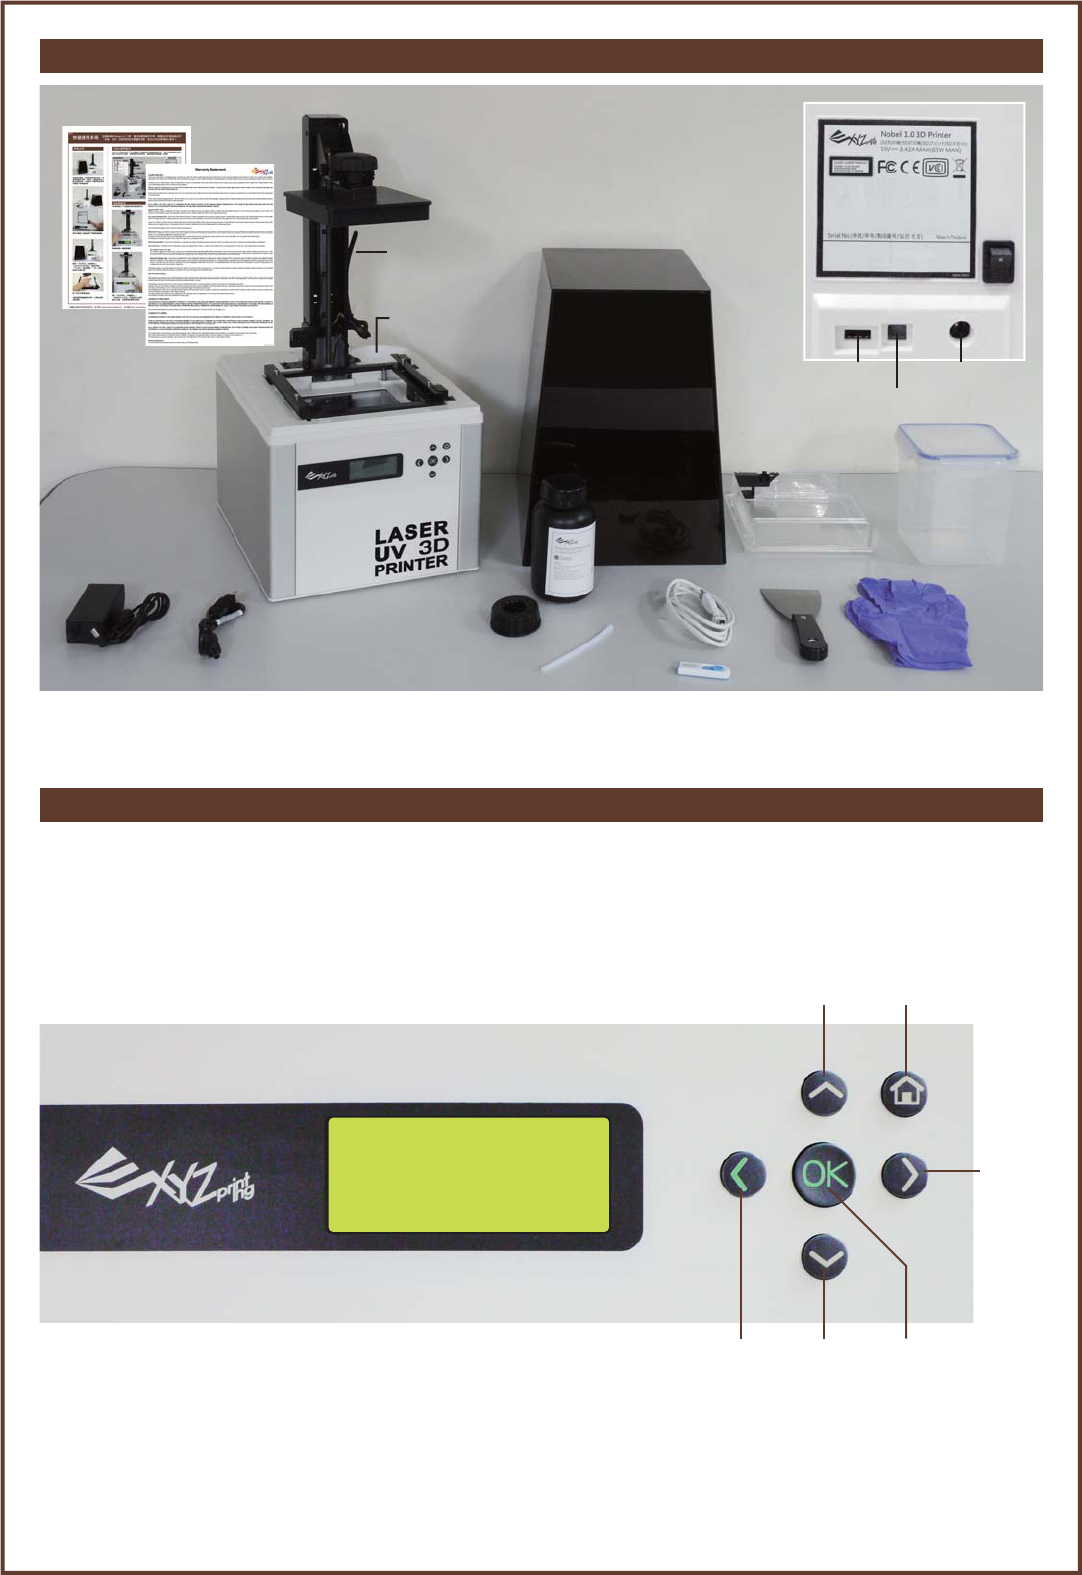
Product Overview & Accessories
Use the Display and Control Panel
V1
-4-
To control and maintain the printer, you will need to operate certain functions with buttons on the control panel. Here’s the map
of the buttons:
Move up
Next
page
Move downBack/Cancel
Home menu
Confirm selection
and settings/Exit
Platform
Filling Tubes
Cartridge Slot
Tank Slot
Operation Panel
Lid
Resin Tank
Rinse Basket
Gloves
Scraper
USB Flash Drive
Inner Tube
Nozzle cap
Power Cable
Power Adapter Starter Resin
USB Wire
Power Jack
USB Wire Port
USB Drive Port
(Back View)
Power
Switch
Quick Start Guide
Warranty
Card
LCM Menus
UTILITIES
FILL RESIN TANK
V1
-5-
“Utilities” menu provides the control of the printer. You can instruct to fill the resin tank manually, calibrate the
printer when necessary, and print the built-in samples.
You can activate resin-filling function manually. Before doing so, make sure the resin cartridge, resin tank and the lid
are installed correctly. (See “Unpack & Setup” for details).
“Horizon Calibration” ensures the platform is parallel with the resin tank for more stable printing performance.
Always perform “Horizon Calibration” after changing to a new tank or a tank different the one used for last print.
Select “Yes” and press [OK] to begin:
• If “Auto Fill” function under “Settings” menu is disabled, be sure to load resin manually before printing.
• Shake the resin cartridge well before use ensures even color.
HORIZON CALIB
INSTALL RESIN
BOTTLE BY NOW
NO
►YES
MAKE SURE BOTH
PIPE HAS BEEN
INSTALL PROPERLY
[OK] FOR NEXT
RESIN TANK IS
FILLING UP NOW
PLEASE WAIT…
MOVE PLATFORM
Activate the function when you need to move the platform manually.
Simple select move the platform “to top” or “to bottom” to proceed:
PRINT SAMPLE
MOVE PLATFORM
TO TOP
►TO BOTTOM
Select “Yes” and press [OK] to begin:
Note
3 sample models are built-in the printer. You may begin your first 3D prints with the samples.
Simply select one of the sample to begin:
See “Printed Object Removal and Cleaning” for post-print steps.
PRINT SAMPLE
►PRINT SAMPLE01
PRINT SAMPLE02
PRINT SAMPLE03
START PRINTING?
SAMPLE FILE
NO
►YES
Note
To ensure the accurracy of calibration, please empty
the resin tank before calibrating.
Note
START HORIZONAL
CALIBRATION NOW?
NO
►YES
MOVE PLATFORM
TO BOTTOM NOW?
NO
►YES
REMOVE OBJECT
FROM PLATFORM
[OK] TO CONTINUE
①②③
④
Tighten the screws
diagonally across the
print bed locker to
make sure the force is
even.
TIGHTEN ALL 4
SCREWS ABOVE
THE PRINT BED
[OK] TO FINISH
LOOSEN 4 SMALL
SCREWS ABOVE
THE PRINT BED
[OK] TO CONTINUE
SETTINGS
BUZZER
V1
-6-
The Settings menu alows you to adjust printer settings.
When the buzzer is turned on, the printer will output an audible signal when a button is pressed, print job is finished,
or issue is detected.
When “Auto Fill” is enabled, the printer will fill the resin tank before printing and when low tank level is detected.
With auto fill function, you are free from manual resin filling during printing. This is especially useful when printing
large objects.
Buzzer is turned on by default. To switch off the buzzer:
Select “OFF” and press [OK] to change the setting.
AUTO FILL
BUZZER [ON]
►OFF
ON
ENERGY SAVE
LED backlight of the LCM enhances the readibility of the content of the display. To save energy consumed, the
backlight will go off after the printer idles 3 minutes (shown as 03M on the display) by default.
“Auto Fill” is enabled by default. To disable the function:
Select “OFF” and press [OK] to change the setting.
Be sure to place the printer on a leveled surface, or tank level detection may be inaccurate.
Note
To set a longer time interval:
Select an option, and press [OK] to change the setting.
Backlight will never go off.
Backlight will go off after the printer idles 3 minutes.
Backlight will go off after the printer idles 6 minutes.
RESTORE DEFAULT
All settings can be reset to factory default with a few clicks.
To reset all settings at once:
RESTORE DEFAULT
ARE YOU SURE?
NO
►YES
Simply select “YES” and press [OK] to reset.
ENERGY SAVE [OFF]
►OFF
03M
06M
AUTO FILL [ON]
►OFF
ON
INFO
V1
-7-
Under “Info” menu, you can check the statistics and firmware version of the printer, status of resin cartridge
installed, and information on XYZprinting.
SYSTEM VERSION
Firmware version is shown here. To ensure optimal printing performance, it is advised to keep the firmware up to
date. To check for firmware updates, please go to XYZware.
SYSTEM VERSION
1.1.A
[OK] TO RETURN
Select a language and press [OK] to change the setting.
The content may look like this:
RESIN STATUS
“Resin Status” provides the information on cartridge level (see REMAINING), and the capacity, color and material of
the resin. Press▼to read the second page.
RESIN STATUS 1/2
REMAINING 10%
CAPACITY 500g
[OK] TO NEXT
RESIN STATUS 2/2
COLOR GREY
[OK] TO RETURN
SENSOR STATUS
When you encounter exceptional status during the operation of the printer, you may check the status of each sensor
here. The information is especially helpful for troubleshooting.
SENSOR STATUS
C:0 Z-T:1 Z-B:1
T:1 L:0
[OK] TO RETURN
HELP
The URL to XYZprinting website can be found here. You may go to the website for the latest information, product
documents, tutorial video and more.
HELP
XYZPRINTING.COM
[OK] TO RETURN
How to read the satus:
C:1 – Lid (Top cover) covered; C:0 – Lid not covered
Z-T:1 – Platform at top; Z-T:0 – Platform away from top
Z-B:1 –Platform at bottom; Z-B:0 - Platform away from bottom
T:1 – Tank in place; T:2 – Tank not installed
L:1 – Tank level low; L:0 – Tank full or tank not installed
• Please slice the 3D model with XYZware and save it in 3w format. Files in other format or not sliced with XYZware will
not be shown.
• For correct file name display, please name the file with English and Japanese (Katakana preferred) alphabets and
numbers.
Note
PRINT FROM USB
V1
-8-
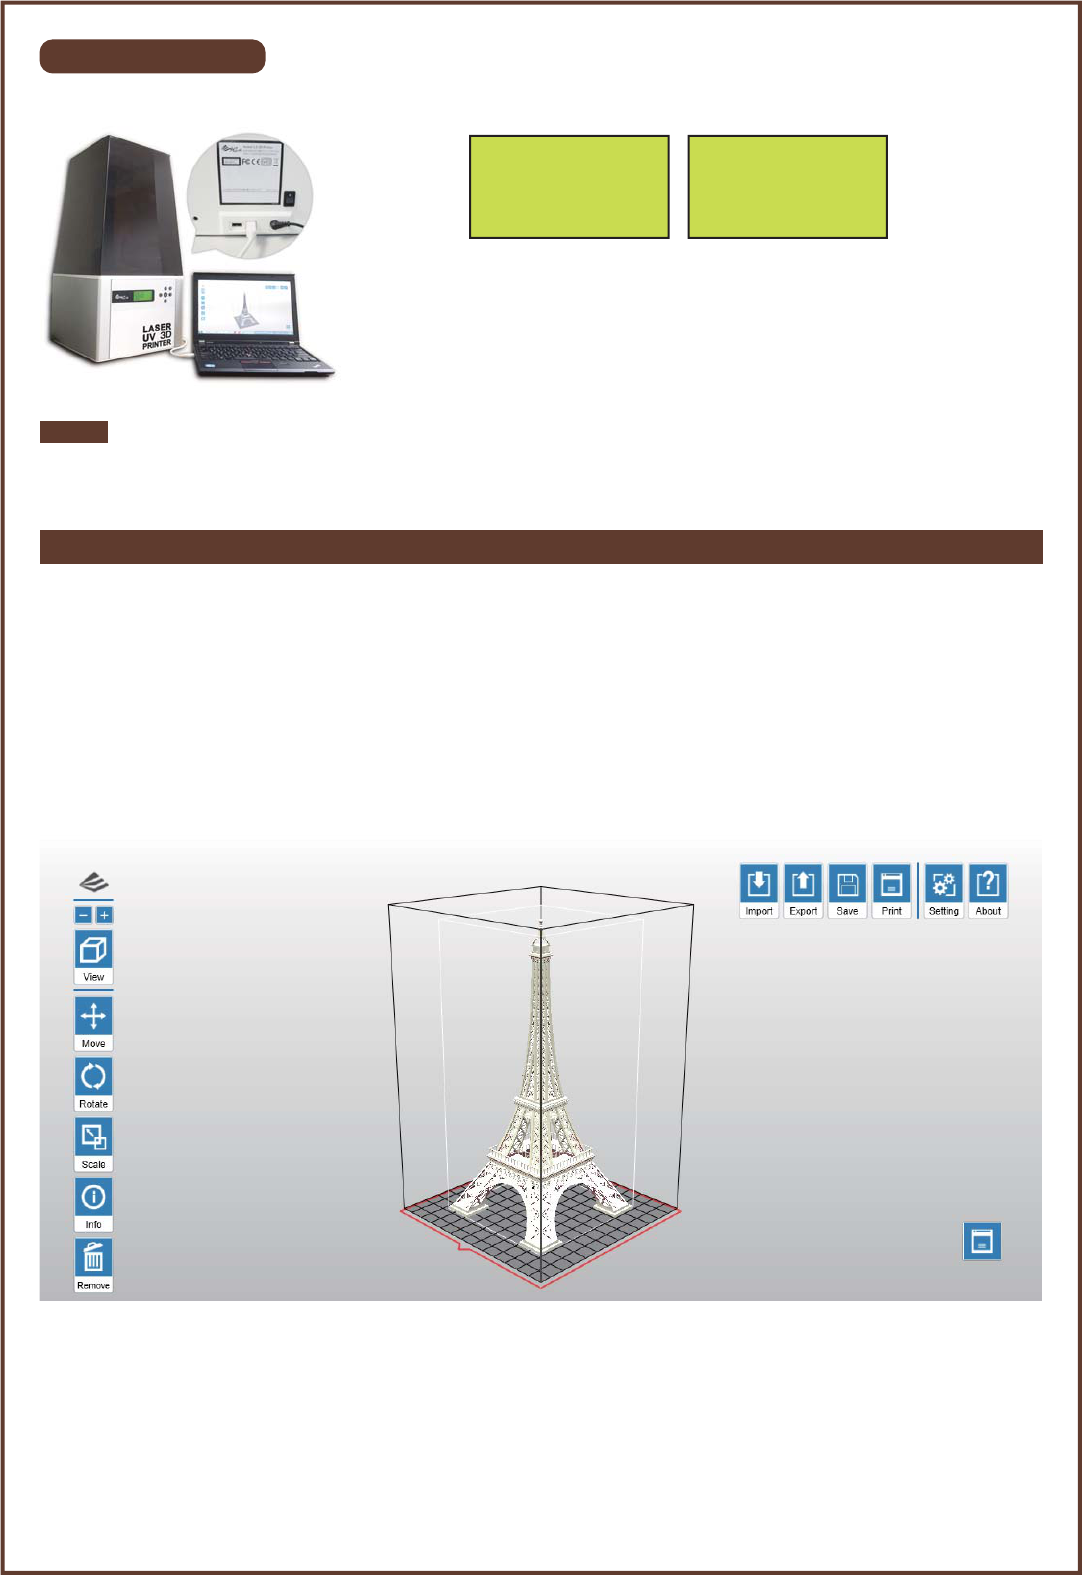
PC-link Printing via XYZware for Nobel Series
Before printing from PC, please first install XYZware for Nobel Series on your device. "XYZware for Nobel Series" Installer can be
found in the bundled USB drive and at XYZprinting website:
http://support.xyzprinting.com/global_en/Support/download (log in is required)
Minimum system requirements for XYZware for Nobel Series:
System RAM: 4GB and above
Graphics RAM: 1GB and above (OpenGL 2.1+ compatible)
Hard disk space: 300MB and more
Operating system requirements for XYZware for Nobel Series : Windows 7/8+ (32bits and 64 bits)
A.
B.
Import objects in .stl/.3w format: Open file browser and select the .stl or .3w files to print. ".3w" format is sliced by XYZware based on the printer
type selected. For the file set to slice for printer type other than "Nobel 1.0", XYZware for Nobel Series may not import it.
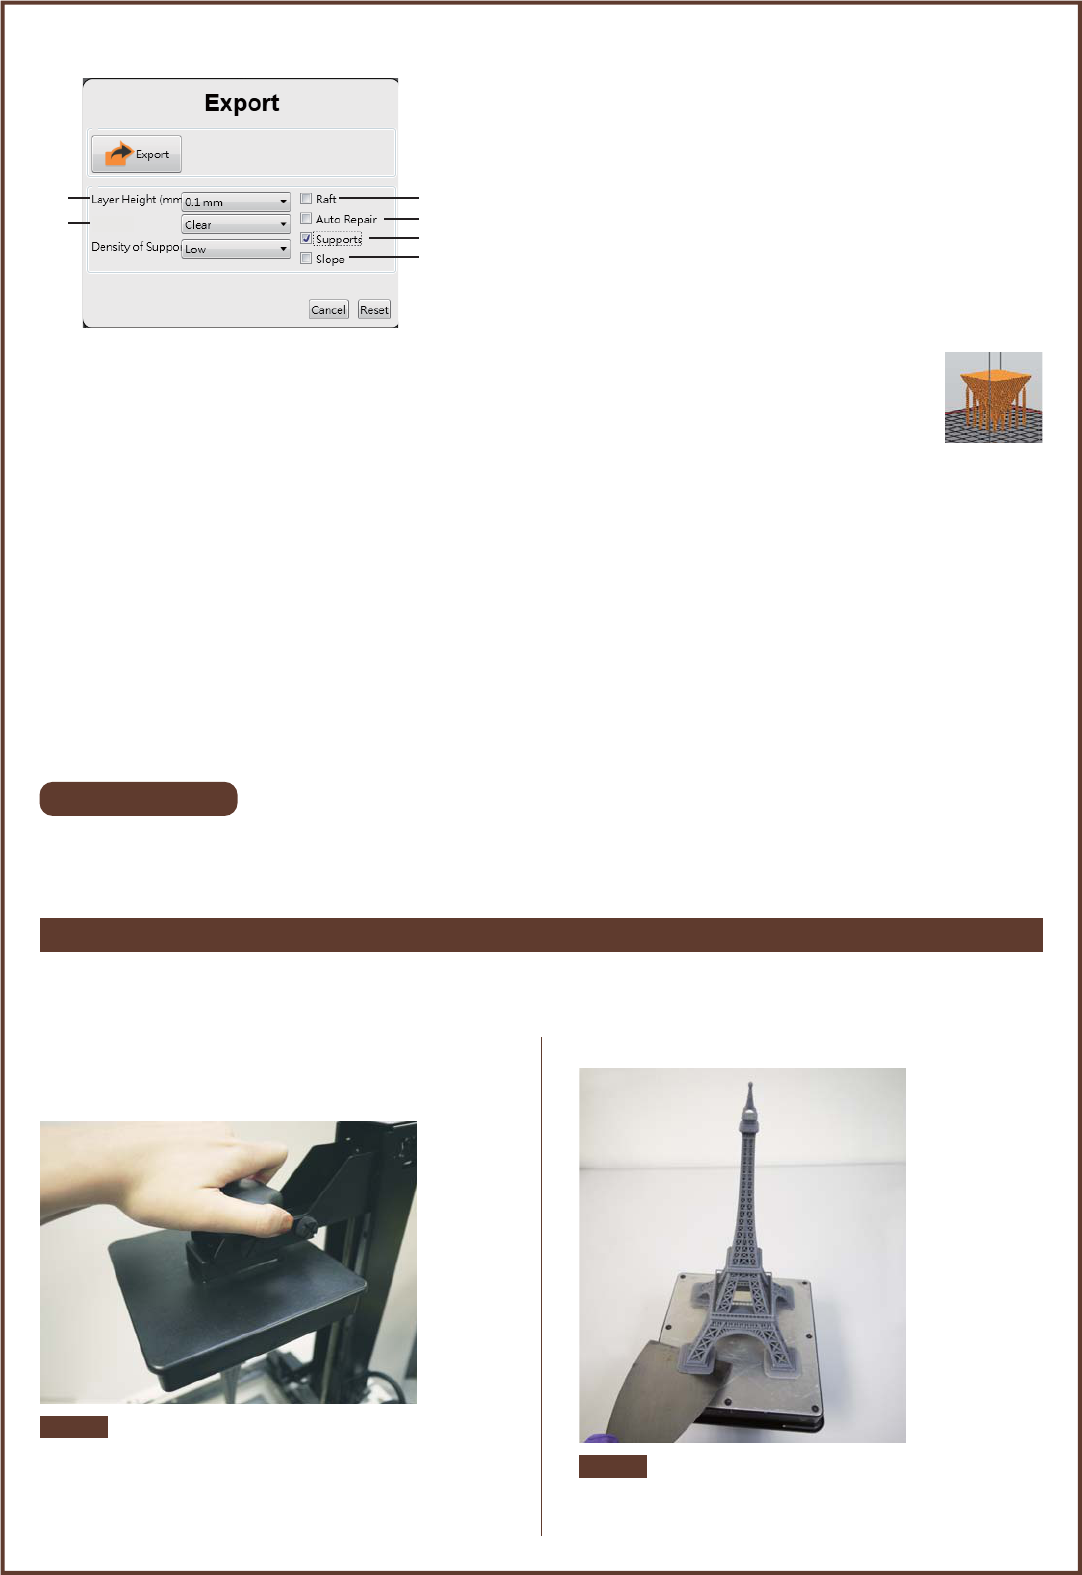
Export to .3w format: After selecting a desire printout setting, click on "Export" to save the model to a sliced . 3w file. Once the file is sliced, you
may skip repeating settings in the future.
A
G
H
I
J
K
L
MN
BCD EF
(Overview of XYZware for Nobel Series)
Functions:
Insert USB flash drive to the USB
drive port at the back of the printer.
press ▼ to browse the menu, and press [OK] to select a file to
proceed:
FILE LIST [1/10]
XYZ_KEY.3w
►Mini_nobel.3w
my_nobel.3w
START PRINTING?
XYZ_KEY
NO
►YES
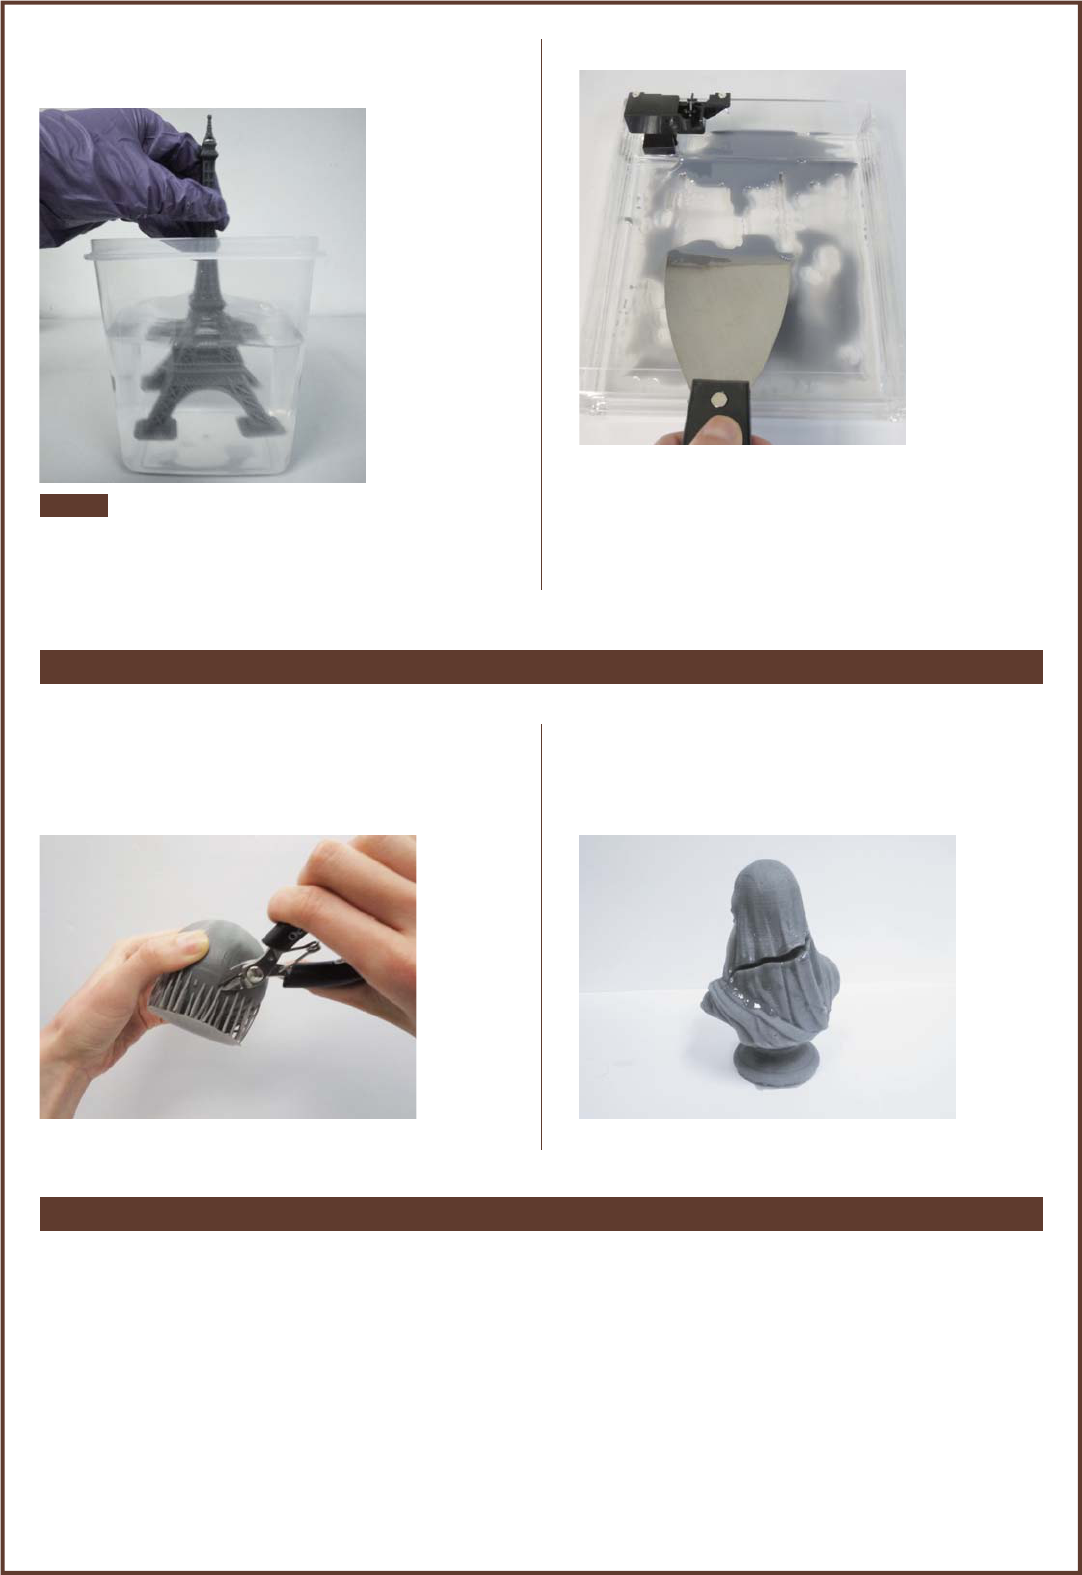
Always remove the platform before removing the resin tank
to avoid dripping leftover material on printer surface.
Note
① Remove the platform
Wear gloves before removing the prints. Turn the platform
locker anticlockwise until it stops. And pull the platform to
remove it.
Scrap off the print gently to avoid damaging the surface of
the platform.
Note
② Use the scraper to remove print
V1
-9-
Operation Flow
① Click "Import" to import a .stl/.3w file to the virtual platform.
② Adjust the placement, angle and size of the object with "Move", "Rotate" and "Scale" buttons on the left as desired.Please note that .3w file is
unadjustable.
③ Click "print" and setup printing preference based on the features of the prints, and click "Print" to slice and send the file for printing.
"Layer Height" indicates the resolution of a print. Thinner layer leads to
more dedicated finish, however it takes longer for printing.
Printing setup varies based on the color and material of the resin.
Please set the option based on the resin cartridge installed on the
printer before printing. It is advise to include color setting in filename
for instant distinction in the future.
Check "raft" for 3D oject that has less contact with the platform to
increase adhesion.
For file slicing issue, you may retry slicing with this option. XYZware for
Nobel Series will try to repair any modelling issue while slicing.
For objects with overhanging structure, "support" structure is required
for printing. Check "Support" and select a desire density for support.
Denser support structures will prolong the printing.
For objects with slope, check "slope" to add supports on
slope structure to enhance the stability during printing.
C.
D.
E.
F.
G.
H.
I.
J.
K.
L.
M.
N.
Save as .stl file: Save all objects on the platform to a single stl file. Any adjustment to the size or placement of the objects will apply to the stl file.
Setup printing preference and send the objects for printing: Once your device is connected to the printer, click "Print" to open printout setting
window (options are the same as "Export" window). Setup printing preference based on the features of the objects and hit "Print" to proceed.
Setup interface language, display unit and etc.
Info/Software & firmware update: Apply printer firmware and XYZware for Nobel Series updates when prompt by the software for stable printing
performance.
Zoom in/out: Zoom in or out the platform to view the details of objects.
Switch views: Switch views with a click to view objects from different angles.
Move the object: move the object along x, y or z axis. You may also press and hold ALT key and drag the mouse to move the object horizontally.
Rotate the object: adjust the angle of the object around x, y or z axis. Flipping the object around to adjust the face on the platform may help to
enhance printing performance. Increasing the contact area between the object and the platform may help to enhance printing quality and
strength.
Resize the object: Scale the object as you desire. The adjustment to the object on the platform will not affect the size of your original file.
View info of the object: check the dimension and location of the object, so you can tell the size of the object easily.
Remove the object from the platform: select an object and click the option to delete it from the platform. Or you may press Delete key to remove
the object.
View printer status
Options under Export:
③
④
①
②
⑤
⑥
①
②
③
④
⑤
⑥
Printed Object Removal and Cleaning
When removing prints from the printer, follow the procedure to post-process the object and maintain your printer.
Color
Troubleshooting
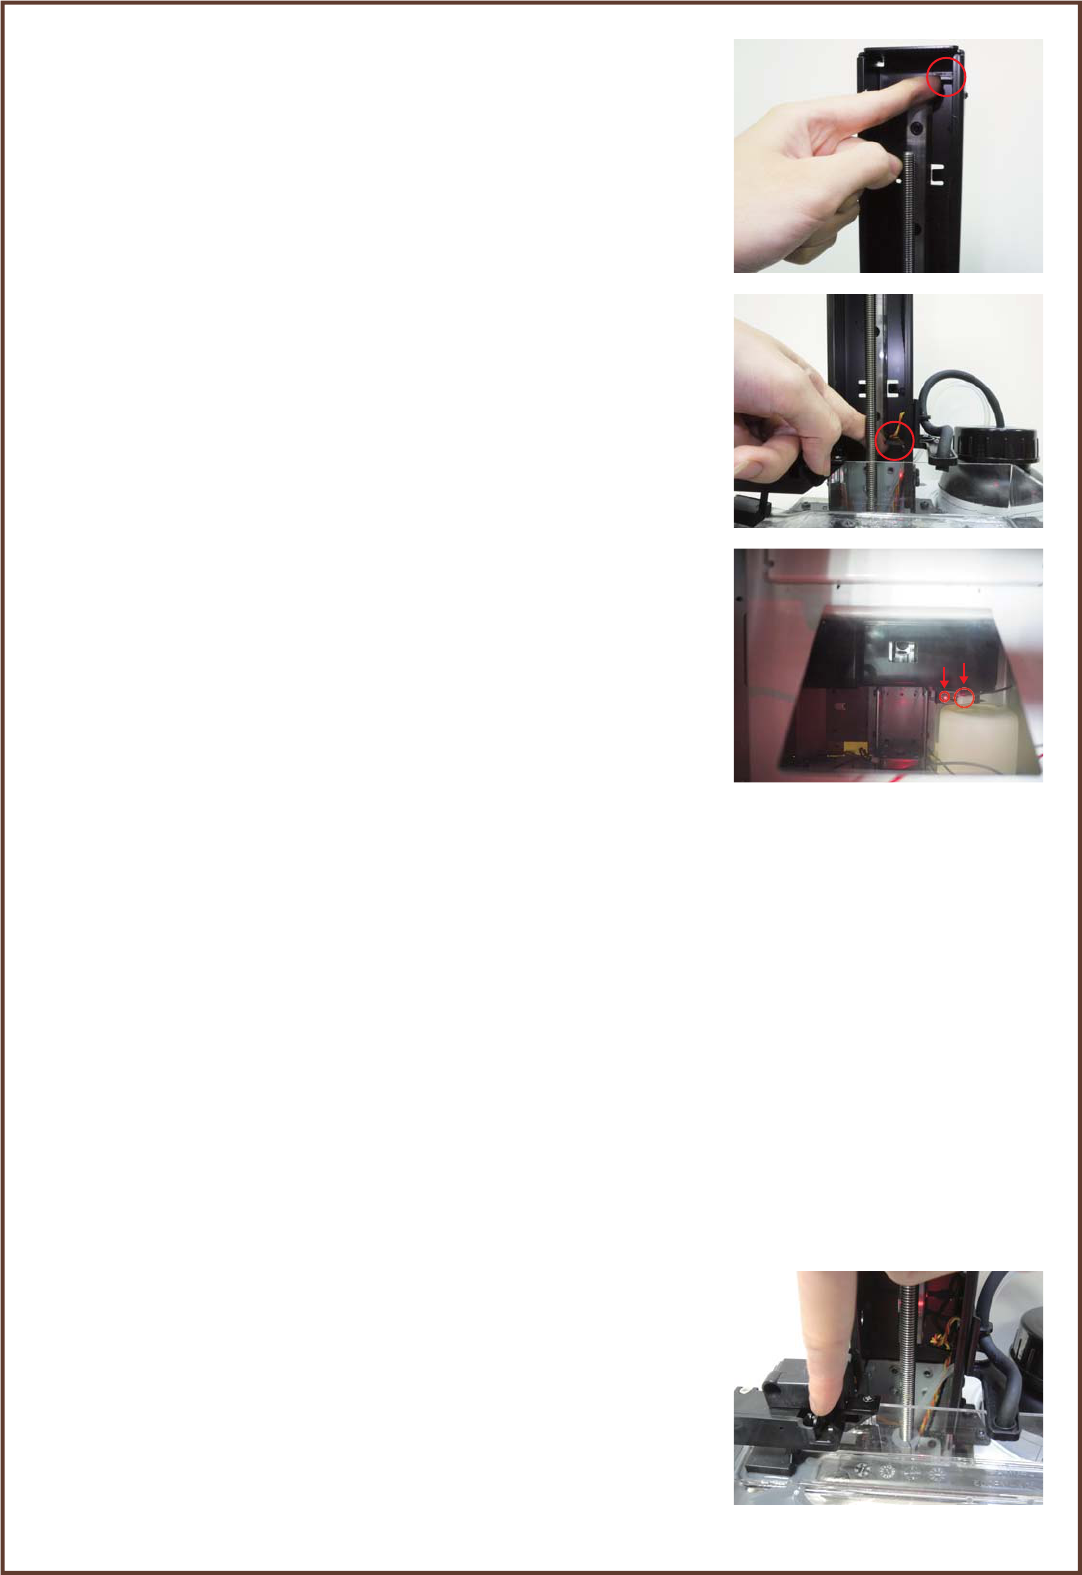
Be sure to wear gloves for the operation!
You may also brush out the uncured resin in the alcohol.
When an error occurs, please refer to the service code on the printer and/or in the software, and check the suggestion below for
troubleshooting.
If any error persists, please contact customer service center for support.
Note
③ Rinse part in Alcohol (≧75% Alcohol)
Pour alcohol into the rinse basket, shake the print for 10
minutes and rub it with fingers thoughroughly.
Remove any residue in the resin tank. Operate gently to
avoid scratching the surface of the resin tank. Reinstall the
resin tank after cleaning.
Scrap off any residue and remove excess resin from the
surface of the platform. When reinstall it to the printer, turn
the platform locker clockwise until it stops.
④ Cleanup and reinstall
● Error Code 1000: Vibration generator movement abnormalities or tank sensormalfunctioned
Suggestion:
Contact customer service center directly.
V1
-10-
Post-Process Your Prints
Remove Support Structure
Use pliers or other tools to remove the support structure
from the cleaned prints to ensure perfect finish.
Empty Uncured Resin Inside the Prints
Hollow prints with uncured resin inside may break as time
passes. To ensure the durability of hollow prints, leave a
weep hole at the bottom of your 3D design, so you can
empty the uncured resin easily.
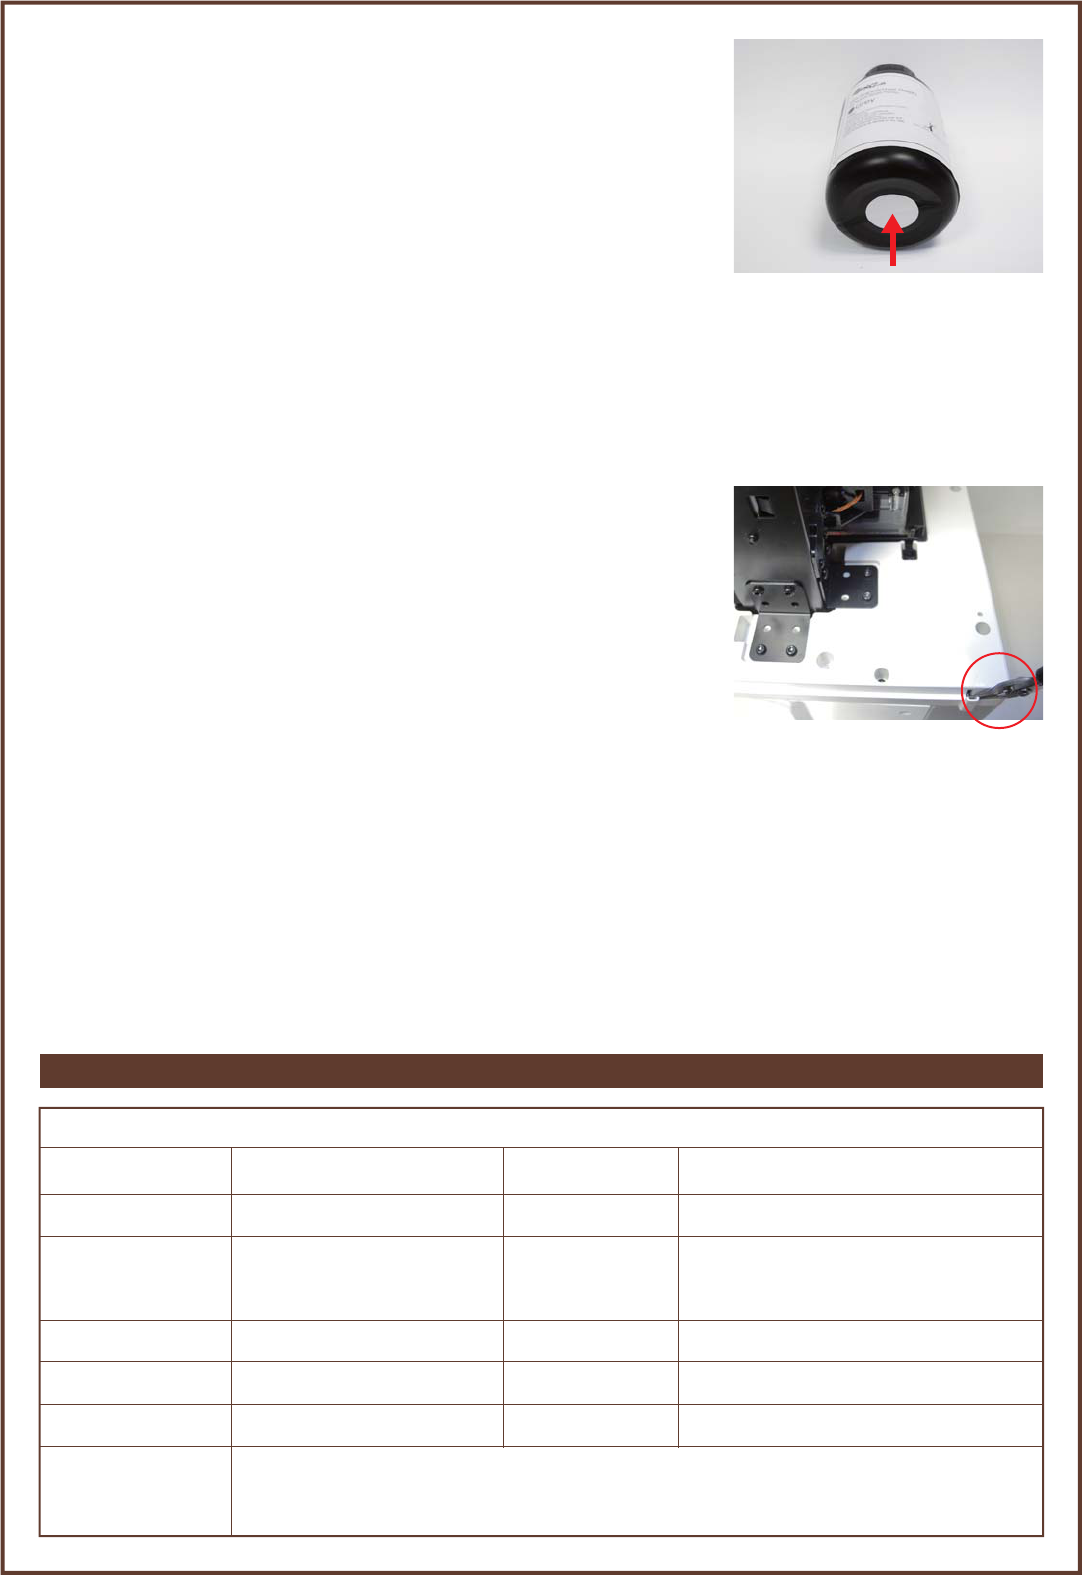
● Error Code 1001: Z axis motor upward movement abnormalities or Z axis top sensor
malfunctioned
Suggestion:
Select "INFO">"SENSOR STATUS" on the printer, touch Z axis top sensor, and see if
the status of "Z-T" switches from 0 to 1. If the value doesn't switch accordingly, then
the sensor is malfunctioning.
Then select "UTILITIES">"MOVE PLATFORM">"TO TOP" to raise the . If the platform
doesn't rise accordingly, then the motor is malfunctioning.
Contact the service center after you have checked the status of the printer.
● Error Code 1002: Z axis motor downward movement abnormalities or Z axis bottom
sensor malfunctioned
Suggestion:
Select "INFO">"SENSOR STATUS" on the printer, touch Z axis bottom sensor, and see
if the status of "Z-B" switches from 0 to 1. If the value doesn't switch accordingly,
then the sensor is malfunctioning.
Then select "UTILITIES">"MOVE PLATFORM">"TO BOTTOM" to descend the
platform. If the platform doesn't descend accordingly, then the motor is
malfunctioning.
Contact the service center after you have checked the status of the printer.
● Error Code 1003: NFC tag reader malfunctioned
Suggestion:
Remove the tank, and check the status of NFC tag read through the mirror under the
tank slot. Please check if the NFC tag reader is in place, the indicator LED illuminates
and the connected is securely attached.
Contact the service center after you have checked the status of the printer.
● Error Code 2000: Resin filling timeout
Suggestion:
If the resin cartridge is not empty, and the NFC tag matches the cartridge, first check
if the tank level sensor is functioning. Select "INFO">"SENSOR STATUS", and touch
the tank level sensor. If the value doesn't switches from 1 to 0 after "L", the sensor is
not working.
Then tap the tank level sensor to see if it moves smoothly.
Also check the status of the filling pump. Disconnect the transparent filling tube, and
select "UTILITIES">"INSTALL RESIN". If you don't feel air releasing from the tube,
then the pump is malfunctioning.
Contact the service center after you have checked the status of the printer.
● Error Code 1004: Engine board malfunctioned
Suggestion:
Contact customer service center directly.
● Error Code 1020: Printer not found
Suggestion:
Make sure printer is powered on, and connected to PC correctly. If the error persists, please try to restart your PC or refer to FAQ
on XYZprinting website.
● Error Code 1021: XYZware slicer not found
Suggestion:
Reinstall XYZware.
● Error Code 1022: Transmission failed
Suggestion:
Make sure the USB wire is securely connected to the printer. Do not remove the wire before data transmission is completed.
● Error Code 1023: Insufficient memory to load file(s)
Suggestion:
Increase system memory to 4G RAM and 1G graphics RAM or above. Leave some prints for next task if you are printing several
models.
● Error Code 1024: XYZware runtime error
Suggestion:
Restart XYZware.
V1
-11-
Specification
Nobel 1.0 3D Printer
Print Technology
UV Light Source
Maximum Build Size
X/Y Axis Resolution
Z Axis Resolution
File Format
Operating Conditions
Stereolithography (SL)
UV Laser λ 405nm (100mW)
128 x 128 x 200mm
5”x 5”x 7.8”
0.3mm
0.025/0.05/0.1 mm
.stl & .3w (sliced with XYZware)
Temperature: 18-35℃/64.4-95℉
Humidity: 40-80% RH (no condensation)
USB Wire & USB drive
100-240V 50/60Hz 60W
280 x 337 x 590 mm
11”x 13.2”x 23.2”
9.6 KG
Photopolymer Resin
Windows 7/8 and above
Connectivity
AC Input
Printer Dimension
Net Weight
Print Material
OS Support
V1
-12-
● Error Code 2001: Resin cartridge not found
Suggestion:
Make sure resin cartridge is placed correctly and NFC tag is in place under the bottle.
If the NFC label is missing, please contact customer service center.
● Error Code 2004: Lid not covered during printing
Suggestion:
Place the lid on the printer before printing. If the lid is placed correctly, please
remove the lid, select "INFO">"SENSOR STATUS", tap the lid sensor and see if the
status of "C" switches from 0 to 1. If the value doesn't switch accordingly, then the
sensor is malfunctioning.
Contact the service center after you have checked the status of the printer.
● Error Code 2002: UV laser module not calibrated
Suggestion:
Contact customer service center directly.
● Error Code 2003: Resin cartridge empty
Suggestion:
Resin cartridge is empty based on the record of the NFC tag. Select "INFO">"RESIN STATS" to check cartridge level. When
"REMAINING" is shown as "0%", then the resin cartridge should be empty. Please install another XYZprinting resin cartridge
before printing.
● Error Code 2005: Unrecognized resin tag
Suggestion:
Check the record of the resin cartridge by selecting "INFO">"RESIN STATS". If the display shows "INVALID RESIN TAG", please
change to XYZprinting resin cartridge.
● Error Code 2006: Unsupported file format
Suggestion:
"Print from USB" supports only .3w format. Please select files in the supported format.
● Error Code 2007: File too large
Suggestion:
Please select a .3w file, size no more than 200MB.
● Error Code 2020: Printer is busy
Suggestion:
Wait until the printer finishes current task. If the error persists when the printer is idle, please try to restart the printer.