XYZprinting CT-NFC Nobel Superfine 3D Printer User Manual Nobel Superfine EN V3
XYZprinting, Inc. Nobel Superfine 3D Printer Nobel Superfine EN V3
Users Manual

XYZprinting
Nobel Superfine
ENGLISH
V3
-2-
Safety and Compliance
Read the following safety instructions and contents of this manual before use, operation, maintenance, replacement or removal of any
parts, components, or materials of the printer.
For the latest information about the Nobel Superfine 3D Printer and XYZprinting products, please visit XYZprinting website
(http://us.xyzprinting.com) or contact your sales representative.
Resin Care
Resin Tank Care
•Wear proper protective equipment, avoid raw material contact and vapor inhalation.
•Chemical-resistant gloves should be worn when you make contact with resin.
•Resin should preferably be stored at temperatures between 10-32°C (50-89.6°F), localized heat sources (i.e., drum or band heaters), oxidizing
conditions, freezing conditions, direct sunlight, ultraviolet radiation, inert gas blanketing.
•Never pour the waste resin back to the bottle or down the sink, as it may pollute the remaining resin or clog the drain.
•You may pour resin waste into plastic bag and expose it to sunlight or UV light source to cure the resin. The cured resin can then be discarded.
•Avoid dripping resin on anything other than the platform or the resin tank, or the printer may malfunction.
•Please ensure that the recommended operating conditions are adhered to. (Operating temperature 20-30°C (68-86°F)/ humidity 40 ~ 60% RH; If
a different operating temperature is printed on the label on the resin bottle, please adhere to recommended conditions on the label.)
•For the best printing quality, resin should be used up within 3 months after purchasing and within 1 month of opening.
•The resin tank is consumable. It should be replaced when the bottom is damaged or gets cloudy to ensure the printing quality.
•It is suggested to use isolated resin tank while different color resin is going to be used to ensure printing quality.
Copyright
All other trade names and trademarks are properties of their respective owners.
Important Safety Information:
•Do not let children operate this device without adult supervision. Moving parts may cause serious injury.
•Electric shock hazard.
•Do not place the printer on an unleveled or unstable surface. Printer may fall or tumble causing harm and/or injury.
•Do not place any object on top of the printer. Liquid and solid objects that fall into the printer may lead to printer damage or safety risks.
•Please keep the printer, resin, or alcohol away from fire.
•Do not disassemble or replace the printer cover with non-XYZprinting covers.
•Insert and secure the power cord firmly for proper usage and to avoid potential electricity and fire dangers.
•Do not attempt to service the printer beyond the instructions specified in this document. In the case of irrecoverable problem, contact XYZprinting
service center or your sales representative.
•Do not place the printer in humid or dusty environments such as bathrooms and high traffic areas.
•Some components of the printer move during operation. Do not attempt to touch or change anything inside before powering off the printer.
•Please keep the lid closed during printing to avoid injury.
•For optimized printing quality, only use resin supplied by XYZprinting.
•The socket-outlet shall be installed near the equipment and shall be easily accessible.
•Make sure to set the power switch to the off position and remove the power cord before transporting the device.
•Only use the grounded power adapter and power cord supplied with the printer to prevent possible electrical shocking.
•Please place and use the printer in a well ventilated area. The process of printing will produce a small amount of non-toxic odor. Having a well
ventilated area will ensure a more comfortable environment.
The following has been written in order to cover all possible printing scenarios. For scenarios which occur outside the scenarios detailed
in this manual, the user will be held accountable for their own safety.
-3-
↓
Power
Jack↓
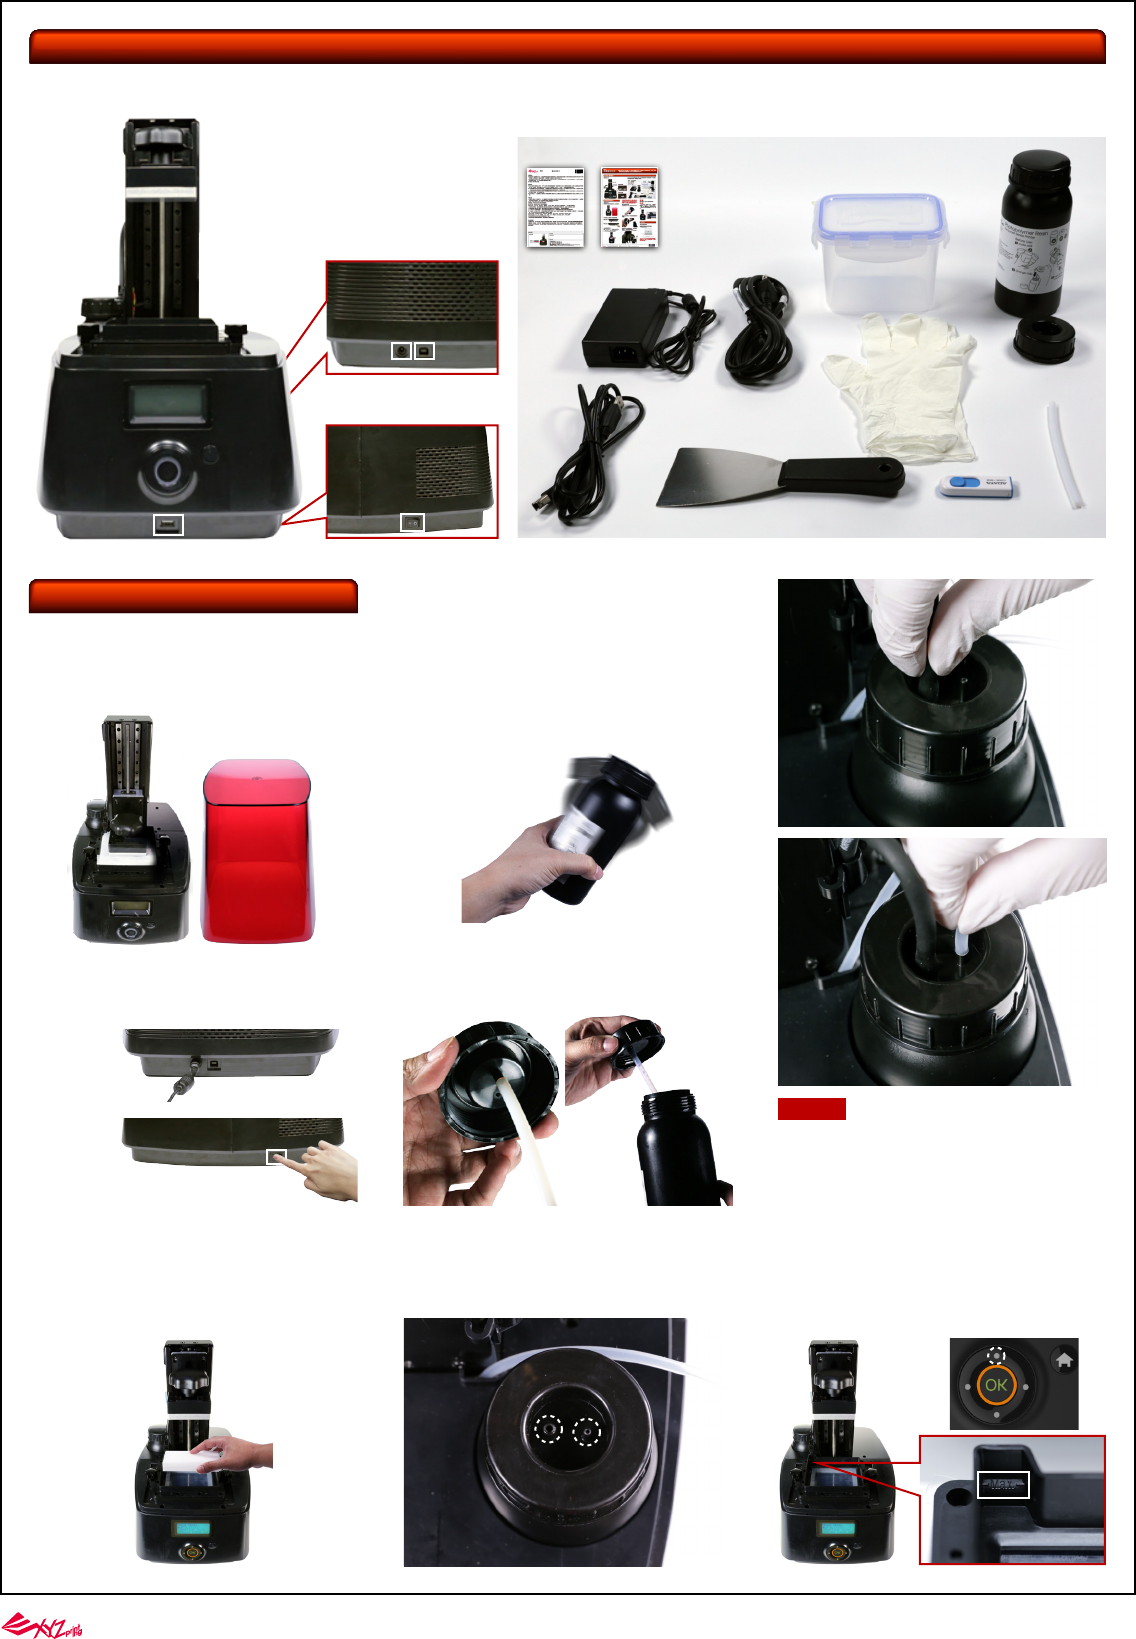
Product Overview and Accessories
Unpacking and Setting Up
Unpack the carton, remove all protective material
and take the printer out of the package.
●Power On the Printer
●Side View
●Back View
■Side View
■Back View
●Front View
Connect power adapter, power cord to the printer.
Switch on the printer.
Shake the resin bottle for about 10 seconds.
Assemble the nozzle cap and the inner tube, and
replace the original bottle cap with the assembled
one.
Put the bottle into the bottle slot. Install the filling
tubes (First, attach the black tube to the thick
nozzle. Then attach the transparent tube to the thin
nozzle and push all tubes down.)
●Raise the Platform
●Install the Resin Bottle
●Refill Resin
Select "UTILITIES" > "MOVE PLATFORM" > "TO
TOP" > "YES" to raise the platform.
Remove the protective materials under the platform.
※Keep original packaging material in the event of
sending your unit back for repair.
Power
Switch
↓
←Platform
↑
Resin Tank
LCM→
←Operation
Panel
USB Disk
Port→
Filling Tube→
The Nobel Superfine is shipped with the below parts and accessories. After unpacking, please
check if there is any damage on the printer and accessories. Please contact customer support
for any missing or defective parts and accessories.
■USB Cable
■USB Flash Disk
■
Rinse Basket
■Scraper
■Gloves
■
Starter
Resin
■Nozzle Cap
■Inner Tube
■
Power Cord
■
Power Adapter
Resin Bottle
Slot→
■
Quick Start Guide
■
Warranty Card
Up
Refill the resin tank before sending the printing task.
Please select "UTILITIES">"REFILL RESIN" on the
printer screen. And press and hold the UP key to
infuse resin into the tank. Release the UP key until
the resin reaching the "Max" mark on the resin
tank(The resin capacity to MAX mark on the resin
tank is about 90g), to avoid resin effluence from the
resin tank.
Note
Before changing the resin bottle, remove the
transparent tube first, then remove the black tube.
Thick hole
Thin hole
USB
Cable
Port

-4-
Printing
Import 3D objects to XYZware_Nobel, add proper
supports, press "Print" to set up the printing
parameters. Once the file is sliced, it will be sent to
the printer.
Import 3D objects to XYZware_Nobel, add proper
supports, press "Print" to set up the printing
parameters. Once the file is sliced, it will be sent to
the printer via WiFi Connection.
Install the printing software XYZware_Nobel from
the bundled USB flash drive.
There are three ways to send print files to the printer:
through USB flash disk, USB cable connection, and
WiFi connection. Follow below instructions for each
operation:
Prepare the sliced files with XYZware_Nobel, and
export them into ".3wn" format. Save the 3wn files
in the USB flash disk, and plug it into the USB port
on the front of the printer. Select and print the 3D
model via LCM interface on the printer. Please refer
to instruction of "PRINT FROM USB" on page 8 for
detailed operation.
※Apply printer firmware and XYZware_Nobel
updates when prompted by the software for stable
printing performance.
③ Printing via WiFi Connection
●Install the Printing Software
●Printing Operations
Connect the printer to your PC with the USB cable.
② Printing via USB Cable Connection
① Once the WiFi connection is setup correctly and
kept connected on the printer, you can start printing
via WiFi connection from the next step.
② Naming your printer provides better distinction
when there are more than one printer on the same
network. The printer name can be changed on
printer's LCM (see P. 7 "Printer Name") or in
XYZware_Nobel (see P. 12 "Change Printer name").
To check the printer name in XYZware_Nobel or
printer's LCM, please refer to green box on below
illustration:
Run XYZware_Nobel on the PC, press "Printer
Monitor" in right lower corner. Press "My Printer"
and confirm the printer is connected(indicated as
red box).
Choose the WiFi network which your PC connects
to from the network scan list. You can set up the
WiFi connection with the printer panel or in
XYZware_Nobel. See P. 4 "WiFi" for the settings on
the printer or P.10 "WiFi Connection" for the
settings in XYZware_Nobel.
Tip
■Print Wireless from PC
■Enable WIFI Connection
① Printing via USB Flash Disk
■Check the printer name in XYZware_Nobel:
■Check the printer name on printer LCM:
-5-
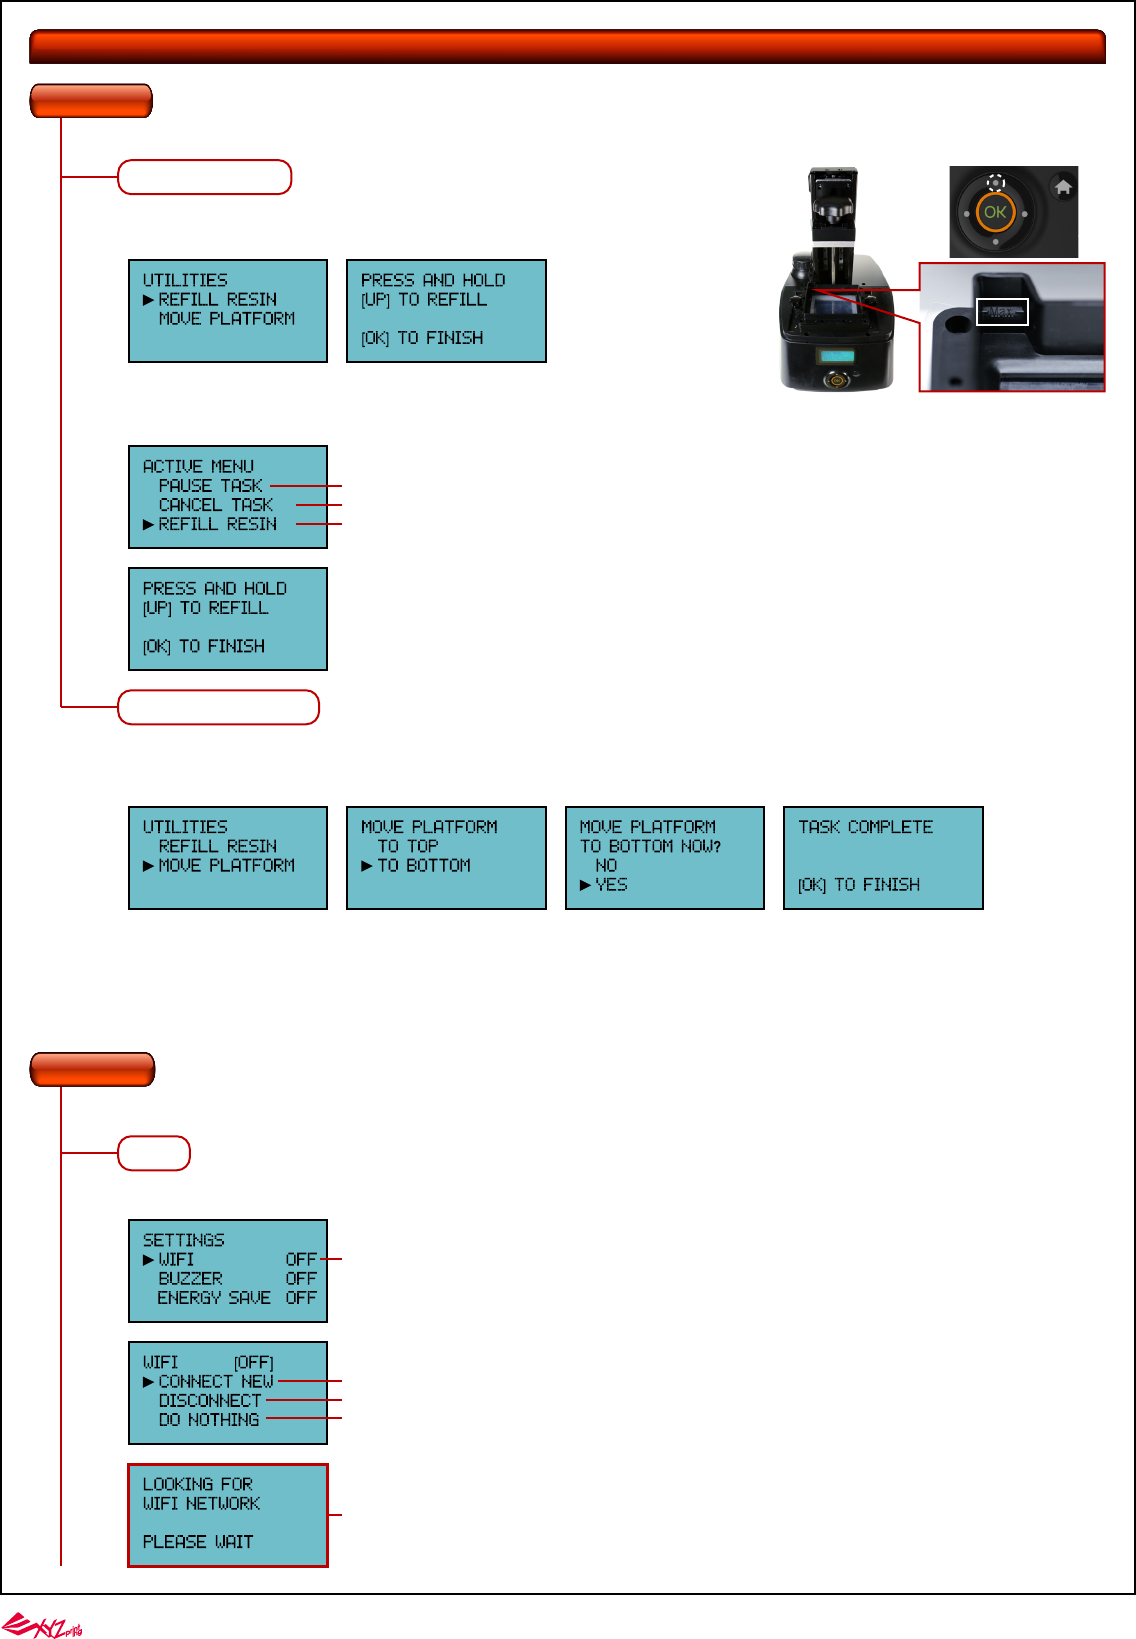
LCM Menus
REFILL RESIN
The "Utilities" menu gives the user control over the printer settings. Users can choose to refill resin manually, and move the Z-axis when necessary.
Select "REFILL RESIN" and press "OK". Press and hold the UP key to infuse resin into the tank.
Release the UP key until the resin reaching the "Max" mark.
If you want to refill resin during printing, press "OK" to launch "ACTIVE MENU" page and select "REFILL RESIN". To refill resin, follow the same operations.
The "Settings" menu alows you to adjust printer settings.
To pause printing
To cancel printing
To refill resin
MOVE PLATFORM
Activate the function when you need to move the platform manually.
Simply select move the platform “to top” or “to bottom” to proceed:
WIFI is disabled by default. To enable WIFI connection, follow the steps below:
UTILITIES
WIFI
SETTINGS
Up
Connect to a new WiFi connection. Current WiFi connection, if any, will be disconnected after this option is selected.
Cancel setting and go back to "SETTING" menu.
Disconnect current WIFI connection.
Select WIFI and enter WIFI setting.
The printer will start to looking for available WIFI after selecting "CONNECT NEW".
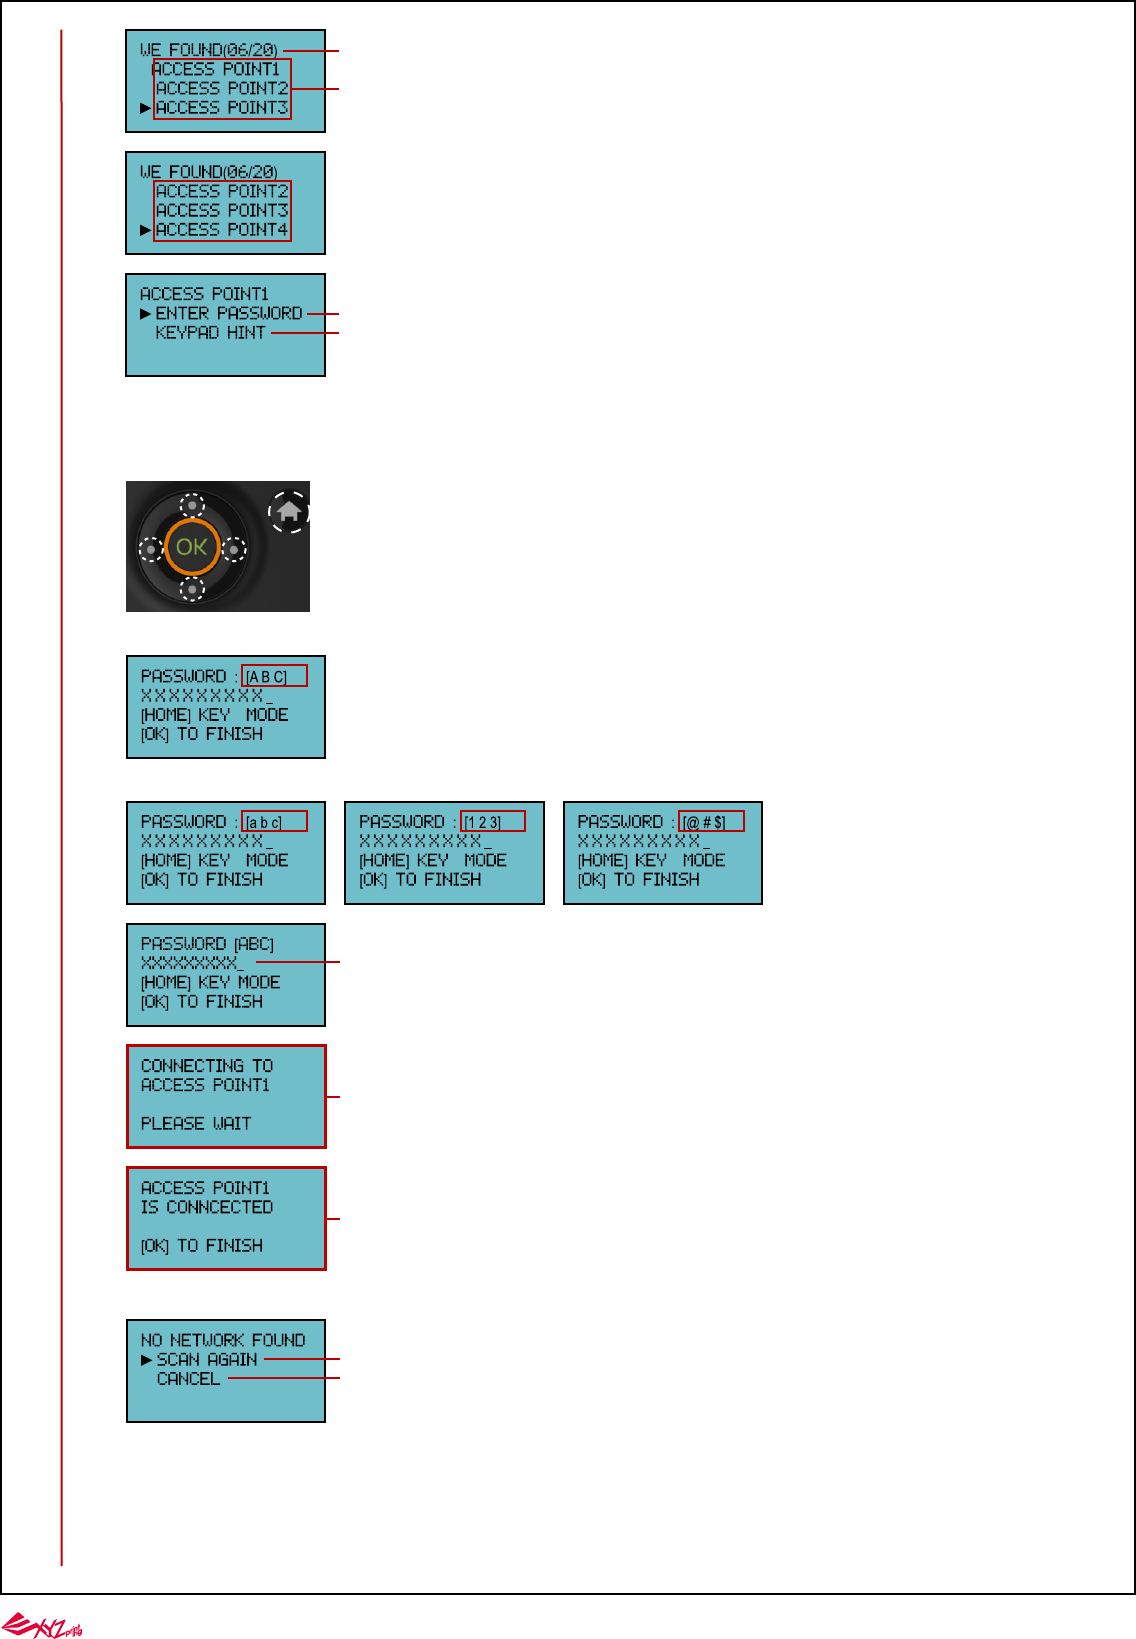
-6-
Each digit turns invisible as "X" once setup
To scan available WiFi connection again
To cancel the search
Please wait while the printer is connecting to the selected network
The printer is connected to the selected WiFi network. Press [OK] to finish settings
06 : 06 : the number of WIFI connections currently detected
20 : Maximum detected WIFI
The list will be replaced by the actual WiFi connections found in your area. To view more available network, press Down
key to move to the next page.
Press [OK] to enter the password.
Press [OK] to read the instruction on inputing the password with the printer control panel.
●Home Key: Switch input mode
●Up and Down keys: Select numerals, alphabets, or symbols.
●Left and Right keys:Moves to the previous or next digit.
Up
Down
Right
HOME
Left
Capital English letters mode:
Enter password with the control panel and press "OK" to activate the WiFi function.
4 input modes are available, including capital English letters, lowercase English letters, Arabic numerals and special symbols. When in the password input
mode, the keys function as illustrated below:
In case of no WIFI is available, please select "SCAN AGAIN" to retry scanning.
<---Current input mode
Lowercase English letters mode: Arabic numerals mode: Special symbols mode:
■Input the WiFi Password
-7-
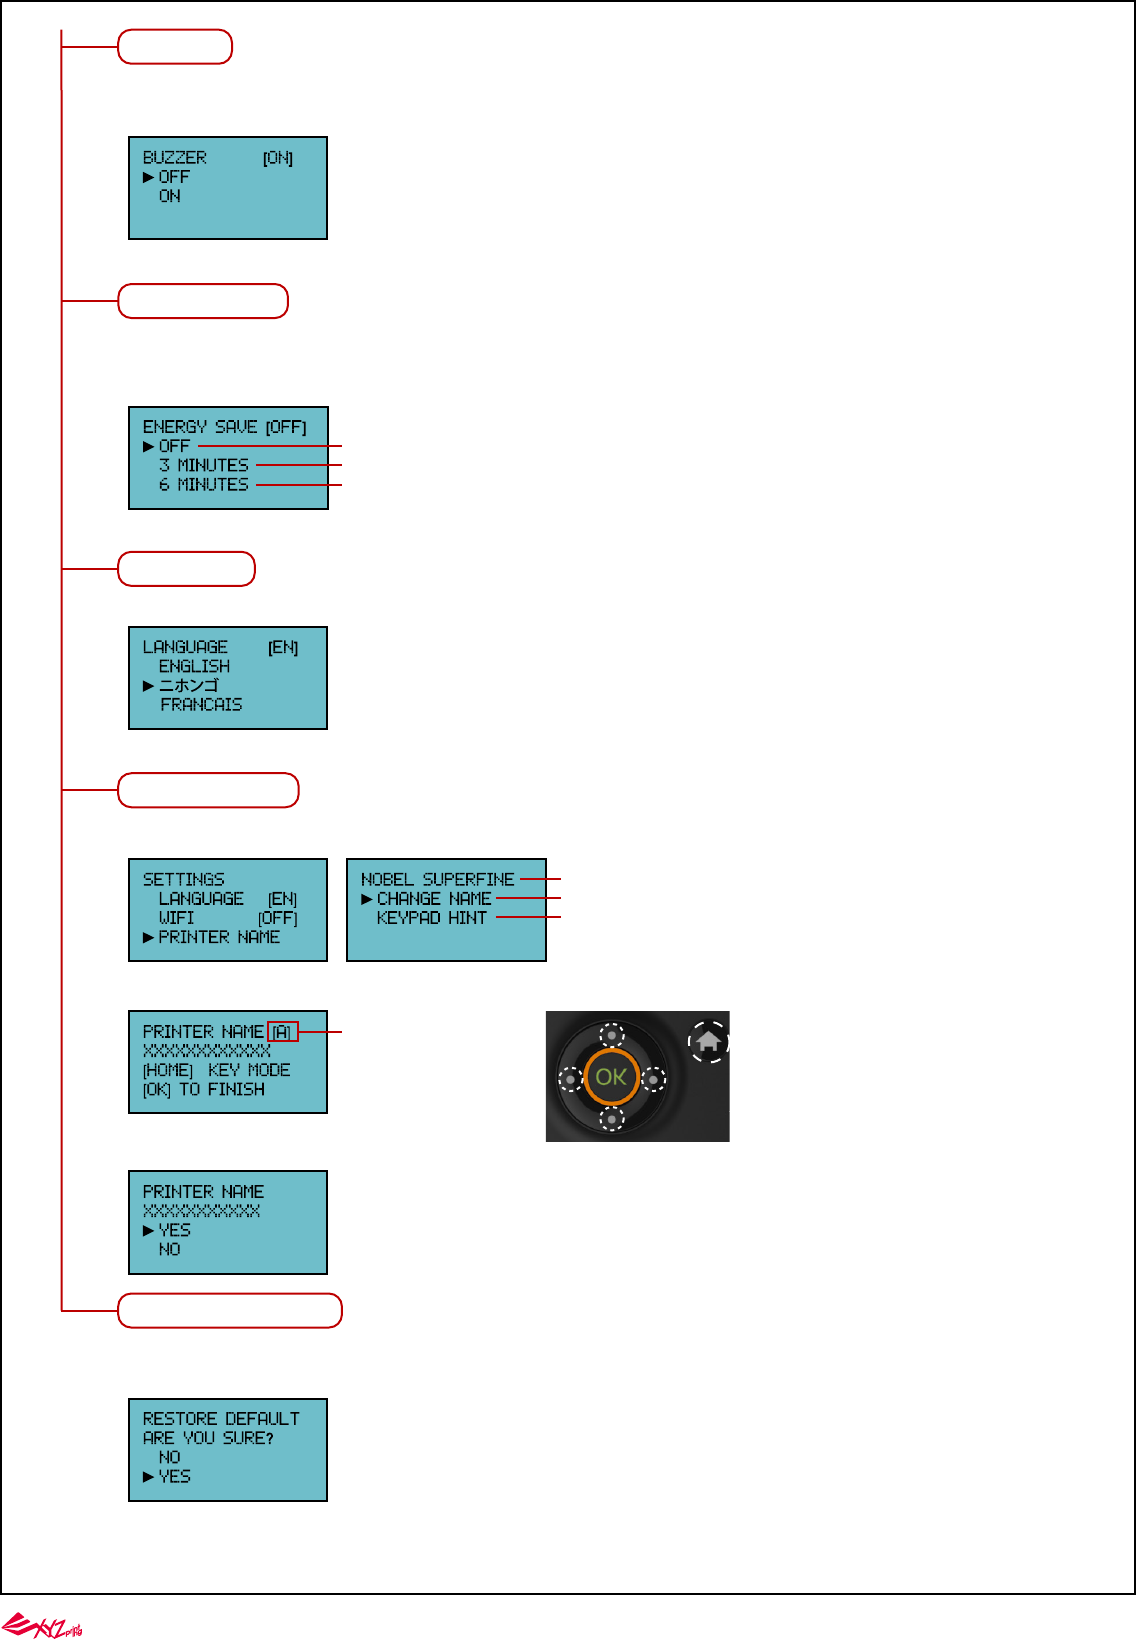
BUZZER
When the buzzer is turned on, the printer will output an audible signal when a button is pressed.
Buzzer is turned on by default. To switch off the buzzer:
Select “OFF” and press [OK] to change the setting.
ENERGY SAVE
LED backlight of the LCM enhances the readibility of the content of the display. To save energy consumed, the backlight will go off after the printer idles for
3 minutes (shown as 03M on the display) by default.
To set a longer time interval:
Select an option, and press [OK] to change the setting.
Backlight will never go off.
Backlight will go off after the printer idles 3 minutes.
Backlight will go off after the printer idles 6 minutes.
LANGUAGE
You may switch the display language on the printer. The default language is English. To switch to other language:
Select a language and press [OK] to change the setting.
PRINTER NAME
You can change the printer name on the WiFi network with below steps:
RESTORE DEFAULT
All settings can be reset to factory default with a few clicks.
To reset all settings at once:
Simply select “YES” and press [OK] to reset.
Change the printer name
Press [OK] to read the instruction on inputing the printer name with the printer
control panel
4 input modes are available:
[A] : Capital English letters mode
[a] : Lowercase English letters mode
[1] : Arabic numerals mode
[@] : Special symbols mode
●Home Key: Switch input mode
●Up and Down keys: Select numerals, alphabets, or symbols.
●Left and Right keys:Moves to the previous or next digit.
Up
Down
Right
HOME
Left
This is the name of the printer. Only 16 characters are allowed
Confirm the inputted printer name and press [OK] to finish.
Press [OK] to change the printer name.
-8-
The content may look like this:
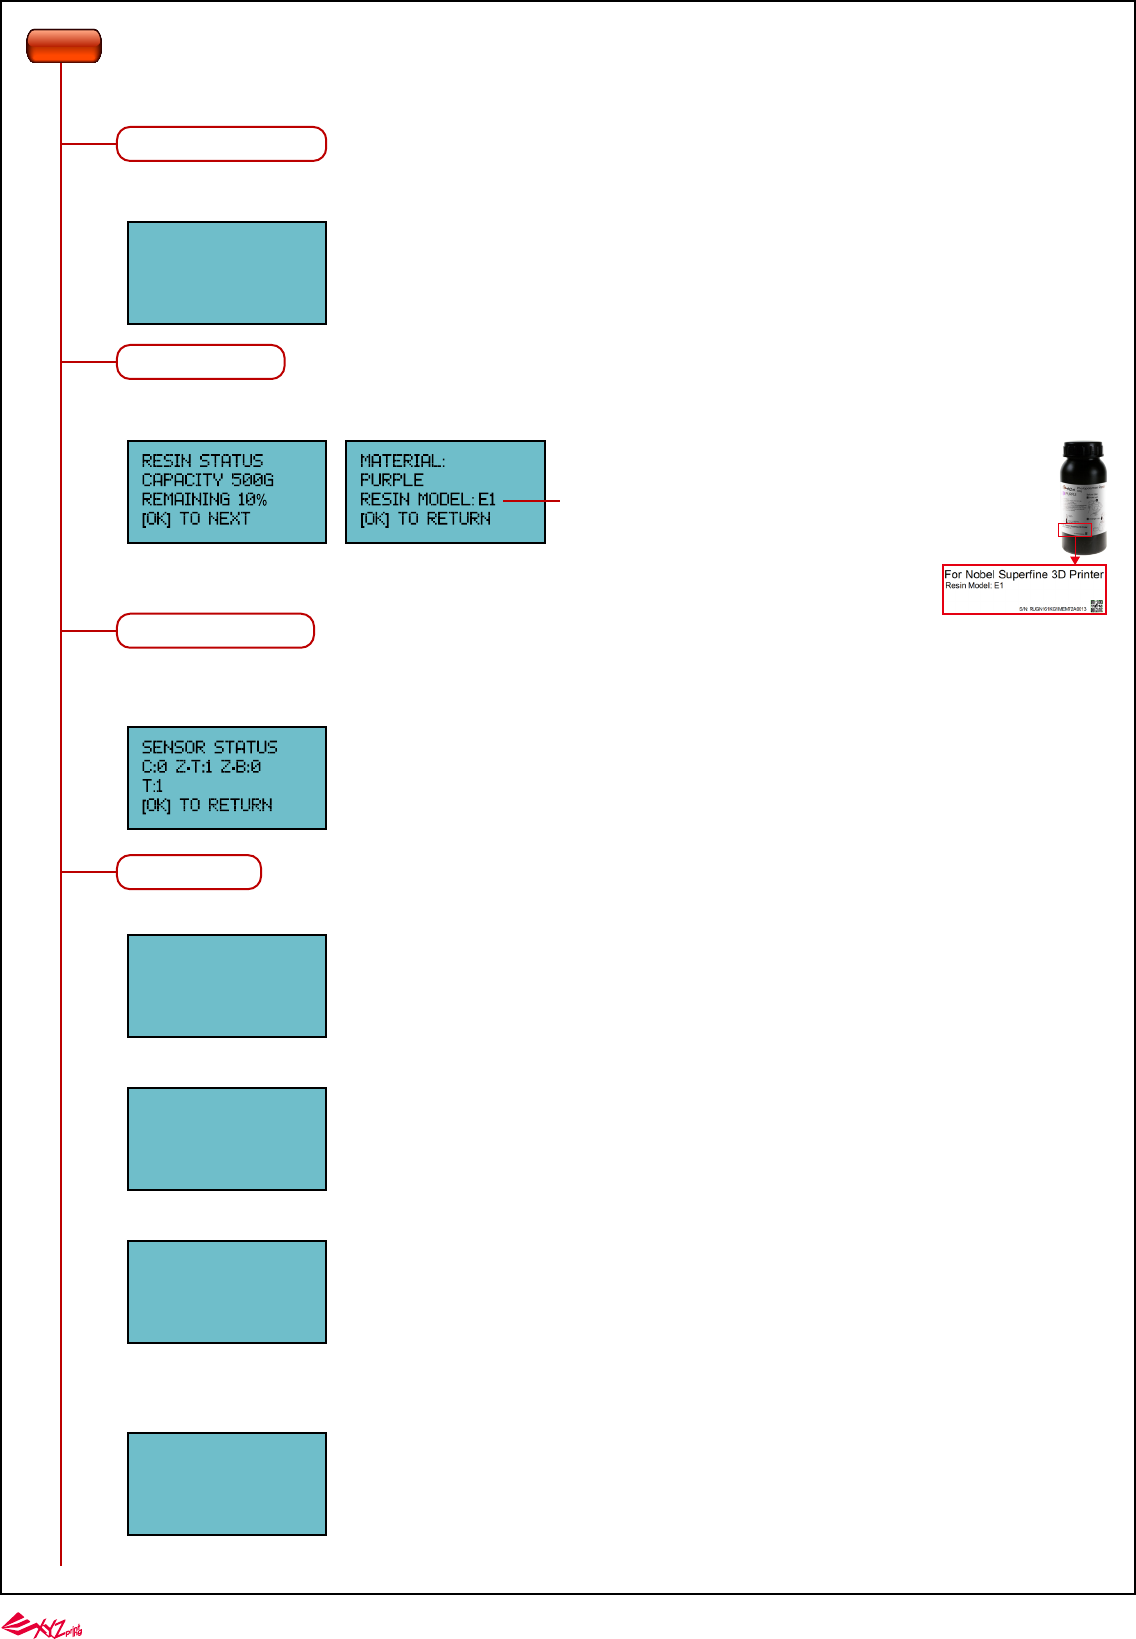
SENSOR STATUS
When you encounter exceptional status during the operation of the printer, you may check the status of each sensor here. The information is especially
helpful for troubleshooting.
How to read the satus:
C:1 – Lid (Top cover) covered; C:0 – Lid not covered
Z-T:1 – Platform at top; Z-T:0 – Platform away from top
Z-B:1 –Platform at bottom; Z-B:0 - Platform away from bottom
T:1- Tank motor in action (Right side of the tank sinks slightly) T:0 - Tank motor idling (Tank is leveled)
Under “Info” menu, you can check the statistics and firmware version of the printer, status of resin bottle installed, and information on XYZprinting.
SYSTEM VERSION
Firmware version is shown here. To ensure optimal printing performance, it is advised to keep the firmware up to date. To check for firmware updates,
please go to XYZware_Nobel.
RESIN STATUS
“Resin Status” provides the information on resin level (see REMAINING), and the capacity, color and material of the resin. Press "OK" to read the second
page.
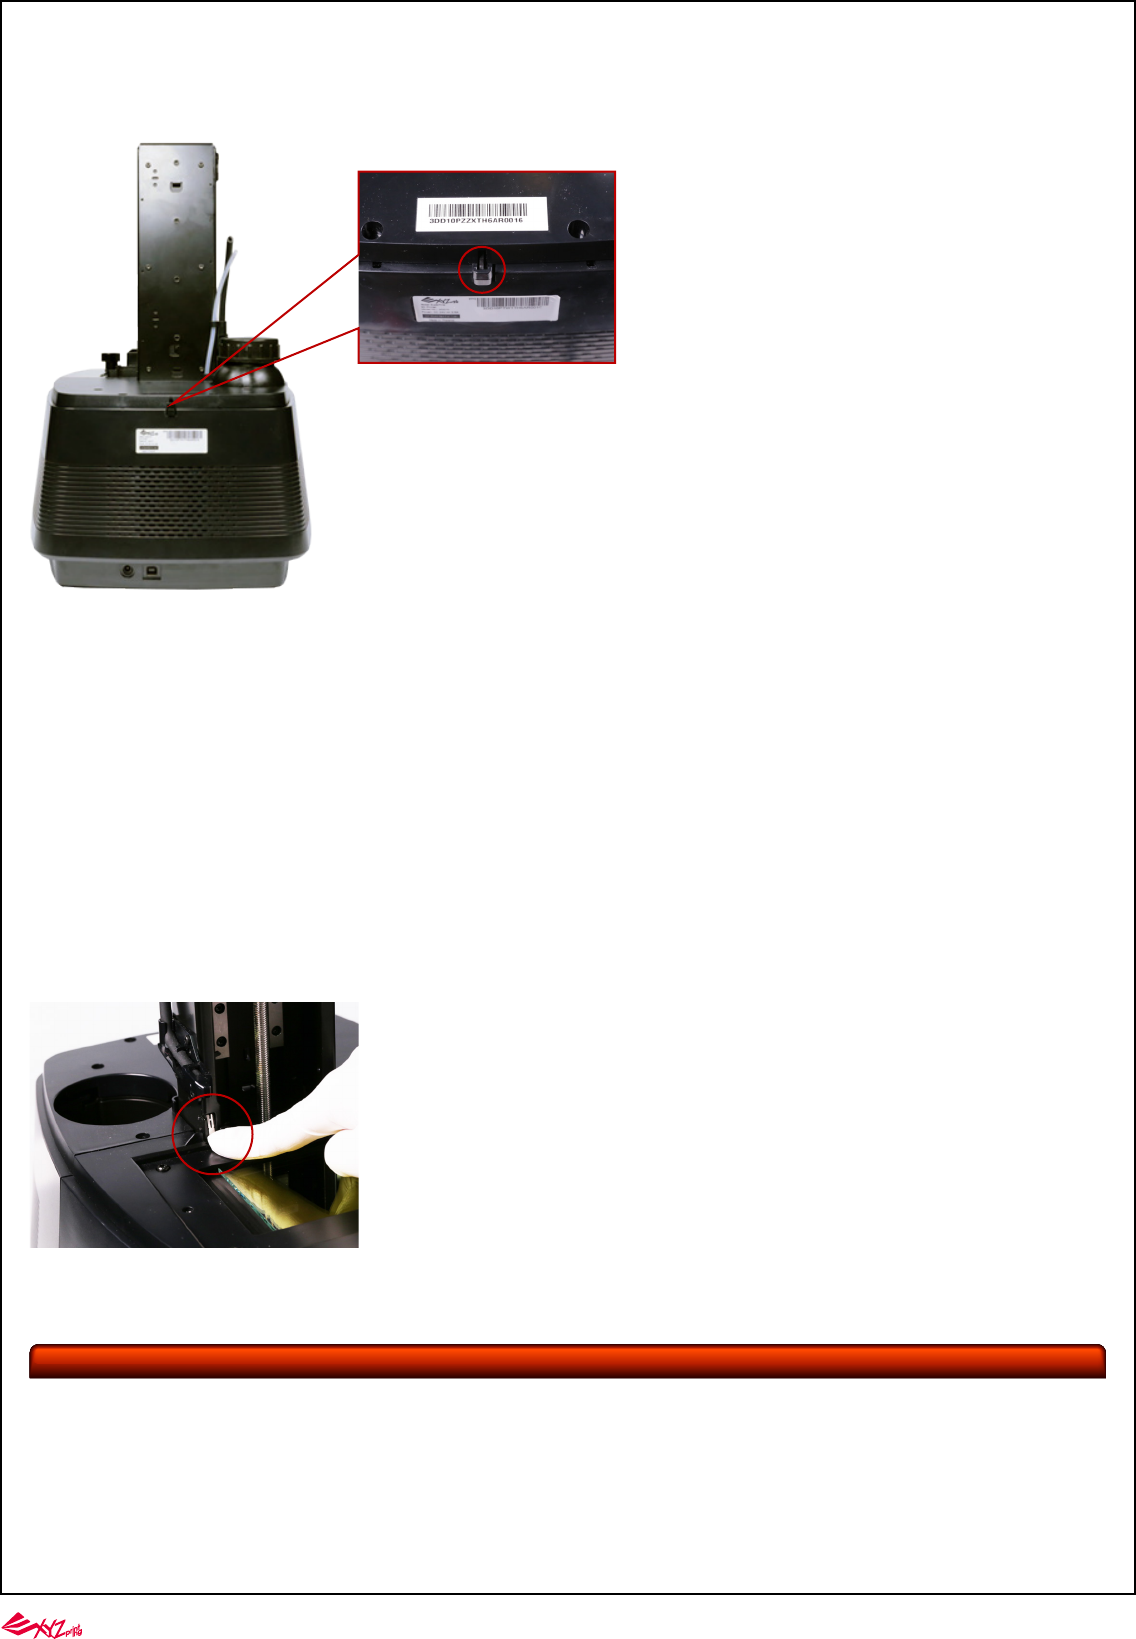
Resin Model indicates the resin version. While setting up printing preference
in XYZware_Nobel, please select the correct resin model.
The info is also printed on the serial number label on the resin bottle.
INFO
SYSTEM VERSION
ENGINE:1.6.0.1
LCM :0.1.6
[OK] TO RETURN
PRINTER NAME
XXXXXXXXXXX
[OK] TO NEXT
WIFI STATUS
Check the wireless connection status with this option.
WIFI AP SSID
XXXXXXXXXXX
[OK] TO NEXT
Display the printer name. Click [OK] to go to the next page.
IP
XXX.XXX.XXX.XXX
RSSI: XXX
[OK] TO NEXT
Display the name of the wireless network that the printer is connected to. Click [OK] to go to the next page.
Display the MAC address of the printer. Click [OK] to return to the main menu.
MAC
XX:XX:XX:XX:XX:
XX
[OK] TO RETURN
IP: The IP address of the printer
RSSI: Signal strength of the wireless network
Click [OK] to go to the next page.

-9-
HELP
The URL to XYZprinting website can be found here. You may go to the website for the latest information, product documents, tutorial video and more.
PRINT FROM USB
Import the 3D model into XYZware_Nobel, select "EXPORT" to save in USB flash disk as ".3wn" file
format, and save the sliced file in the USB drive.
Plug the flash drive into the USB port on the front of the printer. Select "PRINT FROM USB" on control
panel to open the model list, select the file to print.
Select "PRINT FROM USB"
Select the desired file to print
Select "YES" and start to print
-10-
XYZware_Nobel
Before printing from PC, please first install XYZware_Nobel on your device. "XYZware_Nobel" Installer can be found in the bundled USB drive or at XYZprinting website:
http://support.xyzprinting.com/us_en/Help/download (login is required)
Supported operating systems: Windows 7, Windows 8 and Windows 10 Supported Mac OS X operating systems: Mac OS X 10.9 / 10.10 / 10.11 / 10.12
Supported file type:
.stl
.3ws
.3wn
File Type Description
The file format is native to stereolithography CAD software. It is widely used for 3D printing.
After adding supports to the object in XYZware_Nobel, you can save the file in this format. The support layout can be re-adjusted.
The XYZware_Nobel proprietary file format contains detailed instructions for the printer to follow for each slice. The file is unadjustable. The file
type also contains the data of the targeted printer type. For the file set to slice for printer type other than "Nobel Superfine", it will not be printed
on this printer.
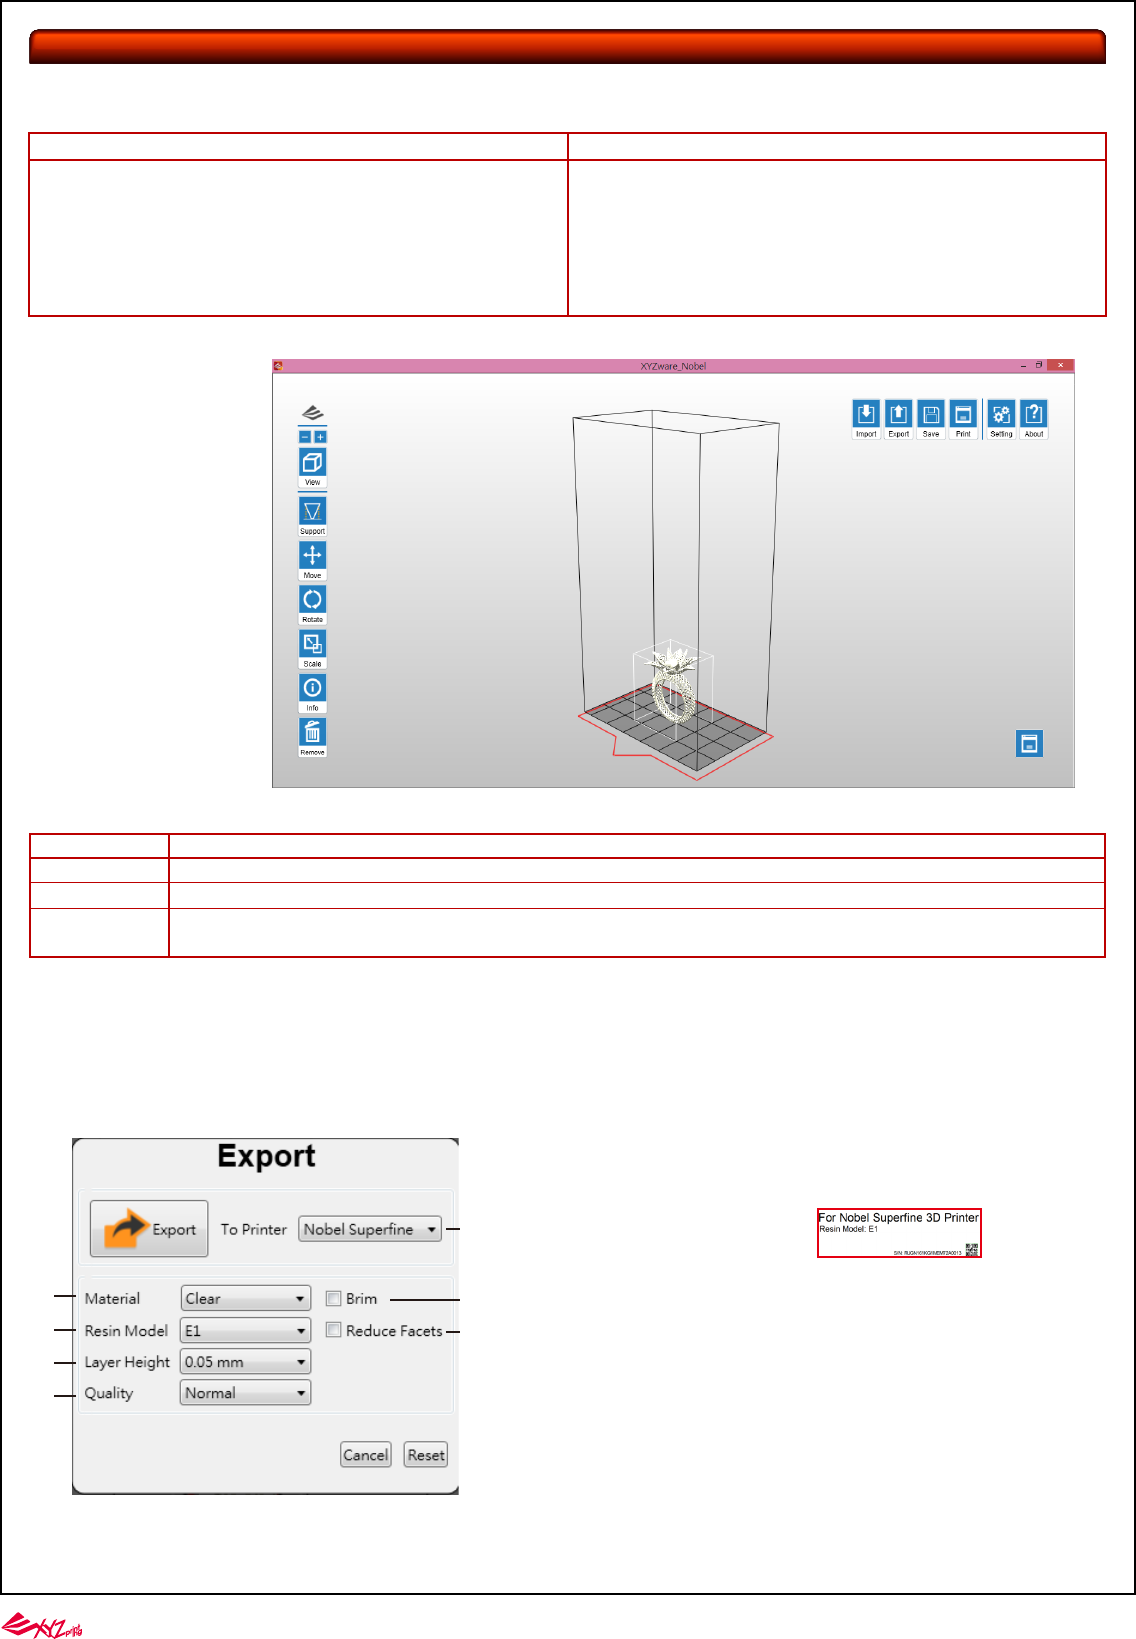
Overview of
XYZware_Nobel
*OpenGL 2.1+ compatible
A.
B.
Import objects in .stl/.3ws/.3wn format: Open file browser and select the files to print.
Export to .3wn format: After selecting the target printer and the preferred printout setting, click on "Export" to save the model to a sliced .3wn file. Once the file is sliced,
you may skip repeating settings in the future.
Functions :
Options under Export :
Recommended system requirement:
64-bit operating system
System RAM: 8GB
Graphics RAM*: 4GB
Hard disk space: 300MB and more
Recommended system requirement:
System RAM: 8GB
Graphics RAM: OpenGL 2.1+ compatible
Hard disk space: 300MB and more
Minimum system requirement:
32-bit operating system
System RAM: 4GB
Graphics RAM*: 1GB
Hard disk space: 300MB and more
Windows version: Mac version:
G
H
I
J
K
L
M
N
O
A B C D E F
Printing setup varies based on the color and material of the resin. Please set the option
based on the resin cartridge installed on the printer before printing. It is advised to include
color setting in filename for instant distinction in the future.
Please note that printing will be stopped if the selected resin type doesn’t match the resin
installed. “Resin Model” can be found under
“Info”>”Resin status” on the printer and on
the serial number label on the resin bottle.
"Layer Height" indicates the resolution of a print. Using thinner layers will make higher
quality prints but will also take longer to print.
The "Quality" option may affect the smoothness of the prints. Select "Superfine" to achieve
a smooth print, while the time required for printing will be longer than that of the "Standard"
option.
Please select printing parameters based on connected printer model. If other printer model
is selected when Nobel Superfine is connected, it will not be printed on this printer.
Check "Brim" for the 3D objects that has less contact with the platform to increase
adhesion. Complex 3D models are composed of a large amount of meshes.
Enable this function for slicing such models may save the render time as it will reduce the
facets to 200 thousand elements. This function can also repair the 3D model when
necessary.
①
②
③
④
⑤
⑥
⑦
①
②
③
④
⑤
⑥
⑦
-11-
F.
G.
H.
I.
C.
D.
E.
Tips for Printout Scaling(①):
If you find the dimension of the printout doesn't
match the 3D model, you may adjust the scale of the
X/Y axis. The setting will be stored in the software
and applied to every print job sent afterwards.
④
④
②
①
③
Operation Flow
①
②
③
Click "Import" to import a .stl/.3ws/.3wn file to the virtual platform.
Adjust the placement, angle and size of the object with "Move", "Rotate" and "Scale" buttons on the left as desired. Also add supports and brim for objects with
overhangings or that have less contact with the platform.
Click "print" and setup printing preference based on the features of the prints, and click "Print" to slice and send the file for printing.
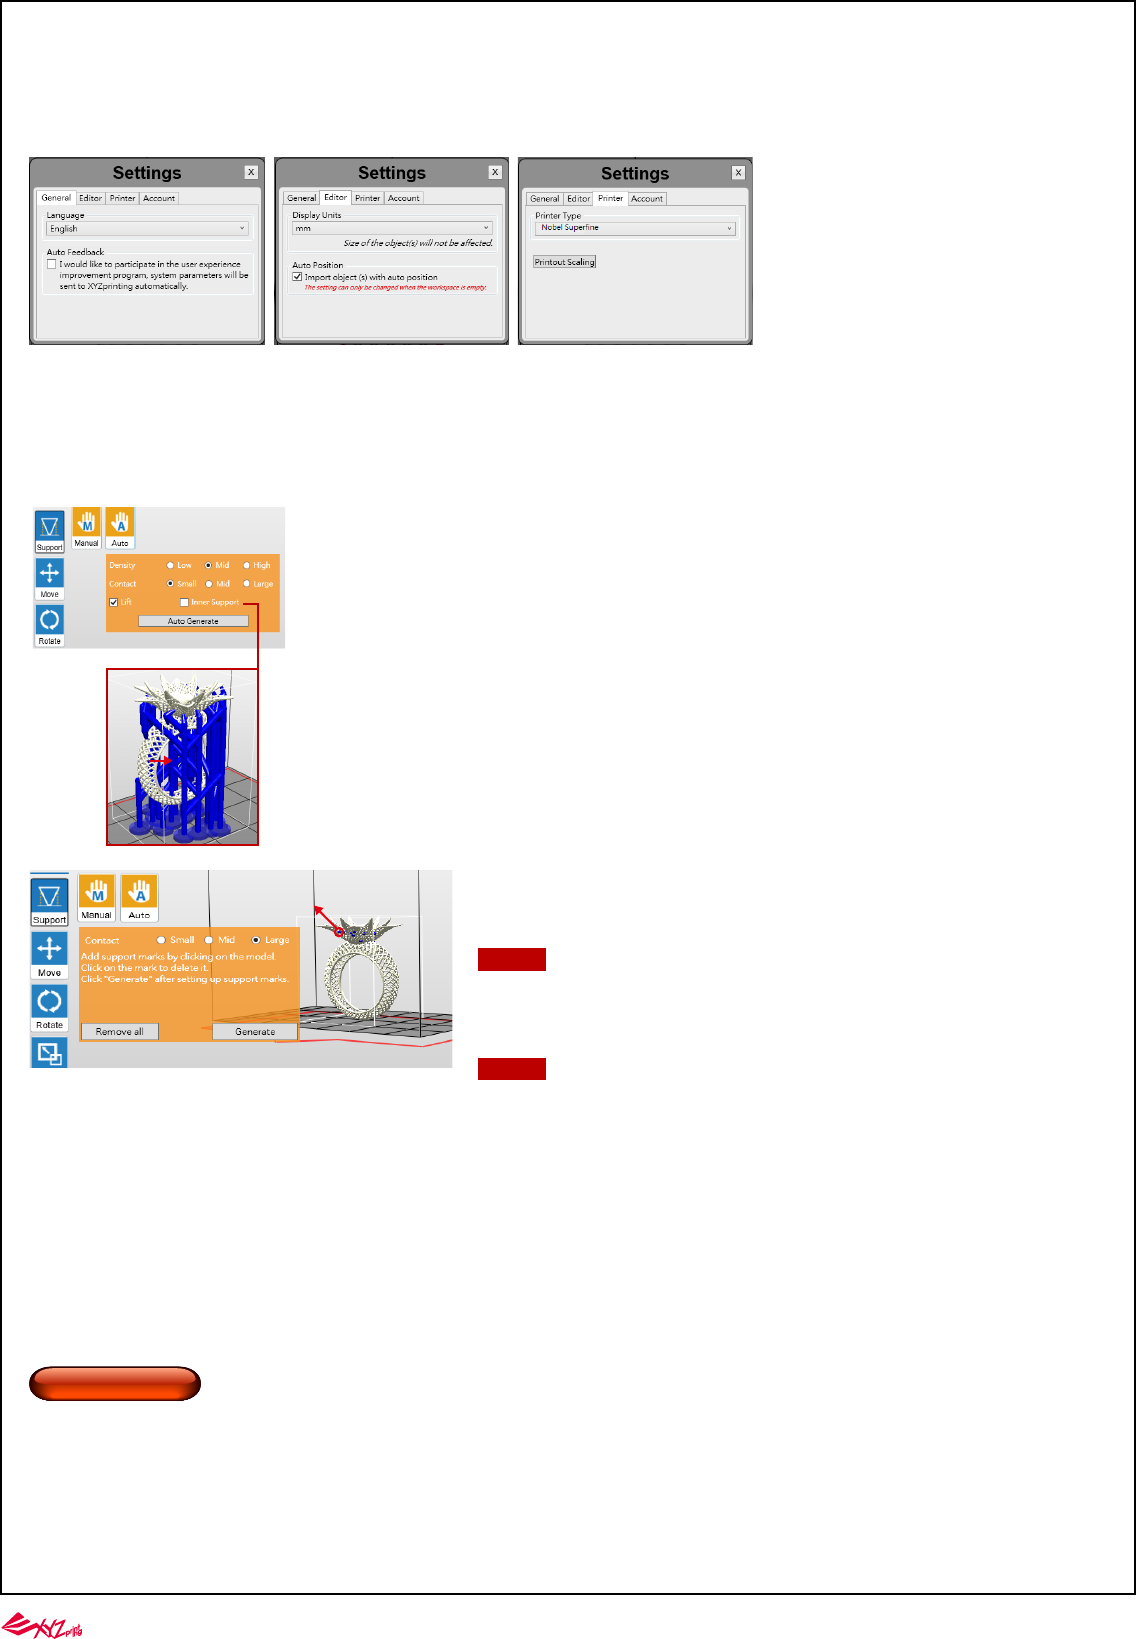
You may generate support automatically with XYZware_Nobel, and then add/delete the
support structure based on your printing experience. Use both functions help to ensure the success
of printing, and may decrease resin consumption and shorten printing time.
Once the support structures are setup, you can save the object in .3ws format. With this file format,
you can re-adjust the support layout.
If the object is moved vertically or resized, the support structure will be reset. Please set
up the supports again.
J.
K.
L.
M.
N.
O.
Manual editing: you may add or delete support structure based on the features of the print manually.
To add support, simply select a proper size of the contact point and then click on the model at the
overhangs. To delete support, just click on the support mark (the blue dot). After setting up support
marks, click "Generate" to continue.
Move the object: move the object along the x, y, or z axis. You may also press and hold ALT key and drag the mouse to move the object horizontally.
Rotate the object: adjust the angle of the object around the x, y, or z axis. Flipping the object around to adjust the face on the platform may help to enhance printing
performance. Increasing the contact area between the object and the platform may help to enhance printing quality and strength.
Resize the object: Scale the object as you desire. The adjustment to the object on the platform will not affect the size of your original file.
View info of the object: check the dimension and location of the object, so you can tell the size of the object easily.
Remove the object from the platform: select an object and click the option to delete it from the platform. Or you may press Delete key to remove the object.
View printer status.
Support auto generation: XYZware_Nobel is able to analyze the features of the model and add support structure to where
necessary. Simply select a desired density ① and contact ②, choose to "Lift" ③ the print and/or print without internal support
④, and press "Auto Generate" to preview the support structure.
① Density : Large overhangs will require more support structure. However, more support structure will take longer for printing.
② Contact : Thicker contact point will lead to higher strength but will take longer for printing.
③ Lift : Lift the objects over the platform will ease the removal after printing. However, the support structure under the prints
will take longer for printing.
④ Inner Support : For objects with inner overhanging structure, XYZware_Nobel will add support to the parts. However the
support inside may not be removed easily, you may consider printing without inner support.
Save as .stl or .3ws file: Save all objects on the platform to a single stl/3ws file. Any adjustment to the size or placement of the objects will apply to the file.
Setup printing preference and send the objects for printing: Once your device is connected to the printer, click "Print" to open printout setting window (options are the
same as "Export" window). Set your printing preference based on the features of the objects and hit "Print" to proceed.
Setup interface language, printer type, display unit and etc.
Info/Software & firmware update: Apply printer firmware and XYZware_Nobel updates when prompt by the software for stable printing performance.
Zoom in/out: Zoom in or out the platform to view the details of objects.
Switch views: Switch views with a click to view objects from different angles.
Support structure: support structure is required under overhangs. It prevents the falling for gravity and the deforming due to the peeling force during printing, and
increases adhesion of the model to the platform.
Note
Tip
Support mark
①
-12-
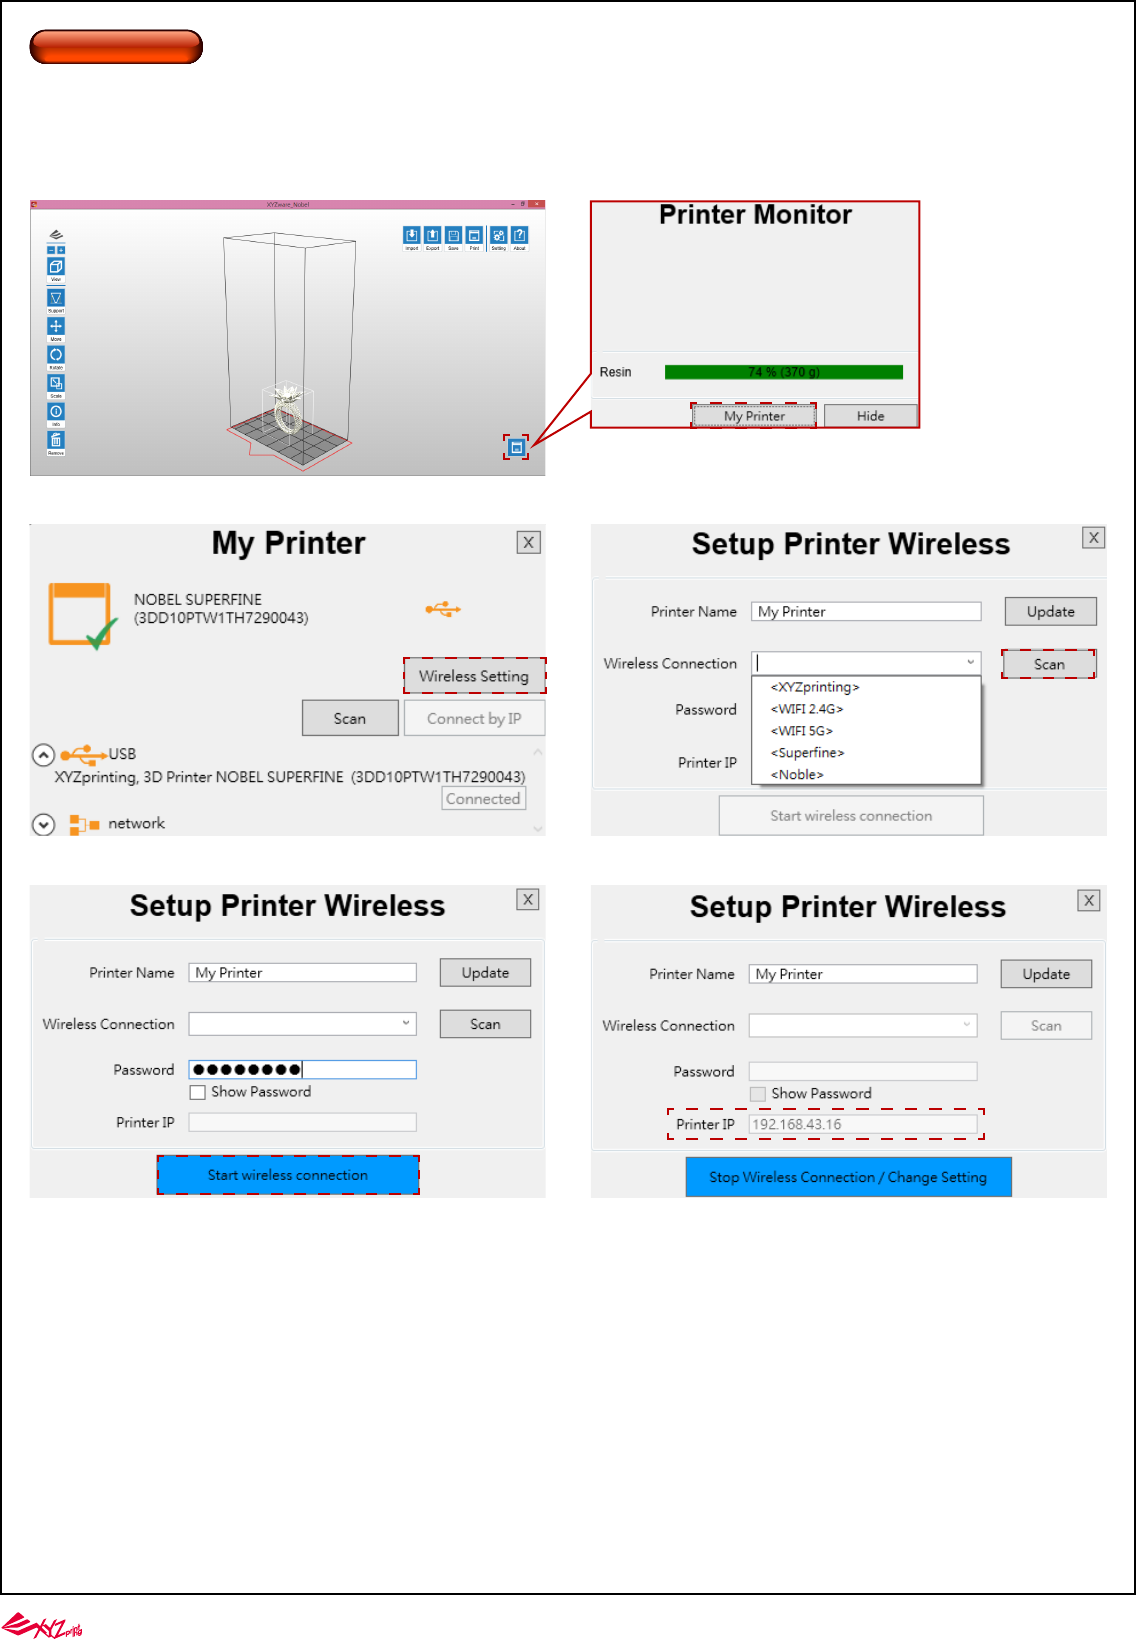
①On the main page of the XYZware_Nobel, press "Printer Monitor" in the lower right corner, and then press "My Printer".
②Press "Wireless Setting".
WIFI Connection
To set up the connection through XYZware_Nobel, please connect the printer and the PC with the USB cable supplied in the package firstly, and following the steps below:
WiFi connection can be set up on the printer directly or through XYZware_Nobel installed on PC.
③Press "Scan" and select the desired WIFI network from the drop-down list.
④Enter WIFI password and press "Start wireless connection". ⑤Once the printer is WiFi connected, the printer IP is shown here.
<WIFI 2.4G>
<WIFI 2.4G>
-13-
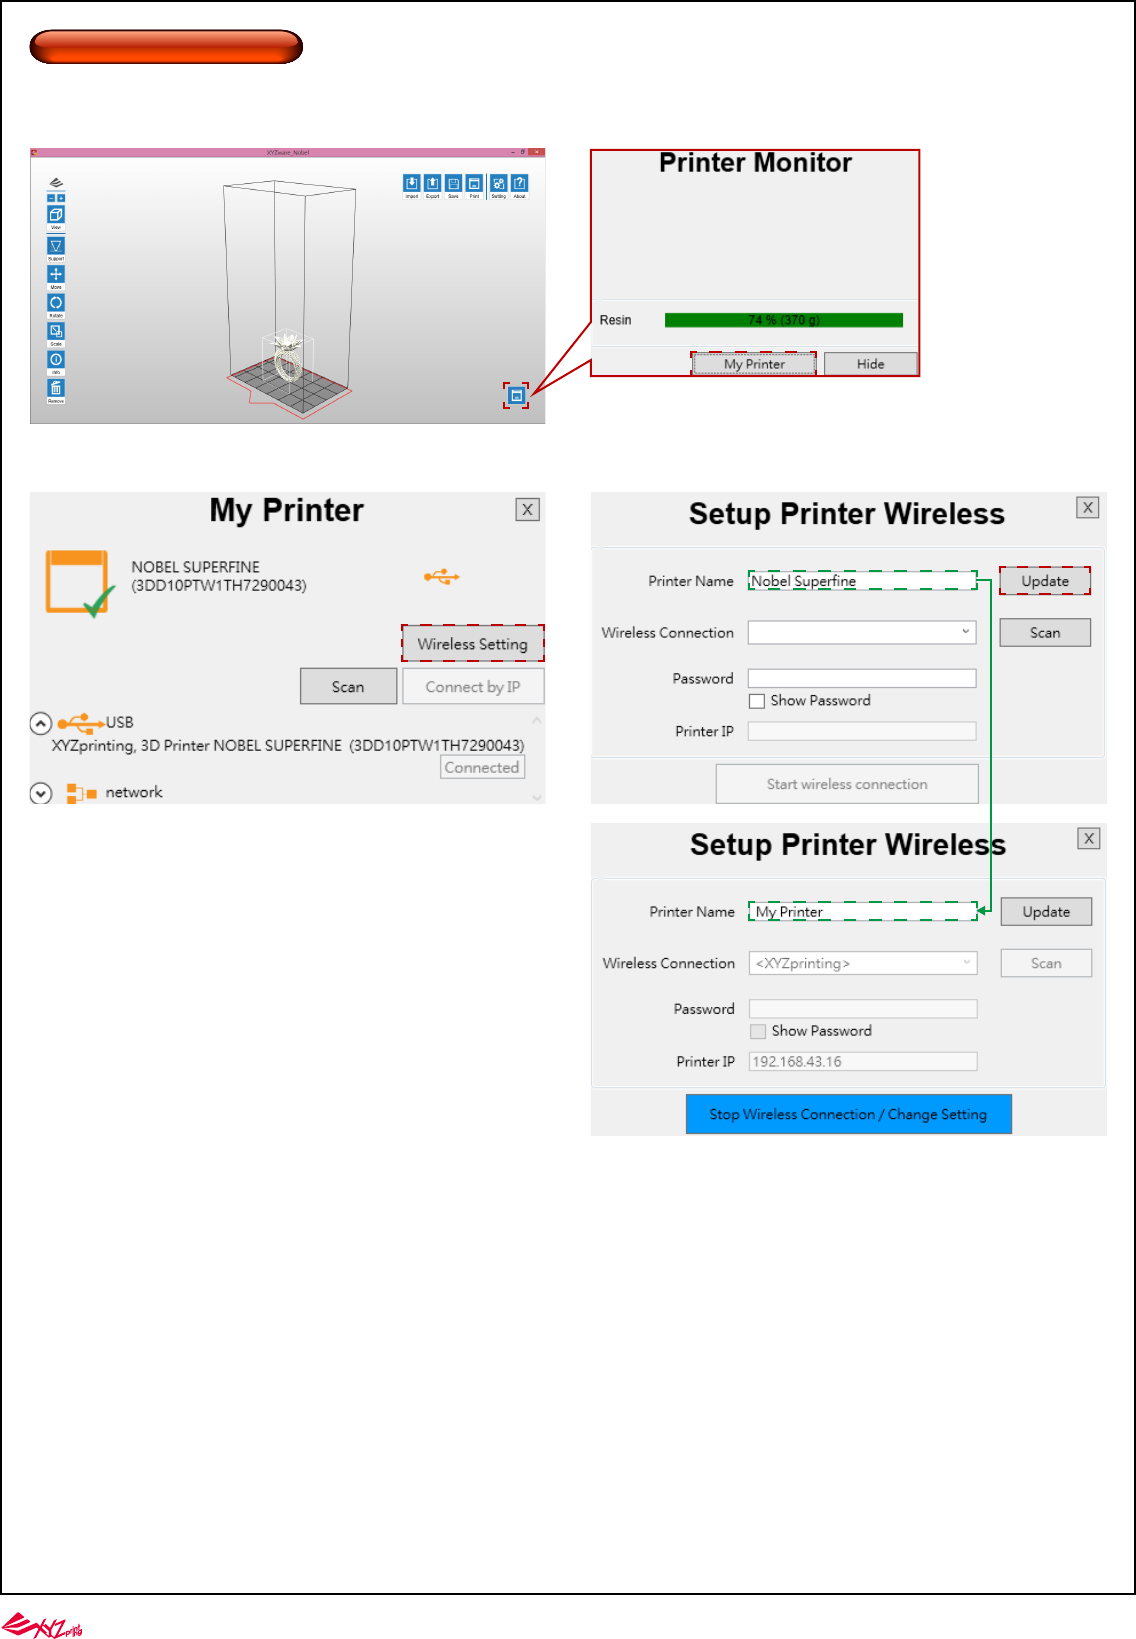
①On the main page of the XYZware_Nobel, press "Printer Monitor" in the lower right corner, and then press "My Printer".
Change the Printer Name
Please follow the below steps to change the printer name in XYZware_Nobel.
②Press "Wireless Setting". ③Rename the printer with the first column and press "Update".
-14-
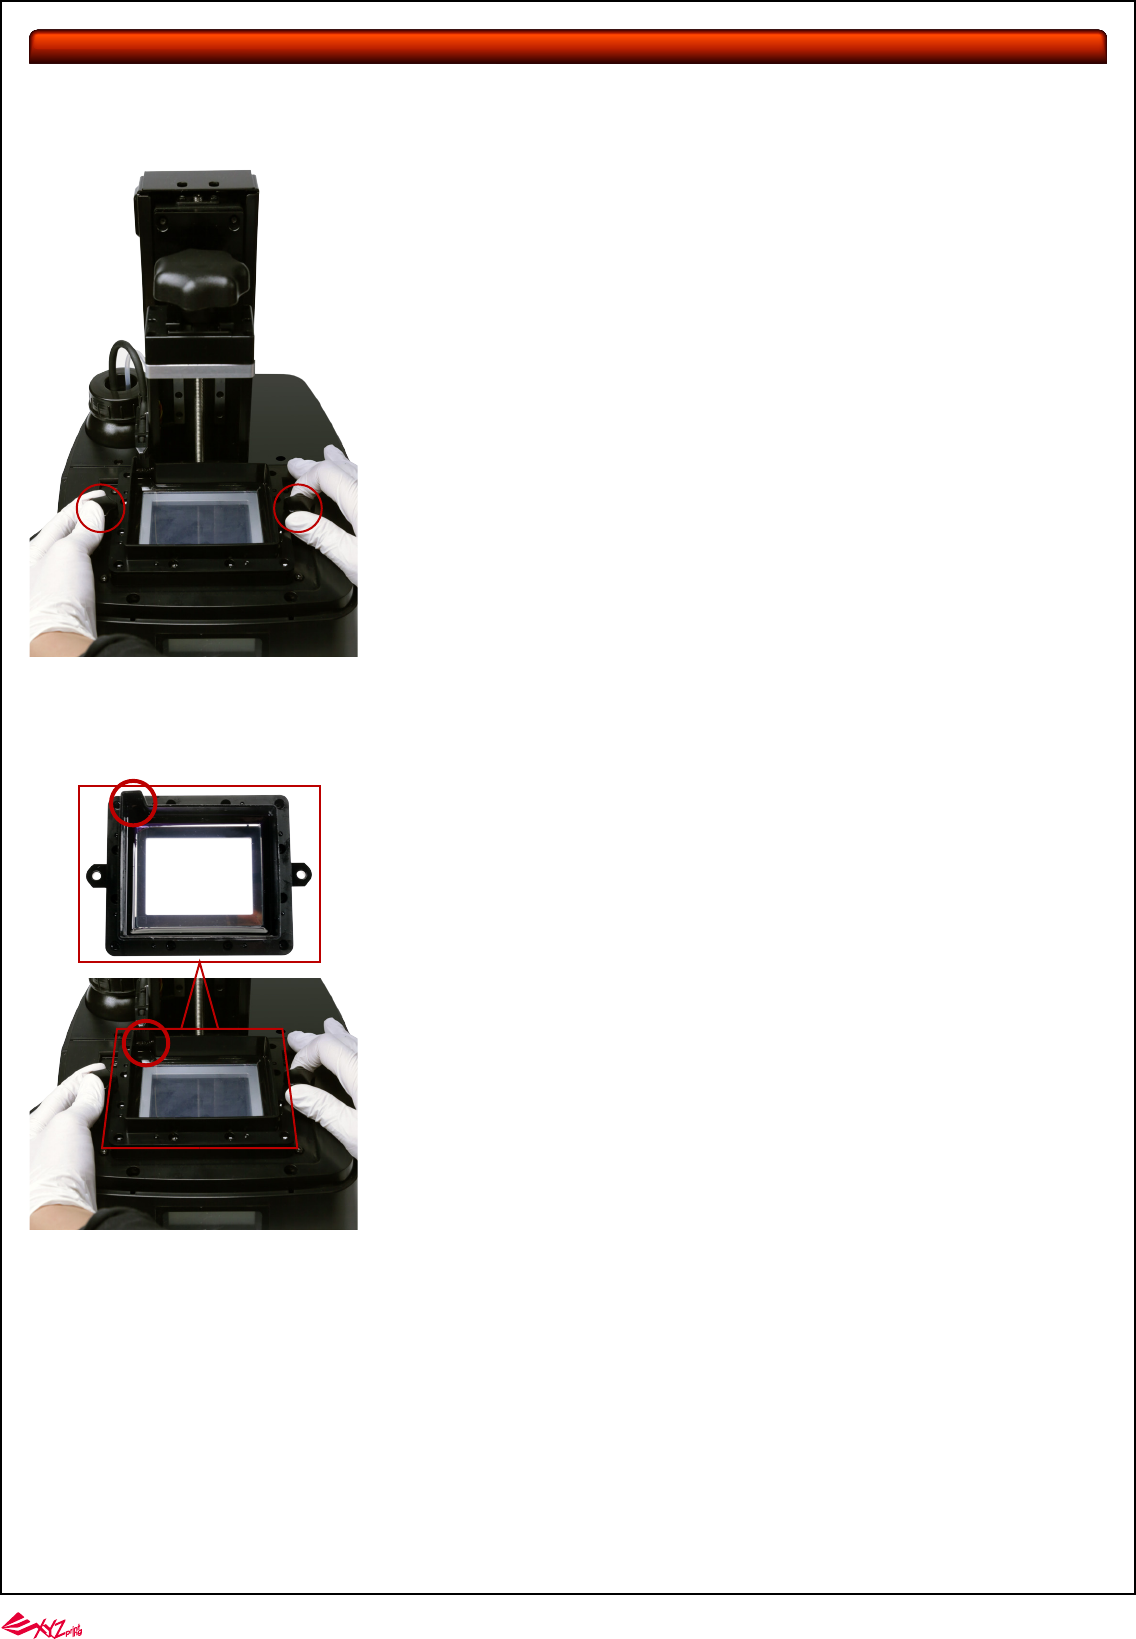
Removal
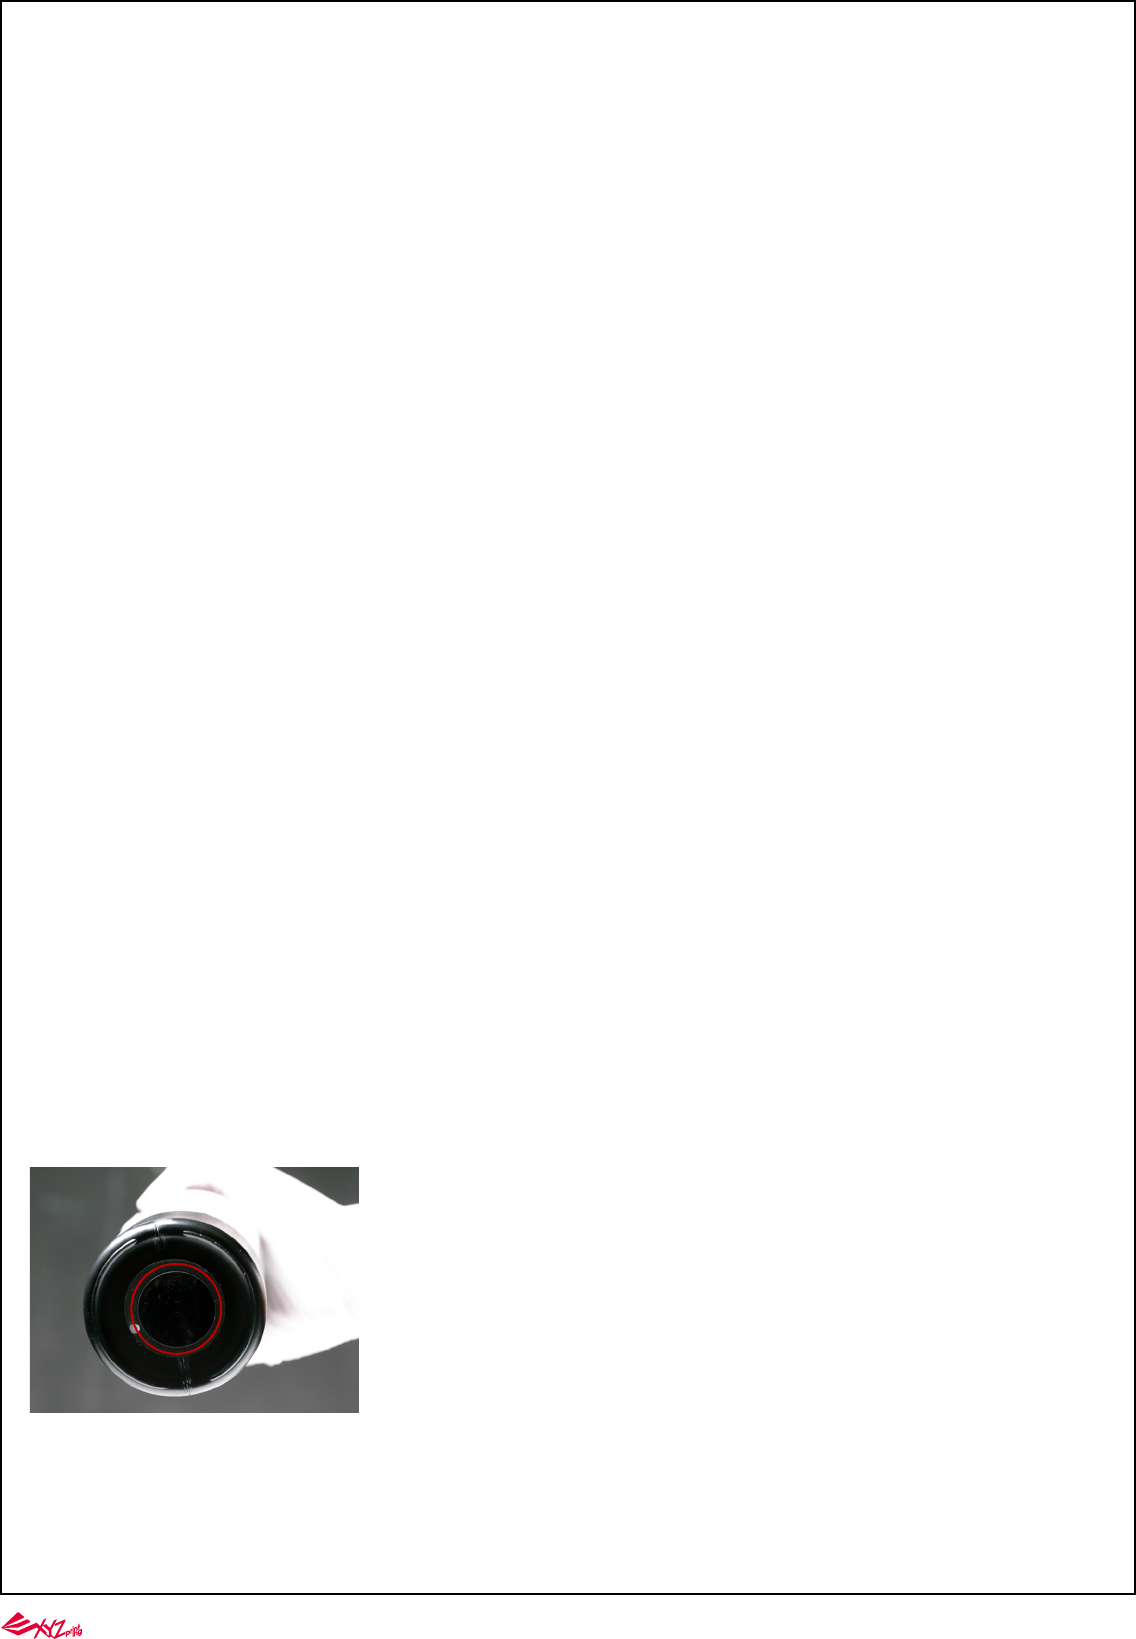
Turn the two knobs (indicated as red circle) of the resin tank in the counterclockwise direction and remove the resin tank.
Installation
Reinstall the resin tank on its original position(The "MAX" mark should be located on the left up side), and turn the knobs of the resin tank in the clockwise direction.
Install and Remove the Resin Tank
-15-
Note
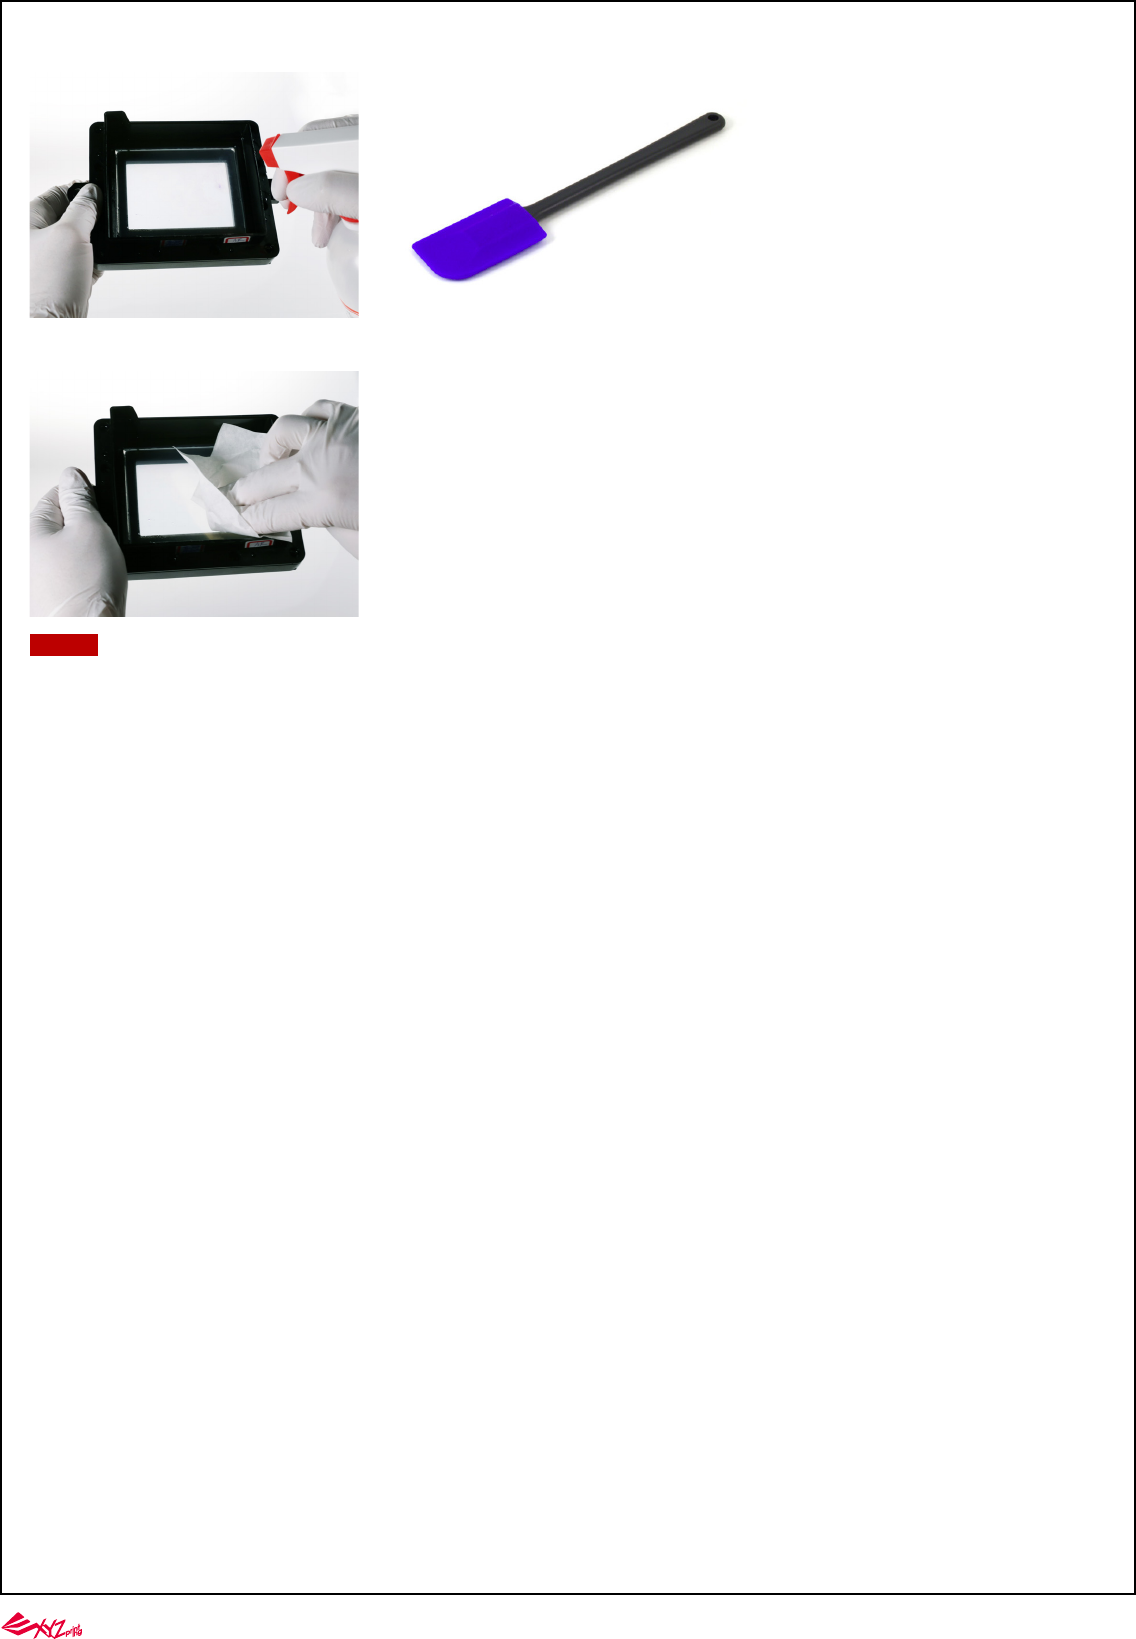
●Clean the print platform
Scrap off any residue and remove excess resin from the surface of the platform. Make sure there are no prints or residue on the platform. Reinstall the platform, push the
platform to the end and turn it clockwise with both hands to ensure platform is correctly positioned.
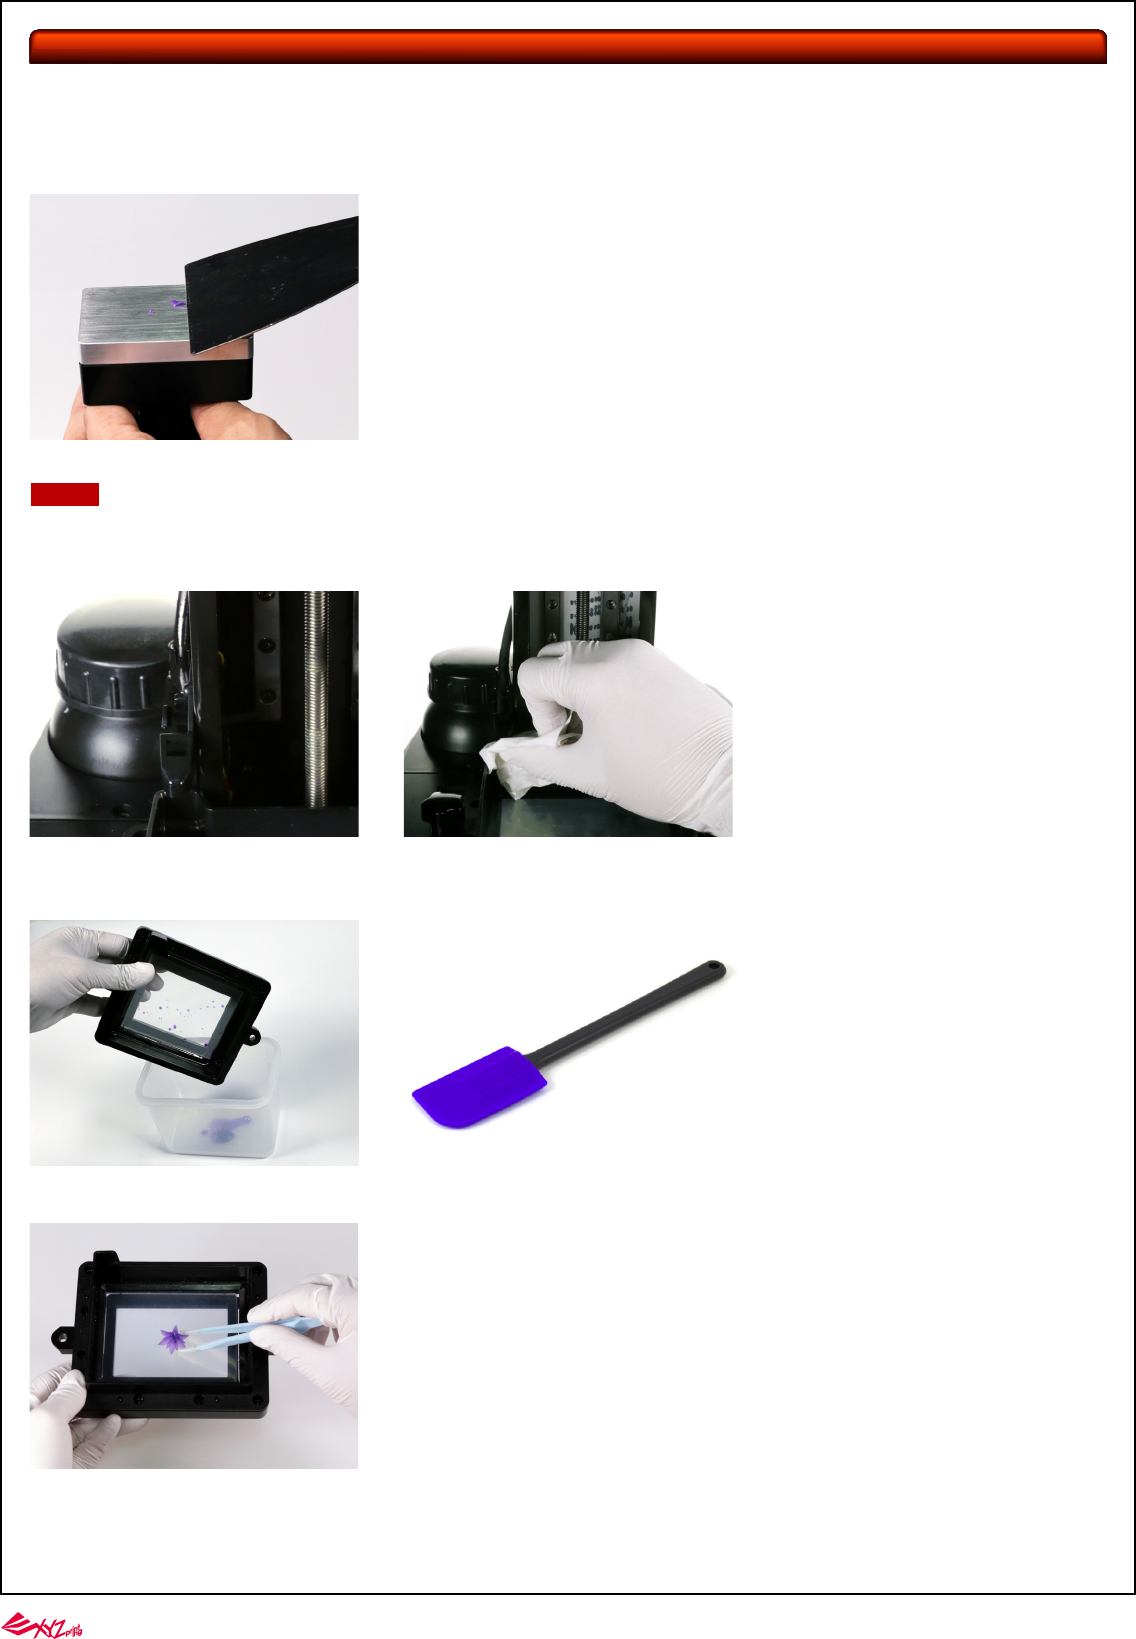
●Clear the resin tank
Check Before Every Print
A. Check the following items to ensure printing quality and the operation of the printer.
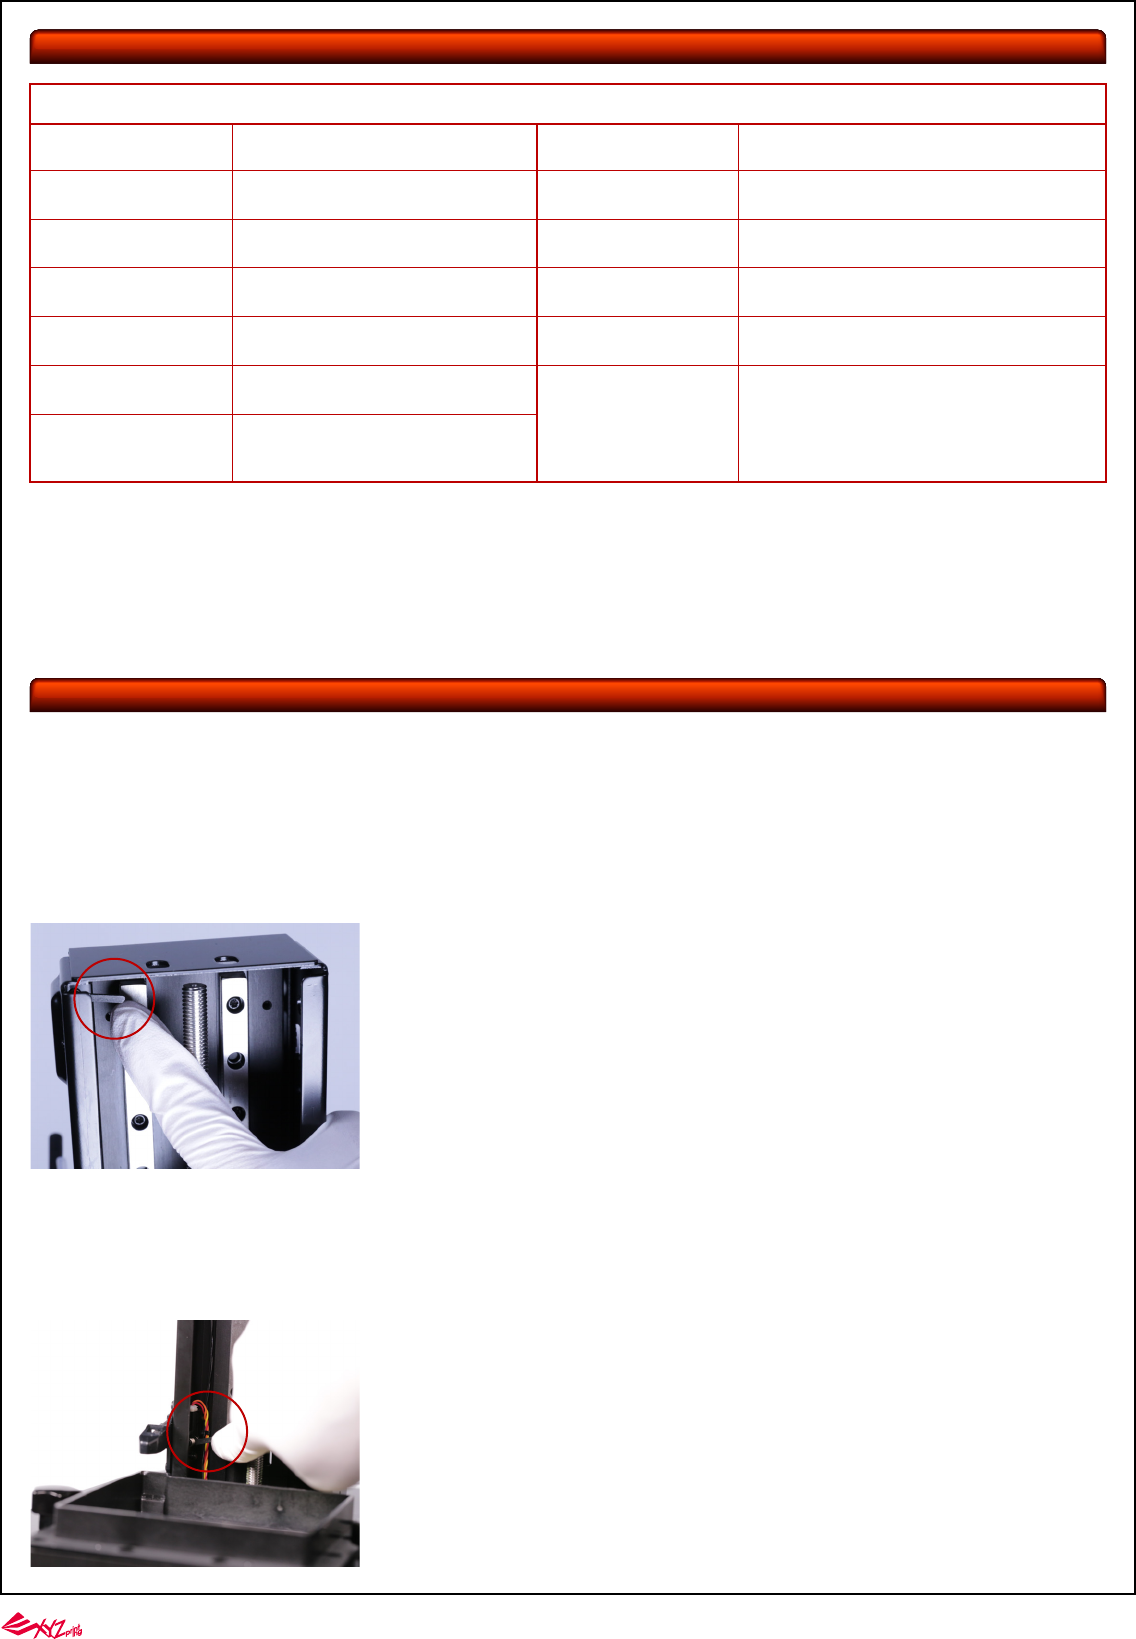
1. Avoid touching the bottom of the resin tank with a sharp, hard tool to avoid damaging the surface coating.
2. Filter the resin after every print may ensure the stability of printing.
3. Resin residing in the black filling tube may drip on the printer case. Please cover the opening of the tube with paper towel before removing the tank.
To remove any residue stuck to the bottom of the resin tank, or to clean the tank thoroughly, follow the procedure for cleaning:
Pour uncured resin in the tank into a waste bin. For the resins left over in the tank, clear the surface of the tank gently with plastic scraper.
Clean the residue stuck on the tank gently with plastic tweezers. Avoid damaging the Teflon surface.
-16-
Note
You can either wait until the alcohol in the tank evaporates completely or wipe away the alcohol with a softness lint-free cloth.
If resin in tank is cured, please replace the tank.
Spray alcohol on the tank and the Teflon surface, and wait for around 1 minute. Clear the surface of the tank gently with plastic scraper. Pour remaining alcohol left in the
tank into the waste bin. Repeat these steps until all residue has been removed.
-17-
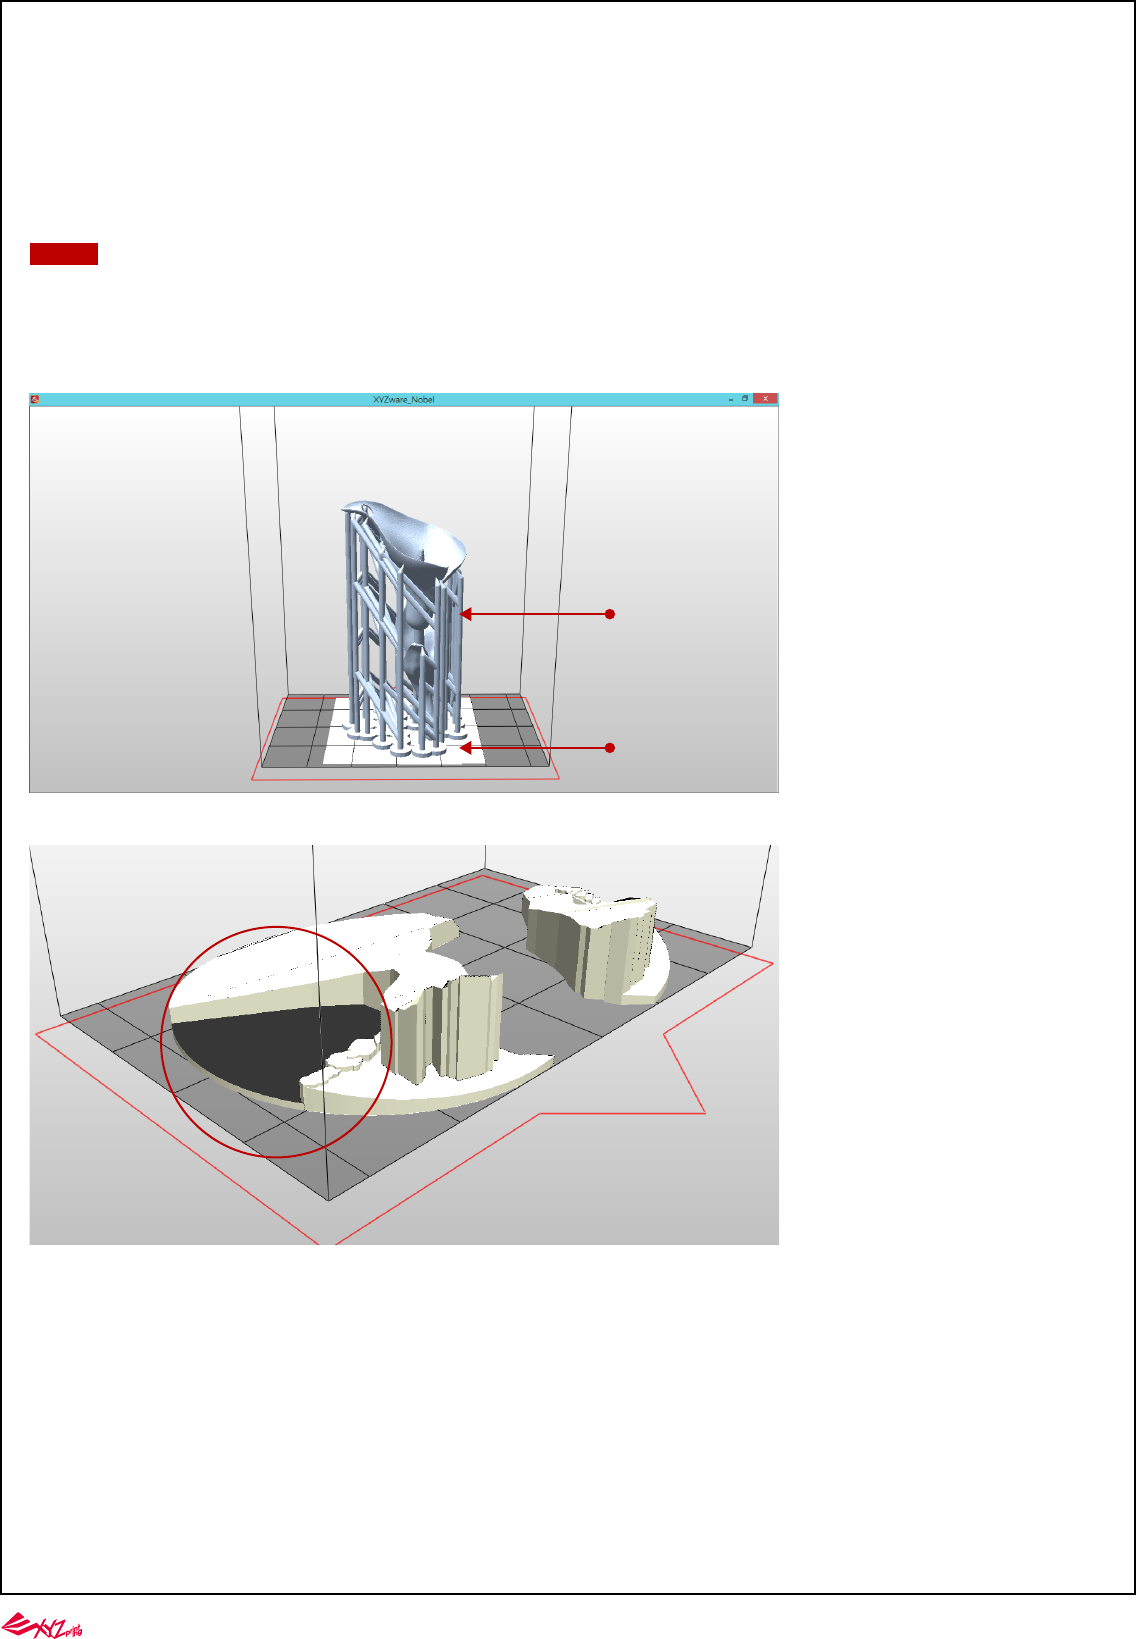
For models with non-manifold geometry (black-highlighted in the software), please repair the models before printing.
●Support:
For models of top-heavy structure, with overhanging parts or with less contact with the platform after rotated, please add support structures.
For larger overhanging parts, please choose the support structure with higher density and larger contact point.
Tips
Optimize the placement and the support structure of the model with the ”Rotate”, “Support” and “Brim” functions in the software.
●Rotate:
For models of top-heavy structure, with less contact with the platform, or with any larger solid layer, please rotate the model to reduce the effect of peeling force during build
process.
●Brim:
One of the keys to successful printing on the bottom up type SL printer is to ensure the adhesion of the model to the platform. If rotating the model doesn’t increase the
contact between the models and the platform greatly, please check “Brim” while exporting or printing the file. Also add “support” if necessary.
B. Also make sure that the printer and the printout setting is optimized by following the tips below.
Support
Brim
-18-
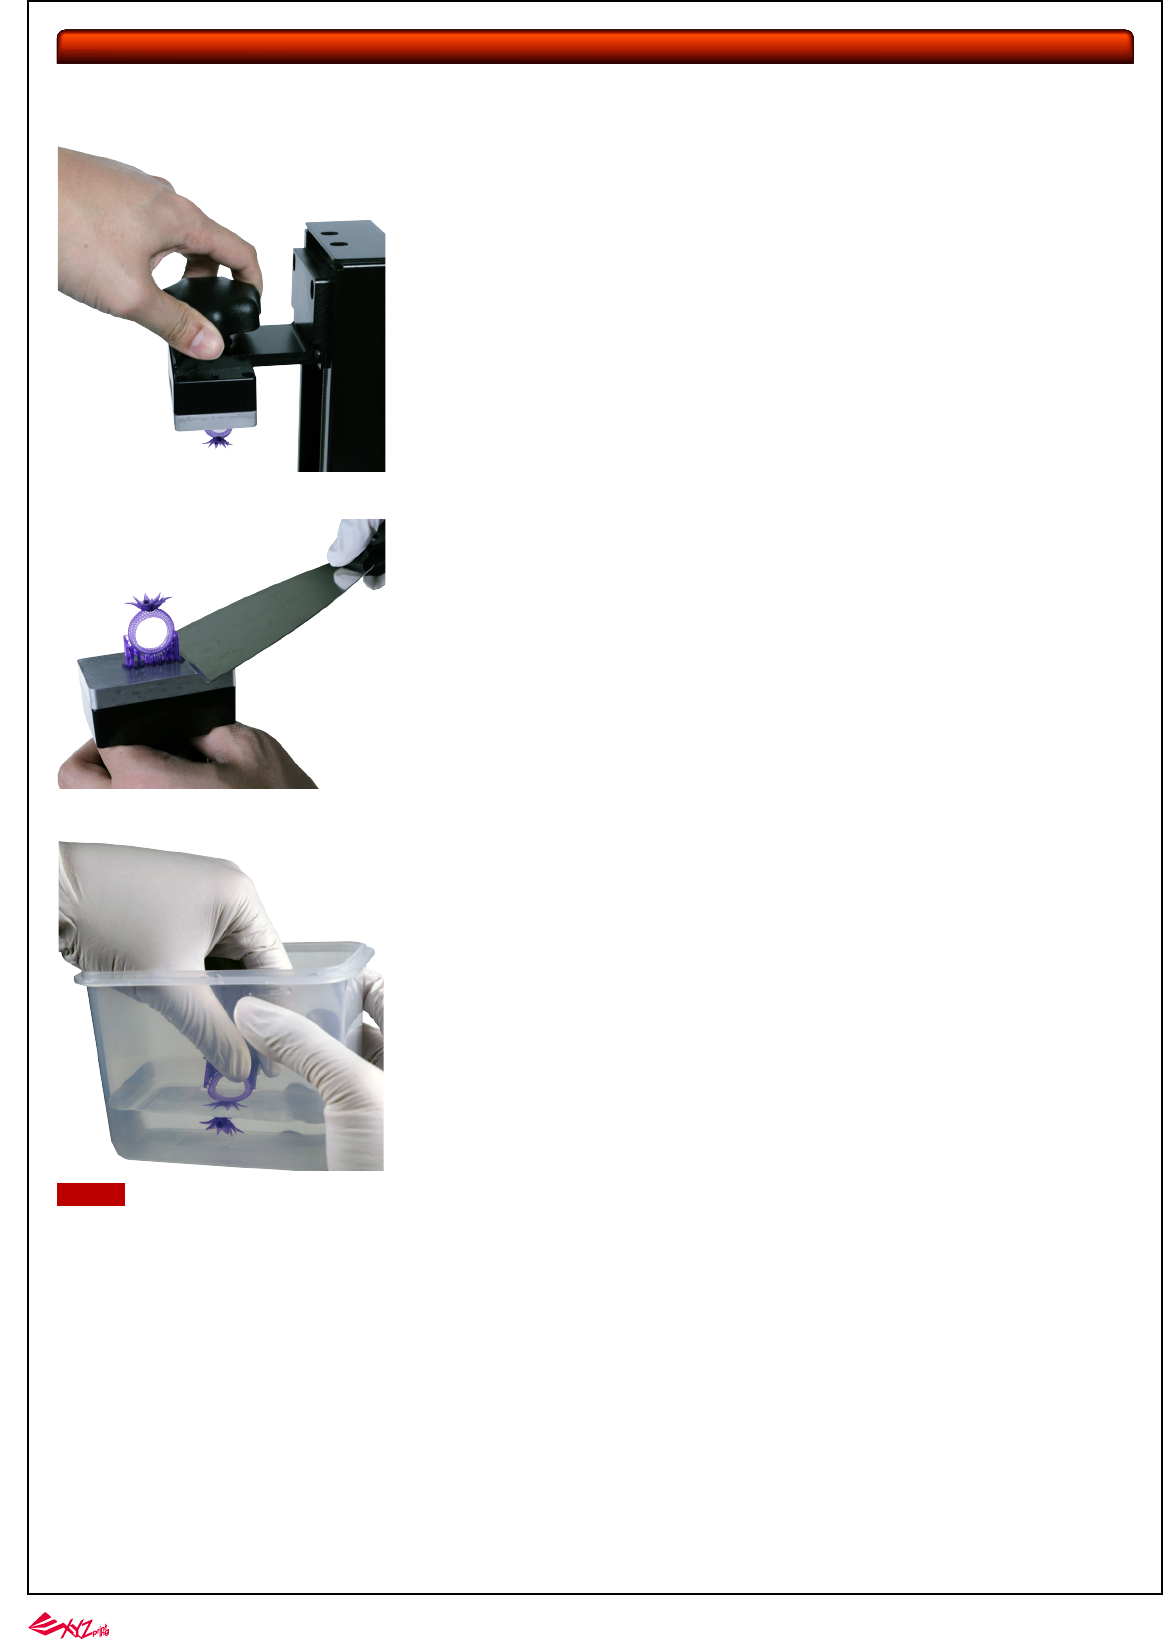
Turn the platform locker counterclockwise until it stops. And pull the platform to remove it.
Rinse part in Alcohol (≧ 75% Alcohol) Pour alcohol into the rinse basket, shake the print for 5 minutes, then rub it with your fingers thoughroughly.
Reinstall the platform after cleaning. Push the platform to the end and turn it clockwise with both hands to ensure platform is correctly positioned.
1. Always remove the platform before removing the resin tank to avoid dripping leftover material on printer surface.
2. Rinse with 75% alcohol or higher concentration. Washing with alcohol of higher concentration will result in higher cleaning efficiency. Alcohol is not supplied with the
printer.
3. The cleanup time of print depends on of the complexity, structural fineness of the print and other factors, it is recommended not to rinse more than 5 minutes to ensure
that the integrity of the print. Extend proper cleanup time for if necessary.
4. Always ware gloves before touching uncured resin or cleaning prints.
5. Remove any residue on the platform or the resin tank before next print to ensure the printing quality.
Note
Printed Object Removal and Cleaning
When removing prints from the printer, follow the procedure to post-process the object and maintain your printer.
Use the scraper to remove print.
-19-
Printer Cleanup and Maintenance
1. Please refer to P14 for cleanup operation of the print platform and the resin tank.
2. Uncured resin in the tank can be left for future printing. To prevent dust from accumulating on the resin, always cover the lid over the printer after removing any residue
from the tank or the platform.
3. Place the printer away from direct sunlight or UV lighting, even if the lid is covered, or resin in tank may cure and solidify.
Post-Process Your Prints
Remove Support Structure
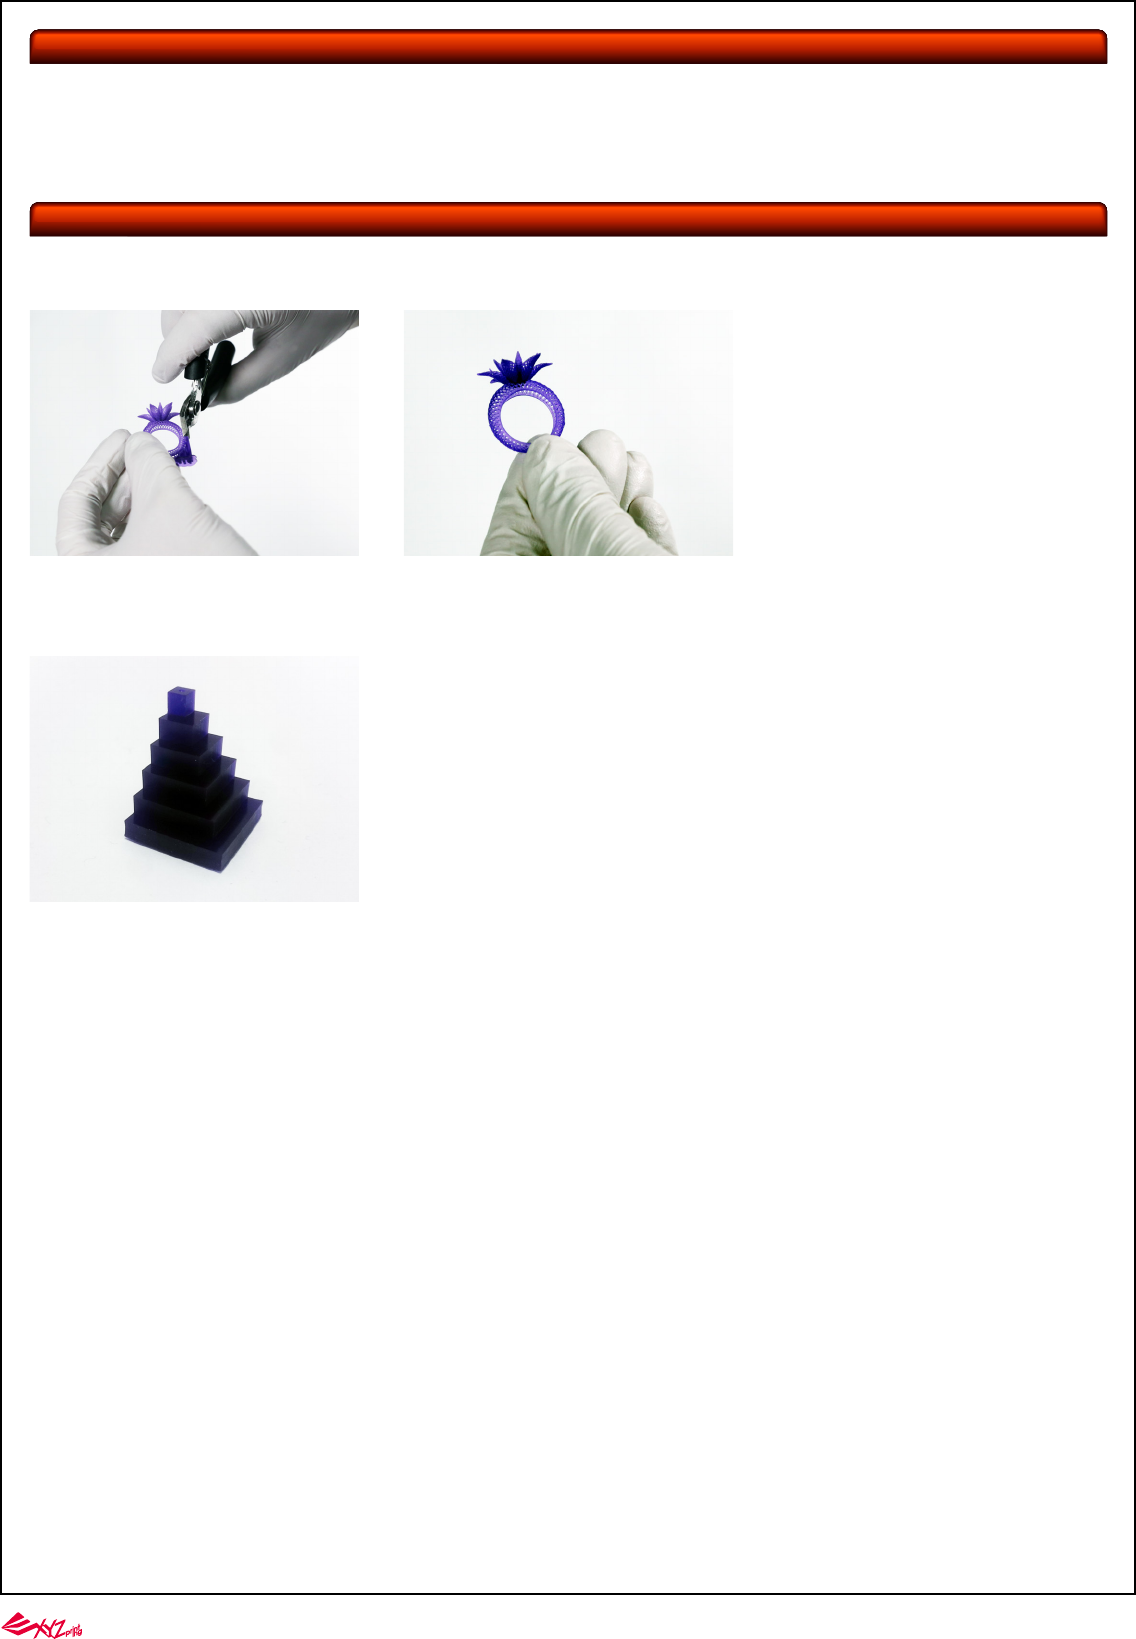
Use pliers or other tools to remove the support structure from the cleaned prints to ensure perfect finish.
Empty Uncured Resin Inside the Prints
Hollow prints with uncured resin inside may break as time passes. To ensure the durability of hollow prints, leave a weep hole at the bottom of your 3D design, so you can
empty the uncured resin easily.
-20-
Specification
Troubleshooting
Nobel Superfine Printer
When an error occurs, please refer to the service code on the printer and/or in the software, and check the suggestion below for troubleshooting. If any error persists,
please contact customer service center for support.
● Error Code 1001: Z axis motor upward movement abnormalities or Z axis top sensor malfunctioned
Suggestion:
Select "INFO">"SENSOR STATUS" on the printer, touch Z axis top sensor, and see if the status of "Z-T" switches from 0 to 1. If the value doesn't switch accordingly, then
the sensor is malfunctioning. Then select "UTILITIES">"MOVE PLATFORM">"TO TOP" to raise the . If the platform doesn't rise accordingly, then the motor is malfunction-
ing. Contact the service center after you have checked the status of the printer.
● Error Code 1002: Z axis motor downward movement abnormalities or Z axis bottom sensor malfunctioned
Suggestion:
Select "INFO">"SENSOR STATUS" on the printer, touch Z axis bottom sensor, and see if the status of "Z-B" switches from 0 to 1. If the value doesn't switch accordingly,
then the sensor is malfunctioning. Then select "UTILITIES">"MOVE PLATFORM">"TO BOTTOM" to descend the platform. If the platform doesn't descend accordingly,
then the motor is malfunctioning. Contact the service center after you have checked the status of the printer.
Print Technology
UV Light Source
Maximum Printing Area(W*D*H)
X/Y Axis Resolution
Z Axis Resolution
File Format
Connectivity
DLP(Digital Light Processing)
UV LED λ 405nm
64 *40 *120mm
50µm
25µm / 50µm / 100µm
.stl / XYZ format .3ws/.3wn
USB Cable & USB drive & WIFI
AC Input
Printer Dimension(W*D*H)
Net Weight
Print Material
OS Support
Operating Conditions
100-240V 50/60Hz, 24V/2.5A(60W)
290 * 357 * 426.5 mm
11 Kg
Photopolymer Resin
Windows 7, 8, 10
Mac OS X 10.9 / 10.10 / 10.11 / 10.12
Please ensure that the recommended operating
conditions are adhered to. (Operating temperature
20-30°C (68-86°F)/ humidity 40 ~ 60% RH; If a different
operating temperature is printed on the label on the
resin bottle, please adhere to recommended conditions
on the label.)
-21-
● Error Code 1025: Unable to save the file
Suggestion:
Please check if there is enough space on the selected disk/device. Delete some files and try again. If you are saving the file to external device, make sure that the device
is securely connected.
● Error Code 1026: Non-manifold issue is found in the file
Suggestion:
Repair the file with 3D model repairing software (such as netfabb or MakePrintable) and slice the model with XYZware_Nobel again.
● Error Code 2001: Resin bottle not found
Suggestion:
Make sure resin bottle is placed correctly and NFC tag is in place under the bottle. If the NFC label is missing, please contact customer service center.
● Error Code 2003: Resin bottle empty
Suggestion:
Resin bottle is empty is based on the the reading from the NFC tag. Select "INFO">"RESIN STATUS" to check resin level. When "REMAINING" is shown as "0%", then the
resin bottle should be empty. Please install another XYZprinting resin bottle before printing.
● Error Code 1003: NFC tag reader malfunctioned
Suggestion:
Contact customer service center directly.
● Error Code 1004: Engine board malfunctioned
Suggestion:
Contact customer service center directly.
● Error Code 1009: WIFI module malfunctioned
Suggestion:
Contact customer service center directly.
● Error Code 100C: Internal error
Suggestion:
Contact customer service center directly.
● Error Code 100A: Z axis motor malfunctioned
Suggestion:
Turn off the printer and confirm if the printing platform and the resin tank are installed correctly. If the error still occurs, contact customer service center.
● Error Code 100D: Internal error
Suggestion:
Contact customer service center directly.
● Error Code 100E: Internal error
Suggestion:
Contact customer service center directly.
● Error Code 1020: Printer not found
Suggestion:
Make sure printer is powered on, and connected to PC correctly. If the error persists, please try to restart your PC or refer to FAQ on XYZprinting website.
● Error Code 1021: XYZware_Nobel slicer not found
Suggestion:
Reinstall XYZware_Nobel.
● Error Code 1022: Transmission failed
Suggestion:
Make sure the USB wire is securely connected to the printer. Do not remove the wire before data transmission is completed.
● Error Code 1023: Insufficient memory to load file(s)
Suggestion:
Increase system memory to 4G RAM and 1G graphics RAM or above. Leave some prints for next task if you are printing several models. For better performance, it is
recommended to run the program on 64-bit operating system.
● Error Code 1024: XYZware_Nobel runtime error
Suggestion:
Restart XYZware_Nobel.
-22-
Safety Notice
This NFC module is mounted below the resin bottle slot. The FCC ID of NFC module is 2AB9W-CT-NFC.
Caution!
Any changes or modifications not expressly approved by the party responsible for compliance could void the user's authority to operate the equipment.
● Error Code 2004: Lid not covered during printing
Suggestion:
Place the lid on the printer before printing. If the lid is placed correctly, please remove the lid, select "INFO">"SENSOR STATUS", tap the lid sensor and see if the status of
"C" switches from 0 to 1. If the value doesn't switch accordingly, then the sensor is malfunctioning. Contact the service center after you have checked the status of the
printer.
● Error Code 2005: Unrecognized resin tag
Suggestion:
Check the record of the resin bottle by selecting "INFO">"RESIN STATUS". If the display shows "UNIDENTIFIED TAG", please change to XYZprinting resin bottle.
● Error Code 2006: Unable to resolve the file
Suggestion:
Slice the file again with XYZware_Nobel. Be sure to set “Printer Type”as Nobel Superfine while slicing the file.
● Error Code 2007: File too large
Suggestion:
Please select a .3wn file, size no more than 200MB.
● Error Code 2008: Non-manifold issue is found in the file
Suggestion:
Repair the file with 3D model repairing software (such as netfabb or MakePrintable) and slice the model with XYZware_Nobel again.
● Error Code 2009: Resin tank is not installed correctly
Suggestion:
Confirm if the resin tank is installed correctly. If the resin tank is placed correctly, remove the tank, select "INFO">"SENSOR STATUS" on the printer, touch the resin tank
sensor, and see if the status of "T" switches from 0 to 1. If the value doesn't switch accordingly, then the sensor is malfunctioning. Contact the service center after you
have checked the status of the printer.
● Error Code 2020: Printer is busy
Suggestion:
Wait until the printer finishes current task. If the error persists when the printer is idle, please try to restart the printer.