Xi Long Electronics PIR-SD PIR MOTION SENSOR WITH HIDDEN CAMERA, SD RECORDER User Manual
Shenzhen Xi Long Electronics Co., Ltd. PIR MOTION SENSOR WITH HIDDEN CAMERA, SD RECORDER Users Manual
User Manual

PIR-SD User’s
M
a
nu
a
l
PIR Motion Sensor with Hidden Color
C
am
e
r
a
,
SD Recorder, and Remote
C
on
t
r
ol

©
Copyright
2
0
1
2
This manual is
furnished
under license and may be used or
copied
only
i
n
accordance
with
t
h
e
t
e
r
m
s
of
such
li
c
e
n
s
e
.
E
xc
e
p
t
as
permitted
by such license, no
part of
t
h
i
s
p
u
b
li
c
a
t
i
o
n
may
b
e
r
e
p
r
o
d
u
c
e
d
,
stored
in a
r
e
t
r
i
e
v
a
l
s
y
s
t
e
m
,
or
t
r
a
n
s
m
i
tt
e
d
,
in any
form
or any
m
e
a
n
s
,
e
l
e
c
t
r
o
n
i
c
,
m
e
c
h
a
n
i
c
a
l
,
r
e
c
o
r
d
i
n
g
,
or
o
t
h
e
r
w
i
s
e
,
including
t
r
a
n
s
l
a
t
i
o
n
to
a
n
o
t
h
e
r
language
or
f
o
r
m
a
t
,
without
t
h
e
prior written
permission of
S
e
c
u
r
i
t
y
Ma
n
.
The
content of
t
h
i
s
manual is
furnished for
i
n
f
o
r
m
a
t
i
o
n
a
l
use only, is
s
u
b
j
e
c
t
to
change
without
n
o
t
i
c
e
,
and
should
not
be
c
o
n
s
t
r
u
e
d
as a
c
o
mm
i
t
m
e
n
t
b
y
S
e
c
u
r
i
t
y
Ma
n
.
S
e
c
u
r
i
t
y
Ma
n
Inc assumes no
r
e
s
p
o
n
s
i
b
ili
t
y
or
liability for
any errors
o
r
inaccuracies
that
may
appear
in
t
h
i
s
b
oo
k
.
FCC
In
f
or
ma
t
i
on
N
o
t
e
s
on FCC’s
“
C
o
n
s
i
s
t
e
n
t
S
t
a
t
e
m
e
n
t
of
I
n
f
o
r
m
a
t
i
o
n
”
This
product
m
ee
t
t
h
e
r
e
q
u
i
r
e
m
e
n
t
s
specified
in P
a
r
t
1
5
of
FCC R
e
g
u
l
a
t
i
o
n
.
O
p
e
r
a
t
i
o
n
r
e
s
t
s
with
t
h
e
following two
co
n
d
it
i
o
n
s
:
(
1
)
The
e
q
u
i
p
m
e
n
t
should
not
cause any
harmful
i
n
t
e
r
f
e
r
e
n
c
e
.
(2)
The
e
q
u
i
p
m
e
n
t
m
u
s
t
receive
and
process
any
i
n
t
e
r
f
e
r
e
n
c
e
,
including
a
n
y
possible
i
n
t
e
r
f
e
r
e
n
c
e
caused by
o
p
e
r
a
t
i
o
n
m
i
s
ta
k
es
.
After
t
e
s
t
i
n
g
t
h
e
p
r
o
d
u
c
t
,
we
confirm that
t
h
e
camera complies
with
t
h
e
p
r
o
vi
s
i
o
n
for
class C
digital
e
q
u
i
p
m
e
n
t
in
t
h
e
1
5
t
h
part
in FCC
r
e
g
u
l
a
t
i
o
n
s
;
and
t
h
e
r
e
c
e
iv
e
r
complies
with
t
h
e
li
m
i
t
a
t
i
o
n
s
for
class B
digital
e
q
u
i
p
m
e
n
t
in P
a
r
t
1
5
of
F
CC
r
e
g
u
l
a
t
i
o
n
.
The
product
g
e
n
e
r
a
t
e
s
,
applies
and
e
m
i
t
s
radio waves.
It might
c
a
u
s
e
harmful
i
n
t
e
r
f
e
r
e
n
c
e
s
to
wireless
c
o
mm
un
i
c
a
t
i
o
n
if not
be
i
n
s
t
a
ll
e
d
and
u
s
e
d
following
t
h
e
d
e
s
c
r
i
p
t
i
o
n
of
t
h
e
m
a
nu
a
l
.
The
product
may cause
i
n
t
e
r
f
e
r
e
n
c
e
in
r
e
s
i
d
e
n
t
i
a
l
area, and
t
h
e
customer
s
h
o
u
l
d
t
a
k
e
remedies
to
e
li
m
i
n
a
t
e
t
h
e
i
n
t
e
r
f
e
r
e
n
c
e
on
t
h
e
i
r
own
c
o
s
t
s
.
If
t
h
e
p
r
o
d
u
c
t
causes any
harmful
i
n
t
e
r
f
e
r
e
n
c
e
to
wireless
e
q
u
i
p
m
e
n
t
or
d
i
s
t
u
r
b
s
t
h
e
receiving
o
f
TV signals
(it
can be
i
d
e
n
t
i
f
i
e
d
by
t
u
r
n
i
n
g
on and
off
t
h
e
p
r
o
d
u
c
t
)
,
you can
s
o
lv
e
t
h
e
trouble
by
following
m
e
t
h
o
d
s
:
•
R
e
a
d
j
u
s
t
t
h
e
product
or
put it
in
a
n
o
t
h
e
r
p
l
a
c
e
.
•
E
x
t
e
n
d
t
h
e
d
i
s
t
a
n
c
e
b
e
t
w
ee
n
t
h
e
e
q
u
i
p
m
e
n
t
i
n
t
e
r
f
e
r
e
d
and
t
h
e
p
r
o
d
u
c
t
.
• Refer
to dealers or
experienced
radio
e
l
e
c
t
r
i
c
i
a
n
for
h
e
l
p
.

W
arr
an
t
y
S
e
c
u
r
i
t
y
Ma
n
w
a
rr
a
n
t
s
that
t
h
i
s
product
will be
free from
d
e
f
e
c
t
s
in
t
i
t
l
e
,
m
a
t
e
r
i
a
l
s
and
m
a
nu
f
a
c
t
u
r
i
n
g
workmanship for
one year
from
t
h
e
d
a
t
e
of
t
h
e
purchase
o
r
o
t
h
e
r
w
i
s
e
specified
on
t
h
e
p
a
ck
a
g
e
.
If
t
h
e
product
is
found to
be
d
e
f
e
c
t
iv
e
t
h
e
n
,
as your sole
remedy
and as
t
h
e
m
a
nu
f
a
c
t
u
r
e
r
’
s
only
o
b
li
g
a
t
i
o
n
,
S
e
c
u
r
i
t
y
Ma
n
w
ill
repair
or
replace
t
h
e
p
r
o
d
u
c
t
.
This
w
a
rr
a
n
t
y
is
exclusive
and is
limited
to
t
h
i
s
p
r
o
d
u
c
t
.
This
w
a
rr
a
n
t
y
shall
n
o
t
apply
to
p
r
o
d
u
c
t
s
that
have been
s
u
b
j
e
c
t
e
d
to abuse, misuse,
abnormal
e
l
e
c
t
r
i
c
a
l
or
e
n
vi
r
o
n
m
e
n
t
a
l
c
o
n
d
i
t
i
o
n
s
,
or any
condition o
t
h
e
r
t
h
a
n
w
h
a
t
can be
c
o
n
s
i
d
e
r
e
d
normal
u
s
e
.
Warranty Di
s
c
l
aim
er
s
S
ecu
r
i
t
y
M
an
Inc, makes no
o
t
h
e
r
w
a
rr
a
n
t
i
e
s
,
express,
implied
or
o
t
h
e
r
w
i
s
e
,
regarding
t
h
i
s
p
r
odu
c
t
,
and
specifically disclaims
any
w
ar
r
an
t
y
for
m
e
r
c
h
an
t
ab
ili
t
y
or
f
i
t
n
e
ss
for
a
p
a
r
t
i
c
u
l
a
r
p
u
r
p
o
s
e
.
The
exclusion of implied
w
a
rr
a
n
t
i
e
s
is
not permitted
in some
s
t
a
t
e
s
and
t
h
e
e
xc
l
u
s
i
o
n
s
specified
herein may
not apply
to you. This
w
a
rr
a
n
t
y
provides
you
with
s
p
e
c
i
f
i
c
legal
r
i
g
h
t
s
.
There may be
other
r
i
g
h
t
s
that
you have
which
vary
from
s
t
a
t
e
to
s
t
a
t
e
.
Limitation
of
L
i
a
bil
it
y
The
liability of
S
e
c
u
r
i
t
y
Ma
n
Inc, arising
from
t
h
i
s
w
a
rr
a
n
t
y
and sale shall be
li
m
i
t
e
d
to a
refund of
t
h
e
purchase
price. In no
e
v
e
n
t
shall
S
e
c
u
r
i
t
y
Ma
n
be liable
for
c
o
s
t
s
o
f
p
r
o
c
u
r
e
m
e
n
t
of
s
u
b
s
t
i
t
u
t
e
p
r
o
d
u
c
t
s
or services, or
for
any
l
o
s
t
p
r
o
f
i
t
s
,
or
for
a
n
y
c
o
n
s
e
q
u
e
n
t
i
a
l
,
i
n
c
i
d
e
n
t
a
l
,
direct
or
i
n
d
i
r
e
c
t
d
a
m
a
g
e
s
,
however
caused and on
a
n
y
t
h
e
o
r
y
of
li
a
b
ili
t
y
,
arising
from
t
h
i
s
w
a
rr
a
n
t
y
and sale. These
li
m
i
t
a
t
i
o
n
s
shall
a
pp
ly
not
w
i
t
h
s
t
a
n
d
i
n
g
any
failure of
e
ss
e
n
t
i
a
l
purpose of
any
limited
r
e
m
e
d
y
.
For Tech Support Call:
8
8
8
-
9
77
-
3777
S
e
c
u
ri
t
y
M
a
n
4
6
0
1
E.
Airport
Drive,
On
t
a
r
i
o
,
CA,
9
1
7
6
1
,
U
S
A
Tel:
909-230-6668
Fax:
9
0
9
-
2
3
0
-
6
88
9
Email:
i
n
fo
@
s
e
c
u
r
it
y
m
a
n
i
n
c
.
co
m
W
e
b
s
it
e
:
www
.
s
e
c
u
r
it
y
m
a
n
i
n
c
.
co
m
C
o
p
y
r
i
g
h
t
2
0
1
2
by
S
e
c
u
r
i
t
y
Ma
n
v
1
.
0

Table of
Contents
I
n
t
r
od
uc
t
io
n
1
F
ea
t
u
res
1
I
m
po
r
ta
n
t
2
Ope
ra
t
i
ng
R
e
s
t
r
i
c
t
io
n
s
2
C
on
di
t
i
on
s
5
Sa
f
e
t
y
In
s
t
r
u
c
t
i
on
s
5
P
ac
ka
ge
C
o
ntent
s
6
P
r
od
uc
t
B
a
s
i
c
s
7
P
I
R
-S
D
7
R
e
m
o
t
e
Con
t
r
o
l
7
S
e
t
U
p
8
S
e
t
t
h
e
D
a
t
e
a
n
d
T
i
m
e
8
Adding
and
Cancelling
R
e
m
o
t
e
C
o
n
t
r
o
l
12
Adding
R
e
mo
t
e
Co
n
t
r
ol
12
Cancelling
R
e
mo
t
e
Co
n
t
r
ol
12
Operation
13
Using PIR-SD 13
M
o
t
io
n
D
e
t
e
c
t
io
n
Recording
13
Emergency Recording
13
S
t
o
p
Recording
14
New File
Alert
14
SD Full
Alert (Memory Full)
14
Playback Recorded Video
15
I
n
t
e
g
r
a
t
i
n
g
with Air-Alarm
Series 15
Adding
PIR-SD R
e
m
o
t
e
to
t
h
e
Alarm
H
o
s
t
16
Cancelling
PIR-SD R
e
m
o
t
e
from
t
h
e
Alarm
H
o
s
t
16
Adding
PIR-SD
M
o
t
io
n
D
e
t
e
c
t
io
n
to
t
h
e
Alarm
H
o
s
t
16
Cancelling
PIR-SD
M
o
t
io
n
D
e
t
e
c
t
io
n
from
t
h
e
Alarm
H
o
s
t
16
Enabling Video Recording
17
Disabling Video Recording
18
Specifications 19

1
Introduction
Thank you
for purchasing
S
e
cur
i
t
y
Ma
n
PIR-SD. The PIR-SD is a
color
c
a
m
e
r
a
with
SD
recorder hidden
inside a PIR
motion
d
e
t
e
c
t
o
r
.
This
covert
m
o
t
i
o
n
detector
camera blends
perfectly into
a
l
m
o
s
t
any home or
b
u
s
i
n
e
ss
e
n
vi
r
o
n
m
e
n
t
where an alarm
s
y
s
t
e
m
might
be
p
r
e
s
e
n
t
and can also
b
e
i
n
t
e
r
g
r
a
d
e
d
with
any
of
our
S
e
c
u
r
i
t
y
Ma
n
DIY
Wireless
Home
Alarm
S
y
s
t
e
m
s
,
providing
you
with both
s
e
c
u
r
i
t
y
and
d
i
s
c
r
ee
t
monitoring
c
a
p
a
b
ili
t
i
e
s
.
S
o
w
h
e
t
h
e
r
you’re looking to
expand
your
wireless
s
e
c
u
r
i
t
y
s
y
s
t
e
m
or
j
u
s
t
looking for
a
covert hidden
camera,
t
h
e
PIR-SD will
fit
your
n
ee
d
s
.
Features
•
PIR
motion
sensor
with color
camera
and SD
r
e
c
o
r
d
e
r
(SD
card
not
i
nc
l
ude
d
)
• Works i
n
d
e
p
e
n
d
e
n
t
ly
or can be
i
n
t
e
g
r
a
t
e
d
with
any
S
e
c
u
r
i
t
y
Ma
n
Air-Alarm
series
wireless
alarm
sy
s
t
e
m
s
•
Up
to 300ft (clear
line
of sight)
wireless
transmitting
d
i
s
t
a
n
c
e
b
e
t
w
ee
n
t
h
e
PIR-SD and alarm
h
o
s
t
(
1
00
f
t
i
n
d
oo
r
s
)
•
1
-
m
i
nu
t
e
video
clip per
motion detection
e
v
e
n
t
• Records
up
to
1
2
hours
of video footage
on a 32 GB SD
c
a
r
d
•
SD card
full
n
o
t
i
fi
c
a
t
i
o
n
• Audible
and visual new
file
a
l
e
r
t
n
o
t
i
fi
c
a
t
i
o
n
•
Can easily be
a
r
m
e
d
/
d
i
s
a
r
m
e
d
via
r
e
m
o
t
e
c
o
n
t
r
o
l
,
alarm
h
o
s
t
k
e
y
p
a
d
,
or
phone
call
(when
i
n
t
e
g
r
a
t
e
d
with
a
S
e
c
u
r
i
t
y
Ma
n
Air-Alarm
s
y
s
t
e
m
)
•
One
t
o
u
c
h
(remote control)
manual
record for emergency
s
i
t
u
a
t
i
o
n
s
•
Easy PC
playback
using a PC card
reader
or
direct
c
o
nn
e
c
t
via mini USB
p
o
r
t

2
Important
This
guide provides important
i
n
f
o
r
m
a
t
i
o
n
on
t
h
e
use and
o
p
e
r
a
t
i
o
n
o
f
your PIR-SD. Please read all
t
h
e
i
n
f
o
r
m
a
t
i
o
n
carefully prior to
using
t
h
e
product for
t
h
e
b
e
s
t
performance
and
to
p
r
e
v
e
n
t
any
d
a
m
a
g
e
/
i
n
j
u
r
i
e
s
or
misuse
of
t
h
e
d
e
vi
c
e
(
s
)
.
C
u
s
t
o
m
e
r
s
are
entitled to
have read
through
t
h
i
s
c
o
m
p
l
e
t
e
user’s manual
before
using
t
h
e
PIR-SD. Any
un
a
pp
r
ove
d
changes
or
m
o
d
i
fi
c
a
t
i
o
n
s
will void your
w
a
rr
a
n
t
y
.
Please ensure
to
h
a
v
e
a
c
o
m
p
l
e
t
e
un
d
e
r
s
t
a
n
d
i
n
g
of
t
h
e
following
r
e
s
t
r
i
c
t
i
o
n
s
.
Please keep in mind
t
h
e
PIR-SD has a 2-sec delay
time to record after
a
n
e
v
e
n
t
o
cc
u
rr
e
d
.
To
c
o
m
p
e
n
s
a
t
e
for
t
h
e
2-sec delay
time to record
a
n
d
proper
use, we
recommend
to
i
n
s
t
a
ll
t
h
i
s
product
a
b
o
u
t
1
5
f
t
away
f
r
o
m
t
h
e
i
n
t
e
n
d
e
d
monitoring o
b
j
e
c
t
.
As
part of
our
disclaimers
it
is
t
h
e
c
u
s
t
o
m
e
r
s
r
e
s
p
o
n
s
i
b
ili
t
i
e
s
to
be aware
of
t
h
e
2-sec delay
time to r
e
c
o
r
d
before
u
s
e
.
Operating Restrictions
When using
t
h
i
s
p
r
o
d
u
c
t
,
t
h
e
s
a
f
e
t
y
p
r
e
c
a
u
t
i
o
n
s
below
m
u
s
t
be
t
a
k
e
n
to
avoid possible
legal
li
a
b
ili
t
i
e
s
and
d
a
m
a
g
e
s
.
R
e
t
a
i
n
and
follow
a
ll
product
s
a
f
e
t
y
and
o
p
e
r
a
t
i
n
g
i
n
s
t
r
u
c
t
i
o
n
s
.
Observe
all
warnings
i
n
t
h
e
product
o
p
e
r
a
t
i
n
g
i
n
s
t
r
u
c
t
i
o
n
s
.
To
reduce
t
h
e
risk
of bodily
i
n
j
u
r
y
,
e
l
e
c
t
r
i
c
shock,
fire
and
damage
to
t
h
e
e
q
u
i
p
m
e
n
t
,
observe
t
h
e
f
o
ll
o
w
i
n
g
pr
e
c
a
u
t
i
on
s
.
PLEASE NOTE
that
under
c
e
r
t
a
i
n
c
i
r
c
u
m
s
t
a
n
c
e
s
,
a
u
d
i
o
/
vi
d
e
o
r
e
c
o
r
d
i
n
g
may be PROHIBITED by law. This
device should
be used only
i
n
compliance
with
all
applicable
f
e
d
e
r
a
l
,
s
t
a
t
e
and local
s
t
a
t
u
t
e
s
.

3
•
DO NOT place
t
h
i
s
product
near any
medical
e
q
u
i
p
m
e
n
t
s
.
Radio
w
a
v
e
s
might potentially
cause
breakdown of
e
l
e
c
t
r
i
c
a
l
medical
e
q
u
i
p
m
e
n
t
.
This
product
should
be
placed at
l
e
a
s
t
one
foot
away
from
any
h
e
a
r
t
p
a
c
e
m
a
k
e
r
.
Radio waves
might potentially
influence
h
e
a
r
t
p
a
c
e
m
a
k
e
r
and lead
to
r
e
s
p
i
r
a
t
o
r
y
d
i
s
t
u
r
b
a
n
c
e
.
•
DO NOT use
t
h
i
s
product to
vi
o
l
a
t
e
one’s
p
r
iv
a
c
y
.
M
o
n
i
t
o
r
i
n
g
o
n
e
’
s
p
r
iv
a
t
e
a
c
t
ivi
t
i
e
s
without
c
o
n
s
e
n
t
is illegal and
t
h
i
s
product
is
n
o
t
designed
and
m
a
nu
f
a
c
t
u
r
e
d
for
t
h
e
s
e
p
u
r
p
o
s
e
s
.
•
DO NOT use
t
h
i
s
product for
any illegal
a
c
t
ivi
t
i
e
s
.
S
e
c
u
r
i
t
y
Ma
n
s
h
a
ll
not
be
responsible for
any
consequences of
illegal
c
o
n
d
u
c
t
s
m
a
d
e
by
u
s
e
r
s
.
•
DO NOT
put
t
h
e
p
l
a
s
t
i
c
package
bags in reach
of children
or
b
a
b
i
e
s
.
Young children
can choke on
t
h
e
s
e
i
t
e
m
s
if they put
t
h
e
m
into their
m
o
u
t
h
s
.
•
DO NOT plug
t
h
e
AC
a
d
a
p
t
e
r
into
t
h
e
outlet
in
improper
s
i
t
u
a
t
i
o
n
s
.
• Plugging
in an AC
a
d
a
p
t
e
r
with wet
hands
might
cause
e
l
e
c
t
r
i
c
s
h
o
ck
.
• Plugging
in
t
h
e
AC
a
d
a
p
t
e
r
un
s
t
e
a
d
ily
might
cause
fire
or
e
l
e
c
t
r
i
c
s
h
o
ck
.
•
DO NOT
cover
t
h
e
AC
a
d
a
p
t
e
r
when
it
is
c
o
nn
e
c
t
e
d
to
an
o
u
t
l
e
t
,
p
l
a
c
e
t
h
e
a
d
a
p
t
e
r
near
h
e
a
t
e
r
s
,
or
put it
on
t
h
e
floor which
is
equipped
w
i
t
h
a
h
e
a
t
e
r
.
The
above
m
e
n
t
i
o
n
e
d
o
p
e
r
a
t
i
o
n
might
cause
fire
or
i
n
c
i
d
e
n
t
s
.
•
DO NOT use
it
a
b
o
a
r
d
;
please abide by
t
h
e
airway’s
p
r
o
vi
s
i
o
n
.
It
m
i
g
h
t
influence
c
o
mmu
n
i
c
a
t
i
o
n
aboard
and
t
h
e
flying
ap
p
ar
a
t
u
s
if
d
e
p
ar
t
i
n
g
from
t
h
e
airway’s
r
e
g
u
l
a
t
i
o
n
.
This will
r
e
s
u
l
t
in
a
cc
i
d
e
n
t
,
possible
d
e
a
t
h
and severe
physical
hu
r
t
.
•
DO NOT
disassemble
or
repair
t
h
e
camera
or
other
r
e
l
e
v
a
n
t
peripheral
e
q
u
i
p
m
e
n
t
s
by
y
o
u
r
s
e
l
f
.
Improper disassembly
might
c
a
u
s
e
damage
to
t
he
product
or
t
he
peripheral
e
q
u
i
p
men
t
.

4
•
DO NOT
put
t
h
e
camera
in
quaky
paces. The
camera
may be
un
s
t
a
b
l
e
or
out of
o
p
e
r
a
t
i
o
n
if
i
n
s
t
a
ll
e
d
i
m
p
r
o
p
e
r
ly
.
Such
i
n
s
t
a
ll
a
t
i
o
n
may
a
l
s
o
cause
b
r
ea
k
d
o
w
n
.
•
DO NOT use
t
h
e
camera
in
complex
e
n
vi
r
o
n
m
e
n
t
,
t
h
e
obstruction o
f
s
t
u
m
b
li
n
g
block
will
affect
t
h
e
e
l
e
c
t
r
o
m
a
g
n
e
t
i
c
wave and
i
n
fl
u
e
n
c
e
t
h
e
receiving
range. Wall,
t
r
ee
and
other
s
t
u
m
b
li
n
g
block might
a
b
s
o
r
b
,
reflect
t
h
e
e
l
e
c
t
r
o
m
a
g
n
e
t
i
c
wave, and
influence
t
h
e
receiving
r
a
n
g
e
.
•
DO NOT use
t
h
e
camera
in
t
h
e
places
which
are
covered
w
i
t
h
m
e
t
a
l
.
T
h
e
around
m
e
t
a
l
,
such as
e
l
e
v
a
t
o
r
and cabin,
might
shield
t
h
e
e
l
e
c
t
r
o
m
a
g
n
e
t
i
c
wave, and
r
e
s
u
l
t
in
inability to
receive
s
i
g
n
a
l
s
.
•
DO NOT use
t
he
camera
near
aggressive
c
hem
i
c
a
l
s
.
•
DO NOT place
t
h
e
product
near any
s
t
r
o
n
g
m
a
g
n
e
t
i
c
o
b
j
e
c
t
s
•
DO NOT
disassemble
t
he
p
r
o
d
u
c
t
.
•
DO NOT shake or
s
t
r
i
k
e
t
h
e
p
r
o
d
u
c
t
.
•
DO NOT
attempt to
service
t
h
e
product yourself
as
opening
o
r
removing covers
may expose you
to
dangerous
v
o
l
t
a
g
e
or
other
hazards.
Refer
all
servicing
to qualified
service
p
e
r
s
o
nn
e
l
.
The PIR-SD is designed to be, and acts as, a theft
deterrent.
T
h
i
s
device cannot offer
complete protection
for your home or business.
Like all
p
r
a
c
t
i
c
a
l
s
y
s
t
e
m
s
,
it
has
li
m
i
t
a
t
i
o
n
s
and
it could
be
disable
b
y
a skilled
i
n
t
r
u
d
e
r
.
We
s
u
gg
e
s
t
that
you
avoid relying
solely on P
I
R
-
S
D
to protect
your
p
r
o
p
e
r
t
y
,
but
used
it
as
part of
a
c
o
m
p
r
e
h
e
n
s
iv
e
s
e
cu
r
i
t
y
s
o
l
ut
i
o
n
.

5
Conditions
Please read
t
h
e
following
messages
to
make sure your
w
o
r
k
i
n
g
en
vi
r
o
n
men
t
is
s
u
i
t
a
b
l
e.
•
The
t
e
m
p
e
r
a
t
u
r
e
should
be
kept
b
e
t
w
ee
n
–
1
0
˚
C
and
5
0
˚
C
(
1
4
˚
F
t
o
1
22
˚
F
)
.
The
r
e
l
a
t
iv
e
humidity
should
be
kept
b
e
t
w
ee
n
20%
and
8
0
%
.
• Avoid putting
t
h
e
product
in places where
t
e
m
p
e
r
a
t
u
r
e
or
hu
m
i
d
i
t
y
may
change
r
a
p
i
d
ly
.
•
Keep
it
dry,
d
u
s
t
l
e
ss
and
avoid exposure
directly
in
s
un
li
g
h
t
.
•
Keep
product
away
from
h
e
a
t
sources such as
e
l
e
c
t
r
i
c
h
e
a
t
e
r
.
• It might
influence
t
h
e
normal
o
p
e
r
a
t
i
o
n
of
t
h
e
product if
used
at
t
h
e
fringe
range
of normal
t
e
m
p
e
r
a
t
u
r
e
.
Please
turn off
t
h
e
power
w
h
e
n
not
in
u
s
e
.
•
Please obey
t
h
e
local
g
o
v
e
r
n
m
e
n
t
’
s
e
n
vi
r
o
n
m
e
n
t
protection
p
o
li
c
y
.
Safety
Instructions
•
Please read
t
h
e
s
e
i
n
s
t
r
u
c
t
i
o
n
s
before
using
t
h
e
p
r
o
d
u
c
t
.
This
product
is
n
e
i
t
h
e
r
waterproof
nor
d
u
s
t
p
r
oo
f
;
t
h
e
r
e
f
o
r
e
it
c
a
nn
o
t
be
u
s
e
d
o
u
t
d
o
ors
or in
adverse
e
n
vi
r
onm
e
n
t
.
•
Please
adopt original
DC
power
s
u
pp
ly
,
to
avoid causing
d
e
vi
c
e
damage
or
e
l
e
c
t
r
i
c
shock or
fi
r
e
.
•
U
n
a
u
t
h
o
r
iz
e
d
d
i
s
m
a
n
t
l
e
m
e
n
t
of
t
h
e
device
or
r
e
p
l
a
c
e
m
e
n
t
of
d
e
vi
c
e
p
a
r
t
s
is
f
o
r
b
i
dd
e
n
.
The
m
a
nu
f
a
c
t
u
r
e
r
will
not
be
responsible for
a
n
y
loss arising
from
such
a
c
t
i
o
n
s
.
•
Do
not put
t
h
e
device into
fi
r
e
,
oven or
microwave
oven, in
order
t
o
avoid
e
x
p
l
o
s
i
o
n
.
•
As a
r
e
s
u
l
t
of version
changes,
t
h
e
user manual may be
different
f
r
o
m
t
h
e
a
c
t
u
a
l
p
r
o
d
u
c
t
.
Please
t
a
k
e
t
h
e
a
c
t
u
a
l
product
as
t
h
e
s
t
a
n
d
a
r
d
.
6
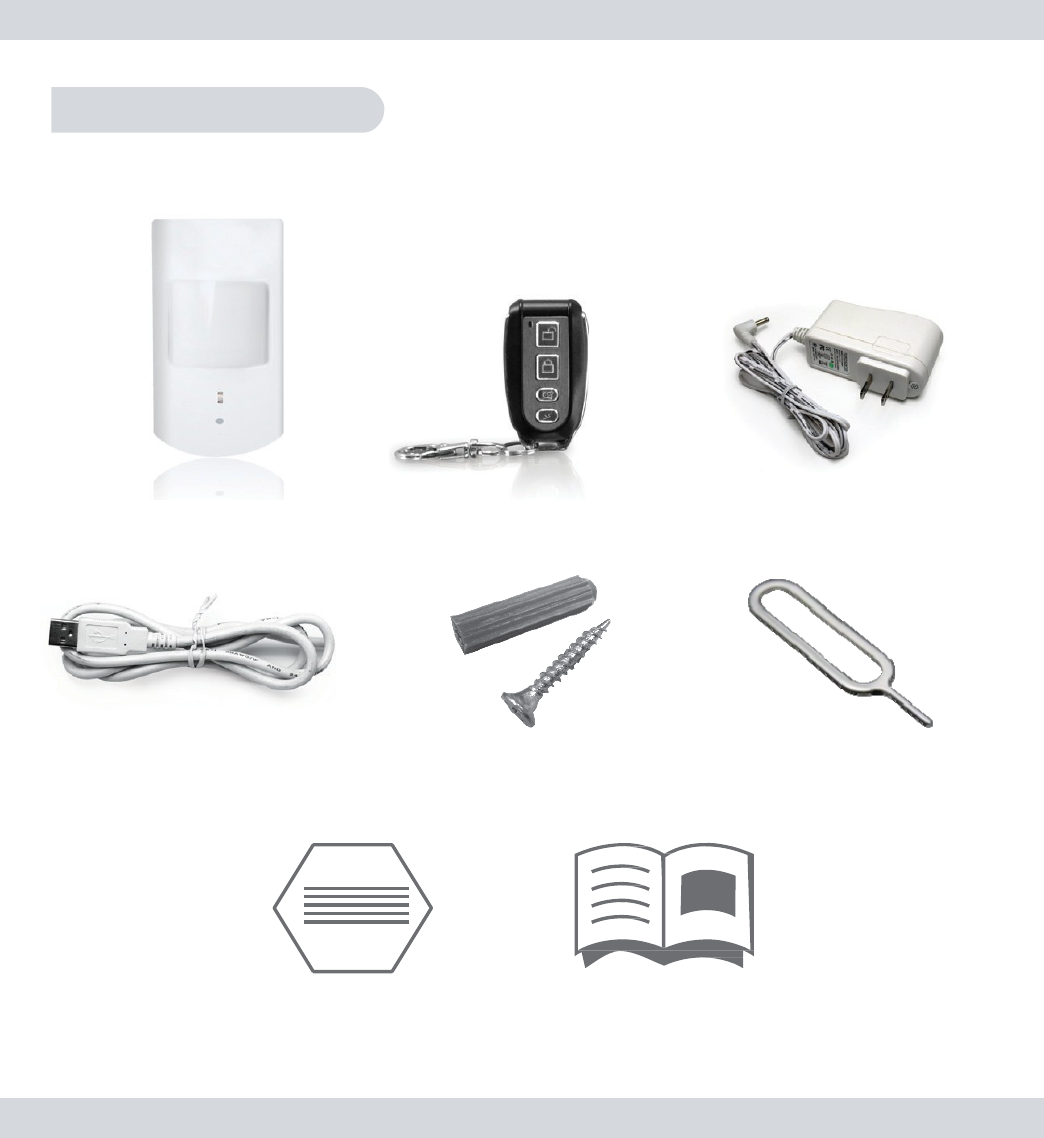
Package
Contents
**SD card not
included.
1
x PIR-SD
w
/
B
r
a
c
k
e
t
1
x Remote Control
1
x USB AC
A
d
a
p
t
e
r
s
1
x USB
C
a
b
l
e
Screws Plectrum
(for
P
air
ing
)
2x Warning
S
t
i
c
k
er
s
User’s
M
a
nu
a
l
7
Study Power/USB
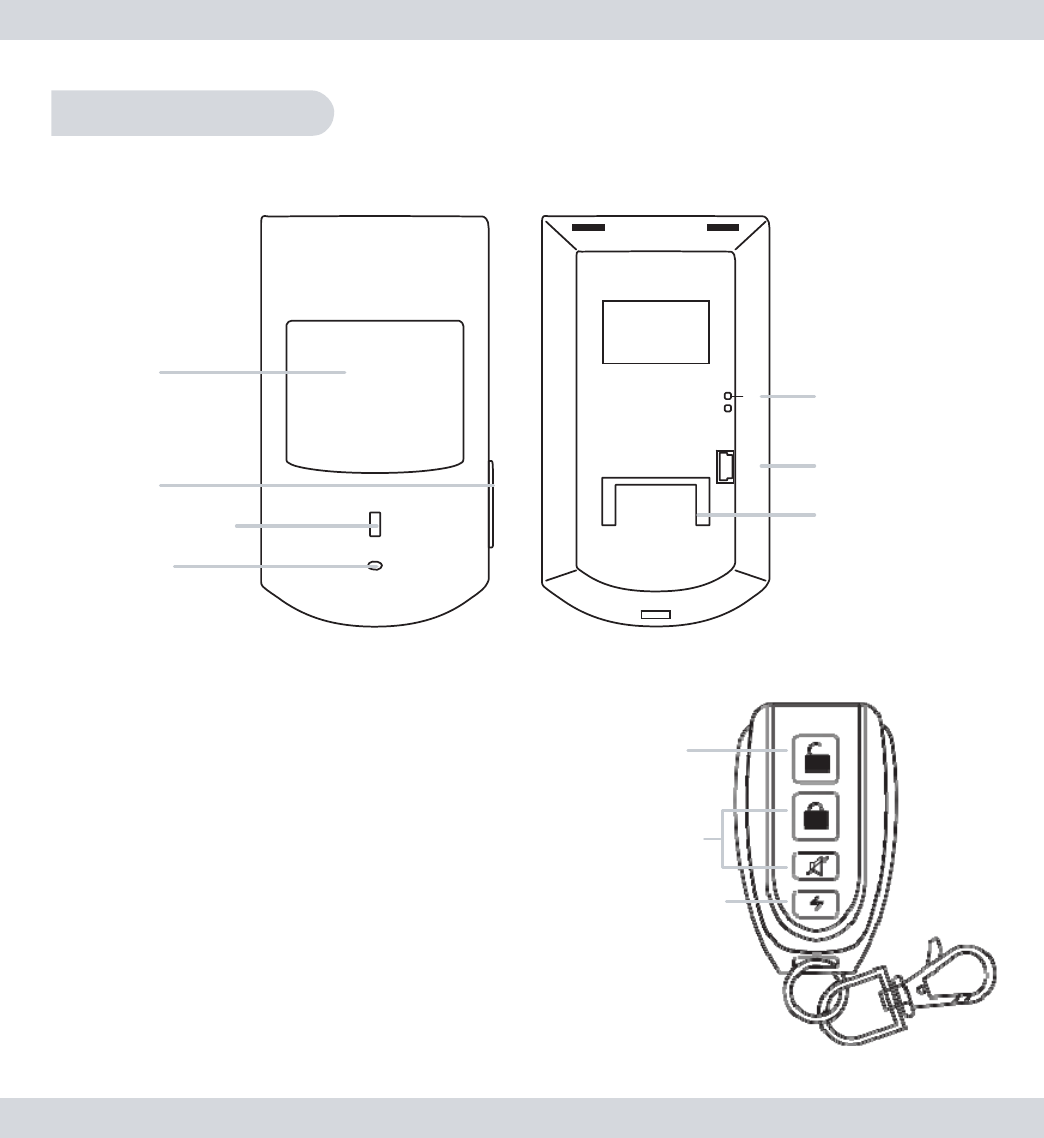
Product Basics
PIR-SD
Front
Back
S
e
n
s
o
r
Wi
n
d
ow
SD
S
l
o
t
D
e
t
e
c
t
i
n
g
LE
D
C
a
mer
a
S
t
u
d
y
B
u
t
to
n
Mini
U
S
B
Power
S
o
ck
e
t
Mounting Base
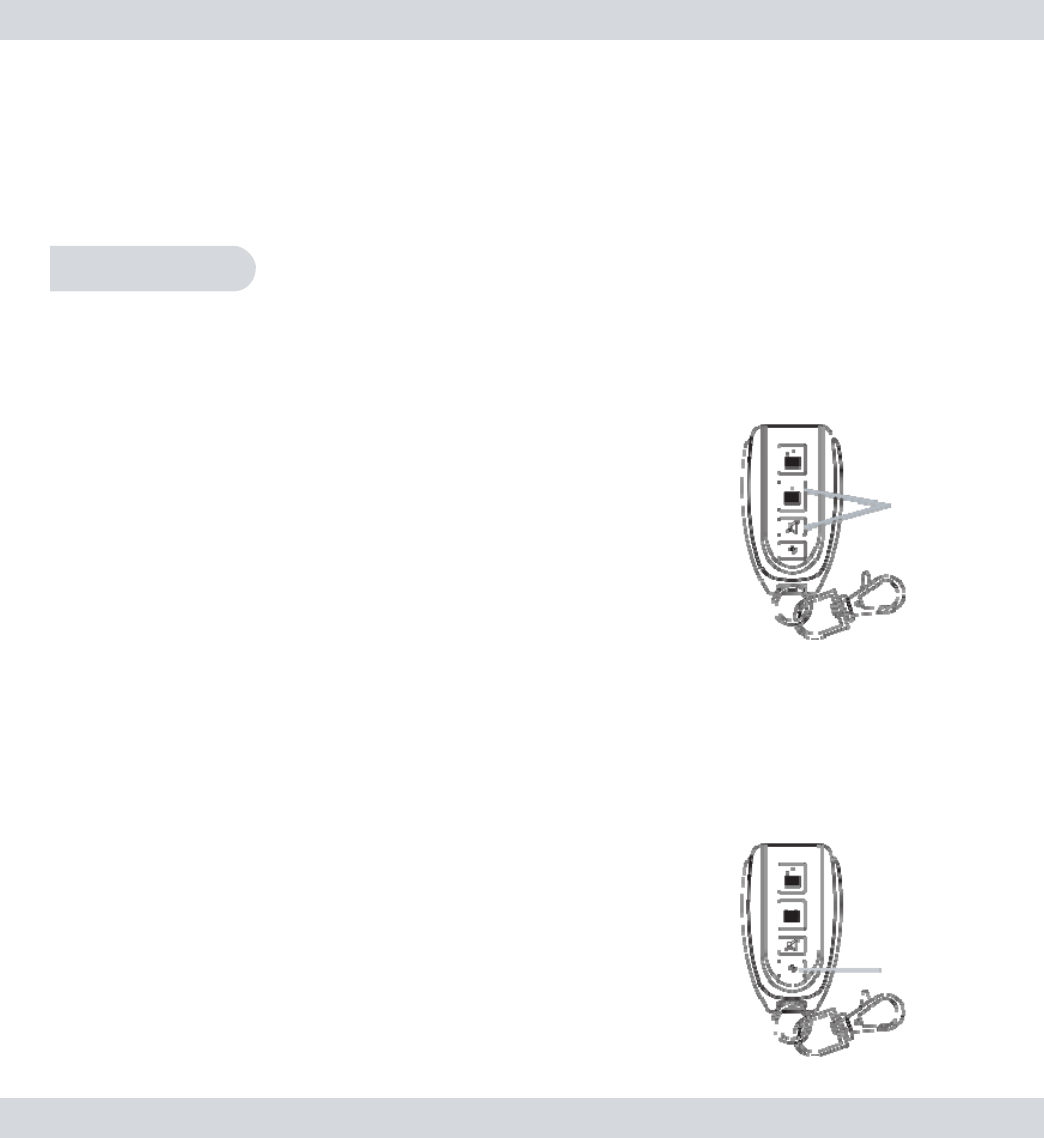
Remote
Control
Stop R
e
c
o
r
d
Stop Record
button
Stop/Deactivate Motion Detection
and
Emergency Recording
Motion Record
button
Motion
R
e
c
o
r
d
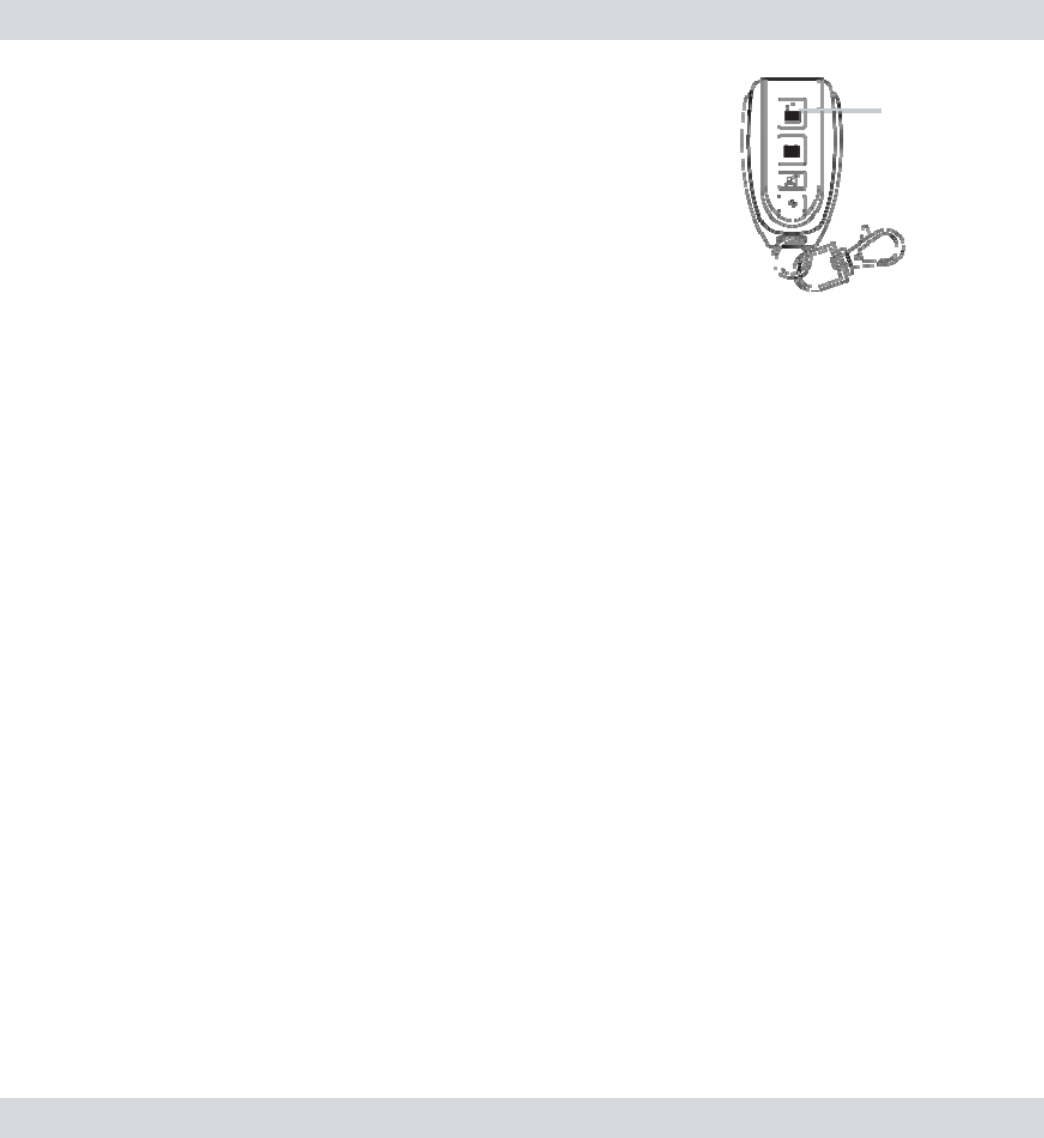
Emergency
R
e
c
o
r
d
Start/Activate Motion Detection Recording
Emergency Record
button
Start
Emergency Record
(1
minute
clip)
8
Set
Up
Set the Date and
T
i
m
e
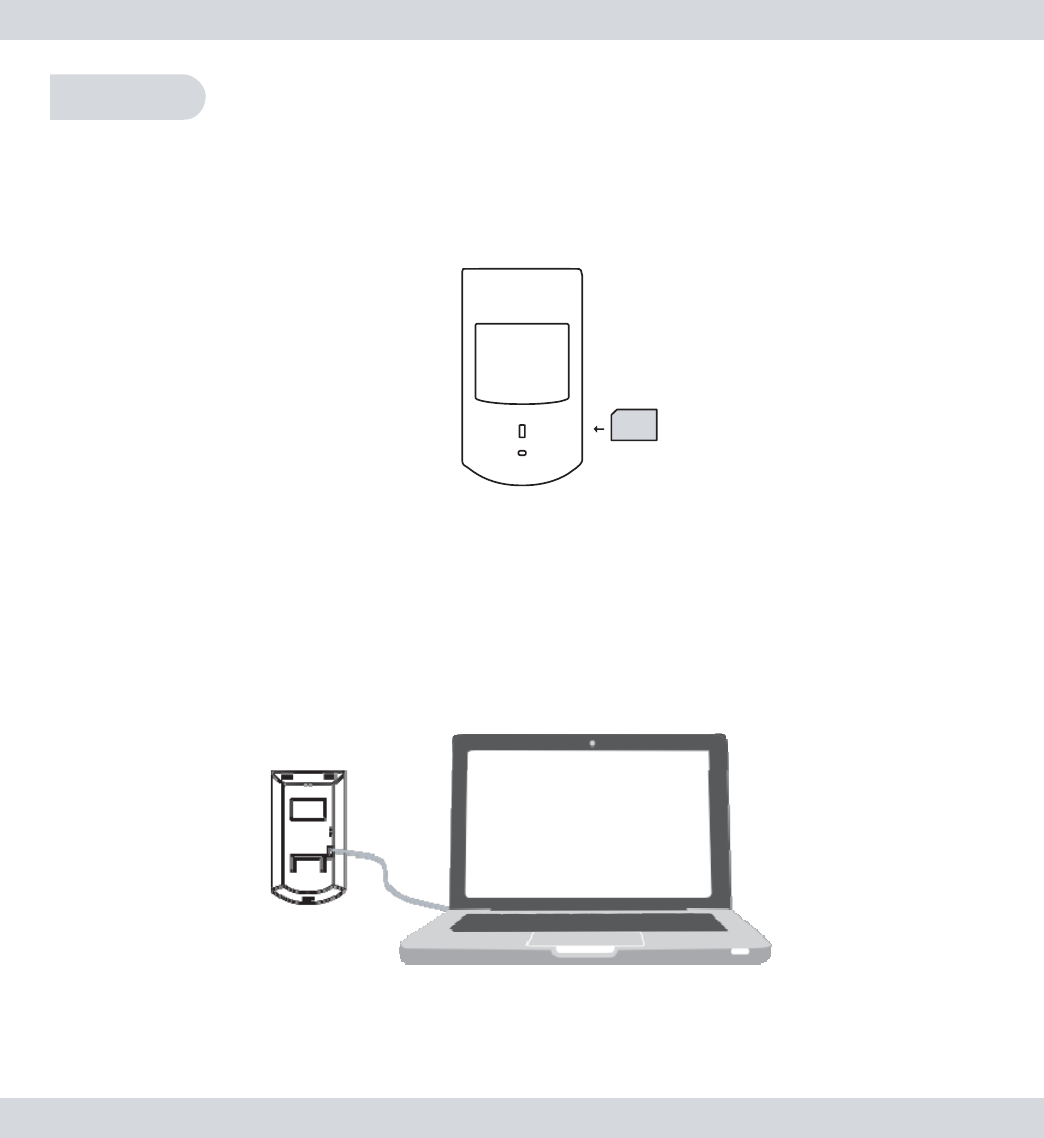
I
n
s
e
r
t
an SD card
(note included) “face up” into
t
h
e
SD
s
l
o
t
l
o
c
a
t
e
d
o
n
t
h
e
right
hand side
of
t
h
e
PIR-SD as
ill
u
s
t
r
a
t
e
d
b
e
l
o
w
.
SD
IMPORTANT
NOTICE: The PIR-SD required an SD card to be
i
n
s
e
r
t
ed
into the SD slot in order for the PIR-SD to function as a
m
o
t
io
n
de
t
e
c
t
or
/
r
e
c
o
rd
e
r
.
C
o
n
ne
c
t
t
h
e
PIR-SD
to
your PC or
Laptop
using
t
h
e
USB cable
p
r
o
vi
d
e
d
as
ill
u
s
t
ra
t
e
d
b
e
l
o
w
.
9
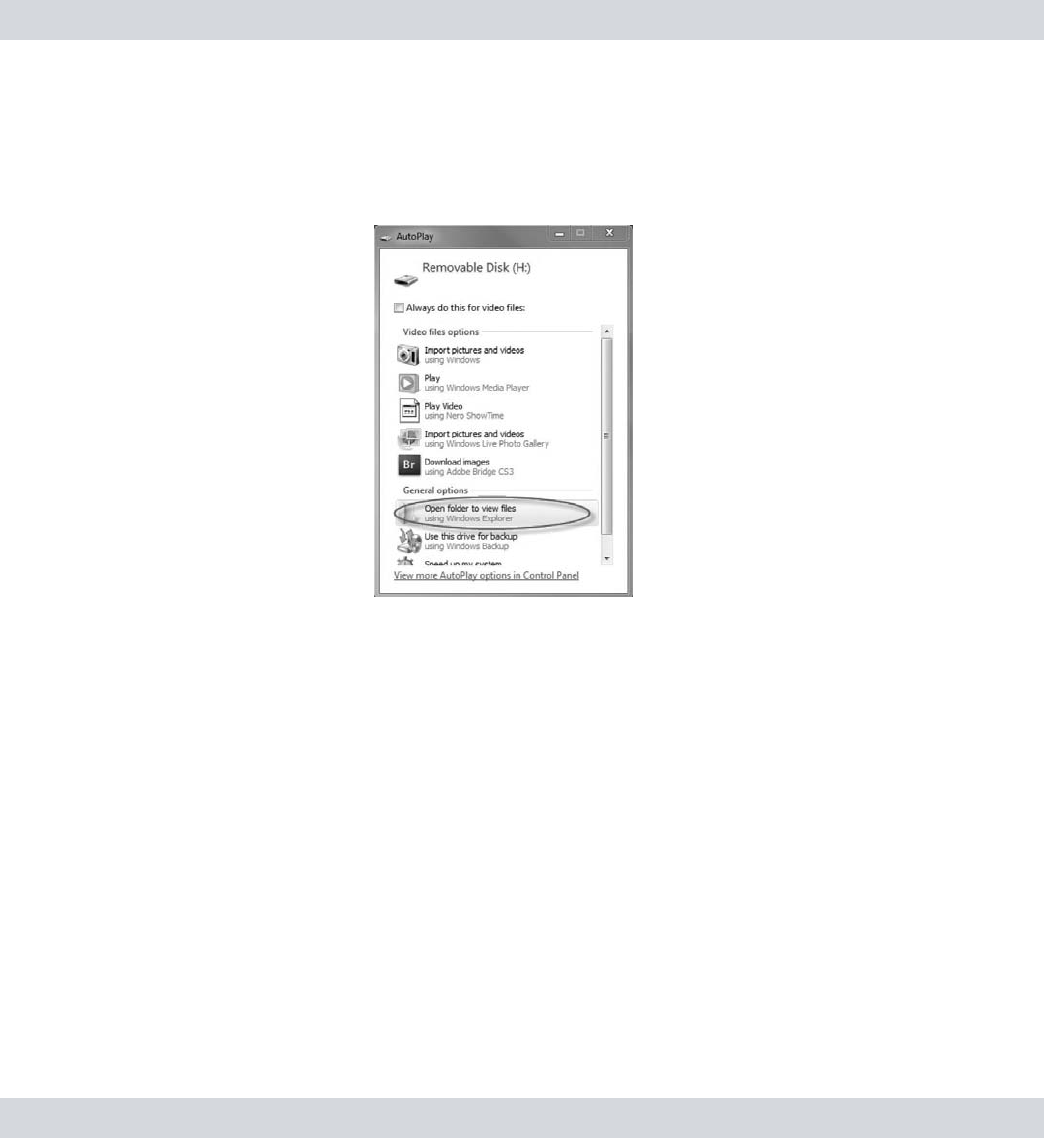
Once
c
o
nn
e
c
t
e
d
,
an
“Auto Play”
pop up
window
will
appear (as
s
h
o
w
n
below) providing various programs for
you
to
use
to
access and view
t
h
e
s
t
o
r
e
d
fi
l
e
s
.
Click on
t
h
e
“
Open
Folder to View
Files
”
option to
open
a
folder
view as
ill
u
s
t
r
a
t
e
d
.
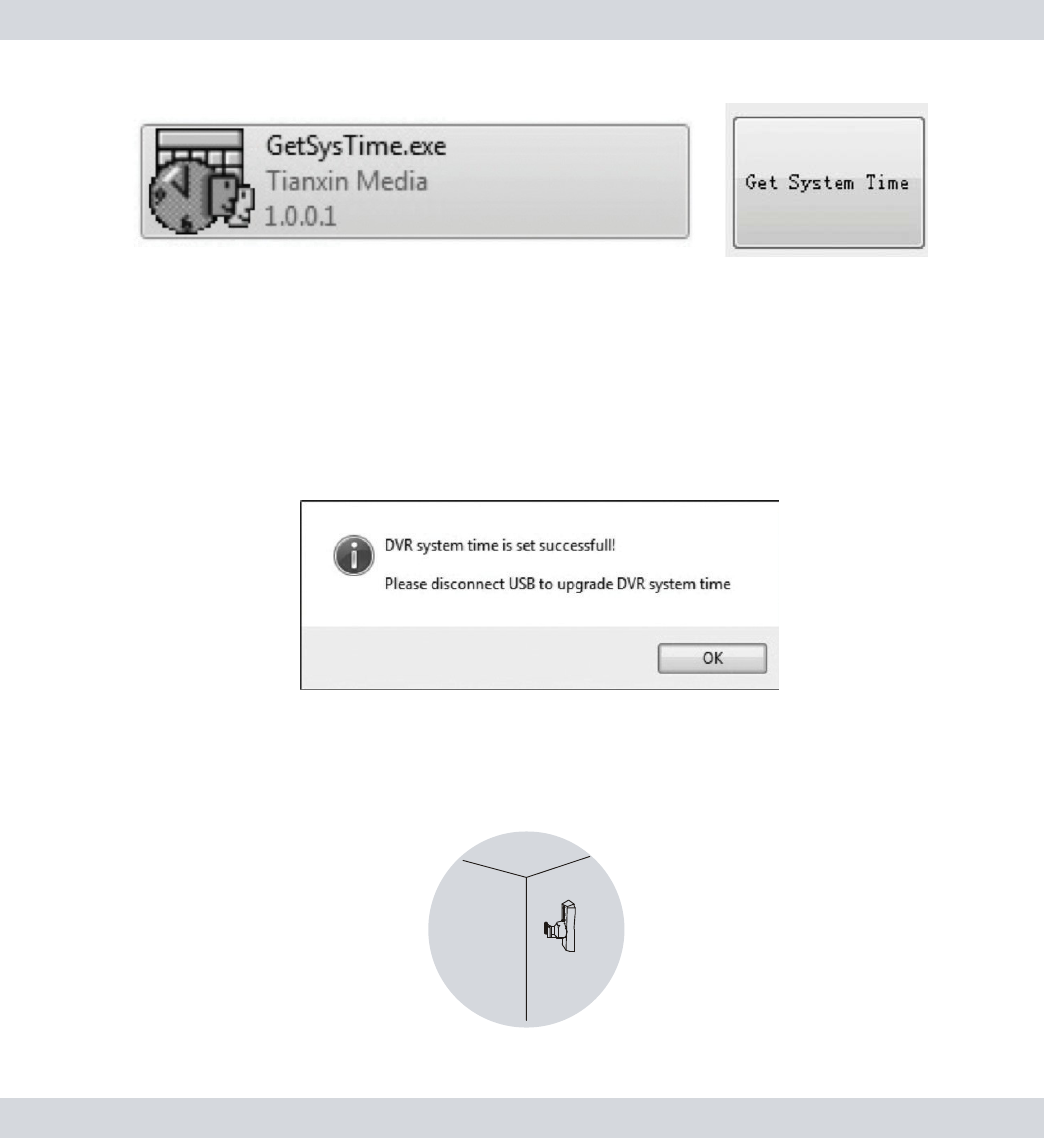
Double-click
on
t
h
e
“
G
e
t
S
y
s
T
i
m
e
”
f
o
l
d
e
r
,
double-click
on
t
h
e
“
G
e
t
S
y
s
T
i
m
e
.
e
x
e
”
file
l
o
c
a
t
e
d
on
t
h
e
SD card, and
t
h
e
n
click on
t
h
e
“
G
e
t
S
y
s
t
e
m
Time”
pop up
to
synchronize
your
c
o
m
p
u
t
e
r
s
time to
t
h
e
P
I
R
-
S
D
.
Make sure
t
h
e
c
o
m
p
u
t
e
r
you are using has
t
h
e
c
u
rr
e
n
t
time
and
d
a
t
e
.
I
f
it
is a
newly formatted
SD card, please
copy
and
p
a
s
t
e
t
h
e
“
G
e
t
S
y
s
T
i
m
e
.
exe”
t
i
m
e
/
d
a
t
e
s
e
t
u
p
file from other
SD source or
download it from
o
u
r
web
s
i
t
e
,
h
tt
p
:
//
www
.
s
e
c
u
r
i
t
y
m
a
n
i
n
c
.
c
o
m
/
?
p
a
g
e_
i
d
=
5
7
5
.
Look
for
“
P
I
R
-
SD”
under
t
h
e
s
o
f
t
w
a
r
e
column
and click on
t
h
e
link
to download
t
h
e
GetSysTime
fi
l
e.
10
After clicking
on
t
h
e
“
G
e
t
S
y
s
t
e
m
Time”
pop up, a
c
o
n
fi
r
m
a
t
i
o
n
pop up
w
ill
appear
letting
you
know that
t
h
e
time
and
d
a
t
e
were
s
e
t
s
u
cc
e
ss
f
u
lly
.
C
li
ck
OK
to
close
t
h
e
window
and
d
i
s
c
o
nn
e
c
t
t
h
e
PIR-SD
from
your
c
o
m
p
u
t
e
r
.
NOTE: A “SysTime.bin” file will be created indicating that the
d
a
t
e
and time was set
c
orr
e
c
t
ly
.
Mount
t
h
e
PIR-SD’s
mouting
b
r
a
ck
e
t
in
t
h
e
desired
l
o
c
a
t
i
o
n
and secure
i
t
to
t
h
e
wall using
t
h
e
screws
provided (use
t
h
e
green dry wall
i
n
s
e
r
t
s
w
h
e
n
applicable)
as shown
b
e
l
o
w
.
Wall

11
IMPORTANT
NOTICE: Due to a 2~3-sec delay time to record,
we
recommend
to mount the PIR-SD about
1
5
f
t
from the
i
n
t
e
n
ded
monitoring
object for proper
r
e
c
or
d
i
n
g
.
Slide
t
h
e
PIR-SD over
t
h
e
m
o
un
t
i
n
g
b
r
a
ck
e
t
and push
it
d
o
w
n
w
a
r
d
to
secure.
A
d
j
u
s
t
t
h
e
PIR-SD as
necessary
until
you reach a
d
e
s
i
r
e
d
viewing
angle as shown
b
e
l
o
w
.
Wall
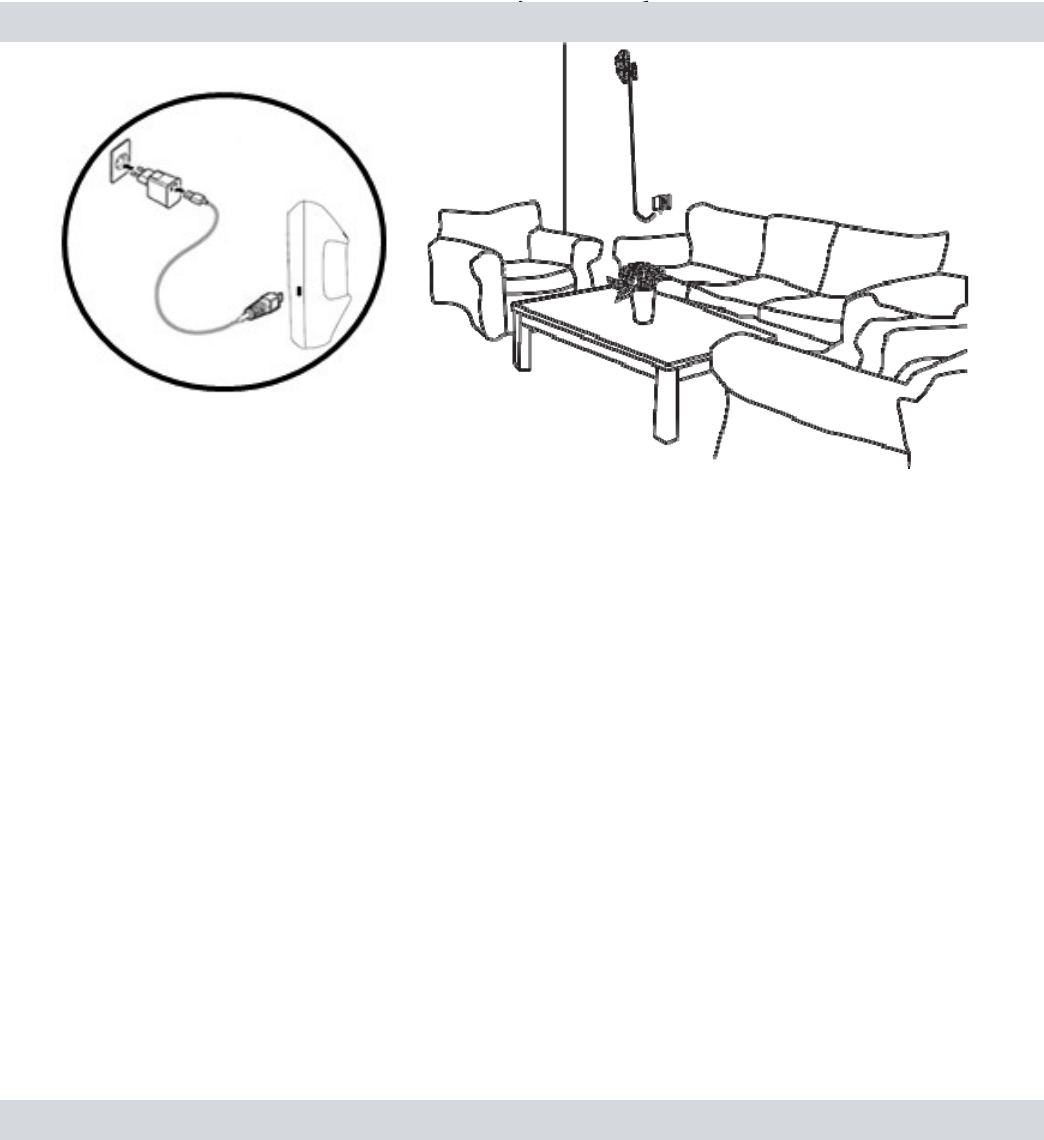
Finally,
c
o
nn
e
c
t
t
h
e
PIR-SD
to
t
h
e
USB
power
a
d
a
p
t
e
r
and a solid
r
e
d
light
will
appear
in
t
h
e
motion detection window for 30
seconds
a
s
ill
u
s
t
r
a
t
e
d
b
e
l
o
w
.
After
t
h
e
red
light d
i
s
a
pp
e
a
r
e
d
,
t
h
e
PIR-SD is ready
t
o
u
se
.
IMPORTANT
NO
T
I
C
E
:
1
)
Please avoid unplugging the USB power from the PIR-SD
t
o
prevent the system Date and Time from
r
e
s
e
tt
i
n
g
.
2)
To playback the
recorded
files, we
recommend
to remove the
S
D
card from the PIR-SD to playback on a media card reader due
t
o
important
notice
#
1
a
bo
v
e
.
3)
Since the PIR_SD does not have infrared to monitor in dark
a
r
e
a
,
we
would
recommend
to use night light or lamp stand in dark
a
r
e
a
.
12
Adding and Cancelling Remote
C
o
n
t
r
ol
Adding Remote
C
o
n
t
rol
:
1
)
While
plugged into
t
h
e
power o
u
t
l
e
t
,
press and release
t
h
e
“
S
t
u
d
y
”
button
l
o
c
a
t
e
d
on
t
h
e
back
of
t
h
e
PIR-SD. The PIR-SD
w
ill
beep once
after being
pressed
i
n
d
i
c
a
t
i
n
g
that it
is in
s
t
u
d
y
m
o
d
e
.
2) Press any one
of
t
h
e
four buttons
on
t
h
e
r
e
m
o
t
e
control 2
c
o
n
s
e
c
u
t
iv
e
t
i
m
e
s
and
t
h
e
PIR-SD will beep 5
t
i
m
e
s
to
i
n
d
i
c
a
t
e
t
h
e
r
e
m
o
t
e
control
has been
successfully added
to
t
h
e
P
I
R
-
S
D
.
Note: The PIR-SD will beep twice to indicate failure during
t
h
e
adding process and exit the study mode if the signal is not
r
e
c
e
iv
ed
from the remote control within
20
seconds. Please repeat steps
1
-
2
above if this should
h
a
ppe
n
.
Cancelling Remote
C
o
n
t
rol
:
Press and hold
down
t
h
e
“
S
t
u
d
y
”
button for
5
seconds
and
t
h
e
n
release,
t
h
e
PIR-SD will beep
for
3
seconds
to
i
n
d
i
c
a
t
e
t
h
e
r
e
m
o
t
e
control
is
sucessfully cancelled from
t
h
e
P
I
R
-
S
D
.
13
NOTE: Since the same command are used to cancel the remote
c
o
n
t
rol
from the PIR-SD and disable the video recording from the Alarm
H
o
s
t
(when integrating),
it is
important
to
remember
to enable the
vi
de
o
recording back
(or
pair video
recording)
to the Alarm Host
w
h
e
n
e
v
e
r
cancelling the remote control from the P
I
R
-
S
D
.
Operation
Using
PI
R
-
S
D
Motion
Detection
R
e
c
or
d
i
n
g
To
Activate
M
o
t
i
o
n
D
e
t
e
c
t
i
o
n
r
e
c
o
r
d
i
n
g
,
s
i
m
p
ly
press any
of
t
h
e
“
M
o
t
i
o
n
Record” buttons o
n
t
h
e
r
e
m
o
t
e
control
and
t
h
e
PIR-SD will
b
ee
p
once
to
i
n
d
i
c
a
t
e
that motion detection
has
b
ee
n
a
c
t
iv
a
t
e
d
in
s
t
a
n
d
-
b
y
mode. Once
a
c
t
iv
a
t
e
d
a
n
d
motion
has been
detected after
t
h
e
8
s
e
c
o
n
d
s
delay
time to
e
x
i
t
,
t
h
e
red LED will
turn
r
e
d
to
i
n
d
i
c
a
t
e
r
e
c
o
r
d
i
n
g
.
The PIR-SD will
record a
1
m
i
nu
t
e
video
clip per
motion detection
e
v
e
n
t
.
Motion
R
e
c
o
r
d
Note: The PIR-SD has a built in 8 second exit delay that allows
t
h
e
u
s
e
r
to exit the
detecting
area
(after activating
motion
de
t
e
c
t
io
n
)
without
triggering
the PIR to record. Motion
detection
recording
fi
l
e
s
will continue to accumulate if events re-occurs within the
1
m
i
nu
t
e
recording
p
er
io
d
.
Emergency R
e
c
or
d
ing
Press
t
h
e
“Emergency Record”
button
on
t
h
e
r
e
m
o
t
e
control (at
any
time) to start
an
i
mm
e
d
i
a
t
e
Emergency recording
e
v
e
n
t
.
Once
a
c
t
ivat
e
d
,
t
h
e
red LED will
become
solid
(while recording) and
t
h
e
PIR-SD will
record
a
1
m
i
nu
t
e
video
clip
p
e
r
emergency recording
e
v
en
t
.
E
m
e
r
ge
ncy
R
e
c
o
r
d
14
Stop R
e
c
or
d
i
n
g
To
stop
emergency recording
or
D
e
a
c
t
iv
a
t
e
M
o
t
i
o
n
D
e
t
e
c
t
i
o
n
r
e
c
o
r
d
i
n
g
,
simply
p
r
e
ss
t
h
e
“
S
t
o
p
Record” button
on
t
h
e
r
e
m
o
t
e
control at
any
time (the
PIR-SD will beep
t
w
i
c
e
to
i
n
d
i
c
a
t
e
that recording
has been
s
t
o
pp
e
d
)
.
New File
A
ler
t
After
d
e
a
c
t
iv
a
t
i
n
g
motion detection
or
emergency
r
e
c
o
r
d
i
n
g
,
b
y
d
e
f
a
u
l
t
t
h
e
“New
File
Alert”
f
e
a
t
u
r
e
d
:
•
Blue LED will
s
t
a
y
solid
for
5
s
e
c
o
n
d
s
.
•
PIR-SD will beep 5
t
i
m
e
s
.
To
disable
t
h
e
PIR-SD
from beeping
5
t
i
m
e
s
.
Make sure
t
h
e
P
I
R
-
SD is
d
i
s
a
r
m
e
d
.
Press
both
t
h
e
“
D
I
S
A
R
M
+
ARM”
buttons o
n
c
e
S
to
p
R
e
c
o
r
d
s
i
m
u
l
t
a
n
e
o
u
s
ly
and
t
h
e
PIR-SD will beep 3
t
i
m
e
s
to
disable
t
h
e
P
I
R
-
S
D
from beeping
5
t
i
m
e
s
on
“New
File
Alert”
n
o
t
i
fi
c
a
t
i
o
n
.
Press
both
t
h
e
“
D
I
S
A
R
M
+
ARM”
buttons
once
s
i
m
u
l
t
a
n
e
o
u
s
ly
a
g
a
i
n
and
t
h
e
PIR-SD will beep 4
t
i
m
e
s
to
enable
t
h
e
PIR-SD
to
beep 5
t
i
m
e
s
on
“New
File
Alert”
n
o
t
i
fi
c
a
t
i
o
n
.
NOTE: To manually mute the new file alerts, press the Stop R
e
c
or
d
button 3 times rapidly within 5 seconds or simply
activate
motion
or
manual recording. “New File Alert”
notification
will always
d
i
s
p
lay
ed
a solid blue LED for 5 seconds regardless of the beeping “New
Fil
e
Alert”
n
o
t
i
fi
c
a
t
io
n
.
SD Full Alert
(Memory F
u
ll
)
The Blue LED will
start to
flash
c
o
n
t
i
nu
o
u
s
ly
whenever
t
h
e
SD
c
a
r
d
becomes
f
u
ll
.
Please
remove
t
h
e
SD card
from
t
h
e
PIR-SD and back
u
p
all
recorded
e
v
e
n
t
s
to
a PC or
Laptop to free
up
s
p
a
c
e
.
NOTE: The Blue LED will also start to flash continuously whenever
t
h
e
SD card is not present. Please insert an SD card into the SD card
s
lo
t
.

15
The SD Full
notification
flashes whenever there are
1
minute or
60MB
o
f
the free capacity left for system
buffering.
The PIR-SD system does
n
o
t
have an
overwrite
f
e
a
t
u
r
e
.
Playback Recorded
V
i
de
o
You can
playback recorded files directly from
t
h
e
PIR-SD
(
w
h
e
n
c
o
nn
e
c
t
e
d
to
a
PC)
or
directly from
t
h
e
SD card by
i
n
s
e
r
t
i
n
g
t
h
e
card
i
n
t
o
your
c
o
m
p
u
t
e
r
s
card reader. To
playback recorded video
on a PC:
1.
Remove
t
h
e
SD card
from
t
h
e
PIR-SD by
gently
pushing
on
t
h
e
S
D
card
allowing it to
pop
out from
t
h
e
SD card
s
l
o
t
.
2.
I
n
s
e
r
t
t
h
e
SD card
into
an SD card
reader
(not included)
c
o
nn
e
c
t
e
d
to
your PC
(your
PC
should
load
the
SD card as a new
Removable
D
r
iv
e
)
.
3. When
p
r
o
m
p
t
e
d
,
s
e
l
e
c
t
t
h
e
“
Open
folder to view
files
”
option
t
o
view
i
t
s
c
o
n
t
e
n
t
s
,
you
should
see
two
folders labeled
S
Y
S
T
E
M
and
V
I
D
E
O
.
Open
t
h
e
VIDEO
folder to
view a
li
s
t
of
all
t
h
e
recorded
e
v
e
n
t
s
.
O
n
c
e
inside
t
h
e
video folder
you can
double-click
any
of
t
h
e
recorded
AVI
fi
l
e
s
and
t
h
e
video
will
begin playing
in your
d
e
f
a
u
l
t
AVI media
p
l
a
y
e
r
.
NOTE: To playback video footages, we
recommend
to remove
t
h
e
SD card from the PIR-SD to playback. Using method
1
to connect
t
h
e
PIR-SD via USB cable for playback is strongly NOT
r
e
c
o
mm
e
n
ded
.
Once the PIR-SD is
powered
on, if for any reasons the power were
t
o
be
unplugged
from the PIR-SD, the Date and Time will auto reset
t
o
default
d
a
t
e
/t
i
m
e
.
When this occurs, please
remember
to setup
t
h
e
Date and Time before the next
o
pe
r
a
t
io
n
.
Integrating
with
Air-Alarm
Ser
i
e
s
To
fully i
n
t
e
g
r
a
t
e
t
h
e
PIR-SD
s
y
s
t
e
m
with
t
h
e
Air-Alarm
H
o
s
t
series,
t
h
e
r
e
are
t
h
r
ee
c
o
m
p
o
n
e
n
t
s
that
needs
to
be
a
dd
e
d
.
Adding
t
h
e
PIR-SD
r
e
m
o
t
e
control (Not
a
m
u
s
t
)
,
t
h
e
PIR-SD
motion detection
sensor, and
t
h
e

16
video recording
(
o
n
/
o
ff
)
as shown
b
e
l
o
w
.
To
avoid
using
m
u
l
t
i
p
l
e
r
e
m
o
t
e
c
o
n
t
r
o
l
s
when
integrating
t
h
e
PIR-SD
to
t
h
e
Air-Alarm
h
o
s
t
series,
p
l
e
a
s
e
add
t
h
e
PIR-SD
r
e
m
o
t
e
control to
t
h
e
Air-Alarm
h
o
s
t
series or vice
v
e
r
s
a
.
Adding PIR-SD Remote to the Alarm
H
o
s
t
S
t
e
p
1:
Press PRG
M
/
S
E
T
+ Password
(
s
y
s
t
e
m
d
e
f
a
u
l
t
888
)
+
E
N
T+7
0
+
ENT+00+ENT
[
t
h
e
“
/
L
e
a
r
n
”
light
will
appear
solid
b
l
u
e
/
r
e
d
]
.
Step2: Press any
1
of
t
h
e
4
buttons
on
t
h
e
PIR-SD
r
e
m
o
t
e
t
w
i
c
e
c
o
n
s
e
c
u
t
i
ve
ly
to
a
dd
.
Cancelling PIR-SD Remote from the Alarm
H
o
s
t
S
t
e
p
1
:
Press PRG
M
/
S
E
T
+ Password
(
s
y
s
t
e
m
d
e
f
a
u
l
t
888
)
+
E
N
T+7
1
+ENT+00+ENT
to
c
a
nc
el
.
NOTE: Please
reference
t
h
e
Air-Alarm
series user’s manual as
n
ee
d
e
d
on how
to
add
r
e
m
o
t
e
c
o
n
t
r
o
l
s
.
Adding
t
h
e
PIR-SD
r
e
m
o
t
e
to
t
h
e
Alarm
H
o
s
t
series is
not
a
r
e
q
u
i
r
e
m
e
n
t
,
only pair
t
h
e
m
if
you
w
a
n
t
t
o
use one
r
e
m
o
t
e
to control both
t
h
e
PIR-SD and
t
h
e
Alarm
H
o
s
t
.
Adding PIR-SD Motion
Detection
to the Alarm
H
o
s
t
Make sure
t
h
e
h
o
s
t
is
“DIS-ARMED”
and
p
r
e
ss
:
S
t
e
p
1:
PRG
M
/
S
E
T
+ Password
(default
is
888)
+ ENT+
70
+ ENT +
XX
+ ENT
[
I
n
p
u
t
zones
11
~
1
5
for
XX
i
n
d
i
c
a
t
i
n
g
t
h
e
2nd
defense
li
n
e
d
e
d
i
c
a
t
e
d
for
PIR
s
e
n
s
o
r
s
]
(The “
/
L
e
a
r
n
”
light
will
appear
solid
b
l
u
e
/
r
e
d
)
S
t
e
p
2:
Provoke
t
h
e
motion
sensor on
t
h
e
PIR-SD 2
c
o
n
s
e
c
u
t
iv
e
t
i
m
e
s
to
a
dd
.
Cancelling PIR-SD Motion
Detection
from the Alarm
H
o
s
t
Make sure
t
h
e
h
o
s
t
is
“DIS-ARMED”
and
p
r
e
ss
:
PRGM/SET + Password
(default
is
888)
+ ENT+
7
1
+ ENT + XX + E
N
T
[
I
n
p
u
t
zones
11
~
1
5
for
XX
i
n
d
i
c
a
t
i
n
g
t
h
e
zone
number that
t
h
e
P
I
R
-
S
D
were
paired to
and using code
7
1
to remove
t
h
e
PIR-SD will
remove
a
ll

17
(up to
4
sensors)
sensor
that
was
paired to that
z
o
n
e
.
]
(The “
/
L
e
a
r
n
”
light
will
appear
solid
b
l
u
e
/
r
e
d
)
The alarm
h
o
s
t
will beep
t
w
i
c
e
,
and
t
h
e
“
/
L
e
a
r
n
”
light
will
flash
o
n
c
e
to
i
n
d
i
c
a
t
e
t
h
e
PIR-SD
motion detection
is
successfully cancelled
f
r
o
m
t
h
e
Alarm
H
o
s
t
.
Enabling Video R
e
c
or
d
ing
To enable
video
r
e
c
o
r
d
i
n
g
,
please
follow
s
t
e
p
s
1
and 2
b
e
l
o
w
.
E
n
a
b
li
n
g
video recording
allows
t
h
e
PIR-SD
to start recording video
f
oo
t
a
g
e
s
whenever
t
h
e
alarm
s
y
s
t
e
m
are
triggered
by 24hrs devices, by
other
sensors
that
are
pre-paired to
t
h
e
Alarm
H
o
s
t
or by
t
h
e
PIR_SD.
S
t
e
p
1:
Press
t
h
e
“
S
t
u
d
y
”
button
on
t
h
e
back
of
t
h
e
P
I
R
-
S
D
(PIR-SD
will beep
o
n
c
e
)
.
S
t
e
p
2: On
t
h
e
Alarm
H
o
s
t
Press: ESC + Password
(default
is
888) +
ENT + ESC + Password
(default
is
888)
+ ENT. The PIR-SD
w
ill
beep 5
t
i
m
e
s
i
n
d
i
c
a
t
i
n
g
t
h
e
video recording
has
b
ee
n
successfully
e
n
a
b
l
e
d
.
PIR-SD will beep 2
t
i
m
e
s
to
i
n
d
i
c
a
t
e
f
a
il
u
r
e
;
please
r
e
p
e
a
t
s
t
e
p
s
1
-
2
a
b
o
v
e
.
IMPORTANT
NOTICE: Enabling video recording when
in
t
eg
r
a
t
ing
with
SM-8808T
or
SM-8808E Air-Alarm
Hosts will have a 2-sec
or
3-sec delay time to record
respectively
due to processing
s
peed
.
Please note that it is normal for the PIR-SD to have a
2
~
3
-
s
e
c
delay time to record. It is very
important
and our
recommendation
t
o
mount the PIR-SD
1
5
f
t
from the
intended target
for
p
ro
pe
r
m
o
n
i
t
ori
n
g
view and proper recording. Please be sure to
t
h
oro
u
g
h
ly
test the recording and camera angle before fixing the P
I
R
-
S
D
.
Note: Study mode will
automatically
turned off if inactive for
m
or
e
than
20
seconds. During Alarm Host series
4
0
-
s
e
c
exiting
de
lay
time, the PIR-SD will continue to record if motion is
de
t
e
c
t
ed
.

18
Disabling Video R
e
c
or
d
ing
Make sure
t
h
e
h
o
s
t
is
“DIS-ARMED”
and
p
r
e
ss
:
Press and hold
down
t
h
e
“
S
t
u
d
y
”
button
on
t
h
e
back
of
t
h
e
P
I
R
-
S
D
for
5 seconds,
t
h
e
n
release, and
t
h
e
PIR-SD will beep
for
3
s
e
c
o
n
d
s
to
i
n
d
i
c
a
t
e
video recording
is
successfully
d
i
s
a
b
l
e
d
.
NOTE: Since
t
h
e
same
command
are use
to remove
t
h
e
r
e
m
o
t
e
control from
t
h
e
PIR-SD and
disable
t
h
e
video recording from
t
h
e
Alarm
H
o
s
t
,
please pair
t
h
e
r
e
m
o
t
e
control
back
to
t
h
e
P
I
R
-
S
D
whenever disabling video recording from
t
h
e
Alarm
H
o
s
t
.
After
t
h
e
PIR-SD has been
successfully added
to
t
h
e
Alarm
H
o
s
t
series,
t
h
e
PIR-SD
should
f
un
c
t
i
o
n
in
t
h
e
same
manners
as
t
h
e
m
o
t
i
o
n
sensor
only PIR-SD has
t
h
e
video recording
f
e
a
t
u
r
e
.
If
t
h
e
PIR-SD
i
s
triggered
by
motion
in
Armed
mode,
it
will alarm
t
h
e
H
o
s
t
and
at
t
h
e
same
time
t
h
e
Alarm
H
o
s
t
will send a signal
to
t
h
e
PIR-SD
to
s
t
a
r
t
t
h
e
video recording
process.
M
o
r
e
o
v
e
r
,
if
any
of
t
h
e
input
s
e
n
s
i
n
g
device(s) that
are
pre-programmed to
t
h
e
Alarm
H
o
s
t
triggered
a
t
a
n
y
t
i
m
e
to
alarm
t
h
e
h
o
s
t
,
t
h
e
PIR-SD will
process video
r
e
c
o
r
d
i
n
g
.
Note: To review the
recorded
video footages, please
f
ollo
w
“Playback Recorded Video” section
a
b
ov
e
.

19
Specifications
PIR
s
e
n
s
or
/
c
amer
a
Image
S
e
n
s
o
r
1
/
6
.
5
”
C
M
O
S
colo
r
Re
s
o
l
u
t
i
o
n
6
4
0
x4
8
0
Recording
S
p
ee
d
3
0
f
ps
Camera
Lens
8
mm
Camera
Viewing
A
ng
l
e
H:
60
d
e
g
r
ee
,
V: 35
d
e
g
r
ee
Recording
Video
F
o
r
ma
t
A
V
I
Recording
Time and
S
i
z
e
One
minute
per
motion
d
e
te
c
t
i
o
n
e
v
e
n
t
.
4
0
M
B
/
m
i
nu
te
.
32GB =
1
2
h
r
s
of
v
i
d
e
o
LED
I
n
d
ic
a
t
o
r
2 LED
li
g
h
t
s
(
R
e
d
:
p
o
w
e
r
,
r
e
co
r
d
,
a
l
a
r
m
/
Blue: SD
full
or new REC
fi
l
e
)
USB P
o
r
t
2
.
0
(data
t
r
a
n
s
f
e
r
to
PC or USB
power
a
d
a
pte
r
)
Video
S
t
o
r
a
g
e
(SD
s
l
o
t
)
SD card
(up to
3
2
G
B
,
SD Class 4 or
h
i
g
h
e
r
)
PIR
D
e
te
c
t
i
n
g
A
r
e
a
11
0
degree
*
26ft
(8
M
)
M
in
.
I
ll
u
m
in
a
t
io
n
1
Lu
x
/
F
1
.
2
P
e
t
Im
mu
n
i
t
y
22
l
b
s
(
1
0
kg
s
)
or
l
e
ss
Power
C
o
n
su
m
p
t
i
o
n
≤
60mA
(
s
t
a
n
dby
)
;
11
0
m
A
(
a
c
t
i
v
e
)
Power
S
u
pply
11
0
-
2
4
0
V
A
C
,
5VDC
1
.
0A
(
U
S
B
)
D
im
e
n
s
io
n
s
4
.
3
”x
2
.
4
”x
1
.
7
”
Gross
Wei
g
h
t
0
.
5
l
b
s
R
e
m
o
te
C
o
nt
rol
O
p
er
a
t
i
n
g
P
o
w
er
27A
1
2
V
battery
(
a
lk
a
li
n
e
)
Remote
C
o
n
t
r
o
l
D
i
s
t
a
n
c
e
30
f
t
B
a
t
te
r
y
Life
T
i
m
e
Up
to
2
y
e
a
r
s
B
u
t
to
n
s
S
t
op
,
M
o
t
ion
D
e
t
e
c
t
ion
,
and Manual R
e
c
ord
W
ir
ele
ss
(
G
en
er
a
l
)
F
r
e
q
ue
n
c
y
4
33M
hz
Transmission D
is
t
a
n
ce
Up
to 300ft (in
open
a
r
e
a
)
;
Up
to
1
00
f
t
(
i
n
d
oo
r
s
)
O
p
er
a
t
i
n
g
T
em
p
er
a
t
u
r
e
-
1
0
°
C
to
5
0
°
C
(
1
4
°
F
to
1
22
°
f
)
O
p
e
ra
t
i
n
g
H
u
midi
t
y
≤ 85% R
H

Note:Thisequipmenthasbeentestedandfoundtocomplywiththelimits
foraClassBdigitaldevice,pursuanttopart15oftheFCCRules.These
limitsaredesignedto
providereasonableprotectionagainstharmfulinterferenceinaresidential
installation.Thisequipmentgenerates,usesandcanradiateradio
frequencyenergyand,ifnotinstalledandusedinaccordancewiththe
instructions,maycauseharmfulinterferencetoradiocommunications.
However,thereisnoguaranteethatinterferencewillnotoccurina
particularinstallation.Ifthisequipmentdoescauseharmfulinterferenceto
radioortelevisionreception,whichcanbedeterminedbyturningthe
equipmentoffandon,theuserisencouragedtotrytocorrectthe
interferencebyoneormoreofthefollowingmeasures:
—Reorientorrelocatethereceivingantenna.
—Increasetheseparationbetweentheequipmentandreceiver.
—Connecttheequipmentintoanoutletonacircuitdifferentfromthatto
whichthereceiverisconnected.
—Consultthedealeroranexperiencedradio/TVtechnicianforhelp.