Xiamen Huoshiquan Import and Export HOLYSTONEGS quadcopter wifi camera User Manual
Xiamen Huoshiquan Import & Export CO., LTD quadcopter wifi camera Users Manual
Contents
- 1. User manual part 1
- 2. User manual part 2
User manual part 1

INSTRUCTIONS FOR USE
HS100G
usa@holystone.com (America)
ca@holystone.com (Canada)
eu@holystone.com (Europe)
16age
+1(855) 888-6699

Table of Contents
Preface ...................................................................................1
Warnings ...............................................................................2
Maintenance ......................................................................... 3
Package Contents ................................................................4
Preparation
-- Download the APP ........................................................... 5
-- Check the Battery Level ................................................... 5
-- Charging the Battery and Transmitter ......................... 6
-- Assemble the Propeller .................................................... 7
-- Assemble the Propeller Guard ....................................... 8
-- Assemble the Camera ...................................................... 9
Drone and Battery ............................................................. 10
Transmitter Functions .......................................................11
Fly Safety ..............................................................................14
Flight
-- Pair the Drone ................................................................. 16
-- Compass Calibration .......................................................17
-- GPS Searching ..................................................................18
-- Recalibrate Gyroscope ....................................................19
-- Using the Application .....................................................19
APP Functions ..................................................................... 20
Take-off ................................................................................ 21
Landing/Emergency Stop ................................................ 21
Follow Me ............................................................................22
Return to Home ..................................................................23
Headless Mode ................................................................... 24
Camera Functions ..............................................................25
Replace the Landing Gear ................................................26
Specifications ......................................................................27
Trouble Shooting ...............................................................29
Contact Us ...........................................................................29
General Information .......................................................... 30
< PREFACE>
Safety Guidelines
Important Statement
To make your experience with this drone as straightforward and convenient as possible, please
read this Instructions For Use carefully before operating. Also make sure you Keep it safe for future
reference and to kensure safe and enjoyable use of your drone.
1. This product is not a toy, but a high precision drone that integrates various electronic stability and
control mechanisms. This drone requires a correct assembly and setup to ensure a safe and
accident free operation. This equipment should always be operated in a safe and controlled
manner. Incorrect or dangerous operations may cause damages to the device, property, or cause
serious injury to those in the vicinity.
2. This product is suitable for experienced drone pilots over 16 years of age.
3. If you are experiencing difficulties on any aspect of the product, operation or maintenance,
please contact your local sales agent or contact customer support here at Holy Stone.
This product has a flying camera that offers easy, controllable flight when in good working order
conditions, however, there is also a significant risk to property or people if flown irresponsibly or
within confined spaces. Incorrect assembly or poor control by inexperienced pilots can result in
damage to property or harm to people. Be fully aware of your surroundings when flying and
always maintain complete control of the vehicle.
1. Keep Your Distance.
a. Always fly in locations that are cleared of obstructions such as buildings, poles, electrical wires,
trees and so on.
b. Never fly above or near people.
2. Do not fly in adverse weather conditions.
a. Keep clear of moisture, fog, ice and excessive wind.
b. Oly fly in good weather conditions .
3. Use and maintain the product according to the Instructions For Use.
a. Operate this device legally in accordance with instructions provided and with local laws and
regulations.
b. Always use original parts made by Holy Stone for maintenance and repair.
4. Do not operate the device alone.
a. If you are a new pilot, seek assistance from an experienced drone pilot as you learn.
b. Have others around to help you fly.
5. Safety First every time.
a. Always operate the drone within your limits as a pilot. If you are ill, disoriented, or unsure of how
to effectively fly the drone, please seek help to avoid accidents.
6. Keep clear of spining parts.
a. During operation, the rotors revolve extremely quickly, please avoid contact with the propellers
and ensure that foreign objects are kept clear of all moving parts.
7.Avoid exposure to excessive heat.
a. Due to the numerous material types used in construction, this drone is not suitable when
exposed to heat. Please keep your device away from heat sources and avoid prolonged exposure
to direct sunlight. High temperatures can distort the structure of the device, Please check for any
damages before flight.
1

<WARNINGS>
1. The information within this package is important for the safe operation and maintenance of your
drone. Please keep it safe for future reference.
2. You accept sole responsibilities for any injury, loss or damage that result from your operation of
the device.
3. Always follow the instructions when assembling or operating the drone. Always keep at least
6 feet between the user and viewers from the model to avoid risk of injury. Pay attention to the
device at all times while in flight.
4. Neither Holy Stone nor any distributors or agents accept any responsibility for loss, injury or
damage caused by incorrect operation of the drone.
5. This drone is not suitable for children under the age of 16. Younger pilots should always operate
the drone under adult supervision.
6. Please make sure assembly instructions are followed correctly to ensure proper operation and
performance of your drone.
7. This product contains many small parts. To avoid choking hazards, please keep this drone and
all its components out of children’s reach.
8. You must not, under any circumstances, fly this drone over open water or near any public road
due to increased the risk of accidents..
9. Keep all packaging materials away from children and dispose them safely.
10. The internals of the drone are not user serviceable, please do not attempt to dissemble this
drone or replace any part of the drone, to avoid malfunctions during flight.
11. Please ensure batteries are fitted in the correct orientation shown in these instructions.
12. You can access the transmitter battery compartment by unscrewing the screws on the battery
cover. Always put on the battery cover and tighten the screws securely before use.
13. Only use the charger provided with your drone for safety reasons.
14. The charger is not a toy.
15. Dispose used batteries carefully, do not litter.
16. The power socket must not be removed from the drone. Do not attempt to short-circuit the
connection socket.
17. When disposing batteries, do not throw them in fire or leave them to decomposed. Keep clear
of heat sources and high temperatures at all time.
18. If the device is not going to be used for an extended period, remove batteries to prevent poten-
tial damage from battery leakage.
19. Care should be taken to keep your drone away from sources of magnetic interference of other
electrical equipment to prevent signal issues during operation.
20. Keep clear of rotating parts and be aware of loose clothing that could become entangled in
the rotors causing injury.
21. Be aware of the noise volume the drone produces. Keep your distance to avoid ear damage.
22.The charger socket uses a mini USB 5V connection.
23. Always use the product in compliance with local aviation rules and comply with local
authorities should they require you to refrain from operating at any time.
1. Clean the product after each use with a clean and soft cloth.
2. Avoid prolonged exposure to direct sunlight and heat buildup in the drone.
3. This device is not waterproof and must not be submerged in water under any circumstance.
Failure to maintain the device completely dry will result in the failure of the unit.
4. Frequently check the charging plug and other accessories for signs of damage. If any part of the
device is damaged refrain from flying until maintenance is carried out .
<MAINTENANCE>
23
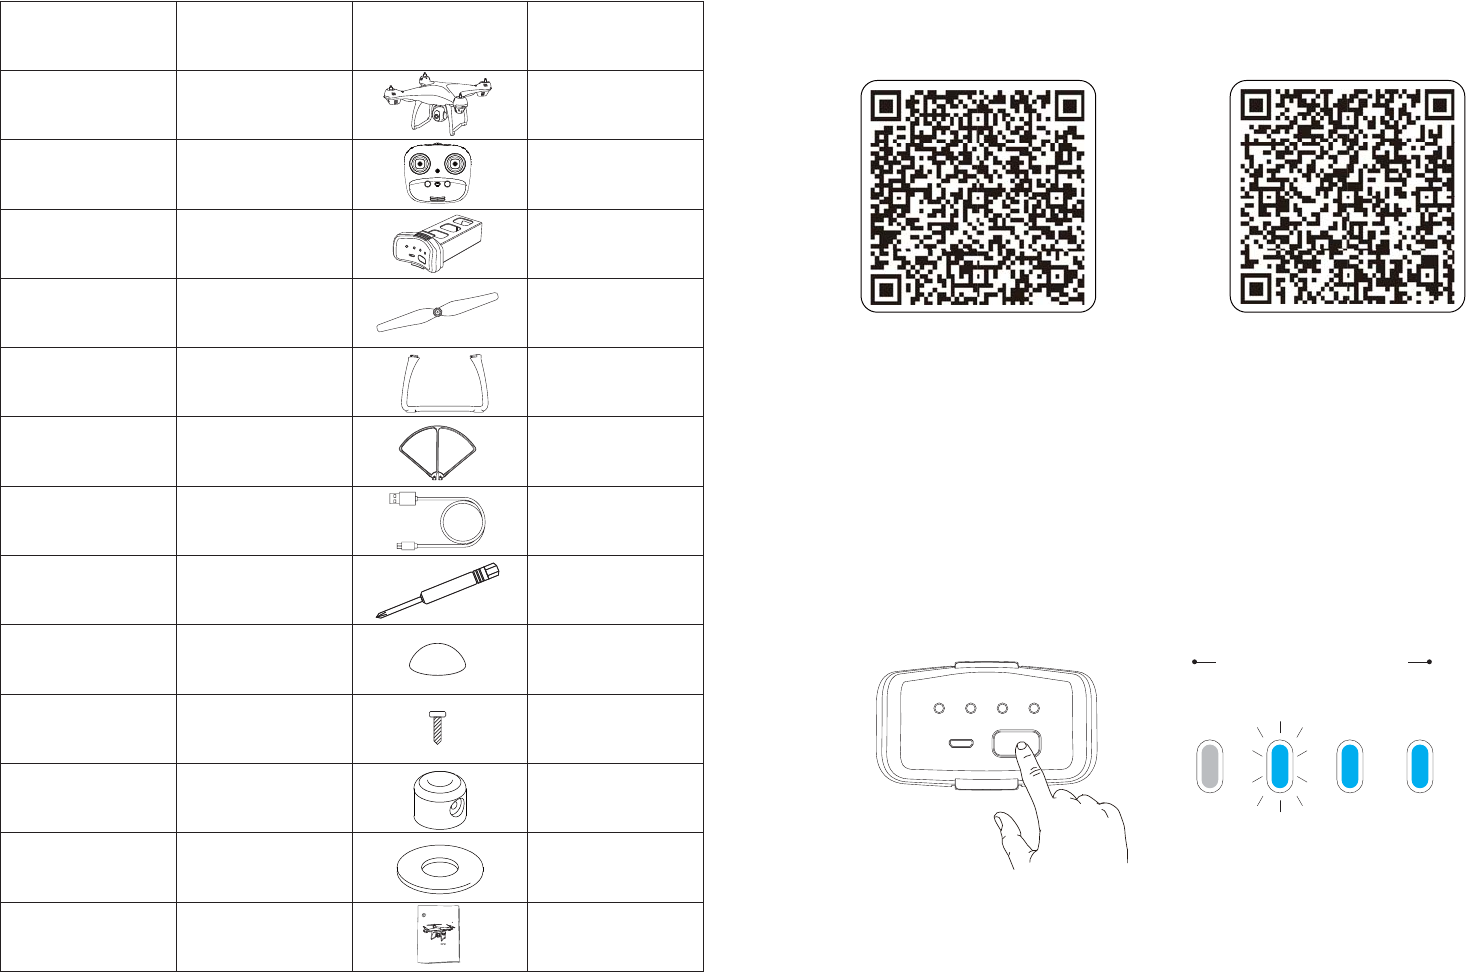
Package Contents
SN Name Pic. Qty.
1
2
2
3
4
5
66
7
8
10
11
12
13
Drone
Transmitter
Battery
Propellers
Landing Gear
Propeller Guard
USB Charging
Cable
Screws
Instructions
For Use
28 Screwdriver
INSTRUCTIONS FOR USE
HS100G
E-mail:
usa@holystone.com (America)
ca@holystone.com (Canada)
eu@holystone.com (Europe)
16age
TEL:
+1(855) 888-6699
1
1
1
1
1
8
8
20
Preparation:
High Electricity Low
1. Download the APP
2. Check the Battery Level
iOS Google Play
Connect to the App Store™ or Google Play™ and download the“HS GPS
PRO” application for free.
89 Caps
Press the “Power Switch”button to turn on and check the battery level.
Spacer Ring
Fixed Ring
45
This drone is only suitable for the phones with 5G Wi-Fi signals!
3. Charging the Battery and Transmitter
Phone adapter:
5V 1A/2A
(Not included)
Press the buckle and Pull out
the Battery from the drone.
----
Charging time:
3~6 Hours
(Depending on
Charging Power)
Phone adapter:
5V 1A/2A
(Not included)
----
Charging time of the
transmitter: about 1Hour
(Charging) (Fully Charged)
Tip:
When the transmitter is in low power, the “Battery Power Indicators” on
the transmitter will blink, you need to charge the transmitter this time.
Connect the USB Charging Cable with the Battery, then, connect the USB
Charging Cable to a computer or a USB adapter.
Connect the USB Charging Cable with the Transmitter, then, connect
the USB Charging Cable to a computer or a USB adapter.
5. Assemble the Propeller
A
A
B
B
1. Remove Propeller Cap.
2. Unscrew the small screw.
3. Pull out the Fixed Ring and Spacer Ring, then pull out the propeller.
4. Attach the correct propeller.
Cap
Spacer Ring
Fixed Ring
Propeller
Attach the propellers with the
ring mark to the motor cover
with ring marks.
Please note that the letter “A ” or “ B ” is printed on each propeller.
Make sure all the propellers are attached in the correct motor posi-
tion.
67
①
②
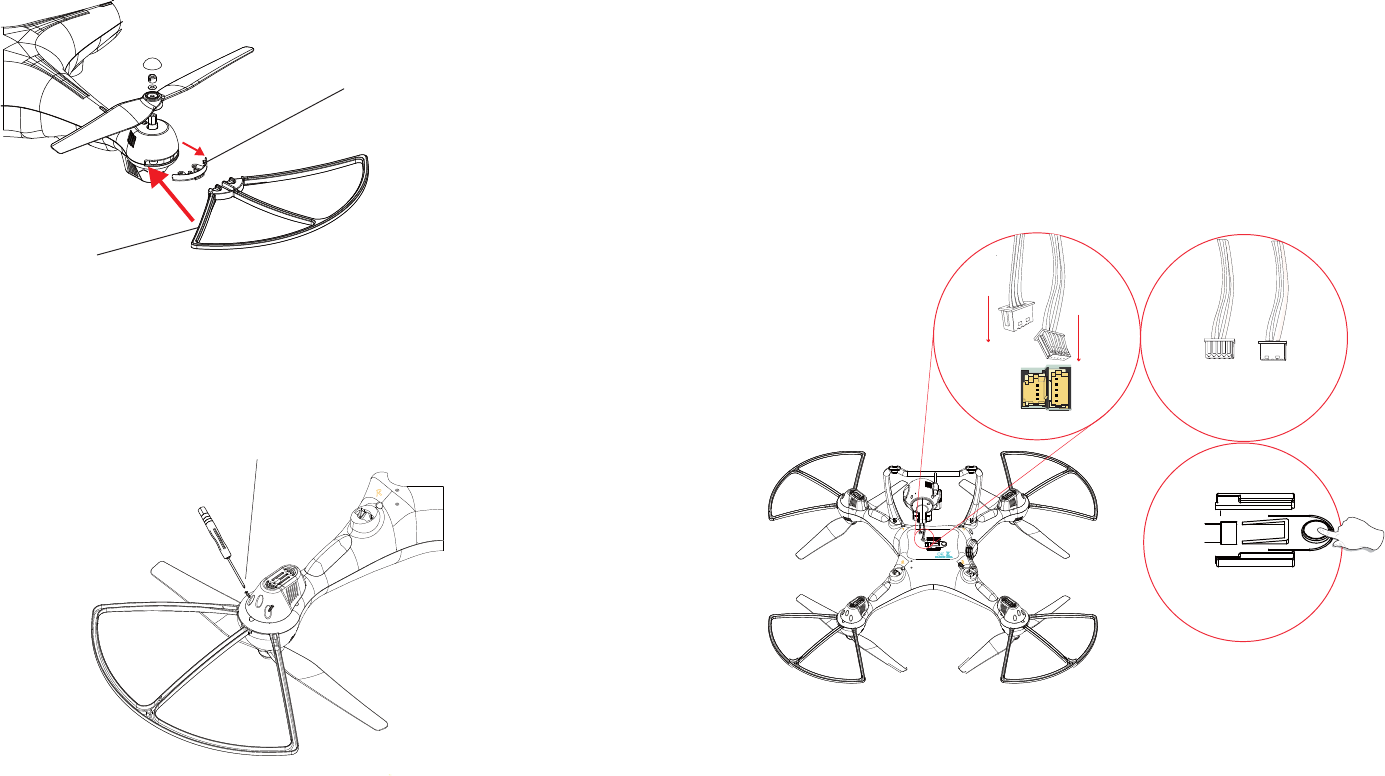
6. Assemble the Propeller Guard
1st. Pull out the Dust Cover
2nd. Attach the Propeller Guard
Tighten the screws
3)Tighten the screws under the motor cover.
To prevent accidents or injuries, we suggest the pilot to install the
propeller guards.
1)Take out the Dust Cover from the motor cover.
2)Attach the Propeller Guard to the motor cover.
7. Assemble the Camera
A
Pic. 2
Pic. 3
B
Pic. 1
Press
1) Plug the camera wires accordingly into the connection ports on
the bottom of the drone.(Smaller wire should be connected to small-
er ports while the Bigger wire connects to bigger port Pic.1.
Wire connector has two sides A/B Pic.2, A side of the smaller interface
faces the drone’s Head and A side of Bigger interface
faces the drone’s Tail direction.
2) Push the camera into the camera installation track on the bottom
of the drone.
3) Remove camera by pressing the camera lock pic.3 on the bottom
of the drone, and push the camera out to disconnect the camera
wire from the port.
89

Drone’s Detail Transmitter Functions
⑥ USB Charging Port.
⑥ USB Charging Port.
Ascend/Descend;
Turn Left/Right
Fly to Left/Right/
Forward/Backward
③ Return to Home ④ One Button Take-off/
One Button Landing
⑤ Power Button
① Forward/Backward;
Turn Left/Right
② Ascend/Descend;
Fly to Left/Right
③ Return to Home ④ One Button Take-off/
One Button Landing
⑤ Power Button
Mode 2:
Left hand throttle Mode 2 will be default setting.
①②
Propeller A
(Clockwise)
Propeller A
(Clockwise)
Propeller B
Propeller B
(Counter Clockwise)
(Counter Clockwise)
High Electricity Low
1
23
1. Battery Power Indicators
2. Micro USB Charging Port
3. Power Switch
Battery of Drone
Tip:
HD Camera Landing Gear
Body Frame
Cap
Press the Power Switch shortly to turn on; hold the Power Switch for
2 seconds to turn off.
Once the battery is low, please fly the drone back as soon as possi-
ble. Otherwise, it may cause the drone loss.
10 11
Mode 1:
Turn on the transmitter while holding the “Follow Me” button to enter Mode
1.
(Don’t release the “Speed Switch” button until the transmitter is powered on.)
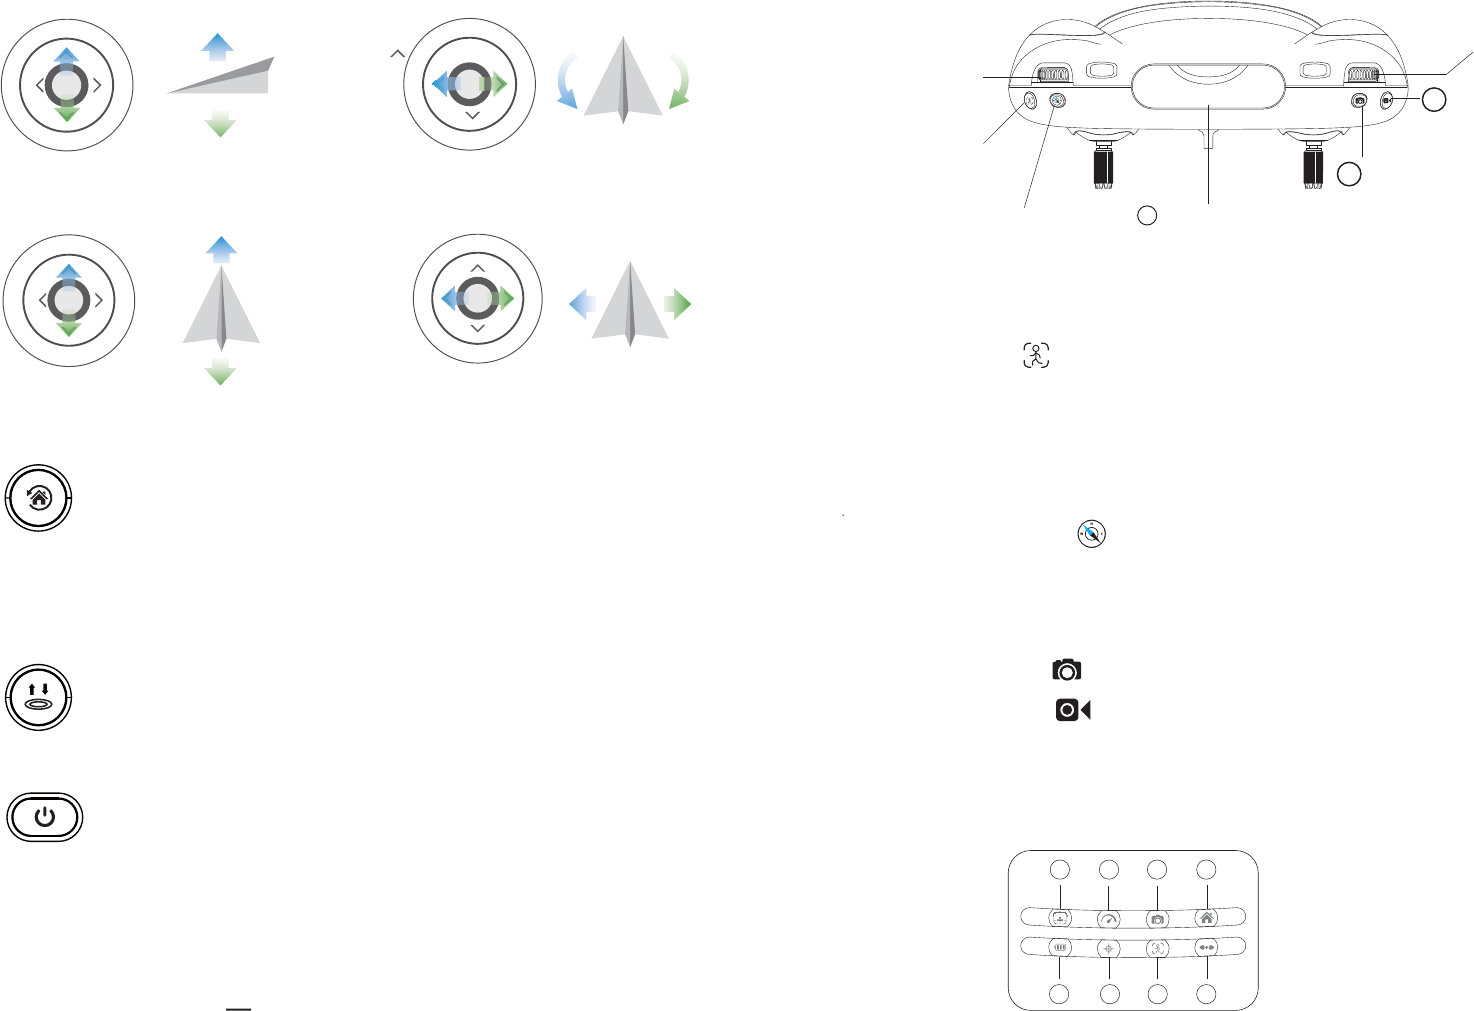
1. Throttle Joystick.
3. Return To Home(RTH):
2. Direction Joystick.
5. Power Button:
4. One Button Take-off, One Button Landing.
Hold 2 seconds for EMERGENCY STOP.
......
Down
Down
Up
Up
Left
Left
Right
Right
Ascend
Descend
Turn Left Trun Right
Forward
Backward
Fly to Left Fly to Right
⑩Gimbal Dial
11
13
12
14. Status LED
15. Speed Status
16. Photo/Video
17. RTH
18. Charging Indicator Light
19. Headless Mode
20. Follow-me
21. Trim LED
8. Follow Me: Click to enter Follow-me mode; Click again to cancel
the Follow-Me mode.(For more details, please check page22#)
Hold this button for 3 seconds to enter Trim mode. Click again to
cancel Trim mode.
Note: No need to trim under the GPS Mode!
9. Headless Mode: Click to switch headless/normal mode.
Hold the button for 3 seconds to exit the GPS MODE.
(For more details, please check page24#)
10. Gimbal Dial: Dial left/right to adjust the camera tilt up/down.
11. Take Photo: Click to take photo.
12. Take Video: Click to take video; Click again to stop and save
the video .
(Don’t take photo while taking video, otherwise it will disturb the Video process.)
13. Phone Holder : Fits on all phones up to 7.5 cm wide.
7. Speed Switch: Dial to the right to accelerate; Dial to the left to
decelerate.
6. USB Charging Port:
Press the Power Button shortly to turn on;
Hold the Power Button for 2 seconds to turn off.
Smart RTH: Press this button and the drone will return to the
vertical position of the TAKE OFF point which you set, then,
land by itself slowly.
(This function can only work in GPS mode.)
Charge the Transmitter when transmitter’s battery level is low.
Connect the USB port to computer or smartphone adapter
with OUTPUT: DC 5V 1A/2A
14 15 16 17
18 19 20 21
12 13
⑨ Headless Mode
⑧ Follow Me
⑦ Speed Switch
Take Photo
Take Video
Phone Holder
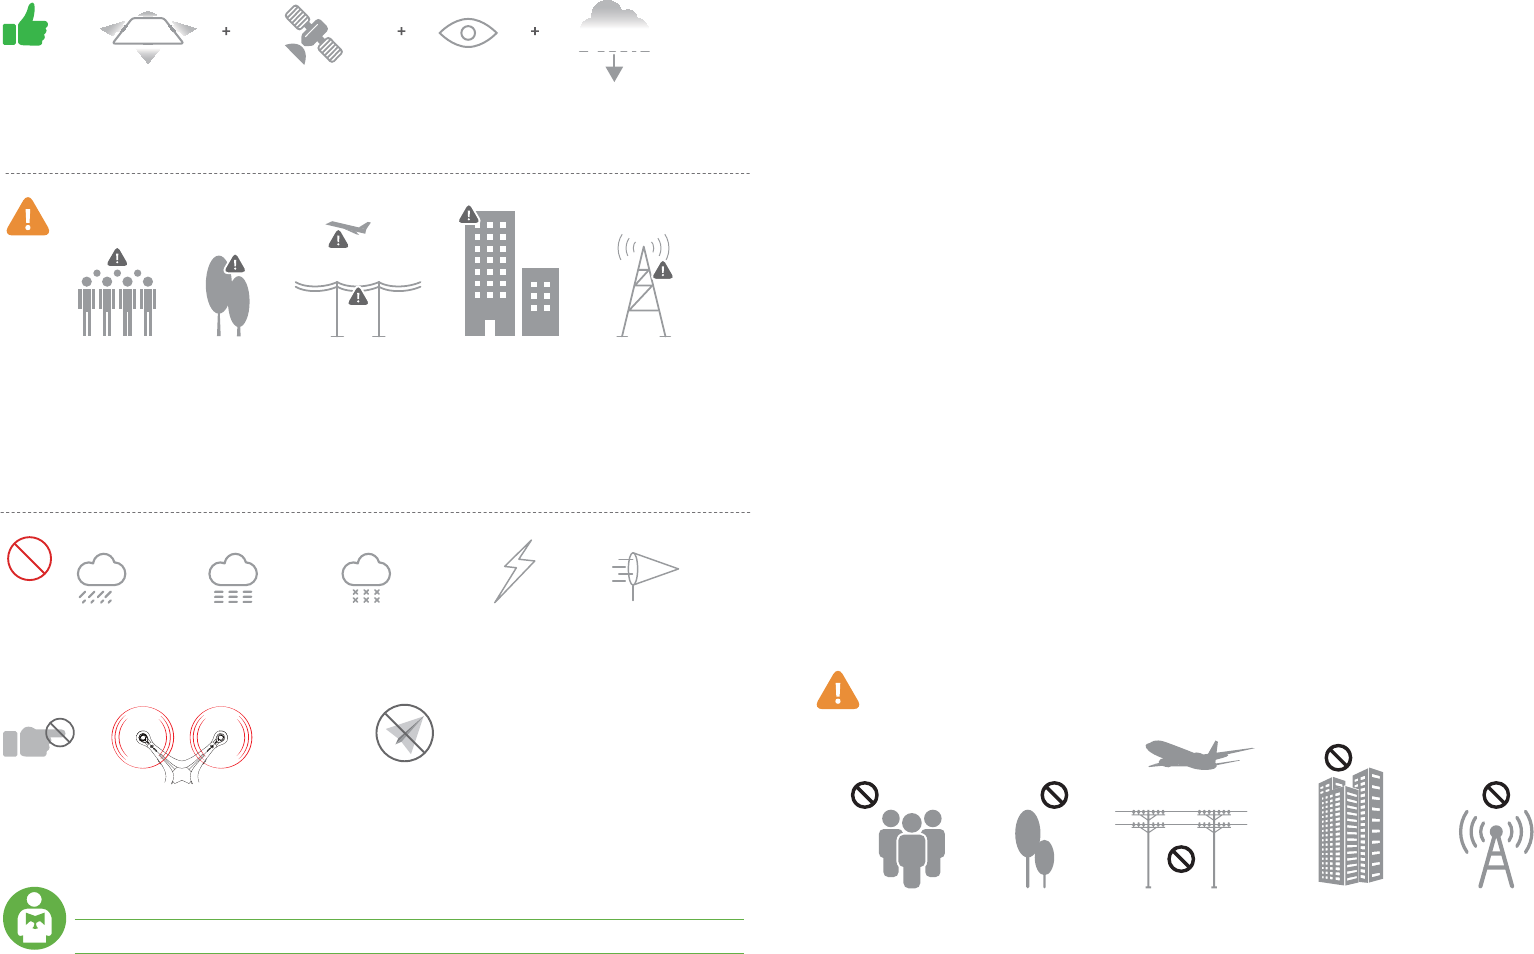
Fly Safety
No Fly Zone
Stay away from the rotating
propellers and motors.
Fly in Open Areas Strong GPS Signal Maintain Line
of Sight
Fly Below
400 feet (120 m)
≥
NT
Avoid flying over or near obstacles, crowds, high voltage power lines, trees,air-
ports, and bodies of water.
DO NOT fly near strong electromagnetic sources such as power lines and base
stations as it may affect the onboard compass.
DO NOT use the drone in adverse weather conditions such as rain, snow, fog and
windy day.
It’s important to understand basic flight guidelines, for the safety of both you and
those around you. Don't forget to read the Safety Guidelines before flight.
Fly Safety
1. Fly in Open Areas: Always fly in locations that are clear of build-
ings, trees, power lines, and other obstacles. Do not fly above or near
people or animals.
2. Maintain Control at All Times: Even when using autopilot func-
tions such as Auto-Takeoff, Auto-Landing, and Return to Home,
always keep your hands on the Transmitter and maintain control of
your drone when it is in flight.
3. Maintain Line of Sight: Keep your drone in sight at all times, and
avoid flying behind buildings or other obstacles that may block your
view.
4. Monitor Your Altitude: For the safety of full-sized drone and
other air traffic, always fly at altitudes less than 400 feet (120
meters) above ground level, or in line with your local laws and regu-
lations.
14 15
ᴺ Power on the Transmitter.
⑤ LED indicators on the drone will blink Purple (Back) and Pink (Front) when
the drone is paired successfully.
② Plug the Battery into the Drone and
Power on the drone.
③ Place the Drone on a flat and dry
surface and in an unobstructed
and light area.
④ Push the left joystick up then down
to pair with drone.
Front
Back
Back
Front
2. Compass Calibration
①
Compass Calibration Part 1
— Push Joysticks at 1 & 11 o’clock positions as shown by the picture above.
— Lights rapidly alter between Purple (Back) and Pink (Front) .
— App Drone Status: “Compass calibration”.
Flight Setting
On APP
1. Pair the Drone
Flight
Please Note, all of the following operations are taking Mode 2 for
example.
Tip: Safe to Fly (GPS)
The Default GPS Mode is BEGINNER MODE, Under BEGINNER MODE:
1. Flight Distance is limited between 0-30 M/0-98.4 Feet.
2. Flight Altitude is limited between 0-30 M/0-98.4 Feet.
3. RTH Altitude is under 25 M/82 Feet.
You only can Turn-off the BEGINNER MODE to modify the parameters in the APP
on your phone after you complete the Compass Calibration operations.
② Compass Calibration Part 2
—Hold the drone horizontally; turn your body 360 degrees and the back lights
will turn solid purple.
16 17