Xiamen Huoshiquan Import and Export HOLYSTONEGS quadcopter wifi camera User Manual
Xiamen Huoshiquan Import & Export CO., LTD quadcopter wifi camera Users Manual
Contents
- 1. User manual part 1
- 2. User manual part 2
User manual part 2
Front
Back
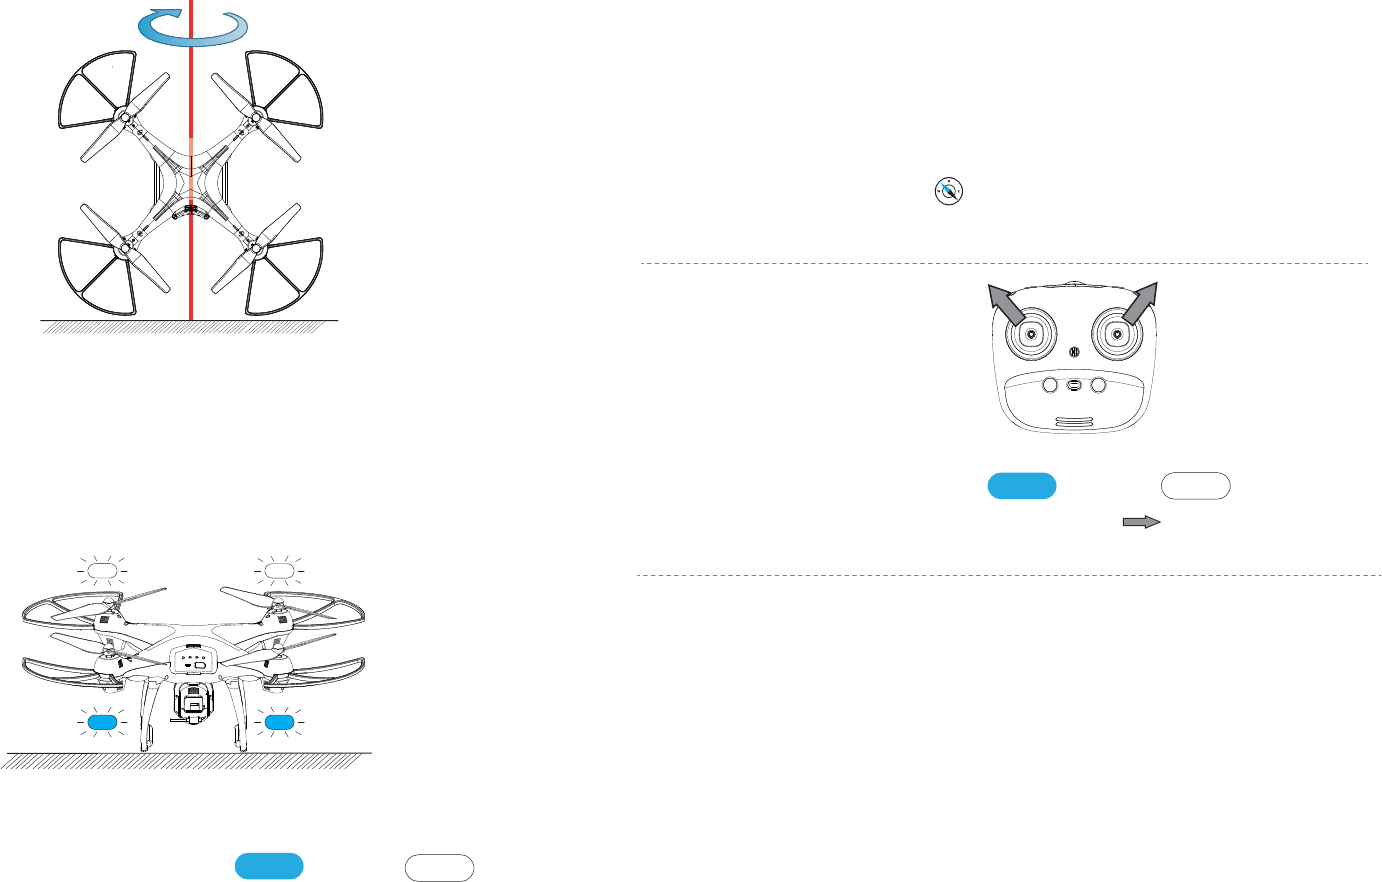
③ Compass Calibration Part 3
—Hold the drone vertically and camera is facing the sky; spin your body
360 degrees. The front Pink lights and the rear Purple light will turn to
solid.
Compass only need to calibrate when first fly the drone in a new area.
3. GPS Searching (DO NOT use GPS Mode indoor )
— Place the Drone on a flat and dry surface and in an unobstructed and lit area.
— LED Flight Indicators will turn to blink Blue (Back) and White (Front) .
This means the drone is Searching the GPS Signal.
This process can take a few minutes. App Drone Status: “Waiting for GPS signal”.
Once the lights have turned all solid, GPS Mode is Ready(Drone can only take off
when it is connected to GPS successfully).
— Blue (back) and white (front) lights are all solid (no blinking).
— App Drone Status: “Ready to fly”.
4. Recalibrate Gyroscope
— Push the Joysticks at 11 & 1 o’clock positions as shown by the picture above.
— Lights will blink rapidly in both Blue (Back) and White (Front).
— App Drone Status: “Gyroscope is being calibrated” “Gyroscope okay”.
5. Using the Application
Note: You can also calibrate the Drone if it does not stay on course correctly.
ATTENTION:
① If the LED Flight Indicators keep blinking quickly, it indicates drone is searching
for GPS signals.
② If the drone keep blinking quickly after a few minutes, it indicates that the
process has FAILED. Please taking the drone a meter or so from the ground,and
repeat all the Compass Calibration operations until the process is successful.
③ If you fly indoors, please hold button for 3 second to exit GPS Mode, and the
LED lights will blink slowly. You can fly this drone when you complete the Compass
Calibration operations if you exit GPS mode.
Connect your smart phone to the Wi-Fi of the Drone and check the drone’s
status on the ”HS GPS PRO” App.
① Power on the Drone.
② On your smartphone, launch a search of the available Wi-Fi networks:
if you are using an iPhone or an iPad, select Settings>Wi-Fi;
if you are using an Android smartphone, select Settings > Wireless and
networks >Wi-Fi.
③ Select the Wi-Fi network: HolyStoneFPV_xxxxx
④ Wait for your smartphone connect to the Wi-Fi network of the drone.
This connection is generally represented by the Wi-Fi logo appearing on your
smartphone’s screen.
⑤ Enter the HS GPS PRO application.
> The connection between your smartphone and the Drone is established
automatically.
比例 1.000
18 19
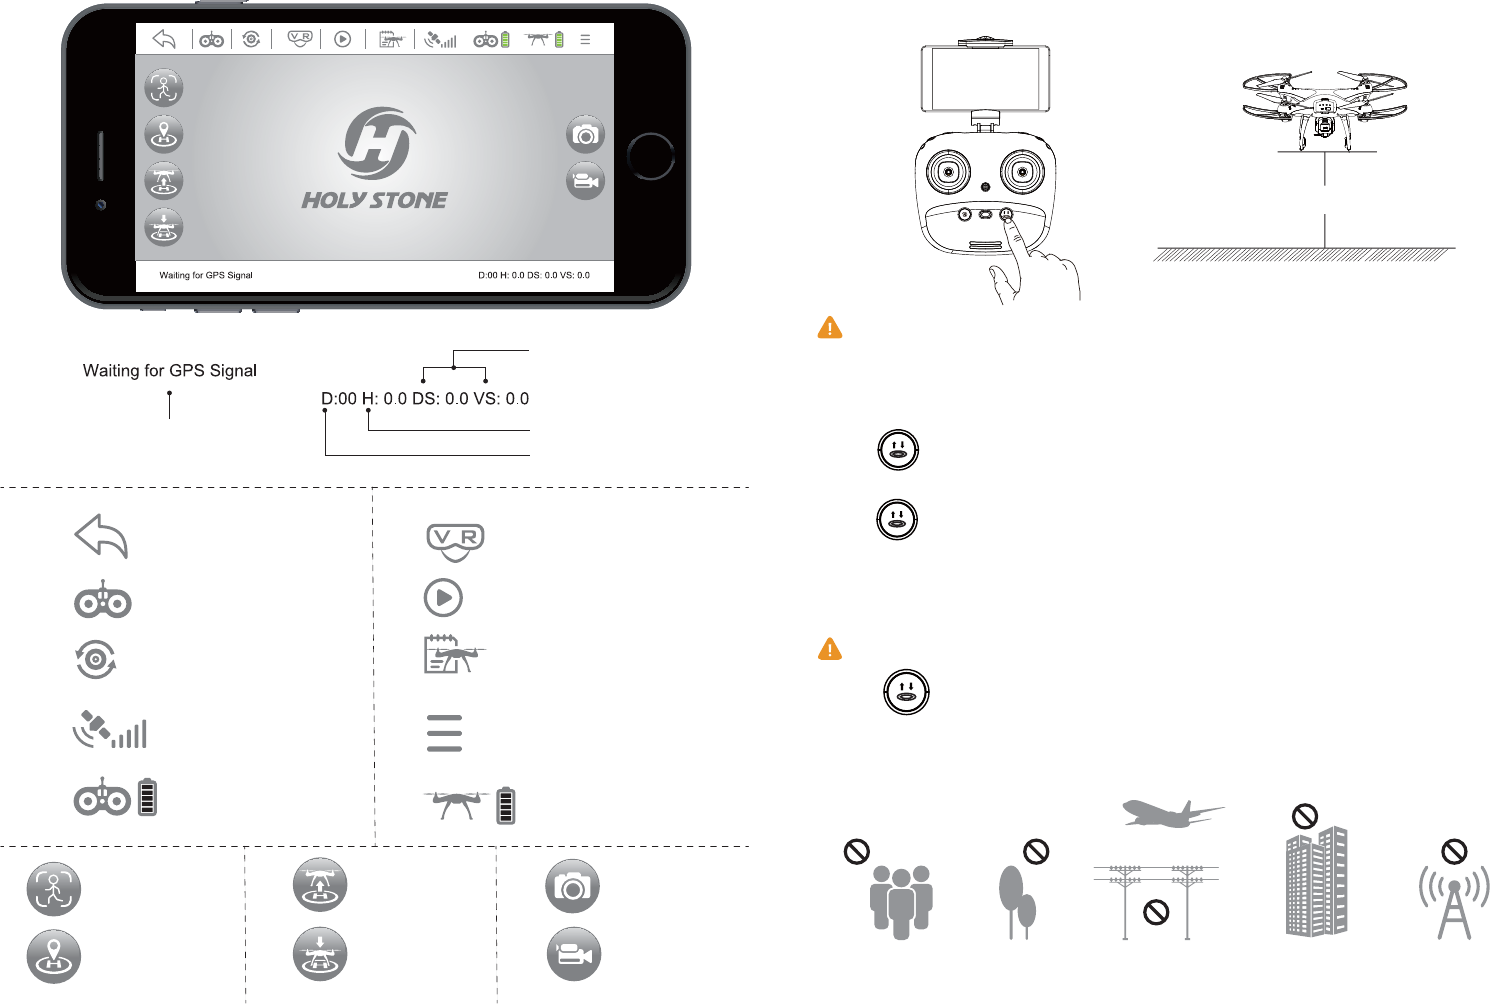
Flight Setting
Drone Battery
Transmitter Battery
GPS Signal
Back to Main Menu
Controls ON/OFF
Flip Screen
VR Split Screen
Flight Record
Media Gallery
Follow Me
Return Home
Auto Take-off
Auto Land
Take Photo
Take Video
Drone Status Distance (Meters)
Height (Meters)
Speed(Meter/Sec.)
APP Functions
Head
Hold 2 secs for EMERGENCY STOP.
Take-off/Landing/Emergency Stop
Only stop motors mid-flight in an emergency. Doing so can reduce
the risk of damage or injury.
about 5 feet
Rotating propellers can be dangerous. Do not start the motors when
there are people nearby.
Press , the propellers will spin and the drone will take off at an
altitude of about 5 feet.
(Always keep the head of drone facing forward).
Press again, the drone will land automatically. Remember to
always keep your hands on the transmitter as long as the motors are
spinning.
20 21
Follow Me
Trim under NO GPS Mode
The app’s RTH Button
RTH Button
1.Smart Return To Home
WARNING:
This drone is NOT equipped with obstacle-avoidance.
When the Follow Me function is activated., the drone will follow the GPS
in your smartphone to follow you wherever you go.
Follow Me Mode:
1. Set drone at least 10 feet high and 100 feet distance position.
2. Click the on the transmitter or app interface .
3. Wait for the HS GPS PRO app Drone Status to display “Follow Me ready”
— the drone will now follow the phone’s coordinates.
4. To exit Follow Me mode, simply click the on the transmitter or app
interface again.
Common Issues :
Follow Me mode would be hard to activated if the phone’s GPS signal is too weak, this
could be due to the signal loss from surrounding buildings, trees, or congestion from too
many mobile phones in the area.
* Use in an open area and be mindful of your surroundings. The drone is NOT equipped
with obstacle avoidance.
If the drone flies under NO GPS Mode, you can trim the drone to obtain
a more balanced flight. Press for 3 seconds, and you will enter the
trim mode. Push the direction stick to the opposite side that the drone
drifts to rebalance the drone. For example, if the drone drifts to the left,
push the direction stick to the right to make the drone more balanced.
Press again to exit the Trim Mode.
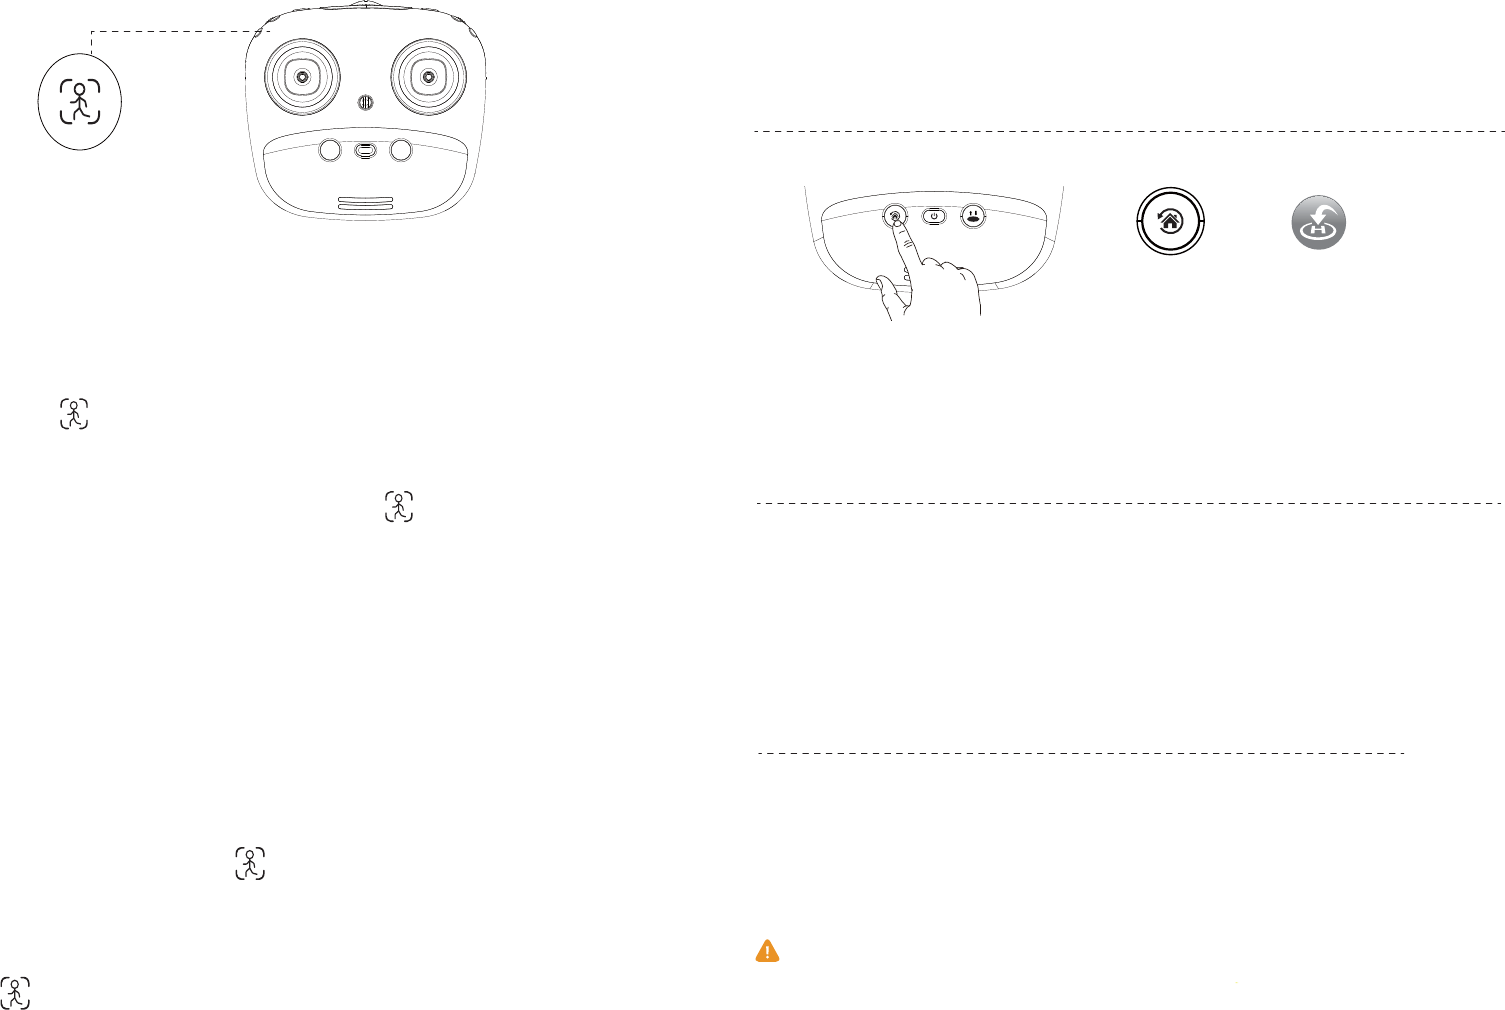
Return-to-Home (RTH)
The Return to Home (RTH) function brings the drone back to the last recorded Take-Off
Point. This function can only be achieved in GPS mode. There are three types of RTH:
Smart RTH / Low--Battery RTH / Failsafe RTH.
Press the Return to Home Button on your Transmitter or tap on the App of
your smart phone, and the transmitter will start beeping.
Your drone will return to the TAKE OFF Point. Press the button again to stop
RTH procedure. Push the throttle joystick down to land the drone on a safe
area.
2. Low-Battery RTH
Low-Battery RTH is triggered when the Flight Battery level is low, When
Low-Battery RTH is activated, the drone will fly back to where you are from
about 100 feet, and you can still control your drone. Push the throttle
down to land the drone in a safe area. When the power of drone is com-
pletely empty, drone will return to the TAKE OFF point where you set.
3. Failsafe RTH
Drone will enter Return to Home Mode if the signal between the drone
and the transmitter lost. The drone will fly back to where you are from
about 100 feet, and the drone will rebind to the transmitter by itself. When
the drone flies back into your view, you can control it agian.
22 23
Hold the on the transmitter for 3 secs to exit GPS MODE.
Press the on the transmitter to enter Headless Mode.
Press the again to exit Headless Mode.
Headless Mode
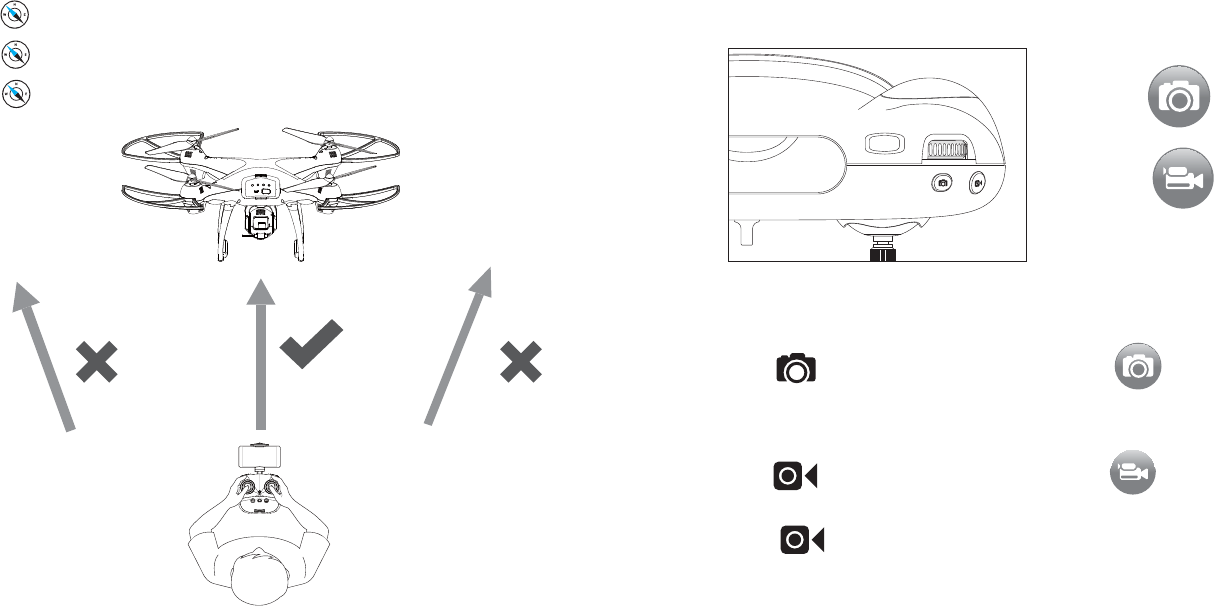
Take Photo
Take Video
Camera Functions
The Original images and videos are saved in your phone directly.
The images can be also viewed in the App.
ICON on APP
Press on the Transmitter or tap on APP, the red indicator
on camera will flash once, indicating the camera has taken a
photo.
Press on the Transmitter or tap on APP, the red indicator
will keep flashing, indicating the camera is capturing a video.
Press again to save the video.
Do not take photos when shooting a video!
NOTE: When using the HS-GPS PRO app, the original photos and
videos will be compressed and saved to the smart phone.
24 25
Under Headless Mode, the forward direction is the direction that the head of
drone faces when the drone takes off. In order to make sure the pilot can tell
drone's direction, we recommend that pilots to stay in the same orientation as
the drone head faces when the drone takes off. If so, when the pilot pushes
the direction joystick forward, the drone will fly forward. If the pilot pushes the
direction joystick backward, the drone will fly towards him/her. If the pilot
move the right stick left /right, the drone will move left/right relative to you. It is
very important that the pilot stay in the same orientation as the drone head
faces when the drone takes off.
Please make sure the pilot to stay in the
same orientation as the drone’s direction.
Head
Tail
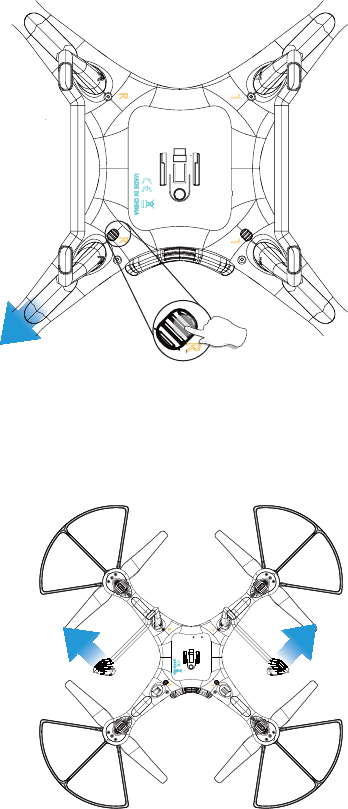
Replace the Landing Gear
1st: Press
2nd: Pull
1)Letter “L” and “R” is printed on each side of a landing gear shell. “L” is
the mark of the left landing gear as “R” is for the right landing gear.
2)There are two locks on the bottom; Press and hold down the lock, and
pull the lock-side landing gear out.
3)Rotate landing gears outside at angle of about 90 degrees to take the
landing gear out.
● Drone
MODEL:HS100G
Weight (Including Battery) :700 g / 24.7 oz
Flight Time:12-15 minutes
WIFI Distance:1312 feet/400m(Outdoor and Unobstructed)
Motor Model:180
Hovering:Enabled
Operating Temperature Range :32° to 104° F ( 0° to 40° C )
Satellite Systems GPS / GLONASS
Dimensions:500*500*175mm
● Gimbal
Controllable Range:Pitch: -90° to 0°
● Camera
Frequency: 5G
Lens:FOV 120°/2.0
Still Photography Modes:Single shot
Video Recording Modes:HD1920*1080P
Photo:JPEG
Video:AVI
Operating Temperature:32° to 104° F ( 0° to 40° C )
Specifications
26 27
usa@holystone.com (America)
ca@holystone.com (Canada)
eu@holystone.com (Europe)
jp@holystone.com (Japan)
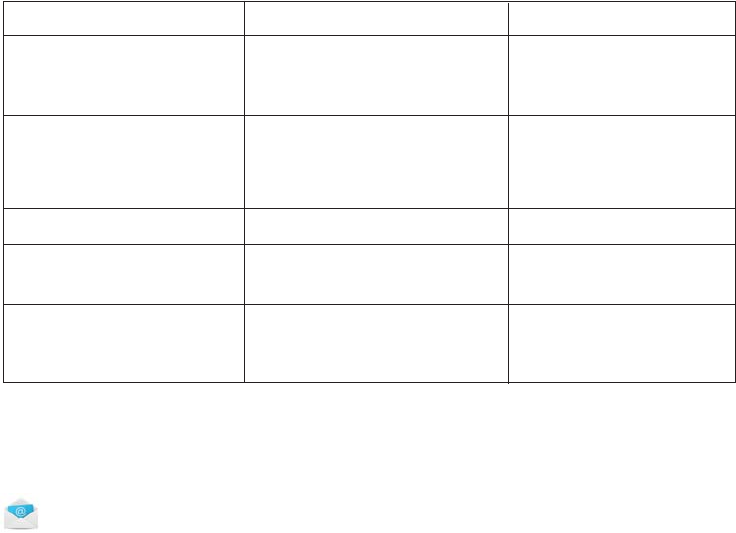
Trouble Shooting
Drone flashes and don't
respond to the transmitter
during operation.
The propellers spin, but
the drone cannot take-off.
The drone shakes heavily.
Drone cannot stay balanced
in flight.
Drone is unstable after
crashing.
1. The propellers are distorted.
2. The motor doesn’t work
properly.
Four-axis acceleration
sensor loses it’s balance
after crashing.
1. Insufficient battery power.
2. The propellers are installed
in wrong orientation.
3. The propellers are distorted.
The propellers are distorted. Replace the propellers.
1. Replace the propellers.
2. Replace the motor.
Restart and re-calibrate
the drone.
1. Transmitter is not synced
to the drone.
2. Insufficient battery power.
1. Refer to the Manual
and re-sync the drone.
2. Recharge the battery.
1. Recharge the battery.
2. Install the propellers in
right orientation.
3. Replace the propellers.
THE PROBLEMS REASONS SOLUTIONS
For more further technical support, please do not
hesitate to contact us via Email or Hot Line Phone Call.
+1(855) 888-6699
● Flight Battery
Capacity:2500 mAh
Voltage:7.4V
Battery Type:Li-ion
Energy:18.5Wh
Net Weight:175 g / 6.1oz
Max Charging Power:5-10W
Max Charging Time:3-6 hours(Depending on Charging Power)
Charging Temperature Range:14° to 104° F ( -10° to 40° C )
● USB Cable
Voltage:5V
● APP / Live View
Mobile App: HS GPS PRO
Live View Working Frequency: 2.4 GHz ISM
Live View Quality: 1080P @ 25fps
Latency: Low Latency Video (depend on conditions and mobile device)
Required Operating Systems: iOS 9.0 or later / Android 4.4.0 or later
Recommended Devices: 4.7″ to 5.5″ Smart phones
● Transmitter
Operating Frequency:2.4GHz
Max transmission distance:1640 feet/500m(Outdoor and Unobstructed)
Battery:300 mAh / Li-ion
Operating Voltage: 3.7V
Mobile Device Holder:4.7″ to 5.5″Smart Phones
Operating Temperature:32° to 104° F ( 0° to 40° C )
28 29
30 31
General Information
FCC Notice:
This device complies with Part 15 of the FCC Rules.
Operation is subject to the following two conditions:
(1) This device may not cause harmful interference.
(2) This device must accept any interference received, including interference that
may cause undesired operation.
NOTE: This equipment has been tested and found to comply with the limits for a
Class B digital device, pursuant to Part 15 of the FCC Rules. These limits are
designed to provide reasonable protection against harmful interference in a
residential installation. This equipment generates uses and can radiate radio
frequency energy and, if not installed and used in accordance with the instruc-
tions, may cause harmful interference to radio communications. However, there is
no guarantee that interference will not occur in a particular installation. If this
equipment does cause harmful interference to radio or television reception, which
can be determined by turning the equipment off and on, the user is
encouraged to try to correct the interference by one or more of the following mea-
sures:
---Reorient or relocate the receiving antenna.
---Increase the separation between the equipment and receiver.
---Connect the equipment into an outlet on a circuit different from that to which
the receiver is connected.
---Consult the dealer or an experienced radio/TV technician for help.
WARNING: Changes or modifications not expressly approved by the
party responsible for compliance could void the user's authority to
operate the equipment.
RF Exposure
The equipment complies with FCC radiation exposure limits set forth for an uncon-
trolled environment. This device should be installed and operated with minimum
distance 20cm between the radiator & your body.
IC Notice:
This device complies with Canada Industry licence-exempt RSS standard(s).
Operation is subject to the following two conditions:
(1) this device may not cause interference; and
(2) this device must accept any interference. Including interference that may
cause undesired operation of the device.
CAN ICES-3 (B)
Avis d’Industrie Canada
Le présent appareil est conforme aux CNR d'industrie Canada applicables aux
appareils radio exem pts de licence L'exploitation est autorisée aux deux condi-
tions suivantes:
1) I'appareil ne doit pas produire de brouillage; et
2) I'utillsateur de I'appareil doit accepterbrouillage radioélectrique subi meme si
le brouillage est susceptible d'encompromettre le fonctionnement. mauvais
fonctionnement de I'appareil. Cet appareil numériquie de la classe B est
conforme à la norme NMB-003 du Canada.
CAN NMB-3 (B)
RF Exposure
Radiation Exposure Statement:
This equipment complies with IC radiation exposure limits set forth for an
uncontrolled environment. This equipment should be installed and operated
with minimum distance 20cm between the radiator & your body.
Déclaration d'exposition aux radiations:
Cet équipement est conforme aux limites d'exposition aux rayonnements IC
établies pour un environnement non contrôlé. Cet équipement doit être installé
et utilisé avec un minimum de 20 cm de distance entre la source de rayonne-
ment et votre corps
y
32 33
HOW TO RECYCLE THIS PRODUCT
This symbol on the product or its documentation indicates that it must not be
disposedof with household waste.
Uncontrolled waste disposal may harm the environment or human health.
Please separate your device from other types of waste to recycle it responsibly.
This will help to foster the sustainable re-use of material resources.
We invite you to contact your retailer or inquire at your local town hall to find out
where and how the drone can be recycled.
BATTERY WARNING:
1.Failure to follow all the instructions may result in serious injury, irreparable damage
to the battery and may cause a fire, smoke or explosion.
2.Always check the battery’s condition before charging or using it.
3.Replace the battery if it has been dropped, or in case of odour, overheating,
discolouration, deformation or leakage.
4.Never use anything other than the approval LiPo charger the battery. Always use a
balancing charger for LiPo cells or a LiPo cell balancer. It is recommended that you do
not to use any other charger than the one provided with the product.
5.The battery temperature must never exceed 60°C(140°F) otherwise the battery
could be damaged or ignite.
6.Never charger on a flammable surface, near flammable products or inside a vehicle
(perferably place the battery in a non-flammable and non-conductive container).
7.Never leave the battery unattended during the charging process. Never disassem-
ble or modify the housing’s wiring, or puncture the cells. Always ensure that the char-
ger output voltage corresponds to the voltage of the battery. Do not short circuit the
batteries.
8. Never expose the LiPo battery to moisture or direct sunlight, or store it in a place
where temperatures could exceed 60°C(car in the sun, for example).
9.Always keep it out of reach of children.
10.Improper battery use may result in a fire, explosion or other hazard.
11.Non-rechargeable batteries are not to be recharged. Rechargeable batteries are
only to be charged under adult supervision.
12.Different types of batteries or new and used batteries are not to be mixed.
13.Batteries are to be inserted with the correct polarity.
14.The supply terminals are not to be short-circuited. Regular examination of trans-
former or battery charger for any damage to their cord, plug, enclosure and other
parts and they must not be used until the damage has been repaired.
15.The packaging has to be kept since it contains important information.
16.The toy is only to be connected to Class II equipment bearing the symbol.
After receiving the certificate of registration, you must mark your unique FAA regis-
tration number on the Drone by any means, such as permanent marker, lable,
engraving. This number must be readily accessible and maintained in a condition that
is readable and legible upon close visual inspection
WARNING: Do NOT fly drone near airports or any other un-authorized areas.
Follow all rules for Federal Aviation Administration (FAA) regulation summary for
Small Unmanned Aircraft Systems (sUAS).
Read: Academy of Model Aeronautics (AMA) Know Before You Fly important informa-
tion brochure
FAA REGISTRATION: PLEASE FOLLOW ALL FEDERAL, STATE AND
LOCAL FAA LAWS. YOU MAY BE REQUIRED TO REGISTER YOUR-
SELF AND YOUR DRONE WITH THE FAA MORE INFO CAN BE
FOUND
AT: HTTPS://WWW FAA GOV/UAS/GETTING STARTED/