Xinwei Electronic Quanzhou NF173 Transceiver User Manual 173 mdi
Xinwei Electronic Co., Ltd., Quanzhou Transceiver 173 mdi
User manual

Introduction
………………………………1
Unpacking and check devices
……………2
Accessory List
………………………………2
Main Features
………………………3
Technical
information
………………………4
Identification
…………………………………6
Preparation for
Using
………………………7
PC Software Programming Setting
……12
Operation
Guide
……………………………18
Maintenance
…………………………21
Troubleshooting
……………………………22
Appendix: CTCSS QT and DCS DQT

Chart
………24

- 1 -
Introduction
Thanks for purchasing NANFONE
NF-173. Please read this manual carefully to
learn its functions and operations before using.
With mini compact size, stable
performance, and easy-to-use feature,
transceiver NF-370 is developed for wide
using. It offers you a normal communication
when you are in the rural area, forest zone,
pasturing area or sea area. The fine appearance
of NF-370 meets your needs of personality.

- 2 -
Unpacking and check the
devices
Please take the radio out carefully from the
package, and check again before disposing of
the packing to make sure that all the following
items are contained in the packaging. If any of
them are missing or damaged during
transportation, please contact with the vendor
for service.
Accessories list
Description Unit Quantity
Antenna pc 1

- 3 -
Belt clip pc 1
Lithium
battery pack
pc 1
Charger pc 1
Wrist string pc 1
Warranty
card
pc 1
QC passed
card
pc 1
User Manual book 1
Main Feature
1、446.00625—464.375MHz full frequency
2、Chinese and English channel report
3、High and low power optional
4、wide and narrow band optional
5、CTCSS/50 and DCS/83 squelch system to avoid

- 4 -
the disturbance from other radio station.
6、VOX function ,free your hands,easy operation
7、BCL(busy channel lock)function to know the
busy state
8、SCAN function, scan all the channels
9、Built-in FM-radio to know the latest new at
anytime.
10、power-save function to make the standby time
longer.
All the above functions are edited by PC
programming software. And the transceiver has the
following functions itself:
1. Emergency alarm function gives you more
peace.
2.
Rime elimination function will eliminate
the noise when stop talking.

- 5 -
Technical Information
GENERAL
Frequency range
446.00625MHz-464.375MHz
Number of channel
13
Channel spacing
12.5kHz
Modulation method FM
Operating temperature range
-10℃ --- +55℃
Volt age
3.7V---4.2V
Standby Current
about 10mA(省电时)
Size
95(H) × 53(W) × 30(D)mm
Weight
about 135g
TRANSMITTER
Frequency stabilization ≤5ppm
Output power
≤3.5W
Emission current
≤1.3A
Maximum frequency deviation
±2.5kHz

- 6 -
Audio distortion <10%
Adjacent channel power <70dB
Residual radiation <-60dB
RECEIVER
Reference sensitivity
<-122dBm (12dB SINAD)
Sensitivity lock <-126dBm
Audio Power
≥500mW
Receiving current
≤300mA
Audio distortion <10%
Adjacent channel selection ≥60dB
Intermodulation rejection ≥60dB
- 7 -
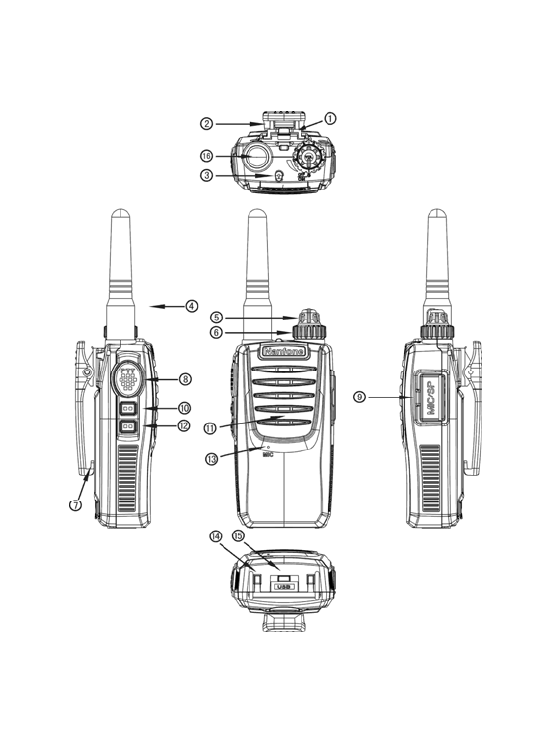
Identification

- 8 -
1.
Pendent hole
2.
Belt Clip Stator
3.
Indicated Light
4.
Antenna
5 .
Volume Knob
6.
Channel Knob;
7.
Belt Clip;
8. PTT
9.
Earphone Jack
10.
FM
Radio/Monitor/Reception+
11.
Speaker
12.
Call/Reception-
13.
MIC 14.
Charging Contact Plate
15.
USB Charging Jack
16.
Antenna Terminal
Preparation before Using
Install Lithium battery pack
Install the battery rear case properly as
following pictures show
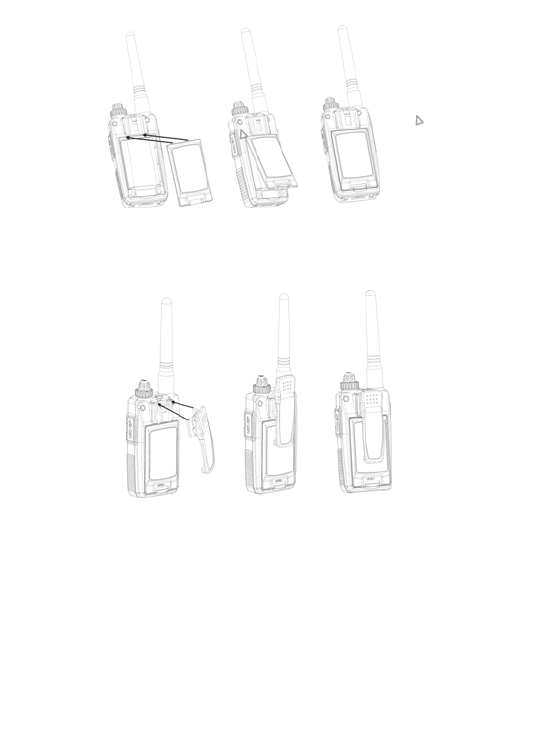
- 9 -
Picture1 picture2
Install battery rear case
Install the battery rear case properly as
following pictures show
Picture1 picture2 picture3
Fix the belt clip
fix the belt clip properly as the following
pictures show:
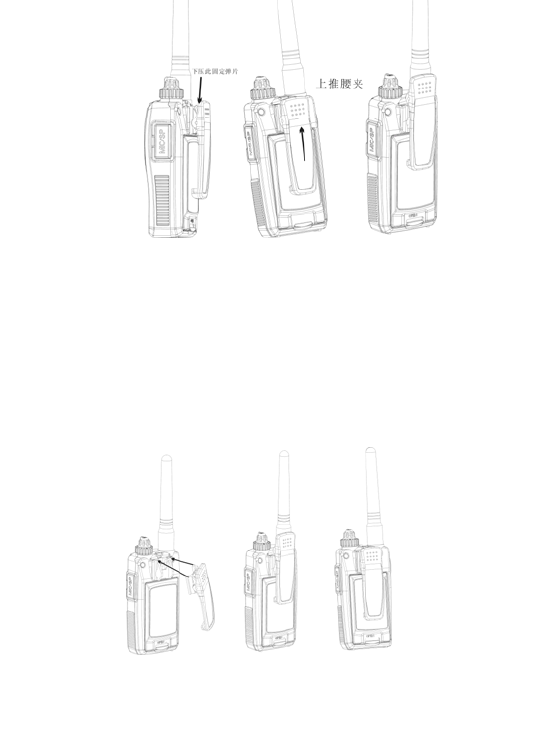
- 10 -
Picture1 picture2 picture3
Take off the Belt Clip
Press the belt clip stator (as arrow shows) as
following picture 1 shows, push up the belt clip as
the arrow of picture 2 shows, then take off the belt
clip as picture 3 shows.
- 11 -
Picture1 picture2 picture3
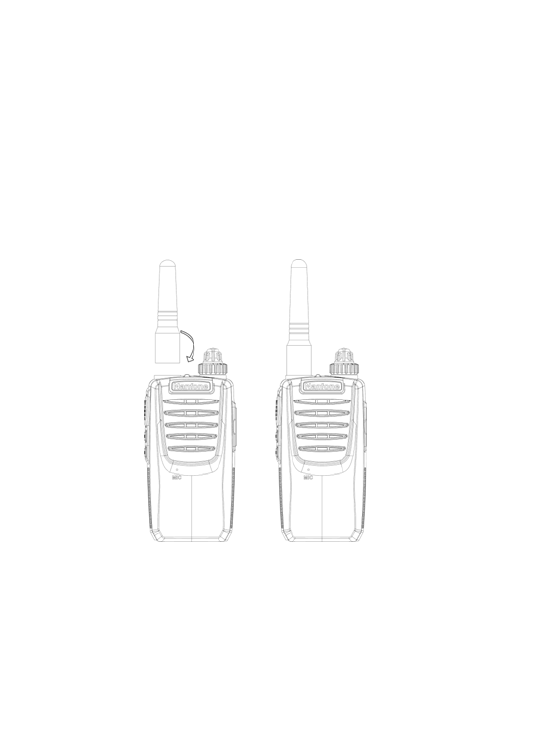
Install the Antenna
Rotate the antenna clockwise into the antenna
terminal as the arrow of picture 1 shows, and
then tighten the antenna as picture 2 shows.
Picture1 picture2

- 12 -
Charging the Lithium Battery Pack
The battery pack is without completely
charging when finished, and please charge it
before using.
When used for the first time after
purchased or stored over two months, the
capacity of battery pack is less than normal.
However, it will return normal after charged
and discharged for three or five times.
Green light shines when start charging, red light
is on while it is charging and the green light indicate
that the charging is finished.
Note:NF-173
has two independent charging
channels for the whole machine and battery pack,
but it cannot charge by the two way at the
same time, otherwise it will be failed
charge.
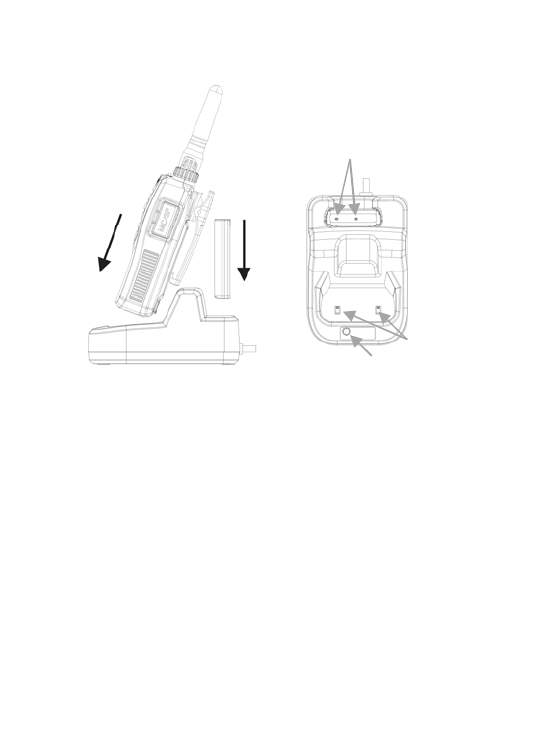
- 13 -
t would take about 6 hours to charge full.
Software programming setting
PC programming method
1.Please visit http://www.nanfone.com ,and
download the NF-170 programming software.
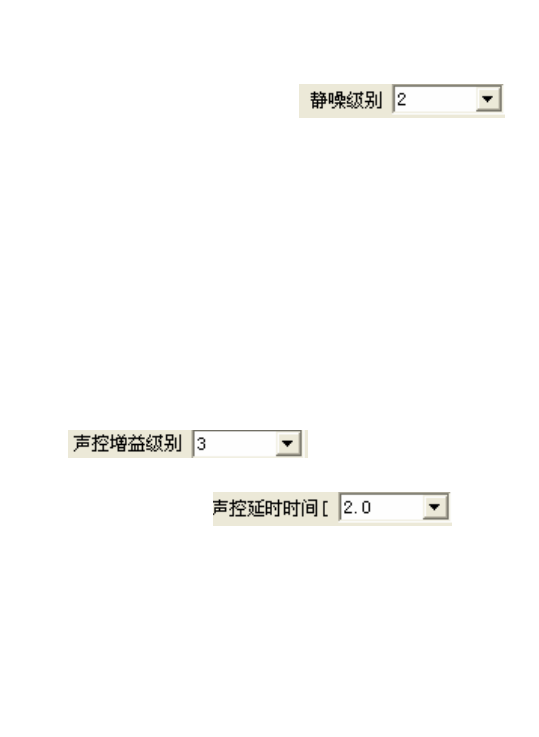
SQL squelch lever setting
Picture2
Picture1
Indicate light
Charging contact
Charging contact
- 14 -
1. Open the programming software,choose your
target squelch lever in
from 1 – 9. The lever is higher, the
disturbance is less, but it has some influence on
the working distance
2. The squelch system can eliminate the back noise
when it is not receiving signals. It not only
makes the standby state quiet but also can save
power in standby state obviously.
VOX function
1.Open the programming software, and select in
. The VOX levers are
1~9,the lever is higher, the sensitivity is better.
2.VOX delay ,. The
transceiver return to receive mode after calling, if
part of message can not be sent correctly, you can
set the VOX delay to avoid it.
- 15 -
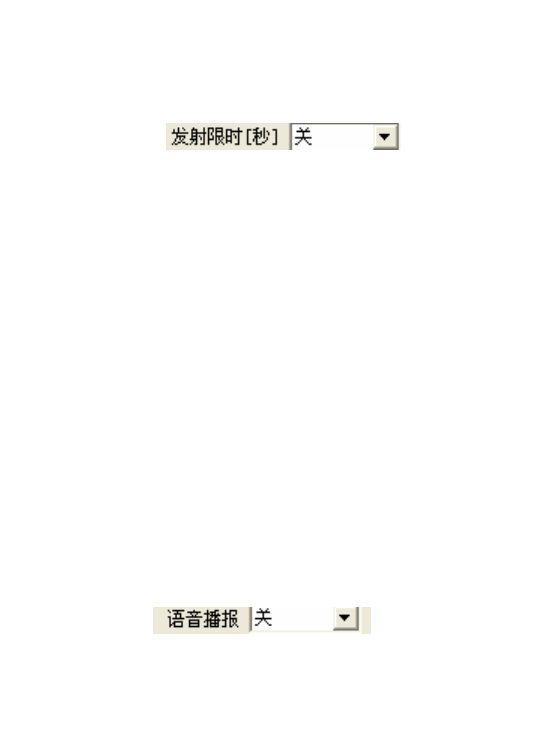
Time-out timer
1. Open the programming software, and choose the
target time in . The aim of
the time-out timer is to avoid any caller occupying
the frequency too long and damages by long- time
launch.
2.You can set the time-out timer by programming
software
from”closed,30s,60s,90s,120s,150s,180s,...600s”. If
you continually launch longer than the set time, the
transceiver will stop launching and “bibi: sound
appeared. You can lose the 【PTT】 and hold it again
to resume.
Channel report
Open the programming software to chose the sound
language in . The selections

- 16 -
are: closed, Chinese and English. If you choose the
Chinese/ English, to turn the channel snob when the
transceiver is power-on, it will report the current
channel; if you choose the closed, the transceiver
won’t report the channel.
Scan
The distributor and manufacturer can set the
scan function by PC software, the option on
the software is “Scan”.
When scan function is ON, there’re scan
function options behind each channel number.
When the scan function is set to be ON, the
channel can be scanned automatically in
standby state, and you can talk on this channel
while there’s signal.
Rotate the channel selector to channel 16 to
activate the scan function, and then those
channels which set automatic scan will be
- 17 -
activated by itself. For instance, if the scan
function of channel 3,5,7 was activated by PC
software programming, when you rotate the
channel selector to channel 16, the transceiver
will scan channel 3,5,7,16, when receive
signal from one of these four channels, it will
stop scanning, and talk on this channel.
It’s normal that it will be delayed when you
open the speaker after activating the scan
function, the delay time is related to the
number of channels which set scan function.
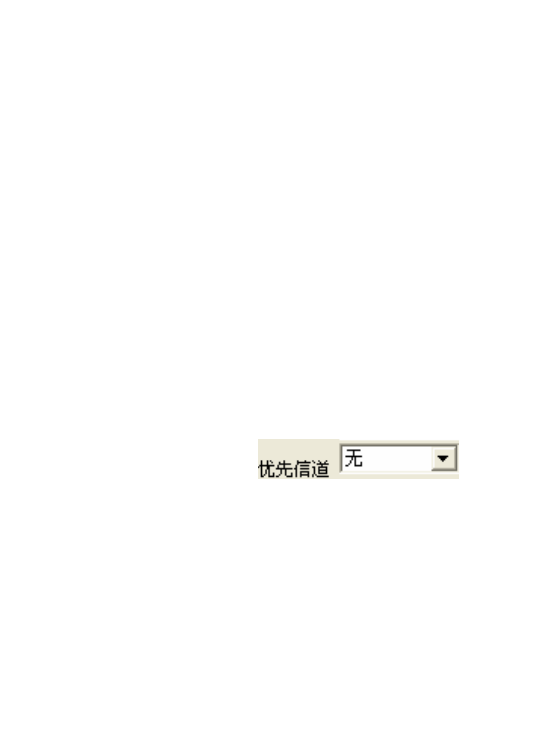
1. It can be set in ,
after setting, it can monitor the prior
channel even the transceiver is not using
the prior channel. When there is signal in
prior channel, it will turn to the prior
- 18 -
channel at once.
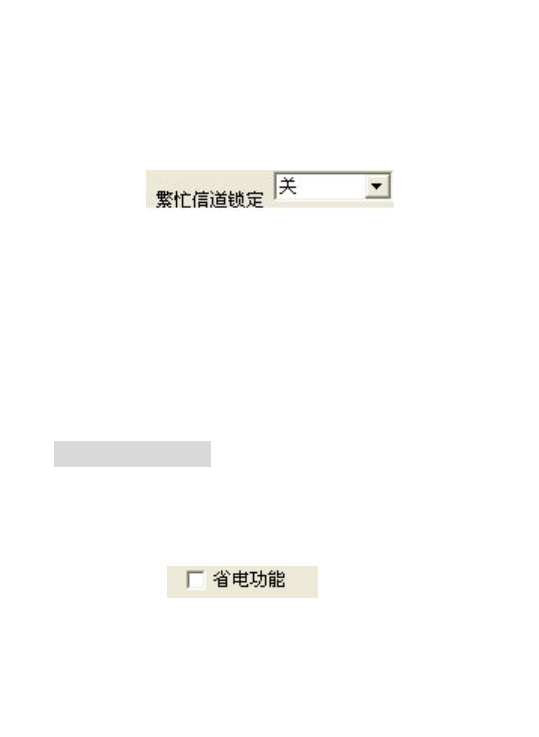
Busy channel lock
1.Open the programming software to choose the
function in There are
close, CTCSS and carrier as choices. Only when the
channel has set the CTCSS, it allows choosing
CTCSS busy channel lock
2.CTCSS busy lock: it won’t stop transmitting when
there is SQ and no QT/DQT. When receive both
SQ and QT/DQT, it will stop transmitting.
Carrier busy lock: It stop transmitting when
receiving SQ.
Power-save function
1.Open the software to select if open the power-save
function in . when choosing the
“√”,it means open the function。
- 19 -
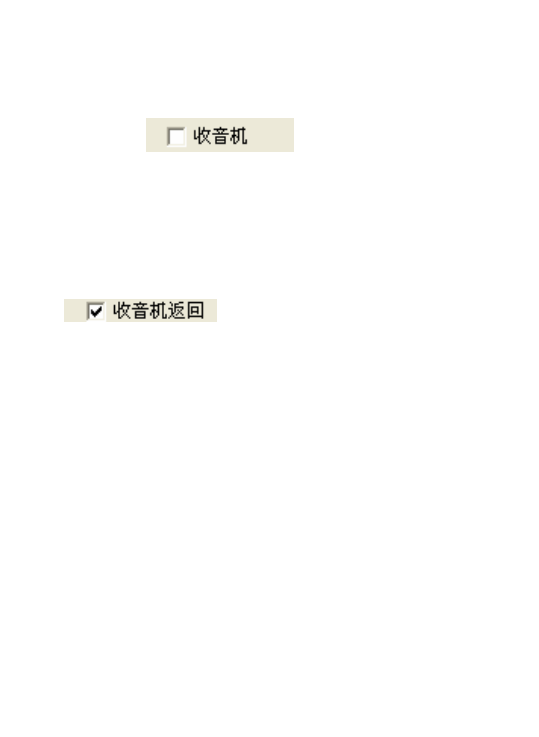
FM-radio control
Open the software to select if using the FM-radio
function in . when it choose “ √ ”,
it means open the function.
FM-radio automatically returns when
receiving signal
1.Open the software to select if use the function in
. Choosing “√”means open the
function. The FM-radio automatically exit
when receiving signal if don’t do any
choice.
High and low power selection
1.Open the programming software and select the
“transmitting power to choose the power which is
suitable for your using channel.
Wide and narrow band selection
1 Open the programming software and click

- 20 -
“wide/narrow” to choose the suitable band for the
current channel.
CTCSS QT/ DCS DQT
1.Open the programming software,click the “receive
dicate” and “transmit dicate” to choose the CTCSS
QT/ DCS DQT for the current channel or close
2.If some channel has set the CTCSS/DCS signal, it
can open the squelch only when using the same
CTCSS or DCS signals. In the same way,it can
receive your signal only when the QT/DQT signal
mode is the same to yours. If people use different
QT/DQT but the same channel to call you, the
squelch cannot be open, only the green light to
indicate.

- 21 -
Operation Guide
Transmit
1.Hold 【PTT】after the red light is on to talk and
lose the button to stop.
Monitor
1. Short-press 【
Radio/Monitor/Reception+
】
按to open noise in force and press it again to
exit.
Audio call
1.Press 【PTT】to transmit and then
【
Radio/Monitor/Reception+
】to open audio
call function(1750KHz),the transceiver emits
1750KHzaudio frequency,lose
【
Radio/Monitor/Reception+
】to exit.
FM-radio function operation
1.Press 【
Radio/Monitor/Reception+
】功in 2s

- 22 -
when heard ”di” to open FM-radio. Press
【
Radio/Monitor/Reception+
】or
【
Call/Reception-
】 to scan automatically,
and it will stop when coming to the radio which
has signals. For other radio station, please press
【
Radio/Monitor/Reception+
】or
【
Call/Reception-
】。
Emergency alarm
1. press【
Call/Reception-
】in 2s to open the
emergency alarm function. Here the red light of the
station is on and the acoustic alarm is heard and sent
to the same frequency transceiver; Press【PTT】to
stop the function.
The transceiver will remain at channel
01 when you operate the Emergency Call
Function, until rotate the channel selector
to your desired channel. The green
indicated light will flash if you didn’t rotate

- 23 -
the channel selector after operating the
Emergency Call Function.
Low Power Detection
1.
The device works properly, when the
voltage is higher than 3.6V;
2.
When the voltage is among 3.4V to 3.5V,
the transceiver receives normally but with
alerts and “dididi” indication every 20secs,
and launches normally, but the light
flashes red while launching.
3. When the voltage is below 3.3V, then the
transceiver will power off by itself.
Wired Cloning (Mutual clone between two
transceivers)
1.
Well connected the transmission lines to
the both transceivers, and then power on
the subsidiary transceiver.

- 24 -
2.
Rotate the channel selector on the base
transceiver to channel 8, then hold and
Press “Radio/Monitor/Reception+” key to
power on, (3 seconds later) until the
orange light (red light and yellow light
flash simultaneously) flashes which
indicates the base transceiver is in cloning
state, then release the button
3.
When the orange light on the base
transceiver flashes, press the PTT key, the
red light on base transceiver flashes, and
the yellow light on subsidiary transceiver
flashes, which indicates the base
transceiver is in cloning state. The mutual
clone is successful when the light on base
transceiver flashes orange again
。
4.
If the indicator lights of both two
transceivers flashes abnormally in the

- 25 -
process of data transmit, it means
replication fail. In that case, please check
and make sure the transmission line is well
connected. And please press the PTT
button again to resume cloning when the
indicator light of the base transceiver
shines orange
。
5.
If need to clone with more than one
transceiver, please turn off the subsidiary
device after cloning finished and then pull
out the transmission cable. And then clone
to next transceiver following steps b
above
。
6.
Please reboot the transceiver to make it
work properly after cloning
。
Maintenance
Transceiver NF-173 you purchased is an

- 26 -
exactitude design electronic products and
please use it carefully. Following
maintenance ways may help extend its
lifetime.
1、
lease don’t try to disassemble the
transceiver because non-technicians’
processing may cause damage to the
device.
2、Don’t use or charge the transceiver in explosive
condition(The air contains a lot of fine sand,
dust, and a place where a large number of
chemicals)
3、Turn off the transceiver when you are in gas
station.
4、
Please don’t put the transceiver in sun or hot
place for long time, because the high
temperature will shorten use life of

- 27 -
electronic parts and cause distortion to
plastic parts.
。
5、
Please keep the transceiver dry, because
rain and moisture will erode the electronic
circuits.
6、
Please power off the transceiver and remove
its battery pack immediately once there is
peculiar smell or smog emit from the
device.
Troubleshooting
Trouble Solution
No reaction
when
power-on
z The battery pack
has been exhausted.
Please change a new
battery or recharge the
battery.
z
The battery pack may be
not installed correctly.

- 28 -
Please install it again.
Unable to
talk with
other
members in
the same
group
z Please check the
frequency and
CTCSS/DCS you use are
the same as other
members use in the same
group.
z
The distance between you
and other group members
may be too far. Please
check if you are in the
cover range of other group
transceivers
Talking
distance is
short
z Make sure the antenna screws
tight and contact well
z Make sure if using the

- 29 -
original antenna from the
manufacturer.
z The dealer or user set the
higher squelch lever, please
reduce the lever.。
Other (not
from group
members)
sound heard
in channels.
z Change the frequency
z
Please change your
CTCSS/DCS NO. And it
has to change all signal
sound of the group
transceivers.
The battery
used out
soon after
recharged.
z
The use-life of the battery
is over, please change new
battery.
z If the battery has been
completely charged
People
receive your
Voice is low
Check if the MIC hole is jammed

- 30 -
or broken
Water inlet
z Take out the battery at once
when water inlet and dump the
water, put it in a draft to dry it.
Make sure to send it to
maintenance station in a short
time.
Appendix:CTCSS and DCS list
50 CTCSS
67.0 85.4 107.2 136.5 165.5 186.2 210.7 254.1
69.3 88.5 110.9 141.3 167.9 189.9 218.1
71.9 91.5 114.8 146.2 171.3 192.8 225.7

- 31 -
74.4 94.8 118.8 151.4 173.8 196.6 229.1
77.0 97.4 123.0 156.7 177.3 199.5 233.6
79.7 100.0 127.3 159.8 179.9 203.5 241.8
82.5 103.5 131.8 162.2 183.5 206.5 250.3
83 DCS
023 051 114 143 174 251 315 371 445 532 631 723
025 054 115 152 205 261 331 411 464 546 632 731
026 065 116 155 223 263 343 412 465 565 654 732
031 071 125 156 226 265 346 413 466 606 662 734
032 072 131 162 243 271 351 423 503 612 664 743
043 073 132 165 244 306 364 431 506 624 703 754
047 074 134 172 245 311 365 432 516 627 712
Note: The FCC ID label is location at battery
compartment
Changes or modifications not expressly approved
by the party responsible for compliance could void
the user's authority to operate the equipment.
This device complies with Part 15 of the FCC rules. Operation is subject to the following
two conditions: (1) This device may not cause harmful interference, and (2) this device
must except any interference received, including interference that may cause undesired
operation.

SAFETY TRAINING INFORMATION
Your Quansheng radio generates RF electromagnetic en-ergy during
transmit mode. This radio is designed for and classified as
“Occupational Use Only”, meaning it must be used only during the
course of employment by individuals aware of the hazards,
Warning and the ways to minimize such hazards. This radio is
not intended for use by the “General Population” in an
uncontrolled environment.
This radio has been tested and complies with the FCC RF exposure limits for
“Occupational Use Only.” In addition, your Quansheng radio complies with the following
Standards and Guidelines with regard to RF energy and electromagnetic energy levels
and evaluation of such levels for exposure to humans:
• FCC OET Bulletin 65 Edition 97-01 Supplement C, Evaluating Compliance with FCC
Guidelines for Human Exposure to Radio Frequency Electromagnetic Fields.
• American National Standards Institute (C95.1–1992), IEEE Standard for Safety Levels
with Respect to Human Exposure to Radio Frequency Electromagnetic Fields, 3 kHz to
300 GHz.
• American National Standards Institute (C95.3–1992), IEEE Recommended Practice for
the Measurement of Potential y Hazardous Electromagnetic Fields— RF and Microwave.
To ensure that your exposure to RF electromagnetic energy is
within the FCC allowable limits for occupational use, always adhere
to the following
CAUTION guidelines:
• DO NOT operate the radio without a proper antenna attached, as
this may damage the radio and may also cause you to exceed FCC
RF exposure limits. A proper antenna is the antenna supplied with
this radio by the manufacturer or an antenna specifically authorized by the manufacturer
for use with this radio.
• DO NOT transmit for more than 50% of total radio use time (“50% duty cycle”).
Transmitting more than 50% of the time can cause FCC RF exposure compliance
requirements to be exceeded. The radio is transmitting when the “TX indicator” lights red.
You can cause the radio to transmit by pressing the “PTT” switch.
• ALWAYS use Quansheng authorized accessories (antennas, batteries, belt clips,
speaker/mics, etc). Use of unauthorized accessories can cause the FCC RF exposure
compliance requirements to be exceeded. Body-worn operations are restricted to
belt-clips, holsters or similar accessories that have no metallic component in the assembly
and that provide at least 1.5 cm separation between the device, including its antenna, and
the user's body. To provide the recipients of your transmission the best sound quality, hold
the antenna at least 5 cm (2 inches) from mouth, and slightly off to one side. The
information listed above provides the user with the information needed to make him or her
aware of RF exposure, and what to do to assure that this radio operates within the FCC
RF exposure limits of this radio.
Electromagnetic Interference/Compatibility
During transmissions, your Quansheng radio generates RF energy that can possibly cause
interference with other devices or systems. To avoid such interference, turn off the radio in
areas where signs are posted to do so. DO NOT operate the transmitter in areas that are
sensitive to electromagnetic radiation such as hospitals, aircraft, and blasting sites.
FOREWORD
Thank you for purchasing the TG-UV transceiver.
READ ALL INSTRUCTIONS carefully and completely before using the transceiver.
SAVE THIS INSTRUCTION MANUAL–This instruction manual contains important
operating instructions for the transceiver.
INSTALLATION NOTES
• Body-worn operations are restricted to belt-clips, holsters or similar accessories that
have no metallic component in the assembly and that provide at least 1.5 cm separation
between the device, including its antenna, and the user's body
• If you wear a portable two-way radio on your body, ensure that the antenna is at least 2.5
centimeters (1 in.) from your body when transmitting.
IMPORTANT
RF CAUTION! NEVER hold the transceiver so that the antenna is very close to, or
touching exposed parts of the body, especially the face or eyes, while transmitting. The
transceiver will perform best if the microphone is 2 to 4 in. (5 to 10 cm) away from the lips
and the transceiver is vertical.
RF CAUTION! NEVER operate the transceiver with a headset or other audio accessories
at high volume levels.
RF CAUTION! NEVER short the terminals of the battery pack.
DO NOT push the PTT when not actually desiring to transmit.
AVOID using or placing the transceiver in direct sunlight or in areas with temperatures
below +14°F (–10°C) or above +122°F (+50°C). The basic operations, transmission and
reception of the transceiver, are guaranteed within the specified operating temperature
range (depending on version). However, the LCD display may not be operate correctly, or
show an indication in the case of long hours of operation, or after being placed in
extremely cold areas.
DO NOT modify the transceiver for any reason.
KEEP the transceiver from the heavy rain, and never immerse it in the water. The
transceiver construction is water resistant, not waterproof.
The use of non Quansheng battery packs/chargers may impair transceiver performance
and invalidate the warranty.

FCC INFORMATION
This device complies with Part 15 and Part 90 of the FCC rules.
Operation is subject to the following two conditions: (1) This device
may not cause harmful interference, and (2) This device must
accept any interference received, including interference that may
cause undesired operation.
FCC ID: UUPNF173