Contents
- 1. USERS MANUAL
- 2. user manual
USERS MANUAL

EXI HALO User Manual 980-000002-000
EXI Wireless Systems Inc. 32 March 2000
Revision 5.0
User Manual
March 2000
Table of Contents

EXI HALO User Manual 980-000002-000
EXI Wireless Systems Inc. 32 March 2000
Revision 5.0
P 1. LIMITED WARRANTY.....................................................................................................................3
P 2. RECORD OF CHANGES ..................................................................................................................4
P 3. FCC REGULATIONS........................................................................................................................5
P 4. SYSTEM MAINTENANCE................................................................................................................6
1. SYSTEM INTRODUCTION..................................................................................................................9
1.1. SYSTEM COMPONENTS ......................................................................................................................9
1.2. TERMS USED IN THIS DOCUMENT ........................................................................................................9
1.3. COMPUTER DISPLAY CONVENTIONS ................................................................................................10
2. USER LEVEL .......................................................................................................................................11
2.1. ADMITTING A PATIENT.....................................................................................................................11
2.2. DISCHARGING A PATIENT.................................................................................................................14
2.3. SILENCING AND ACCEPTING ALARMS ..............................................................................................16
2.4. “NURSE SAVER” AND “LOITERING” FEATURES.................................................................................18
3. SUPERVISOR LEVEL.........................................................................................................................19
3.1. ACCESSING SUPERVISOR LEVEL.......................................................................................................19
3.2. EXITING SUPERVISOR LEVEL ............................................................................................................20
4. ACTIVITY LOG MANAGEMENT.....................................................................................................21
4.1. ACTIVITY LOGS................................................................................................................................21
4.2. NAVIGATING THE ACTIVITY LOG.......................................................................................................22
4.3. ADDING A SUPERVISOR ANNOTATION TO AN ALARM........................................................................22
4.4. BACKING UP ACTIVITY LOGS...........................................................................................................23
5. MANAGING TAGS..............................................................................................................................24
5.1. TAGS ...............................................................................................................................................24
5.2. ADDING A NEW P-TAG TO THE SYSTEM ............................................................................................25
5.3. DELETING A P-TAG FROM THE SYSTEM.............................................................................................26
5.4. DISABLING A P-TAG.........................................................................................................................27
5.5. UNASSIGNING A P-TAG....................................................................................................................27
5.6. EDITING A P-TAG RECORD...............................................................................................................28
5.7. PRINTING.........................................................................................................................................28
6. MANAGING SYSTEM USERS...........................................................................................................29
6.1. ADDING A NEW USER TO THE SYSTEM...............................................................................................30
6.2. DELETING A USER FROM THE SYSTEM ...............................................................................................31
6.3. DISABLING A SYSTEM USER ..............................................................................................................31
6.4. EDITING A SYSTEM USER ACCESS......................................................................................................31
7. SHUTTING AND RESTARTING THE SYSTEM.............................................................................32
7.1. SHUTTING DOWN .............................................................................................................................32
7.2. RESTARTING THE SYSTEM.................................................................................................................32
P 1. Limited Warranty

EXI HALO User Manual 980-000002-000
EXI Wireless Systems Inc. 32 March 2000
Revision 5.0
EXI Wireless Systems Inc. (“EXI”) hereby warrants the product(s) accompanying this limited warranty (the
“Product(s)”) to be free of defects in materials and workmanship for a period of two years (excluding any
batteries that may be added to or used in conjunction with the Products(s)) from the date of delivery of the
original purchase of the Product(s) subject to the limiting conditions set forth below, provided that EXI has
received notification of such defects no later than 30 days after expiration of the applicable warranty period
and provided further that EXI has received a fully completed registration card (below) within 30 days from
the date of original purchase of the Product(s).
The responsibility of EXI under this warranty is and shall be limited to repairing or replacing the Product(s)
or any part thereof determined by EXI in its sole discretion to be defective in workmanship or material.
The installation of the Product(s) shall be deemed as acceptance by the original purchaser and any subse-
quent purchaser of the Product(s) (collectively the “Purchaser”) of the terms set out in this limited warranty
including the following further limiting conditions:
(a) EXI shall not be responsible for any repair or replacement of any Product(s) which has been found,
upon inspection, to have been subjected to abuse, misuse or negligence, or any damage attributable to acci-
dent, lightning, power surge, brown-out, leaking, damaged or inoperative batteries or to have been installed,
altered or repaired contrary to factory designated procedures without the prior written consent of EXI;
(b) It is understood, and the Purchaser agrees further to so inform any user of the Product(s) that the Prod-
uct(s) is not, nor can it be, infallible in the detection of wandering patients, the prevention of infant abduc-
tion, the prevention of theft of assets or any other contemplated use of the Product(s). The Purchaser will
warn all users and acknowledges on it’s own behalf that it has read and understands the above-
mentioned limitations of the Product(s). The Purchaser further acknowledges that the Product(s) are
solely intended to provide an additional safeguard in notifying staff and accordingly do not guarantee the
prevention of wandering patients or the attempted abduction of an infant or the theft of assets;
(c) It is further agreed by the Purchaser that the Purchaser has received no additional promises or state-
ments of fact from EXI or its agents relative to the Product(s) upon which the Purchaser might have relied in
purchasing the Product(s);
(d) The warranty set out above excludes and is in lieu of all other express or implied warranties, condi-
tions or obligations, and no person is authorized to give any further representation or warranty or assume
any further obligation on behalf of EXI. Although the Purchaser may have other rights, as they may vary
from State to State or Province to Province, where it is legally possible to do so any statutory warranty is
hereby expressly excluded. The warranty is subject to the domestic laws of Canada and the Purchaser
agrees to attorn to the jurisdiction of the courts of competent jurisdiction in the Province.
(e) EXI shall not be liable for any damages, whether direct or, indirect, incidental, consequential or arising
out of contact or tort with the sole exception of the warranty set out above and any rights expressly created
by applicable statute.
THIS WARRANTY IS VALID ONLY IN THE USA AND CANADA
P 2. Record of Changes

EXI HALO User Manual 980-000002-000
EXI Wireless Systems Inc. 32 March 2000
Revision 5.0
March 2000 Revision 5.0 Added FCC Regulations
P 3. FCC Regulations
This device complies with Part 15 of the FCC Rules. Operation is subject to the following two conditions: (1)
This device may not cause harmful interference, and (2) This device must accept any interference received, in-
cluding interference that may cause undesired operation.
This equipment has been tested and found to comply with the limits for Class B Digital Device, pursuant to Part
15 of the FCC Rules. These limits are designed to provide reasonable protection against harmful interference in

EXI HALO User Manual 980-000002-000
EXI Wireless Systems Inc. 32 March 2000
Revision 5.0
a residential installation. This equipment generates and can radiate radio frequency energy and, if not installed
and used in accordance with the instructions, may cause harmful interference to radio communications. How-
ever, there is no guarantee that interference will not occur in a particular installation. If this equipment does
cause harmful interference to radio or television reception, which can be determined by turning the equipment off
and on, the user is encouraged to try to correct the interference by one or more of the following measures.
• Reorient or relocate the receiving antenna
• Increase the separation between the equipment and receiver
• Connect the equipment into an outlet on a circuit different from that to which the receiver is connected
• Consult the dealer or an experienced radio/TV technician for help
Any changes or modifications not expressly approved by the party responsible for compliance could void the
user’s authority to operate the equipment.
EXI Wireless Systems Model No.: Patient Tag
CANADA: 287710217261A FCC ID: HE7 PTG
* This device complies with Part 15 of the FCC Rules. Operation is
subject to the following two rules: (1) This device may not cause harmful
interference, and (2) This device must accept any interference received,
including interference that may cause undesired operation.Made in Canada
EXI Wireless Systems Model No.: Halo Infant/ECO tag
CANADA: TBD FCC ID: HE7 ETG
* This device complies with Part 15 of the FCC Rules. Operation is
subject to the following two rules: (1) This device may not cause harmful
interference, and (2) This device must accept any interference received,
including interference that may cause undesired operation.Made in Canada
EXI Wireless Systems Model No.: Halo Asset tag
CANADA: TBD FCC ID: HE7 ATG
* This device complies with Part 15 of the FCC Rules. Operation is
subject to the following two rules: (1) This device may not cause harmful
interference, and (2) This device must accept any interference received,
including interference that may cause undesired operation.Made in Canada
P 4. System Maintenance
HALO is designed to assist staff in providing a higher degree of safety for patients. It is not intended
as the sole means of protection in preventing a wanderer or infant from leaving the premises.
Regular checks to verify that your HALO system is operational is highly recommended.

EXI HALO User Manual 980-000002-000
EXI Wireless Systems Inc. 32 March 2000
Revision 5.0
Intended Audience
This manual is intended for system users (typically duty nurses) and supervisory level users who manage the
system and the system users.
Scope
This manual will provide step by step instructions for users and supervisors who administer the usage of the
system. The Halo system features a very simple user interface that steps the user through and provides in-
structions at each step.
About Halo Infant Protection System
Halo is a premium infant protection system. Halo works in conjunction with the EXI P-tag patient trans-
ponder that is capable of sensing if it has been removed from the infant. Halo is an electronic system, which,
in conjunction with staff diligence, creates a secure perimeter to deter infant abductions.
SYSTEM MAINTENANCE SHOULD INCLUDE THE FOLLOWING STEPS:
All Tags should be checked for physical damage after each cleaning, disinfecting or sterilization
procedure.
Each Tag should be tested for correct operation before being attached to an infant. The HALO
software prompts for testing of Tags prior to their deployment. Please refer to the appropriate
section in this manual for the instructions.
The warrantee on Tags is 2 years, and the batteries within the Tags are expected to last in access
of the warrantee period depending on the usage pattern. Do not leave Tags in the detection field
for long periods of time, and store them in the foil bags supplied. Failure to do so will result in
false alarms, and will reduce battery life.
Set up a regular system check schedule to verify that the Controllers, Receivers and Tags are op-
erational. Controllers should have the “Ready” light illuminated to show that they are powered.
Check the operation of the Controller daily by starting a bypass or triggering an alarm using a Tag
to ensure that it is fully operational and protecting the egress point where it is located.
Check each Receiver on a regular basis to ensure that it can receive signals from Tags in the “Off
Body” condition. Failure to regularly check for this operation may lead to failure to detect a Tag
that is removed from an infant, and therefore compromising protection for the infant.
Whenever you see a known wandering patient, look for the Tag on their person to verify they are
still wearing it. This may require special knowledge as to the placement of the Tag.
Conduct frequent back-ups of Activity Logs for future reference.

EXI HALO User Manual 980-000002-000
EXI Wireless Systems Inc. 32 March 2000
Revision 5.0
Halo will detect if an infant is near a controlled exit and invoke countermeasures. The system will identify
the infant, the location and the time. Alarms must be accepted by staff using password access to the system.
The system maintains a log of all activity.
Access Levels
The Halo system has three separate access levels:
• User
• Supervisor
• Dealer
Level Password
required Functions Access Management
User Yes Admit Patients
Discharge Patients
Accept/Silence alarms
Toggle between floor plans (No
Password required)
Access controlled by
Supervisor or Dealer
level users
Supervisor Yes All user functions
Manage user list
Assign usernames and passwords
View and annotate activity logs
Add/Delete tags from fleet
Initiate System Data Backups
Print logs
Exit the Halo system
The first Supervisor is
setup by the installing
dealer. This Supervisor
may add more assigned
supervisory access.
Dealer Yes All user/Supervisor functions
System Diagnostics
System modifications
Importing floor plans
Controlled by EXI
System Conventions
Each user in the system has a unique identity (username) and password. The Supervisor assigns both the
username and password. It is suggested that both be kept between 4-8 characters to provide sufficient secu-
rity and allow users to easily enter and remember their system access codes. For example:
A user named Barbara Smith would have a username such as bsmith or barbs. Note that that each user
should have a unique name.

EXI HALO User Manual 980-000002-000
EXI Wireless Systems Inc. 32 March 2000
Revision 5.0
The system prompts the user for any text entry such as usernames or infant names etc. To navigate from one
field to the next, the user may press tab or place the mouse cursor over the field and Click the left button.
System Support
For system service or support contact your installing dealer. Your dealer is:
Name: _____________________________
Phone: _____________________________
Or contact:
EXI Wireless Systems
100-13551 Commerce Parkway
Richmond, BC
Canada V6V 2L1
Ph: 1-800-667-9689
Fax: 604-207-7760
Web: www.exi.com

EXI HALO User Manual 980-000002-000
EXI Wireless Systems Inc. 32 March 2000
Revision 5.0
1. System Introduction
1.1. System Components
HALO Software: Primary user interface that assist in the assignment and tracking of Transponders,
and displays alarms and other activities in graphical format. Also stores and al-
lows printing of all system events that have been logged.
Controllers: Controls an egress point and reports any Tag presence at the egress point to the
computer. Depending on system configuration, Controllers may control door locks
and local alarms, allow keypad input for door bypass, and offer a “Nurse Saver”
and “Loiter” feature. The “Nurse Saver” feature eliminates nuisance alarms by not
setting off an alarm when the presence of a Tag is detected and the door is sensed
as closed. In the event that the door is open, or is opened when the Tag is at the
egress point, the system will alarm. The “Loiter” feature sounds an alarm if a Tag
detected at a door remains at that door for a period of time, regardless of the fact
that the door may be sensed as closed.
Controllers will also detect a “Tag off body” condition in its area, as does a Re-
ceiver.
Receivers: Detects “Tag off body” condition when a Tag is removed from a patient, and re-
ports this activity to the computer.
Transponders: Also referred to as “Tags”, these devices are attached to the patient. Tags initiate
two different kinds of alarm conditions as follows:
Tag-initiated-Communications (TIC)
This alarm is initiated in the event that a Tag is removed from a patient.
This occurs due to the fact that the Tag can no longer sense the body of the
patient.
Tag-in-field Communications (TIF)
This alarm is initiated when a Tag enters an area protected by a Control-
ler. The Controller emits a constant field of radio waves which is picked
up by the Tag when in the proximity of the Controller. The Tag reports its
presence to the Controller, and therefore the system, when it senses this
RF field.
1.2. Terms used in this document
The following terms are used to help explain user functions in this document:
Press means press a key on the keyboard
Click means click the left mouse button once.
Double-click means rapidly click the left mouse button twice.
Select means you position the cursor on a field and highlight it by clicking once.
Names of keys are bolded. For example, Press Enter.
Names of dialog boxes, screens, and field titles in forms are bolded. For example, The Ad-
mit Patient dialog box is displayed.
EXI HALO User Manual 980-000002-000
EXI Wireless Systems Inc. 32 March 2000
Revision 5.0
Names of buttons are bolded. For example, Click the tags button.
1.3. Computer Display Conventions
The computer displays various types of information, which is color coded to differentiate between the
Dealer, Supervisor and User modes. In addition, the “Icons” that display the locations of the various
system components such as the Controllers and the Receivers, and the on-screen “buttons” may also
change color to indicate their status.
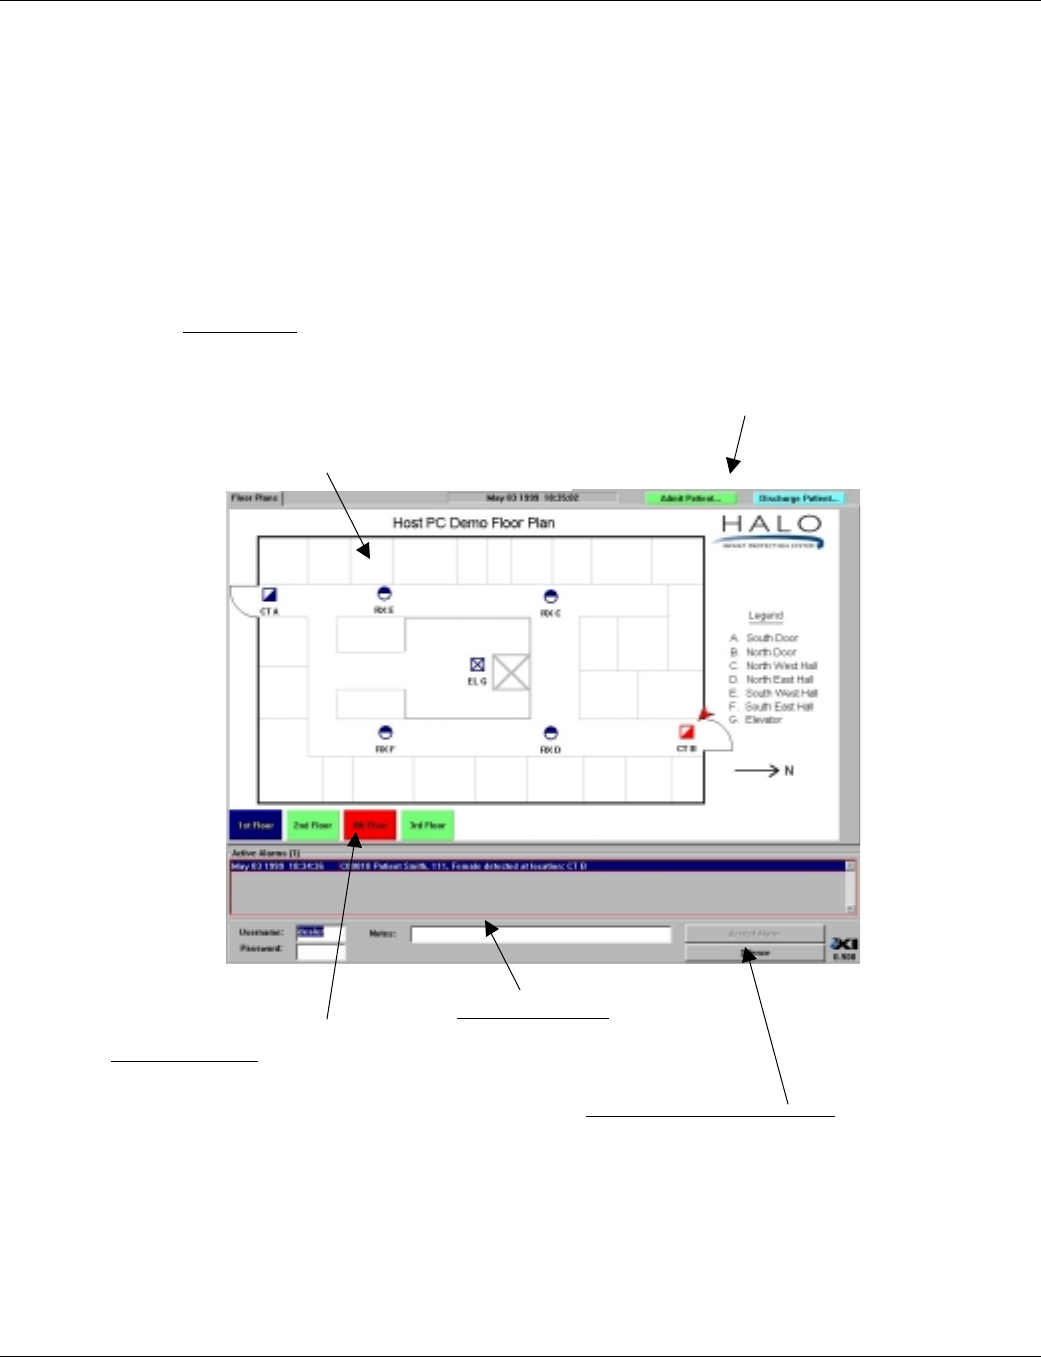
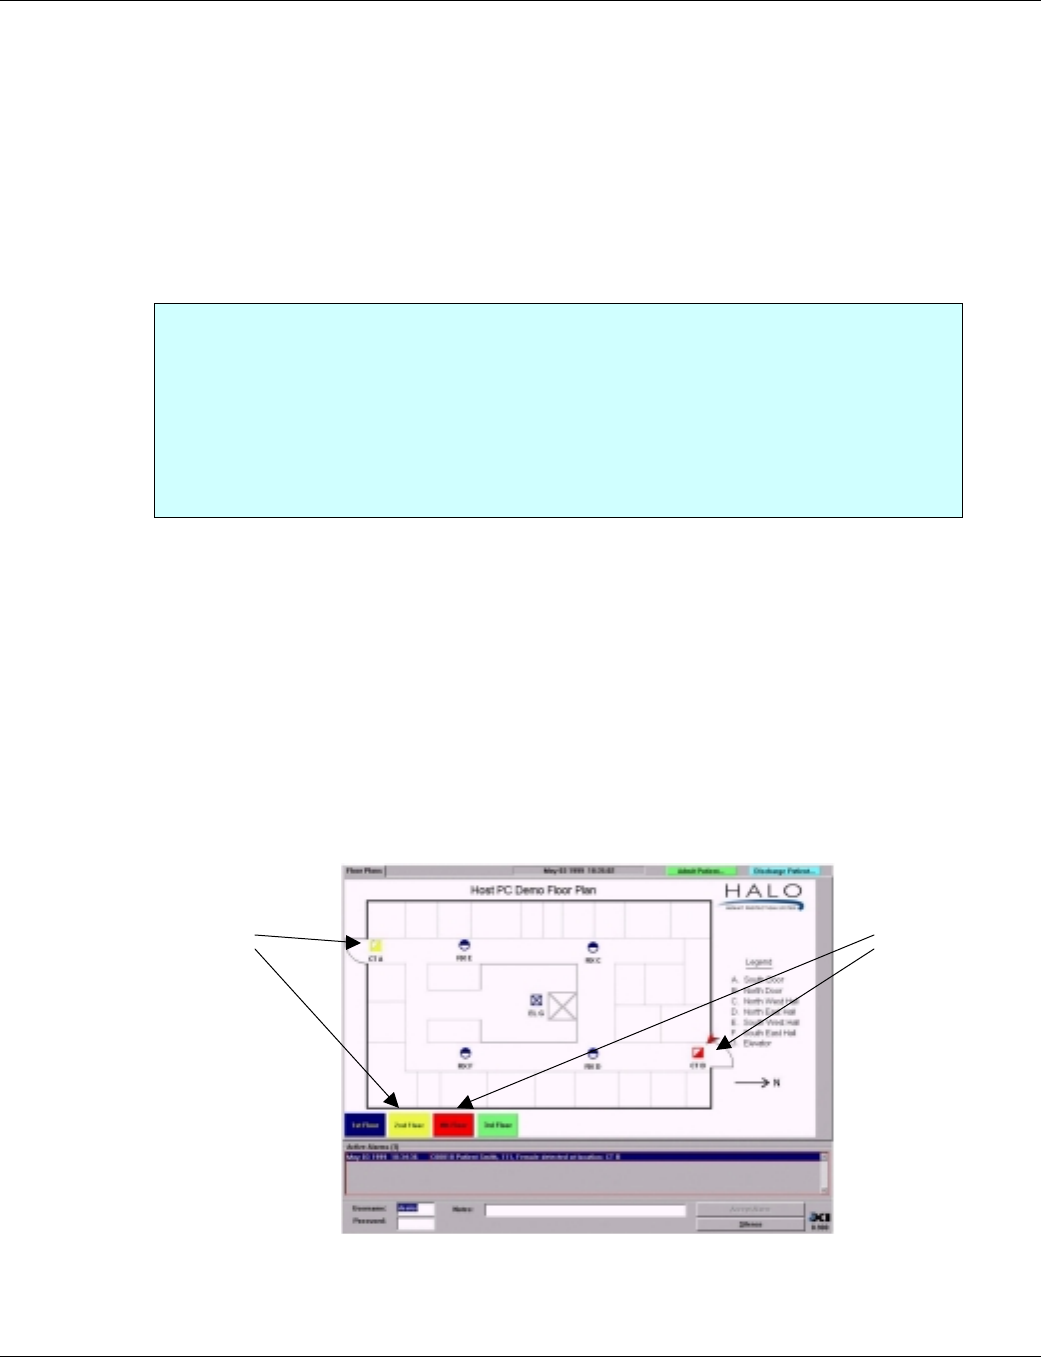
The figure below shows a typical user screen and identifies its components.
Floor Plan Buttons
Green: Normal
Blue: Indicates that the cursor is positioned
over button
Yellow: Indicated Pre-alarm condition on
floor
Red: Alarm condition on this floor
Active alarms field
Red: Normal alarm color
Blue: Selected alarm
Alarm Silence and Accept field.
Normally grayed characters.
“Silence” button is active upon selecting an
alarm from the Active Alarm field.
“Accept Alarm” button is active after valid
Username and Password are entered.
Floor Plan area.
Controllers shown as half-filled square icons
Receivers shown as half-filled circular icons
Elevators shown as square icon with “X’
Blue: Normal, Yellow: Pre-Alarm condition,
Flashing Red: Full Alarm condition
Arrow points at device(s) corresponding to selected
alarm in Active Alarm field
Patient Admit and Discharge
buttons
EXI HALO User Manual 980-000002-000
EXI Wireless Systems Inc. 32 March 2000
Revision 5.0
TAB
!"#$%&'(%$)*%
!
"#$%&'(%$)*%!"#$%&'(%$)*%
!
"#$%&'(%$)*%
2. User Level
The Halo system provides a simple, intuitive user interface. After each step, the system will automatically
take you to the next until the task is complete.
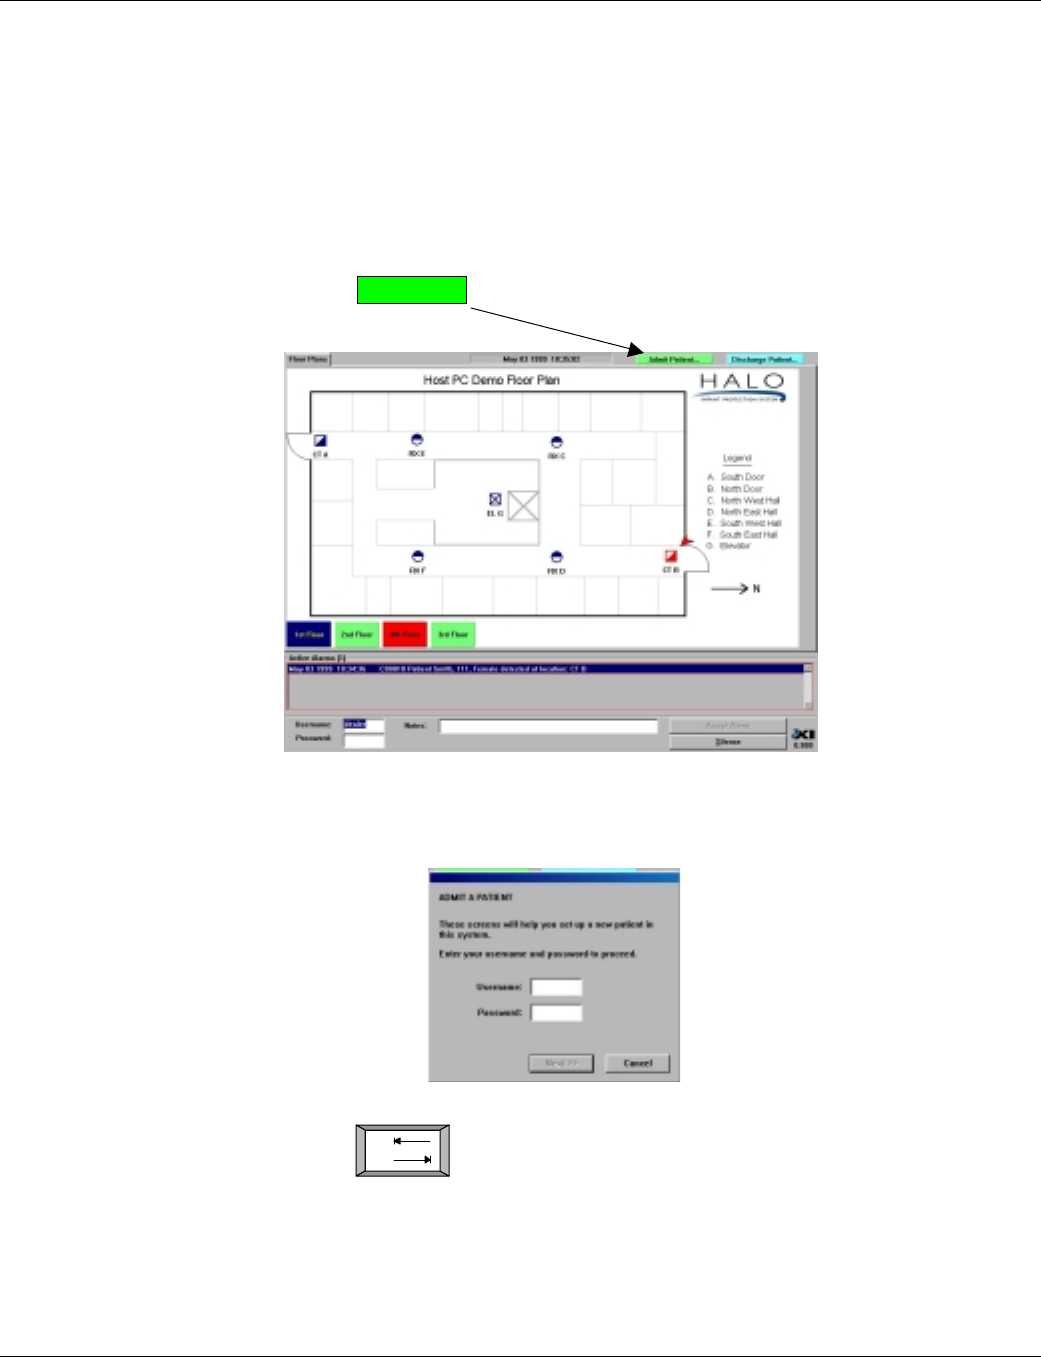
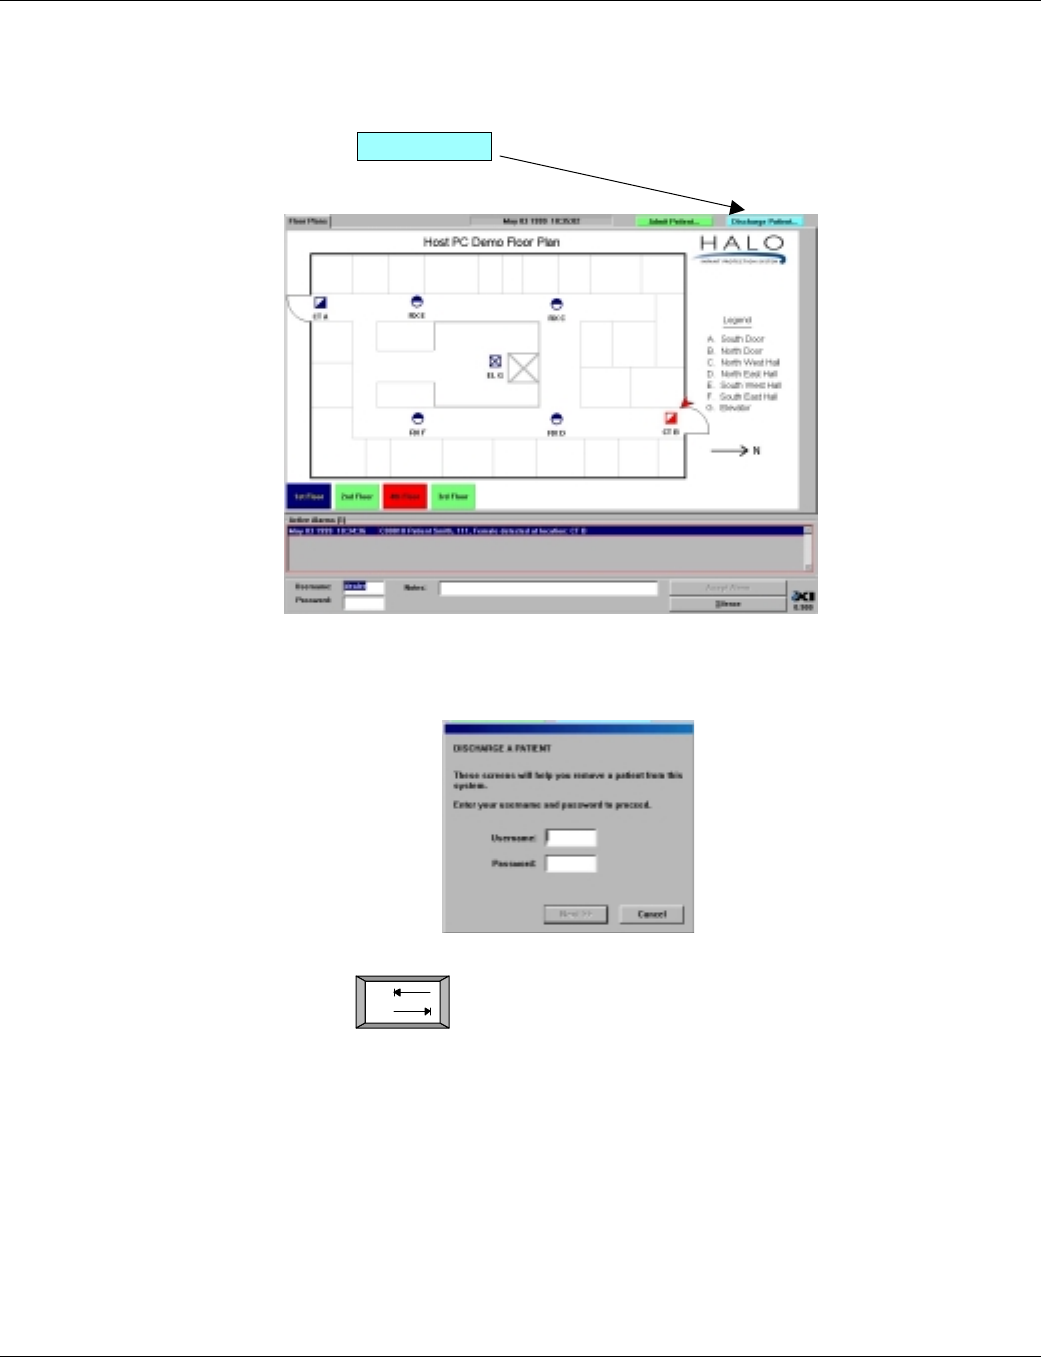
2.1. Admitting a Patient
1. Select the button on the top right of the screen.
Main Screen - User Level
2. The system will ask for your Username and Password. Type in your Username as as-
signed by your supervisor.
3. Press the key on the keyboard
EXI HALO User Manual 980-000002-000
EXI Wireless Systems Inc. 32 March 2000
Revision 5.0
Enter
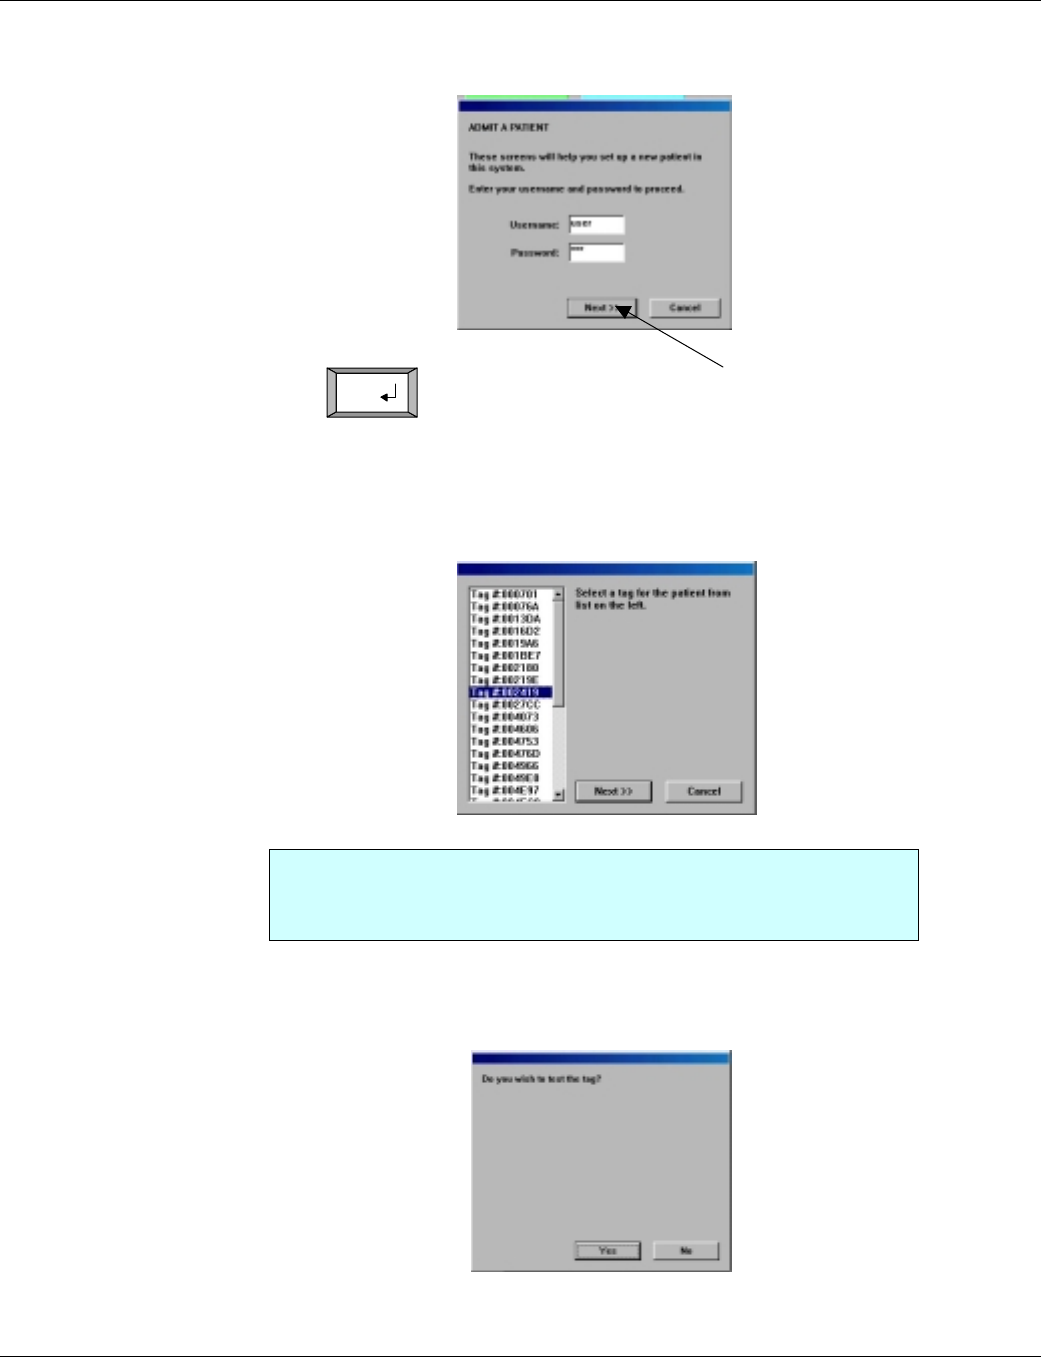
4. Type in your Password
5. Press key on the keyboard, or click on the Next button
6. The system will now ask you to choose a tag. Select the Tag Serial Number correspond-
ing to the tag you wish to use.
7. The system will ask if you wish to test the tag. Select Yes if you wish to do so. The sys-
tem will navigate you through the process.
Note: Each infant tag has a unique serial number on the side of the tag. The
system will list all of the available tags registered in the system but
not yet assigned to an infant.
EXI HALO User Manual 980-000002-000
EXI Wireless Systems Inc. 32 March 2000
Revision 5.0
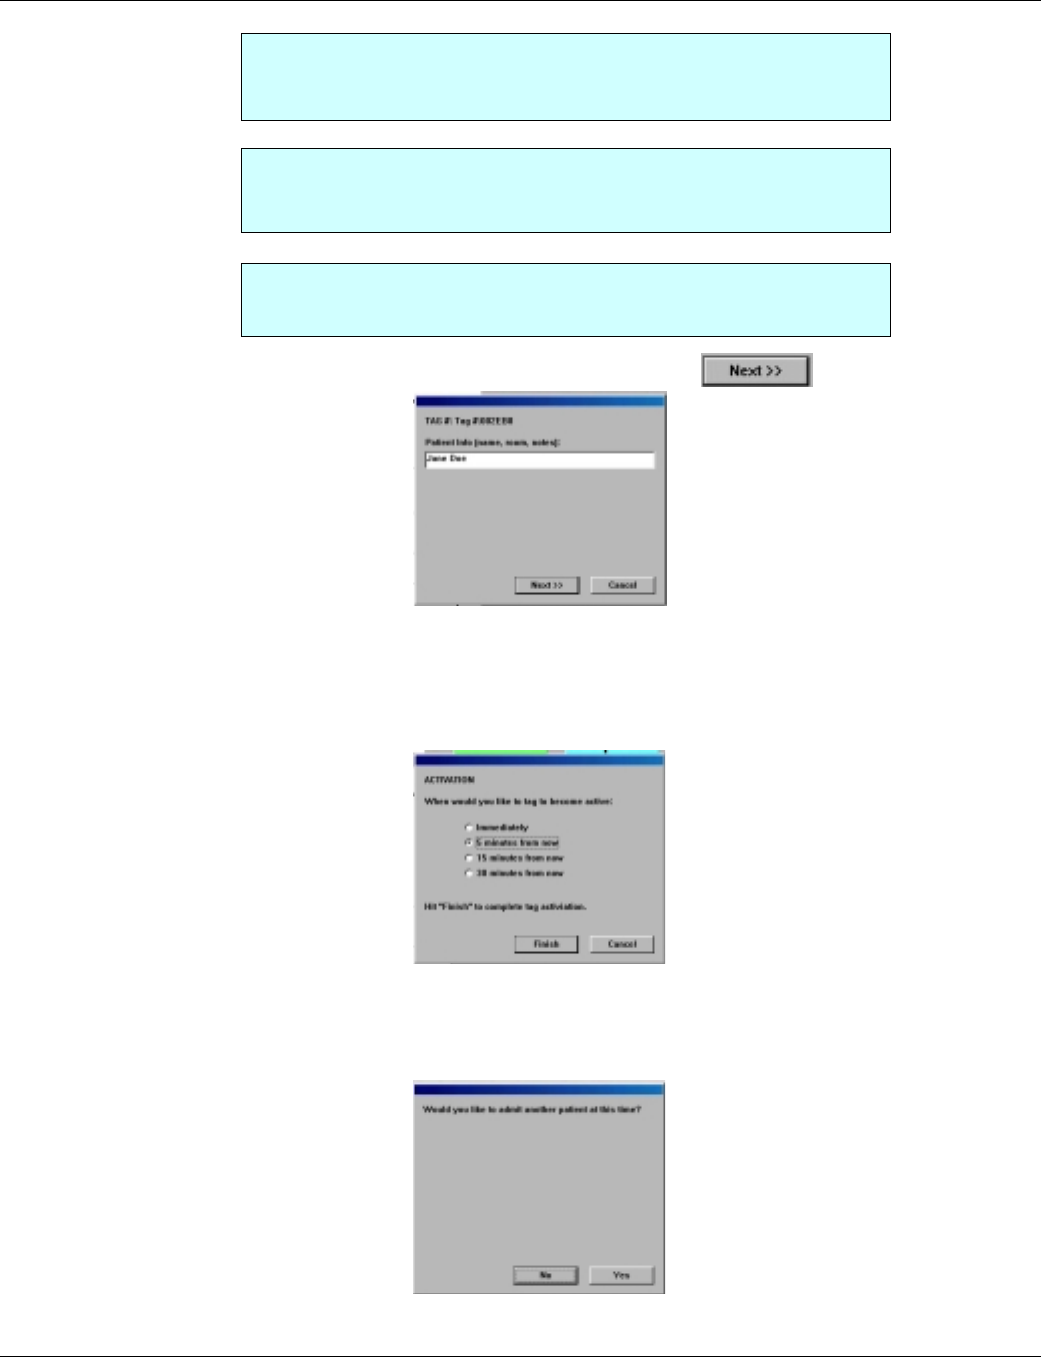
8. Enter the Infant Name in any format you wish. Click
9. Choose when you would like the tag removal alarm to be activated by selecting the ap-
propriate Activation delay box. Select Finish. Delays apply to sensing “off body” or
TIC alarms only. Tag will still initiate alarms and control at egress points
10. You have now admitted the infant. If you wish to admit another, select Yes. If not, select
No.
Note: During this test, the system is verifying the tag serial number, testing
the tag removal alarm and generating an activity log entry to docu-
ment the test.
Hint: Ensure the bottom of the tag is held stable on your skin during the
test for about 10 seconds prior to removing. If the test fails, try it
once more on
y
our wrist.
Once the tag is verified, the system will automatically take you to the next
step in the admit process.
EXI HALO User Manual 980-000002-000
EXI Wireless Systems Inc. 32 March 2000
Revision 5.0
+$,-.(/0)&'(%$)*%
+$,-.(/0)&'(%$)*%+$,-.(/0)&'(%$)*%
+$,-.(/0)&'(%$)*%
TAB
2.2. Discharging a Patient
1. Select the button on the top right of the screen.
2. The system will ask for your Username and Password. Type in your username as as-
signed by your supervisor.
3. Press the key on the keyboard
EXI HALO User Manual 980-000002-000
EXI Wireless Systems Inc. 32 March 2000
Revision 5.0
Enter
4. Type in your Password
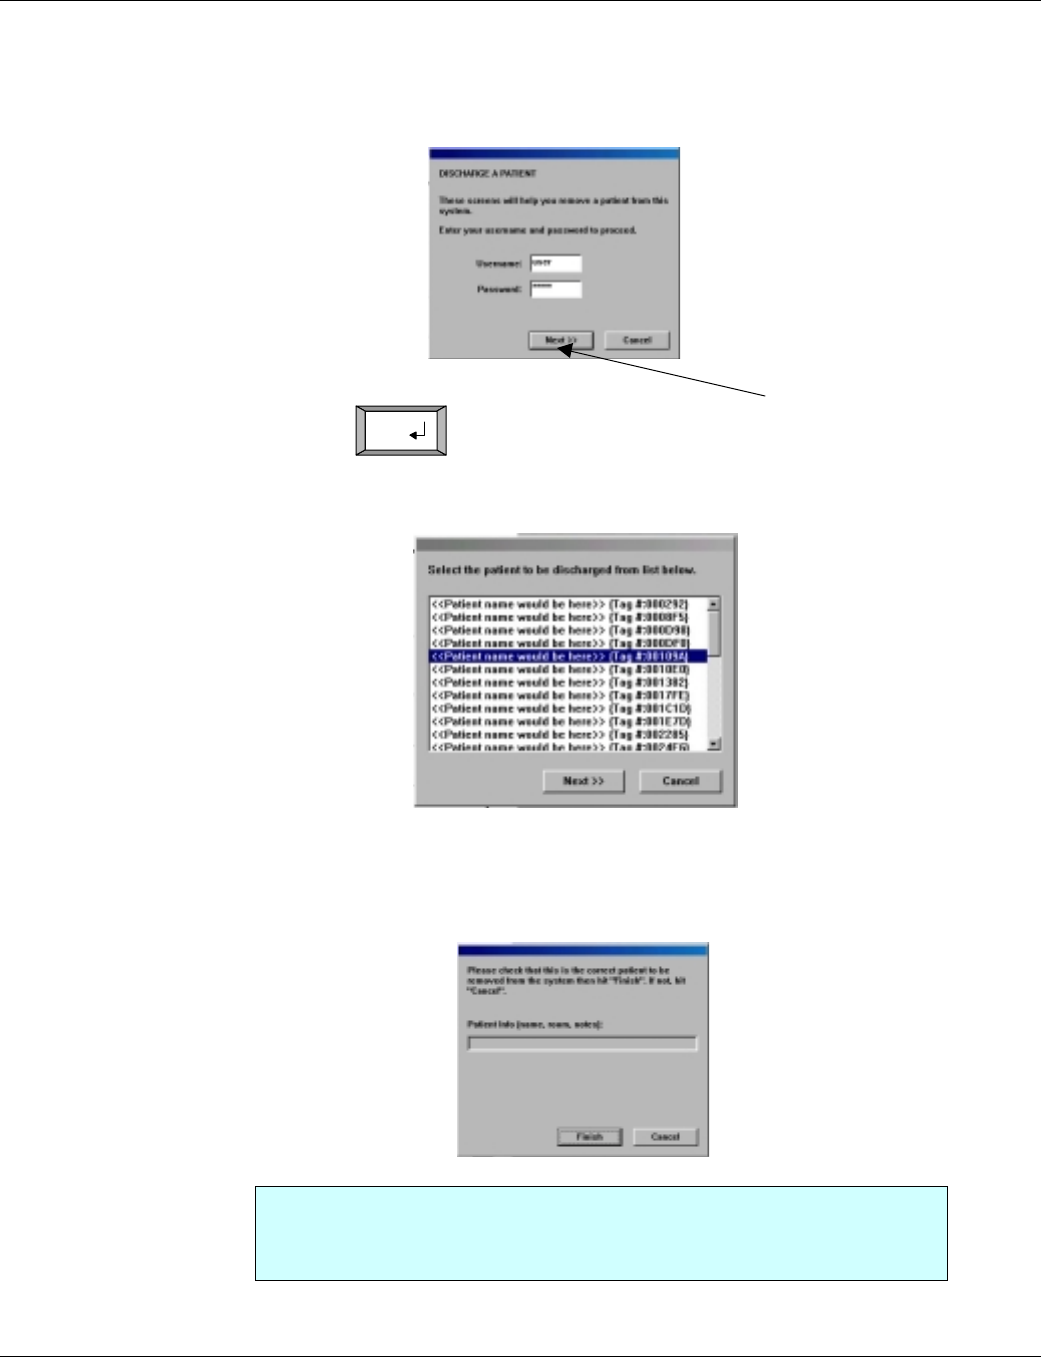
5. Press the key on the keyboard, or click on the Next button.
6. Select the Patient Name you wish to discharge. Select Next.
7. The system will redisplay the Infant Name for you to verify. Select Finish if this is the
correct infant. If it is not the infant you wish to discharge, select Cancel and start from
step 1 again.
The system will continue to respond to a tag detected at an egress point, such as
a doorway or elevator, and control that egress point even after the tag has been
discharged.
EXI HALO User Manual 980-000002-000
EXI Wireless Systems Inc. 32 March 2000
Revision 5.0
Alarm
Acceptance
Area
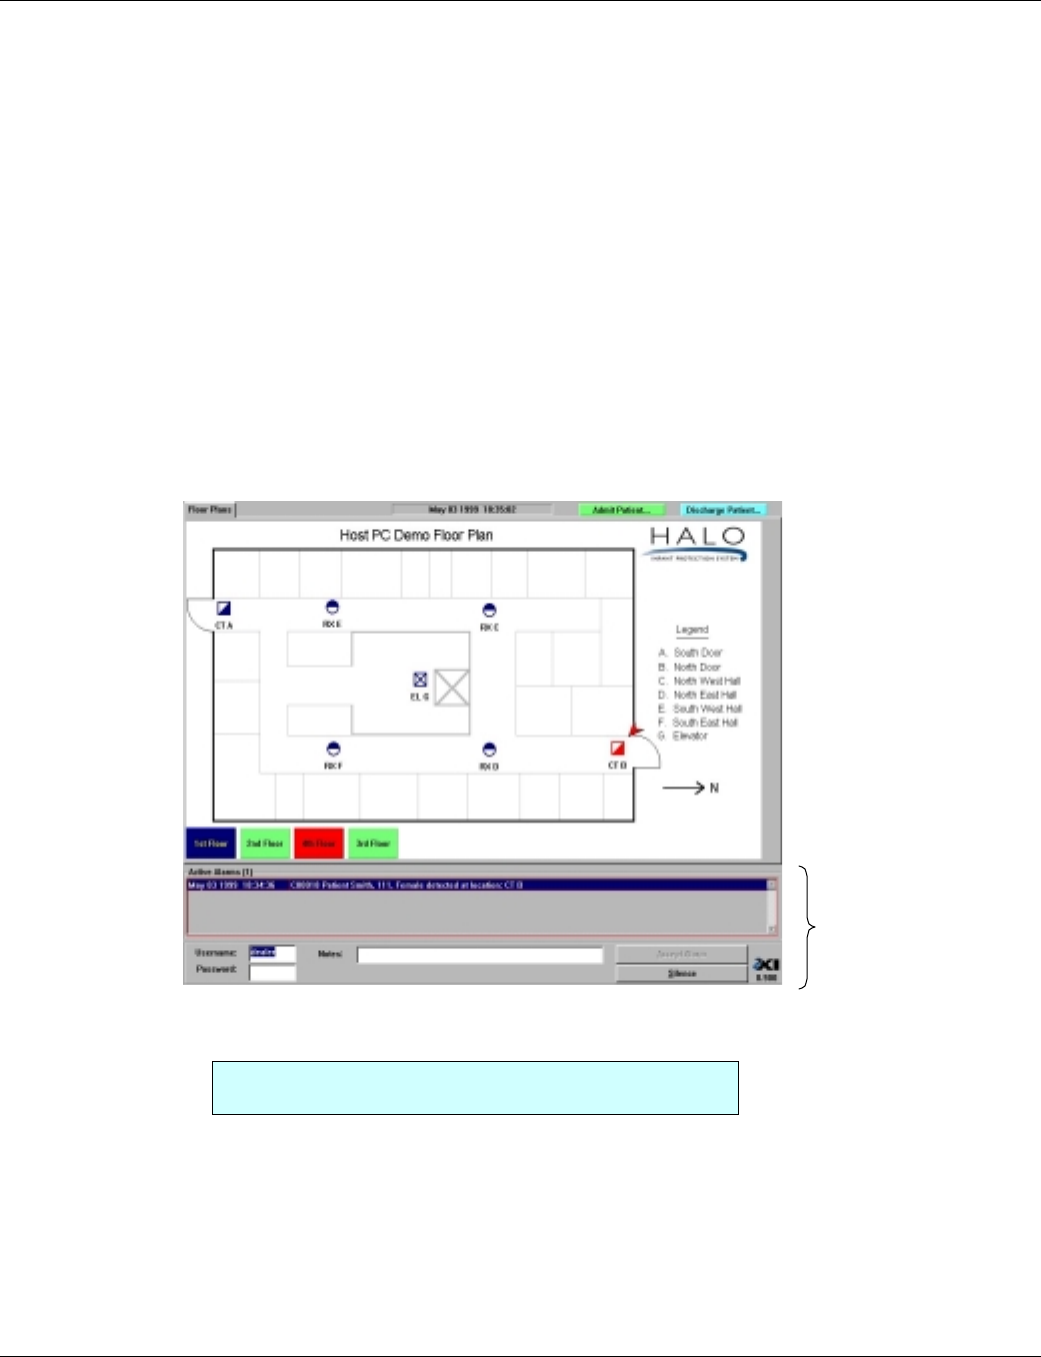
2.3. Silencing and Accepting Alarms
The Halo system will alarm when:
• An assigned infant tag has been removed from an infant (off-body or TIC)
• When an infant tag is detected near a controlled egress area (In field or TIF)
When an alarm occurs, the system will:
• Identify the infant associated with the detected tag
• Identify the location by flashing an icon and expressing the location name
• Identify the alarm type as a tag removal or egress area detection
• Sound an audible alarm at the computer.
Main Screen - User Level
During an alarm, the alarm acceptance area becomes active.
EXI HALO User Manual 980-000002-000
EXI Wireless Systems Inc. 32 March 2000
Revision 5.0
TAB
TAB
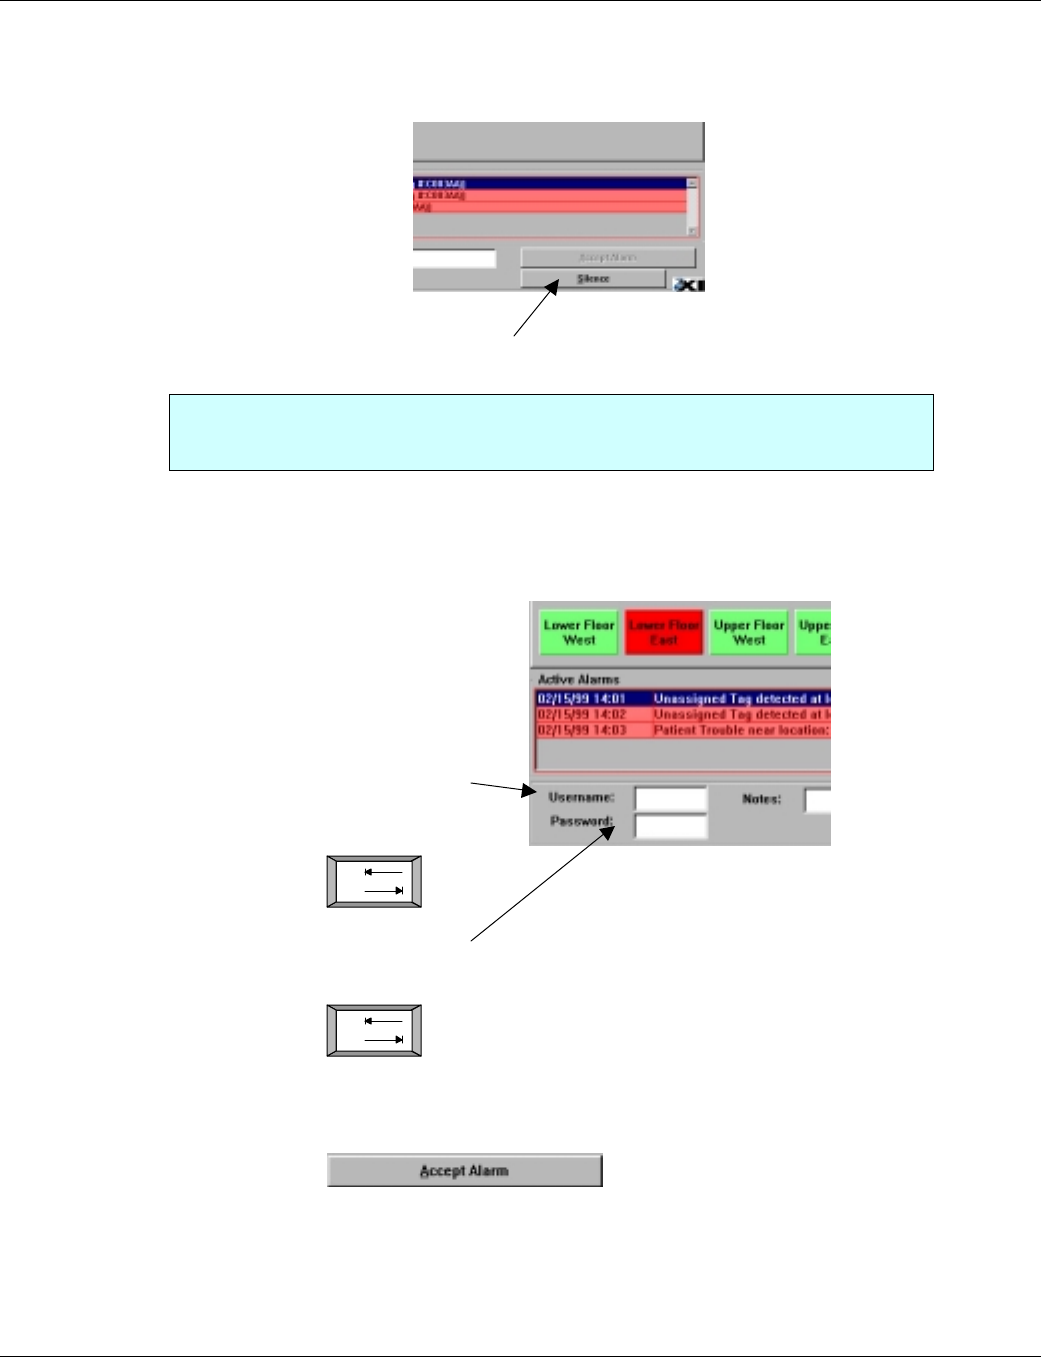
Silencing an alarm
To silence the audible alarm, select Silence in the alarm acceptance area.
Accepting an alarm
To accept an alarm, select the alarm condition in the active alarms field. If only one alarm exists, it
will automatically be selected.
1. Type in your Username
2. Press
3. Type in your Password
4. Press
5. Enter a note in the Notes field (optional)
6. Select
The system will log the following incident details:
Note: You must accept the alarm to clear the alarm condition. Silencing simply silences the
audible alarm while the incident is investigated.
EXI HALO User Manual 980-000002-000
EXI Wireless Systems Inc. 32 March 2000
Revision 5.0
• Alarm type (tag removal or egress alarm)
• Infant name
• Tag number
• Time
• ID of staff member accepting the alarm
• Staff member notes on alarm incident
2.4. “Nurse Saver” and “Loitering” Features
If the system is installed with the “Nurse Saver” feature, Tags detected at egress points which are se-
cured will not set off nuisance alarms. A Tag detected near a door that is closed will result in the floor
button on the computer screen turning yellow (pre-alarm), and the icon associated with that door also
turning yellow. If a bypass keypad is installed at the door, it will flash a light and emit periodic
“beeps” to indicate the presence of the Tag. This event is logged into the computer as “Tag detected at
location xxx”, but will not create an alarm condition. An alarm is initiated if the door was to be opened
while the Tag was still present at the door. For this feature, the door has to be equipped with a magnetic
switch to sense whether it is in the closed or open position.
If the tag remains at the door for a period of one minute or more, an egress alarm will be initiated and
the button on the screen and the icon will turn to red. This is the “Loitering” feature.
The Halo system is usually set up to create multiple detections of an alarm for security purposes.
When multiple system devices see the same tag in alarm, the system will condense this into one
incident for the staff member to accept.
When multiple alarms occur, the staff member much accept each alarm before the system will
clear the alarms. This normally means more that one infant tag alarmed simultaneously.
All alarms are maintained in a log for supervisor review.
Pre-Alarm
(Yellow) Alarm (Red)
EXI HALO User Manual 980-000002-000
EXI Wireless Systems Inc. 32 March 2000
Revision 5.0
Supervisor Tabs
Alt
TAB
L
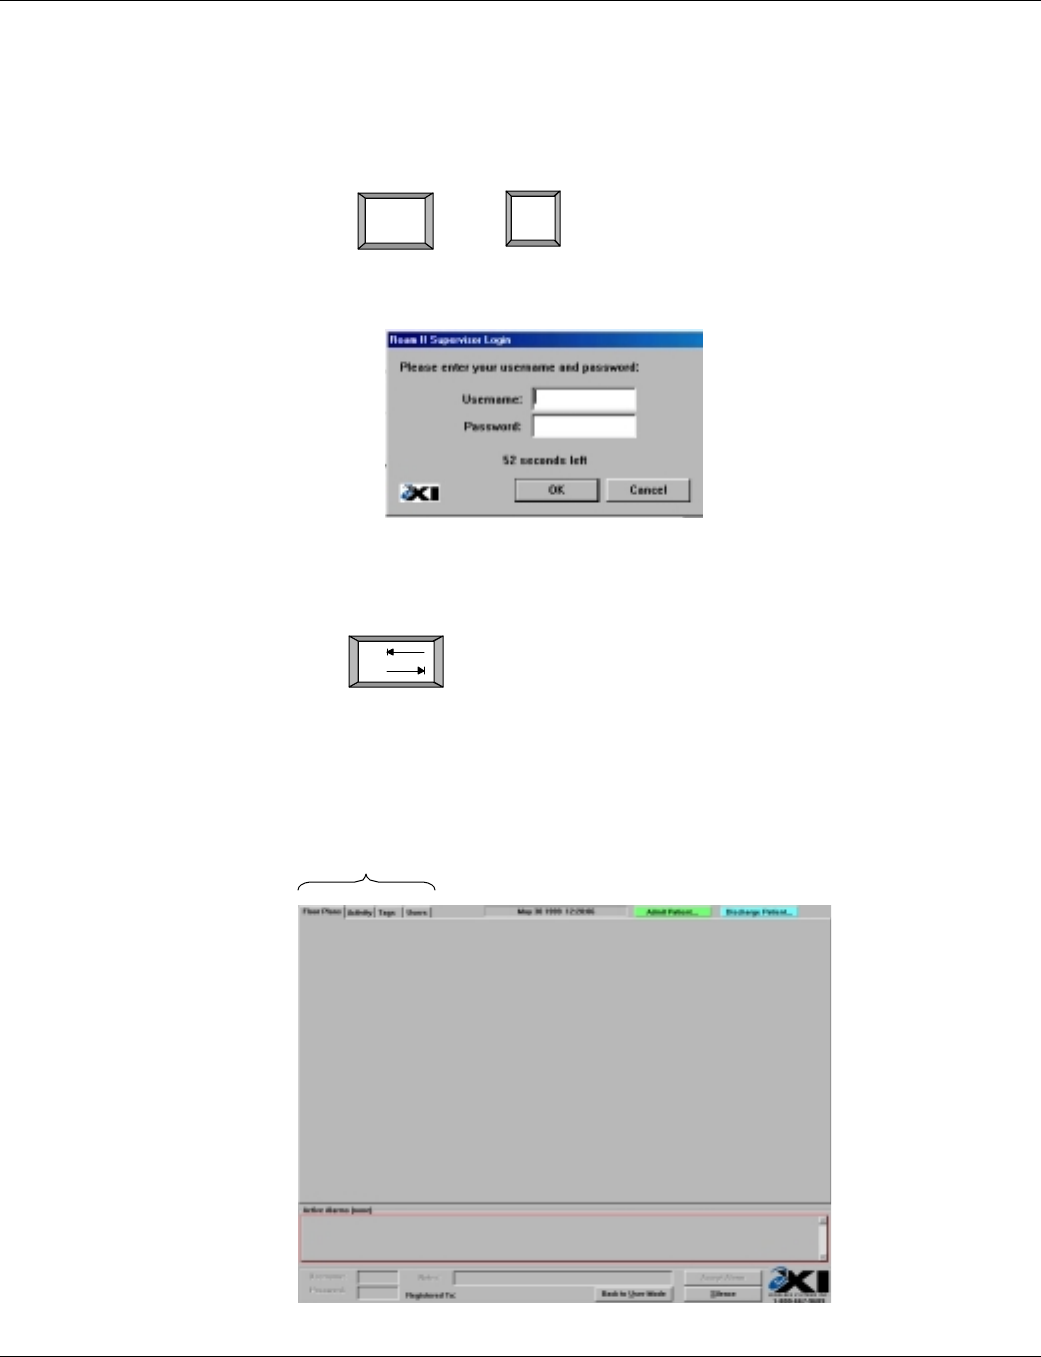
3. Supervisor Level
3.1. Accessing Supervisor Level
1. Press the and keys on the keyboard simultaneously.
2. The system will ask for your Username and Password.
3. Enter you Username
4. Press the key on the keyboard
5. Enter your Password
6. Select OK. The Supervisor screen will appear as shown below.

EXI HALO User Manual 980-000002-000
EXI Wireless Systems Inc. 32 March 2000
Revision 5.0
Once in Supervisor mode, three Supervisor function tabs appear:
• Activity
• Tags
• Users
Supervisor Level Functions
Supervisor tab Access Functions
Activity Supervisor only View activity logs
Annotate activity logs
Print logs
Tags Supervisor only Add or delete tags
View registered tag list
Disable a tag
Unassign a tag
Edit patient information for tag
View current infant population
Users Supervisor only Add or delete a user
Disable or Activate a user
Change user passwords
3.2. Exiting Supervisor Level
To exit the Supervisor level, select the button at the bottom of the screen.
EXI HALO User Manual 980-000002-000
EXI Wireless Systems Inc. 32 March 2000
Revision 5.0
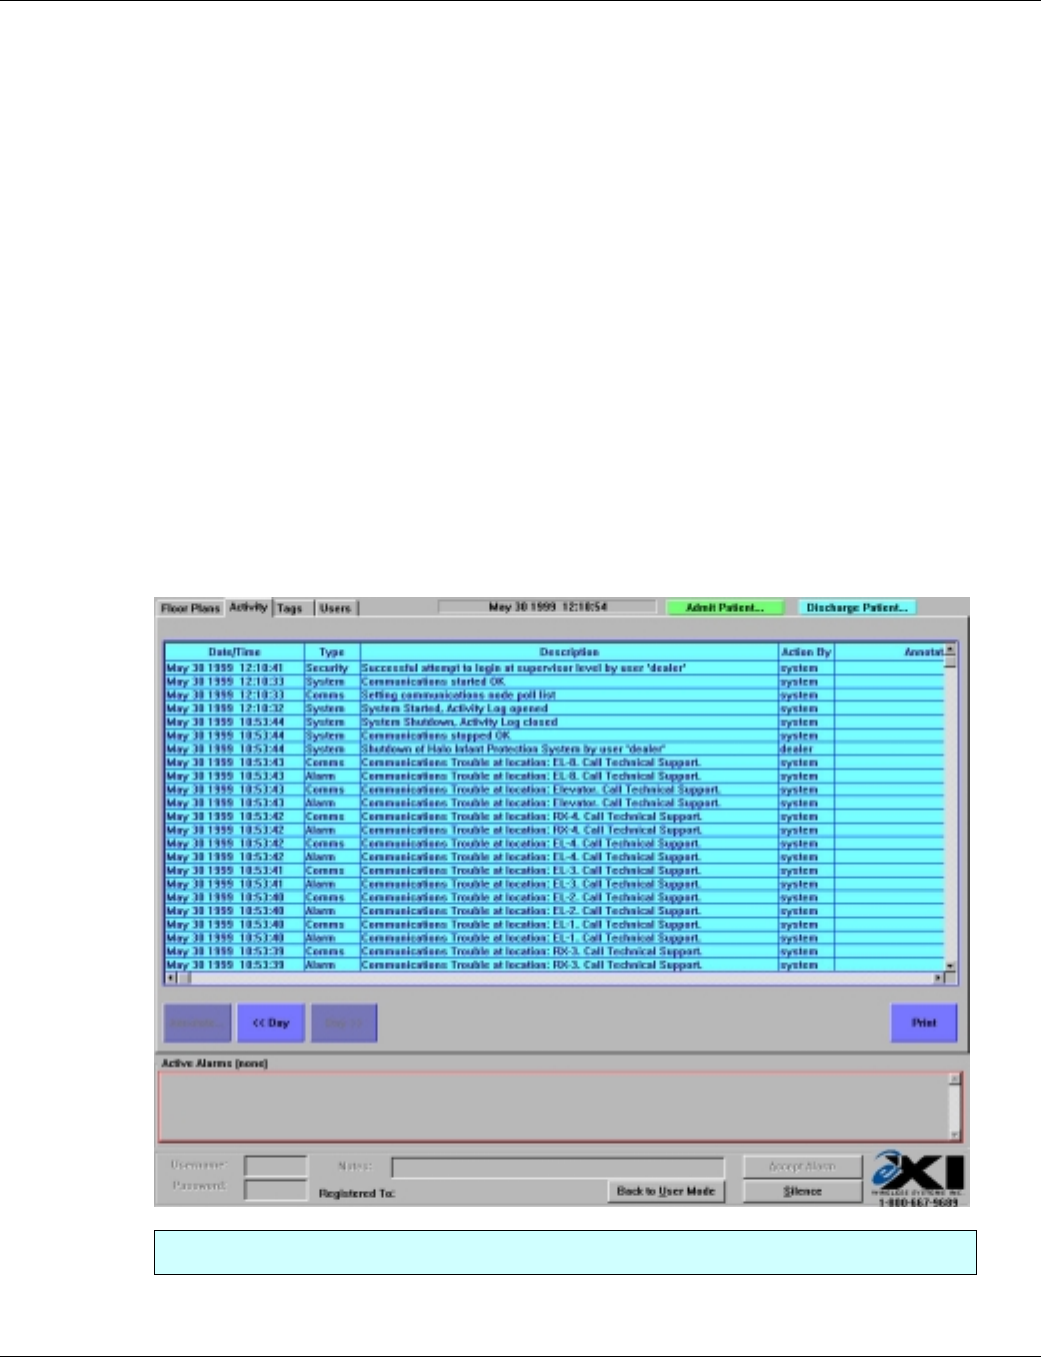
4. Activity Log Management
4.1. Activity Logs
The system allows supervisors the ability to search the historical activity log in the system. The system
will record:
• Patient admission and discharge
• Alarm events including acceptance parameters
• System diagnostics
• Entry and Deletion of new tags and users
• Warning of unassigned tags or tags not in the database
• Door bypass activity
To enter the activity log area, you must first be in the Supervisor access area (See section 3.1). To view
the activity log, select Activity Log from the Supervisor function tabs.
Activity Screen - Supervisor Level
The activity log screen will display:
The system will show the system activity log. Each screen will display one page of alarm activity.
EXI HALO User Manual 980-000002-000
EXI Wireless Systems Inc. 32 March 2000
Revision 5.0
• The time and day of activity
• The type of activity
• Description of the activity
• The user name associated with the activity
• The user notes.
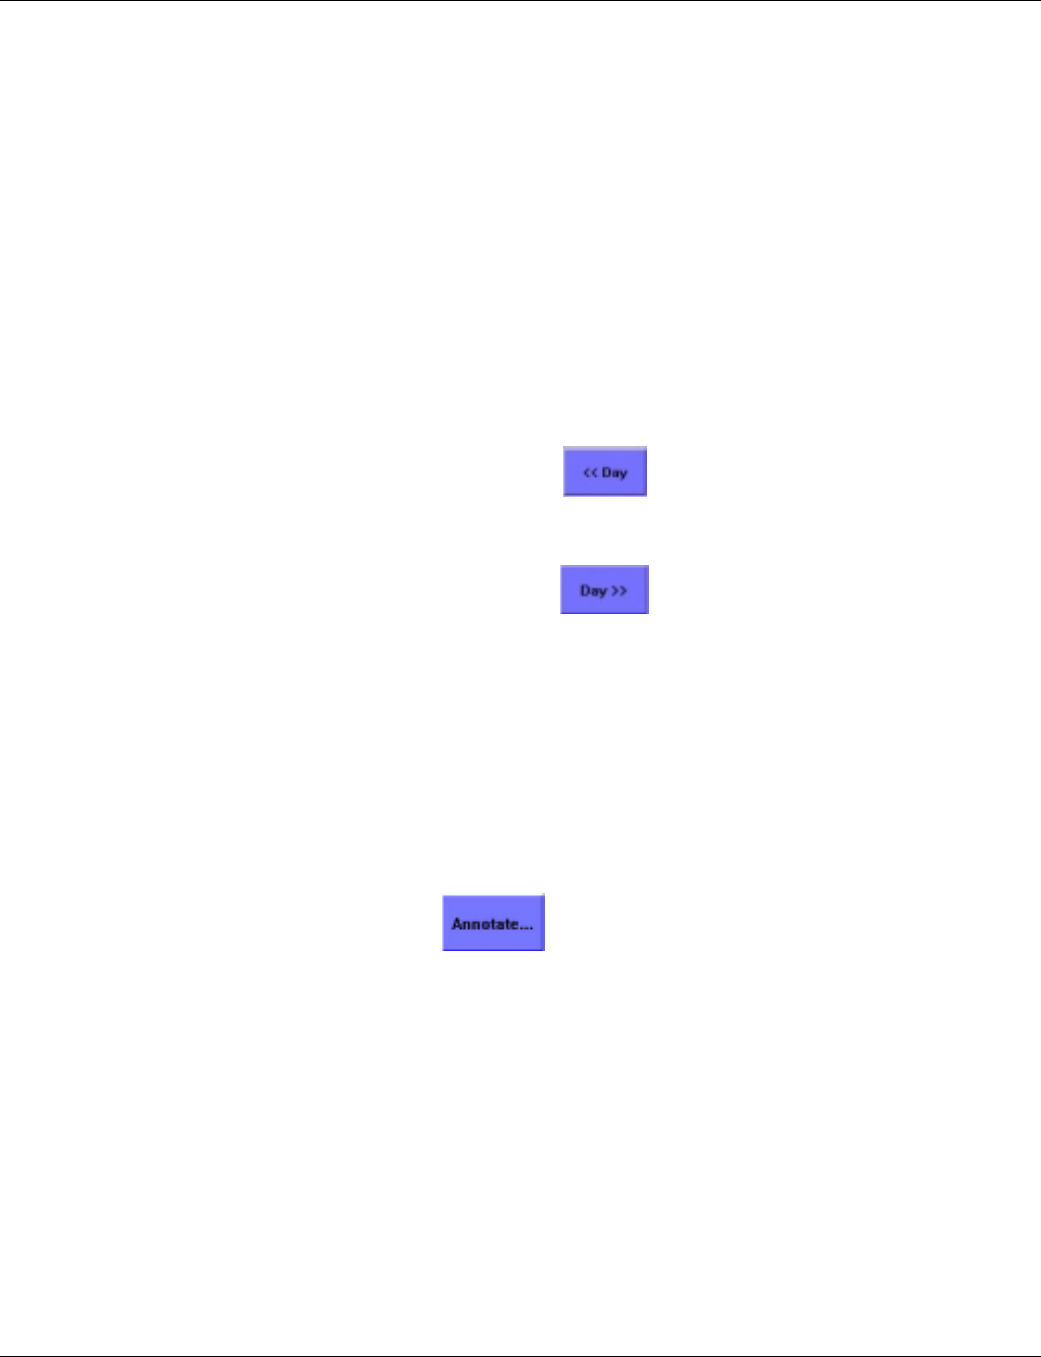
4.2. Navigating the activity log
To find a particular activity event, first navigate to the day of interest by selecting the “Day” buttons.
To step one day back, select
To step one day forward, select
The date you are viewing will appear in the leftmost column.
4.3. Adding a Supervisor annotation to an alarm
To add a Supervisor annotation, select the particular alarm you wish to annotate by highlighting it. You
may highlight the alarm by navigating the mouse pointer anywhere on the alarm line and clicking the left
mouse button on the activity of interest.
1. Select
2. Enter the note
3. Select OK

EXI HALO User Manual 980-000002-000
EXI Wireless Systems Inc. 32 March 2000
Revision 5.0
AltB
4.4. Backing up Activity Logs
The system is capable of storing 14,000 events in the Activity Logs. Remember that all system activi-
ties, including alarm conditions, pre-alarm conditions, door access and bypass activity are logged.
After the 14,000 events are captured, subsequent events displace the first log in the list. That is, events
are purged on a first-in first-out basis after the 14,000 limit is reached.
Activity Logs may be backed up on the computer Hard Drive while in Supervisor mode. To initiate a
back-up, simultaneously press the and keys on the Keyboard.
The back-up log file is stored under the “Halo” directory on the Hard Drive of the computer. The file is
date stamped to identify the different back-up files. If it is desired to make copies of these files for ar-
chiving, you will need to exit the HALO Console application and manually copy the back-up file to the
removable back-up media (such as a ZIP Disk) using the Windows Explorer program.
EXI HALO User Manual 980-000002-000
EXI Wireless Systems Inc. 32 March 2000
Revision 5.0
5. Managing Tags
5.1. Tags
Your system requires each infant to wear a P-Tag. You should have a fleet of tags on hand that exceeds
your peak demand. Each tag has a unique serial number that is on the side of the tag.
The tag management tab allows a Supervisor to:
• Add new tags to the system
• Delete tags from the system
• View the existing tag fleet and edit the properties of each
• Disable or Unassign a tag
• Edit patient information for an assigned tag.
• Print the list of tags in the fleet.
To manage tags, you must be in the Supervisor level of the system.
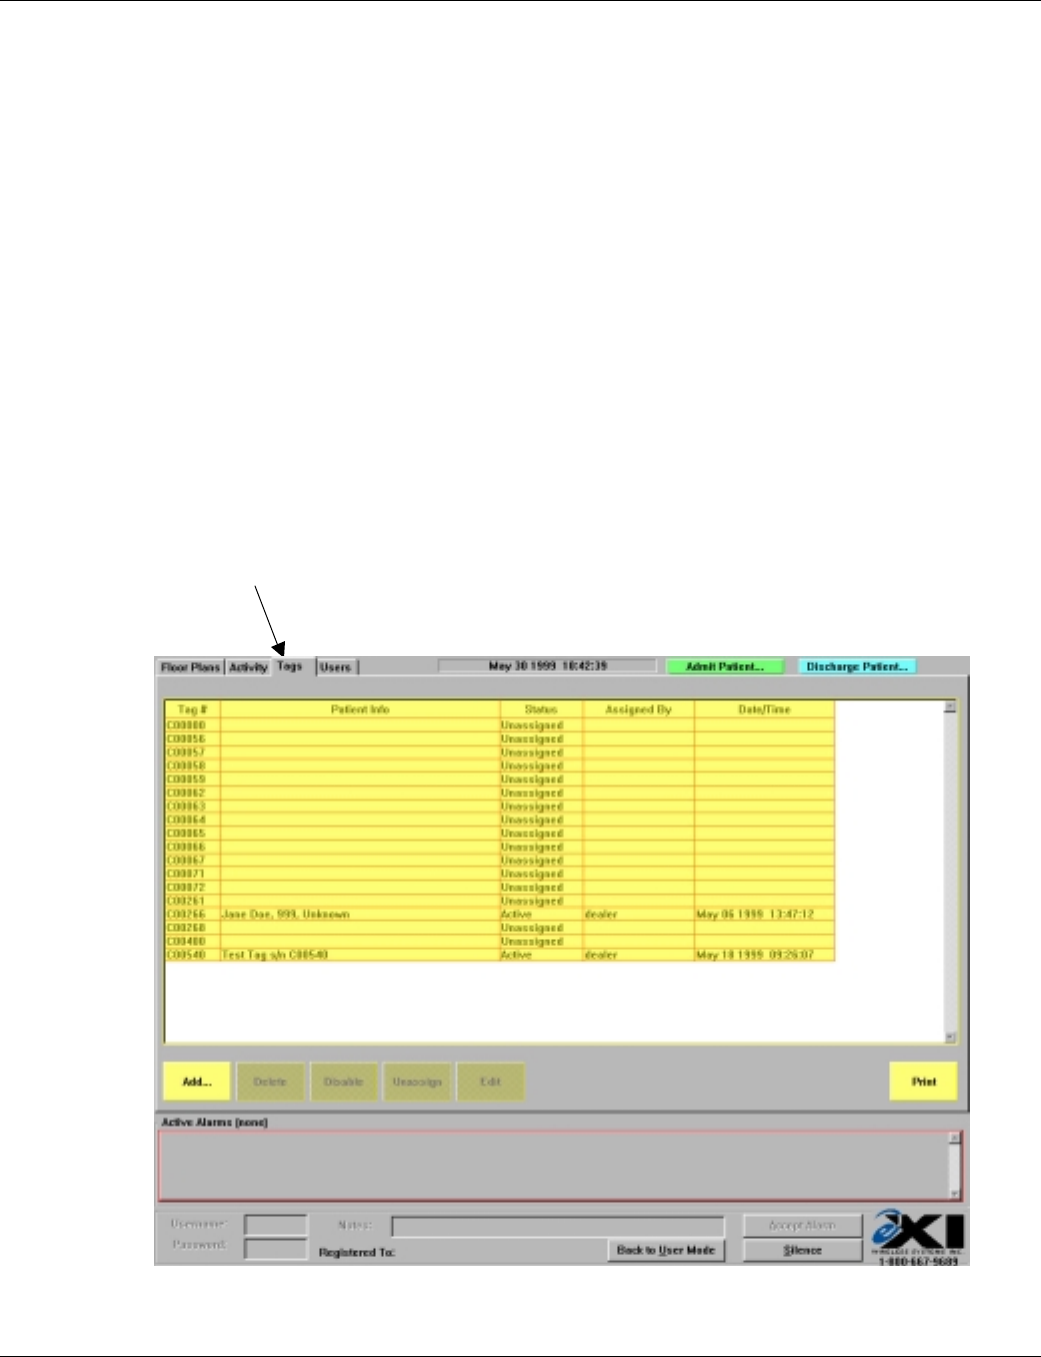
Select the Tags button on the top left of the screen.
Tag Management Screen - Supervisor Level
EXI HALO User Manual 980-000002-000
EXI Wireless Systems Inc. 32 March 2000
Revision 5.0
Note: The automatic reader mode uses the Controller or Receiver closest to the
computer that you are working on to enable the reading of the Tag serial
number. Ensure you clear “Reader Mode” alarm to re-enable this device.
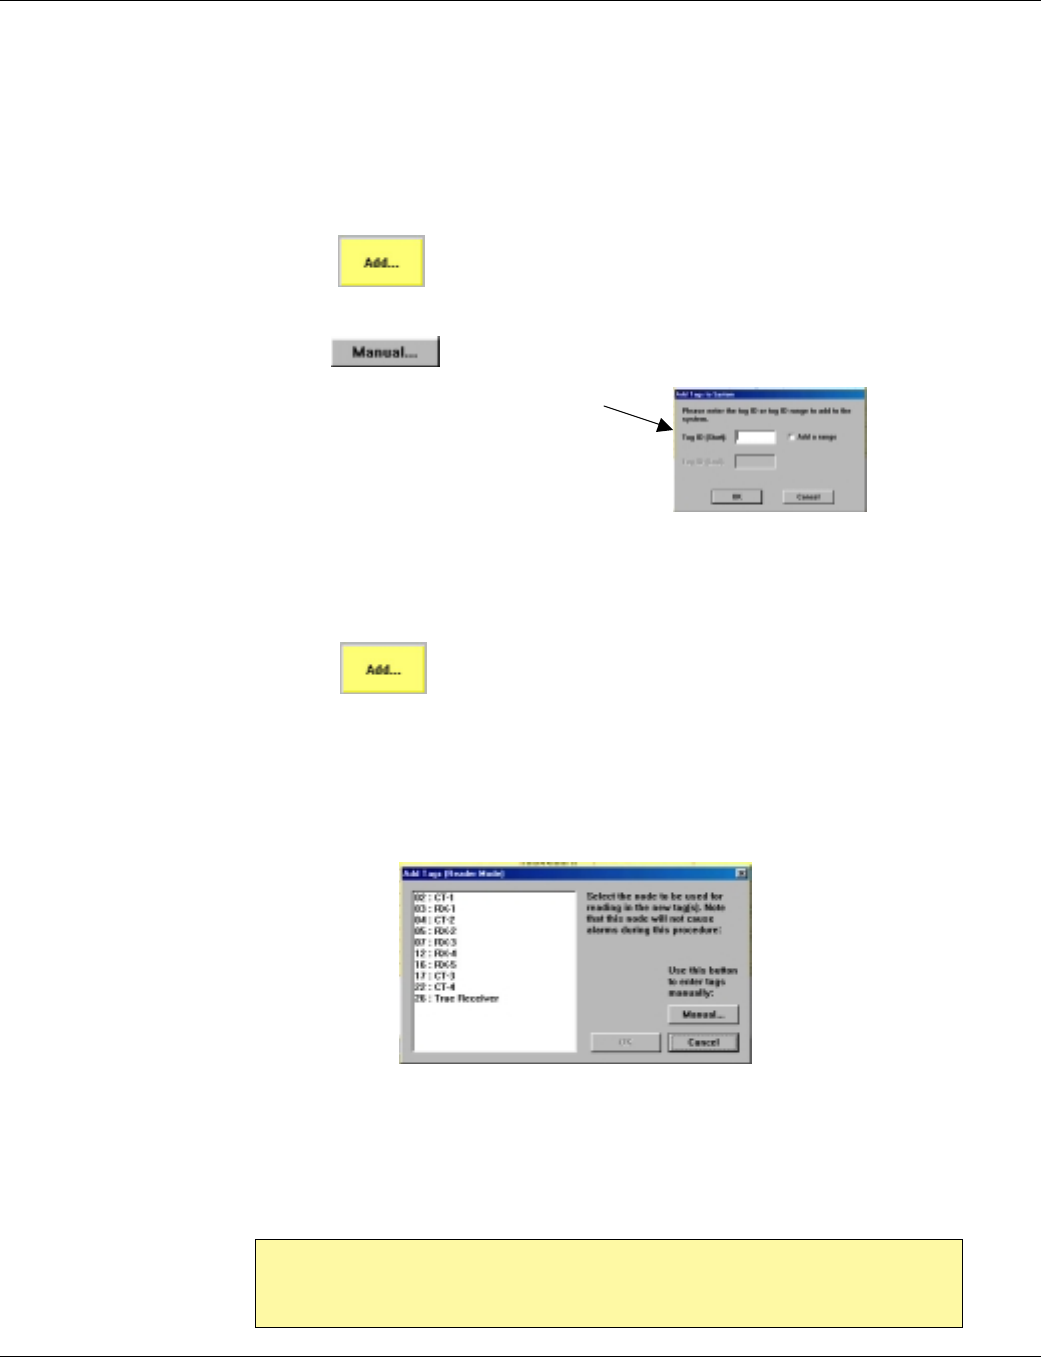
5.2. Adding a new P-Tag to the system
To add a new P-Tag to the system, you must first navigate to the Tags screen in Supervisor level area.
You may add P-Tag’s manually or by using the Halo network to read them.
To add manually:
1. Select
2. Select
3. Enter in the serial number of the new tag
4. Select OK
To use the system to read the tags in:
1. Select
2. Select the nearest device in the system from the list shown on the left of the “Add Tags”
panel. After selecting the device and clicking on “OK”, a “Reader Mode” alarm for the
device will appear in the Active Alarm Field. This indicates that the device selected has
entered Reader Mode and is not available for normal alarms, and is therefore in bypass
state.
3. Wave the tag in the air ensuring you are not contacting the bottom of the tag. The tag
should read in automatically.
4. Clear the “Reader Mode” alarm to ensure that the device comes back on line and is ready
to report alarms.
EXI HALO User Manual 980-000002-000
EXI Wireless Systems Inc. 32 March 2000
Revision 5.0
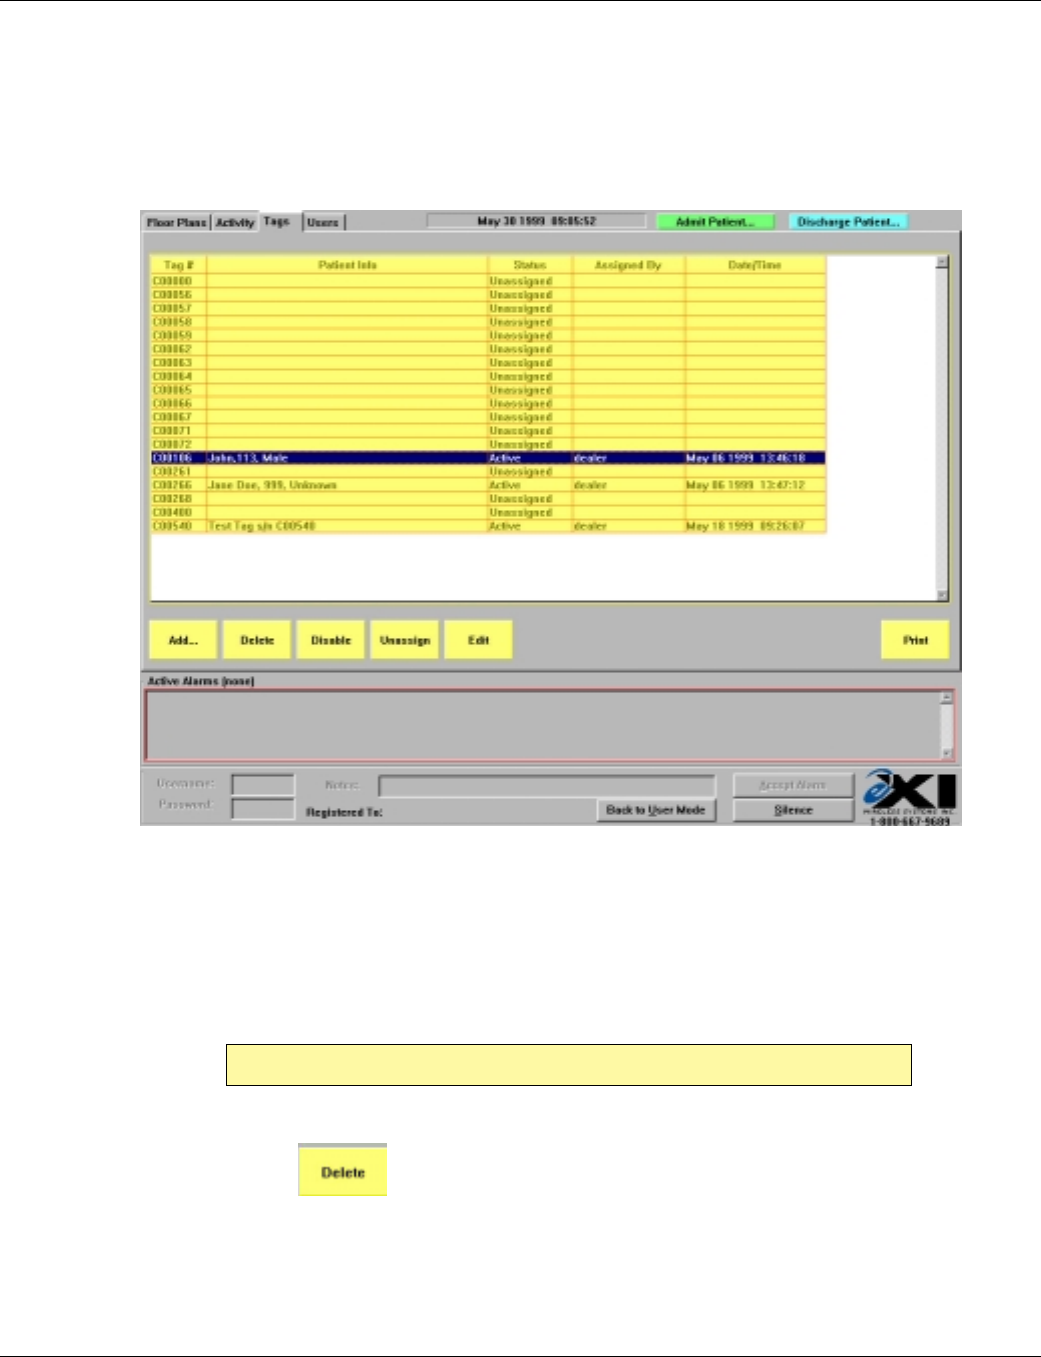
5.3. Deleting a P-Tag from the system
To delete a P-Tag, you must first navigate to the Tags screen in Supervisor level.
Tags Screen - Supervisor Level
To delete a tag:
1. Select the tag you wish to delete by navigating the mouse pointer anywhere on the line corre-
sponding to the tag on the screen.
2. Select
Note: The line will change color when you have selected it (See example above)
EXI HALO User Manual 980-000002-000
EXI Wireless Systems Inc. 32 March 2000
Revision 5.0
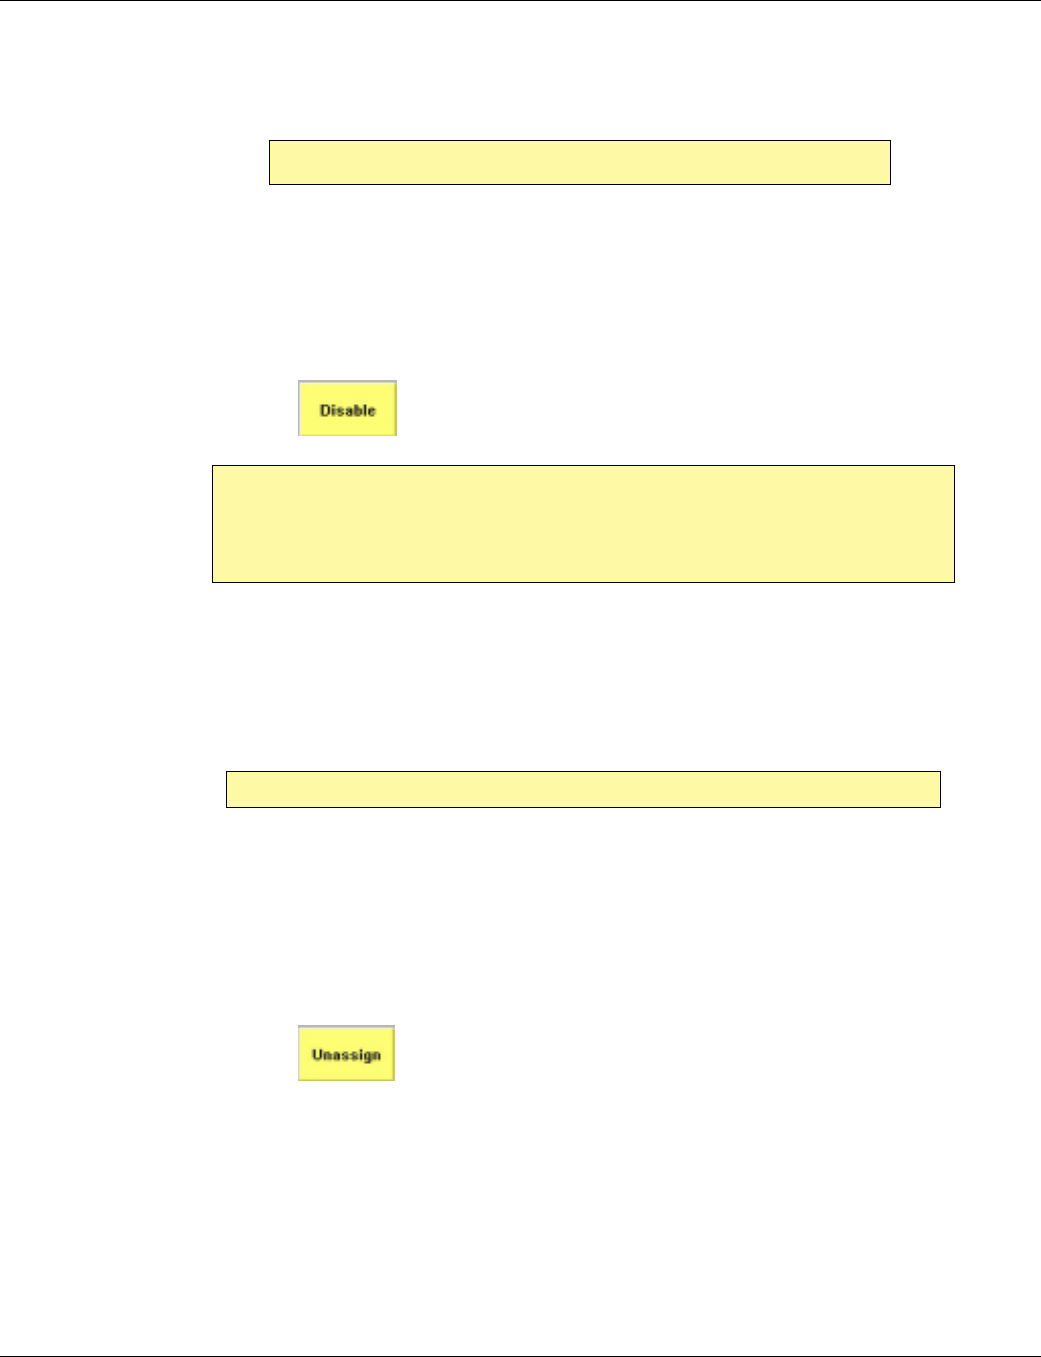
5.4. Disabling a P-Tag
To disable a P-Tag, you must first navigate to the Tags screen in Supervisor level.
To temporarily disable a P-Tag in the system:
1. Select the tag to be disabled by navigating the mouse pointer anywhere on the line corre-
sponding to the tag on the screen.
2. Select
5.5. Unassigning a P-Tag
As a supervisor, you may unassign a P-Tag. To unassign a P-Tag, you must first navigate to the Tags
screen in Supervisor level.
To unassign a tag:
1. Select the tag to be unassigned by navigating the mouse pointer anywhere on the line corre-
sponding to the tag on the screen.
2. Select
The tag will automatically be unassigned.
Note: You may only disable tags that are currently assigned to an infant.
Note: The tag disabling allows for removal of the tag from the infant without an alarm.
The infant is not actually discharged from the system. Once you have disabled the
tag you are responsible to enable it again or remove the infant from the system in
user mode or supervisor mode. This event is captured in the Activity log.
N
ote: Once a ta
g
is unassi
g
ned
,
the
p
atient name will be removed from the s
y
stem.
EXI HALO User Manual 980-000002-000
EXI Wireless Systems Inc. 32 March 2000
Revision 5.0
5.6. Editing a P-Tag Record
A P-Tag record may be edited if the tag is assigned to a patient. The edit function allows a Supervisor
to edit the name associated with the tag serial number. To edit a P-Tag record you must be in the Tags
area in the Supervisor level. To edit a P-Tag parameter listing:
1. Select the tag to be edited by navigating the mouse pointer anywhere on the line corresponding
to the tag on the screen.
2. Select
The system will now display the name currently assigned to the tag. You may edit the name by selecting
the name and typing in the edits.
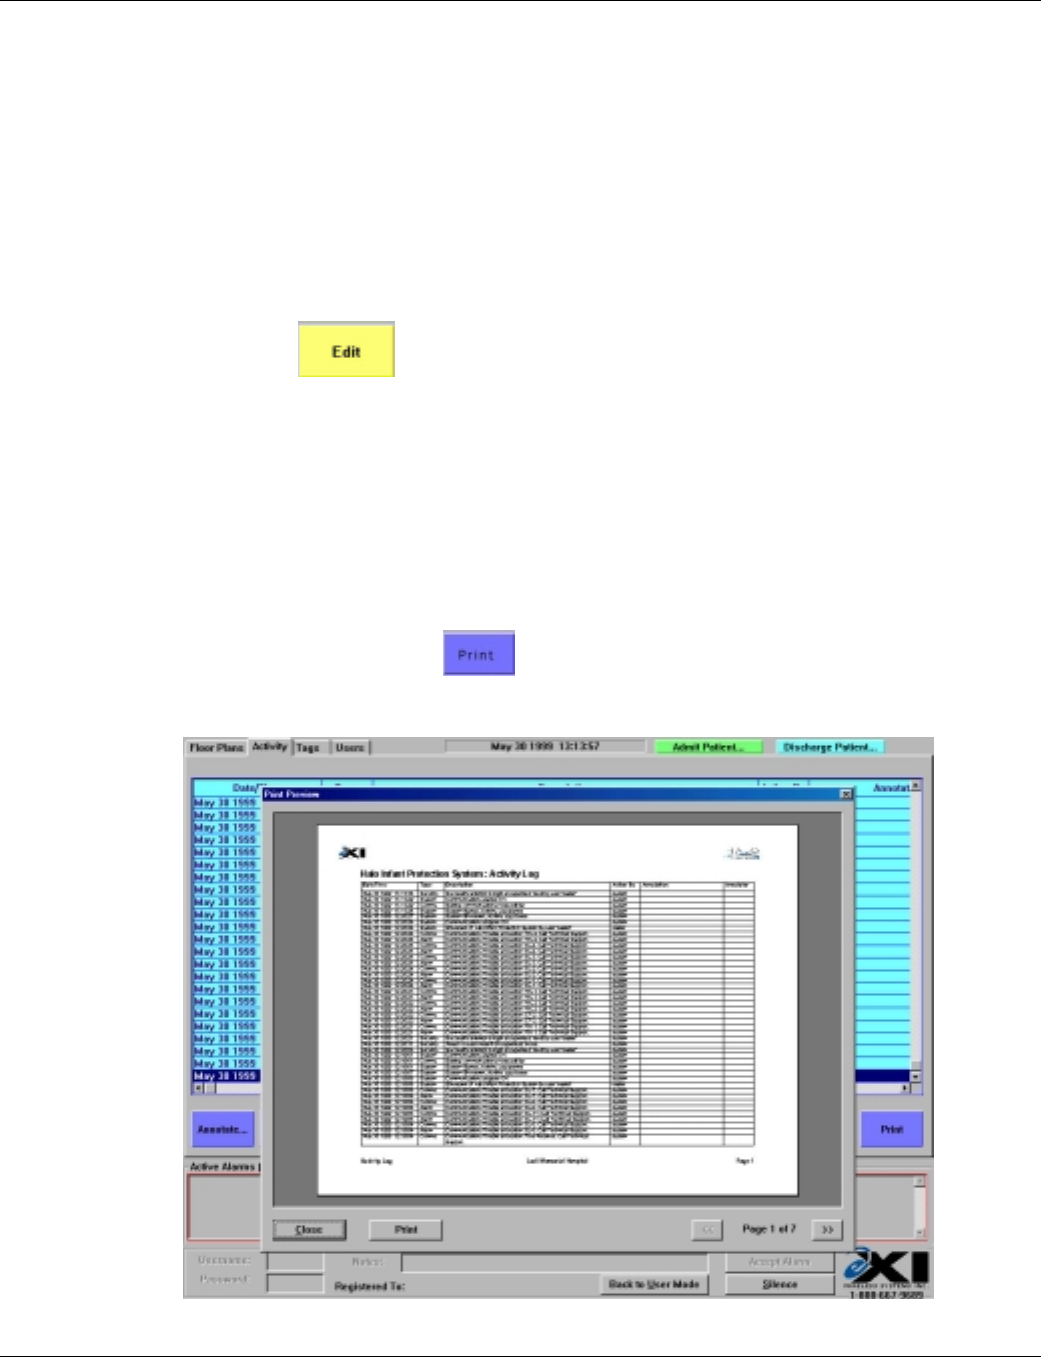
5.7. Printing
Hard copy printing is supported for all the primary logs. It is necessary for a printer to be connected to
the Halo computer to be able to print hard copies of the logs.
To initiate printing, click on the button. A preview of the print-out will appear as
shown below.
Click on Print to proceed with printing, or on Close to abort.
EXI HALO User Manual 980-000002-000
EXI Wireless Systems Inc. 32 March 2000
Revision 5.0
6. Managing System Users
As a supervisor, you control who has access to the system. Every activity in the system requires a username
and password that is assigned and entered into the system by a supervisor.
To manage users, you must have accessed the Supervisor level of the system (See section 4.1)
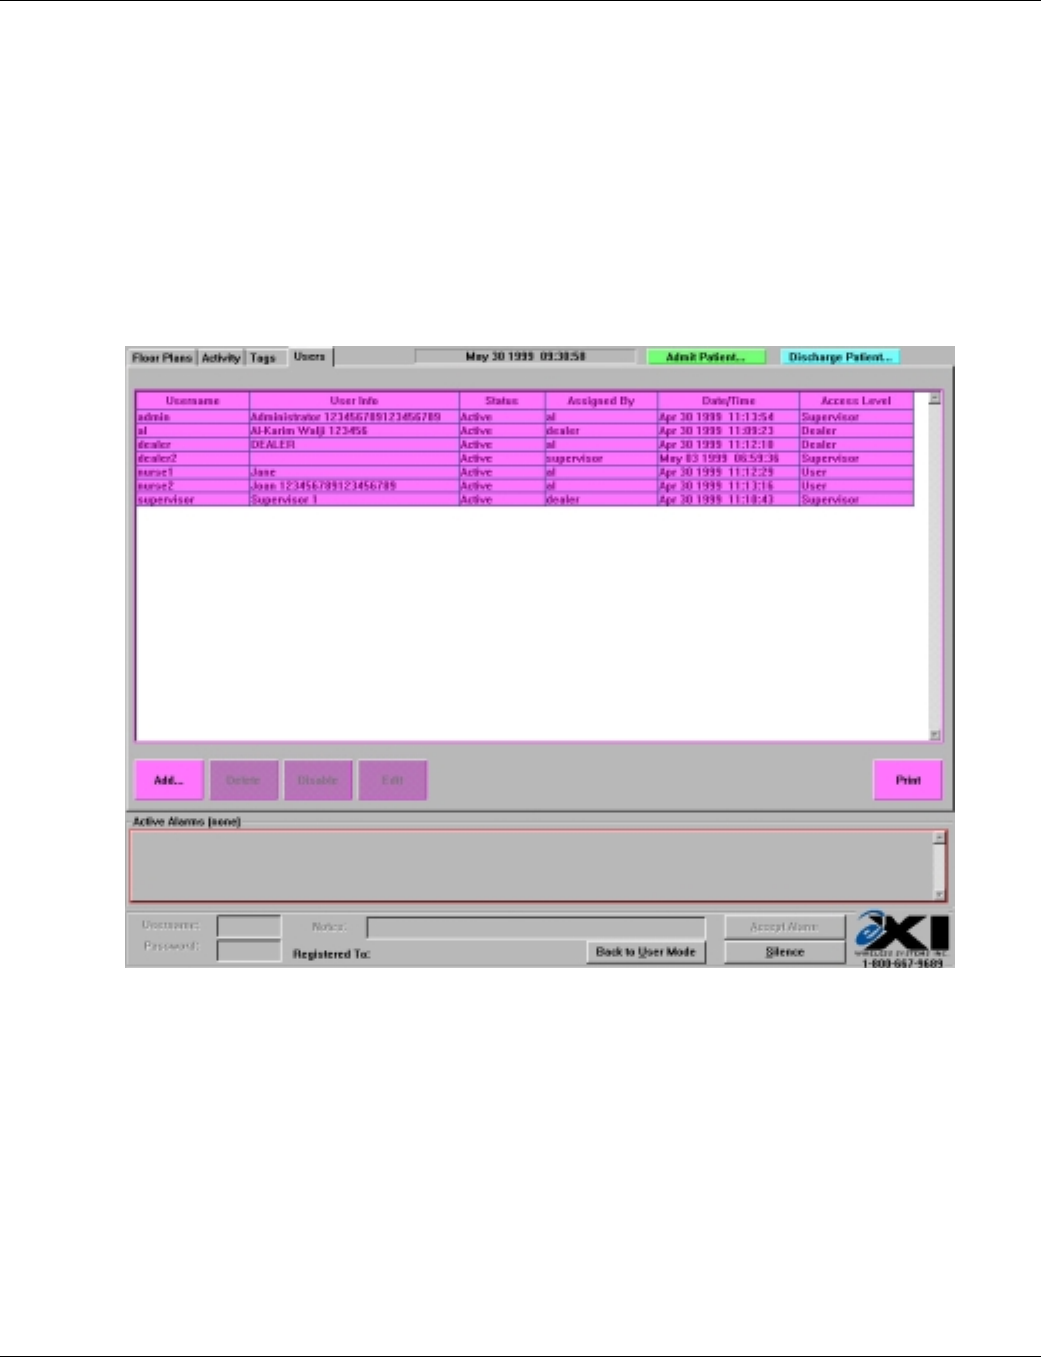
Select Users in the top left-hand corner of the screen using the mouse.
User Management Screen - Supervisor Level
The user management screen displays:
• The current authorized users
• The usernames
• Status (Active or Disabled)
• The identity of the Supervisor assigning the user
• The last date of user file edit or entry
• The access level of the user
EXI HALO User Manual 980-000002-000
EXI Wireless Systems Inc. 32 March 2000
Revision 5.0
TAB
TAB
TAB
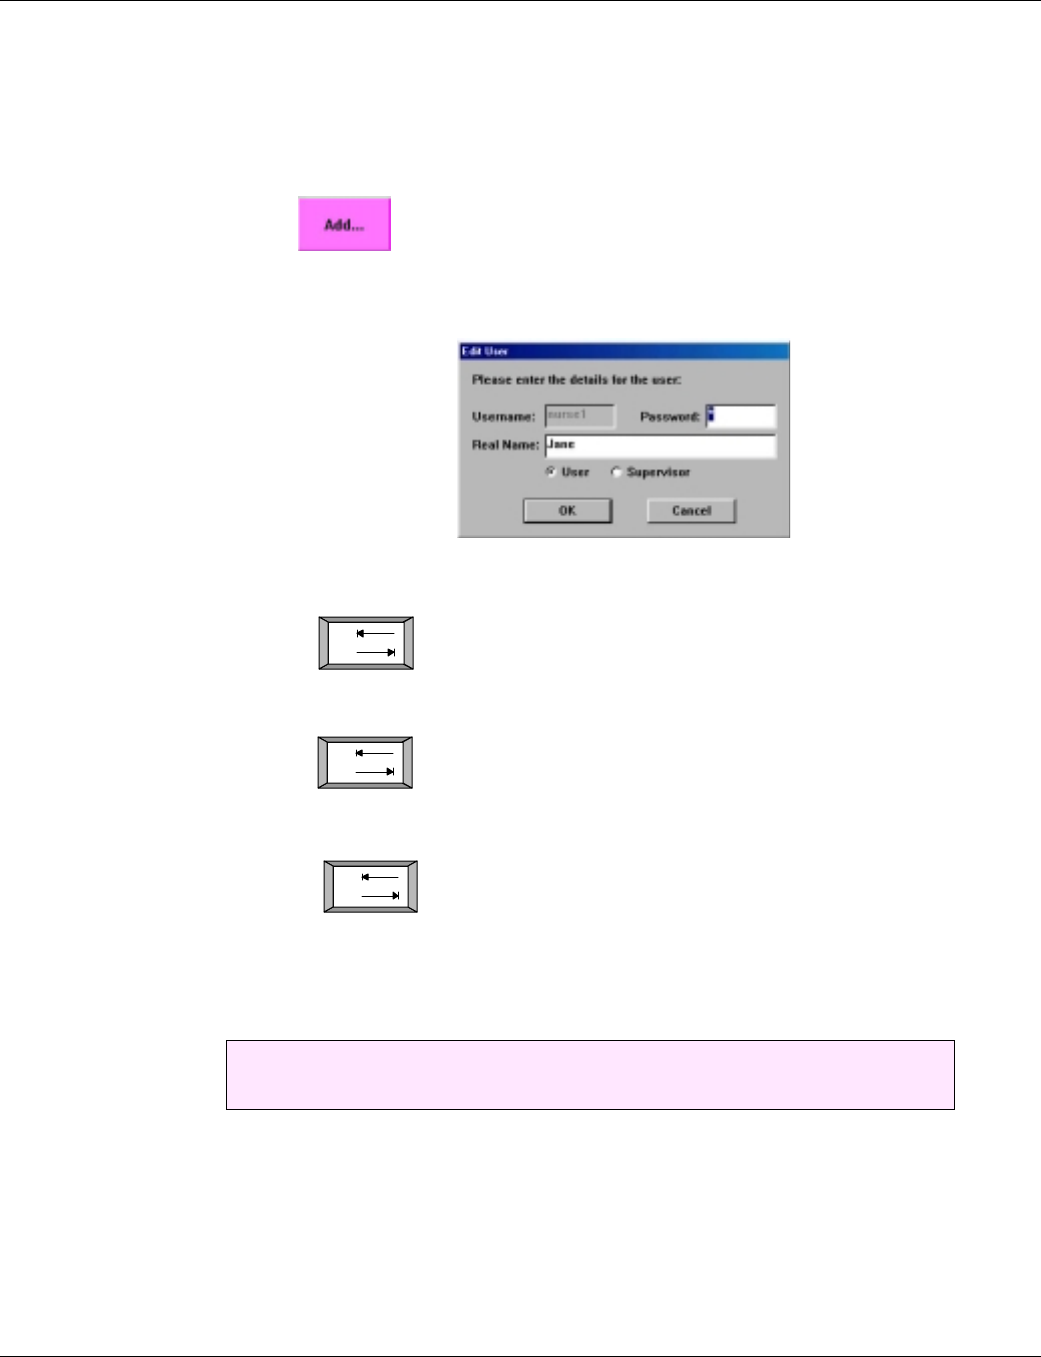
6.1. Adding a new user to the system
To add a new user, you must first navigate to the Users screen in Supervisor level.
1. Select
2. The system will then ask you to enter in a username, password and real name.
3. Enter in the username you wish to assign to the user, followed by the
4. Press the key on the keyboard
5. Enter in the password assigned to the new user
6. Press the key on the keyboard
7. Enter in the common name for the user (usually their full name)
8. Press the key on the keyboard
9. If the user is to have Supervisor level access select Supervisor
10. Select OK
Note: It is suggested that supervisor access be carefully controlled. Any supervisor may
assign, delete or edit another supervisors access level.
EXI HALO User Manual 980-000002-000
EXI Wireless Systems Inc. 32 March 2000
Revision 5.0
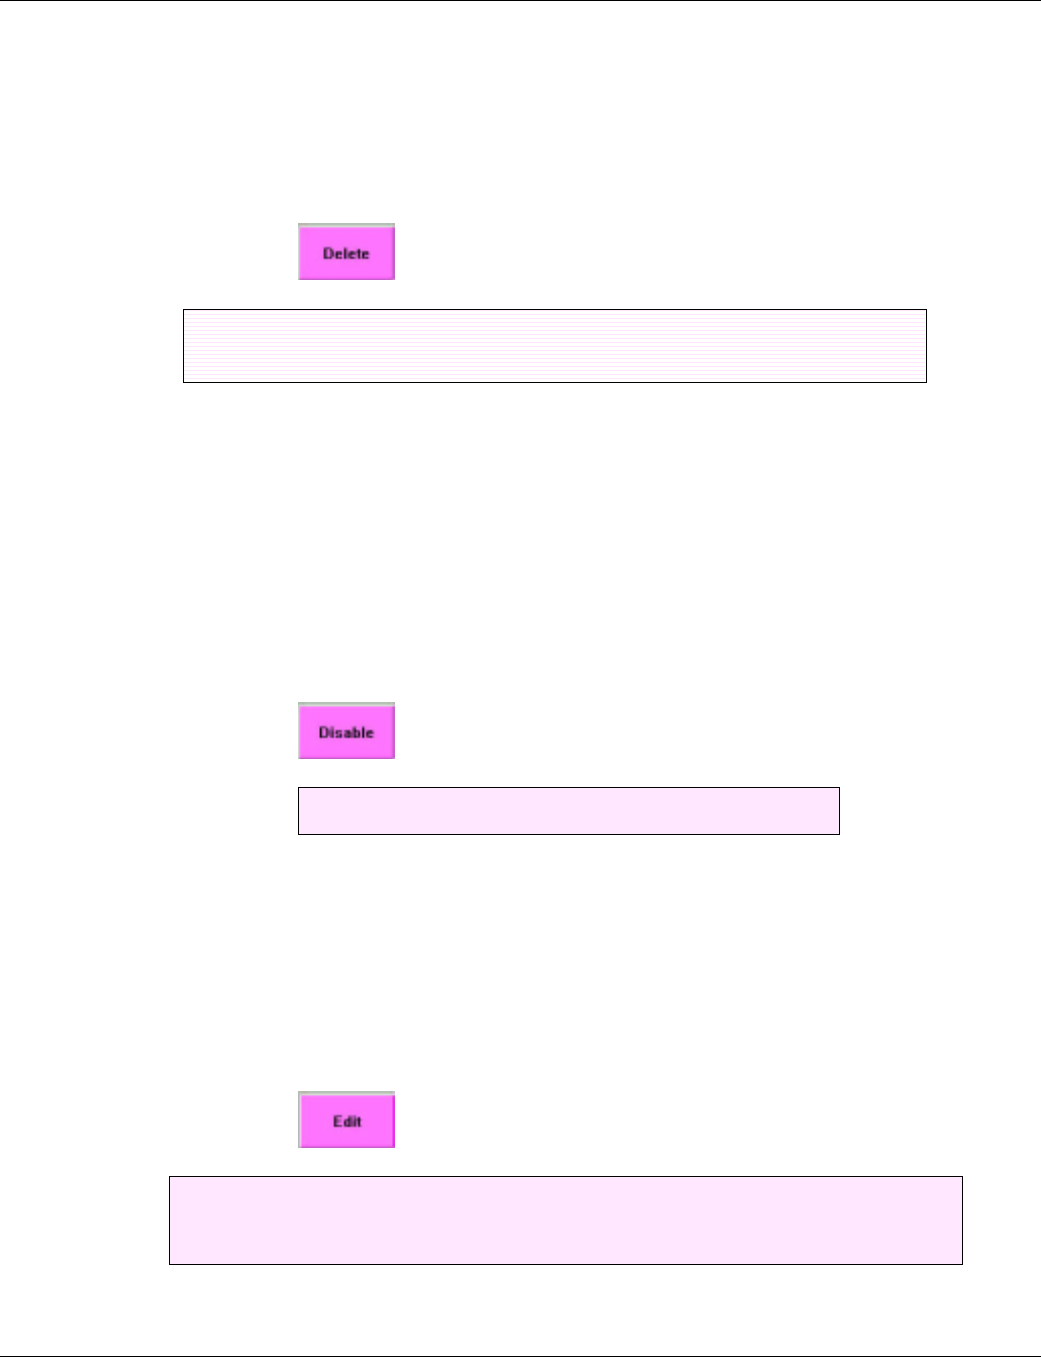
6.2. Deleting a user from the system
To delete a user from the system, you must first navigate to the user area in the Supervisor level.
1. Select the user you wish to delete by clicking anywhere on the line corresponding to the user
on the screen
2. Select
6.3. Disabling a system user
The user disable function allows a user to temporarily disable the user access of a particular user. This
may be useful when a nurse is on leave of absence but is expected to return. Instead of deleting and re-
entering all of the nurses’ information, a Supervisor may leave the user in the system but disable access.
To disable a user, you must first navigate to the user area in the Supervisor level.
1. Select the user you wish to disable by clicking anywhere on the line corresponding to the user
on the screen.
2. Select
6.4. Editing a system user access
A Supervisor may change a user’s password or name associated with the system username. This may be
useful for surname changes etc. To edit a user file, you must first navigate to the Supervisor level and
user area.
1. Select the user you wish to edit
2. Select
Caution!: Ensure you have selected the correct user prior to selecting delete. This step
cannot be undone.
The user status field should now read “disabled” for that user.
Note: You may change a users password and “real” name. The system username is fixed. If you
wish to change the username, you will have to delete and then add the user into the system
again.
EXI HALO User Manual 980-000002-000
EXI Wireless Systems Inc. 32 March 2000
Revision 5.0
Q
Alt
7. Shutting and Restarting the System
7.1. Shutting down
If you wish to shut down the system, you must first enter the Supervisor level (See Section 2.1). Once in
Supervisor level, Press the and keys on the keyboard simultaneously.
7.2. Restarting the system
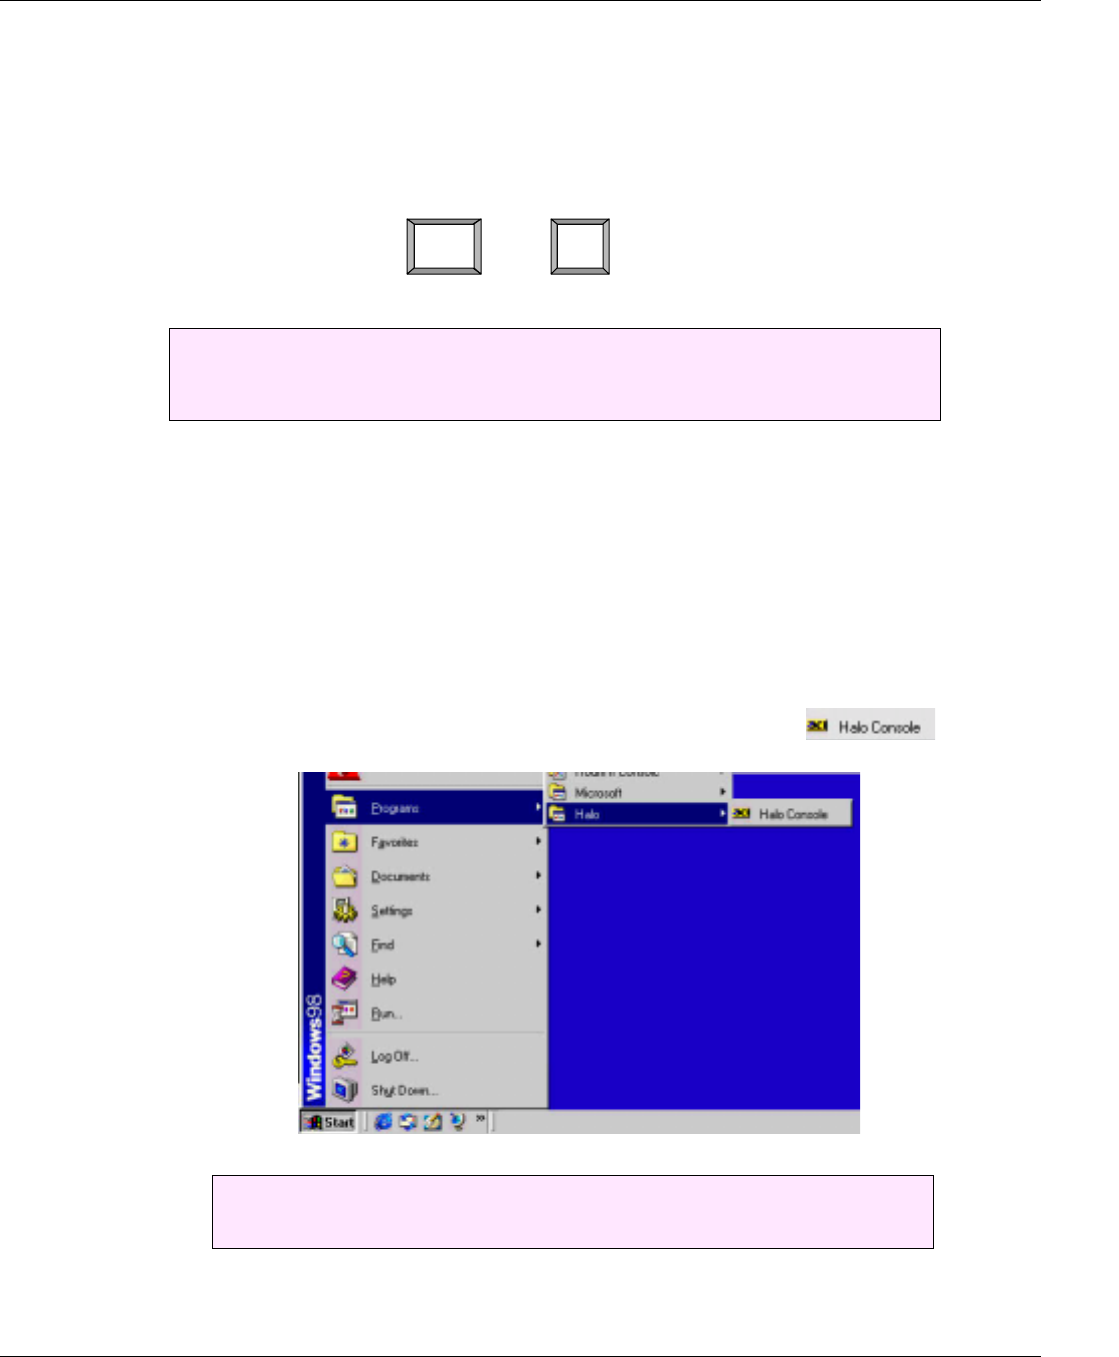
To restart the system, you may:
1. Cycle the power on the computer. (Halo will automatically launch)
2. While in the Windows 98 operating system, double click on the “Halo Console” icon on the
desktop, or you can select Start – Programs – Halo, and click on
Caution!: Once you have exited the software, the system will no longer log events. The door
units will remain active and lock the exit doors if your system is designed to do so.
It is recommended that the system is shut down only for servicing.
Note: If your system requires restarting more than once a week, contact your dealer and
have them investigate the problem.