Xplore Technologies of America IHW9533ANH J3400 Tablet PC User Manual BradstreetUsersGuide 112408
Xplore Technologies Corp of America J3400 Tablet PC BradstreetUsersGuide 112408
Users Manual

J3400
T
ablet
PC
Us
e
r
’
s
G
u
i
d
e
©
2009
M
o
tio
n
C
o
mputi
ng
,
I
n
c
.
Al
l
r
i
ghts
r
eser
ved
.
Th
i
s
d
o
cu
m
e
nt
c
o
nt
a
i
ns
i
n
f
orm
a
t
i
on
pro
t
ec
t
e
d
by
copyr
i
ght.
N
o
pa
r
t
of
this
do
cu
ment
m
a
y
be
r
e
produ
ced
in
any
f
orm
without
written
consent
fr
om
Mo
t
i
on
.
T
h
e
inf
ormation
in
this
document
is
provided
“
a
s
is
”
and
is
su
bj
ec
t
t
o
cha
n
ge
without
notice
.
M
o
tion
is
not
li
able
f
or
err
o
rs
or
omi
s
sions
i
n
this
docu
m
ent.
M
otion,
M
o
ti
on
C
o
mput
ing
,
Spea
k
An
y
w
her
e
,
and
V
i
ew
An
y
w
her
e
ar
e
tr
ademarks
or
r
e
g
i
ster
ed
trademar
ks
of
M
o
tion
C
ompu
t
ing
,
I
n
c.
in
the
U
.
S.A.
and
o
t
her
cou
n
tri
e
s.
A
c
ro
ba
t
is
a
r
e
g
i
stered
trademark
of
A
d
obe
S
ystems
In
c
or
p
or
a
t
e
d
.
A
uthen
T
ec
is
a
r
e
g
i
stered
trademark
of
A
uthen
T
ec
,
I
n
c
.
Bluet
ooth
is
a
r
e
g
i
ster
ed
tr
ademark
o
w
ned
b
y
the
Bluet
ooth
SIG,
I
n
c.,
U
.
S.A.
and
licensed
t
o
M
o
tion
Co
m
p
u
t
i
ng
,
I
n
c.
In
t
e
l
,
In
t
e
l
In
s
i
d
e
,
t
h
e
In
t
e
l
In
s
i
d
e
l
ogo
,
P
e
n
t
i
um
,
C
e
ntrino
,
and
PROS
et
are
trademark
s
or
r
e
gistered
trademar
ks
of
I
n
t
e
l
C
o
rpora
t
ion
or
its
su
bsid
iaries
in
the
Unite
d
S
t
at
es
and
other
c
oun
tries
.
K
n
owles
and
I
n
t
e
ll
iS
onic
are
trademark
s
or
r
e
g
i
ster
ed
trademar
ks
of
K
no
w
l
e
s
A
c
ou
stics
,
I
n
c
.
OmniP
a
ss
i
s
a
trad
ema
r
k
of
So
f
t
ex,
I
n
c.
Real
t
e
k
i
s
a
tradema
r
k
of
Real
t
e
k
S
e
micondu
c
t
or
Co
r
p
or
a
t
i
on
.
M
i
crosof
t
W
i
n
d
o
w
s
,
W
i
ndo
w
s
V
i
sta,
and
W
i
n
d
o
w
s
Jou
r
nal
ar
e
t
r
a
d
emark
s
or
r
e
g
i
stered
trademark
s
of
M
i
crosof
t
C
o
rpora
t
ion
in
the
Unit
ed
Stat
es
and/or
other
countries
.
Sig
m
a
T
el
is
a
r
e
g
i
ster
ed
tr
ademark
and
Univ
ers
a
l
Jacks
is
a
trademark
of
Sigma
T
el
C
orporatio
n.
W
i
-F
i
is
a
r
e
g
i
ster
ed
tr
ademark
of
the
W
i
-F
i
A
l
lianc
e
.
I
n
sy
d
e
is
a
trad
em
ark
of
I
n
sy
d
e
Sof
t
w
a
r
e
C
o
rporation.
End
u
s
er
s
may
not
loan,
r
e
n
t
,
l
e
ase
,
le
nd
,
or
other
w
ise
transf
er
the
CDs
or
DVDs
pro
v
id
ed
f
or
r
e
co
v
e
r
y
purposes
t
o
another
user
,
e
x
ce
pt
as
permitte
d
in
the
End
U
s
er
License
A
gr
eemen
t
f
or
s
u
c
h
pr
oduc
t
.
M
o
tion
C
o
mputing
,
I
n
c
.
has
made
every
eff
or
t
to
identify
trademarked
pr
oper
ties
and
owners
on
t
h
is
page
.
All
brands
and
produc
t
nam
e
s
u
s
ed
in
this
document
are
f
or
iden
ti
fication
purposes
only
a
n
d
may
be
trad
em
arks
or
regist
er
ed
trademark
s
of
their
re
s
p
ec
t
i
ve
c
om
p
a
n
i
e
s.
T
h
e
w
a
rra
n
ties
f
or
M
o
tion
produ
c
t
s
a
r
e
set
f
or
t
h
in
the
e
x
pr
ess
li
mit
e
d
warranty
statemen
ts
acc
o
mpan
ying
such
prod
uc
ts.
Noth
ing
i
n
this
docu
m
en
t
constitu
t
e
s
an
a
dditio
n
al
w
a
rra
n
t
y
.
T
h
e
M
o
t
i
on
C
o
mput
ing
produc
t
s
and
ser
v
ices
may
be
co
v
e
r
e
d
by
one
or
more
pa
tent
-pro
tec
t
ed
i
n
v
e
ntions
.
A
dditional
pa
te
nts
may
al
so
be
pending
.
F
or
mor
e
inf
orm
a
t
ion,
see
www
.
motio
n
c
o
mputing
.
com
/
inf
o
/
p
at
ents
.asp
.
Model
J34
00
(
T
00
8)
PN
024-02-0197
Revision
A00
Contents
Chapter
1
Getting
Started
.
.
.
.
.
.
.
.
.
.
.
.
.
.
.
.
.
.
.
.
.
.
.
.
.
.
.
1
Fin
ding
inf
or
mation
.
.
.
.
.
.
.
.
.
.
.
.
.
.
.
.
.
.
.
.
.
.
.
.
.
.
.
.
.
.
.
.
.
.
.
.
.
.
.
.
.
.
.
.
.
.
.
.
.
.
.
.
.
.
.
.
.
.
.
.
.
1
O
v
e
r
vie
w
.
.
.
.
.
.
.
.
.
.
.
.
.
.
.
.
.
.
.
.
.
.
.
.
.
.
.
.
.
.
.
.
.
.
.
.
.
.
.
.
.
.
.
.
.
.
.
.
.
.
.
.
.
.
.
.
.
.
.
.
.
.
.
.
.
.
.
.
.
.
.
.
2
Se
ttin
g
u
p
th
e
J
3400
.
.
.
.
.
.
.
.
.
.
.
.
.
.
.
.
.
.
.
.
.
.
.
.
.
.
.
.
.
.
.
.
.
.
.
.
.
.
.
.
.
.
.
.
.
.
.
.
.
.
.
.
.
.
.
.
.
.
.
.
.
6
Chapter
2
Features
.
.
.
.
.
.
.
.
.
.
.
.
.
.
.
.
.
.
.
.
.
.
.
.
.
.
.
.
.
.
.
.
.
.
9
P
e
n
.
.
.
.
.
.
.
.
.
.
.
.
.
.
.
.
.
.
.
.
.
.
.
.
.
.
.
.
.
.
.
.
.
.
.
.
.
.
.
.
.
.
.
.
.
.
.
.
.
.
.
.
.
.
.
.
.
.
.
.
.
.
.
.
.
.
.
.
.
.
.
.
.
.
.
.
10
Fr
on
t
p
a
n
e
l
b
u
tton
s
.
.
.
.
.
.
.
.
.
.
.
.
.
.
.
.
.
.
.
.
.
.
.
.
.
.
.
.
.
.
.
.
.
.
.
.
.
.
.
.
.
.
.
.
.
.
.
.
.
.
.
.
.
.
.
.
.
.
.
.
11
B
a
tte
ry
statu
s
light
.
.
.
.
.
.
.
.
.
.
.
.
.
.
.
.
.
.
.
.
.
.
.
.
.
.
.
.
.
.
.
.
.
.
.
.
.
.
.
.
.
.
.
.
.
.
.
.
.
.
.
.
.
.
.
.
.
.
.
.
.
12
Se
c
u
r
i
ty
.
.
.
.
.
.
.
.
.
.
.
.
.
.
.
.
.
.
.
.
.
.
.
.
.
.
.
.
.
.
.
.
.
.
.
.
.
.
.
.
.
.
.
.
.
.
.
.
.
.
.
.
.
.
.
.
.
.
.
.
.
.
.
.
.
.
.
.
.
.
.
.
13
W
i
n
d
ow
s
Se
cu
rit
y
b
u
tto
n
.
.
.
.
.
.
.
.
.
.
.
.
.
.
.
.
.
.
.
.
.
.
.
.
.
.
.
.
.
.
.
.
.
.
.
.
.
.
.
.
.
.
.
.
.
.
.
.
.
.
.
.
.
.
.
13
Fin
g
er
p
r
in
t
r
e
ade
r
.
.
.
.
.
.
.
.
.
.
.
.
.
.
.
.
.
.
.
.
.
.
.
.
.
.
.
.
.
.
.
.
.
.
.
.
.
.
.
.
.
.
.
.
.
.
.
.
.
.
.
.
.
.
.
.
.
.
.
.
.
.
13
Disp
la
y
.
.
.
.
.
.
.
.
.
.
.
.
.
.
.
.
.
.
.
.
.
.
.
.
.
.
.
.
.
.
.
.
.
.
.
.
.
.
.
.
.
.
.
.
.
.
.
.
.
.
.
.
.
.
.
.
.
.
.
.
.
.
.
.
.
.
.
.
.
.
.
.
.
14
Vie
w
Any
w
h
e
r
e
disp
la
y
(
o
p
t
ion
a
l
)
.
.
.
.
.
.
.
.
.
.
.
.
.
.
.
.
.
.
.
.
.
.
.
.
.
.
.
.
.
.
.
.
.
.
.
.
.
.
.
.
.
.
.
.
.
.
.
14
M
i
c
ro
p
ho
nes
.
.
.
.
.
.
.
.
.
.
.
.
.
.
.
.
.
.
.
.
.
.
.
.
.
.
.
.
.
.
.
.
.
.
.
.
.
.
.
.
.
.
.
.
.
.
.
.
.
.
.
.
.
.
.
.
.
.
.
.
.
.
.
.
.
.
.
14
Sp
e
a
ke
rs
.
.
.
.
.
.
.
.
.
.
.
.
.
.
.
.
.
.
.
.
.
.
.
.
.
.
.
.
.
.
.
.
.
.
.
.
.
.
.
.
.
.
.
.
.
.
.
.
.
.
.
.
.
.
.
.
.
.
.
.
.
.
.
.
.
.
.
.
.
.
.
14
Am
b
i
en
t
li
ght
sen
s
or
(AL
S
)
.
.
.
.
.
.
.
.
.
.
.
.
.
.
.
.
.
.
.
.
.
.
.
.
.
.
.
.
.
.
.
.
.
.
.
.
.
.
.
.
.
.
.
.
.
.
.
.
.
.
.
.
.
.
15
Mo
tion
Data
Gu
ar
d
.
.
.
.
.
.
.
.
.
.
.
.
.
.
.
.
.
.
.
.
.
.
.
.
.
.
.
.
.
.
.
.
.
.
.
.
.
.
.
.
.
.
.
.
.
.
.
.
.
.
.
.
.
.
.
.
.
.
.
.
.
15
U
S
B
2.
0
po
rts
.
.
.
.
.
.
.
.
.
.
.
.
.
.
.
.
.
.
.
.
.
.
.
.
.
.
.
.
.
.
.
.
.
.
.
.
.
.
.
.
.
.
.
.
.
.
.
.
.
.
.
.
.
.
.
.
.
.
.
.
.
.
.
.
.
.
.
15
He
a
dph
on
es
po
rt
.
.
.
.
.
.
.
.
.
.
.
.
.
.
.
.
.
.
.
.
.
.
.
.
.
.
.
.
.
.
.
.
.
.
.
.
.
.
.
.
.
.
.
.
.
.
.
.
.
.
.
.
.
.
.
.
.
.
.
.
.
.
.
15
M
i
c
ro
p
ho
ne
p
o
rt
.
.
.
.
.
.
.
.
.
.
.
.
.
.
.
.
.
.
.
.
.
.
.
.
.
.
.
.
.
.
.
.
.
.
.
.
.
.
.
.
.
.
.
.
.
.
.
.
.
.
.
.
.
.
.
.
.
.
.
.
.
.
.
15
Se
c
u
r
i
ty
slot
.
.
.
.
.
.
.
.
.
.
.
.
.
.
.
.
.
.
.
.
.
.
.
.
.
.
.
.
.
.
.
.
.
.
.
.
.
.
.
.
.
.
.
.
.
.
.
.
.
.
.
.
.
.
.
.
.
.
.
.
.
.
.
.
.
.
.
.
16
VG
A
p
or
t
.
.
.
.
.
.
.
.
.
.
.
.
.
.
.
.
.
.
.
.
.
.
.
.
.
.
.
.
.
.
.
.
.
.
.
.
.
.
.
.
.
.
.
.
.
.
.
.
.
.
.
.
.
.
.
.
.
.
.
.
.
.
.
.
.
.
.
.
.
.
.
16
Eth
e
r
n
e
t
p
or
t
.
.
.
.
.
.
.
.
.
.
.
.
.
.
.
.
.
.
.
.
.
.
.
.
.
.
.
.
.
.
.
.
.
.
.
.
.
.
.
.
.
.
.
.
.
.
.
.
.
.
.
.
.
.
.
.
.
.
.
.
.
.
.
.
.
.
.
16
Do
ck
in
g
p
o
rt
.
.
.
.
.
.
.
.
.
.
.
.
.
.
.
.
.
.
.
.
.
.
.
.
.
.
.
.
.
.
.
.
.
.
.
.
.
.
.
.
.
.
.
.
.
.
.
.
.
.
.
.
.
.
.
.
.
.
.
.
.
.
.
.
.
.
.
16
Sm
a
r
t
ca
rd
r
e
a
d
e
r
slot
(o
pt
iona
l)
.
.
.
.
.
.
.
.
.
.
.
.
.
.
.
.
.
.
.
.
.
.
.
.
.
.
.
.
.
.
.
.
.
.
.
.
.
.
.
.
.
.
.
.
.
.
.
.
16
Exp
r
ess
c
a
r
d
slo
t
(
o
p
t
ion
a
l)
.
.
.
.
.
.
.
.
.
.
.
.
.
.
.
.
.
.
.
.
.
.
.
.
.
.
.
.
.
.
.
.
.
.
.
.
.
.
.
.
.
.
.
.
.
.
.
.
.
.
.
.
.
17
SIM
slot
.
.
.
.
.
.
.
.
.
.
.
.
.
.
.
.
.
.
.
.
.
.
.
.
.
.
.
.
.
.
.
.
.
.
.
.
.
.
.
.
.
.
.
.
.
.
.
.
.
.
.
.
.
.
.
.
.
.
.
.
.
.
.
.
.
.
.
.
.
.
.
.
17
W
i
-F
i
(8
02
.11
a
/g/
n
w
i
rele
ss)
.
.
.
.
.
.
.
.
.
.
.
.
.
.
.
.
.
.
.
.
.
.
.
.
.
.
.
.
.
.
.
.
.
.
.
.
.
.
.
.
.
.
.
.
.
.
.
.
.
.
.
.
.
17
Mo
b
i
le
Bro
a
db
an
d
(o
pt
iona
l)
.
.
.
.
.
.
.
.
.
.
.
.
.
.
.
.
.
.
.
.
.
.
.
.
.
.
.
.
.
.
.
.
.
.
.
.
.
.
.
.
.
.
.
.
.
.
.
.
.
.
.
18
B
l
u
e
to
oth
w
i
re
less
(op
t
io
nal)
.
.
.
.
.
.
.
.
.
.
.
.
.
.
.
.
.
.
.
.
.
.
.
.
.
.
.
.
.
.
.
.
.
.
.
.
.
.
.
.
.
.
.
.
.
.
.
.
.
.
.
18
P
o
w
e
r
a
d
ap
ter
.
.
.
.
.
.
.
.
.
.
.
.
.
.
.
.
.
.
.
.
.
.
.
.
.
.
.
.
.
.
.
.
.
.
.
.
.
.
.
.
.
.
.
.
.
.
.
.
.
.
.
.
.
.
.
.
.
.
.
.
.
.
.
.
.
18
B
a
tte
ry
.
.
.
.
.
.
.
.
.
.
.
.
.
.
.
.
.
.
.
.
.
.
.
.
.
.
.
.
.
.
.
.
.
.
.
.
.
.
.
.
.
.
.
.
.
.
.
.
.
.
.
.
.
.
.
.
.
.
.
.
.
.
.
.
.
.
.
.
.
.
.
.
.
18
iii
Chapter
3
Using
your
Tablet
PC
.
.
.
.
.
.
.
.
.
.
.
.
.
.
.
.
.
.
.
.
21
U
s
ing
Mo
tion
Dash
b
o
ar
d
.
.
.
.
.
.
.
.
.
.
.
.
.
.
.
.
.
.
.
.
.
.
.
.
.
.
.
.
.
.
.
.
.
.
.
.
.
.
.
.
.
.
.
.
.
.
.
.
.
.
.
.
.
.
.
22
U
s
ing
t
h
e
p
e
n
.
.
.
.
.
.
.
.
.
.
.
.
.
.
.
.
.
.
.
.
.
.
.
.
.
.
.
.
.
.
.
.
.
.
.
.
.
.
.
.
.
.
.
.
.
.
.
.
.
.
.
.
.
.
.
.
.
.
.
.
.
.
.
.
.
.
23
U
s
ing
T
a
bl
et
PC
Inp
u
t
P
a
n
e
l
.
.
.
.
.
.
.
.
.
.
.
.
.
.
.
.
.
.
.
.
.
.
.
.
.
.
.
.
.
.
.
.
.
.
.
.
.
.
.
.
.
.
.
.
.
.
.
.
.
.
.
.
24
U
s
ing
T
a
bl
et
PC
Inp
u
t
P
a
n
e
l
.
.
.
.
.
.
.
.
.
.
.
.
.
.
.
.
.
.
.
.
.
.
.
.
.
.
.
.
.
.
.
.
.
.
.
.
.
.
.
.
.
.
.
.
.
.
.
.
.
24
Co
nf
igu
r
in
g
p
e
n
o
p
t
i
ons
.
.
.
.
.
.
.
.
.
.
.
.
.
.
.
.
.
.
.
.
.
.
.
.
.
.
.
.
.
.
.
.
.
.
.
.
.
.
.
.
.
.
.
.
.
.
.
.
.
.
.
.
.
.
.
24
Co
nf
igu
r
in
g
p
e
n
o
p
t
i
ons
.
.
.
.
.
.
.
.
.
.
.
.
.
.
.
.
.
.
.
.
.
.
.
.
.
.
.
.
.
.
.
.
.
.
.
.
.
.
.
.
.
.
.
.
.
.
.
.
.
.
.
.
24
Ena
b
li
ng
p
e
rso
n
al
ized
han
d
wr
iting
reco
gnit
ion
.
.
.
.
.
.
.
.
.
.
.
.
.
.
.
.
.
.
.
.
.
.
.
.
.
.
.
.
.
.
.
.
.
25
U
s
ing
p
e
rso
n
al
ized
han
d
wr
iting
reco
gnit
ion
.
.
.
.
.
.
.
.
.
.
.
.
.
.
.
.
.
.
.
.
.
.
.
.
.
.
.
.
.
.
.
.
.
.
.
.
25
Co
nf
igu
r
in
g
f
ro
n
t
pane
l
b
u
tto
ns
.
.
.
.
.
.
.
.
.
.
.
.
.
.
.
.
.
.
.
.
.
.
.
.
.
.
.
.
.
.
.
.
.
.
.
.
.
.
.
.
.
.
.
.
.
.
.
.
25
Co
nf
igu
r
in
g
f
ro
n
t
pane
l
b
u
tto
ns
.
.
.
.
.
.
.
.
.
.
.
.
.
.
.
.
.
.
.
.
.
.
.
.
.
.
.
.
.
.
.
.
.
.
.
.
.
.
.
.
.
.
.
.
.
26
U
s
ing
U
S
B
.
.
.
.
.
.
.
.
.
.
.
.
.
.
.
.
.
.
.
.
.
.
.
.
.
.
.
.
.
.
.
.
.
.
.
.
.
.
.
.
.
.
.
.
.
.
.
.
.
.
.
.
.
.
.
.
.
.
.
.
.
.
.
.
.
.
.
.
.
.
26
U
s
ing
Et
her
n
e
t
.
.
.
.
.
.
.
.
.
.
.
.
.
.
.
.
.
.
.
.
.
.
.
.
.
.
.
.
.
.
.
.
.
.
.
.
.
.
.
.
.
.
.
.
.
.
.
.
.
.
.
.
.
.
.
.
.
.
.
.
.
.
.
.
.
26
U
s
ing
t
h
e
displ
a
y
.
.
.
.
.
.
.
.
.
.
.
.
.
.
.
.
.
.
.
.
.
.
.
.
.
.
.
.
.
.
.
.
.
.
.
.
.
.
.
.
.
.
.
.
.
.
.
.
.
.
.
.
.
.
.
.
.
.
.
.
.
.
.
26
Adjustin
g
th
e
disp
la
y
b
r
ightn
e
ss
.
.
.
.
.
.
.
.
.
.
.
.
.
.
.
.
.
.
.
.
.
.
.
.
.
.
.
.
.
.
.
.
.
.
.
.
.
.
.
.
.
.
.
.
.
27
Ro
tatin
g
th
e
displ
a
y
.
.
.
.
.
.
.
.
.
.
.
.
.
.
.
.
.
.
.
.
.
.
.
.
.
.
.
.
.
.
.
.
.
.
.
.
.
.
.
.
.
.
.
.
.
.
.
.
.
.
.
.
.
.
.
.
.
27
Set
t
ing
up
a
n
e
x
tern
al
disp
l
a
y
.
.
.
.
.
.
.
.
.
.
.
.
.
.
.
.
.
.
.
.
.
.
.
.
.
.
.
.
.
.
.
.
.
.
.
.
.
.
.
.
.
.
.
.
.
.
.
.
.
.
27
U
s
ing
t
h
e
b
u
il
t-in
m
i
cr
opho
ne
s
.
.
.
.
.
.
.
.
.
.
.
.
.
.
.
.
.
.
.
.
.
.
.
.
.
.
.
.
.
.
.
.
.
.
.
.
.
.
.
.
.
.
.
.
.
.
.
.
.
28
Co
nn
ec
ting
he
adp
h
o
n
e
s
,
e
x
tern
al
sp
e
a
ke
rs,
or
a
m
i
cr
opho
ne
.
.
.
.
.
.
.
.
.
.
.
.
.
.
.
.
.
.
.
29
U
s
ing
sp
eec
h
r
ec
o
gnitio
n
.
.
.
.
.
.
.
.
.
.
.
.
.
.
.
.
.
.
.
.
.
.
.
.
.
.
.
.
.
.
.
.
.
.
.
.
.
.
.
.
.
.
.
.
.
.
.
.
.
.
.
.
.
.
29
Set
t
ing
up
sp
eec
h
rec
o
gnitio
n
.
.
.
.
.
.
.
.
.
.
.
.
.
.
.
.
.
.
.
.
.
.
.
.
.
.
.
.
.
.
.
.
.
.
.
.
.
.
.
.
.
.
.
.
.
.
.
29
U
s
ing
Dic
t
at
ion
an
d
Voic
e
Co
mm
a
n
ds
.
.
.
.
.
.
.
.
.
.
.
.
.
.
.
.
.
.
.
.
.
.
.
.
.
.
.
.
.
.
.
.
.
.
.
.
.
.
.
30
U
s
ing
p
ower
pl
ans
.
.
.
.
.
.
.
.
.
.
.
.
.
.
.
.
.
.
.
.
.
.
.
.
.
.
.
.
.
.
.
.
.
.
.
.
.
.
.
.
.
.
.
.
.
.
.
.
.
.
.
.
.
.
.
.
.
.
.
.
.
30
Sel
ec
t
ing
a
p
ower
pl
an
.
.
.
.
.
.
.
.
.
.
.
.
.
.
.
.
.
.
.
.
.
.
.
.
.
.
.
.
.
.
.
.
.
.
.
.
.
.
.
.
.
.
.
.
.
.
.
.
.
.
.
.
.
.
31
Ch
an
ging
po
wer
p
l
an
sett
ings
.
.
.
.
.
.
.
.
.
.
.
.
.
.
.
.
.
.
.
.
.
.
.
.
.
.
.
.
.
.
.
.
.
.
.
.
.
.
.
.
.
.
.
.
.
.
.
31
Cr
ea
ting
a
p
ower
p
l
a
n
.
.
.
.
.
.
.
.
.
.
.
.
.
.
.
.
.
.
.
.
.
.
.
.
.
.
.
.
.
.
.
.
.
.
.
.
.
.
.
.
.
.
.
.
.
.
.
.
.
.
.
.
.
.
.
32
U
s
ing
S
l
ee
p
.
.
.
.
.
.
.
.
.
.
.
.
.
.
.
.
.
.
.
.
.
.
.
.
.
.
.
.
.
.
.
.
.
.
.
.
.
.
.
.
.
.
.
.
.
.
.
.
.
.
.
.
.
.
.
.
.
.
.
.
.
.
.
.
.
.
.
.
32
U
s
ing
S
l
ee
p
.
.
.
.
.
.
.
.
.
.
.
.
.
.
.
.
.
.
.
.
.
.
.
.
.
.
.
.
.
.
.
.
.
.
.
.
.
.
.
.
.
.
.
.
.
.
.
.
.
.
.
.
.
.
.
.
.
.
.
.
.
.
.
.
.
32
U
s
ing
H
i
b
e
r
n
at
e
.
.
.
.
.
.
.
.
.
.
.
.
.
.
.
.
.
.
.
.
.
.
.
.
.
.
.
.
.
.
.
.
.
.
.
.
.
.
.
.
.
.
.
.
.
.
.
.
.
.
.
.
.
.
.
.
.
.
.
.
.
.
.
.
32
U
s
ing
H
i
b
e
r
n
at
ion
.
.
.
.
.
.
.
.
.
.
.
.
.
.
.
.
.
.
.
.
.
.
.
.
.
.
.
.
.
.
.
.
.
.
.
.
.
.
.
.
.
.
.
.
.
.
.
.
.
.
.
.
.
.
.
.
.
.
.
33
U
s
ing
t
h
e
b
a
tte
ry
.
.
.
.
.
.
.
.
.
.
.
.
.
.
.
.
.
.
.
.
.
.
.
.
.
.
.
.
.
.
.
.
.
.
.
.
.
.
.
.
.
.
.
.
.
.
.
.
.
.
.
.
.
.
.
.
.
.
.
.
.
.
.
33
Chec
kin
g
b
a
tte
ry
p
o
w
e
r
.
.
.
.
.
.
.
.
.
.
.
.
.
.
.
.
.
.
.
.
.
.
.
.
.
.
.
.
.
.
.
.
.
.
.
.
.
.
.
.
.
.
.
.
.
.
.
.
.
.
.
.
.
33
Ch
ar
ging
the
b
a
tte
ry
.
.
.
.
.
.
.
.
.
.
.
.
.
.
.
.
.
.
.
.
.
.
.
.
.
.
.
.
.
.
.
.
.
.
.
.
.
.
.
.
.
.
.
.
.
.
.
.
.
.
.
.
.
.
.
.
34
Bat
t
ery
a
n
d
p
ower
m
a
nag
e
m
e
n
t
tip
s
.
.
.
.
.
.
.
.
.
.
.
.
.
.
.
.
.
.
.
.
.
.
.
.
.
.
.
.
.
.
.
.
.
.
.
.
.
.
.
.
34
Re
m
o
ving
a
n
d
r
e
p
l
a
c
in
g
th
e
b
a
tter
y
.
.
.
.
.
.
.
.
.
.
.
.
.
.
.
.
.
.
.
.
.
.
.
.
.
.
.
.
.
.
.
.
.
.
.
.
.
.
.
.
.
35
Sw
ap
pin
g
th
e
ba
tter
y
.
.
.
.
.
.
.
.
.
.
.
.
.
.
.
.
.
.
.
.
.
.
.
.
.
.
.
.
.
.
.
.
.
.
.
.
.
.
.
.
.
.
.
.
.
.
.
.
.
.
.
.
.
.
.
35
Bat
t
ery
m
a
inte
nan
ce
.
.
.
.
.
.
.
.
.
.
.
.
.
.
.
.
.
.
.
.
.
.
.
.
.
.
.
.
.
.
.
.
.
.
.
.
.
.
.
.
.
.
.
.
.
.
.
.
.
.
.
.
.
.
.
.
.
.
.
36
Lo
ng-
t
er
m
b
a
tte
ry
sto
r
age
(
not
atta
ched
to
t
a
b
l
et
)
.
.
.
.
.
.
.
.
.
.
.
.
.
.
.
.
.
.
.
.
.
.
.
.
.
.
.
36
Disposing
of
u
s
ed
ba
tter
i
es
.
.
.
.
.
.
.
.
.
.
.
.
.
.
.
.
.
.
.
.
.
.
.
.
.
.
.
.
.
.
.
.
.
.
.
.
.
.
.
.
.
.
.
.
.
.
.
.
.
.
37
T
ro
u
b
l
e
s
ho
otin
g
th
e
ba
tter
y
.
.
.
.
.
.
.
.
.
.
.
.
.
.
.
.
.
.
.
.
.
.
.
.
.
.
.
.
.
.
.
.
.
.
.
.
.
.
.
.
.
.
.
.
.
.
.
.
.
37
Re
m
o
ving
a
n
d
r
e
p
l
a
c
in
g
th
e
S
I
M
.
.
.
.
.
.
.
.
.
.
.
.
.
.
.
.
.
.
.
.
.
.
.
.
.
.
.
.
.
.
.
.
.
.
.
.
.
.
.
.
.
.
.
.
.
.
.
.
39
U
s
ing
Mo
tion
O
m
niP
a
ss
a
n
d
t
h
e
fin
g
er
p
r
in
t
r
e
ade
r
.
.
.
.
.
.
.
.
.
.
.
.
.
.
.
.
.
.
.
.
.
.
.
.
.
.
.
.
.
.
42
Ca
p
t
ur
ing
a
fi
ng
er
pr
int
.
.
.
.
.
.
.
.
.
.
.
.
.
.
.
.
.
.
.
.
.
.
.
.
.
.
.
.
.
.
.
.
.
.
.
.
.
.
.
.
.
.
.
.
.
.
.
.
.
.
.
.
.
.
42
U
s
ing
p
a
ssw
o
rd
r
e
p
l
a
ce
ment
.
.
.
.
.
.
.
.
.
.
.
.
.
.
.
.
.
.
.
.
.
.
.
.
.
.
.
.
.
.
.
.
.
.
.
.
.
.
.
.
.
.
.
.
.
.
.
.
44
U
s
ing
t
h
e
p
a
sswo
r
d
wiza
rd
.
.
.
.
.
.
.
.
.
.
.
.
.
.
.
.
.
.
.
.
.
.
.
.
.
.
.
.
.
.
.
.
.
.
.
.
.
.
.
.
.
.
.
.
.
.
.
.
.
.
45
Lo
gging
on
to
a
re
m
e
m
b
ered
sit
e
.
.
.
.
.
.
.
.
.
.
.
.
.
.
.
.
.
.
.
.
.
.
.
.
.
.
.
.
.
.
.
.
.
.
.
.
.
.
.
.
.
.
.
.
45
Co
nf
igu
r
in
g
a
u
th
en
tic
a
tion
r
u
l
e
s
.
.
.
.
.
.
.
.
.
.
.
.
.
.
.
.
.
.
.
.
.
.
.
.
.
.
.
.
.
.
.
.
.
.
.
.
.
.
.
.
.
.
.
.
45
U
s
ing
W
i
n
d
ow
s
Se
cu
r
i
ty
C
e
nte
r
.
.
.
.
.
.
.
.
.
.
.
.
.
.
.
.
.
.
.
.
.
.
.
.
.
.
.
.
.
.
.
.
.
.
.
.
.
.
.
.
.
.
.
.
.
.
.
.
.
46
Set
t
ing
up
u
s
e
r
s
a
n
d
p
a
ssw
or
ds
.
.
.
.
.
.
.
.
.
.
.
.
.
.
.
.
.
.
.
.
.
.
.
.
.
.
.
.
.
.
.
.
.
.
.
.
.
.
.
.
.
.
.
.
.
.
.
.
46
Set
t
ing
up
W
i
n
d
ow
s
u
s
er
acc
o
un
ts
.
.
.
.
.
.
.
.
.
.
.
.
.
.
.
.
.
.
.
.
.
.
.
.
.
.
.
.
.
.
.
.
.
.
.
.
.
.
.
.
.
.
47
iv
Cont
ent
s
Se
ttin
g
a
BIO
S
p
a
ssw
or
d
.
.
.
.
.
.
.
.
.
.
.
.
.
.
.
.
.
.
.
.
.
.
.
.
.
.
.
.
.
.
.
.
.
.
.
.
.
.
.
.
.
.
.
.
.
.
.
.
.
.
.
.
.
47
Se
ttin
g
u
p
a
har
d
disk
dr
ive
(H
DD)
p
a
ssw
or
d
.
.
.
.
.
.
.
.
.
.
.
.
.
.
.
.
.
.
.
.
.
.
.
.
.
.
.
.
.
.
.
.
.
48
U
s
in
g
W
i
-Fi
(
802
.
11
a
/g/n
)
.
.
.
.
.
.
.
.
.
.
.
.
.
.
.
.
.
.
.
.
.
.
.
.
.
.
.
.
.
.
.
.
.
.
.
.
.
.
.
.
.
.
.
.
.
.
.
.
.
.
.
.
.
.
.
49
En
ab
lin
g
or
disab
l
ing
W
i
-F
i
.
.
.
.
.
.
.
.
.
.
.
.
.
.
.
.
.
.
.
.
.
.
.
.
.
.
.
.
.
.
.
.
.
.
.
.
.
.
.
.
.
.
.
.
.
.
.
.
.
.
49
Se
ttin
g
u
p
a
W
i
-
F
i
c
o
nn
ec
tio
n
.
.
.
.
.
.
.
.
.
.
.
.
.
.
.
.
.
.
.
.
.
.
.
.
.
.
.
.
.
.
.
.
.
.
.
.
.
.
.
.
.
.
.
.
.
.
.
.
49
U
s
in
g
Mo
b
i
le
Br
oa
dba
n
d
(
o
p
t
io
nal
)
.
.
.
.
.
.
.
.
.
.
.
.
.
.
.
.
.
.
.
.
.
.
.
.
.
.
.
.
.
.
.
.
.
.
.
.
.
.
.
.
.
.
.
.
.
49
Ac
tivat
i
ng
y
o
u
r
Mo
b
i
le
Br
oa
dba
n
d
se
rvic
e
.
.
.
.
.
.
.
.
.
.
.
.
.
.
.
.
.
.
.
.
.
.
.
.
.
.
.
.
.
.
.
.
.
.
.
50
En
ab
lin
g
Mo
b
i
le
B
r
oa
db
and
.
.
.
.
.
.
.
.
.
.
.
.
.
.
.
.
.
.
.
.
.
.
.
.
.
.
.
.
.
.
.
.
.
.
.
.
.
.
.
.
.
.
.
.
.
.
.
.
.
50
Install
i
ng
the
c
onn
ec
tio
n
m
a
nage
r
.
.
.
.
.
.
.
.
.
.
.
.
.
.
.
.
.
.
.
.
.
.
.
.
.
.
.
.
.
.
.
.
.
.
.
.
.
.
.
.
.
.
.
50
C
o
nn
ec
t
i
ng
a
n
d
disc
on
ne
ct
ing
.
.
.
.
.
.
.
.
.
.
.
.
.
.
.
.
.
.
.
.
.
.
.
.
.
.
.
.
.
.
.
.
.
.
.
.
.
.
.
.
.
.
.
.
.
.
50
U
s
in
g
Bl
ue
too
t
h
(o
ptio
nal)
.
.
.
.
.
.
.
.
.
.
.
.
.
.
.
.
.
.
.
.
.
.
.
.
.
.
.
.
.
.
.
.
.
.
.
.
.
.
.
.
.
.
.
.
.
.
.
.
.
.
.
.
.
.
50
En
ab
lin
g
or
disab
l
ing
B
l
u
e
to
oth
.
.
.
.
.
.
.
.
.
.
.
.
.
.
.
.
.
.
.
.
.
.
.
.
.
.
.
.
.
.
.
.
.
.
.
.
.
.
.
.
.
.
.
.
.
.
51
Se
ttin
g
u
p
a
Blu
e
t
oot
h
devic
e
.
.
.
.
.
.
.
.
.
.
.
.
.
.
.
.
.
.
.
.
.
.
.
.
.
.
.
.
.
.
.
.
.
.
.
.
.
.
.
.
.
.
.
.
.
.
.
.
51
If
th
e
devic
e
is
no
t
disc
ove
r
e
d
…
.
.
.
.
.
.
.
.
.
.
.
.
.
.
.
.
.
.
.
.
.
.
.
.
.
.
.
.
.
.
.
.
.
.
.
.
.
.
.
.
.
.
.
.
.
52
Fin
ding
addition
al
sof
t
w
a
re
.
.
.
.
.
.
.
.
.
.
.
.
.
.
.
.
.
.
.
.
.
.
.
.
.
.
.
.
.
.
.
.
.
.
.
.
.
.
.
.
.
.
.
.
.
.
.
.
.
.
.
.
.
53
Chapter
4
Care
and
Maintenance
.
.
.
.
.
.
.
.
.
.
.
.
.
.
.
.
.
.
.
55
G
e
n
e
r
a
l
ca
re
.
.
.
.
.
.
.
.
.
.
.
.
.
.
.
.
.
.
.
.
.
.
.
.
.
.
.
.
.
.
.
.
.
.
.
.
.
.
.
.
.
.
.
.
.
.
.
.
.
.
.
.
.
.
.
.
.
.
.
.
.
.
.
.
.
.
.
.
55
St
anda
rd
disp
la
y
.
.
.
.
.
.
.
.
.
.
.
.
.
.
.
.
.
.
.
.
.
.
.
.
.
.
.
.
.
.
.
.
.
.
.
.
.
.
.
.
.
.
.
.
.
.
.
.
.
.
.
.
.
.
.
.
.
.
.
.
.
.
.
56
Vie
w
Any
w
h
e
r
e
disp
la
y
(
o
p
t
ion
a
l
)
.
.
.
.
.
.
.
.
.
.
.
.
.
.
.
.
.
.
.
.
.
.
.
.
.
.
.
.
.
.
.
.
.
.
.
.
.
.
.
.
.
.
.
.
.
.
.
56
C
l
e
a
ning
in
a
he
alth
c
a
r
e
e
n
vir
onm
e
n
t
.
.
.
.
.
.
.
.
.
.
.
.
.
.
.
.
.
.
.
.
.
.
.
.
.
.
.
.
.
.
.
.
.
.
.
.
.
.
.
.
.
.
57
Disin
f
ec
t
i
ng
p
r
oc
edur
e
s
.
.
.
.
.
.
.
.
.
.
.
.
.
.
.
.
.
.
.
.
.
.
.
.
.
.
.
.
.
.
.
.
.
.
.
.
.
.
.
.
.
.
.
.
.
.
.
.
.
.
.
.
.
57
T
rainin
g
a
n
d
do
cu
m
e
n
t
ation
conside
r
atio
ns
.
.
.
.
.
.
.
.
.
.
.
.
.
.
.
.
.
.
.
.
.
.
.
.
.
.
.
.
.
.
.
.
.
57
C
l
e
a
ning
so
lu
tion
s
.
.
.
.
.
.
.
.
.
.
.
.
.
.
.
.
.
.
.
.
.
.
.
.
.
.
.
.
.
.
.
.
.
.
.
.
.
.
.
.
.
.
.
.
.
.
.
.
.
.
.
.
.
.
.
.
.
.
.
58
C
l
e
a
ning
th
e
fin
g
er
p
r
in
t
re
ade
r
.
.
.
.
.
.
.
.
.
.
.
.
.
.
.
.
.
.
.
.
.
.
.
.
.
.
.
.
.
.
.
.
.
.
.
.
.
.
.
.
.
.
.
.
.
.
.
.
.
58
P
e
n
.
.
.
.
.
.
.
.
.
.
.
.
.
.
.
.
.
.
.
.
.
.
.
.
.
.
.
.
.
.
.
.
.
.
.
.
.
.
.
.
.
.
.
.
.
.
.
.
.
.
.
.
.
.
.
.
.
.
.
.
.
.
.
.
.
.
.
.
.
.
.
.
.
.
.
.
59
R
e
p
l
acin
g
p
e
n
tip
s
.
.
.
.
.
.
.
.
.
.
.
.
.
.
.
.
.
.
.
.
.
.
.
.
.
.
.
.
.
.
.
.
.
.
.
.
.
.
.
.
.
.
.
.
.
.
.
.
.
.
.
.
.
.
.
.
.
.
.
59
O
rderin
g
n
e
w
p
e
n
s
.
.
.
.
.
.
.
.
.
.
.
.
.
.
.
.
.
.
.
.
.
.
.
.
.
.
.
.
.
.
.
.
.
.
.
.
.
.
.
.
.
.
.
.
.
.
.
.
.
.
.
.
.
.
.
.
.
.
59
T
r
avel
ing
with
y
o
u
r
Ta
b
l
et
PC
.
.
.
.
.
.
.
.
.
.
.
.
.
.
.
.
.
.
.
.
.
.
.
.
.
.
.
.
.
.
.
.
.
.
.
.
.
.
.
.
.
.
.
.
.
.
.
.
.
.
.
60
T
r
ave
l
ing
by
a
i
r
.
.
.
.
.
.
.
.
.
.
.
.
.
.
.
.
.
.
.
.
.
.
.
.
.
.
.
.
.
.
.
.
.
.
.
.
.
.
.
.
.
.
.
.
.
.
.
.
.
.
.
.
.
.
.
.
.
.
.
.
.
.
60
FAA
W
i
re
less
air
trav
el
re
qu
ir
em
e
n
t
.
.
.
.
.
.
.
.
.
.
.
.
.
.
.
.
.
.
.
.
.
.
.
.
.
.
.
.
.
.
.
.
.
.
.
.
.
.
.
.
.
.
60
C
r
e
a
tin
g
a
b
a
c
k
up
arc
h
ive
.
.
.
.
.
.
.
.
.
.
.
.
.
.
.
.
.
.
.
.
.
.
.
.
.
.
.
.
.
.
.
.
.
.
.
.
.
.
.
.
.
.
.
.
.
.
.
.
.
.
.
.
.
.
61
R
e
st
oring
da
ta
.
.
.
.
.
.
.
.
.
.
.
.
.
.
.
.
.
.
.
.
.
.
.
.
.
.
.
.
.
.
.
.
.
.
.
.
.
.
.
.
.
.
.
.
.
.
.
.
.
.
.
.
.
.
.
.
.
.
.
.
.
.
.
.
.
.
61
U
s
in
g
W
i
ndo
w
s
Re
covery
Envir
on
me
nt
.
.
.
.
.
.
.
.
.
.
.
.
.
.
.
.
.
.
.
.
.
.
.
.
.
.
.
.
.
.
.
.
.
.
.
.
.
.
61
U
s
in
g
W
i
ndo
w
s
Vista
to
r
e
sto
r
e
fi
les
.
.
.
.
.
.
.
.
.
.
.
.
.
.
.
.
.
.
.
.
.
.
.
.
.
.
.
.
.
.
.
.
.
.
.
.
.
.
.
.
.
.
.
.
.
62
Co
nt
ent
s
v
Appendix
A
Troubleshooting
and
Suppo
rt
.
.
.
.
.
.
.
.
.
.
63
T
ro
u
b
l
e
s
ho
otin
g
.
.
.
.
.
.
.
.
.
.
.
.
.
.
.
.
.
.
.
.
.
.
.
.
.
.
.
.
.
.
.
.
.
.
.
.
.
.
.
.
.
.
.
.
.
.
.
.
.
.
.
.
.
.
.
.
.
.
.
.
.
.
.
63
Po
w
e
r
.
.
.
.
.
.
.
.
.
.
.
.
.
.
.
.
.
.
.
.
.
.
.
.
.
.
.
.
.
.
.
.
.
.
.
.
.
.
.
.
.
.
.
.
.
.
.
.
.
.
.
.
.
.
.
.
.
.
.
.
.
.
.
.
.
.
.
.
.
.
63
Bat
t
ery
.
.
.
.
.
.
.
.
.
.
.
.
.
.
.
.
.
.
.
.
.
.
.
.
.
.
.
.
.
.
.
.
.
.
.
.
.
.
.
.
.
.
.
.
.
.
.
.
.
.
.
.
.
.
.
.
.
.
.
.
.
.
.
.
.
.
.
.
.
.
64
Display
.
.
.
.
.
.
.
.
.
.
.
.
.
.
.
.
.
.
.
.
.
.
.
.
.
.
.
.
.
.
.
.
.
.
.
.
.
.
.
.
.
.
.
.
.
.
.
.
.
.
.
.
.
.
.
.
.
.
.
.
.
.
.
.
.
.
.
.
.
.
64
Inp
u
t
.
.
.
.
.
.
.
.
.
.
.
.
.
.
.
.
.
.
.
.
.
.
.
.
.
.
.
.
.
.
.
.
.
.
.
.
.
.
.
.
.
.
.
.
.
.
.
.
.
.
.
.
.
.
.
.
.
.
.
.
.
.
.
.
.
.
.
.
.
.
.
65
Po
rt
s
an
d
co
nn
ec
tor
s
.
.
.
.
.
.
.
.
.
.
.
.
.
.
.
.
.
.
.
.
.
.
.
.
.
.
.
.
.
.
.
.
.
.
.
.
.
.
.
.
.
.
.
.
.
.
.
.
.
.
.
.
.
.
.
.
66
Ne
tw
or
k
.
.
.
.
.
.
.
.
.
.
.
.
.
.
.
.
.
.
.
.
.
.
.
.
.
.
.
.
.
.
.
.
.
.
.
.
.
.
.
.
.
.
.
.
.
.
.
.
.
.
.
.
.
.
.
.
.
.
.
.
.
.
.
.
.
.
.
.
66
Au
dio
.
.
.
.
.
.
.
.
.
.
.
.
.
.
.
.
.
.
.
.
.
.
.
.
.
.
.
.
.
.
.
.
.
.
.
.
.
.
.
.
.
.
.
.
.
.
.
.
.
.
.
.
.
.
.
.
.
.
.
.
.
.
.
.
.
.
.
.
.
.
.
67
Syst
em
.
.
.
.
.
.
.
.
.
.
.
.
.
.
.
.
.
.
.
.
.
.
.
.
.
.
.
.
.
.
.
.
.
.
.
.
.
.
.
.
.
.
.
.
.
.
.
.
.
.
.
.
.
.
.
.
.
.
.
.
.
.
.
.
.
.
.
.
.
.
67
Fre
q
ue
ntl
y
asked
qu
e
s
tion
s
.
.
.
.
.
.
.
.
.
.
.
.
.
.
.
.
.
.
.
.
.
.
.
.
.
.
.
.
.
.
.
.
.
.
.
.
.
.
.
.
.
.
.
.
.
.
.
.
.
.
.
.
.
68
Sp
ec
ific
atio
ns
.
.
.
.
.
.
.
.
.
.
.
.
.
.
.
.
.
.
.
.
.
.
.
.
.
.
.
.
.
.
.
.
.
.
.
.
.
.
.
.
.
.
.
.
.
.
.
.
.
.
.
.
.
.
.
.
.
.
.
.
.
.
.
.
.
.
69
W
a
rr
an
ty
and
In
su
ran
ce
P
ro
g
ra
m
s
.
.
.
.
.
.
.
.
.
.
.
.
.
.
.
.
.
.
.
.
.
.
.
.
.
.
.
.
.
.
.
.
.
.
.
.
.
.
.
.
.
.
.
.
.
.
69
Ser
vic
e
a
n
d
S
u
pp
or
t
.
.
.
.
.
.
.
.
.
.
.
.
.
.
.
.
.
.
.
.
.
.
.
.
.
.
.
.
.
.
.
.
.
.
.
.
.
.
.
.
.
.
.
.
.
.
.
.
.
.
.
.
.
.
.
.
.
.
.
.
69
Index
.
.
.
.
.
.
.
.
.
.
.
.
.
.
.
.
.
.
.
.
.
.
.
.
.
.
.
.
.
.
.
.
.
.
.
.
.
.
.
.
.
.
.
.
.
.
71
vi
Cont
ent
s
Ge
tt
ing
S
t
ar
t
e
d
1
T
h
e
Mo
tion
C
o
mputing
J3
400
is
a
full
-
f
e
a
t
ur
e
d
T
a
bl
et
PC
,
c
o
mbin
i
ng
per
f
orma
nc
e
,
l
o
ng
batte
r
y
lif
e
,
an
d
a
light
w
eight,
sl
eek
design
.
T
h
e
J3
400
o
ff
e
r
s
th
e
l
a
test
in
novation
s
in
m
obile
c
o
mputing:
a
user
-f
ocused
desig
n
,
unmat
c
hed
mobilit
y
,
and
stat
e
-
of-the
-ar
t
se
c
u
r
i
t
y
.
If
y
o
u
a
r
e
ne
w
to
T
a
bl
et
PC
s
,
use
th
e
inf
o
rma
t
ion
in
this
sec
t
ion
to
get
star
t
e
d
quick
l
y
.
I
f
y
o
u
a
r
e
al
r
e
ady
fa
mi
li
ar
w
i
t
h
t
a
ble
t
c
o
m
p
ut
er
s
,
y
o
u
c
a
n
s
k
i
p
to
t
h
e
n
e
x
t
c
h
a
p
ter
to
le
a
r
n
a
b
ou
t
th
e
f
e
a
t
u
r
es
o
f
the
J
3400
.
If
th
e
r
e
a
r
e
ce
r
t
a
i
n
th
ings
y
o
u
w
a
n
t
t
o
l
e
a
r
n
a
b
o
u
t
y
our
ne
w
T
a
ble
t
PC,
lo
ok
on
the
C
onten
ts
page
.
F
i
nding
inf
o
rmation
I
f
y
o
u
ar
e
viewing
this
PDF
documen
t
on
y
our
scr
e
en,
y
o
u
can
use
t
h
e
f
o
llowin
g
meth
ods
to
find
inf
ormation:
•
I
n
the
B
ook
mark
pane
,
click
or
tap
a
to
pic
to
view
it
.
I
f
t
h
e
B
ook
mark
pane
is
not
v
i
sible
,
selec
t
Vi
e
w
>
Na
vi
ga
tion
T
a
bs
>
Bookmarks
.
•
On
th
e
C
o
n
t
ents
page
,
click
or
tap
a
t
opic
to
view
it
.
•
T
o
sear
c
h
the
docu
ment
,
selec
t
Edit
>
Fi
nd
.
Be
cause
y
o
u
t
ypical
ly
use
a
ta
bl
et
pe
n
in
stea
d
of
a
mo
use
w
ith
a
T
a
bl
et
PC
,
w
e
use
th
e
term
tap
inst
ea
d
of
click
in
most
situations
.
1

O
v
er
view
T
h
e
f
o
llo
wing
illustrations
show
the
butt
ons
,
sl
ots
,
a
n
d
por
t
s
on
the
Mo
tion
J3400
T
a
blet
PC.
Fr
o
n
t
V
i
e
w
Speakers
M
i
c
r
op
hone
Ambient
lig
h
t
sen
s
or
Came
ra
Mo
t
i
on
Qu
ick
N
a
v
Das
hboard
®
Escape
Di
rec
t
i
o
nal
pad
M
i
cr
o
p
hones
Spe
a
ke
rs
Liste
n
to
music
or
ot
he
r
a
udio
.
M
i
cr
opho
ne
s
R
ecor
d
so
un
ds
an
d
use
f
or
spe
e
ch
r
ec
o
gnitio
n.
Ambient
lig
h
t
sensor
M
easur
es
backg
r
ound
light
and
ca
n
a
u
tomatica
lly
adjust
the
display
brightness
.
Camera
Use
to
tr
igger
the
built-in
c
a
m
e
ra.
Mo
tion
QuickNa
v
Use
t
o
op
en
th
e
Mo
tio
n
Q
u
ickN
a
v
Das
h
boar
d
b
u
tt
on
Open
Mot
i
o
n
D
a
s
h
b
o
a
r
d
.
Esc
butt
on
Canc
el
the
curr
ent
task
.
Equivalen
t
t
o
the
Esc
key
on
a
keyboar
d
.
Dir
ec
t
iona
l
pad
U
se
f
or
ba
sic
na
vigation.
E
q
ui
va
le
n
t
t
o
the
a
rro
w
key
s
on
a
ke
ybo
a
r
d
.
T
h
e
ce
nter
but
t
on
is
equivalent
t
o
Ent
e
r
.
2
Ch
apter
1
Getting
Started
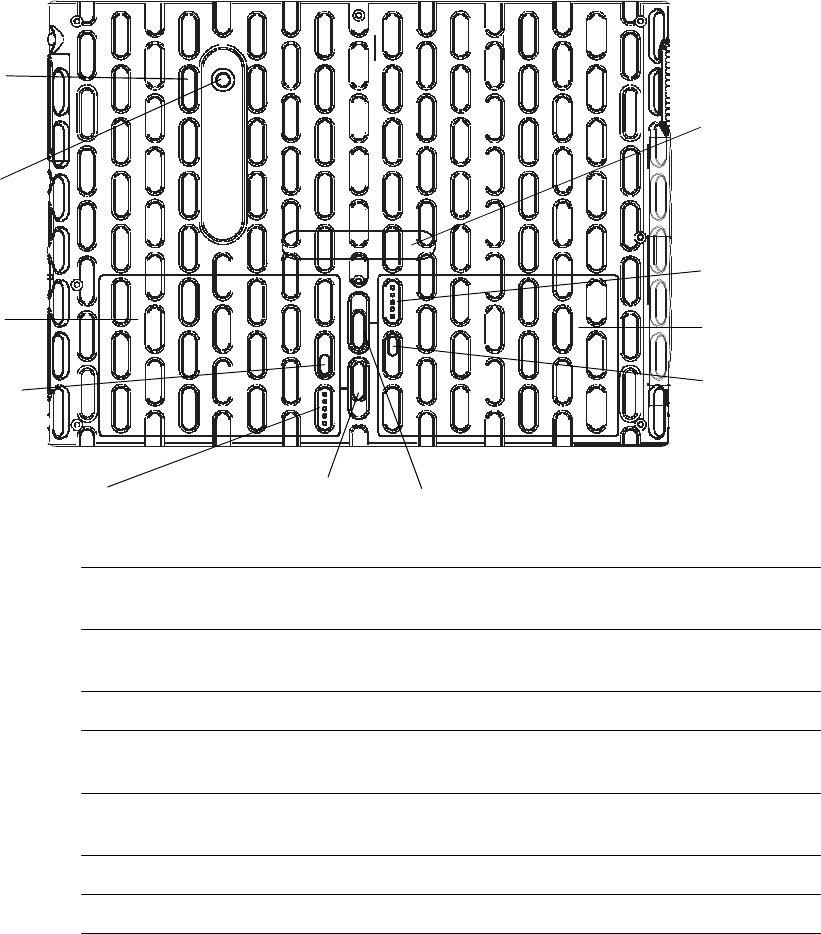
Rear
V
i
e
w
Ca
m
e
r
a
li
g
h
t
Came
ra
l
ens
Fl
e
xD
o
c
k
c
o
nnec
t
or
(cover
sho
win
g)
Battery
power
indic
a
tor
lig
h
ts
(r
ight
)
Battery
(
l
ef
t
)
Battery
(
r
ight)
Battery
g
a
ug
e
bu
tton
(l
ef
t
)
Battery
g
a
u
g
e
button
(right)
Batt
e
r
y
p
o
w
e
r
indicator
lights
(le
f
t)
Battery
r
e
l
e
ase
s
witch
(lef
t)
Batt
e
r
y
release
switch
(r
igh
t
)
Fl
e
xD
o
c
k
c
o
nn
ec
t
or
(c
ov
e
r
sho
win
g)
C
onne
c
t
s
to
th
e
F
l
exD
o
ck
w
h
e
n
do
cked
.
Ba
tt
ery
po
w
e
r
indicator
ligh
t
s
I
n
dica
tes
a
m
ount
of
r
e
mainin
g
batter
y
po
w
e
r
.
Ba
tt
ery
P
o
w
e
r
s
the
ta
bl
et
wh
en
it
is
n
o
t
pl
ugge
d in
or
doc
ked
.
Ba
tt
ery
gauge
butt
on
P
r
ess
the
bu
tt
on
t
o
sho
w
r
e
maini
ng
po
w
e
r
on
the
indica
t
or
ligh
ts
.
B
a
tte
r
y
r
e
lea
s
e
swit
ch
Sl
ide
to
r
e
lea
s
e
a
n
d
r
e
mo
v
e
th
e
batte
r
y
.
Camera
len
s
C
a
ptur
e
images
to
the
ha
r
d
disk
dr
ive
.
Camera
light
P
rov
i
de
s
li
gh
t
f
or
the
built-in
c
a
mera.
Ch
apter
1
Getting
Started
3
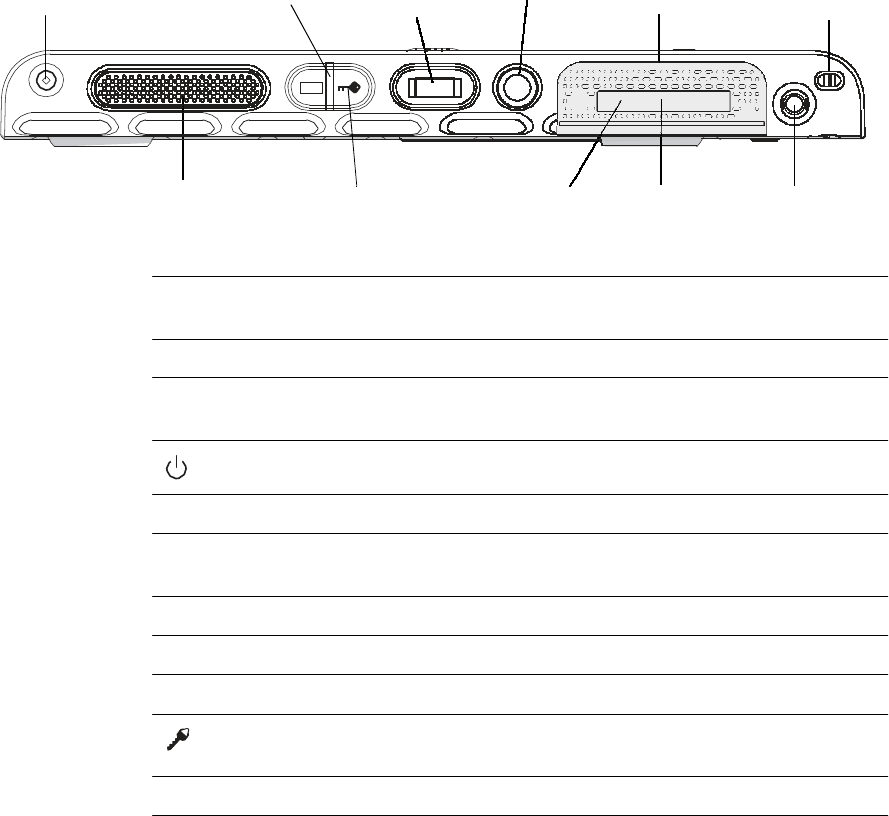
Ri
g
h
t
S
ide
Sh
ould
er
strap
attach
poin
t
Batt
e
r
y
s
t
atus
lig
h
t
Fi
n
g
e
r
p
r
i
n
t
re
a
d
e
r
P
o
w
e
r
button
Ca
rd
s
l
o
t
s
c
o
v
e
r
re
m
o
v
e
d
Pe
n
t
e
t
h
e
r
a
ttach
point
Air
v
e
nt
W
i
n
d
o
ws
Se
cur
i
t
y
bu
tton
Smar
t
car
d
sl
ot
(optiona
l)
Ex
pr
e
ss
card
slo
t
(o
ptional
)
Pe
n
Shoulder
strap
a
tta
ch
point
A
ttach
point
f
or
the
shoulder
str
a
p
.
Ba
tt
e
r
y
sta
t
us
li
gh
t
I
ndi
c
at
e
s
amo
un
t
of
r
e
mainin
g
b
a
tt
ery
po
w
e
r
.
F
i
nger
p
r
in
t
r
e
a
d
er
Sc
an
y
o
u
r
fin
g
erprin
ts
f
or
added
security
.
Y
o
u
can
also
use
th
e
fin
gerprint
r
e
ader
as
a
n
a
vigation
dev
i
ce
.
p
o
w
e
r
bu
tt
on
T
u
rns
the
T
a
blet
PC
on
and
of
f
.
C
a
r
d
slots
c
ov
e
r
C
ov
ers
the
smar
t
car
d
and
Expr
ess
car
d
slots
.
Pe
n
t
e
t
h
e
r
a
tt
a
c
h
po
int
A
ttach
point
f
or
the
pen
tether
.
P
e
n
and
pen
bay
S
t
or
e
the
pen
when
not
in
use
.
Expr
ess
car
d
slot
A
ttach
an
Expr
ess
car
d
.
Smar
t
ca
r
d
slot
A
ttach
a
sma
r
t
ca
r
d
.
Wi
n
d
o
w
s
S
ec
u
r
i
t
y
bu
tto
n
U
s
e
to
log
o
n
to
or
lock
y
our
ta
bl
et.
Equival
e
nt
to
Ctr
l
+Alt+D
el
on
a
keyboar
d
.
Air
v
e
n
t
Dissipat
es
hea
t
fr
om
the
tablet.
4
Ch
apter
1
Getting
Started
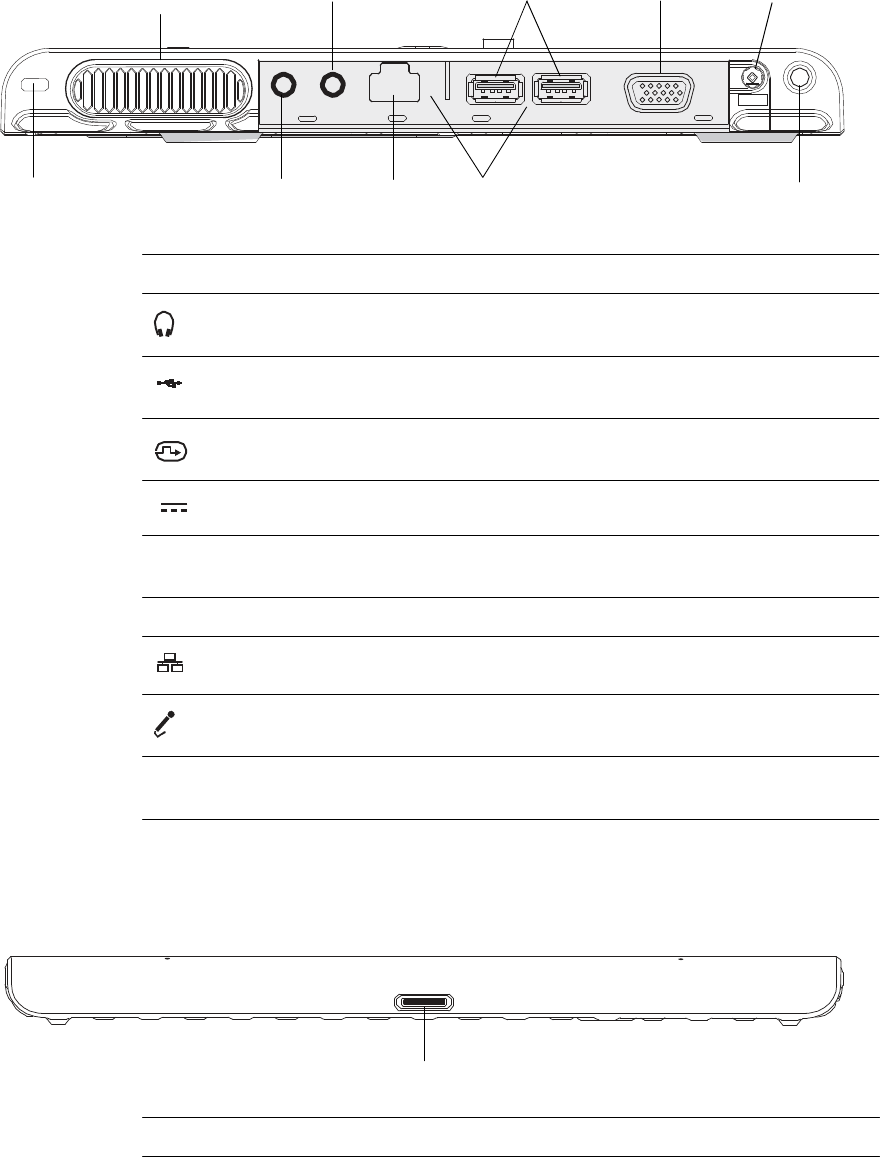
Air
vent
Le
f
t
S
id
e
Hea
dph
one
por
t
USB
por
ts
V
i
deo
por
t
(
V
GA)
P
o
w
e
r
adapter
por
t
Se
c
u
rity
sl
o
t
M
i
crophon
e
por
t
Eth
e
rnet
por
t
P
or
t
cove
r
s
r
e
m
o
ve
d
Sh
ould
er
strap
attach
poin
t
Air
v
e
nt
Dissipat
e
s
heat
fr
om
the
tablet.
A
udio
out/
He
a
dph
on
e
po
r
t
C
o
nn
ec
t
h
e
adph
on
es
,
speake
rs,
or
audio
e
q
uipme
n
t
using
a
3.5
mm
jack
.
USB
2.0
po
r
t
s
C
o
nn
ec
t
USB
devices
such
as
a
mouse
,
digita
l
came
r
a
,
p
r
i
nte
r
,
or
ex
tern
a
l
s
t
ora
g
e
d
e
v
i
ce.
V
i
deo
(
VG
A
)
por
t
C
o
nn
ec
t
an
ex
tern
al
monitor
using
t
h
e
standar
d
DB
-15
VGA
connec
tor
.
P
o
w
e
r
ad
apt
e
r
po
r
t
C
o
nn
ec
t
the
p
o
w
e
r
adapt
e
r
.
Shoulder
str
a
p
attach
point
Attach
point
f
or
the
shoulder
strap
.
P
or
t
covers
Cover
s
t
h
e
t
w
o
s
e
t
s
of
p
or
t
s
.
Ethe
r
n
e
t
po
r
t
C
o
nn
ec
t
to
a
10
/10
0
/1
000
Ethe
r
net
n
e
t
w
or
k
.
Au
d
i
o
i
n
/
M
i
cr
opho
ne
por
t
C
o
nn
ec
t
a
micr
opho
ne
or
o
t
he
r
a
udio
so
ur
ce
usin
g
a
3.
5
mm
jack
.
Secu
rit
y
slot
C
o
nnec
t
a
security
ca
ble
t
o
pr
ot
ec
t
y
our
tablet
fr
om
thef
t.
Bottom
V
i
e
w
Do
c
k
i
n
g
po
r
t
D
o
ck
ing
por
t
I
nter
f
ace
f
or
th
e
F
l
exD
o
ck
.
Ch
apter
1
Getting
Started
5
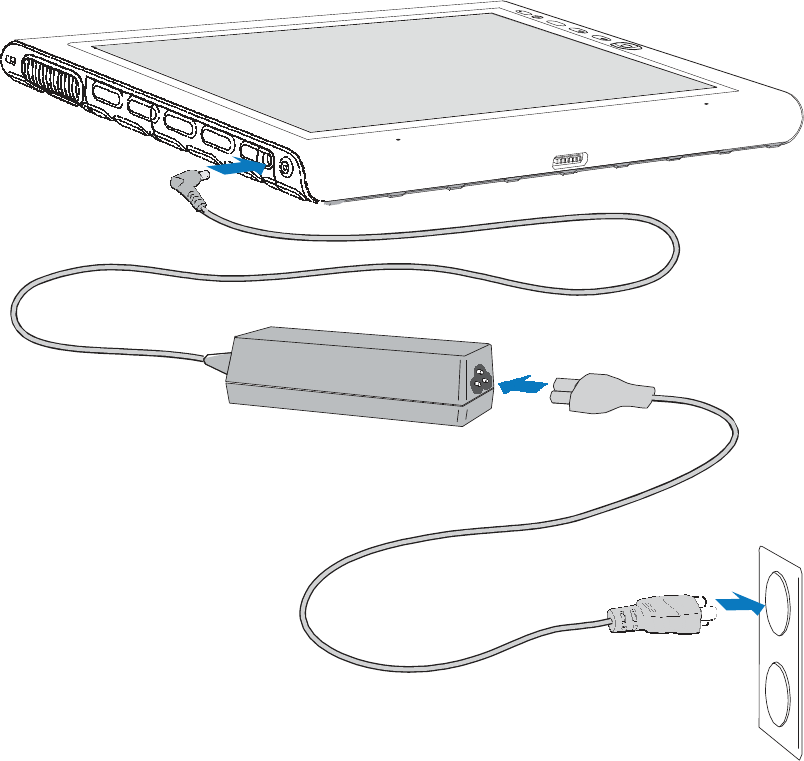
Setting
up
the
J3400
T
h
e
J3
400
is
self-
c
onta
i
ned,
so
y
o
u
ca
n
sta
r
t
usin
g
it
immediately
.
Y
o
u
sh
ould
co
nne
c
t
A
C
po
w
e
r
until
t
h
e
batte
r
y
is
full
y
ch
ar
ge
d
.
U
s
e
the
f
o
llo
wing
st
eps
to
get
sta
r
t
e
d:
Step
1:
Plug
in
the
po
w
e
r
adapter
•
Plug
the
pow
e
r
c
or
d
int
o
the
po
w
e
r
a
d
apt
e
r
and
the
tablet,
then
plug
the
po
w
e
r
c
or
d
int
o
an
outlet
.
St
ep
2:
C
o
nnec
t
the
cables
•
I
f
y
o
u
want
to
con
n
ec
t
y
our
T
a
ble
t
PC
to
a
n
e
t
w
or
k
,
in
ser
t
an
Ethe
r
n
e
t
cable
into
the
Eth
e
r
net
p
or
t
.
T
o
c
o
nn
ec
t
t
o
a
w
i
r
e
l
e
ss
n
e
tw
ork
,
se
e
“U
sin
g
W
i
-F
i
(8
02
.
11
a
/g/n
)”
on
page
49
.
T
o
c
o
nn
ec
t
using
dock
ing
stations
a
n
d
other
accessories
,
refe
r
t
o
t
h
e
d
o
c
um
e
n
t
a
t
i
o
n
fo
r
t
h
a
t
p
ro
d
u
c
t
.
6
Ch
apter
1
Getting
Started

St
ep
3:
T
urn
on
the
T
a
blet
PC
•
P
r
ess
the
pow
e
r
butt
on.
As
th
e
T
a
blet
PC
st
ar
ts,
t
h
e
po
w
e
r
light
c
o
mes
o
n
.
T
h
e
first
time
W
i
ndo
w
s
star
ts
,
the
W
i
ndo
w
s
V
i
sta
We
lcome
C
e
nte
r
a
ppe
ars.
I
f
y
o
u
do
no
t
want
th
is
scr
ee
n
to
appea
r
ev
e
r
y
t
i
me
y
o
u
star
t
the
computer
,
cl
ea
r
th
e
Ru
n
a
t
s
t
ar
t
u
p
ch
eck
bo
x.
T
o
r
e
tur
n
to
the
We
l
c
o
m
e
C
e
n
t
er
later
,
go
to
System
a
n
d
M
a
inten
a
nce
in
C
ontr
o
l
Pa
n
e
l
.
St
ep
4:
C
a
libr
a
t
e
the
dig
i
tiz
e
r
W
ith
a
T
a
blet
PC,
y
o
u
fr
equently
use
a
tablet
pen
inst
ead
of
a
mouse
a
n
d
keyboar
d
f
or
input
.
Use
t
h
e
pen
to
mo
v
e
th
e
po
in
ter
ar
oun
d
th
e
scr
ee
n
,
an
d
tap
t
h
e
scr
e
en
to
click
.
U
s
e
T
a
bl
et
PC
Inpu
t
P
a
ne
l
a
n
d
h
a
n
d
writ
ing
r
e
cog
n
ition
t
o
ent
e
r
t
e
x
t
.
T
h
e
dig
i
tiz
e
r
det
ec
t
s
t
h
e
position
of
the
pe
n
on
the
disp
la
y
.
Y
o
u
sho
u
l
d
c
a
li
br
a
t
e
th
e
dig
i
tiz
e
r
t
h
e
first
time
y
o
u
st
ar
t
the
T
a
blet
PC,
and
again
w
h
e
n
ever
th
e
po
int
e
r
doe
s
n
o
t
align
with
the
pen
tip
.
T
o
calibra
t
e
the
digitiz
e
r
1.
P
r
ess
the
Dashboar
d
butt
on
(
)
to
sta
r
t
Mo
tion
Da
shboa
r
d.
Y
o
u
can
use
Mo
t
i
on
Dashbo
ar
d
to
con
f
igur
e
y
our
T
a
bl
e
t
PC
an
d
t
o
st
ar
t
c
o
mmon
l
y
u
s
ed
tablet
applications
.
See
“Using
Mo
tion
Dashboar
d”
on
page
22.
2.
Unde
r
P
e
n
&
T
a
blet
,
tap
C
alibr
a
t
e
Digitiz
e
r
.
3.
F
o
ll
o
w
th
e
in
struc
t
io
ns
in
the
calibration
prog
ram.
Not
e
:
I
f
y
o
u
ar
e
l
e
ft
-
h
ande
d
,
s
ee
“H
o
w d
o
I
adj
u
st
t
h
e
T
a
bl
et
PC
f
or
le
f
t
-
h
a
n
ded
use
?
”
on
page
69.
Step
5:
G
e
t
familiar
with
y
our
T
a
blet
PC
Mo
tion
C
o
mpu
ting
of
f
e
rs
fr
ee
We
b
-
ba
sed
Quick
Sta
r
t
T
r
a
i
ning
th
a
t
y
o
u
c
a
n
use
t
o
familiar
ize
y
our
sel
f
with
th
e
f
e
atur
es
o
f
y
our
T
a
ble
t
PC
.
I
f
y
o
u
ar
e
ne
w
to
t
a
blet
computing
,
y
o
u
can
use
t
h
e
training
to
ge
t
star
te
d
quick
l
y
.
Y
o
u
can
fin
d
th
e
t
r
a
i
ning
a
t
http
://t
r
a
ining
.
mo
tion
com
p
u
t
i
ng
.com
.
Y
o
u
can
also
use
t
h
e
W
i
ndow
s
T
a
ble
t
PC
tuto
ria
l
s
t
o
learn
about
the
ta
blet
c
o
mputing
capabilities
of
W
i
ndo
w
s
V
i
sta,
such
as
pen
sup
p
ort,
dig
i
tal
ink
input,
a
n
d
handwriting
r
e
cog
nition.
T
o
star
t
the
tut
o
rials
,
selec
t
S
t
ar
t
>
A
ll
P
r
og
r
a
ms
>
T
a
blet
PC
>
T
a
blet
PC
T
u
torial
s
.
Ch
apter
1
Getting
Started
7
8
Ch
apter
1
Getting
Started
Fe
a
t
u
r
e
s
2
T
h
e
Mo
tion
C
o
mputing
J3
400
T
a
ble
t
PC
has
th
e
po
w
e
r
an
d
f
e
a
t
ur
e
s
of
a
no
t
e
bo
ok
c
o
mput
er
,
while
giving
y
o
u
the
added
mobilit
y
and
v
e
rsatilit
y
of
a
tablet
comput
er
.
U
s
e
the
inf
o
rma
t
ion
in
this
chapt
e
r
t
o
get
mor
e
fa
miliar
with
the
ha
r
d
wa
r
e
f
e
atur
es
of
y
our
J3
400
T
a
blet
PC
,
such
as
butto
n
s
,
slo
t
s
,
con
n
ec
to
rs
,
a
n
d
w
i
r
e
le
ss
ada
p
ters.
T
h
e
J34
00
T
a
bl
et
PC
in
cl
ude
s
th
e
f
o
ll
o
wing
in
tegra
t
ed
f
e
atur
es:
•
I
nte
l
®
Co
re
™
2
D
u
o
P
ro
ce
ss
or
•
Mobile
I
n
t
e
l®
GS45
Expr
ess
Chipset
•
W
i
-F
i
(8
02
.1
1a/
g
/n)
ne
t
w
or
k
i
ng
•
Bluetoot
h®
(o
ption
a
l)
•
Mobile
Br
oadb
an
d
(o
ptio
nal)
•
D
a
taG
u
a
r
d
t
o
he
l
p
p
r
ot
ec
t
th
e
h
a
r
d
driv
e
•
DD
R2
RAM
•
12.1"
diago
n
al
TFT
L
C
D
WX
GA
•
Fi
ng
e
r
p
r
i
n
t
r
e
a
d
e
r
•
Giga
bit
Eth
e
r
net
9

Pe
n
A
n
impor
t
ant
diff
erenc
e
bet
w
een
tr
adi
t
ional
PC
s
and
T
a
blet
PCs
is
tha
t
y
o
u
fr
equently
use
the
ta
blet
pen
t
o
in
t
erac
t
with
the
comput
e
r
inst
ead
of
a
mouse
a
n
d
k
e
yboar
d
.
The
pen
in
cl
ude
s
a
p
r
essu
r
e-sen
sitiv
e
tip
,
a
f
unction
butt
on
,
a
n
d
on
so
me
mo
del
s
,
an
er
as
er
.
T
h
e
pen
c
o
ntain
s
no
batter
ie
s
an
d
r
e
quir
es
n
o
ex
te
r
n
al
po
w
e
r
.
Eraser
F
u
nc
tion
butt
on
Ti
p
F
or
inf
or
mation
a
bout
using
the
pen,
see
“Using
the
pen
”
on
page
23.
10
Ch
apter
2
Fe
a
t
u
r
e
s
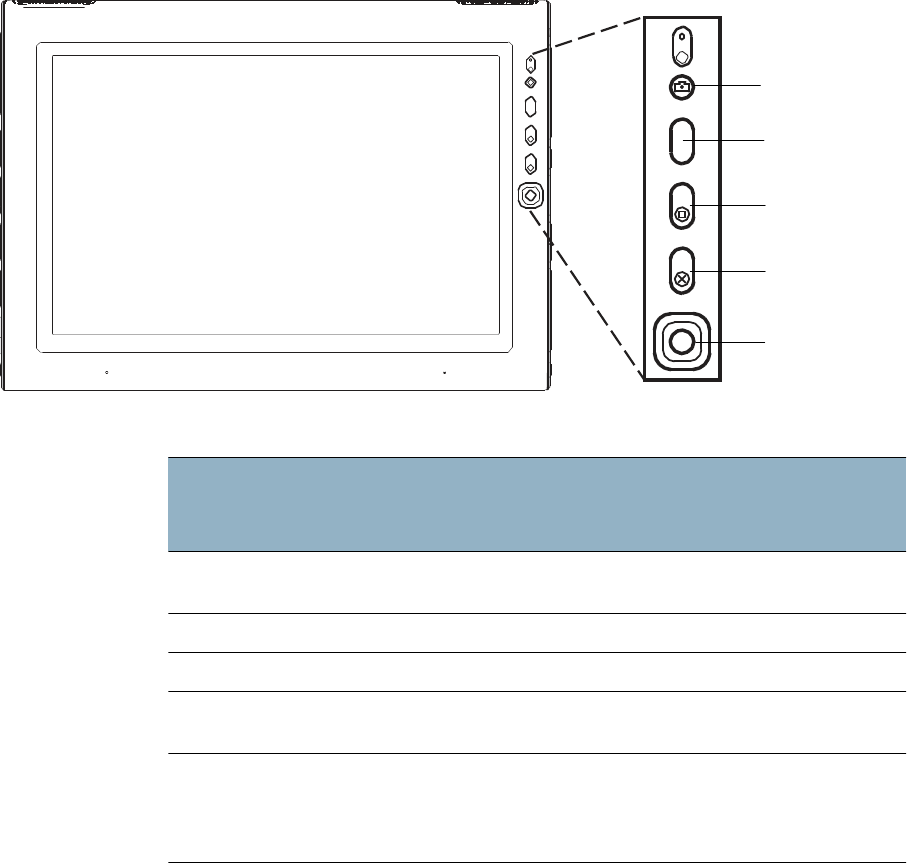
F
r
ont
panel
buttons
Y
o
u
can
use
t
h
e
but
t
on
s
on
th
e
fr
ont
of
th
e
t
a
blet
to
per
f
or
m
man
y
fun
c
tion
s
w
i
tho
u
t
h
a
ving
to
use
th
e
pe
n.
The
button
s
ar
e
custo
m
iz
ab
le,
so
yo
u
ca
n
m
o
d
i
fy
th
eir
fu
n
c
tion
s
to
suit
t
h
e
way
y
o
u
w
or
k
.
S
ee
“
C
onfigur
i
ng
fr
ont
pane
l
butto
n
s
”
o
n
page
25
.
Ca
me
ra
M
o
ti
on
QuickNa
v
Dashboar
d
Es
c
Dir
ec
t
ional
pad
Butt
on
Pri
mar
y
Se
c
o
nd
a
r
y
(
P
r
e
ss
a
nd
hold
button
for
o
n
e
s
e
co
nd
)
Camera
Use
to
tr
igger
an
exposur
e
in
th
e
built-in
camer
a
.
Mo
tion
QuickN
a
v
Opens
Quic
kNa
v
.
O
pens
S
t
icky
Not
e
s
Dashboar
d
S
tar
t
s
Mo
tion
Dashboar
d
.
Opens
W
i
ndo
w
s
Journal
Esc
C
anc
e
ls
the
curr
en
t
task
.
Equivalent
to
t
h
e
Esc
key
.
Dir
ec
t
iona
l
pad
U
se
t
o
mo
v
e
the
point
e
r
or
na
vigat
e
thr
o
ugh
documents
.
E
q
uiv
a
lent
t
o
a
rro
w
ke
y
s
on
a
key
b
oar
d
.
The
cente
r
b
u
tt
o
n
i
s
eq
u
i
va
lent
to
E
nte
r
.
The
dir
ec
t
ional
pad
orientation
rota
t
e
s
t
o
ma
t
c
h
the
di
spla
y
orie
n
t
a
t
io
n.
T
o
mo
v
e
th
e
point
e
r
in
a
cer
t
ain
dir
ec
t
ion,
pr
ess
that
dir
ec
t
ion
on
the
pad
r
e
gar
d
less
of
orien
t
a
t
ion.
F
or
exa
m
pl
e
,
t
h
e
“
u
p
”
dir
ec
t
ion
in
la
ndscape
or
ientation
bec
o
mes
the
“l
ef
t
”
dir
ec
t
ion
in
por
t
r
a
i
t
orientation.
Ch
apter
2
Fe
a
t
u
r
e
s
11
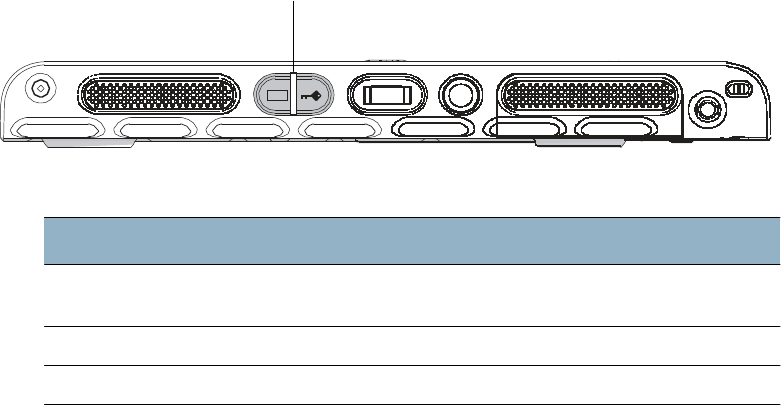
Batt
e
r
y
sta
t
us
ligh
t
Y
o
u
can
use
the
indicator
light
on
the
right
side
of
the
tablet
t
o
monit
or
the
st
a
t
us
of
the
ba
tter
y
.
The
f
o
llo
wing
illustra
tion
and
table
s
how
the
ba
tt
ery
sta
t
us
light
and
the
v
a
rious
po
w
e
r
stat
e
descriptions
.
Battery
status
light
Statu
s
Descri
ption
Steady
gr
ee
n
T
he
batte
r
y
is
full
y
ch
ar
ge
d
an
d
the
ta
bl
et
is
runn
ing
on
AC
p
o
w
e
r
Steady
ambe
r
O
ne
or
mo
re
b
a
tt
e
r
i
e
s
c
h
a
r
g
i
ng
O
ff
N
ot
ch
ar
gin
g
.
The
table
t
is
runn
ing
on
ba
tte
r
y
po
w
e
r
.
12
Ch
apter
2
Fe
a
t
u
r
e
s
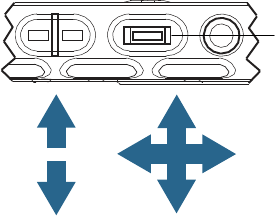
Securit
y
T
h
e
J3
400
pr
ovide
s
a
saf
e
computing
en
vironme
n
t
th
a
t
en
ables
str
o
ng
secur
i
t
y
pr
otec
tion
an
d
ser
v
e
s
as
the
f
o
undation
f
or
compleme
n
tar
y
se
cur
i
t
y
tech
nol
ogie
s
.
T
h
e
c
or
e
se
cur
i
t
y
f
e
a
t
ur
es
include
I
n
sy
de
H
2
0
Ex
ten
s
ible
F
i
r
m
wa
r
e
I
nter
f
ace
(EFI)
BIOS
,
a
b
u
il
t-in
fi
nger
pr
int
r
e
ade
r
,
a
un
iversa
l
se
cu
r
i
t
y
lo
ck
,
t
h
e
Dashb
o
ar
d
S
e
cu
r
i
t
y
C
e
nter
,
TP
M
(
T
rust
ed
P
l
a
t
f
o
rm
Mo
dule),
and
a
Smar
t
C
a
r
d
-ready
pla
t
f
o
rm.
W
ith
th
e
built-in
TP
M
an
d
I
n
fine
on
S
e
cur
i
t
y
Platf
or
m
T
o
ol
s
,
y
o
u
can
cr
e
a
te
an
d
man
a
ge
dig
i
ta
l
ce
r
t
ific
a
t
es
f
or
user
a
n
d
pl
a
t
f
o
rm
a
u
th
en
tic
a
tion
.
T
h
ese
f
e
a
t
u
r
es
ar
e
mo
st
c
o
mmon
l
y
used
b
y
enterprises
and
enabled
by
the
sy
st
em
admin
i
str
a
t
or
.
T
o
l
e
arn
mo
r
e
about
TP
M,
go
to
www
.
motioncomputing
.com/sup
p
or
t/suppor
t
_
d
ocumenta
tion.asp
.
Wi
n
d
o
w
s
S
e
c
u
r
i
t
y
b
u
tt
o
n
Y
o
u
can
use
th
e
W
i
ndo
w
s
S
e
cur
i
t
y
but
t
on
to
log
on
to
or
l
o
ck
y
our
T
a
bl
et
PC
.
P
r
e
ssing
the
W
i
ndo
w
s
Se
curity
butt
on
is
e
q
uiv
a
le
n
t
t
o
pr
e
ssing
Ctrl
+A
l
t
+Del
on
a
key
b
oa
r
d
.
F
i
ngerpr
int
r
e
ader
U
s
in
g
th
e
fi
nger
p
r
in
t
r
e
a
d
er
,
y
o
u
c
a
n
log
on
t
o
y
our
T
a
bl
e
t
PC
b
y
sc
an
ning
y
o
u
r
fin
g
erprin
t
inste
a
d
o
f
enter
i
ng
a
passw
or
d.
T
h
is
pr
esents
an
added
level
of
se
cur
i
t
y
f
or
y
our
ta
bl
et.
F
i
ng
er
pr
int
r
e
ader
Sca
n
fingerprint
Scr
o
lli
ng
Y
o
u
can
use
the
OmniP
a
ss
ap
plication
t
o
associ
a
t
e
y
o
u
r
fingerprint
with
passw
or
ds
f
or
We
b
page
s
an
d
oth
e
r
ap
plication
s
.
Y
o
u
can
al
so
use
th
e
fing
er
pr
int
r
e
ader
as
a
scr
o
lling
device
.
Mo
ve
y
our
finger
on
the
finger
pr
int
r
e
a
d
er
to
mo
v
e
th
e
pointer
on
th
e
scr
ee
n
.
Not
e
:
The
scr
o
ll
func
t
ion
is
disa
bl
ed
w
h
il
e
scan
ning
a
fin
g
er
pr
in
t.
F
or
inf
or
mation
a
bout
se
tting
up
and
usin
g
the
fingerprint
r
e
ader
,
see
“
C
apturing
a
fi
ngerpr
in
t
”
on
page
42
.
Ch
apter
2
Fe
a
t
u
r
e
s
13
Displa
y
T
h
e
J3
400
in
cludes
a
12
.1
-inch
displ
a
y
with
th
e
f
o
ll
o
wing
f
e
a
t
ur
es:
•
A
h
i
ghly
r
e
a
d
able
L
C
D
(l
iquid
cry
s
tal
display)
.
•
WX
GA,
1280
×
800
r
e
sol
u
tio
n
.
•
A
pr
ot
ec
tiv
e
la
y
e
r
th
a
t
off
e
rs
a
firm
w
r
itin
g
sur
f
ace
and
minimiz
e
s
glar
e
.
•
A
digitiz
e
r
pane
l
th
a
t
enable
s
ha
nd
writt
e
n
en
tr
y
with
th
e
table
t
pen
.
V
i
ew
Any
w
her
e
display
(optional)
T
h
e
V
i
ew
Any
w
h
e
r
e
™
displ
a
y
o
ption
e
nha
nces
outdoo
r
view
i
ng
and
br
igh
t
-light
view
i
ng
en
vironme
n
ts
.
T
h
e
V
i
ew
Any
w
he
r
e
display
in
cl
ude
s
al
l
th
e
f
e
a
t
ur
es
of
th
e
standa
r
d
displ
a
y
plus:
•
A
prote
c
tiv
e
la
y
e
r
th
a
t
impr
ov
e
s
the
sunl
ight
contrast
ratio
and
significa
n
t
ly
r
e
duc
e
s
r
e
fle
c
tio
n
and
glar
e
.
•
I
mpr
ov
ed
sun
light
contrast
r
a
tio
,
w
h
ich
enhan
ce
s
vie
wabilit
y
at
w
i
de
view
i
ng
an
gles.
•
Redu
ced
r
e
flec
tion
and
glar
e
and
impr
ov
e
d
light
pa
ss-
t
hrough
e
f
ficie
n
c
y
.
M
i
cr
ophones
T
h
e
J3
400
is
equip
p
e
d
w
ith
in
te
gra
t
e
d
micr
opho
ne
s
that
y
o
u
ca
n
use
to
r
e
cor
d
a
udio
,
dic
t
a
t
e
n
o
te
s
,
and
use
voice
c
omma
n
ds
w
ith
out
th
e
need
f
or
an
ex
te
r
n
al
micr
opho
ne
.
Y
o
u
ca
n
a
l
so
use
th
e
micr
opho
ne
p
or
t
t
o
c
o
nn
ec
t
an
e
x
t
e
rna
l
micro
p
ho
ne
or
micro
p
ho
ne
he
adset.
S
ee
“
C
o
nn
ec
t
in
g
he
adpho
n
e
s
,
ex
tern
al
speake
r
s
,
or
a
micr
opho
ne
”
on
page
29
.
Speakers
T
h
e
J3
400
is
equip
p
e
d
w
ith
in
te
gra
t
e
d
ste
r
eo
sp
e
a
ker
s
th
a
t
y
o
u
c
a
n
use
t
o
li
sten
to
music
,
mo
vies
,
or
other
multimedia
ap
plications
.
Y
o
u
can
also
use
t
h
e
he
adpho
n
e
s
por
t
to
conn
ec
t
ex
tern
al
speake
r
s
or
he
adpho
n
e
s
.
S
ee
“
C
on
ne
c
t
ing
hea
d
phon
es
,
ex
tern
al
spe
a
ke
rs
,
or
a
micro
p
hon
e
”
o
n
page
29
.
14
Ch
apter
2
Fe
a
t
u
r
e
s
Ambient
light
sensor
(
A
LS)
I
f
y
o
u
have
dy
namic
br
ightn
e
ss
se
le
c
t
ed
a
n
d
ar
e
ru
nn
ing
on
ba
tt
ery
po
w
e
r
,
th
e
am
bien
t
light
se
nso
r
mea
s
ur
e
s
the
sur
r
ounding
light
a
n
d
adjusts
the
display
brightness
and
contrast
acc
or
d
ingly
.
This
en
sur
e
s
th
a
t
y
o
u
h
a
v
e
pr
oper
se
tting
s
f
or
all
li
gh
t
i
ng
c
o
nditio
ns
.
T
o
enable
dyn
a
mic
brightne
ss
,
see
“
A
djusting
the
display
brightne
ss
”
on
page
27
.
Motion
Da
taGuar
d
F
or
J3
400
ta
bl
ets
usin
g
a
ha
r
d
disk
driv
e
(
s
pi
nn
i
ng
me
di
a)
,
th
e
Da
ta
G
u
ar
d
f
e
a
t
ur
e
i
s
included,
which
det
ec
t
s
shocks
,
ex
tr
eme
vibra
ti
o
n
s
,
an
d
fall
s
.
I
f
th
ese
condit
ions
ar
e
det
ec
t
ed
,
DataGuar
d
mo
v
e
s
the
driv
e
heads
a
w
a
y
fr
om
t
h
e
disk
,
w
h
ich
can
pr
event
h
a
r
d
driv
e
failur
es
and
data
loss
.
F
or
mor
e
inf
o
rma
t
io
n,
go
to
C
o
ntr
o
l
P
a
n
e
l
and
o
p
en
Da
t
a
Gua
r
d.
USB
2.0
por
t
s
T
w
o
USB
2.0
(
H
igh-
spe
e
d
USB)
por
t
s
ca
n
be
use
d
to
a
tt
a
ch
any
USB
device
such
as
a
mouse
,
dig
i
tal
camer
a
,
print
e
r
,
or
ex
t
e
rnal
st
or
age
device
.
The
USB
por
t
s
ar
e
co
mpatible
wit
h
o
l
de
r
USB
de
vices
(
U
SB
1
.
1)
.
F
or
mor
e
inf
or
m
ation,
see
“Using
USB
”
on
page
26.
Headphones
por
t
T
h
e
he
adpho
n
es
por
t
is
o
n
t
h
e
le
f
t
e
d
ge
of
th
e
T
a
ble
t
PC
.
I
t
is
marked
w
ith
a
sma
ll
he
adpho
n
e
s
symbol
an
d
is
designe
d
as
an
audio
o
u
tput
channe
l
o
n
ly
.
Y
o
u
can
attach
he
adpho
n
e
s
or
ex
tern
al
spe
a
ke
rs
to
th
is
por
t
.
F
or
mor
e
inf
or
matio
n,
see
“
C
o
nn
ec
t
ing
he
adpho
n
e
s
,
ex
tern
al
speake
rs,
or
a
micr
opho
ne
”
on
page
29
.
M
i
cr
ophone
por
t
T
h
e
micr
opho
ne
por
t
is
o
n
the
le
f
t
edge
of
th
e
T
a
b
l
e
t
PC
.
I
t
is
marked
with
a
sma
ll
micr
opho
ne
sy
mbo
l
a
n
d
is
design
e
d
a
s
an
au
dio
inp
u
t/lin
e
in
c
h
a
nn
e
l
on
l
y
.
Y
o
u
ca
n
a
t
ta
ch
an
ex
te
r
n
a
l
micr
opho
ne
dir
ec
t
ly
to
th
is
por
t
to
e
nhance
y
our
a
udio
r
e
co
r
din
g
capabilitie
s
.
T
h
e
in
te
rna
l
mi
cr
o
p
ho
ne
s
ar
e
disa
bl
ed
wh
en
an
e
x
t
e
rna
l
micr
opho
ne
is
a
t
ta
ched
.
F
or
mor
e
inf
or
matio
n,
see
“
C
o
nn
ec
t
ing
he
adpho
n
e
s
,
ex
tern
al
speake
rs,
or
a
micr
opho
ne
”
on
page
29
.
Ch
apter
2
Fe
a
t
u
r
e
s
15
Secur
i
t
y
slot
Y
o
u
can
u
s
e
the
secu
r
i
ty
slot
t
o
a
t
tach
y
our
tab
l
et
t
o
a
desk
,
table
or
other
fix
t
ur
e
.
Y
o
u
must
pur
chase
a
security
lock
separ
a
t
e
ly
.
VGA
por
t
Y
o
u
can
use
the
VGA
por
t
to
connec
t
standar
d
VGA
mon
i
t
o
rs
.
Whe
n
y
o
u
attach
an
ex
t
e
r
n
al
mon
i
tor
,
y
o
u
can
use
th
e
ex
tern
al
mon
i
tor
o
n
ly
,
or
t
h
e
ex
te
r
n
a
l
mo
nito
r
a
n
d
th
e
T
a
ble
t
PC
display
togethe
r
.
S
ee
“S
ettin
g
up
an
ex
tern
al
displ
a
y
”
o
n
page
27.
Et
her
net
p
or
t
T
h
e
J3
400
co
me
s
w
ith
an
integrated
10
/1
00
/10
00
Ba
se
-
T
Eth
e
r
net
po
r
t
(R
J-
45)
,
wh
ich
y
o
u
c
a
n
u
s
e
t
o
c
o
nn
ec
t
t
o
a
n
E
t
herne
t
n
e
tw
ork
or
an
oth
e
r
c
o
m
p
ut
er
.
F
or
mor
e
inf
or
m
ation,
see
“U
sin
g
E
t
herne
t
”
on
page
26
.
Dock
ing
por
t
T
h
e
J3
400
h
a
s
a
do
ck
in
g
por
t
th
a
t
y
o
u
can
use
to
con
n
ec
t
th
e
ta
blet
to
the
Mo
t
i
on
F
l
ex
Do
ck
.
Whe
n
th
e
table
t
is
con
n
ec
ted
to
th
e
F
l
exD
o
ck
,
th
e
por
t
conn
ec
tio
n
s
a
r
e
r
e
pl
ica
t
e
d
on
th
e
do
ck
.
T
h
is
enable
s
y
o
u
t
o
c
o
nn
ec
t
a
mo
nit
or
,
ke
ybo
a
r
d
,
mou
s
e
,
or
e
x
t
e
rn
al
driv
e
t
o
the
dock
and
easily
dock
and
undock
the
tablet.
F
or
mor
e
inf
o
rmation
a
bout
the
F
l
ex
Do
ck
and
oth
e
r
accessor
i
es
,
go
to
the
Mo
t
i
on
C
o
mputing
acce
sso
r
ies
page
a
t
www
.
m
o
tio
n
com
p
u
t
ing
.com
/
a
c
cesso
r
i
es
.
Smar
t
car
d
r
e
ader
slot
(optional)
Y
our
ta
blet
includes
a
smar
t
car
d
r
e
ader
lo
ca
te
d
on
th
e
r
i
ght
side
of
th
e
tablet,
under
t
h
e
slot
co
v
e
r
,
nex
t
to
t
h
e
pen
bay
.
Using
smar
t
car
d
sof
t
w
a
r
e
,
this
device
ca
n
r
e
ad
inf
or
m
a
t
ion
fr
om
and
writ
e
inf
o
rmation
t
o
the
sma
r
t
car
d
wh
en
the
car
d
is
inser
t
ed
in
t
o
the
slot.
T
h
e
smar
t
car
d
is
a
n
ISO
7816
PC/SC
compliant,
c
o
n
t
ac
t
t
y
pe
smar
t
ca
r
d
r
e
ade
r
/writ
e
r
.
F
or
inf
or
mation
a
bout
using
the
smar
t
car
d
r
e
ader
,
see
“Using
the
smar
t
car
d
r
e
ader
(o
pt
ional)”
on
page
30
.
16
Ch
apter
2
Fe
a
t
u
r
e
s
Expr
ess
car
d
slot
(optional)
T
h
e
Expre
ss
car
d
slo
t
h
o
lds
on
e
Expre
ss
ca
r
d
f
or
net
w
or
k
i
ng
,
me
mor
y
expansio
n,
or
accessories
.
•
T
o
inser
t
a
n
Ex
pr
e
ss
ca
r
d
,
r
e
m
o
ve
th
e
ca
r
d
slot
co
v
e
r
and
pl
ace
th
e
Expr
ess
car
d
in
the
slot
with
the
la
bel
side
up
.
•
T
o
r
e
mo
v
e
the
ca
r
d
,
pull
the
car
d
out
of
th
e
sl
ot
a
n
d
r
e
pl
ace
the
ca
r
d
slo
t
c
ov
e
r
.
T
h
e
J3
400
in
cludes
a
co
v
e
r
f
or
th
e
Expre
ss
car
d
slo
t
.
T
o
prote
c
t
the
PC
ca
r
d
slot,
y
o
u
sh
ould
l
e
a
v
e
th
e
bl
ank
ca
r
d
in
pl
ace
wh
en
y
o
u
do
no
t
h
a
v
e
a
PC
c
a
r
d
in
the
sl
o
t
.
SIM
slot
T
h
e
SIM
slot
holds
one
SIM
(Sub
scriber
Identit
y
Mo
dule).
A
SIM
is
a
smar
t
car
d
,
about
the
siz
e
of
a
postage
stamp
,
tha
t
st
or
es
inf
o
rmation
about
y
our
wir
e
less
acc
o
un
t.
Y
o
u
need
t
o
use
a
SI
M
only
if
y
o
u
ar
e
using
Mobile
Br
oadband
on
an
HSDP
A
(H
igh
Speed
Downlink
P
a
cket
A
cce
ss)
net
w
or
k
.
C
ontac
t
y
our
ser
v
ic
e
pr
ovider
f
or
deta
ils
.
F
or
inf
or
mation
a
bout
r
e
moving
and
r
e
placing
th
e
SIM,
se
e
“Remo
ving
a
n
d
r
e
pl
ac
ing
the
SIM”
on
pag
e
39.
W
i
-F
i
(802.11a/g/n
wir
e
less)
Y
our
T
a
blet
PC
h
a
s
integr
ate
d
W
i
-F
i
(
802
.11
a
/g/n
)
th
at
y
o
u
can
use
to
co
nne
c
t
to
th
e
In
t
e
rnet
an
d
oth
e
r
c
o
mp
ut
er
s
wir
e
le
ssl
y
.
Y
o
u
ca
n
use
W
i
-F
i
in
y
our
ho
me
,
an
d
in
ma
n
y
sc
hool
s
,
ho
t
e
l
s
,
a
i
rpo
r
ts
,
a
n
d
r
e
stau
r
a
n
t
s
.
Not
e
:
W
i
r
e
le
ss
acce
ss
r
e
quir
es
an
80
2.11
a,
80
2.11
g
,
or
80
2.11
n
a
c
cess
po
in
t.
I
nte
r
n
e
t
access
r
e
quir
es
a
w
o
rk
ing
I
nternet
c
o
nnec
tion.
Y
our
a
b
ilit
y
t
o
use
W
i
-F
i
depends
on
the
seve
ral
c
onditions:
•
Distan
ce
fr
o
m
th
e
acce
ss
point
.
•
Abilit
y
t
o
c
o
nnec
t
to
the
acce
ss
point.
•
A
cce
ss
righ
ts
(whic
h
may
r
e
qu
ir
e
a
n
a
cc
o
un
t
f
ee
,
user
na
me
,
pa
ssw
or
d
,
a
n
/or
n
e
tw
ork
set
up
thr
o
ugh
an
a
d
ministra
t
o
r).
•
S
e
cur
i
t
y
se
ttin
g
s
,
such
as
w
h
e
t
he
r
the
ne
t
w
or
k
br
o
a
dca
s
ts
a
ne
t
w
or
k
n
a
me
or
uses
encry
p
tio
n
.
F
or
mor
e
inf
or
m
ation,
see
“Using
W
i
-F
i
(8
02
.1
1a
/g/n)”
on
page
49
.
Ch
apter
2
Fe
a
t
u
r
e
s
17

Mobile
Br
oadband
(optional)
T
h
e
J3
400
T
a
blet
PC
is
a
v
ail
a
ble
w
i
t
h
a
n
o
ption
al
Mobile
Br
oa
dba
n
d
a
d
apter
th
a
t
y
o
u
can
use
to
sen
d
an
d
r
ece
iv
e
da
ta
wir
e
le
ssl
y
.
By
u
s
ing
Mob
i
le
Br
o
a
dba
n
d
,
y
o
u
ca
n
br
o
w
se
the
In
t
e
rnet
,
sen
d
an
d
r
ece
iv
e
e
m
ail
,
c
o
nn
ec
t
t
o
y
our
c
o
m
p
any’
s
in
tr
a
net
,
or
use
We
b
-
ba
sed
applica
t
ions
.
Mobile
Br
oadband
is
based
on
cellular
net
w
or
k
te
ch
nolo
gy
,
so
you
c
a
n
u
s
e
it
in
m
or
e
p
l
ace
s
tha
n
oth
e
r
wir
e
less
techno
l
ogie
s
.
W
ith
Mobile
Br
oa
dba
n
d,
y
our
T
a
bl
et
PC
con
n
ec
ts
to
a
ser
vice
pr
ovider
’
s
base
station,
which
in
turn
is
c
o
nnec
t
e
d
t
o
the
I
n
t
e
rnet.
Unlike
W
i
-F
i,
y
o
u
do
not
need
to
se
ar
ch
f
or
W
i
-
F
i
ho
tspo
ts
or
buy
base
sta
t
ions.
Y
o
u
can
t
y
pically
use
Mobile
Br
oadband
any
w
her
e
y
o
u
can
u
s
e
y
our
mobile
phone
.
F
or
mor
e
inf
ormation,
see
“Using
Mobile
Br
oadband
(opt
ional)”
on
page
49.
Bluetooth
wir
e
less
(optional)
Y
our
T
a
bl
e
t
PC
ha
s
an
in
t
e
g
r
a
t
ed
Blu
e
t
o
oth
a
d
a
p
t
e
r
.
W
ith
Bl
ue
t
oo
t
h,
c
o
mp
ut
er
s
a
n
d
o
t
he
r
devices—
s
uch
as
mic
e
,
keyboar
d
s
,
cameras
,
an
d
PD
As—
c
a
n
be
inter
c
on
ne
c
t
ed
using
a
sh
or
t-r
a
ng
e
wir
e
l
e
ss
c
o
nn
ec
tion
.
Bl
uet
o
oth
devic
e
s
c
a
n
c
o
nn
ect
wir
e
l
e
ss
ly
a
t
dista
n
ce
s
up
to
33
f
e
et
(1
0
me
ter
s
).
F
or
mor
e
inf
or
matio
n,
see
“Using
Blue
too
t
h
(
o
ptio
nal
)
”
o
n
page
50
.
P
o
w
e
r
adapt
e
r
T
h
e
p
o
w
e
r
a
d
ap
t
e
r
p
rovide
s
po
w
e
r
t
o
th
e
T
a
bl
et
PC
a
n
d
ch
a
r
ge
s
the
b
a
tt
ery
wh
en
it
is
in
the
T
a
blet
PC.
WA
R
N
I
N
G
:
Use
only
the
Mo
tion
ap
pr
ov
ed
po
w
e
r
ada
p
ter
wit
h
y
our
Mo
t
i
on
T
a
blet
PC.
D
o
not
use
the
ada
p
ter
t
o
po
w
e
r
any
other
elec
tr
oni
c
devices
.
Using
the
Mo
tion
ap
pr
ov
ed
po
w
e
r
adap
te
r
t
o
po
w
e
r
o
t
h
e
r
devic
es
can
damage
the
p
o
w
e
r
adapt
e
r
or
o
t
he
r
devic
e
s
.
U
s
ing
a
non-Mo
tion
approv
ed
pow
e
r
adapt
e
r
can
damage
t
h
e
T
a
ble
t
PC.
Batt
e
r
y
T
h
e
J3
400
in
cludes
t
w
o
batte
r
y
bay
s
f
or
co
n
t
a
i
ning
up
to
t
w
o
h
i
gh-
c
apacity
Lith
ium-ion
ba
tteries
that
ar
e
installed
on
the
back
of
the
T
a
blet
PC.
I
f
o
n
l
y
o
n
e
ba
tt
ery
is
included
with
th
e
t
a
blet,
a
batte
r
y
bay
ca
r
t
r
i
dge
(n
on-fun
c
t
ion
i
ng)
is
included
f
or
oc
cupying
the
sec
o
nd
batt
ery
bay
.
Do
not
discar
d
the
batt
ery
bay
ca
r
t
ridge
.
I
f
y
our
b
a
tt
ery
or
spar
e
batt
ery
b
ec
o
mes
dama
ged
and
is
being
r
e
placed
by
Mo
tion,
the
ba
tter
y
bay
car
t
r
i
dge
must
r
e
main
installed
in
the
batter
y
bay
to
pr
event
f
or
e
ign
o
b
je
c
t
s
falling
int
o
the
batt
ery
bay
.
18
Ch
apter
2
Fe
a
t
u
r
e
s

Un
der
no
rmal
c
o
nditio
ns
,
y
o
u
ca
n
r
un
th
e
ta
bl
et
on
batt
ery
po
w
e
r
with
one
batt
ery
f
or
a
b
o
u
t
thr
ee
ho
ur
s
a
n
d
u
s
ing
tw
o
b
a
tt
erie
s
f
or
ab
out
se
v
e
n
ho
ur
s
.
Y
o
u
ca
n
maximiz
e
ba
tt
e
r
y
lif
e
b
y
optimizing
y
our
po
w
e
r
plan.
See
“Using
po
w
e
r
plans
”
on
p
a
ge
30.
F
or
inf
or
mation
a
bout
cha
r
ging
and
ch
eck
i
ng
ba
tte
r
y
status
,
see
“Using
the
ba
tt
ery
”
on
page
33.
C
A
UTION:
T
o
a
vo
i
d
per
s
on
al
injur
y
,
han
d
le
the
batter
y
wit
h
care
.
D
o
no
t
ope
n
,
punc
tur
e
,
sho
rt,
or
expose
it
to
fir
e
or
water
.
K
ee
p
th
e
ba
tt
e
r
y
in
an
amb
i
en
t
t
e
mp
er
a
t
ur
e
o
f
l
e
ss
tha
n
+1
04
°F
(+
40°C)
.
F
or
exa
m
pl
e
,
do
not
le
a
v
e
the
batter
y
in
a
clo
s
ed
car
in
ho
t
w
e
ath
e
r
f
or
an
ex
te
nde
d
time
.
F
or
mo
r
e
in
f
or
m
a
t
io
n,
se
e
t
h
e
Sa
f
e
t
y
an
d
R
e
gulator
y
Guide
included
with
yo
u
r
T
a
b
l
e
t
PC
.
Ch
apter
2
Fe
a
t
u
r
e
s
19
20
Ch
apter
2
Fe
a
t
u
r
e
s
Us
i
n
g
you
r
T
a
bl
e
t
PC
3
T
h
e
J3
400
T
a
b
l
e
t
PC
ru
ns
M
i
cr
oso
f
t
W
i
n
d
o
w
s
V
i
sta,
w
h
ic
h
in
cl
udes
in
k
-
t
o
-t
e
x
t
a
n
d
w
or
d
r
ec
o
gn
it
ion,
vo
ice
r
ec
o
gn
it
ion,
a
n
d
impr
ov
ed
se
cur
i
t
y
to
hel
p
def
e
n
d
aga
i
nst
v
i
ruses
,
w
or
m
s
,
an
d
ot
her
th
r
eats
.
An
d
unlik
e
PDAs
or
o
t
he
r
h
a
n
d
hel
d
dev
i
ce
s
,
the
J340
0
ca
n
r
un
any
W
i
n
d
o
w
s
V
i
sta-
c
o
mpatible
applica
t
io
n.
U
s
e
the
inf
o
rma
t
ion
in
this
chapt
e
r
t
o
learn
about
c
o
mmon
tasks
such
as
using
the
ta
blet
pe
n
to
e
nter
t
e
x
t
,
u
s
i
ng
Mo
t
i
o
n
D
a
s
h
b
o
a
r
d,
us
ing
speech
r
ec
o
gnition,
a
n
d
cust
omizing
t
h
e
tablet
t
o
fi
t
the
way
y
o
u
w
o
rk
.
21
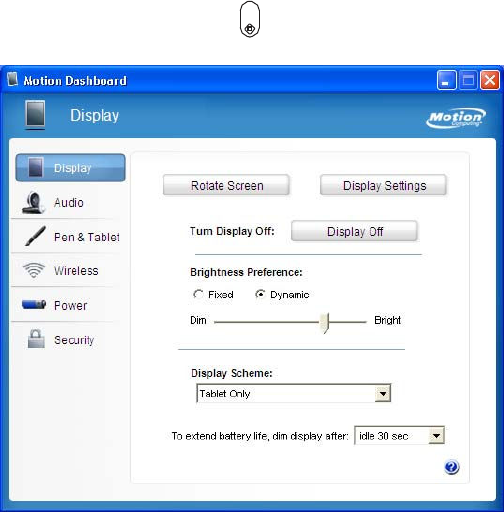
U
s
ing
Motion
Dashboar
d
Mo
tion
Dashboar
d
pu
ts
man
y
c
o
mmon
tablet-r
el
at
ed
settings
and
tasks
at
y
our
fingertips
.
F
or
e
x
amp
l
e
,
y
o
u
ca
n
e
n
a
b
l
e
or
disa
bl
e
Bl
ue
t
oo
t
h
an
d
W
i
-F
i,
ca
li
br
a
t
e
th
e
dig
i
tiz
e
r
,
or
ch
ec
k
y
our
r
e
maining
batt
ery
po
w
e
r
.
T
o
s
t
ar
t
M
o
tion
Dashboar
d
•
P
r
ess
the
Dashboar
d
butt
on
(
)
on
the
fr
ont
of
the
tablet.
Whe
n
y
o
u
change
a
se
tting
on
Mo
t
i
on
Dashbo
ar
d
,
the
cha
n
ge
occur
s
immediate
l
y
.
Y
o
u
do
not
need
t
o
tap
Apply
or
OK
.
F
or
mor
e
inf
or
m
ation,
see
Mo
t
i
on
Dashboar
d
Help
.
22
Ch
apter
3
Using
your
T
a
b
l
e
t
PC

U
s
ing
the
pen
Y
o
u
c
a
n
use
th
e
table
t
pen
t
o
writ
e
on
th
e
di
spla
y
a
n
d
n
a
vigate
t
h
e
operating
system.
A
pen
ca
n
f
e
el
mor
e
n
a
tural
in
y
our
han
d
th
an
a
mouse
,
and
y
o
u
can
use
the
pe
n
wh
ile
stan
ding
or
w
a
l
k
ing
.
T
h
e
f
o
ll
o
w
i
ng
ta
bl
e
sh
o
w
the
v
a
r
i
o
u
s
pe
n
a
c
tion
s
an
d
th
eir
mou
s
e
equiva
l
e
n
t
s
.
Mou
s
e
ac
tion
P
e
n
e
quivalent
P
o
int
P
oint
Cl
ick
T
ap
Doub
le
-
c
lick
Dou
b
le
-tap
Drag
D
r
ag
R
i
ght
-
click
T
ap
an
d
h
o
ld
R
i
ght
-
click
P
r
e
ss
pen
F
u
nc
tion
button
and
then
tap
S
ome
sof
t
war
e
a
p
plications
,
such
as
M
i
crosof
t
W
or
d
,
sup
p
or
t
ink
dra
wing
and
ink
an
no
ta
tio
n
s
.
S
ome
ap
pl
icatio
ns
such
as
ar
t
or
dra
win
g
pr
o
g
rams
ar
e
designe
d
e
s
pecially
f
or
ink
input
.
F
or
mor
e
inf
o
rma
t
ion
about
a
par
t
ic
ul
ar
ap
pl
icatio
n,
ope
n
th
e
ap
plication
h
e
l
p
a
n
d
s
e
a
r
c
h
f
or
“p
e
n
”
,
“i
n
k
”
,
or
“
t
a
b
l
e
t
“
.
Y
o
u
ca
n
use
T
a
bl
e
t
PC
I
n
put
P
a
ne
l
inst
e
a
d
of
a
k
e
yb
oa
r
d
to
e
nter
tex
t
.
F
or
m
o
re
i
nform
a
t
i
o
n
,
see
“Using
T
a
blet
PC
I
n
p
u
t
P
a
ne
l”
on
page
24
.
S
t
or
e
the
pen
in
the
pen
bay
when
not
in
use
.
T
o
stor
e
th
e
pe
n
in
th
e
pe
n
bay
,
inser
t
it
int
o
the
bay
and
pr
ess
it
until
it
clicks
.
T
o
r
e
mo
v
e
th
e
pe
n,
pr
ess
it
aga
i
n.
I
f
y
o
u
ha
v
e
th
e
pe
n
t
e
th
er
a
tta
che
d
,
en
sur
e
tha
t
y
o
u
ha
v
e
r
e
le
a
s
ed
the
pen
befor
e
y
o
u
pull
it
out
using
the
tet
h
e
r
.
T
h
e
pe
n
includes
ex
tra
tips
.
Y
o
u
can
use
th
e
included
r
e
placeme
n
t
too
l
to
change
th
e
tips.
Se
e
“Repl
a
cin
g
pe
n
tips
”
on
page
59.
Impor
t
an
t:
T
h
e
T
a
blet
PC
r
e
spo
n
ds
onl
y
to
t
h
e
table
t
pe
n.
Do
no
t
use
tr
a
d
ition
a
l
pe
ns
or
o
t
he
r
po
in
ting
devic
es
with
th
e
T
a
bl
et
PC.
Ch
apter
3
Using
your
T
a
b
l
e
t
PC
23
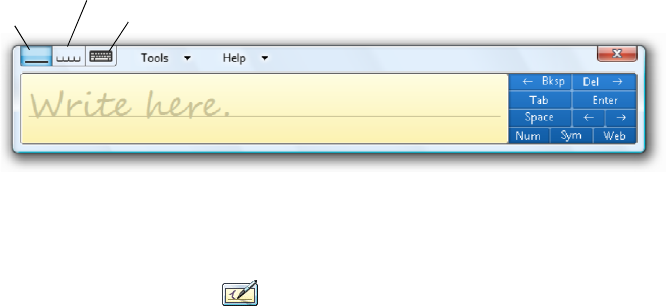
)
U
s
ing
T
a
blet
PC
I
n
put
P
a
nel
Y
o
u
ca
n
u
s
e
T
a
bl
e
t
PC
I
n
put
P
a
ne
l
in
st
ea
d
of
a
ke
yb
oa
r
d
t
o
en
te
r
t
e
x
t
o
n
y
our
T
a
bl
et
PC.
U
s
e
th
e
writing
pa
d
or
th
e
ch
a
r
a
c
t
e
r
pa
d
t
o
c
o
n
v
er
t
y
our
h
a
ndw
r
itin
g
t
o
te
x
t
,
or
ta
p
ch
a
r
a
c
t
e
r
s
usin
g
th
e
o
n
-sc
r
ee
n
key
b
o
a
r
d
.
U
s
ing
T
a
blet
PC
I
n
put
P
a
nel
T
h
e
f
o
llowin
g
ill
u
st
r
a
tion
sh
o
w
s
I
n
put
P
a
n
e
l
ope
n
to
th
e
wr
itin
g
pad.
W
r
iting
pad
Ch
ar
ac
te
r
pad
On-scr
een
keyboar
d
T
o
star
t
Input
P
a
nel
•
Do
o
n
e
of
th
e
f
o
llowin
g
:
–
T
ap
at
t
h
e
place
y
o
u
want
to
e
n
t
e
r
t
e
x
t
,
such
as
a
t
e
x
t
bo
x.
T
h
en
ta
p
the
T
a
bl
et
PC
I
n
put
P
a
n
e
l
icon
(
.
–
T
ap
t
h
e
I
n
put
P
a
n
e
l
tab
o
n
the
le
f
t
edge
of
t
h
e
scr
e
en
(de
f
aul
t
).
T
o
swit
ch
amon
g
th
e
writin
g
pad,
t
h
e
ch
arac
t
e
r
pad,
and
the
on
-scree
n
ke
yboa
r
d
,
t
a
p
th
e
ap
propriat
e
butt
o
n
.
F
or
a
demonstra
t
ion,
ta
p
Help
,
then
tap
S
how
m
e
h
o
w
t
o
e
n
te
r
tex
t
.
F
or
mor
e
inf
or
mation
a
bout
using
I
npu
t
P
a
nel
,
see
the
I
n
put
P
a
nel
Help
.
C
o
nfiguring
pen
options
Y
o
u
ca
n
u
s
e
pe
n
op
tion
s
t
o
e
n
abl
e
or
disa
bl
e
the
pen
func
t
ion
butt
on
and
the
pen
eraser
.
C
o
nfiguring
pen
options
T
o
c
o
nfigur
e
pen
options
1.
Open
Mo
tion
Da
shboa
r
d
t
o
the
Pe
n
&
D
i
g
i
t
i
z
e
r
p
a
n
e
l
(
p
a
g
e
22
)
.
2.
T
a
p
t
h
e
P
e
n
&
Button
O
p
tio
n
s
button.
3.
I
n
th
e
T
a
blet
an
d
P
e
n
S
e
ttin
g
s
w
i
ndow
,
t
a
p
th
e
Pe
n
O
p
t
i
o
n
s
ta
b
.
4
.
F
or
pe
n
butt
o
n
s
,
do
on
e
or
mor
e
of
th
e
f
o
ll
o
win
g:
•
T
o
enable
the
pen
butt
on,
selec
t
U
s
e
pen
b
u
tt
o
n
t
o
righ
t-
c
l
i
c
k
.
•
T
o
e
n
a
b
l
e
th
e
er
a
s
er
,
selec
t
U
s
e
t
o
p
of
pen
t
o
er
ase
(wher
e
av
ail
a
ble)
.
24
Ch
apter
3
Using
your
T
a
b
l
e
t
PC

Enabling
personaliz
ed
handwriting
r
e
c
o
gnition
Y
o
u
ca
n
u
s
e
the
T
a
bl
e
t
PC
S
e
ttings
wind
o
w
t
o
en
a
b
le
per
s
o
n
a
li
z
e
d
ha
nd
writing
r
e
cog
nition.
T
o
enabl
e
personalize
d
han
dwr
it
in
g
rec
o
gni
t
ion
1
.
Open
Mo
tion
Dash
bo
ar
d
t
o
th
e
P
e
n
&
T
a
bl
et
pane
l
(
p
a
g
e
2
2)
.
2.
T
a
p
t
h
e
T
a
blet
PC
S
e
ttings
button.
3.
I
n
the
T
a
blet
PC
S
e
ttings
windo
w
,
ta
p
the
Handwri
t
ing
Re
c
o
gnition
tab
.
4.
S
e
l
ec
t
U
s
e
the
personal
iz
ed
r
e
c
ogniz
er
.
F
or
inf
or
mation
on
using
the
handwr
iting
pers
on
a
l
iz
a
t
ion
t
oo
l
,
see
“Using
pe
rso
n
a
l
iz
e
d
ha
ndwriting
r
e
cog
n
ition
”
on
page
25.
U
s
ing
personaliz
ed
handwriting
r
e
c
o
gnition
A
f
t
e
r
y
o
u
h
a
v
e
en
a
b
le
d
pe
rso
n
a
l
iz
ed
ha
n
d
writing
r
ec
o
gn
itio
n,
y
o
u
c
a
n
use
th
e
Ha
nd
writing
persona
lization
t
o
ol
t
o
impr
ov
e
y
our
handwr
iting
r
ec
o
gn
ition
r
e
sults
.
T
o
u
s
e
the
Handwriting
r
e
c
o
gnition
personaliza
tion
t
o
ol
1.
Ope
n
I
n
put
P
a
n
e
l
(page
24
)
.
2.
T
a
p
To
o
l
s
,
then
tap
P
e
rs
onali
ze
Ha
ndwr
it
in
g
R
e
c
o
gn
iti
o
n
.
3.
F
o
ll
o
w
th
e
in
struc
t
io
ns
in
the
Handwr
iting
personalization
t
o
ol
.
C
o
nfiguring
fr
ont
panel
butt
ons
A
s
y
o
u
bec
ome
mor
e
familiar
with
y
our
T
a
bl
e
t
PC
,
y
o
u
may
wa
n
t
to
custo
m
iz
e
the
button
s
on
th
e
fr
ont
pane
l
.
Y
o
u
can
c
o
nfigur
e
t
h
e
buttons
to
star
t
y
our
fa
vor
i
te
progr
a
m,
r
un
a
co
mm
a
n
d,
or
e
nte
r
a
key
combina
t
ion.
Came
ra
Mo
tion
Q
u
ickNa
v
Dash
board
Esc
Dir
ec
t
ional
pad
Ch
apter
3
Using
your
T
a
b
l
e
t
PC
25

C
o
nfiguring fr
ont
panel
buttons
T
o
ch
ange
the
fr
on
t
panel
butt
ons
1
.
Open
Mo
tion
Dash
bo
ar
d
t
o
th
e
P
e
n
&
T
a
bl
et
pane
l
(
p
a
g
e
2
2)
.
2.
T
a
p
t
h
e
T
a
blet
PC
S
e
ttings
butt
on.
3.
I
n
the
T
a
blet
PC
S
e
ttings
windo
w
,
ta
p
the
Butt
on
s
tab
.
4
.
Se
le
c
t
th
e
bu
tt
o
n
c
o
mbin
a
t
ion
y
o
u
w
a
n
t
t
o
c
h
a
n
ge
.
T
h
e
cu
rr
en
tl
y
se
l
ec
t
e
d
b
u
tt
on
s
appear
in
r
e
d.
5.
T
a
p
Change
.
6
.
Se
le
c
t
th
e
a
p
pr
o
p
ria
t
e
actio
n
f
or
th
e
bu
tt
o
n
.
F
or
some
ac
tions
,
y
o
u
must
en
t
e
r
mor
e
inf
ormat
io
n,
suc
h
a
s
th
e
l
o
c
a
tion
o
f
a
p
r
og
r
a
m
t
o
star
t
.
Y
o
u
can
selec
t
an
ac
tion
f
or
Pre
ss
and
ano
t
he
r
f
or
Pr
ess
and
hold
.
F
or
mo
r
e
inf
ormation,
tap
Wha
t
is
pr
ess
and
ho
l
d
?
Us
i
n
g
U
S
B
Y
o
u
can
use
th
e
t
w
o
integrated
USB
2.0
po
r
t
s
to
c
o
nn
ec
t
USB
devices,
such
as
digita
l
ca
meras
,
print
e
rs
,
ex
t
e
rnal
st
or
a
g
e
devices
,
ke
yboa
r
d
s
,
a
n
d
mice
.
USB
devices
t
ypical
ly
use
po
w
e
r
fr
om
the
c
o
mp
ut
er
,
so
y
o
u
should
u
s
e
A
C
pow
e
r
or
ha
v
e
adequat
e
batt
ery
po
w
e
r
while
y
o
u
a
r
e
using
USB
devic
es
.
T
o
use
a
USB
devic
e
,
c
o
nnec
t
the
device
t
o
the
USB
po
r
t
( )
on
the
side
of
th
e
T
a
ble
t
PC.
Whe
n
y
o
u
con
n
ec
t
a
USB
device
,
th
e
T
a
ble
t
PC
r
ec
o
gnizes
it
and
lo
ads
th
e
a
ppr
o
p
r
i
ate
device
driv
er
.
Y
o
u
can
connec
t
and
disc
onnec
t
USB
devices
without
shutting
do
wn
y
our
co
m
p
u
t
e
r
.
Us
i
n
g
Et
h
e
r
n
e
t
Y
o
u
can
use
th
e
inte
gra
t
e
d
10
/1
00/
1000
Base
-
T
Ethe
r
n
e
t
po
r
t
(RJ-4
5
)
to
c
o
nn
ec
t
to
a
n
E
t
he
r
n
e
t
n
e
tw
ork
,
high
-spee
d
modem,
or
another
c
o
mput
e
r
.
T
o
c
o
nn
ec
t
to
an
Ethe
r
n
e
t
n
e
t
w
or
k
or
dev
i
ce
,
co
nne
c
t
th
e
Eth
e
r
net
cabl
e
to
th
e
Eth
e
r
net
por
t
(
)
o
n
t
h
e
le
f
t
side
o
f
the
T
a
ble
t
PC
.
U
s
ing
the
display
Use
t
h
e
pr
oc
edur
es
in
this
sec
t
ion
t
o
cust
om
iz
e
y
our
display
settings
.
Y
o
u
can
adjust
the
brightne
ss
le
v
e
l
,
rotate
th
e
di
spl
a
y
,
a
n
d
change
th
e
order
in
wh
ich
th
e
displ
a
y
rota
t
e
s
.
26
Ch
apter
3
Using
your
T
a
b
l
e
t
PC
A
d
justing
the
display
brightness
Use
t
h
is
pr
ocedur
e
to
chang
e
th
e
br
igh
t
ne
ss
of
th
e
displ
a
y
.
T
o
adjust
the
displ
ay
brightness
1.
Ope
n
Mo
tio
n
Da
shboa
r
d
to
the
Display
pane
l
(
p
a
g
e
2
2)
.
2
.
Se
t
th
e
Brigh
t
n
e
ss
sl
ider
t
o
the
a
pp
ropria
t
e
l
e
v
e
l
.
F
or
optima
l
batt
ery
c
o
nser
vation
and
viewa
bi
lit
y
,
set
the
brightness
scale
to
the
mid-
point
or
slightly
abo
v
e
.
3
.
Se
le
c
t
on
e
of
th
e
f
o
ll
o
w
i
ng:
•
Fi
xe
d
.
S
e
ts
the
display
brightness
t
o
a
c
o
nsta
nt
l
e
v
e
l
.
U
s
e
th
e
sl
ider
t
o
adj
u
st
the
display
t
o
the
desi
r
e
d
brightness
lev
e
l
.
T
h
e
a
mbien
t
light
sensor
is
not
used
with
fix
e
d
brightne
ss
.
•
Dyna
mi
c
.
U
s
es
the
ambient
li
gh
t
sensor
t
o
main
tain
an
ap
propriat
e
br
igh
t
ne
ss
le
v
e
l
f
or
th
e
cu
rr
en
t
li
gh
ting
c
o
nditio
ns
.
U
s
ing
dyn
a
mic
brigh
t
ne
ss
he
lp
s
t
o
r
e
duc
e
po
w
e
r
consumption
w
h
il
e
r
unn
in
g
o
n
batte
r
y
po
w
e
r
.
Rotating
the
display
Y
o
u
can
easil
y
cha
n
ge
th
e
scr
ee
n
or
ie
n
t
ation
to
fit
y
our
curr
ent
ta
sk
.
Y
o
u
may
want
t
o
use
th
e
po
r
t
r
a
it
orie
n
t
a
t
ion
f
or
filli
ng
ou
t
f
o
rms
or
r
e
a
din
g
a
n
e
-
bo
ok
.
A
t
o
t
he
r
times
,
y
o
u
may
want
a
la
ndscape
or
ientation
f
or
We
b
br
o
w
sin
g
or
sketchin
g
.
T
o
r
o
tate
the
dis
pla
y
1.
Ope
n
Mo
tio
n
Da
shboa
r
d
to
the
Display
pane
l
(
p
a
g
e
2
2)
.
2.
T
a
p
t
h
e
Rota
te
butt
on.
Not
e
:
I
f
y
o
u
cha
n
ge
the
scr
e
en
orientation,
y
o
u
may
need
to
r
eca
libr
at
e
the
ta
blet
pen.
S
ee
“
C
alibra
t
e
the
digitiz
e
r
”
on
page
7.
Setting
up
an
e
x
t
e
rnal
display
I
f
y
o
u
want
mor
e
space
on
the
de
sk
top
,
or
th
e
flexibilit
y
of
multipl
e
mo
nito
rs
,
y
o
u
can
c
o
nn
ec
t
an
ex
t
e
r
n
al
display
,
such
as
a
mon
i
t
or
or
pr
o
j
ec
t
or
.
Y
o
u
c
a
n
ex
ten
d
your
d
i
s
p
lay
to
t
h
e
ex
te
r
n
a
l
m
o
ni
to
r
,
m
i
rror
your
d
i
s
p
lay
on
t
h
e
ex
tern
a
l
mo
nit
or
,
or
use
th
e
e
x
t
e
rn
al
mon
i
t
or
on
ly
.
Beca
u
s
e
the
ta
bl
et
pe
n
do
es
no
t
w
o
rk
o
n
th
e
e
x
t
e
rn
al
disp
la
y
,
y
o
u
sh
ou
ld
t
ypica
ll
y
use
a
key
b
o
a
r
d
an
d
mo
use
wh
en
y
o
u
h
a
v
e
a
n
e
x
t
e
rna
l
display
atta
ch
ed.
T
o
set
u
p
an
e
x
t
e
rnal
mo
nit
o
r
1.
C
o
nn
ec
t
the
mon
i
tor
cable
into
the
ap
propr
i
ate
displ
a
y
po
r
t
on
the
F
l
exDo
ck
.
Use
th
e
VGA
po
r
t
to
c
o
nn
ec
t
to
t
h
e
ex
te
r
n
al
mon
ito
r
.
2.
Plug
in
th
e
ex
tern
al
mon
i
tor
an
d
tur
n
it
o
n
.
Ch
apter
3
Using
your
T
a
b
l
e
t
PC
27

3.
I
f
necessar
y
,
install
sof
t
war
e
and
driv
er
s
f
or
th
e
mo
nit
or
.
Se
e
the
man
ufa
c
t
ur
er’
s
documentation
f
or
mor
e
inf
ormation.
4.
Ope
n
Mo
tio
n
Da
shboa
r
d
to
the
Display
pane
l
(
p
a
g
e
2
2)
.
5.
F
or
Di
sp
l
ay
Sc
he
m
e
,
selec
t
o
n
e
of
th
e
f
o
ll
o
wing
:
•
Mi
rr
o
r
Di
sp
l
ay
.
Duplica
t
es
the
T
a
blet
PC
disp
la
y
on
the
ex
t
e
rnal
monit
or
or
pr
ojec
t
or
.
The
same
deskto
p
is
visible
o
n
bo
th
displa
ys
.
The
ex
tern
al
mon
i
tor
must
use
th
e
same
display
r
e
sol
u
t
i
on
as
th
e
T
a
ble
t
PC
.
Docu
m
e
n
t
Docu
m
e
n
t
Ta
b
l
e
t
PC
E
x
tern
a
l
m
o
n
i
tor
•
Ex
tended
with
Mo
nit
o
r
P
rimar
y
.
En
l
a
r
g
e
s
th
e
deskt
o
p
ar
ea
to
inc
l
u
d
e
the
e
x
t
e
r
n
a
l
mon
i
t
or
as
the
primar
y
mo
nitor
.
The
ex
t
e
rn
al
monitor
ca
n
use
a
diff
er
ent
displ
a
y
r
e
solution
than
the
T
a
blet
PC.
Spre
adsheet
Documen
t
Email
Ta
b
l
e
t
PC
E
x
te
r
n
a
l
m
o
ni
to
r
•
Ex
tended
with
T
a
blet
Primary
.
Enl
a
r
g
e
s
the
de
sktop
a
r
ea
to
include
t
h
e
ex
te
r
n
a
l
mon
i
t
or
as
the
seco
ndar
y
monitor
.
The
ex
t
e
rn
al
mon
i
t
or
can
use
a
diff
er
ent
displ
a
y
r
e
solution
than
the
T
a
blet
PC.
•
Monit
o
r
Only
.
Uses
the
ex
ternal
monitor
only
.
•
T
a
blet
Only
.
U
s
e
s
th
e
T
a
blet
PC
display
o
n
ly
.
T
o
lea
r
n
mo
r
e
about
custom
mo
nito
r
sche
me
s
,
go
to
www
.
m
otio
nc
ompu
ting
.c
om/tips
.
U
s
ing
the
built-in
micr
ophones
Y
o
u
can
use
th
e
built-in
micr
oph
one
s
to
r
e
cor
d
audio
,
dic
t
a
t
e
n
o
te
s
,
and
use
voice
c
o
mm
an
ds.
The
t
w
o
m
i
cr
oph
o
n
e
s
a
r
e
u
s
ed
at
th
e
same
time
t
o
optimiz
e
sound
det
ec
t
ion
f
or
speech
r
e
cog
n
ition
and
vo
ic
e
r
e
cor
ding
.
28
Ch
apter
3
Using
your
T
a
b
l
e
t
PC
C
o
nnec
ting
headphones
,
ex
ternal
speakers
,
or
a
microphone
Y
o
u
can
c
o
nn
ec
t
h
e
adph
on
es
or
e
x
tern
al
speake
rs
to
the
he
adpho
n
e
s
por
t
using
a
3
.
5
mm
plug
.
When
speake
rs
or
he
adpho
n
e
s
ar
e
conn
ec
te
d
,
the
inte
r
n
al
spea
ker
s
ar
e
disable
d
.
Y
o
u
can
c
o
nn
ec
t
a
n
ex
tern
al
micr
oph
o
n
e
or
headset
to
the
micro
p
hon
e
po
r
t
using
a
3.5
mm
plug
.
When
a
micr
opho
ne
is
con
n
ec
ted,
th
e
in
tern
al
micr
oph
o
n
e
s
a
r
e
disable
d
.
U
s
ing
speech
r
e
c
o
gnition
Y
o
u
can
use
speech
r
e
cog
n
ition
to
int
e
r
a
c
t
wi
t
h
your
T
a
bl
et
PC
by
vo
ice.
Y
o
u
c
a
n
dic
t
ate
do
cume
n
t
s
an
d
ema
il
s
,
or
use
vo
ic
e
c
omma
n
ds
t
o
c
o
n
t
ro
l
pr
o
g
r
a
ms
.
•
Dic
t
a
t
i
o
n
mode
.
W
ith
Dic
t
a
t
ion
mode
,
y
o
u
r
c
o
mp
ut
er
li
sten
s
t
o
ever
yth
i
ng
y
o
u
sa
y
a
n
d
co
n
v
er
t
s
your
word
s
to
tex
t
.
Y
o
u
c
a
n
u
s
e
d
i
c
t
a
t
i
o
n
m
o
d
e
to
e
nte
r
tex
t
d
i
r
ec
t
ly
i
n
to
a
n
y
document
or
t
e
x
t
bo
x.
•
Vo
ic
e
c
o
mmand
mo
de
.
W
ith
V
o
ic
e
c
ommand
mode
,
y
our
c
o
mp
ut
er
list
ens
f
or
specific
w
or
d
s
that
c
orr
espond
to
a
list
of
a
v
ailable
vo
ic
e
c
o
mm
ands
.
Y
o
u
can
use
c
o
mmands
t
o
switc
h
bet
w
een
prog
r
a
m
s
,
sa
v
e
do
cu
ments
,
c
o
p
y
,
past
e
,
or
undo
.
S
e
tting
up
speech
r
e
cog
n
ition
Bef
or
e
y
o
u
can
use
speech
r
ec
o
gnition,
y
o
u
must
c
o
n
f
igur
e
the
micro
p
ho
ne
s
an
d
tr
a
i
n
the
sy
st
em
f
or
the
char
ac
t
e
ristics
of
y
our
vo
ice
.
Y
o
u
can
also
tak
e
t
h
e
speech
tut
o
ria
l
to
learn
how
to
t
a
lk
to
y
o
u
r
com
p
ute
r
.
S
etting
up
the
micr
ophones
Bef
or
e
y
o
u
star
t
this
pr
oc
edur
e
,
ensur
e
that
y
o
u
ha
v
e
se
t
up
th
e
a
n
gle
o
f
acce
pt
ance
and
skew
angle
(p
age
28).
F
or
best
r
esu
lts
,
mo
v
e
t
o
a
qu
iet
en
vironment.
T
o
s
e
t
u
p
the
microphones
1.
I
n
C
ontr
o
l
P
a
ne
l
,
o
p
e
n
Spee
ch
Re
c
o
gnitio
n.
2.
T
a
p
S
e
t
up
micr
ophone
.
3.
I
f
y
o
u
ar
e
usin
g
th
e
inte
gra
t
e
d
T
a
bl
et
PC
micro
p
ho
ne
arra
y
,
selec
t
Oth
e
r
.
4.
F
o
ll
o
w
th
e
in
struc
t
io
ns
in
the
setup
prog
ram.
If
the
micro
p
ho
ne
s
ar
e
set
t
o
a
n
a
p
pr
o
p
ria
t
e
l
e
v
e
l
,
th
e
met
e
r
wi
ll
sta
y
in
the
gr
ee
n
z
o
n
e
wh
ile
y
o
u
r
e
ad
th
e
sente
n
ces.
I
f
th
e
le
v
e
l
is
too
lo
w
or
too
high
,
use
Mo
tion
Dashbo
ar
d
to
adj
u
st
the
le
v
e
l
(
p
age
22
)
.
T
rain
y
our
c
omput
er
to
r
ec
o
gnize
y
our
speech
Use
t
h
is
pr
ocedur
e
to
impr
ov
e
y
our
co
mpute
r
’
s
abilit
y
to
un
der
s
tand
y
our
vo
ice
.
T
o
tr
ain
your
c
o
mputer
to
r
e
c
ognize
your
speech
1.
I
n
C
ontr
o
l
P
a
ne
l
,
o
p
e
n
Spee
ch
Re
c
o
gnitio
n.
Ch
apter
3
Using
your
T
a
b
l
e
t
PC
29

2.
T
a
p
T
rain
your
c
o
mputer
to
bett
er
understa
nd
you
.
3.
F
o
ll
o
w
th
e
in
struc
t
io
ns
in
the
setup
prog
ram.
T
a
k
i
ng
the
Speech
T
utorial
Y
o
u
ca
n
u
s
e
the
Sp
ee
ch
T
u
t
o
rial
to
le
a
r
n
ba
sic
c
omma
nds
a
n
d
dic
t
a
t
io
n.
T
h
e
Spee
ch
T
u
to
r
i
a
l
t
a
k
e
s
a
b
ou
t
30
m
i
nute
s
to
co
m
p
l
et
e
.
T
o
tak
e
the
speech
tutorial
1.
I
n
C
ontr
o
l
P
a
ne
l
,
o
p
e
n
Spee
ch
Re
c
o
gnitio
n.
2.
T
a
p
T
a
k
e
Speech
T
u
t
o
rial
.
3.
F
o
ll
o
w
th
e
in
struc
t
io
ns
in
the
t
utorial
prog
ram.
U
s
ing
Dic
t
ation
and
V
o
ic
e
C
o
mmands
Af
te
r
y
o
u
have
se
t
up
spee
ch
r
ec
o
gnitio
n,
y
o
u
can
star
t
it
fr
o
m
C
ontr
o
l
P
a
ne
l
.
T
o
u
s
e
Di
c
t
a
t
ion
and
Vo
ic
e
C
ommands
1.
I
n
C
ontr
o
l
P
a
ne
l
,
o
p
e
n
Spee
ch
Re
c
o
gnitio
n.
2.
T
a
p
Star
t
Speech
Rec
o
gnition
.
3.
Ensure
that
th
e
Speech
R
ec
o
gnitio
n
wind
o
w
is
o
p
e
n
and
listen
ing
.
4.
Do
o
n
e
of
th
e
f
o
llowin
g
:
•
F
or
voice
comma
nds
,
sa
y
the
ap
propriat
e
c
ommand.
F
or
a
list
of
comma
n
ds
,
sea
r
ch
W
i
n
d
o
w
s
He
lp
an
d
Sup
p
or
t
f
or
“
s
pee
c
h
comma
nds
”
.
•
F
or
dic
t
ation
,
o
p
en
the
pr
ogram
y
o
u
want
to
use
an
d
star
t
spea
k
i
ng
.
F
or
mor
e
inf
or
mation
about
speech
r
ec
o
gn
it
ion,
sear
ch
W
i
ndo
w
s
Help
and
Sup
p
or
t
f
or
“
s
peech
r
ec
o
gn
ition
”
.
U
s
ing
pow
e
r
plans
T
h
e
J3
400
in
cludes
a
compr
e
he
nsive
suite
o
f
p
o
w
e
r
management
fu
nc
tions
.
By
using
po
w
e
r
plans
,
y
o
u
can
maximiz
e
sys
t
em
per
f
orma
nc
e
,
sa
v
e
e
n
e
rgy
,
or
ge
t
th
e
mo
st
f
r
om
a
single
charge
.
30
Ch
apter
3
Using
your
T
a
b
l
e
t
PC
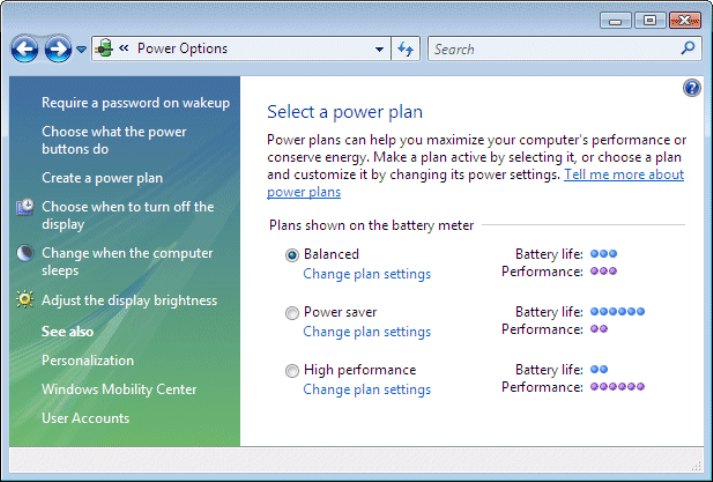
Selec
t
ing
a
pow
e
r
plan
Use
t
h
is
pr
ocedur
e
to
ch
oo
se
a
mong
the
B
a
lan
c
ed
,
P
o
w
e
r
sa
v
e
r
,
or
H
i
gh
per
f
or
mance
po
w
e
r
plans
.
T
o
sel
e
c
t
a
pow
e
r
plan
1.
Ope
n
Mo
tio
n
Da
shboa
r
d
to
the
P
o
w
e
r
panel
(page
2
2).
2.
T
a
p
t
h
e
Po
w
e
r
O
p
t
i
o
n
s
bu
tt
on.
3.
On
t
h
e
P
o
w
e
r
Option
s
page
,
selec
t
a
po
w
e
r
pla
n
.
F
or
inf
or
mation
a
bout
cr
eating
a
cust
om
pow
e
r
plan
,
se
e
“
C
r
e
ating
a
pow
e
r
plan
”
o
n
page
32.
Chang
i
ng pow
e
r
plan
settings
Y
o
u
can
edit
t
h
e
par
t
icular
se
tting
s
of
an
existin
g
po
w
e
r
pl
an.
T
o
cr
e
a
te
y
our
o
w
n
po
w
e
r
plan
,
se
e
“
C
r
e
ating
a
pow
e
r
plan
”
on
page
32
.
T
o
change
pow
e
r
plan
settings
1.
Ope
n
Mo
tio
n
Da
shboa
r
d
to
the
P
o
w
e
r
panel
(page
2
2).
2.
T
a
p
t
h
e
Po
w
e
r
O
p
t
i
o
n
s
bu
tt
on.
3.
On
the
P
o
w
e
r
Options
p
a
ge
,
tap
Change
plan
settings
f
or
t
h
e
pl
an
y
o
u
w
a
n
t
t
o
change
.
4
.
C
h
oo
s
e
t
h
e
s
e
tt
i
ng
s
t
h
a
t
yo
u
wa
n
t
yo
u
r
co
m
p
u
t
e
r
to
us
e.
Y
o
u
ca
n
a
l
s
o
t
a
p
Change
adv
a
nc
ed
pow
e
r
settings
f
or
mor
e
op
tion
s
.
Ch
apter
3
Using
your
T
a
b
l
e
t
PC
31
Cr
ea
ting
a
pow
e
r
plan
I
f
th
e
existing
pow
e
r
plan
s
ar
e
no
t
sufficient,
y
o
u
can
cr
e
a
te
y
our
o
w
n
pow
e
r
plan
.
T
o
cr
ea
t
e
a
pow
e
r
plan
1.
Ope
n
Mo
tio
n
Da
shboa
r
d
to
the
P
o
w
e
r
panel
(page
2
2).
2.
T
a
p
t
h
e
Po
w
e
r
O
p
t
i
o
n
s
bu
tt
on.
3.
On
t
h
e
P
o
w
e
r
Option
s
page
,
tap
C
r
ea
t
e
a
pow
e
r
plan
.
4.
S
e
lec
t
t
h
e
existing
plan
tha
t
is
closest
t
o
the
plan
y
o
u
want
to
creat
e
.
5.
I
n
th
e
Pl
an
name
bo
x,
enter
a
n
a
me
f
or
th
e
pl
an
,
a
n
d
th
en
click
Ne
x
t
.
6
.
C
h
oo
s
e
t
h
e
s
e
tt
i
ng
s
t
h
a
t
yo
u
wa
n
t
yo
u
r
co
m
p
u
t
e
r
to
us
e,
t
h
e
n
cl
i
c
k
Cr
ea
te
.
Us
i
n
g
Sl
ee
p
Sleep
is
a
stat
e
in
which
y
our
display
and
ha
r
d
di
sks
turn
off
,
so
tha
t
y
our
comput
er
uses
less
po
w
e
r
.
W
h
en
y
o
u
want
to
use
the
c
o
mput
e
r
agai
n,
it
c
o
mes
o
u
t
of
Sl
ee
p
quick
l
y
,
al
tho
ugh
y
o
u
may
have
to
l
o
g
on
aga
i
n.
U
s
e
Sleep
t
o
sa
v
e
po
w
e
r
when
y
o
u
will
be
a
w
a
y
f
r
om
the
c
o
mput
e
r
f
or
a
shor
t
time
.
WA
R
N
I
N
G
:
Be
cause
Sl
ee
p
doe
s
n
o
t
sa
v
e
y
our
deskto
p
stat
e
t
o
disk
,
a
po
w
e
r
failur
e
while
on
Sleep
c
a
n
cause
y
o
u
t
o
lose
unsa
v
e
d
inf
ormation.
Us
i
n
g
S
l
ee
p
T
o
put
your
c
o
mputer
on
S
leep
1.
Ope
n
Mo
tio
n
Da
shboa
r
d
to
the
P
o
w
e
r
panel
(page
2
2).
2
.
Do
on
e
or
mor
e
of
th
e
f
o
ll
o
w
i
ng:
•
Fo
r
P
o
wer
S
witch
on
batter
y
,
selec
t
S
leep
.
•
Fo
r
P
o
w
e
r
S
w
i
t
c
h
pl
u
gge
d
i
n
,
selec
t
Sleep
.
3
.
T
o
p
u
t
y
our
c
o
m
p
ut
er
on
Sl
ee
p
,
p
r
ess
th
e
po
w
e
r
butt
on
.
T
o
turn
y
o
u
r
c
o
mput
e
r
back
on,
pr
ess
the
po
w
e
r
butt
on.
U
s
ing
H
i
berna
t
e
H
i
bernation
is
a
stat
e
in
which
y
our
comput
er
shuts
do
wn
t
o
sa
v
e
pow
e
r
but
first
s
a
v
e
s
ever
yth
i
ng
in
me
mor
y
on
y
our
ha
r
d
disk
.
When
y
o
u
r
e
star
t
the
c
o
mputer
,
y
o
u
r
deskt
o
p
is
r
e
sto
r
e
d
exac
t
ly
as
y
o
u
lef
t
it.
U
s
e
h
i
ber
nation
to
save
pow
e
r
wh
en
y
o
u
w
ill
be
away
fr
om
the
c
o
mput
e
r
f
or
an
ex
t
e
nded
time
.
32
Ch
apter
3
Using
your
T
a
b
l
e
t
PC

H
i
bern
ation
ha
s
th
e
f
o
ll
o
wing
adva
n
t
ages
ov
e
r
Sle
e
p:
•
H
i
ber
n
at
e
sa
ves
the
stat
e
of
th
e
deskt
o
p
and
ap
pl
icatio
ns
•
H
i
ber
n
ate
co
nsumes
n
o
batte
r
y
po
w
e
r
•
W
h
en
y
o
u
r
e
turn
fr
o
m
the
H
i
be
rna
t
e
sta
t
e
,
y
o
u
r
e
turn
t
o
w
h
e
r
e
y
o
u
w
e
r
e
wh
en
y
o
u
enter
e
d
h
i
ber
n
a
t
io
n.
U
s
ing
H
i
bernation
T
o
put
your
c
o
mputer
on
Hiberna
t
e
1.
Ensure
that
H
i
bernat
e
is
e
n
able
d
.
2.
Ope
n
Mo
tio
n
Da
shboa
r
d
to
the
P
o
w
e
r
panel
(page
2
2).
3
.
Do
on
e
or
mor
e
of
th
e
f
o
ll
o
w
i
ng:
•
Fo
r
P
o
wer
S
witch
on
batter
y
,
selec
t
Hiberna
t
e
.
•
Fo
r
P
o
w
e
r
S
w
i
t
c
h
pl
u
gge
d
i
n
,
selec
t
Hibern
a
t
e
.
4.
T
o
p
u
t
y
our
c
o
m
p
ut
er
on
H
i
berna
t
e
,
pr
ess
the
po
w
e
r
b
u
tton.
T
o
turn
y
o
u
r
c
o
mput
e
r
back
on,
pr
ess
the
po
w
e
r
butt
on.
U
s
ing
the
batter
y
T
h
e
T
a
blet
PC
runs
on
ba
tter
y
pow
e
r
when
it
is
not
plugged
in.
T
h
e
ba
tt
ery
,
included
with
the
T
a
bl
et
PC
,
is
insta
lle
d
o
n
th
e
back
of
th
e
table
t
.
T
o
incr
ease
y
our
ba
tt
ery
lif
e
,
y
o
u
can
in
stal
l
a
sec
o
n
d
batt
ery
in
any
of
th
e
t
w
o
batt
e
r
y
bay
s
.
I
f
a
secon
d
batter
y
is
no
t
in
stal
led,
a
ba
tte
r
y
bay
ca
r
t
r
i
dge
(n
on-fun
c
t
ioning
)
is
pr
ovided
t
o
o
c
cu
p
y
th
e
sec
o
n
d
ba
tt
ery
bay
.
F
or
mor
e
inf
ormation,
go
t
o
t
h
e
Mo
ti
on
C
o
mputing
accessories
page
a
t
www
.
m
o
tio
n
com
p
u
t
ing
.com
/
a
c
cesso
r
i
es
.
Check
i
ng
ba
tt
ery
pow
e
r
Y
o
u
can
check
the
r
e
maining
batt
ery
po
w
e
r
fr
om
Mo
tion
Dash
bo
ar
d
,
fr
om
the
batt
ery
icon
in
the
notification
a
r
ea,
or
fr
om
the
batt
ery
itself
.
T
o
check
the
r
e
m
a
ining
ba
tt
er
y
pow
e
r
•
Open
Mo
tion
Dashboar
d
t
o
the
P
o
w
e
r
panel
(page
2
2).
Y
o
u
ca
n
also
place
the
point
e
r
ov
er
the
batt
ery
ic
on
in
the
notification
a
r
ea.
The
ba
tt
ery
icon
pr
ovides
a
g
r
aphical
r
e
pr
esen
ta
tion
of
the
r
e
maining
batt
ery
p
o
w
e
r
.
If
t
w
o
batt
eries
ar
e
insta
lled
,
the
po
w
e
r
r
e
ading
is
the
cu
mulativ
e
char
g
e
of
both
ba
tteries
.
Ch
apter
3
Using
your
T
a
b
l
e
t
PC
33

F
or
each
batt
ery
,
y
o
u
can
check
t
h
e
r
e
maining
batt
ery
po
w
e
r
fr
om
the
ba
tter
y
it
self
.
T
o
check
the
ba
tt
er
y
gauge
on
the
ba
tt
er
y
•
L
o
cat
e
the
batt
ery
gauge
but
t
on
and
the
ba
tt
ery
po
w
e
r
indicator
lights
and
pr
ess
the
ba
tter
y
g
a
uge
butt
on.(page
35).
The
indicator
lights
s
h
o
w
the
r
e
maining
charge
.
Each
light
r
e
pr
e
s
ents
a
p
pr
oximately
20
%
of
th
e
a
v
ail
a
ble
ch
ar
ge
.
Charging
the
batter
y
W
h
en
th
e
T
a
ble
t
PC
is
c
o
nn
ecte
d
t
o
A
C
p
o
w
e
r
,
the
ba
tter
y
a
u
t
o
matica
lly
cha
r
ges
until
it
r
e
a
c
h
e
s
ful
l
c
h
a
r
ge
,
even
if
th
e
T
a
bl
et
PC
is
be
ing
used
.
I
f
t
w
o
batt
eries
ar
e
i
n
stalled,
the
ba
tter
y
with
the
lo
w
e
st
batt
ery
po
w
e
r
char
ges
first,
t
h
en
th
e
sec
o
n
d
ba
tt
ery
ch
a
r
ge
s
.
T
h
e
ch
a
r
gi
ng
sequ
en
ce
is
sta
g
ge
r
e
d
t
o
en
sur
e
th
a
t
both
ba
tteries
get
as
close
t
o
being
full
y
ch
ar
ge
d
at
ne
ar
l
y
th
e
same
time
as
possible
.
T
h
e
first
b
a
tt
e
r
y
(
w
i
t
h
l
owe
s
t
r
e
m
a
i
n
i
ng
p
ower
)
c
h
a
r
g
e
s
to
t
h
e
90
%
l
e
ve
l,
f
o
ll
owe
d
by
t
h
e
s
e
co
n
d
ba
tter
y
char
g
i
ng
t
o
the
100%
lev
e
l
.
Then,
the
ta
blet
swit
ches
t
o
the
first
running
ba
tter
y
.
When
running
on
ba
tter
y
pow
e
r
,
the
ba
tt
ery
with
th
e
l
o
w
e
st
r
e
ma
ining
po
w
e
r
dis
c
ha
r
g
es
fi
rst,
then
the
second
ba
tt
ery
discha
r
g
es
.
F
or
inf
or
mation
a
bout
the
batt
ery
status
lig
h
t,
see
“Batt
e
r
y
status
light”
on
page
12.
C
A
UTION:
T
o
a
v
oid
injur
y
,
keep
the
batt
ery
within
the
r
ec
ommended
t
e
mpera
tur
e
r
a
nge
while
it
is
char
g
i
ng
.
I
f
the
ba
tt
ery
has
been
subjec
t
e
d
t
o
a
hot
en
vir
onment
,
wait
un
t
il
it
co
o
l
s
to
roo
m
tem
p
e
ra
t
u
re
b
e
f
or
e
re
c
h
a
r
gi
ng
i
t
.
F
or
mo
re
i
n
f
or
m
a
t
i
o
n
,
s
ee
t
h
e
S
a
f
e
t
y
a
n
d
Regula
tor
y
Guide
included
with
the
T
a
blet
PC.
Battery
and
pow
e
r
management
tips
•
T
o
l
e
ng
th
en
th
e
ba
tt
ery’
s
usa
b
l
e
lif
e
,
use
A
C
po
w
e
r
wh
en
y
o
u
ca
n
.
T
h
e
ba
tt
e
r
y
wil
l
ch
ar
ge
a
u
t
o
m
a
tica
ll
y
wh
il
e
y
o
u
r
un
on
A
C
po
w
e
r
,
so
l
e
a
v
e
th
e
b
a
tt
ery
in
the
ta
bl
et
wh
il
e
y
o
u
a
r
e
wo
r
k
i
ng
.
•
F
or
optimal
batt
ery
lif
e
,
use
A
C
po
w
e
r
when
using
a
CD
or
DVD
pla
yer
.
•
W
h
en
running
on
ba
tt
ery
po
w
e
r
,
plac
e
the
syst
em
in
H
i
ber
n
ate
or
Slee
p
mo
de
if
y
o
u
ar
e
go
ing
t
o
le
a
v
e
it
un
a
tt
e
nde
d
f
or
mo
r
e
tha
n
a
f
e
w
minu
t
e
s
(
p
age
32
)
.
•
Remember
tha
t
the
display
,
p
r
oc
essor
,
PC
Car
d
s
,
wir
e
less
car
d
s
,
an
d
accesso
r
y
driv
e
s
a
ll
dr
a
w
on
the
ba
tter
y
,
so
adjust
pr
oper
ties
and
disable
unused
ac
cess
ories
while
running
on
batter
y
pow
e
r
.
•
When
running
on
ba
tter
y
pow
e
r
,
a
d
just
th
e
display
brightness
t
o
a
dimmer
setting
and
enable
D
ynamic
br
ightn
e
ss
.
S
ee
“
A
djusting
th
e
displ
a
y
br
ightn
e
ss
”
on
page
27
.
•
T
u
r
n
off
w
i
r
e
le
ss
devices
wh
en
th
ey
ar
e
no
t
bein
g
used.
34
Ch
apter
3
Using
your
T
a
b
l
e
t
PC

Remo
ving
and
r
e
placing
the
batt
ery
Y
o
u
ca
n
r
e
mo
v
e
the
b
a
tt
ery
t
o
ch
ec
k
th
e
r
e
main
in
g
po
w
e
r
,
or
t
o
r
e
pl
ace
it
with
a
f
u
ll
y
ch
ar
ge
d
b
a
tter
y
.
T
o
r
e
m
ove
the
ba
tter
y
1.
Ensure
that
the
T
a
blet
PC
is
plu
gged
in
to
A
C
po
w
e
r
or
turned
off
.
2.
T
u
r
n
the
T
a
bl
et
PC
ov
er
so
th
a
t
the
back
side
is
up
.
3.
F
or
the
batt
ery
y
o
u
wa
n
t
t
o
r
e
mo
v
e
,
slide
the
batt
ery
r
elease
switch
until
the
batt
ery
is
par
t
ially
ejec
ted
,
and
then
pull
t
h
e
ba
tt
ery
out
of
t
h
e
ba
tter
y
bay
.
Bat
t
ery
r
e
le
ase
switch
(r
ight
batte
r
y
)
Ba
tt
ery
r
e
le
a
s
e
swit
c
h
(l
e
f
t
ba
tt
e
r
y
)
T
o
r
e
plac
e
the
ba
tter
y
•
F
or
the
ba
tter
y
y
o
u
want
t
o
insta
ll
,
pla
ce
the
t
w
o
tabs
of
the
batt
ery
int
o
the
t
w
o
slots
in
the
batter
y
bay
,
a
n
d
th
en
pr
ess
t
h
e
oth
e
r
e
n
d
of
the
ba
tt
ery
in
t
o
the
batt
ery
bay
until
y
o
u
hear
a
click
or
f
eel
th
e
batt
ery
l
o
c
k
in
t
o
p
l
ace
.
S
w
apping
t
h
e
ba
tt
ery
Y
o
u
ca
n
sw
ap
a
ba
tt
e
r
y
wh
il
e
th
e
tabl
e
t
is
o
n
an
d
r
unn
in
g
on
ba
tte
r
y
po
w
e
r
o
n
l
y
if
y
o
u
ha
v
e
a
sec
ond
batt
ery
t
o
r
e
plac
e
the
batt
ery
tha
t
is
low
on
po
w
e
r
.
T
o
sw
ap
a
ba
tt
er
y
with
a
tablet
c
o
ntaining
a
ba
tt
er
y
and
ba
tt
er
y
ba
y
car
t
ridge
(non-
func
tionin
g)
•
If
y
our
tab
l
et
has
a
ba
tt
ery
and
ba
tt
ery
bay
car
t
r
i
dge
(n
on-fun
c
t
ion
i
ng)
in
stall
e
d
,
r
e
mo
ve
th
e
ba
tt
ery
bay
c
a
r
t
ridge
a
n
d
insta
ll
th
e
sec
ond
batter
y
.
F
or
inf
or
mation
about
r
e
moving
the
batt
ery
,
see
“Remo
ving
and
r
e
pla
c
ing
the
batt
ery
”
on
page
35.
T
o
sw
ap
a
ba
tt
er
y
with
a
tablet
c
o
ntaining
tw
o
ba
tt
eries
•
I
f
y
our
ta
blet
has
t
w
o
ba
tteries
insta
lled
,
r
e
mo
v
e
the
ba
tt
ery
with
the
lo
w
e
st
po
w
e
r
and
insta
ll
t
h
e
char
ged
batt
ery
in
t
h
e
other
batt
ery
bay
.
F
or
inf
or
m
a
t
ion
a
bout
r
e
moving
the
ba
tter
y
,
see
“Removing
and
r
e
placing
the
ba
tt
ery
”
on
page
35.
Ch
apter
3
Using
your
T
a
b
l
e
t
PC
35
T
o
det
e
rmine
which
batt
ery
needs
to
be
r
e
placed
,
see
“
C
heck
ing
batt
ery
po
w
e
r
”
on
page
33.
Impor
t
an
t:
U
s
e
o
n
ly
Mo
t
i
on
C
o
mputing
J-S
e
r
i
es
ba
tt
erie
s
w
ith
the
J
-
Series
T
a
bl
et
PC
.
Batt
e
r
y
maint
e
nance
T
o
maximiz
e
the
per
f
ormanc
e
of
the
tablet
batt
erie
s
,
deple
t
e
each
ba
tter
y’
s
ch
ar
ge
l
e
vel
to
le
ss
th
an
10
%
every
30
day
s
.
T
o
de
plete
the
ch
ar
ge
,
insta
ll
the
batte
r
y
on
th
e
table
t
an
d
use
the
ta
blet
without
A
C
pow
e
r
until
the
batt
ery
ch
a
r
g
e
i
s
d
e
p
l
e
t
e
d
t
o
l
e
ss
t
h
a
n
10
%
.
V
e
r
if
y
t
h
e
status
of
y
our
ba
tt
ery
using
the
batt
ery
icon
in
the
notification
a
r
ea
of
yo
u
r
t
a
b
l
e
t
d
e
s
k
to
p
.
Se
e
“
C
he
ck
in
g
b
a
tt
ery
po
w
e
r
”
on
p
a
ge
33
.
L
o
ng-t
er
m
batt
ery
stor
age
(not
attached
t
o
tablet)
Do
not
st
or
e
any
batt
eries
with
a
full
c
h
arge;
this
can
cause
a
permanen
t
loss
of
char
g
i
ng
c
a
pa
c
i
t
y
.
F
or
lo
ng-t
e
r
m
st
or
a
g
e
,
th
e
ba
tt
ery
sh
oul
d
be
ch
a
r
ge
d
t
o
a
l
e
v
e
l
b
e
tw
ee
n
20
%
an
d
40%
(tw
o
c
ontiguous
L
E
Ds
illuminat
e
d)
of
a
fu
ll
cha
r
ge
.
S
t
or
e
d
ba
tt
erie
s
sh
ou
ld
be
ch
ec
ked
every
90
day
s
to
de
term
in
e
the
charge
st
a
t
us
.
I
f
onl
y
one
LED
or
n
o
LED
is
illuminate
d
,
r
e
ch
a
r
ge
th
e
ba
tte
ries
t
o
a
le
v
e
l
be
t
w
ee
n
20
%
an
d
40
%.
F
or
optimum
care
,
st
or
e
the
batt
ery
in
a
c
o
ol
,
dr
y
en
vir
onment
.
Nev
e
r
expose
the
ba
tter
y
t
o
tem
p
e
ra
t
u
re
s
a
b
ov
e
60
º
C
(
140
º
F
)
.
Not
e
:
I
n
storage
,
the
bat
t
erie
s
w
ill
se
lf-
d
ischar
g
e
at
a
rate
o
f
10
%
of
th
e
tota
l
capacity
per
month
.
36
Ch
apter
3
Using
your
T
a
b
l
e
t
PC

Battery
fault
c
o
de
T
o
check
the
batt
ery
status
,
push
the
batt
ery
gauge
butt
on
nex
t
t
o
the
batt
ery
indicator
lights
.
I
f
the
t
o
p
,
middle
,
a
n
d
bott
om
lights
on
th
e
ba
tte
r
y
ill
umin
a
t
e
simu
ltan
e
o
u
s
ly
,
th
e
ba
tter
y
has
failed
and
must
b
e
r
e
placed
.
B
a
tt
ery
ga
uge
butt
on
Batte
r
y
po
w
e
r
in
dicator
li
ghts
I
f
th
e
thr
ee
in
dica
t
or
li
gh
ts
(in
d
ica
t
ed
with
a
rro
w
s
)
ar
e
il
lum
i
na
t
e
d
,
the
b
a
tt
ery
ha
s
fa
il
ed
a
n
d
must
be
r
e
pl
a
c
ed
.
Disposing
of
u
s
ed
ba
tt
eries
When
Lithium-ion
(Li-ion)
batt
er
ies
a
r
e
n
o
long
er
se
r
vicea
bl
e
,
the
batt
eries
should
be
sen
t
t
o
a
ha
za
r
d
ous
ma
t
e
rial
s
r
ec
y
c
l
in
g
ce
n
t
e
r
.
Do
n
o
t
discar
d
the
batt
eries
in
a
wast
e
r
e
ceptacle
because
they
c
o
uld
be
sent
t
o
a
landf
ill
.
T
roubleshooting
the
batt
ery
T
h
e
ba
tt
er
y
sta
t
us
light
on
the
T
a
blet
PC
is
glowing
amber
,
which
indica
t
e
s
tha
t
the
batter
y
is
char
ging
,
but
the
ba
tter
y
do
es
not
char
ge
.
•
T
h
e
sy
st
em
BIOS
and
Mo
tion
Dashboar
d
may
be
o
u
t
o
f
date
.
D
o
wn
lo
ad
t
h
e
late
st
dr
iver
s
an
d
BIOS
fr
om
www
.
m
otio
nc
ompu
ting
.c
om/suppor
t
.
Ch
apter
3
Using
your
T
a
b
l
e
t
PC
37
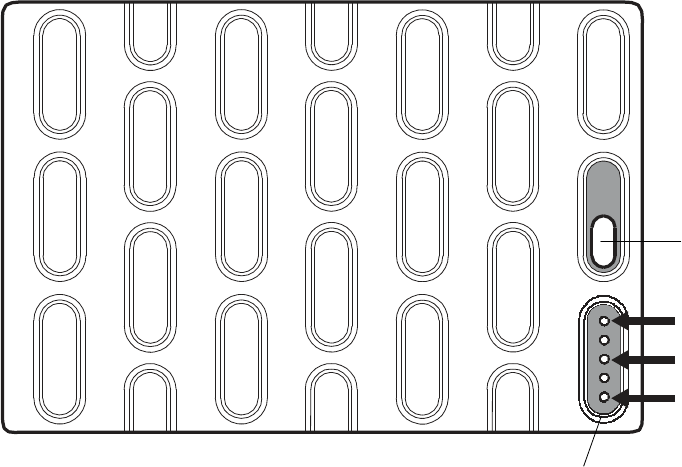
T
h
e
ba
tt
er
y
sta
t
us
light
on
the
T
a
blet
PC
is
blinking
amber
when
the
ba
tt
er
y
is
instal
led
and
A
C
p
o
w
e
r
is
applied
to
the
tablet
.
•
T
h
e
ba
tt
ery
may
ha
v
e
fa
iled.
Use
the
status
lig
h
t
s
on
the
Ex
t
e
nded
B
a
tter
y
to
v
e
rify
its
c
o
ndition.
Battery
ga
ug
e
butt
on
Battery
po
w
e
r
indic
a
t
or
li
gh
ts
I
f
the
thr
ee
indica
t
or
lights
(indicat
ed
with
a
rro
ws)
ar
e
illuminated
,
the
batt
ery
ha
s
fa
iled
and
must
be
r
e
placed
.
38
Ch
apter
3
Using
your
T
a
b
l
e
t
PC
Remo
ving
and
r
e
placing
the
SIM
T
o
r
e
mo
ve
a
n
d
r
e
pl
ace
t
h
e
SIM,
per
f
or
m
t
h
e
f
o
llowin
g
pr
ocedur
es
.
To
r
e
m
ove
t
h
e
S
I
M
1.
T
u
r
n
off
th
e
ta
bl
et.
2.
Remo
v
e
the
batt
ery
or
batt
ery
bay
car
t
ridg
e
(non-func
tioning)
fr
om
the
right
batt
ery
bay
.
Sl
ide
the
ba
tt
ery
r
e
le
a
s
e
swit
c
h
un
til
th
e
ba
tt
ery
is
p
a
r
t
ial
l
y
e
j
ec
t
e
d
,
a
n
d
th
en
p
u
ll
the
ba
tter
y
out
of
the
ba
tter
y
bay
.
Ri
gh
t
b
a
tt
e
r
y
Ba
tt
ery
r
e
le
a
s
e
swit
ch
(righ
t
ba
tt
e
r
y
)
Ch
apter
3
Using
your
T
a
b
l
e
t
PC
39
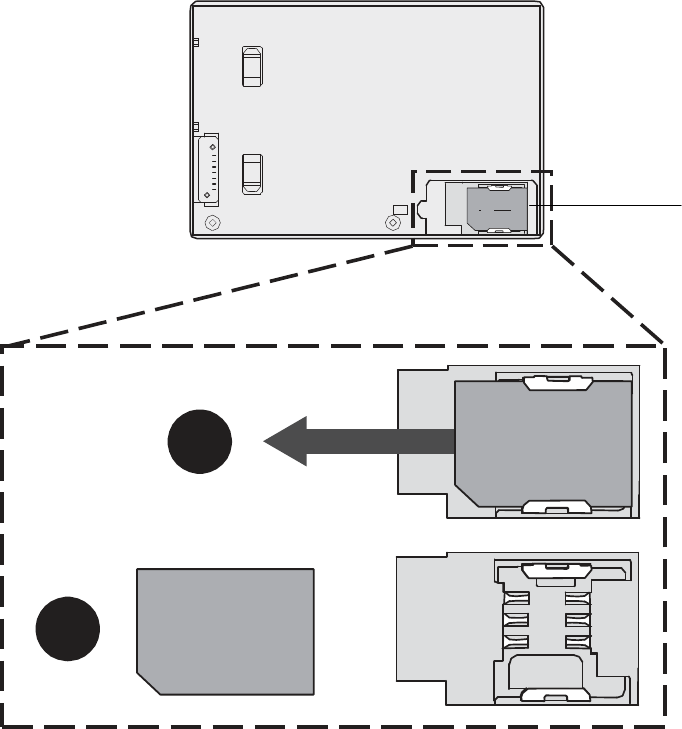
3.
Lif
t
t
h
e
c
or
n
e
r
of
th
e
pl
astic
film
co
v
e
r
i
ng
the
SIM
slot
and
slide
the
SIM
out
of
the
slot.
S I M
SIM
slot
1
S I M
2
S I M
4.
I
f
y
o
u
ar
e
not
r
e
pla
c
in
g
th
e
S
I
M,
r
e
pla
ce
th
e
batt
ery
or
batt
ery
bay
car
t
ridge
b
y
plac
ing
the
t
w
o
tabs
of
t
h
e
ba
tter
y
or
batt
ery
bay
ca
r
t
ridge
int
o
the
t
w
o
slots
in
the
ba
tter
y
bay
,
and
then
pr
ess
the
other
end
of
the
batt
ery
int
o
the
batt
ery
bay
until
y
o
u
hear
a
click
or
f
e
el
the
batt
ery
lock
in
to
pla
ce
.
If
y
o
u
ar
e
r
e
placing
the
SIM,
p
e
r
f
orm
the
f
o
llo
wing
pr
oced
ur
e
.
40
Ch
apter
3
Using
your
T
a
b
l
e
t
PC

S
I M
T
o
r
e
plac
e
the
SIM
1.
W
ith
the
t
a
blet
turned
off
and
the
batt
ery
or
batt
ery
bay
car
t
ridge
r
e
mo
v
e
d
f
r
om
the
right
batt
ery
bay
,
lif
t
the
plastic
film
c
ov
e
r
i
ng
t
h
e
SIM
slo
t
an
d
slide
th
e
SIM
in
to
t
h
e
slot
wit
h
th
e
meta
l
contacts
fa
cin
g
do
w
n
war
d
and
the
no
tche
d
c
or
n
e
r
po
sition
ed
as
sh
o
w
n
in
the
illustration.
SIM
slot
1
S I M
No
tc
he
d
c
or
n
e
r
of
SIM
2
2.
Replace
t
h
e
ba
tt
ery
or
batt
ery
bay
ca
r
t
ridge
in
the
right
ba
tt
ery
bay
b
y
pla
c
ing
the
t
w
o
tabs
of
t
h
e
batt
ery
or
batt
ery
bay
car
t
ridge
in
t
o
the
t
w
o
slots
in
the
ba
tter
y
bay
,
and
then
pr
e
ss
th
e
oth
e
r
en
d
of
t
h
e
ba
tte
r
y
into
th
e
ba
tt
ery
bay
until
y
o
u
hear
a
click
or
f
e
el
the
ba
tter
y
lock
int
o
plac
e
.
Ch
apter
3
Using
your
T
a
b
l
e
t
PC
41

(
U
s
ing
Motion
OmniP
a
ss
and
the
fingerprint
r
e
ader
Mo
tion
O
m
niP
a
ss
off
e
rs
a
se
cur
e
a
n
d
c
o
n
v
e
n
ie
nt
syst
em
f
or
manag
i
ng
y
our
passw
or
ds
and
providing
c
o
nfidentialit
y
f
or
y
our
sens
i
t
iv
e
da
ta
thr
o
ugh
fi
le
encry
p
tio
n
.
T
o
s
t
ar
t
M
o
tion
O
m
niP
a
ss
•
In
the
no
tif
i
ca
tio
n
a
r
e
a
,
doub
le
-ta
p
th
e
Mo
tion
O
m
niP
a
ss
i
c
on
)
.
Y
o
u
can
also
star
t
Mo
tion
OmniP
a
ss
fr
o
m
th
e
S
e
cur
i
t
y
pane
l
of
Mo
t
i
o
n
Dashbo
ar
d
.
T
o
cr
e
a
t
e
a
ne
w
use
r
and
ca
ptur
e
a
fin
gerprint
in
OmniP
a
ss
,
see
“
C
aptur
i
ng
a
fin
g
er
pr
int”
on
page
42.
F
r
om
the
OmniP
a
ss
C
o
ntr
o
l
C
e
nt
er
,
y
o
u
can
manage
OmniP
a
ss
users
and
settings
(distinc
t
fr
om
W
i
ndo
w
s
users),
change
OmniP
a
ss
settings
,
manage
passw
or
ds
,
and
pr
otec
t
y
our
files
.
F
or
mor
e
inf
or
m
ation,
see
the
OmniP
a
ss
Help
.
C
a
pturing
a
fingerprint
A
f
t
e
r
y
o
u
c
a
ptu
r
e
y
our
fingerp
r
in
ts
,
y
o
u
c
a
n
a
ssocia
t
e
th
e
fin
g
er
pr
ints
with
an
OmniP
a
ss
user
.
T
h
is
off
e
rs
a
quick
and
convenient
way
t
o
log
o
n
to
y
our
T
a
bl
et
PC
,
pr
ovide
s
gl
obal
passw
or
d
manage
ment,
a
n
d
hel
p
s
pr
o
t
ec
t
y
our
data
fr
o
m
una
u
th
or
ized
a
c
cess
.
Use
t
h
is
pr
ocedur
e
to
en
ro
ll
a
n
e
w
user
an
d
captur
e
a
finger
pr
in
t
f
or
authe
ntication
.
T
o
enr
o
ll
a
ne
w
user
and
capture
a
fingerprin
t
1
.
S
t
a
r
t
Mo
tion
O
m
niP
a
ss
(
p
a
g
e
4
2)
an
d
ta
p
Enr
o
ll
a
ne
w
use
r
.
2.
Enter
th
e
W
i
ndo
w
s
account
in
f
or
m
a
t
ion
f
or
th
e
ne
w
use
r
and
tap
Ne
x
t
.
T
h
e
fiel
ds
may
default
t
o
the
user
na
me
of
the
curr
ent
user
.
3.
I
n
th
e
C
h
oose
F
i
ng
er
wind
o
w
,
tap
on
the
finger
y
o
u
want
to
e
n
ro
ll
,
th
en
tap
Ne
x
t
or
Pra
c
t
i
ce
.
P
r
ac
tice
a
llow
s
y
o
u
t
o
do
a
tria
l
run
of
the
fingerprint
captur
e
.
42
Ch
apter
3
Using
your
T
a
b
l
e
t
PC
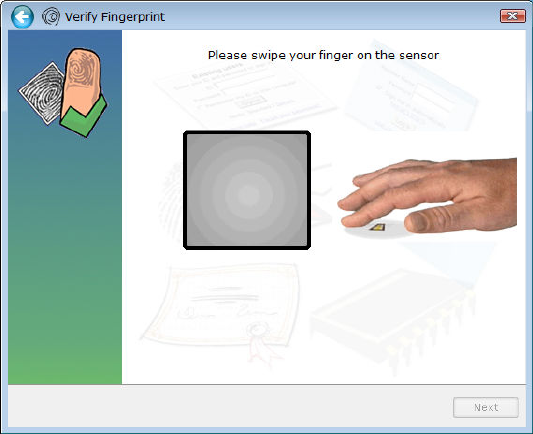
4
.
P
l
a
ce
th
e
se
le
c
t
ed
fin
g
er
ov
er
the
fi
nger
prin
t
r
e
a
d
er
an
d
slo
w
l
y
dr
ag
y
our
fi
nger
ac
ro
ss
the
se
nso
r
in
a
do
w
n
war
d
mot
i
on
or
in
an
up
wa
r
d
motio
n
.
I
f
th
e
ca
pt
ur
e
is
succe
ssful
,
a
gr
ee
n
fin
g
er
pr
int
ima
g
e
wil
l
ap
pe
ar
in
th
e
ca
pt
ur
e
ar
ea
.
I
f
the
captur
e
is
unsuc
cessful
,
f
o
llo
w
the
instru
c
t
ion
s
on
th
e
sc
r
ee
n
t
o
impr
ov
e
th
e
sca
n
.
Af
te
r
y
o
u
have
su
ccessf
ul
ly
ca
pt
ure
d
your
fin
g
er
print,
sca
n
your
fi
nger
p
r
int
o
n
e
m
o
re
time
f
or
v
e
rifica
tion.
5.
T
a
p
Ne
x
t
,
then
tap
Ye
s
if
y
o
u
wa
n
t
to
en
ro
ll
a
se
c
o
nd
fin
g
er
pr
int
(r
ecomme
nded)
.
I
f
y
o
u
injur
e
a
fi
nger
,
y
o
u
can
use
a
sec
o
nd
finger
t
o
authentic
a
t
e
.
Y
o
u
can
also
captur
e
a
secon
d
finger
pr
in
t
later
.
F
ro
m
th
e
Omn
i
P
a
ss
C
o
ntr
o
l
C
e
nter
,
tap
Run
U
s
er
Managemen
t
W
i
zar
d
,
then
tap
Mo
dif
y
a
user’
s
de
vic
e
enr
o
ll
m
e
n
t
.
6.
S
e
l
ec
t
y
our
use
r
pr
efer
e
n
ces
a
n
d
t
a
p
Ne
x
t
.
O
n
the
B
a
ck
u
p
User
P
r
of
ile
sc
r
e
en
,
tap
Backup
No
w
.
7.
S
e
l
ec
t
a
lo
catio
n
f
or
y
our
back
up
prof
ile
and
tap
Sa
ve
.
En
ter
a
passw
or
d
an
d
tap
OK
.
On
th
e
fin
a
l
scr
e
en
,
ta
p
Done
.
Y
o
u
sho
u
ld
ke
ep
y
our
back
up
pr
o
f
ile
in
a
secur
e
lo
catio
n
,
such
as
on
an
ex
te
r
n
a
l
dr
ive
that
y
o
u
can
r
e
mo
ve
a
n
d
sto
r
e
in
a
secur
e
e
n
vir
on
ment.
I
f
y
o
u
r
p
ro
fil
e
i
s
l
o
s
t
or
c
orr
u
p
t
e
d
,
y
o
u
c
a
n
r
e
s
t
or
e
i
t
l
a
t
e
r
.
Y
o
u
s
h
o
u
l
d
b
a
c
k
u
p
y
o
u
r
p
ro
fil
e
per
i
o
d
ica
lly
to
pr
o
t
ec
t
y
our
c
o
nfiguration
a
n
d
a
n
y
stor
ed
pa
ssw
or
ds
an
d
e
n
cry
ption
keys
.
F
or
mor
e
inf
or
m
ation,
see
the
OmniP
a
ss
Help
.
Ch
apter
3
Using
your
T
a
b
l
e
t
PC
43
F
ingerprin
t
reader
tips
•
B
e
con
s
istent.
H
o
l
d
y
our
fing
er
and
scan
a
t
the
same
a
n
gl
e
ea
ch
time
.
F
or
example
,
if
y
o
u
en
ro
ll
y
our
fin
g
er
w
ith
y
our
han
d
ope
n
,
ho
ld
y
our
h
a
nd
this
way
e
a
ch
t
i
me
y
o
u
scan
.
•
T
h
e
sca
nn
e
r
is
bi-
dir
ec
tion
al
.
Y
o
u
ca
n
mov
e
y
our
fin
g
er
in
an
up
wa
r
d
or
do
w
n
war
d
motion
acr
o
ss
the
sensor
.
•
R
e
ad
th
e
pr
o
m
pts
ca
r
e
ful
ly
and
en
sur
e
th
a
t
y
o
u
wait
f
or
t
h
e
pr
o
m
pt
befor
e
y
o
u
sw
ipe
.
•
Swiping
too
fast
or
too
slow
ca
n
ma
ke
a
captur
e
unsuccessful
.
Change
the
swipe
speed
un
t
il
y
o
u
lea
r
n
wh
at
spe
e
d
w
or
k
s
be
st.
•
Whe
n
sca
nning
,
pr
ess
har
d
e
n
o
ugh
to
fully
contac
t
the
e
n
tir
e
sur
f
ace
of
th
e
fing
er
pr
int
r
e
ade
r
;
y
o
u
do
no
t
have
to
pr
e
ss
ha
r
d
.
•
R
u
b
y
our
fin
g
er
s
t
o
ge
the
r
t
o
stimu
l
a
t
e
th
e
na
tu
r
a
l
sk
in
o
il
s
so
y
our
fin
g
e
r
prin
t
is
easier
t
o
de
t
ec
t
.
C
o
n
v
er
se
ly
,
w
i
pe
y
our
finger
o
ff
so
n
o
th
ing
in
t
e
r
f
er
e
s
with
th
e
sca
n
.
•
I
f
y
o
u
ar
e
h
a
ving
t
ro
u
bl
e
e
n
ro
ll
ing
a
spe
c
ific
fin
g
er
,
e
n
ro
ll
a
diff
er
ent
finger
.
T
y
picall
y
,
y
o
u
sho
u
ld
scan
an
index
fin
g
er
,
thumb
,
middl
e
fin
g
er
,
r
i
ng
fin
g
er
,
and
littl
e
fing
er
in
that
or
de
r
.
•
I
f
y
o
u
ar
e
r
e
peatedl
y
h
a
ving
tr
ouble
gett
in
g
a
good
scan
,
y
o
u
may
nee
d
to
clea
n
the
se
nso
r
.
Se
e
“
C
l
e
a
n
ing
the
fi
nger
prin
t
r
e
a
d
er
”
on
p
a
ge
58
.
U
s
ing
passw
or
d
r
e
plac
emen
t
OmniP
a
ss
ca
n
manag
e
y
our
passw
or
ds
f
or
o
t
he
r
ap
plicatio
ns
,
such
as
We
b
sites
,
I
nternet
email
,
FTP
,
or
any
r
e
stric
t
ed-ac
c
ess
netw
ork
r
e
sour
ce
.
A
f
t
e
r
OmniP
a
ss
r
e
g
i
sters
y
our
cr
e
d
ential
s
,
y
o
u
can
acce
ss
any
o
f
the
s
e
r
e
str
i
c
t
ed
ar
eas
b
y
using
y
our
fin
g
er
pr
int
or
the
master
pas
s
w
or
d
.
T
o
r
eg
i
s
t
er
passw
or
ds
1.
Whe
n
y
o
u
en
counter
a
use
r
name
an
d
pa
ssw
or
d
prompt,
ent
e
r
y
o
u
r
user
name
and
passw
or
d
,
but
do
not
log
on.
(D
o
not
ta
p
En
ter
,
Submi
t
,
or
OK
.)
2.
R
i
ght
-
click
t
h
e
OmniP
a
ss
icon,
and
selec
t
Rem
e
mber
P
a
ssw
or
d
.
T
h
e
W
i
ndows
a
rro
w
point
e
r
changes
t
o
the
OmniP
a
ss
golden
key
.
3
.
C
l
ick
th
e
key
c
u
r
s
or
o
n
th
e
wind
o
w
th
a
t
has
the
passw
or
d
tha
t
y
o
u
want
OmniP
a
ss
to
re
m
e
mb
e
r
.
Not
e
:
F
or
some
applica
t
ions
,
y
o
u
may
ha
v
e
t
o
use
the
passw
or
d
wizar
d
to
r
e
g
i
ster
passw
or
ds
.
S
ee
“Using
the
passw
or
d
wizar
d
”
on
page
45.
4.
Ent
e
r
the
f
o
llo
wing
inf
ormation:
•
F
ri
e
ndly
Name
.
A
descriptiv
e
name
t
o
identify
the
passw
or
d
bo
x.
•
A
u
to
m
a
t
i
c
a
ll
y
e
n
te
r
.
I
n
stantly
ac
cesses
the
sit
e
without
r
e
quiring
a
pass
w
or
d
or
fi
ngerpr
in
t
scan.
I
f
y
o
u
ar
e
logg
ed
in
t
o
OmniP
a
ss
and
y
o
u
ac
cess
a
secur
e
We
b
sit
e
,
OmniP
a
ss
wil
l
a
u
tomatica
lly
submit
y
our
user
nam
e
and
passw
or
d
without
pr
ompting
f
or
v
e
rifica
tion.
•
Au
t
o
m
a
t
i
c
a
ll
y
c
l
i
c
k
.
P
rompts
y
o
u
f
or
y
our
OmniP
a
ss/W
i
ndo
w
s
passw
or
d
or
fi
ngerpr
in
t
scan
when
y
o
u
access
the
sit
e
(default).
5.
T
a
p
Fi
ni
s
h
.
44
Ch
apter
3
Using
your
T
a
b
l
e
t
PC
6.
I
f
pr
ompted,
sw
ipe
y
our
fin
g
er
pr
int
or
e
nter
y
our
master
pa
ssw
or
d
to
authe
n
ticate
the
s
e
settings
.
U
s
ing
the
passw
or
d
wizar
d
C
e
r
t
ain
applica
t
ions
r
e
qu
ir
e
mor
e
sophistic
a
t
e
d
user
input
f
or
authentica
tion.
F
or
these
applica
t
ions
,
y
o
u
may
need
t
o
use
the
pa
ssw
or
d
wizar
d
to
set
up
passw
or
d
r
e
placemen
t.
T
o
run
th
e
passw
or
d
wi
zar
d
1
.
S
t
a
r
t
Mo
tion
O
m
niP
a
ss
(
p
a
g
e
4
2)
.
2.
I
n
th
e
l
e
f
t
pan
e
,
tap
P
a
ss
w
o
rd
W
i
z
a
rd
.
3.
F
o
ll
o
w
th
e
in
struc
t
io
ns
in
the
wizar
d
prog
ram.
L
o
gging
on
t
o
a
r
e
member
ed
sit
e
T
o
log
on
t
o
a
r
e
member
e
d
sit
e
,
ope
n
t
h
e
We
b
sit
e
or
ap
plication
t
h
at
y
o
u
h
a
v
e
set
up
with
passw
or
d
r
e
pl
acement.
S
ee
“Using
pa
ssw
or
d
r
e
pla
ce
ment
”
on
page
44
.
Swipe
y
our
fin
g
er
or
en
t
e
r
th
e
master
p
a
ssw
or
d
wh
en
pr
o
mpt
ed
.
T
o
r
e
mo
v
e
a
r
e
mem
b
ered
sit
e
,
tap
M
anage
P
a
ssw
o
r
ds
.
C
o
nfiguring
authentica
tion
rules
T
o
c
o
nfigur
e
authen
tica
tio
n
rule
s
1
.
S
t
a
r
t
Mo
tion
O
m
niP
a
ss
(
p
a
g
e
4
2)
.
2.
T
a
p
Change
Y
our
U
s
er
S
e
ttings
.
3.
T
a
p
S
e
t
user
authentication
rules
and
p
o
licies
.
4
.
Se
le
c
t
th
e
a
p
pr
o
p
ria
t
e
au
th
en
tica
tio
n
r
u
le
s
.
5.
T
a
p
S
ave
all
settings
.
Ch
apter
3
Using
your
T
a
b
l
e
t
PC
45
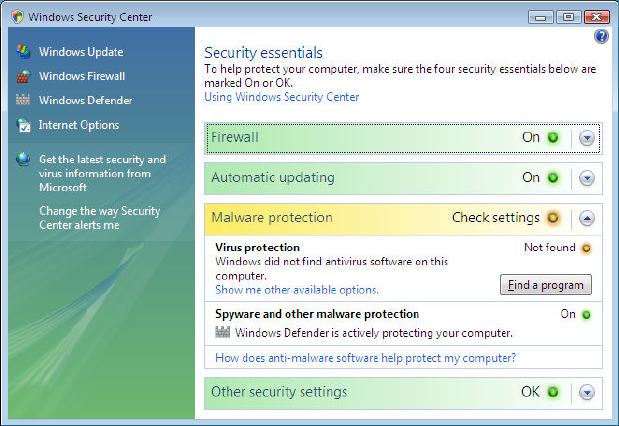
Us
i
n
g
W
i
n
d
ows
S
e
c
u
r
i
t
y
Ce
nte
r
W
i
n
d
o
w
s
S
e
cur
i
t
y
C
e
nte
r
pr
ovides
a
central
l
ocation
f
or
y
o
u
to
manage
y
our
c
o
mpute
r
’
s
security
setting
s
and
learn
mor
e
about
impr
o
ving
security
.
I
f
a
pr
oblem
is
detec
t
ed
(such
as
an
out
-
of-
d
a
t
e
a
n
t
ivirus
ap
plication),
the
S
e
cu
rit
y
C
e
nt
er
sends
y
o
u
a
n
aler
t
and
pr
ov
ides
r
e
comme
ndation
s
f
or
ho
w
to
r
e
medy
the
situa
t
ion.
W
i
n
d
o
w
s
S
e
cur
i
t
y
C
e
nte
r
mana
ges
t
h
e
f
o
llowin
g
:
•
W
indow
s
F
ir
e
wall
.
P
rotec
ts
y
our
computer
aga
i
nst
viruses
and
oth
e
r
secur
i
t
y
th
r
eats
,
such
as
in
truders
who
might
tr
y
acce
ss
ov
er
the
I
nternet
or
a
net
w
ork
.
•
A
u
t
omatic
Upd
a
tes.
Kee
p
s
y
our
c
o
mpute
r
up
t
o
da
t
e
b
y
n
o
t
if
yin
g
y
o
u
o
f
impo
r
t
an
t
W
i
ndo
w
s
u
p
dat
e
s
.
Y
o
u
can
conf
igur
e
A
utomatic
Updat
e
s
t
o
do
wnload
and
install
u
p
d
a
te
s
a
u
to
ma
t
i
c
a
ll
y
.
•
Malwar
e
pr
o
t
ec
tio
n
.
P
r
ote
c
ts
y
o
u
fr
om
v
i
ruses
,
spy
w
ar
e
,
and
oth
e
r
un
wanted
sof
t
wa
r
e
.
•
O
t
her
sec
u
rit
y
s
e
tting
s
.
M
a
nages
I
n
t
e
r
net
security
se
ttings
and
User
A
c
count
C
o
ntr
o
l
t
o
help
pr
ot
ec
t
y
our
c
o
mputer
.
I
n
t
e
rnet
secu
rity
settings
ap
ply
t
o
Int
e
r
net
Explorer
,
but
no
t
to
o
t
he
r
We
b
br
o
w
ser
s
.
T
o
lea
r
n
mo
r
e
about
W
i
ndo
w
s
S
e
cur
i
t
y
C
e
nter
,
open
Mo
tion
Dash
bo
ar
d
to
th
e
S
e
cur
i
t
y
panel
,
then
ta
p
Wi
nd
o
w
s
S
e
c
u
ri
t
y
C
e
n
t
e
r
.
Setting
up
users
and
passw
or
d
s
Y
o
u
can
u
s
e
diff
er
ent
t
y
pes
of
user
acc
ounts
and
passw
or
ds
t
o
creat
e
v
a
rious
lev
e
ls
of
pr
ot
ection
f
or
y
our
T
a
bl
et
PC
an
d
its
data,
depe
nding
on
the
le
v
e
l
of
se
cur
i
t
y
th
at
y
o
u
ne
ed.
46
Ch
apter
3
Using
your
T
a
b
l
e
t
PC

S
e
tting
up
W
i
ndow
s
user
acc
ounts
Y
o
u
can
u
s
e
W
i
ndo
w
s
user
acc
o
un
ts
t
o
help
se
c
u
r
e
the
files
on
y
our
c
o
mp
ut
er
f
r
om
o
t
he
r
u
s
er
s.
Y
o
u
mu
s
t
hav
e
a
n
a
d
m
i
n
i
s
t
rator
a
c
co
unt
on
t
h
e
com
p
uter
to
a
dd
a
n
e
w
u
s
er
to
t
h
e
co
m
p
u
t
e
r
.
T
o
set
u
p
a
W
indow
s
user
ac
c
oun
t
1.
I
n
C
ontr
o
l
P
a
ne
l
,
o
p
e
n
U
s
e
r
A
c
count
C
ontr
o
l
P
a
ne
l
.
2.
T
a
p
M
anage
another
ac
c
ou
n
t
.
3.
T
a
p
Cr
ea
te
a
ne
w
ac
c
ount
.
4
.
En
t
e
r
the
appro
p
riat
e
in
f
o
rmation
f
or
the
ne
w
use
r
acc
o
un
t
an
d
tap
C
r
ea
t
e
A
cc
ount
.
S
e
tting
a
BIOS
passw
or
d
Y
o
u
can
use
a
BIOS
passw
or
d
to
secur
e
the
basic
input/output
sy
st
em
of
the
c
o
mputer
.
WA
R
N
I
N
G
:
Read
t
h
is
sec
t
ion
ca
r
e
fully
t
o
understand
the
implications
of
cr
eating
a
B
I
OS
sy
st
em
passw
or
d
.
I
f
y
o
u
f
or
get
the
passw
or
d
,
y
o
u
w
ill
n
o
t
b
e
ab
l
e
to
access
your
T
a
bl
et
PC
.
I
f
this
hap
p
en
s
,
contac
t
Mo
tion
C
o
mputing
T
e
chn
i
ca
l
S
u
pp
or
t
at
www
.
m
o
tio
n
com
p
u
t
ing
.com
/
su
pp
or
t
.
Ha
v
e
y
our
serial
nu
mber
r
e
ady
.
Y
o
u
c
a
n
find
the
se
rial
num
b
er
o
n
th
e
ba
ck
of
th
e
T
a
ble
t
PC.
T
o
set
a
BI
OS
passw
or
d
1.
St
ar
t
the
T
a
bl
et
PC
.
2
.
W
h
en
th
e
Mo
tio
n
C
o
mpu
tin
g
spla
sh
sc
r
e
en
ap
pears
,
pr
ess
the
Dashboar
d
b
utt
o
n
(
).
Whe
n
acce
ss
is
e
n
able
d
,
y
o
u
w
ill
he
ar
an
aler
t
sound
.
I
f
y
o
u
miss
the
splash
scr
e
en,
r
esta
r
t
t
h
e
c
o
mputer
and
tr
y
a
g
ain.
3.
Quick
l
y
tap
the
scr
e
en
with
the
tablet
pen
t
o
open
the
sy
stem
setup
menu
.
I
f
y
o
u
ha
v
e
a
key
b
oar
d
atta
ch
ed,
yo
u
ca
n
a
l
so
p
r
e
ss
th
e
space
bar
t
o
open
the
syst
em
setup
menu
.
4.
T
a
p
Pa
ss
word
O
p
t
i
o
n
s
.
5.
I
n
th
e
P
a
ssw
or
d
w
i
ndow
,
selec
t
Change
curr
ent
passw
o
rd
and
ent
e
r
a
passw
or
d
using
th
e
on
-scree
n
key
b
oa
r
d
.
6.
S
e
l
ec
t
Enabl
e
P
a
ssw
or
d
on
boo
t
,
if
desir
e
d
.
A
BIOS
passw
or
d
r
e
quir
es
the
user
t
o
ent
e
r
a
passw
or
d
t
o
open
the
BIOS.
A
passw
or
d
on
boo
t
r
e
quir
es
t
h
e
use
r
to
enter
a
passw
or
d
to
sta
r
t
the
computer
.
7.
T
a
p
OK
.
T
o
cl
ear
th
e
pa
ssw
or
d
,
selec
t
Change
curr
en
t
pa
ssw
o
rd
,
lea
v
e
t
h
e
passw
or
d
fiel
ds
blan
k
,
then
tap
OK
.
Ch
apter
3
Using
your
T
a
b
l
e
t
PC
47

S
e
tting
up
a
har
d
disk
driv
e
(HDD
)
passw
or
d
Y
o
u
can
u
s
e
a
HDD
passw
or
d
t
o
pr
ot
ec
t
the
comput
e
r
and
the
har
d
disk
driv
e
.
T
h
e
c
o
mputer
ca
nn
ot
be
sta
r
te
d
wit
hout
the
H
DD
passw
or
d
,
an
d
th
e
da
ta
on
th
e
disk
driv
e
ca
nn
ot
be
accesse
d
,
even
if
it
is
r
e
mo
v
e
d
an
d
attache
d
to
a
diff
er
ent
c
o
mpute
r
.
T
o
s
e
t
u
p
a
hard
disk
driv
e
pas
s
w
o
rd
1.
St
ar
t
the
T
a
bl
et
PC
.
2
.
W
h
en
th
e
Mo
tio
n
C
o
mpu
tin
g
spla
sh
sc
r
e
en
ap
pears
,
pr
ess
the
Dashboar
d
b
utt
o
n
(
).
Whe
n
acce
ss
is
e
n
able
d
,
y
o
u
w
ill
he
ar
an
aler
t
sound
.
I
f
y
o
u
miss
the
splash
scr
e
en,
r
esta
r
t
t
h
e
c
o
mputer
and
tr
y
a
g
ain.
3.
I
n
th
e
I
n
sy
de
H
2
0
S
e
tup
Ut
ilit
y
,
tap
Se
c
u
ri
ty
on
th
e
me
nu
ba
r
.
4.
T
a
p
Ent
e
r
fo
r
Set
Har
d
Di
sk
P
a
ss
w
o
rd
.
5.
T
o
enter
a
passw
or
d
,
ta
p
the
passw
or
d
dia
l
og
bo
x
a
n
d
a
n
o
n
-scree
n
k
e
y
b
o
a
r
d
w
ill
open
.
6
.
U
s
in
g
th
e
o
n
-sc
r
ee
n
key
b
o
a
r
d
,
en
t
e
r
the
pas
s
w
or
d
a
n
d
ta
p
Ent
e
r
.
T
o
con
f
ir
m
the
passw
or
d
,
en
ter
the
passw
or
d
again,
and
tap
Ent
e
r
.
7.
T
a
p
Ent
e
r
to
co
nti
nu
e
,
t
a
p
Exit
,
then
selec
t
Ex
i
t
S
a
ving
C
h
a
n
ge
s
.
T
o
cl
ear
th
e
pa
ssw
or
d
,
tap
Ent
e
r
fo
r
S
e
t
Har
d
Di
sk
P
a
ss
w
o
rd
.
Ente
r
th
e
cur
r
ent
passw
or
d
,
then
tap
Ent
e
r
twic
e
t
o
le
a
v
e
the
Ent
e
r
New
P
a
ssw
or
d
fie
l
d
s
b
l
a
n
k
.
48
Ch
apter
3
Using
your
T
a
b
l
e
t
PC

U
s
ing
W
i
-F
i
(802.11a/g/n)
Use
t
h
e
inf
o
rmation
in
this
sec
t
ion
t
o
set
up
a
W
i
-F
i
connec
tion.
W
i
r
e
less
acce
ss
r
e
quir
es
an
80
2.11
a,
802.11g
,
or
802
.
11
n
acce
ss
point.
I
nternet
acce
ss
r
e
quir
es
a
w
or
k
in
g
I
nternet
co
nn
ec
t
i
o
n
.
DA
N
G
E
R
:
F
AA
r
e
gula
tion
s
r
e
q
u
ir
e
th
a
t
y
o
u
disa
bl
e
a
n
y
wir
e
l
e
ss
c
o
nn
ec
tion
wh
en
tr
a
v
e
l
ing
b
y
air
.
F
a
il
ur
e
t
o
disab
l
e
th
e
w
i
r
e
l
e
ss
c
o
nn
ec
tion
on
th
e
T
a
bl
et
PC
wh
il
e
tr
a
v
el
in
g
b
y
air
ca
n
c
a
use
c
ommunications
pr
oblems
with
air
c
raf
t
instruments
.
Enabling
or
disabling
W
i
-F
i
B
e
f
or
e
y
o
u
can
esta
bl
ish
a
W
i
-F
i
c
o
nn
ec
tion
,
y
o
u
must
e
n
able
th
e
W
i
-F
i
ada
p
te
r
.
Y
o
u
can
enable
th
e
W
i
-F
i
adapt
e
r
usin
g
Mo
t
i
on
Dashbo
ar
d
.
T
o
enabl
e
or
disable
W
i
-F
i
1.
Ope
n
the
Mo
t
i
on
Dashbo
ar
d
to
th
e
W
i
r
e
le
ss
pane
l
(
p
age
22
)
.
2.
S
e
l
ec
t
or
cl
ear
th
e
Enable
802.11
Int
e
rnal
W
ir
e
l
e
ss
check
bo
x.
S
e
tting
up
a
W
i
-F
i
connec
t
ion
Use
t
h
is
pr
ocedur
e
to
create
a
W
i
-F
i
con
n
ec
tio
n
.
T
o
set
up
a
W
i-
F
i
c
o
nnec
t
ion
1.
Ope
n
the
Mo
t
i
on
Dashbo
ar
d
to
th
e
W
i
r
e
le
ss
pane
l
(
p
age
22
)
.
2.
Ensure
that
Enable
Internal
802.11
W
ir
eless
is
selec
t
ed
.
3.
T
a
p
t
h
e
P
roper
ties
butt
on.
4.
I
n
th
e
N
e
t
w
or
k
an
d
Sh
ar
in
g
C
e
nte
r
,
ta
p
C
o
nnec
t
to
a
network
.
5.
F
or
Sh
ow
,
se
le
c
t
W
ir
eless
.
6
.
Se
le
c
t
th
e
n
e
tw
ork
y
o
u
w
a
n
t
t
o
c
o
nn
ect
t
o
a
n
d
ta
p
C
onne
c
t
.
I
f
you
ar
e
con
n
ec
ting
to
a
secur
e
net
w
ork
,
y
o
u
may
need
t
o
en
ter
authentication
inf
o
rma
t
ion.
F
or
mor
e
inf
or
mation
a
bout
W
i
-
F
i,
see
“
Wi-F
i
(8
02
.1
1a
/g/n
wir
e
l
e
ss)
”
on
page
17
.
U
s
ing
Mobile
Br
oadband
(optional)
Use
t
h
e
inf
o
rmation
in
this
sec
t
ion
t
o
set
up
a
Mobile
Br
oadband
connec
tion.
Mobile
Br
oa
dba
n
d
ac
cess
r
e
quir
es
a
ser
vic
e
contrac
t
fr
om
a
Mobile
B
roadband
ser
vice
pr
ovider
.
F
or
mor
e
inf
or
m
ation,
see
“M
obile
Br
oadband
(optiona
l)
”
on
page
18
.
WA
R
N
I
N
G
:
F
AA
r
e
gulation
s
r
e
quir
e
th
at
y
o
u
disabl
e
a
n
y
wir
e
less
c
o
nn
ec
tion
w
h
e
n
trav
e
l
ing
b
y
air
.
F
a
ilur
e
to
disabl
e
th
e
wir
e
less
c
o
nn
ec
tion
o
n
t
h
e
T
a
ble
t
PC
wh
ile
trav
e
l
ing
b
y
air
can
cause
c
o
mm
unic
ations
pr
oble
m
s
w
ith
a
i
r
c
raf
t
instruments
.
Ch
apter
3
Using
your
T
a
b
l
e
t
PC
49
A
c
tiva
ting
y
our
Mobile
Br
oadband
ser
v
ic
e
Bef
or
e
y
o
u
can
use
the
Mobile
Br
oadband
ser
vic
e
,
y
o
u
must
ac
tiva
te
y
our
ser
vice
with
the
se
r
vic
e
pr
ovider
y
o
u
ch
o
s
e
wh
en
y
o
u
order
e
d
y
our
T
a
bl
et
PC.
Y
o
u
m
a
y
be
able
t
o
ac
tiv
a
t
e
y
our
ser
vic
e
usin
g
the
c
o
nn
ectio
n
man
a
ge
r
,
or
y
o
u
may
ha
v
e
t
o
ca
ll
y
our
ser
vic
e
pr
ovider
t
o
ac
tiva
te
.
F
or
mor
e
inf
or
mation
a
bout
sta
r
ting
the
connec
t
ion
manager
,
see
the
Mobile
Br
oadband
doc
ument
in
the
T
a
blet
PC
bo
x.
Enabling
M
obile
Br
oadband
Be
f
or
e
y
o
u
ca
n
e
s
tab
l
ish
a
Mobile
Br
oa
dba
n
d
c
o
nn
ec
tion
,
y
o
u
must
enable
th
e
Mo
bil
e
Br
oa
dba
n
d
a
d
apt
e
r
.
Y
o
u
ca
n
ena
b
le
the
Mobile
Br
o
a
dban
d
adapt
e
r
usin
g
Mo
t
i
on
Dashb
o
ar
d
.
T
o
enabl
e
Mobile
Br
oadband
1.
Ope
n
the
Mo
t
i
on
Dashbo
ar
d
to
th
e
W
i
r
e
le
ss
pane
l
(
p
age
22
)
.
2
.
Se
le
c
t
th
e
Enable
M
o
bile
Br
oadband
with
GPS
check
bo
x.
I
n
stalling
the
c
o
nnec
tion
manager
T
o
install
the
c
o
nnec
tion
m
anager
•
Do
uble-ta
p
th
e
ic
o
n
on
y
our
deskto
p
an
d
f
o
ll
o
w
th
e
on
lin
e
instr
u
c
t
io
ns.
Y
o
u
w
ill
need
an
In
t
e
rnet
c
o
nn
ectio
n
t
o
do
wn
l
o
a
d
y
o
u
r
c
o
nn
ectio
n
ma
n
a
ge
r
.
F
or
mor
e
inf
or
m
ation,
see
the
connec
t
ion
manager
help
.
Not
e
:
T
h
e
c
o
nn
ec
tio
n
mana
ger
so
f
t
war
e
y
o
u
use
depends
on
y
our
wir
e
less
ser
vice
pr
ovider
.
I
f
y
our
ta
bl
et
c
o
n
t
ains
a
Mo
bil
e
B
r
oadban
d
car
d
,
f
or
mo
r
e
in
f
o
rmation
,
se
e
the
Mobile
Br
oadband
documen
t
in
the
T
a
blet
PC
bo
x.
C
o
nnec
t
ing
and
disc
onnec
t
ing
Use
t
h
e
c
o
nn
ec
tio
n
manage
r
sof
t
war
e
to
conn
ec
t
to
and
disco
nne
c
t
fr
om
y
our
pr
ovider
’
s
Mobile
Br
oadband
netw
ork
.
U
s
ing
Bluetooth
(optional)
Y
o
u
can
use
Bl
ue
to
oth
®
to
c
o
nn
ec
t
to
accesso
r
y
dev
i
ce
s
or
o
t
he
r
co
mpute
r
s
.
The
devices
c
a
n
c
o
mm
unic
a
t
e
w
ith
ea
ch
o
t
he
r
w
h
e
n
the
y
ar
e
in
r
a
nge
.
F
or
mor
e
inf
ormation,
see
“Bl
uet
oo
th
w
i
r
e
le
ss
(o
ption
a
l)
”
on
page
18
.
50
Ch
apter
3
Using
your
T
a
b
l
e
t
PC

)
Enabling
or
disabling
Bluet
o
oth
Bef
or
e
y
o
u
can
set
u
p
a
Bluet
o
oth
devic
e
,
y
o
u
must
enable
th
e
B
l
ue
to
oth
ada
p
ter
on
th
e
T
a
bl
et
PC.
A
f
t
e
r
y
o
u
enable
Bl
ue
t
oo
t
h,
th
e
Blu
e
t
o
oth
ic
on
(
a
p
pe
a
r
s
in
the
no
tifica
tion
ar
ea
.
Y
o
u
can
ta
p
on
this
ic
on
t
o
get
shor
t
c
ut
s
t
o
the
Bluet
o
oth
S
e
ttings
windo
w
,
the
Bl
uet
o
oth
F
i
le
T
r
an
sfe
r
W
i
za
r
d
,
a
n
d
th
e
A
dd
Ne
w
C
o
nn
ec
tio
n
W
i
za
r
d
.
T
o
enabl
e
or
disable
Blueto
oth
1
.
Open
Mo
tion
Dash
bo
ar
d
t
o
th
e
W
i
r
e
le
ss
pan
e
l
(
p
a
g
e
22
)
.
2.
S
e
l
ec
t
or
cl
ear
Enable
Interna
l
Bl
uetooth
W
ir
eless
.
Af
te
r
you
en
a
b
le
B
l
u
e
too
t
h,
t
h
e
B
l
u
e
toot
h
a
d
a
p
te
r
t
r
i
e
s
to
d
i
s
c
over
o
t
he
r
B
l
u
e
toot
h
d
e
v
i
c
es
wit
h
in
r
a
nge
.
When
a
Bluet
o
oth
device
is
disc
ov
er
a
b
le
,
it
is
visible
t
o
other
Bluet
o
oth
devices
in
range
.
F
or
inf
o
rmation
about
mak
i
ng
a
devic
e
disco
v
erable
,
see
the
device’
s
documentation.
S
e
tting
up
a
Bluetooth
devic
e
B
e
f
or
e
y
o
u
can
use
a
Bl
ue
too
t
h
device
with
y
our
T
a
bl
et
PC
,
y
o
u
need
to
se
t
up
th
e
device
.
A
f
t
e
r
y
o
u
set
up
the
devi
ce
,
it
is
pair
ed
with
y
our
T
a
blet
PC,
and
uses
a
p
asskey
t
o
c
r
ea
t
e
a
se
cur
e
c
o
nn
ec
tio
n
be
t
w
ee
n
th
e
T
a
bl
et
PC
a
n
d
th
e
Blu
e
t
oo
t
h
devic
e
.
Not
e
:
Although
the
passkey
excha
n
ge
helps
t
o
secur
e
y
our
data,
Bluet
o
oth
wir
e
less
tech
nol
ogy
sh
ould
n
o
t
be
con
s
ider
ed
c
o
mpl
e
te
ly
secur
e
.
T
o
set
u
p
a
Blueto
oth
c
o
nnec
tion
1
.
En
sur
e
th
a
t
Bl
ue
t
oo
t
h
is
enable
d
.
2.
Place
the
Bl
ue
too
t
h
device
in
disco
v
erable
mode
.
Each
B
l
ueto
oth
dev
i
ce
may
have
a
diff
er
e
n
t
way
to
ma
ke
it
disco
v
e
r
a
b
l
e
.
S
ee
t
h
e
manufac
t
ur
er’
s
do
cume
n
t
a
t
ion
f
or
mo
r
e
inf
ormation.
3.
I
n
C
ontr
o
l
P
a
ne
l
,
o
p
e
n
Bluetoot
h
D
e
v
i
ce
s
.
4.
T
a
p
Ad
d
.
5.
F
o
ll
o
w
th
e
in
struc
t
io
ns
in
th
e
se
tup
pr
ogram.
I
f
th
e
device
is
no
t
disco
v
e
r
ed
,
se
e
“I
f
the
device
is
n
o
t
disco
v
ered
…
”
on
page
52
.
Ch
apter
3
Using
your
T
a
b
l
e
t
PC
51
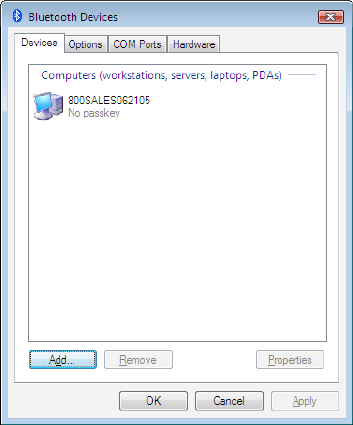
T
h
e
Bluet
o
oth
device
is
r
e
ady
t
o
use
.
P
a
ir
ed
dev
i
ce
s
ar
e
sho
w
n
in
the
Bluet
o
oth
S
e
tt
ings
w
i
ndo
w
.
T
h
e
f
o
ll
o
w
i
ng
ill
u
str
a
tion
sho
w
s
a
Bl
ue
t
oo
t
h
Settings
wind
o
w
with
a
Bl
ue
t
oo
t
h
ke
ybo
a
r
d
an
d
m
o
use
.
I
f
the
devic
e
is
not
disco
v
e
r
e
d…
I
f
the
Bluet
o
oth
device
is
not
detec
t
ed
af
ter
multiple
attempts
,
tr
y
the
f
o
llowin
g
:
•
En
sur
e
th
a
t
Bl
ue
t
oo
t
h
is
enable
d
(p
age
5
1)
.
•
Ensure
that
th
e
device
y
o
u
ar
e
adding
is
disco
v
e
r
a
b
le
.
S
ee
t
h
e
man
u
fac
t
ur
er’
s
documentation
f
or
mor
e
inf
ormation.
•
Ensure
that
the
Bluetooth
device
has
good
batt
eries.
•
F
or
keyboa
r
d
s
,
mic
e
,
and
pr
in
t
e
rs
,
ensur
e
that
y
o
u
selec
t
My
de
vic
e
is
set
up
and
r
eady
t
o
be
f
ound
in
th
e
A
dd
Bluetoot
h
D
e
v
i
ce
W
i
za
r
d
.
•
F
or
T
a
blet
PCs
transfer
ring
files
,
both
tablet
s
must
turn
on
the
dev
i
ce
transfer
wizar
d
,
although
only
the
r
ece
iving
T
a
blet
PC
needs
to
be
disc
ov
er
a
b
le
.
T
a
p
t
h
e
Bluet
o
oth
ic
on
an
d
then
S
e
nd
a
file
or
Rec
e
iv
e
a
file
.
When
you
do
th
is
,
disc
ov
ery
is
au
to
m
a
tic
a
l
ly
turned
on
f
or
the
r
ece
iving
device
.
•
Se
le
c
t
A
llow
Blu
e
too
t
h
d
e
vic
e
s
to
c
o
nnec
t
to
this
c
o
mputer
to
conn
ec
t
to
k
e
ybo
a
rd
s,
mic
e
,
pr
in
t
e
rs
,
a
n
d
other
devices
.
Y
o
u
find
this
by
right
-
click
i
ng
the
Bluet
o
oth
ic
on
>
Show
Bluetoo
t
h
D
e
vic
e
s
>
Option
s
.
•
Ch
eck
w
h
ich
Bl
ue
too
t
h
devices
ar
e
co
nne
c
t
ed
.
T
a
p
the
B
l
uet
o
oth
D
evices
ic
on
>
Open
Blue
too
t
h
S
e
ttin
g
s
.
On
t
h
e
De
vices
w
i
ndow
,
y
o
u
sho
u
l
d
be
a
b
l
e
to
se
e
Bluetoot
h
devic
e
s
that
ar
e
curr
ently
connec
ted
.
I
f
th
e
T
a
ble
t
PC
still
ca
nn
ot
de
tec
t
the
Bl
ue
t
o
oth
device
,
conta
c
t
the
devic
e
manufac
t
ur
er
f
or
assistance
.
52
Ch
apter
3
Using
your
T
a
b
l
e
t
PC
Bluetoot
h
wir
eless
tips
Mo
tion
C
o
mputin
g
a
n
d
its
Bl
ue
t
oo
t
h
p
a
r
t
ne
rs
ha
v
e
w
o
rked
t
o
ensur
e
a
positiv
e
experience
wit
h
th
is
te
ch
nolo
gy
,
a
n
d
to
e
n
su
r
e
Blu
e
toot
h
inte
ro
p
e
rab
i
lit
y
.
I
n
doing
so
,
we
h
a
v
e
f
o
un
d
the
f
o
llo
wing
issues:
•
I
f
y
o
u
ar
e
runn
ing
Bluetoot
h
a
n
d
W
i
-F
i
a
t
th
e
sa
me
time
,
in
te
r
f
er
e
n
ce
can
aff
ec
t
th
e
Blue
too
t
h
per
f
or
mance
.
This
is
most
n
otice
able
wh
en
y
o
u
tr
y
to
transfer
la
r
g
e
amounts
of
data,
such
a
s
fil
e
tr
a
n
sfe
r
s
or
pr
inting
lar
g
e
do
cuments.
This
may
a
l
so
be
n
o
ticea
b
l
e
wh
en
y
o
u
tr
y
to
transfer
la
r
g
e
or
smal
l
amo
un
t
s
of
data
may
if
seve
r
a
l
Bluet
o
oth
devices
ar
e
operating
simul
t
aneously
in
an
o
f
fic
e
.
•
Blue
too
t
h
audio
h
a
s
n
o
t
bee
n
fully
de
v
e
l
oped
f
or
spe
e
ch
r
ec
o
gnit
ion.
The
r
ef
or
e
,
f
or
spee
ch
r
e
cogn
ition
,
w
e
r
ec
ommend
that
y
o
u
no
t
use
a
B
l
ueto
oth
w
i
r
e
le
ss
he
adse
t.
Mor
e
ov
e
r
,
Mo
tion
Spea
k
Any
w
he
r
e
can
r
e
cor
d
cle
a
r
audio
,
dic
t
ate
notes
,
an
d
use
vo
ice
c
omman
ds
wit
hout
a
micr
opho
ne
he
adse
t.
•
S
ome
Bl
ueto
oth
device
s
wil
l
disconne
c
t
w
h
en
they
go
int
o
pow
e
r-sa
ving
mode
.
Mo
st
devic
e
s
w
ill
au
t
o
ma
tic
a
ll
y
r
ec
o
nn
ect
wh
e
n
the
y
be
c
ome
a
c
tiv
e
aga
i
n.
•
I
f
y
o
u
a
ttempt
to
in
stall
oth
e
r
w
i
r
e
le
ss
he
adse
t
or
o
t
he
r
audio
dr
iver
s
(such
as
Bl
ueto
oth
or
USB)
ov
er
th
e
T
a
bl
et
PC
a
udio
dr
iver
s
,
a
mal
f
unc
t
ion
of
th
e
T
a
blet
PC
a
udio
system
may
oc
c
u
r
because
the
driv
ers
may
not
b
e
c
o
mpatible
.
•
Occasionally
,
some
Bluet
o
ot
h
devic
e
compatibil
ity
issue
s
c
a
n
occur
.
I
f
y
o
u
ar
e
h
a
ving
pr
oblems
with
int
e
ro
perabilit
y
of
Bluet
o
ot
h
devices
,
contac
t
the
man
u
fac
t
ur
er
o
f
y
our
Bluet
o
oth
device
and
check
its
c
o
mpatibilit
y
with
th
e
B
l
ueto
ot
h
so
f
t
war
e
installe
d
on
yo
u
r
T
a
b
l
e
t
PC
.
F
i
nding
additional
sof
t
w
a
r
e
F
or
inf
or
mation
a
bout
other
tablet
-
or
i
ent
e
d
sof
t
war
e
,
g
o
t
o
the
Mo
tion
C
o
mputing
sof
t
war
e
page
at
www
.
mot
i
onco
m
putin
g
.c
o
m
/pr
oduc
t
s/sof
t
war
e
_mot
ion.asp
.
Y
o
u
w
ill
fin
d
lin
k
s
to
so
f
t
war
e
solutio
n
s
f
or
pur
c
h
ase
as
w
e
ll
as
fr
ee
down
loa
d
s
fr
om
Mo
tion
sof
t
war
e
and
ser
vice
par
t
ners
.
Ch
apter
3
Using
your
T
a
b
l
e
t
PC
53
54
Ch
apter
3
Using
your
T
a
b
l
e
t
PC
C
a
r
e
and
M
a
in
tenanc
e
4
P
ro
p
er
ca
r
e
a
n
d
ma
inte
nance
w
ill
ke
ep
y
our
T
a
blet
PC
w
o
rk
ing
a
n
d
in
good
condition
f
or
a
l
o
ng
time
.
F
or
gene
r
a
l
in
f
o
rma
t
ion
a
b
ou
t
ca
r
e
of
th
e
T
a
b
l
e
t
PC
a
n
d
its
c
o
mpon
ents
a
n
d
ac
cess
ories
,
see
the
S
a
f
e
ty
and
R
e
gulat
or
y
Guide
included
wit
h
y
our
T
a
blet
PC.
T
h
is
ch
apter
de
scr
i
be
s
th
e
care
an
d
mainte
nan
ce
pr
ocedur
es
f
or
y
our
XX
1x00
T
a
ble
t
PC
.
WA
R
N
I
N
G
:
F
o
ll
o
w
the
guidel
in
es
li
ste
d
belo
w
wh
en
ca
ring
f
or
y
our
T
a
bl
et
PC
a
n
d
its
c
o
mp
onen
ts
.
Improper
use
m
a
y
damage
the
T
a
blet
PC
and
its
c
omponen
t
s
and
vo
id
the
wa
rr
a
n
t
y
.
Gene
r
a
l
c
a
r
e
•
P
ro
t
ec
t
t
h
e
T
a
blet
PC
fr
om
expo
sur
e
to
ex
tr
eme
temperatur
e
s
,
sh
ock
,
liquids
,
a
n
d
str
o
ng
m
a
gn
etic
fi
el
ds
.
•
If
y
o
u
ar
e
st
oring
th
e
T
a
b
l
e
t
PC
f
or
a
long
time
,
unp
l
ug
the
po
w
e
r
a
d
a
p
t
e
r
an
d
r
e
m
ov
e
the
ba
tter
y
a
f
t
e
r
pa
r
t
ia
lly
dischar
g
i
ng
it.
•
Do
n
o
t
pl
ace
he
a
v
y
o
b
je
c
t
s
on
to
p
of
th
e
T
a
bl
et
PC.
•
Do
no
t
o
p
en
the
T
a
bl
et
PC
case
ex
cept
to
r
e
place
Mo
tio
n
-author
i
zed
compo
n
ents
.
Always
f
o
llow
the
inst
ruc
t
ion
s
include
d
wit
h
th
ese
accessor
i
es
w
h
e
n
per
f
or
ming
th
ese
p
r
oc
edur
es
.
55
Standar
d
display
•
Cl
ea
n
fing
er
pr
ints
a
n
d
mo
st
mark
s
fr
o
m
th
e
display
sur
f
ace
b
y
w
i
pin
g
it
with
th
e
so
f
t
c
l
o
t
h
(provide
d
)
.
N
e
v
e
r
sp
r
a
y
or
p
our
li
quids
dir
ec
t
ly
ont
o
the
display
sur
f
ace
itself
.
Nev
e
r
use
a
n
a
b
r
a
sive
cl
ean
e
r
on
th
e
displ
a
y
.
I
f
li
quid
is
spilled
on
t
h
e
display
,
wipe
it
up
immediat
ely
.
•
I
f
nee
d
ed,
spra
y
a
sof
t
cl
oth
(
not
dir
ec
t
l
y
on
th
e
displa
y)
w
ith
a
wind
o
w
-t
ype
cle
a
ne
r
an
d
wipe
th
e
display
.
•
A
v
oid
usin
g
tissues
or
paper
to
w
e
ls
to
cle
a
n
the
display
sur
f
ace
.
These
conta
i
n
w
o
od
fibe
rs
t
h
at
c
a
n
scratch
th
e
displ
a
y
.
•
U
s
e
on
ly
th
e
ta
bl
et
pe
n
on
th
e
disp
la
y
.
Do
n
o
t
writ
e
o
n
the
displ
a
y
with
a
n
in
k
p
e
n
or
pen
c
il
,
or
any
o
t
he
r
obje
c
t
th
a
t
c
o
uld
damage
t
h
e
displ
a
y
sur
f
a
ce
.
•
P
r
ot
ec
t
the
di
spla
y
sur
f
ace
fr
om
unnecessar
y
conta
c
t
b
y
usin
g
a
case
w
h
e
n
tran
spor
t
i
ng
the
T
a
blet
PC.
•
A
v
oid
ex
po
sing
the
display
to
dir
ec
t
sunl
igh
t
f
or
long
per
i
ods
o
f
time
.
V
i
ew
Any
w
her
e
display
(optional)
•
Cl
ea
n
fing
er
pr
ints
a
n
d
mo
st
mark
s
fr
o
m
th
e
display
sur
f
ace
b
y
w
i
pin
g
it
with
th
e
so
f
t
c
l
o
t
h
(provide
d
)
.
N
e
v
e
r
sp
r
a
y
or
p
our
li
quids
dir
ec
t
ly
ont
o
the
display
sur
f
ace
itself
.
Nev
e
r
use
a
n
a
b
r
a
sive
cl
ean
e
r
on
th
e
displ
a
y
.
I
f
li
quid
is
spilled
on
t
h
e
display
,
wipe
it
up
immediat
ely
.
•
I
f
n
ee
d
ed
,
cle
a
n
with
any
a
l
cohol-
ba
sed
pr
oduc
t
r
ec
ommende
d
f
or
anti-r
efle
c
t
iv
e
gla
ss
.
O
t
he
r
cle
a
ning
pr
oduc
ts
might
lea
v
e
a
r
e
sidue
.
•
A
v
oid
usin
g
tissues
or
paper
to
w
e
ls
to
cle
a
n
the
display
sur
f
ace
.
These
conta
i
n
w
o
od
fibe
rs
t
h
at
c
a
n
scratch
th
e
displ
a
y
.
•
U
s
e
on
ly
th
e
ta
bl
et
pe
n
on
th
e
disp
la
y
.
Do
n
o
t
writ
e
o
n
the
displ
a
y
with
a
n
in
k
p
e
n
or
pen
c
il
,
or
any
o
t
he
r
obje
c
t
th
a
t
c
o
uld
damage
t
h
e
displ
a
y
.
•
P
r
ot
ec
t
the
di
spla
y
sur
f
ace
fr
om
unnecessar
y
conta
c
t
b
y
usin
g
a
case
w
h
e
n
tran
spor
t
i
ng
the
T
a
blet
PC.
•
A
v
oid
ex
po
sing
the
display
to
dir
ec
t
sunl
igh
t
f
or
long
per
i
ods
o
f
time
.
56
Ch
apter
4
Care
an
d
Main
ten
a
n
ce

Cleaning
in
a
health
care
en
viro
nment
T
h
is
sec
t
ion
describes
the
cleaning
pr
oc
edur
es
f
or
a
T
a
bl
et
PC
in
a
h
e
al
th
care
e
n
vir
on
ment.
Disinf
ec
ting
pr
oc
edur
es
Y
o
u
sh
oul
d
periodic
al
l
y
disinf
ec
t
th
e
table
t
a
c
cor
ding
t
o
the
institutio
n
a
l
polices
of
sur
f
ace
an
d
equipment
sa
f
e
t
y
an
d
clea
nlin
ess
.
Acc
or
d
i
ng
t
o
t
h
e
Ce
nt
e
r
s
fo
r
D
i
s
e
a
s
e
Co
n
t
ro
l,
“i
tems
that
do
not
ordinarily
t
ouch
the
patien
t
or
t
o
u
c
h
o
n
l
y
in
ta
c
t
sk
in
a
r
e
n
o
t
in
vo
lv
ed
in
dise
a
s
e
tr
a
n
smission
,
a
n
d
gen
e
r
a
ll
y
do
n
o
t
nec
e
ssitat
e
disinf
ec
tion
bet
w
een
uses
on
diff
er
ent
patients
”
.
1
We
r
ec
ommend
using
an
EP
A-
ap
pr
ov
e
d
low-level
disinf
ec
tant
wh
en
general
clea
ning
is
r
e
quir
ed.
F
or
a
li
st
of
cle
a
n
i
ng
soluti
ons
t
e
sted
by
Motion
C
o
mputing
,
see
“
C
leaning
solutions
”
on
page
58.
If
the
tablet
bec
o
mes
soi
l
ed
with
blood
or
ot
her
body
fluids
,
chemica
l
g
e
rmicides
that
ar
e
EP
A-ap
pr
ov
e
d
f
or
use
a
s
ho
spital
disinf
ec
tants
a
n
d
t
h
at
ar
e
tuber
c
ul
ocidal/virucida
l
w
h
e
n
used
at
r
ec
ommen
d
e
d
dilutio
n
s
and
c
o
n
t
ac
t
time
s
can
be
used
.
V
i
sibly
s
oiled
ar
eas
should
fi
rst
be
cl
e
a
n
e
d
a
n
d
th
en
c
h
e
m
ica
l
ly
dec
o
n
t
a
m
in
a
t
ed
.
F
or
disin
f
ec
tion
,
th
e
cl
ea
n
e
d
a
r
ea
s
sho
u
ld
be
moist
e
ned
with
th
e
ap
pr
o
p
ria
t
e
ge
rmicide
an
d
al
lo
w
e
d
t
o
air
dr
y
.
2
If
a
ta
bl
et
is
u
s
ed
with
p
a
tien
ts
w
h
o
a
r
e
inf
ec
t
e
d
or
c
o
l
o
n
i
z
e
d
w
ith
va
nc
om
y
c
in
-r
esista
n
t
entero
cocci
or
oth
e
r
dr
ug-r
e
s
istant
microor
g
an
isms
judge
d
by
th
e
inf
ec
t
ion
contr
o
l
prog
r
a
m
(
b
a
s
e
d
on
cu
rr
en
t
sta
t
e
,
r
e
g
i
on
al
,
or
na
tion
al
r
ec
omme
n
da
tio
n
s
,
t
o
be
of
spe
c
ia
l
or
clinical
or
epidemiolog
i
c
sig
n
if
ica
n
ce
or
with
high
ly
vir
ul
en
t
mi
c
roor
g
an
i
s
ms
such
as
Ebo
l
a
or
Lassa
),
then
the
ta
blet
shou
ld
be
dedica
t
e
d
to
one
pa
tient
or
pa
t
i
ent
c
o
ho
r
t
or
subjec
ted
to
low-l
e
vel
disinf
ec
tion
bet
w
ee
n
patie
n
t
uses
.
1
T
raining
and
documenta
t
ion
c
o
nsider
ations
Al
l
user
s
o
f
Mo
tio
n
T
a
blet
PC
s
in
th
e
h
e
a
lth
c
a
r
e
en
viro
n
me
n
t
s
h
o
u
ld
be
pr
ovided
with
tr
a
i
n
i
ng
on
pr
o
p
er
c
l
ea
ning
p
r
oc
edur
es
.
C
l
e
a
ning
p
r
oc
edur
es
sh
oul
d
be
a
dde
d
t
o
th
e
instit
ution's
policies
and
pr
oc
edur
es
f
or
inf
ec
t
ion
con
t
ro
l
.
1.
C
e
nt
ers
f
or
D
i
s
e
ase
C
o
ntr
o
l
and
P
r
ev
en
tion.
“S
t
e
rilization
or
Disinf
ec
tion
of
M
e
di
ca
l
D
e
vi
ces-
G
e
neral
P
r
inciples
.
”
2002
.
<w
ww
.cdc.go
v
/ncid
od/
dhqp/bp_sterilization
_
m
e
dDevi
c
es.h
tml>
(2
0
Sept
.
2006
).
2.
C
e
nt
ers
f
or
D
i
s
e
ase
C
o
ntr
o
l
and
P
r
ev
en
tion.
“S
t
e
rilization
or
Disinf
ec
tion
of
P
a
tien
t-
Car
e
Equ
i
pmen
t-
HIV
Relate
d
.
”
20
00.
<w
ww
.cdc.go
v
/ncid
od/
dhqp/bp_sterilizatio
n_patien
t_car
e
.h
tml>
(20
Sept
.
2006
).
Ch
apter
4
Care
an
d
Main
ten
a
n
ce
57

Cleaning
solutions
T
h
is
sec
t
ion
describes
various
cleaning
solutions
that
ha
v
e
been
test
ed
b
y
Mo
tio
n
C
o
mputin
g
.
Ple
ase
r
e
vie
w
the
man
u
fac
t
ur
er
's
gu
ide
l
in
es
f
or
pr
oper
use
of
th
e
pr
oduct.
Pro
d
u
c
t
T
y
p
e
Man
u
f
a
c
t
u
r
e
r
C
omments
A
l
c
o
h
o
l
P
r
e
p
P
a
ds
D
yna
r
e
x
F
or
gene
r
a
l
pu
rpose
use
o
n
l
y
.
No
t
c
o
n
s
ider
ed
a
disin
f
ec
tant
f
or
he
alth
care
en
vironme
n
ts
.
C
a
vi-W
i
pes
M
e
t
r
e
x
C
an
be
difficult
to
cl
ea
n
o
ff
.
Can
le
av
e
a
film
on
th
e
product
.
Germicida
l
W
i
pes
(Super
S
a
ni-
C
loth
)
P
D
I
R
equir
e
s
gl
ov
es
f
or
use
a
n
d
can
be
difficul
t
to
cl
ea
n
of
f
.
Effec
t
iv
e
on
a
c
r
y
li
c
displ
a
y
s
but
ca
n
be
difficult
to
cl
ean
o
ff
th
e
V
i
ew
Any
w
he
r
e
display
.
MOC
Reviv
er
MOC
C
an
be
di
fficu
lt
t
o
c
l
e
a
n
of
f
.
C
a
n
l
e
a
v
e
a
fil
m
o
n
th
e
product
.
PVP
-
I
P
r
e
p
P
a
ds
T
r
iad
C
an
le
av
e
a
y
e
llow
fil
m
on
th
e
pr
oduct.
Sa
ni-
C
l
o
th
P
D
I
R
equir
e
s
gl
ov
es
f
or
use
a
n
d
can
be
difficul
t
to
clean
off
.
S
c
r
e
en
C
l
ea
ne
r
O
ffice
De
po
t
F
or
gen
e
ral
pur
p
o
s
e
use
on
ly
.
N
o
t
consider
e
d
a
disin
f
ec
tant
f
or
he
alth
care
en
vironme
n
ts
.
V
i
r
a
-
G
ua
r
d
V
e
ridien
H
i
gh
ly
r
ec
omme
nd
ed
.
V
i
r
e
x
V
ir
e
x
C
a
n
be
di
fficu
l
t
t
o
c
l
e
a
n
of
f
.
C
a
n
l
e
a
v
e
a
fil
m
o
n
th
e
product
.
Cleaning
the
fingerprint
r
e
ader
Unde
r
n
or
m
a
l
cir
c
umstan
ce
s
,
y
o
u
sh
ould
cle
a
n
the
finger
pr
int
r
e
a
d
er
on
ce
a
month
,
or
wh
enever
ne
cessar
y
.
T
o
cl
ean
the
fingerprint
reader
1.
Shut
do
w
n
th
e
T
a
ble
t
PC
,
unpl
ug
it
,
and
r
e
mov
e
the
batt
ery
.
2.
Lig
h
t
ly
spra
y
a
cot
t
on
swab
w
ith
ho
use
h
o
l
d
w
i
ndow
cle
a
n
e
r
.
3.
Gently
rub
the
sensor
sur
f
a
ce
with
the
cott
on
sw
ab
,
slo
w
ly
ro
tating
the
swab
so
a
new
,
cl
ea
n
sur
f
ace
of
th
e
swab
is
con
s
tantly
ex
posed
t
o
the
sensor
su
r
f
a
ce
.
Do
no
t
a
llow
c
l
e
a
n
e
r
t
o
drip
or
r
un
do
w
n
in
t
o
th
e
el
ec
tr
on
ics
a
rou
nd
the
sen
s
or
.
Do
no
t
u
s
e
bl
ea
ch
,
so
lv
ents
,
or
a
b
r
a
siv
e
s
.
Do
n
o
t
spr
a
y
or
p
our
any
li
quid
dir
ec
t
l
y
o
n
the
sensor
.
4.
Af
te
r
cle
a
n
i
ng
,
gently
r
u
b
t
h
e
sur
f
aces
a
g
ain
wit
h
a
clea
n,
dr
y
cotton
swab
.
U
s
e
a
cl
ean
swab
each
time
y
o
u
clean
the
sensor
.
58
Ch
apter
4
Care
an
d
Main
ten
a
n
ce
Pe
n
•
S
t
or
e
the
pen
in
the
pen
bay
or
in
a
case
when
not
in
use
.
•
Do
not
st
or
e
the
pen
v
e
r
t
ica
lly
on
the
tip
.
C
onstant
pr
essure
on
the
tip
can
aff
ec
t
the
pen-t
o
-
dig
itiz
er
int
e
r
a
c
t
ion.
•
Change
the
pen
tip
r
e
gu
larly
.
S
ee
“
R
e
p
l
a
c
i
ng
pe
n
tips
”
on
p
a
ge
59
.
•
Do
not
immerse
the
pen
in
li
q
u
id
.
I
t
c
o
n
t
a
i
ns
el
ec
tr
on
ic
c
o
mpo
ne
n
t
s
tha
t
c
o
uld
be
damaged
.
•
I
n
cer
t
ain
en
vironments
,
pa
r
t
icles
or
debr
is
ca
n
stick
t
o
the
pen
tip
or
t
h
e
T
a
blet
PC
display
.
T
o
a
v
oid
da
maging
the
display
,
clea
n
it
fr
e
q
ue
ntly
wit
h
th
e
pr
ovided
cle
a
ning
c
l
o
t
h
.
A
l
s
o
,
c
h
a
ng
e
p
e
n
t
i
p
s
r
e
gu
l
a
r
l
y
,
e
s
p
ec
i
a
ll
y
if
y
o
u
d
ro
p
t
h
e
p
e
n
o
n
t
o
a
ro
ugh
s
u
r
f
a
ce
that
c
o
u
l
d
damage
the
tip
or
embed
debris
in
it.
Damaged
pen
tips
can
scra
t
c
h
the
display
.
Replacing
pen
tips
P
e
n
tips
ev
entually
w
e
ar
do
wn
or
get
damaged
,
so
t
h
e
pen
includes
ex
tra
tips
a
n
d
a
too
l
f
or
re
p
l
a
c
i
ng
t
h
e
m
.
W
ith
t
ypica
l
use
,
y
o
u
sh
ou
ld
ch
a
n
ge
th
e
pe
n
tip
every
90
day
s
.
If
y
o
u
use
the
pen
in
a
dir
t
y
en
vironme
n
t,
y
o
u
sh
ould
chang
e
th
e
pe
n
tip
every
30
day
s
.
P
a
r
t
icle
s
can
become
embedded
in
the
pen
tip
and
scra
t
c
h
the
display
.
T
o
r
e
plac
e
the
pen
tip
1.
Grasp
the
old
tip
with
the
tip
r
e
placemen
t
t
o
ol
.
U
s
e
th
e
no
t
c
h
on
th
e
r
i
ng
t
o
g
r
a
b
th
e
tip
.
2.
P
u
ll
the
old
tip
out
of
t
h
e
pen.
3.
I
n
ser
t
a
ne
w
tip
.
4.
A
p
ply
slight
pr
essure
t
o
push
it
in
t
o
plac
e
.
Or
dering
new
pens
T
o
order
additional
pens
,
go
t
o
the
Mo
tion
C
o
mpu
ting
accessories
p
a
ge
a
t
www
.
m
o
tio
n
com
p
u
t
ing
.com
/
a
c
cesso
r
i
es
.
Ch
apter
4
Care
an
d
Main
ten
a
n
ce
59

T
r
a
v
eling
with
y
our
T
a
blet
PC
U
s
e
th
e
f
o
ll
o
w
i
ng
tips
wh
en
y
o
u
tr
a
v
el
with
y
our
T
a
bl
e
t
PC
:
•
Remo
v
e
all
accessories
and
c
a
bles
.
Reme
mber
t
o
pa
ck
tho
s
e
y
o
u
wil
l
n
ee
d
wh
ile
traveling
,
including
a
t
least
one
tablet
pen.
•
P
u
t
th
e
T
a
ble
t
PC
in
to
a
por
t
f
o
lio
or
ot
her
case
to
pr
o
t
ec
t
the
display
.
•
P
r
ot
ec
t
the
pen
by
keeping
it
in
the
pen
bay
or
in
a
case
du
r
i
ng
tr
a
v
el
.
•
P
a
ck
th
e
T
a
bl
et
PC
se
cur
e
l
y
in
a
brief
c
a
s
e
or
ha
n
d
-
c
a
r
rie
d
lu
gga
g
e
,
an
d
ke
e
p
i
t
se
pa
r
a
t
e
fr
o
m
to
iletr
i
es
,
liquids
,
and
f
o
od
.
D
o
not
pack
it
in
check
e
d
lugg
age
.
•
Ke
ep
th
e
T
a
ble
t
PC
stable
dur
i
ng
tr
a
v
el
.
S
e
cur
e
it
t
o
pr
even
t
it
fr
om
sliding
a
r
ound
in
ov
e
r
he
a
d
b
i
ns
a
n
d
ca
r
tru
n
ks
.
•
B
e
f
or
e
ex
te
nded
use
in
th
e
fiel
d
or
l
o
ng
tr
ips
a
w
a
y
fr
o
m
A
C
pow
e
r
,
a
d
just
th
e
pow
e
r
pr
o
p
erties
to
ma
ximiz
e
batte
r
y
con
s
er
vation
.
Y
o
u
ca
n
a
d
just
th
e
pow
e
r
pr
o
p
erties
fr
om
Mo
tion
Dashboar
d
.
S
ee
“Using
p
o
w
e
r
plans
”
on
page
30.
•
F
or
int
e
r
nation
a
l
tr
a
v
el
,
obtain
an
d
use
the
ap
propriat
e
adapt
e
rs
f
or
y
our
destin
a
t
ion
’
s
el
ec
tr
ical
outle
t
s
.
A
cur
r
en
t
conv
er
t
e
r
is
not
necessar
y
.
•
Y
o
u
may
w
a
nt
to
car
r
y
pr
oo
f
of
own
e
r
s
hip
or
a
mer
c
han
d
ise
pa
sspo
r
t
wh
en
trav
e
l
ing
int
e
rna
t
iona
lly
.
•
C
o
nsu
l
t
y
our
in
sur
a
n
ce
c
ompa
n
y
a
n
d
cr
edit
ca
r
d
c
ompa
n
y
to
le
a
r
n
ab
out
eme
rgen
c
y
trav
el
assistance
in
case
y
our
T
a
blet
PC
bec
o
mes
lost
or
disabled
.
T
r
a
v
eling
b
y
air
Use
t
h
e
f
o
llowin
g
tips
w
h
e
n
tr
a
velin
g
by
air
.
•
Ha
ve
a
fully
charged
batt
e
r
y
in
ca
se
se
curi
t
y
pe
rs
on
ne
l
a
s
k
y
o
u
t
o
sta
r
t
the
T
a
bl
et
PC
.
•
Ha
ve
it
han
d
-inspe
c
t
e
d
or
sent
t
h
ro
ugh
the
X
-
r
a
y
sca
nner
,
but
ne
v
e
r
car
r
y
it
thr
o
ugh
th
e
metal
det
ec
t
or
.
•
T
u
r
n
off
th
e
T
a
bl
et
PC
o
ff
or
pl
ace
it
in
hiber
n
a
t
ion
mode
f
or
take
off
and
lan
ding
.
F
AA
W
i
r
e
less
air
tra
v
e
l
r
e
quir
ement
T
h
e
F
AA
r
e
quir
es
that
y
o
u
suspend
wir
e
less
oper
atio
ns
,
such
as
W
i
-F
i
an
d
B
l
uet
o
oth
,
befor
e
boar
din
g
a
pl
ane
.
Y
o
u
ca
n
disa
bl
e
a
ll
wir
e
less
b
y
ope
n
in
g
th
e
Da
shboa
r
d
to
the
W
ir
eless
tab
,
and
under
80
2.
11
W
i-
F
i
,
uncheck
the
Enabl
e
802.11
Int
e
rnal
W
ir
eless
.
T
o
dis
a
ble
ex
t
e
rnal
wir
e
less
,
r
e
mo
v
e
any
wir
e
less
PC
car
d
s
.
F
a
ilur
e
t
o
suspend
wir
e
less
o
p
er
a
t
io
ns
wh
il
e
tr
a
v
el
ing
b
y
air
c
a
n
cause
p
r
obl
e
ms
with
a
i
r
c
r
a
ft
in
strumen
t
s
.
DA
N
G
E
R
:
Do
n
o
t
t
r
anspor
t
Li-io
n
ba
tt
erie
s
in
ch
ecke
d
bag
g
age
.
The
bagg
age
h
o
l
d
can
get
v
e
r
y
h
ot,
wh
ich
can
ov
e
r
he
at
th
e
Li-io
n
batter
y
an
d
r
e
sult
in
a
n
ex
pl
osio
n.
Y
o
u
ca
n
t
a
ke
up
t
o
tw
o
spar
e
ba
tt
eries
in
car
r
y-
on
lugg
age
,
in
addition
t
o
the
one
in
y
our
T
a
blet
PC.
T
r
anspor
ting
batt
eries
in
checked
baggage
or
tr
a
n
spor
ting
mor
e
tha
n
t
w
o
spar
e
ba
tteries
is
a
v
i
olation
o
f
f
e
deral
tr
a
n
spor
tation
r
e
gulation
s
.
60
Ch
apter
4
Care
an
d
Main
ten
a
n
ce
Cr
eating
a
back
up
ar
chiv
e
I
f
y
o
u
want
to
ro
ll
back
y
our
ta
bl
et
to
a
pr
ede
t
er
min
e
d
st
a
t
e
,
y
o
u
can
create
a
ba
ck
up
ar
chiv
e
.
T
o
cr
ea
t
e
a
c
o
mplet
e
PC
backup
ar
chiv
e
1.
F
ro
m
th
e
Sta
r
t
menu
,
tap
Backup
Sta
t
us
and
C
o
nfigur
a
t
ion
.
2.
T
a
p
C
o
mp
let
e
PC
Backup
.
3.
T
a
p
Cr
ea
te
a
ba
ckup
no
w
a
n
d
f
o
ll
o
w
th
e
in
struc
t
io
ns
to
create
a
back
up
c
o
p
y
o
f
y
our
entir
e
c
o
mputer
.
Not
e
:
Y
o
u
w
ill
need
a
n
e
x
t
e
rn
al
USB
h
a
r
d
disk
driv
e
or
DVD
driv
e
a
tta
ched
t
o
st
or
e
the
backup
c
o
p
y
.
T
o
back
up
individual
files
1.
F
ro
m
th
e
Sta
r
t
menu
,
tap
Backup
Sta
t
us
and
C
o
nfigur
a
t
ion
.
2.
T
a
p
Ba
ck
U
p
F
i
l
e
s
.
3.
F
o
ll
o
w
th
e
in
struc
t
io
ns
to
back
up
se
le
c
t
e
d
fil
e
s
t
o
pr
ot
ec
t
a
g
a
i
nst
lo
ss
or
ac
cide
n
t
al
deletion.
Rest
oring
da
ta
I
f
y
o
u
expe
r
i
en
ce
a
pr
o
b
lem,
y
o
u
can
use
the
W
i
n
d
o
w
s
R
e
covery
En
vir
onment
to
r
e
pa
ir
y
our
W
i
ndo
w
s
V
i
sta
fi
le
s
,
or
y
o
u
c
a
n
r
e
s
t
or
e
y
our
c
o
mp
ut
er
to
th
e
sta
t
e
it
w
a
s
in
wh
en
it
l
e
ft
th
e
fac
t
or
y
.
I
f
a
serious
pr
oblem
occurs
and
W
i
ndow
s
V
i
sta
will
not
r
e
star
t
,
the
W
i
ndo
w
s
R
ec
ov
e
r
y
En
viro
n
me
n
t
R
e
pair
wil
l
automaticall
y
star
t.
A
dditio
n
al
ly
,
y
o
u
can
create
y
our
o
w
n
backup
data
ar
ch
iv
e
s
an
d
r
e
st
or
e
th
ose
lat
e
r
.
F
or
mor
e
inf
o
rma
t
ion,
see
“
C
r
e
ating
a
back
up
ar
chiv
e
”
o
n
page
61
.
U
s
ing
W
i
ndow
s
Rec
o
v
e
r
y
En
vironmen
t
Whe
n
usin
g
th
e
W
i
ndow
s
R
e
covery
En
vironme
n
t,
y
o
u
w
ill
need
a
ke
ybo
a
r
d
conn
ec
te
d
to
the
tablet.
T
o
r
e
pair
W
indow
s
V
i
sta
files
1.
Af
te
r
y
our
ta
blet
r
e
star
ts
a
f
te
r
t
h
e
init
ial
BIOS
display
scr
e
en,
pr
ess
and
hold
the
F8
key
.
2.
On
t
h
e
A
d
va
nc
ed
Boot
Option
s
scr
e
en,
selec
t
Repair
yo
ur
c
o
mputer
and
pr
ess
the
En
ter
key
.
3.
S
e
lec
t
a
keyboa
r
d
la
y
o
ut
a
n
d
click
Ne
x
t
.
4.
S
e
l
ec
t
a
user
n
a
me
and
enter
th
e
pa
ssw
or
d
,
an
d
then
click
OK
.
5.
On
t
h
e
Sys
t
e
m
R
e
co
ve
r
y
O
p
t
i
o
n
s
m
e
nu,
click
Star
tup
Repair
.
Ch
apter
4
Care
an
d
Main
ten
a
n
ce
61
T
o
r
e
st
ore
fr
o
m
your
c
o
mpl
e
te
PC
backup
ar
chiv
e
1.
Af
te
r
y
our
ta
blet
r
e
star
ts
a
f
te
r
t
h
e
init
ial
BIOS
display
scr
e
en,
pr
ess
and
hold
the
F8
key
.
2.
On
t
h
e
A
d
va
nc
ed
Boot
Option
s
scr
e
en,
selec
t
Repair
your
c
o
mputer
and
pr
ess
the
En
ter
key
.
3.
S
e
lec
t
a
keyboa
r
d
la
y
o
ut
a
n
d
click
Ne
x
t
.
4.
S
e
l
ec
t
a
user
n
a
me
and
enter
th
e
pa
ssw
or
d
,
an
d
then
click
OK
.
5.
A
tta
ch
th
e
USB
ha
r
d
disk
dr
ive
or
DVD
driv
e
th
a
t
y
o
u
used
to
stor
e
y
our
c
o
mpl
e
te
PC
backup
ar
chiv
e
.
6.
On
t
h
e
Sys
t
e
m
R
e
co
ve
r
y
O
p
t
i
o
n
s
m
e
nu,
click
W
indow
s
C
o
mplet
e
PC
Rest
ore
.
7.
F
o
ll
o
w
th
e
in
struc
t
ions
in
the
Rest
ore
your
entir
e
c
o
mputer
fr
om
a
backup
dialog
.
T
o
r
e
st
ore
the
original
fac
t
ory
image
1.
Af
te
r
y
our
ta
blet
r
e
star
ts
a
f
te
r
t
h
e
init
ial
BIOS
display
scr
e
en,
pr
ess
and
hold
the
F8
key
.
2.
On
t
h
e
A
d
va
nc
ed
Boot
Option
s
scr
e
en,
selec
t
Repair
your
c
o
mputer
and
pr
ess
the
En
ter
key
.
3.
S
e
lec
t
a
keyboa
r
d
la
y
o
ut
a
n
d
click
Ne
x
t
.
4.
S
e
l
ec
t
a
user
n
a
me
and
enter
th
e
pa
ssw
or
d
,
an
d
then
click
OK
.
5.
On
t
h
e
Sys
t
e
m
R
e
co
ve
r
y
O
p
t
i
o
n
s
m
e
nu,
click
Motion
C
o
mputing
F
a
c
t
ory
Im
age
Rest
ore
.
6.
T
o
ack
n
o
w
le
dge
t
h
at
y
our
"C:"
dr
ive
w
ill
be
r
e
f
or
m
a
t
ted
a
n
d
t
h
e
fa
c
t
or
y
ima
g
e
r
e
stor
e
d
,
click
Rest
ore
,
and
then
c
l
ick
Ye
s
.
All
user-
c
r
e
ate
d
data
w
ill
be
dele
ted.
7
.
A
f
t
e
r
th
e
ima
g
e
h
a
s
be
en
r
e
st
or
ed
,
c
l
ick
Res
t
ar
t
.
T
h
e
ta
bl
et
wil
l
r
esta
r
t
t
w
ic
e
be
f
or
e
a
n
y
user
input
is
r
e
quir
ed
.
Using
W
i
ndows
V
i
sta
to
r
e
stor
e
files
Yo
u
c
a
n
u
s
e
W
indow
s
V
i
sta
Backup
Sta
t
us
and
C
o
nfigur
a
t
ion
to
r
e
s
t
ore
d
a
t
a
t
h
at
you
ar
chiv
e
d
.
T
o
r
e
st
ore
backup
files
1.
F
r
om
the
S
t
a
r
t
Menu,
tap
Backup
S
t
a
t
us
and
C
o
nfigur
a
t
ion
.
2.
T
a
p
Restor
e
F
i
l
e
s
.
3.
F
o
llo
w
the
instruc
t
ions
t
o
r
e
st
or
e
individua
l
files
and
f
o
lders
tha
t
ha
v
e
been
acciden
t
ally
delet
e
d
or
damaged
.
62
Ch
apter
4
Care
an
d
Main
ten
a
n
ce
A
T
roubleshooting
and
Suppor
t
Motion
C
o
mputing
T
a
blet
PCs
ar
e
thor
oughly
teste
d
f
or
per
f
or
mance
and
qual
it
y
,
but
occasio
n
a
lly
pr
oble
ms
still
occur
.
I
f
y
o
u
do
not
find
the
inf
o
rma
t
ion
y
o
u
ar
e
look
ing
f
or
in
this
sec
t
ion,
g
o
t
o
the
Mo
tion
C
o
mputing
sup
p
or
t
page
a
t
www
.
motionc
o
mputing
.
c
o
m/
su
pp
or
t
.
T
roubleshooting
U
s
e
the
inf
o
rma
t
ion
in
this
sec
t
ion
t
o
identi
fy
a
n
d
r
eso
lv
e
c
o
mmon
i
ssues
.
I
f
an
iss
u
e
has
m
or
e
than
one
pot
e
n
t
ial
cause
,
the
most
c
o
mmon
c
a
u
s
e
is
list
ed
fi
rst
.
Po
w
e
r
T
h
e
c
o
mputer
do
es
not
turn
on
•
T
h
e
po
w
e
r
b
u
tt
on
might
not
be
fu
lly
pr
essed
.
P
r
ess
and
ho
ld
th
e
pow
e
r
but
t
on
f
or
a
t
lea
s
t
a
hal
f
-se
c
ond,
but
no
mor
e
tha
n
t
h
r
ee
seco
nds
.
•
T
h
e
tablet
might
not
be
plugged
in
or
ba
tter
y
might
be
deplet
ed
.
Plug
the
tablet
in
t
o
AC
p
o
w
e
r
.
T
h
e
c
o
mputer
do
es
not
shut
down
•
An
ap
pl
icatio
n
might
h
a
v
e
sto
ppe
d
r
e
spon
ding
.
Use
T
ask
M
a
nag
e
r
to
ma
nually
stop
th
e
ap
pl
icatio
n.
(P
r
e
ss
th
e
W
i
n
d
o
w
s
S
e
curit
y
butt
on
an
d
tap
Sta
r
t
T
a
sk
M
a
n
age
r
.)
F
or
mo
r
e
inf
o
rmation
,
o
p
en
W
i
n
d
o
w
s
He
lp
an
d
Sup
p
or
t
an
d
sea
r
ch
f
or
“
t
ask
manage
r
”
.
Y
o
u
can
also
slide
and
pr
ess
the
pow
e
r
but
t
on
f
or
fiv
e
sec
o
nds
t
o
f
or
ce
the
tablet
to
shut
do
wn.
T
h
e
c
o
mputer
will
not
e
n
t
e
r
H
iberna
t
ion
mo
de
.
•
H
i
berna
t
ion
migh
t
not
be
enabled
.
U
s
e
Mo
ti
on
Dash
bo
ar
d
t
o
enable
H
i
be
rnation
.
S
ee
“Using
H
i
bernat
e
”
on
page
32.
T
h
e
c
o
mputer
do
es
not
r
e
turn
fr
o
m
Hib
e
rna
t
ion
while
on
ba
tt
er
y
p
o
w
e
r
•
T
h
e
batt
ery
might
be
deplet
ed
.
P
l
ug
the
c
o
mput
er
in
t
o
A
C
po
w
e
r
.
63
T
h
e
displa
y
go
es
black
while
th
e
T
a
blet
PC
is
still
turned
on
•
T
h
e
c
o
mput
e
r
might
ha
v
e
turned
off
the
display
t
o
sa
v
e
po
w
e
r
.
T
o
r
e
st
or
e
the
display
,
t
ouch
the
scr
e
en
with
the
tablet
pen
or
pr
ess
a
butt
on.
•
T
h
e
c
o
mpute
r
might
have
gon
e
into
Sl
eep
mo
de
.
I
n
Sl
ee
p
mode
,
t
h
e
po
w
e
r
status
light
flash
e
s
blue
.
P
r
e
ss
an
d
ho
ld
t
h
e
po
w
e
r
button
f
or
about
one
se
c
o
nd
.
•
T
h
e
c
o
mpu
t
e
r
might
ha
v
e
gone
int
o
low-ba
tt
ery
H
i
b
e
rnation
mode
.
In
lo
w-ba
tter
y
H
i
ber
nation
mode
,
the
po
w
e
r
status
light
is
of
f
.
Plug
the
c
o
mput
e
r
in
to
A
C
po
w
e
r
,
then
pr
ess
and
hold
the
po
w
e
r
butt
on
f
or
abou
t
one
s
ec
ond
.
Battery
T
h
e
ba
tt
er
y
do
es
no
t
last
ve
r
y
long
(less
than
thr
ee
hours)
•
H
o
t
or
c
o
l
d
c
o
nditio
ns
ca
n
a
d
v
e
r
s
ely
a
ff
ec
t
the
ba
tt
ery
ch
a
r
ge
.
U
s
e
A
C
po
w
e
r
if
y
o
u
ar
e
oper
ating
the
comput
e
r
in
these
c
o
nditions
.
•
A
cce
sso
r
y
devic
e
s
such
a
s
a
DVD
pl
a
yer
an
d
applica
t
io
ns
that
mak
e
h
e
a
v
y
use
of
th
e
ha
r
d
driv
e
can
dr
a
i
n
th
e
batte
r
y
mo
r
e
quick
l
y
.
R
e
mo
ve
the
accessor
y
devices
or
use
A
C
po
w
e
r
if
possible
.
•
T
h
e
batter
y
may
be
w
e
a
ken
ing
.
Use
a
diff
er
ent
ba
tt
ery
if
possible
.
T
o
or
de
r
a
new
ba
tt
ery
,
go
t
o
www
.
motionc
o
mpu
ting
.
c
om/ac
cessories
.
I
lost
da
ta
while
sw
apping
ba
tteries
•
Y
o
u
can
sw
a
p
ba
tter
i
e
s
on
ly
if
:
–
T
he
tablet
is
running
on
A
C
po
w
e
r
while
y
o
u
swap
the
batt
ery
.
–
Y
ou
ha
v
e
a
sec
o
nd
batt
ery
t
o
plac
e
in
the
sec
o
nd
ba
tt
ery
b
a
y
be
for
e
r
e
moving
the
ba
tter
y
in
the
first
ba
tt
ery
bay
.
F
or
in
f
or
m
a
t
ion
a
bout
swap
ping
ba
tter
i
e
s
,
se
e
“S
wa
pp
in
g
th
e
batte
r
y
”
on
page
35
.
Displa
y
T
h
e
deskto
p
ar
ea
is
larger
than
the
T
a
blet
PC
displa
y
•
I
f
the
display
r
e
solution
is
set
higher
than
the
display
can
sup
p
or
t
,
the
deskt
o
p
ar
ea
scr
o
lls
as
y
o
u
mov
e
ar
ound
.
D
e
cr
ease
the
display
r
e
solution
so
t
h
at
the
entir
e
deskt
o
p
is
visible
.
F
or
mor
e
inf
o
rma
t
ion,
open
W
i
ndow
s
He
lp
an
d
Sup
p
or
t
an
d
sea
r
ch
f
or
“
c
h
a
ng
e
re
s
o
l
u
t
i
o
n
”
.
W
h
en
I
disc
onnec
t
an
e
x
t
e
rnal
mo
nit
o
r
,
the
deskto
p
ar
ea
is
l
a
r
g
er
than
the
T
a
blet
PC
displa
y
•
T
h
e
c
o
mput
e
r
may
ha
v
e
expanded
the
des
k
t
o
p
be
y
o
nd
th
e
dis
p
la
y
a
r
e
a
o
f
th
e
T
a
bl
et
PC
display
.
U
s
e
Mo
tion
Dashboar
d
t
o
set
the
T
a
blet
PC
a
s
the
ac
tiv
e
display
.
F
or
mor
e
inf
o
rmation
,
see
“S
et
ting
up
an
ex
t
e
r
n
al
display
”
on
page
27
.
1.
Ope
n
Mo
tio
n
Da
shboa
r
d
to
the
Display
pane
l
(
p
a
g
e
2
2)
.
2.
T
a
p
t
h
e
P
roper
ties
butt
on
3.
S
e
l
ec
t
Not
e
book
t
o
make
th
e
T
a
b
l
e
t
PC
the
primar
y
displ
a
y
.
64
Appendix
A
Tro
u
bl
e
s
ho
otin
g
a
n
d
Sup
p
or
t
T
h
e
displa
y
is
too
dim
•
T
h
e
brightne
ss
may
be
set
to
o
l
o
w
.
Use
Mo
tion
Dash
bo
ar
d
to
in
cr
e
ase
the
brightne
ss
.
Se
e
“
A
dj
usting
the
displ
a
y
brigh
t
ne
ss
”
on
p
a
ge
27
.
T
h
e
displa
y
is
unreadable
or
distor
t
e
d
•
T
h
e
scr
e
en
r
e
sol
u
tion
an
d
color
qual
it
y
may
be
set
incorr
ec
tly
.
Use
W
i
ndow
s
Display
P
roper
ties
t
o
r
e
set
the
display
sett
i
n
gs
.
1.
I
n
C
ontr
o
l
P
a
ne
l
,
o
p
e
n
P
e
r
s
on
aliz
a
t
io
n.
2.
T
a
p
Di
spla
y
S
e
ttings
.
3.
F
or
Resolution
,
se
le
c
t
th
e
a
ppr
opr
i
ate
r
eso
lution
f
or
y
our
displ
a
y
(
1280
×
800
f
or
WX
GA
display
s
).
4.
F
or
Co
l
o
r
s
,
selec
t
H
i
gh
est
(3
2
bit)
.
•
T
h
e
disp
la
y
driv
er
may
ha
v
e
b
e
en
r
e
mo
v
e
d
or
bec
ome
c
orru
pt
ed
.
U
s
e
W
i
ndo
w
s
D
e
vic
e
M
a
nager
t
o
r
e
install
the
driv
er
.
1.
I
n
C
ontr
o
l
P
a
ne
l
,
o
p
e
n
S
y
stem.
2.
Unde
r
T
a
sks
,
tap
De
vic
e
Manager
.
3.
Expand
Displa
y
adapters
.
4.
S
e
l
ec
t
t
h
e
adapt
e
r
and
selec
t
Ac
t
i
o
n
>
Upda
t
e
Dri
v
er
S
o
f
t
war
e
.
5.
F
o
ll
o
w
th
e
in
str
u
c
t
io
ns
in
the
setup
prog
ram.
In
p
u
t
T
h
e
T
a
blet
PC
does
not
r
e
spond
t
o
the
pen
I
am
u
s
ing
•
Y
o
u
may
be
using
an
impr
oper
input
devic
e
.
O
n
ly
Mo
tion
tablet
pens
can
be
used
t
o
wr
ite
on
the
T
a
bl
et
PC
display
.
T
h
e
T
a
ble
t
PC
does
no
t
r
e
spo
n
d
to
o
t
he
r
pe
ns
or
to
a
plastic
st
ylu
s
.
•
Y
o
u
may
b
e
usin
g
th
e
wr
o
ng
ta
bl
et
pen
.
Occ
asi
o
n
a
l
ly
,
a
pa
r
t
i
c
ul
ar
tablet
pen
may
not
w
o
rk
w
ith
a
pa
r
t
i
c
ul
ar
T
a
bl
e
t
PC
.
If
y
o
u
a
r
e
in
a
n
en
vir
onment
with
multiple
tablets
a
n
d
pens
,
tr
y
using
a
diff
er
ent
pen.
Y
o
u
c
a
n
also
t
e
t
h
er
the
pen
t
o
the
tablet
t
o
ensur
e
that
a
pen
sta
y
s
with
its
tablet
.
T
h
e
po
int
e
r
on
the
scr
een
does
not
align
with
the
tablet
pen
•
T
h
e
pen
may
n
ee
d
to
be
cal
i
brated.
S
ee
“
C
alibra
te
th
e
digiti
z
e
r
”
on
page
7
.
W
h
en
I
writ
e
,
I
inadv
e
r
t
en
tl
y
clic
k
the
func
t
i
on
button
on
the
pen
•
T
r
y
a
d
j
u
sting
ho
w
y
o
u
ho
l
d
th
e
pe
n.
A
v
oid
r
e
sting
y
o
u
r
fin
g
er
o
n
th
e
fun
c
t
ion
butt
o
n
.
Y
o
u
can
also
disable
th
e
butto
n
.
S
ee
“
C
o
nfigur
i
ng
pen
optio
n
s
”
o
n
page
24
.
Appendix
A
Tro
u
bl
e
s
ho
otin
g
a
n
d
Sup
p
or
t
65
T
h
e
pen
fun
c
tion
butt
on
does
n
o
t
w
o
rk
•
T
h
e
pen
f
u
nc
tion
bu
tton
may
not
be
enab
led
.
–
Y
ou
ca
n
use
th
e
P
e
n
an
d
Inpu
t
De
vic
e
s
wind
o
w
t
o
en
a
b
l
e
th
e
b
u
tt
on
.
O
p
en
He
l
p
a
n
d
Sup
p
or
t
and
sear
ch
f
or
“P
en
an
d
I
n
put
D
evices
“
.
•
Y
o
u
may
not
be
pr
es
sing
the
b
u
tton
early
en
ough.
T
r
y
pr
essing
th
e
pe
n
fun
c
t
ion
butt
on
befor
e
y
o
u
t
o
u
c
h
the
pen
t
o
the
display
sur
f
ace
.
T
h
e
er
aser
do
es
not
w
o
rk
•
T
h
e
erase
r
may
no
t
be
enable
d
.
–
Y
o
u
can
use
th
e
P
e
n
an
d
I
n
put
D
evices
wind
o
w
to
enable
the
e
r
a
s
er
.
Open
He
l
p
and
Sup
p
or
t
and
sear
ch
f
or
“P
en
an
d
I
n
put
D
evices
“
.
The
e
r
a
s
er
w
or
k
s
on
in
k
on
ly
,
no
t
tex
t
.
T
h
e
buttons
on
the
T
a
blet
PC
do
not
d
o
wha
t
I
e
xpec
t
them
t
o
do
•
T
h
e
button
fun
c
t
i
ons
may
h
a
v
e
bee
n
custo
m
ized
.
Y
o
u
can
use
th
e
T
a
ble
t
an
d
P
e
n
S
e
tt
ings
wind
o
w
to
chang
e
t
h
e
button
s
to
the
desir
e
d
fun
c
tion
s
.
S
ee
“
C
onfigur
i
ng
fr
ont
panel
butt
ons
”
on
page
25.
P
or
t
s
and
c
o
nnec
t
ors
T
h
e
sy
stem
does
not
r
e
c
ognize
the
Expr
ess
car
d
I
inser
t
ed
•
T
h
e
ca
r
d
might
be
inser
t
ed
impr
o
p
e
rly
.
Ejec
t
the
ca
r
d
and
r
e
-inser
t
i
t
.
Ensure
the
la
bel
side
is
up
.
S
ee
“Expr
e
ss
car
d
slot
(optional)”
on
page
17.
•
T
h
e
devic
e
may
not
ha
v
e
been
t
e
sted
f
or
W
i
ndo
w
s
c
ompa
tibilit
y
.
F
or
a
list
of
t
e
sted
pr
o
d
uc
t
s
,
go
to
th
e
W
i
ndow
s
M
a
r
k
et
pl
ace
T
e
sted
P
ro
d
uc
t
s
page
a
t
www
.
micr
osof
t
.
c
o
m/whdc/hcl
.
T
h
e
sy
stem
does
not
r
e
c
ognize
a
USB
de
vic
e
•
W
i
ndo
w
s
may
ta
ke
a
shor
t
time
t
o
r
e
cog
n
iz
e
a
USB
device
.
W
a
it
a
f
e
w
momen
t
s
t
o
see
if
W
i
ndo
w
s
r
e
cog
n
iz
es
t
h
e
device
.
•
T
h
e
device
may
n
o
t
be
con
n
ec
ted
pr
operly
.
Ch
eck
t
h
e
c
o
nn
ec
tio
n
a
n
d
e
n
sur
e
it
is
inse
r
t
e
d
pr
oper
l
y
in
to
a
USB
po
r
t
.
Y
o
u
can
a
l
so
tr
y
a
diff
er
ent
por
t
.
•
T
h
e
c
orr
ec
t
driv
er
might
n
o
t
be
in
cl
uded
w
ith
W
i
ndow
s
.
C
h
ec
k
the
man
u
fa
c
t
ur
e
r
’
s
We
b
site
f
or
a
cur
r
e
n
t
dr
iver
,
or
use
th
e
inst
a
llation
CD
tha
t
ca
me
with
the
devic
e
.
T
h
e
T
a
blet
PC
is
in
the
F
l
e
xDock,
but
the
sy
ste
m
does
not
r
e
c
ognize
any
ac
c
e
ssor
y
de
vic
e
s
,
such
as
the
e
x
t
e
rnal
disk
driv
e
or
monit
o
r
•
T
h
e
T
a
blet
PC
may
not
be
fully
sea
t
ed
in
th
e
do
ck
.
R
e
m
o
ve
the
T
a
b
l
et
PC
f
ro
m
th
e
do
c
k
an
d
then
r
e
place
it
.
Net
w
or
k
T
h
e
wir
eless
adapt
e
r
k
eeps
c
o
nnec
ting
even
when
I
do
not
w
a
n
t
it
t
o
•
T
h
e
wir
e
less
adapte
r
is
ena
b
led.
Y
o
u
can
use
Mo
tion
Dashboar
d
t
o
d
i
sable
the
wir
e
less
adapt
e
r
.
S
ee
“Enablin
g
or
di
sabling
W
i
-F
i”
on
page
49.
66
Appendix
A
Tro
u
bl
e
s
ho
otin
g
a
n
d
Sup
p
or
t
I
cannot
c
onne
c
t
t
o
a
network
using
the
E
t
hernet
a
dapter
•
T
h
e
Ethe
r
n
e
t
cable
may
no
t
be
con
n
ec
ted
pr
o
p
er
l
y
.
R
e
mov
e
a
n
d
r
e
conn
ec
t
th
e
Eth
e
r
net
c
a
ble
or
r
e
plac
e
the
cable
.
A
u
dio
No
sou
nd
is
c
o
ming
fr
om
the
built-in
speak
ers
•
En
sur
e
th
a
t
no
thin
g
is
c
o
nn
ec
t
e
d
t
o
the
au
dio
ou
t
po
r
t
.
C
o
nn
ecting
head
phon
e
s
or
ex
te
r
n
a
l
spea
ker
s
disable
s
th
e
built-in
sp
eakers
.
Disconnec
t
the
he
adse
t
or
ex
tern
al
speakers
if
not
in
use
.
No
sou
nd
is
c
o
ming
fr
om
any
speak
ers
•
T
h
e
volume
may
be
set
t
oo
lo
w
or
muted
.
Y
o
u
can
use
Mo
tion
Dashboar
d
t
o
incr
ease
the
volume
or
turn
mute
of
f
.
•
T
h
e
in
teg
r
a
t
ed
audio
c
omponents
may
ha
v
e
been
ov
er
writt
e
n.
I
f
y
o
u
install
a
thir
d-par
t
y
audio
device
(such
as
a
USB
or
Bl
ue
t
oo
t
h
device),
t
h
e
int
e
g
rat
ed
a
udio
may
st
op
w
o
rk
ing
.
I
f
this
hap
p
ens
,
r
e
install
the
audio
driv
ers
.
Af
ter
y
o
u
install
these
,
if
y
o
u
still
ha
v
e
pr
o
b
lems
r
e
cor
ding
,
c
ontac
t
Mo
tion
C
o
mputing
T
e
chnical
S
uppo
r
t
.
Sys
t
e
m
I
f
o
r
g
ot
m
y
BIOS
passw
o
rd
and
c
a
nnot
ac
c
e
ss
m
y
c
o
mputer
•
Y
o
u
c
a
n
en
t
e
r
se
v
e
r
a
l
in
c
orr
ec
t
pa
ssw
or
ds
befor
e
the
BIOS
t
e
mporarily
locks
the
syst
em.
Y
o
u
can
tr
y
again
b
y
r
esta
r
tin
g
th
e
system.
I
f
y
o
u
still
cann
ot
log
on
,
c
ontac
t
Mo
tion
C
o
mpu
t
ing
T
ec
hn
ica
l
Su
ppo
r
t
a
t
www
.
m
otio
nc
ompu
ting
.c
o
m/supp
or
t
.
A
n
appl
ica
t
i
o
n
has
st
opped
r
esponding
,
b
u
t
I
can
still
move
the
poin
t
e
r
a
nd
use
oth
e
r
ap
plica
t
ions
•
T
h
e
applica
t
ion
may
h
a
v
e
stopped
r
e
spon
din
g
.
Use
T
ask
M
a
na
ger
to
man
u
a
lly
sto
p
the
applica
t
ion.
(P
r
e
ss
the
W
i
ndo
w
s
S
e
curit
y
butt
on
and
tap
Sta
r
t
T
a
s
k
M
anage
r
.)
S
ee
W
i
n
d
ows
He
l
p
a
n
d
S
u
pp
or
t
fo
r
m
o
re
i
nfo
r
m
a
t
i
o
n
.
T
h
e
c
o
mputer
seems
to
b
e
oper
a
t
ing
mor
e
slo
w
ly
than
usual
•
T
h
e
har
d
d
i
sk
driv
e
may
be
full
or
nearly
full
.
Y
o
u
c
a
n
use
Disk
Cleanup
t
o
fr
ee
up
sp
ace
on
y
our
ha
r
d
driv
e
.
F
or
mor
e
inf
or
mation
,
open
W
i
n
d
o
w
s
He
lp
a
n
d
Sup
p
or
t
an
d
se
ar
ch
f
or
“
d
isk
clea
nup
”
.
•
T
h
e
har
d
disk
may
nee
d
to
be
defr
a
g
mente
d
.
Y
o
u
ca
n
use
Disk
D
e
fragmenter
to
c
o
nso
l
idate
fil
e
s
a
n
d
f
o
l
d
e
r
s
on
th
e
h
a
r
d
dr
ive
.
F
or
mor
e
inf
or
matio
n,
ope
n
W
i
ndo
w
s
He
l
p
an
d
Suppo
r
t
an
d
sea
r
c
h
f
or
“
d
isk
defrag
ment
er
”
.
Appendix
A
Tro
u
bl
e
s
ho
otin
g
a
n
d
Sup
p
or
t
67
F
requently
asked
questions
Ho
w
can
I
mak
e
the
ba
tter
y
char
ge
l
a
st
longer?
•
F
or
ma
ximum
c
o
nse
rv
a
tion
,
y
o
u
ca
n
use
th
e
Po
w
e
r
s
ave
r
pow
e
r
plan
.
S
ee
“S
el
ec
tin
g
a
po
w
e
r
plan
”
on
page
31.
•
Use
t
h
e
D
y
n
a
mic
brightne
ss
display
sett
ing
.
Th
is
automaticall
y
co
n
t
ro
ls
th
e
displ
a
y
brightne
ss
to
conse
r
ve
pow
e
r
.
S
ee
“
A
djusting
the
display
brightne
ss
”
o
n
pag
e
27
.
•
S
e
t
the
display
brightness
t
o
the
dimmest
lev
e
l
y
o
u
ar
e
c
o
mf
or
tabl
e
w
i
th.
S
ee
“
A
djusting
the
display
brightne
ss
”
o
n
page
27
.
•
Disc
on
ne
c
t
any
E
t
herne
t
c
o
nn
ec
tion
s
th
a
t
a
r
e
n
o
t
bei
ng
used
.
Disa
bl
e
th
e
wir
e
l
e
ss
adapte
r
and
Bluetoot
h
a
d
apter
if
y
o
u
a
r
e
n
o
t
usin
g
th
em.
Disconn
ec
t
un
ne
ce
ssar
y
USB
devices
.
•
Stop
unn
e
cessa
r
y
backgr
oun
d
applica
t
io
ns
a
n
d
pr
o
ce
sses
.
W
h
a
t
do
I
need
t
o
use
the
T
a
blet
PC
in
another
c
ountr
y?
•
Y
o
u
wil
l
n
ee
d
a
tr
a
v
el
plug
a
d
apt
e
r
.
Y
o
u
ca
n
find
the
s
e
in
air
p
or
ts
and
trav
el
st
or
e
s
.
Y
o
u
do
not
need
to
buy
a
vo
ltag
e
conv
e
r
te
r
;
t
h
e
Mo
tio
n
A
C
adapte
r
w
ill
automaticall
y
a
d
just
to
diff
er
e
n
t
vo
ltag
es
.
Ho
w
do
I
clean
the
V
i
e
w
A
n
y
wher
e
displa
y
scr
een?
•
T
o
cl
ean
th
e
V
i
ew
Any
w
he
r
e
display
scr
e
en
,
wipe
it
w
ith
a
so
f
t
cl
oth
(like
t
h
e
on
e
suppli
ed).
If
needed
,
clean
with
any
alc
o
hol-b
ase
d
pr
o
d
uc
t
r
ec
ommende
d
f
or
use
on
anti-r
efle
c
t
iv
e
gla
ss
.
O
t
he
r
cl
ean
i
ng
pr
oduc
ts
may
lea
v
e
a
r
e
sidue
.
D
o
n
o
t
spra
y
cle
a
ne
rs
,
spr
a
y
/
pour
any
liquid
,
n
or
wipe
a
n
y
a
b
rasive
clea
ne
r
on
the
scr
ee
n
n
or
a
n
y
sur
f
ace
o
f
th
e
T
a
ble
t
PC
.
D
o
no
t
use
tissue
s
or
pape
r
to
w
e
l
s
to
cl
ea
n
th
e
scr
e
en.
The
y
c
o
n
t
ain
w
ood
fi
bers
and
may
scra
t
c
h
the
sur
f
ace
.
Ho
w
do
I
clean
the
standar
d
displa
y
scr
een?
•
T
o
c
l
e
a
n
the
ac
r
y
lic
disp
la
y
scr
e
en
,
wip
e
it
w
ith
a
so
f
t
cl
o
t
h
(like
th
e
on
e
suppl
ied)
o
n
t
o
wh
ich
y
o
u
have
spray
e
d
a
wind
o
w
-t
ype
cl
ean
e
r
.
Do
no
t
sp
r
a
y
c
l
e
a
ne
rs
,
sp
r
a
y/p
our
any
li
quid
,
n
or
wipe
a
n
y
a
b
r
a
siv
e
cl
ea
n
e
r
o
n
th
e
scr
ee
n
no
r
a
n
y
sur
f
a
ce
o
f
the
T
a
bl
et
PC
.
Do
no
t
use
tissues
or
pa
per
to
w
e
ls
to
clea
n
t
h
e
scr
e
en
.
The
y
c
o
ntain
w
oo
d
fibe
rs
a
n
d
may
scrat
c
h
the
sur
f
ace
.
W
i
ll
scr
a
t
c
hes
af
f
e
c
t
the
p
e
r
f
o
r
manc
e
of
the
displa
y
or
digitiz
e
r?
•
Our
t
e
sting
has
not
f
o
und
ap
pr
eciable
loss
of
per
f
orman
ce
o
n
a
scra
tche
d
display
.
Ho
w
sensitiv
e
is
the
scr
een
to
va
rio
u
s
elem
en
ts?
•
As
w
ith
any
c
o
mputer
or
ele
c
tr
onic
device
,
y
o
u
sh
oul
d
p
r
ot
ec
t
th
e
T
a
bl
e
t
PC
f
r
om
li
quids
,
dir
t
and
sand,
oth
e
r
c
ontamina
n
ts
,
and
ex
tr
eme
he
at.
W
i
ll
any
m
o
nit
o
r
,
USB
de
vic
e
,
k
e
yb
oar
d
,
or
m
ouse
w
o
rk
with
the
T
a
blet
PC?
•
If
the
devic
e
h
a
s
a
driv
e
r
f
or
W
i
n
d
o
w
s
,
it
w
ill
w
o
rk
with
th
e
T
a
bl
et
PC.
F
or
a
list
o
f
pr
o
d
uc
t
s
that
ha
v
e
bee
n
teste
d
f
or
W
i
ndow
s
,
go
to
th
e
W
i
ndo
w
s
M
a
r
k
etpla
ce
T
e
sted
Pr
o
d
u
c
t
s
p
a
g
e
a
t
www
.
micr
osof
t
.
c
o
m/whdc/hcl
.
W
h
y
is
the
T
a
blet
PC
l
a
ck
ing
parallel
,
serial,
and
PS2
(mouse
)
p
o
r
t
s?
•
M
i
crosof
t
T
a
blet
PC
cer
t
ification
r
e
quir
es
the
sy
st
em
t
o
be
c
o
mplet
ely
Grab
-and-
G
o
—
that
is
,
to
be
able
t
o
dock
with
and
undo
ck
fr
om
all
accessor
i
es
without
putting
the
68
Appendix
A
Tro
u
bl
e
s
ho
otin
g
a
n
d
Sup
p
or
t
sy
st
em
int
o
suspend
or
shutting
it
do
wn.
C
o
nn
ec
ting
thr
o
ugh
leg
a
c
y
por
t
s
such
as
serial
,
parallel
,
an
d
PS
2
often
r
e
quir
es
suspendin
g
or
r
esta
r
tin
g
the
sy
ste
m
,
w
h
ich
pr
events
y
o
u
fr
om
moving
bet
w
een
deskt
o
p
mode
and
mo
bile
mode
seamlessl
y
in
one
dock
ing/
undoc
k
ing
st
ep
.
Ho
w
do
I
adjust
the
T
a
blet
PC
f
o
r
left-handed
use?
•
Ope
n
the
T
a
bl
et
PC
S
e
ttings
wind
o
w
.
Y
o
u
can
selec
t
le
f
t
-
or
r
i
gh
t-han
d
ed
and
chang
e
the
l
o
ca
tio
n
of
th
e
me
nus
.
Y
o
u
sho
u
ld
calibra
t
e
t
h
e
T
a
ble
t
PC
scr
e
en
if
y
o
u
change
any
pe
n
o
ption
s
(pa
g
e
7
)
.
Specifications
Y
o
u
can
use
Sy
ste
m
I
n
f
or
mation
to
find
o
u
t
mor
e
about
y
our
har
d
war
e
an
d
sof
t
wa
r
e
en
vironme
n
t.
F
r
om
th
e
Sta
r
t
men
u
,
ch
oo
se
All
P
r
og
r
a
ms
>
A
cc
e
ssor
i
es
>
Sys
t
e
m
T
oo
l
s
>
Sys
t
e
m
I
n
f
o
rm
a
t
i
o
n
.
Y
o
u
can
fin
d
the
specificatio
ns
f
or
ot
her
Mo
tion
C
o
mputing
pr
o
d
ucts
a
t
www
.
m
o
tio
n
com
p
u
t
ing
.com
/
p
ro
d
u
c
ts
.
W
a
rrant
y
and
I
n
suran
c
e
P
r
ograms
Mo
tion
C
o
mpu
ting
curr
ently
pr
o
vides
limi
te
d
war
rantie
s
on
Mo
t
i
on
pr
o
d
uc
t
s
an
d
a
cce
sso
ries
.
Se
e
the
W
a
rr
a
n
t
y
pack
age
d
with
y
our
Mo
tion
prod
uc
t
or
a
cce
sso
r
y
or
visit
our
We
b
s
i
t
e
a
t
www
.
m
o
tio
n
com
p
u
ting
.com
.
I
n
addition
,
Mo
t
i
on
C
o
mputing
off
e
rs
ex
ten
d
ed
wa
rr
a
n
t
i
es
a
l
ong
w
ith
var
i
ous
scr
een
an
d
c
onfigura
t
ion
insurance
pr
ograms
.
G
o
to
th
e
Mo
t
i
on
C
o
mputing
Sup
p
or
t
a
n
d
S
e
r
vices
page
at
www
.
motionc
o
mputing
.
c
om/su
pp
or
t
.
Ser
v
ic
e
and
Sup
p
or
t
I
f
y
o
u
need
h
e
l
p
with
y
our
Mo
tio
n
C
o
mput
i
ng
J34
00
T
a
bl
et
PC
,
go
to
t
h
e
Mo
tio
n
C
o
mputing
Suppor
t
and
S
e
r
vic
es
page
at
www
.
mo
tio
n
c
om
puting
.c
om/suppor
t
.
T
h
is
page
will
pr
ovide
y
o
u
links
t
o
all
the
inf
o
rma
t
ion
y
o
u
need
about
Mo
tion
pr
oduc
ts
,
t
e
chnical
s
u
pp
or
t
,
cust
omer
ser
v
ic
es
and
prof
essional
ser
vic
es
.
Appendix
A
Tro
u
bl
e
s
ho
otin
g
a
n
d
Sup
p
or
t
69
70
Appendix
A
Tro
u
bl
e
s
ho
otin
g
a
n
d
Sup
p
or
t
Index
Numerics
10
/10
0
/1
000
Base
-T
Ethe
rnet
about
16
using
26
80
2.11
a/g/n
about
17
en
ablin
g
49
setting
up
49
using
49
A
AC
adapte
r
about
18
adjusting
display
brightness
27
air
ven
t
4
,
5
ambien
t
li
gh
t
se
nso
r
2,
15
audio
in
po
rt
5
audio
out
po
rt
5
Automat
i
c
Updates
46
B
backup
pr
ocedur
e
61
battery
3
about
19
checkin
g
stat
us
33
gauge
34
notificat
i
on
ar
ea
status
33
swapping
35
tips
34
using
33
battery
gauge
button
3
battery
power
indicator
lights
3
batte
ry
rele
ase
switc
h
3
battery
status
light
4
BIOS
setting
a
password
47
Bluetooth
about
18
discovery
52
en
ablin
g
51
setting
up
51
tips
53
using
50
bookmarks,
using
1
buttons
abo
u
t
11
configuring
25
fu
nctions
11
C
calibrating
the
digitizer
7
calibrating
the
pen
7
camera
2,
11
le
ns
3
ligh
t
3
capturing
a
fingerprint
42
car
d
slots
c
o
ver
4
ca
r
e
a
n
d
ma
inte
nanc
e
display
56
fin
g
er
pr
int
re
a
d
er
58
general
care
55
pen
59
re
pair
an
d
recovery
61
replaceme
n
t
pe
ns
59
replacing
pen
tips
59
scre
en
56
tablet
pen
59
View
An
yw
here
display
56
character
pad
24
charging
the
batt
ery
34
checking
batt
ery
gaug
e
34
che
c
kin
g
batt
ery
sta
t
us
33
configuring
front
pa
nel
buttons
25
pe
n
o
ption
s
24
,
25
co
nn
ec
ting
ex
tern
al
spea
ker
s
29
he
adpho
n
e
s
29
micro
p
ho
ne
29
cord
18
Ctr
l
+Al
t
+D
el
4
,
13
cust
omizing
buttons
25
D
Dashb
o
ard
starting
22
using
22
Dashb
o
ard
bu
tton
abo
u
t
2,
11
configuring
25
71
dictation
mod
e
29
digitizer
pen
about
10
,
23
ca
lib
r
a
t
ing
7
directional
pad
2,
11
disabling
th
e
er
a
s
er
24
the
pen
button
24
display
about
14
brightness
27
dynamic
brightness
27
ext
e
nde
d
28
fe
atur
es
14
fix
e
d
brightness
27
mir
rored
28
rotating
27
using
26
disposing
of
used
ba
tter
i
es
37
docking
port
5,
16
document,
about
1
dynamic
brightness
27
E
en
ablin
g
80
2.11
a/g/n
49
Bluetooth
51
er
aser
24
Mobile
Broadband
50
pen
bu
tton
24
Wi-Fi
49
er
aser
about
23
en
ablin
g
24
Esc
button
about
2,
11
configuring
25
Ethernet
co
nn
ection
s
6
port
16
using
26
Ethe
rnet
po
rt
5
Express
card
about
17
using
17
Expre
ss
ca
rd
sl
ot
4,
17
ext
e
nde
d
display
28
ext
e
rn
al
display
co
nn
ecting
16
using
27
F
FAA
w
i
rel
e
ss
a
i
r
trav
el
re
quir
emen
t
60
f
e
a
t
ur
es
ove
r
vie
w
9
finding
a
dditional
tablet
PC
softwa
re
53
fin
g
er
pr
int
reader
4
about
13
setting
up
42
tips
44
five-w
ay
direc
t
io
nal
c
o
n
t
roller
2,
11
fixed
brightness
27
Flex
Dock
co
nn
ec
tor
3
fr
equen
t
ly
aske
d
questio
n
s
68
fr
on
t
pan
e
l
butt
ons
about
11
configuring
25
Function
but
t
on
configuring
25
G
getting
sta
r
ted
6
Giga
bit
Ethe
rnet
16
H
handwriting
recognit
i
o
n
about
23
usin
g
24
har
d
ware
ove
rv
i
ew
2,
9
HDD
password,
setting
up
48
he
adphon
es
po
rt
5,
15
he
adphon
es,
con
n
ec
tin
g
29
Hiber
n
a
t
e
about
32
usin
g
33
I
In
p
u
t
P
a
ne
l
usin
g
24
insurance
69
inte
gra
t
ed
micro
p
ho
nes
14
,
28
integra
t
ed
speakers
14
Internet
Options
46
K
key
button
13
keyboard
24
L
lan
d
scape
mode
27
72
Inde
x
LC
D
about
14
ca
re
an
d
c
l
ea
ning
56
View
An
yw
here
14
P
password
replacement
abo
u
t
44
using
45
Li-
i
on
batte
ry
19
liquid
cry
s
t
a
l
displ
a
y
Se
e
LCD
Lit
hium-ion
battery
Se
e
Li-ion
battery
logging
on
to
a
r
e
member
e
d
site
45
M
maintenance
backu
p
61
recovery
61
main
ten
a
nce
pr
oce
d
ur
es
55
memory
c
a
rd
s
lot
17
micr
oph
one
por
t
5
,
15
micr
oph
one
s
about
14
built-in
2
ext
e
r
n
al
29
using
28
mini-plug
18
mirror
display
28
Mobile
Broadb
and
en
ablin
g
50
using
49
mo
nito
r
on
l
y
displ
a
y
28
monitor
port
16
Motion
Dashboard
using
22
Motion
Dashboa
r
d
button
11
Motion
DataGuard
15
Motion
QuickNa
v
2,
11
N
ne
tw
ork
connectio
n
s
6
ne
tw
ork
por
t
16
ne
tw
ork
i
ng
Bluetooth
18
wireless
17
O
OmniPass
about
13
,
42
starting
42
on
-scree
n
key
b
o
a
r
d
24
order
i
ng
repl
ace
m
en
t
pen
s
59
overview
ha
rdw
a
re
9
ports
and
connectors
2
pen
4
abo
u
t
10
,
23
actio
n
s
10
,
23
calibr
ating
7
ca
r
e
a
n
d
ma
inte
nanc
e
59
configuring
options
24,
25
storing
23
tether
23
Pen
and
Button
Options
24,
25
pen
tether
4
plug
18
port
covers
5
portrait
mode
27
power
adap
ter
abo
u
t
18
port
5
power
button
4
po
wer
co
rd
abo
u
t
18
Q
QuickNav
2,
11
R
re
c
o
very
pro
ce
d
ur
e
61
removing
the
ba
ttery
35
removing
the
SIM
39
replacing
pen
tips
59
replacing
the
battery
35
replac
ing
the
SIM
39
righ
t-clicking
10,
23
RJ
-45
j
a
ck
16
Rota
te
button
configuring
25
rotating
the
display
27
running
the
repair
an
d
recovery
pro
ce
d
ure
61
S
Se
cure
Atte
nt
ion
Sequen
ce
abo
u
t
4
button
13
security
featur
es
13
using
13
security
slot
5,
16
Index
73
service
69
setting
up
80
2.11
a/g/n
49
a
BIOS
password
47
an
HDD
password
48
Bluetooth
51
th
e
fin
g
er
prin
t
re
ade
r
42
the
ta
blet
PC
6
user
s
an
d
passwo
r
ds
46
Wi-Fi
49
Windows
user
ac
counts
47
shoulder
strap
attache
point
5
shoulder
strap
connection
4
SIM
removing
and
replacing
39
SIM
slot
17
Sleep
32
about
32
using
32
smart
card
16
smart
c
a
rd
reader
slo
t
16
smart
card
slot
4
speake
rs
2,
14
speakers,
external
29
specifications
69
speech
recognit
ion
about
29
setting
up
29,
30
Sticky
Notes
11
support
69
swap
ping
batteries
35
T
table
t
o
n
ly
display
28
Tablet
PC
Inpu
t
P
a
nel
using
24
TPM
13
traveling
with
your
t
a
blet
PC
60
tr
oub
l
e
s
ho
otin
g
audio
67
battery
64
display
64
input
65
ne
two
r
k
66
ports
and
connectors
66
power
63
system
67
Trusted
P
l
atform
Module
13
turning
on
the
ta
blet
PC
7
U
un
ive
rsal
se
rial
b
u
s
Se
e
USB
USB
about
15
usin
g
26
USB
2
.
0
p
or
t
s
5
usin
g
80
2.1
1
a
/
g/n
49
ba
ttery
33
Bluet
oot
h
50
Ethernet
26
Express
cards
17
exte
rn
al
displ
a
y
27
handwriting
recognit
i
o
n
24
Hiber
n
a
t
e
33
In
p
u
t
P
a
ne
l
24
micr
opho
ne
s
28
Mobile
Broadband
49
OmniPass
42
po
wer
pl
an
s
30
security
13
Sleep
32
speech
recognition
29
this
document
1
USB
26
Wi-Fi
49
V
VGA
port
16
Vide
o
(VG
A
)
por
t
5
Vie
w
An
yw
here
d
i
splay
14
voice
comma
n
ds
29
W
war
r
a
n
ty
69
Wi
-Fi
about
17
en
abling
49
setting
up
49
usin
g
49
Wi
ndows
Firewall
46
Win
d
ow
s
Jour
nal
11
Wi
ndows
Security
button
4,
13
Win
d
ow
s
Se
cur
i
ty
Ce
nte
r
about
46
usin
g
46
Wi
ndows
Vista
about
7
tutorials
7
74
Inde
x
wir
e
l
e
ss
80
2.11
a/g/n
17
Bluetooth
18
wireless
networking
17,
18
writing
pad
24
Index
75
FCC Warning:
This device complies with Part 15 of the FCC Rules. Operation is subject to the following two conditions:
(1) This device may not cause harmful interference.
(2) This device must accept any interference received, including interference that may cause undesired
operation.
Any changes or modifications (including the antennas) made to this device that are not expressly
approved by the manufacturer may void the user’s authority to operate the equipment.
FCC RF Radiation Exposure Statement: This equipment complies with FCC RF radiation exposure
limits set forth for an uncontrolled environment. This device and its antenna must not be co-located or
operating in conjunction with any other antenna or transmitter.
This equipment has been tested and found to comply with the limits for a class B digital device,
pursuant to part 15 of the FCC Rules. These limits are designed to provide reasonable protection
against harmful interference in a residential installation.
This equipment generates, uses and can radiate radio frequency energy and, if not installed and used
in accordance with the instructions, may cause harmful interference to radio communications. However,
there is no guarantee that interference will not occur in a particular installation. If this equipment does
cause harmful interference to radio or television reception, which can be determined by turning the
equipment off and on, the user is encouraged to try to correct the interference by one or more of the
following measures:
---Reorient or relocate the receiving antenna.
---Increase the separation between the equipment and receiver.
---Connect the equipment into an outlet on a circuit different from that to which the receiver is connected.
---Consult the dealer or an experienced radio/TV technician for help.
FCC RF Radiation Exposure Statement:
1. This Transmitter must not be co-located or operating in conjunction with any other antenna or
transmitter.
2. This equipment complies with FCC RF radiation exposure limits set forth for an uncontrolled
environment. To maintain compliance with FCC RF exposure compliance requirements, avoid
direct contact to the transmitting antenna during transmitting.
3. Any changes or modifications (including the antennas) made to this device that are not
expressly approved by the manufacturer may void the user’s authority to operate the
equipment.
except above RF exposure statement, for devices used at 5.15-5.25GHz should add the following
wording at their user manual.
According to FCC 15.407(e), the device is intended to operate in the frequency band of 5.15GHz to
5.25GHz under all conditions of normal operation. Normal operation of this device is restricted to
indoor used only to reduce any potential for harmful interference to co-channel MSS operations.
Any changes or modifications (including the antennas) made to this device that are not expressly
approved by the manufacturer may void the user’s authority to operate the equipment.
Canda:
IC Warning statement
This digital apparatus does not exceed the Class B limits for radio noise emissions from digital
apparatus as set out in the interference-causing equipment standard entitled "Digital Apparatus," ICES-
003 of Industry Canada. Cet appareil numerique respecte les limites de bruits radioelectriques
applicables aux appareils numeriques de Classe B prescrites dans la norme sur le material brouilleur:
"Appareils Numeriques," NMB-003 edictee par l’Industrie. (1) this device may not cause
interference,and (2) this device must accept any interference, including interference that may cause
undesired operation of the device."

CE Declaration of Conformity
!
0984
For the following equipment:
Is herewith confirmed to comply with the requirements set out in the Council Directive on the
Approximation of the Laws of the Member States relating to Electromagnetic Compatibility
(2004/108/EC), Low-voltage Directive (2006/95/EC), the procedures given in European Council
Directive (1999/5/EC).
The equipment was passed. The test was performed according to the following European standards:
•
EN 55022: 2006
EN 61000-3-2: 2006
EN 61000-3-3: 1995 + A1: 2001 +A2:2005
•EN 55024: 1998+A1:2001+A2:2003
IEC 61000-4-2: 2001
IEC 61000-4-3: 2006
IEC 61000-4-4: 2004
IEC 61000-4-5: 2005
IEC 61000-4-6: 2003+A1: 2004+A2: 2006
IEC 61000-4-8: 2001
IEC 61000-4-11: 2004
•EN 301 893 V1.4.1: 2007
•
EN 60950-1 : 2001 + A11:2001
•EN 301 489-1 V1.6.1 : 2005
•
EN 301 489-17 V1.2.1 : 2002
•EN50371: 2002
•EN 300 328 V1.7.1 : 2006
2.4G warning statement
European standards dictate maximum radiated transmit power of 100mW EIRP and frequency range
2.400-2.4835GHz
In France, the equipment must be restricted to the 2.4465-2.4835GHz frequency range and must be
restricted to indoor use.
5G warning statement
Operation of this device is subjected to the following National regulations and may be prohibited to use
if certain restriction should be applied.