Y Soft a s 0YX0MP04087 Multireader HF User Manual
Y Soft Corporation, a.s. Multireader HF
User Manual

YSOFT SAFEQ TERMINAL PROFESSIONAL 3.8 USER’S GUIDE 1

2 YSOFT SAFEQ TERMINAL PROFESSIONAL USER’S GUIDE
Copyright © 2014 Y Soft Corporation. All rights reserved.
Edition 2.0 [EN]
Date: 5 October 2014
YSoft SafeQ, the YSoft SafeQ logo, and the Y Soft logo are registered trademarks of Y Soft Corporation. All
other trademarks and names stated in this document may be trademarks and/or registered trademarks of
individual owners.
www.ysoft.com
Y Soft Corporation Y Soft Americas
Podnikatelska 4 info.us@ysoft.com
Technology Park
612 00 Brno
Czech Republic
info@ysoft.com

YSOFT SAFEQ TERMINAL PROFESSIONAL USER’S GUIDE 3
Contents
About this guide ......................................................................................... 4
About this guide .......................................................................................................... 5
SafeQ Terminal Professional—overview ..................................................................... 5
Terminology ................................................................................................................ 5
2 Logging in to the terminal .................................................................... 6
Changing the terminal’s language ............................................................................... 7
Logging in with an ID card ........................................................................................... 8
Registering your ID card by entering your PUK code .......................................... 8
Locating your PUK code ...................................................................................... 9
Logging in with a PIN .................................................................................................10
Logging in with an ID card and PIN............................................................................11
Logging in with an ID card or PIN ..............................................................................12
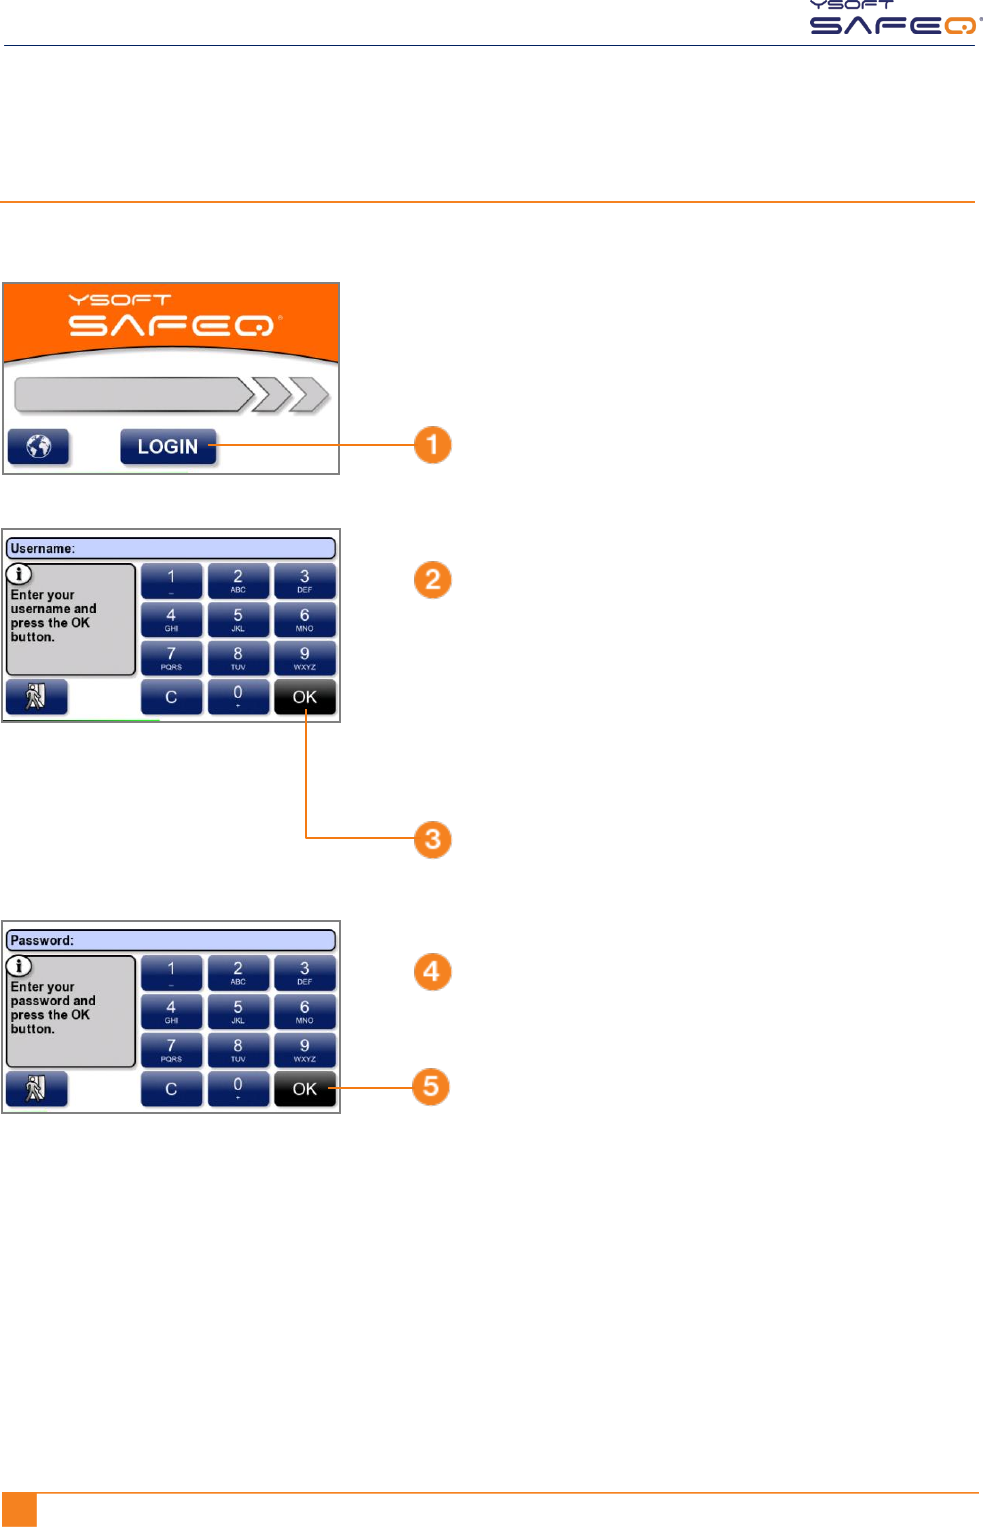
Logging in with an ID card and PIN or username/password .....................................13
Logging in with username/password ........................................................................14
Logging in with an ID card or username/password ...................................................15
Logging in with a PIN or username/password ..........................................................16
Logging in with an ID card or PIN or username/password ........................................17
3 Printing .............................................................................................. 19
Viewing lists of jobs ...................................................................................................19
Exiting the Jobs menu .......................................................................................19
Printing ......................................................................................................................20
Printing all your print jobs .................................................................................20
Printing or deleting specific jobs .......................................................................21
Printing your favorite jobs.................................................................................22
Reprinting or deleting jobs that have been printed ..........................................23
4 Copying and scanning ....................................................................... 24
5 Changing the screen’s brightness ..................................................... 25

4 YSOFT SAFEQ TERMINAL PROFESSIONAL USER’S GUIDE
FCC Statements
§ 15.21 Information to user.
The user’s manual or instruction manual for an intentional or unintentional radiator shall caution the user
that changes or modifications not expressly approved by the party responsible for compliance could void the
user's authority to operate the equipment. In cases where the manual is provided only in a form other than
paper, such as on a computer disk or over the Internet, the information required by this section may be
included in the manual in that alternative form, provided the user can reasonably be expected to have the
capability to access information in that form.
§ 15.105 Information to the user
This equipment has been tested and found to comply with the limits for a Class A digital device, pursuant to
part 15 of the FCC Rules. These limits are designed to provide reasonable protection against harmful
interference when the equipment is operated in a commercial environment. This equipment generates,
uses, and can radiate radio frequency energy and, if not installed and used in accordance with the
instruction manual, may cause harmful interference to radio communications. Operation of this equipment
in a residential area is likely to cause harmful interference in which case the user will be required to correct
the interference at his own expense.
YSOFT SAFEQ TERMINAL PROFESSIONAL USER’S GUIDE 5
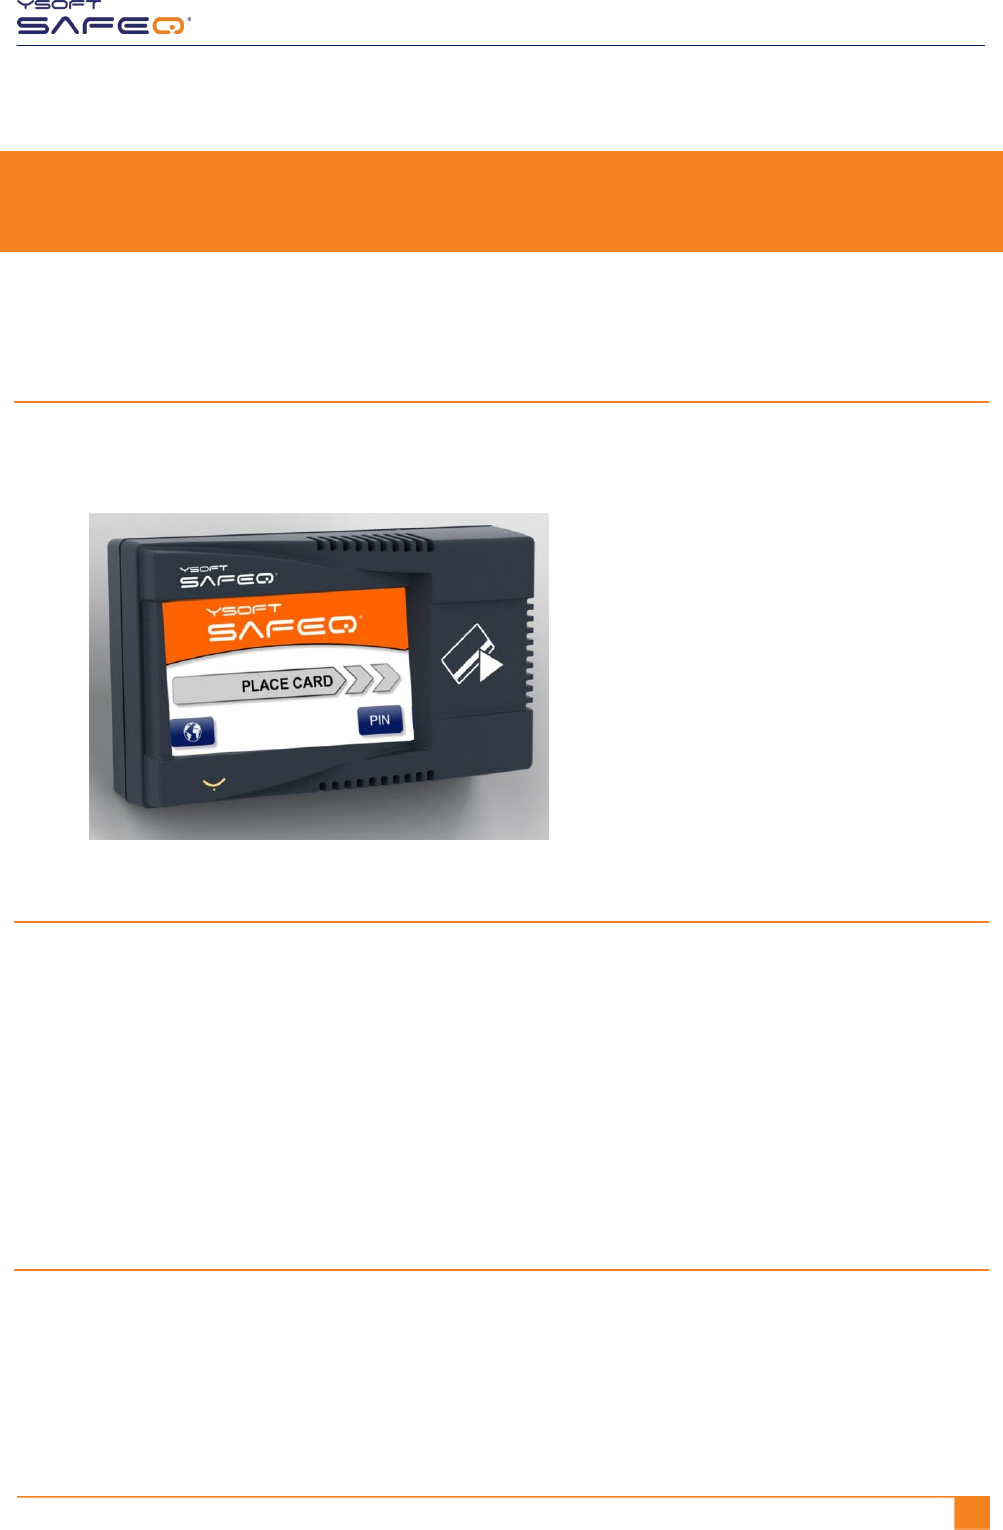
1 About this guide
About this guide
This guide provides instructions for using YSoft SafeQ® Terminal Professional,
firmware version 3.8.0 and higher.
SafeQ Terminal Professional—overview
Depending on how your SafeQ administrator has set up the terminal,
you can use the terminal to:
Access printers and MFPs to print, copy, and scan.
View and select jobs (jobs to print, favorite jobs, and printed jobs).
Print favorite jobs by selecting them at the terminal.
Delete jobs from queues.
View information about print/copying status and detailed price accounting
Terminology
In this guide, multifunction printers (MFPs) and network printers are both
referred to as printers.

YSOFT SAFEQ TERMINAL PROFESSIONAL USER’S GUIDE 6
2 Logging in to the terminal
Before you can use the printer, you must log in at the terminal. Depending on how your
SafeQ administrator has set up the terminal, use one of the following methods to log in:
ID card
PIN
ID card and PIN
ID card or PIN
ID card and PIN or username/password
Username/password
ID card or username/password
PIN or username/password
ID card or PIN or username/password
Each method is described in this chapter.
NOTE: Username is also sometimes referred to as user login name.
YSOFT SAFEQ TERMINAL PROFESSIONAL USER’S GUIDE 7
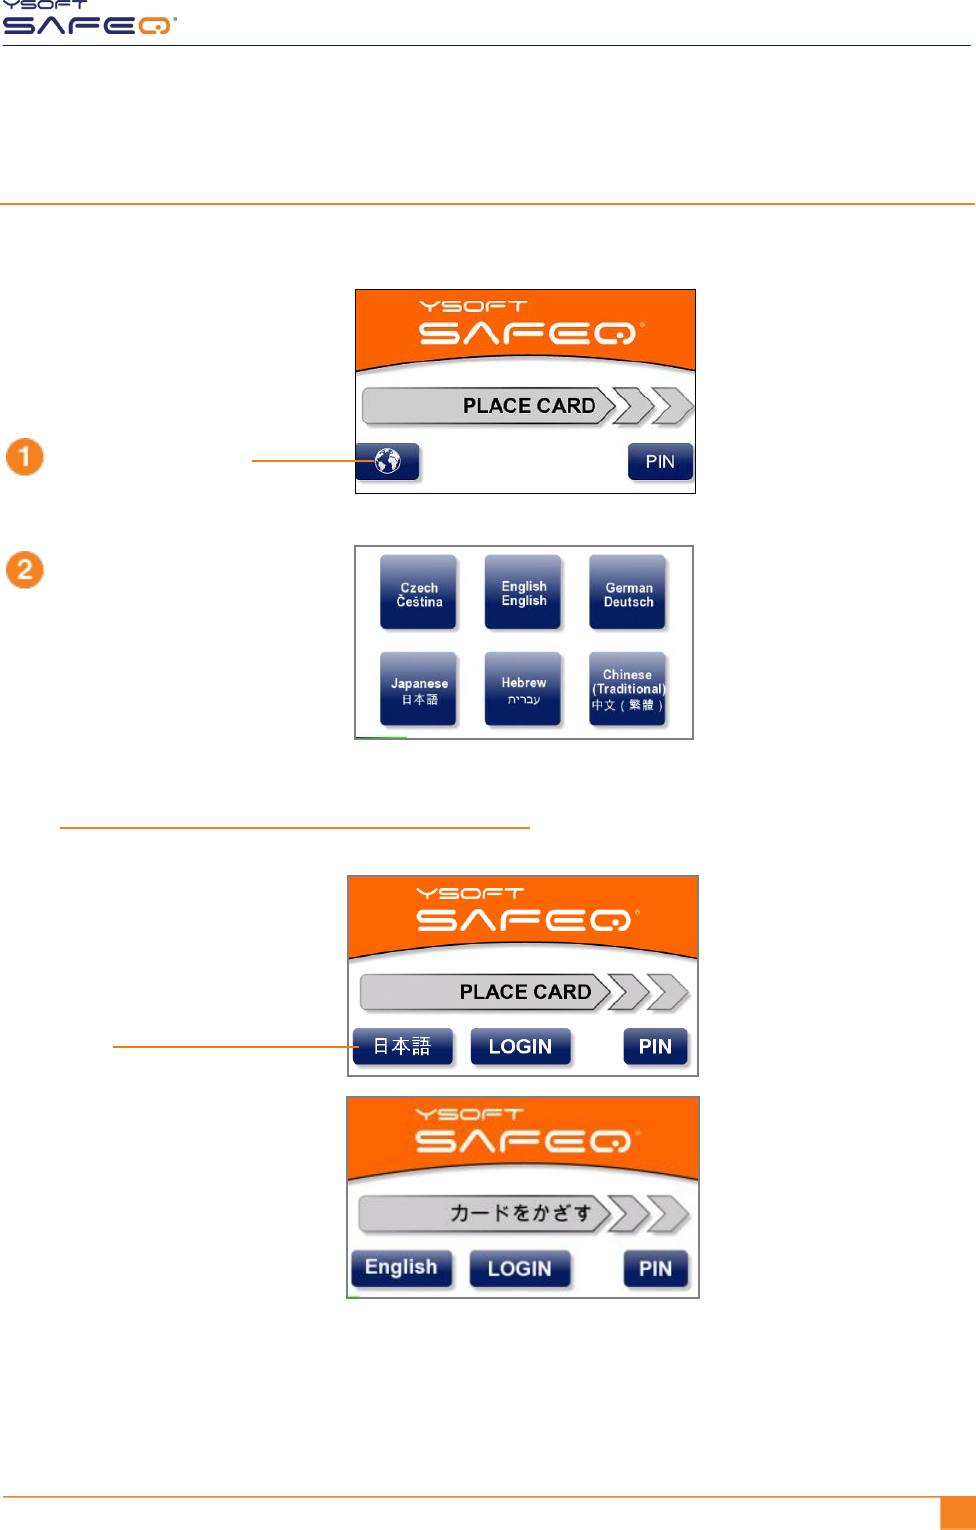
Chapter 2. Logging in to the terminal
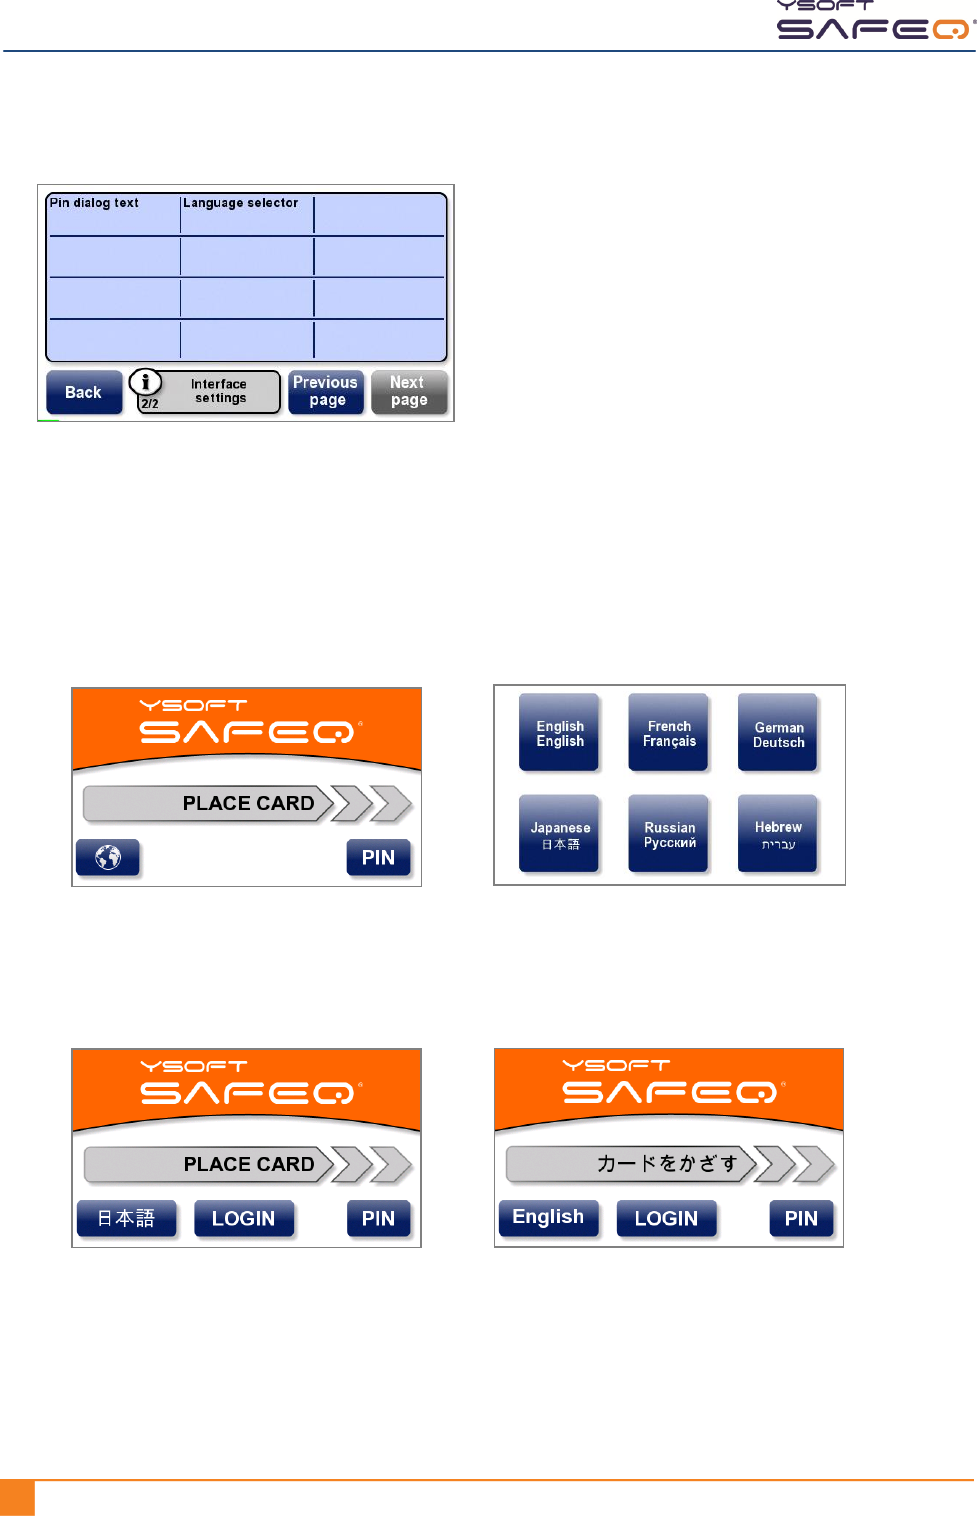
Changing the terminal’s language
If necessary, change the terminal’s language as follows:
Touch the globe icon.
Touch the language you want.
The available languages
depend on how your
terminal is configured.
Touch the language button
to switch to the alternate
language.
The available languages
depend on how your
terminal is configured.
OR
8 YSOFT SAFEQ TERMINAL PROFESSIONAL USER’S GUIDE
Chapter 2. Logging in to the terminal
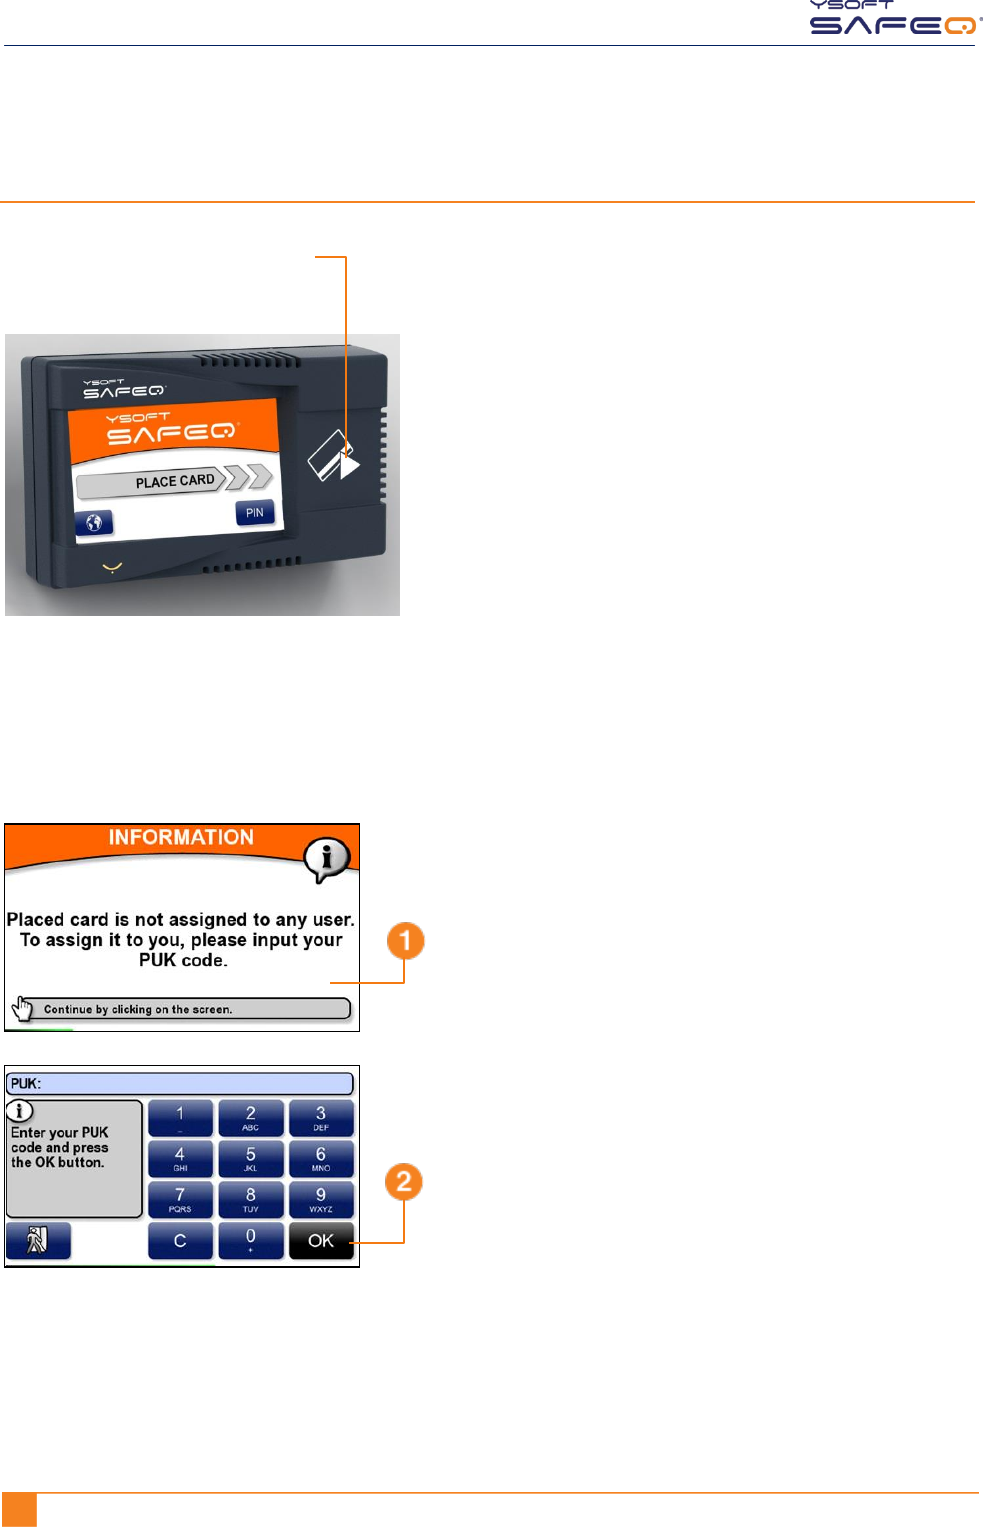
Logging in with an ID card
Registering your ID card by entering your PUK code
If SafeQ does not recognize your ID card, the terminal displays a message asking you
to enter your PUK (Pin Unlocking Key) code.
From now on, the terminal will recognize your ID card; you will not have to enter the
PUK code again.
Place your ID card on the terminal.
Touch anywhere on the
screen to display a keypad.
Enter your PUK code;
then touch OK.
NOTE: If you do not know your PUK
code, see page 9.
YSOFT SAFEQ TERMINAL PROFESSIONAL USER’S GUIDE 9
Chapter 2. Logging in to the terminal
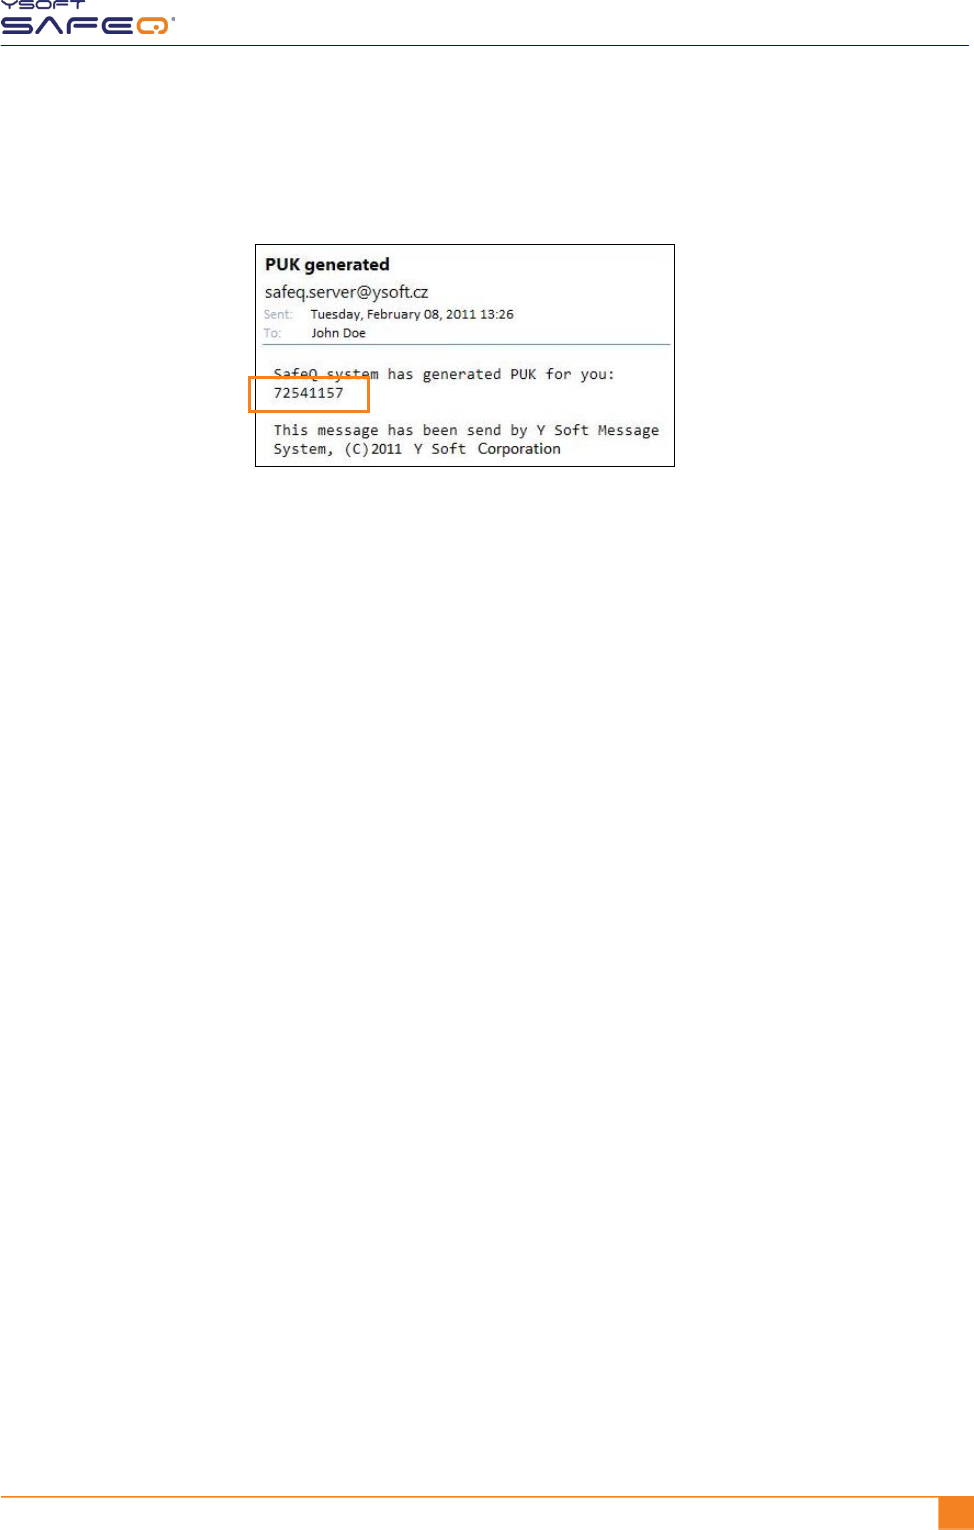
Locating your PUK code
Your PUK code appears
in an email you receive
from SafeQ.
10 YSOFT SAFEQ TERMINAL PROFESSIONAL USER’S GUIDE
Chapter 2. Logging in to the terminal
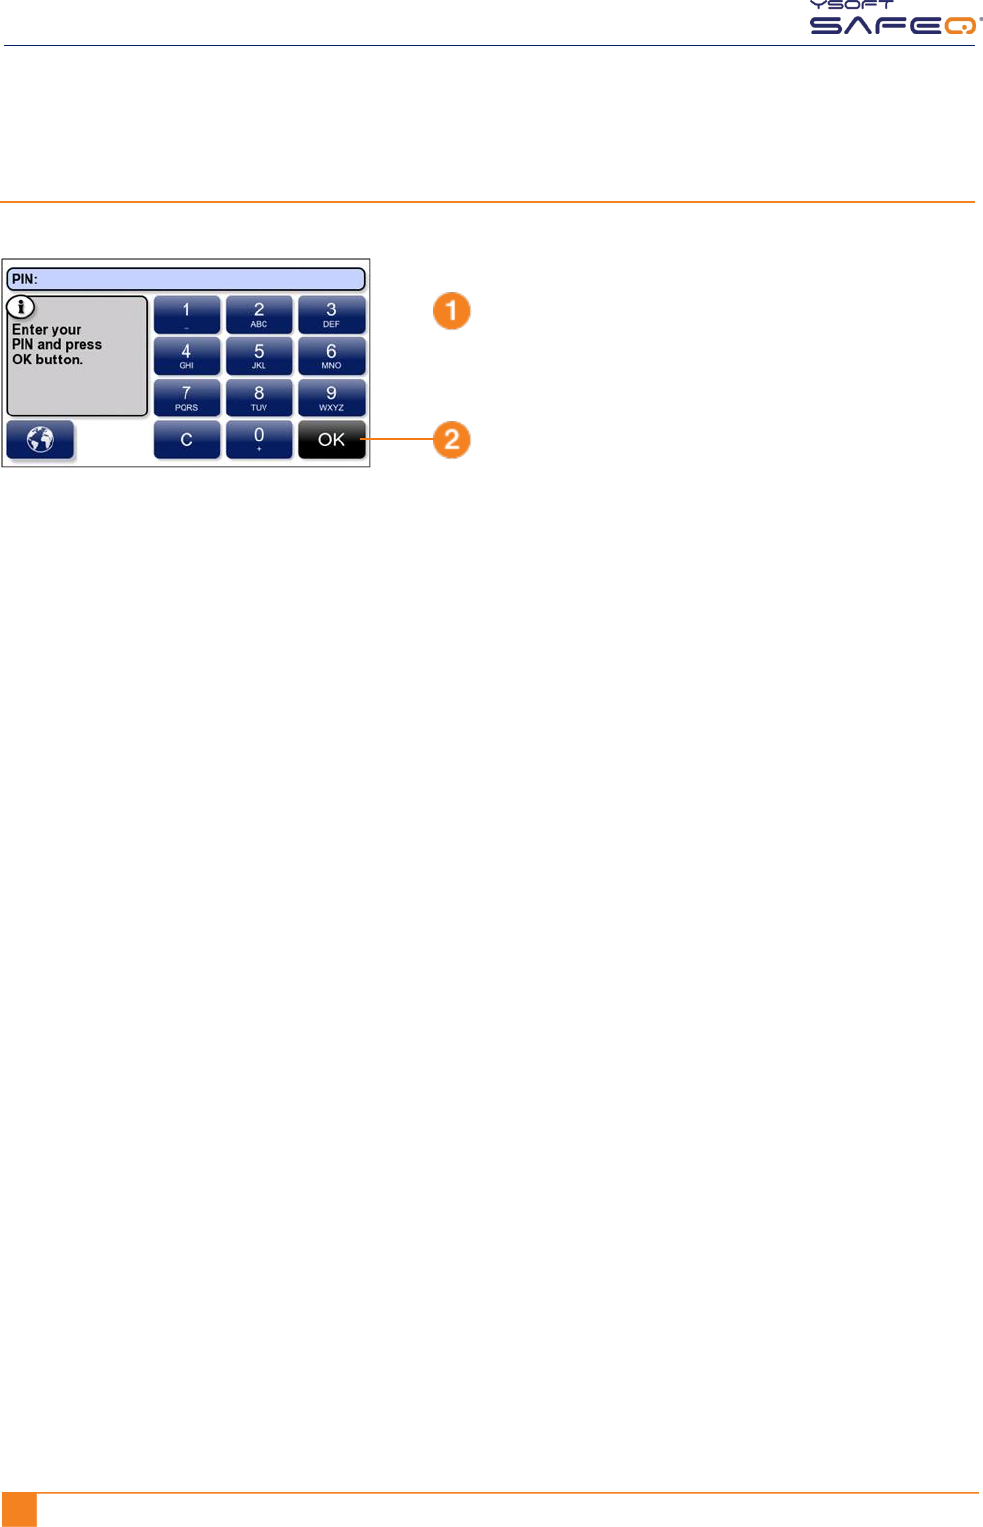
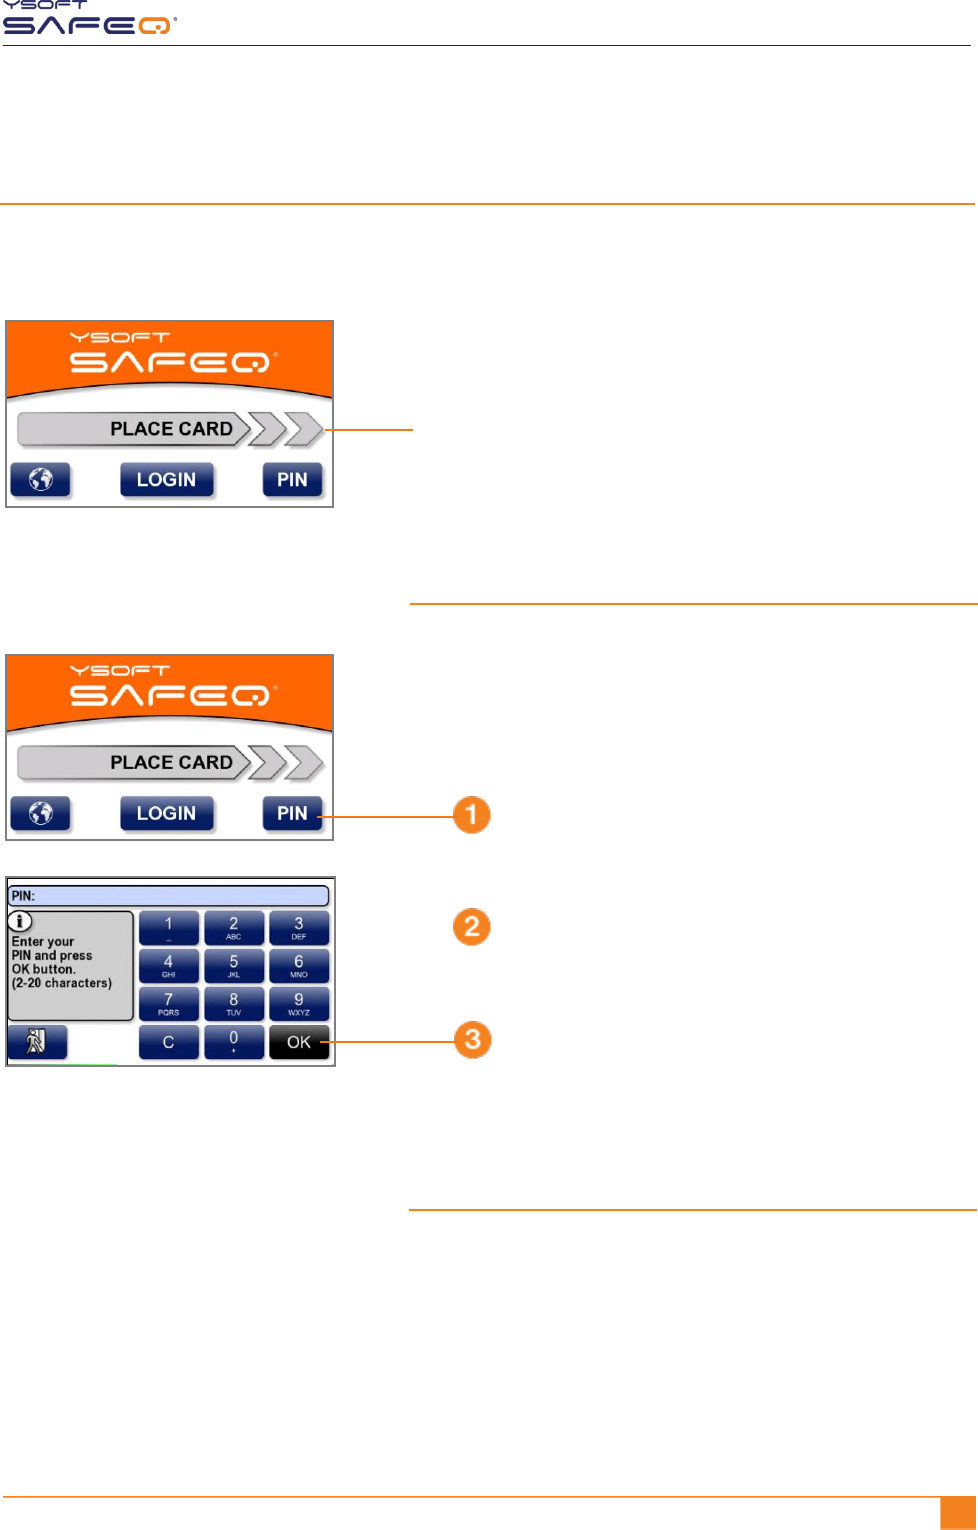
Logging in with a PIN
Enter your PIN.
Touch OK.
YSOFT SAFEQ TERMINAL PROFESSIONAL USER’S GUIDE 11
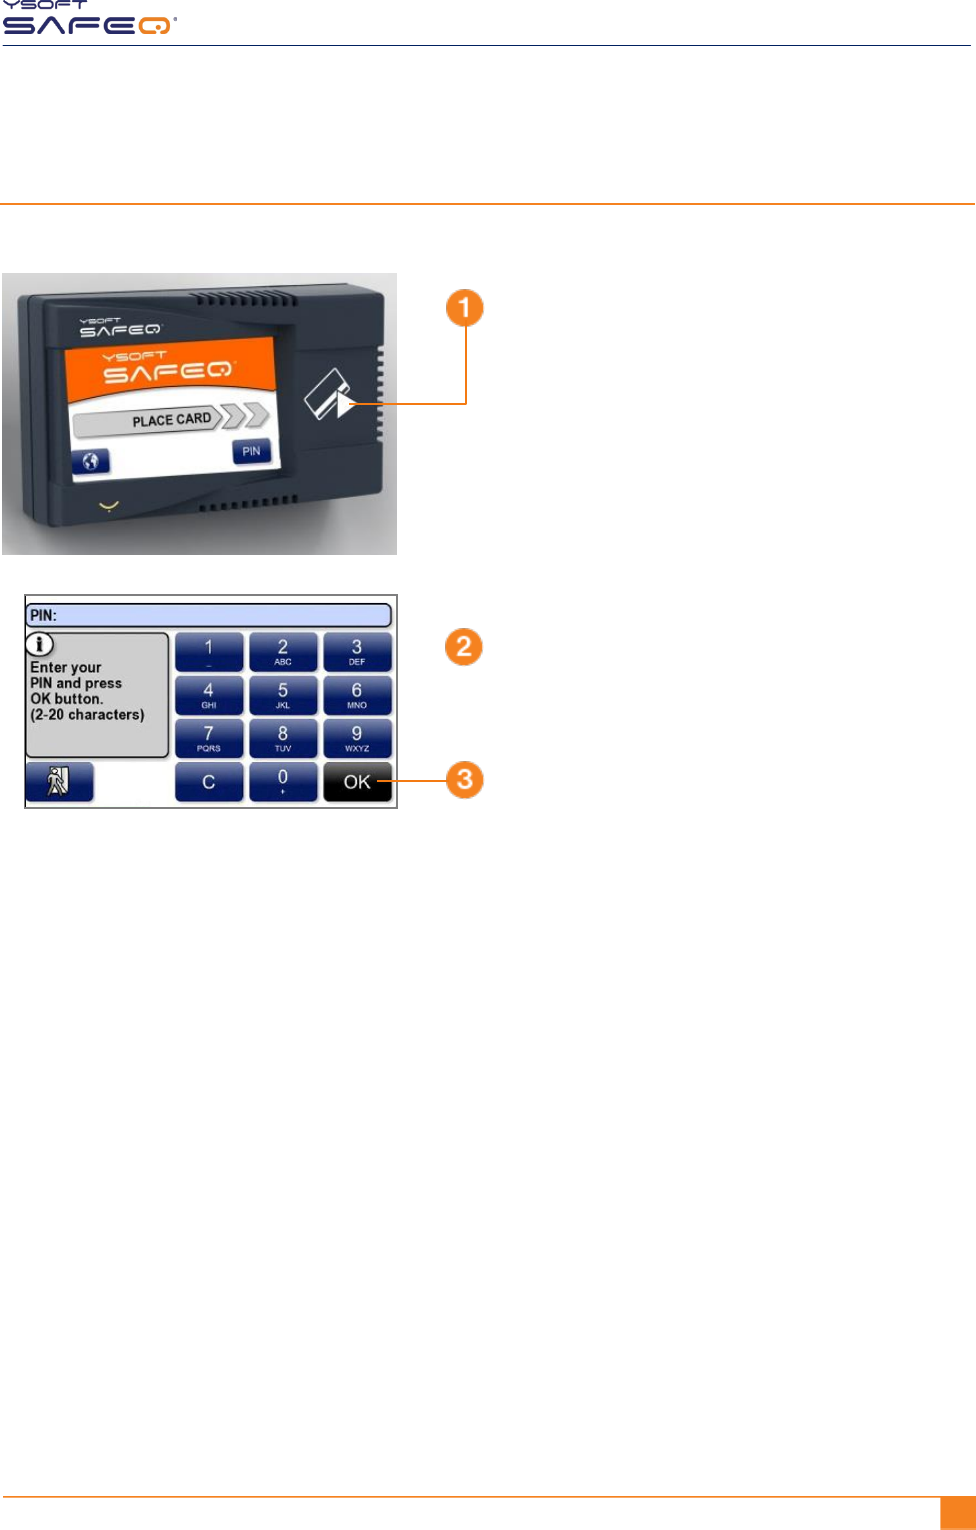
Chapter 2. Logging in to the terminal
Logging in with an ID card and PIN
Enter your PIN.
Touch OK.
Place your ID card on
the terminal.
12 YSOFT SAFEQ TERMINAL PROFESSIONAL USER’S GUIDE
Chapter 2. Logging in to the terminal
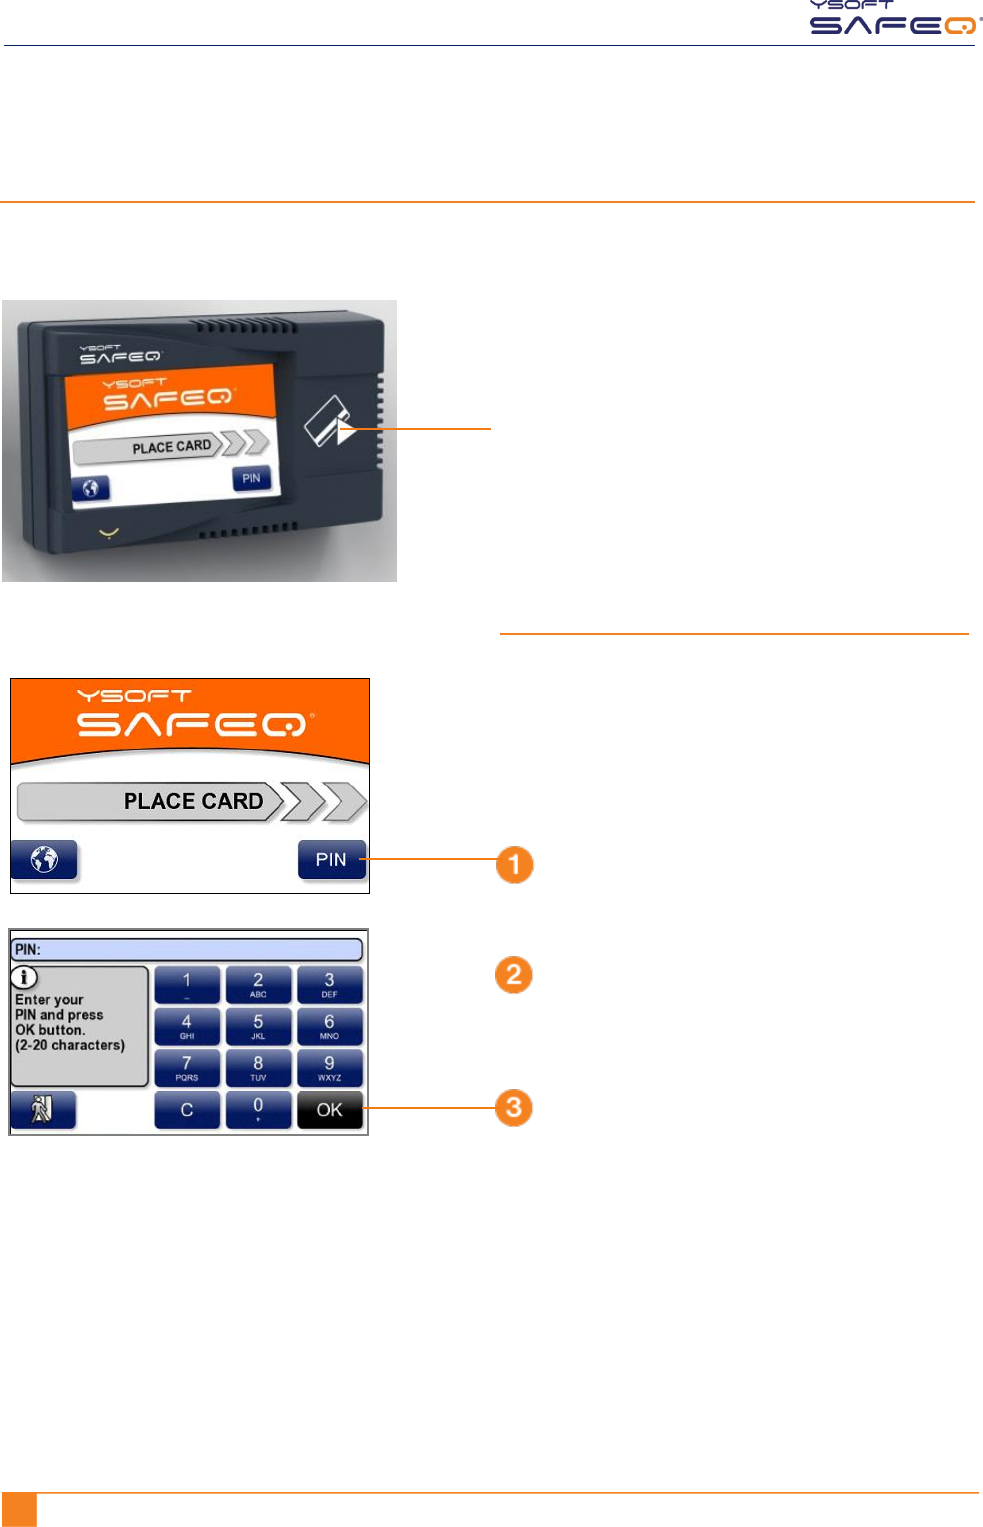
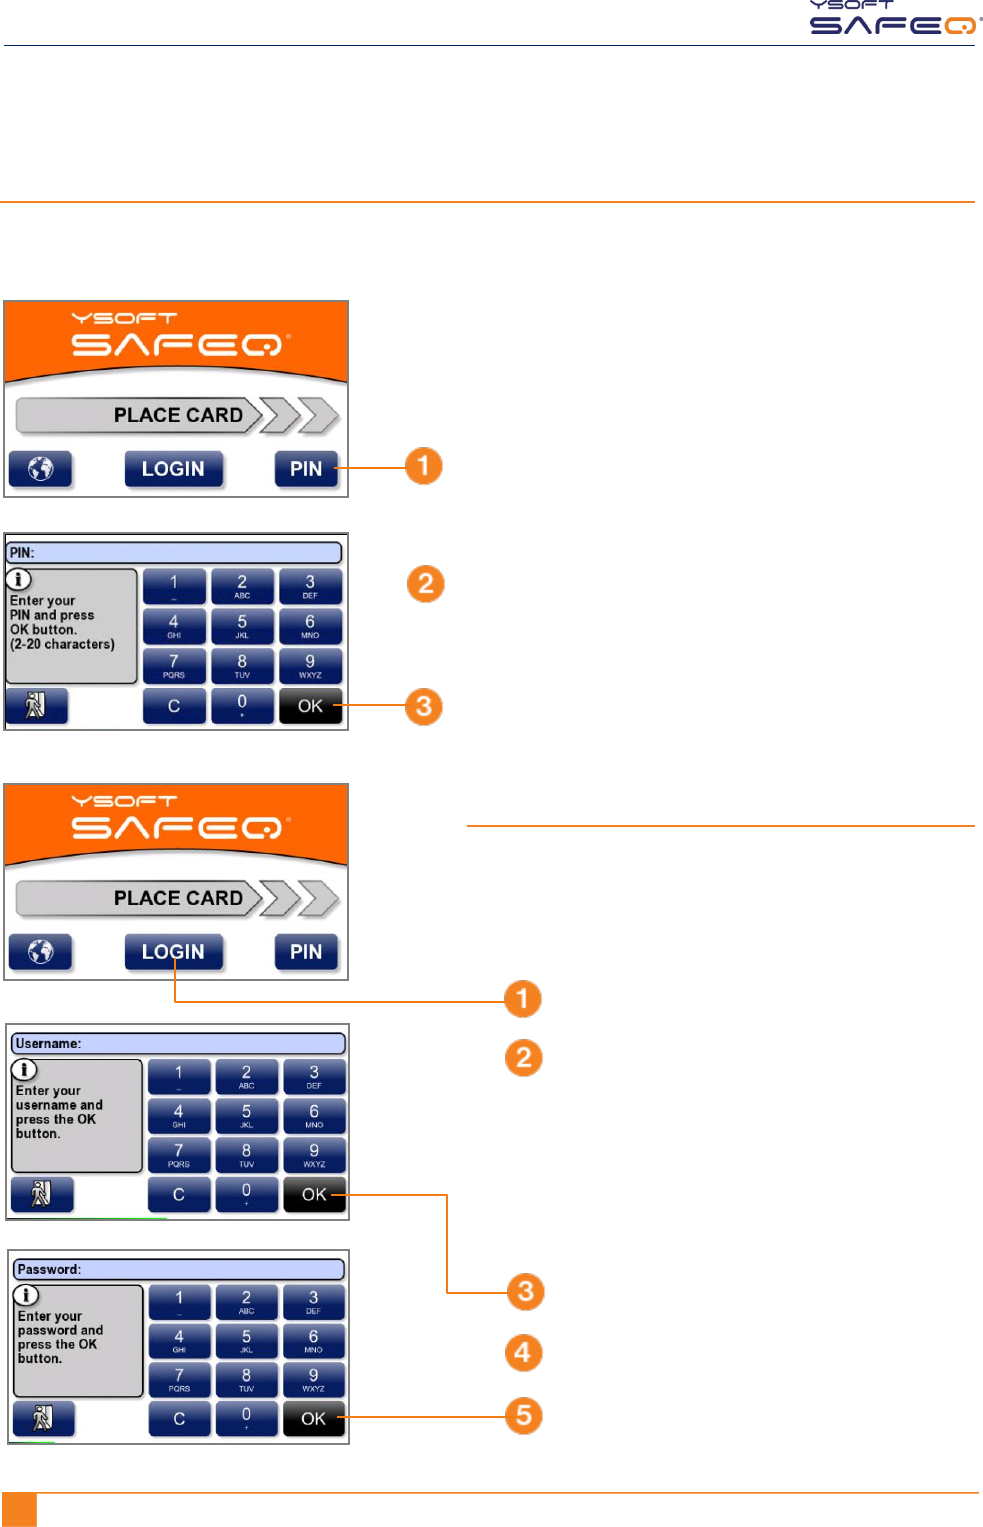
Logging in with an ID card or PIN
Use either of these methods to log in:
Enter your PIN.
Touch OK.
Place your ID card on
the terminal.
OR
Touch PIN.
Log in with your PIN:
YSOFT SAFEQ TERMINAL PROFESSIONAL USER’S GUIDE 13
Chapter 2. Logging in to the terminal
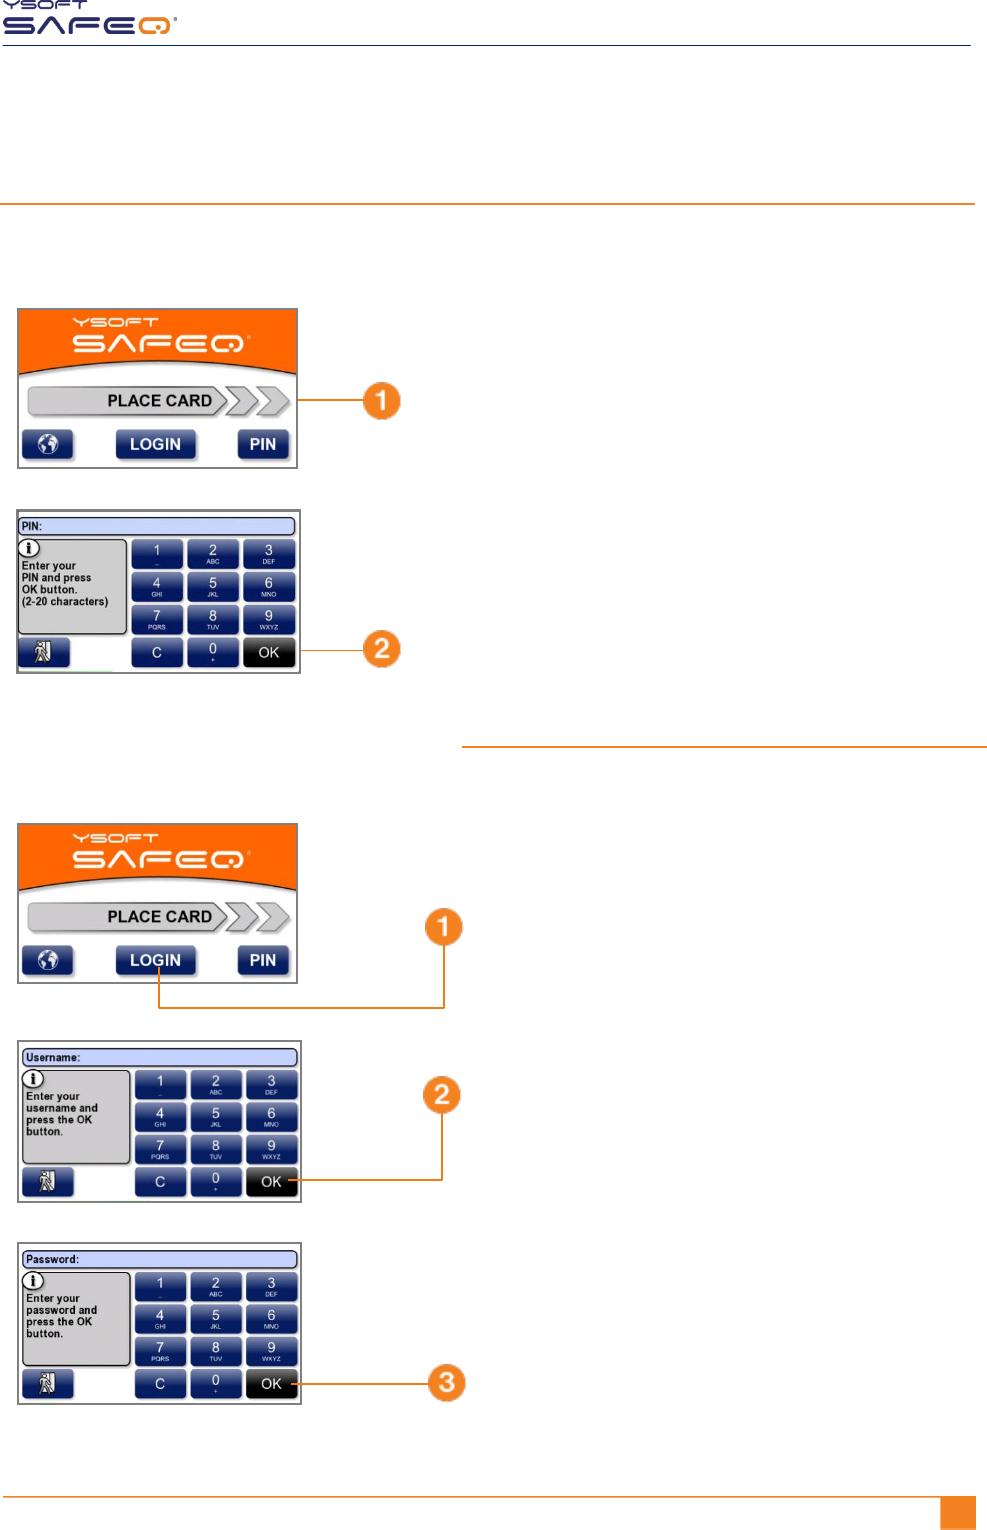
Logging in with an ID card and PIN or username/password
Use either of these methods to log in:
Enter your PIN; then touch OK.
Place your ID card on
the terminal.
OR
Enter your username and password:
Enter your username; then touch OK.
Enter your password; then touch OK.
The keypad works like phone keypads.
To enter a lowercase or uppercase letter,
touch a key more than once. For example:
To enter the letter e,
touch the 3 key 2 times (3 3).
To enter the letter E,
touch the 3 key 6 times (3 3 3 3 3 3).
Touch LOGIN.
14 YSOFT SAFEQ TERMINAL PROFESSIONAL USER’S GUIDE
Chapter 2. Logging in to the terminal
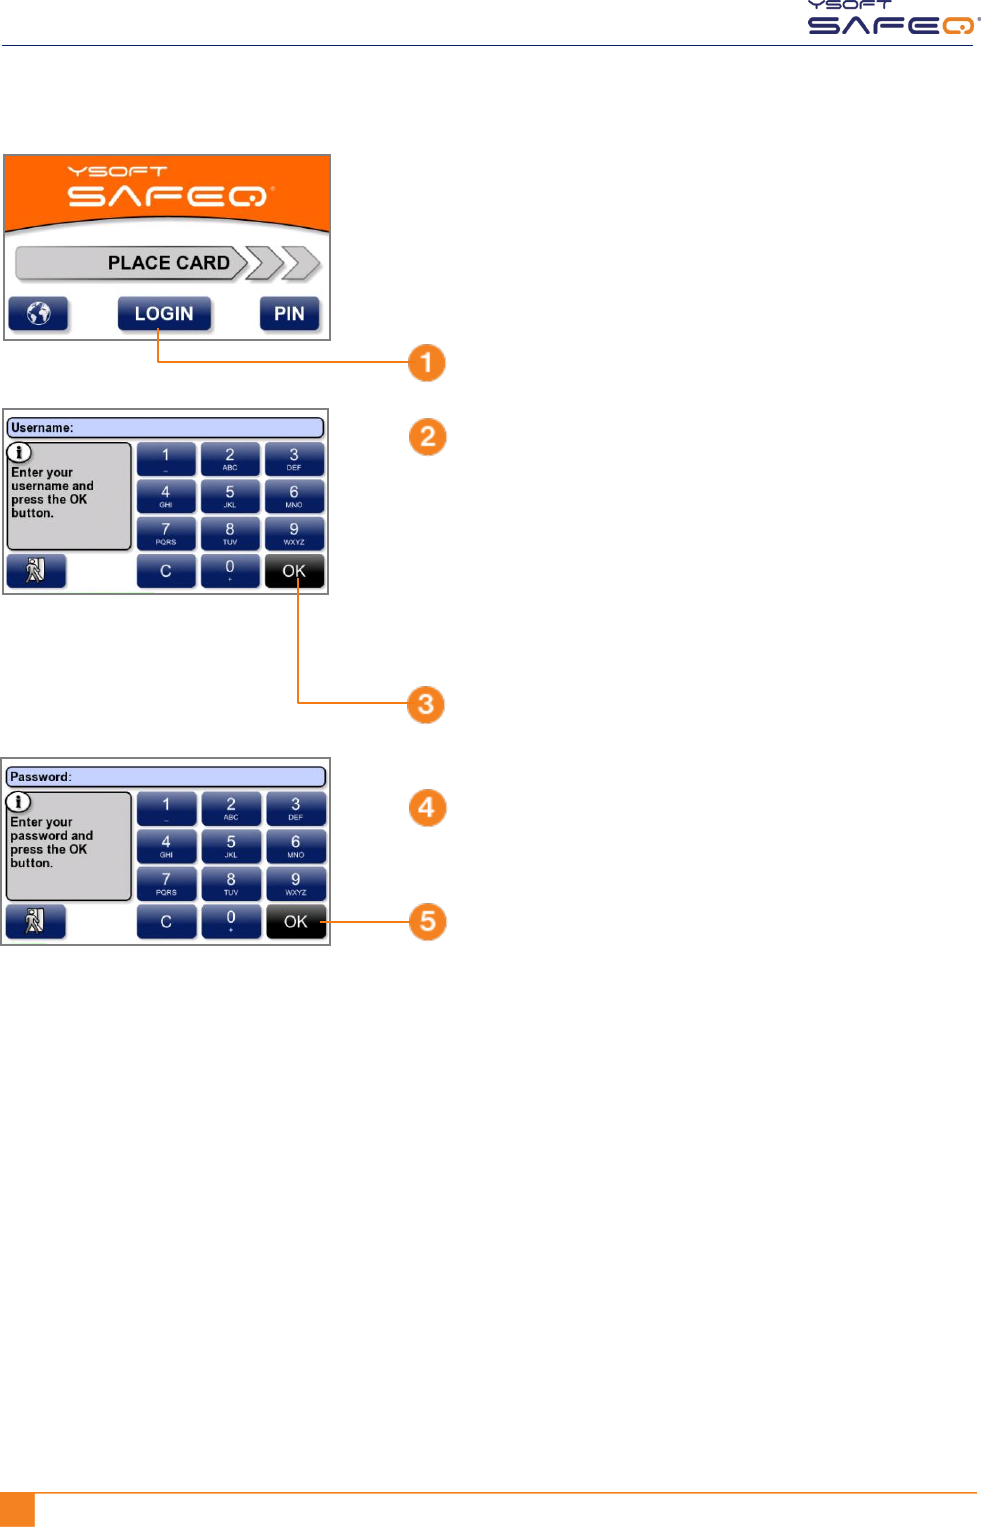
Logging in with username/password
Enter your username.
Touch OK.
Touch LOGIN.
Enter your password.
Touch OK.
The keypad works like phone keypads.
To enter a lowercase or uppercase letter,
touch a key more than once. For example:
To enter the letter e,
touch the 3 key 2 times (3 3).
To enter the letter E,
touch the 3 key 6 times (3 3 3 3 3 3).

YSOFT SAFEQ TERMINAL PROFESSIONAL USER’S GUIDE 15
Chapter 2. Logging in to the terminal
Logging in with an ID card or username/password
Use either of the following methods to log in:
Enter your username.
Touch OK.
Touch LOGIN.
Enter your password.
Touch OK.
Place your ID card on
the terminal.
OR
Log in with your username/password:
The keypad works like phone keypads.
To enter a lowercase or uppercase letter,
touch a key more than once. For example:
To enter the letter e,
touch the 3 key 2 times (3 3).
To enter the letter E,
touch the 3 key 6 times (3 3 3 3 3 3).
16 YSOFT SAFEQ TERMINAL PROFESSIONAL USER’S GUIDE
Chapter 2. Logging in to the terminal
Logging in with a PIN or username/password
Use either of these methods to log in:
Enter your PIN.
Touch OK.
Touch PIN.
Touch OK.
Touch LOGIN.
Touch OK.
Enter your username.
Enter your password.
OR
Log in with your username/password:
The keypad works like phone keypads.
To enter a lowercase or uppercase letter,
touch a key more than once. For example:
To enter the letter e,
touch the 3 key 2 times (3 3).
To enter the letter E,
touch the 3 key 6 times (3 3 3 3 3 3).
YSOFT SAFEQ TERMINAL PROFESSIONAL USER’S GUIDE 17
Chapter 2. Logging in to the terminal
Logging in with an ID card or PIN or username/password
Use any of these methods to log in:
Enter your PIN.
Touch OK.
Place your ID card on
the terminal.
Touch PIN.
Log in with your username/password
as described on the next page.
OR
Log in with your PIN:
OR
18 YSOFT SAFEQ TERMINAL PROFESSIONAL USER’S GUIDE
Chapter 2. Logging in to the terminal
Touch OK.
Touch LOGIN.
Touch OK.
Enter your username.
Enter your password.
The keypad works like phone keypads.
To enter a lowercase or uppercase letter,
touch a key more than once. For example:
To enter the letter e,
touch the 3 key 2 times (3 3).
To enter the letter E,
touch the 3 key 6 times (3 3 3 3 3 3).
19 YSOFT SAFEQ TERMINAL PROFESSIONAL 3.8 USER’S GUIDE
3 Printing
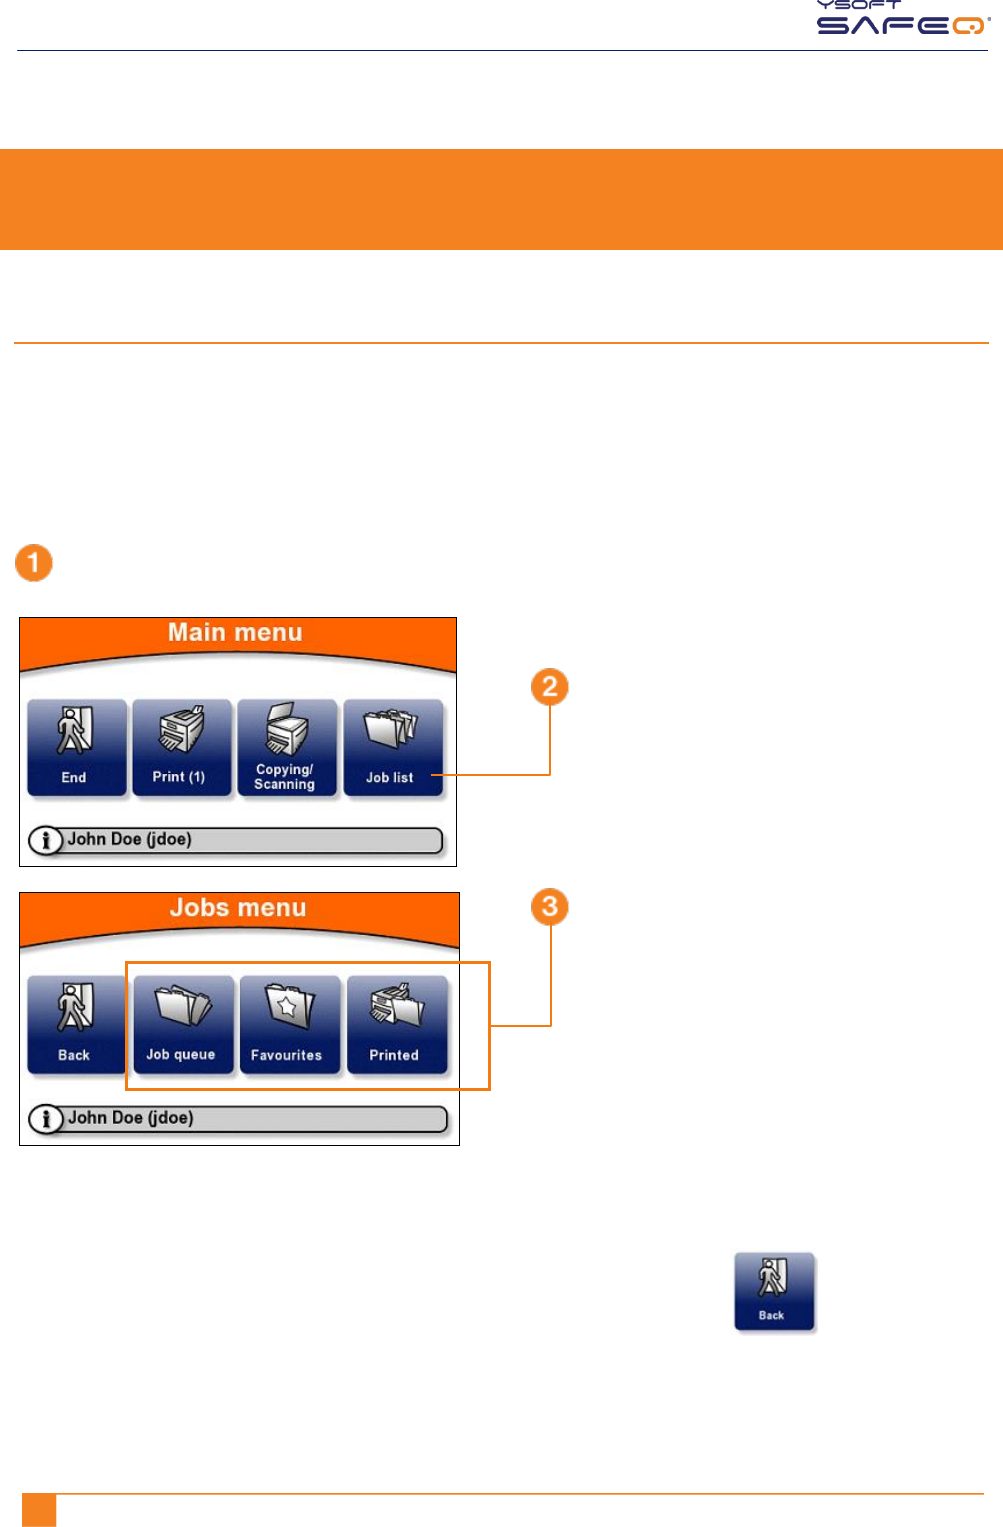
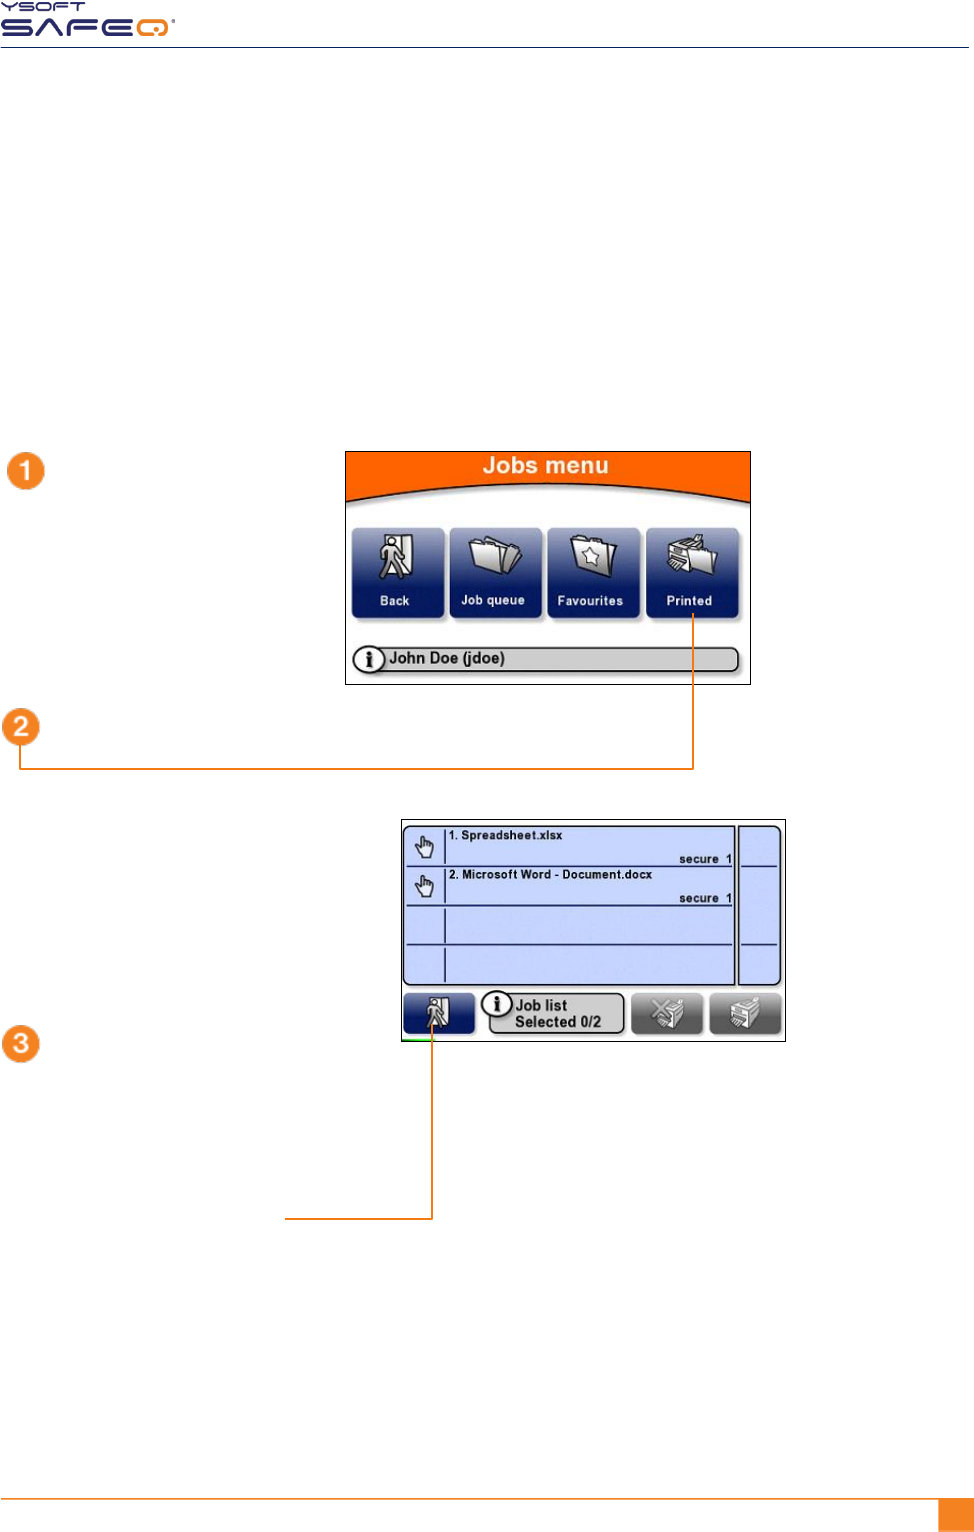
Viewing lists of jobs
The Jobs menu lets you see lists of jobs, including jobs waiting to be printed, your
favorite jobs, and jobs you have printed in the past.
NOTE: The Job list option may not be available on your terminal. If the Job list option
does not appear, see “Printing all your print jobs” on page 20.
Exiting the Jobs menu
To exit the Jobs menu and return to the Main menu, touch the Back button.
Log in to the terminal (see "Logging in to the terminal" on page 6).
Touch the Job list button.
Touch the button for the type
of job list you want to view.
Your Jobs menu may not
include all the options
shown on this sample.
20 YSOFT SAFEQ TERMINAL PROFESSIONAL USER’S GUIDE
Chapter 3. Printing
Printing
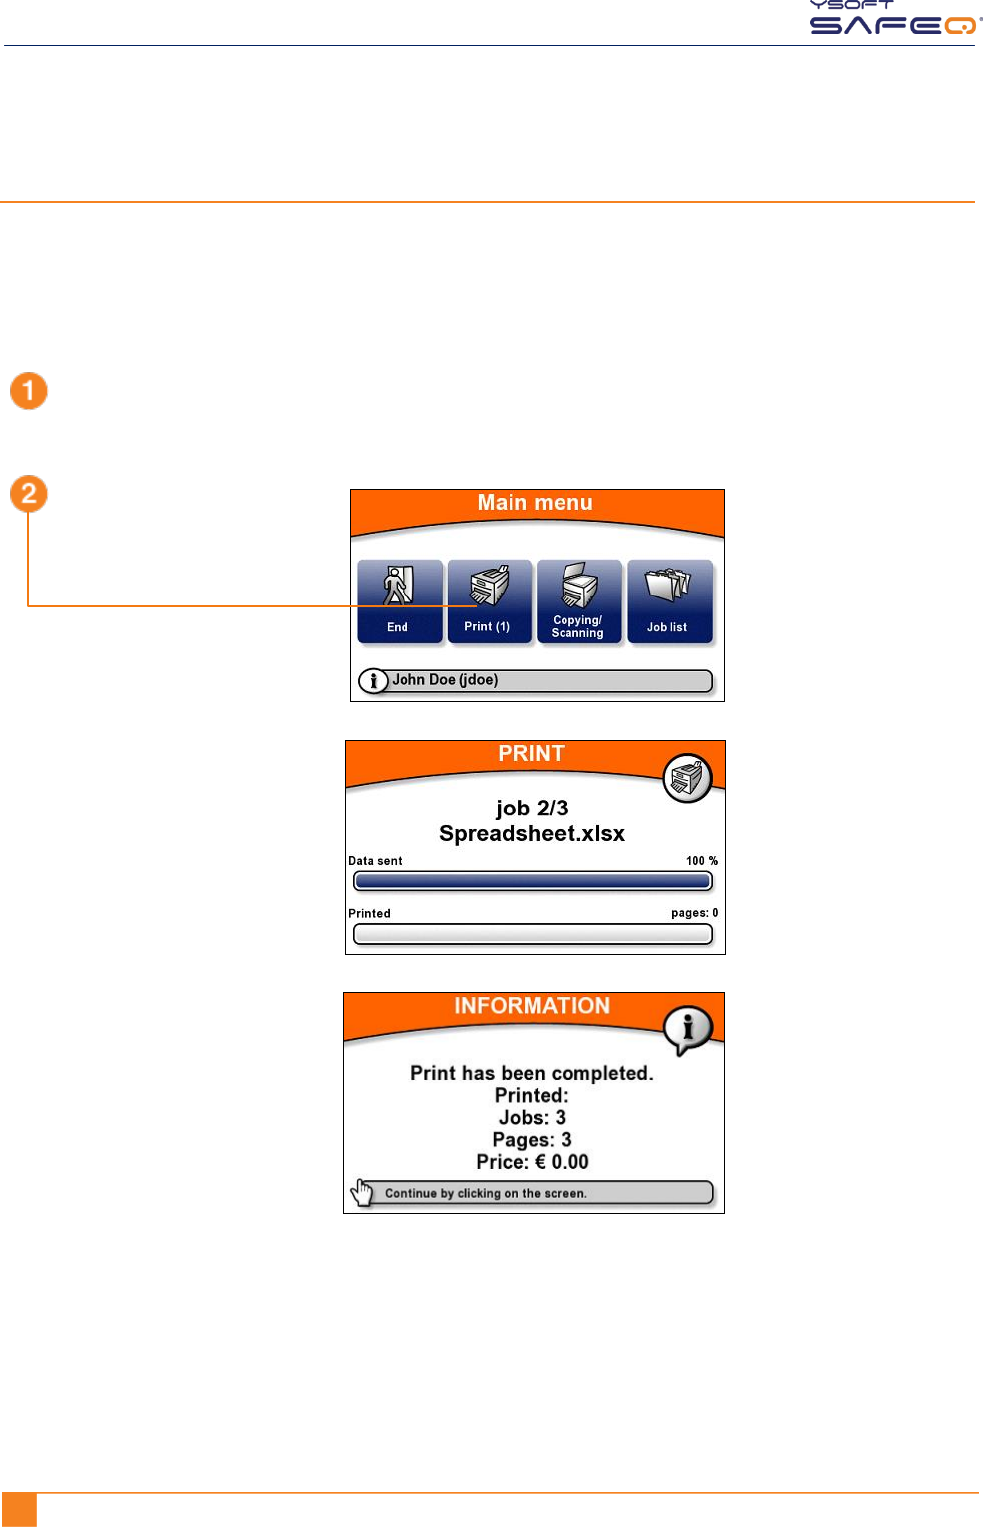
Printing all your print jobs
To print all your jobs that have not yet been printed:
Log in to the terminal (see "Logging in
to the terminal" on page 5).
Touch the Print button.
The printer/MFP begins to print
all your jobs. The Print screen
shows the progress.
When all your jobs have been
printed, the terminal displays
information and then
automatically logs you out.
The Print button displays the
number of print jobs you
have waiting to be printed.
In the example shown here,
one ( 1 ) job is waiting.
Price information may or
may not appear,
depending on how the
terminal has been
configured.
YSOFT SAFEQ TERMINAL PROFESSIONAL USER’S GUIDE 21
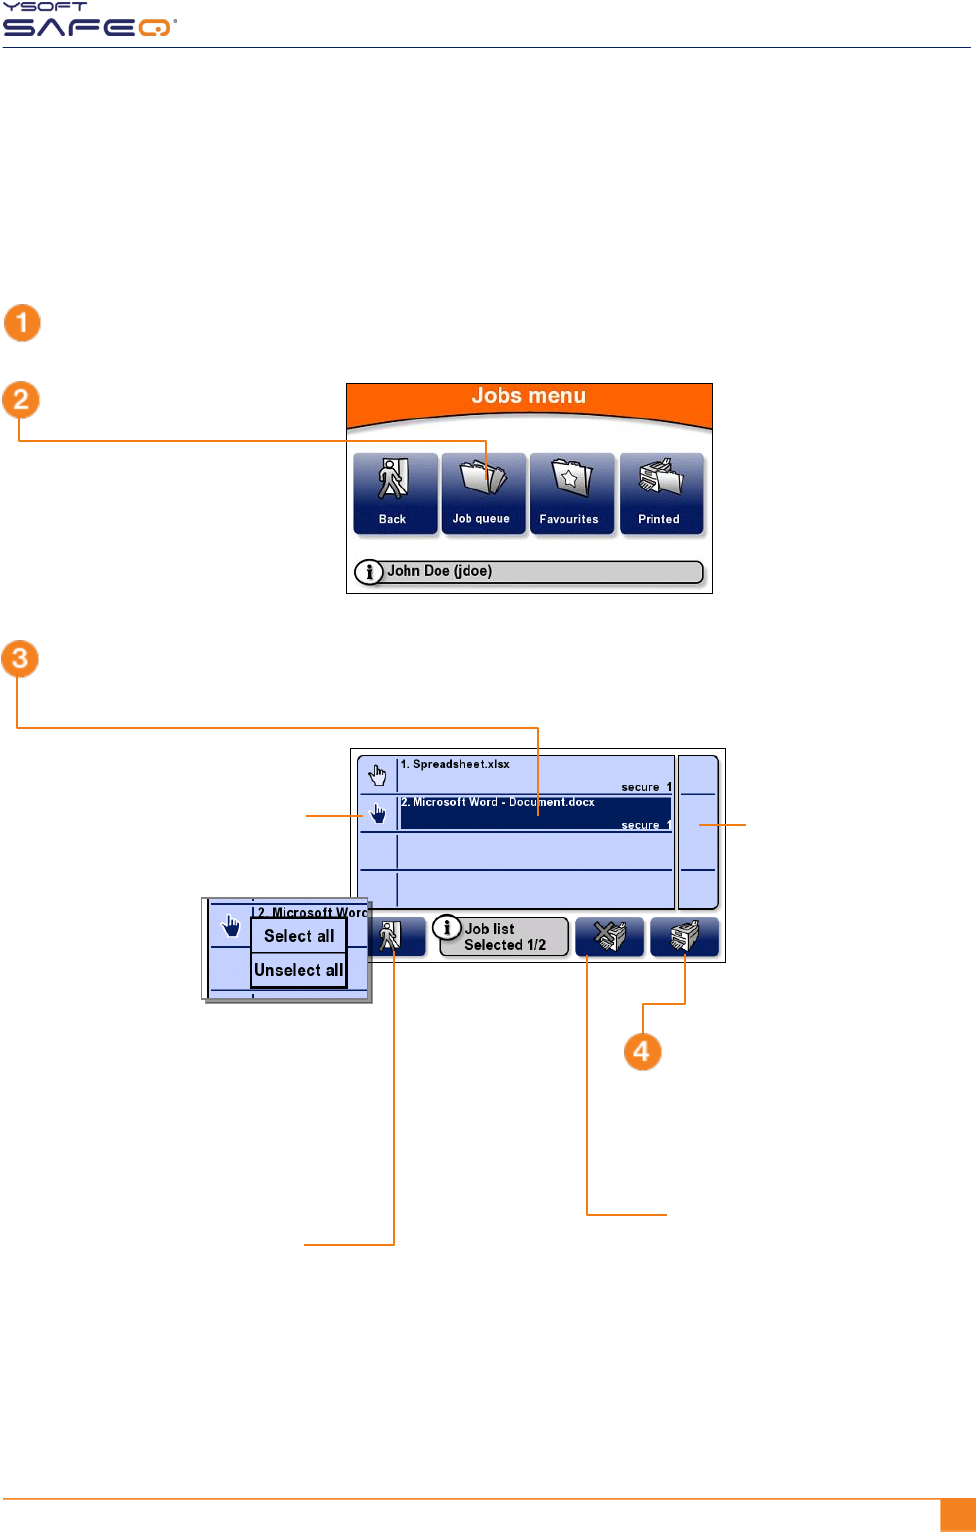
Chapter 3. Printing
Printing or deleting specific jobs
The terminal can display a list of all your jobs that have not yet been printed, and you
can select jobs from the list to print or to delete.
Log in to the terminal (see "Logging in to the terminal" on page 5).
Touch the Job queue button.
Touch each job you want to
print or delete.
The terminal displays a
list of your jobs that have
not yet been printed.
To select or de-select all
jobs, touch the hand icon;
then touch Select all or
Unselect all in the menu
that opens.
To move up or down
through the list,
touch the buttons on
the right side of the
screen.
To print the selected job(s):
Touch the Print button.
The printer prints the job(s).
To return to the Jobs menu,
touch the Back button.
To delete the selected job(s):
Touch the Delete button.
SafeQ deletes the job(s).
NOTE: You cannot delete a
favorite job at the
terminal.
22 YSOFT SAFEQ TERMINAL PROFESSIONAL USER’S GUIDE
Chapter 3. Printing
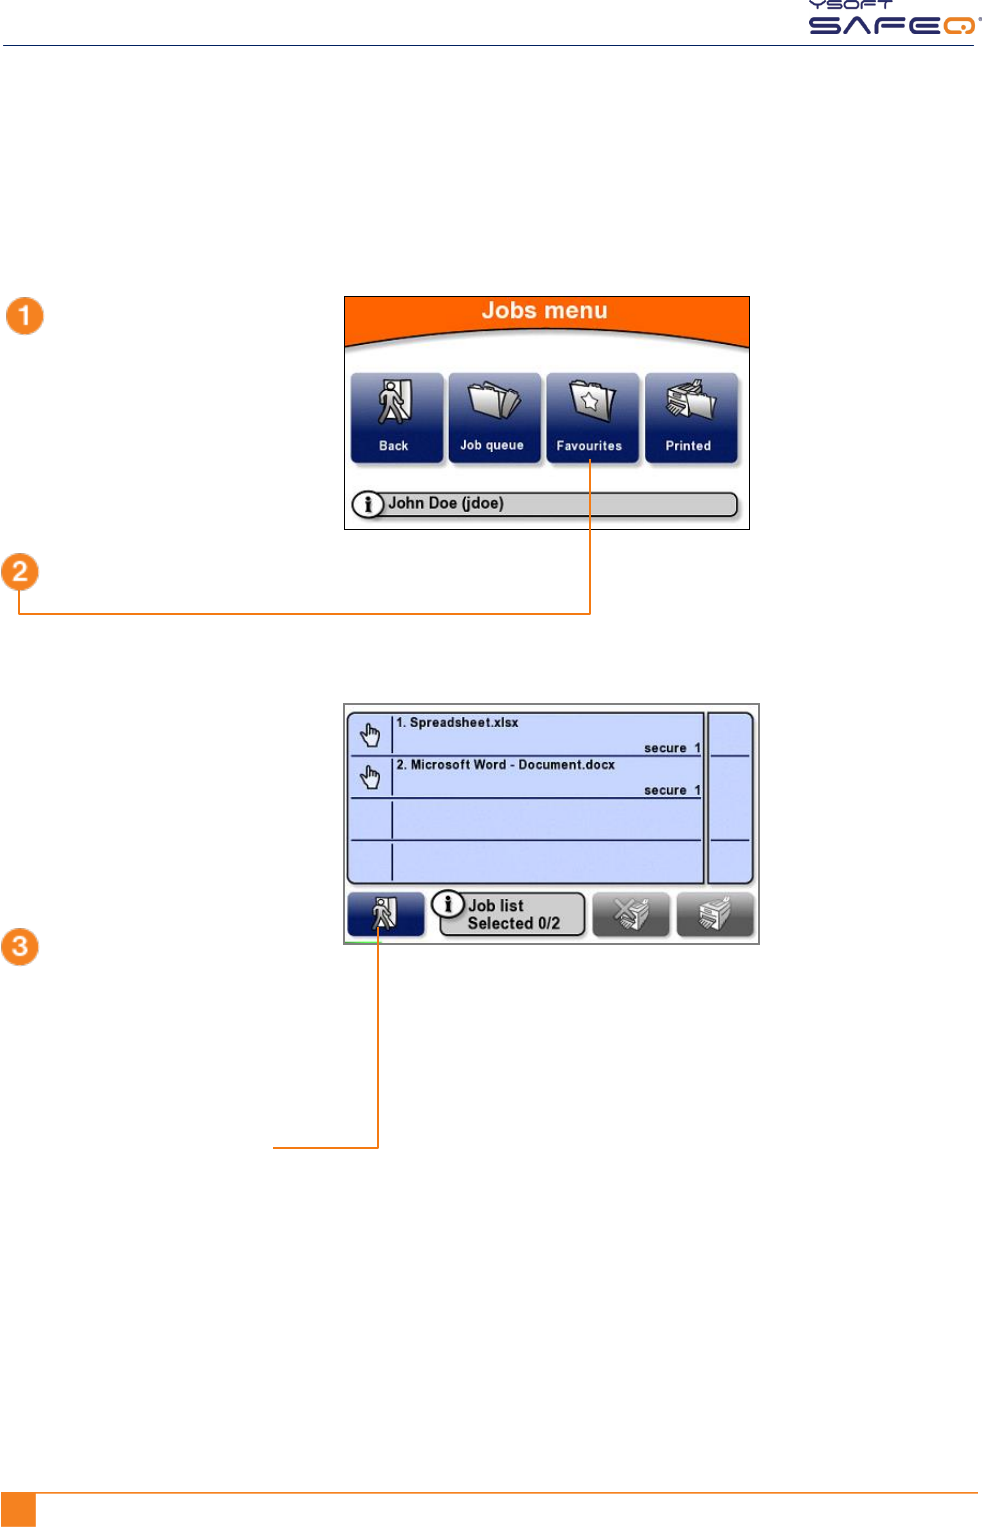
Printing your favorite jobs
To print a job you have specified as a Favorite job in SafeQ:
Display the Jobs menu
(see page 19).
Touch the Favourites button.
The terminal displays a list
of your favorite jobs.
Select and print the job (or
jobs) as described in
"Printing or deleting specific
jobs” on page 21.
To return to the Jobs menu,
touch the Back button.
YSOFT SAFEQ TERMINAL PROFESSIONAL USER’S GUIDE 23
Chapter 3. Printing
Reprinting or deleting jobs that have been printed
The terminal can display a list of all your jobs that have been printed, and you can select
jobs from the list to reprint or to delete.
NOTE: Depending on the way your SafeQ administrator has configured SafeQ, printed
jobs may not be available after a certain period of time, or they may never be
available. If you are unsure why a job does not appear in the list, ask your
administrator.
Display the Jobs menu
(see page 19).
Touch the Printed button.
The terminal displays a list of
your jobs that have been printed.
Print or delete the job (or jobs) as
described in "Printing or deleting
specific jobs” on page 21.
To return to the Jobs menu,
touch the Back button.
YSOFT SAFEQ TERMINAL PROFESSIONAL USER’S GUIDE 24
4 Copying and scanning
To make copies or scans:
Log in to the terminal (see "Logging in to the terminal" on page 5).
Touch the
Copying/Scanning button.
If a project entry screen opens, enter the first
digits of the project code; then touch OK.
On the MFP’s control panel, select the
options you want; then make the
copies or scan your document.
When you finish, touch End.
The terminal automatically
logs you out.
The terminal may or
may not display
more information
about your session,
depending on the
way the terminal has
been configured.
Touch the project you need.
The terminal
displays information
about the copies
you made.

YSOFT SAFEQ TERMINAL PROFESSIONAL USER’S GUIDE 25
Chapter 3. Printing
5 Changing the screen’s brightness
Your terminal may be set up to save power by dimming the screen’s brightness after a certain period.
If the terminal screen appears to be dim, touch anywhere on the screen to restore the brightness.

YSOFT SAFEQ TERMINAL PROFESSIONAL INSTALLATION AND ADMINISTRATION GUIDE 11

2 YYSOFT SAFEQ TERMINAL PROFESSIONAL INSTALLATION AND ADMINISTRATION GUIDE
Copyright © 2014 Y Soft Corporation. All rights reserved.
Edition: 2.0 [EN]
Date: 5 October 2014
YSoft SafeQ, the YSoft SafeQ logo, and the Y Soft logo are registered trademarks of Y Soft Corporation.
All other trademarks and names stated in this document may be trademarks and/or registered trademarks
of individual owners.
www.ysoft.com
Y Soft Corporation Y Soft Americas
Podnikatelska 4 info.us@ysoft.com
Technology Park
612 00 Brno
Czech Republic
info@ysoft.com
Disclaimers
Y Soft, Inc. rejects any and all responsibility for the consequences of improper, negligent, or incorrect installation
or incorrect settings of optional operational system parameters.
Changes or modifications not expressly approved by Y Soft, Inc. may void the user’s authority to operate
the SafeQ Terminal Professional.

YSOFT SAFEQ TERMINAL PROFESSIONAL INSTALLATION AND ADMINISTRATION GUIDE 31
Contents
1 About this guide .................................................................................. 6
2 Obtaining more information and getting help ..................................... 7
Obtaining information ................................................................................................. 7
Getting help ................................................................................................................. 7
3 SafeQ Terminal Professional—overview ............................................. 8
SafeQ Terminal Professional capabilities .................................................................... 9
SafeQ Terminal Professional user options .................................................................. 9
4 Installing the terminal ........................................................................ 10
Step 1. Complete the Before-You-Begin checklist....................................................10
Step 2. Check package contents ...............................................................................11
Step 3. Connect cables .............................................................................................12
Step 4. Configure the connection between the terminal and the SafeQ server ......14
Display the site admins Service menu ...............................................................14
Configure the terminal’s network settings .......................................................14
Step 5. Test the connection between the terminal and the SafeQ server ...............23
Step 6. Replace the back cover of the terminal .......................................................25
Step 7. Mount the terminal ......................................................................................26
Step 8. Verify installation .........................................................................................28
5 Changing settings ............................................................................. 29
Displaying the site admins Service menu ..................................................................29
Displaying the Y Soft partners Service menu ............................................................31
Viewing system information and settings .................................................................32
Viewing license information ......................................................................................33
Optimizing the Ethernet port speed and mode ........................................................34
Enabling cluster support............................................................................................36
Setting MFP/printer locking options .........................................................................37
Changing card reader and fingerprint recognition settings ......................................38
Setting and testing the I/O Module...........................................................................39
Setting the I/O Module for the control cable interface ....................................39

4 YYSOFT SAFEQ TERMINAL PROFESSIONAL INSTALLATION AND ADMINISTRATION GUIDE
Testing the I/O Module .....................................................................................40
Viewing information about the I/O Module connection ..................................41
Changing terminal interface settings ........................................................................42
Changing language settings .......................................................................................47
Changing display settings ..........................................................................................48
6 Performing diagnostics ...................................................................... 49
Enabling Debug mode ...............................................................................................49
Downloading terminal logs .......................................................................................50
Testing the connection between the terminal and the SafeQ server .......................51
Troubleshooting an unsuccessful terminal/SafeQ server connection ..............52
Ping other devices .....................................................................................................53
7 Performing service procedures ......................................................... 55
Rebooting the terminal .............................................................................................55
Changing the Y Soft partners Service menu access PIN code ...................................56
Changing the site admins Service menu access PIN code .........................................57
8 Updating terminal firmware ............................................................... 58
Performing a Regular terminal firmware update ......................................................59
Performing an Emergency terminal firmware update ..............................................61
A Terminal properties and technical specifications ............................... 64
Specifications.............................................................................................................64
B Service connector ............................................................................. 66

YSOFT SAFEQ TERMINAL PROFESSIONAL INSTALLATION AND ADMINISTRATION GUIDE 51
FCC Statements
§ 15.21 Information to user.
The user’s manual or instruction manual for an intentional or unintentional radiator shall caution the user
that changes or modifications not expressly approved by the party responsible for compliance could void the
user's authority to operate the equipment. In cases where the manual is provided only in a form other than
paper, such as on a computer disk or over the Internet, the information required by this section may be
included in the manual in that alternative form, provided the user can reasonably be expected to have the
capability to access information in that form.
§ 15.105 Information to the user
This equipment has been tested and found to comply with the limits for a Class A digital device, pursuant to
part 15 of the FCC Rules. These limits are designed to provide reasonable protection against harmful
interference when the equipment is operated in a commercial environment. This equipment generates, uses,
and can radiate radio frequency energy and, if not installed and used in accordance with the instruction
manual, may cause harmful interference to radio communications. Operation of this equipment in a
residential area is likely to cause harmful interference in which case the user will be required to correct the
interference at his own expense.

6 YYSOFT SAFEQ TERMINAL PROFESSIONAL INSTALLATION AND ADMINISTRATION GUIDE
1 About this guide
This guide provides instructions for installing and configuring Y Soft SafeQ® Terminal
Professional version 3.5, firmware version 3.8.0 and higher.
The information in this guide applies to the following SafeQ products:
YSoft SafeQ Instant Edition v. 3.5
YSoft SafeQ Professional Edition v. 3.1.5, 3.3, and 3.6
YSoft SafeQ Enterprise Edition v. 3.1.5, 3.3, and 3.6
YSoft SafeQ 4 all editions
YSoft SafeQ 5 all editions
In order to use this guide, you must already know how to perform standard system
administration tasks and must have an understanding of networking concepts.
Specifically, you must have a working knowledge of the following:
Server/client systems, IP addressing, and TCP/UDP ports
Printing terminology and concepts
You must also be familiar with the SafeQ system and SafeQ administration tasks.

7 YSOFT SAFEQ TERMINAL PROFESSIONAL INSTALLATION AND ADMINISTRATION GUIDE
2 Obtaining more information and
getting help
Obtaining information
You can download manuals and other information from the Y Soft Portal:
http://portal.ysoft.com
Getting help
The Y Soft user-friendly online help desk is available 24/7 and provides quick answers to
questions you may have about installing and configuring the terminal. Interactive
troubleshooting trees help you find the information you need. And if you still have a
question, you can fill out a help ticket form that enables Y Soft to quickly assist you.
To access the online help desk, go to http://portal.ysoft.com and log in.
If you are not already a registered user, follow these steps to register:
1 Click new registration.
2 Fill in the required information.
Y Soft emails you when your account is activated.
Chapter 3. SafeQ Terminal Professional—overview
8 YYSOFT SAFEQ TERMINAL PROFESSIONAL INSTALLATION AND ADMINISTRATION GUIDE
3 SafeQ Terminal Professional—
overview
SafeQ Terminal Professional provides an interface for users to access multifunction
printers (MFPs) and network printers to perform print, copy, and scan operations. The
terminal supports follow-me, printing, print job management, printing shared
documents, and self-serve printing/copying. The terminal also supports streamlined
scanning workflows.
The terminal has a graphical user interface touchscreen and is equipped with a 4-port
network adapter.
The terminal also features:
Microcomputer
Flash EEPROM
Network interface
Various optional card readers are available to meet the compatibility requirements of
your existing identification cards. (PINs can be used instead of the card reader.) Both
contactless and contact readers are available.
The terminal communicates with the YSoft SafeQ server over an Ethernet network
(default communication port 4096). RJ45 connectors connect the terminal to the
network. MFPs and printers communicate with the SafeQ server via the terminal. You
can set access rights that require users to authenticate at the terminal before using the
MFP or network printer.
Each terminal has a MAC address allocated by Y Soft.
For more information, see Appendix A.

Chapter 3. SafeQ Termininal Professional -- Overview
YSOFT SAFEQ TERMINAL PROFESSIONAL INSTALLATION AND ADMINISTRATION GUIDE 91
SafeQ Terminal Professional capabilities
The terminal has the following capabilities:
Supports follow-me, printing, copying, and scanning.
Displays accounting and credit information.
Supports authorization by PIN, card, and login—alone or in a variety of
combinations.
Enables one-time authorization by PUK code or login if the user has
no active card.
Supports project accounting.
Beeps and displays a warning when copying timeout period expires.
Blocks access to MFPs – firewall and routing.
Enables central configuration.
Supports remote administration.
Optimizes data transfer between the SafeQ server and printers.
Includes power management feature that enables brightness to be decreased or
turned off when the terminal is idle for a configured length of time.
SafeQ Terminal Professional user options
The terminal offers users the following options:
Print, copy, and scan.
View and select jobs (jobs to print, favorite jobs, and printed jobs).
Print favorite jobs by selecting them at the terminal.
Delete jobs from queue.
View information about print/copying status and detailed price accounting on the
terminal screen.
10 TERMINAL PROFESSIONAL INSTALLATION AND ADMINISTRATION GUIDE
4 Installing the terminal
Step 1. Complete the Before-You-Begin checklist
Before you begin installing the terminal, complete this checklist:
If possible, register and acquire access to the Y Soft online help desk a day or two before you begin
the installation. (See page 7.)
Obtain the Terminal Professional installation packages (see page 11) and a small Phillips
screwdriver.
Make sure YSoft SafeQ Server is installed and running.
Write down the terminal’s serial number (located on the back of the terminal).
Make sure the Control Interface cable (see page 11) is the correct cable for the MFP you are
connecting the terminal to.
NOTE: Refer to the MFP/cable part number compatibility list that Y Soft provided you or go
to http://helpdesk.ysoft.com and check the list there.
If the cable you have is not correct, find the correct cable before you proceed. The
cable may be among other Y Soft packages at the location where you are installing
the terminal.
Obtain the following information:
SafeQ server IP address _______________________________________________________
Does the network support DHCP? Yes____ No____
If it does not support DHCP, obtain this additional information:
Terminal IP address __________________________________________________________
Netmask address ____________________________________________________________
Gateway IP address __________________________________________________________
DNS server IP address ________________________________________________________
Information about the MFP or printer:
IP address _________________________________________________________________
Serial number ______________________________________________________________
Model number _____________________________________________________________
Chapter 4. Installing the terminal
YSOFT SAFEQ TERMINAL PROFESSIONAL INSTALLATION AND ADMINISTRATION GUIDE 111
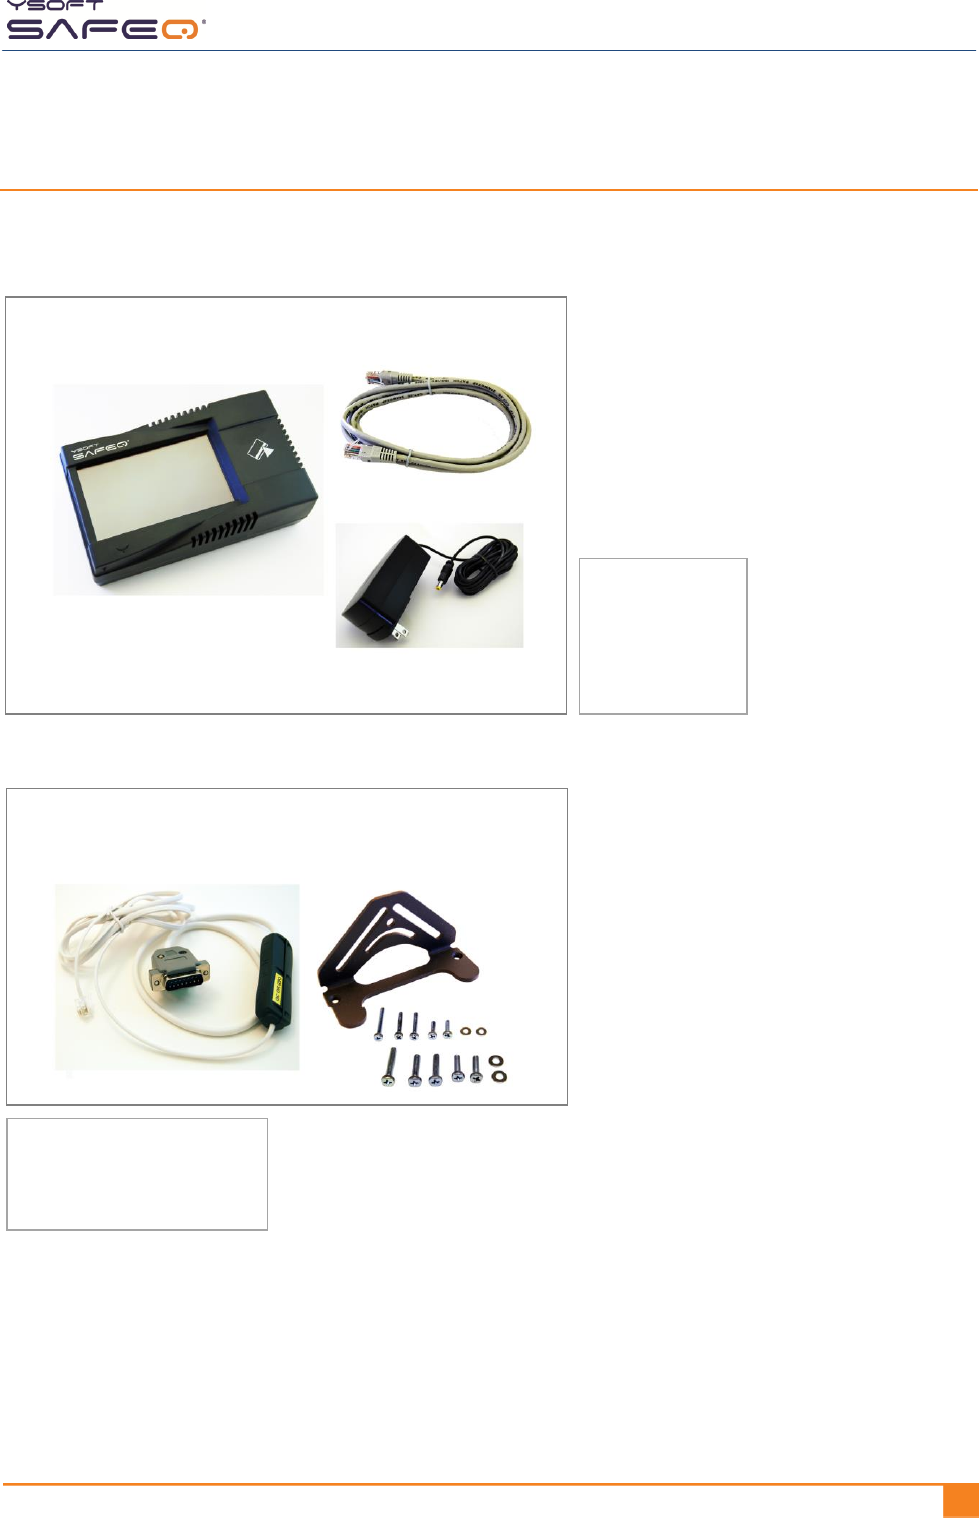
Step 2. Check package contents
Check to make sure you have the following items (included in several packages):
Main package
Accessory packages
Terminal
Ethernet cable
Power supply adapter
NOTE:
The package also
includes clear
plastic cable wrap
for the Ethernet
cables.
MFP Universal Mounting Kit
(bracket, screws, washers)
NOTE:
The Control Interface cable
for your MFP may be different
from the one shown here.
Control Interface cable
(Blocking cable)
Chapter 4. Installing the terminal
12 YYSOFT SAFEQ TERMINAL PROFESSIONAL INSTALLATION AND ADMINISTRATION GUIDE
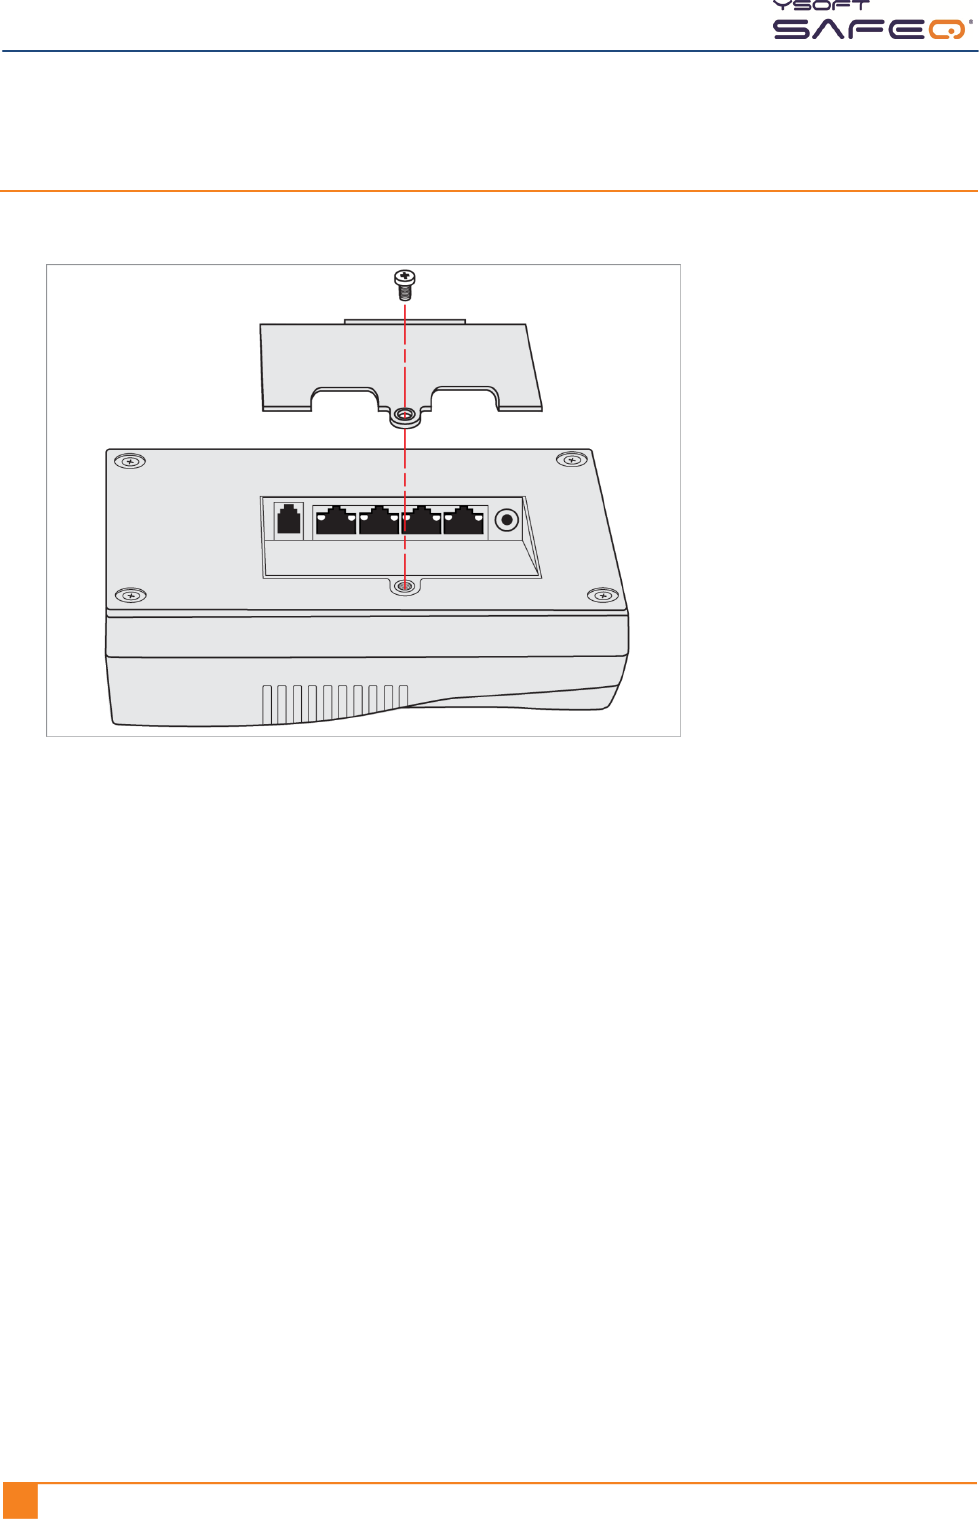
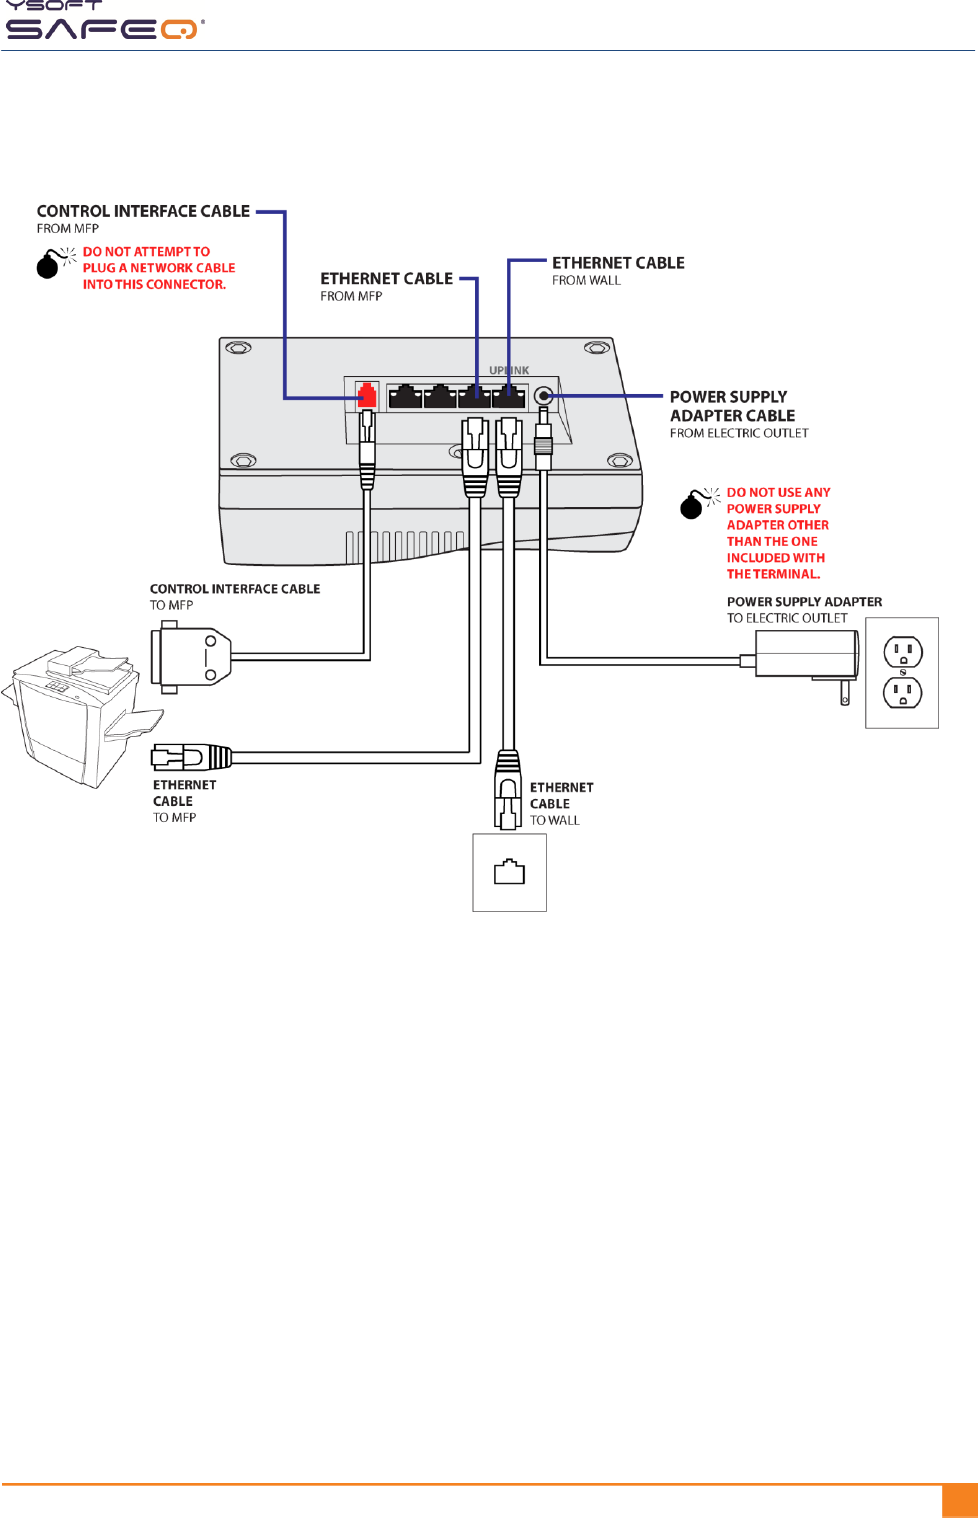
Step 3. Connect cables
1 On the back of the terminal, remove the cover and expose the connectors.
2 Connect cables as shown on the next page.
Chapter 4. Installing the terminal
YSOFT SAFEQ TERMINAL PROFESSIONAL INSTALLATION AND ADMINISTRATION GUIDE 131
Chapter 4. Installing the terminal
14 YYSOFT SAFEQ TERMINAL PROFESSIONAL INSTALLATION AND ADMINISTRATION GUIDE
Step 4. Configure the connection between the terminal
and the SafeQ server
Display the site admins Service menu
If you are using YSoft SafeQ Instant or Professional Edition:
Display the site admins Service menu as described on page 29.
If you are using YSoft SafeQ Enterprise Edition and will need to configure cluster support:
Display the Y Soft partners Service menu as described on page 31.
NOTES: The options available on the Service menu vary according to the type of access
you have and other variables.
The options are similar to those for earlier versions of the terminal, with a few
differences, such as the locations of certain options on menus.
Configure the terminal’s network settings
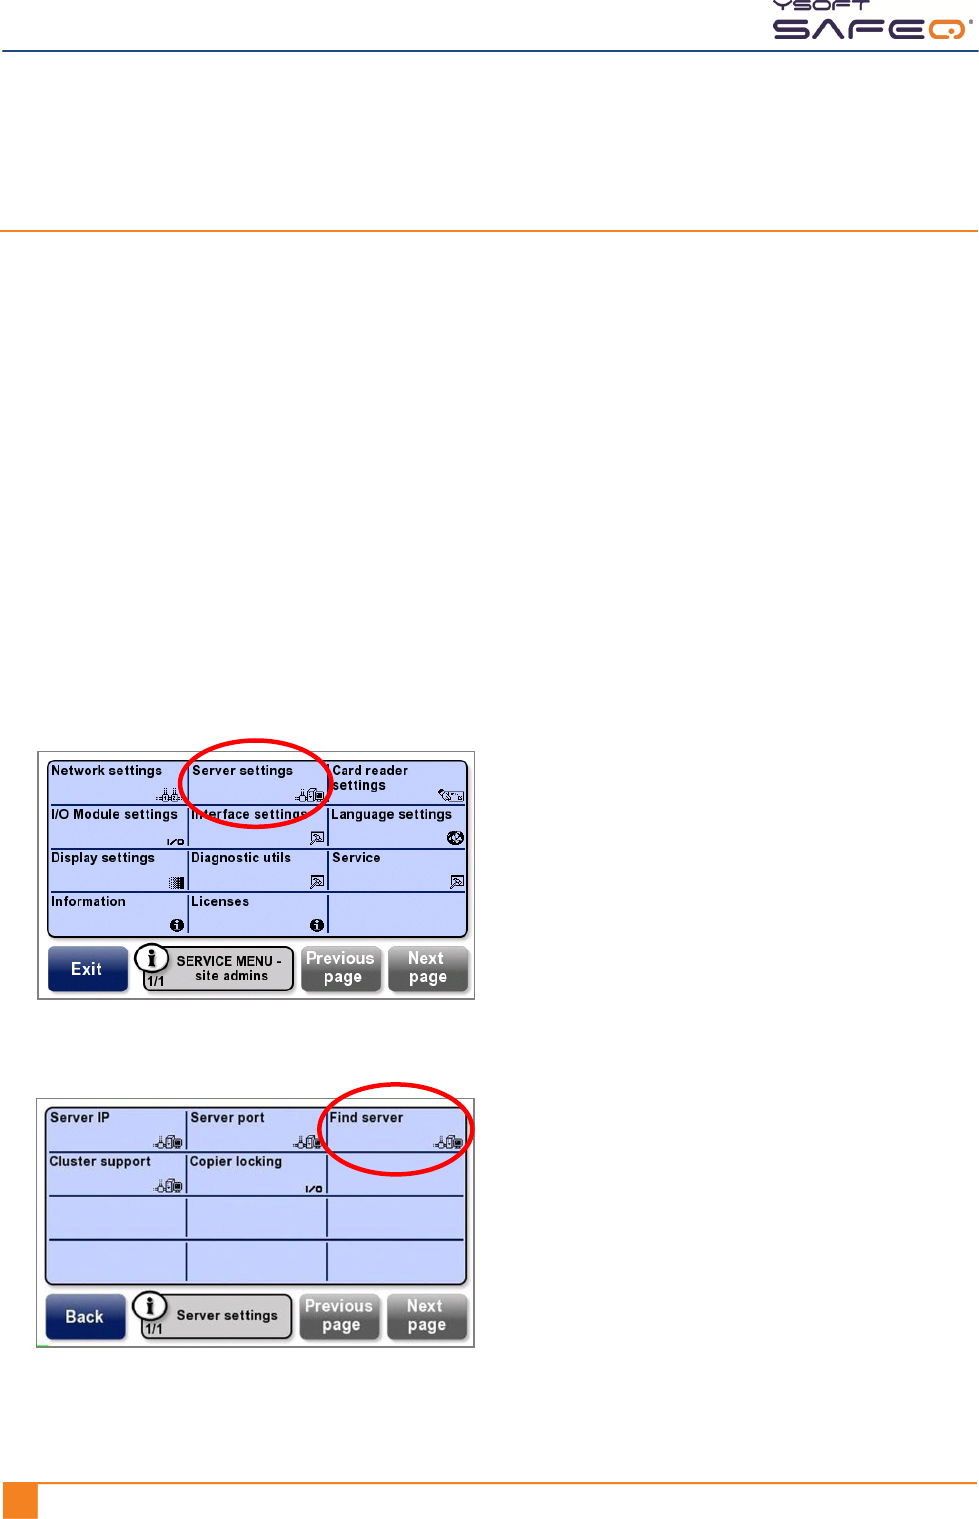
Refer to the information you entered on page 10 as you follow the steps in this section.
1 Touch Server settings.
2 Touch Find server.
Chapter 4. Installing the terminal
YSOFT SAFEQ TERMINAL PROFESSIONAL INSTALLATION AND ADMINISTRATION GUIDE 151
3 If the terminal finds the server, skip to step 4 on page 16.
If the terminal does not find the server, enter the server IP address and server
port as follows:
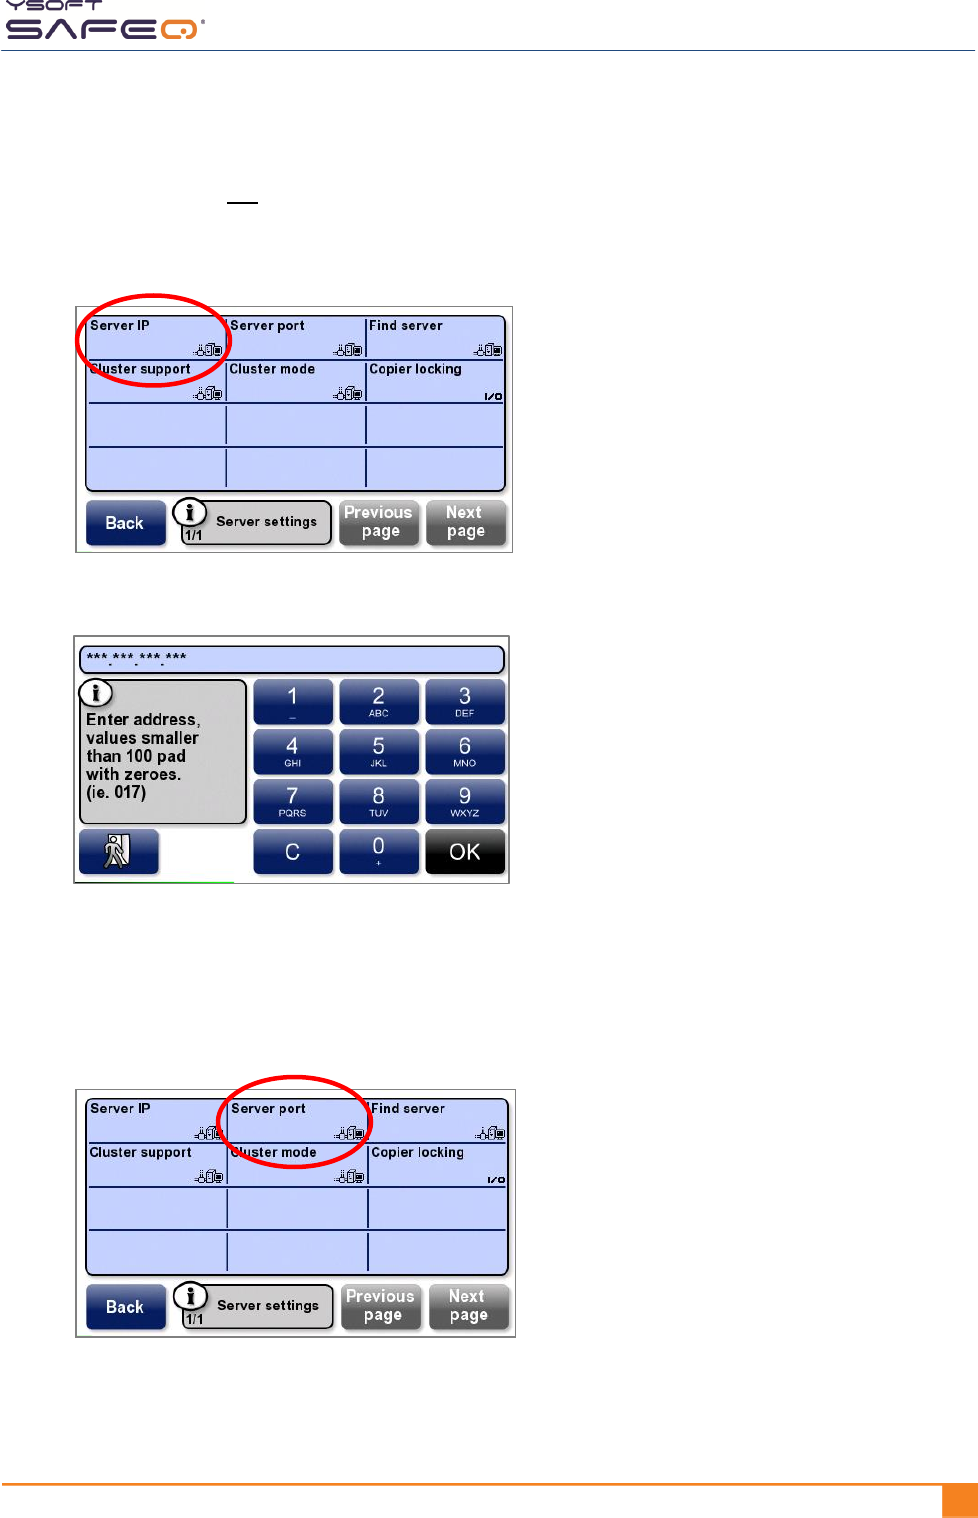
a Touch Server IP.
A keypad opens.
b Enter the SafeQ server’s IP address in the format shown in this example:
10.0.1.1 is entered as 010 000 001 001.
Touch OK.
c Touch Server port.
Chapter 4. Installing the terminal
16 YYSOFT SAFEQ TERMINAL PROFESSIONAL INSTALLATION AND ADMINISTRATION GUIDE
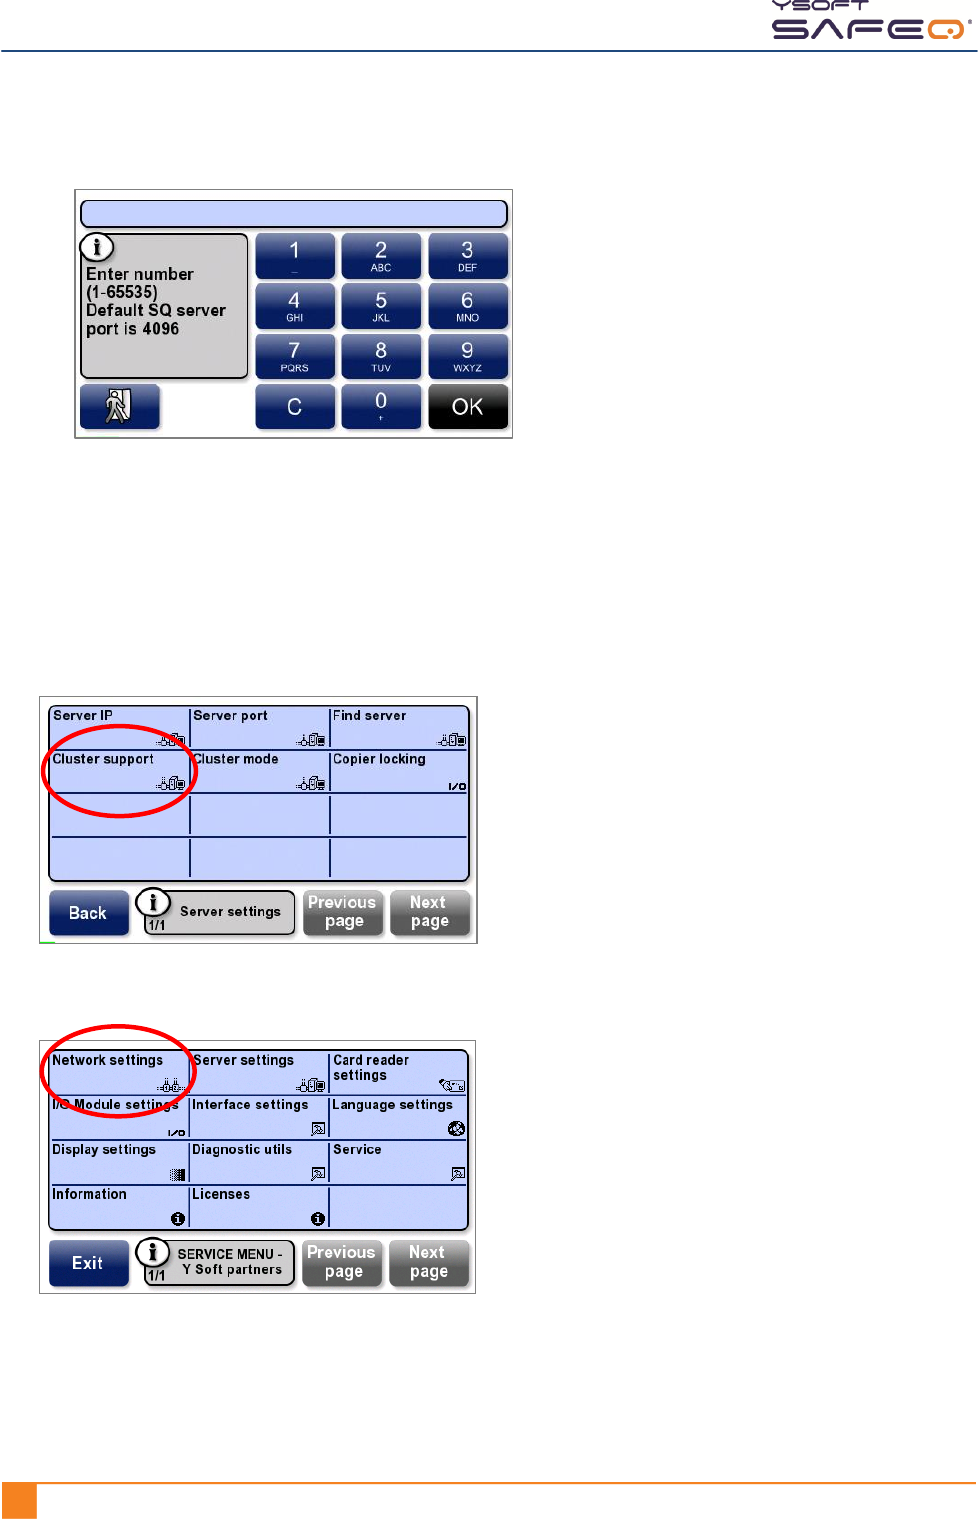
d Enter the SafeQ server’s port; then touch OK.
NOTE: The default port is 4096.
4 If you are using SafeQ Enterprise Edition, touch Cluster support;
then touch Enable.
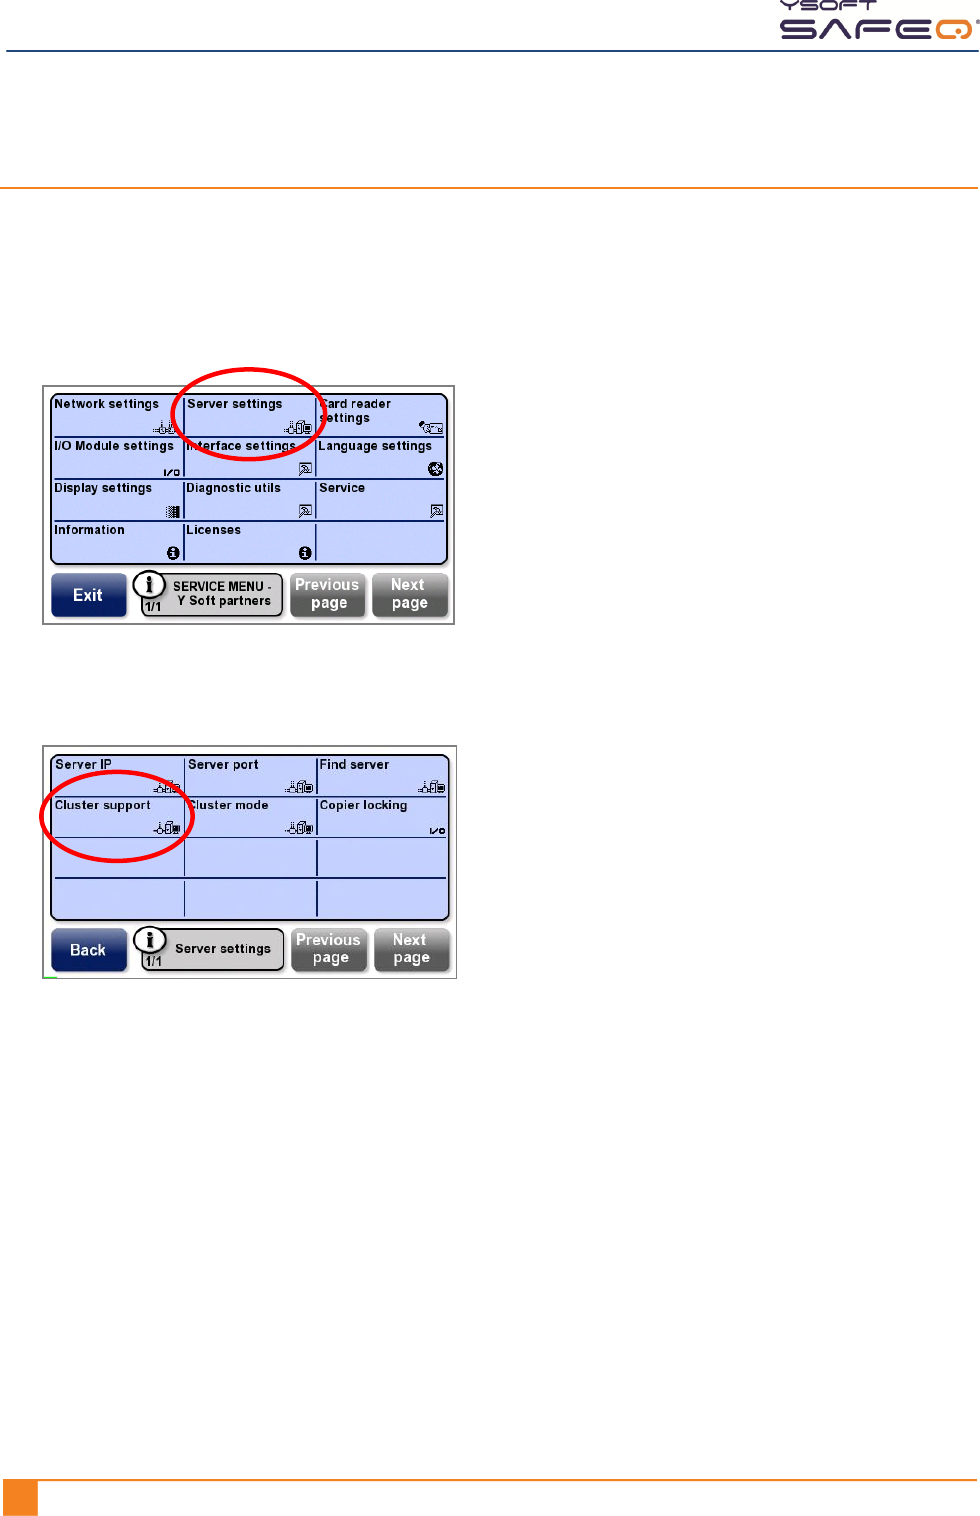
NOTE: The Cluster support option is available only from the Y Soft partners Service menu.
(See page 31.)
5 Touch Network settings.
Chapter 4. Installing the terminal
YSOFT SAFEQ TERMINAL PROFESSIONAL INSTALLATION AND ADMINISTRATION GUIDE 171
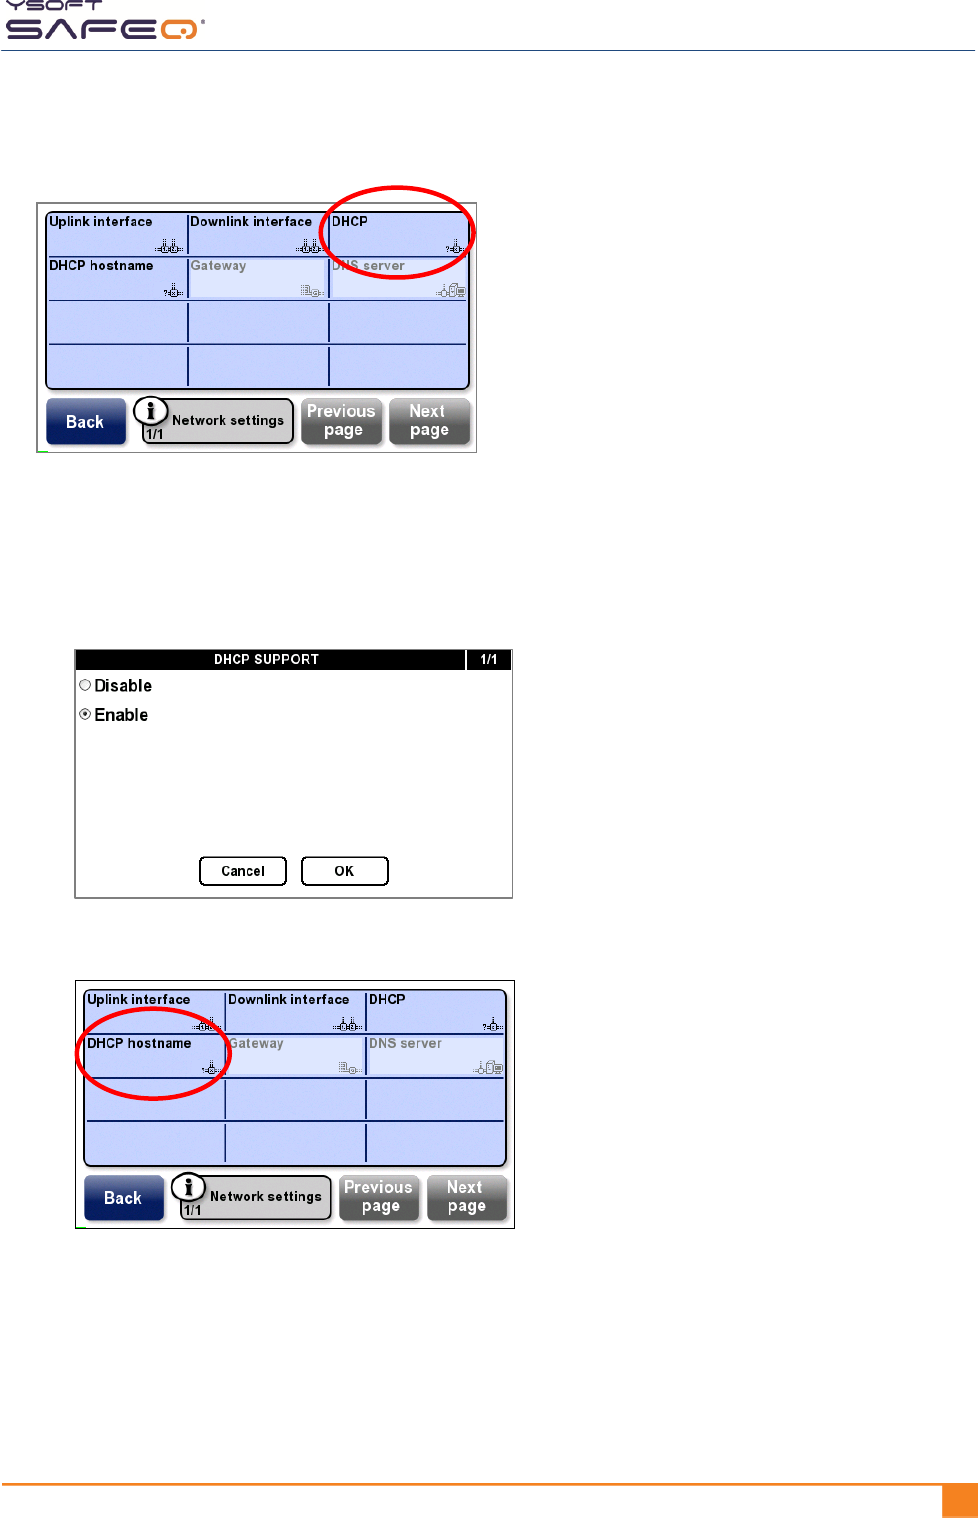
6 Touch DHCP.
The DHCP Support screen opens.
7 Select the appropriate option:
If DHCP is enabled:
a Touch Enable; then touch OK.
b Touch DHCP hostname.

Chapter 4. Installing the terminal
18 YYSOFT SAFEQ TERMINAL PROFESSIONAL INSTALLATION AND ADMINISTRATION GUIDE
c Enter the hostname that will be sent by the DHCP client; then touch OK.
NOTES: The hostname can contain a maximum of 31 characters.
The terminal’s serial number is used as the hostname by default.
d Touch Back to return to the Service menu.
e Skip to Step 5 on page 23.
If DHCP is disabled:
a Touch Disable; then touch OK.
b Continue to step 8.
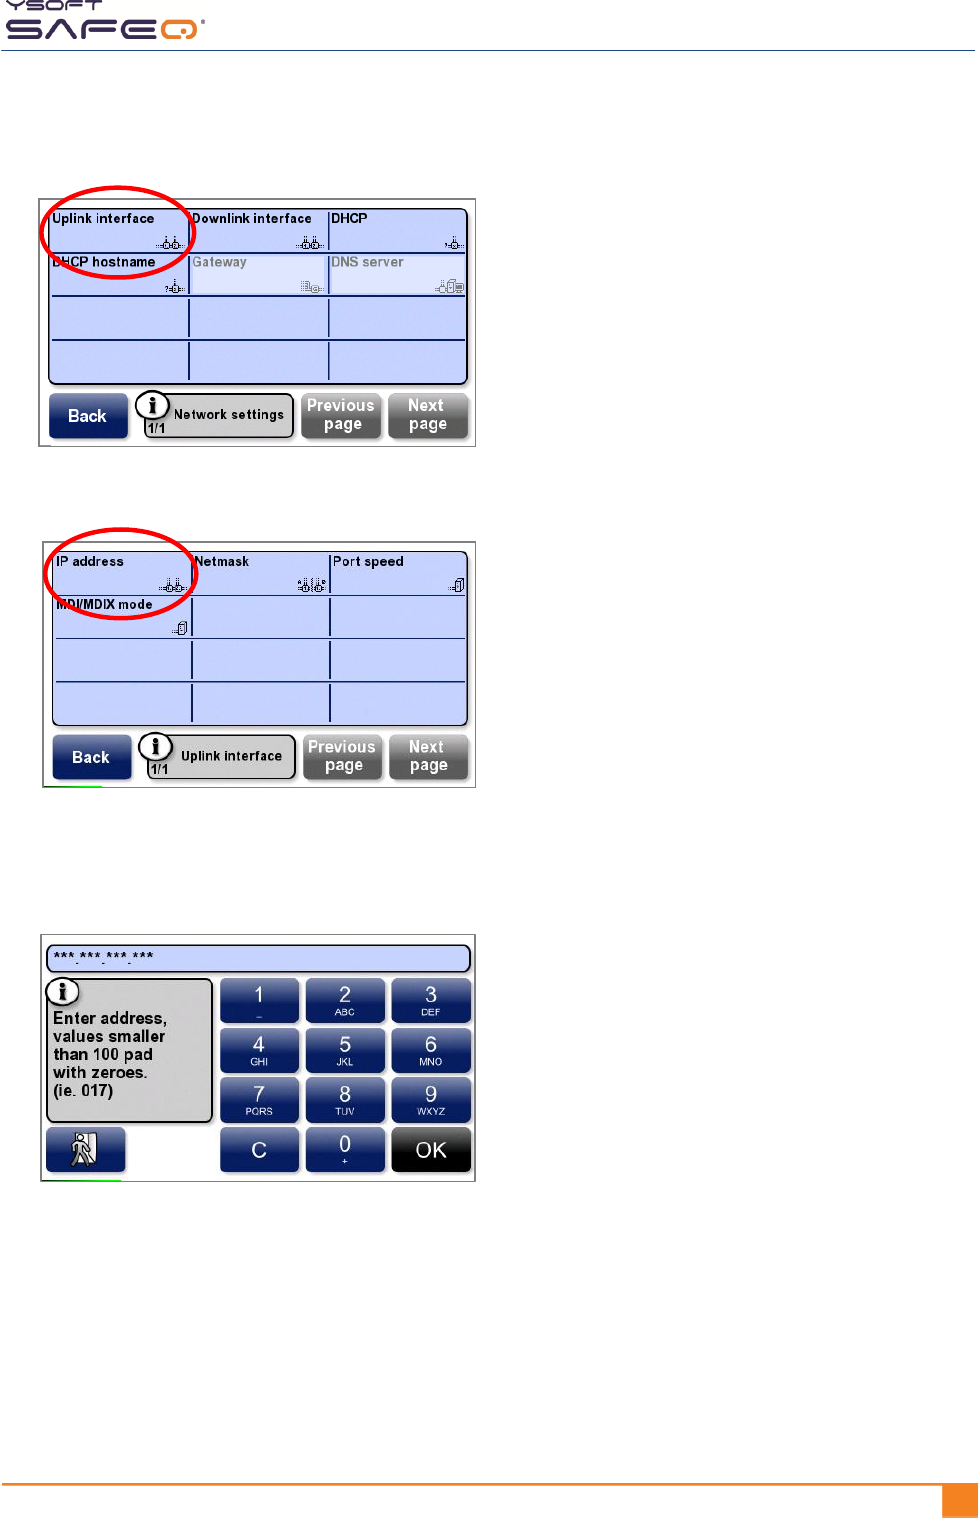
Chapter 4. Installing the terminal
YSOFT SAFEQ TERMINAL PROFESSIONAL INSTALLATION AND ADMINISTRATION GUIDE 191
8 Touch Uplink interface.
9 Touch IP address.
10 Enter the terminal’s IP address in the format shown in this example:
10.0.1.1 is entered as 010 000 001 001.
Touch OK.
Chapter 4. Installing the terminal
20 YYSOFT SAFEQ TERMINAL PROFESSIONAL INSTALLATION AND ADMINISTRATION GUIDE
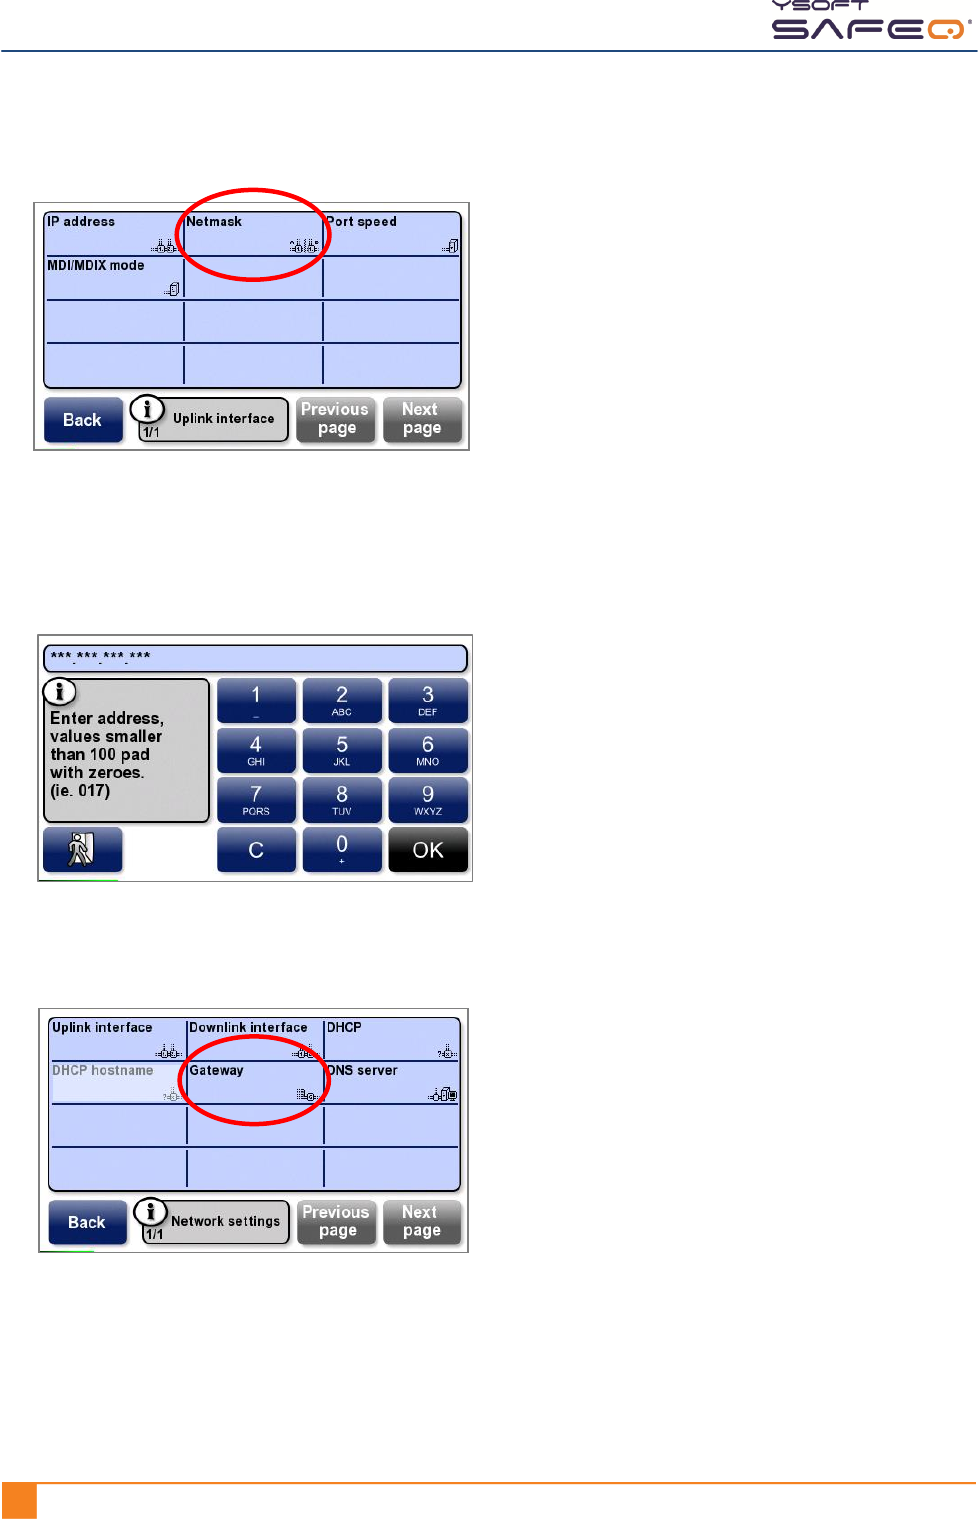
11 Touch Netmask.
The terminal displays a keypad.
12 Enter the subnet mask in the format shown in this example:
255.255.255.0 is entered as 255 255 255 000.
Touch OK.
13 Touch Back.
14 Touch Gateway.
Chapter 4. Installing the terminal
YSOFT SAFEQ TERMINAL PROFESSIONAL INSTALLATION AND ADMINISTRATION GUIDE 211
15 Enter the gateway’s IP address in the format shown in this example:
10.0.1.1 is entered as 010 000 001 001.
Touch OK.
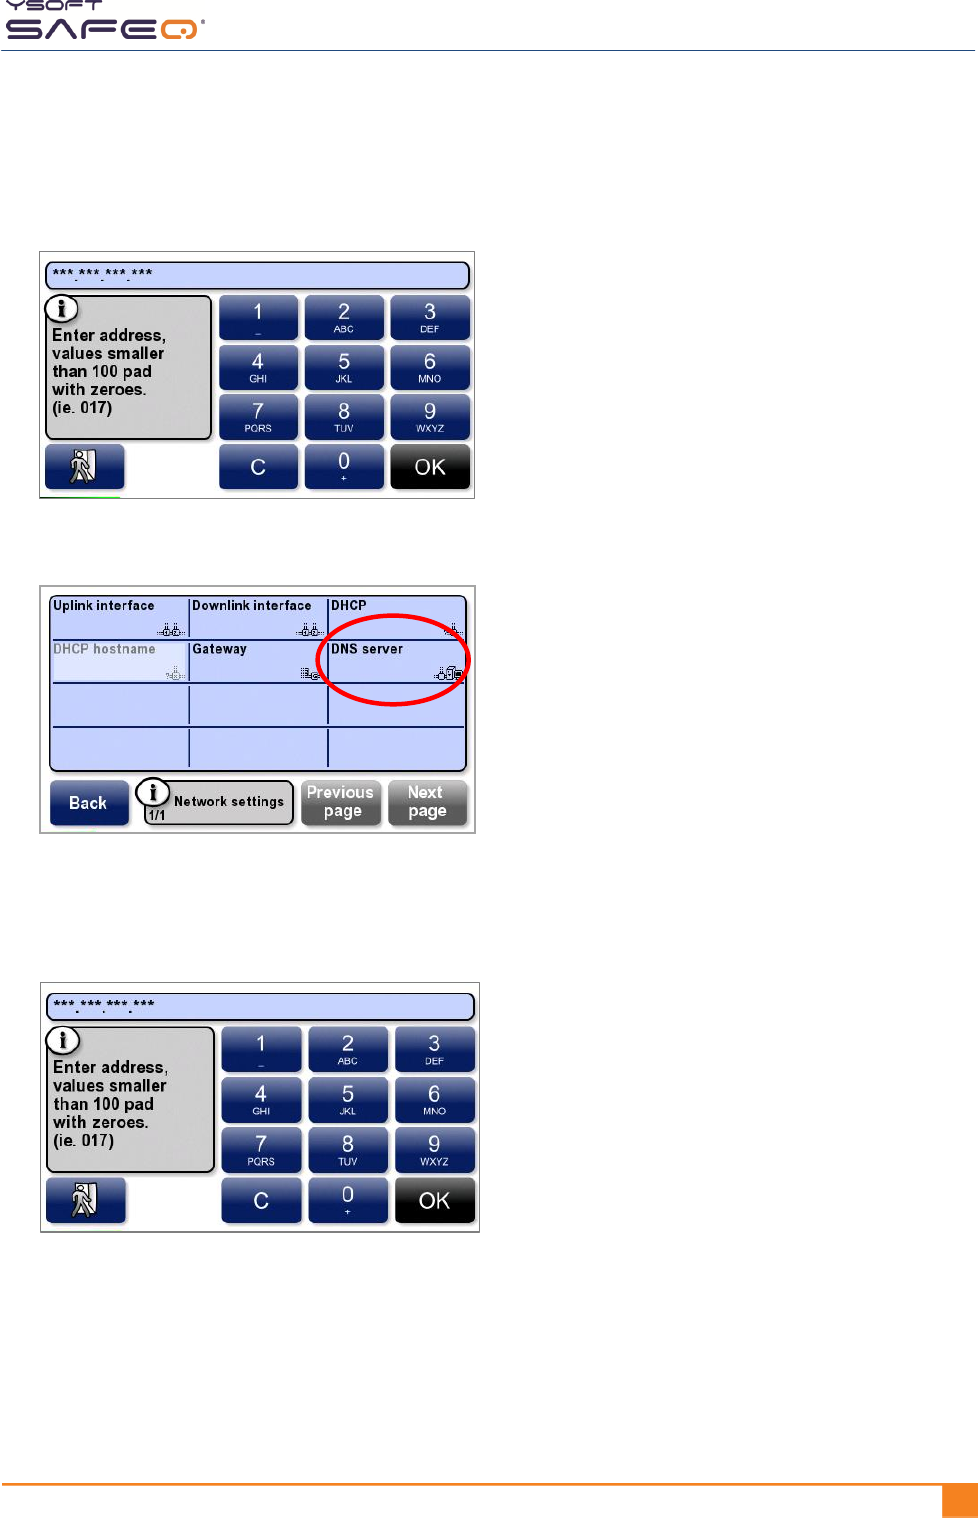
16 Touch DNS server.
17 Enter the DNS server’s IP address in the format shown in this example:
10.0.1.1 is entered as 010 000 001 001.
Touch OK.
18 Touch Back to return to the Service menu.
Chapter 4. Installing the terminal
22 YYSOFT SAFEQ TERMINAL PROFESSIONAL INSTALLATION AND ADMINISTRATION GUIDE
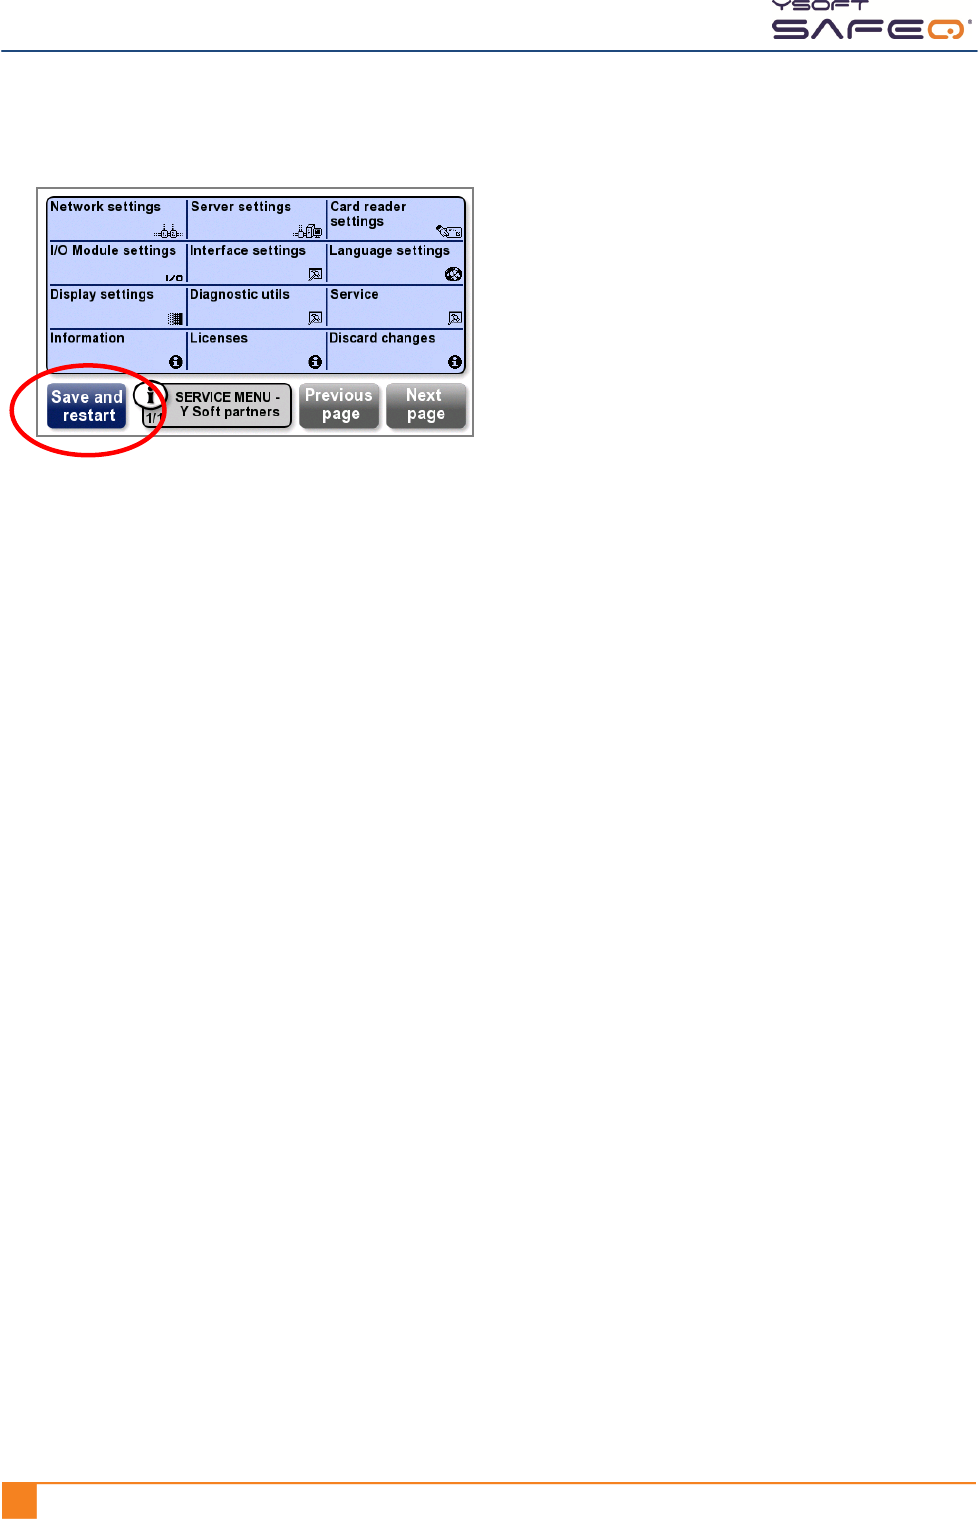
19 Touch Save and restart to save the changes.
Chapter 4. Installing the terminal
YSOFT SAFEQ TERMINAL PROFESSIONAL INSTALLATION AND ADMINISTRATION GUIDE 231
Step 5. Test the connection between the terminal and the
SafeQ server
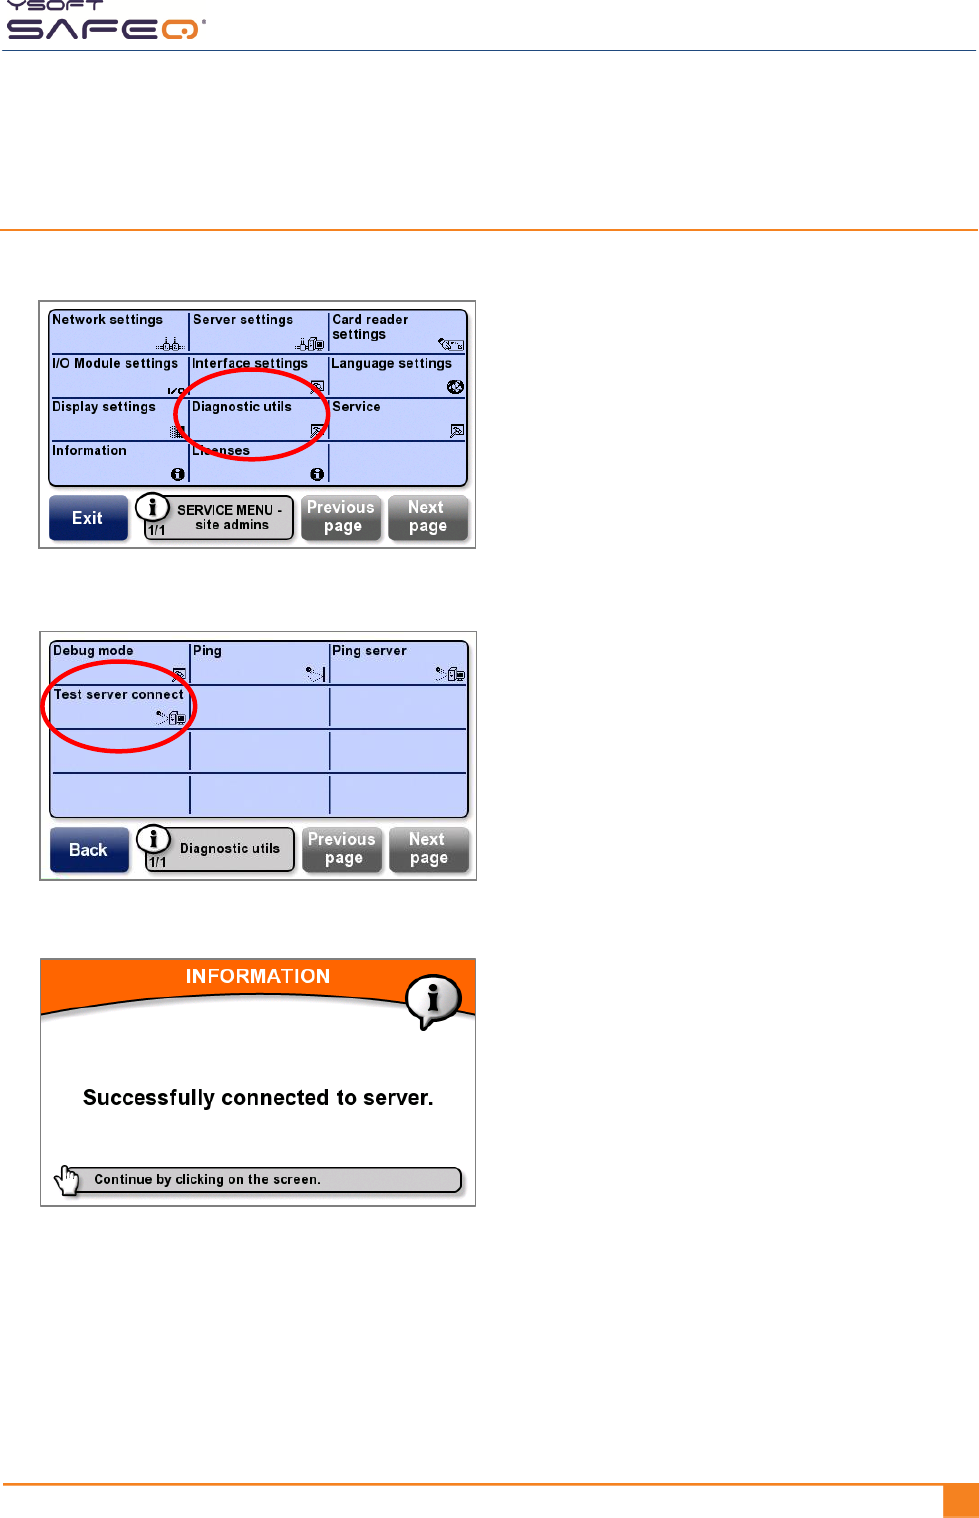
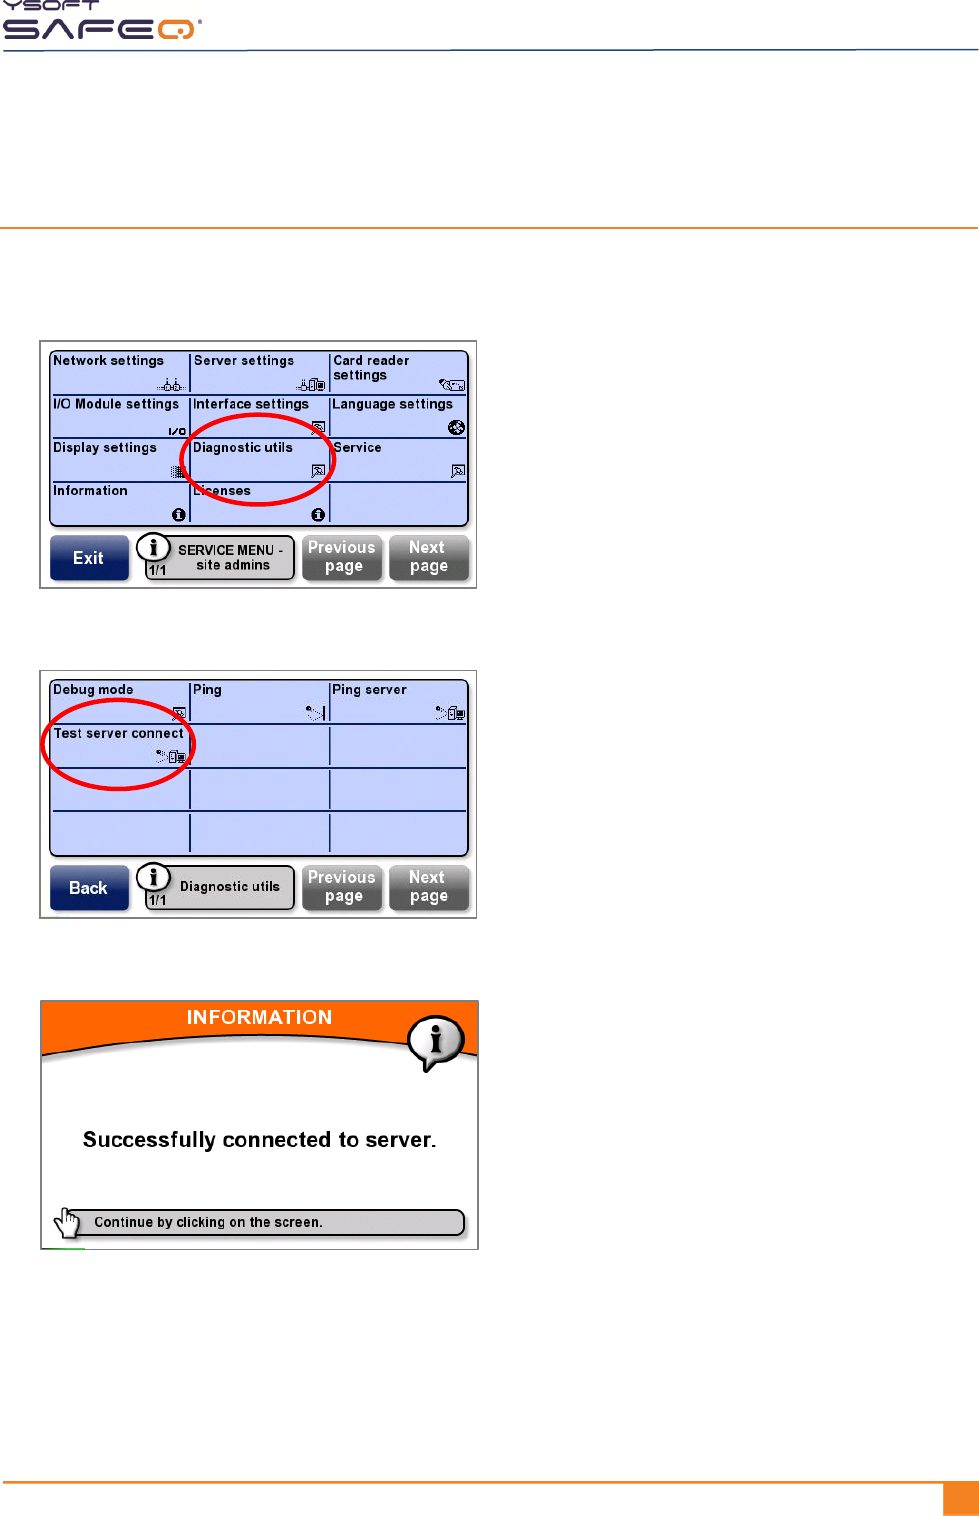
1 In the Site admins Service menu, touch Diagnostic utils.
2 Touch Test server connect.
If the connection is successful, the terminal displays this screen:

Chapter 4. Installing the terminal
24 YYSOFT SAFEQ TERMINAL PROFESSIONAL INSTALLATION AND ADMINISTRATION GUIDE
If the connection is successful:
a Click anywhere on the screen to return to the Diagnostics menu.
c Touch Back to return to the Service menu.
d Exit the Service menu.
e Go to Step 6 on page 25.
If the connection is not successful:
a Click anywhere on the screen to return to the Diagnostics menu.
b Troubleshoot the connection as described in “Troubleshooting an unsuccessful
terminal/SafeQ server connection” on page 52.
Chapter 4. Installing the terminal
YSOFT SAFEQ TERMINAL PROFESSIONAL INSTALLATION AND ADMINISTRATION GUIDE 251
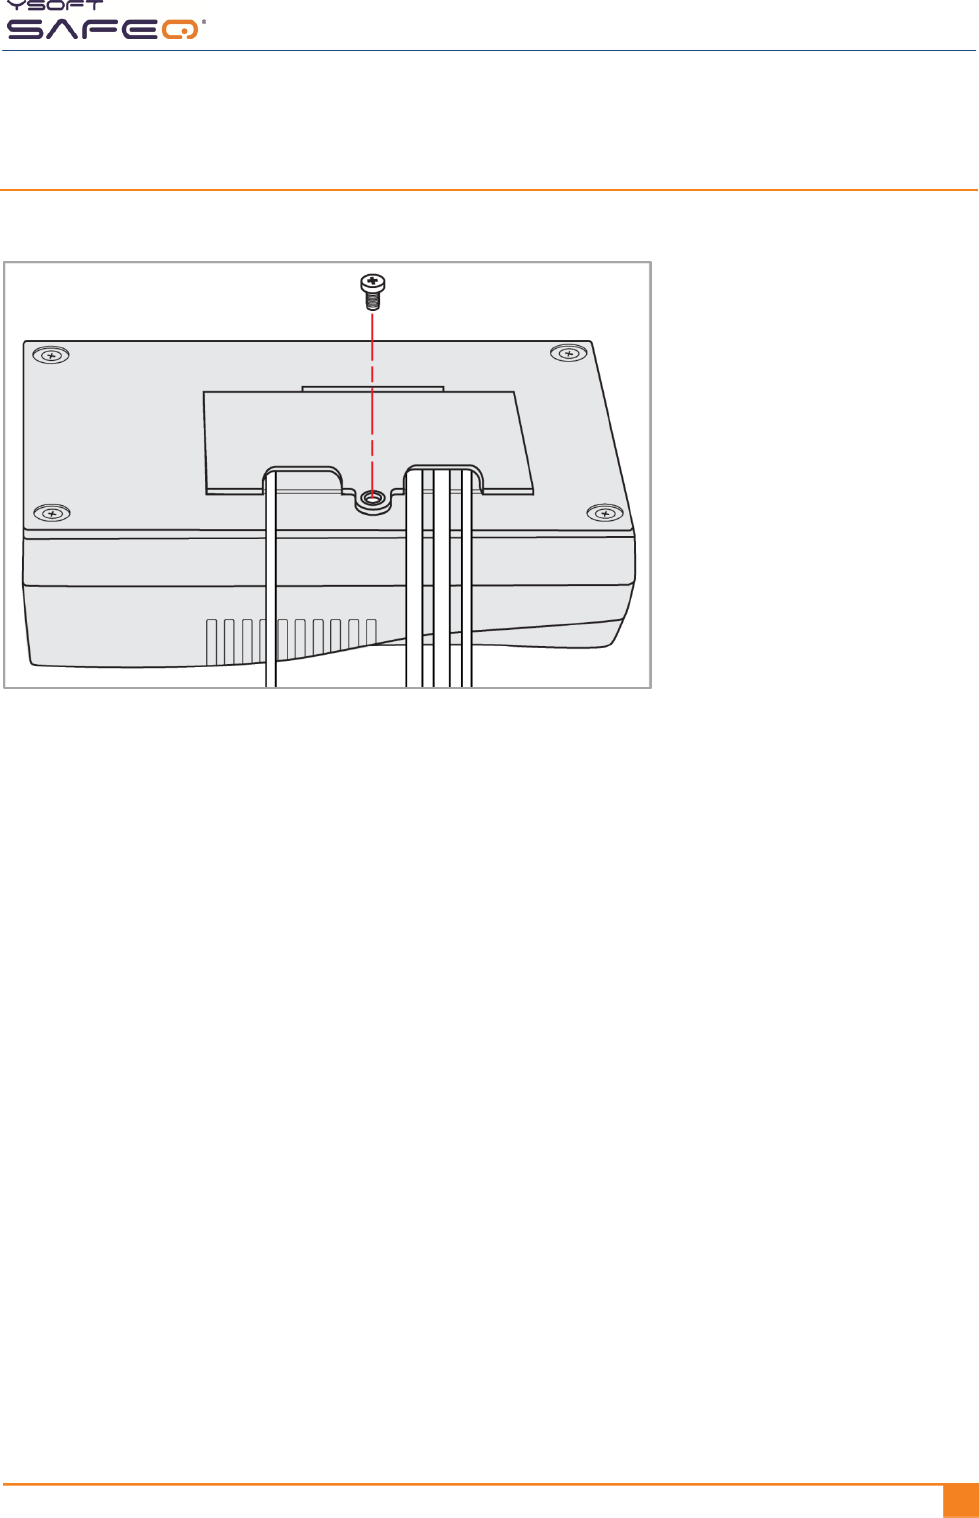
Step 6. Replace the back cover of the terminal
Replace the terminal’s cover and tighten the screw.
Chapter 4. Installing the terminal
26 YYSOFT SAFEQ TERMINAL PROFESSIONAL INSTALLATION AND ADMINISTRATION GUIDE
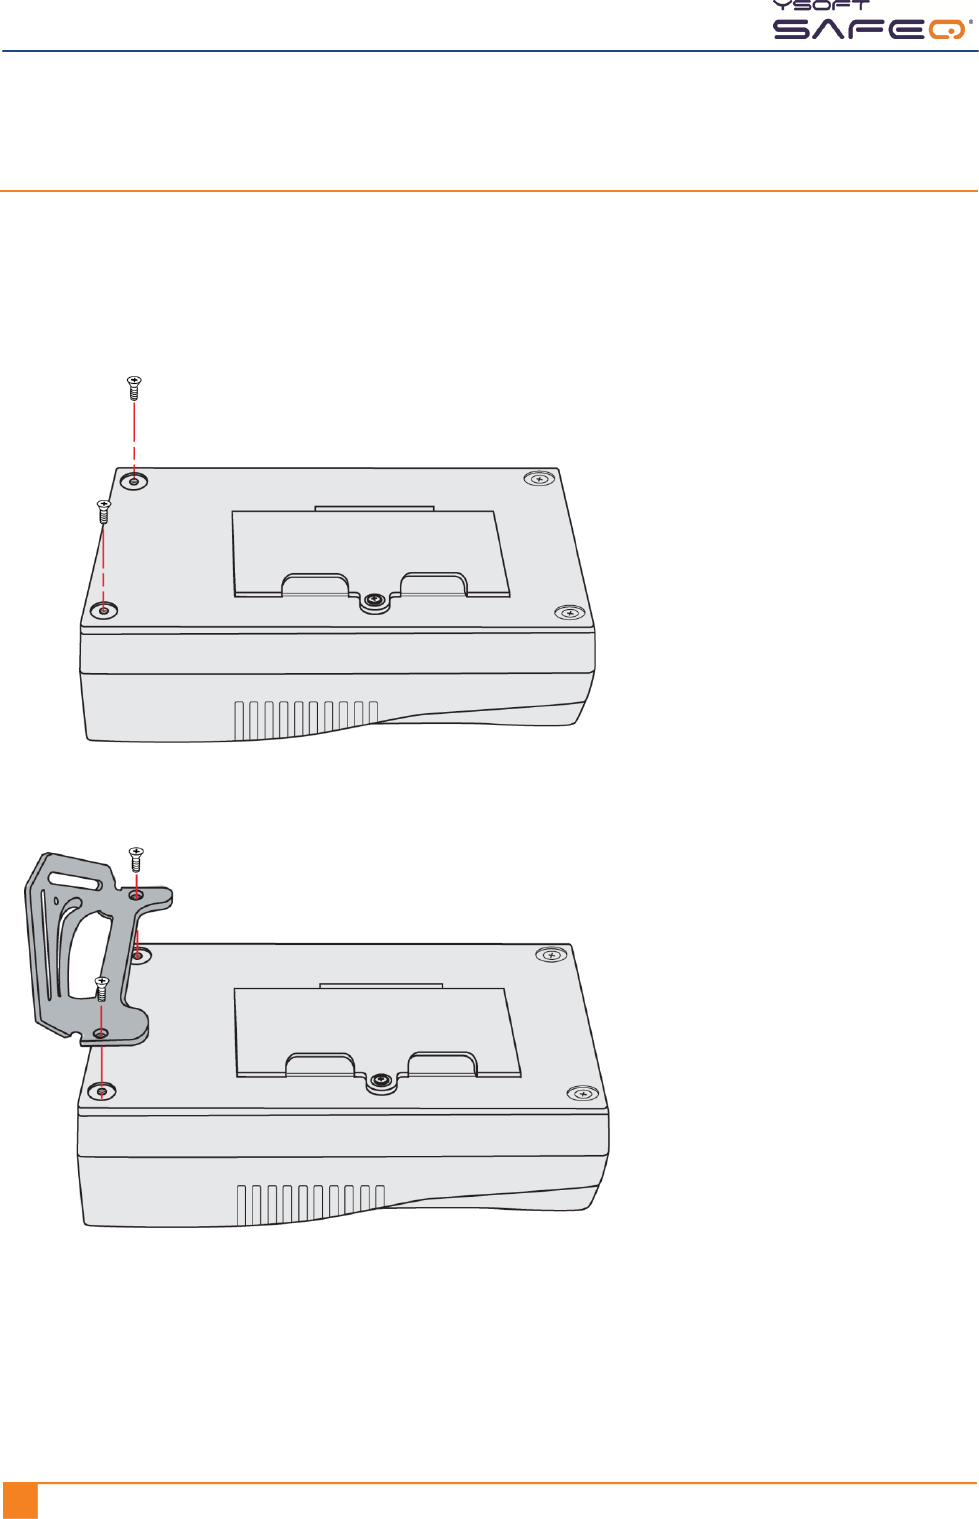
Step 7. Mount the terminal
Depending on the type of bracket included with the terminal, mount the bracket to the
MFP, to the wall, or to a nearby object such as a desk or table.
To mount the terminal onto the MFP, follow these steps:
1 Remove 2 screws from the back of the terminal.
2 Attach the mounting bracket to the terminal.
3 If you have not already done so, write down the terminal’s serial number (located on
the back of the terminal).
4 Use the screws and washers included with the mounting bracket to mount the
bracket and terminal onto the MFP.
Chapter 4. Installing the terminal
YSOFT SAFEQ TERMINAL PROFESSIONAL INSTALLATION AND ADMINISTRATION GUIDE 271
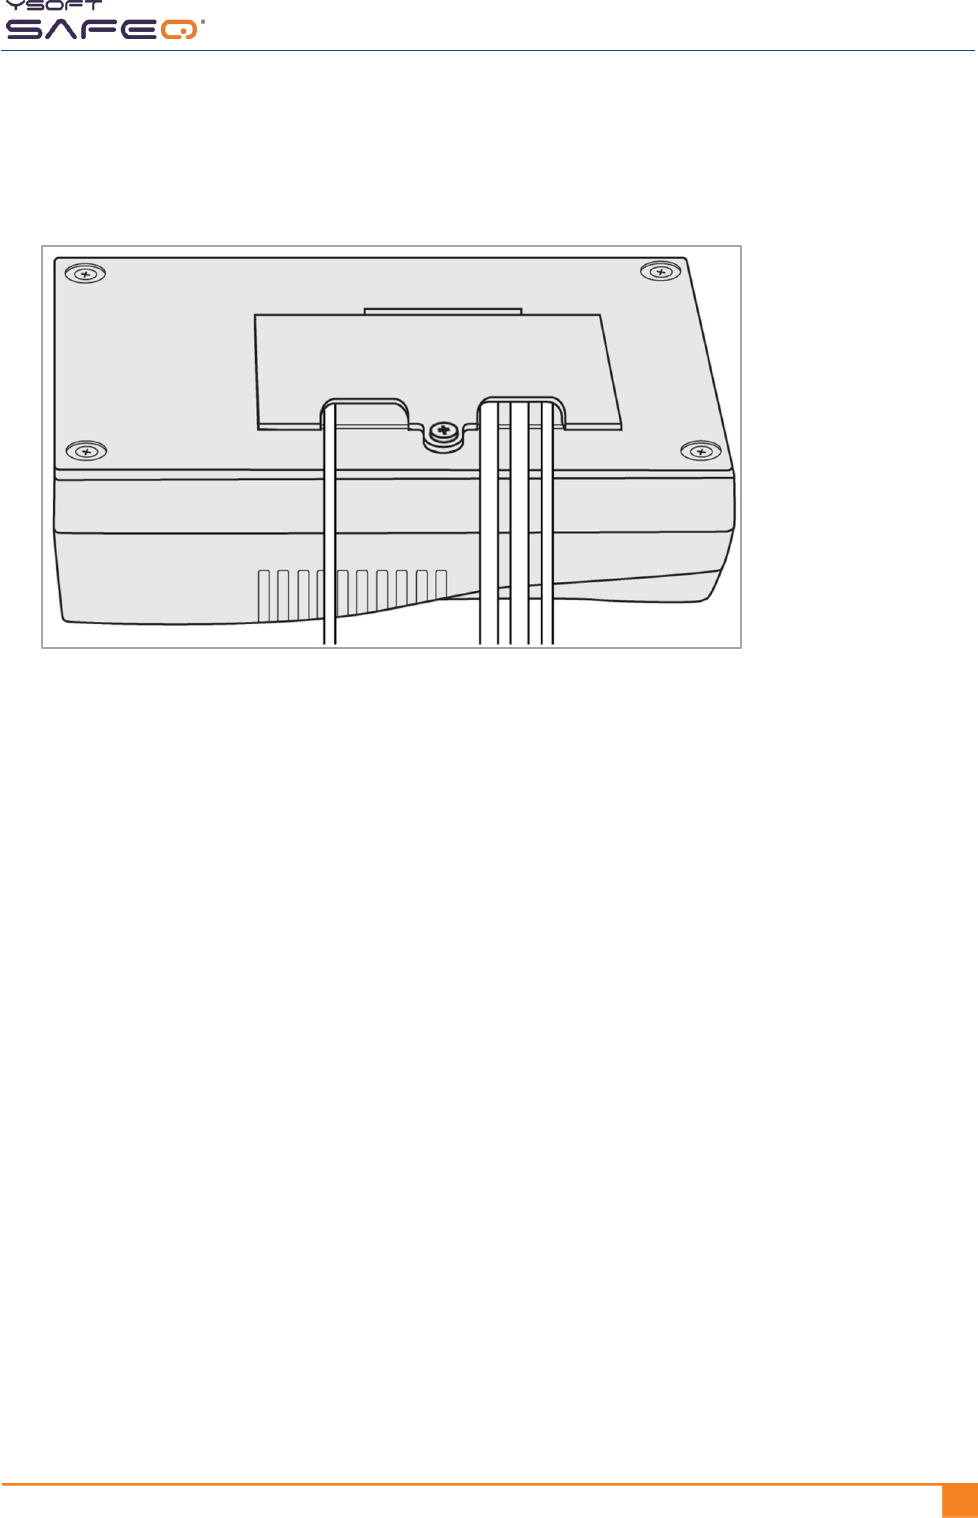
5 Cover all cables with the clear plastic wrap (included in the plastic bag with the
cable). Start the wrap about 4 or 5 inches (10 to 12 cm) from the back of the
terminal.

Chapter 4. Installing the terminal
28 YYSOFT SAFEQ TERMINAL PROFESSIONAL INSTALLATION AND ADMINISTRATION GUIDE
Step 8. Verify installation
Before you verify installation:
If a user (with associated card or PIN) has not been created in SafeQ, create one now for
testing purposes as follows:
1 In the SafeQ Web Interface, add a new user named “test.”
2 Assign a card and a PIN to the test user (for example, PIN 1111).
NOTE: For exact instructions, see the YSoft SafeQ Installation and Administration
Guide for your edition of SafeQ Server.
If the terminal does not include a card reader:
1 On the terminal’s PIN entry screen, touch 1111 (or whatever PIN you assigned to the
test user); then touch OK.
2 Check to make sure the MFP panel unlocks (that is, the panel lights up and
comes on).
If the terminal includes a card reader:
1 Touch the PIN button to display the PIN entry screen.
2 Touch 1111 (or whatever PIN you assigned to the test user); then touch OK.
3 Check to make sure the MFP panel unlocks (that is, the panel lights up and
comes on).
If the MFP unlocks and the user is authenticated:
Installation is now complete.
If the MFP does not unlock:
Submit a problem report to Y Soft as described on page 7, and provide the following
information (see page 10):
Terminal serial number
Printer/MFP serial number
YSOFT SAFEQ TERMINAL PROFESSIONAL INSTALLATION AND ADMINISTRATION GUIDE 291
5 Changing settings
Displaying the site admins Service menu
To access most settings, first display the Site admins Service menu as described in this
section.
NOTE: To display the Y Soft partners Service menu, see page 31.
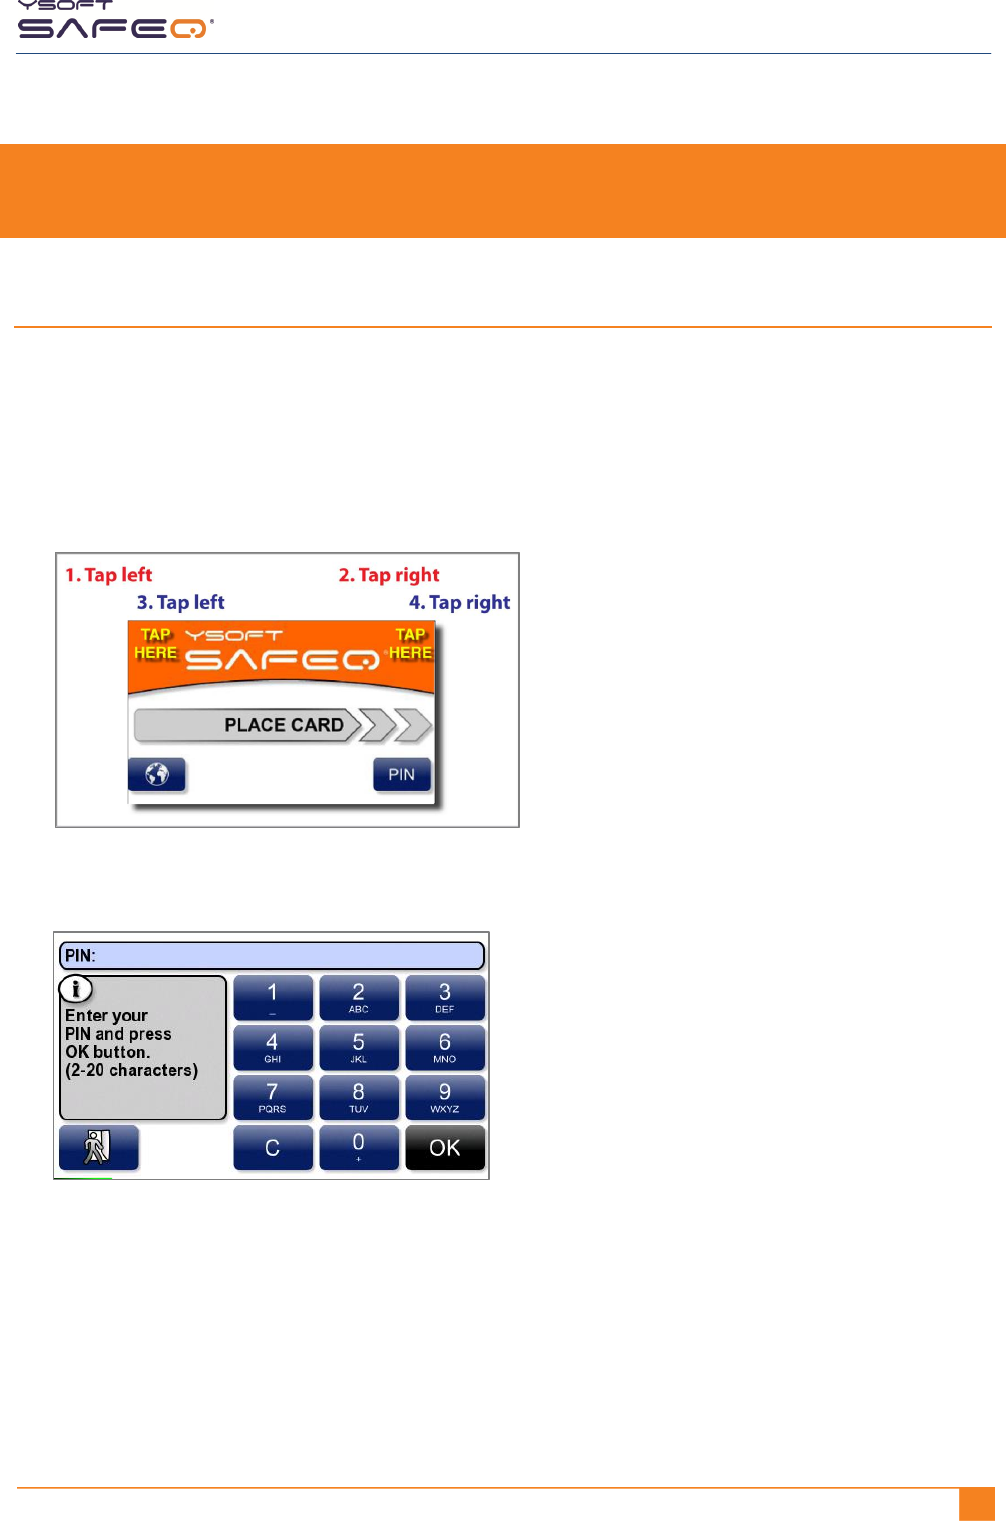
If the terminal displays a Place Card screen:
Tap the corners 4 times as shown here:
The terminal displays a keypad.
Enter the PIN; then touch OK.
NOTE: The default PIN is 0000.
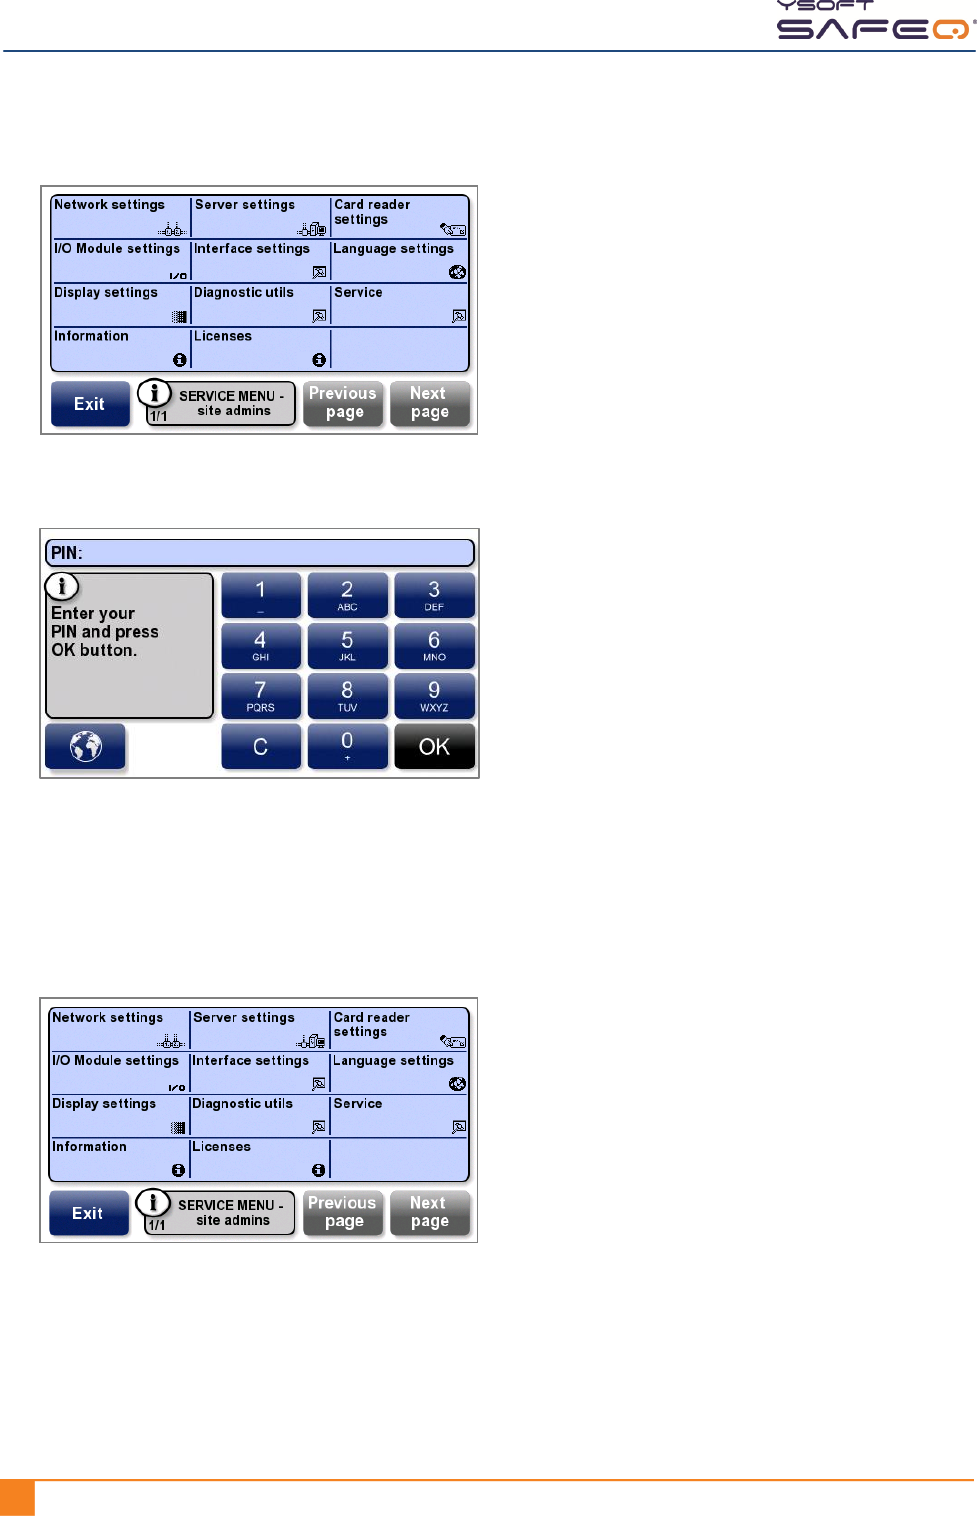
Chapter 5. Changing settings
30 YYSOFT SAFEQ TERMINAL PROFESSIONAL INSTALLATION AND ADMINISTRATION GUIDE
The terminal displays the Service menu.
If the terminal displays a keypad:
Touch the 0 button 9 times (000000000).
Touch OK.
Enter the PIN; then touch OK.
NOTE: The default PIN is 0000.
The terminal displays the Service menu.
Your menu may not include
all the options shown here.
Your menu may not include
all the options shown here.

Chapter 5. Changing settings
YSOFT SAFEQ TERMINAL PROFESSIONAL INSTALLATION AND ADMINISTRATION GUIDE 311
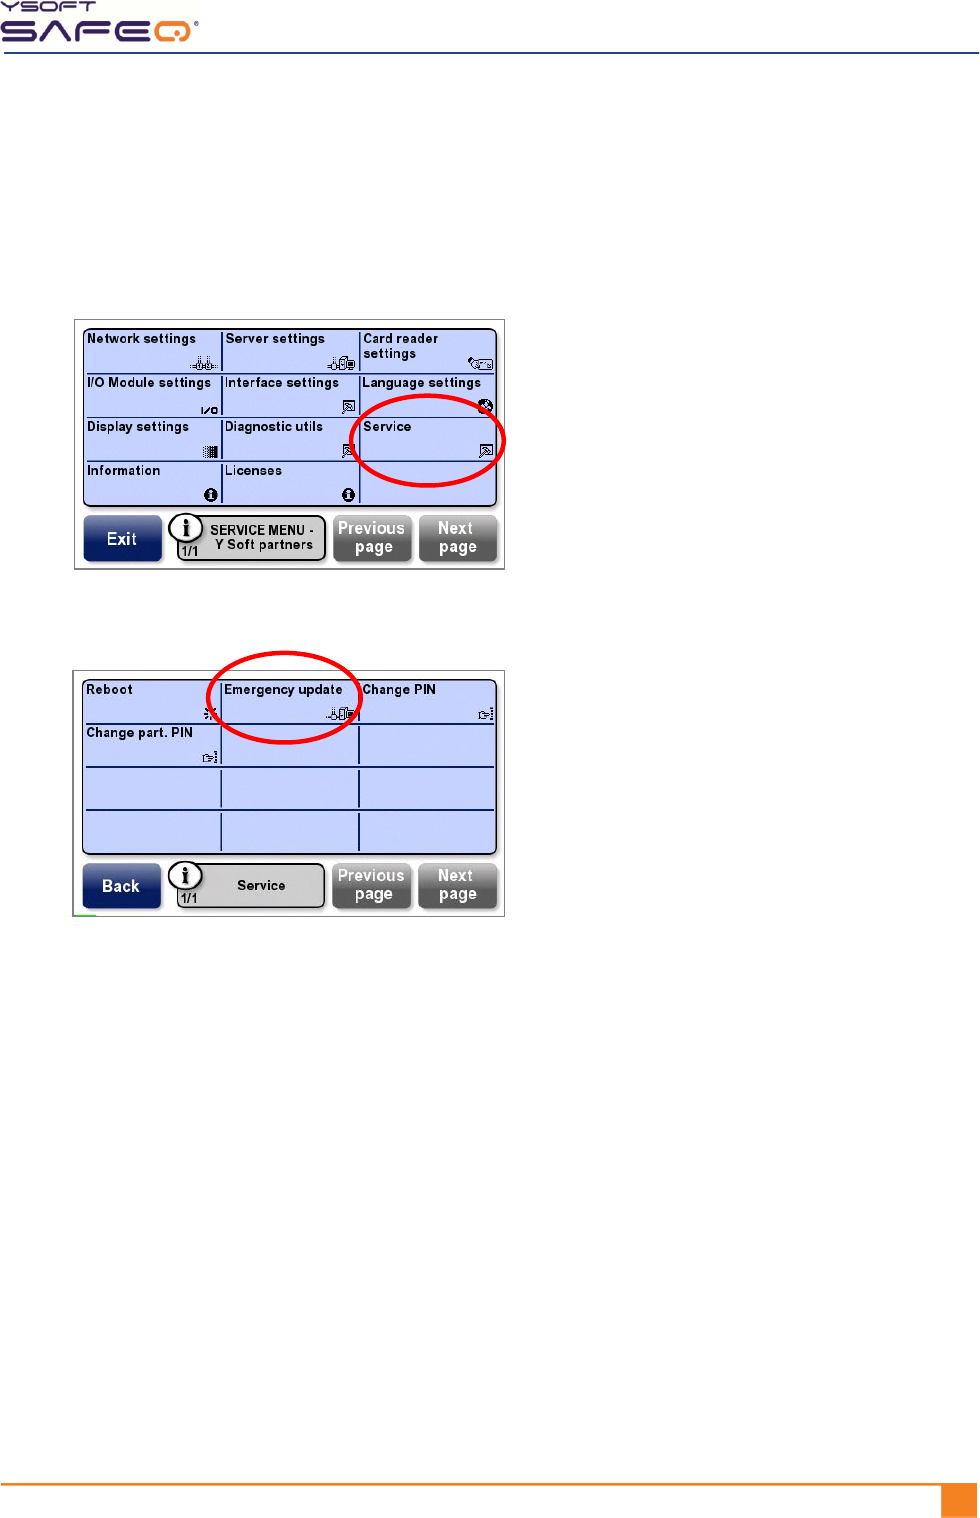
Displaying the Y Soft partners Service menu
The following options are available only from the Y Soft partners Service menu:
Cluster support
I/O Module
Debug mode
I/O Module test
Card reader
Emergency update
Card reader test
Change part. PIN
Interaction mode
To display the Y Soft partners Service menu, use the same procedure as for displaying
the Site admins Service menu (page 29), but use the PIN that provides access to the
Y Soft partners Service menu.
Chapter 5. Changing settings
32 YYSOFT SAFEQ TERMINAL PROFESSIONAL INSTALLATION AND ADMINISTRATION GUIDE
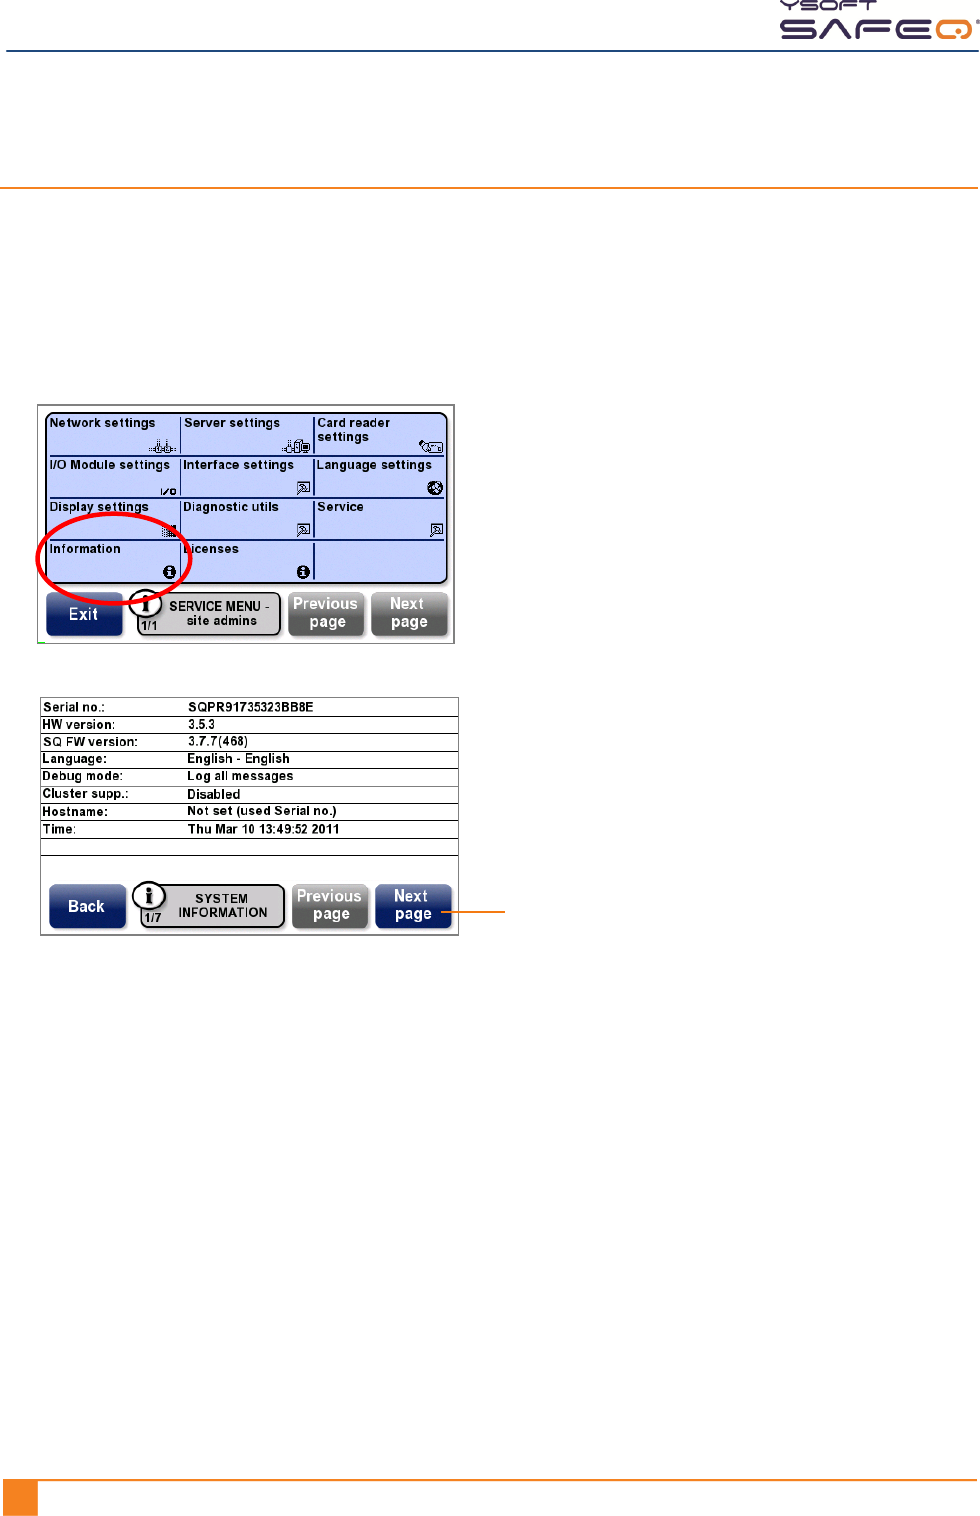
Viewing system information and settings
The System Information screens display detailed information about
your terminal.
To display the System Information screens:
1 Display the Site admins Service menu (see page 29).
2 Touch Information.
Touch Next page to display more
information screens, including:
Network
NET.Adapter
Font
Low-level firmware
Terminal hardware
Chapter 5. Changing settings
YSOFT SAFEQ TERMINAL PROFESSIONAL INSTALLATION AND ADMINISTRATION GUIDE 331
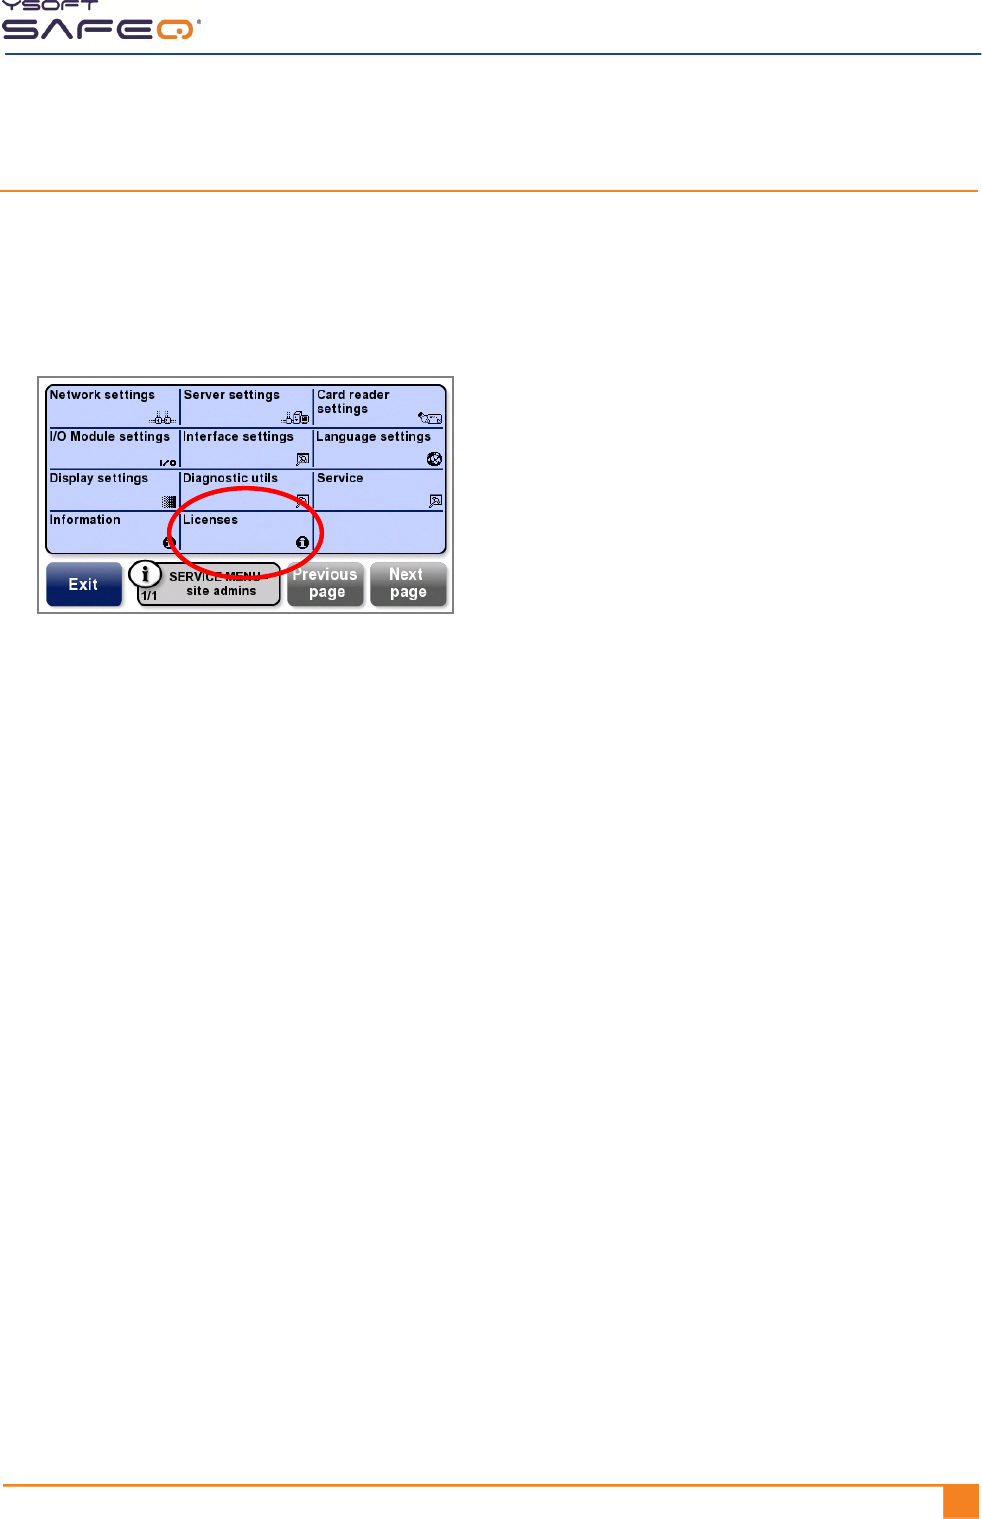
Viewing license information
The License screens display information about your terminal licenses.
To display the License screens:
1 Display the Site admins Service menu (see page 29).
2 Touch Licenses.
Chapter 5. Changing settings
34 YYSOFT SAFEQ TERMINAL PROFESSIONAL INSTALLATION AND ADMINISTRATION GUIDE
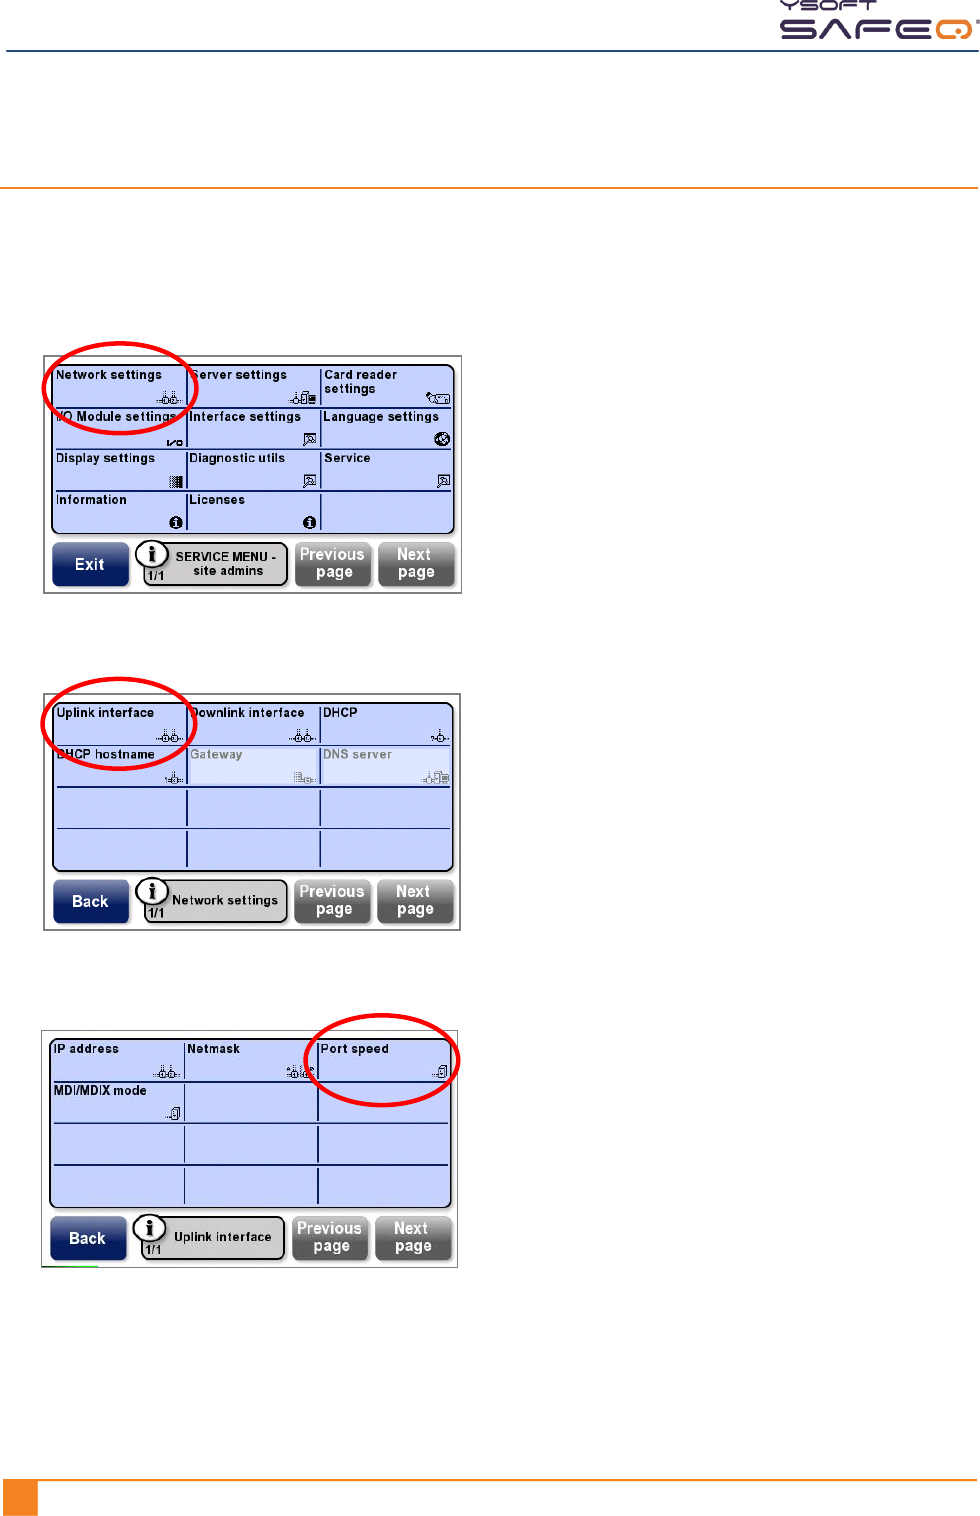
Optimizing the Ethernet port speed and mode
If the port speed set by autodetect is not optimal, manually set the speed as follows:
1 Display the Site admins Service menu (see page 29).
2 Touch Network settings.
3 Touch Uplink Interface.
4 Touch Port speed.
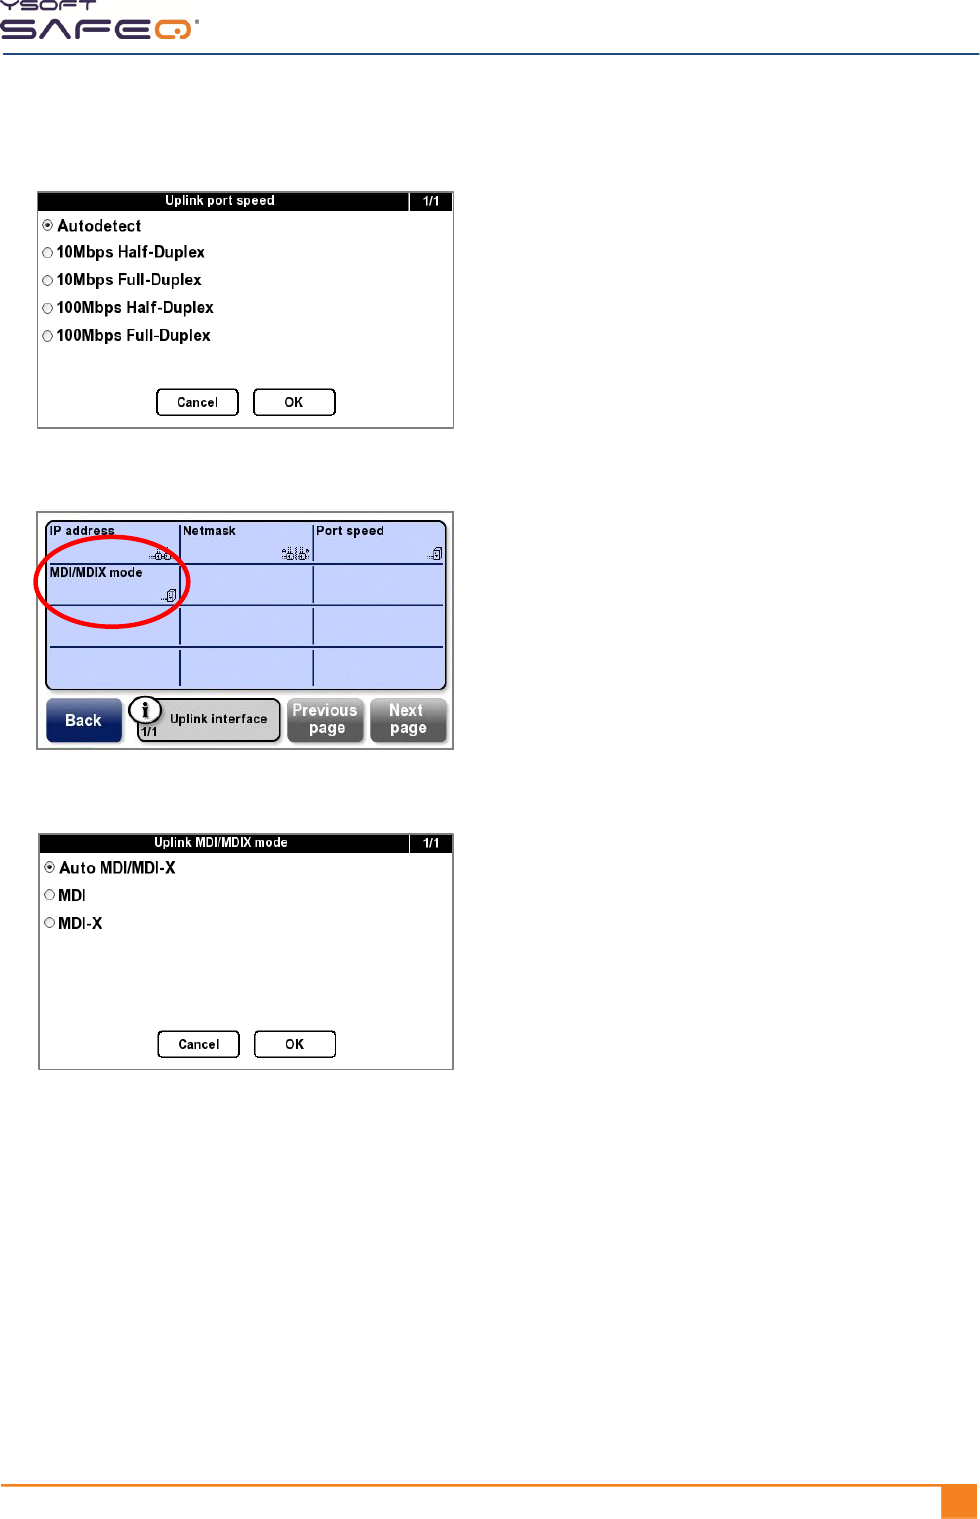
Chapter 5. Changing settings
YSOFT SAFEQ TERMINAL PROFESSIONAL INSTALLATION AND ADMINISTRATION GUIDE 351
5 Select a port speed; then touch OK.
6 Touch MDI/MDIX mode.
7 Select the appropriate mode; then touch OK.
Chapter 5. Changing settings
36 YYSOFT SAFEQ TERMINAL PROFESSIONAL INSTALLATION AND ADMINISTRATION GUIDE
Enabling cluster support
Follow these steps to enable the terminal to be used with SafeQ Enterprise Edition
server clusters:
1 Display the Y Soft partners Service menu (see page 31).
2 Touch Server settings.
The Server settings menu opens.
3 Touch Cluster support; then touch Enable.
Chapter 5. Changing settings
YSOFT SAFEQ TERMINAL PROFESSIONAL INSTALLATION AND ADMINISTRATION GUIDE 371
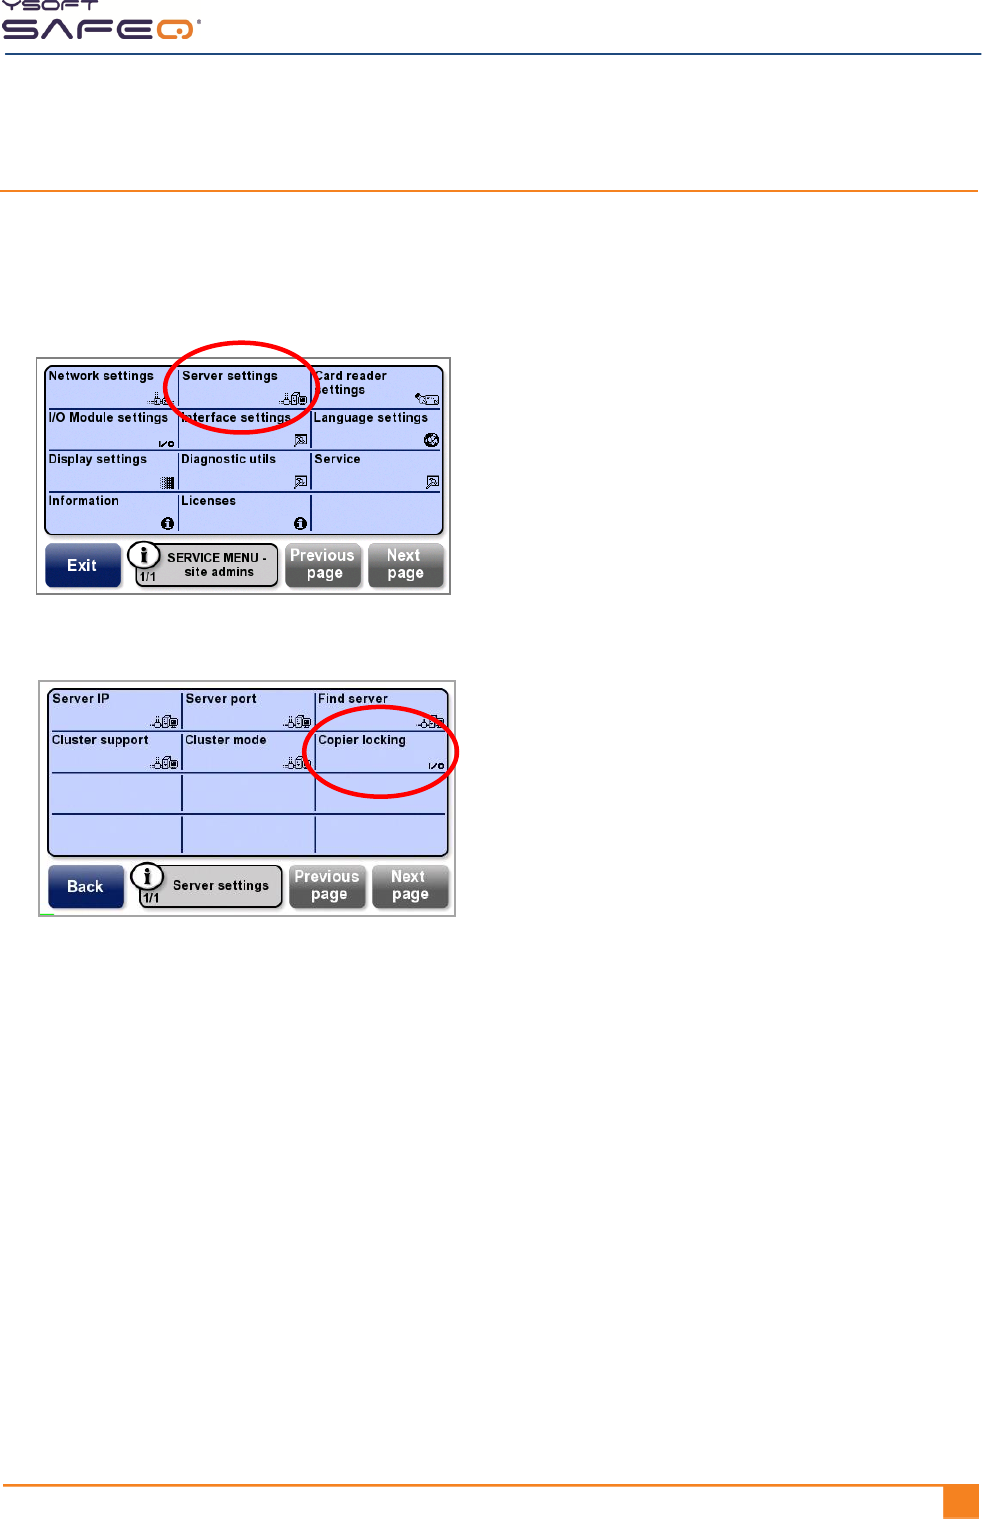
Setting MFP/printer locking options
The copier locking settings let you set how the MFP or network printer is locked.
1 Display the Site admins Service menu (see page 29).
2 Touch Server settings.
3 Touch Copier locking.
4 Select one of the options; then touch OK.
Immediate—(Default) The terminal signals the MFP/printer to lock when the user
touches the End button and is logged out.
From server—The server signals the MFP/printer to lock after the job is finished and
the device returns to Ready status.
Chapter 5. Changing settings
38 YYSOFT SAFEQ TERMINAL PROFESSIONAL INSTALLATION AND ADMINISTRATION GUIDE
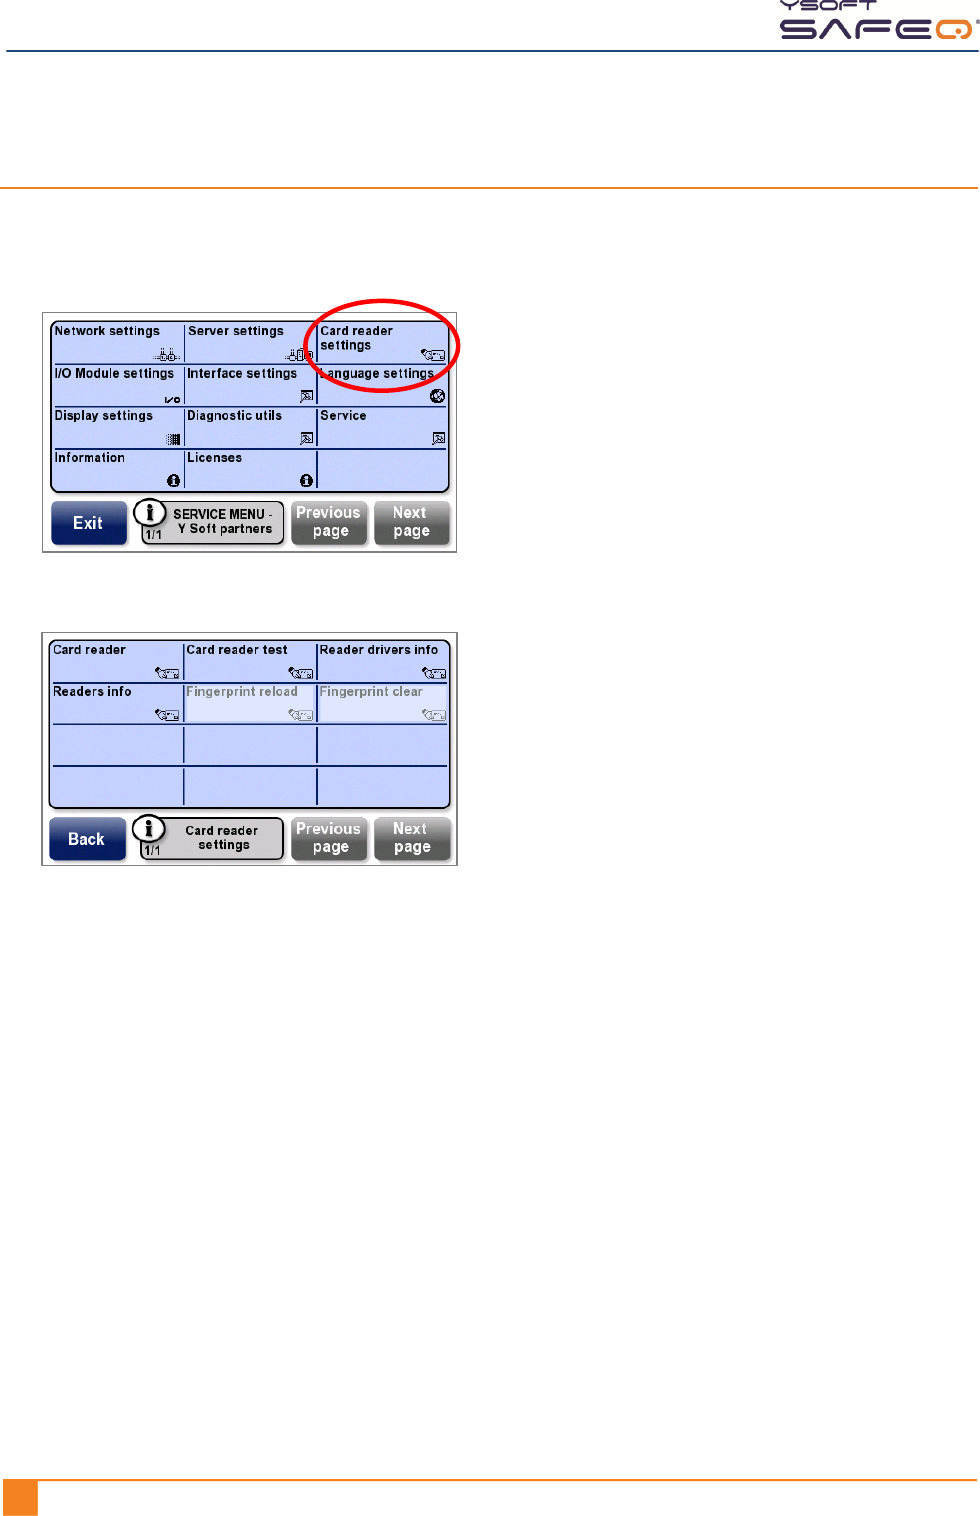
Changing card reader and fingerprint recognition settings
1 Display the Y Soft partners Service menu (see page 31).
2 Touch Card reader settings.
The Card reader settings menu opens.
3 Select options as follows:
Card reader – Select the type and protocol of card reader.
Card reader test –Swipe a card through or place a card in front of the reader and
see if the terminal displays the card number. (If the card number does not appear,
touch the Card reader option again and make sure you selected the correct card
reader type.)
Fingerprint reload – Touch this button to clear all fingerprint data in the terminal
and download new data from the server (applies only to fingerprint readers).
Fingerprint clear – Touch this button to clear all fingerprint data in the terminal
(applies only to fingerprint readers).
Chapter 5. Changing settings
YSOFT SAFEQ TERMINAL PROFESSIONAL INSTALLATION AND ADMINISTRATION GUIDE 391
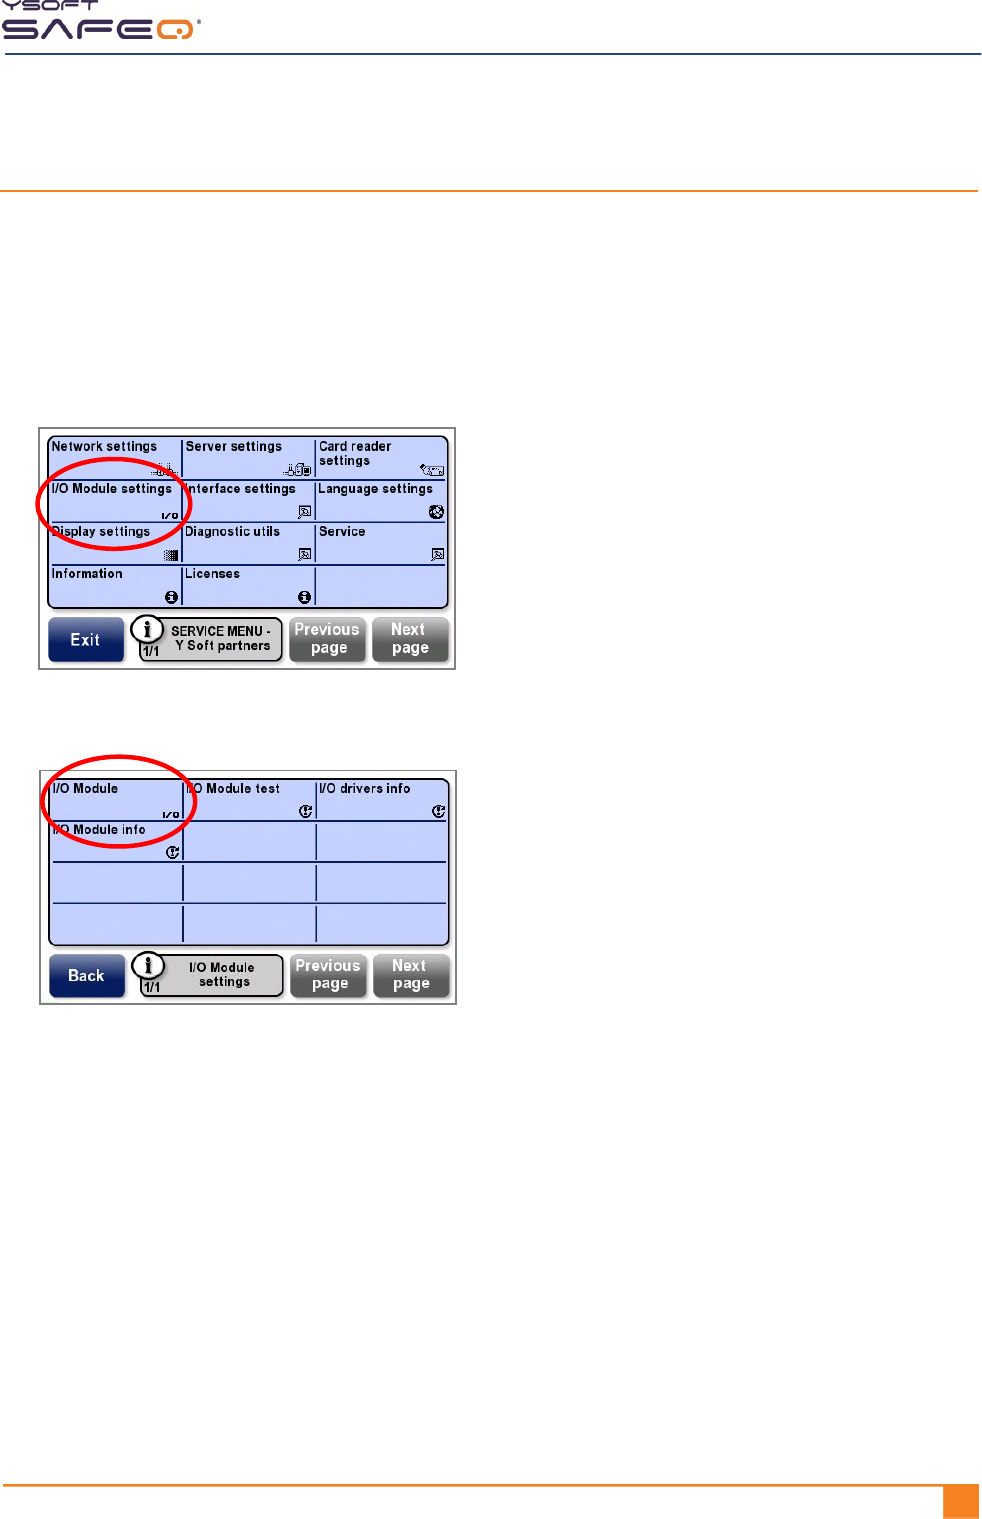
Setting and testing the I/O Module
Setting the I/O Module for the control cable interface
Select the I/O Module for the control cable interface (also called the blocking cable
interface) according to the type of MFP the terminal is connected to, as follows:
1 Display the Y Soft partners Service menu (see page 31).
2 Touch I/O Module settings.
3 Touch I/O Module.
4 Select the appropriate I/O Module.
Chapter 5. Changing settings
40 YYSOFT SAFEQ TERMINAL PROFESSIONAL INSTALLATION AND ADMINISTRATION GUIDE
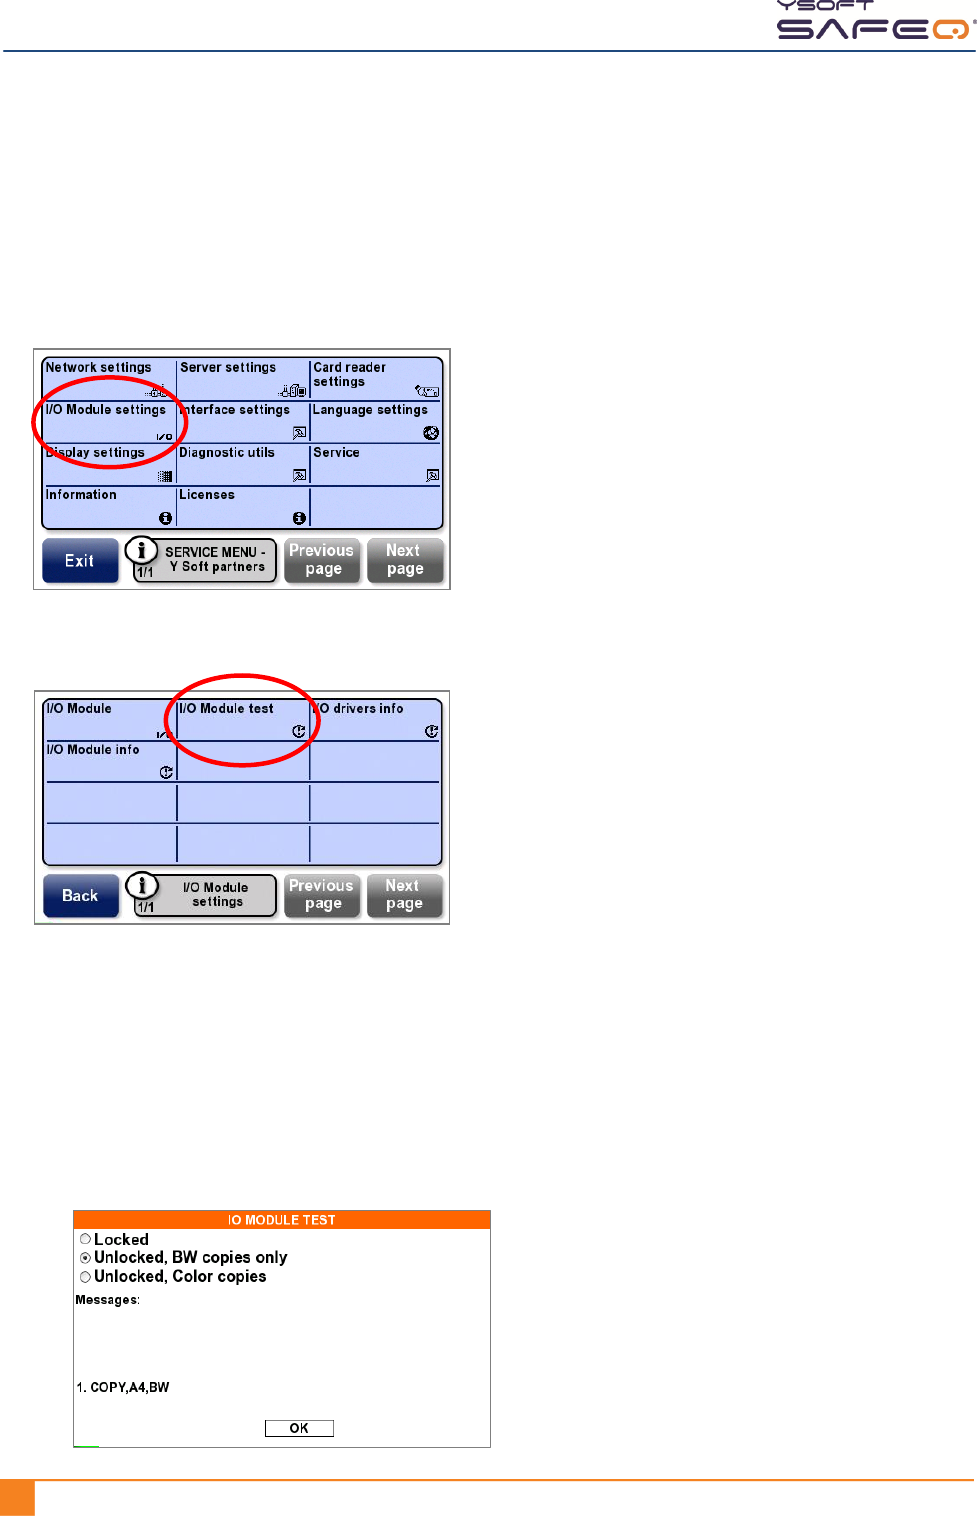
Testing the I/O Module
Test to see if the control cable interface (also called the blocking cable interface)
is functioning, as follows:
1 Display the Y Soft partners Service menu (see page 31).
2 Touch I/O Module settings.
3 Touch I/O Module test.
4 Select one of the following options and perform the associated test. The terminal
displays information received from the MFP.
Locked—Select this option; then see if the MFP is locked.
Unlocked, BW copies only —Select this option; then see if the MFP is unlocked and only
permits B/W copies.
Unlocked, Color copies—Select this option; then see if the MFP is unlocked and permits
both B/W and color copies.
Chapter 5. Changing settings
YSOFT SAFEQ TERMINAL PROFESSIONAL INSTALLATION AND ADMINISTRATION GUIDE 411
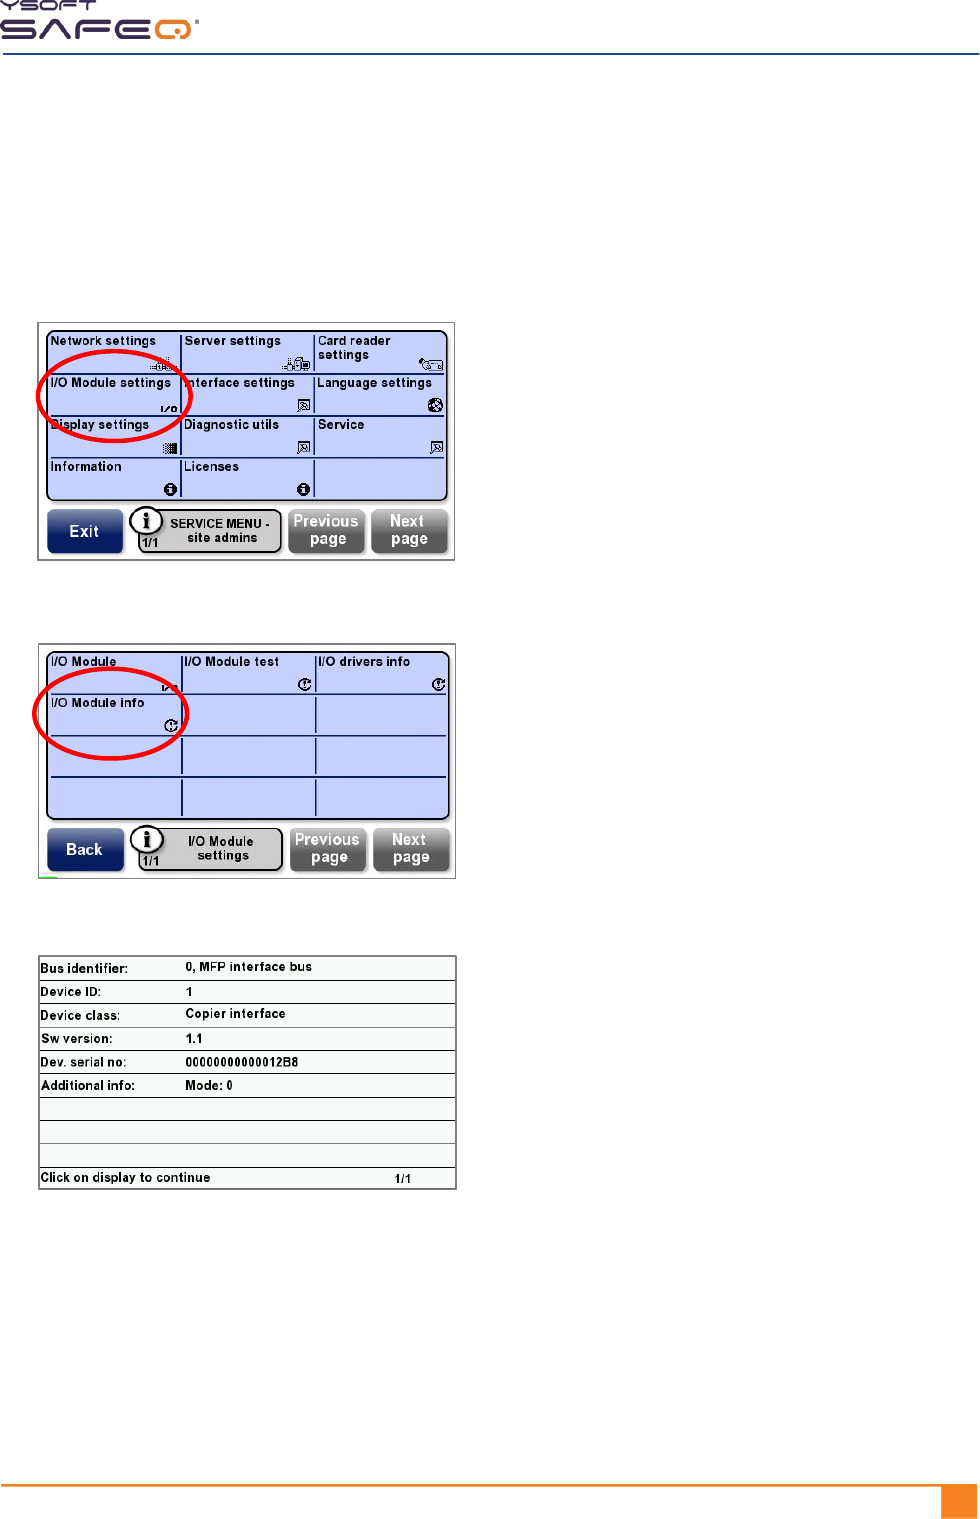
Viewing information about the I/O Module connection
To view a summary of information about the I/O Module connection:
1 Display the Site admins Service menu (see page 29).
2 Touch I/O Module settings.
3 Touch I/O Module info.
The terminal displays information as shown here:
4 Touch anywhere on the display to close the screen.
Chapter 5. Changing settings
42 YYSOFT SAFEQ TERMINAL PROFESSIONAL INSTALLATION AND ADMINISTRATION GUIDE
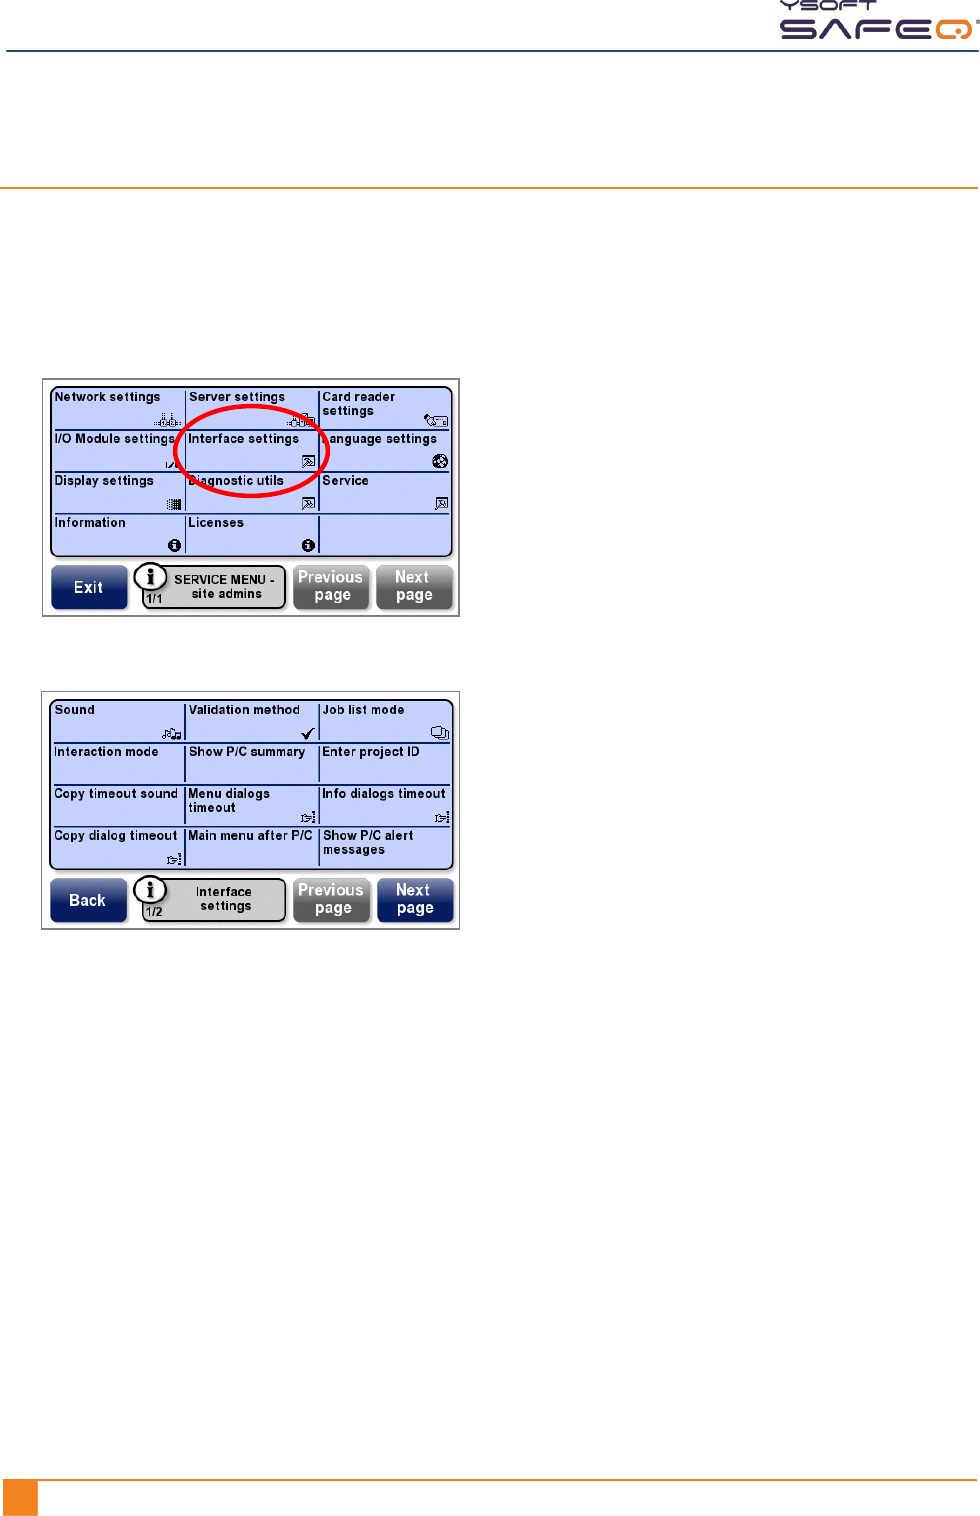
Changing terminal interface settings
1 Display the site admins Service menu (see page 29).
NOTE: If you are going to change the Interaction mode, you must display the
Y Soft partners Service menu (see page 31).
2 Touch Interface settings.
The Interface settings menu opens.
3 Select options as follows:
Sound
For beeps to sound when terminal buttons are touched, select on.
To turn off beeps, select off.
Validation method
Select one of the following validation methods:
ID Card only – User only needs to swipe a card.
PIN only – User only needs to enter a PIN.
ID Card and PIN – User must swipe a card, then enter a PIN.

Chapter 5. Changing settings
YSOFT SAFEQ TERMINAL PROFESSIONAL INSTALLATION AND ADMINISTRATION GUIDE 431
ID Card or PIN – User can choose to either swipe a card or enter a PIN.
Login – User must enter a login name and password.
PIN or Login – User can choose to either enter a PIN or a login name and password.
(Requires SafeQ Professional or Enterprise v.3.6.1 and higher.)
(ID Card and PIN) or Login – User can choose to either swipe a card and enter a
PIN, or enter a login name and password.
ID Card or PIN or Login – User can choose any of these methods:
Swipe a card.
Enter a PIN.
Enter a login name and password.
Job list mode
Select one of the following job list modes:
No job list – The terminal does not display a Job List option; users cannot view
jobs at the terminal.
Queue only – The terminal displays a Job List option. When users select it, they
see a list of only jobs in the print queue. They can select jobs they want to print
or delete.
Queue/printed – The terminal displays a Job List option. When users select it,
they can view jobs that are ready to print (highlighted) and jobs that have been
printed.
Queue/printed/favorites – The terminal displays a Job List option. When users
select it, a submenu appears from which the user can select the jobs they want
to see: jobs in the print queue, printed jobs, or the user‘s favorite jobs.
Temporarily disabled – The terminal displays a Job List option. When users
select it, they see a message that the administrator has disabled the Job List
feature; users cannot view jobs at the terminal.
Interaction mode
NOTE: To change the Interaction mode, you must display the Y Soft partners
Service menu (see page 31).
Select one of the following interaction modes:
Normal—After login, the terminal displays the Main menu.
Simplified—After login, if the user has any jobs waiting, they are immediately
printed and the user is automatically logged off.
If the user has no jobs waiting, the terminal displays only the Copy menu.

Chapter 5. Changing settings
44 YYSOFT SAFEQ TERMINAL PROFESSIONAL INSTALLATION AND ADMINISTRATION GUIDE
Show P/C summary
Select the information that the terminal displays when a print/copy operation is
complete, before the print/copy session ends:
Pages only – The terminal displays only the number of pages.
Pages and price – The terminal displays the number of pages and the price.
Disabled – The terminal does not display any information.
Enter Project ID
Yes – The user can enter a project ID. The terminal does not initially display the
project list. However, if the user enters the first digit of a project ID, the
terminal then displays all the projects that begin with that digit. For example, if
the user enters 22, the terminal displays all the projects beginning with 22.
No – The user does not need to enter a project ID; the terminal displays all the
project IDs.
Copy timeout sound
NOTE: Sound must be enabled for this option to work. See page 42.
Select Yes for the terminal to emit a sound when the specified maximum
amount of time for a copy session is reached. (See "Copy dialog timeout.")
Select No for the terminal to remain quiet when the specified maximum amount
of time for a copy session is reached.
Menu dialogs timeout
Select the maximum length of time with no user input the terminal will display
menus:
10 seconds
30 seconds
60 seconds
None—No timeout. Applicable only if the terminal includes a specific card
reader and the user is logged in with a card.
NOTE: "None" is supported only by Smartcard reader, Mifare reader in
Continuous mode, or HID Continuous reader.

Chapter 5. Changing settings
YSOFT SAFEQ TERMINAL PROFESSIONAL INSTALLATION AND ADMINISTRATION GUIDE 451
Info dialogs timeout
Select the maximum length of time with no user input the terminal will display
information screens:
2 seconds
5 seconds
10 seconds
20 seconds
Copy dialog timeout
Select the length of time with no copy activity before the terminal automatically
logs the user out (applies only to the time before the first copy is made):
20 seconds
60 seconds
None (default)—SafeQ Server determines the timeout period.
Main menu after P/C
Enabled (applicable only if the terminal includes a card reader):
When a print/copy operation is complete and the user’s card is still present
at the reader, the terminal displays the Main menu and the user stays
logged in—the session does not end until he/she touches the End button.
NOTE: "Enabled" is supported only by Smartcard reader, Mifare reader in
Continuous mode, or HID Continuous reader.
Disabled (default):
When a print/copy operation is complete, the user is logged out and the
print/copy session is ended.
Show P/C alert messages
Enabled (default) – Print and copy screens will display warning messages from the
server.
Disabled – Print and copy screens will not display warning messages from the server.
Chapter 5. Changing settings
46 YYSOFT SAFEQ TERMINAL PROFESSIONAL INSTALLATION AND ADMINISTRATION GUIDE
4 Touch Next Page and select more options as necessary.
PIN dialog text
Complete – PIN screens will include characters count.
Without characters count – PIN screens will not include characters count.
Language selector
Globe always – If multiple languages are available, the Globe button appears on
the main terminal screen. Users can touch the button, then select a language.
Direct for 2 lang mode – If only two languages are available, instead of the
Globe button, a button with the name of the second language appears on the
main terminal screen. Users can touch the button to switch to the other
language.
Chapter 5. Changing settings
YSOFT SAFEQ TERMINAL PROFESSIONAL INSTALLATION AND ADMINISTRATION GUIDE 471
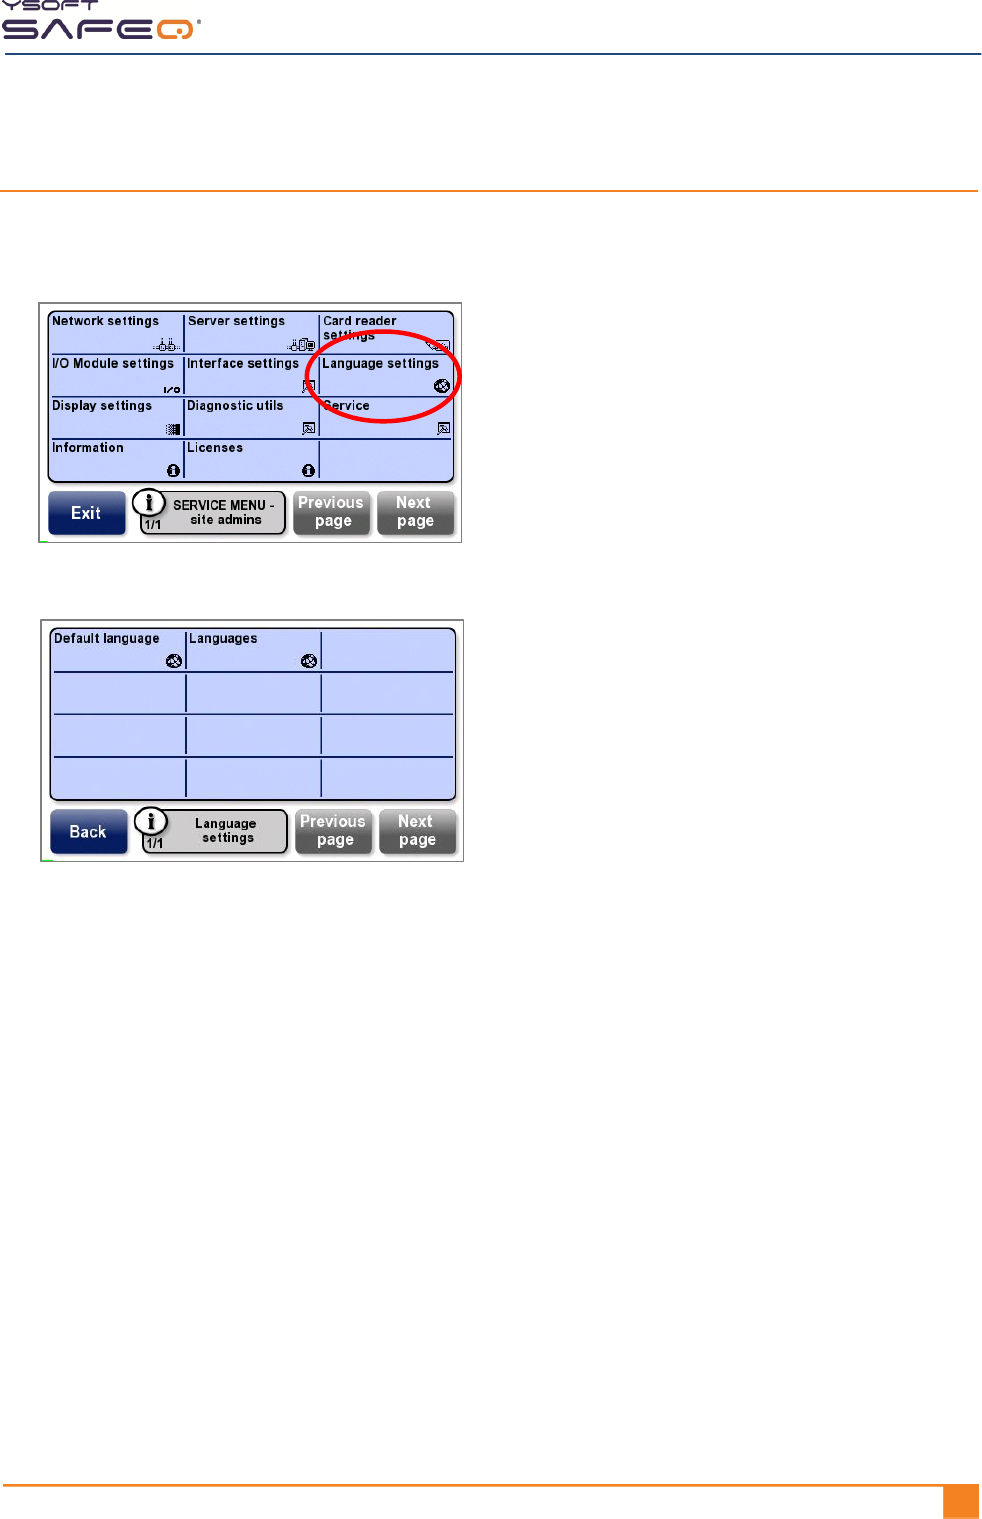
Changing language settings
1 Display the Site admins Service menu (see page 29).
2 Touch Language settings.
The Language settings menu opens.
3 Select options as follows:
Default language – Select the default language the terminal will use.
Languages – Select the languages the terminal will make available for users to choose
(maximum of 6 languages, including the default language).
Chapter 5. Changing settings
48 YYSOFT SAFEQ TERMINAL PROFESSIONAL INSTALLATION AND ADMINISTRATION GUIDE
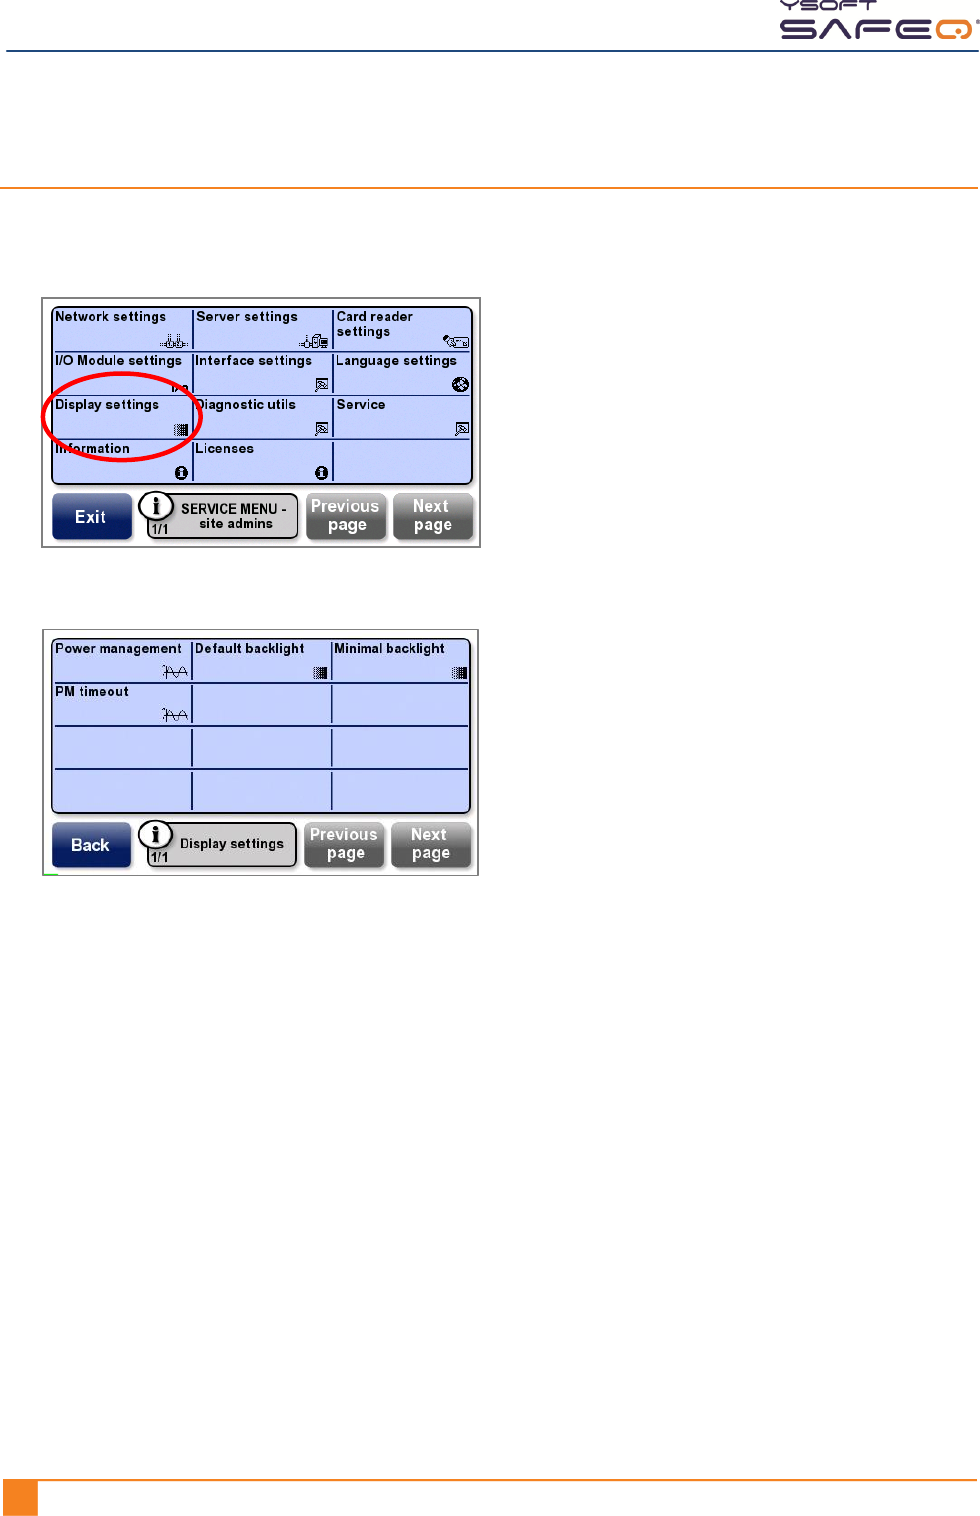
Changing display settings
1 Display the Site admins Service menu (see page 29).
2 Touch Display settings.
The Display settings menu opens.
3 Select options as follows:
Power management – Select a power management option:
Disable
Screen dimming
Backlight completely off
Screen completely off
Default backlight – Set the intensity of the backlight.
Minimal backlight – When power management options are applied, dim the
backlight intensity.
PM timeout – Set the maximum length of time (in seconds) before power
management options are implemented.
YSOFT SAFEQ TERMINAL PROFESSIONAL INSTALLATION AND ADMINISTRATION GUIDE 491
6 Performing diagnostics
This chapter describes diagnostics procedures available from the Diagnostics menu.
NOTE: For information about testing the MFP control interface (also called the
"blocking cable”), see page 39.
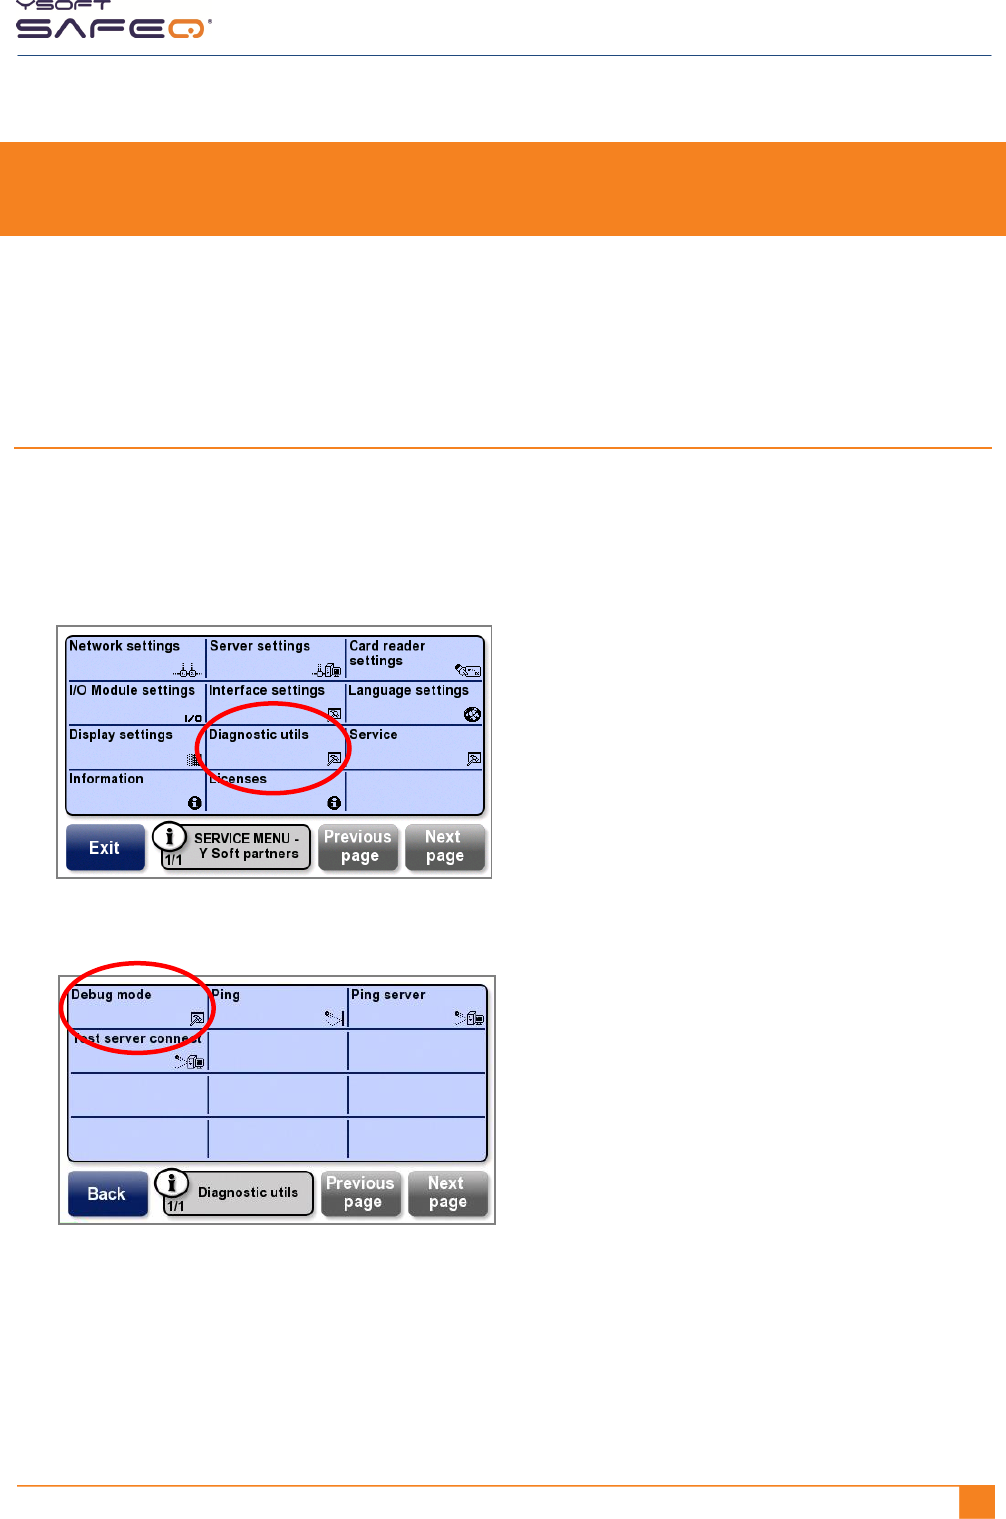
Enabling Debug mode
In Debug mode, the terminal records error messages and other messages in a log. To
enable Debug mode and select which type of messages to log, follow these steps:
1 Display the Y Soft partners Service menu (see page 31).
2 Touch Diagnostic utils.
3 Touch Debug mode.
4 Select one of the following options:
No log – The terminal does not log any information.
Log errors – The terminal logs only error messages.
Log all messages – The terminal logs all messages.

Chapter 6. Performing diagnostics
50 YYSOFT SAFEQ TERMINAL PROFESSIONAL INSTALLATION AND ADMINISTRATION GUIDE
Downloading terminal logs
NOTE: In order to download logs, the terminal must be in Debug mode (see page 49).
Follow these steps to download terminal logs:
1 Go to the Y Soft Partners Portal (http://partners.ysoft.com), and download the utility
for downloading terminal log files:
Customer Support Services>
Request for information >
Download SafeQ or its components >
Various tools >
Tool for log downloading from Terminal Professional
2 Save the utility in any convenient folder (for example, c:\safeq).
NOTE: When you run the utility, logs will be downloaded to this location.
3 Run the utility.
4 When the utility asks for the terminal IP address, enter the IP address of the
terminal whose logs you want to download.
The utility downloads the log files to the folder you specified. The logs are identified by
the terminal’s IP address (for example: 10.0.10.202.log).
Chapter 6. Performing diagnostics
YSOFT SAFEQ TERMINAL PROFESSIONAL INSTALLATION AND ADMINISTRATION GUIDE 511
Testing the connection between the terminal and the SafeQ
server
1 Display the Site admins Service menu (see page 29).
2 Touch Diagnostic utils.
3 Touch Test server connect.
If the connection is successful, the terminal displays this screen:
If the connection is not successful:
Touch Back to return to the Diagnostic utils menu.
Ping the server as described in the next section, "Troubleshooting an unsuccessful
terminal/SafeQ server connection."

Chapter 6. Performing diagnostics
52 YYSOFT SAFEQ TERMINAL PROFESSIONAL INSTALLATION AND ADMINISTRATION GUIDE
Troubleshooting an unsuccessful terminal/SafeQ server connection
If the message Failed to connect to server appeared when you tested the server
connection, follow these steps:
1 Touch Ping server.
If the connection fails, the terminal displays this screen:
2 Check to see if the server IP address displayed on the screen is the correct address
for the SafeQ server (see page 10).
If the IP address is correct:
Check the other network and server port settings to make sure they are correct
(see page 10).
If they are all correct, proceed to step 3.
If the IP address is not correct:
Enter the correct IP address; then ping the server again. If the ping fails again,
check the other network settings to make sure they are correct (see page 10).
If they are all correct, proceed to step 3.
3 Check troubleshooting information at the Y Soft 24/7 help desk website:
http://helpdesk.ysoft.com. (For more information about the help desk website,
see page 7.)
Chapter 6. Performing diagnostics
YSOFT SAFEQ TERMINAL PROFESSIONAL INSTALLATION AND ADMINISTRATION GUIDE 531
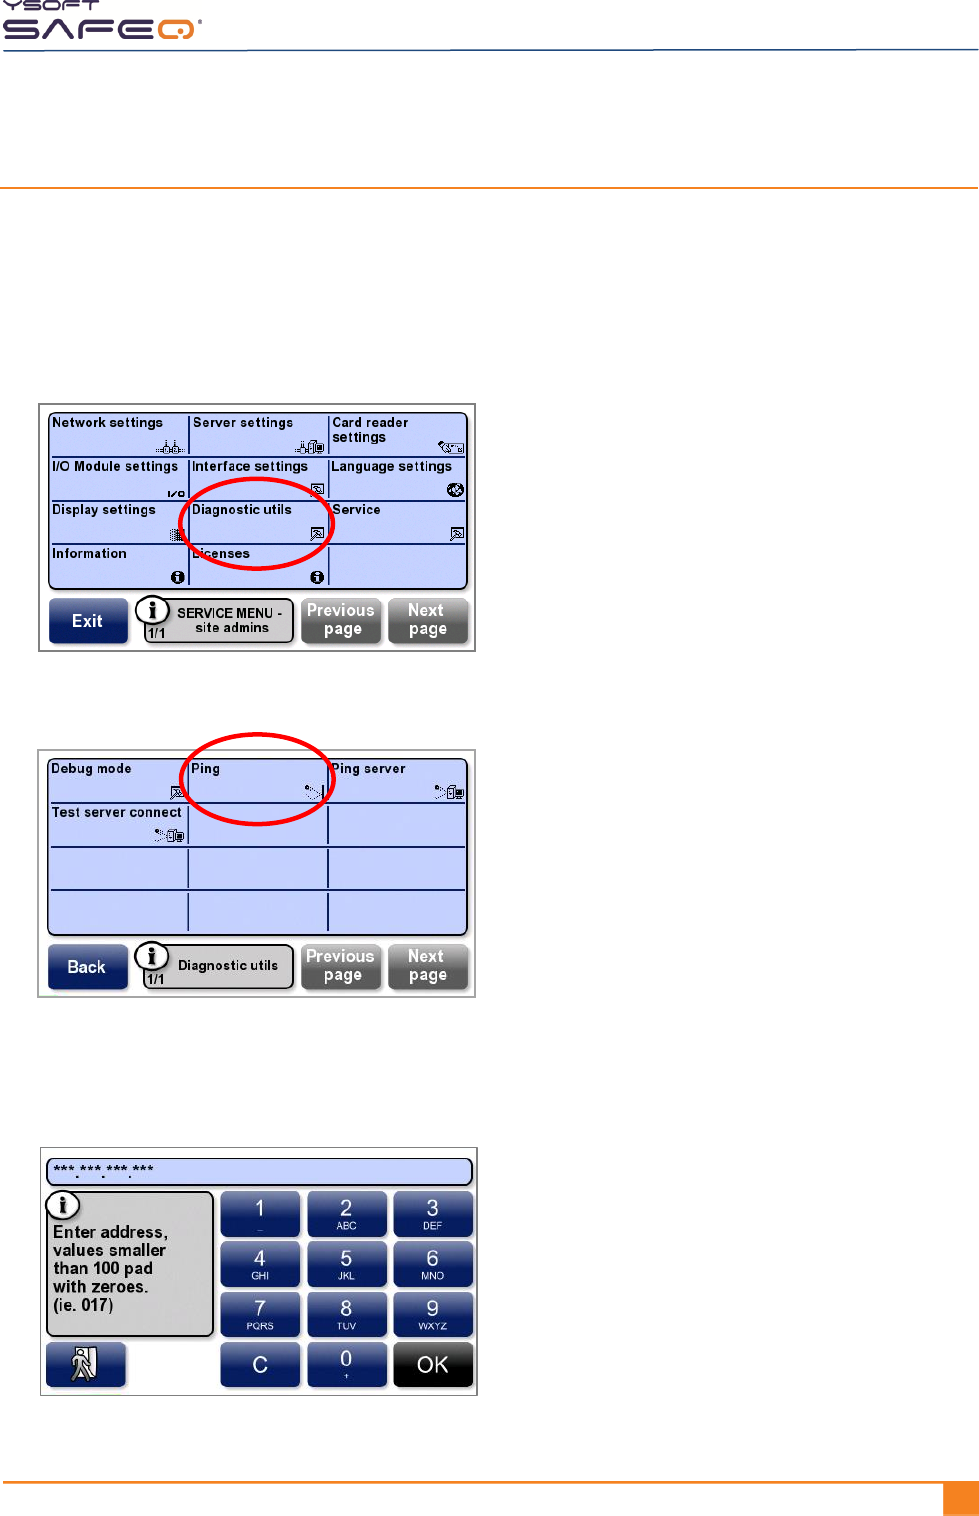
Ping other devices
Follow these steps to ping devices other than the server.
NOTE: This procedure pings devices accessible via uplink connection;
it cannot detect devices “behind” the terminal.
1 Display the site admins Service menu (see page 29).
2 Touch Diagnostic utils.
3 Touch Ping.
4 Enter the device‘s IP address in the format shown in this example:
10.0.1.1 is entered as 010 000 001 001.
Touch OK.

Chapter 6. Performing diagnostics
54 YYSOFT SAFEQ TERMINAL PROFESSIONAL INSTALLATION AND ADMINISTRATION GUIDE
5 If the connection is unsuccessful, check to see if the IP address displayed on the
screen is the correct address for the device.
If the IP address is correct:
Proceed to step 6.
If the IP address is not correct:
Enter the correct IP address; then ping again. If the ping fails again, proceed to step 6.
6 Check troubleshooting information at the Y Soft 24/7 help desk website:
http://helpdesk.ysoft.com. (For more information about the help desk website,
see page 7.)
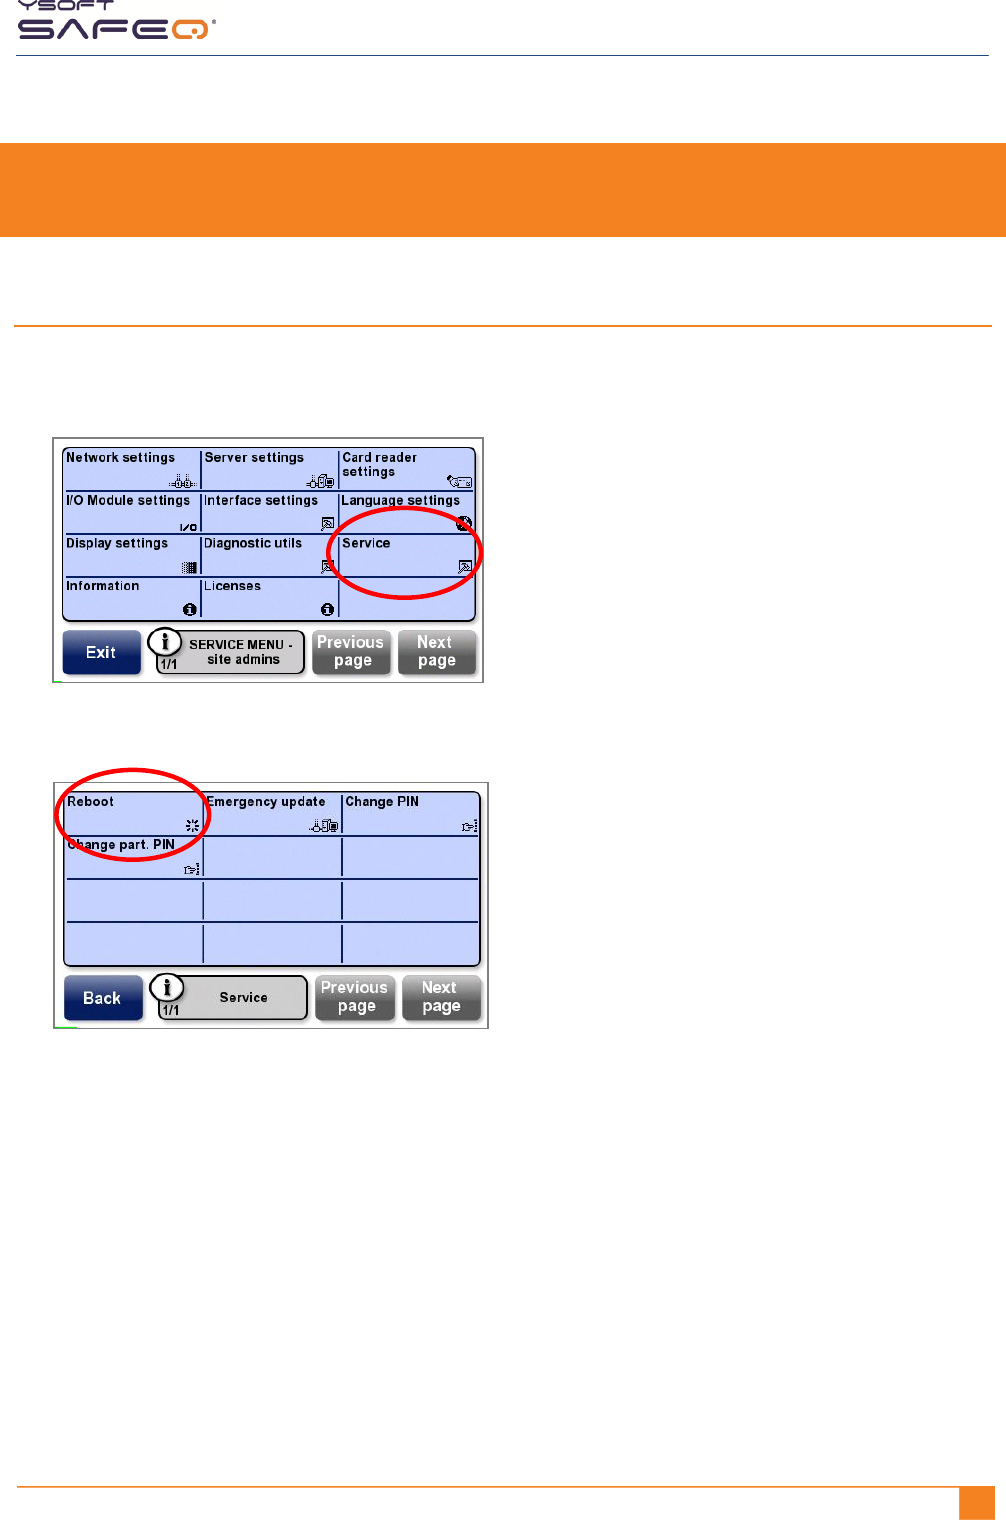
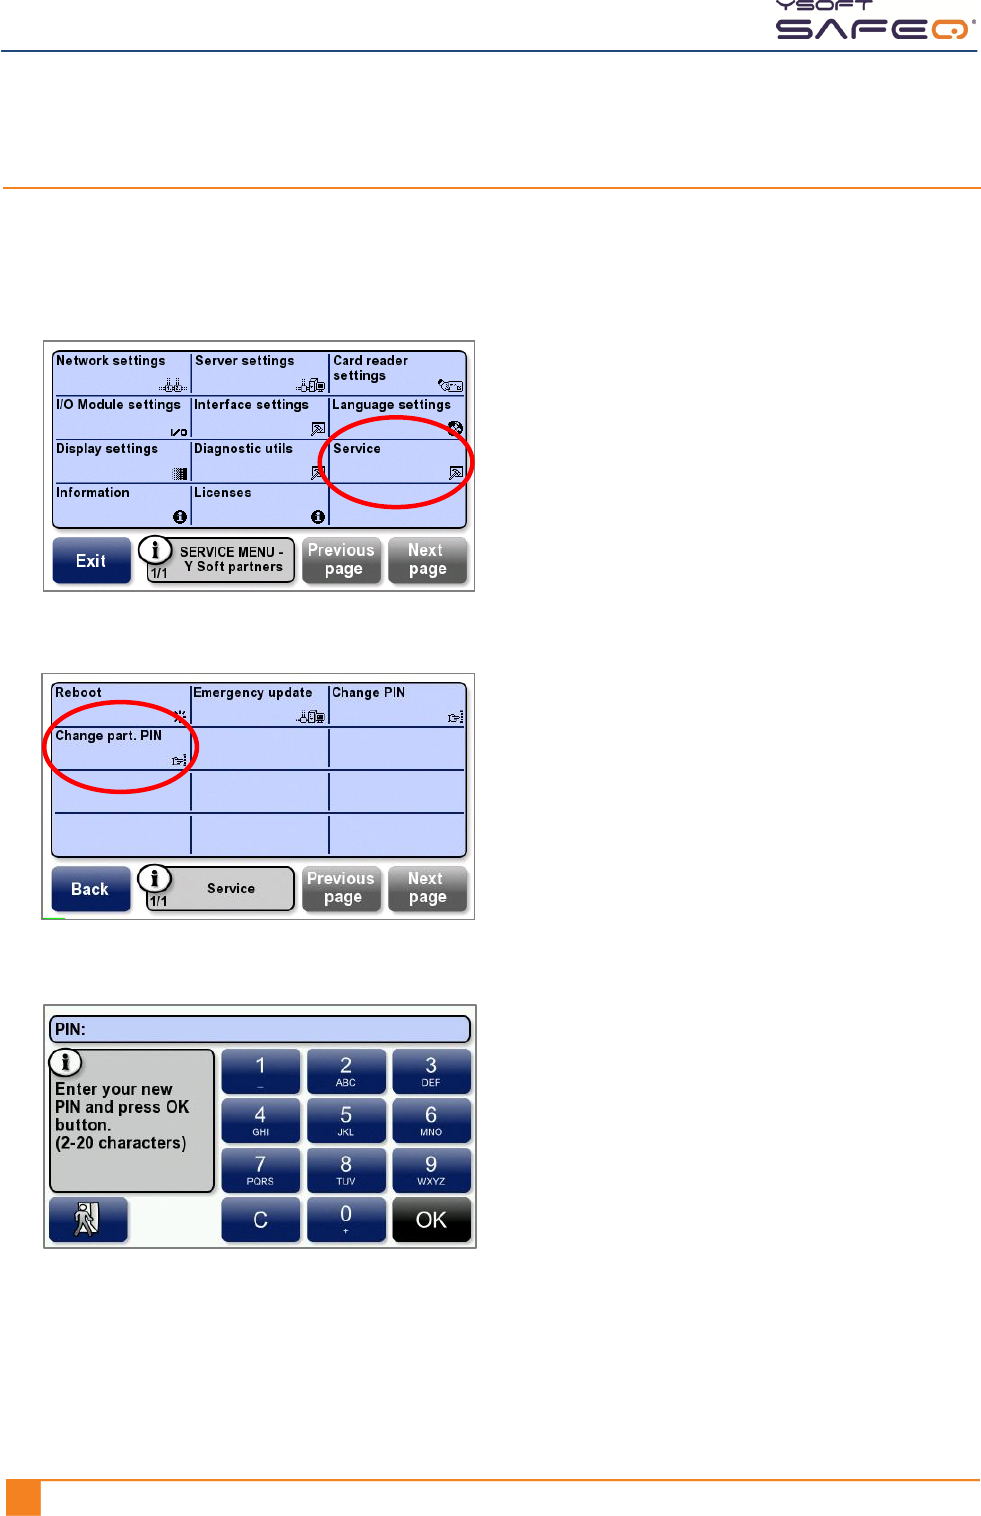
Chapter 7. Performing service procedures
56 YYSOFT SAFEQ TERMINAL PROFESSIONAL INSTALLATION AND ADMINISTRATION GUIDE
Changing the Y Soft partners Service menu access PIN code
To change the PIN code that must be entered to access the Y Soft partners Service menu:
1 Display the Y Soft partners Service menu (see page 31).
2 Touch Service.
3 Touch Change part. PIN.
4 Enter the new PIN; then touch OK.
Chapter 7. Performing service procedures
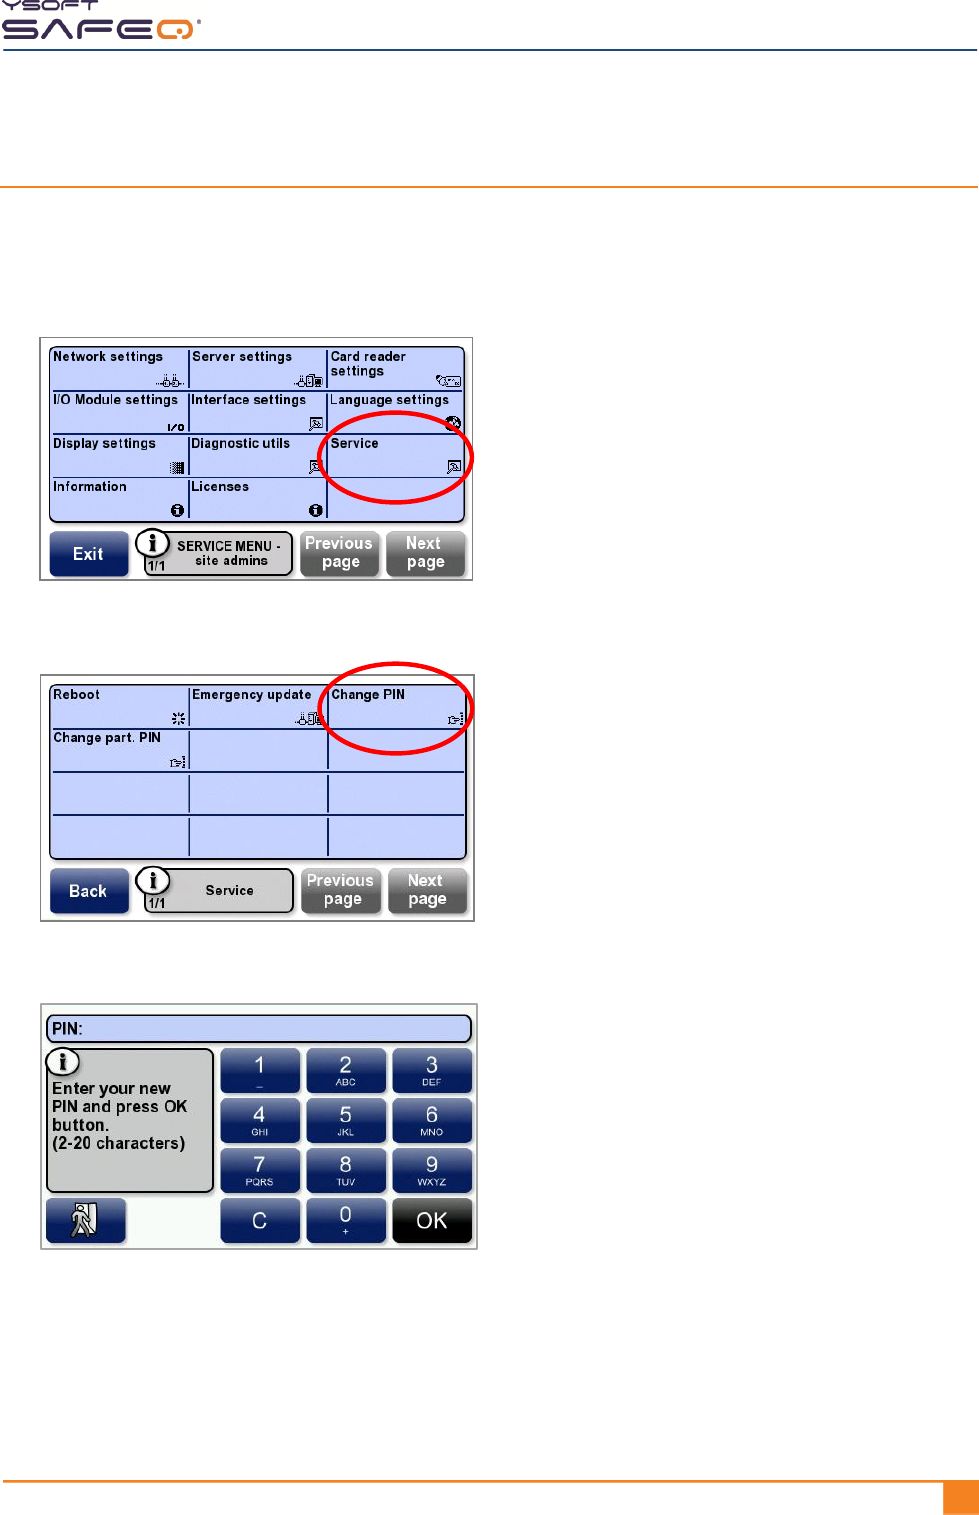
YSOFT SAFEQ TERMINAL PROFESSIONAL INSTALLATION AND ADMINISTRATION GUIDE 571
Changing the site admins Service menu access PIN code
To change the PIN code that must be entered to access the site admins Service menu:
1 Display the Site admins Service menu (see page 29).
2 Touch Service.
3 Touch Change PIN.
4 Enter the new PIN; then touch OK.

58 YYSOFT SAFEQ TERMINAL PROFESSIONAL INSTALLATION AND ADMINISTRATION GUIDE
8 Updating terminal firmware
This chapter describes the two methods you can use to update the terminal’s firmware:
Regular update – The first time a user authenticates at the terminal, the update process
is automatically triggered. SafeQ downloads the update files to the terminal, starts the
update process, and displays a message on the terminal screen informing the user about
the update.
Emergency update – If you need to update only a small number of terminals, you can
perform an emergency update. Unlike a regular update, which is automatic, you initiate
an emergency update from the Site admins Service menu, enabling you to perform the
update at a convenient time.
Chapter 8. Updating terminal firmware
YSOFT SAFEQ TERMINAL PROFESSIONAL INSTALLATION AND ADMINISTRATION GUIDE 591
Performing a Regular terminal firmware update
1 Download the new firmware files from the Y Soft Partners‘ Portal
(http://partners.ysoft.com) to the SafeQ server.
2 Copy the new firmware files into the "update" folder
(typically: c:\SafeQ\server\update\).
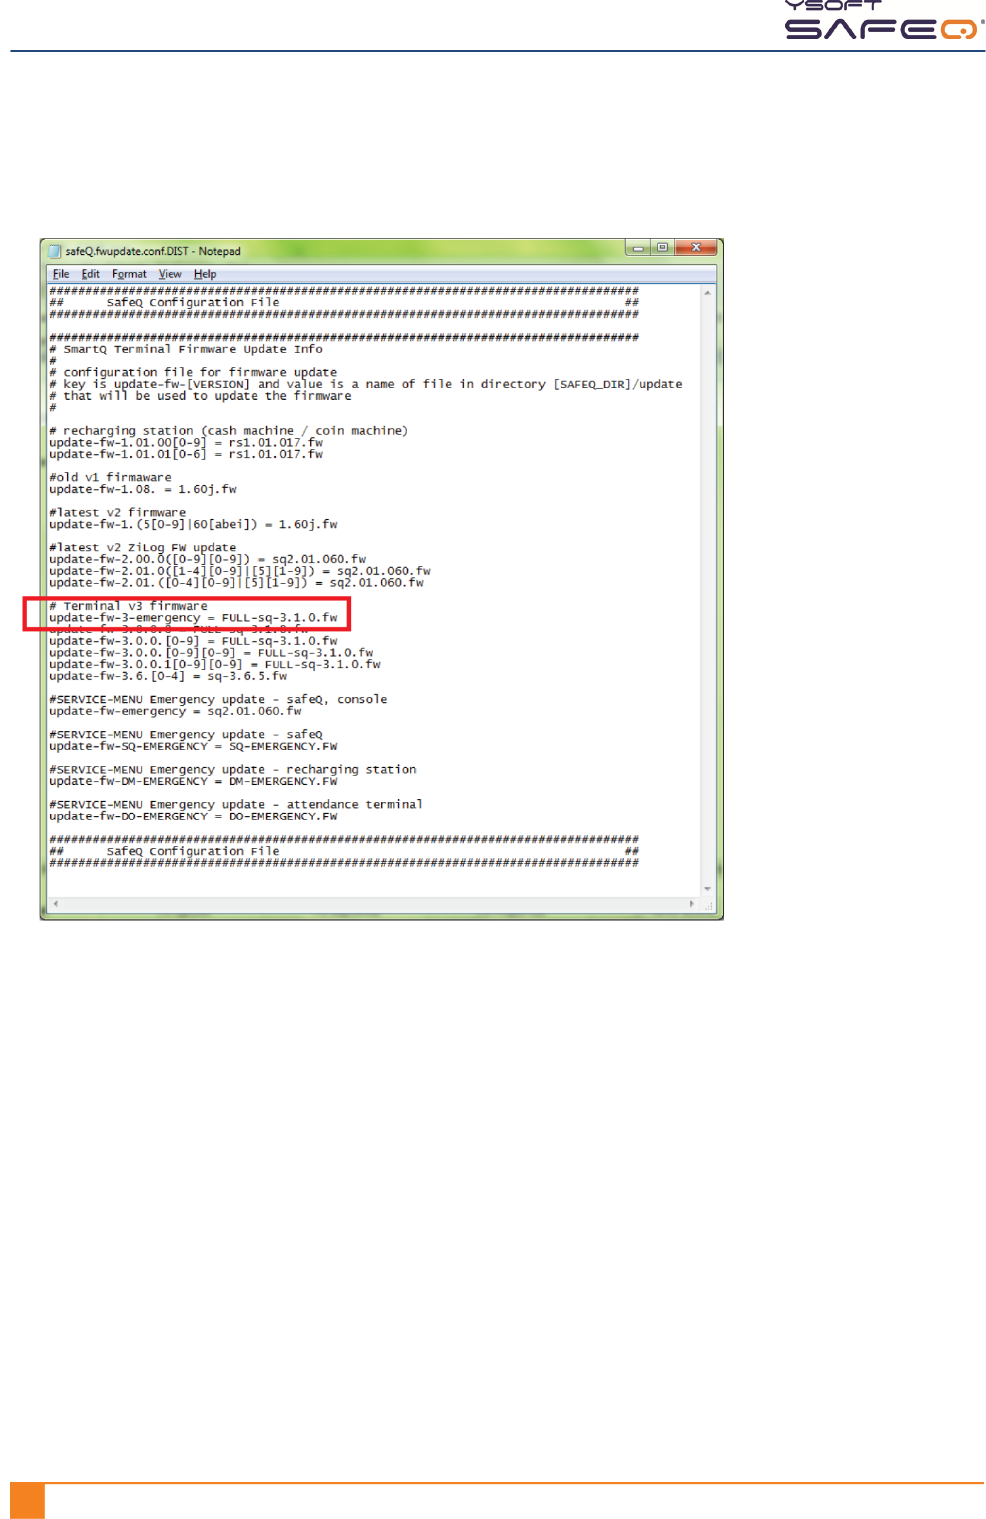
3 Edit the configuration file (safeQ.fwupdate.conf or fwupdate.conf), which is located
in the SafeQ home directory in the folder conf\modules (or conf\), as described in
the following example. (The configuration file includes parameters for different
versions of terminals and for the recharging station.)
In the Terminal v3 firmware area, look at the last line. As a general rule, on the left side of
the equal sign ( = ) is the definition of the current firmware, and on the right is the new
firmware. In the example shown here, the last time the firmware was updated, version
3.0.0.1[0-9][0-9] was updated to version 3.1.0.
NOTE: Brackets indicate a range of firmware. For example, 3.0.0.1 [0-9][0-9]
means any firmware version from 3.0.0.100 to 3.0.0.199.
Chapter 8. Updating terminal firmware
60 YYSOFT SAFEQ TERMINAL PROFESSIONAL INSTALLATION AND ADMINISTRATION GUIDE
To perform the update, you can use either a full update file or a differential update file.
Differential files are smaller and therefore the update is faster, but can be used only when
the third-level version of the firmware changes. For example, if you’re updating from 3.6.0
to 3.6.1, you can perform a differential update. But if you’re updating from 3.4.1 to 3.6.1,
you must perform a full update.
If you are not sure, perform a full update.
a Open the configuration file on the server.
b Add a line as shown here:
The left side defines the firmware currently installed on the terminal (in this example,
version 3.6.[0-4]. The right side, after the equal sign ( = ), specifies which firmware file
you want to apply (in this example, version 3.6.5).
c Save the file; then close it.
d Authenticate at the terminal. The update process begins. The update process
can take several minutes, depending on the connection. The terminal service
menu indicates when the update is complete.
e Try to authenticate on the terminal.
If you are able to authenticate, you have now successfully upgraded the terminal
firmware.
Chapter 8. Updating terminal firmware
YSOFT SAFEQ TERMINAL PROFESSIONAL INSTALLATION AND ADMINISTRATION GUIDE 611
Performing an Emergency terminal firmware update
NOTE: Emergency updates are always full updates – not differential updates.
1 Download the new firmware files from the Y Soft Partners‘ Portal
(http://partners.ysoft.com) to the SafeQ server.
2 Copy the new firmware files into the "update" folder
(typically: c:\SafeQ\server\update\).
3 Edit the configuration file (safeQ.fwupdate.conf or fwupdate.conf), which is located
in the SafeQ home directory in the folder conf\modules (or conf\), as described in
the following example. (The configuration file includes parameters for different
versions of terminals and for the recharging station.)
In the Terminal v3 firmware area, look at the line that includes “emergency”. On the left
side of the equal sign ( = ) is the version of the terminal and on the right is the new
firmware. In the example shown here, the last time an emergency update was performed,
Terminal Professional version 3 was updated with firmware version 3.1.0.
Chapter 8. Updating terminal firmware
62 YYSOFT SAFEQ TERMINAL PROFESSIONAL INSTALLATION AND ADMINISTRATION GUIDE
4 Open the configuration file on the server.
5 Add a line as shown here:
The left side defines the terminal version (in this example, Terminal Professional version 3).
The right side, after the equal sign ( = ), specifies which firmware file you want to apply (in
this example, version 3.1.0).
6 Save the file; then close it.
Chapter 8. Updating terminal firmware
YSOFT SAFEQ TERMINAL PROFESSIONAL INSTALLATION AND ADMINISTRATION GUIDE 631
7 Use either of these methods to invoke the firmware update:
Method 1: Invoking the firmware update from the Service menu
a Display the Y Soft partners Service menu (see page 31).
b Touch Service.
c Touch Emergency update.
The terminal reboots.
Method 2: Invoking the firmware update during power up
a Power off the terminal.
b Power on the terminal.
c Immediately touch and hold your finger on the lower left corner of the terminal
screen.
d Continue to hold your finger there until the terminal asks you to confirm the
emergency update.
The update process can take several minutes, depending on the connection. The
terminal Service menu indicates when the update is complete.
You have now successfully upgraded the terminal firmware.

64 YYSOFT SAFEQ TERMINAL PROFESSIONAL INSTALLATION AND ADMINISTRATION GUIDE
A Terminal properties and technical
specifications
Specifications
SafeQ Terminal Professional properties and specifications
Item
Specification
Terminal el. power supply input
12 VDC
Maximum current input
1.0 Amp
Working temperature
+10 °C to +40 °C (50 °F to 104 °F)
Storage temperature
0 °C to +50 °C (32 °F to 122 °F)
Maximum air humidity
80% without condensation
Resistance to magnetic field
no added resistance
Weight
cca 900g (varies according to the card reader used)
Size (H x H x D)
165 x 99 x 52mm
Architecture
Renesas SH-3
200MHz CPU, 64MB SDRAM, 16MB Flash dedicated for firmware + 128MB
dedicated for data
Screen
480 x 272px, 16-bit color
Maximum pressure: 250g
Internal readers
RFID 125kHz
Mifare, Motorola, HID, IDTECK, TIRIS, Cotag, Unique, Smart card, magnetic
three track, drafting bar codes, dual readers, and many others
For a complete list, contact your Y Soft sales representative or go to
http://partners.ysoft.com.
External interface
8-pin miniDIN, RS 232 interface (for service only; see Appendix B)
Power/frequency
200 MIPs
Data bus
32-bit
Instruction set
RISC
RAM
64MB
Flash memory
16MB

Appendix A. Terminal properties and technical specifications
YSOFT SAFEQ TERMINAL PROFESSIONAL INSTALLATION AND ADMINISTRATION GUIDE 651
SafeQ Terminal Professional properties and specifications (continued)
Item
Specification
Blocking cables to MFP
Yes
Internal operating system
Linux
Customization option
Yes, as required
66 YYSOFT SAFEQ TERMINAL PROFESSIONAL INSTALLATION AND ADMINISTRATION GUIDE
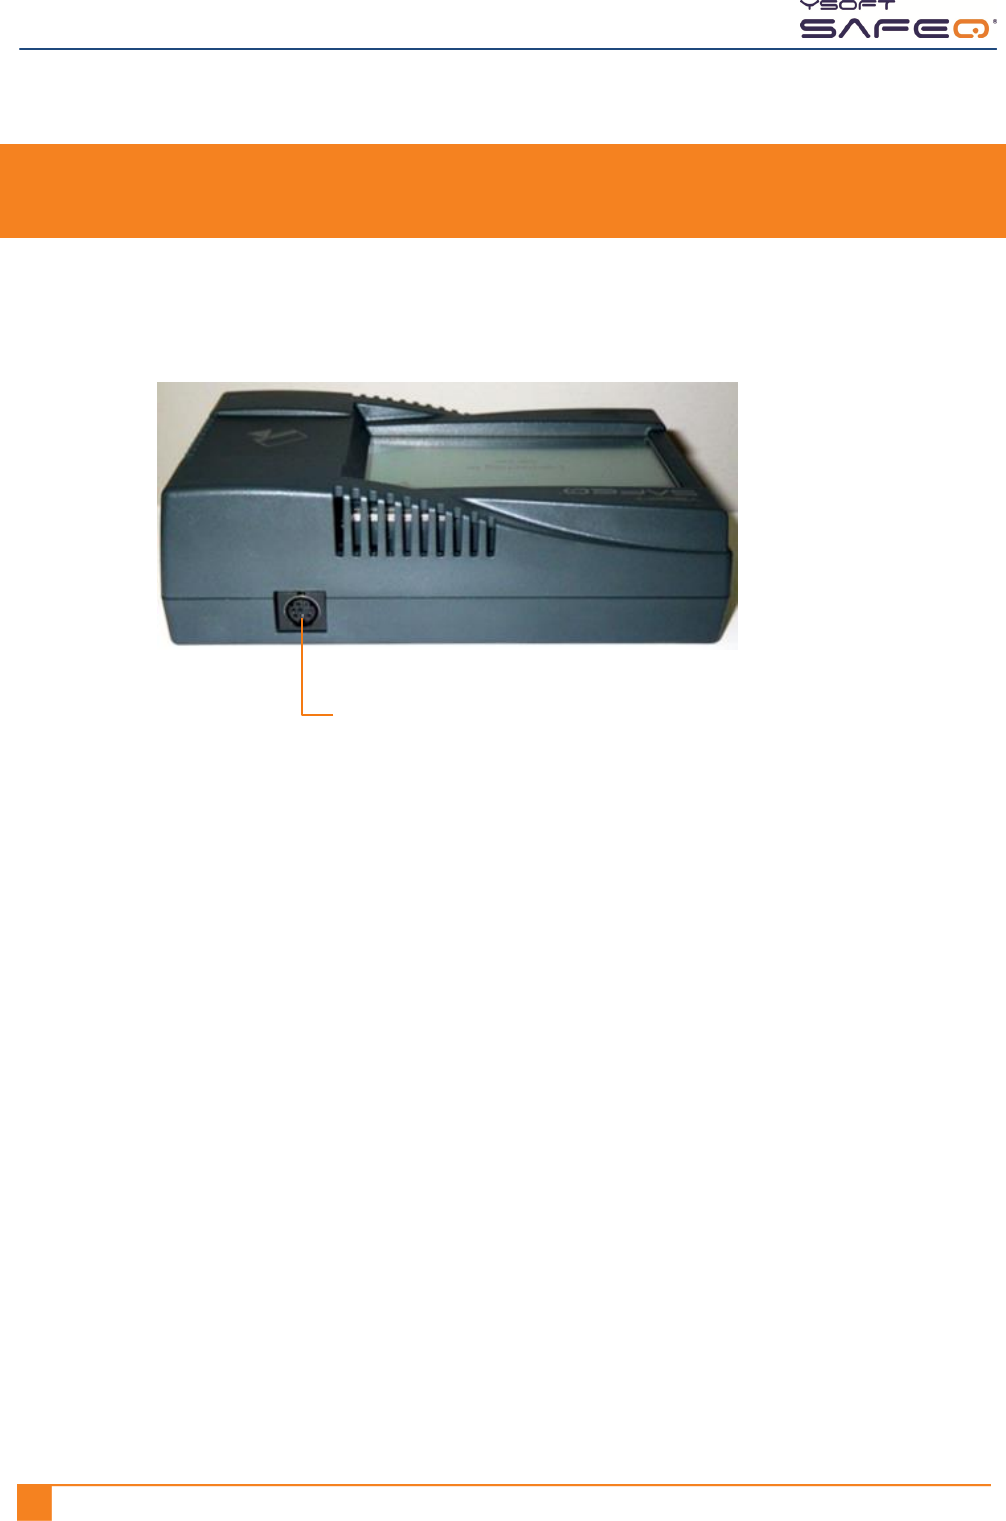
B Service connector
An 8-pin miniDIN, RS 232 connector is located on the top of the terminal, for service
purposes only.
Service connector