YONGNUO PHOTOGRAPHIC EQUIPMENT RF605C Wireless Flash Trigger User Manual PMZ SMS 021 605 V1 1
SHENZHEN YONGNUO PHOTOGRAPHIC EQUIPMENT CO., LTD Wireless Flash Trigger PMZ SMS 021 605 V1 1
Contents
- 1. User manual part 1
- 2. User manual part 2
User manual part 1

Wireless Flash Trigger
User Manual
RF605C
Thank you for purchasing YONGNUO products in
advance.
Please be sure to read and understand this user
manual and the usage of camera and flash before
using. This product is a wireless transceiver
i n te gr a t e d d e s i g n , f o r t h e co n v e n i e n c e of
description, the product will named “transmitter ”
when mounted on the camera hot shoe,named
“receiver”when mounted or connected to the
flash.
Contents
Off-Camera
Flash
Product Features .......................................................................1
Cautions................................................................................2
.........................................................4
Preparation before using...............................................................5
.....................................................6 7
...............................................................8
Function extend........................................................................9
Troubleshooting ......................................................................10
Specification..........................................................................11
Names of RF605 Parts ..................................................................3
Button,display, indicator light
Wireless triggering and testing -
Shutter release function
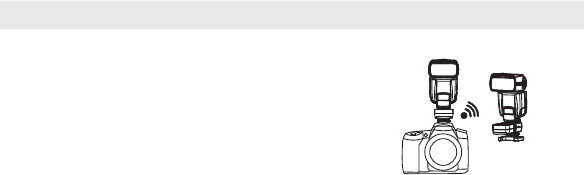
On-Top
Flash
Receiver
Transmitter
Product Features
RF-602/RF-603 two communication modes RF605 = RF602 +RF603
TX/RX/TRX multiple working ways
A/B/C/D/E/F 6 groups (compatible with YN560-TX)
Wireless shutter remote control
Clear LCD screen display, shortcut key operation
16 channels
Communication range up to 100M
Package Contents:
RF605C or RF605N ......................X2
LS-2.5 shutter connecting cable* . . . . . . X2
User Manual .............................X1
*The shutter release cable type please
refer to the packing shown.
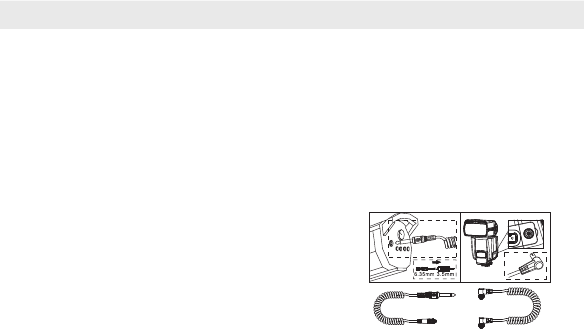
Optional component:
LS-PC series flash cable
LS-PC635 LS-PC PC/
Please purchase the additional shutter
release cable or PC cable if necessary.
1

Cautions
2
1. As this is an electronic product accessory, some of the environment causes
may affect the working. However this is hardly ever to get this situation,
don't worry.
2. Do not pull the wires and turn off the camera when connecting.
3. For a long time non-use, please turn the transceiver off and remove the
batteries.
4. Do not put it in high temperature, such as a closed car under direct sunlight,
the control panel and other high temperature areas.
5. Keep dry, do not use wet hands contact with the product, the product must
not be immersed in water or exposed to rain, and this may and this may lead
to not work properly.
6. Do not used in the flammable occasion in violation of this warning may cause
an explosion or fire.
7. Owing to this product include battery, please operate it strictly according to
related rules, otherwise maybe cause explosion, fire or physical injury.
8. Do not trigger the flash close to a person's eyes, it may impair the person's
vision.
RF605C is more
suitable for the
Canon cameras
Names of RF605 Parts
RF605N is more
suitable for the
Nikon cameras
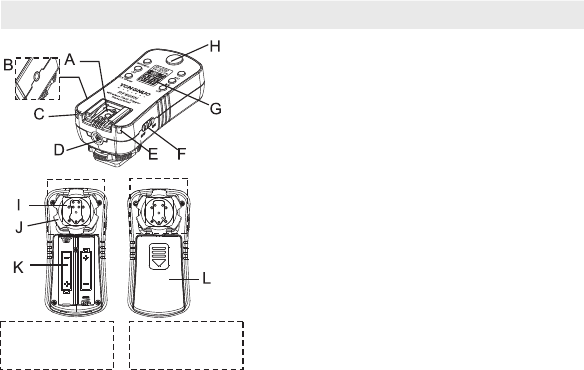
A-Hot shoe stand/Hot shoe contacts: install flash
B-2.5mm shutter release socket
C-Focus light (Green)/shutter indicator light
(Red),in RF-603 TRX status, the AF-assist light
will blink once in every 2 seconds.
D-PC interface(output)
E-Waken indicator (Green)/trigger indicator light
(Red),in RF-602 RX , the trigger indicator
light will blink once in every 2 seconds.
F-Power switch: ON means turn on, while OFF
means turn off
G-Buttons and display (see below page)
H-Multifunction button (see below page)
I-Hot shoe fixed foot and contacts: mounted on
the camera hot shoe
J-Locking ring
K-Battery compartment
L-the battery compartment cover
status
3
Button,display,indicator light
4
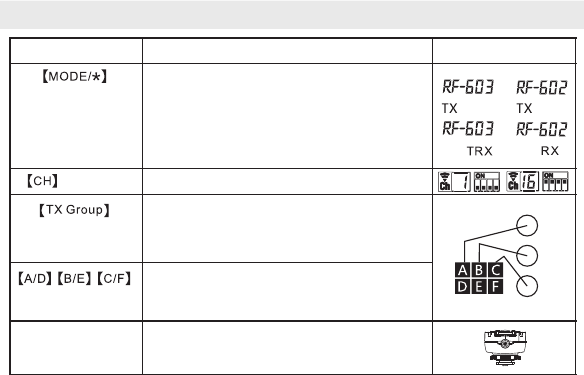
Button
Function
Display/Indicator light
Communication
mode/Transmit-
receive status
button
Long press to switch the communication
mode RF-602/RF-603;Short press to switch
the transmit-receive status
RF-602 can use TX(transmit),RX(receive)
Statu s; RF -603 can us e TX (trans mit),
TRX(transmit-receive) status
Channel
Press to setup the channel (1-16)
Transmit
grouping button
Press the button to activate the transmit
grouping button setting, then press the
transmit-receive grouping button to turn on/off
the transmitting group
Transmit-receive
grouping button
Short press to turn on/off the A/B/C group, long
press to turn on/off D/E/F group, the
corresponding grouping indicator light on or off
【Multifunction
Button】
In TX status:half press to waken the speedlite,
full press the to test flash
waken/
trigger
focus/
shutter
A/D
B/E
C/F
5
Preparation before using
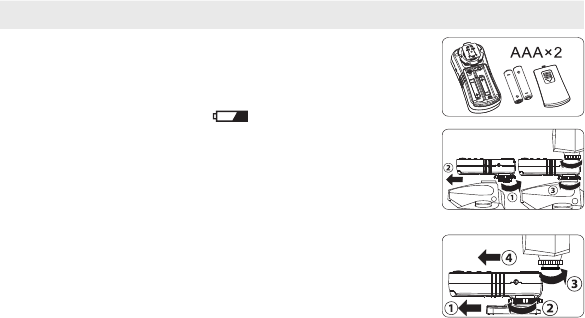
1.Battery Installation:
Slide to open the battery compartment, install two AAA
batteries(not included) for two transceivers according to the
"+/-"direction shown.
The low battery Indicator( )
The low battery indicator will blink when the batteries are low.
Please replace the battery.
2.Fix the transmitter on the hot shoe of the camera:
Mount the transmitter on the hot shoe of the camera through
the hot shoe mounting foot, then tight the locking screw.
Supports installing the flash on the transmitter (on-top
flash, as the picture shown).
3.Fixed the receiver and flash
Mount the receiver on the mini stand of the flash attached or
other fixed device (not included), and tight the locking screw.
Install the flash on the hot shoe of the receiver, lock the flash
and ensure all links are fixed well.
Make sure all the transceivers have been fixed, the flash set to manual “M”
mode.
6
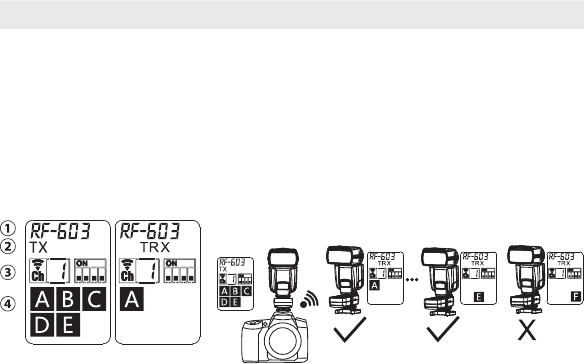
RF605
1.Set the communication mode: Set all the transmitters and receivers to the same
communication mode (RF-602 or RF-603).
2.Set the transmit-receive status: Set the transmitter to TX, the receiver set to RX or
TRX.
3.Channel setting: Set all the transceivers in the same channel.
4.Set the groups of transmitter and receiver:
1)Transmitter settings: In TX status, press the grouping button for setup; in TRX
status, press the TX Group button or half press the camera shutter release button to
activate the transmit group settings.
2)Receiving group setting: Press the grouping button for settings.
Example: Use the RF605 and set the F group not flash
Wireless triggering and testing
Transmitter
Setting
Receiver
Setting
FUse the non specialized transmitter can also wireless trigger the flash (single
contact trigger).
7
Wireless triggering and testing
5.Waken the flash: half press the transmitter(TX status) multifunction button or
camera shutter to waken the flash.
6.Test and trigger the flash :Fully press the multifunction button of the transmitter
(TX status) to test the flash once. When fully pressing the release button of camera
shutter, it will wireless synchronously trigger the on-top flash and off-camera flash.
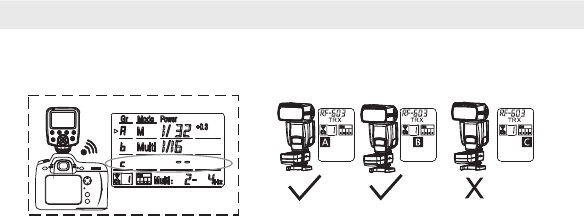
YN560-TX RF605
Example: use the YN560-TX and set C group not flash
Set the C group flash mode to “--” when using the YN560-TX ,the C group of
corresponding RF605 receiver does not flash.