YONGNUO PHOTOGRAPHIC EQUIPMENT YN622C-TX E-TTL Wireless Flash Controller User Manual YN622C TX
SHENZHEN YONGNUO PHOTOGRAPHIC EQUIPMENT CO., LTD E-TTL Wireless Flash Controller YN622C TX
UserManual.wiki
>
YONGNUO PHOTOGRAPHIC EQUIPMENT
>
YN622C TX User Manual
User Manual
Navigation menu
Upload a User Manual
Namespaces
Wiki Guide
HTML
PDF
Info
Views
User Manual
Discussion / Help
Navigation

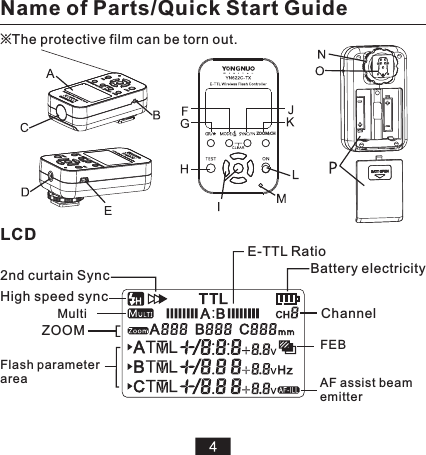
![Name of Parts/Quick Start GuideA-LCD: Display all the settings of controller.B-2.5MM Shutter release interface: Wireless shutter release function(P.16).C-AF assist beam emitter: (P.14)D-PC interface: Input the flash sync signal(P.15).E-USB interface: Connected to the computer to update the firmware (P.19). F- button: Flash mode setting.G-GR/* button: Short press to move the arrow to set flash group or other parameters; Long press to get different functions int different modes.H-TEST button: Long press to wake the flash up, loosen to test the flash(P.12).I-Select/Set button group: Multifunction button group, including the [UP] [DOWN] [LEFT] [RIGHT] and [OK] buttons. J-SYNC/FN button: Short press for flash shutter sync mode setting(P.11), long press for C.FN setting (P.14).K-ZOOM/CH button: short press for zoom setting (P.11), long press for channel setting(P.7) .L-Power switch: Slide to ON for power on.M-Status indicator : The green light will bright when in communication; while the red light will bright when in triggering (or shutter releasing).N-Locking ring and locking pinO-Hot shoe Mounting foot and contactsP-Battery compartment and battery cover](https://usermanual.wiki/YONGNUO-PHOTOGRAPHIC-EQUIPMENT/YN622C-TX/User-Guide-2363911-Page-7.png)
![Preparation Before Use2.YN622C-TX Controller Settings:(excluded).2).Installing the Controller on the Camera .3).Power on when the power switch slides to [ON].1).Installing the 2 AA (1.5V)batteries4).Channel Setting: Long press the [ZOOM/CH] button, then press the select/set button group to the same channel as the YN622C transceiver.HCZ MOOCh7Ch6Ch5Ch4Ch3Ch2Ch1Ch11.YN622C Transceiver Settings:Set the receiving group transceiver(refer to the user manual of the YN622C).and channel of the](https://usermanual.wiki/YONGNUO-PHOTOGRAPHIC-EQUIPMENT/YN622C-TX/User-Guide-2363911-Page-8.png)
![Long press the [ ] button to switch the flash mode GR/TTL/Multi. In GR mode, short press the [ ] button to switch the current group the arrow pointing to; in TTL/Multi mode, short press this button can also switch the flash mode. Flash Mode Setting: GR/TTL/MultiExamples:1.GR2.TTL3.MultiSettingsHCZ MOO](https://usermanual.wiki/YONGNUO-PHOTOGRAPHIC-EQUIPMENT/YN622C-TX/User-Guide-2363911-Page-9.png)
![TTL: E-TTL(II) Fully Automatic Flash The FEC adjustment range is within -3 to +3EV, It’s supported to press select/set button group to adjust the FEC value. If the FEC value is set on the flash, iM: Manual FlashThe adjustment range is within 1/128-1/1, press [LEFT] or [RIGHT] button to adjust, press the [UP] or [RIGHT] button for fine adjustment.SS(Super Sync):refer to P.14.OFF: This group is not participate in flash.*Long press the [GR/*] button to quickly turn off the A/B two groups at the same time.t will plus with the FEC value set on the controller.Settings1.GR-Grouping flash mode: set different flash modes for different groups.1).short press the [GR/*] button to choose the setting groups. 2).Short press the [ ] button to set the flash mode of the selected group, each press of the setting as below:HCZ MOO](https://usermanual.wiki/YONGNUO-PHOTOGRAPHIC-EQUIPMENT/YN622C-TX/User-Guide-2363911-Page-10.png)
![1. A+B+C(ALL)Flash Group-Set flash ratio of A/B group3. A:B CFlash Group- 2. A:B Flash Group-1.)Set the flash group: Long press the [GR/*] button to set the TTL flash group. 2.)Set the flash ratio or exposure compensation: Short press the [GR/*] button to select the setting items, then press the select/set button groups to set the parameters. Set FEC of A/B/C groups at one time. Set FEC group(C group does not flash )of the A/B Set flash ratio of A/B group Set FEC of A/B group Set FEC of C groupSettings2.E-TTL(II)Mode -Fully Automatic Flash](https://usermanual.wiki/YONGNUO-PHOTOGRAPHIC-EQUIPMENT/YN622C-TX/User-Guide-2363911-Page-11.png)
![Short press the [GR/*] button to select the items, then press the select/set button groups to set the parameters. 3.Multi Flash Mode:Stroboscopic FlashThe details of the flash ratio settings as below:Press[LEFT]or[RIGHT]Press[UP]or[DOWN]Output power Stroboscopic frequencyStroboscopic flash count *The output power of group B/C should be set up through the camera’s menu (P.13)respectively Settings](https://usermanual.wiki/YONGNUO-PHOTOGRAPHIC-EQUIPMENT/YN622C-TX/User-Guide-2363911-Page-12.png)
![HCZ MOO1st curtain sync5.Flash shutter syncShort press the [SYNC/FN] button to set the shutter sync mode(except the multi flash).There will be a relevant icon displayed on the LCD. HCZ MOO4.ZOOM:Flash Coverage Setting It supports the controller to set the focal length of the flash on the transceiver.Short press the [ZOOM/CH]button, set the flash focal length of A/B/C group in sequence, then press the Select/Set button group and set. Settings rang supported manual 24-105mm,AU (Automatic).2nd curtain sync high speed syncSettings](https://usermanual.wiki/YONGNUO-PHOTOGRAPHIC-EQUIPMENT/YN622C-TX/User-Guide-2363911-Page-13.png)
![2.Flash triggeringWhen half press the shutter button of the camera or press the [TEST] button of the controller , the green wake-up indicator light lights on, and the flash on the hot-shoe of the transceiver will be waked up. When loosen the [TEST] button, the flash of the selected groups will be tested for once.Completely press the shutter button of the camera will trigger the flash synchronously, the red triggering indicator light lights on.Flash Awaking and Triggering1.Flash Awaking&Testing HCZ MOO](https://usermanual.wiki/YONGNUO-PHOTOGRAPHIC-EQUIPMENT/YN622C-TX/User-Guide-2363911-Page-14.png)
![01-SS: Super sync delay SettingsThe range of settings : 0.0-2.002-SHU(Shutter):Wireless shutter function Refer to P.16,can be set to ON/OFF03-AF: AF assist light function It can be set to ON/OFF, relevant icon will displayed on the screen (refer to P.4)04-LEG(Legacy Flash Trigger):Single contact trigger functionRefer to P.15, can be set to ON/OFF05-ECO(Ex Compat): EX series flash Compat Refer to P.18, can be set to ON/OFF (refer to P.17)1).Long press the [SYNC/FN] button.2).Press the [up] or [down] buttons to select the setting items, then press the [LEF T] or [RIGHT] buttons to set the parameters.3).Press [OK] to confirm and exit the settings. HCZ MOOCustom Function Settings(C.FN)](https://usermanual.wiki/YONGNUO-PHOTOGRAPHIC-EQUIPMENT/YN622C-TX/User-Guide-2363911-Page-16.png)
![1).Use the LS-2.5 series shutter connecting cable to connect the controller and camera’s shutter interface, as for the EOS digital cameras released after 2012, it does not need the shutter connecting cable. 2).Set the C.FN 02 as ON (P.14),turn on the wireless shutter function.3).Press the [TEST] button of YN622C transceiver (if the flash have installed) and loose, the flash will be triggered once to test the flash. About one second later, the camera shutter will be triggered and will flash synchronously.Supports single shot only. If you do not use the shutter release function, please set the C.FN 02 as OFF.C1 C3YN622CYN622C-TXUse the YN622C transceiver for wireless transmitting, the YN622C-TX controller as the shutter signal output. Shutter Release Function](https://usermanual.wiki/YONGNUO-PHOTOGRAPHIC-EQUIPMENT/YN622C-TX/User-Guide-2363911-Page-18.png)
![HCZ MOOHCZ MOOH o l d d o w n t h e [ M O D E ] a n d [SYNC/FN] buttons at the same time until the screen as shown, then loosen to restore factory settings. 1).Visit YONGNUO official website: http://www.hkyongnuo.com to download the firmware upgrade software and the latest firmware. 2).Turn off . Keep pressing [mode] button and turn on again. The screen will show 3).Connect the controller to PC via USB-MINIB cable.4).Complete the firmware upgrade operation according to the prompt of software.firmware upgrade interface(will display the current version ). (not include)6.USB Firmware Upgrade 5.Factory Reset Reference19](https://usermanual.wiki/YONGNUO-PHOTOGRAPHIC-EQUIPMENT/YN622C-TX/User-Guide-2363911-Page-21.png)