YUXINXIN ELECTRONICS 20151215 Wireless TV Earphones User Manual
SHENZHEN YUXINXIN ELECTRONICS CO.,LTD Wireless TV Earphones Users Manual
Users Manual
Fold Fold Fold Fold Fold
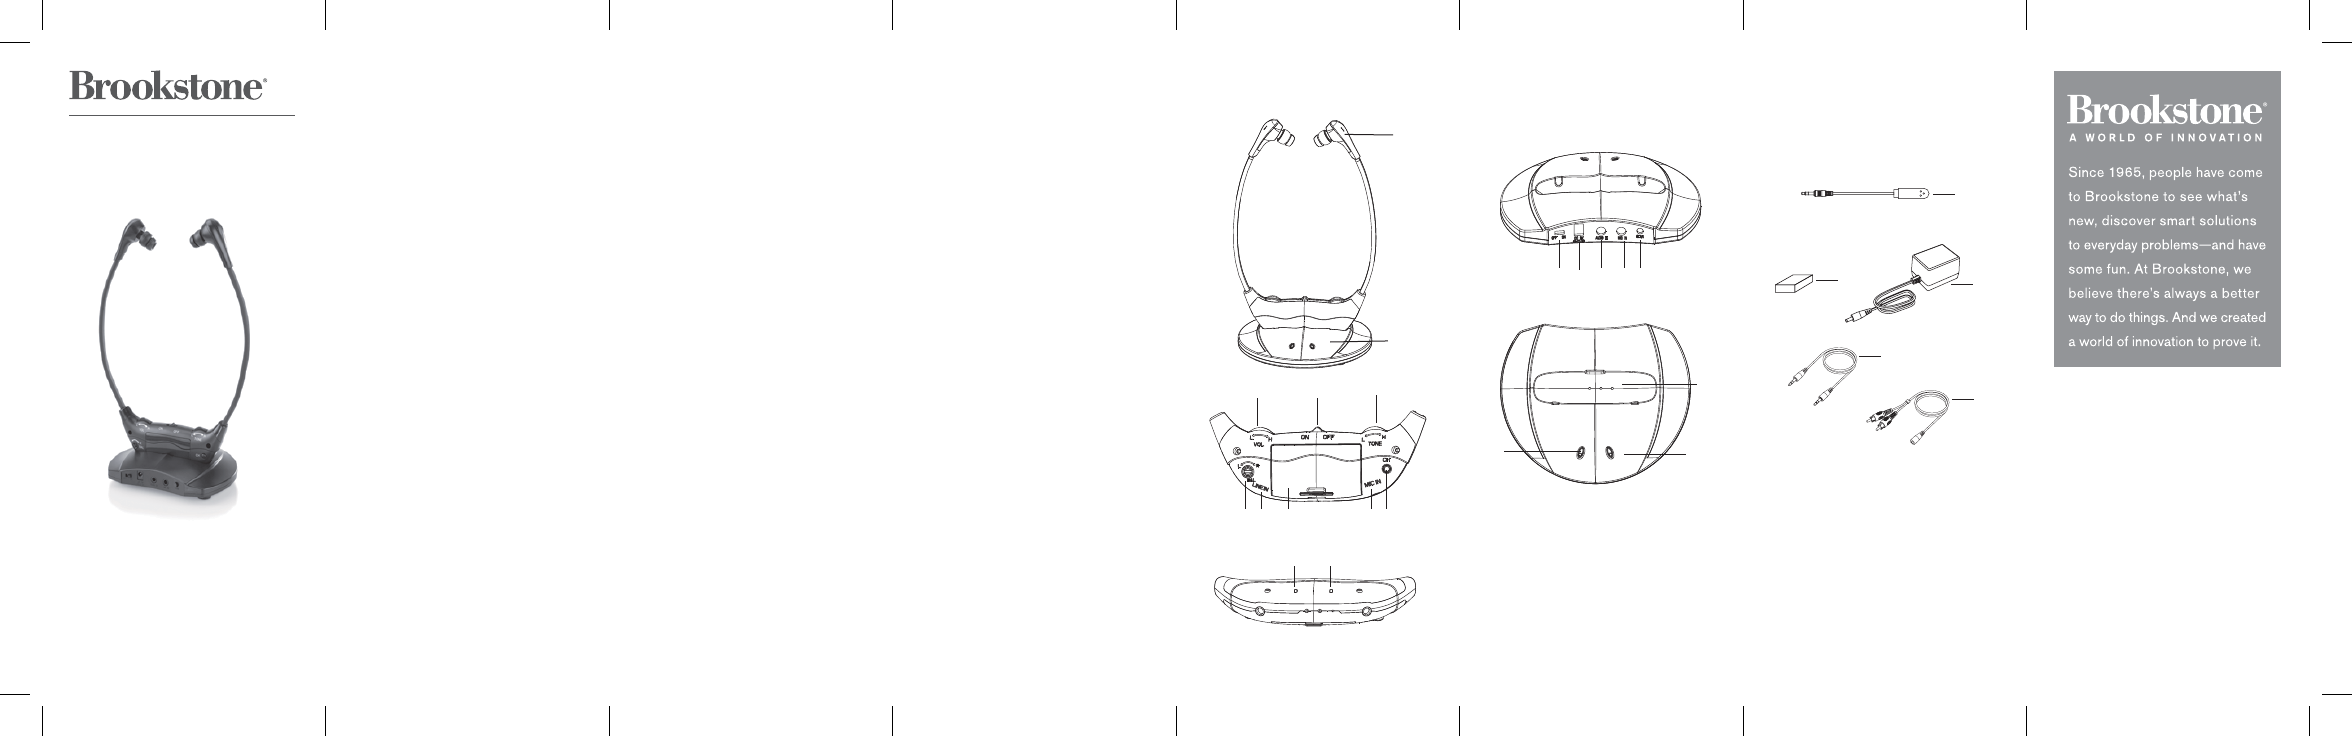
LOCATION OF PARTS AND
CONTROLS
1. Earphones
2. Transmitter
3. Volume Dial
4. Power Switch
5. Tone Dial
6. Balance Knob
7. LINE-IN Port
8. Battery Door Cover
9. MIC-IN Port
10. CHANNEL Button
11. Power LED
12. RF Reception LED
13. Power Switch
14. DC-IN Port
15. AUDIO- IN Port
16. MIC-IN Port
17. SCAN Button
18. Charging Pins/Contacts
19. Power LED
20. Audio LED
21. Microphone
22. Li-ion Rechargeable Battery
23. AC/DC Adapter
24. Audio Cable
25. 3.5mm(female)-to-RCA(male)
Y-Cable
Wireless TV Earphones
ENJOY THE SHOW-WITHOUT
DISTURBING OTHERS
LITHIUM-ION BATTERY
WARNINGS
This device contains a non-removable
lithium-ion battery. The battery must be
recycled or disposed of properly.
Contact your local waste management
office for information on battery
recycling or disposal.
FCC INFORMATION
This equipment has been tested
and found to comply with the
limits for a Class B Digital Device,
pursuant to Part 15 of the FCC
Rules. These limits are designed to
provide reasonable protection against
harmful interference in a residential
installation. This equipment generates,
uses, and can radiate radio frequency
energy and, if not installed and used
in accordance with the instructions,
may cause harmful interference to
radio communications. However, there
is no guarantee that interference will
not occur in a particular installation.
If this equipment does cause harmful
interference to radio or television
reception, which can be determined
by turning the equipment off and
on, the user is encouraged to try to
correct the interference by one or
more of the following measures:
• Reorient or relocate the
receiving antenna.
• Increase the distance between
the equipment and receiver.
• Connect the equipment to an outlet
on a circuit different from that to
which the receiver is connected.
• Consult the dealer or an
experienced radio/TV technician
for help.
This device complies with
Part 15 of the FCC Rules.
Operation is subject to the
following two conditions:
1. This equipment may not cause
harmful interference.
2. This equipment must accept any
interference received, including
interference that may cause
undesired operation.
Modifications not authorized by the
manufacturer may void the user’s
authority to operate this device.
This equipment complies with FCC RF
radiation exposure limits set forth for
an uncontrolled environment. This
transmitter must not be co-located or
operating in conjunction with any other
antenna or transmitter.
FCCID: ZRH-20151215
Merrimack, New Hampshire, USA 03054
800-846-3000 • Brookstone.com
LOCATION OF PARTS AND
CONTROLS (EARPHONES)
LOCATION OF PARTS AND
CONTROLS (TRANSMITTER)
LOCATION OF PARTS AND
CONTROLS (ACCESSORIES)
23
24
25
21
22
20
19
18
1716151413
5
43
109
876
11 12
1
2
311673
dloFdloFdloF
CHARGING THE EARPHONES
1. Carefully open the Battery Door Cover
and insert the Li-ion Battery (included)
according to the polarity markings.
Replace the Battery Door Cover.
TROUBLE SHOOTING
NO SOUND
• Ensure the AC/DC adapter is securely
plugged into the transmitter.
• Ensure the earphones are
powered on.
• Ensure the earphones and the
transmitter are synced.
• The earphones may need to be
charged.
• The earphones may need to move
closer to the transmitter.
• Ensure the audio device is
switched ON.
• The volume of the audio device may
need to be increased.
• If there is interference or poor signal
reception, audio from the earphones
will mute and the Power LED will flash
RED. Press the SCAN Buttons
on transmitter and CHANNEL Button
on earphones at the same time for 10
seconds until the earphones’ RF LED
turn SOLID BLUE again.
USING THE EARPHONES
WITH THE DIRECT PLUG
1. Connect the earphones directly
to an audio source by plugging one
end of a 3.5mm-to-3.5mm cable
(included) into the AUX-IN Port at
the bottom of the earphones and
other end into the audio source.
2. Use the volume controls on the audio
source to change the volume.
Note:
When using a 3.5mm-to 3.5mm cable,
the two LEDs are off.
TRANSMITTER SET UP
1. Plug the AC/DC power adapter into
the DC Port located on the rear of
the transmitter. Plug the other end
of the AC/DC power adapter into
an electrical wall outlet.
2. Slide the Power Switch to ON . The
transmitter’s Power LED is solid
GREEN.
NOTE: If the earphones are docked
on the transmitter and in low battery,
the transmitter’s Power LED is solid
ORANGE. The earphones are being
charged.
3. Connect the transmitter to an audio
source using the included RCA and
audio cables.
4. When the transmitter receives an
audio signal, the AUDIO LED is solid
GREEN.
If no audio signal is detected, the
AUDIO LED is solid ORANGE.
NOTE:
Plug in the included external
microphone in the MIC-IN Port at the
rear of the transmitter to perform
monitoring function.
CARE AND STORAGE
1. Dust the earphones and transmitter
with a soft, dry cloth.
2. Store the earphones and transmitter
in a cool, dry place.
SPECIFICATIONS
Power Supply (Transmitter):
DC 5V, 500mA
Power Supply (Earphones):
3.7V 420mAh
Frequency: 2.402-2.480 GHz Digital
Transmission mode: GFSK
Range: Up to 100ft/30m & 75ft/25m
with some obstructions
S/N Ratio: 75dB
Frequency Response: 30Hz~20KHz
Charging Time: Approx. 3 hours
(subsequent uses after first initial
charge of 12 hours)
Battery Life: Approx. 8 hours
USING THE EARPHONES
WITH TRANSMITTER
1. To turn the earphones on, slide the
Power Switch to ON. The Power
LED is solid RED.
2. The earphones will automatically
sync to the transmitter when the
transmitter is with audio signal in.
When the earphones are attempting
to set up a connection with the
transmitter, the Power LED will blink
RED. When the earphones and
transmitter are synced, the
earphones’ RF LED is solid BLUE
and the transmitter’s AUDIO LED is
GREEN.
3. Use the Volume Dial on the
earphones and the audio source
to change the volume.
4. Adjust the Tone Dial to your desired
bass performance.
5. Use the Balance Knob to adjust
sound clarity of the right and left
channels.
6. After 5 minutes of no audio signal
detected, the AUDIO LED on
transmitter turns solid ORANGE
should be earphones power LED
blinking RED.
7. To turn the earphones off, slide
the Power Switch to OFF. The LEDs
will turn off.
2. For first time use, charge the
Earphones for at least 12 hours. To
charge earphones, ensure the
earphones are OFF by sliding the
Power Switch to OFF on earphones
until the two LEDs are off. Place the
earphones on the top of transmitter
ensuring the charging contacts are
aligned. When the earphones are
fully charged the Power LED is solid
GREEN.
Note:
Insert the external microphone to the
MIC-IN Port at the bottom of the
earphones, audio signal will be paused
and now the earphones perform as a
hearing aid device. Audio signal resume
when the microphone is unplugged.