Yaesu Musen 20695X20 FM DUAL BAND TRANSCEIVER User Manual Operating Manual 1
Yaesu Musen Co., Ltd. FM DUAL BAND TRANSCEIVER Operating Manual 1
UserManual.wiki
>
Yaesu Musen
>
20695X20 User Manual
>
Operating-Manual-1
Contents
1.
Operating-Manual-1
2.
Operating-Manual-2
Operating-Manual-1
Navigation menu
Upload a User Manual
Namespaces
Wiki Guide
HTML
PDF
Info
Views
User Manual
Discussion / Help
Navigation
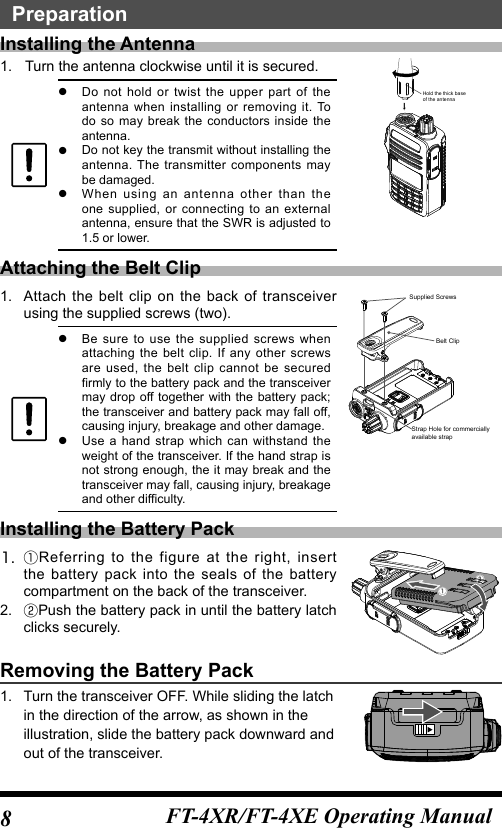
![2FT-4XR/FT-4XE Operating Manual① Turning the Power ONRotate the until it clicks.② Adjusting the volumeRotate the .③ Selecting the Operating BandPress the .The operating frequency changes between the 144 MHz Band, the 430 MHz Band, and the FM Radio Broadcast Band.④ Tuning the frequencyPress the or .⑤ Adjusting the squelch settingThe squelch level may be adjusted to mute the background noise when no signal is Quick GuideNames and display of ControlsPTT SwitchMONI/T-CALLSwitchPWR/VOL Knob[BAND] KeyMicrophone(Frequency up and down) KeyFunction KeyS Meter / PO MeterVFO-A ModeOperating FrequencyNormal operation (VFO Mode)received.1. Press the (Function key), then press the (MONI/T-CALL switch).2. Press the or to adjust the squelch level.* When the squelch level is increased, the noise is more likely to be silenced, but it may become more difficult to receive weak signals.3. Press the PTT ( ) switch to save the setting.⑥ Transmitting Signals zTransmittingPress the , then speak into microphone.](https://usermanual.wiki/Yaesu-Musen/20695X20.Operating-Manual-1/User-Guide-3759822-Page-4.png)