Yaesu Musen 50013X20 PORTABLE AIRBAND TRANSCEIVER User Manual FTA 750 FTA 550 OperatingManual
Yaesu Musen Co., Ltd. PORTABLE AIRBAND TRANSCEIVER FTA 750 FTA 550 OperatingManual
UserManual.wiki
>
Yaesu Musen
>
50013X20 User Manual
>
Operational Manual
Contents
1.
Operational Manual
2.
Operating Manual 1
Operational Manual
Navigation menu
Upload a User Manual
Namespaces
Wiki Guide
HTML
PDF
Info
Views
User Manual
Discussion / Help
Navigation
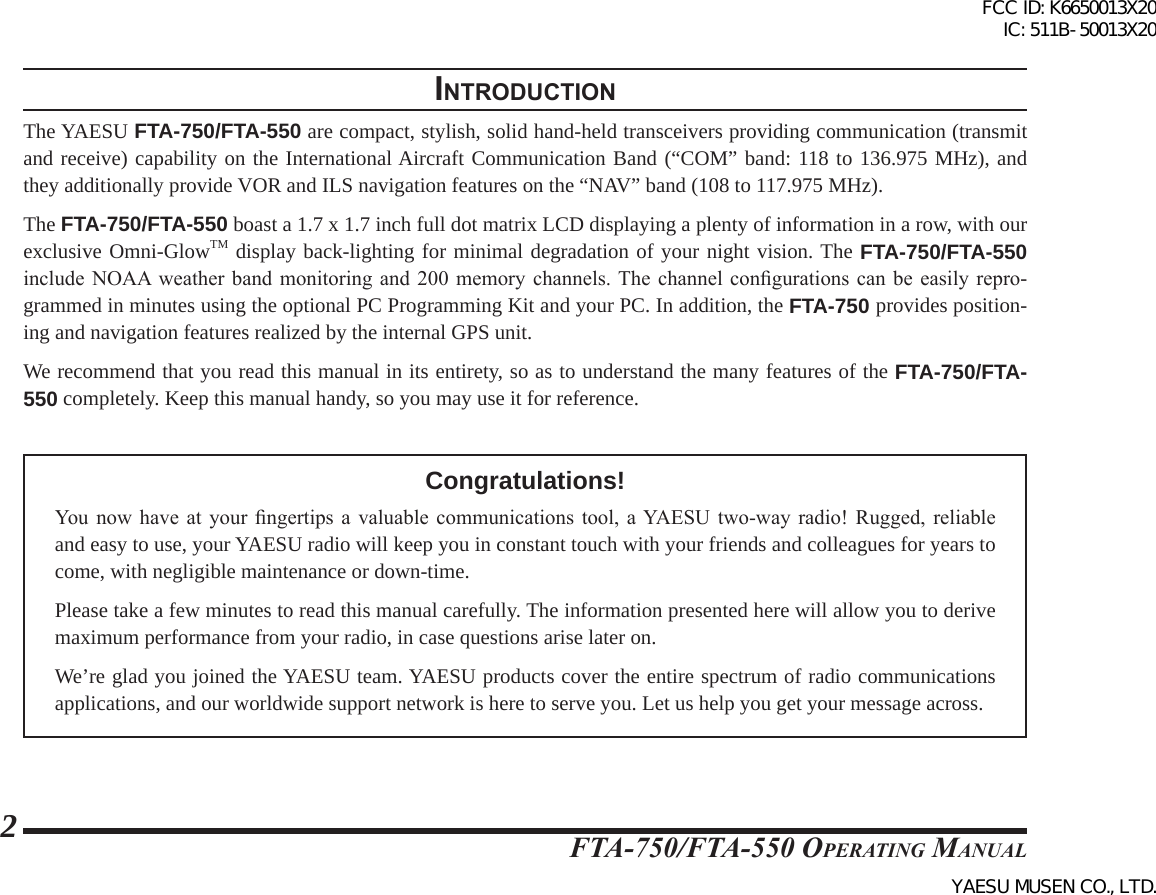

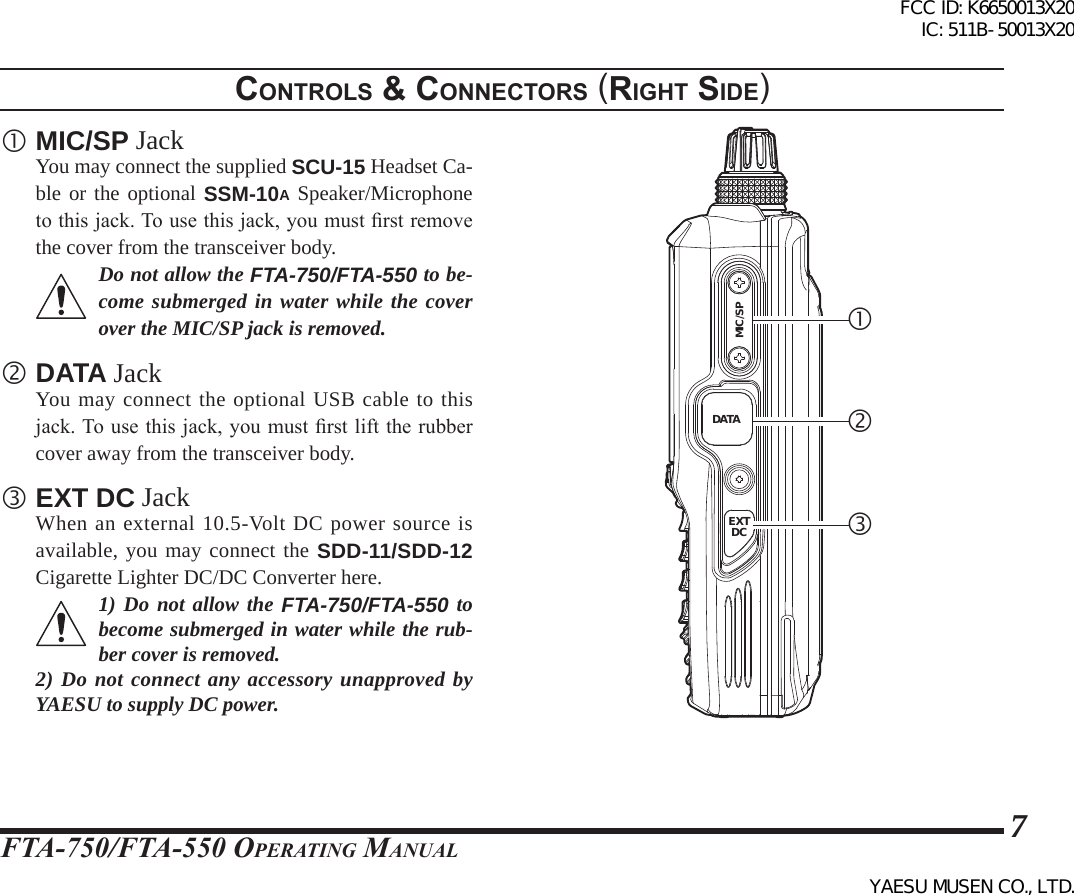
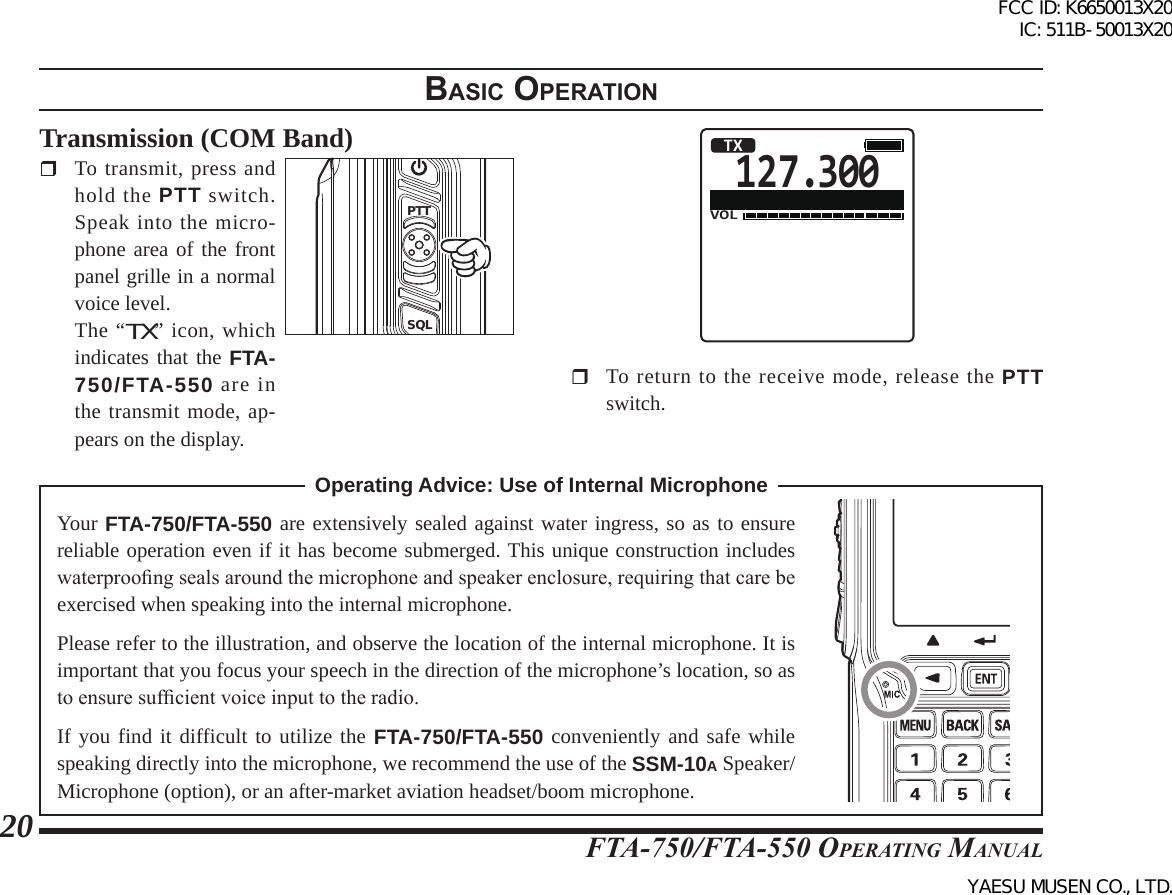
![FTA-750/FTA-550 OperATing MAnuAl5 LCD (Liquid Crystal Display) The display shows selected operating conditions, as indicated on Pages 8 to 10. Microphone Speak across this opening in a normal voice level, while pressing the PTT switch, to transmit. Cursor Keys and ENT Key The cursor keys are used to select an item displayed on the LCD. Press the ENT key to determine the selection or entered values. Control Keys Press the MENU key to display the MENU screen. Press the BACK key to turn the display to the previous screen. Press the SAVE key to store the current channel information to the memory. Press and hold the lock key [ ] to disable the controls with the keys and knobs. COMM Key Press this key to enter the COMM mode instantly. Numeric Keypad The keypad is used when setting frequencies. 121.5 Key Press and hold this key to access the emergency frequency (121.5 MHz) instantly. Loudspeaker The internal speaker is located in this position.controls & connectors (Front panel)FCC ID: K6650013X20 IC: 511B-50013X20YAESU MUSEN CO., LTD.](https://usermanual.wiki/Yaesu-Musen/50013X20.Operational-Manual/User-Guide-2185162-Page-7.png)
![FTA-750/FTA-550 OperATing MAnuAl16BasIc operatIonReception (COM Band)Turning on and off the radio To turn the radio on, press and hold the POWER switch. The WARNING mes-sage will be displayed. PTTSQL If you agree with the message, press the [ENT] key. A channel frequency will appear on the display. If not, press the [COMM] key. The “BUSY” icon appears on the display when the audio signal is received on the current frequency.127.300VOLBUSY To turn the radio off, press and hold the POWER switch.FCC ID: K6650013X20 IC: 511B-50013X20YAESU MUSEN CO., LTD.](https://usermanual.wiki/Yaesu-Musen/50013X20.Operational-Manual/User-Guide-2185162-Page-18.png)
![FTA-750/FTA-550 OperATing MAnuAl17BasIc operatIonAdjusting the frequency You may turn the DIAL selector (outer) knob on the top panel to choose the desired operating frequency. The channel frequency will appear on the LCD. Directly entering frequencies from the keypad is the easiest method if you know the frequency on which you wish to operate. Just enter the ve digits of the frequency to move to that frequency. For example, to set 134.35 MHz, press [1] [3] [4] [3] [5]. To set 118.275 MHz, you do not need to press the nal “5” in the frequency as below: [1] [1] [8] [2] [7].13-.---VOL You may recall the op-erating frequency that you have used by press-ing the [◄] or [►] key.133.800VOL2:132.400 KSAN-GND3:134.800 KSAN-TWR4:127.600 KSAN-APP5:119.150 KSAN-ATI6:124.250 KLGB-TWR7:129.200 KLGB-DEPBUSYKLAX-ATISFCC ID: K6650013X20 IC: 511B-50013X20YAESU MUSEN CO., LTD.](https://usermanual.wiki/Yaesu-Musen/50013X20.Operational-Manual/User-Guide-2185162-Page-19.png)
![FTA-750/FTA-550 OperATing MAnuAl18Adjusting the volume Rotate the VOL (inner) knob to set the volume level. If no signal is present, press the SQL switch; background noise will now be heard, and you may use this noise to set the VOL knob for the desired audio level. Press and hold the SQL switch to silence the noise and resume normal (quiet) monitoring.PTTSQLAdjusting the squelch Press the SQL switch, then rotate the DIAL se-lector knob or press the [◄] or [►] key to set the squelch threshold (0 to 15) so that the re-ceiver is just silenced. A higher number indicates that a higher signal lev-el is required in order to open the squelch.PTTSQL127.300VOLBUSYSQL Press and hold the SQL switch to set the squelch threshold to 0 (off). Your new setting will be saved each time you per-form either of the operations above.BasIc operatIonFCC ID: K6650013X20 IC: 511B-50013X20YAESU MUSEN CO., LTD.](https://usermanual.wiki/Yaesu-Musen/50013X20.Operational-Manual/User-Guide-2185162-Page-20.png)
![FTA-750/FTA-550 OperATing MAnuAl19BasIc operatIonMonitor SwitchWhen listening to a very weak signal from an aircraft or ground station, you may observe the signal disappearing periodically as the incoming signal strength becomes too weak to override the squelch threshold setting.To disable the squelch temporarily, press and hold the SQL switch for 2 seconds. The squelch will remain open and you should have a better chance of hearing weak signals.To return to normal operation, press the SQL or the PTT switch momentarily.Accessing the 121.5 MHz Emergency FrequencyThe FTA-750/FTA-550 can quickly access the 121.500 MHz emergency frequency. This function can be activated even when the keypad lock function (de-scribed on Page 42) is in use. To access the emergen-cy frequency, press and hold the [121.5] key. After four beeps, the transceiver enters the emergency mode and the frequency is au-tomatically tuned to 121.500 MHz.121.500VOL2:132.400 KSAN-GND3:134.800 KSAN-TWR4:127.600 KSAN-APP5:119.150 KSAN-ATI6:124.250 KLGB-TWR7:129.200 KLGB-DEPEMERGENCYEMG To exit the emergency mode, press the [COMM] key. The message conrming the cancelation of the emergency mode will appear. Press the [◄] or [►] key to select “YES”, then press the [ENT] key.FCC ID: K6650013X20 IC: 511B-50013X20YAESU MUSEN CO., LTD.](https://usermanual.wiki/Yaesu-Musen/50013X20.Operational-Manual/User-Guide-2185162-Page-21.png)
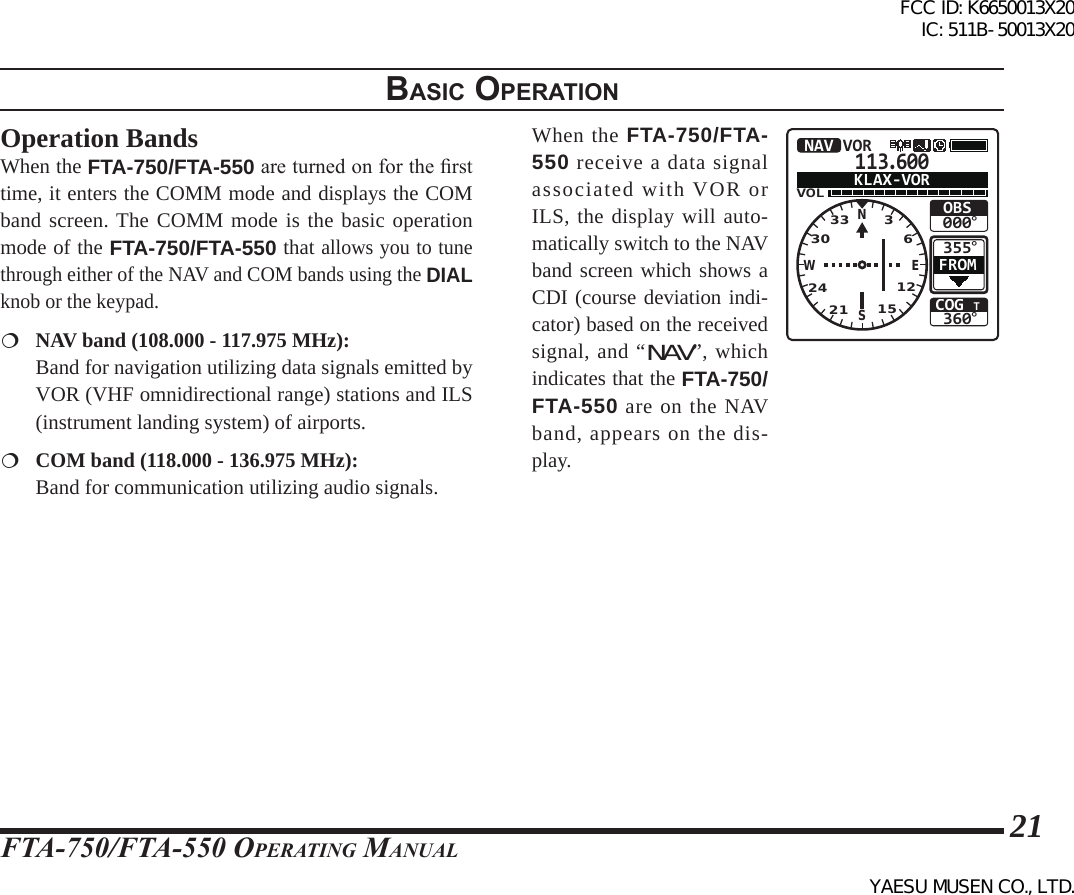
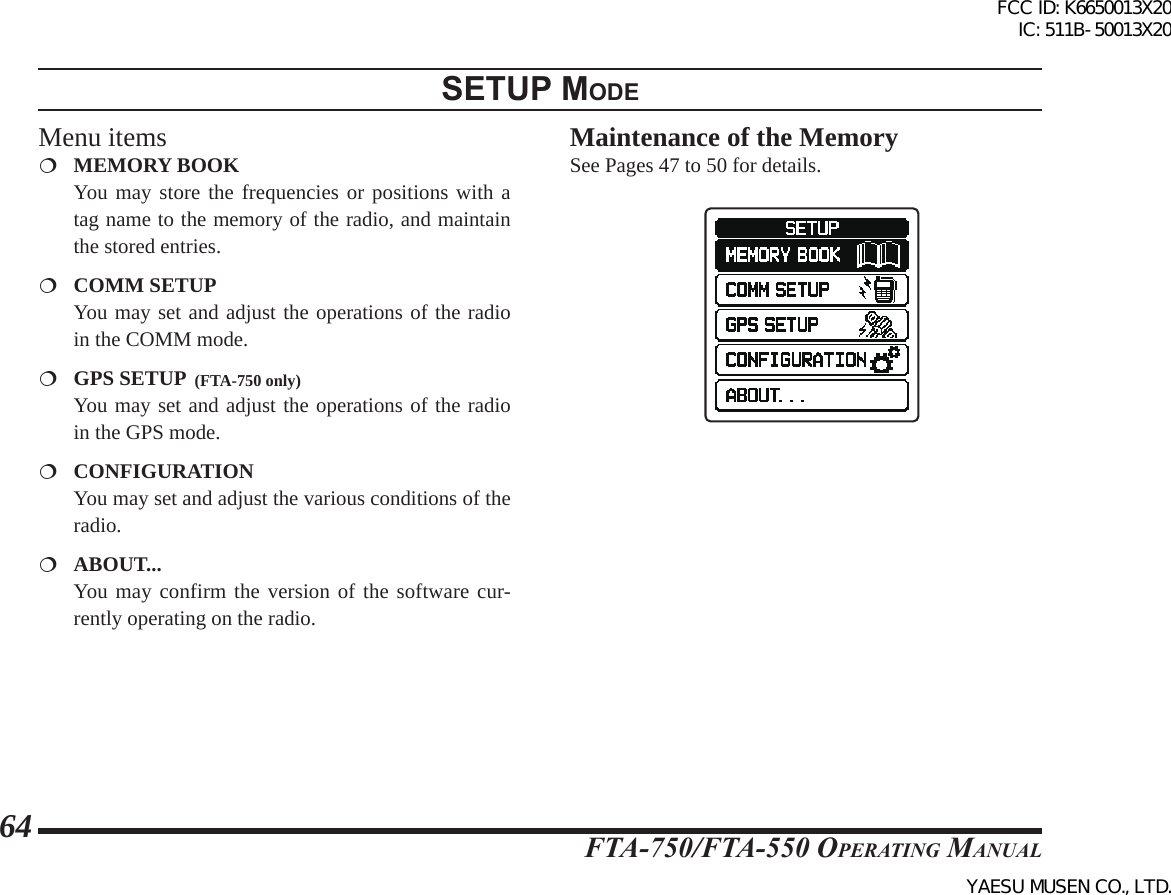
![FTA-750/FTA-550 OperATing MAnuAl22Operation ModesThe FTA-750/FTA-550 op-erate in either of the modes below. You can switch the modes via the MENU screen displayed by pressing the [MENU] key on the front panel.When turning on the FTA-750/FTA-550, the last mode you have used before turning off will automati-cally be entered. COMM The basic operating mode for communication. Navi-gation through the NAV band is also performed on this mode. MR (MEMORY) This mode provides you with the ability to store and recall as many as 200 channels in the radio’s main memory bank. WX (USA version only) The receive mode for the VHF weather chan-nel broadcasts. 10 weather channels are pre-pro-grammed at the factory. GPS (FTA-750 only) The position information and status of the GPS sat-ellites according to the signals received by the built-in GPS unit are displayed during this mode. NAVI (FTA-750 only) Navigation to the waypoint (destination) memorized or manually input is carried out in this mode. SETUP This mode allows certain aspects of your radio’s configuration to be customized for your personal operating conditions.BasIc operatIonFCC ID: K6650013X20 IC: 511B-50013X20YAESU MUSEN CO., LTD.](https://usermanual.wiki/Yaesu-Musen/50013X20.Operational-Manual/User-Guide-2185162-Page-24.png)
![FTA-750/FTA-550 OperATing MAnuAl23BasIc operatIonConvenient menu itemsThe MENU screen also includes the following items which provide advanced and convenient usage of the FTA-750/FTA-550. TIMER You may use the FTA-750/FTA-550 as a count-down timer or a stopwatch through this menu. FUNCTION Enables and disables various functions such as scan and dual watch features through this menu.Resetting the RadioTo clear all memories and other settings to factory de-faults: 1. Press the [MENU] key to display the MENU screen.2. Select “SETUP” on the screen by pressing the [◄] or [►] key, and then press the [ENT] key.3. Select “CONFIGURA-TION” on the screen by pressing the [◄] or [►] key, and then press the [ENT] key.FCC ID: K6650013X20 IC: 511B-50013X20YAESU MUSEN CO., LTD.](https://usermanual.wiki/Yaesu-Musen/50013X20.Operational-Manual/User-Guide-2185162-Page-25.png)
![FTA-750/FTA-550 OperATing MAnuAl24BasIc operatIon4. Select “RESET” on the screen by pressing the [◄] or [►] key, and then press the [ENT] key.AF PITCH CONTLOCK SELECTMIC SELECTSIDE TONEVOXVOX SENSEVOX DELAYRESETCONFIGURATION5. Select “FACTORY” on the screen by pressing the [◄] or [►] key, and then press the [ENT] key.RESETMEMORYFUNCTIONCONFIGURATIONFACTORYCONFIGURATION6. Select “OK?” on the screen by pressing the [◄] or [►] key, and then press the [ENT] key.RESETFACTORYCANCELCONFIGURATIONOK? The initialization will start and then “COMPLETED!” will be displayed after the radio returns to factory default.FCC ID: K6650013X20 IC: 511B-50013X20YAESU MUSEN CO., LTD.](https://usermanual.wiki/Yaesu-Musen/50013X20.Operational-Manual/User-Guide-2185162-Page-26.png)
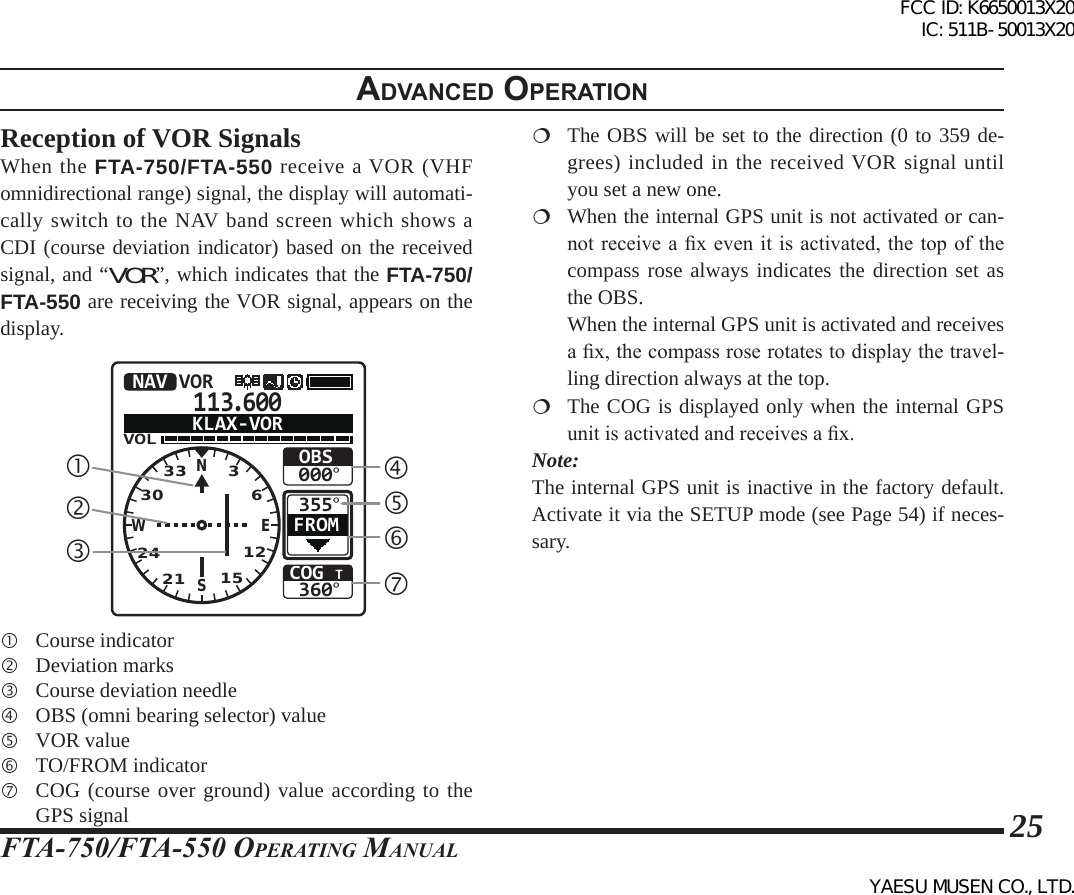
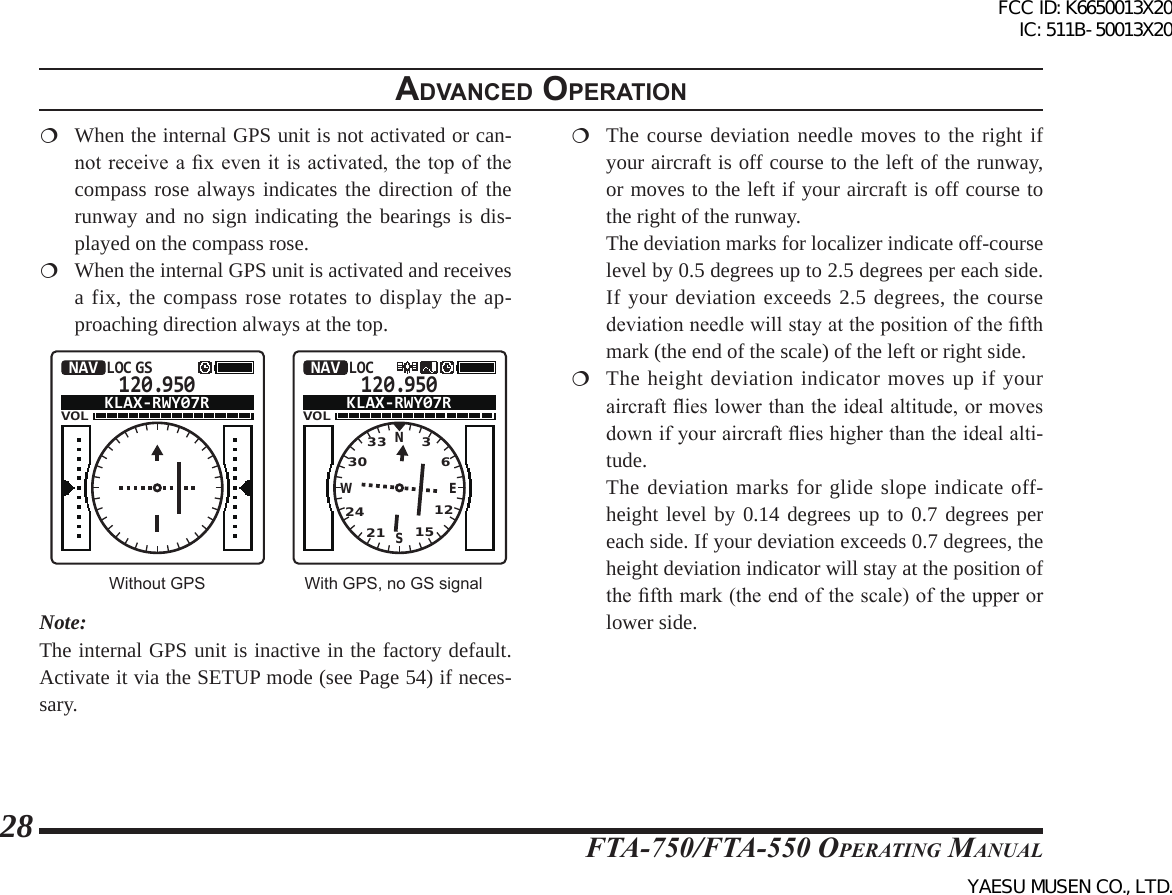
![FTA-750/FTA-550 OperATing MAnuAl26Flying to a desired courseIf you know the direction of your destination from a specic VOR station, you may use the CDI to correct your course of ying.1. Set the frequency to the desired VOR station.2. Press the [◄] or [►] key to select “OBS” on the screen.113.600VOL355°OBS355°NAV VORFROMKLAX-VORNSEW332421 151230363. Enter the course from the VOR station with the keypad or the DIAL knob.113.600VOL355°OBS000°NAV VORFROMKLAX-VORNSEW332421 151230364. Correct your course until the course deviation needle on the screen is at the center of the compass rose. The course deviation needle moves to the right if your aircraft is off course to the left of the OBS, or moves to the left if your aircraft is off course to the right of the OBS. The deviation marks indicate off-course level by 2 degrees up to 10 degrees per each side. If your deviation exceeds 10 degrees, the course deviation needle will stay at the position of the fth mark (the end of the scale) of the left or right side.Flying to a VOR station1. Set the frequency to the desired VOR station.2. Press the [◄] or [►] key to select “OBS” on the screen.113.600VOLCOG T360°355°OBS355°NAV VORFROMKLAX-VORNSEW332421 15123036adVanced operatIonFCC ID: K6650013X20 IC: 511B-50013X20YAESU MUSEN CO., LTD.](https://usermanual.wiki/Yaesu-Musen/50013X20.Operational-Manual/User-Guide-2185162-Page-28.png)
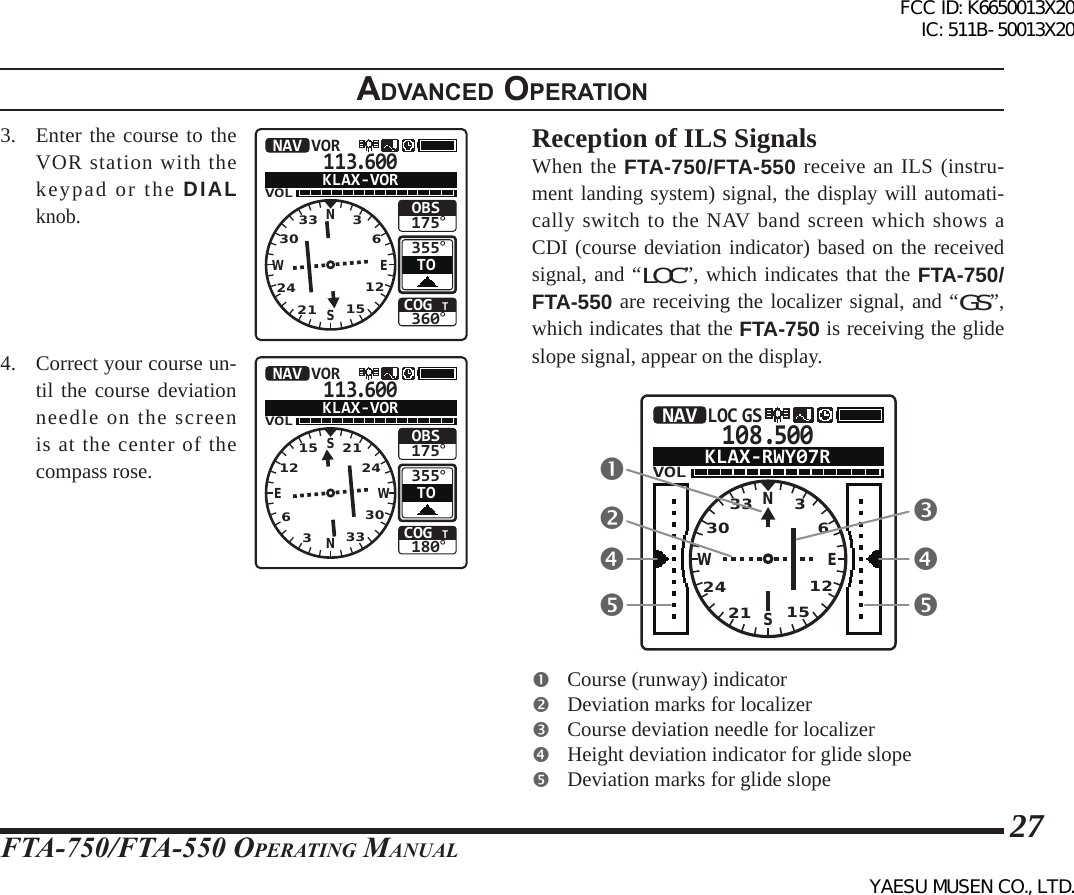
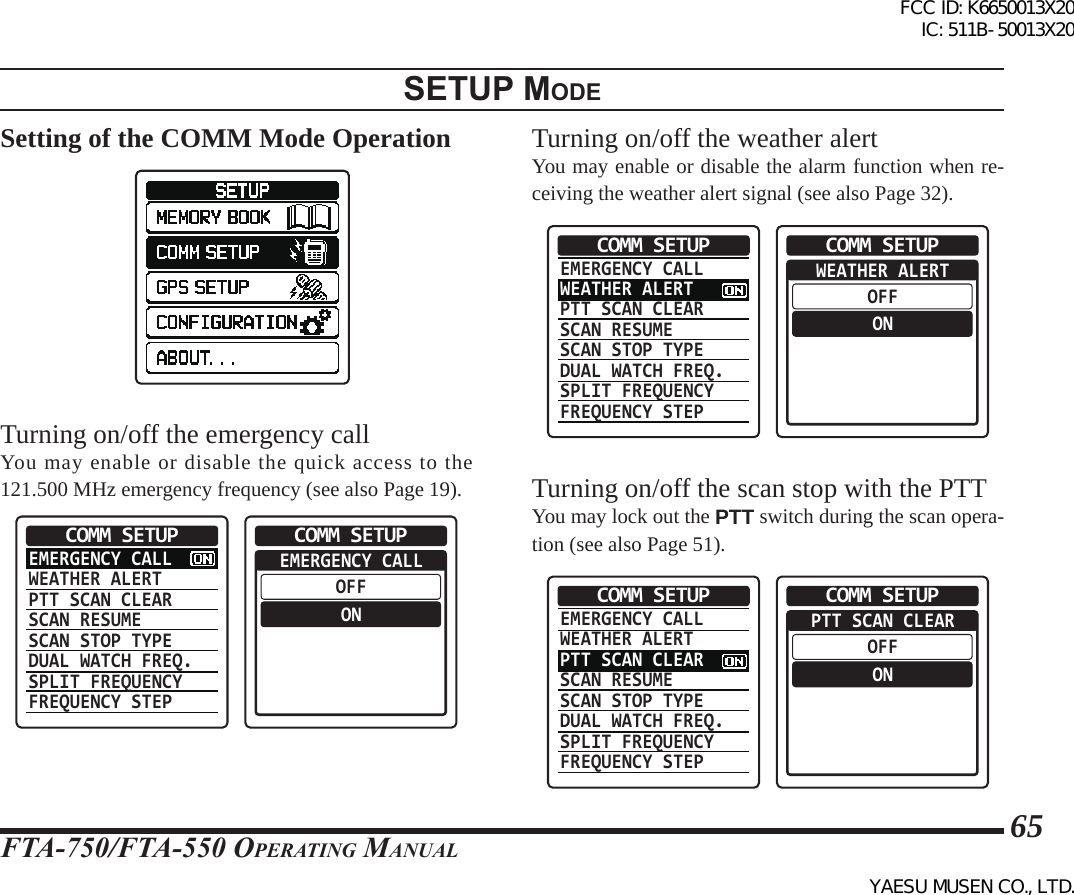
![FTA-750/FTA-550 OperATing MAnuAl29adVanced operatIonSplit OperationThe split operation feature allows you to transmit a call to a ight service station using the COM band frequen-cies, while receiving a station in the NAV band. VOR stations equipped with this capability typically are shown, on navigation charts, with the voice calling fre-quency in parenthesis above the navigation frequency.Programming a transmit frequency1. Press the [MENU] key to display the MENU screen.2. Select “SETUP” on the screen by pressing the [◄] or [►] key, and then press the [ENT] key.3. Select “COMM SET-UP” on the screen by pressing the [◄] or [►] key, and then press the [ENT] key.4. Select “SPLIT FRE-QUENCY” on the screen by pressing the [◄] or [►] key, and then press the [ENT] key.EMERGENCY CALLWEATHER ALERTPTT SCAN CLEARSCAN RESUMESCAN STOP TYPEDUAL WATCH FREQ.SPLIT FREQUENCYFREQUENCY STEPCOMM SETUP5. Enter the transmit frequency with the keypad.COMM SETUPSPLIT FREQUENCYFINISH122.100MHzFCC ID: K6650013X20 IC: 511B-50013X20YAESU MUSEN CO., LTD.](https://usermanual.wiki/Yaesu-Musen/50013X20.Operational-Manual/User-Guide-2185162-Page-31.png)
![FTA-750/FTA-550 OperATing MAnuAl30adVanced operatIon6. Select “FINISH” on the screen by pressing the [◄] or [►] key, and then press the [ENT] key. The frequency will be determined and the dis-play will return to the COMM SETUP menu.COMM SETUPSPLIT FREQUENCYFINISH122.100MHzNote: Either of the COM band frequencies only can be set as the transmit frequency.Activating the split mode1. Press the [MENU] key to display the MENU screen.2. Select “FUNC” on the screen by pressing the [◄] or [►] key, and then press the [ENT] key.3. Select “SPLIT” on the screen by pressing the [◄] or [►] key, and then press the [ENT] key.SCAN MEMDUAL WATCHSCANANLSPLITLOGGEROFFOFFOFFOFFOFFOFFFUNCTION If “ON” is displayed in the right hand of “SPLIT”, the FTA-750/FTA-550 are already in the split mode. The display will return to the previous screen and “±”, which indicates that the FTA-750/FTA-550 are in the split mode, will appear on the display.FCC ID: K6650013X20 IC: 511B-50013X20YAESU MUSEN CO., LTD.](https://usermanual.wiki/Yaesu-Musen/50013X20.Operational-Manual/User-Guide-2185162-Page-32.png)
![FTA-750/FTA-550 OperATing MAnuAl31adVanced operatIonOperating in the split mode To transmit a voice call during the NAV band recep-tion, press and hold the PTT switch, and speak into the microphone. The COM band screen will be dis-played with the frequency you have set. To exit the split mode, select “SPLIT” and press the [ENT] key in the FUNCTION menu.SCAN MEMDUAL WATCHSCANANLSPLITLOGGEROFFOFFOFFOFF ONOFFFUNCTIONReception of Weather Channel Broadcasts (USA version only)The FTA-750/FTA-550 can receive VHF weather chan-nel broadcasts, which may assist your flight planning. The FTA-750/FTA-550 include a special bank capable of storing 10 weather channels, which simplifies your access when you are in an unfamiliar location. To receive weather channels, press the [MENU] key, select “WEATHER” on the screen by pressing the [◄] or [►] key, and then press the [ENT] key. “WX”, which in-dicates that the FTA-750/FTA-550 are in the WX mode, appears on the display. The last channel you have tuned will be re-ceived.162.475VOL1:162.550 WX012:162.400 WX023:162.475 WX034:162.425 WX045:162.450 WX056:162.500 WX06BUSYWX03WXFCC ID: K6650013X20 IC: 511B-50013X20YAESU MUSEN CO., LTD.](https://usermanual.wiki/Yaesu-Musen/50013X20.Operational-Manual/User-Guide-2185162-Page-33.png)
![FTA-750/FTA-550 OperATing MAnuAl32adVanced operatIon You can also select a weather channel from the pre-programmed list with the DIAL selector knob. To conrm the weather channel frequency se-lection, press the [ENT] key.162.475VOL1:162.550 WX012:162.400 WX023:162.475 WX034:162.425 WX045:162.450 WX056:162.500 WX06BUSYWX03WX To exit the WX mode, press the [MENU] key, se-lect the mode other than “WEATHER” on the screen by pressing the [◄] or [►] key, and then press the [ENT] key.Weather alert receptionIn the event of extreme weather disturbances, such as storms and hurricanes, the NOAA (National Oceanic and Atmospheric Administration) sends a weather alert accompanied by a 1050 Hz tone and subsequent weather report on one of the NOAA weather channels. When the radio receives the weather alert on the oper-ating frequency, it displays a warning as below on the screen and continues to make alarm sounds until either of the keys is pressed.VOLBUSYWX03Radio receivedWeather Alert!WARNINGPress any keys162.475WXYou may enable or disable the alarm function when re-ceiving the weather alert signal via the COMM SETUP menu, if desired. See Page 65 for details.FCC ID: K6650013X20 IC: 511B-50013X20YAESU MUSEN CO., LTD.](https://usermanual.wiki/Yaesu-Musen/50013X20.Operational-Manual/User-Guide-2185162-Page-34.png)
![FTA-750/FTA-550 OperATing MAnuAl33adVanced operatIonDual Watch OperationThe dual watch feature automatically checks for activity on the P-ch (priority channel) set via the COMM SETUP menu while you are operating on another channel. Dur-ing the dual watch operation, the current channel and the P-ch will be polled alternately for a 200 ms interval.Setting the P-ch1. Press the [MENU] key to display the MENU screen.2. Select “SETUP” on the screen by pressing the [◄] or [►] key, and then press the [ENT] key.3. Select “COMM SET-UP” on the screen by pressing the [◄] or [►] key, and then press the [ENT] key.4. Select “DUAL WATCH FREQ.” on the screen by pressing the [◄] or [►] key, and then press the [ENT] key.EMERGENCY CALLWEATHER ALERTPTT SCAN CLEARSCAN RESUMESCAN STOP TYPEDUAL WATCH FREQ.SPLIT FREQUENCYFREQUENCY STEPCOMM SETUP5. Enter the frequency you want to poll, with the keypad.COMM SETUPDUAL WATCH FREQ.FINISH---.---MHzFCC ID: K6650013X20 IC: 511B-50013X20YAESU MUSEN CO., LTD.](https://usermanual.wiki/Yaesu-Musen/50013X20.Operational-Manual/User-Guide-2185162-Page-35.png)
![FTA-750/FTA-550 OperATing MAnuAl34adVanced operatIon6. Select “FINISH” on the screen by pressing the [◄] or [►] key, and then press the [ENT] key. The frequency will be determined and the dis-play will return to the COMM SETUP menu.COMM SETUPDUAL WATCH FREQ.FINISH127.600MHzStarting the dual watch1. Press the [MENU] key to display the MENU screen.2. Select “FUNC” on the screen by pressing the [◄] or [►] key, and then press the [ENT] key.3. Select “DUAL WATCH” on the screen by pressing the [◄] or [►] key, and then press the [ENT] key.SCAN MEMDUAL WATCHSCANANLSPLITLOGGEROFFOFFOFFOFFOFFOFFFUNCTION If “ON” is displayed in the right hand of “DUAL WATCH”, the FTA-750/FTA-550 are perform-ing the dual watch. The display will return to the previous screen and “DW”, which indicates that the FTA-750/FTA-550 are performing the dual watch, will appear on the display. When the radio encounters a signal in the current channel, it still polls both channels alternately with longer staying time on the current channel. When the radio encounters a signal in the P-ch, the radio stays on the P-ch until the signal disappears, and the frequency indication on the display blinks. After the signal disappears, the dual watch resumes.FCC ID: K6650013X20 IC: 511B-50013X20YAESU MUSEN CO., LTD.](https://usermanual.wiki/Yaesu-Musen/50013X20.Operational-Manual/User-Guide-2185162-Page-36.png)
![FTA-750/FTA-550 OperATing MAnuAl35adVanced operatIon To stop the dual watch, select “DUAL WATCH” and press the [ENT] key in the FUNCTION menu.SCAN MEMDUAL WATCHSCANANLSPLITLOGGEROFF ONOFFOFFOFFOFFFUNCTION Timer Mode OperationThe FTA-750/FTA-550 are provided a “Stopwatch” timer and a “Countdown” timer. These can be used for a variety of time-keeping purposes.Even while the timer is in operation, you can move to the other operation modes to receive, transmit, scan, etc.Using the stopwatch timer1. Press the [MENU] key to display the MENU screen.2. Select “TIMER” on the screen by pressing the [◄] or [►] key, and then press the [ENT] key.FCC ID: K6650013X20 IC: 511B-50013X20YAESU MUSEN CO., LTD.](https://usermanual.wiki/Yaesu-Musen/50013X20.Operational-Manual/User-Guide-2185162-Page-37.png)
![FTA-750/FTA-550 OperATing MAnuAl36adVanced operatIon3. Select “STOPWATCH” on the screen by pressing the [◄] or [►] key, and then press the [ENT] key.127.300VOLBUSYCOUNTDOWNTIMERSTOPWATCH4. To start the counting, select “START” on the screen by pressing the [◄] or [►] key, and then press the [ENT] key. The displayed time will increase and “START” changes to “STOP”.127.300VOLBUSYRESETSTOPWATCHTIMERSTART00:00:00127.300VOLBUSYRESETSTOPWATCHTIMERSTOP00:00:035. To stop the counting, select “STOP” and press the [ENT] key. To resume the count-ing, select “START” changed from “STOP” and press the [ENT] key again.127.300VOLBUSYRESETSTOPWATCHTIMERSTART00:01:536. To clear the count, select “RESET” on the screen by pressing the [◄] or [►] key, and then press the [ENT] key.127.300VOLBUSYRESETSTOPWATCHTIMERSTART00:01:53 If “RESET” is determined while counting, the timer will continue to count from “00:00:00”. If “RESET” is determined while stopping, the dis-played time will be changed to “00:00:00” and the timer will keep stopping.FCC ID: K6650013X20 IC: 511B-50013X20YAESU MUSEN CO., LTD.](https://usermanual.wiki/Yaesu-Musen/50013X20.Operational-Manual/User-Guide-2185162-Page-38.png)
![FTA-750/FTA-550 OperATing MAnuAl37adVanced operatIonUsing the countdown timer1. Press the [MENU] key to display the MENU screen.2. Select “TIMER” on the screen by pressing the [◄] or [►] key, and then press the [ENT] key.3. Select “COUNTDOWN” on the screen by pressing the [◄] or [►] key, and then press the [ENT] key.127.300VOLBUSYCOUNTDOWNTIMERSTOPWATCH4. Input the time with the keypad or the DIAL selector knob, and then press the [ENT] key. Press the [◄] or [►] key to move the cursor to hour, minute, or sec-ond. Press the [BACK] key to cancel the input time.127.300VOLBUSYRESETCOUNTDOWNTIMERSTART00:00:005. To start the counting, select “START” on the screen by pressing the [◄] or [►] key, and then press the [ENT] key. The displayed time will decrease and “START” changes to “STOP”.127.300VOLBUSYRESETCOUNTDOWNTIMERSTART00:04:00127.300VOLBUSYRESETCOUNTDOWNTIMERSTOP00:03:556. To stop the counting, select “STOP” and press the [ENT] key. To resume the count-ing, select “START” changed from “STOP” and press the [ENT] key again.127.300VOLBUSYRESETCOUNTDOWNTIMERSTART00:03:42FCC ID: K6650013X20 IC: 511B-50013X20YAESU MUSEN CO., LTD.](https://usermanual.wiki/Yaesu-Musen/50013X20.Operational-Manual/User-Guide-2185162-Page-39.png)
![FTA-750/FTA-550 OperATing MAnuAl38adVanced operatIon7. To clear the count, select “RESET” on the screen by pressing the [◄] or [►] key, and then press the [ENT] key. The displayed time will be changed to “00:00:00” and the timer will stop.127.300VOLBUSYRESETSTOPWATCHTIMERSTOP00:00:03 When the countdown reaches to “00:00:00”, the beeps will continu-ously sound and “Timer Alarm!” will be dis-played on the screen. Press any key to stop the beeps.127.300VOLBUSYTIMERTimer Alarm!Press any keys You can set the timer to alarm without beeps. Select “OFF” on the item “TIMER ALARM” of the CON-FIGURATION menu in the SETUP mode.DIMMERLAMPCONTRASTKEY BEEPTX TOTTIMER ALARMBATTERY SAVEAF PITCH CONTCONFIGURATION TIMER ALARMONOFFCONFIGURATIONFCC ID: K6650013X20 IC: 511B-50013X20YAESU MUSEN CO., LTD.](https://usermanual.wiki/Yaesu-Musen/50013X20.Operational-Manual/User-Guide-2185162-Page-40.png)
![FTA-750/FTA-550 OperATing MAnuAl41adVanced operatIonSide Tone ControlWhen utilizing an external headset, you may monitor your own voice talking to the microphone through the headphone. To activate the monitoring of your voice (side tone), select one of the following side tone level on the item “SIDE TONE” of the CONFIGURATION menu in the SETUP mode.MIN/LEVEL1/LEVEL2/MAXAF PITCH CONTLOCK SELECTMIC SELECTSIDE TONEVOXVOX SENSEVOX DELAYRESETCONFIGURATION SIDE TONEOFFMINLEVEL1LEVEL2MAXCONFIGURATION To change the side tone level temporarily during the monitoring, press the [◄] or [►] key or rotate the DIAL selector knob when pressing and holding the PTT switch.ANL FeatureFor reduction of impulse noise, such as that produced by an engine’s ignition system, the ANL (automatic noise limiter) feature may prove helpful. To activate the ANL, select “ANL” and press the [ENT] key in the FUNCTION menu.SCAN MEMDUAL WATCHSCANANLSPLITLOGGEROFFOFFOFFOFFOFFOFFFUNCTIONFCC ID: K6650013X20 IC: 511B-50013X20YAESU MUSEN CO., LTD.](https://usermanual.wiki/Yaesu-Musen/50013X20.Operational-Manual/User-Guide-2185162-Page-43.png)
![FTA-750/FTA-550 OperATing MAnuAl42adVanced operatIonLock FunctionThis function prevents accidental changes to the fre-quency setting and the keypad controls.Setting the lockout congurationYou may choose the controls to be locked. 1. Press the [MENU] key to display the MENU screen.2. Select “SETUP” on the screen by pressing the [◄] or [►] key, and then press the [ENT] key.3. Select “CONFIGURATION” on the screen by pressing the [◄] or [►] key, and then press the [ENT] key.4. Select “LOCK SELECT” on the screen by press-ing the [◄] or [►] key, and then press the [ENT] key.AF PITCH CONTLOCK SELECTMIC SELECTSIDE TONEVOXVOX SENSEVOX DELAYRESETCONFIGURATION5. Select one of the fol-lowing lock configura-tion by pressing the [◄] or [►] key, and then press the [ENT] key.KEY LOCK / DIAL LOCK / ALL LOCKLOCK SELECTKEY LOCKDIAL LOCKALL LOCKCONFIGURATION The setting will be determined and the display will return to the CONFIGURATION menu.FCC ID: K6650013X20 IC: 511B-50013X20YAESU MUSEN CO., LTD.](https://usermanual.wiki/Yaesu-Musen/50013X20.Operational-Manual/User-Guide-2185162-Page-44.png)
![FTA-750/FTA-550 OperATing MAnuAl43adVanced operatIonActivating the lock feature Press and hold the [ ] key. According to the setting of the lockout configu-ration, either of “KEY LOCK”, “DIAL LOCK”, or “ALL LOCK” will ap-pear on the screen for 2 seconds and then the display will return to the previous screen. During the FTA-750/FTA-550 are locked, the con-trols with the DIAL selector knob and/or the keys except the PTT switch, the POWER switch, and the [121.5] key are disabled. If the DIAL selector knob is rotated or any of the keys is pressed, either of “DIAL LOCK”, “KEY LOCK”, or “ALL LOCK” will appear on the screen for 2 seconds and then the display will return to the previous screen. To turn the lock feature off, press and hold the [ ] key again. “UNLOCK” will ap-pear on the screen for 2 seconds and then the display will return to the previous screen.FCC ID: K6650013X20 IC: 511B-50013X20YAESU MUSEN CO., LTD.](https://usermanual.wiki/Yaesu-Musen/50013X20.Operational-Manual/User-Guide-2185162-Page-45.png)
![FTA-750/FTA-550 OperATing MAnuAl44memory operatIonThe FTA-750/FTA-550 provide 200 user-programma-ble memories which can hold sets of information about channels such as its channel frequency, position infor-mation, channel tag (name) up to 15 characters, group label, etc. The stored channels can be assigned to the priority group which can be named with up to 10 characters.The FTA-750/FTA-550’s memory system allows you to store, label, and recall channel frequencies you may use frequently. Recalling the Memories To enter the MR (mem-ory recall) mode from the COMM mode, press the [MENU] key to dis-play the MENU screen, select “MEMORY” on the screen by pressing the [◄] or [►] key, and then press the [ENT] key. The frequency and tag name of the last chan-nel and “MR”, which indicates that the FTA-750/FTA-550 are in the MR mode, will ap-pear on the upper area of the display. 133.800VOL2:132.400 Las VegaBUSYLos AngelesMR If the last channel is assigned to the priority group, “GRP”, which indicates that the channel belongs to the priority group of the memory, will appear below “MR”. The list of memory channels you have used will also appear below the VOL meter on the display. You may select and move to a channel in the list by pressing the [◄] or [►] key followed by the [ENT] key.FCC ID: K6650013X20 IC: 511B-50013X20YAESU MUSEN CO., LTD.](https://usermanual.wiki/Yaesu-Musen/50013X20.Operational-Manual/User-Guide-2185162-Page-46.png)
![FTA-750/FTA-550 OperATing MAnuAl45 To recall a channel other than the last one, press the [ENT] key while the cursor is on the tag name. The MEMORY BOOK screen listing the following two groups appears on the display.ALLPRIORITYMEMORY BOOKALL ... Group including all the memory channelsPRIORITY ... Group of memory channels you have specied when storing Select a group rst that the desired channel is assigned by pressing the [◄] or [►] key followed by the [ENT] key, then select a chan-nel from the channel list of the group in the same way.ALLMEMORY BOOK133.800 Los Angel121.650 KLAX-TWR121.750 KLAX-DEP120.950 Kansas124.300 Las Vegas125.200 KLAS-APP119.850 KLAS-TWR124.050 KLAS-GND If you have not yet stored any memory channel, a dialog box titled “No Address” will appear, which asks whether you make an entry. Select “YES” and press the [ENT] key to store channel informa-tion. See Page 47 for detailed procedure of storing channel information.MEMORY BOOKNONo AddressYESDo you make amemory book? To exit the MR mode, press the [COMM] key.memory operatIonFCC ID: K6650013X20 IC: 511B-50013X20YAESU MUSEN CO., LTD.](https://usermanual.wiki/Yaesu-Musen/50013X20.Operational-Manual/User-Guide-2185162-Page-47.png)
![FTA-750/FTA-550 OperATing MAnuAl46memory operatIonInstant Storage Select a desired fre-quency in the COMM mode, then press the [SAVE] key. The MEMORY BOOK form appears on the display, with the channel name (tag), frequency, group tag, and position in-formation (if exists) already lled.Name: ------Group:ALLFreq.:127.600MHzLAT --˚--.----LON ---˚--.----Shift:ONMEMORY BOOKPress [SAVE] key If you need no change to the items on the form, press the [SAVE] key. The channel information will be stored into the memory and the display returns to the COMM mode. If you want to change or input either of the items in the form, press the [◄] or [►] key to select the item, then press the [ENT] key. Input letters and/or numerics with the keypad or the DIAL selector knob, or select a setting with the [◄] or [►] key, then press the [ENT] key. Press the [SAVE] key after all the inputs or changes have been done to store them into the memory. Press the [BACK] key to cancel the changes or inputs.Note: You cannot store weather channels to the memory by pressing the [SAVE] key during the WX mode. If you dial up or key in the weather station’s frequency manually in the COMM mode, you may store the fre-quency and other information with a custom tag name.FCC ID: K6650013X20 IC: 511B-50013X20YAESU MUSEN CO., LTD.](https://usermanual.wiki/Yaesu-Musen/50013X20.Operational-Manual/User-Guide-2185162-Page-48.png)
![FTA-750/FTA-550 OperATing MAnuAl47memory operatIonMaintenance of the MemoryAdding new addresses, editing the stored information, and deleting the stored addresses are allowed through the SETUP mode.Adding entries1. Press the [MENU] key to display the MENU screen.2. Select “SETUP” on the screen by pressing the [◄] or [►] key, and then press the [ENT] key.3. Select “MEMORY BOOK” on the screen by pressing the [◄] or [►] key, and then press the [ENT] key.4. Select the item you wish to view and/or modify by pressing the [◄] or [►] key, and then press the [ENT] key.ADDEDITDELETEGROUP NAMEMEMORY BOOK5. Select the item, input letters and/or numer-ics, select a setting, and store the changes in the same way as the instant storage described previ-ously.Name: MEM001----------Group:ALLFreq.:---.---MHzLAT --˚--.----LON ---˚--.----Shift:OFFMEMORY BOOKFCC ID: K6650013X20 IC: 511B-50013X20YAESU MUSEN CO., LTD.](https://usermanual.wiki/Yaesu-Musen/50013X20.Operational-Manual/User-Guide-2185162-Page-49.png)
![FTA-750/FTA-550 OperATing MAnuAl48memory operatIonEditing the information1. Press the [MENU] key to display the MENU screen.2. Select “SETUP” on the screen by pressing the [◄] or [►] key, and then press the [ENT] key.3. Select “MEMORY BOOK” on the screen by pressing the [◄] or [►] key, and then press the [ENT] key.4. Select “EDIT” by press-ing the [◄] or [►] key, and then press the [ENT] key.ADDEDITDELETEGROUP NAMEMEMORY BOOK5. Press the [◄] or [►] key to select the group including the entry you want to edit, then press the [ENT] key.ALLPRIORITYMEMORY BOOKEDIT6. Press the [◄] or [►] key to select the entry you want to edit, then press the [ENT] key.ALLMEMORY BOOK CHICAGO DALLAS DAYTON DETROIT EL TORO FLORIDA GUATEMALAEDIT7. Select the item, input letters and/or numerics, select a setting, and then store the changes in the same way as the instant storage described previously.FCC ID: K6650013X20 IC: 511B-50013X20YAESU MUSEN CO., LTD.](https://usermanual.wiki/Yaesu-Musen/50013X20.Operational-Manual/User-Guide-2185162-Page-50.png)
![FTA-750/FTA-550 OperATing MAnuAl49memory operatIonDeleting the memory1. Press the [MENU] key to display the MENU screen.2. Select “SETUP” on the screen by pressing the [◄] or [►] key, and then press the [ENT] key.3. Select “MEMORY BOOK” on the screen by pressing the [◄] or [►] key, and then press the [ENT] key.4. Select “DELETE” by pressing the [◄] or [►] key, and then press the [ENT] key.ADDEDITDELETEGROUP NAMEMEMORY BOOK5. Press the [◄] or [►] key to select the group including the entry you want to delete, then press the [ENT] key.ALLPRIORITYMEMORY BOOKDELETE6. Press the [◄] or [►] key to select the entry you want to delete, and then press the [ENT] key.ALLMEMORY BOOK CHICAGO DALLAS DAYTON DETROIT EL TORO FLORIDA GUATEMALADELETE7. Select “OK?” on the screen by pressing the [◄] or [►] key, and then press the [ENT] key.DELETEDAYTONCANCELMEMORY BOOKOK? The display will return to the previous screen after the deletion of the entry from the memory.ALLMEMORY BOOK CHICAGO DALLAS DETROIT EL TORO FLORIDA GUATEMALA HONOLULUDELETEFCC ID: K6650013X20 IC: 511B-50013X20YAESU MUSEN CO., LTD.](https://usermanual.wiki/Yaesu-Musen/50013X20.Operational-Manual/User-Guide-2185162-Page-51.png)
![FTA-750/FTA-550 OperATing MAnuAl50memory operatIonEditing the group nameYou may assign a unique name to the priority group.1. Press the [◄] or [►] key to select “GROUP NAME” on the MEMORY BOOK menu, and then press the [ENT] key. 2. Enter the desired group name with the DIAL selector knob and/or the keypad followed by the [ENT] key. MEMORY BOOKGROUP NAMEFINISHPRIORITY--3. Select “FINISH” on the screen by pressing the [◄] or [►] key, and then press the [ENT] key. The group name will be determined and the display will return to the MEMORY BOOK menu.FCC ID: K6650013X20 IC: 511B-50013X20YAESU MUSEN CO., LTD.](https://usermanual.wiki/Yaesu-Musen/50013X20.Operational-Manual/User-Guide-2185162-Page-52.png)
![FTA-750/FTA-550 OperATing MAnuAl51scannIng operatIonThe FTA-750/FTA-550 allow you to scan active chan-nels automatically in the COMM (COM band), MR, and WX (USA version only) modes. It pauses on signals encountered, so you can talk to the station(s) on that fre-quency if you like.Scanning All Channels1. Set the radio to the COMM mode.2. Press the [MENU] key to display the MENU screen.3. Select “FUNC” on the screen by pressing the [◄] or [►] key, and then press the [ENT] key.4. Select “SCAN” on the screen by pressing the [◄] or [►] key, and then press the [ENT] key.SCAN MEMDUAL WATCHSCANANLSPLITLOGGEROFFOFFOFFOFFOFFOFFFUNCTION The scanning starts and the display returns to the COMM mode screen. The scanner searches a signal from the lower fre-quency to higher. When the scanner encounters a signal, the scanning pauses and the radio remains on that channel until the signal disappears, and the frequency indication on the display blinks. After the signal disappears, the scanning resumes. To stop the scanning, press the PTT switch, or select “SCAN” again in the FUNCTION menu. SCAN MEMDUAL WATCHSCANANLSPLITLOGGEROFFOFF ONOFFOFFOFFFUNCTION Next time the scanning is activated, the search will start from the frequency at which the scanning was stopped last time.FCC ID: K6650013X20 IC: 511B-50013X20YAESU MUSEN CO., LTD.](https://usermanual.wiki/Yaesu-Musen/50013X20.Operational-Manual/User-Guide-2185162-Page-53.png)
![FTA-750/FTA-550 OperATing MAnuAl52scannIng operatIonScanning the Specied ChannelsAmong the memory and weather channels, you may scan only those on which you want to see if a signal exists.Marking the channels1. Set the radio to the MR or WX mode and tune to the channel that you want to be scanned.2. Press the [MENU] key to display the MENU screen.3. Select “FUNC” on the screen by pressing the [◄] or [►] key, and then press the [ENT] key.4. Select “SCAN MEM” on the screen by pressing the [◄] or [►] key, and then press the [ENT] key.SCAN MEMDUAL WATCHSCANANLSPLITLOGGEROFFOFFOFFOFFOFFOFFFUNCTION The current channel is marked to be scanned and the “MEM” icon, which indicates that the channel is the target of scanning, will ap-pear at the right side of the channel frequency when the display re-turns to the MR or WX mode screen.133.800VOL2:132.400 Las VegaBUSYLos AngelesMRMEM5. Repeat the steps 1 to 4 above to mark other channels as well.FCC ID: K6650013X20 IC: 511B-50013X20YAESU MUSEN CO., LTD.](https://usermanual.wiki/Yaesu-Musen/50013X20.Operational-Manual/User-Guide-2185162-Page-54.png)
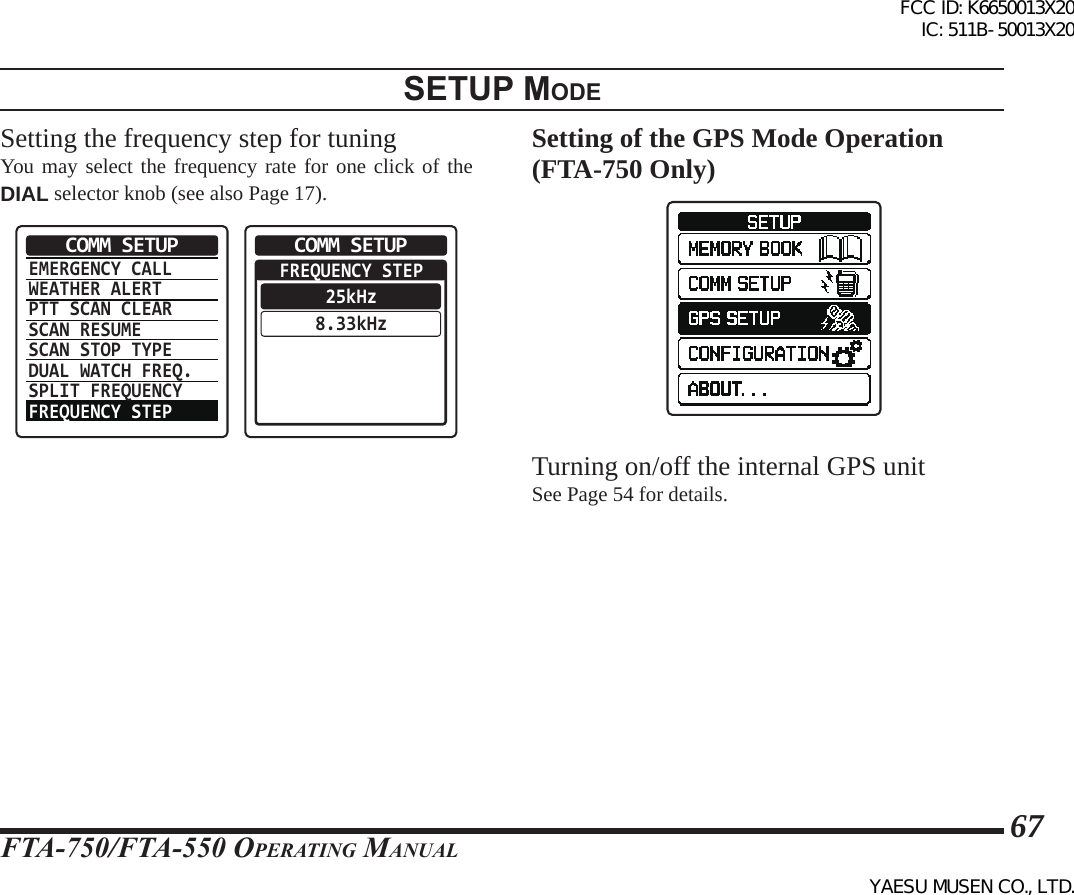
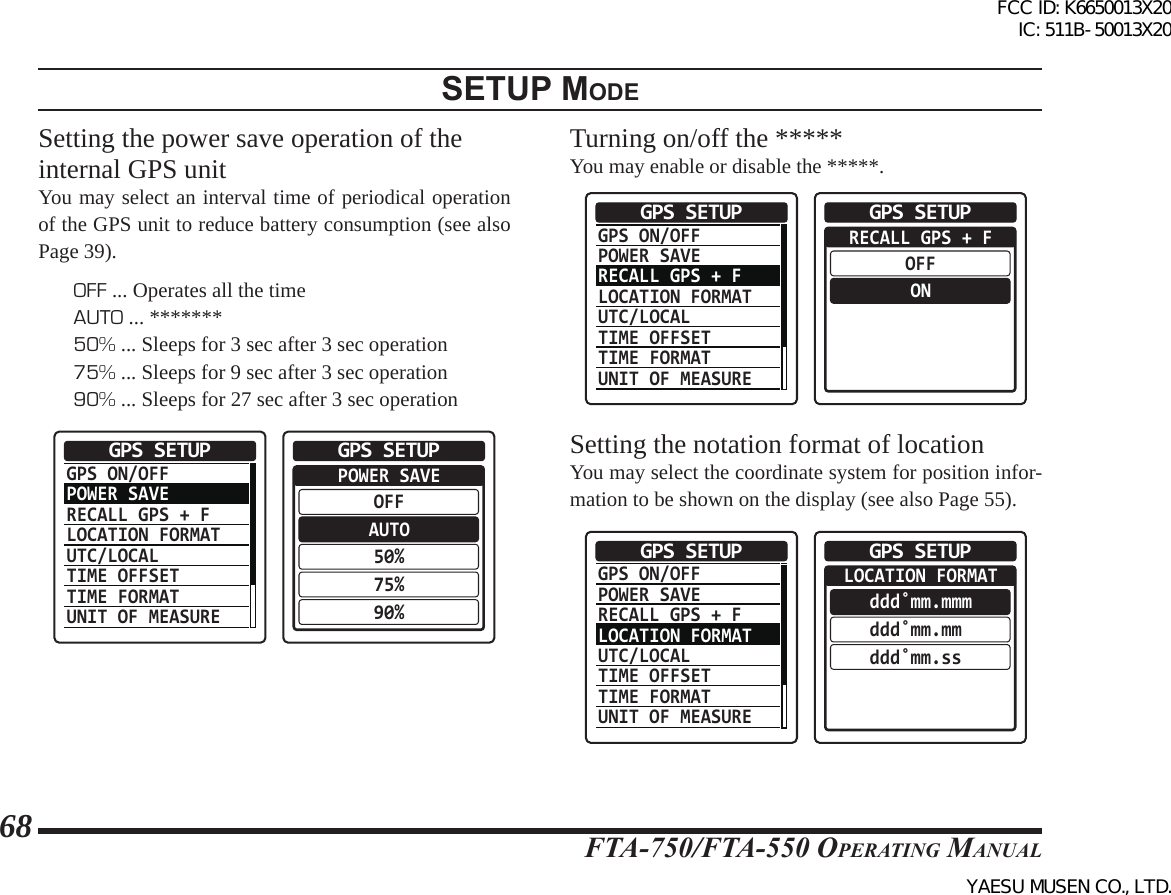
![FTA-750/FTA-550 OperATing MAnuAl54gps FunctIon (Fta-750 only)The FTA-750 has an internal GPS reception unit to receive and display the position information at all times. The position information of your own as well as recieved stations can be memorized and utiliezd later for navigation. Activating the GPS UnitIn factory default, the GPS unit is set to OFF to save the power consumption. Switch the unit to ON to use the GPS function with the procedure below.1. Press the [MENU] key to display the MENU screen.2. Select “SETUP” on the screen by pressing the [◄] or [►] key, and then press the [ENT] key.3. Select “GPS SETUP” on the screen by pressing the [◄] or [►] key, and then press the [ENT] key.4. Select “GPS ON/OFF” on the screen by press-ing the [◄] or [►] key, and then press the [ENT] key.GPS ON/OFFPOWER SAVERECALL GPS + FLOCATION FORMATUTC/LOCALTIME OFFSETTIME FORMATUNIT OF MEASUREGPS SETUP5. Select “ON” on the screen by pressing the [◄] or [►] key, and then press the [ENT] key. The GPS unit is set to ON and the display will return to the GPS SETUP menu.GPS ON/OFFOFFONGPS SETUPFCC ID: K6650013X20 IC: 511B-50013X20YAESU MUSEN CO., LTD.](https://usermanual.wiki/Yaesu-Musen/50013X20.Operational-Manual/User-Guide-2185162-Page-56.png)
![FTA-750/FTA-550 OperATing MAnuAl55gps FunctIon (Fta-750 only)Displaying the Position InformationYou can choose the way to display the position information from three types; numerical, compass, and numerical with GPS status.Notes: You may change the unit of displayed measure-ments via the SETUP mode. You may set the time area and offset via the SETUP mode. The position information will be displayed with the screen type you have selected last time before switching the operation mode or turning off the ra-dio.Numerical display1. Press the [MENU] key to display the MENU screen.2. Select “GPS” on the screen by pressing the [◄] or [►] key, and then press the [ENT] key.3. Select “GPS INFO” on the screen by pressing the [◄] or [►] key, and then press the [ENT] key.MARK POSITIONGPS INFOCOMPASSGPS STATUSGPS The latitude and lon-gitude of your current position, COG (course over ground), SOG (speed over ground), altitude, and the date will be displayed below the VOL meter on the screen.133.800GRPMRVOLLAT/LON 23°56.890N123°56.890WCOG095°Oct/25 09:56AMSOGKT095 ALTM0956.8BUSYMEMDATEKLAX-ATISFCC ID: K6650013X20 IC: 511B-50013X20YAESU MUSEN CO., LTD.](https://usermanual.wiki/Yaesu-Musen/50013X20.Operational-Manual/User-Guide-2185162-Page-57.png)
![FTA-750/FTA-550 OperATing MAnuAl56gps FunctIon (Fta-750 only)Compass display1. Press the [MENU] key to display the MENU screen.2. Select “GPS” on the screen by pressing the [◄] or [►] key, and then press the [ENT] key.3. Select “COMPASS” on the screen by pressing the [◄] or [►] key, and then press the [ENT] key.MARK POSITIONGPS INFOCOMPASSGPS STATUSGPS The compass with your traveling direc-tion always at the top, COG (course over ground), SOG (speed over ground), altitude, and the date will be dis-played below the VOL meter on the screen. 133.800VOLSOGkph360 Oct/2509:56AMCOG T360°ALTft10000BUSYGRPMRKLAX-ATISNumerical display with GPS status1. Press the [MENU] key to display the MENU screen.2. Select “GPS” on the screen by pressing the [◄] or [►] key, and then press the [ENT] key.3. Select “GPS STATUS” on the screen by press-ing the [◄] or [►] key, and then press the [ENT] key.MARK POSITIONGPS INFOCOMPASSGPS STATUSGPS The latitude and lon-gitude of your current position, a radar scope showing the position of captured GPS satellites, bars indicating the sig-nal strength of captured GPS satellites, and the date will be displayed below the VOL meter on the screen.133.800VOLBUSYGRPMRKLAX-ATISLAT/LON 23°56.890N123°56.890WOct/25 09:56AMDATESTATUSSEARCHFCC ID: K6650013X20 IC: 511B-50013X20YAESU MUSEN CO., LTD.](https://usermanual.wiki/Yaesu-Musen/50013X20.Operational-Manual/User-Guide-2185162-Page-58.png)
![FTA-750/FTA-550 OperATing MAnuAl57gps FunctIon (Fta-750 only)Memorizing the Position InformationYou can save your position information at a certain point of time in the memory book of the radio.1. Press the [MENU] key to display the MENU screen.2. Select “GPS” on the screen by pressing the [◄] or [►] key, and then press the [ENT] key.3. Select “MARK POSI-TION” on the screen by pressing the [◄] or [►] key, and then press the [ENT] key.MARK POSITIONGPS INFOCOMPASSGPS STATUSGPS The MARK POSITION form appears on the display, with the name (tag), frequency, group tag, and current posi-tion information already lled.Name: MARK001Group:ALLFreq.:133.800MHzLAT 33˚56.325NLON 118˚24.225WGPSPress [SAVE] keyMARK POSITION If you need no change to the items on the form, press the [SAVE] key. The position information will be stored into the memory and the display returns to the screen displayed before entering the menu mode. If you want to change or input either of the items in the form, press the [◄] or [►] key to select the item, then press the [ENT] key. Input letters and/or numerics with the keypad or the DIAL selector knob, then press the [ENT] key. Press the [SAVE] key after all the inputs or changes have been done to store them into the memory. Press the [BACK] key to cancel the changes or in-puts.FCC ID: K6650013X20 IC: 511B-50013X20YAESU MUSEN CO., LTD.](https://usermanual.wiki/Yaesu-Musen/50013X20.Operational-Manual/User-Guide-2185162-Page-59.png)
![FTA-750/FTA-550 OperATing MAnuAl58gps FunctIon (Fta-750 only)Recording the Position InformationYou can save your current position information in the memory of the radio at a regular interval.1. Press the [MENU] key to display the MENU screen.2. Select “FUNC” on the screen by pressing the [◄] or [►] key, and then press the [ENT] key.3. Select “LOGGER” on the screen by pressing the [◄] or [►] key, and then press the [ENT] key.SCAN MEMDUAL WATCHSCANANLSPLITLOGGEROFFOFFOFFOFFOFFOFFFUNCTION The recording starts and the display returns to the previous screen. You may change the interval time of recording via the SETUP mode.FCC ID: K6650013X20 IC: 511B-50013X20YAESU MUSEN CO., LTD.](https://usermanual.wiki/Yaesu-Musen/50013X20.Operational-Manual/User-Guide-2185162-Page-60.png)
![FTA-750/FTA-550 OperATing MAnuAl59WaypoInt naVIgatIon (Fta-750 only)The navigation feature of the FTA-750 is presented in a compass that helps you to gure out the destination and your traveling direction at a glance.The destination can be selected from the database of airports and VOR stations, memory channels, and the list of points you have selected previously, or directly specied.Notes: Be sure that the internal GPS unit has been activated before using the navigation. The navigation does not work when insufficient number of GPS satellites are captured to obtain your position.Entering the Navigation (NAVI) Mode Select “NAVI” on the MENU screen by press-ing the [◄] or [►] key, and then press the [ENT] key. The compass screen including the destination you have selected last time will be displayed if you did not reach there before switching the operation mode or turning off the radio.133.800VOLSOGkph360COG T360°DSTkm10KLAXBUSYKLAX-ATIS Course indicator Destination indicator Tag name of the destination DST (distance) COG (course over ground) SOG (speed over ground)FCC ID: K6650013X20 IC: 511B-50013X20YAESU MUSEN CO., LTD.](https://usermanual.wiki/Yaesu-Musen/50013X20.Operational-Manual/User-Guide-2185162-Page-61.png)
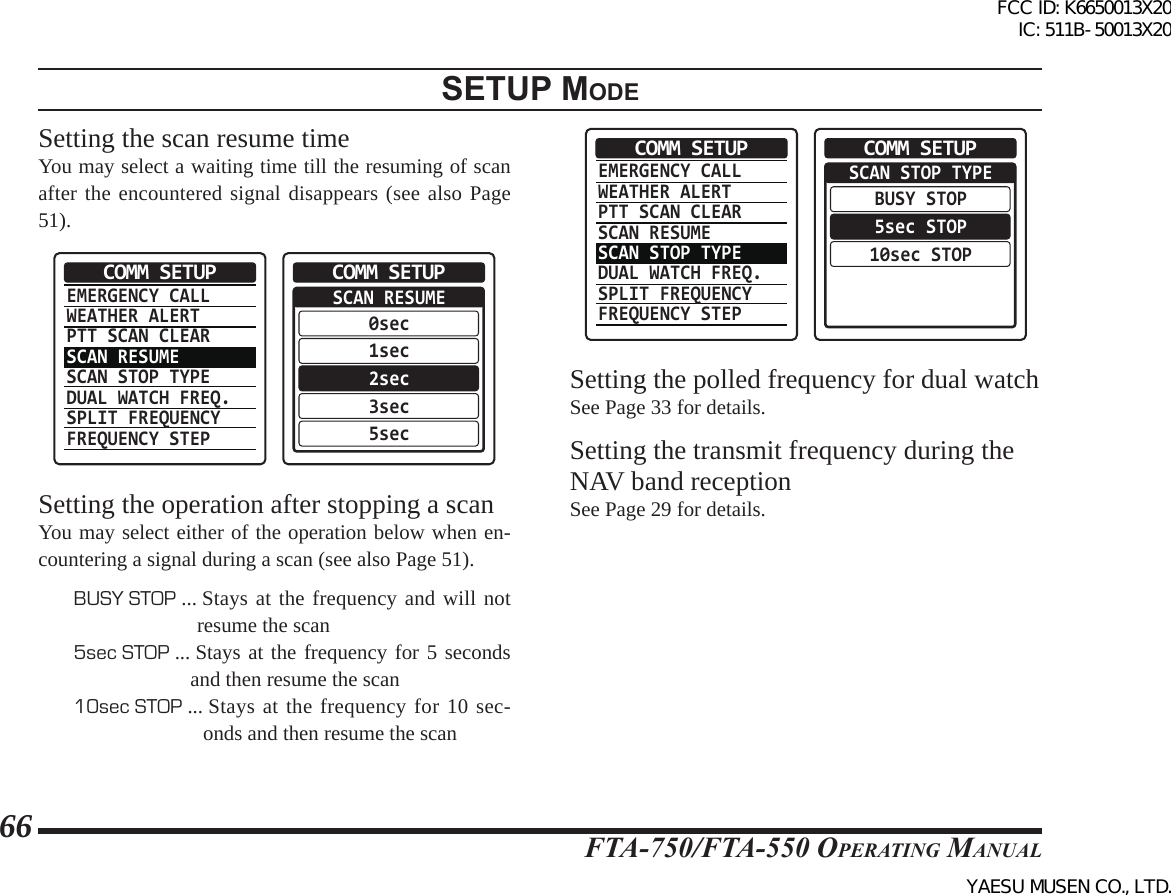
![FTA-750/FTA-550 OperATing MAnuAl60WaypoInt naVIgatIon (Fta-750 only)Setting the DestinationWhen you enter the NAVI mode for the first time, or if you have reached the destination during the NAVI mode last time, the NAVI menu will be displayed after selecting “NAVI” on the MENU screen.Selecting from the memory1. Select “MEMORY” on the NAVI menu by pressing the [◄] or [►] key, and then press the [ENT] key.HISTORYMEMORYMANUALNAVI2. Select a group that the desired station is as-signed by pressing the [◄] or [►] key, and then press the [ENT] key.ALLPRIORITYNAVIMEMORY3. Select a station from the station list of the group by pressing the [◄] or [►] key, and then press the [ENT] key.ALLNAVI Los Angeles McCarran Lakeland KLGB KLAR KSAN-VOR MIAMIMEMORY The information of the selected station will ap-pear with the reversed “GOTO” displayed at the bottom.Name: KLARGroup:ALLLAT 33˚56.325NLON 118˚24.225WNAVIGOTOMEMORY4. Press the [ENT] key. The compass screen will be displayed.Selecting from the history Select “History” on the NAVI menu, and then select and set the desired station in the same way as the steps 3 and 4 above.FCC ID: K6650013X20 IC: 511B-50013X20YAESU MUSEN CO., LTD.](https://usermanual.wiki/Yaesu-Musen/50013X20.Operational-Manual/User-Guide-2185162-Page-62.png)
![FTA-750/FTA-550 OperATing MAnuAl61WaypoInt naVIgatIon (Fta-750 only)Specifying the position directly1. Select “MANUAL” on the NAVI menu by pressing the [◄] or [►] key, and then press the [ENT] key.HISTORYMEMORYMANUALNAVI2. Select the “LAT” and “LON” eld by pressing the [◄] or [►] key, and then press the [ENT] key.Name: WPT001Group:ALLLAT --˚--.----LON ---˚--.----NAVIGOTOSAVE AND GOTOMANUAL3. Input numerics and let-ters with the keypad or the DIAL selector knob, then press the [ENT] key. The cursor will move to the next digit of the position information.NAVIPOSITIONFINISHLAT --˚--.----LON ---˚--.----4. Repeat the step 3 to input all digits of the position information. If you want to correct a mistake, press the [◄] or [►] key to move the cursor to the digit you want to change, then perform the step 3 again.5. Select “FINISH” by pressing the [◄] or [►] key, and then press the [ENT] key. The input information will appear with the reversed “GOTO” dis-played at the bottom.Name: WPT001Group:ALLLAT 33˚56.325NLON 118˚24.225WNAVIGOTOSAVE AND GOTOMANUAL6. Press the [ENT] key. The compass screen will be displayed.FCC ID: K6650013X20 IC: 511B-50013X20YAESU MUSEN CO., LTD.](https://usermanual.wiki/Yaesu-Musen/50013X20.Operational-Manual/User-Guide-2185162-Page-63.png)
![FTA-750/FTA-550 OperATing MAnuAl62WaypoInt naVIgatIon (Fta-750 only) You may store the input information to the memory of the radio by selecting “SAVE AND GOTO” before the step 6 above. You may give a custum tag name to the input information and assign it to a desired group before the step 6, in the same way as the steps 2 to 5.Starting the Navigation to the Receiving StationYou can set the currently receiving station in the COMM mode as the destination, and start navigation instantly.1. Tune to the frequency of the station you want to be navigated to in the COMM mode.2. Press the [ENT] key to display the instant menu.3. Select “INFO” by press-ing the [◄] or [►] key, and then press the [ENT] key.COMMVOR/ILSINFOKLAX AIRPORT The information includ-ing the latitude and longitude of the station will appear with the reversed “GOTO” dis-played at the bottom.Los Angeles IntlLos Angeles CALARGE AIRPORTLAT 33˚56.325NLON 118˚24.225WKLAX AIRPORTGOTOINFO4. Press the [ENT] key. The compass screen will be displayed.FCC ID: K6650013X20 IC: 511B-50013X20YAESU MUSEN CO., LTD.](https://usermanual.wiki/Yaesu-Musen/50013X20.Operational-Manual/User-Guide-2185162-Page-64.png)
![FTA-750/FTA-550 OperATing MAnuAl63Note:We do not recommend that any of the default settings be changed until you are thoroughly familiar with the operation of the FTA-750/FTA-550. Basic Operation1. Press the [MENU] key to display the MENU screen.2. Select “SETUP” on the MENU screen by press-ing the [◄] or [►] key, and then press the [ENT] key.3. Select the item on the SETUP menu by press-ing the [◄] or [►] key, and then press the [ENT] key.4. Select the item you wish to view and/or change the settings by pressing the [◄] or [►] key, and then press the [ENT] key.EMERGENCY CALLWEATHER ALERTPTT SCAN CLEARSCAN RESUMESCAN STOP TYPEDUAL WATCH FREQ.SPLIT FREQUENCYFREQUENCY STEPCOMM SETUP5. Enter or select settings on the screen dedicated to each item, and then press the [ENT] key to determine the new set-tings.SCAN RESUME0sec1sec2sec3sec5secCOMM SETUPsetup modeFCC ID: K6650013X20 IC: 511B-50013X20YAESU MUSEN CO., LTD.](https://usermanual.wiki/Yaesu-Musen/50013X20.Operational-Manual/User-Guide-2185162-Page-65.png)

![FTA-750/FTA-550 OperATing MAnuAl76specIFIcatIonsTransmitterPower Output (@ 7.4 V): 5.0 W (PEP), 1.5 W (Carrier Power)Frequency Stability: Better than ±2 ppm (+14 ºF to + 140 ºF [–10 ºC to +60 ºC])Modulation System: Low Level Amplitude ModulationSpurious Emission: >60 dB below carrierInt. Microphone Type: CondenserExt. Mic. Impedance: 150 OhmsGPS Unit (FTA-750 only)Receiver Channels 12 ChannelsSensitivity Less than –130 dBmTime to First Fix 1 minute typical (@Cold Start) 40 seconds typical (@ Warm Start)Geodetic Datum WGS84Specications are subject to change without notice or obligation.FCC ID: K6650013X20 IC: 511B-50013X20YAESU MUSEN CO., LTD.](https://usermanual.wiki/Yaesu-Musen/50013X20.Operational-Manual/User-Guide-2185162-Page-78.png)
![FTA-750/FTA-550 OperATing MAnuAl79Quick Reference(Cut Here)Quick Reference CardRecalling the Previous Frequencies1. In the COM band screen, press the [◄] or [►] key to select the desired channel from the list. 2. Press the [ENT] key.Selecting the Alternate Channels1. In the COM band screen, press the [ENT] key.2. Select “COMM”, then press the [ENT] key.3. Press the [◄] or [►] key to select the desired channel from the list. 4. Press the [ENT] key.Saving the Frequency to Memory 1. In the COM band screen, set the frequency to be stored with the DIAL selector knob or the keypad.2. Press the [SAVE] key.3. To save the data without change, press the [SAVE] key.Recalling the Memory Channels1. Press the [MENU] key to display the MENU screen. 2. Press the [◄] or [►] key to select “MEMORY”, then press the [ENT] key.3. Press the [◄] or [►] key to select the desired channel from the list. 4. Press the [ENT] key.Receiving the Weather Channels1. Press the [MENU] key to display the MENU screen. 2. Press the [◄] or [►] key to select “WEATHER”, then press the [ENT] key.3. Press the [◄] or [►] key to select the desired channel from the list. 4. Press the [ENT] key.Locking the Dial and KeysPress and hold the [] key.Press and hold the [] key again to unlock.YAESU MUSEN CO., LTD.FTA-750Selecting the Operation Mode1. Press the [MENU] key to display the MENU screen. 2. Press the [◄] or [►] key to select the mode, then press the [ENT] key.3. To return to the COMM mode, press the [COMM] key.FCC ID: K6650013X20 IC: 511B-50013X20YAESU MUSEN CO., LTD.](https://usermanual.wiki/Yaesu-Musen/50013X20.Operational-Manual/User-Guide-2185162-Page-81.png)
![FTA-750/FTA-550 OperATing MAnuAl80VOR and ILS Navigation1. In the COM band screen, press the [ENT] key.2. Select “VOR/ILS”, then press the [ENT] key.3. Press the [◄] or [►] key to select the desired station from the list. 4. Press the [ENT] key. When the VOR or ILS signal is recieved, the CDI (course deviation indicator) will appear on the display. GPS Activation1. Press the [MENU] key to display the MENU screen. 2. Press the [◄] or [►] key to select “SETUP”, then press the [ENT] key.3. Select “GPS SETUP”, then press the [ENT] key.4. Select “GPS ON/OFF”, then press the [ENT] key.5. Select “ON”, then press the [ENT] key.6. To return to the COMM mode, press the [COMM] key.Waypoint Navigation1. In the COM band screen, press the [ENT] key.2. Select “INFO”, then press the [ENT] key.3. Press the [ENT] key with the “GOTO” reversed.Entering and Editing Characters1. Rotate the DIAL selector knob to select alphabets and numbers, then press the [ENT] key to set the character.2. Press the appropriate key on the keypad to enter numbers.3. Press the [◄] or [►] key to move the cursor.4. Press the [BACK] key to delete one character.5. Press and hold the [BACK] key to clear all the characters in the eld.FCC ID: K6650013X20 IC: 511B-50013X20YAESU MUSEN CO., LTD.](https://usermanual.wiki/Yaesu-Musen/50013X20.Operational-Manual/User-Guide-2185162-Page-82.png)