Yaesu Musen HX460S Marine Transceiver User Manual F HX460S HX460S NEW
Yaesu Musen Co., Ltd. Marine Transceiver F HX460S HX460S NEW
UserManual.wiki
>
Yaesu Musen
>
HX460S User Manual
>
revised users manual
Contents
1.
users manual
2.
revised users manual
revised users manual
Navigation menu
Upload a User Manual
Namespaces
Wiki Guide
HTML
PDF
Info
Views
User Manual
Discussion / Help
Navigation
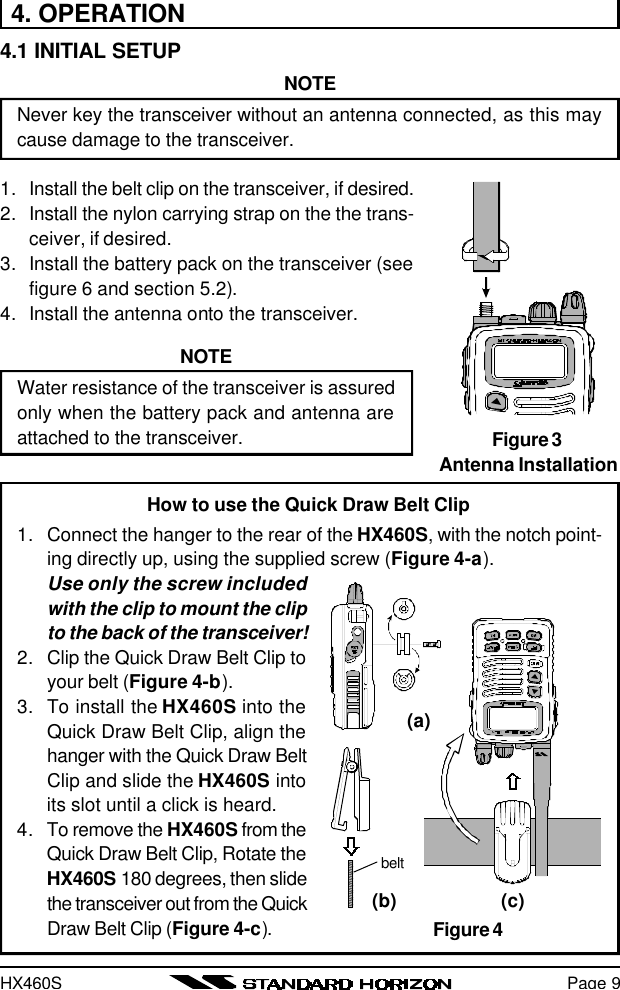
![HX460SPage 104.2 RECEPTION1. Turn the POWER/VOLUME CONTROL knob clockwise to turn the trans-ceiver on.2. Turn the SQUELCH CONTROL knob fully counterclockwise. This stateis known as “Squelch Off.”3. Turn up the POWER/VOLUME CONTROL knob until the noise or audiofrom the speaker is at a comfortable level.4. Select a channel that has no signal being received (no one is transmit-ting on the channel) and where only noise is heard.5. Slowly turn the SQUELCH CONTROL knob clockwise and stop immedi-ately after the noise disappears. This condition is known as the “SquelchThreshold.” If the knob is turned clockwise past this point, weak signalsmay not be received. No noise or no signal is heard until a signal isreceived that exceeds the squelch threshold.6. To change channels, press the [p] or [q] key. Sometimes, a slight ad-justment of the squelch threshold is needed, as some channels have ahigher noise level than others.7. Please refer to the Owner’s Manual Supplement for a complete listing ofall USA, International and Canadian VHF Marine channels and their uses.8. If necessary, press the LAMP key to turn on the display illumination. Thelamp automatically turns off in about 5 seconds. To turn off the lamp,press the LAMP key again.9. To “lock” the channel so that it is not accidentally changed, hold downthe LAMP key for about one second. This locks the [p] and [q] buttonsand all the front panel controls except the H/L, PTT and LAMP keys. The“” symbol will appear on the display to indicate that the keypad islocked. Hold down the LAMP key for about one second to unlock thekeys. The “ ” symbol will disappear from the display..](https://usermanual.wiki/Yaesu-Musen/HX460S.revised-users-manual/User-Guide-132403-Page-12.png)
![HX460SPage 124.5 USA, CANADIAN, AND INTERNATIONAL BANDS1. To change the operating band (channel set) of the transceiver, hold downthe 16/9 key and press the WX key. The band will change from USA, toInternational, and to Canadian with each press.2. “USA” appears on the LCD for the USA band, “CAN” appears for theCanadian band, and “INTL” appears for the International band.3. Refer to the marine channel charts in the OWNER’S MANUAL SUPPLE-MENT for allocated channels in each band.4.6 NOAA WEATHER CHANNELS1. To receive a NOAA weather channel, press the WX key. The transceiverchanges to the weather channel mode. This mode consists of a specialpre-set memory bank containing the standard NOAA weather channels.2. The transceiver will be set to the last-used NOAA weather channel. Pressthe [p] or [q] key to change to other weather channels.3. To exit from the weather channel mode, press the WX key. The trans-ceiver will revert to the channel you were using prior to switching to theweather channel mode.4.7 SCANThis transceiver provides a special “Scanning Memory Bank” which allowsyou to designate certain channels for inclusion in a “loop” which will bescanned at high speed. If an incoming signal is detected on one of the chan-nels in the scanning loop, the radio will pause on that channel, allowing youto listen to the incoming transmission.1. Select the desired channel to be included in the scanning loop using the[p] or [q] key.2. Press the MEM key to store the channel into the transceiver’s scanningmemory. “MEM” will be displayed on the LCD.3. Repeat steps 1 and 2 for all the channels to be scanned.4. To delete a channel from the transceiver’s scan memory, press the MEMkey again while the memorized channel is displayed. “MEM” will disap-pear from the display.5. All channels programmed remain in the transceiver’s scan memory evenif the power is turned off. See section 4.17: “RESETTING THETRANSCEIVER’S MICROPROCESSOR” to clear all channels from thetransceiver’s scan memory.](https://usermanual.wiki/Yaesu-Musen/HX460S.revised-users-manual/User-Guide-132403-Page-14.png)
![HX460SPage 136. Adjust the SQUELCH CONTROL knob until background noise is elimi-nated.7. To start scanning, press the SCAN key. The scan proceeds from thelowest to the highest programmed channel number and stops on chan-nels when a transmission is received. Scanning will resume when thesquelch closes after the incoming signal disappears at the end of thetransmission.8. To stop the scan, press the SCAN, 16/9, WX, or PRESET key.4.8 PRIORITY SCANThe priority scanning feature allows the radio to scan while also keepingwatch on a particularly important “priority channel.” The following channelscan be set as the priority channel: 16, 09, and Preset Channels A through E(Preset Channels are described in section 4.14).1. To set the priority channel, hold down the 16/9 key and press the MEMkey. The channel will change from 16 to 09 to Preset A to Preset B toPreset C to Preset D to Preset E with each press of the MEM key. Thedisplayed channel will be set as the priority channel when the 16/9 key isreleased.2. For priority scanning, hold down the SCAN key during normal scanning.Scanning will proceed between the memorized channels and the prioritychannel. The priority channel will be scanned after each programmedchannel. “PRI” is shown on the left side of the channel number duringpriority scanning.3. As an example of priority scanning, let us say that channels 06, 07, and08 are memorized in the transceiver’s scan memory. Priority scanningwill proceed in the following sequence:[CH06] à [Priority Channel] à [CH07] à [Priority Channel] à [CH08] à [Priority Channel] à [CH06] à [Priority Channel] ……4. Even when the transceiver stops and listens to the signal of a programmedchannel, the transceiver will shift to a “dual watch” mode between thischannel and the priority channel. Therefore, your priority watching of thedesignated channel is not compromised when the scanner has pausedon an active channel.](https://usermanual.wiki/Yaesu-Musen/HX460S.revised-users-manual/User-Guide-132403-Page-15.png)
![HX460SPage 154.12 OPERATING ON CHANNEL 13Channel 13 is used at docks, bridges and for maneuvering in port. Mes-sages on this channel must concern navigation only, such as meeting andpassing in restricted waters. In emergencies and when approaching blindriver bends, High power is allowed. Pressing the H/L key will change thepower output from 1 Watt ( ) to 5 Watts ( ); if pressed again, 2.5 Watts( ) will be selected. When the PTT switch is released, the transceiver willrevert to Low power. Press the H/L key again if you need High power on asubsequent transmission.4.13 OPERATING ON CHANNEL 67When channel 67 is used for navigational bridge-to-bridge traffic betweenships, High or Medium power may be used temporarily (in the USA band) bypressing the H/L key. When the PTT switch released, the transceiver willrevert to low power.4.14 PRESET CHANNELS (A ~ E): INSTANT ACCESSFive user-assigned channels can be programmed for instant access. Press-ing the PRESET key provides activates the user-assigned channel bank. Ifthe PRESET key is pressed and no channels have been assigned, an alertbeep will be emitted twice from the speaker (if the beeper has been en-abled; see Section 4.17.1 KEY BEEP on page 18).4.14.1 ProgrammingHold down the PRESET key, and press the [p] or [q] key (repeatedly, ifnecessary) until the desired channel number (from among the regular oper-ating channels) is displayed.With the desired channel number displayed, release the PRESET key. The“A” notation will appear on the LCD display, indicating that the displayedchannel is now saved in the Preset Channel A position.Repeat steps 1 and 2 to program the desired channels into Preset Channelsb ~ E.To delete a Preset Channel, hold down the PRESET key and press the [p]or [q] key until the Preset Channel number to be deleted is displayed, thenrelease the PRESET key.](https://usermanual.wiki/Yaesu-Musen/HX460S.revised-users-manual/User-Guide-132403-Page-17.png)
![HX460SPage 184.17 SETUP MODEThe HX460S’s Setup Mode allows a number of the HX460S operating pa-rameters to be custom-configured for your operating requirements.The Setup Mode is easy to activate and set, using the following procedure:1. Turn the radio off.2. Hold down the LAMP key, then turn on the transceiver while still holdingdown the LAMP key.3. “SET” will appear on the display, indicating that the Setup Mode hasbeen activated.4. Press the LAMP key to select the Menu item to be adjusted.5. Press the [p] or [q] key select the status or value of the Menu item.6. After completing your adjustment, press the 16/9 key to save the newsetting and exit to normal operation.4.17.1 bEP (KEY BEEP)Function: Enable/Disable the Keypad beeper.Available Values: ON/OFFDefault: ON4.17.2 LP (LAMP MODE)Function: Select the LCD/Keypad Lamp mode.Available Values: KEY/TGL (Toggle)/5 (5 second)Default: KEYKEY:Illuminates the LCD/Keypad for 5 seconds when any key ispressed.TGL (Toggle):Pressing the LAMP key toggles the LCD/Keypad lamp On/Off.5 (5 second):Pressing the LAMP key illuminates the LCD/Keypad for 5 sec-onds.4.17.3 snL (SCAN LAMP)Function: Enable/Disable the Scan lamp while scanning is paused.Available Values: ON/OFFDefault: OFF](https://usermanual.wiki/Yaesu-Musen/HX460S.revised-users-manual/User-Guide-132403-Page-20.png)
![HX460SPage 194.17.4 sCn (SCAN DISPLAY)Function: Select the display mode while scanning.Available Values: nor (Normal)/SPL (Special)Default: nor (Normal)nor (Normal):Changes the channel number accordance with scanningSPL (Special):The channel number does not change during scanning. How-ever, the channel number changes, when the scanner isstopped, to indicate the channel number on which the radiohas received a transmission; this lets you see the last chan-nel on which someone called.4.17.5 bro (BAROMETRIC PRESSURE) [Requires optional SU-1]Function: Select the unit of the Barometric Pressure display.Available Values: HG (mm Hg)/HPADefault: HG (mm Hg)4.17.6 boF (BAROMETRIC PRESSURE OFFSET) [Requires optional SU-1]Function: Calibrating the Barometric Pressure meter.Press the [p] or [q] key to set the HX460S’s Barometric Pressure display tomatch a Calibrated Barometer’s displayed pressure.Barometric Pressure Conversion Chart(Rounded to nearest whole number)hpa Inches hpa Inches hpa Inches hpa Inches982 29.0 1001 29.55 1011 29.85 1026 30.3985 29.1 1002 29.6 1013 29.9 1029 30.4989 29.2 1004 29.65 1014 29.95 1033 30.5992 29.3 1006 29.7 1016 30.0 1036 30.6996 29.4 1007 29.75 1019 30.1 – –999 29.5 1009 29.8 1023 30.2 – –](https://usermanual.wiki/Yaesu-Musen/HX460S.revised-users-manual/User-Guide-132403-Page-21.png)


![HX460S5.3 USING THE NC-72 BATTERY CHARGER1. Turn the transceiver off.2. Insert the miniature plug on the end ofthe NC-72 Battery Charger cable into theEXT DC jack of the transceiver.3. Plug the NC-72 into a 120 VAC wall out-let.4. The indicator on the radio will glow red,indicating that charging has begun.5. When charging is completed, the redindicator on the radio will change togreen. Remove the plug from the EXTDC jack when charging has been ac-complished.6. Replace the rubber gasket in its placeto protect the inside of the transceiverfrom the water.Caution: Make sure that the gasket isin place to ensure the radio remains waterproof.Note: The CNB460 battery pack must be installed in the radio prior to con-nection of the NC-72 Battery Charger. If the NC-72 is plugged in before thebattery pack is installed, charging will not take place.5.4 FBA-23 BATTERY CASEFBA-23 is a battery case that holds two alkaline batteries and is used with theHX460S transceiver. Alkaline batteries can be used for transmission in anemergency, but power output will only be 1 Watt, and battery life will be short.1. Slide the batteries into the FBA-23 with the Nega-tive [–] side of the batteries touching the springconnections inside the FBA-23.2. Insert the FBA-23 into the battery compartment onthe back of the transceiver, then close the BatteryPack Latch until it locks in place with a “click.”Note: The battery indicator on the transceiver is onlyapplicable to the CNB460 rechargeable battery. Disre-gard this indication when using alkaline batteries.Page 23Figure 7Figure 8](https://usermanual.wiki/Yaesu-Musen/HX460S.revised-users-manual/User-Guide-132403-Page-25.png)