Yaesu Musen VX-7R Amateur Scanning Transceiver User Manual Manual
Yaesu Musen Co., Ltd. Amateur Scanning Transceiver Manual
UserManual.wiki
>
Yaesu Musen
>
VX-7R User Manual
>
Manual
Contents
1.
Manual
2.
Manual insert
Manual
Navigation menu
Upload a User Manual
Namespaces
Wiki Guide
HTML
PDF
Info
Views
User Manual
Discussion / Help
Navigation
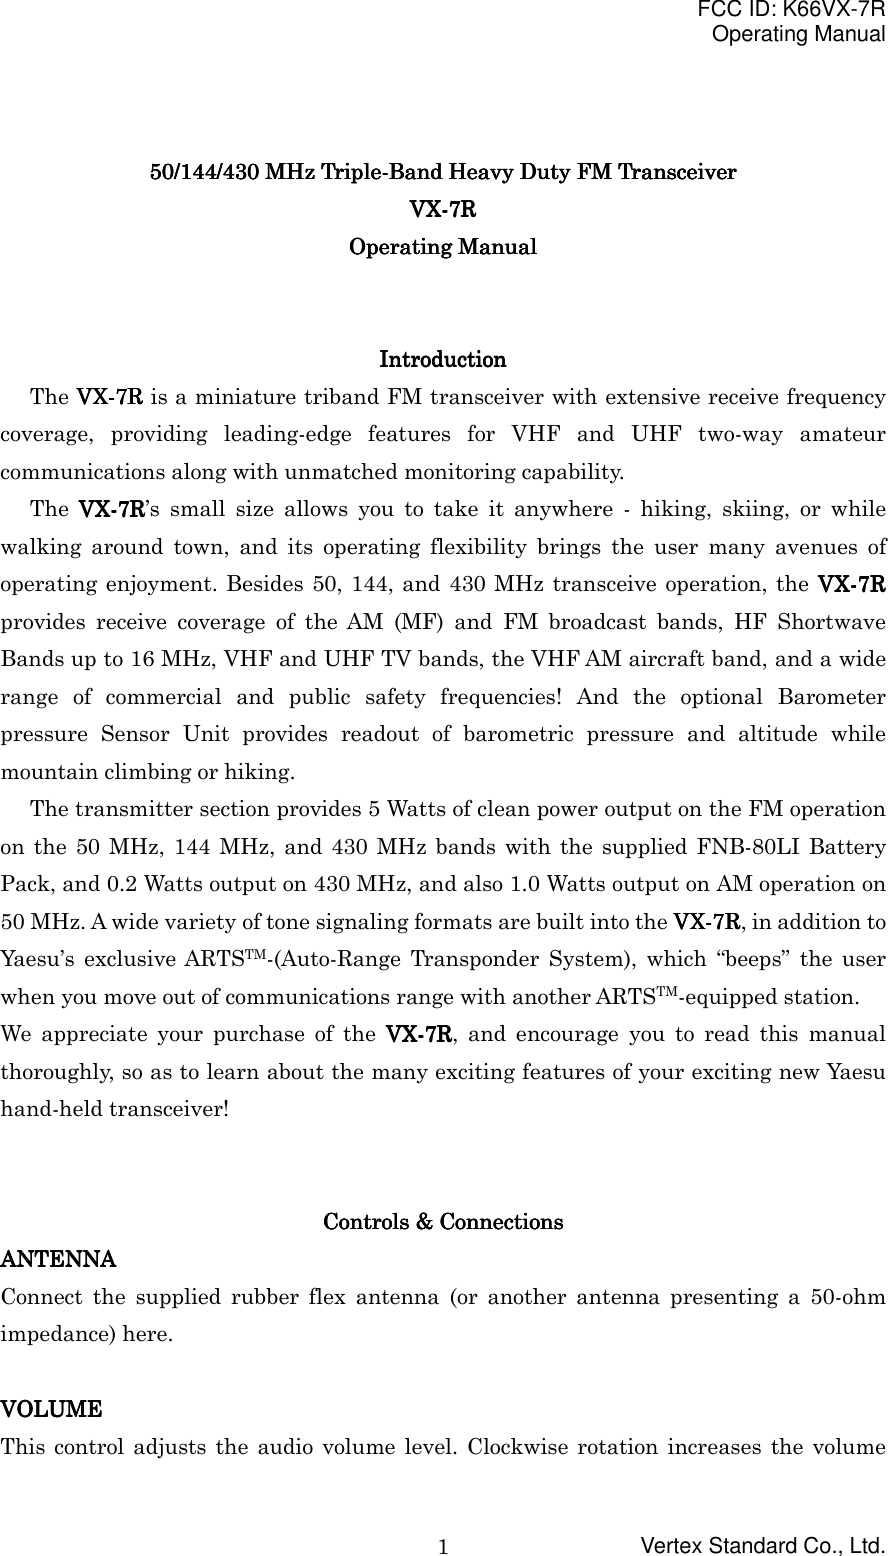
![FCC ID: K66VX-7ROperating ManualVertex Standard Co., Ltd.3EXT DCEXT DCEXT DCEXT DCThis coaxial DC jack allows connection to an external DC power source (10-16V DC).The center pin of this jack is the Positive (+) line.Display Icons AND IndicatorsDisplay Icons AND IndicatorsDisplay Icons AND IndicatorsDisplay Icons AND IndicatorsDouble size display (default)Press and hold the [4(MG) DSP] key for one secondSmall character displayFrequency/Data FieldS- and TX Power MeterOperating ModeLow Battery!Battery Saver Active (page ??)DTMFG Autodialer Active (page ??)Bell Alarm Active (page ??)Low TX Power Selected (page ??)Automatic Power-Off Active (page ??)Digital Coded Squelch Active (page ??)CTCSS Decoder Active (page ??)CTCSS Encoder Active (page ??)Repeater Shift Direction (page ??)Dual Watch Active (page ??)Keypad FunctionKeypad FunctionKeypad FunctionKeypad Function[1(SCAN)] keyPress key: Frequency entry digit “1.”Press [MON/F] +: Activate the Scanner.Press and hold key: Store the current setting into the Hyper Memory “1.”[2(DW)] keyPress key: Frequency entry digit “2.”Press [MON/F] +: Activate the Dual Watch Feature.](https://usermanual.wiki/Yaesu-Musen/VX-7R.Manual/User-Guide-229636-Page-3.png)
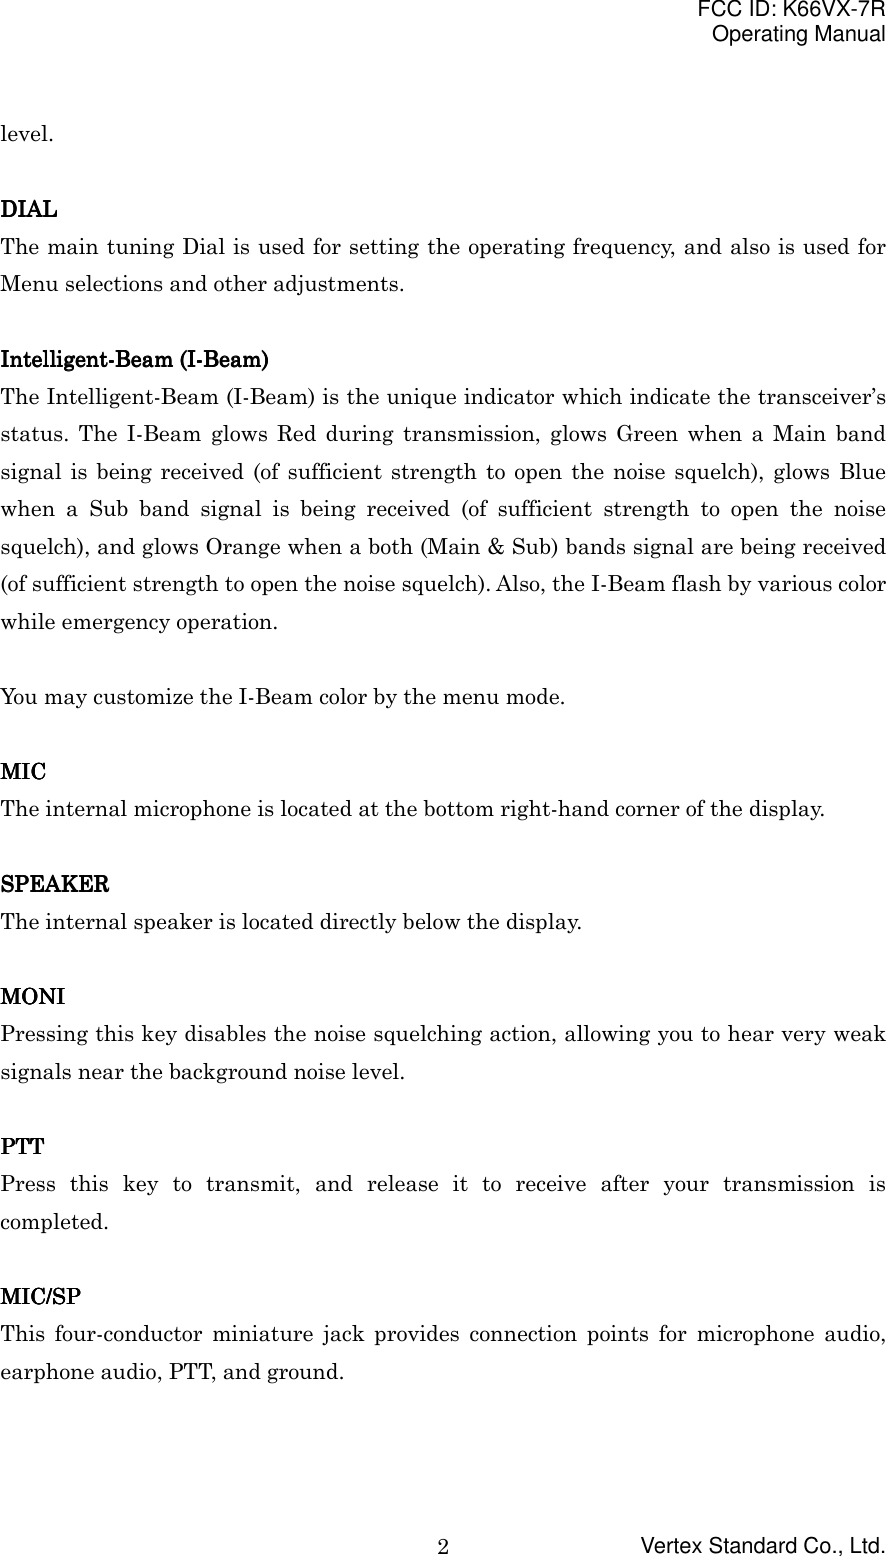
![FCC ID: K66VX-7ROperating ManualVertex Standard Co., Ltd.4Press and hold key: Store the current setting into the Hyper Memory “2.”[3(WX)] keyPress key: Frequency entry digit “3.”Press [MON/F] +: Recall the “Weather” broadcast channel.Press and hold key: Store the current setting into the Hyper Memory “3.”[4(ARTS)] keyPress key: Frequency entry digit “4.”Press [MON/F] +: Activate the ARTS feature.Press and hold key: Store the current setting into the Hyper Memory “4.”[5(S.SCH)] keyPress key: Frequency entry digit “5.”Press [MON/F] +: Activate the Smart Search feature.Press and hold key: Store the current setting into the Hyper Memory “5.”[6(SP-ANA)] keyPress key: Frequency entry digit “6.”Press [MON/F] +: Activate the Spectrum Analyzer (Spectra-ScopeTM) feature.Press and hold key: Store the current setting into the Hyper Memory “6.”[7(CH.CNT)] keyPress key: Frequency entry digit “7.”Press [MON/F] +: Activate the Channel Counter feature.Press and hold key: Store the current setting into the Hyper Memory “7.”[8(TONE)] keyPress key: Frequency entry digit “8.”Press [MON/F] +: Activate the CTCSS or DCS operation.Press and hold key: Store the current setting into the Hyper Memory “8.”[9(SPCL)] keyPress key: Frequency entry digit “9.”Press [MON/F] +: Enter the “Special Memory” mode.Press and hold key: Store the current setting into the Hyper Memory “9.”](https://usermanual.wiki/Yaesu-Musen/VX-7R.Manual/User-Guide-229636-Page-4.png)
![FCC ID: K66VX-7ROperating ManualVertex Standard Co., Ltd.5[0(SET)] keyPress key: Frequency entry digit “0.”Press [MON/F] +: Enter the “Set” (Menu) mode.Press and hold key: Store the current setting into the Hyper Memory “9.”[BAND(BND DN)] keyPress key: Move up the frequency band.Press [MON/F] +: Move down the frequency band.Press and Hold key: Move up the frequency band.[V/M(WRITE MT)] keyPress key: Switches frequency control between VFO and Memory. SystemPress [MON/F] +: None.Press and hold key: ????.[MON/F] keyPress key: Activate the “Alternate” key function.Press [MON/F] +: None.Press and hold key: ????.[HM/RV(EMG)] keyPress key: Reverse the transmit and receive frequencies while working through arepeater.Press [MON/F] +: Switch to the “Home” (favorite frequency) Channel.Press and hold key: Activate the EMERGENCY feature.[%(TX PO LK)] keyPress key: Activate the Internet Connection feature.Press [MON/F] +: Select the desired transmitter power output.Press and hold key: Activate the Key Lock feature.PTT SwitchPress key: TransmitPress [MON/F] +: Temporary High Power Transmit.Press and hold key: Transmit](https://usermanual.wiki/Yaesu-Musen/VX-7R.Manual/User-Guide-229636-Page-5.png)
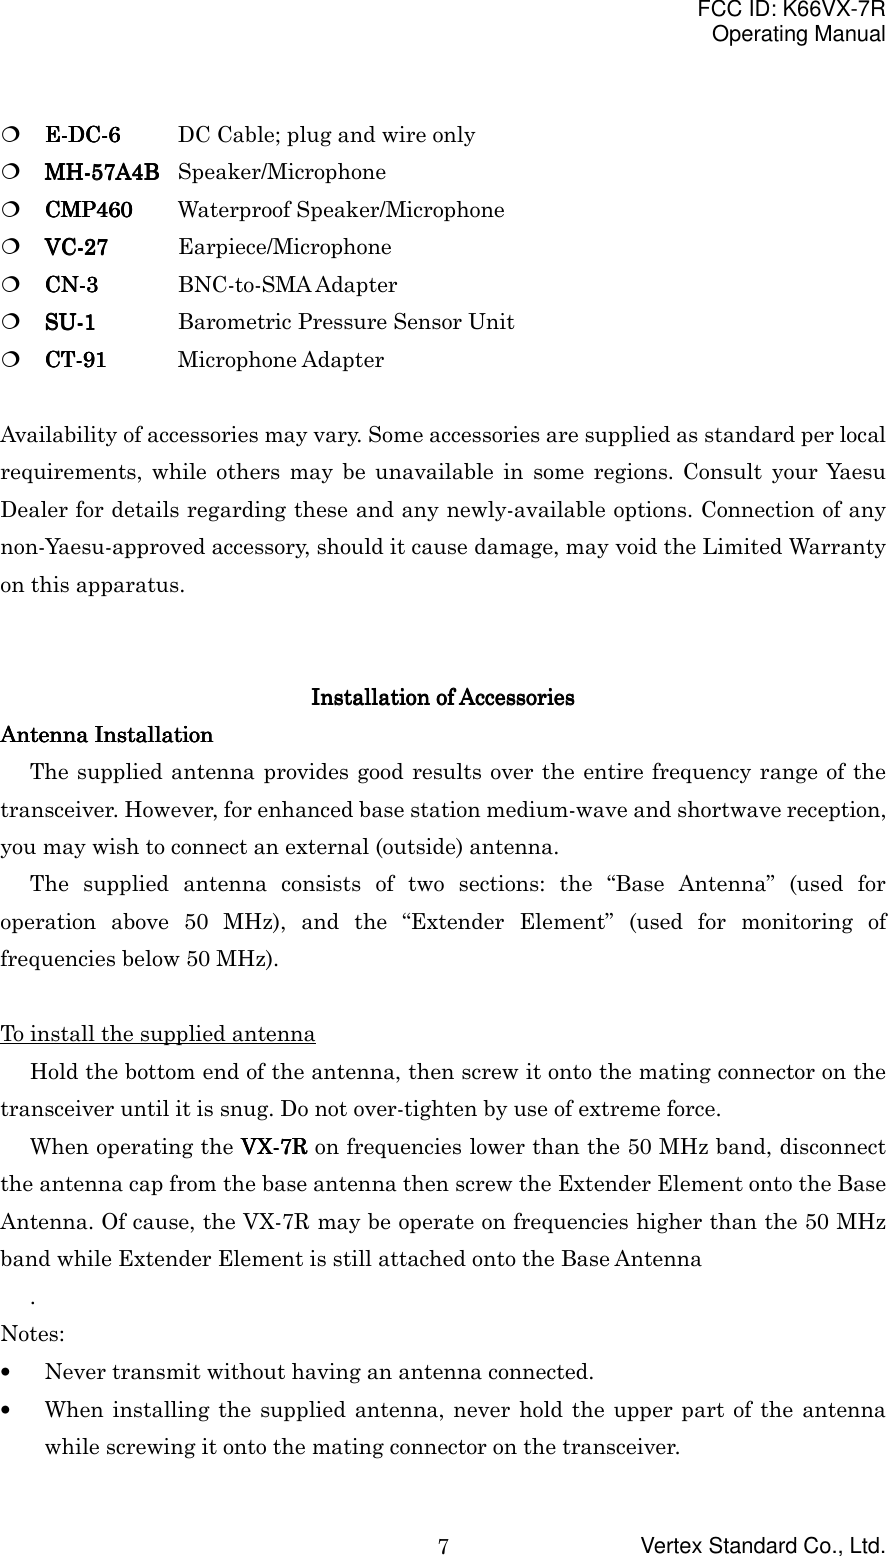
![FCC ID: K66VX-7ROperating ManualVertex Standard Co., Ltd.6MON keyPress key: USA version; Disable the Noise and Tone Squelch.European version; Activate the T.CALL.Press [MON/F] +: Enter the squelch level setting mode.[MAIN] keyPress key: Switch the Upper Frequency to the Operating Band.Press [MON/F] +: Switches Upper Frequency display between Large Character andSmall Character mode.Press and hold key: Activate the Dual Receive feature.[SUB] keyPress key: Switch the Lower Frequency to the Operating Band.Press [MON/F] +: Switches Lower Frequency display between Large Character andSmall Character mode.Press and hold key: Activate the Dual Receive feature.Accessories & OptionsAccessories & OptionsAccessories & OptionsAccessories & OptionsAccessories Supplied with theAccessories Supplied with theAccessories Supplied with theAccessories Supplied with the VX-7R VX-7R VX-7R VX-7RFNB-80LI Battery Pack (7.4V/1,300mAh)NC-72B/C Battery ChangerQuick Draw Belt ClipHand StrapAntennaOperating ManualWarranty CardAvailable Options for your VX-Available Options for your VX-Available Options for your VX-Available Options for your VX-7R7R7R7R! CSC-CSC-CSC-CSC-88888888 Soft Case! CD-CD-CD-CD-15A15A15A15A Rapid Charger (requires NC-72B/C)! FBA-23FBA-23FBA-23FBA-23 2 x “AA” Cell Battery Case (batteries not supplied)! FNB-8FNB-8FNB-8FNB-80000LILILILI Battery Pack! E-DC-5BE-DC-5BE-DC-5BE-DC-5B DC Cable w/Noise Filter! NC-72B/CNC-72B/CNC-72B/CNC-72B/C Battery Changer](https://usermanual.wiki/Yaesu-Musen/VX-7R.Manual/User-Guide-229636-Page-6.png)
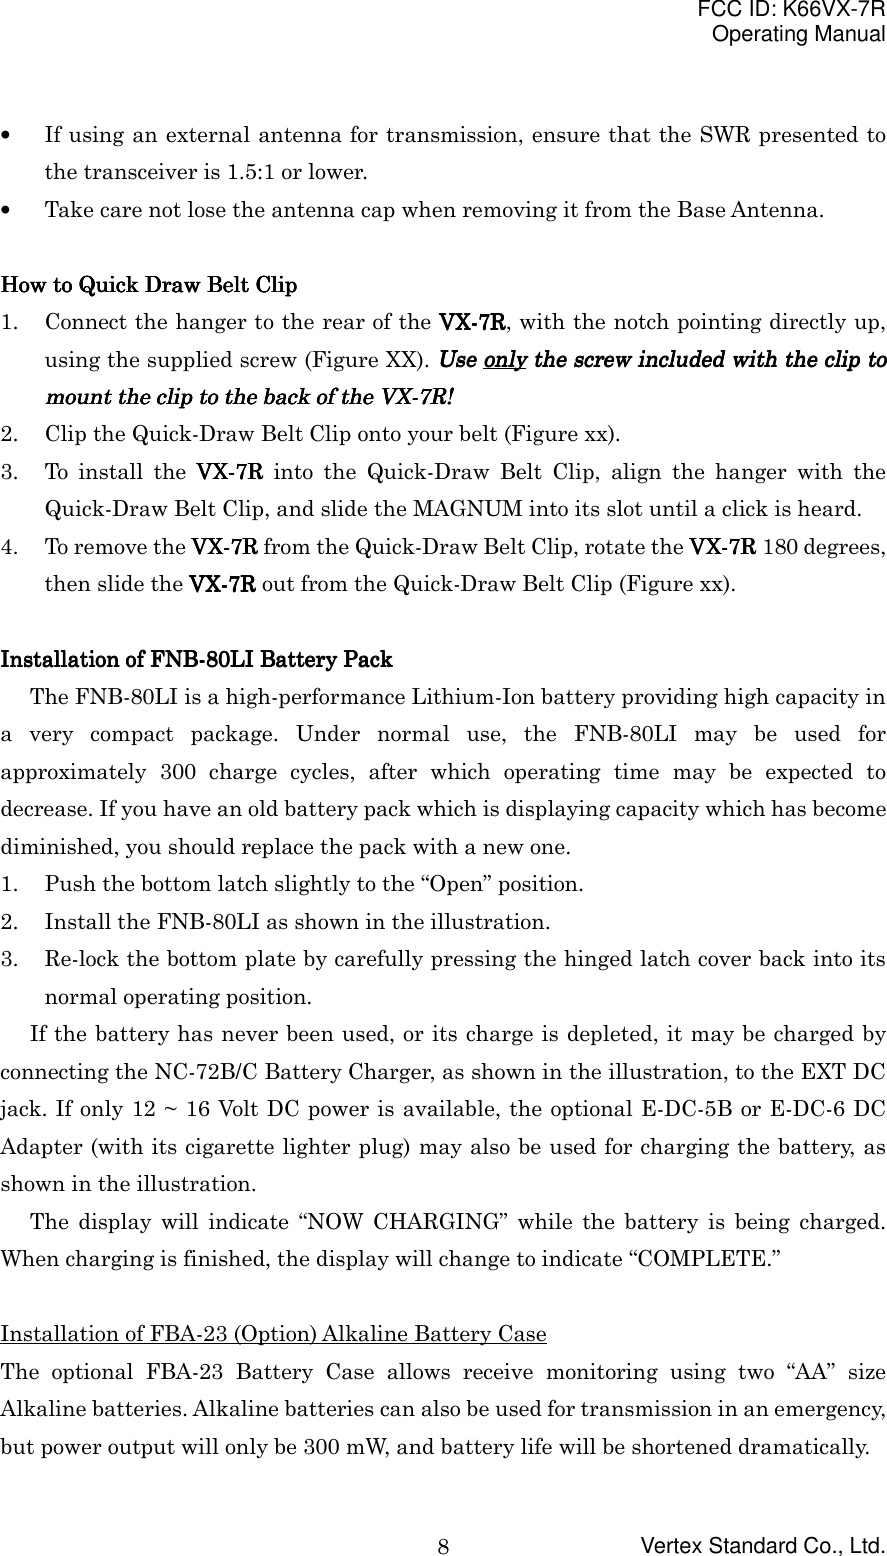
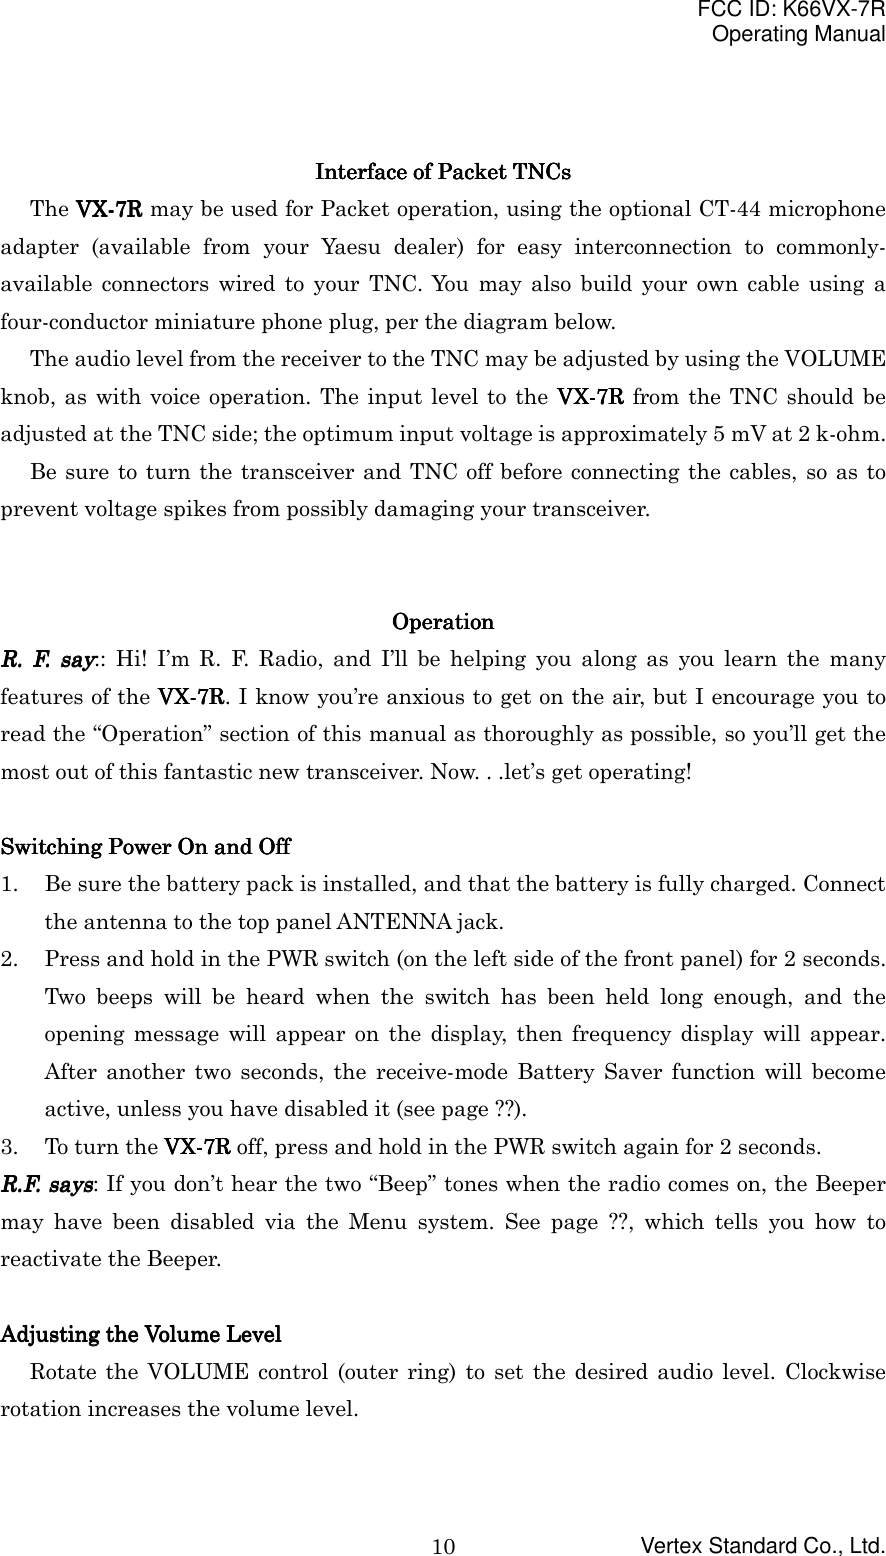
![FCC ID: K66VX-7ROperating ManualVertex Standard Co., Ltd.9To Install Alkaline Batteries into the FBA-231. Slide the batteries into the FBA-23 as shown in the illustration, with the Negative[–] side of the batteries touching the spring connections inside the FBA-23.2. Unlock the bottom plate by pushing the latch in the “Open” direction.3. Install the FBA-23 as shown in the illustration, with the [+] side facing the bottomof the transceiver.4. Re-lock the bottom plate by carefully pressing the latch cover back into its normaloperating position.The FBA-23 does not provide connections for charging, since Alkaline cells cannot bere-charged. Therefore, the NC-72B/C, E-DC-5B, or E-DC-6 may safely be connected tothe EXT DC jack when the FBA-23 is installed.Notes:• The FBA-23 is designed for use only with AA-type Alkaline cells.• If you do not use the VX-VX-VX-VX-7R7R7R7R for a long time, remove the Alkaline batteries from theFBA-23, as battery leakage could cause damage to the FBA-23 and/or thetransceiver.Battery Life InformationWhen the battery charge is almost depleted, a “Low Voltage” indicator will appear onthe display. When this icon appears, it is recommended that you charge the batterysoon.(1) TX 6 sec., RX 6 sec. and Squelched 48 sec.(2) Continuous signal receptionThe current battery voltage can be displayed manually on the LCD, by following theinstructions on page ??.Battery capacity may be reduced during extremely cold weather operation. Keepingthe radio inside your parka may help preserve the full charge capacity.AC Operation Using NC-72B/C (Receiving only)AC Operation Using NC-72B/C (Receiving only)AC Operation Using NC-72B/C (Receiving only)AC Operation Using NC-72B/C (Receiving only)The VX-VX-VX-VX-7R7R7R7R may be operated from your house current by use of the supplied NC-72B/CBattery Charger.To use the NC-72B/C, turn the transceiver off, then plug the miniature connector of theBattery Charger into the EXT DC jack on the side of the radio. Now plug the BatteryCharger into the wall outlet. You may now turn on the transceiver.](https://usermanual.wiki/Yaesu-Musen/VX-7R.Manual/User-Guide-229636-Page-9.png)
![FCC ID: K66VX-7ROperating ManualVertex Standard Co., Ltd.11Squelch AdjustmentSquelch AdjustmentSquelch AdjustmentSquelch AdjustmentThe VX-VX-VX-VX-7R7R7R7R’s Squelch system allows you to mute the background noise when nosignal is being received. Not only does the Squelch system make “standby” operationmore pleasant, it also significantly reduces battery current consumption.The Squelch system may be adjusted independently for the FM and Wide-FM (FMBroadcast) modes.1. Press the [MON/F] key, then press the MONI switch on the left side of the radio.This provides a “Short-cut” to Menu Item (Basic Setup #1: SQL NFM) or Menu Item(Basic Setup #2: SQL WFM).2. Now, press the [MAIN] or [SUB] key to set the background noise is just silenced(typically at a setting of about “3” or “4” on the scale); this is point of maximumsensitivity to weak signals.3. When you are satisfied with the Squelch threshold setting, press the PTT keymomentarily to save the new setting and exit to normal operation.4. You may also adjust the Squelch setting by using the “Set” (Menu) mode. Seepage ?? for details.RRRR....FFFF.... Say Say Say Say: If you’re operating in an area of high RF pollution, you may need to consider“Tone Squelch” operation using the built-in CTCSS Decoder. This feature will keep yourradio quiet until a call is received from a station sending a carrier which contains amatching (subaudible) CTCSS tone. Or if your friends have radios equipped with DCS(Digital Coded Squelch) like your VX-VX-VX-VX-7R7R7R7R has, try using that mode for silent monitoringof busy channels.Selecting the Operating BandSelecting the Operating BandSelecting the Operating BandSelecting the Operating BandThe VX-VX-VX-VX-7R7R7R7R covers an incredibly wide frequency range, over which a number ofdifferent operating modes are used. Therefore, the VX-VX-VX-VX-7R7R7R7R’s frequency coverage has beendivided into different operating bands, each of which has its own pre-set channel stepsand operating modes. You can change the channel steps and operating modes later, ifyou like (see page ??).USA Version EXP VersionBANDMAIN VFO SUB VFO MAIN VFO SUB VFOBC Band 0.5-1.8 MHz --- 0.5-1.8 MHz ---SW Band 1.8-30 MHz --- 1.8-30 MHz ---FM BC Band 59-108 MHz --- 88-108 MHz ---AIR Band 108-137 MHz --- 108-137 MHz ---VHF-TV Band 174-222 MHz --- 174-222 MHz ---Action Band 1 225-420 MHz --- 222-420 MHz ---UHF TV Band 470-729 MHz --- 470-800 MHz ---](https://usermanual.wiki/Yaesu-Musen/VX-7R.Manual/User-Guide-229636-Page-11.png)
![FCC ID: K66VX-7ROperating ManualVertex Standard Co., Ltd.12Action Band 2 800-999 MHz --- 800-999 MHz ---50 MHz Ham Band 30-59 MHz 50-54 MHz 30-88 MHz 50-54 MHz144 MHz Ham Band 137-174 MHz 140-174 MHz 137-174 MHz 140-174 MHz220 MHz Ham Band 222-225 MHz --- --- ---430 MHz Ham Band 420-470 MHz 420-470 MHz 420-470 MHz 420-470 MHzTo Change Operating Bands1. Press the [BAND(BND DN)] key repetitively. You will see the LCD indication moveup as you press the [BAND(BND DN)] key.2. If you wish to move down the operating band, press the [MON/F] key, then pressthe [BAND(BND DN)] key.3. The VX-VX-VX-VX-7R7R7R7R uses a dual VFO system (explained in detail on page ??). To switch fromthe “Main” VFO to the “Sub” VFO instantly, press the [SUB] key momentarily.Pressing the [MAIN] key will return the VX-7R to “Main” VFO.4. Once you have selected the desired band, you may initiate manual tuning (orscanning) per the discussions below.Frequency NavigationFrequency NavigationFrequency NavigationFrequency NavigationThe VX-VX-VX-VX-7R7R7R7R will initially be operating in the “VFO” mode, as just described. This is achannelized system which allows free tuning throughout the currently-selectedoperating band.Three basic frequency navigation methods are available on the VX-VX-VX-VX-7R7R7R7R:1) Tuning DialRotation of the DIAL allows tuning in the pre-programmed steps established for thecurrent operating band. Clockwise rotation of the DIAL causes the VX-VX-VX-VX-7R7R7R7R to be tunedtoward a higher frequency, while counter-clockwise rotation will lower the operatingfrequency.If you press the [MON/F] key momentarily, then rotate the DIAL, frequency steps of 1MHz will be selected. This feature is extremely useful for making rapid frequencyexcursions over the wide tuning range of the VX-VX-VX-VX-7R7R7R7R.2) Direct Keypad Frequency EntryThe desired operating frequency may be entered directly from the keypad.The operating mode will automatically be set once the new frequency is entered viathe keypad.To enter a frequency from the keypad, just press the numbered digits on the keypad inthe proper sequence. There is no “Decimal point” key on the VX-7R, so if the frequency](https://usermanual.wiki/Yaesu-Musen/VX-7R.Manual/User-Guide-229636-Page-12.png)
![FCC ID: K66VX-7ROperating ManualVertex Standard Co., Ltd.13is below 100 MHz (e.g. 15.150 MHz), any required leading zeroes must be entered.However, there is a short-cut for frequencies ending in zero - press the [V/M(WRITEMT)] key sfter the last non-zero digit.Examples:To enter 146.520 MHz, press [1] " [4] " [6] " [5] " [2] " [0]To enter 15.255 MHz, press [0] " [1] " [5] " [2] " [5] " [5]To enter 1.250 MHz (1250 kHz), press [0] " [0] " [1] " [2] " [5] " [0]To enter 0.950 MHz (950 kHz), press [0] " [0] " [0] " [9] " [5] " [0]To enter 430.000MHz, press [4] " [3] " [V/M(WRITE MT)]3) ScanningFrom the VFO mode, press the [MON/F] key, then press the [1(SCAN)] key. The VX-VX-VX-VX-7R7R7R7R will begin scanning toward a higher frequency, and will stop when it receives asignal strong enough to break through the Squelch threshold. The VX-7R will then holdon that frequency according to the setting of the “RESUME” mode (Menu Item: ScanModes #3). See page ?? for details.If you wish to reverse the direction of the scan (i.e. toward a lower frequency, insteadof a higher frequency), just rotate the DIAL one click in the counter-clockwise directionwhile the VX-7R is scanning. The scanning direction will be reversed. To revert toscanning toward a higher frequency once more, rotate the DIAL one click clockwise.Press the PTT switch momentarily to cancel the scanning.Dual Receive OperationDual Receive OperationDual Receive OperationDual Receive OperationThe VX-7R may be operate dual frequency receive.Press and hold the [MAIN] or [SUB] key for 2 second to activate the Dual Receiveoperation.While Dual Receive operation, “Main” band frequency display upper side and “Sub”band frequency display lower side, and “Operating” band (enabling the transmit andband/frequency change) indicate large characters.To switch the “Operating” band, press the [MAIN] key momentarily to switch the“Main” band frequency to the “Operating” band. Meanwhile, press the [SUB] keymomentarily to switch the “Sub” band frequency to the “Operating” band, describedpreviously.R.F. SayR.F. SayR.F. SayR.F. Say: The “Sub” band frequency is possible operate only on the amateur bands, butyou can select both bands to receive different frequencies on the same bands.](https://usermanual.wiki/Yaesu-Musen/VX-7R.Manual/User-Guide-229636-Page-13.png)
![FCC ID: K66VX-7ROperating ManualVertex Standard Co., Ltd.14Audio MutingThe Audio Mute feature is useful in situations where it would be helpful to reducethe audio level of the “Receive Only” receiver (Small character) whenever you receive asignal on the “main” band (Large character) while Dual Receive operation.To activate the Audio Mute feature:1. Press the [MON/F] key, then press the [0(SET)] key to enter the Set mode.2. Rotate the DIAL to select Menu Item (Basic Operation #8: MUTE SET).3. Press the [MAIN] or [SUB] key to select “ON” (to enable Audio Mute feature).4. Press the PTT switch to save the new setting and exit to normal operation.5. To disable the Audio Mute feature, select “ON” in step 3 above.When the Audio Mute feature is activated, the “MMMM” icon will appear on the display.BAND LinkingFor operation on Amateur satellites which use a “normal” (not “inverted” FMtransponder, the BAND Link feature may be useful.1. Set up dual receive operation, as just described.2. Press the [MON/F] key, then press the [0(SET)] key to enter the Set mode.3. Rotate the DIAL to select Menu Item (Misc Setup #9: BAND LINK).4. Press the [MAIN] or [SUB] key to set this Menu Item to ON.5. Press the PTT key to save the new setting and exit to Linked/Dual receiveoperation.As you rotate the DIAL, you will observe that both BAND frequencies are changingtogether. When you are done with this operating mode, re-enter the Set mode, and set(Misc Setup #9: BAND LINK) to OFF.TransmissionTransmissionTransmissionTransmissionOnce you have set up an appropriate frequency inside one of the three or fourAmateur bands on which the VX-7R can transmit (50 MHz, 144 MHz, or 430 MHz, plus220 MHz on the USA version), you’re ready to transmit. These are the most basic steps;more advanced aspects of transmitter operation will be discussed later.1. To transmit, press the PTT switch, and speak into the front panel microphone(located in the upper right-hand corner of the speaker grille) in a normal voice level.The “I-Beam” will glow red during transmission.2. To return to the receive mode, release the PTT switch.3. During transmission, the relative power level will be indicated on the LCD. Fullpower (5 Watts) is indicated by eight arrows below the frequency display. The three](https://usermanual.wiki/Yaesu-Musen/VX-7R.Manual/User-Guide-229636-Page-14.png)
![FCC ID: K66VX-7ROperating ManualVertex Standard Co., Ltd.15“Low Power” levels (L1, L2, and L3) are indicated by two, four, or six arrows,respectively. Additionally, the “L1,” “L2,” or “L3” icon will appear at the bottom ofthe display, corresponding with the “Low Power” Level setting.RRRR....FFFF.... Say Say Say Say: If you’re just talking to friends in the immediate area, you’ll get much longerbattery life by switching to Low Power operation. To do this, press the [MON/F] key,then press the [%(TX PO LK)] key so that the “L” icon appears at the bottom of thedisplay. And don’t forget, always have an antenna connected when you transmit.Transmission is not possible on any operating bands other than the 50 MHz, 144 MHz,and 430 MHz bands.Changing the Transmitter Power LevelYou can select between a total of four transmitter power levels on your VX-7R. Theexact power output will vary somewhat, depending on the voltage supplied to thetransceiver. With the standard FNB-80LI Battery Pack and external DC source, thepower output levels available are:HIGH LOW 3 LOW2 LOW150/144/430 MHz FM 5.0 W 2.5 W 1.0 W 0.5 W50 MHz AM 1.0 W (Fixed)220 MHz FM 0.3 W (Fixed)To change the power level:1. The default setting for the power output is “High;” in this configuration, the LCDshows no indication of the power output level. Press the [MON/F] key, then pressthe [%(TX PO LK)] key causes the power levels “L1,” “L2,” or “L3” appear.2. Press the [MON/F] key, then press the [%(TX PO LK)] key until the “Low Power”icon disappears will restore High Power operation.RRRR....FFFF.... Say Say Say Say: The VX-7R is smart! You can set up Low power on one band (like UHF), whileleaving VHF on High power, and the radio will remember the different settings on eachband. And when you store memories, you can store High and Low power settingsseparately in each memory, so you don’t waste battery power when using very close-inrepeaters!When you are operate on Low power setting, Press the [MON/F] key, then press the PTTswitch, the VX-7R temporarily.VOX OperationThe VOX system provides automatic transmit/receive switching based on voice inputto the microphone. With the VOX system enabled, you do not need to press the PTT](https://usermanual.wiki/Yaesu-Musen/VX-7R.Manual/User-Guide-229636-Page-15.png)
![FCC ID: K66VX-7ROperating ManualVertex Standard Co., Ltd.16switch in order to transmit.1. Press the [MON/F] key, then press the [0(SET)] key to enter the Set mode.2. Rotate the DIAL to select the Menu Item (Misc Setup #7: VOX).Press the [MAIN] or [SUB] key to select desired VOX level “HIGH” or “LOW.”3. When you have made your choice, press the PTT key to save the new setting andreturn to normal operation.4. Without pressing the PTT switch, speak into the microphone in a normal voice level.When you start speaking, the transmitter should be activated automatically. Whenyou finish speaking, the transceiver should return to the receive mode (after a shortdelay).5. To cancel VOX and return to PTT operation, just repeat the above procedures, select“OFF” in step 3 above.When the VOX system is activated, the “VVVV” icon will appear on the display.The VX-7R may be adjusted the “Hang-Time” of the VOX system (the transmit-receivedelay after the cessation of speech) via the Menu. The default delay is 1/2 second. To seta different delay time:1. Press the [MON/F] key, then press the [0(SET)] key to enter the Set mode.2. Rotate the DIAL to select the Menu Item (Misc Setup #8: VOX DLAY).3. Press the [MAIN] or [SUB] key to select the delay time among “0.5s,” “1s,” and “2s.”4. When you have made your choice, press the PTT key to save the new setting andreturn to normal operation.AM Broadcast ReceptionAM Broadcast ReceptionAM Broadcast ReceptionAM Broadcast ReceptionThe VX-7R includes provision for reception of AM broadcasts, either on the standardmedium-wave (MW) broadcast band, or on the shortwave bands up to 16 MHz.1. Set the VX-7R to the VFO mode2. Press the [BAND(BND DN)] key (or Press [MON/F] " [BAND(BND DN)])repetitively until you see a frequency in the frequency range desired. The MWcoverage is 0.5 MHz to 1.8 MHz, while the shortwave broadcast coverage is 1.8MHz to 16 MHz. In either case, the operating mode (displayed on the right edge ofthe LCD) should be shown as being “AM.”3. Rotate the DIAL to tune across the broadcast band.4. You may also use the keypad to enter frequencies directly. This method will bequicker for changing from the 49-meter broadcast band to the 31-meter band, for](https://usermanual.wiki/Yaesu-Musen/VX-7R.Manual/User-Guide-229636-Page-16.png)
![FCC ID: K66VX-7ROperating ManualVertex Standard Co., Ltd.17example.RRRR....FFFF.... Say Say Say Say: If the operating mode is not correct, you may need to adjust the setting ofMenu Item (Basic Setup #4: RX MODE). See page ?? for details.The VX-7R is stored the frequency of the Short-wave Broadcast station into the memorychannel “???” through “???.”AM Aircraft ReceptionAM Aircraft ReceptionAM Aircraft ReceptionAM Aircraft ReceptionReception of AM signals in the aeronautical band (108-137 MHz) is similar to thatdescribed in the previous section.1. Be sure that the VX-7R is set to the VFO mode.2. Press the [BAND(BND DN)] key (or Press [MON/F] " [BAND(BND DN)])repetitively until you see a frequency in the aeronautical band.3. Rotate the DIAL to tune across the aeronautical band.4. You may also use the keypad to enter frequencies directly. Remember thatfrequencies quoted by aircraft operators may be abbreviated, and that the “5” at theend of a frequency may be dropped. Since aeronautical channels are assigned in25-kHz steps, therefore, a frequency announced as “thirty-two, forty-two”corresponds to an operating frequency of 132.425 MHz.FM Broadcast/TV Audio ReceptionFM Broadcast/TV Audio ReceptionFM Broadcast/TV Audio ReceptionFM Broadcast/TV Audio ReceptionThe VX-7R also includes provision for reception in the FM broadcast band, utilizing awide-bandwidth filter which provides excellent fidelity.To Activate FM Broadcast Reception1. Be sure that the VX-7R is set to the VFO mode.2. Press the [BAND(BND DN)] key (or Press [MON/F] " [BAND(BND DN)])repetitively until a frequency in the FM broadcast band appears on the display. Thetotal frequency range included in the “FM” band is 59-108 MHz.3. Rotate the DIAL to select the desired station. The default synthesizer steps for theW-FM mode are 100 kHz/step.To Activate VHF or UHF TV Audio Reception1. Be sure that the VX-7R is set to the VFO mode.2. Press the [BAND(SET)AR] key repetitively until a frequency in the VHF or UHFTV bands appears on the LCD.](https://usermanual.wiki/Yaesu-Musen/VX-7R.Manual/User-Guide-229636-Page-17.png)
![FCC ID: K66VX-7ROperating ManualVertex Standard Co., Ltd.183. Rotate the DIAL to select the desired station.RRRR....FFFF.... Say Say Say Say: Remember that the Wide-FM Squelch setting may be made independentlyfrom the Narrow-FM setting, using Menu Item (Basic Setup #2: SQL WFM). Seepage ??.Weather BroadcastWeather BroadcastWeather BroadcastWeather Broadcast/VHF Marine Channel/VHF Marine Channel/VHF Marine Channel/VHF Marine Channel Reception Reception Reception ReceptionThe VX-7R includes a unique feature which allows reception of weather broadcastsin the 160-MHz frequency range. Ten standard Weather Broadcast channels are pre-loaded into a special memory bank.To listen to a Weather Broadcast Channel/VHF Marine Channel:1. Press the [MON/F] key, then press the [3(WX)] key to recall the Weather Broadcastchannels.2. Turn the DIAL knob to select the desired Weather Broadcast channel.3. If you wish to check the other channels for activity by scanning, press the [MON/F]key then press the [1(SCAN)] key.4. Press the [3(WX)] key again to recall the VHF Marine Channels. Turn the DIALknob to select the desired Marine channel.5. To exit to normal operation, again the [MON/F] key, then press the [3(WX)] key.Operation will return to the VFO or Memory channel you were operating on beforeyou began Weather Broadcast operation.R.F. SayR.F. SayR.F. SayR.F. Say: In the event of extreme weather disturbances, such as storms and hurricanes,the NOAA (National Oceanic and Atmospheric Administration) sends a weather alertaccompanied by a 1050 Hz tone and subsequent weather report on one of the NOAAweather channels. You may disable the Weather Alert feature via Menu Item (MiscSetup #20 WX ALERT), if desired.Keyboard LockingKeyboard LockingKeyboard LockingKeyboard LockingIn order to prevent accidental frequency change or inadvertent transmission, variousaspects of the VX-7R’s keys and switches may be locked out. The possible lockoutcombinations are:KEY: Just the front panel keys are locked outDIAL: Just the top panel DIAL is locked outKEY + DIAL: Both the DIAL and Keys are locked outPTT: The PTT switch is locked (TX not possible)KEY + PTT: Both the keys and PTT switch are locked out](https://usermanual.wiki/Yaesu-Musen/VX-7R.Manual/User-Guide-229636-Page-18.png)
![FCC ID: K66VX-7ROperating ManualVertex Standard Co., Ltd.19DIAL + PTT: Both the DIAL and PTT switch are locked outALL: All of the above are locked outTo lock out some or all of the keys:1. Press the [MON/F] key, then press the [0(SET)] key to enter the Set mode.2. Rotate the DIAL to select Menu Item (Basic Setup #10: LOCK MODE).3. Press the [MAIN] or [SUB] key to choose between one of the locking schemes asoutlined above.4. When you have made your selection, press the PTT switch to save the new settingand resume normal operation.5. To activate the locking feature, press and hold in the [%(TX PO LK)] key for 2seconds. The “Key Lock” icon will appear on the LCD. To cancel locking, again pressand hold the [%(TX PO LK)] key for 2 seconds.RRRR....FFFF.... SaySaySaySay: Even when “ALL” keys have been locked out, one key actually is not lockedout: the [%(TX PO LK)] key remains available so you can Unlock your keypad when youwant to!Keypad/LCD IlluminationKeypad/LCD IlluminationKeypad/LCD IlluminationKeypad/LCD IlluminationYour VX-7R includes a reddish illumination lamp which aids in nighttime operation.The red illumination yields clear viewing of the display in a dark environment, withminimal degradation of your night vision. Three options for activating the lamp areprovided:KEY Mode: Illuminate the Keypad/LCD for five seconds when any key pressed.CONTINUE Mode: Illuminate the Keypad/LCD continuously.OFF Mode: Disables the Keypad/LCD lamp.Here is the procedure for setting up the Lamp mode:1. Press the [MON/F] key, then press the [0(SET)] key to enter the Set mode.2. Rotate the DIAL to select Menu Item (Display Setup #5: LAMP MODE).3. Press the [MAIN] or [SUB] key to select one of the three modes described above.4. When you have made your choice, press the PTT key to save the new setting andreturn to normal operation.Disabling the Keypad BeeperDisabling the Keypad BeeperDisabling the Keypad BeeperDisabling the Keypad BeeperIf the keypad’s Beeper creates an inconvenience (particularly when operating in aquiet room), it may easily be disabled.1. Press [MON/F] then, press the [0(SET)] key to enter the Set mode.](https://usermanual.wiki/Yaesu-Musen/VX-7R.Manual/User-Guide-229636-Page-19.png)
![FCC ID: K66VX-7ROperating ManualVertex Standard Co., Ltd.202. Rotate the DIAL to select Menu Item (Basic Setup #9: KEY BEEP).3. Press the [MAIN] or [SUB] key to change the setting from ON to OFF.4. When you have made your selection, press the PTT key to save the new setting andexit to normal operation.5. If you wish to re-enable the Beeper, just repeat the above procedure, pressing the[MAIN] or [SUB] key to select ON in step “3” above.Advanced OperationAdvanced OperationAdvanced OperationAdvanced OperationNow that you’re mastered the basics of VX-7R operation, let’s learn more about someof the really neat features.Setting the Frequency Display Image SizeSetting the Frequency Display Image SizeSetting the Frequency Display Image SizeSetting the Frequency Display Image SizeVFO ModeWhen operating in the VFO mode, press the [MON/F] key, then press the [MAIN] or[SUB] key causes the LCD to “toggle” between display of largelargelargelarge characters and the smallsmallsmallsmallcharacters. However, this feature does not activate while Dual Receive operation.Memory ModeWhen operating in the Memory mode (see page ??), press the [MON/F] key, then pressthe [MAIN] or [SUB] key causes the LCD to “toggle” between display of the (largecharacters) current memory’s frequency and the (small characters) current memory’sfrequency with alpha numeric Tag. However, this feature does not activate while DualReceive operation.Changing the Channel StepsChanging the Channel StepsChanging the Channel StepsChanging the Channel StepsThe VX-7R’s synthesizer provides the option of utilizing channels steps of5/9/10/12.5/15/20/25/50/100 kHz per step, any number of which may be important toyour operating requirements. The VX-7R is set up at the factory with different defaultsteps on each operating band which probably are satisfactory for most operation.However, if you need to change the channel step increments, the procedure to do so isvery easy.1. Press the [MON/F] key, then press the [0(SET)] key to enter the Set mode.2. Rotate the DIAL to select Menu Item (Basic Setup #3: VFO STEP).3. Press the [MAIN] or [SUB] key to select the new channel step size.4. Press the PTT key to save the new setting and exit to normal operation.](https://usermanual.wiki/Yaesu-Musen/VX-7R.Manual/User-Guide-229636-Page-20.png)
![FCC ID: K66VX-7ROperating ManualVertex Standard Co., Ltd.21Changing the Operating ModeChanging the Operating ModeChanging the Operating ModeChanging the Operating ModeThe VX-7R provides for automatic mode changing when the radio is tuned todifferent operating frequencies. However, should an unusual operating situation arisein which you need to change between the available operating modes (FM-Narrow, FM-Wide, and AM), here is the procedure for doing so:1. Press the [MON/F] key, then press the [0(SET)] key to enter the Set mode.2. Rotate the DIAL to select Menu Item (Basic Setup #4: RX MODE).3. Press the [MAIN] or [SUB] key to select the new channel step size. The availableselections are:AUTO: Automatic mode setting per default values.N-FM: Narrow-bandwidth FM (used for voice communication)W-FM: Wide-bandwidth FM (used for high-fidelity broadcasting)AM: Amplitude Modulation4. Press the PTT key to save the new setting and exit to normal operation.RRRR....FFFF.... Say Say Say Say: Unless you have a compelling reason to do so, leave the Automatic ModeSelection feature on so as to save time and trouble when changing bands. If you make amode change for a particular channel or station, you can always store that one channelinto memory, as the mode setting will be memorized along with the frequencyinformation.Repeater OperationRepeater OperationRepeater OperationRepeater OperationRepeater stations, usually located on mountaintops or other high locations, provide adramatic extension of the communication range for low-powered hand-held or mobiletransceivers. The VX-7R includes a number of features which make repeater operationsimple and enjoyable.Repeater ShiftsYour VX-7R has been configured, at the factory, for the repeater shifts customary inyour country. For the 50 MHz band, this usually will be 1 MHz, while the 144 MHz shiftwill be 600 kHz; on 70 cm, the shift may be 1.6 MHz, 7.6 MHz, or 5 MHz (USA version).Depending on the part of the band in which you are operating, the repeater shift may beeither downward (–) or upward (+), and one of these icons will appear at the top of theLCD when repeater shifts have been enabled.Automatic Repeater Shift (ARS)](https://usermanual.wiki/Yaesu-Musen/VX-7R.Manual/User-Guide-229636-Page-21.png)
![FCC ID: K66VX-7ROperating ManualVertex Standard Co., Ltd.22The VX-7R provides a convenient Automatic Repeater Shift feature, which causesthe appropriate repeater shift to be automatically applied whenever you tune into thedesignated repeater sub-bands in your country. These sub-bands are shown below.If the ARS feature does not appear to be working, you may have accidentally disabledit.To re-enable ARS:1. Press the [MON/F] key, then press the [0(SET)] key to enter the Set mode.2. Rotate the DIAL to select Menu Item (Basic Setup #5: ARS).3. Press the [MAIN] or [SUB] key to select “ON” (to enable Automatic Repeater Shift).4. Press the PTT key to save the new setting and exit to normal operation.Manual Repeater Shift ActivationIf the ARS feature has been disabled, or if you need to set a repeater shift other thanthat established by the ARS, you may set the direction of the repeater shift manually.To do this:1. Press the [MON/F] key, then press the [0(SET)] key to enter the Set mode.2. Rotate the DIAL to select Menu Item (Basic Setup #7: RPT SHIFT).3. Press the [MAIN] or [SUB] key to select the desired shift among the “–RPT,”“+RPT,” and “SIMP.”4. Press the PTT key to save the new setting and exit to normal operation.Changing the Default Repeater ShiftsIf you travel to a different country, you may need to change the default repeater shiftso as to ensure compatibility with local operating requirements.To do this, follow the procedure below:1. Press the [MON/F] key, then press the [0(SET)] key to enter the Set mode.2. Rotate the DIAL to select Menu Item (Basic Setup #6: SHIFT).3. Press the [MAIN] or [SUB] key to select the new repeater shift magnitude.4. Press the PTT key to save the new setting and exit to normal operation.RRRR....FFFF.... Say Say Say Say: If you just have one “odd” split that you need to program, don’t change the“default” repeated shifts using this Menu Item! Enter the transmit and receivefrequencies separately, as shown on page ??.When setting a large repeater shift (e.g. 5.0 MHz for 440 MHz), remember that you cantune in 1 MHz steps by pressing [MON/F] key, then pressing the [MAIN] or [SUB] key(first step entry: “MHz” icon will blinks).](https://usermanual.wiki/Yaesu-Musen/VX-7R.Manual/User-Guide-229636-Page-22.png)
![FCC ID: K66VX-7ROperating ManualVertex Standard Co., Ltd.23Checking the Repeater Uplink (Input) FrequencyIt often is helpful to be able to check the uplink (input) frequency of a repeater, to seeif the calling station is within direct (“Simplex”) range.To do this, just press the [HM/RV(EMG)] key. You’ll notice that the display hasshifted to the repeater uplink frequency. Press the [HM/RV(EMG)] key again to causeoperation to revert to normal monitoring of the repeater downlink (output) frequency.CTCSS OperationCTCSS OperationCTCSS OperationCTCSS OperationMany repeater systems require that a very-low-frequency audio tone besuperimposed on your FM carrier in order to activate the repeater. This helps preventfalse activation of the repeater by radar or spurious signals from other transmitters.This tone system, called “CTCSS” (Continuous Tone Coded Squelch System), is includedin your VX-7R, and is very easy to activate.RRRR....FFFF.... Say Say Say Say: CTCSS setup involves two actions: setting the Tone Frequency and thensetting of the Tone Mode. These actions are set up by using the [8(TONE)] key, or MenuItems (TSQ/DCS/DTMF #1: SQL TYPE) and (TSQ/DCS/DTMF #2: TONE SET).1. Press the [MON/F] key, then press the [8(TONE)] key. This provides a “Short-cut”to Menu Item (TSQ/DCS/DTMF #1: SQL TYPE).2. Press the [MAIN] or [SUB] key so that “TONE” appears on the display; thisactivates the CTCSS Encoder, which allows repeater access.RRRR....FFFF.... Say Say Say Say: You may notice an additional “DCS” icon appearing while you press the[MAIN] or [SUB] key in this step. We’ll discuss the Digital Code Squelch systemshortly.3. Press the [MAIN] key in step “2” above will occasionally cause “SQL” to appearadjacent to the “TONE.” When “TONE SQL” appears, this means that the ToneSQueLch system is active, which mutes your VX-7R’s receiver until it receives a callfrom another radio sending out a matching CTCSS tone. This can help keep yourradio quiet until a specific call is received, which may be helpful while operating incongested areas.4. When you have made your selection of the CTCSS tone mode, rotate the DIAL oneclick clockwise to select Menu Item (TSQ/DCS/DTMF #2: TONE SET). This Menuselection allows setting of the CTCSS tone frequency to be used.5. Press the [BAND(BND DN)] key to enable the adjustment of the CTCSS frequency.6. Press the [MAIN] or [SUB] key until the display indicates the Tone Frequency youneed to be using (ask the repeater owner/operator if you don’t know the tonefrequency).](https://usermanual.wiki/Yaesu-Musen/VX-7R.Manual/User-Guide-229636-Page-23.png)
![FCC ID: K66VX-7ROperating ManualVertex Standard Co., Ltd.247. When you have made your selection, press the [BAND(BND DN)] key, then pressthe PTT switch to save the new settings and exit to normal operation.RRRR....FFFF.... Say Say Say Say: Some repeaters may or may not re-transmit a CTCSS tone - some systems justuse CTCSS to control access to the repeater, but don’t pass it along when transmitting.If the S-Meter indicats, but the VX-7R is not passing audio, repeat steps “1” through “3”above, but rotate the DIAL so that “SQL” disappears - this will allow you to hear alltraffic on the channel being received.DCS OperationDCS OperationDCS OperationDCS OperationAnother form of tone access control is Digital Code Squelch, or DCS. It is a newer,more advanced tone system which generally provides more immunity from false pagingthan does CTCSS. The DCS Encoder/Decoder is built into your VX-7R, and operation isvery similar to that just described for CTCSS. Your repeater system may be configuredfor DCS; if not, it is frequently quite useful in Simplex operation if your friend(s) usetransceivers equipped with this advanced feature.RRRR....FFFF.... Say Say Say Say: Just as in CTCSS operation, DCS requires that you set the Tone Mode to DCSand that you select a tone code.1. Press the [MON/F] key, then press the [8(TONE)] key. This provides a “Short-cut”to Menu Item (TSQ/DCS/DTMF #1: SQL TYPE).2. Press the [MAIN] or [SUB] key until “DCS” appears on the display; this activatesthe DCS Encoder/Decoder.3. Now rotate the DIAL to select Menu Item (TSQ/DCS/DTMF #3: DCS SET).4. Press the [BAND(BND DN)] key to enable the adjustment of the DCS code.5. Press the [MAIN] or [SUB] key to select the desired DCS Code (a three-digitnumber). Ask the repeater owner/operator if you don’t know DCS Code; if you areworking simplex, just set up the DCS Code to be the same as that used by yourfriend(s).6. When you have made your selection, press the [BAND(BND DN)] key, then pressthe PTT switch to save the new settings and exit to normal operation.RRRR....FFFF.... Say Say Say Say: Remember that the DCS is an Encode/Decode system, so your receiver willremain muted until a matching DCS code is received on an incoming transmission.Switch the DCS off when you’re just tuning around the band!Tone Search ScanningTone Search ScanningTone Search ScanningTone Search ScanningIn operating situations where you don’t know the CTCSS or DCS tone being used byanother station or stations, you can command the radio to listen to the incoming signal](https://usermanual.wiki/Yaesu-Musen/VX-7R.Manual/User-Guide-229636-Page-24.png)
![FCC ID: K66VX-7ROperating ManualVertex Standard Co., Ltd.25and scan in search of the tone being used. Two things must be remembered in thisregard:# You must be sure that your repeater uses the same tone type (CTCSS vs. DCS).# Some repeaters do not pass the CTCSS tone; you may have to listen to thestation(s) transmitting on the repeater uplink (input) frequency in order to allowTone Search Scanning to work.To scan for the tone in use:1. Set the radio up for either CTCSS or DCS Decoder operation (see the previousdiscussion). In the case of CTCSS, “TSQL” will appear on the display; in the case ofDCS, “DCS” will appear on the display.2. Press the [MON/F] key, then press the [0(SET)] key to enter the Set mode.3. Rotate the DIAL to select the Menu Item (TSQ/DCS/DTMF #2: TONE SET) whenTONE SQL is selected or Menu Item (TSQ/DCS/DTMF #3: DCS SET) during DCSoperation.4. Press the [BAND(BND DN)] key to enable the Menu Item.5. Press the [MON/F] key, then press the [1(SCAN)] key to start scanning for theincoming CTCSS or DCS tone/code.6. When the radio detects the correct tone or code, it will halt on that tone/code, andaudio will be allowed to pass. Press the [BAND(BND DN)] key to lock in thattone/code, then press PTT to exit to normal operation.RRRR....FFFF.... Say Say Say Say: f the Tone Scan feature does not detect a tone or code, it will continue to scanindefinitely. When this happens, it may be that the other station is not sending any tone.You can press the PTT switch to halt the scan at any time.You also can press the MONI key during Tone Scanning to listen to the (muted) signalfrom the other station. When you release the MONI key, Tone Scanning will resumeafter about a second.Tone Scanning works either in the VFO or Memory modes.CTCSS/DCS Bell OperationCTCSS/DCS Bell OperationCTCSS/DCS Bell OperationCTCSS/DCS Bell OperationDuring CTCSS Decode or DCS operation, you may set the VX-7R up such that a ringing“bell” sound alerts you to the fact that a call is coming in. Here is the procedure foractivating the CTCSS/DCS Bell:1. Set the transceiver up for CTCSS Decode (“Tone Squelch”) or DCS operation, asdescribed previously.2. Adjust the operating frequency to the desired channel.](https://usermanual.wiki/Yaesu-Musen/VX-7R.Manual/User-Guide-229636-Page-25.png)
![FCC ID: K66VX-7ROperating ManualVertex Standard Co., Ltd.263. Press the [MON/F] key, then press the [0(SET)] key to enter the Set mode.4. Rotate the DIAL to select Menu Item (TSQ/DCS/DTMF #5: BELL).5. Press the [MAIN] or [SUB] key to set the desired number of rings of the Bell. Theavailable choices are 1, 3, 5, or 8 rings, REPEAT (continuous ringing), or OFF.6. Press the PTT key momentarily to save the new setting and exit to normaloperation.When a station calls you whose transceiver is sending a CTCSS tone or DCS code whichmatches that set into your Decoder, the Bell will ring in accordance to thisprogramming.Split Tone OperationSplit Tone OperationSplit Tone OperationSplit Tone OperationThe VX-7R can be operate Split Tone operation via Set mode.1. Press the [MON/F] key, then press the [0(SET)] key to enter the Set mode.2. Rotate the DIAL to select Menu Item (TSQ/DCS/DTMF #6: SPLIT TONE).3. Press the [MAIN] or [SUB] key to set the desired number of rings of the Bell.4. Press the PTT key momentarily to save the new setting and exit to normaloperation.When the Split Tone feature is activated, you can see the following additionalparameters after the “DCS” parameter while selecting the Menu Item (TSQ/DCS/DTMF#6: SQL TYPE),:D CODE: DSC Encode only (“D” icon will appear while operating)TONE DC: Encode the CTCSS Tone and Decode the DCS code(“T∙D” icon will appear while operating)DC TONE: Encode the DCS code and Decode the CTCSS Tone(“D∙T” icon will appear while operating)Select the desired operating mode above.Tone Calling (1750 Hz)Tone Calling (1750 Hz)Tone Calling (1750 Hz)Tone Calling (1750 Hz)If the repeaters in your country require a 1750-Hz burst tone for access (typically inEurope), you can set the MONI key to serve as a “Tone Call” switch instead. To changethe configuration of this switch, we again use the Menu to help us.1. Press the [MON/F] key, then press the [0(SET)] key to enter the Set mode.2. Rotate the DIAL to select Menu Item (Misc Setup #3 MON/T-CAL).3. Press the [MAIN] or [SUB] key to select “T-CALL” on the display.4. Press the PTT key to save the new setting and exit to normal operation.](https://usermanual.wiki/Yaesu-Musen/VX-7R.Manual/User-Guide-229636-Page-26.png)
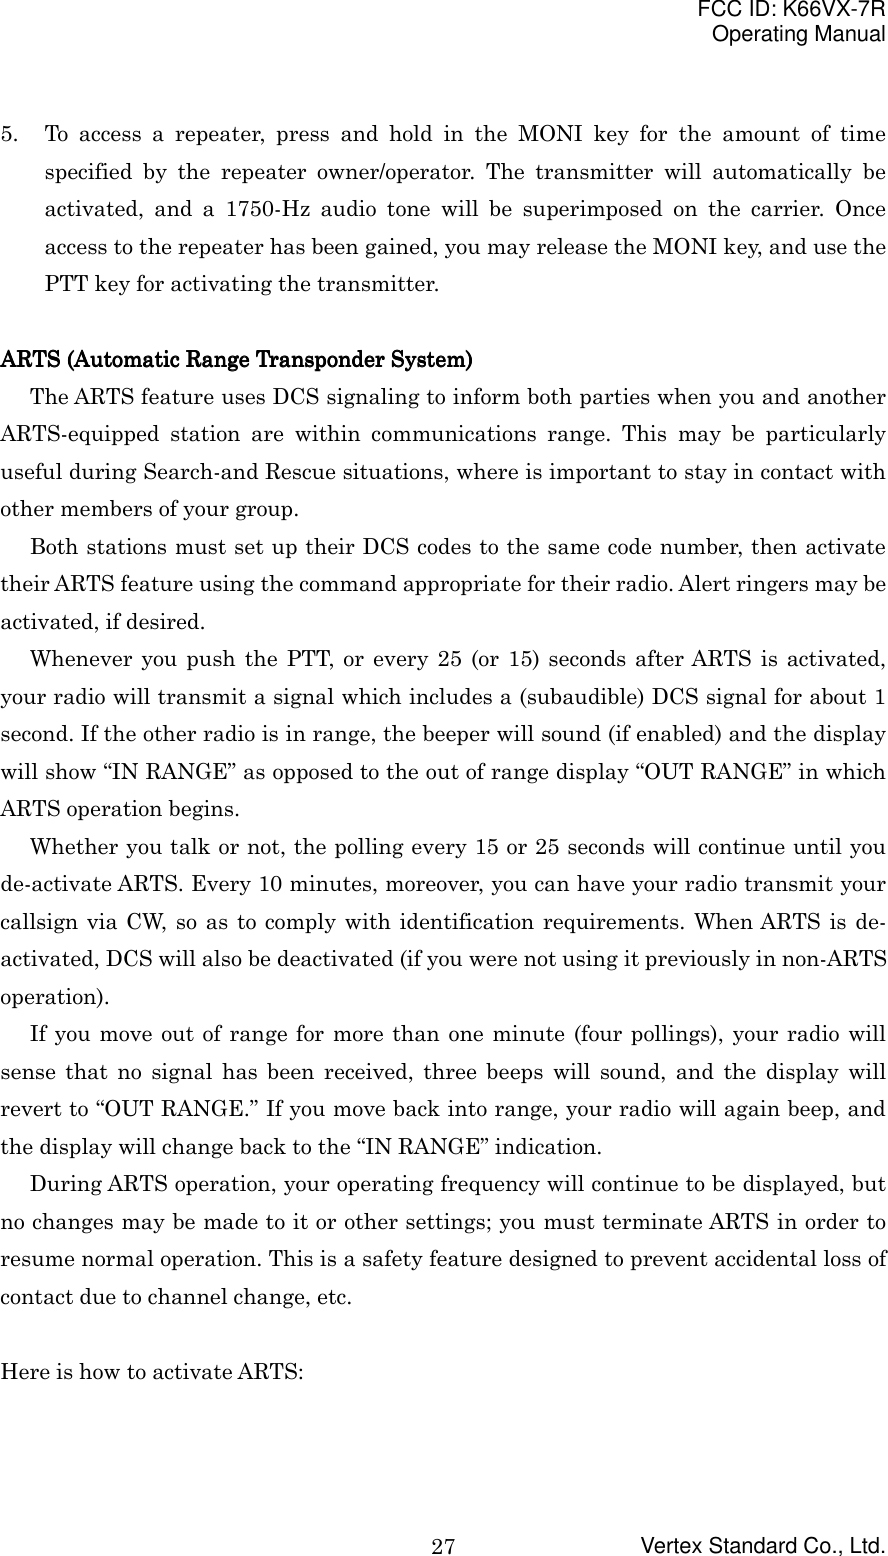
![FCC ID: K66VX-7ROperating ManualVertex Standard Co., Ltd.28Basic ARTS Setup and Operation1. Set your radio and the other radio(s) to the same DCS code number, per thediscussion on page ??.2. Press the [MON/F] key, then press the [4(ARTS)] key. You will observe the “OUTRANGE” display on the LCD below the operating frequency. ARTS operation hasnow commenced.3. Every 25 seconds, your radio will transmit a “polling” call to the other station.When that station responds with its own ARTS polling signal, the display willchange to “IN RANGE” to confirm that the other station’s polling code was receivedin response to yours.4. Press the [MON/F] key, then press the [4(ARTS)] key to exit ARTS operation andresume normal functioning of the transceiver.RRRR....FFFF.... Say Say Say Say: ARTS won’t work if you have used the Lock feature to disable the PTT!ARTS Polling Time OptionsThe ARTS feature may be programmed to poll every 25 seconds (default value) or 15seconds. The default value provides maximum battery conservation, because the pollingsignal is sent out less frequently. To change the polling interval:1. Press the [MON/F] key, then press the [0(SET)] key to enter the Set mode.2. Rotate the DIAL to select Menu Item (ARTS #2: ARTS ITVL).3. Press the [MAIN] or [SUB] key to select the desired polling interval (15 or 25seconds).4. When you have made your selection, press the PTT key to save the new setting andexit to normal operation.ARTS Alert Beep OptionsThe ARTS feature allows two kinds of alert beeps (with the additional option ofturning them off), so as to alert you to the current status of ARTS operation. Dependingon your location and the potential annoyance associated with frequent beeps, you maychoose the Beep mode which best suits your needs. The choices are:IN RANGE: The beeps are issued only when the radio first confirms that you arewithin range, but does not re-confirm with beeps thereafter.ALWAYS: Every time a polling transmission is received from the other station,the alert beeps will be heard.OFF: No alert beeps will be heard; you must look at the display to confirmcurrent ARTS status.](https://usermanual.wiki/Yaesu-Musen/VX-7R.Manual/User-Guide-229636-Page-28.png)
![FCC ID: K66VX-7ROperating ManualVertex Standard Co., Ltd.29To set the ARTS Beep mode, use the following procedure:1. Press the [MON/F] key, then press the [0(SET)] key to enter the Set mode.2. Rotate the DIAL to select Menu Item (ARTS #1: ARTS BEEP”).3. Press the [MAIN] or [SUB] key to select the desired ARTS Beep mode (see above).4. When you have made your selection, press the PTT key to save the new setting andexit to normal operation.CW Identifier SetupThe ARTS feature includes a CW identifier, as discussed previously. Every tenminutes during ARTS operation, the radio can be instructed to send “DE (your callsign)K” if this feature is enabled. The callsign field may contain up to 16 characters.Here’s how to program the CW Identifier:1. Press the [MON/F] key, then press the [0(SET)] key to enter the Set mode.2. Rotate the DIAL to select Menu Item (ARTS #3: CW ID).3. Press the [BAND(BND DN)] key to enable changing of this Menu item. Appear the“ ” with blinking.4. Press the [MAIN] or [SUB] key to set the CW ID function ON.5. Rotate the DIAL one click clockwise to begin entry of the letters and numbers inyour callsign.6. Press the [MAIN]/[SUB] key or keyboard to set the first letter or number in yourcallsign.Example 1: Press the [MAIN] or [SUB] key to select any of ?? available characters(including letters, numbers, and special symbols).Example 2: Press the [2(DW)] key repeatedly to toggle among the seven availablecharacters: A " B " C " a " b " c " 27. When the correct character has been selected, rotate the DIAL one click clockwiseto move on to the next character.8. Repeat steps 6 and 7 as many times as necessary to complete your callsign. Notethat the “slant bar” (– • • – • is among the available characters, should you be a“portable” station.9. When you have entered your entire callsign, press the [BAND(BND DN)] key todefine the callsign, then press the PTT key to save the settings and exit to normaloperation.](https://usermanual.wiki/Yaesu-Musen/VX-7R.Manual/User-Guide-229636-Page-29.png)
![FCC ID: K66VX-7ROperating ManualVertex Standard Co., Ltd.30DTMF OperationDTMF OperationDTMF OperationDTMF OperationThe VX-7R’s 16-button keypad allows easy DTMF dialing for Autopatch or repeatercontrol purposes. Besides numerical digits [0] through [9], the keypad includes the [*]and [#] digits, plus the [A], [B], [C], and [D] tones often used for repeater control.Manual DTMF Tone GenerationYou can generate DTMF tones during transmission manually.1. Press the PTT switch to begin transmission.2. While transmitting, press the desired numbers on the keypad.3. When you have sent all the digits desired, release the PTT key.DTMF AutodialerNine DTMF Autodial memories are provided, allowing you to store telephone numbersfor autopatch use. You can also store short autopatch access code streams so as to avoidhaving to send them manually.Here is the DTMF Autodial storage procedure:1. Press the [MON/F] key, then press the [0(SET)] key to enter the Set mode.2. Rotate the DIAL to select Menu Item (TSQ/DCS/DTMF #8: DTMF SET).3. Press the [BAND(BAND DN)] key to enable adjustment of this Menu Item.4. Press the [MAIN] or [SUB] key to select the DTMF Memory register into which youwish to store this DTMF string.5. Rotate the DIAL knob one click to begin DTMF Memory entry into the selectedregister.6. Key in the DTMF digits you wish to store into this register.Press the [MAIN] key to store the “Pause,” then press again the [MAIN] key todelete the previously storing data after the cursor.7. Press the PTT switch to save the setting. To store other numbers, repeat thisprocess, using a different DTMF memory register.To send the telephone number:1. Press the [MON/F] key, then press the [0(SET)] key to enter the Set mode.2. Rotate the DIAL to select Menu Item (TSQ/DCS/DTMF #7: DTMF DIALER).3. Press the [MAIN] or [SUB] key to set the DTMF Autodialer function to the “ON”position.4. Press the PTT switch to exit to normal operation and activates the DTMFAutodialer function (“Telephone” icon will appear).](https://usermanual.wiki/Yaesu-Musen/VX-7R.Manual/User-Guide-229636-Page-30.png)
![FCC ID: K66VX-7ROperating ManualVertex Standard Co., Ltd.315. In the Autodialer function mode, press the numerical key ([1] through [9])corresponding to the DTMF memory string you wish to send. Once the string begins,you may release the PTT key, as the transmitter will be held “on the air” until theDTMF string is completed.Emergency Channel OperationEmergency Channel OperationEmergency Channel OperationEmergency Channel OperationThe VX-7R includes an “Emergency” feature which may be useful if you havesomeone monitoring on the same frequency as your transceiver’s UHF “Home” channel.See page ?? for details on setting the Home channel.The “Emergency” feature is activated by pressing the [HM/RV(EMG)] key for 2seconds.When this is done, the radio (A) is placed on the UHF amateur band Home channel,(B) emits a loud “Alarm” sound (the volume is controlled by the VOLUME knob), (C)flash the I-Beam by various color, and (D) if you press the PTT key, this alarm soundwill be transmitted.To disable the “Emergency” feature, turn the radio by press and holding in the [PWR]switch for 2 seconds.Use this feature if you are out for a walk and want a quick way of alerting a familymember as to a dangerous situation. The alarm sound may discourage an attacker andallow you to escape.RRRR....FFFF.... Say Say Say Say: Be sure to arrange with a friend or family member to be monitoring on thesame frequency, as there will be no identification sent via the Emergency alarm sound.And do not transmit the alarm tone except in a true emergency!The I-Beam may change to another function via Menu Item (Misc Setup #5: EMG SET),see page xx.ATT (Front End ATT (Front End ATT (Front End ATT (Front End Attenuator)Attenuator)Attenuator)Attenuator)The attenuator will reduce all signals (and noise) by 20 dB, and it may be used tomake reception more pleasant under extremely noisy conditions.1. Press [MON/F] then, press the [0(SET)] key to enter the Set mode.2. Rotate the DIAL to select Menu Item (Misc Setup #18: ATT).3. Press the [MAIN] or [SUB] key to change the setting from OFF to ON.4. When you have made your selection, press the PTT key to save the new setting andexit to normal operation.5. If you wish to disable the attenuator, just repeat the above procedure, pressing the[MAIN] or [SUB] key to select OFF in step “3” above.](https://usermanual.wiki/Yaesu-Musen/VX-7R.Manual/User-Guide-229636-Page-31.png)
![FCC ID: K66VX-7ROperating ManualVertex Standard Co., Ltd.32R.F. SayR.F. SayR.F. SayR.F. Say: When the attenuator is activated, the “ATATATAT” icon will appear on the display.Receive Battery Saver SetupReceive Battery Saver SetupReceive Battery Saver SetupReceive Battery Saver SetupAn important feature of the VX-7R is its Receive Battery Saver, which “puts theradio to sleep” for a time interval, periodically “waking it up” to check for activity. Ifsomebody is talking on the channel, the VX-7R will remain in the “active” mode, thenresume its “sleep” cycles. This feature significantly reduces quiescent battery drain, andyou may change the amount of “sleep” time between activity checks using the MenuSystem:1. Press the [MON/F] key, then press the [0(SET)] key to enter the Set mode.2. Rotate the DIAL to select Menu Item (Save Modes #2: RX SAVE).3. Press the [MAIN] or [SUB] key to select the desired “sleep” duration. The selectionsavailable are 200 ms, 300 ms, 500 ms, 1 second, and 2 seconds, or OFF. The defaultvalue is 200 ms.4. When you have made your selection, press the PTT key to save the new setting andexit to normal operation.RRRR....FFFF.... Say Say Say Say: When you are operating on Packet, switch the Receive Battery Saver OFF, asthe sleep cycle may “Collide” with the beginning of an incoming Packet transmission,causing your TNC not to receive the full data burst.TX Battery SaverTX Battery SaverTX Battery SaverTX Battery SaverThe VX-7R also includes a useful Transmit Battery Saver, which will automaticallylower the power output level when the last signal received was very strong. For example,when you are in the immediate vicinity of a repeater station, there generally is noreason to use the full 5 Watts of power output in order to achieve full-quieting access tothe repeater. With the Transmit Battery Saver, the automatic selection of Low Poweroperation conserves battery drain significantly.To activate the Transmit Battery Saver:1. Press the [MON/F] key, then press the [0(SET)] key to enter the Set mode.2. Rotate the DIAL to select Menu Item (Save Modes #3: TX SAVE).3. Press the [MAIN] or [SUB] key to set this Menu Item to “ON” (this activating theTransmit Battery Saver).4. When you have completed your selection, press the PTT key to save the new settingand exit to normal operation.](https://usermanual.wiki/Yaesu-Musen/VX-7R.Manual/User-Guide-229636-Page-32.png)
![FCC ID: K66VX-7ROperating ManualVertex Standard Co., Ltd.33Disabling the Disabling the Disabling the Disabling the ““““I-BeamI-BeamI-BeamI-Beam””””Further battery conservation may be accomplished by disabling the “I-Beam” whilereceiving the signal (BUSY LED). Use the following procedure:1. Press the [MON/F] key, then press the [0(SET)] key to enter the Set mode.2. Rotate the DIAL to select Menu Item (Display Setup #1: BUSY LED).3. Press the [MAIN] or [SUB] key to set this Menu Item to “OFF” (thus disabling theBUSY lamp).4. Press the PTT key to save the new setting and exit to normal operation.Automatic Power-Off (APO) FeatureAutomatic Power-Off (APO) FeatureAutomatic Power-Off (APO) FeatureAutomatic Power-Off (APO) FeatureThe APO feature helps conserve battery life by automatically turning the radio offafter a user-defined period of time within which there has been no dial or key activity.The available selections for the time before power-off are 0.5/1/3/5/8 hours, as well asAPO Off. The default condition for the APO is OFF , and here is the procedure foractivating it:1. Press the [MON/F] key, then press the [0(SET)] key to enter the Set mode.2. Rotate the DIAL to select Menu Item (Save Modes #1: APO).3. Press the [MAIN] or [SUB] key to select the desired time period after which theradio will automatically shut down.4. Once you have made your selection, press the PTT key to save the new setting andexit to normal operation.Transmitter Transmitter Transmitter Transmitter Time-Out Timer (TOT)Time-Out Timer (TOT)Time-Out Timer (TOT)Time-Out Timer (TOT)The TOT feature provides a safety switch which limits transmission to a pre-programmed value. This will promote battery conservation by not allowing you to makeexcessively-long transmissions, and in the event of a stuck PTT switch (perhaps if theradio or a Speaker/Mic is wedged between car seats) it can prevent interference to otherusers as well as battery depletion. As configured at the factory the TOT feature is set toOFF, and here is the procedure for activating it:1. Press the [MON/F] key, then press the [0(SET)] key to enter the Set mode.2. Rotate the DIAL to select Menu Item (Save Modes #4: TOT).3. Press the [MAIN] or [SUB] key to set the Time-Out Timer to the desired “MaximumTX” time (1 minute, 2.5 minutes, 5 minutes, or 10 minutes).4. Once you’re made the selection you wish to use, press the PTT key to save the newsetting and exit to normal operation.RRRR....FFFF.... Say Say Say Say: Since brief transmissions are the mark of a good operator, try setting up your](https://usermanual.wiki/Yaesu-Musen/VX-7R.Manual/User-Guide-229636-Page-33.png)
![FCC ID: K66VX-7ROperating ManualVertex Standard Co., Ltd.34radio’s TOT feature for a maximum transmission time of 1 minute. This willsignificantly improve battery life, too!Busy Channel Lock-Out (BCLO)Busy Channel Lock-Out (BCLO)Busy Channel Lock-Out (BCLO)Busy Channel Lock-Out (BCLO)The BCLO feature prevents the radio’s transmitter from being activated if a signalstrong enough to break through the “noise” squelch is present. On a frequency wherestations using different CTCSS or DCS codes may be active, BCLO prevents you fromdisrupting their communications accidentally (because your radio may be muted by itsown Tone Decoder). The default setting for the BCLO is OFF, and here is how to changethat setting:1. Press the [MON/F] key, then press the [0(SET)] key to enter the Set mode.2. Rotate the DIAL to select Menu Item (Misc Setup #1: BCLO).3. Press the [MAIN] or [SUB] key to set this Menu Item to “ON” (this activating theBCLO feature).4. Press the PTT key to save the new setting and resume normal operation.MIC MonitorMIC MonitorMIC MonitorMIC MonitorThe MIC Monitor feature enable to monitor the sound around the transceiver by theoptional VC-27 Earpiece/Microphone.1. Connect the VC-27 Earpiece/Microphone to the MIC/EAR jack.2. Press the [MON/F] key, then press the [0(SET)] key to enter the Set mode.3. Rotate the DIAL to select Menu Item (Misc Setup #19: MIC MONITOR).4. Press the [MAIN] or [SUB] key to set this Menu Item to “ON” (this activating theMIC Monitor feature).5. Press the PTT key to save the new setting, and the VX-7R’s internal microphonepick up the sound around the transceiver, then output its to the VC-27Earpiece/Microphone.R.F.SayR.F.SayR.F.SayR.F.Say: When this feature is activated without the VC-27 Earpiece/Microphone, theVX-7R engage the howling.Changing the TX Deviation LevelChanging the TX Deviation LevelChanging the TX Deviation LevelChanging the TX Deviation LevelIn many areas of the world, channel congestion has required that operating channelsbe closely spaced. In such operating environments, it often is required that operatorsuse reduced deviation levels, so as to reduce the potential for interference to users onadjacent channels. The VX-7R includes a simple method of accomplishing this:1. Press the [MON/F] key, then press the [0(SET)] key to enter the Set mode.](https://usermanual.wiki/Yaesu-Musen/VX-7R.Manual/User-Guide-229636-Page-34.png)
![FCC ID: K66VX-7ROperating ManualVertex Standard Co., Ltd.352. Rotate the DIAL to select Menu Item (Misc Setup #6: HALF DEV).3. Press the [MAIN] or [SUB] key to change this setting to ON. In this configuration(HALF DEVIATION active), the transmitter’s deviation will be approximately ±2.5kHz.4. When you have made your selection, press the PTT key to save the new setting andexit to normal operation.RRRR....FFFF.... Say Say Say Say: The “normal” setting for the deviation (when this Menu item is set to OFF) is±5 kHz.Memory ModeMemory ModeMemory ModeMemory ModeThe VX-7R provides a wide variety of memory system resources. These include:# Regular Memory Channel, which made up of;$ ??? “Standard” memory channels, numbered “1” through “???” (includes ???channels which already stored Shot-wave Broadcast Station frequency).$ 12 (USA version) or 11 (EXP version) Home channels, storage and quickrecall of one prime frequency on each operating band.$ 20 sets of band-edge memories also known as “Programming Memory Scan”channels, labeled “L1/U1” through “L20/U20”.$ Ten Memory Groups, labeled “MG0” through “MG9”. Each Memory Groupcan be assigned 64 channels from the “standard” memory channel bank.# Ten One-Touch Memory Channel# Ten Hyper Memory ChannelRegularRegularRegularRegular Memory Channel Operation Memory Channel Operation Memory Channel Operation Memory Channel OperationMemory Storage1. Select the desired frequency, while operating in the VFO mode. Be sure to set upany desired CTCSS or DCS tones, as well as any desired repeater offset. The powerlevel may also be set at this time, if you wish to store it.2. Press and hold the [MON/F] key for 2 seconds.3. Within five seconds of releasing the [MON/F] key, rotate the DIAL to select thedesired memory channel. The microprocessor will automatically select the next-available “free” channel (a memory register on which no data has been stored). Ifyou see an Asterisk (*) by any channel number, it means that the channel currentlyhas no data written on it (i.e. the channel is “free”.)4. Press the [MON/F] key once more to store the frequency into memory.](https://usermanual.wiki/Yaesu-Musen/VX-7R.Manual/User-Guide-229636-Page-35.png)
![FCC ID: K66VX-7ROperating ManualVertex Standard Co., Ltd.365. You still will be operating in the “VFO” mode, so you may now enter otherfrequencies, and store them into additional memory locations, by repeating theabove process.R.F.SayR.F.SayR.F.SayR.F.Say: You may change the automatic memory channel selection feature to “nextmemory channel which is last stored memory channel” by the “next-available “free”channel” via Menu Item (Basic Setup #12 MW MODE).Storing Independent Transmit Frequencies (“Odd Splits”)All memories can store an independent transmit frequency, for operation onrepeaters with non-standard shift. To do this:1. Store the receive frequency using the method already described under MEMORYSTORAGE (it doesn’t matter if a repeater offset is active).2. Turn to the desired transmit frequency, then press and hold the [MON/F] key forone second.3. With in five seconds of releasing the [MON/F] key, rotate the DIAL to select thesame memory channel number as used in step “1” above.4. Press and hold the PTT switch while pressing the [MON/F] key once moremomentarily (this does not key the transmitter).RRRR....FFFF.... Say Say Say Say: Whenever you recall a memory which contains independently-stored transmitand receive frequencies, the “[+][–]” indication will appear in the display.Memory Recall1. While operating in the VFO mode, press the [V/M(WRITE MT)] key to enter theMemory mode.2. Rotate the DIAL to select the desired channel.3. To return to the VFO mode, press the [V/M(WRITE MT)] key.RRRR....FFFF.... Say Say Say Say: When the radio already enter the Memory mode, an easy way to recallmemories is to key in the memory channel number, then press [V/M(WRITE MT)] key.For example, to recall memory channel #14, press [1] " [4] " [V/M(WRITE MT)].HOME Channel MemoryA special one-touch “HOME” channel is available (one for each of the 12 (USAversion) or 11 (EXP version) available operating bands: see page xx), to allow quickrecall of a favorite operating frequency on each band. Memory storage is simple toaccomplish:1. Select the desired frequency, while operating in the VFO mode. Be sure to set up](https://usermanual.wiki/Yaesu-Musen/VX-7R.Manual/User-Guide-229636-Page-36.png)
![FCC ID: K66VX-7ROperating ManualVertex Standard Co., Ltd.37any desired CTCSS or DCS tones, as well as any desired repeater offset. The powerlevel may also be set at this time, if you wish to store it.2. Press and hold the [MON/F] key for 2 seconds.3. While the memory channel number is blinking, just press the [HM/RV(EMG)] key.The frequency and other data (if any) will now be stored in the special HOMEchannel register.4. You may repeat this process on the other operating bands.5. To recall the HOME channel, press the [MON/F] key, then press the[HM/RV(EMG)] key while operating either in the VFO or MR mode.RRRR....FFFF.... Say Say Say Say: Note that the UHF HOME channel is the one used during “Emergency”operation. See page ?? for details regarding this feature.Labeling MemoriesYou may wish to append an alpha-numeric “Tag” (label) to a memory or memories, toaid in recollection of the channel’s use (such as a club name, etc.). This is easilyaccomplished using the Set mode.1. Recall the memory channel on which you wish to append a label.2. Press the [MON/F] key, then press the [0(SET)] key to enter the Set mode.3. Rotate the DIAL to select Menu Item (Basic Setup #11: NAME SET).4. Press the [BAND(BND DN)] key momentarily to enable programming of the nametag.5. Press the [MAIN]/[SUB] key or keyboard to select the first digit of the desired label.Example 1: Press the [MAIN] or [SUB] key to select any of ?? available characters(including letters, numbers, and special symbols).Example 2: Press the [2(DW)] key repeatedly to toggle among the seven availablecharacters: A " B " C " a " b " c " 26. Rotate the DIAL one click clockwise to move to the next character.7. Repeat the step 4 and 5 to program the remaining letters, numbers, or symbols ofthe desired label. A total of eight characters may be used in the creation of a label.8. When you have completed the creation of the label, press the PTT key to save thelabel and exit.R.F. SayR.F. SayR.F. SayR.F. Say: During “MR” (Memory Recall) operation, appear the alphanumeric Tag belowthe frequency display. The alphanumeric Tag does not appear while activate the dualwatch feature.](https://usermanual.wiki/Yaesu-Musen/VX-7R.Manual/User-Guide-229636-Page-37.png)
![FCC ID: K66VX-7ROperating ManualVertex Standard Co., Ltd.38Memory Offset TuningOnce you have recalled a particular memory channel, you may easily tune off thatchannel, as though you were in the “VFO” mode.1. With the VX-7R in the “MR” (Memory Recall) mode, select the desired memorychannel.2. Now press and hold the [V/M(WRITE MT)] key for 2 seconds. The “MR” indicatorwill be replaced by one which says “MT” (“Memory Tuning).3. Rotate the DIAL, as desired, to tune to a new frequency. The synthesizer stepsselected for VFO operation on the current band will be the steps used duringMemory Tuning.4. If you wish to return to the original memory frequency, press and hold the[V/M(WRITE MT)] key for 2 seconds. The “MT” indicator will be replaced by “MR”.5. If you wish to store a new frequency set during Memory Tuning, just press and holdin the [MON/F] key for 2 seconds, per normal memory storage procedure. Themicroprocessor will automatically set itself to the next-available clear memorylocation, and you then press [MON/F] again to lock in the new frequency.RRRR....FFFF.... Say Say Say Say: If you want to replace the original memory contents with those of the newfrequency, be sure to rotate the DIAL to the original memory channel number!Any required CTCSS/DCS changes, or repeater offset modifications, must be donebefore storing the data into the new (or original) memory channel location.Masking MemoriesThere may be situations where you want to “Mask” memories so they are not visibleduring memory selection or scanning. For example, several memories used only in a cityyou visit infrequently may be stored, then “Masked” until you visit that city, at whichtime you can “Unmask” them for normal use.1. Press the [V/M(WRITE MT)] key, if needed, to enter the MR mode.2. Press and hold in the [MON/F] key for 2 seconds, then rotate the DIAL to select thememory channel to be “Masked” from view.3. Press the [V/M(WRITE MT)] key. The display will revert to memory channel #1. Ifyou rotate the DIAL to the location you just “Masked,” you will observe that it isnow invisible.4. To Unmask the hidden memory, repeat the above procedure: press and hold in the[MON/F] key for 2 seconds, rotate the DIAL to select the masked memory’s umber,then press [V/M(WRITE MT)] to restore the memory channel’s data.RRRR....FFFF.... Say Say Say Say: Watch out! You can manually store data over a “Masked” memory, deleting](https://usermanual.wiki/Yaesu-Musen/VX-7R.Manual/User-Guide-229636-Page-38.png)
![FCC ID: K66VX-7ROperating ManualVertex Standard Co., Ltd.39previous data, if you’re not careful. Use the “next available memory” technique (look forthe [*] icon) storage technique to avoid over-writing a masked memory.Memory Group OperationMemory Group Assignment1. Recall the memory channel to be assigned to a Memory Group.2. Press and hold the [MON/F] key for 2 seconds, then press the numbered key ([0] ~[9]) you want as the Memory Group for this channel.3. Now memory channel data is copied into the Memory Group.Memory Group Recall1. Set the radio to the Memory mode by pressing the [V/M(WRITE MT)] key, ifnecessary.2. Press the [MON/F] key, then press the [9(SPCL)] key to recall the Special MemoryMenu.3. Press the [MAIN] or [SUB] key to select the “Memory Group” mode.4. Press the PTT switch to activate the “Memory Group” mode.5. Rotate the DIAL knob to select the desired Memory Group (“MG0” ~ “MG9”).6. Press the [V/M(WRITE MT)] key momentarily to lock in the selected MemoryGroup.7. In the Memory Group, you selects the memory channel in the current memorygroup only (up to 64 channels).8. To change the Memory Group to the other Group, press the [V/M(WRITE MT)] keymomentarily then rotate the DIAL knob.9. To exit the Memory Group, recall the Special Memory Menu (press [MON/F] +[9(SPCL)]) then select its setting to “OFF.”Hyper Memory ModeHyper Memory ModeHyper Memory ModeHyper Memory ModeThis feature enable to store the current status of the radio into the special memory bank(Hyper Memory).For example, if you store the Spectrum OperationHyper Memory Storage1. Setup the transceiver desired status, such as the Spectrum Operation, PMSscanning, etc.2. Press and hold the numeric key ([0] through [9]) corresponding to the Hyper](https://usermanual.wiki/Yaesu-Musen/VX-7R.Manual/User-Guide-229636-Page-39.png)
![FCC ID: K66VX-7ROperating ManualVertex Standard Co., Ltd.40Memory channel you wish to store for 2 seconds.R.F.SayR.F.SayR.F.SayR.F.Say: In order to prevent accidental storage, the Hyper Memory Storage feature maybe locked via Menu Item (Basic Setup #14 HYP WRITE).Hyper Memory Recall1. Press the [MON/F] key, then press the [9(SPCL)] key to recall the Special MemoryMenu.2. Press the [MAIN] or [SUB] key to select the “Hyper Memory” mode.3. Press the PTT switch to activate the “Hyper Memory” mode.4. Press and hold the numeric key ([0] through [9]) for 2 seconds to recall the HyperMemory channel.5. To exit the Hyper Memory mode, recall the Special Memory Menu (press [MON/F] +[9(SPCL)]), then select its setting to “OFF.”One-Touch Memory ModeOne-Touch Memory ModeOne-Touch Memory ModeOne-Touch Memory ModeThe One-Touch feature enable to recall up ten favorite frequencies directly via thenumeric ([0] through [9]) key.One-Touch Memory Storage1. Select the desired frequency, while operating in the VFO mode. Be sure to set upany desired CTCSS or DCS tones, as well as any desired repeater offset. The powerlevel may also be set at this time, if you wish to store it.2. Press and hold the [MON/F] key for 2 seconds.3. Within five seconds of releasing the [MON/F] key, rotate the DIAL to select thedesired One-Touch Memory channel which is labeled “OTM0” through “OTM9.”4. Press the [MON/F] key once more to store the frequency into the One-TouchMemory.5. You still will be operating in the “VFO” mode, so you may now enter otherfrequencies, and store them into additional One-Touch Memory locations, byrepeating the above process.One-Touch Memory Recall1. Press the [MON/F] key, then press the [9(SPCL)] key to recall the Special MemoryMenu.2. Press the [MAIN] or [SUB] key to select the “One-Touch Memory” mode.3. Press the PTT switch to activate the “One-Touch Memory” mode.4. Press the numeric key ([0] through [9]) corresponding to the One-Touch memory](https://usermanual.wiki/Yaesu-Musen/VX-7R.Manual/User-Guide-229636-Page-40.png)
![FCC ID: K66VX-7ROperating ManualVertex Standard Co., Ltd.41you wish to recall.5. To exit the One-Touch Memory mode, recall the Special Memory Menu (press[MON/F] + [9(SPCL)]), then select its setting to “OFF.”ScanningScanningScanningScanningThe VX-7R allows you to scan just the memory channels, the entire operating band,or a portion of that band. It will halt on signals encountered, so you can talk to thestation(s) on that frequency, if you like.Scanning operation is basically the same in each of the above modes. Before youbegin, take a moment to select the way in which you would like the scanner to resumescanning after it halts on a signal.Setting the Scan Resume TechniqueSetting the Scan Resume TechniqueSetting the Scan Resume TechniqueSetting the Scan Resume TechniqueThree options for the Scan-Resume mode are available:5 SEC: In this mode, the scanner will halt on a signal it encounters, and will holdthere for 5 seconds. If you do not take action to disable the scanner withinthat time period, the scanner will resume even if the stations are stillactive.BUSY: In this mode, the scanner will halt on a signal it encounters. Two secondsafter the carrier has dropped because the other station(s) ceasedtransmission, the scanner will resume. In the case of constant-carriersignals like Weather Station broadcasts, the scanner will likely remain onthis frequency indefinitely.HOLD: In this mode, the scanner will halt on a signal it encounters. It will notrestart automatically; you must manually re-initiate scanning if you wishto resume.To set the Scan-Resume mode1. Press the [MON/F] key, then press the [0(SET)] key to enter the Set mode.2. Rotate the DIAL to select Menu Item (Scan Modes #3: RESUME).3. Press the [MAIN] or [SUB] key to select the desired scan-resume mode.4. When you have made your selection, press the PTT key to save the new setting andexit to normal operation.RRRR....FFFF.... Say Say Say Say: The default condition for this Menu Item is “5 SEC.”](https://usermanual.wiki/Yaesu-Musen/VX-7R.Manual/User-Guide-229636-Page-41.png)
![FCC ID: K66VX-7ROperating ManualVertex Standard Co., Ltd.42VFO ScanningVFO ScanningVFO ScanningVFO ScanningThis mode allows you to scan the entire current operating band.1. Select the VFO mode by pressing the [V/M(WRITE MT)] key, if necessary.2. Press the [MON/F] key, then press the [1(SCAN)] key to start scanning.3. If and when the scanner encounters a signal strong enough to open the squelch, thescanner will halt temporarily; the decimal point of the frequency display will blinkduring this “Pause” condition.4. The scanner will then resume according to the Scan Resume selected in theprevious section.5. To cancel scanning, press the PTT or [V/M(WRITE MT)] key.RRRR....FFFF.... Say Say Say Say: When you are start scanning, the VX-7R will be changing frequency in theupward direction. If you want to change direction of the scan while it is underway,rotate the DIAL one click in the opposite direction (in this case, one click counter-clockwise). You’ll see the scanner turn around and change frequency downward!You may change the scanning operation to which the VFO frequency will jump to thelow band edge of the next bandnext bandnext bandnext band when the VFO frequency reaches the high edge of thecurrent band (or vice versa). See page xx Menu Item (Misc Setup #10 VFO MODE).Memory ScanningMemory ScanningMemory ScanningMemory ScanningMemory scanning is similarly easy to initiate:$ Set the radio to the Memory mode by pressing the [V/M(WRITE MT)] key, ifnecessary.$ Press the [MON/F] key, then press the [1(SCAN)] key to initiate scanning.$ As with VFO scanning, the scanner will halt on any signal encountered that isstrong enough to open the squelch; it will then resume scanning according to theScan-Resume mode set previously.$ To cancel scanning, press the PTT or [V/M(WRITE MT)] key.How to Skip (Omit) a Channel During Memory Scan OperationAs mentioned previously, some continuous-carrier stations like a Weather Broadcaststation will seriously impede scanner operation if you are using the “Carrier Drop”Scan-Resume mode, as the incoming signal will not pause long enough for thetransceiver to resume scanning. Such channels may be “Skipped” during scanning, ifyou like:1. Set the radio to the Memory Mode by pressing the [V/M(WRITE MT)] key, ifnecessary.](https://usermanual.wiki/Yaesu-Musen/VX-7R.Manual/User-Guide-229636-Page-42.png)
![FCC ID: K66VX-7ROperating ManualVertex Standard Co., Ltd.432. Rotate the DIAL to select the Memory Channel to be skipped during scanning.3. Press the [MON/F] key, then press the [0(SET)] key to enter the Set mode.4. Rotate the DIAL to select Menu Item (Basic Setup #13: SKIP MODE).5. Press the [MAIN] or [SUB] key so as to select “SKIP.” It is to be ignored duringscanning. The “ONLY” selection is “Preferential Memory Scan,” described nextcolumn.6. When you have made your selection, press the PTT key to save the settings and exitto normal operation.A small “!” icon will appear when recall the “skipped” memory channel.To re-institute the channel into the scanning loop, select “OFF” in step 5 above (the“Skipped” channel will, of course, still be accessible via manual channel selectionmethods using the DIAL in the MR mode).Preferential Memory ScanThe VX-7R also allows you to set up a “Preferential Scan List” of channels which youcan “flag” within the memory system. These channels are designated by a “!” icon whenyou have selected them, one by one, for the Preferential Scan List. When you initiatememory scanning on a channel with the “!” icon appended, only those channels bearingthe “!” icon will be scanned. If you initiate scanning on a channel which does not havethe “!” icon appended, you will scan all channels including those with the “!” iconappended.1) Here is the procedure for setting up and using the Preferential Scan List:1. Press the [V/M(WRITE MT)] key momentarily to enter the Memory Recall mode, ifyou are not using memories already.2. Rotate the DIAL to select the channel which you wish to add to the PreferentialScan List.3. Press the [MON/F] key, then press the [0(SET)] key to enter the Set mode.4. Rotate the DIAL to select Menu Item (Basic Setup #13: SKIP MODE).5. Press the [MAIN] or [SUB] key so as to select “ONLY.”6. When you have made your selection, press the PTT key to save the settings and exitto normal operation.2) To initiate Preferential Memory Scan:1. Press the [V/M(WRITE MT)] key momentarily to enter the Memory Recall mode, ifyou are not using memories already.](https://usermanual.wiki/Yaesu-Musen/VX-7R.Manual/User-Guide-229636-Page-43.png)
![FCC ID: K66VX-7ROperating ManualVertex Standard Co., Ltd.442. Rotate the DIAL to select any channel which has an “!” icon appended to thechannel number.3. Press the [MON/F] key, then press the [1(SCAN)] key to initiate PreferentialMemory Scanning. Only the channels which have an “!” icon appended to thechannel number will be scanned.Programmable (Band Limit) Memory Scan (PMS)Programmable (Band Limit) Memory Scan (PMS)Programmable (Band Limit) Memory Scan (PMS)Programmable (Band Limit) Memory Scan (PMS)This feature allows you to set sub-band limits for either scanning or manual VFOoperation. For example, you might with to set up a limit (in North America) of 144.300MHz to 148.000 MHz so as to prevent encroachment into the SSB/CW “Weak Signal”portion of the band below 144.300 MHz. Here’s how to do this:1. Set the radio to the VFO mode by pressing the [V/M(WRITE MT)] key, if necessary.2. Using the techniques learned earlier, store (per the above example) 144.300 MHzinto Memory Channel #L1 (the “L” designates the Lower sub-band limit).3. Likewise, store 148.000 MHz into Memory Channel #U1 (the “U” designates theUpper sub-band limit).4. Switch to the Memory mode by pressing the [V/M(WRITE MT)] key once, thenrotate the DIAL to select Memory Channel # L1.5. Press and hold the [V/M(WRITE MT)] key for 2 seconds to start the PMS; the “MR”label will be replaced by “PMS” in the upper left-hand corner of the display.6. 20 pairs of Band Limit memories, labeled L1/U1 through L20/U20 are available.You therefore can set upper and lower operation limits on a number of bands, if youlike.““““Priority ChannelPriority ChannelPriority ChannelPriority Channel”””” Scanning (Dual Watch) Scanning (Dual Watch) Scanning (Dual Watch) Scanning (Dual Watch)The VX-7R’s scanning features include a two-channel scanning capability whichallows you to operate on a VFO or Memory channel, while periodically checking userdefines Memory Channel for activity. If a station is received on Memory Channel whichis strong enough to open the Squelch, the scanner will pause on that station inaccordance with the Scan-Resume mode set via Menu Item (Scan Modes #3: RESUME).See page xx.Here is the procedure for activating Priority Channel Dual Watch operation:1. Recall the memory channel you wish to be the “Priority” operation.2. Press and hold the [MON/F] key for 2 seconds, then press the [BAND(BND DN)]key. A “P” icon will appear to the right of the “MR” icon, indicating it is priority](https://usermanual.wiki/Yaesu-Musen/VX-7R.Manual/User-Guide-229636-Page-44.png)
![FCC ID: K66VX-7ROperating ManualVertex Standard Co., Ltd.45channel.3. Now set the VX-7R for operation on another memory channel, or on a VFOfrequency.4. Press the [MON/F] key, then press the [2(DW)] key. The display will remain on theVFO or memory channel selected, but every four seconds the VX-7R will check thePriority Channel for activity.Automatic Lamp Illumination on Scan StopAutomatic Lamp Illumination on Scan StopAutomatic Lamp Illumination on Scan StopAutomatic Lamp Illumination on Scan StopThe VX-7R will automatically illuminate the LCD Lamp whenever the scanner stopson a signal; this allows you to see the frequency of the incoming signal better at night.Note that this will, of course, increase the battery consumption, so be sure to switch itoff during the day (the default condition for this feature is “ON”).The procedure for disabling the Scan Lamp is:1. Press the [MON/F] key, then press the [0(SET)] key to enter the Set mode.2. Rotate the DIAL to select Menu Item (Scan Modes #4: SCAN LAMP).3. Press the [MAIN] or [SUB] key to set this Menu Item to OFF.4. When you have made your selection, press the PTT to save the new setting and exitto normal operation.Band Edge BeeperBand Edge BeeperBand Edge BeeperBand Edge Beeper The VX-7R will automatically “beep” when a band edge is encountered duringscanning (either in standard VFO scanning or during PMS operation). You may disablethis feature, if it is annoying, without disabling the keypad beeper (the default conditionfor this feature is “ON”.The procedure for disabling the Band-Edge Beeper is:1. Press the [MON/F] key, then press the [0(SET)] key to enter the Set mode.2. Rotate the DIAL to select Menu Item (Scan Modes #2: EDGE BEEP).3. Press the [MAIN] or [SUB] key to set this Menu Item to OFF.4. When you have made your selection, press the PTT to save the new setting and exitto normal operation.Smart Search OperationSmart Search OperationSmart Search OperationSmart Search OperationThe Smart Search feature allows you to load frequencies automatically according to](https://usermanual.wiki/Yaesu-Musen/VX-7R.Manual/User-Guide-229636-Page-45.png)
![FCC ID: K66VX-7ROperating ManualVertex Standard Co., Ltd.46where activity is encountered by your radio. When Smart Search is engaged, thetransceiver will search above and below your current frequency, storing activefrequencies as it goes (without stopping on them even momentarily); these frequenciesare stored into a special Smart Search memory band, consisting of 31 memories (15above the current frequency, 15 below the current frequency, plus the current frequencyitself).Two basic operating modes for Smart Search are available:SINGLE Sweep: In this mode, the transceiver will sweep the current band once ineach direction starting on the current frequency. All channelswhere activity is present will be loaded into the Smart Searchmemories; whether or not all 31 memories are filled, the searchwill stop after one sweep in each direction.CONTINUE: In this mode, the transceiver will make one pass in each directionas with One-Shot searching; if all 31 channels are not filled afterthe first sweep, however, the radio will continue sweeping untilthey are all filled.Setting the Smart Search ModeSetting the Smart Search ModeSetting the Smart Search ModeSetting the Smart Search Mode1. Press the [MON/F] key, then press the [0(SET)] key to enter the Set mode.2. Rotate the DIAL to select Menu Item (Scan Mode #5: SMRT SRCH).3. Press the [MAIN] or [SUB] key to select the desired Smart Search mode (seeabove).4. When you have made your selection, press the PTT to save the new setting and exitto normal operation.Storing Smart Search MemoriesStoring Smart Search MemoriesStoring Smart Search MemoriesStoring Smart Search Memories1. Set the radio to the VFO mode in the desired band.2. Press the [MON/F] key, then press the [5(S.SCH)] key to enter the Smart Searchmode.3. Press the [V/M(WRITE MT)] key to begin the Smart Search scanning.4. As active channels are detected, you will observe the number of “loaded” channelsincreasing in the regular memory channel window.5. Depending on the mode you set for Smart Search operation (SINGLE orCONTINUE), the Smart Search scan will eventually terminate, and the LCD willrevert to Smart Search Memory Channel “C.”6. To recall Smart Search memories, rotate the DIAL to choose from among the Smart](https://usermanual.wiki/Yaesu-Musen/VX-7R.Manual/User-Guide-229636-Page-46.png)
![FCC ID: K66VX-7ROperating ManualVertex Standard Co., Ltd.47Search memories.7. To return to normal operation, press the [MON/F] key, then press the [5(S.SCH)]key.RRRR....FFFF.... Say Say Say Say: Smart Search is a great tool when visiting a city for the first time. You don’tneed to spend hours looking up repeater frequencies from a reference guidebook… justask your VX-7R where the action is!Spectrum analyzer OperationSpectrum analyzer OperationSpectrum analyzer OperationSpectrum analyzer OperationThe Spectrum Analyzer allows viewing operating activity on channels above or belowthe current operating channel in the VFO mode.The display indicates the relative signal strength on channels immediately adjacentto the current operating frequency.Two basic operating modes for Spectrum Analyzer are available:SINGLE Sweep: In this mode, the transceiver sweeps the current band once.CONTINUE: In this mode, the transceiver sweeps the current band repeatedlyuntil the Spectrum Analyzer is turned off.Setting the Spectrum Analyzer mode1. Press the [MON/F] key, then press the [0(SET)] key to enter the Set mode.2. Rotate the DIAL to select Menu Item (Scan Modes 6: SPEC-ANAL1).3. Rotate the DIAL to select the desired Spectrum Analyzer mode (see above).4. When you have made your selection, press the PTT to save the new setting and exitto normal operation.To activate the Spectrum Analyzer:1. Set the radio to the VFO mode in the desired band.2. Press the [MON/F] key, then press the [6(SP-ANA)] key to activate the SpectrumAnalyzer.3. When the Spectrum Analyzer is activated, press the [MAIN] or [SUB] key to changethe visible bandwidth. Available selections are ±5, ±8, ±14, ±29, and ±60 channels(default: ±5 channel). The visible bandwidth, however, depends on the selectedchannel step size, so match the default channel steps with the amateur band youare using.4. To turn the Spectrum Analyzer off and operate on the centered (and displayed)](https://usermanual.wiki/Yaesu-Musen/VX-7R.Manual/User-Guide-229636-Page-47.png)
![FCC ID: K66VX-7ROperating ManualVertex Standard Co., Ltd.48channel, simply press [MON/F] key, then press the [6(SP-ANA)] key.R.F. SayR.F. SayR.F. SayR.F. Say: You may enable the audio output while activate the Spectrum Analyzer viaMenu Item (Scan Modes #7 SPEC-ANAL2). See page xx for detail.Channel Counter OperationChannel Counter OperationChannel Counter OperationChannel Counter OperationThe Channel Counter allows measuring of the frequency of a nearby transmitter,without knowing that frequency in advance. The frequency can be measured bybringing the VX-7R close to the transceiver which is transmitting.The VX-7R performs a high-speed search within a ±50 MHz range from thefrequency displayed on the LCD. When the strongest signal in that range is identified,the VX-7R displays the frequency of that (strongest) signal, and writes it into thespecial “channel counter memory.Note: This Channel Counter is designed to provide an indication of the operatingfrequency of the incoming signal, one that is close enough to allow the user to tuneprecisely to the other station’s frequency. This feature is not, however, designed toprovide a precise determination of the other station’s frequency.1. Set the radio to the VFO mode in the predication frequency for the transmitter tobe measured.2. Bring the VX-7R into close proximity to the transmitter to be measured.3. Press the [MON/F] key, then press the [7(CH.CNT)] key to activate the ChannelCounter, then frequency of the nearby station will be displayed. When the channelcounter is active, engage the 50 dB receiver front-end attenuator. Therefore, onlystations in close proximity may have their frequencies measured using this feature.4. When it isn’t possible to determine the signal’s frequency, the transceiver willreturn to stating frequency of the channel counter operation.5. Press the [V/M] key. The radio will exit from Channel Counter operation.Setting the Channel Counter Sweep WidthYou may change the bandwidth of the Channel Counter. Available selections are ±5,±10, ±50, and ±100 MHz (default: ±50 MHz).Here is the procedure for selecting the Channel Counter Bandwidth:1. Press the [MON/F] key, then press the [0(SET)] key to enter the Set mode.2. Rotate the DIAL to select Menu Item (Scan Modes #1: CH COUNTER).3. Press the [MAIN] or [SUB] key to select the desired bandwidth.](https://usermanual.wiki/Yaesu-Musen/VX-7R.Manual/User-Guide-229636-Page-48.png)
![FCC ID: K66VX-7ROperating ManualVertex Standard Co., Ltd.495. When you have made your selection, press the PTT to save the new setting and exitto normal operation.SensorSensorSensorSensor Mode Mode Mode ModeThe VX-7R can be displayed various sensor information. Available selections are“Current Time,” “Battery Voltage,” “Temperature,” and “Audio Wave form.”And also, when the optional Barometric Pressure unit (SU-1) is installed, the uniquecapability of providing readout of the current barometric pressure. This information isthen used for calculation of your current altitude and weathercast.The Barometric Pressure unit requires calibration of the “offset” parameters, so thatdifferences in pressure can be used to calculate altitude. This procedure requires thatyou have a calculated barometer, and that you know your current altitude. If you are atsea level, of course, the latter parameter requires no research.To display the sensor information:1. Press the [MON/F] key, then press the [0(SET)] key to enter the Set Mode.2. Rotate the DIAL to select Menu Item (Measurements #1: SENS DISP).3. Press the [MAIN] or [SUB] key to select sensor mode you wish to be displayed.TIME: Indicate the current time.VOLT: Indicate the battery voltage.TEMP: Indicate the current temperature inside the transceiver’s case.WAVE: Indicate the relative (RX and TX) audio wave-form.BARO: Indicate the Barometric Pressure (requires SU-1).ALTI: Indicate the Altitude (requires SU-1)WX: Indicate the Weather Forecast (requires SU-1).OFF: Disable the sensor information.4. Press the PTT key momentarily to exit to normal operation and display the sensorinformation on the display.To disable the sensor information, repeat the above procedure, pressing [MAIN] or[SUB] key to select OFF in step 3 above.SensorSensorSensorSensor Mode Options Mode Options Mode Options Mode OptionsClock SetThe VX-7R has a 24-hour clock with a calendar which from January 1, 2000 andending December 31, 2099.](https://usermanual.wiki/Yaesu-Musen/VX-7R.Manual/User-Guide-229636-Page-49.png)
![FCC ID: K66VX-7ROperating ManualVertex Standard Co., Ltd.50To set the clock:1. Press the [MON/F] key, then press the [0(SET)] key to enter the Set mode.2. Rotate the DIAL knob to select Menu Item (Misc Setup #16: TIME SET).3. Press the [BAND(BND DN)] key to enable setting of this Menu Item.4. Press the [MAIN] or [SUB] key to select the “year” setting.5. Rotate the DIAL one click clockwise, then press the [MAIN] or [SUB] key to selectthe “month” setting.6. Repeat above step as to “day,” “day of the week,” “hour,” and “minute.”7. When you have made your choice, press the PTT key to save the new setting andreturn to normal operation.Selecting the Wave Form Display1. Press the [MON/F] key, then press the [0(SET)] key to enter the Set Mode.2. Rotate the DIAL to select Menu Item (Measurements #2: WAVE MON).3. Press the [MAIN] or [SUB] key to select the desire wave form (RX Signal, TXModulation, or All).4. Press the PTT key momentarily to save the your new setting and exit to normaloperation.Selecting the Unit of Temperature Display1. Press the [MON/F] key, then press the [0(SET)] key to enter the Set Mode.2. Rotate the DIAL to select Menu Item (Measurements #3: TEMP UNIT).3. Press the [MAIN] or [SUB] key to select the preferred unit (°C or °F).4. Press the PTT key momentarily to save the your new setting and exit to normaloperation.Selecting the Unit of Atmospheric Pressure Meter (Barometer)1. Press the [MON/F] key, then press the [0(SET)] key to enter the Set Mode.2. Rotate the DIAL to select Menu Item (Measurements #4: BARO UNIT).3. Press the [MAIN] or [SUB] key to select the preferred unit (hpa/mb/Hg/inch).4. Press the PTT key momentarily to save the your new setting and exit to normaloperation.Correcting the Atmospheric Pressure Meter (Barometer Offset)1. Press the [MON/F] key, then press the [0(SET)] key to enter the Set Mode.2. Rotate the DIAL to select Menu Item (Measurements #5: BARO OFST).](https://usermanual.wiki/Yaesu-Musen/VX-7R.Manual/User-Guide-229636-Page-50.png)
![FCC ID: K66VX-7ROperating ManualVertex Standard Co., Ltd.513. Press the [MAIN] or [SUB] key to set the difference (value) between the VX-7Rdisplay and the calibrated barometer display. For example, if the VX-7R displayshows “1024 hpa” and calibrated barometer indicates “1029 hpa” set the Barometeroffset to “+5”.4. Press the PTT key momentarily to save the your new setting and exit to normaloperation.Selecting the Unit of Altimeter1. Press the [MON/F] key, then press the [0(SET)] key to enter the Set Mode.2. Rotate the DIAL to select Menu Item (Measurements #6: ALTI UNIT).3. Press the [MAIN] or [SUB] key to select the preferred unit (m/ft).4. Press the PTT key momentarily to save the your new setting and exit to normaloperation.Correcting the Altimeter Setting (Altimeter Offset)1. Press the [MON/F] key, then press the [0(SET)] key to enter the Set Mode.2. Rotate the DIAL to select Menu Item (Measurements #7: ALTI OFST).3. Press the [MAIN] or [SUB] key to set the difference (value) between the VX-7Rdisplay and the currently-displayed value and current location’s altitude. Forexample, if the VX-7R display indicates “2m” while you actually are at sea level, setthe Altimeter offset to “–2” in this step. You can set the ALTI OFST at any place(other than sea level) if you know the true altitude at you current location.4. Press the PTT key momentarily to save the your new setting and exit to normaloperation.Timer OperationTimer OperationTimer OperationTimer OperationThe VX-7R includes the capability to turn itself on/off at preset time. If you use thesefeatures, must be setup the VX-7R’s clock, described previously.ON TimerON TimerON TimerON Timer1. Press the [MON/F] key, then press the [0(SET)] key to enter the Set mode.2. Rotate the DIAL to select Menu Item (Save Modes #5: ON TIMER).3. Press the [BAND(BND DN)] key to enable setting of this Menu Item.4. Press the [MAIN] or [SUB] key to set the “hour” setting you want the radio toswitch on.](https://usermanual.wiki/Yaesu-Musen/VX-7R.Manual/User-Guide-229636-Page-51.png)
![FCC ID: K66VX-7ROperating ManualVertex Standard Co., Ltd.525. Rotate the DIAL one click clockwise, then press the [MAIN] or [SUB] key to set the“minute” setting you want the radio to switch on.6. Rotate the DIAL one click clockwise again, then press the [MAIN] or [SUB] key toset this Menu Item to “ON.”7. Once you have made your selection, press the PTT key to save the new setting andexit to normal operation.OOOOFFFFFFFF TimerTimerTimerTimer1. Press the [MON/F] key, then press the [0(SET)] key to enter the Set mode.2. Rotate the DIAL to select Menu Item (Save Modes #6: OFF TIMER).3. Press the [BAND(BND DN)] key to enable setting of this Menu Item.4. Press the [MAIN] or [SUB] key to set the “hour” setting you want the radio toswitch off.5. Rotate the DIAL one click clockwise, then press the [MAIN] or [SUB] key to set the“minute” setting you want the radio to switch off.6. Rotate the DIAL one click clockwise again, then press the [MAIN] or [SUB] key toset this Menu Item to “ON.”7. Once you have made your selection, press the PTT key to save the new setting andexit to normal operation.Display CustomizationDisplay CustomizationDisplay CustomizationDisplay CustomizationThe VX-7R’s display includes several unique customization options which canexpand your enjoyment of your transceiver.Icon ModeIcon ModeIcon ModeIcon ModeThe display’s alphanumeric labels can be replaced by pictorial icons, which may beeasier to remember during operation.To activate the Icon mode:1. Press the [MON/F] key, then press the [0(SET)] key to enter the Set mode.2. Rotate the DIAL to select Menu Item (Misc Setup #12: ICON SET).3. Press the [MAIN] or [SUB] key to set this Menu Item to ON.4. When you have made your selection, press the PTT to save the new setting and exitto normal operation.5. The display will change to incorporate the default icons, as stored in themicroprocessor's firmware.](https://usermanual.wiki/Yaesu-Musen/VX-7R.Manual/User-Guide-229636-Page-52.png)
![FCC ID: K66VX-7ROperating ManualVertex Standard Co., Ltd.53R.F. SayR.F. SayR.F. SayR.F. Say: The icon is replaced by alphanumeric label while dual band operation.You can, of course, select the display items which you wish to be represented by icons.Icon Selection1. Press the [MON/F] key, then press the [0(SET)] key to enter the Set Mode.2. Rotate the DIAL to select Menu Item (Misc Setup #14: ICON SEL).3. Press the [BAND(BND DN)] key to enable modification of this Menu Item.4. Press the [MAIN] or [SUB] key to select the desired band or mode on which youwish to utilize an Icon.5. Turn the DIAL one click clockwise, then press the [MAIN] or [SUB] key to select thedesired Icon to be displayed in place of the regular indicator.6. Press the PTT key momentarily to save the your new setting and exit to normaloperation.Icon EditorThe VX-7R has four Icon memory channels which possible the user.1. Press the [MON/F] key, then press the [0(SET)] key to enter the Set Mode.2. Rotate the DIAL to select Menu Item (Misc Setup #13: ICON EDIT).3. Press the [BAND(BND DN)] key to enable this Menu Item.4. Press the [MAIN] or [SUB] key to select the desired Icon memory channel (1 - 4).5. A blinking dot appear the upper left corner of the icon field.6. Pressing the [2(DW)], [8(TONE)], [4(ARTS)], and [6(SP-ANA)] key to move the dotto “upward,” “downward,” “leftward,” and “rightward” respectively. Bring the dot todesired point on the icon field, then press the [5(S.SCH)] key to set. (press the[5(S.SCH)] key )7. Turn the DIAL one click clockwise, then press the [MAIN] or [SUB] key to select thedesired Icon to be displayed in place of the regular indicator.8. Press the PTT key momentarily to save the your new setting and exit to normaloperation.Power-Off Display ModePower-Off Display ModePower-Off Display ModePower-Off Display ModeWhen the VX-7R is turned off, the LCD may be set up to display one or moreenvironmental measurements. These include temperature, barometric pressure,altitude, or combinations of these.1. Press the [MON/F] key, then press the [0(SET)] key to enter the Set mode.2. Rotate the DIAL to select Menu Item (Display Setup #4: DISP MODE).](https://usermanual.wiki/Yaesu-Musen/VX-7R.Manual/User-Guide-229636-Page-53.png)
![FCC ID: K66VX-7ROperating ManualVertex Standard Co., Ltd.543. Press the [MAIN] or [SUB] key to select the new setting. The options includeNONE: No display when the transceiver is off.TEMP: Display of temperature when the transceiver is off.BARO: Display of barometric pressure when the transceiver is off. (requiresoptional SU-1)ALTI: Display of the current altitude when the transceiver is off. (requiresoptional SU-1)TEMP+BARO: Display of Temperature plus barometric pressure.TEMP+ALTI: Display of Temperature plus altitude.ALL:4. When you have made your selection, press the PTT key to save the new setting andexit to normal operation.S-and TX Power S-and TX Power S-and TX Power S-and TX Power MeterMeterMeterMeterThe VX-7R has five types S- and TX Power Meter. You may change to desired type bydefault meter.1. Press the [MON/F] key, then press the [0(SET)] key to enter the Set mode.2. Rotate the DIAL to select Menu Item (Display Setup #8: MTR SYMB).3. Press the [MAIN] or [SUB] key to select the desired meter type.4. When you have made your selection, press the PTT key to save the new setting andexit to normal operation.Modification the S-and TX Power Meter SymbolThe default “>” symbol which is used for last meter type may be replaced by severalother symbols, if desired.Here’s how to replace the meter symbol:1. Recall the last meter type, described previously.2.2.2.2. Press the [BAND(BND DN)] key to enable modification of this Menu Item.3. Rotate the DIAL one click clockwise, then press the [MAIN]/[SUB] key or keypad toselect the character in the first digit.Example 1: Press the [MAIN] or [SUB] key to select any of ?? available characters(including letters, numbers, and special symbols).Example 2: Press the [2(DW)] key repeatedly to toggle among the seven availablecharacters: A " B " C " a " b " c " 24. Rotate the DIAL to move to the next digit.](https://usermanual.wiki/Yaesu-Musen/VX-7R.Manual/User-Guide-229636-Page-54.png)
![FCC ID: K66VX-7ROperating ManualVertex Standard Co., Ltd.555. Repeat previous steps 3 and 4 as necessary to complete (up to 8 characters).6. When you have made your choice, press the [BAND(BND DN)] key, then press thePTT key to save your selection and exit to normal operation.R.F. SayR.F. SayR.F. SayR.F. Say: you can make the original font, describe next column.Font EditorThe VX-7R has two Font memory channels which possible the user.1. Press the [MON/F] key, then press the [0(SET)] key to enter the Set Mode.2. Rotate the DIAL to select Menu Item (Misc Setup #11: FONT EDIT).3. Press the [BAND(BND DN)] key to enable this Menu Item.4. Press the [MAIN] or [SUB] key to select the desired Font memory channel (1 or 2).5. A blinking dot appear the upper left corner of the font field.6. Pressing the [2(DW)], [8(TONE)], [4(ARTS)], and [6(SP-ANA)] key to move the dotto “upward,” “downward,” “leftward,” and “rightward” respectively. Bring the dot todesired point on the icon field, then press the [5(S.SCH)] key to set. (press the[5(S.SCH)] key )7. Turn the DIAL one click clockwise, then press the [MAIN] or [SUB] key to select thedesired font to be displayed in place of the regular indicator.8. Press the PTT key momentarily to save the your new setting and exit to normaloperation.R.F. SayR.F. SayR.F. SayR.F. Say: The original fonts also can be used for the alpha-numeric tag.Display ContrastDisplay ContrastDisplay ContrastDisplay ContrastThe LCD’s contrast may be adjusted using the Menu, as well.1. Press the [MON/F] key, then press the [0(SET)] key to enter the Set mode.2. Rotate the DIAL to select Menu Item (Display Setup #2: CONTRAST).3. Press the [MAIN] or [SUB] key to adjust the contrast. As you make the adjustment,you will be able to see the effects of your changes.4. When you have completed the adjustment, press the PTT key to save the newsetting and exit to normal operation.Display Display Display Display DimmerDimmerDimmerDimmerThe LCD and keypad illumination may be adjusted using the Menu, as well.1. Press the [MON/F] key, then press the [0(SET)] key to enter the Set mode.2. Rotate the DIAL to select Menu Item (Display Setup #3: DIMMER).3. Press the [MAIN] or [SUB] key to adjust the comfortable brightness level. As you](https://usermanual.wiki/Yaesu-Musen/VX-7R.Manual/User-Guide-229636-Page-55.png)
![FCC ID: K66VX-7ROperating ManualVertex Standard Co., Ltd.56make the adjustment, you will be able to see the effects of your changes.4. When you have completed the adjustment, press the PTT key to save the newsetting and exit to normal operation.I-Beam CustomizationI-Beam CustomizationI-Beam CustomizationI-Beam CustomizationThe VX-7R’s I-Beam also includes customization options.COLOR SelectionCOLOR SelectionCOLOR SelectionCOLOR Selection1. Press the [MON/F] key, then press the [0(SET)] key to enter the Set Mode.2. Rotate the DIAL to select Menu Item (Display Setup #7: LED COLOR2).3. Press the [BAND(BND DN)] key to enable modification of this Menu Item.4. Press the [MAIN] or [SUB] key to select the desired band or status which you wishto utilize. Available selections are:U BAND TX: Set the I-Beam color while transmit on the “Main” band.L BAND TX: Set the I-Beam color while transmit on the “Sub” band.U BAND BUSY: Set the I-Beam color while squelch off on the “Main” band.L BAND BUSY: Set the I-Beam color while squelch off on the “Sub” band.MR BUSY: Set the I-Beam color while squelch off on the Memory channel.5. Turn the DIAL one click clockwise, then press the [MAIN] or [SUB] key to select thedesired color to be illuminated in place of the regular color.6. Press the PTT key momentarily to save the your new setting and exit to normaloperation.COLOR EditorCOLOR EditorCOLOR EditorCOLOR Editor1. Press the [MON/F] key, then press the [0(SET)] key to enter the Set Mode.2. Rotate the DIAL to select Menu Item (Display Setup #6: LED COLOR1).3. Press the [BAND(BND DN)] key to enable modification of this Menu Item.4. Press the [MAIN] or [SUB] key to select the desired color which you wish to edit.5. Turn the DIAL one click clockwise, then press the [MAIN] or [SUB] key to adjustthe “R” (red) element of the color, you will be able to see the effects of your changes.6. Repeat above step regarding the “G” (Green) and “B” (Blue) elements of the color.7. Press the [BAND(BND DN)] key to save the your setting, then press the PTT key toexit to normal operation.](https://usermanual.wiki/Yaesu-Musen/VX-7R.Manual/User-Guide-229636-Page-56.png)
![FCC ID: K66VX-7ROperating ManualVertex Standard Co., Ltd.57ResetResetResetResetMicroprocessor ResettingMicroprocessor ResettingMicroprocessor ResettingMicroprocessor ResettingTo clear all memories and other settings to factory defaults1. Turn the radio off.2. Press and hold the [4(ARTS)], [BAND(BND DN)], and [V/M(WRITE MT)] keywhile turning the radio on.3. Press the [MON/F] key momentarily to reset all settings to their factory defaults(press the another key to cancel the Reset procedure).Set Mode ResettingSet Mode ResettingSet Mode ResettingSet Mode ResettingTo reset the Set (Menu) mode setting to their factory defaults1. Turn the radio off.2. Press and hold the [BAND(BND DN)] and [V/M(WRITE MT)] key while turning theradio on.3. Press the [MON/F] key momentarily to reset the Set (Menu) mode setting to theirfactory defaults (press the another key to cancel the Reset procedure).CloningCloningCloningCloningThe VX-7R includes a convenient “Clone” feature, which allows the memory andconfiguration data from one transceiver to be transferred to another VX-7R. This can beparticularly useful when configuring a number of transceivers for a public serviceoperation. Here is the procedure for Cloning one radio’s data to another:1. Turn both radios off.2. Connect the optional CT-27 cloning cable between the MIC/EAR jacks of the tworadios.3. Press and hold the [MON/F] key while turning the radios on. Do this for both radios(the order of switch on does not matter). “CLONE” will appear on the displaysappear on both radios when the Clone mode is successfully activated in this step.4. On the Destination radio, press the [V/MR(WRITE MT)] key (“CLONE WAIT” willappear on the LCD).5. Press the [BAND(BND DN)] key on the Source radio; “CLONE TX” will appear onthe Source radio, and the data is transferred.6. If there is a problem during the cloning process, “CLONE ERROR” will bedisplayed. Check your cable connections and battery voltage, and try again.7. If the data transfer is successful, “CLONE” will reappear on both displays. Turn](https://usermanual.wiki/Yaesu-Musen/VX-7R.Manual/User-Guide-229636-Page-57.png)
![FCC ID: K66VX-7ROperating ManualVertex Standard Co., Ltd.58both radios off and disconnect the CT-27. You can then turn the radios back on, andbegin normal operation.Set ModeSet ModeSet ModeSet ModeThe VX-7R Set (Menu) mode is easy to activate and set. Use the following procedure:1. Press the [MON/F] key, then press the [0(SET)] key to enter the Set mode.2. Turn the DIAL to select the Menu Item to be adjusted.3. Press the [MAIN]/[SUB] key to adjust or select the parameter to be changed on theMenu item selected in above step.4. After completing your selection and adjustment, press the PTT switch momentarilyto exit the Set mode and exit to normal operation.RF Say: Some Menu Items must be pressing the [BAND(BND DN)] key to enablingadjustment or select the parameter.Set Mode SummarySet Mode DetailsSet Mode DetailsSet Mode DetailsSet Mode DetailsBasic Setup #1 [SQL NFM]Function: Set the Squelch threshold level for the AM and FM-Narrow modes.Available Values: 0 ~ 15/AUTODefault: AUTOBasic Setup #2 [SQL WFM]Function: Set the Squelch threshold level for the FM-Wide mode.Available Values: 0 ~ 8/AUTODefault: AUTOBasic Setup #3 [VFO STEP]Function: Setting of the synthesizer steps.Available Values: 5/9/10/12.5/15/20/25/50/100 kHzDefault: Depends on the transceiver version.Basic Setup #4 [RX MODE]Function: Select the Operating mode.Available Values: AUTO/N-FM/W-FM/AM](https://usermanual.wiki/Yaesu-Musen/VX-7R.Manual/User-Guide-229636-Page-58.png)
![FCC ID: K66VX-7ROperating ManualVertex Standard Co., Ltd.59Default: AUTO (Mode automatically changes according to operating frequency)Basic Setup #5 [ARS]Function: Enable/disable the Automatic Repeater Shift function.Available Values: ON/OFFDefault: ONBasic Setup #6 [SHIFT]Function: Set the magnitude of the Repeater Shift.Available Values: 0.00 ~ 99.95 MHzDefault: Depends on the transceiver version.Basic Setup #7 [RPT SHIFT]Function: Set the Repeater Shift DirectionAvailable Values: +RPT/+RPT/SIMPDefault: Depends on the transceiver version.Basic Setup #8 [MUTE SET]Function: Enable/Disable the Audio Mute feature while operating on the Dual Bandreception.Available Values: ON/OFFDefault: Depends on the transceiver version.Basic Setup #9 [KEY BEEP]Function: Enable/disable the Keypad beeper.Available Values: ON/OFFDefault: ONBasic Setup #10 [LOCK MODE]Function: Select the Control Locking lockout combination.Available Values: KEY/DIAL/PTT/KEY&DIAL/KEY&PTT/DIAL&PTT/ALLDefault: KEYBasic Setup #11 [NAME SET]Function: Store Alpha-Numeric “Tags” for the Memory channels.Name Storing:](https://usermanual.wiki/Yaesu-Musen/VX-7R.Manual/User-Guide-229636-Page-59.png)
![FCC ID: K66VX-7ROperating ManualVertex Standard Co., Ltd.601. Recall the memory channel to be named.2. Recall this Menu, then press the [BAND(BND DN)] key momentarily.3. Press the [MAIN]/[SUB] key or keypad to select the desired first letter, number, orsymbol.Example 1: Press the [MAIN] or [SUB] key to select any of ?? available characters(including letters, numbers, and special symbols).Example 2: Press the [2(DW)] key repeatedly to toggle among the seven availablecharacters: A " B " C " a " b " c " 24. Rotate the DIAL one click clockwise to save the first letter/number/symbol.5. Repeat step 3 and 4 as necessary to complete.6. Press the press the [BAND(BND DN)] key momentarily, then press the PTT keymomentarily to save the your new setting and exit to normal operation.Basic Setup #12 [MW MODE]Function: Select the method of the Memory Writhing.Available Values: LOWER CH/NEXT CHDefault: LOWER CHLOWER CH: Store to the next-available “free” channel”NEXT CH: Store to the next memory channel which is last stored memory channelBasic Setup #13 [SKIP MODE]Function: Set the scan “flag” to the Memory channel.Available Values: OFF/SKIP/PRFCLDefault: OFFSKIP: The scanner is “skipped.”PRFCL: The scanner is only checked the channels which have this “flag.”Basic Setup #14 [HYP WRITE]Function: Enable/disable the Hyper Memory WritingAvailable Values: ENABLE/DISABLEDefault: ENABLEDisplay Setup #1 [BUSY LED]Function: Enable/disable the BUSY LED (“I-Beam”) while the Squelch is open.Available Values: ON/OFFDefault: ON](https://usermanual.wiki/Yaesu-Musen/VX-7R.Manual/User-Guide-229636-Page-60.png)
![FCC ID: K66VX-7ROperating ManualVertex Standard Co., Ltd.61Display Setup #2 [CONTRAST]Function: Setting of the Display contrast level.Available Values: 1 ~ 10Default: 5Display Setup #3 [DIMMER]Function: Setting of the Display brightness level.Available Values: 0 ~ 10Default: 10Display Setup #4 [DISP MODE]Function: Select the display while the transceiver’s power is offAvailable Values: NONE/TEMP/BRM/ALT/T+B/T+A/ALL/WeatherDefault: NONENONE: No display when the transceiver is off.TEMP: The current temperature will be displayed while the transceiver’s power is off.BRM: The current barometric pressure will be displayed while the transceiver’s poweris off.ALT: The current altitude will be displayed while the transceiver’s power is off(calculated from the barometric pressure).T+B: The current temperature and barometric pressure will be displayed while thetransceiver’s power is off.T+A: The current temperature and altitude will be displayed while the transceiver’spower is off.Weather: The weather forecast will be displayed while the transceiver’s power is off.R.F. SaysR.F. SaysR.F. SaysR.F. Says: The barometric pressure, altitude, and Weather information require theoptional SU-1)Display Setup #5 [LAMP MODE]Function: Select the LCD/Keypad Lamp mode.Available Values: KEY /Continue/OFFDefault: KEYKEY: Illuminates the LCD/Keypad for 5 seconds when any key is pressed.Continue: Pressing the LAMP key toggles LCD/Keypad lamp On/Off.OFF: Disable the LCD/Keypad Lamp.](https://usermanual.wiki/Yaesu-Musen/VX-7R.Manual/User-Guide-229636-Page-61.png)
![FCC ID: K66VX-7ROperating ManualVertex Standard Co., Ltd.62Display Setup #6 [LED COLOR 1]Function: Select the “I-Beam” color for each operating status.Display Setup #7 [LED COLOR 2]Function: Edit the “I-Beam” color.Display Setup #8 [MTR SYMB]Function: Select the S- & TX PO meter Symbol.Available Values: Five patternDefault:DSQ/DCS/DTMF #1 [SQL TYPE]Function: Select the Tone Encoder and/or Decoder mode.Available Values: OFF/T/TSQ/DCSDefault: OFFT: CTCSS EncoderTSQ: CTCSS Encoder/DecoderDCS: Digital Coded Squelch Encoder/DecoderDSQ/DCS/DTMF #2 [TONE SET]Function: Setting of the CTCSS Tone FrequencyAvailable Values: 50 standard CTCSS tonesDefault: 100.0 HzRRRR....FFFF.... Say Say Say Say: In this mode, press the [BAND(BND DN)] key to enable the setting, and pressthe [BAND(BND DN)] key again to exit from this item.DSQ/DCS/DTMF #3 [DCS SET]Function: Setting of the DCS code.Available Values: 104 standard DCS codes.Default: 023RRRR....FFFF.... Say Say Say Say: In this mode, press the [BAND(BND DN)] key to enable the setting, and pressthe [BAND(BND DN)] key again to exit from this item.DSQ/DCS/DTMF #4 [DCS COMP]Function: Enabled/Disabled the “Inverted” DCS code decode.](https://usermanual.wiki/Yaesu-Musen/VX-7R.Manual/User-Guide-229636-Page-62.png)
![FCC ID: K66VX-7ROperating ManualVertex Standard Co., Ltd.63Available Values: ENABLE/DISABLEDefault: DISABLEDSQ/DCS/DTMF #5 [BELL]Function: Select the CTCSS Bell ringer repetitions.Available Values: OFF/1/3/5/8/RPTDefault: OFFDSQ/DCS/DTMF #6 [SPLIT TONE]Function: Select the CTCSS Bell ringer repetitions.Available Values:Default: OFFDSQ/DCS/DTMF #7 [DTMF DIALER]Function: Select the CTCSS Bell ringer repetitions.Available Values: ON/OFFDefault: OFFDSQ/DCS/DTMF #8 [DTMF SET]Function: Programming the DTMF Autodialer.DTMF Autodialer Programming:1. After selecting Menu Item 30, press the [BAND(SET)AR] key momentarily.2. Rotate the DIAL to select the autodial memory number you want to store (9memories are available).3. Press the [BAND(SET)AR] key momentarily, then key in the phone number youwant to store (maximum: 16 digits).Press the [MAIN] key to store the “Pause,” then press again the [MAIN] key todelete the previously storing data after the cursor.4. If you make a mistake, rotate the DIAL counterclockwise to back the cursor, thenre-enter the correct number.5. After entering the final digit, press the PTT key momentarily to save the newsetting and exit to normal operation.Scan Modes #1 [CH COUNTER]Function: Select the Channel Counter Search Width.Available Values: ±5 MHz/±10 MHz/± 50 MHz/±100 MHz](https://usermanual.wiki/Yaesu-Musen/VX-7R.Manual/User-Guide-229636-Page-63.png)
![FCC ID: K66VX-7ROperating ManualVertex Standard Co., Ltd.64Default: ± 50 MHzScan Modes #2 [EDGE BEEP]Function: Enable/disable the Band-edge beeper while scanning.Available Values: ON/OFFDefault: ONWhen this feature “ON,” a beep will sound when the scanner reaches the band edge(during VFO Scanning) or when it reaches Memory channel “1” (during MemoryChannel Scanning).Scan Modes #3 [RESUME]Function: Select the Scan Resume mode.Available Values: 5SEC/BUSY/HOLDDefault: 5 SEC1~10 SEC: The scanner will hold for selected periods (seconds), then resume whether ornot the other station is still transmitting.BUSY: The scanner will hold until the signal disappears, then will resume when thecarrier drops.HOLD: The scanner will stop when a signal is received, and will not restart.Scan Modes #4 [SCAN LAMP]Function: Enable/disable the Scan lamp while paused.Available Values: ON/OFFDefault: ONScan Modes #5 [SMRT SRCH]Function: Select the Smart Search Sweep mode.Available Values: SINGLE/CONTINUEDefault: SINGLESINGLE: The transceiver sweeps the current band once in each direction starting onthe current frequency. All channels where activity is present (up to 15 in each direction)are loaded into the Smart Search memories. Whether or not all 31 memories are filled,the search stops after one sweep in each direction.CONTINUE: The transceiver makes a sweep in each direction as with the “SINGLE”mode, but if all 31 channels are not filled after the first sweep, the radio continuessweeping until they are all filled.](https://usermanual.wiki/Yaesu-Musen/VX-7R.Manual/User-Guide-229636-Page-64.png)
![FCC ID: K66VX-7ROperating ManualVertex Standard Co., Ltd.65Scan Modes #6 [SPEC-ANAL1]Function: Select the Spectrum Analyzer Sweep mode.Available Values: SINGLE/CONTINUEDefault: SINGLESINGLE: The transceiver sweeps the current band once.CONTINUE: The transceiver sweeps the current band repeatedly until the SpectrumAnalyzer is turned offScan Modes #7 [SPEC-ANAL2]Function: Enable/disable the Audio output while the Spectrum Analyzer is activated inthe amateur band.Available Values: ON/OFFDefault: ONMeasurement #1 [SENS DISP]Function: Select the display of the sensor unit.Available Values: OFF/WAVE/TEMP/BARO/ALTI/TIME/WXDefault: OFFMeasurement #2 [WAVE MON]Function: Select the Wave Form to be measuredAvailable Values: ALL/RX Signal/TX ModulationDefault: ALLALL: Indicate the RX Audio wave form and TX Audio modulation wave form.RX Signal: Indicate the RX Audio wave.ALL: Indicate the TX Audio modulation wave form.Measurement #3 [TEMP UNIT]Function: Select the measurement unit for the Temperature.Available Values: °C/°FDefault: Depends on the transceiver versionMeasurement #4 [BARO UNIT]Function: Select the measurement unit for the Barometric Pressure.Available Values: hpa/mb](https://usermanual.wiki/Yaesu-Musen/VX-7R.Manual/User-Guide-229636-Page-65.png)
![FCC ID: K66VX-7ROperating ManualVertex Standard Co., Ltd.66Default: Depends on the transceiver versionMeasurement #5 [BARO OFST]Function: Correcting the Barometric Pressure.Available Values: –500 ~ +500 hpa (mb)Default: 0 hpa (mb)Measurement #6 [ALTI UNIT]Function: Select the measurement unit for the Altimeter.Available Values: m/ftDefault: Depends on the transceiver versionMeasurement #7 [ALTI OFST]Function: Correcting the Altimeter.Available Values: –500 ~ +500 m (ft)Default: 0 m (ft)Save Modes #1 [APO]Function: Set the Automatic Power-Off time.Available Values: OFF/30 min/1 hour/3 hours/5 hours/8 hoursDefault: OFFSave Modes #2 [RX SAVE]Function: Select the Receive-mode Battery Saver interval (“sleep” ratio).Available Values: OFF/200mS(1:1)/300mS(1:1.5)/500mS(1:2.5)/1s(1:5)/2s(1:10)Default: 200mS(1:1)Save Modes #3 [TX SAVE]Function: Enable/disable The Transmit Battery Saver.Available Values: ON/OFFDefault: OFFSave Modes #4 [TOT]Function: Set the TOT time.Available Values: OFF/1 min/2.5 min/5 min/10 minDefault: OFF](https://usermanual.wiki/Yaesu-Musen/VX-7R.Manual/User-Guide-229636-Page-66.png)
![FCC ID: K66VX-7ROperating ManualVertex Standard Co., Ltd.67The time-out timer shuts off the transmitter after continuous transmission of theprogrammed time.Save Modes #5 [ON TIMER]Function: Set the ON Timer time.Available Values: OFF/00:00 ~ 23:59Default: OFFThe ON Timer turns on the radio at the programmed time.Save Modes #6 [OFF TIMER]Function: Set the OFF Timer time.Available Values: OFF/00:00 ~ 23:59Default: OFFThe OFF Timer turns off the radio at the programmed time.ARTS #1 [ARTS BEEP]Function: Select the Beep option during ARTS operation.Available Values: IN RANGE/ALWAYS/OFFDefault: IN RANGERANGE: Beeps sound only when the radio first detects that you are within range.ALL: Beeps sound every time a polling transmission is received from the other station(every 15 or 25 seconds when in range).OFF: No alert beeps sound.ARTS #2 [ARTS ITVL]Function: Select the Polling Interval during ARTS operation.Available Values: 15 SEC/25 SECDefault: 25 SECThis setting determines how often the other station will be polled during ARTSoperation.ARTS #3 [CW ID]Function: Program and activate the CW Identifier (used during ARTS operation).CW IDer Programming:1. After selecting Menu Item 31, press the [BAND(SET)AR] key momentarily.2. Turn the DIAL one click to change the display from OFF to ON (CW IDer ON).](https://usermanual.wiki/Yaesu-Musen/VX-7R.Manual/User-Guide-229636-Page-67.png)
![FCC ID: K66VX-7ROperating ManualVertex Standard Co., Ltd.683. Press the [BAND(SET)AR] key momentarily, then turn the DIAL to select the firstletter/number of your callsign, and press the [BAND(SET)AR] key momentarily tosave the first letter/number.4. Repeat the previous step as necessary to complete your callsign, pressing the[BAND(SET)AR] key after each entry.5. Press the PTT key momentarily to save the new setting and exit to normaloperation.Misc Setup #1 [BCLO]Function: Enable/disable the Busy Channel Lock-Out feature.Available Values: ON/OFFDefault: OFFMisc Setup #2 [HOME/REV]Function: Select the function of the [HM/RV(EMG)] key.Available Values: HOME/REVDefault: Depends on the transceiver version.HOME: Pressing this key instantly recalls a favorite “Home” channel.REV: Pressing this key reverses the transmit and receive frequencies during repeateroperation.Misc Setup #3 [MON/T-CAL]Function: Select the MONI key (just below the PTT switch) function.Available Values: MON/T-CALDefault: Depends on the transceiver version.MON: Pressing the MONI key causes the noise/tone Squelch to be over-ridden, allowingyou to listen for weak (or non-encoded) signals.T-CAL: Pressing the MONI key activates a 1750-Hz burst tone, used for repeater accessin many countries.Misc Setup #4 [MON-F CNG]Function: Switch theAvailable Values: F/MONDefault: MON.F:MON: Pressing the MONI key causes the noise/tone Squelch to be over-ridden, allowing](https://usermanual.wiki/Yaesu-Musen/VX-7R.Manual/User-Guide-229636-Page-68.png)
![FCC ID: K66VX-7ROperating ManualVertex Standard Co., Ltd.69you to listen for weak (or non-encoded) signals.T-CAL: Pressing the MONI key activates a 1750-Hz burst tone, used for repeater accessin many countries.Misc Setup #5 [EMG SET]Function: Select theAvailable Values: BEEP+STROBE/BEEP/STROBE1/STROBE2/STROBE3/BEAMDefault: BEEP+STROBEMisc Setup #6 [HALF DEV]Function: Reducing the Deviation level by 50%.Available Values: ON/OFFDefault: OFFMisc Setup #7 [VOX]Function: Select the VOX operation.Available Values: OFF/HIGH/LOWDefault: OFFMisc Setup #8 [VOX DLAY]Function: Select the VOX delay time.Available Values: 0.5S/1S/2SDefault: 1SMisc Setup #9 [BAND LINK]Function: Enable/disable the BAND Link feature.Available Values: ON/OFFDefault: OFFWhen this feature “ON,” the MAIN and SUB bands are “slaved” so that they changefrequency together.Misc Setup #10 [VFO MODE]Function: Select or disable the VFO Band edge for the current band.Available Values: ALL/BANDDefault: BANDALL: When the VFO frequency reaches the high edge of the current band, the VFO](https://usermanual.wiki/Yaesu-Musen/VX-7R.Manual/User-Guide-229636-Page-69.png)
![FCC ID: K66VX-7ROperating ManualVertex Standard Co., Ltd.70frequency will jump to the low band edge of the next bandnext bandnext bandnext band (or vice versa).BAND: When the VFO frequency reaches the high band edge of the current band, theVFO frequency will jump to the low band edge of the current bandcurrent bandcurrent bandcurrent band (or vice versa).Misc Setup #11 [FONT EDIT]Function: Edit the User font.Misc Setup #12 [ICON SET]Function: Enable/disable the Icon display.Available Values: ALL/BANDDefault: BANDMisc Setup #13 [ICON EDIT]Function: Edit the User Icon.Misc Setup #14 [ICON SEL]Function: ICON selection.1. Recall Menu Item 3, then press the [BAND(BND DN)] key momentarily.2. Turn the DIAL to select the desired band or mode on which you wish to utilize anIcon, then press the [BAND(BND DN)] key momentarily.3. Turn the DIAL to select the desired Icon to be displayed in place of the regularindicator.4. Press the PTT key momentarily to save the your new setting and exit to normaloperation.Misc Setup #15 [CLOCK SFT]Function: Shifting of CPU clock frequency.Available Values: ON/OFFDefault: OFFThis function is only used to move a spurious response “birdie” should it fall on a desiredfrequency.Misc Setup #16 [TIME SET]Function: Set the Clock time.Misc Setup #17 [LANGUAGE]](https://usermanual.wiki/Yaesu-Musen/VX-7R.Manual/User-Guide-229636-Page-70.png)
![FCC ID: K66VX-7ROperating ManualVertex Standard Co., Ltd.71Function: Select the language for the Set (Menu) mode selections.Available Values: ENGLISH/JAPANESEDefault: ENGLISHMisc Setup #18 [ATT]Function: Enable/disable the Front-end AttenuatorAvailable Values: ON/OFFDefault: OFFMisc Setup #19 [MIC MONITOR]Function: Enable/disable the Microphone Monitor featureAvailable Values: ON/OFFDefault: OFFMisc Setup #20 [WX ALERT]Function: Enable/disable the Weather Alert FeatureAvailable Values: ON/OFFDefault: OFFSpecificationsSpecificationsSpecificationsSpecificationsGeneralGeneralGeneralGeneralFrequency Ranges: MAIN Rx: 05-1.8 MHz (BC Band)1.8-30 MHz (SW Band)30-59 MHz (50 MHz HAM: USA version)30-76 MHz (50 MHz HAM: EXP version)59-108 MHz (FM: USA version)76-108 MHz (FM: EXP version)108-137 MHz (Air Band)137-174 MHz (144 MHz HAM)174-222 MHz (VHF-TV)222-225 MHz (220 MHz HAM: USA version)225-420 MHz (ACT1: Action Band 1:USA version)222-420 MHz (ACT1: Action Band 1:EXP version)](https://usermanual.wiki/Yaesu-Musen/VX-7R.Manual/User-Guide-229636-Page-71.png)
![FCC ID: K66VX-7ROperating ManualVertex Standard Co., Ltd.72420-470 MHz (430 MHz HAM)470-729 MHz (UHF-TV: USA version)470-800 MHz (UHF-TV: EXP version)800-999 MHz (ACT2: Action Band 2,cellular Blocked)SUB Rx: 50-54 MHz137-174 MHz420-470 MHzTx: 50-54 MHz (MAIN & SUB)144-146 MHz or 144-148 MHz (MAIN & SUB)222-225 MHz ((MAIN, USA version)430-440 MHz or 430-450 MHz (MAIN & SUB)Channel Steps: 5/9/10/12.5/15/20/25/50/100 kHzEmission Type: F2, F3, A3Frequency Stability: ±5 ppm (–10 °C to +50 °C [+14 °F to +122 °F])Antenna Impedance: 50-ohmSupply Voltage: Nominal: 7.4 V DC, Negative GroundOperating: 10-16 V DC, Negative Ground (EXT DC jack)Current Consumption: 150 mA (Mono Band Receive)(Approx.) 200 mA (Dual Band Receive)55 mA (Mono Band Receive, Standby, Saver Off)100 mA (Dual Band Receive, Standby, Saver Off)25 mA (Mono Band Receive, Standby, Saver On “Save Ratio 1:5”)50 mA (Dual Band Receive, Standby, Saver On “Save Ratio 1:5”)400 µA (Auto Power Off)1.6/1.3/1.0/0.7 A (50 MHz, Tx HI/L3/L2/L1)1.7/1.4/1.1/0.8 A (144 MHz, Tx HI/L3/L2/L1)0.6 A (220 MHz, Tx)1.8/1.5/1.2/0.9 A (430 MHz, Tx HI/L3/L2/L1)Operating Temperature: –20 °C to +60 °C (–4 °F to +140 °F)Case Size (W x H x D): 60 x 90 x 28 mm (2.4 x 3.5 x 1.1 inch) w/o knob & antennaWeight (Approx.): 250 g (8.8 oz)](https://usermanual.wiki/Yaesu-Musen/VX-7R.Manual/User-Guide-229636-Page-72.png)

