Yamaha CLS 200 Quick Connect Rev1 Connection Diagram CLS200QC
User Manual: Yamaha CLS-200 Connection Diagram
Open the PDF directly: View PDF ![]() .
.
Page Count: 4
CLS-200
QUICK-CONNECT GUIDE
CLS-200 Quick-Connect Guide
2
Introduction
Yamaha developed the CLS-200 Home Theater Speaker
package to turn your home into a theater. In addition to
enhancing the sound of a video source, like your VCR,
DVD player, or TV, the CLS-200 also superbly reproduces
audio sources, such as a CD player or a cassette deck.
This Quick-Connect Guide will help you get started.
Study the system plan (Figure 1 below), and then use
the wiring diagram (Figure 2 on opposite page) to
connect the CLS-200 speakers to your A/V receiver. To
properly attain the home theater experience, it should be
equipped with Dolby® Digital, Dolby® Pro Logic, DTS,
or comparable multi-channel surround-sound capabil-
ity. For the video portion, you will need a DVD (or LD)
player or a hi-fi stereo VCR and a television or monitor.
Refer to the owner’s manuals that came with your other
components for complete instructions and cautions. Be
sure to turn off all power when connecting the speakers.
NOTE: Label the end of each speaker wire (i.e., left rear, right
front, etc.) before connecting them to the A/V receiver. For wire
runs over 30 feet, use larger 18- or 16-gauge speaker wire.
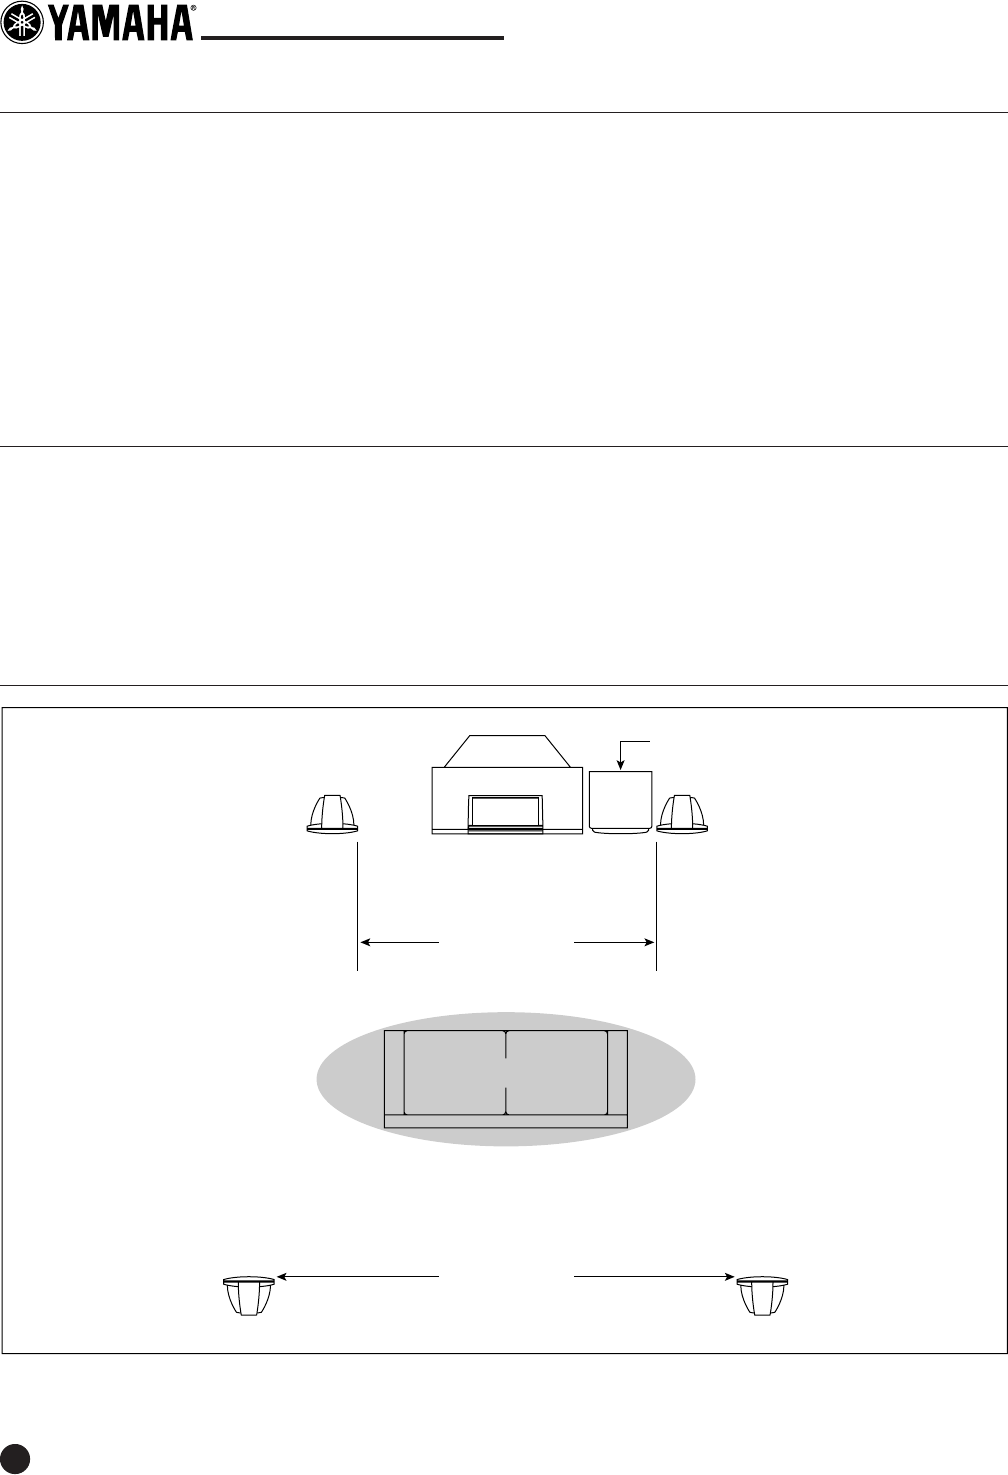
System Plan
Figure 1. This overhead view shows a typical system layout
for the CLS-200 Home Theater speaker package.
C
L
NS-A200X
(left side, same height as TV)
R
NS-A200X
(right side, same height as TV)
S
L = Left Channel
R = Right Channel
C = Center Channel
S = Surround Channel
NS-A200X
(on stand or wall, at least
ear level or preferably higher)
S
NS-A200X
(on stand or wall, at least
ear level or preferably higher)
8'~10' apart
NS-A200X
(on top or below TV)
6'~8' apart
Couch
Listening Area
Sub
SW-5 Subwoofer (on floor)
• Toggle bolts, molly anchor screws, or sheet metal
screws (for securing NS-A200X speakers to walls)
NOTE: If you are unsure of how to securely and safely fasten
speakers to a wall, please contact a reliable source about the best
type of hanger for your particular wall's construction. Secure
installation is the purchaser's responsibility.
Tools And Parts
The CLS-200 Home Theater Speaker package consists
of (5) 2-way NS-A200X speakers, (1) SW-5 powered
subwoofer, 100' of speaker wire, and related speaker
owner’s manuals. For the installation, you will also
need the following items:
• Wire strippers (optional)
CLS-200 Quick-Connect Guide
3
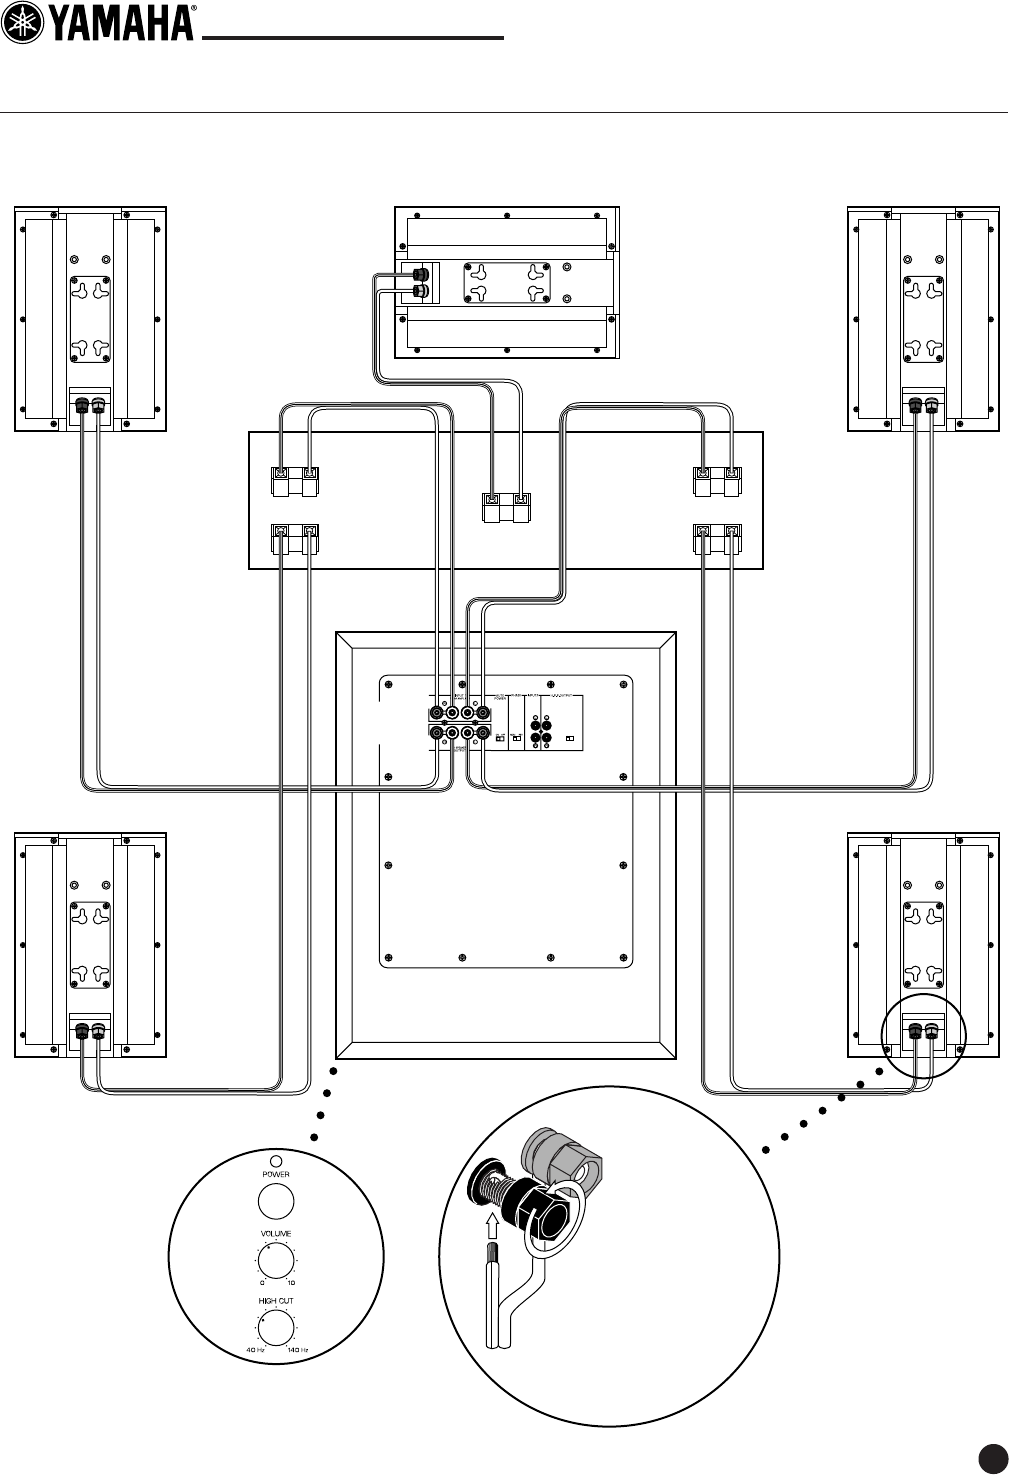
Wiring Diagram
Figure 2. CLS-200 system wiring diagram.
A/V Receiver
(Rear Panel)
-
+
RFront
Center
Surround
Front
Surround
-
+
R
-
+
L
LeftRight
-
+
-
+
L
C
NS-A200X
(Center Channel)
SW-5 Subwoofer
(Rear Panel)
-
+
NS-A200X
(Surround Left)
-
+
NS-A200X
(Surround Right)
-
+
NS-A200X
(Front Right Ch.)
-
+
-
+
NS-A200X
(Front Left Ch.)
-
+
-
+
OUTPUT
INPUT +
-
++
50Hz
80Hz
100Hz
Speaker WiringInitial Settings
(on Side Panel)
❶
Strip
1
⁄
4
" off ends of
speaker wires.
❷
Loosen terminals.
❸
Insert speaker wires;
tighten terminals.
❶
❸
❷
RED = positive (+)
use clear wire
BLK = negative (–)
use clear with
white stripe wire

CLS-200 Quick-Connect Guide
4
Consumer Precautions
Read these precautions carefully before operating your
CLS-200 speaker system:
• Since the NS-A200X speakers can be wall mounted for
surround use, it is essential that they are firmly secured.
Be sure to consult a reliable source about the best type
of hanger for your particular wall’s construction. Secure
installation is the purchaser’s responsibility.
• Do not attach them to thin plywood or soft wall
surface materials as the screws may tear free,
causing the speakers to fall and be damaged, or
resulting in personal injury.
• Do not fasten the NS-A200X speakers to walls with
nails, adhesives, or other unsafe hardware. Long-
term use and vibrations may cause them to pull free.
• Do not place any speakers where they are liable to be
knocked over or struck by falling objects. Stable
placement will also ensure better sound performance.
• The NS-A200X speakers feature a magnetically-
shielded design, but there is still a chance that
placing them too close to a TV set might impair
picture color. Should this happen, move the
speakers away from the TV set.
• Placing speakers on the same stand or shelf as a
turntable can result in feedback.
• Never touch the woofer or tweeter units with your
hand or expose them to excessive physical shock. If
they are dented or bent, the sound will be distorted.
• Lower the power amplifier/receiver volume control
before changing input sources. Never change input
sources (for example, FM to CD) at high listening
levels. Always turn the amplifier/receiver unit off
when installing or removing input cables.
• Any time you note distortion, reduce the volume
control on your power amplifier/receiver to a lower
setting. Never allow your power amplifier to be
driven into “clipping.”
• Do not attempt to clean the speakers with chemical
solvents, as this might damage the finish. To clean,
wipe with a dry, soft cloth.
• To prevent the enclosure from warping or discolor-
ing, do not place the speakers where they will be
exposed to direct sunlight or excessive humidity.
Specifications
MODEL: NS-A200X SW-5
QUANTITY: 51
TYPE: Satellite Speaker, Powered Subwoofer,
Acoustic Suspension Bass Reflex
SPEAKER COMPLEMENT: Magnetically-shielded –
5 1 ⁄ 4" High-Compliance, Glass-Filled 12" Woofer
Cloth Woofer with Inverted Dust Cover
1" Glass-Filled Cloth Dome Tweeter _
SENSITIVITY: 89 dB/1 W/1 m –
FREQUENCY RESPONSE: 55 Hz ~ 22 kHz (+ 3 dB) 18 ~ 170 Hz (-3 dB)
NOMINAL IMPEDANCE: 8 Ω5 Ω
MIN./MAX. AMPLIFIER POWER: 10 W/160 W Built-in 200 W Advanced YST Amplifier
DIMENSIONS (H X W X D): 10 3 ⁄ 8" H x 7" W x 5 5 ⁄ 8" D 19 11 ⁄ 16" H x 15 3 ⁄ 4" W x 17 1 ⁄ 8" D
WEIGHT: 27 lb (boxed as NS-AP200X) 62.2 lb (boxed)
©1999 YAMAHA ELECTRONICS CORPORATION, USA
6660 Orangethorpe Avenue, Buena Park, CA 90620
PH: (714) 522-9105; FAX: (800) 634-0355
http://www.yamaha.com
