Yamaha Tenor Drum Assembly Guide
User Manual: Yamaha Yamaha Tenor Drum Assembly Guide
Open the PDF directly: View PDF ![]() .
.
Page Count: 12
ASSEMBLY INSTRUCTIONS
Yamaha Marching Toms
and Randall May
Free Floating Lug BridgeTM
1 - Yamaha Marching Toms and Randall May Free Floating Lug Bridge Assembly Instructions
PRE-ASSEMBLY
Materials needed for assembly:
nPhillips screwdriver
n7⁄16" Adjustable wrench (ratcheting socket wrench preferred)
nFFLB™ = Free Floating Lug Bridge
• Metal bridges are pre-installed and take the place
of a normal lug casing.
• Black spacers are pre-installed onto shells.
Please be careful when using tools.
Have you ordered a carrier with the drums?
4 YES: Assembly can proceed.
NO: Assembly CANNOT proceed. The carrier’s tom rail
is essential for continuing the assembly of these drums.
RM-FC-QRM-ABS-Q
Tom rail
Bridges (top) and spacers
2 - Yamaha Marching Toms and Randall May Free Floating Lug Bridge Assembly Instructions
ASSEMBLY
Open boxes.
nRemove the drum shells from the smaller boxes.
nDo not open bag of extra parts — save for later.
nSet aside heads, rims and tension rods for later assembly.
Find your marching tom configuration (pg. 5-8)
and refer to it for assembly.
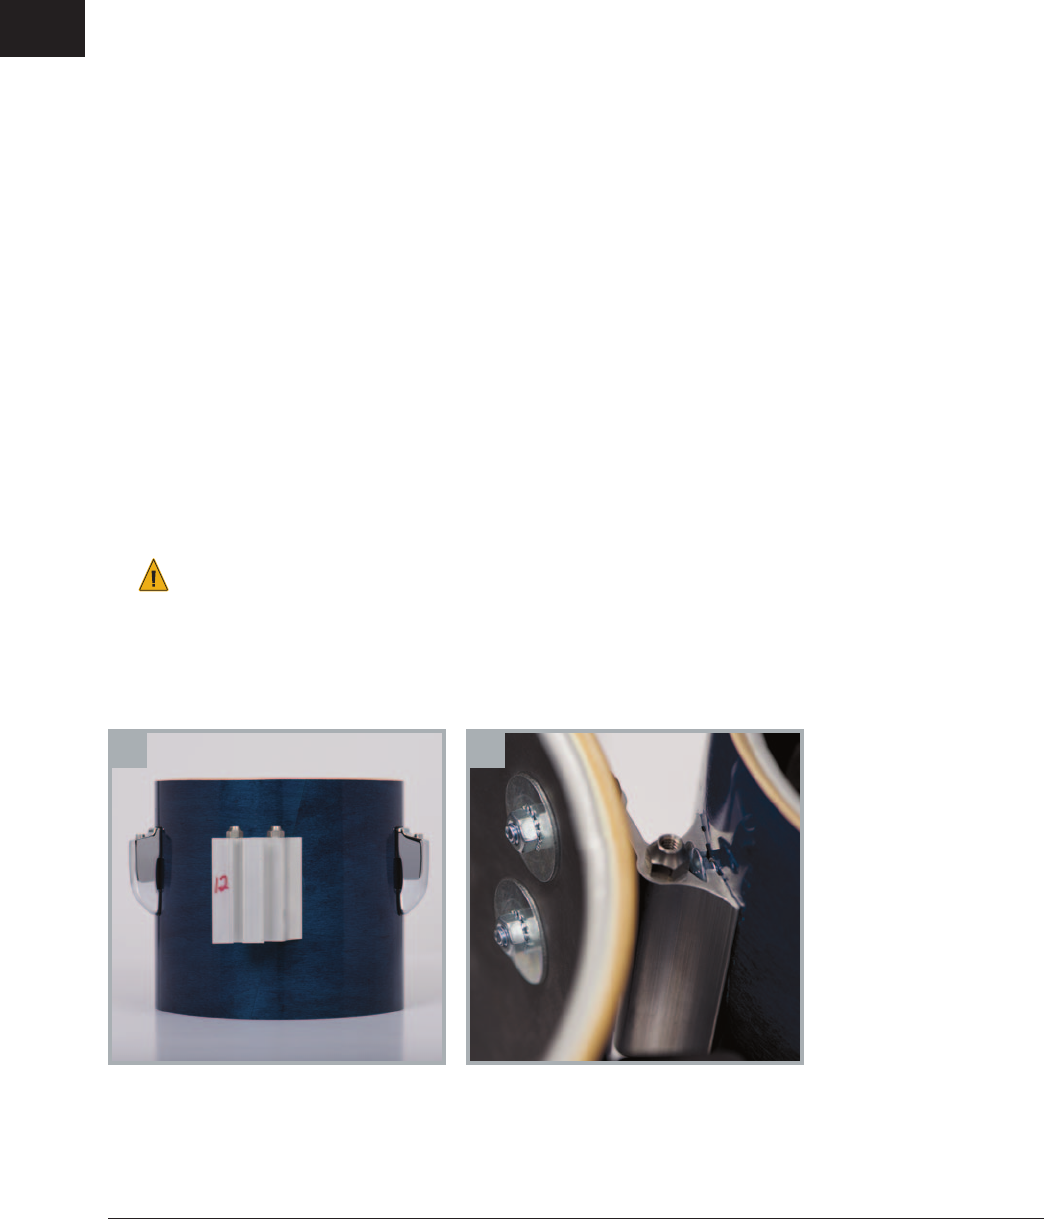
nFFLBs have been pre-installed on your drums (image A).
nLay out the shells as shown in the configuration diagram.
nNestle the Yamaha lug casing inside the FFLBs (image B).
nAttach the casing to the shell utilizing the black screws
and washers.
BA
1
2
3 - Yamaha Marching Toms and Randall May Free Floating Lug Bridge Assembly Instructions
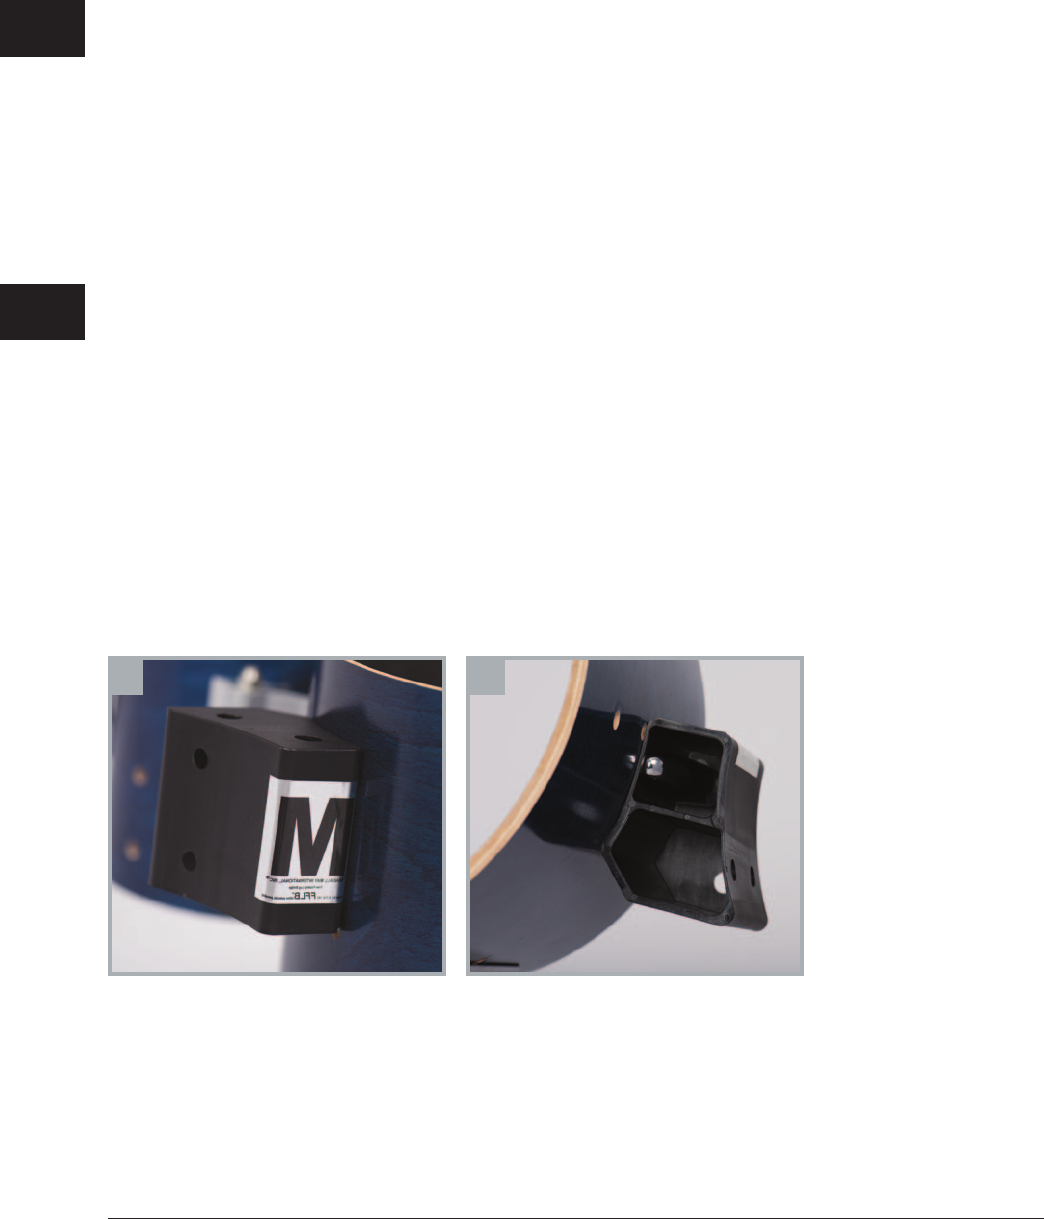
Attach the 6" or 8" space spock drum.
nYour extra 6" or 8" or both will have a pre-installed
metal bridge (image C). These bridges take the
place of the regular Yamaha lug casing.
nAttach the metal bridge to the corresponding shell
as shown in your configuration diagram.
nLocate the bag of bolts, washers and nuts with
sprocket (image D).
nPlace your 6" or 8" or both on a flat surface within
your drum array configuration so you can connect
them to the correct corresponding shell.
• Insert the bolts through the holes in the shell.
• Slide the channel of the bridge down the bolt head.
• Fasten the nut on the inside of the shell (image D).
NOTE: The height of the bridge is important. Image D
shows the top half of the bolt head. This is the ideal
height for the bridge on both shells.
C D
3
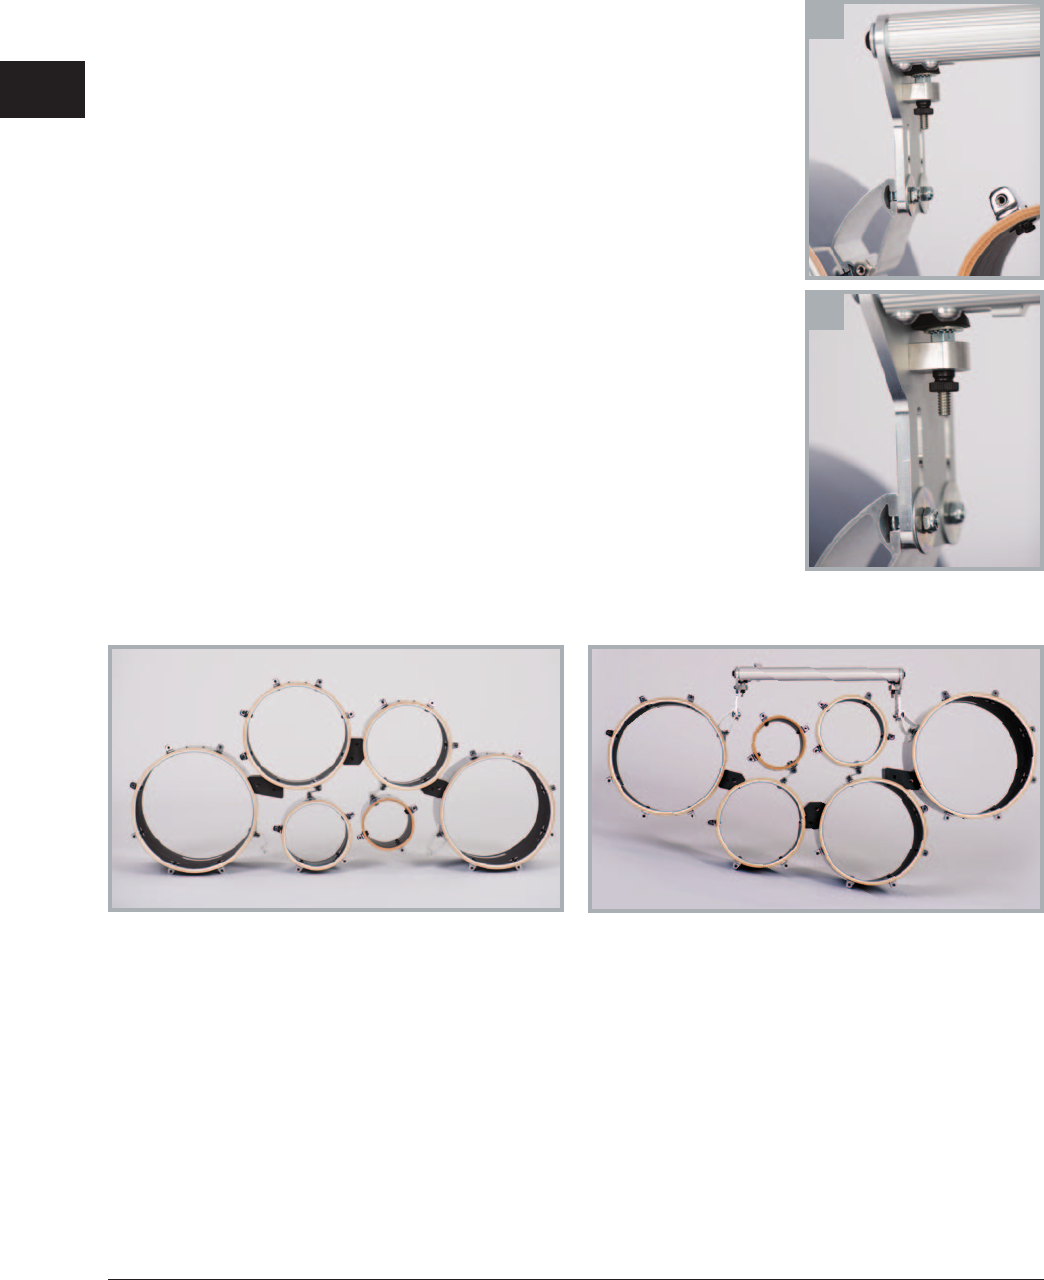
4 - Yamaha Marching Toms and Randall May Free Floating Lug Bridge Assembly Instructions
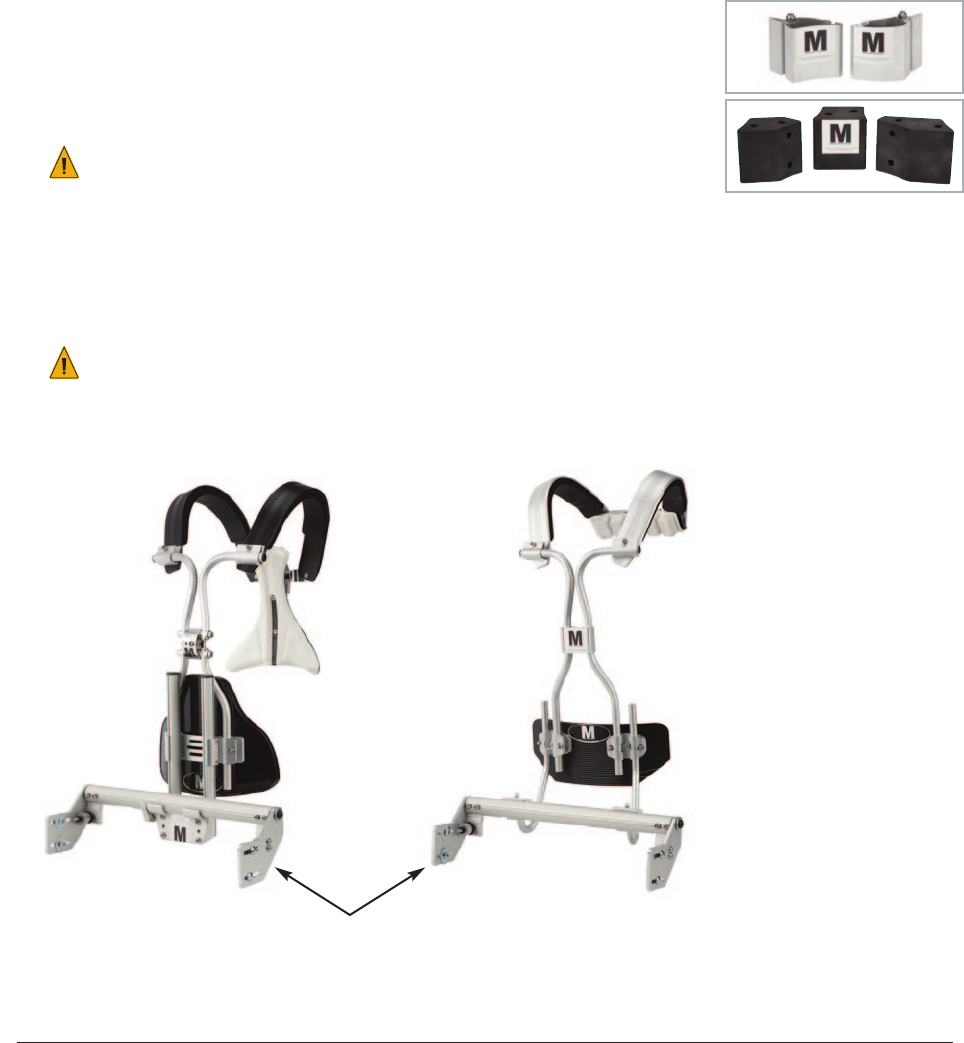
Attach the back rail to the outer drums.
nLocate the bag of bolts, washers and nuts without
the sprocket.
nInsert bolts into the opening channels on both
sides of back rail (images E and F).
• The bolt head should face out of the channel.
• Place the washer on the bolt and loosely tighten
the nut.
nRepeat on the other side (try to insert both sides
of the rail simultaneously so that it’s even).
nOnce the rail is in place, tighten using the 7⁄16" wrench.
Assembly before back rail. Assembly with back rail. Images show drums
without heads, hoops and tension rods.
E
F
4

5 - Yamaha Marching Toms and Randall May Free Floating Lug Bridge Assembly Instructions
BADGE
1
2
1
2
33
4
5
54
8
12
6
7
13
8
6
7
8
1
2
3
4
5
1
2
3
4
5
6
10
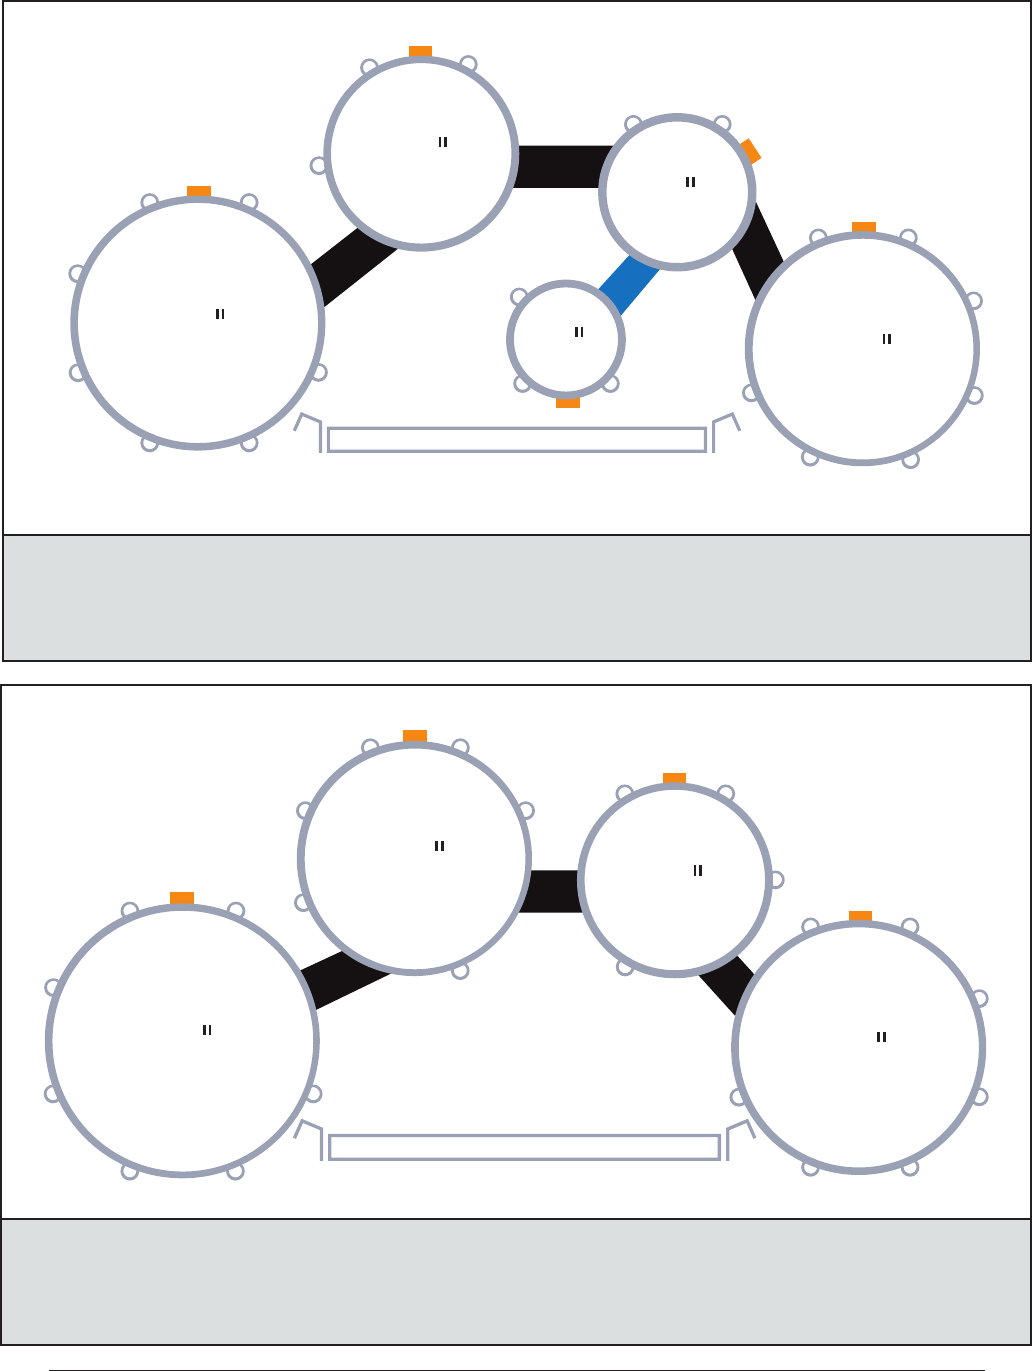
Tom Rail
RMLB-SS60 RMLB-SS68
BADGE
1
2
3
54
13
8
6
7
6
1
23
4
6
1
23
4
8
1
2
3
4
5
1
2
3
4
5
8
12
6
7
1
2
3
4
5
6
10
Tom Rail
MQT-8023
RMLB-S
MQT-668023
RMLB-L
RMLB-SS60
RMLB-SS68
Lug casings that should
be inserted into FFLB:
Lug casings replaced
with metal bridge:
Lug casings that should
be inserted into FFLB:
Lug casings replaced
with metal bridge:
8": 2, 4
10": 2, 4
12": 7
13": 2
8": 2, 4
10": 3, 5
12": 7
13": 2
12": 6
13": 3
6": 1
6": 1
L12": 6
L13": 3
NOTE: The badge on
the 6" drums should face
the rail or the player side
(as close as possible).
TOP VIEW
TOP VIEW
RMLB-SQ68
BADGE
1
2
3
54
13
8
6
7
6
1
23
4
8
1
2
3
4
5
1
2
3
4
5
8
12
6
7
1
2
3
4
5
6
10
Tom Rail
14
1
1
2
1
1
2
2
2
33
3
3
44
5
5
55
6
44
7
8
8
12
6
6
7
10
13
8
6
7
BADGE
Tom Rail
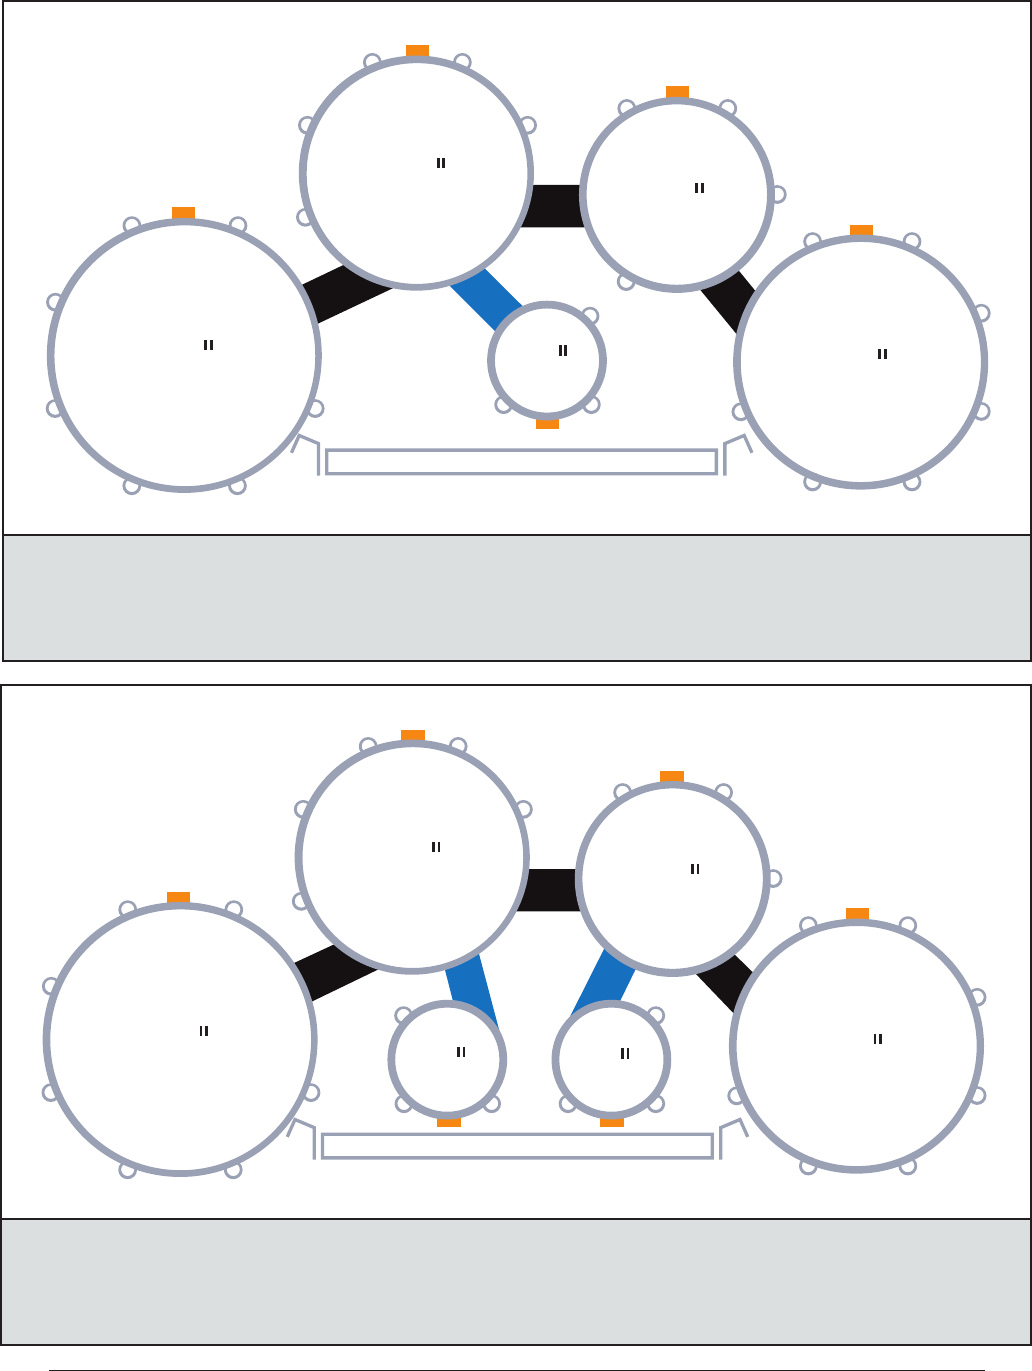
6 - Yamaha Marching Toms and Randall May Free Floating Lug Bridge Assembly Instructions
MQT-68023
RMLB-S
RMLB-SQ68
MQT-0234
RMLB-L
TOP VIEW
TOP VIEW
8": 2, 4
10": 2, 4
12": 7
13": 2
6": 1
8": 3
12": 6
13": 3
NOTE: The badge on
the 6" drums should face
the rail or the player side
(as close as possible).
10": 3, 5
12": 3, 5
13": 7
14": 2
13": 6
14": 3
Lug casings that should
be inserted into FFLB:
Lug casings replaced
with metal bridge:
Lug casings that should
be inserted into FFLB:
Lug casings replaced
with metal bridge:
6
1
23
4
14
1
1
2
1
1
2
2
2
33
3
3
44
5
5
55
6
44
7
8
8
12
6
6
7
10
RMLB-LQ62
BADGE
13
8
6
7
Tom Rail
6
1
23
4
6
1
23
4
14
1
1
2
1
1
2
2
2
33
3
3
44
5
5
55
6
44
7
8
8
12
6
6
7
10
RMLB-LS62 RMLB-LS60
13
8
6
7
BADGE
Tom Rail
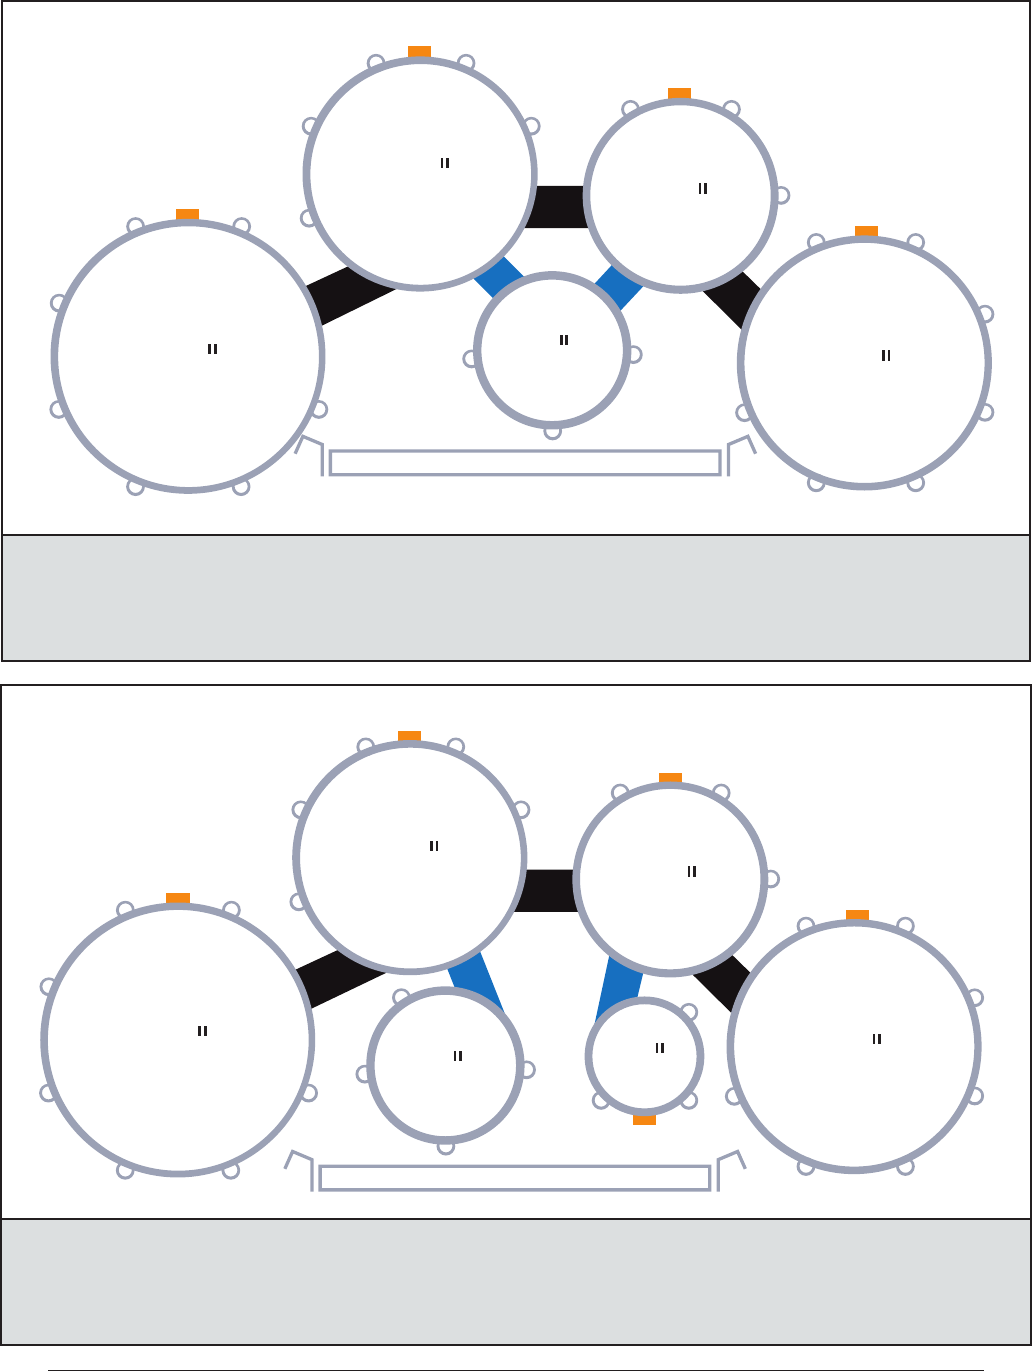
7 - Yamaha Marching Toms and Randall May Free Floating Lug Bridge Assembly Instructions
MQT-60234
RMLB-L
RMLB-LQ62
MQT-660234
RMLB-L
RMLB-LS60
RMLB-LS62
TOP VIEW
TOP VIEW
10": 3, 5
12": 3, 5
13": 7
14": 2
6": 4
12": 4
13": 6
14": 3
NOTE: The badge on
the 6" drums should face
the rail or the player side
(as close as possible).
10": 3, 5
12": 3, 5
13": 7
14": 2
6": 4
10": 4
6": 1
12": 4
13": 6
14": 3
NOTE: The badge on
the 6" drums should face
the rail or the player side
(as close as possible).
Lug casings that should
be inserted into FFLB:
Lug casings replaced
with metal bridge:
Lug casings that should
be inserted into FFLB:
Lug casings replaced
with metal bridge:
BADGE
14
1
1
2
1
1
2
2
2
33
3
3
44
5
5
55
6
44
7
8
8
12
6
6
7
10
RM-68
13
8
6
7
8
1
2
3
4
5
Tom Rail
BADGE
8
1
2
3
4
5
14
1
1
2
1
1
2
2
2
33
3
3
44
5
5
55
6
44
7
8
8
12
6
6
7
10
LS82
LS60
13
6
1
2
3
4
8
6
7
Tom Rail
8 - Yamaha Marching Toms and Randall May Free Floating Lug Bridge Assembly Instructions
MQT-80234
RMLB-L
RM-68: Drilled Spacers
MQT-680234
RMLB-L
RMLB-LS82
RMLB-LS60
TOP VIEW
TOP VIEW
10": 3, 5
12": 3, 5
13": 6, 7
14": 2, 3
13": 6
14": 3
NOTE: This configuration
will be drilled for the 8"
to attach on the 10"
and 12".
10": 3, 5
12": 3, 5
13": 7
14": 2
NOTE: The badge on the 6"
and 8" drums should face
the rail or the player side
(as close as possible).
Lug casings that should
be inserted into FFLB:
Lug casings replaced
with metal bridge:
Lug casings that should
be inserted into FFLB:
Lug casings replaced
with metal bridge:
6": 4
8": 1
10": 4
12": 4
13": 6
14": 3
Inside back cover (blank)

12 - Yamaha Marching Toms and Randall May Free Floating Lug Bridge Assembly Instructions
