Yulong Computer Telecommunication Scientific YLM31 Personal computer with CDMA800, WiFi and BT User Manual
Yulong Computer Telecommunication Scientific (Shenzhen) Co. LTD Personal computer with CDMA800, WiFi and BT
Contents
- 1. user manual
- 2. User Manual
- 3. User manual
user manual

Getting To Know Your PAD
User Manual
Please read the manual before use.
WELCOME
Thank you for choosing the pad. After reading this
guide, you will be able to fully master the use of your
pad and appreciate all its functions and case of use.
DECLARATION
This manual as device use instruction does not
represent the explanation of the device’s software and
hardware, the features possibly is different refer to
the different area.
The pad is compatible with
CDMA1X/CDMA2000/EVDO technology. Some
functions referred in this guide also need the support
from network operators or service providers.
In order to ensure your safety, please read the “Safety
Getting To Know Your PAD
Notice”.
MANUAL ICON
Indicates warning information.
Indicates caution information.
Indicates device tips.
[ ] Indicates function key.
BOLD Indicates a menu or an icon.
Content

Getting To Know Your PAD
1. GETTING TO KNOW YOUR PAD·······························································9
KEYS····································································································10
GETTING TOUSE YOUR PAD ···································································4
INSERT SIM/UIMCARD··············································································4
INSERT UIM/SIM CARD:·············································································6
INSERT AMEMORY CARD ·······································································7
BATTERY CHARGING··············································································9
TURN YOUR PAD ON AND OFF ·······························································12
PASSWORD····························································································12
PIN CODE ·······························································································12
PIN2 CODE ·····························································································12
PUK AND PUK2 CODE················································································13
2. QUICK START GUIDE···················································································14
LOCK AND UNLOCK THE SCREEN ····························································14
LOCK AND UNLOCK THE DEVICE·····························································14
MAIN SCREEN ·······················································································15
STATUS ICON ·························································································16
APPLICATION MENU···············································································18
DATE AND TIME·····················································································19
MAKE CALLS ························································································19
MAKE CALLS FROM DIALER ··········································································19
MAKE A CALL FROMCONTACTS······································································20
MAKE A CALL FROMCALL LOG·······································································21
MAKE A CALL FROMFAVORITES ·····································································21
CREATE A NEW CONTACT IN FAVORITES ····························································21
RECEIVING CALLS, AND CHECKING MISSED CALLS ··································22
RECEIVE CALLS··························································································22
CHECK MISSED CALLS··················································································22
MESSAGING·····························································································23

Getting To Know Your PAD
3. TEXT ENTRY AND PAD SETTINGS ··························································24
TEXT ENTRY ·························································································24
PAD SETTINGS ······················································································26
SOUND SETTINGS·······················································································26
SCREEN SETTINGS ······················································································27
PRIVACY SETTING·······················································································29
MAIN SCREEN SETTINGS ··············································································30
4. INTERNET ········································································································32
BROWSER ·····························································································32
BLUETOOTH ··························································································34
TURN ON/ OFF BLUETOOTH··········································································34
BLUETOOTH SETTINGS·················································································34
CONNECT THIS PAD TO A NEW DEVICE······························································35
WI-FI····································································································36
CONNECT TO WI-FI····················································································36
WI-FI SEARCH AND CONNECTION ···································································37
5. CONTACTS ······································································································· 39
CHECK CONTACTS ······················································································39
ADD CONTACTS·························································································40
EDIT CONTACT ··························································································41
DELETE CONTACT·······················································································41
IMPORT AND EXPORT CONTACT······································································42
6. MESSAGING AND EMAIL············································································43
MESSAGING ··························································································43
CREATE NEW MESSAGE················································································43
MESSAGE REPLY························································································44
CREATE NEW MMS:···················································································44
MANAGE MESSAGES···················································································45
EMAIL ··································································································46
SET UP EMAIL···························································································47
SEND EMAILS····························································································47

Getting To Know Your PAD
RECEIVE EMAILS························································································48
7. MULTIMEDIA··································································································50
MUSIC PLAYER······················································································50
PLAY MUSIC ·····························································································51
VIDEO PLAYER ······················································································52
SOUND RECORDER·················································································53
8. OTHER APPLICATIONS ···············································································54
ALARM CLOCK ······················································································54
ADD ALARM CLOCK····················································································54
CALENDAR ····························································································55
NEW EVENT·····························································································55
MANAGE EVENTS ······················································································56
CALCULATOR ························································································56
NAVIGATION··························································································57
9. MAINTENANCE······························································································58
BATTERY MAINTENANCE········································································58
DEVICE MAINTENANCE··········································································59
TROUBLESHOOTING···············································································61
10. FCC WARNING AND STATEMENT····························································63
Getting To Know Your PAD
Safety Notice:
Before using the PAD, please read and follow the rules
below carefully.
If you dial or answer a call while driving,
please use the hands-free device (e.g.
earphone, vehicle hands-free system, PAD
hands-free system) or use your PAD after
parking the vehicle.
Please switch off your PAD where you see
signs forbidding PAD use. Such signs can be
found in medical centers or establishments
containing medical equipment.
The PAD may interfere with the
communication network of airplanes, so
please make sure your PAD is switched off
during the flight.
To avoid the risk of any explosion, please
switch off the PAD at petrol stations and
places which are near fuel, chemical solvent
or other dangerous substances.
Getting To Know Your PAD
Please switch off your PAD in areas where
there could be a risk of explosion and in
areas where you are asked to switch off
bidirectional radios. Pay attention and
adhere to any rules and regulations
concerning pad use.
All PADs can be subject to interference,
which could affect its performance.
In order to ensure high performance and to
avoid damage the PAD, please use the
original accessories and battery. Avoid using
devices which are not compatible.
Keep this device away from excessive
moisture and extreme temperatures.
Please neither burn the PAD battery nor use
it as ordinary rubbish, as this could
endanger life and damage to the
environment. Please obey the
environmental policy of the local
government and dispose of and recycle
them in time.
Getting To Know Your PAD
If you need to connect your PAD to other
devices, please read the user guide carefully
to ensure the procedure is carried out
safety.
Keep small parts (e.g. SIM card) out of the
reach of children to prevent batteries from
being swallowed or causing other dangers.
Please back up the important information of
PAD and be sure to have a second copy in
case data is lost from your PAD.
SOS
Make sure the PAD is switched on and has
service coverage before inputting the
emergency number. Press the call key for
your position to be located. Please don’t
end call unless told to do so.
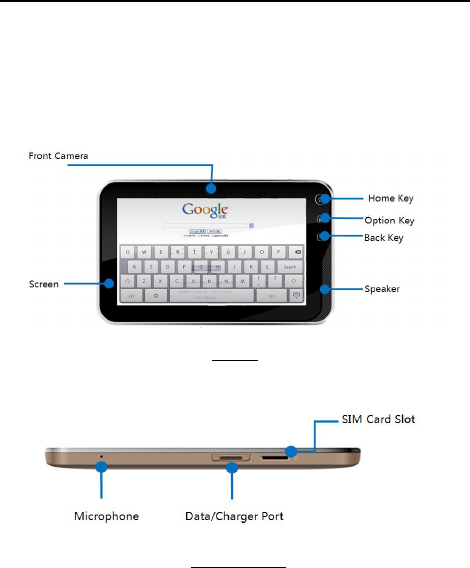
Getting To Know Your PAD
1.
Getting To Know Your
PAD
Front
Below side
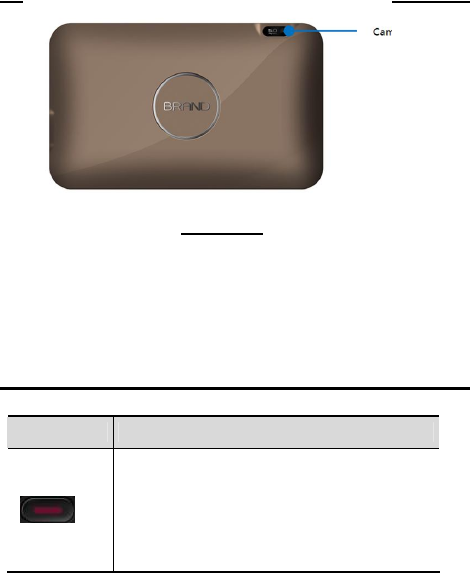
Getting To Know Your PAD
Back side
Keys
key function
Power Key:
Turn on/off the pad by pressing for 3
seconds;
A short press to turn off the screen
backlight.
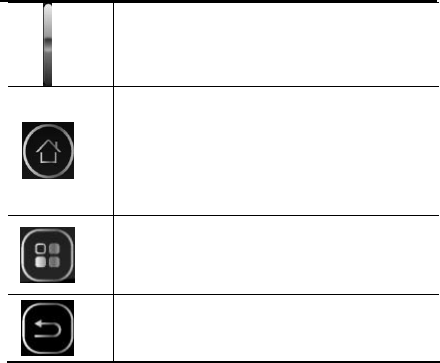
Getting To Know Your PAD
4
Volume:
Adjust the pad’s volume.
Home Key:
Tap in any interface to quit and back
to the standby interface;
Press for a while in any interface to
obtain lately used 6 menu options.
Menu Key:
Tap for more options
Back:
Tap to go back to the previous menu
Getting To Know Your PAD
5
Getting To Use Your Pad
Insert SIM/UIM Card
Always switch off your device before
installing or removing SIM card.
In order to protect UIM/SIM card
when plugging or unplugging in
use, the system will shut down
automatically!
UIM/SIM card is provided by the service
provider, which can store some basic data,
such as contact names and telePADs, ect.
Some UIM/SIM card may not match with
this pad, please resort to the service
provider for replacement.
This device includes original lithium

Getting To Know Your PAD
6
battery. DO NOT attempt to open or
repair this battery. Battery performance
depends on many factors, including
network configuration, signal strength,
the temperature of the environment to
operate the device, the features and/or
settings select and used, and other
application services.
To reduce risk of fire or burns:
- Do not attempt to open or repair the
battery pack.
- Do not disassemble, crush, puncture,
short circuit the external contacts of the
battery, or dispose it in fire or water.
- Do not expose the battery in
environments of temperatures above
60oC (140oF).
- Replace only with the battery pack
designated for this device.
- Recycle or dispose of used battery as
stipulated by local regulations.
Getting To Know Your PAD
7
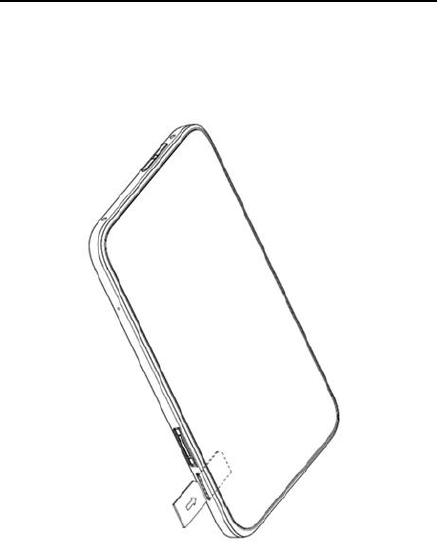
Insert UIM/SIM card:
(1) Insert the UIM/SIM card into the slot (please
pay attention to card direction to insert).

Getting To Know Your PAD
8
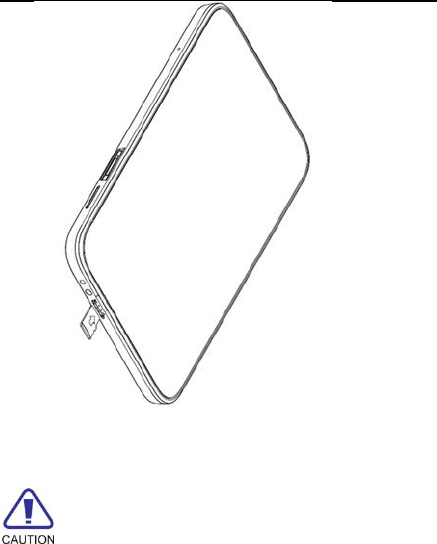
Insert a Memory Card
Insert a memory card to expand the memory
space (This device employs Micro SD card).
(1)Insert a memory card: insert into the slot with
the side of the golden contacts facing down, push
in the direction as indicated in the picture to make
a click.
Getting To Know Your PAD
9
(2)Take out a memory card: slightly push down
the Micro SD card, and take out the popup card.
Recommend to use originally equipped
Micro SD card, or Micro SD card of San Disk or
Kingston and other leading brands. Please confirm

Getting To Know Your PAD
10
the compatibility of Micro SD card with this
device.Please keep the children from MicroSD to
avoid any unexpected swallow.
Battery Charging
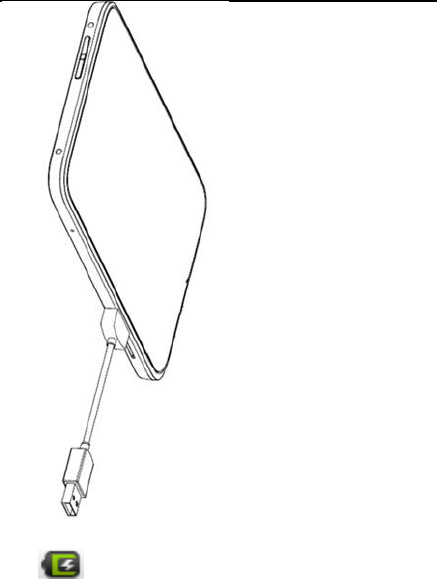
Charging the battery by the travel charger
(1) Connect the USB cable to the travel charger.
Insert the USB cable to the USB port on the
PAD carefully, and connect the charger to a
standard wall outlet.
Getting To Know Your PAD
11
(2) During normal charging, battery status icon
will show up. The fully charged icon will
show up when charging ends.
Getting To Know Your PAD
12
(3) After fully chargedplease disconnect charger
from power supplyand then disconnect the PAD.
New batteries are shipped partially
charged. Before start using your device, it is
recommended to charge the battery as new
batteries perform best after several full
charge/discharge cycles.
Please charge timely as over discharge will
damage the battery.
It is normal that PAD generates slight heat
in charging.
This device only supports exclusive charger,
and other PC or laptop could not fully charge the
device.
After shut down with low battery, this
device takes 5-10 minutes in charging to switch on.
This is a normal phenomenon.

Getting To Know Your PAD
13
Turn Your PAD On and Off
Please first check there is battery with enough
power in your PAD, and press [Power Key] for
3 seconds to turn your PAD on and off.
Password
PIN Code
PIN code (Personal Identification Number)
avoids your SIM card being used illegally. PIN
code is provided with SIM card. If wrong PIN
code is input for continuous three times, you
should unlock it by PUK code. For more
information, please consult the network
operator.
PIN2 Code
You need to enter PIN2 code to start some
functions. If wrong PIN2 code is input for three
times, you should unlock it by PUK2 code. For
more information, please consult the network
operator.

Getting To Know Your PAD
14
PUK and PUK2 Code
PUK and PUK2 code may be provided with SIM
card. If wrong PIN/PIN2 code is input for three
times, the device requires PUK/PUK2 code.
Please consult the network operator if such
codes are not available.
If wrong PIN code is input for three
times continuously, SIM card will be locked.
Please resort to the network operator for help
to decode. Decoding by you may result in a
permanent invalid SIM card.

Quick Start Guide
15
2.Quick Start Guide
Learn how to perform basic operations and use
the main features of your pad.
Lock and Unlock the Screen
1. Lock the screen
Press the [Power Key] to lock the device, save the
battery and avoid misoperation.
2. Unlock the screen
Press the power key to light up the screen.
Lock and Unlock the Device
In order to avoid any misoperation, you may lock
the device.
1. Lock the device
Press the [Power Key] to lock the device.
Quick Start Guide
16
Attention: if no operation is done during the
screen timeout time as defaulted or as set in the
pad, the device will be locked automatically.
2. Unlock the device
Press the [Power Key] and slide the unlock key to
the right side to unlock the device
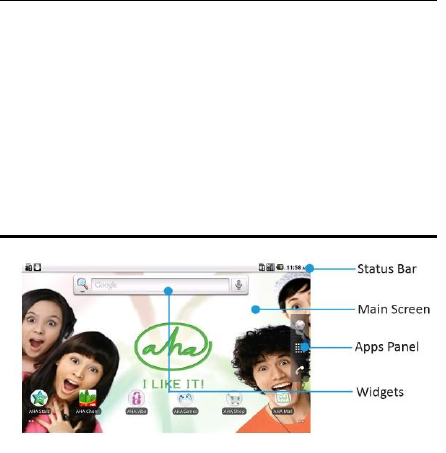
Main Screen
You may activate functions of this device by
operations on the touch screen. There are five
main screens, which could be switched by sliding
to the left or the right. Tap [Home Key] in any
Quick Start Guide
17
interface to go back to the main screen. Tap an
application icon on the main screen to start that
application. Tap Apps Panel to find all
applications.
You may add or cancel icons on the main
screen as expected. Please find more details in the
device basic settings.
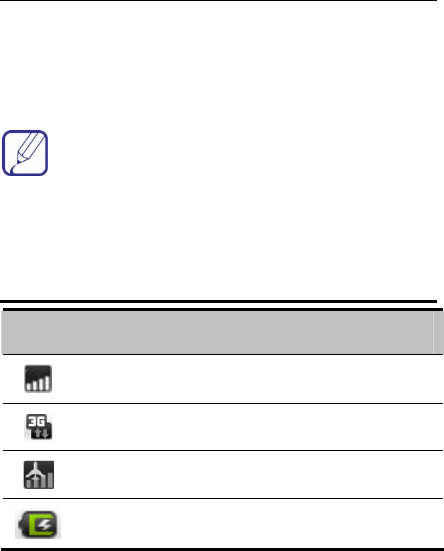
Status Icon
Icon Description
Network signal
3G data connection
Airplane mode
Battery capacity
Quick Start Guide
18
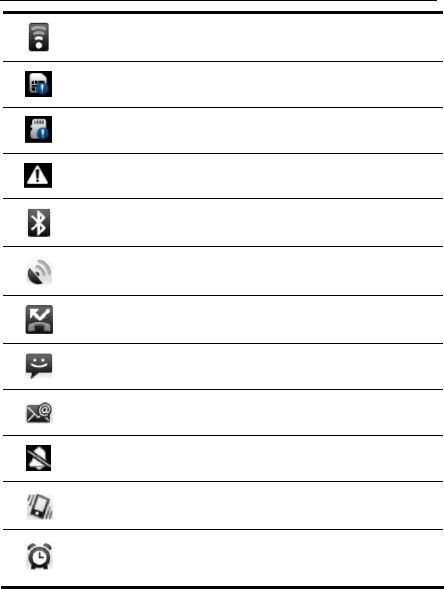
Wi-Fi signal
No SIM card
No Micro SD card
Notification
BT is on.
GPS is on.
Missed call
New message
New Email
Silent mode
PAD vibration
Alarm clock
Quick Start Guide
19
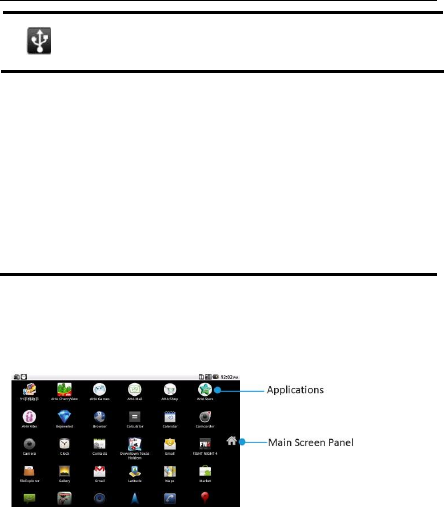
USB connected
If there is any missed call or new message, the
status bar on top of the screen will indicate the
notifications. Slide down from the status bar to
find the notifications and tap to check.
Application Menu
Tap Apps Panel on the main screen, you can view
and set all the applications.
Tap Main Screen Panel to go back to main screen.
Quick Start Guide
20
Date and Time
You can set date, time, time zone and format.
In the applications interface, tap settings>Date &
time.
Date & time settings include: Automatic, Set date,
Select time zone, Set time, Use24-hour format
and Select date format.
Automatic item is available with UIM/SIM
card inserted.
Make Calls
Make Calls from Dialer
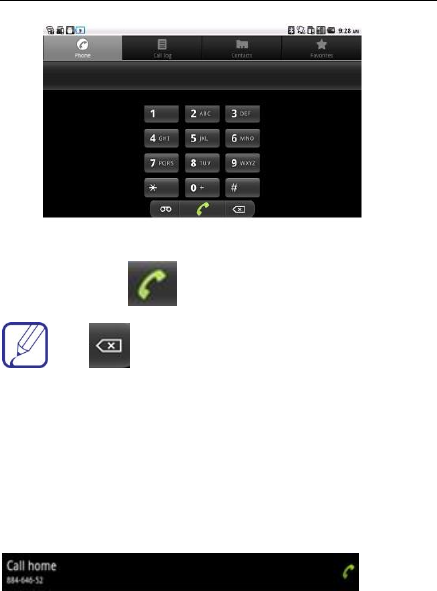
1. Tap Apps Panel>Phone in the main screen to
enter dialer interface
Quick Start Guide
21
2. Input the PAD number you want to dial in the
interface, tap to make a call.
Tap to delete wrong inputting.
Make a call from Contacts
1. Tap Apps Panel>Phone>Contacts, or tap
Contacts.
2. Choose the contact you need to enter
contact details menu.
3. Tap the number
to call.
Quick Start Guide
22
Make a call from Call log
1. In Idle mode, press Apps Panel>Phone>Call log
2. Select a call log. Tap to call back the
number.
Make a call from Favorites
You can call numbers in frequent use from
Favorites.
1. In Idle mode, press Apps
Panel >Phone>Favorites
2. Select a number. Tap to call back the
number.
Create a new contact in Favorites
1. In Idle mode, tapApps Panel>Phone>Contacts
2. Select a contact, tap in contacts detail
interface.
Quick Start Guide
23
If you want to delete contacts in Favorites,
tap again in contacts detail interface.
Receiving Calls, and Checking Missed
Calls
Receive calls
When a call comes, slide the green answer key to
the right to answer the call, or slide the red end
key to reject the call.
Check missed calls
If there is a missed call, the status bar will
indicate a missed call icon . Slide down
from the status bar to check the missed calls.
You may also tap Apps Panel >Phone>Call log
to check missed calls.
Quick Start Guide
24
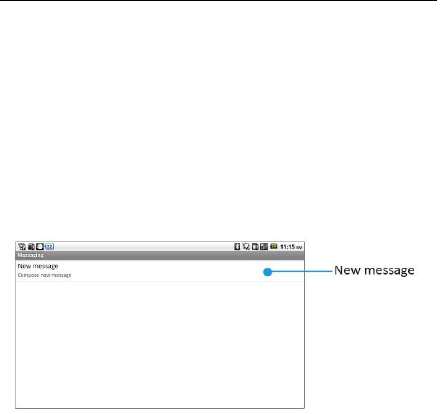
Messaging
You may send or receive SMS or MMS with
multimedia file.
Tap Apps Panel>Messaging to enter the message
interface.

Text Entry and PAD Settings
25
3.Text Entry and PAD
Settings
Text Entry
You may use Android keypad and other input
method to edit, such as add contact information
and edit message ect..
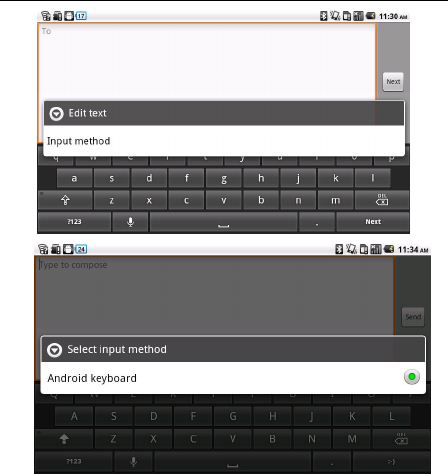
Switch the input methods
1. Enter the editing interface.
2. Press on the edit area and the edit menu will pop
up.
3. Tap the input method and select the expected
input method.
Text Entry and PAD Settings
26

Text Entry and PAD Settings
27
PAD Settings
Sound settings
You can select the ringtone you like to set as
incoming ringtone.
Ringtone Settings
1. In the applications menu, tap
Settings>Sound>Phone ringtone.
2. Scroll the ringtone list up and down, tap the
ringtone name to listen; select one and tap OK to
save.
Ringer volume
1. In the applications menu, tap Settings>
Sound >Volume.
2. Scroll the incoming volume indicator to adjust,
select and tap OK to save.
3. In the main screen, press the volume on the side

Text Entry and PAD Settings
28
to adjust the current volume. Press the volume
down key to set as vibration mode and silent mode.
Press the [Power Key] for a while, and tap
the silent mode in this option menu as a short cut
to activate the silent mode.
Screen settings
Set wallpaper
1. In the main screen, tap [Menu Key] to open the
options.
2. Tap Wallpaper and select from Gallery, Live
wallpapers or Wallpapers.
3. Scroll the wallpaper thumbnails; select the
wallpaper you like and tap Set wallpaper.
Live wallpaper
You may set the screen with live wallpaper.
1. In the main screen, tap [Menu Key] to open the

Text Entry and PAD Settings
29
menu options.
2. Tap Wallpaper and select from Live wallpapers.
3. Select the wallpaper you like and tap Set
wallpaper.
Brightness setting
1. In the applications menu, tap
Settings>Display>Brightness.
2. Scroll to adjust the brightness, tap OK to save.
Screen timeout time setting
You can set the screen timeout time to adjust the
time before the screen automatically locks.
1. In the applications menu, tap
Settings>Display>Screen timeout.
2. Select and tap the screen timeout time to finish
the settings.

Text Entry and PAD Settings
30
Privacy setting
Back up my data
You can back up your settings and other
applications data if you turn this function on.
1. In the applications menu, tap
Settings>Privacy>Back up my data.
2. Tap Back up my data and tap OK to finish the
settings.
Automatic restore
1. In the applications menu, tap Settings> Privacy>
Automatic restore.
2. Tap Automatic restore to turn on/off this
function.
Factory data reset
1. In the applications menu, tap Settings>
Privacy >Factory data reset
2. Tap Reset phone.
3. Tap Erase everything and the pad will restart and

Text Entry and PAD Settings
31
reset to the factory date.
Main screen settings
There are 5 main screens on the pad, and you can
switch by sliding to the left or right. Tap the [Home
Key] in any interface to go back to the main screen.
You may add Shortcuts, Widgets, Folders and
Wallpapers to the main screen as you like.
Add Shortcuts in the main screen
1. Tap [Menu Key] to show menu in the idle
mode.
2. Tap Add >Shortcuts.
3. Select one and save in the main screen.
Add Widgets in the main screen
4. Tap [Menu Key] to show menu in the idle
mode.
5. Tap Add >Widgets.

Text Entry and PAD Settings
32
6. Select one and save in the main screen.
Delete icons in the main screen
1. In the main screen, press on the icon to be
deleted until shows, and drag the icon to
.
Internet
33
4.Internet
Browser
Open the web browser to start to visit the web and
use the applications based on web. If necessary,
please consult your service provider on how to
connect.
The web connection type depends on
services from your service provider. Costs vary from
different connection types. Please consult your
service provider for more details on tariff.
In the applications menu, tap the Browser.
There is an address line
in the browser, tap
and input the webpage address that wants to visit,
tap to visit.

Internet
34
Tap [Menu Key] and options will be shown:
New window: add a new window.
Exit: exit the browser.
Bookmarks: save the favorite webpage.
Windows: tap the key to switch and manage
the windows being opened; tap new window to
create a new window. Tap this key again to close
the windows switching interface.
Refresh: refresh the current webpage.
More: more options, including forward, back,
add a bookmark, search the webpage, ect.
Internet
35
Bluetooth
Turn on/ off Bluetooth
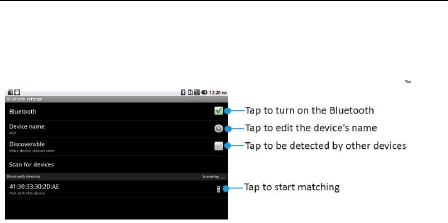
1. In the applications menu, tap Settings>Wireless
& networks.
2. Tap Bluetooth. The Bluetooth indicator in
highlight shows Bluetooth is on. Meanwhile, the
status line will show the Bluetooth indicator on
top of the device.
To save battery and ensure the Bluetooth
security, please close the Bluetooth if the Bluetooth
is not used. The device may not connect to another
device after closing the Bluetooth, unless you turn
on the Bluetooth again.
Bluetooth settings
In the applications menu, tap Settings> Wireless &
Internet
36
networks> Bluetooth settings.
Bluetooth settings include:
Connect this pad to a new device
1. Make sure the Bluetooth is on and visible within
appropriate range (about 10 meters).
2. In the applications menu, tap Settings> Wireless
& networks> Bluetooth settings.
3. Tap Bluetooth to turn it on.
4. Tap Scan for devices and the device being found
will be shown.

Internet
37
5. Tap the device in need, tap matching or input the
device code for matching with the device (the
default code is 0000). Turn on the Bluetooth, and
the Bluetooth indicator will be shown in the status
line.
The Bluetooth devices may have specific
functions, connections in detail and usage, please
refer to related instructions.
Wi-Fi
You may connect to Wi-Fi for wireless internet and
download.
Connect to Wi-Fi
1. In the applications menu, tap Settings> Wireless
& networks.
Internet
38
2. Tap Wi-Fi. The Wi-Fi indicator in highlight
shows the Wi-Fi is on. Meanwhile, the status line
will show the Wi-Fi indicator on top of the
device.
To extend the battery life, please turn off
Wi-Fi if it is not used.
Wi-Fi search and connection
1. In the applications menu, tap Settings>
Wireless & networks> Wi-Fi settings.
2. Tap Wi-Fito turn on and search. The device
will list the networks in the range being searched.
3. Tap Wi-Fi settings to see the searched
networks.
4. Tap the network to be connected, and tap
Connect.

Internet
39
5. If necessary, input the wireless password and
other information, then tapConnect. The wireless
indicator will show in the status line after the
device reaches the network. The Wi-Fi and the
Bluetooth can’t synchronization using.
Contacts
40
5.Contacts
You can save the name, PAD number, email address
etc. in Contacts.
Check contacts
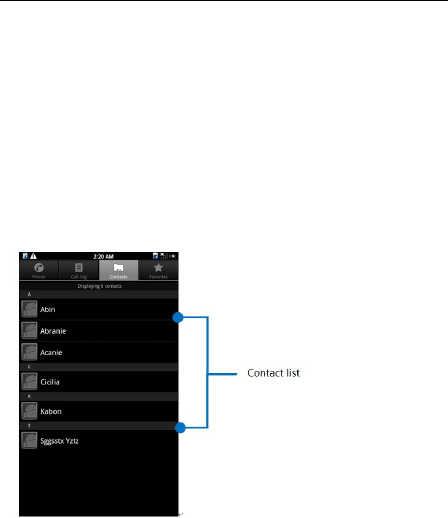
In the applications menu, tap Contacts to enter the

Contacts
41
contact menu.
Scroll up or down the contact list to check more
contacts.
Tap [Menu Key] to enter menu options, such as
Search, New contact, Accounts, and Import/
Export.
Add contacts
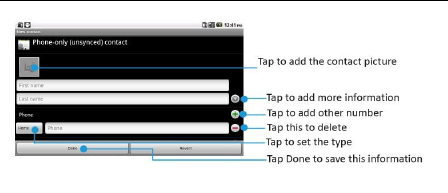
1. In the application menu, tap Contacts to enter
the contact menu.
2. Tap [Menu Key] to enter menu options, tap
New contact.
3. Tap relevant items to input contact
information.
4. Tap Done to save the contact information.
Contacts
42
Edit contact
1. In the applications menu, tap Contacts and enter
contact list.
2. Tap the contact to be edited for a while to enter
options>Edit contact
3. Tap Done to save the contact after inputting
information.
Delete contact
1. In the applications menu, tap Contacts to enter
contact list.
2. Tap the contact to be edited for a while to enter

Contacts
43
options > Delete contact
Import and export contact
1. In the applications menu, tap Contacts to enter
contact list.
2. Tap [Menu Key] to enter menu options>Import/
Export. You can choose Import form SD card or
Export to SD card.
3. Choose the type of import and then choose the
contact, tap Done.
Message and Email
44
6.Messaging and Email
Messaging
You can send and receive SMS and MMS with
multimedia file.
Create new message
1. In the applications menu, tap
Messaging>New message.
2. Tap recipient and edit the recipient
information, or add the recipient from .
3. Tap and edit the text.
4. Tap key to send the message.
Message and Email
45
There is no inbox and sent box in this device.
The messages will be shown in the form of
dialogue threads for easy reading.
Message reply
The notification line on top of the device will show
the reminder when you get a new message.
1. In the applications menu, tap
Messaging>New message.
2. Tap the message and edit the text to reply.
3. Tap key to send the message.
Create new MMS:
1. In the applications menu, tap
Messaging>New message.
Message and Email
46
2. Tap recipient and edit the recipient
information, or add the recipient from .
3. Tap [Menu Key] to open menu options>Add
subject, tap Subject to input the MMS theme
that will be sent.
4. Tap and edit the text, then tap key to
send the message.
You can tap [Menu Key] to add Attach or
Insert smiley and so on.
Manage messages
Delete messages
Tap a dialogue thread, tap one message, select
delete messages and tap delete. Then the
message will be deleted.
Message and Email
47
Delete threads
Tap a dialogue thread, tap [Menu Key] to select
Delete thread and tap Delete. Then the message
will be deleted.
Forward messages
Tap a dialogue thread, press on a message, and
select Forward to forward the message.
Email
You may receive and send emails via Email.
You need to set up your own email, and
then receive and send the emails.
Receiving and sending emails requires
Internet connection. Please consult your
service provider for details about setup
parameters.

Message and Email
48
Set up Email
1. In the applications menu, tap Email.
2. Input email address and password, tap Next,
give this account a name, your name (displayed
on outgoing messages) and signature, tap Done.
You may also use Manual setup for the email
account:
1. Input email address and password.
2. Tap Manual setup to select the type of account.
3. Finish details like server.
4. Tap Next to complete the setup.
Send emails
You may send emails to one or more recipients.
Before sending, add the recipient email address,

Message and Email
49
or select from Contacts.
1. In the applications menu, tap Email.
2. Tap [Menu Key] > Compose for the editing
interface.
3. Tap recipient and input the recipient’s email
address. If necessary, tap [Menu Key] for Add
Cc/Bcc address, input other recipient’s email
address for cc or bcc.
4. Tap Subject and input the subject.
5. Tap Compose Mail and input the text.
6. Tap [Menu Key] > Add attachment to insert
the file as needed.
7. Tap Send to send the email.
Receive emails
1. In the applications menu, tap Email.
2. Tap [Menu Key] > Refresh.

Message and Email
50
3. The device will connect to the server and
download emails. All emails received will be
saved in the Inbox.
4. Tap the email to read.
5. During reading, tap [Menu Key] and tap
Forward to forward the email to others; or
tap Reply to edit and send the email to the
sender.

Multimedia
51
7.Multimedia
Music Player
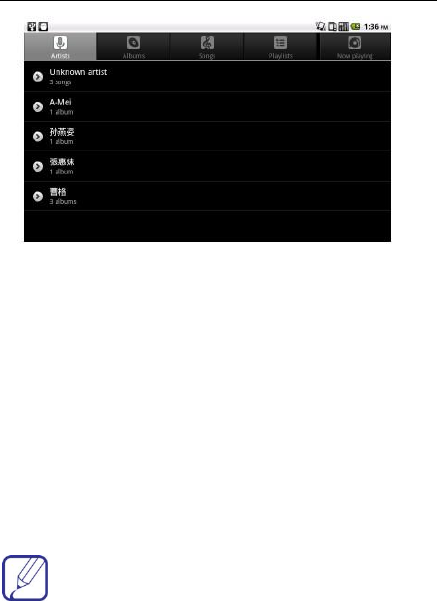
You can play your favorite music in music player.
Please install the memory card with music
saved before playing music.
In the applications menu, tap Music.
Multimedia
52
The music files are classified and saved according
to the artists, albums and playlists. Select a
category and tap the music or playlist in need.
Play music
You just need to tap the music that you want to
play to access music player.
In the music player, press the side key to
Multimedia
53
adjust the volume.
Video player
You can play favorite videos in video player.
Before playing, please install a SD card with
videos saved.
1. In the applications menu, tap Videos.
2.Tap the video in need to access the video player.
During playing the video, tap the side key to
adjust the volume. Also you may pause or drag the
progress bar for video in need.
s
Multimedia
54
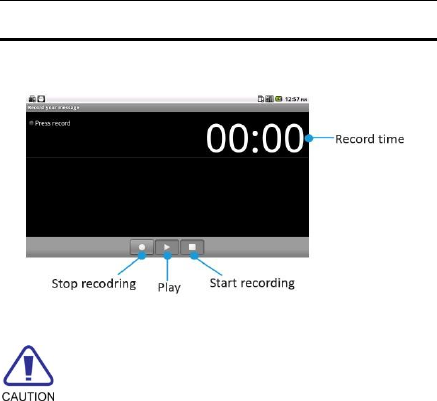
Sound recorder
In the applications menu, tap Sound Recorder.
Please install the memory card before
using the sound recorder.

Other applications
55
8.Other applications
Alarm clock
In the applications menu, tap Clock.
Add alarm clock
Tap [Menu Key] to select Add alarm, set alarm
information and tap Done. When shows in
green means on.
When the alarm functions, the user can select
Snooze/Dismiss.
Tap the indicator on the right side of the alarm to
be started. The indicator in highlight shows the
alarm clock is on.
You may dismiss the alarm clock when it is ringing,
or tap snooze to postpone the alarm clock.
Other applications
56
Calendar
In the applications menu, tap Calendar. You can
use calendar to arrange and manage the
schedules.
The calendar may be viewed by day, week, month
or list.
You may need to set the correct date and
time before using the calendar.
New event
Tap the date for a while to enter options: Show
day,Show agenda and New event. Select New
event to create a new event.
1. Edit event name, time, place, description and
other detailed information, set time to start, time
to end and emergency procedures etc.
2. Tap Done to save new event.

Other applications
57
Manage events
You need to create an event before view or edit it.
Select an event, the device would show the
recorded event.
Add reminder
Click an event to enter the details interface, press
on [Menu Key] to select Add reminder.
Edit event
Click an event to enter the details interface, press
on [Menu Key] to edit event.
Delete event
Click an event to enter the details interface, press
on [Menu Key] to select Delete event.
Calculator
In the applications menu, tap Calculator.
The calculator has limited precision and can be

Other applications
58
used in simple calculations only.
Navigation
In the applications menu, tap Navigation.
Press [Menu Key] to select the operations.
This function is only used outdoors. The
service condition in specific depends on UIM/SIM
card and the data service you applied for. Relevant
information flow may charge you. Please consult
your service provider for detail costs.

Maintenance
59
9.Maintenance
Battery Maintenance
1. This device could use rechargeable battery
as power supply. Please recharge the battery
with inadequate power. To maintain battery life,
it is better to consume all the power before
recharge.
2. When charger is not used, please separate it
from the power supply. Do not connect charger
with battery more than a continuous week, as
overcharge will shorten battery life.
3. Temperatures influence the battery limit to
be charged. So before charge, battery may
need to be cooled or warmed. If battery
temperature is over 40, battery may not be
charged immediately.
4. Please use the battery on the original

Maintenance
60
purposes to avoid short circuit. Short circuit
may happen when conducting substances
connect the anode and cathode of battery.
5. Do not use damaged battery.
6. Keeping battery in extreme cold or extreme
hot places leads to shorten battery life. Battery
being exposed in cold or hot places may lead to
abnormal function, even battery is fully
charged.
7. Do not put the battery in the fire! Please
dispose of dead batteries according to local
regulations.
Device Maintenance
1. Please keep children out of reach of the pad
and the accessories.
2. Avoid the pad from direct contact with
water or other liquids. If liquids enter the pad,
this could cause a short circuit, battery leak or

Maintenance
61
other malfunction.
3. Please keep the pad away from the high
temperature, as it will shorten the life of the
pad, melt the plastic and damage the battery.
4. Do not disassemble or modify the pad, as it
will cause damage to the pad such as battery
leakage or circuitry failure.
5. Do not use acid or alkali to clean the PAD.
6. Do use the original accessories otherwise
the warranty will be failed.

Maintenance
62
Troubleshooting
Problems Cause;
Solution
Unable to turn on The battery is used up;
Charge the pad.
SIM card
malfunction
SIM card is damaged;
Contact your network service provider for help.
SIM card is not properly inserted;
Confirm SIM card is properly inserted.
There is a foreign substance on the metal surface of the SIM
card;
Use a clean cloth to wipe off the metal contact point of the
SIM card
Using the pad in an area with poor reception such as near tall
buildings or in a basement where radio waves cannot be
reached;
Try in an open field.
Using the pad when the network is busy, such as during rush
hour, making it impossible to get through;
Try with available network.
Poor reception
Far away from the bas
e station built by the network;
You may request the network service provider for a service
area plan.
Echo or noise
Caused by poor network trunks, it is a regional problem with
poor connection;
Hang up and redial, or renew the trunks.
Unable to call
The call barring being activated;
Deactivate the barring.
The fixed dialing being activated;
Deactivate the fixed call.
Unable to charge
Battery or charger is damaged;
Replace the battery or charger.
Recharging in the environment of less than -10C or higher
Maintenance
63
than 55C;
Try to charge in an appropriate environment.
Poor contact;
Check if the plug is properly connected
Unable to connect
to the network
Expired SIM card;
Contact your network service provider.
Out of the GSM service area;
Consult your network provider on the service area.
Poor signal;
Please move to a place with a better signal and try again
Standby time is related to the
settings of network system;
Please temporarily turn off your pad, as you are located in an
area with poor reception.
Batteries need to be replaced.
Standby time being
shortened When no signal is available, the pad will continue to transmit
the signal to find a base station, so large amounts of power
will consume the standby time; Pleas move to an area with a
strong signal or temporarily turn off the pad.
Incorrect PIN
number
Consecutively enter the wrong password
for three times;
Contact your network provider.
Unable to add new
contact The storage space of the contacts is full;
Delete a portion of the contact entries.
Unable to set some
functions
Your network provider does not support this function or you
did not apply for it;
Consult your network provider for help.
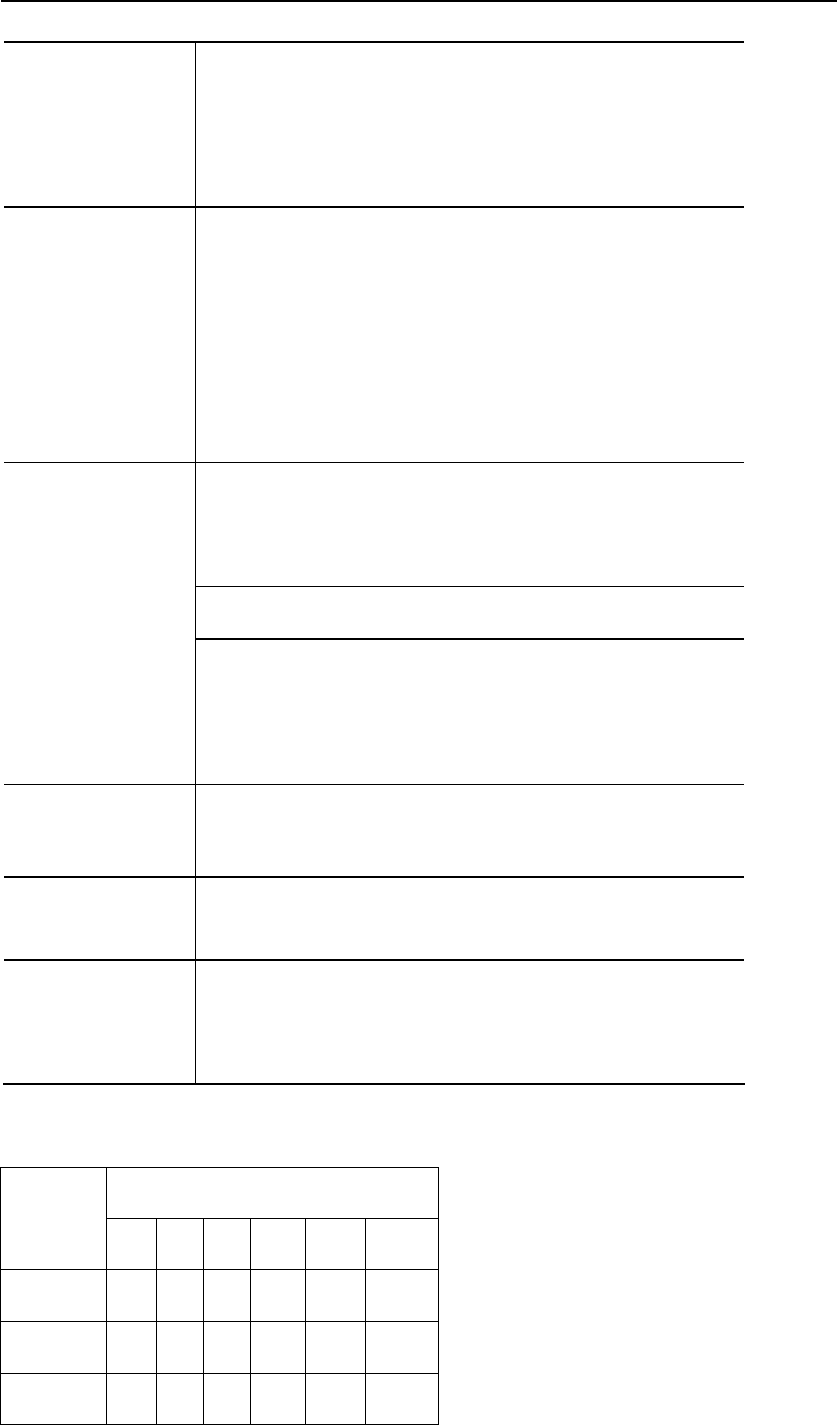
Environmental Instructions
Hazardous Substances
Parts Pb Hg Cd Cr6+ PBB PBDE
PAD X O O O O O
Battery X O O O O O
Accessories X O O O O O

Maintenance
64
Oindicates the content of this hazardous substance in the all materials of the device is lower
than the required volume in the standard of SJ/T 11363-2006.
Xindicates the content of this hazardous substance in the all materials of the device is higher
than the required volume in the standard of SJ/T 11363-2006.
Note: this device is marked with“X” because currently there is no alternative technology or
parts for replacement.
10. FCC Warning statement and Safety Info
Changes or modifications made to this equipment not expressly approved by
Yulong Computer Telecommunication Scientific(Shenzhen) Co., Ltd. for compliance
could void the user’s authority to operate the equipment.
FCC Statement
This device complies with Part 15 of the FCC rules. Operation is subject to the following two
conditions:
1. This device may not cause harmful interference.
2. This device must accept any interference received, including interference that may cause
undesired operation.
This equipment has been tested and found to comply with the limits for a Class B digital device,
pursuant to part 15 of the FCC Rules. These limits are designed to provide reasonable protection
against harmful interference in a residential installation. This equipment generates uses and can
radiate radio frequency energy and, if not installed and used in accordance with the instructions,
may cause harmful interference to radio communications. However, there is no guarantee that
interference will not occur in a particular installation. If this equipment does cause harmful
interference to radio or television reception, which can be determined by turning the equipment
off and on, the user is encouraged to try to correct the interference by one or more of the
following measures:
• Reorient or relocate the receiving antenna.
• Increase the separation between the equipment and receiver.
• Connect the equipment into an outlet on a circuit different from that to which the receiver is
connected.
• Consult the dealer or an experienced radio/TV technician for help.

Maintenance
65
Safety Information
1 . SAFETY INFORMATION FOR FIXED WIRELESS TERMINALS
.POTE NTIALLY EXPLOSIVE ATMOSPHERES
Turn your phone OFF when in any area with a potentially explosive atmosphere and
obey all signs and instructions. Sparks in such areas could cauls e an explosion or fire
resulting in bodily injury or even death.
INTERFERENCE TO MEDICAL DIVICES
Certain electronic equipment may be shielded against RF signal from you wireless
phone. (pacemakers, Hearing Aids, and so on) Turn your phone OFF in health c are
facilities when any regulations posted in these areas instruct you to do so. RF signals
may affect improperly installed or inadequately shielded electronic system in motor
vehicles.
.EXPOSURE TO RF ENERGY
Use only the supplied or an approved replacement antenna. Do not touch the antenna
unnecessarily when the phone is in use. Do not move the antenna close to, or
couching any exposed part of the body when making a call.
SAFETY INFORMATION FOR RF EXPOSURE
Body worm operation
This device was tested for typical body-worn operations with the back of the phone
kept 20 mm. from the body. To maintain compliance with FCC RF exposure
requirements, use only belt-clips, holsters or similar accessories that maintain a 20
mm. separation distance between the user’s body and the back of the phone, including
the antenna. The use of belt-clips, holsters and similar accessories should not contain
metallic components in its assembly. The use of accessories that do not satisfy these
requirements may not comply with FCC RF exposure requirements, and should be
avoided.
SAR INFORMATION
THIS MODEL PHONE MEETS THE GOVERNMENT’S
REQUIREMENTS FOR EXPOSURE TO RADIO WAVES.
Your wireless phone is a radio transmitter and receiver. It is designed and manufactured not to
exceed the emission limits for exposure to radiofrequency (RF) energy set by the Federal
Communications Commission of the U.S. Government. These limits are part of comprehensive
guidelines and establish permitted levels of RF energy for the general population. The guidelines
are based on standards that were developed by independent scientific organizations through
periodic and thorough evaluation of scientific studies. The standards include a substantial safety
margin designed to assure the safety of all persons, regardless of age and health. The exposure
standard for wireless mobile phones employs a unit of measurement known as the Specific
Absorption Rate, or SAR. The SAR limit set by the FCC is 1.6 W/kg. *
Tests for SAR are conducted with the phone transmitting at its highest certified power level in all
tested frequency bands. Although the SAR is determined at the highest certified power level, the
actual SAR level of the phone while operating can be well below the maximum value. This is

Maintenance
66
because the phone is designed to operate at multiple power levels so as to use only the power
required to reach the network. In general, the closer you are to a wireless base station antenna,
the lower the power output. Before a phone model is available for sale to the public, it must be
tested and certified to the FCC that it does not exceed the limit established by the government
adopted requirement for safe exposure. The tests are performed in positions and locations (e.g.,
at the ear and worn on the body) as required by the FCC for each model. The highest SAR value
for this model phone when tested for user to CDMA antenna SAR value is 1.390 W/Kg and user to
WIFI antenna SAR value is 0.288 W/Kg when worn on the body, as described in this user guide.
(Body-worn measurements differ among phone models, depending upon available accessories
and FCC requirements). While there may be differences between the SAR levels of various
phones and at various positions, they all meet the government requirement for safe exposure.
The FCC has granted an Equipment Authorization for this model phone with all reported SAR
levels evaluated as in compliance with the FCC RF exposure guidelines. SAR information on this
model phone is on file with the FCC and can be found under the Display Grant section of
http://www.fcc.gov/ oet/fccid after searching on FCC ID: R38-YLM31. Additional information on
Specific Absorption Rates (SAR) can be found on the Cellular Telecommunications Industry
Asso-ciation (CTIA) web-site at http://www.wow-com.com. * In the United States and Canada,
the SAR limit for mobile phones used by the public is 1.6 watts/kg (W/kg) averaged over one
gram of tissue. The standard incorporates a sub-stantial margin of safety to give additional
protection for the public and to account for any variations in measurements.